- We dismantle the tank
- Replacing fittings with your own hands
- Rebar dismantling
- Installation of valves
- Device adjustment
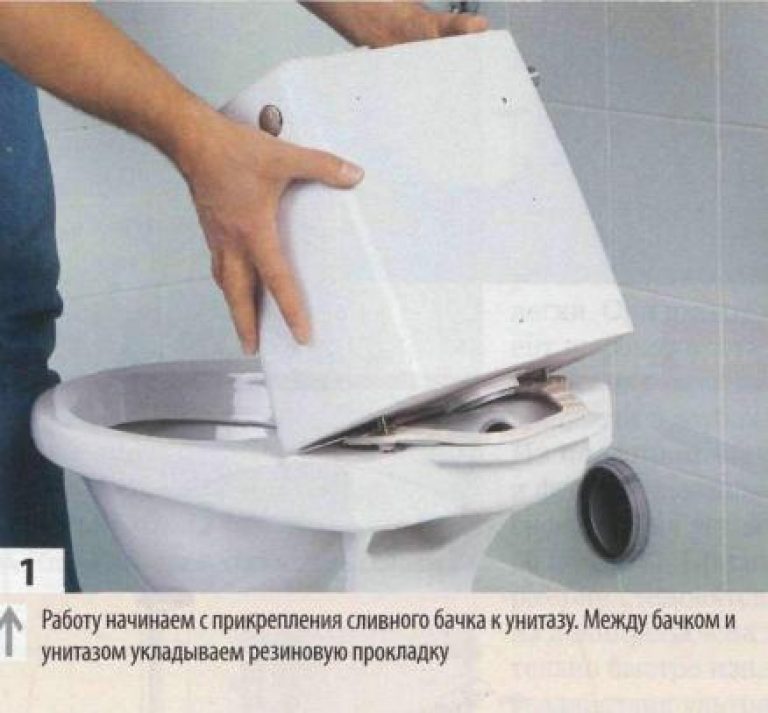
- Installation of the toilet bowl-compact
- Possibilities for adjustment and repair
- How to adjust the water level in the tank
- Toilet cistern leaks
- The tank does not draw water
- Choosing a toilet - what to look for
- Installation and fastening of the tank to the toilet bowl: built-in, hanging and for the toilet bowl-compact
- What kind of sump do you have?
- If you need to replace the old drain tank?
- Need to replace toilet
- Body, lid and shelf repairs
- Replacing an old cistern
- Installation of drain fittings
- What are toilets?
- What is the fittings for the toilet
We dismantle the tank
The old drain fittings of the tank cannot be replaced with a new one without completely dismantling the tank. Before starting work, it is necessary to shut off the water supply - if there is no shut-off valve on the supply to the tank, the cold water supply to the entire branch is shut off.
Next, water is drained from the tank. Using the keys, the side or bottom supply hose is removed, depending on the design of the tank.
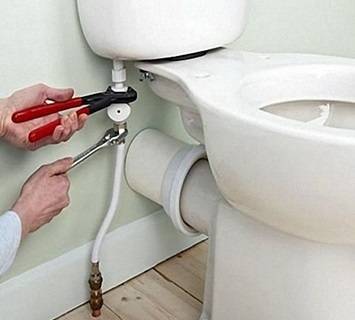
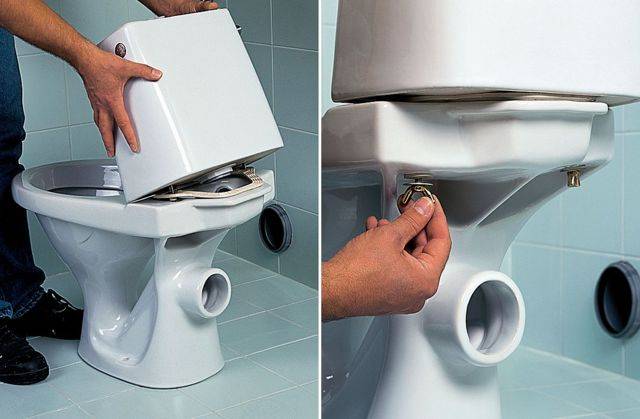
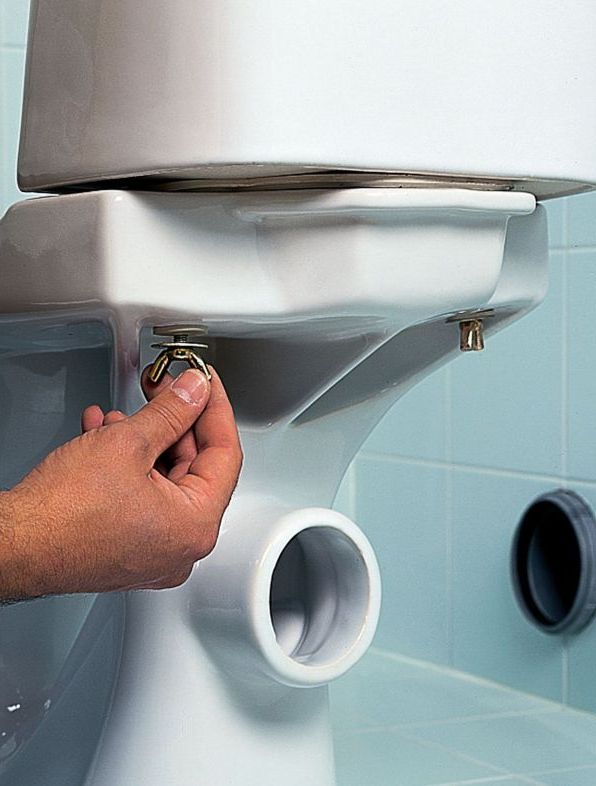
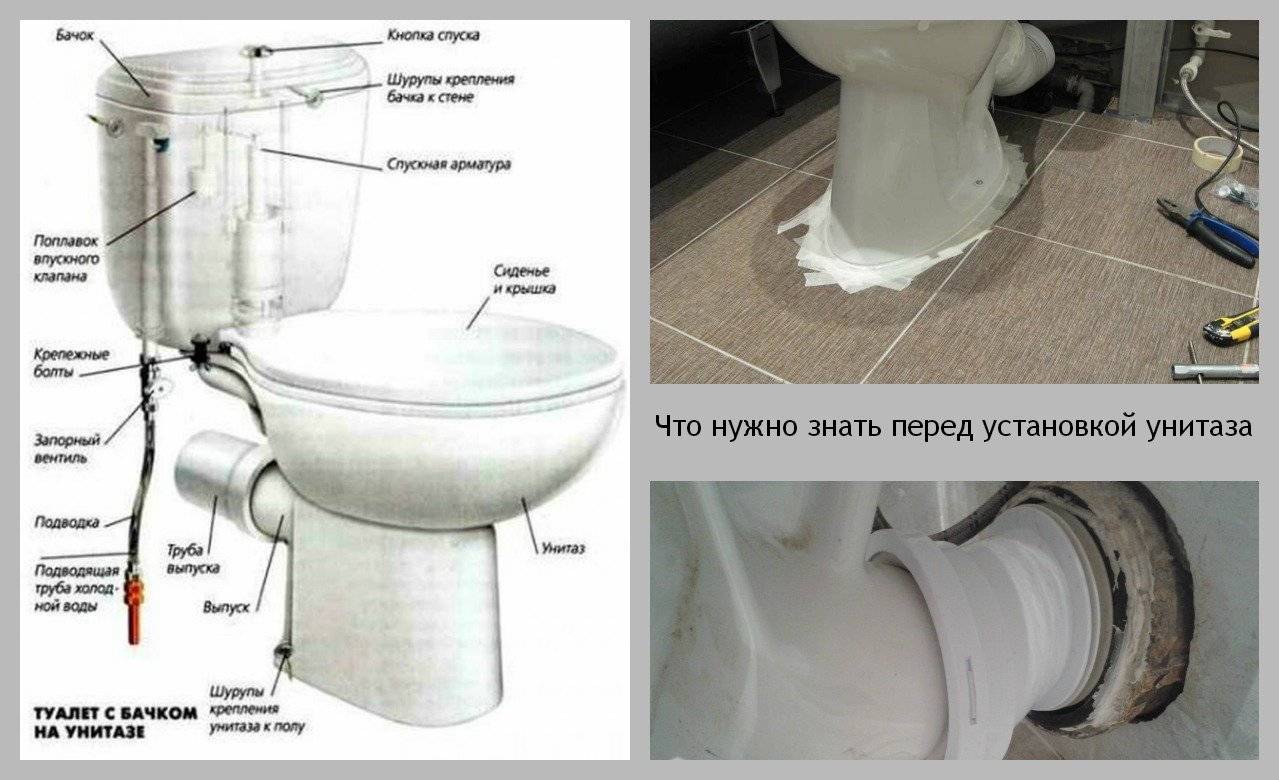
The tank needs to be disconnected from the toilet bowl. It is fixed with two bolts, the nuts are located on the underside of the back shelf of the bowl. To unscrew them, you will need an adjustable wrench or open-end wrench.It is first recommended to lay a rag on the floor or substitute a container - the water remaining at the bottom of the tank will certainly pour out when the fasteners are removed.
If the tank was installed many years ago and the nuts are tightly rusted, the bolts are simply cut through - the hacksaw blade moves freely in the gap between the tank and the shelf of the bowl.
Mounting nuts are located on the underside of the toilet shelf
After unscrewing the nuts and removing the bolts, the tank is carefully removed from the toilet. Discard the old deformed rubber or polymer seal. Even if it has retained its elasticity, there is no guarantee that it will be able to seal the joint when reused.
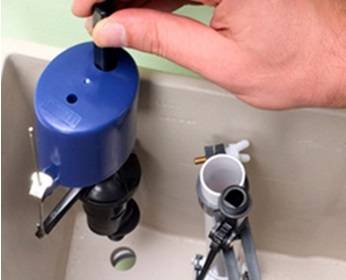
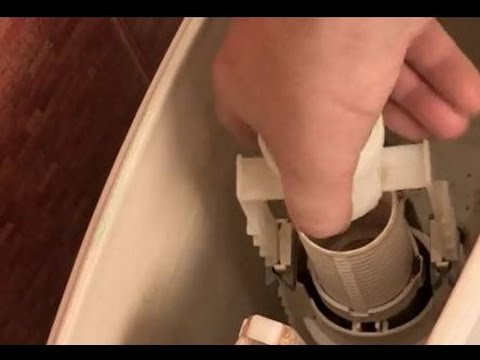
The tank is placed on a flat surface. Unscrew the large plastic nut located on the side of the drain hole - it fixes the flushing mechanism. Also dismantle the water supply device on the side or bottom of the tank.
The container is inspected from all sides for cracks and chips. The inner surface is cleaned of accumulated sediment, rust particles. It is recommended to thoroughly rinse the tank from the inside so that when installing new fittings, solid particles do not get under the seals - they can break the tightness of the joints and cause a leak.
Replacing fittings with your own hands
To replace the fittings you will need:
- wrenches of various diameters or an adjustable wrench;
- gasket installed between the tank and the toilet bowl;
- silicone sealant.
The process of replacing fittings for a toilet cistern is carried out in several stages:
- dismantling of old equipment;
- installation of a new drain system;
- final adjustment.
Rebar dismantling
To remove the fittings that have become unusable from the toilet bowl, you must:
- turn off the water supply. For this, a separate tap is located next to the plumbing device;
- unscrew the water supply hose connecting the tank and water pipes. After dismantling, a certain amount of water remains inside the hose, therefore, the operation must be carried out very carefully so as not to flood the room;
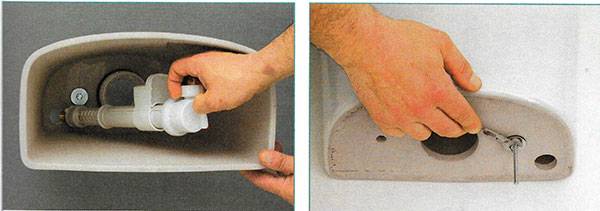
Removing the inlet hose
- the tank lid is removed. To do this, unscrew the drain button or lever;
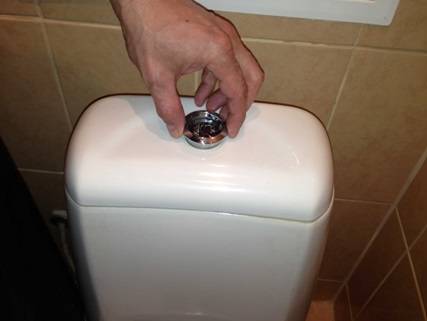
Removing the button to remove the cover
- the remaining water is removed from the tank;
- the tank is removed. To carry out this procedure, it is necessary to unscrew the fixing bolts located at the bottom of the device;
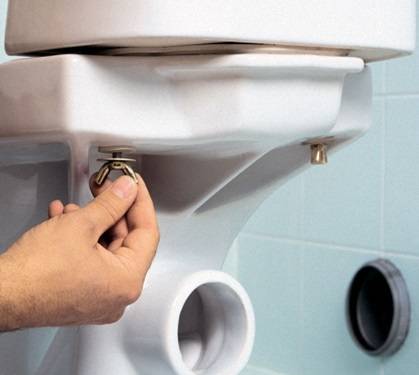
Removing the cistern from the toilet
- reinforcement is removed. To remove the bleeder, it is necessary to unscrew the nut located in the lower part on the outside of the tank;
- if a drain device with a lower supply is installed, then in the same area the nut is unscrewed, which fixes the mechanism for filling the tank. To remove fittings with lateral inlet, unscrew the corresponding nut on the side of the container. After loosening all fixing elements, the devices can be easily removed from the drain tank.
Places for fixing fittings to the drain tank
After dismantling all the fittings, it is recommended to clean the inside of the tank from dirt and accumulated deposits.
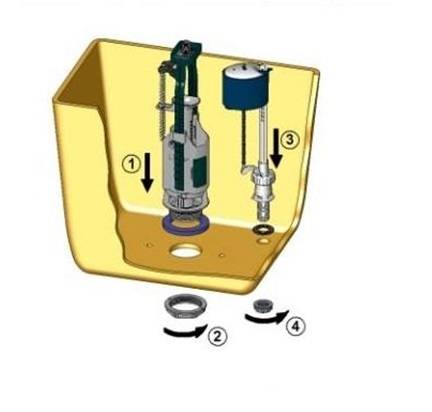
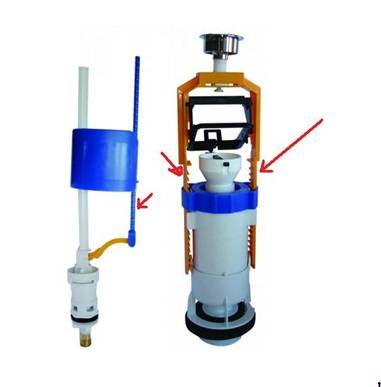
Installation of valves
Before installing a new set of fittings, it is recommended to check the completeness of the device. The installation process is as follows:
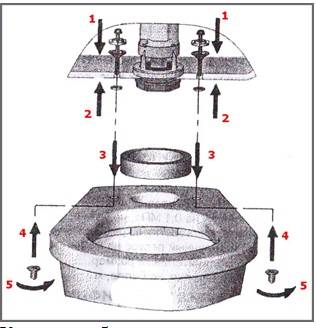
- assembly begins with the installation of the trigger (drain) mechanism. To do this, the fixing nut is unscrewed from the bottom of the device. The mechanism is inserted into the hole.A sealing gasket is installed between the release valve and the reservoir tank (silicone sealant can be used for additional sealing). The drain valve is fixed with a compression nut;

Trigger attachment to tank
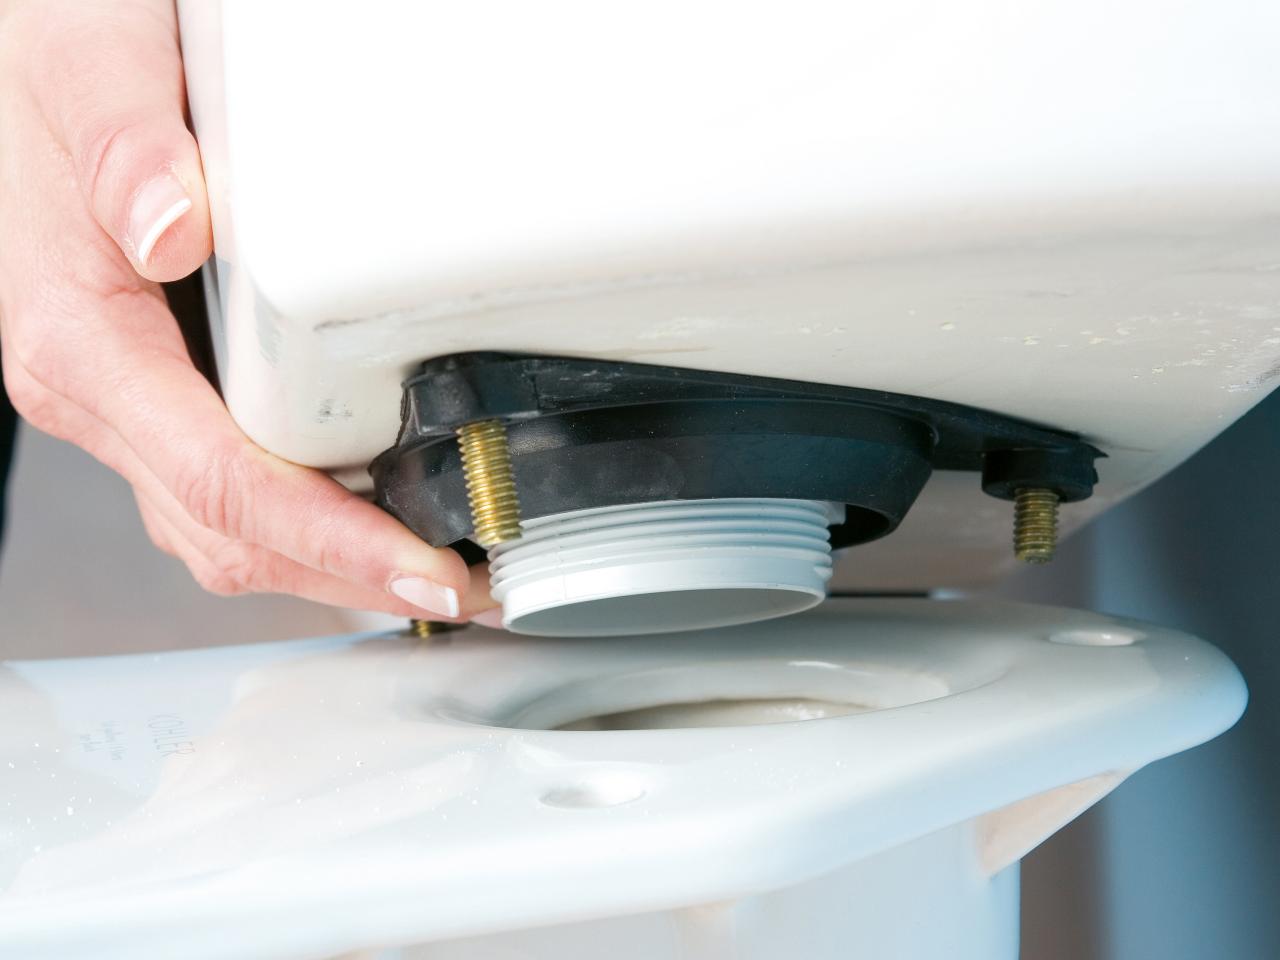
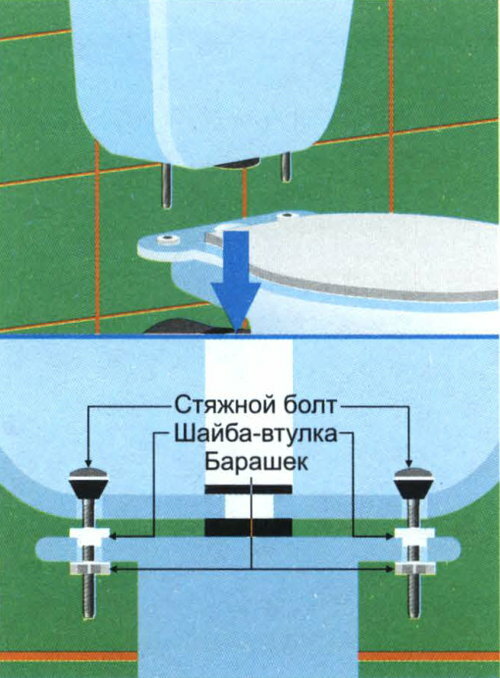
- the next step is to attach the tank to the toilet. Before installing the tank, it is recommended to replace the sealing ring. The tank is fixed with special bolts;
The scheme of fixing the tank to the toilet
- then the filling valve is fixed. A sealing gasket is also installed between the device and the tank, sealing the connection. The device is fixed with a nut;
Tank filling system attachment
- the last step is to connect the flexible hose to the filling mechanism.
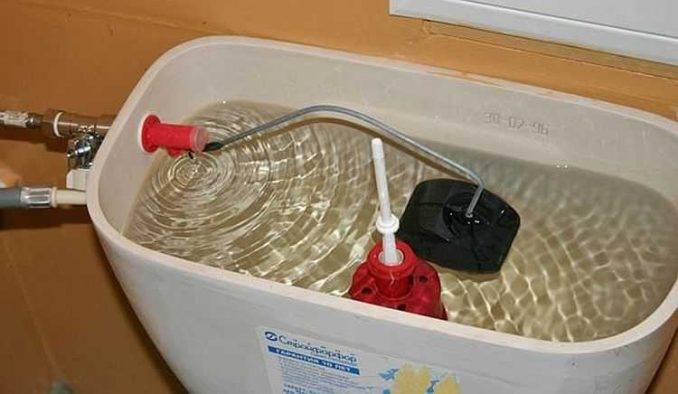
Device adjustment
Shut-off valve for the drain tank is installed. However, final adjustment is required for correct operation.


Consider how to adjust the fittings yourself. In most cases, detailed instructions for performing this operation are attached to the device.
If a small amount of water is collected in the tank capacity, then it is necessary:
- adjust the filling mechanism. Depending on the type of device, the mechanism responsible for filling the toilet bowl can be regulated by a special pin that raises the float higher, or by a lever on which the float is fixed;
- adjust the position of the exhaust valve. To do this, loosen the latches holding the central part of the device (glass) and install it in the desired position.
Rebar alignment for correct operation
For the valve to work correctly, it is necessary that the water level in the tank be 4-5 cm below the edge of the tank and at least 1 cm below the overflow pipe.
After carrying out all the work, checking the operability of the system and the tightness of all attachment points, you can install a lid on the tank.
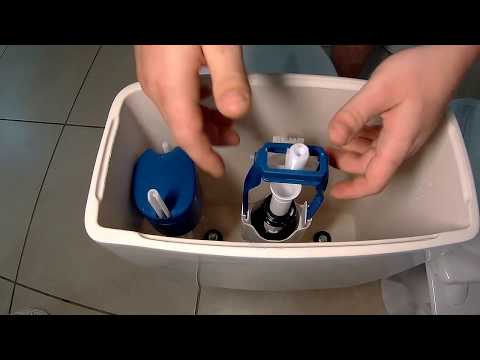
The whole process of replacing valves is presented in the video.
Installation of the toilet bowl-compact
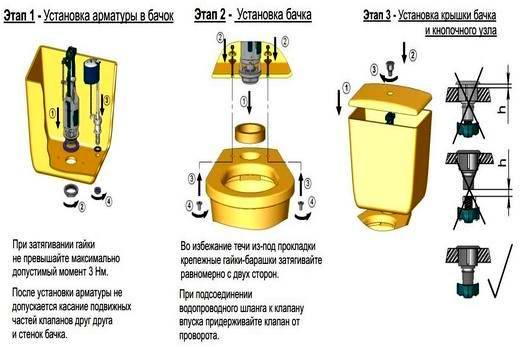
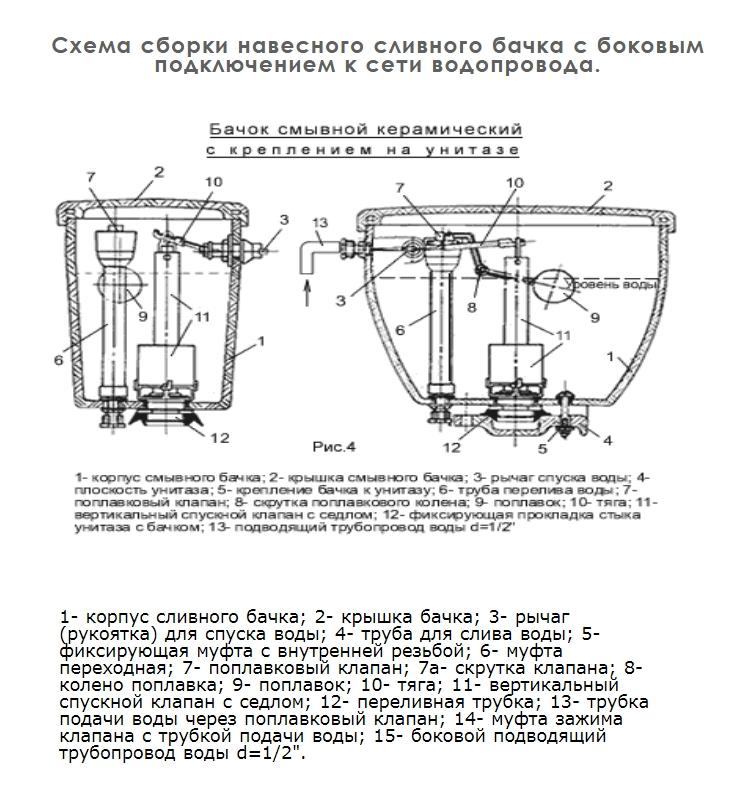
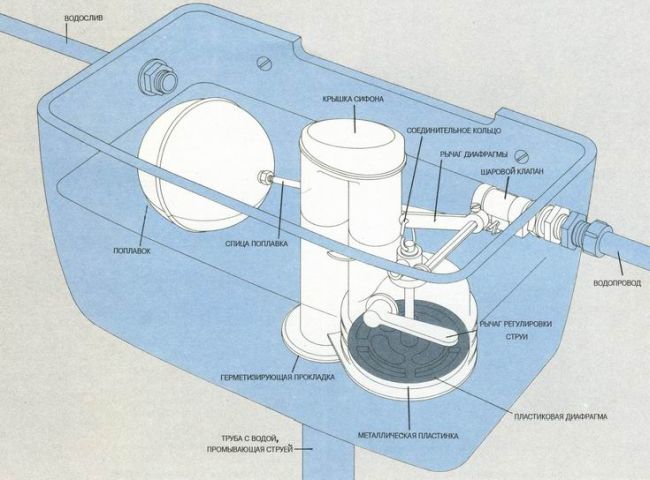
Scheme of assembly of fittings and installation of a drain tank
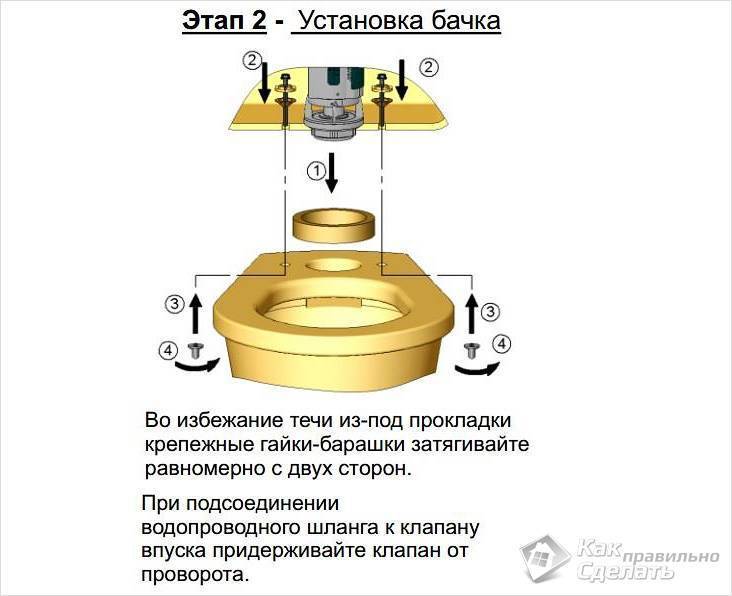
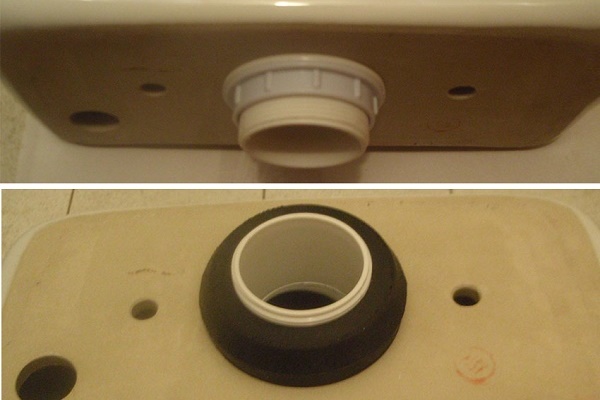
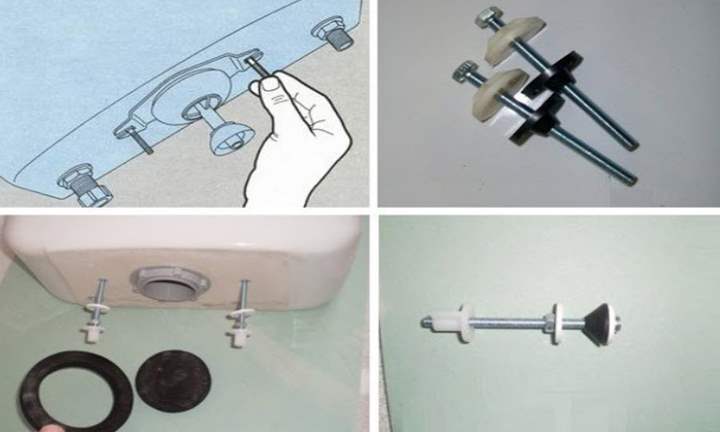
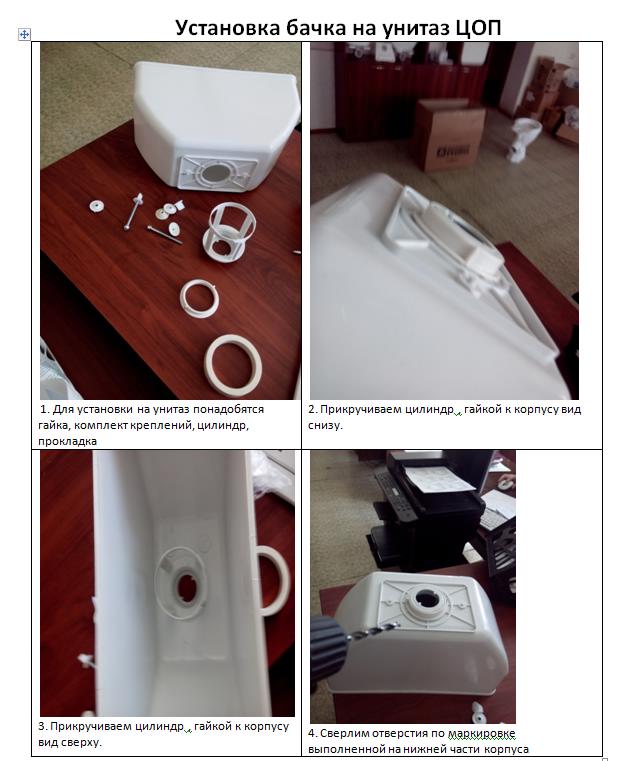
The cistern is fastened to a compact type toilet bowl quickly without the use of special tools or fasteners. Before direct installation, it is necessary to assemble the drain system. The lower part of the valve is equipped with a tapered gasket with the narrow side down. No special tools are required for fixing to the shelf, so the procedure can be carried out independently.
A seal must be placed on the protruding toilet shelf, which, after tightening the fixing bolts, will ensure a tight connection. However, it is recommended to additionally treat with silicone sealant. The tank is installed in such a way that the gasket is located under the outlet mechanism, and the holes on the shelf and the bottom of the tank coincide for tightening the connecting bolts.
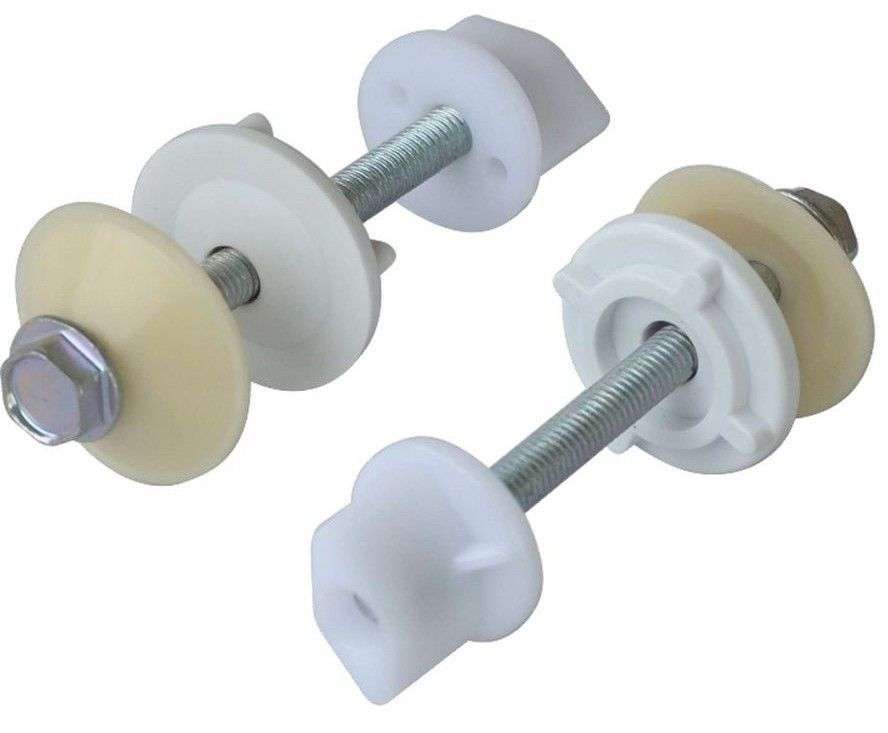
Cone-shaped gaskets and plastic washers are put on fasteners for the toilet cistern, which should be inserted into the holes. On the reverse side, components are also put on and tightened with a union nut. It is difficult to do this manually, so for a secure fastening, you must use a wrench or pliers. However, overtightening can shorten the life of the gaskets, resulting in leakage. It is also possible that cracks appear on the ceramic coating of the cistern.
Next, the position is controlled using the water level, adjusting the pressure or spin at the junction with the bowl. After finishing, put plastic nozzles on the bolt heads and lubricate with an anti-corrosion agent. If the internal fittings are installed, then the top cover is put on and a button is released to drain the liquid. The water supply is carried out by connecting a flexible hose to the inlet valve and using gaskets. It is recommended to wind tow or a special tape that provides a reliable tight connection. It is forbidden to use glue in this area, as the hose may need to be replaced during operation.
Checking the operation of all mechanisms is carried out by running water into the tank. If no drops appear at the butt joints, then water is washed off to check the operation of the drain device. If there are no problems, the installation of the tank on the toilet is completed. Sometimes it is difficult for the owner to do such work, then it is recommended to call a specialist who will correctly and quickly carry out the installation and check the system.
Possibilities for adjustment and repair
During the operation of the toilet, various minor problems arise from time to time. You should not immediately run to the store and buy a new filling in the tank, since some problems can be solved in no more than half an hour. At the same time, it is not necessary to invite a specialist and pay him money, but it is enough to try to do it yourself.
A quick and 100% way to fix a leaking toilet cistern
Watch this video on YouTube
How to adjust the water level in the tank
In devices with a bottom water supply, it is always better to adjust the water level after installing the toilet, since they are all adjusted at the factory to the maximum level, which can be redundant and uneconomical. To adjust the level in the drain tank, it is enough:
- Drain the water tank and turn off the water supply.
- Unscrew the button.
- Remove cover.
- Adjust the height of the float using a special screw located at the top of the float mechanism.
- Close the tank with a lid and install the button.
There are cases when, after installing the toilet, water constantly flows from the tank. This indicates that the water level in the tank is high enough and the water flows through the overflow system. In this case, it is necessary to reduce the water level by lowering the float according to the technology described above.
Setting the Fittings in the cistern
Watch this video on YouTube
If the float mechanism consists of a curved lever, then the water level is adjusted by bending this lever, which is even easier
It is important to understand that the lower the float in the tank, the less water it will take.
 Bending the float lever changes the water level
Toilet cistern leaks
Water leaks in the toilet are possible even if the water level is normal, but then you will have to look for other reasons. Water may leak if:
- The sealing gum of the drain valve has silted up, so it will have to be cleaned. For this you will have to:
-
- Turn off the water supply and empty the tank.
- Remove the water release mechanism.
- Remove the bleed valve and carefully inspect the gasket. If necessary, it is cleaned or polished with a fine emery cloth.
- Install the mechanism back into the drain tank, turn on the water and test the device.If this does not help, then you will have to replace the gasket.
How to eliminate water leakage from the toilet bowl, HOW TO REALLY SAVE SUPER WATER!
Watch this video on YouTube
The escapement mechanism was demolished during operation. This is easy to check, just press the mechanism with your hand. If the water stops flowing, then that's the way it is. In this case, you can make the glass heavier by adding some weight to the bottom of the glass. Adding weight


In any case, you will have to disassemble the mechanism, and then assemble it and check it. If these little tricks do not help, then it is better to buy a new drain mechanism and replace the old one with it. In fact, this is the best option.
Leak in toilet drain
Watch this video on YouTube
The tank does not draw water
There is also such a problem that water is not drawn into the tank at all or is drawn, but rather slowly. If the water pressure is normal, then the reason is obvious - the filter, tube or valve is clogged. The way out of this situation is quite simple and comes down to cleaning the filter, tube or inlet valve. To do this, you will have to completely remove the water supply mechanism, and then assemble everything as it was.
How to do it right, you can see in the video.
What to do if there is no water in the tank
Watch this video on YouTube
Choosing a toilet - what to look for
We will not delve into design nuances - everyone selects the color and shape of a faience friend (as well as other necessary plumbing) to their taste. But to figure out which type of tandem "toilet bowl - flush tank" will be the most convenient for self-installation is simply necessary.
Consider the most common types of installation of the drain tank according to the type of installation.
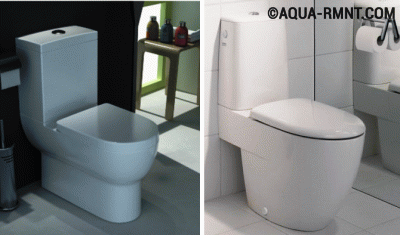
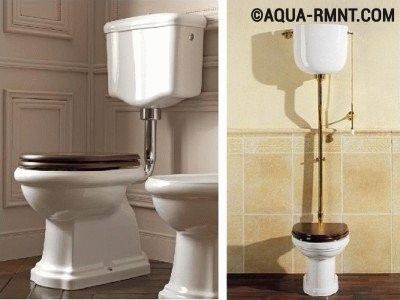
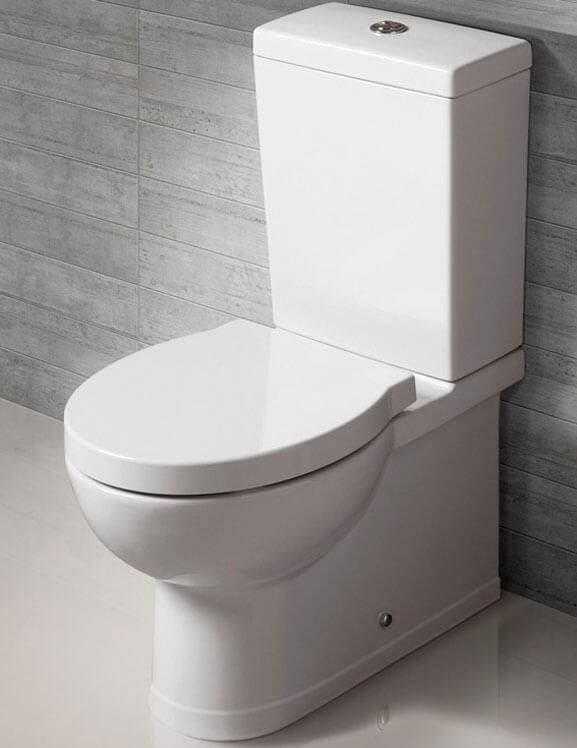
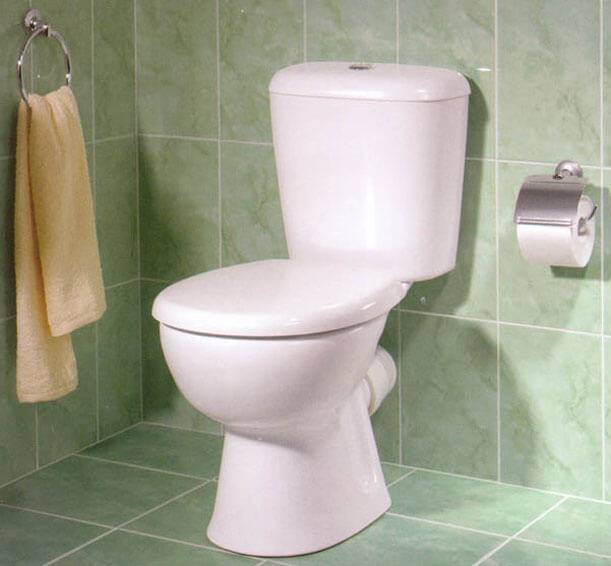
>Compact is a flush tank, which is located directly on a special ledge of the toilet bowl and, after installation, forms an almost integral whole with it. For those who cannot boast of a plumbing education, this layout is the most preferable, since in this case the assembly is as simple as possible.
The most convenient type of drain cisterns for self-assembly. The advantages of this type also include the price and variety of models. It is installed in a special niche or hides behind a false wall.
In principle, the installation itself is not too complicated, since the kit comes with a special support frame, to which the main parts are attached. And yet, for its precise fit, some additional skills and increased care are needed. In addition, then it will also be necessary to cover all the equipment with decorative materials, which also requires additional forces and means.
In the case of purchasing a system of this type, you yourself will not only have to install a complete set - a frame, a tank, a toilet bowl and communications, but also close the frame with decorative panels > Hinged or autonomous flush tank. Mounted separately from the toilet on the wall and connected to it using an additional bypass pipe. The length of this pipe can be quite small, which allows you to use modern fittings (internal filling) of the tank and use a small lever or a familiar button to drain water instead of the Soviet chain with a handle.
However, the installation of such a tank requires a lot of effort, skills and time.
Despite our still Soviet memories, self-contained drain tanks can be no less convenient and beautiful than modern ones. Modernized fittings allow you to use the latest innovations, and the ability to choose any length of the bypass pipe significantly expands the functionality
It should also be noted that in terms of financial costs, the first option will be the most profitable - everything you need is already included in the purchase package. You just need to check the presence of all components. But in the third and especially in the second case, funds are needed for additional parts, and it is far from a fact that they can be purchased in the same store where the main plumbing is chosen.
Installation and fastening of the tank to the toilet bowl: built-in, hanging and for the toilet bowl-compact
A dwelling can be called well-maintained only when all the equipment installed for human comfort, including the toilet, is functioning properly. Its full-fledged work depends on whether the tank is correctly attached to the toilet and whether it is hermetically connected to the water pipe. Ideally, there should be no leaks and problems with draining water.
What kind of sump do you have?
The correct installation of the toilet bowl directly depends on its type. The division into types is related to the location and method of installation of the equipment.
There are three main types:
- The element of the toilet set located at the bottom is compact. The toilet bowl has a wide shelf to which a drain container is mounted. Water descends by pressing a lever or button.
- Autonomous. It is located at the top in a state suspended from the wall, connected to the toilet with a drain pipe. To lower the water, you need to pull the chain (or rope) hanging down.
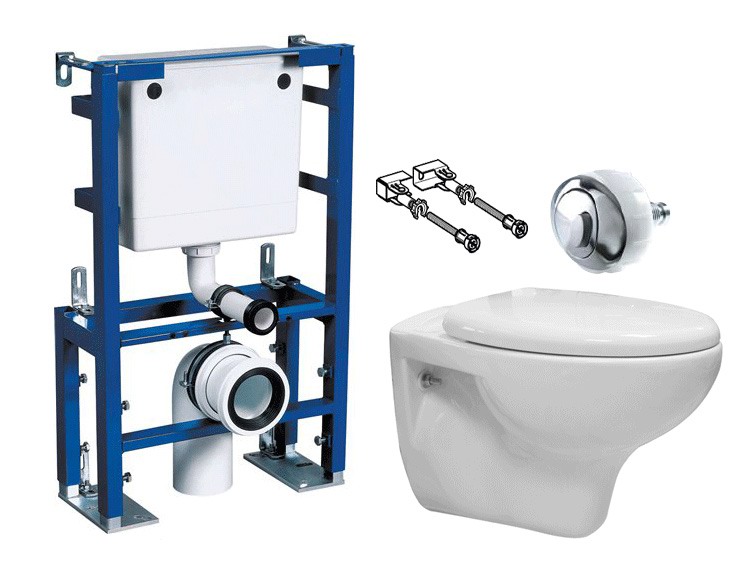
- built-in.Special model designed for wall hung toilet. The toilet is attached to the wall, the water tank is inside it. Draining is done by pressing a button in the wall. To save water, two buttons are used: for complete or partial draining.
Installation of the toilet bowl-compact
Before installation, prepare the necessary parts:
-
- drain fittings, which will be located inside the tank;
- gasket for sealing between the main parts - the container and the toilet;
- flexible hose for connection to a water pipe;
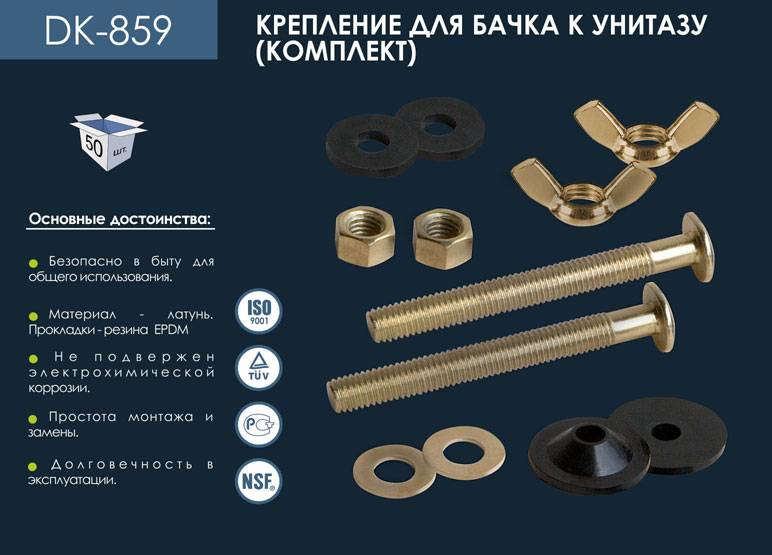
- a set of fixing bolts, nuts and cone-shaped rubber gaskets;
grease to prevent corrosion on the fasteners.
The toilet cistern-compact is sold as a set and after installation forms a single unit with the toilet
After preparing the parts, it is necessary to gradually mount the drain tank to the toilet. A sealing self-adhesive gasket is placed on the shelf of the bowl, which will prevent leakage. A drain container is placed on it and attached to the shelf with fixing bolts, which are fixed on the reverse side with nuts. The fixed tank is connected to a pipe with cold water using a flexible hose. The gasket in the washer also prevents leakage. After completion of work, draw water and make a test drain. The absence of leaks and the correct operation of the drain fittings indicate a correct installation.


Installation of a stand-alone mounted model
The tank is located separately, installation is made to the top of the wall. The cistern and toilet are connected by a drain pipe.
Stand-alone cistern is installed above the toilet: either at the level of the classic design, or very high - under the ceiling
Installation procedure:
- we attach the pipe to the toilet, marking the place of the lower attachment on the wall;
- we calculate the height of the tank by lifting it on the pipe;
- mark the attachment points, check their horizontal position with a level;
- we fix the container with the pipe to the wall using brackets and dowels;
- we connect the pipe and the toilet;
- connect the tank to the water pipe.
At the end of the work - a test test.
Installation of the tank in the wall
The built-in container comes with a wall-mounted toilet bowl. The tank, made of durable plastic, is hidden in a wall of plasterboard panels.
This kit takes up less space and looks aesthetically pleasing. Often a hanging model is purchased paired with a bidet. Big plus of the built-in tank - its safety. The only negative of the whole set is the high price.
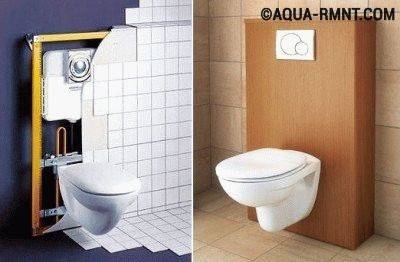
The installation of the toilet cistern ends with the installation of the wall in such a way that only the buttons on the decorative plate are visible from the outside
Fasteners for installation (mounting frame, bolts) are usually included. How to install the toilet cistern is described in detail in the installation instructions, which are also usually attached. The tank is hung on the frame, then the drain volume is adjusted. Two buttons allow you to select full or partial flush, such as 6L and 3L. This is to save water.
If you need to replace the old drain tank?
The phased replacement of the toilet cistern occurs according to the following algorithm:
- Disconnecting the old tank from the water pipe. Before doing this, turn off the water.
- Dismantling the tank - unscrewing the bolts with a wrench.Cleaning the shelves from traces of rust or lime.
3. Installation of a new tank. Produced in the same way as described above.
4. Connecting the equipment to the water supply.
5. Water level setting.
6. Installing the cover and drain button.
When replacing a toilet cistern, be sure to check all fasteners and gaskets
Proper installation of the drain tank is a guarantee of a long service life of the equipment.
Need to replace toilet
It is not always necessary to change the plumbing fixture if there are malfunctions in the sewer system. If water constantly leaks from the tank in the bathroom, this is a serious reason to think.
When it drips onto the floor, and all the pipe joints are in order, then, usually, the cause of the problem is the presence of a chip or crack. It is possible to eliminate the leak in this situation only temporarily - the toilet should be replaced as quickly as possible.
If the water from the drain tank drains into the sewer along the wall of the bowl, then most likely the installation of new plumbing will not be required, since the leaky valve most likely became the cause of such a malfunction. Since all internal elements for flush tanks are sold separately, they only need to be exchanged for new products.
Plumbing faience and porcelain are rather fragile materials that are characterized by instability to sudden temperature changes. The enamel can be covered with a grid of cracks that spoil the external aesthetic component of the device and threaten the complete destruction of the bowl. If chips or other problems have formed on this product, the toilet should be replaced as soon as possible.
None of the users of the toilet can know for sure when the ceramic coating on it will not withstand and burst under the influence of water flows, the weight of a person or as a result of internal stress. It’s good if at this moment the residents are nearby and one of them can quickly eliminate the emergency, otherwise the toilet will need to be repaired by the neighbors living on the floor below.


Another sign of a plumbing problem is the presence of an unpleasant odor. Most often, it is caused by improper installation of the sewer system, as a result of which the drains in the pipes stagnate. When everything turned out to be in order with the pipeline, and the faience was clean, the cause of the smell should be sought in the fact that the glossy coating began to collapse.
If the integrity of the enamel has suffered, and the porous structure of the sanitary ware has begun to come into contact with impurities, it begins to absorb unpleasant "aromas". It will not be possible to cope with these odors, since the destruction process is irreversible. In this case, it is impossible to do without how to replace the old toilet with a new one.
Another important reason for dismantling the old and installing new plumbing is the planned renovation in the bathroom. Few property owners decide to keep the old appliance in the event of a redesign in the bathroom. Since new, more modern products appear on sale regularly, updating a bathroom with the replacement of plumbing can transform its interior beyond recognition.
Regardless of whether the classic version or an unusual model from the catalog is chosen, the process of how to properly change the toilet occurs in the same sequence.
Since new, more modern products appear on sale regularly, updating a bathroom with the replacement of plumbing can transform its interior beyond recognition. Regardless of whether the classic version or an unusual model from the catalog is chosen, the process of how to properly change the toilet occurs in the same sequence.
Body, lid and shelf repairs
If cracks appear on the body of the drain tank, they can be wiped with liquid glass, sealant or epoxy glue.
You will need:
- liquid glass;
- epoxy adhesive;
- steel sheet.
If water flows along the outer wall of the housing, then the reason for this may be that the level of water in the tank is too high. In this case, water enters the holes at the upper edge of the housing. Then you need to bend the lever of the float valve or stick its end deeper into the float, which is bent at an angle of 90 °, and the water level will immediately drop. The cause of the leak may be a crack in the vertical wall of the housing. So, you need to turn off the water with a valve in order for the case to dry. The crack should be wiped with liquid glass, epoxy glue or sealant. If there are cracks at the bottom of the hull, then repair is impossible, since heavy loads fall on the bottom.
Often the lid of the flush tank breaks. Its repair is possible if it is broken into no more than three large pieces. Then they can be glued with epoxy glue. If the cover is broken into more pieces, then its repair is impossible. For a while, you can use a cover made of plywood or sheet plastic.
Cracks may appear on the toilet shelf.To avoid this, it is necessary to install the back wall of the tank or its bottom on a stand-support made of bricks, wooden blocks, corners or pipes. If a faience shelf bursts, then it is impossible to glue it together. Due to the crack that has appeared, the water will begin to drain through its nozzle, falling onto the floor. You need to disconnect the tank and turn it over, then the crack will be noticeable. A shelf made of metal is much more practical and stronger than faience. It is necessary, taking an old shelf with a crack as a sample, to make it from a steel sheet. A piece of curved pipe is also suitable for this.
Replacing an old cistern
How to install the tank on the toilet in case of its replacement with a new one?
If you need to replace the tank, you should use the following algorithm:
- First, the tank is disconnected from the water pipe. The flow of water before this must be blocked.
- Then the mount of the toilet bowl is disassembled with a key.
- Next, the shelf is cleaned of rust or plaque.
- Now you can install a new tank by connecting it to the plumbing system.
- At this stage, the tank needs to be adjusted.
- The last step is to install the cover and drain button.
Proper installation of the toilet cistern is a simple matter, and the result of the correct or incorrect operation of the device immediately becomes noticeable, so this work must be done with high quality and care with your own hands.
Installation of drain fittings
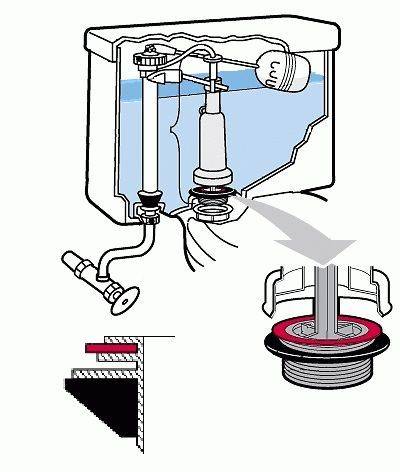
Before starting the installation of the toilet, it is worth checking the drain fittings. Be sure to install a rubber gasket on this part. If it is not there, then this is very bad and you will have to look for a replacement for it.An overflow tube is also installed on this part. It is she who works if the inlet valve for some reason does not work, thereby pushing the water straight into the toilet. If it is not there, then the water will directly merge onto the floor, and this is not very pleasant.

Arrow showing overflow tube
A standard toilet cistern usually has four main openings. The largest recess is for installing a drain valve. Before connecting these two structures, care must be taken to ensure that the valve itself has the widest and thickest gasket. After that, a plastic washer is installed on the outside of the tank and the nut is tightened.

Holes in the toilet bowl: for draining, for filling and two for fastening
To tighten the nut, some manufacturers put a special key in the kit, but if there is none, then you can also tighten the part by hand. It is advisable not to overdo it, because strong pressure can cause the washer to break. The component must fit as tightly as possible to the tank. To accurately tighten the product with high quality, it can be additionally tightened with an adjustable wrench.
 After that, proceed to the installation of the toilet filler valve. Be sure to check that a cone-shaped gasket is installed on the structure. Usually its flat side is placed directly to the valve itself, and the cone-shaped part is inserted into the hole in the tank. It is with the help of the gasket that maximum tightness is achieved.
When installing the toilet drain fittings, as in the case of a drain valve, a plastic washer is installed on the structure for fixation. In some kits it is not, but still its presence greatly facilitates twisting.In addition, there is usually a special filter in the filling valve, which is not recommended to be taken out.


What are toilets?
To begin with, before talking about mounting methods, let's get acquainted with the varieties of this plumbing fixture. Toilets can be classified according to the following characteristics:
- weight and dimensions;
- the material from which they are made;
- release direction;
- type of tank, bowl.
Varieties of toilet bowls by type of connection with the sewer
If we talk about the materials that are used for manufacturing, then these include:
- faience. This is a fragile but inexpensive material, the service life of which is approximately 15 years;
- steel. It is reliable and strong, toilet bowls from it are ideal for public places;
- reinforced acrylic. Differs in durability, small weight, durability, but negatively reacts to influence of high temperatures;
- porcelain. More durable, more beautiful and durable than faience, but also more expensive.
About the advantages of a porcelain toilet bowl
As for the design of the bowl and tank, you can find the types of toilet bowls classified according to this characteristic in the table below.
Table. Types of toilet bowls from a constructive point of view.
| Name, photo | Short description | Pros and cons |
|---|---|---|
| With hidden tank | The device is installed using a metal frame, which is attached to the wall. There is a tank in the frame, while the bowl is located outside. After installation, the frame is closed with a false wall (plasterboard, as a rule). | The advantages include compactness and attractiveness. But there are also weaknesses - you need to spend a lot of time / effort to install such a toilet, and when repairing a tank, you cannot do without disassembling a false wall. |
| Monoblock | Here, the bowl with the tank are a single piece, and therefore do not need to be connected to each other. | The advantages of the design include reliability (there are no connections through which leaks could begin), as well as ease of maintenance. There is only one minus, and it consists in the fact that if one part (bowl or tank) is damaged, then the entire toilet bowl must be changed. |
| Compact | This is the most popular version of the toilet - it has a tank installed behind the bowl and located against the wall. | As for the advantages, they include ease of operation / maintenance, as well as low noise during flushing. Minus is a weaker fluid pressure during operation. |
| Separated | It is also an extremely popular option, but only among outdated models. The distance between the bowl and the tank is large, the first, as a rule, is located under the ceiling. | The main advantage is good water pressure. Still located high, the tank does not “steal” the usable area of the room, which is already minimal. Cons - the water makes a lot of noise during flushing, and if repairs are needed, it is not easy to get to the tank. |
What are toilet bowls
And now consider how exactly the toilet can be attached to the floor:
- dowels;
- through a frame closed by a false wall;
- using sealant/adhesive;
- on taffeta;
- cement (the most "hard" method).
Fastening with taffeta, dowels and glue
Below we will talk in more detail about two methods of attaching a plumbing fixture - with dowels and with glue.
How to glue the toilet to the tile?
What is the fittings for the toilet
Its further work depends on the features of the choice of fittings for the toilet bowl.Having made the right choice and an error-free installation, you can safely be sure that the toilet bowl will last a long time. Reinforcement is divided into types according to several criteria.

According to the type of start-up of the action of the drain valve, for example, fittings are exhaust and pressure. The first involves pushing a lever, pulling a rope, or lifting a lever. The second system is the most modern and widespread. As the name implies, it is activated by pressing the flush button.

But the main criterion by which fittings are distinguished is the system by which it works. Based on this criterion, the reinforcement is divided into:
Shutoff fittings for a toilet bowl. Its action is to close the valve when the water rate is filled into the tank. In this embodiment, when the float goes down, the membrane opens the valve and vice versa when water is collected.


Fittings with bottom water supply. The most common type at present. Communications are hidden from view, which makes it look more presentable. But with such a system it is better to install good sealed gaskets.

Fittings with lateral giving. The most common way for most people to supply water to the tank. Water is poured from the side and blocked by a float valve.