- Varieties of visors for a balcony in shape
- Installation of a polycarbonate visor
- Cost calculation
- Visor installation
- How to install?
- Basket features and selection rules
- Varieties of boxes for air conditioning
- What to look for when choosing?
- Rack, frame and cover materials
- Wood, metal, forging
- Metal and soft tiles
- Polycarbonate and plastic
- Profiled sheet, slate and glass
- Instructions for installing a simple purchased visor
- Types of structures
- Straight column design
- Optimal depth for supports
- Double construction
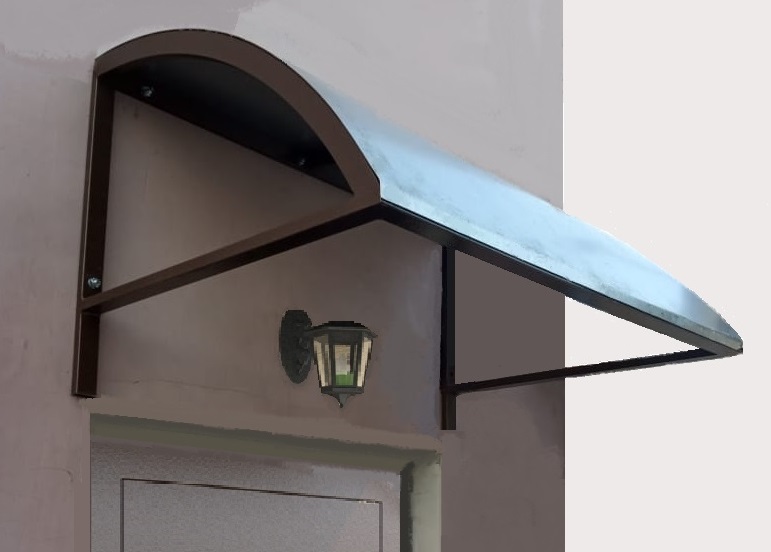
- Canopy in the form of a semi-arch
- Arched option
- Design and assembly of a visor for an air conditioner
Varieties of visors for a balcony in shape
At the word "visor", everyone has their own image of the object pops up in their memory. Indeed, this architectural form can look completely different depending on the shape of the roof, coating materials, and dimensions. Some are more like a full roof, others are more like a beach umbrella.
Let's get acquainted with the main types of canopies on the balcony, depending on the appearance:
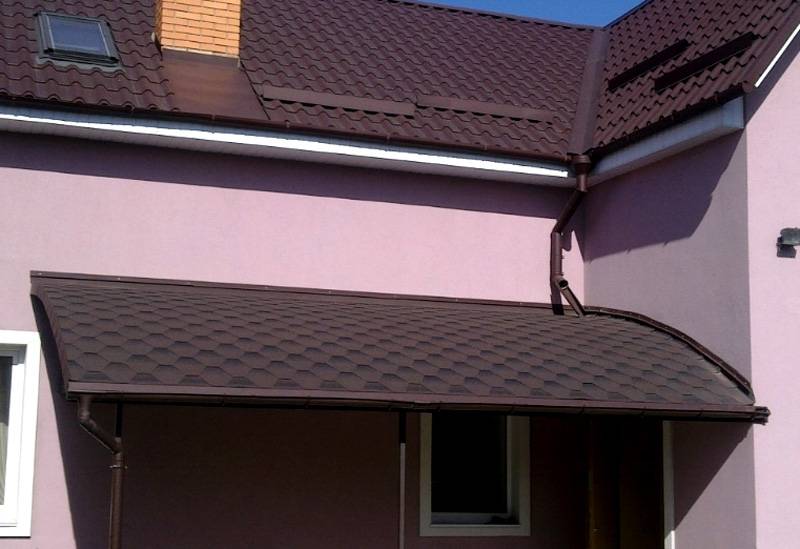
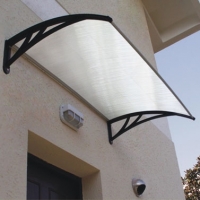
Shed - the simplest and most common type. It is a straight surface, located at an angle relative to the wall of the house. This slope is very important and does not allow moisture to linger on the roof.Due to this, the load on the fastening system is not increased, and the coating materials are not damaged. The disadvantage is the low wind resistance.

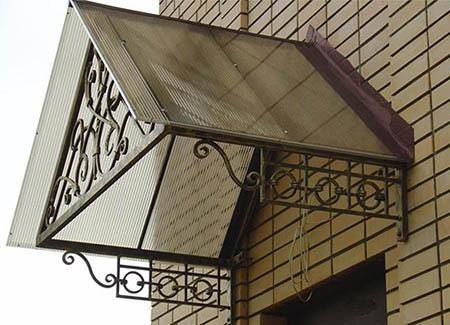
Gable. Such a visor for a balcony is made in the form of two inclined wings. The structure looks more cumbersome than the previous view. For this reason, it is appropriate to apply on large balconies sizes.
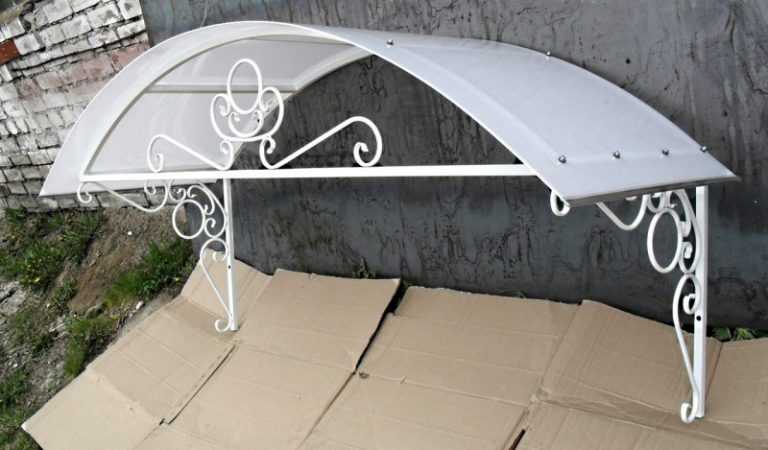
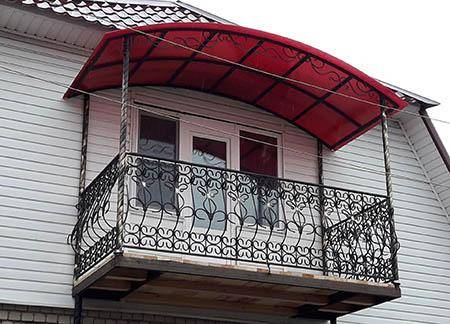
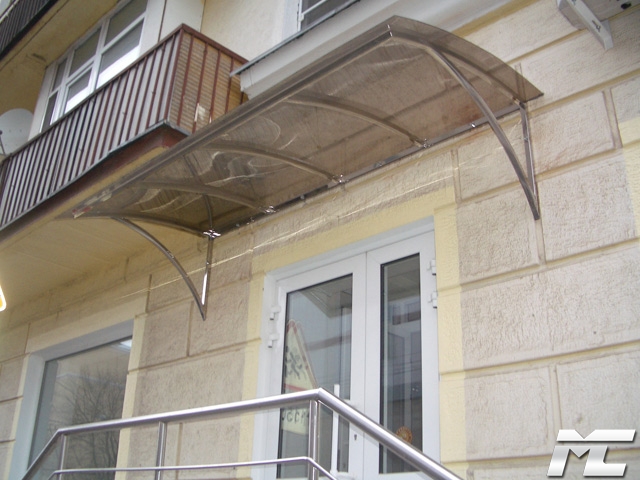
Arched. It has the shape of a semicircle of different radius. Of all the varieties, the most attractive appearance, but you will have to face restrictions on the choice of materials. The most suitable is polycarbonate. Due to the convex design, it is resistant to wind loads.
Shatrova. It looks like a hemisphere or dome. Thanks to this, it protects against weather phenomena more reliably than other types of structures. To enhance the effect of the tent canopy above the balcony of the last floor, they make more area of the balcony slab.
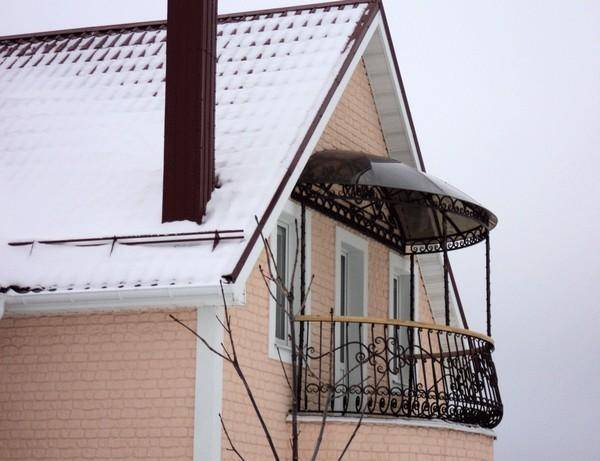
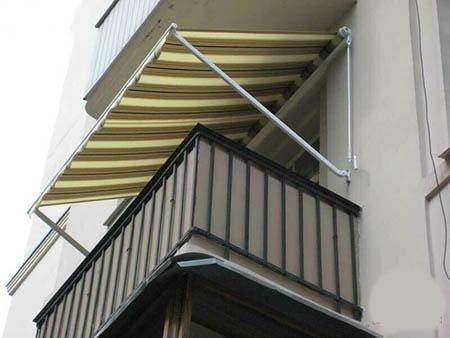
In the form of a marquise. This design is mobile. The awning develops and straightens out by means of mechanical or automatic control. The fabric has a moisture resistant impregnation, and any color can be chosen at the request of the customer.
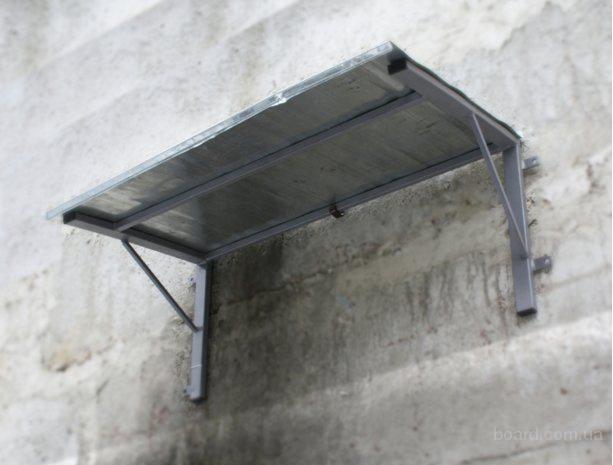
Installation of a polycarbonate visor
As noted, polycarbonate awnings are the squeak of roofing fashion. It has an ideal ratio of price, quality and a pleasant look. It is easy enough to fit under any decoration of the balcony.

The most popular polycarbonate frame equipment schemes:
- straight slope;
- gable;
- arched;
- semicircular.
The first stage is a metal frame. Similarly, in shape, we weld the base, which will rest on the balcony fence. Next, move on to covering the canopy. It is advisable to choose with additional insulation with thermal washers.
Depending on the scheme, different types of polycarbonate can be used:
- cellular - suitable for the implementation of solutions that are complex in form, because has greater flexibility, strength;
- monolithic - for the construction of simple structures.
Cost calculation
In addition to other advantages - high strength, ease of installation, operational safety, resistance to mechanical stress - polycarbonate also has a relatively low price.
The minimum cost is set for a frame made of wood - about 1000 rubles, for metal - from 1500 rubles. The cost will go up depending on:
- the presence of decorative elements - from 300 rubles for each;
- flooring area - from 200 rubles for an additional 10 cm.
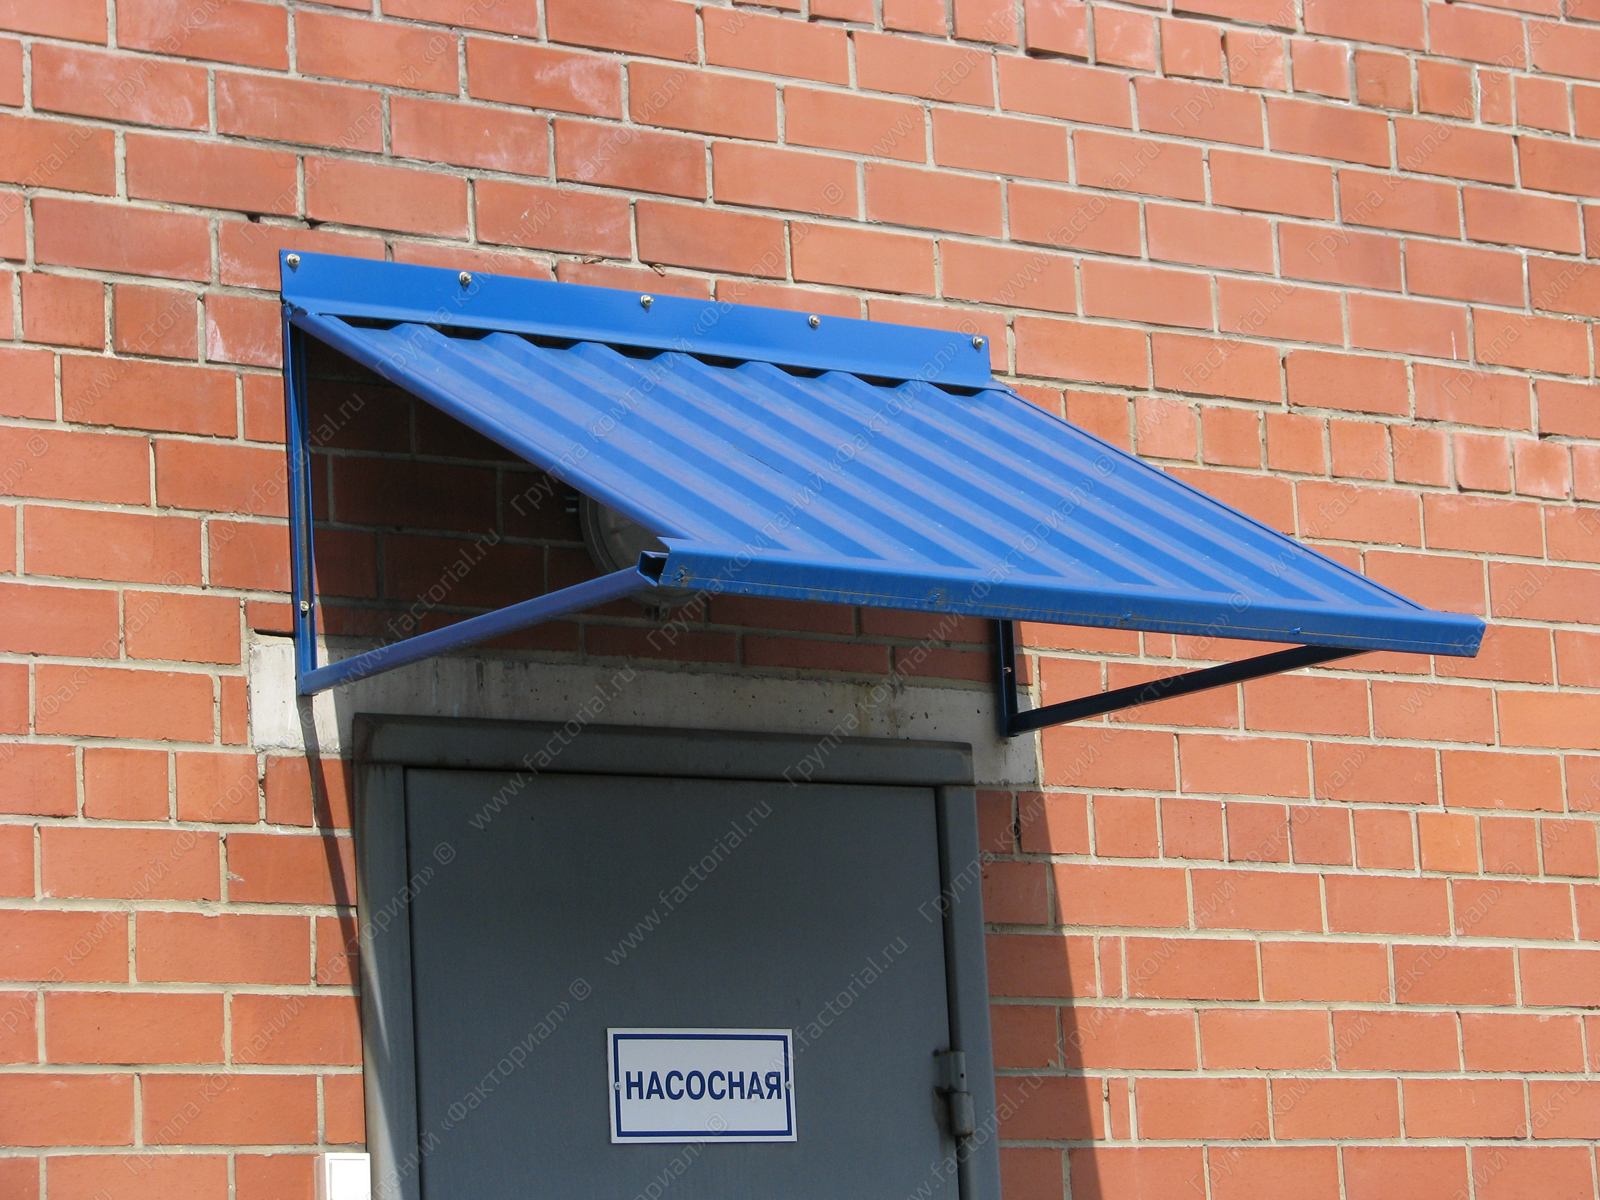
Visor installation
Basic rules for making a visor:
- Preliminary preparation of the drawing of the future design will allow you to calculate the amount of materials needed.
- The width of the canopy should exceed the width of the surface of the balcony slab by 30-40 cm.
- The angle of inclination is optimal at 40-50.
- The frame must be treated with a protective agent (this rule works for both metal profiles and wooden structures).
- The mounting surface (wall) must be even (if there are irregularities, then they must be cleaned or, if they are technologically necessary, think about how to get around them).
- If a multi-storey building does not provide for a visor, then you should think about documenting it. Otherwise, the management company may decide to dismantle the canopy as an illegal structure. A permit will save you nerves and money.
- For installation work, you need to choose dry weather.
- Compliance with safety regulations when working at height is a must!
To make a visor with a frame from a profile pipe, you will need a welding machine as the main tool.
- It is necessary to cut the blanks and fit to the desired size. In the rear wall of the structure profile, it is necessary to drill holes for fasteners. And weld the blanks into the corners of the future frame. The seams must be cleaned with a grinder and treated with an anti-corrosion compound.
- On the wall, mark the attachment points of the structure using the building level. Prepare holes for fasteners and attach in place with anchors.
- To ensure the rigidity of the structure, the corners-blanks must be connected to each other by three profile squares by welding.
- Now you can attach the deck profile sheet to the rubber-coated bolts.
- Next comes the tide.
- All joints must be carefully coated with polyurethane sealant.
If there is no welding machine, then the frame can be made of wood. But the wooden structure is not so durable. To increase the service life, wooden elements must be treated with protective compounds.


We also propose to consider this option of a metal frame without the use of welding.
You will need a corner for rigidity, a profile pipe, a bent metal strip, 3.2 or 4 mm rivets for fixing the flooring (for example, polycarbonate or any other material chosen for the canopy above the balcony), dowels for attaching directly to the wall.
When assembling the frame in the places where the rivets are attached, two holes must be made and fastened with two rivets. This will provide rigidity and the design will not "walk". After the frame is assembled, you can lay a polycarbonate coating using rubber pads.
Depending on the wall material, you need to choose the right dowel or anchor, the fastening step should be no more than 50 cm.
If the balcony canopy is made of galvanized metal, then the biggest problem is the noise generated during rain. As a noise suppressor, liquid high-quality roofing material glued to one side of the element (previously degreased with white spirit) can be used. For the same purpose, you can choose a soft roof pasted on silicone glue.
Installing a canopy on a glazed balcony is a more complex and time-consuming design. When glazing a balcony, we have:
- stove (floor);
- takeaway is attached from the plate;
- glazing is already attached directly to the takeaway;
- top plate (ceiling).
The function of the canopy is to cover the opening between the top plate and the glazing.
The outer part of the visor (going beyond the balcony) must be at least 120 mm and have special bends along the edge and at the point where the visor is attached to the frame (for the rigidity of the element).
As a material on a glazed balcony, only metal is selected - galvanized or white. Plastic or sandwich panels will not withstand possible loads at low temperatures, any "stray" icicle can lead to a break or collapse of the structure.
So that the sound of raindrops does not harass the household, when installing the visor, its entire outer part must be covered with a soft roof (for example, bikrost)
Pay special attention to overlaps and wall junctions. Where it is attached to the wall, there should not be any mounting foam
The design is brought to the wall as tightly as possible, the gap between the visor and the wall should be no more than 2 mm, and it is better if it does not exist at all.After installation, the gap must be lubricated liquid rubber or sealant for outdoor work from the inside and outside. If we talk about overlapping, then the procedure is similar - between the sheets you need to coat with a layer of sealant and tighten with rivets, which also need to be lubricated with sealant.
How to install?
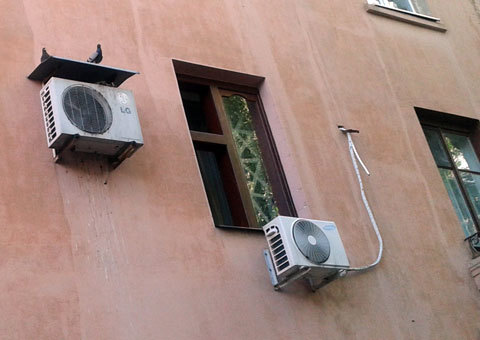
It may seem that installing a protective visor for an outdoor split air conditioner system is not difficult. But it is not so. The surface of the canopies, despite the minimum weight, has the property of windage, which only a professional can handle. With medium gusts of wind, the base of the visor can escape from the hands of an amateur, because of which the master himself may be injured.
For those who live on the 1st floor, you will need to stock up on a stepladder and the help of a friend, relative or neighbor. Two working forces or four hands will allow not only to correctly install the visor. In such conditions, it will be possible to put anti-vandal protection. The only thing that will be the complexity of the work is the accuracy of marking for fasteners. Yes, and when screwing in the screws, it is necessary that the structure is held by a second person. Thus, it will be possible to maintain the evenness of the installed protection.
And now it is proposed to get acquainted with the sequence of actions for installing protective visors for split systems.
- Markup needs to be done.
- Using a perforator, holes are made according to the prepared markings. Places for fastenings must have a depth corresponding to the anchor bolts. For maximum strength, it is recommended to use anchors with a diameter of 10 mm.
- Anchors are inserted into the prepared holes. Further, the protective structure is equipped with holes for the threads of the fasteners.Then the nuts are tightened.
To keep the visor structure as strong as possible, you must use at least 6 attachment points. Otherwise, if strong gusts of wind occur, it is likely that the visor will be torn off and fly away in an unknown direction.
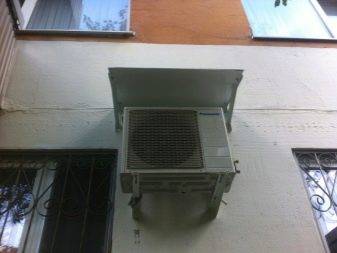
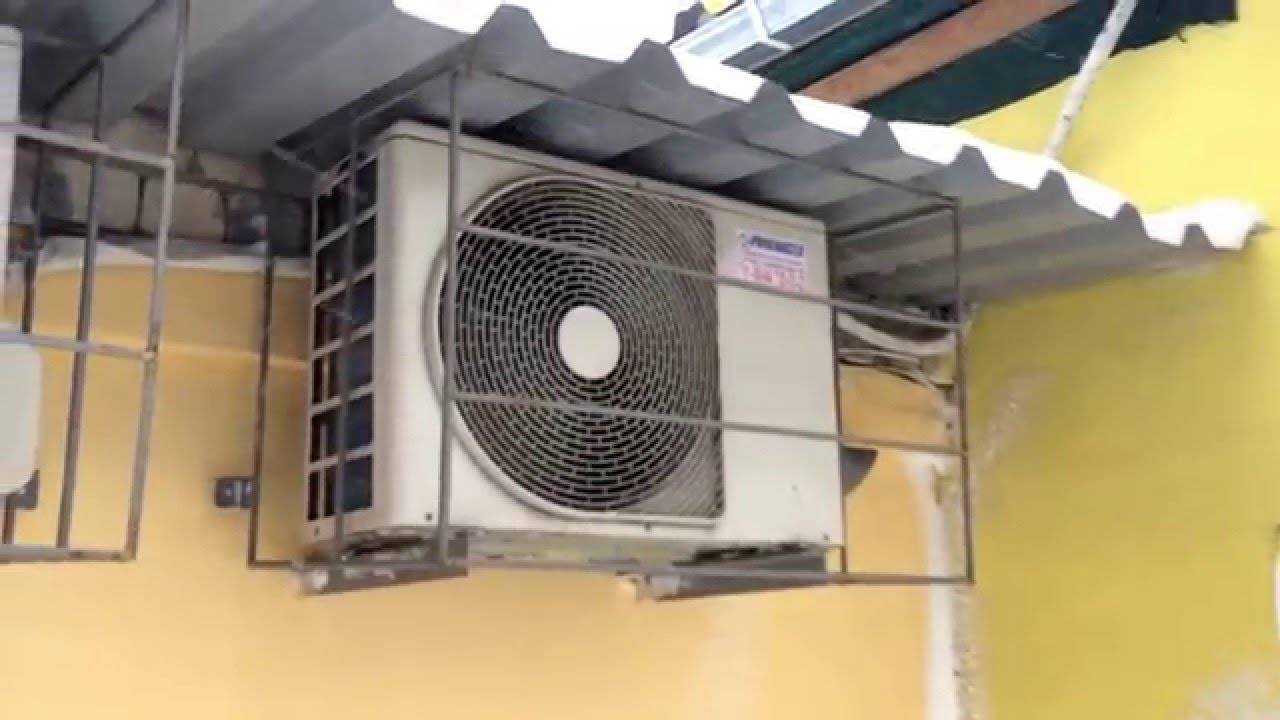
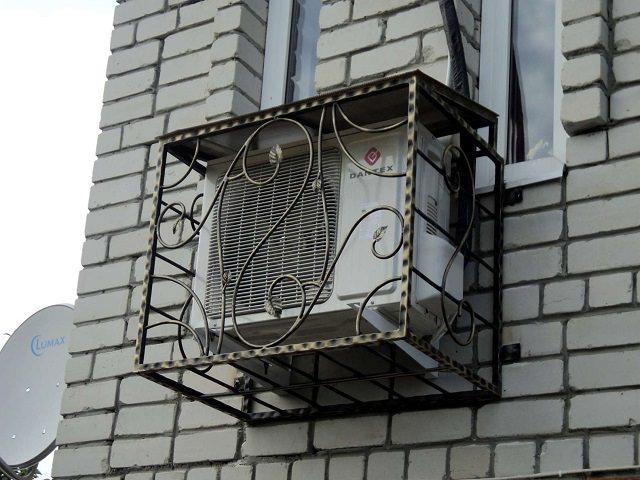
Basket features and selection rules
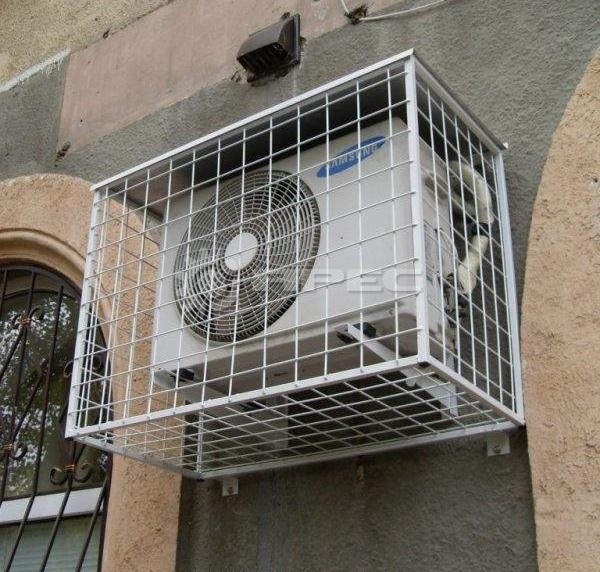
What is a basket or box? This is a metal structure that covers the outdoor unit from all sides.
Its main functions:
- Decorative. To ensure that air conditioner units of various sizes look harmoniously on the facade of the building.
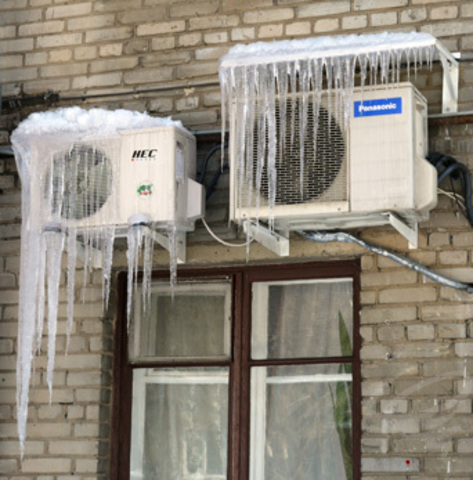
- Protective - fragments of bricks and tiles falling from the roof and walls, cigarette butts thrown out of windows by residents, icicles and other debris can damage the outdoor unit.
- Anti-vandal protection - this function is very relevant for the first floors. The design of such a basket is heavy-duty, closes the unit from all sides.
Anti-vandal structures can additionally be equipped with an alarm. This is a great option for office space, where security guards can react to vandals at any time of the day.


 Many developers provide for the location of air conditioners in newly built buildings at the design stage. With this approach, you can order baskets in the same style and the architectural line of the facade of the building will not be disturbed.
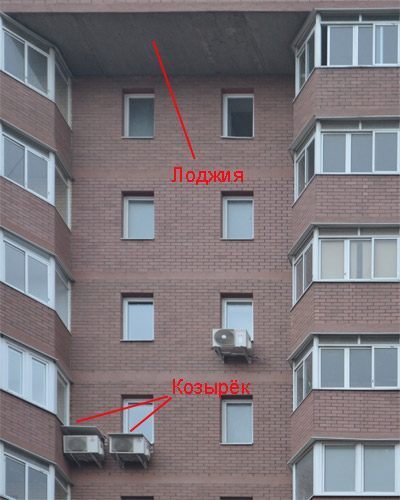
Varieties of boxes for air conditioning
Owners of apartments in the old housing stock are faced with the issue of independent choice space for air conditioning and protect it from precipitation and mechanical damage (accidental or intentional). Therefore, simultaneously with the purchase of split systems, it is advisable to choose and order the installation of baskets for outdoor units air conditioners on the facade.
But there are many offers on the market.To choose the right option, first you need to get acquainted with the existing species in general terms.
According to the manufacturing method, baskets are assembled at a specialized enterprise and home-made. The former are distinguished by greater reliability and durability, stylish appearance, and the ability to withstand significant loads. But this is subject to the availability of a quality certificate, documents confirming the calculations and testing of products, which is typical for responsible manufacturers with a good reputation.
Homemade boxes can be made from improvised materials. Such a design will be simple, but its cost will be minimal.
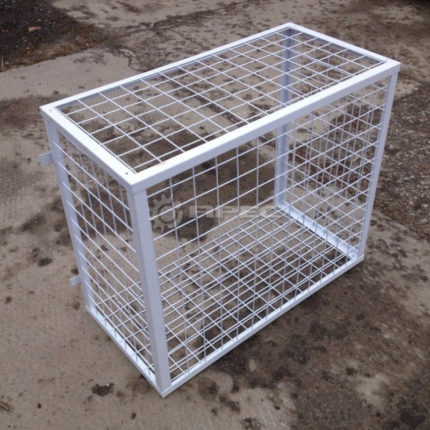 The simplest box can be made on your own using rods and metal corners. Welding to assemble the structure. But such a basket requires maintenance (regular tinting) - rust can appear in the places of welds from exposure to atmospheric precipitation.
Boxes can also be classified according to the following parameters:
- by type of construction - solid and collapsible;
- by appointment - decorative and protective;
- by size - standard and non-standard (made to order);
- by design - depends on the imagination of the designer or the wishes of the customer.
Baskets also differ in the material of manufacture. It can be perforated galvanized sheet, metal rods, forged elements and more.
It is important that the material used is reliable and durable, and also resistant to atmospheric precipitation.
What to look for when choosing?
When choosing a basket, it should be borne in mind that there are standard boxes and non-standard ones, made to measure of the customer.
 Most often, the option of a non-standard basket is relevant when it is required to protect several blocks installed in a row or one above the other with one lattice.
When choosing a basket, a number of parameters are taken into account:
- dimensions - you should take into account the dimensions of the external unit and the required gap of 10 cm between the walls of the unit and the box;
- cladding option - anti-vandal, protective or decorative;
- filling - metal rods, blinds, forged elements, perforated sheet, lamellar perforation, individual perforation pattern (at the request of the customer);
- type of construction - ready-made or collapsible version;
- specific features - painting in a certain color, the presence of a door with a built-in or padlock (for access to the unit), an additional visor, installation of an alarm that notifies of harm by third parties.
All these parameters, in particular dimensions, design complexity and specific features, significantly affect the cost - the more complex and larger, the more expensive.
It is also important when choosing a suitable option to pay attention to access to the outdoor unit of the air conditioner - so that it is easy to perform regular cleaning and maintenance.
Rack, frame and cover materials
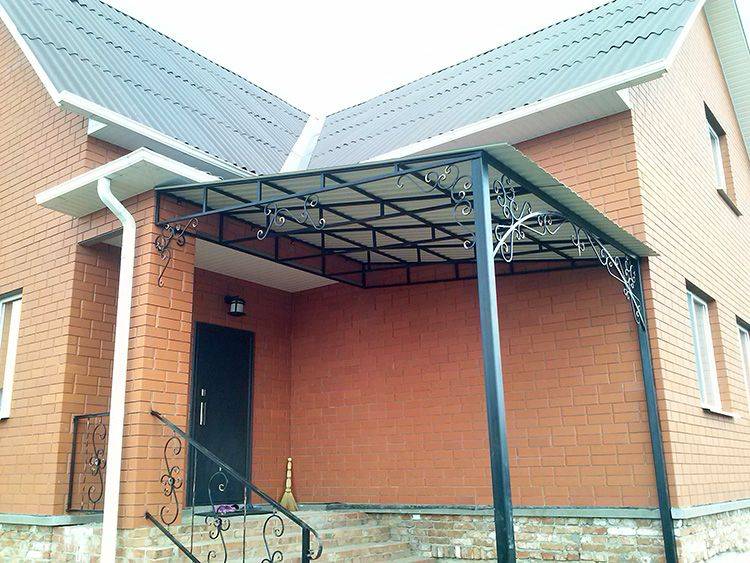
There are no restrictions on the choice of materials from which a canopy can be made over the porch. To create a stylish, beautiful and practical structure, you can use profiles and coatings made of wood, ceramics, metal and plastic. To make the best decision, you need to familiarize yourself with the new and time-tested materials on sale.


Wood, metal, forging
A wooden canopy above the door is used to decorate houses built from logs, timber, or finished with panels or slabs for these materials. Wooden structures look good on brick and stone buildings. The material is easy to process, environmentally friendly and light in weight. The disadvantage is that organics are prone to rotting, combustible, fungus and mold can develop in it, or insects can settle. Timber and boards must be regularly treated with special liquids.
The metal canopy over the porch is durable and reliable. The parts are connected by welding, bolts and rivets. Steel structures have a long service life, are resistant to temperature extremes and ultraviolet radiation. Stainless steel should be chosen, since black iron is prone to corrosion, it must be regularly cleaned of rust and painted.
With the help of forged fragments, original and beautiful canopies are created that attract general attention. Products are associated with exquisite taste, luxury and wealth.
According to the type of manufacture, structures can be forged as a whole or made from individual elements that emphasize the style of the object.
Metal and soft tiles
The surface of a metal tile is made plain or imitates natural stone, fabric or wood. The design of the tiles is extensive, which allows you to choose the best option for arranging a building of any style, shape and size. The material is resistant to sunlight, moisture and temperature changes. Installation of tiles is not a big deal. Fragments are stacked on a horizontal crate.The disadvantages of the coating are the heavy weight and the noise emitted during the rain.
The soft bituminous tile is analog of roofing material. This type of roof is laid on a smooth and even plywood base, boards or OSB. The advantage of the material is an affordable price, ease of installation and sound absorption. The disadvantages of the coating are limited colors and susceptibility to mechanical damage.
Polycarbonate and plastic
A beautiful and practical canopy over the door with your own hands can be made of polycarbonate. To create curved structures, honeycomb panels are used, which have good flexibility. For the construction of structures with flat slopes, it is advisable to choose monolithic sheets, which are characterized by high strength and resistance to impact.
Manufacturers produce transparent, colored and matte models of polymer plates. Products are resistant to moisture, temperature changes and ultraviolet radiation. The disadvantages of the material are its high price and complexity of processing.
Plastic panels are lightweight, easy to install and a wide range of colors. PVC slabs are rarely used as a roofing material, as they do not have sufficient strength. Most often, panels are used for the construction of gables in pitched structures. Plastic fades in the sun. Tarnished panels can be painted or pasted over with a colored film.
Profiled sheet, slate and glass
The profiled sheet is durable due to stiffening ribs, resistant to moisture, temperature extremes and ultraviolet radiation. Unpresentable appearance is compensated by a variety of colors of products on the market.The outer surface can be one-color, imitating stone or precious wood. Corrosion protection is provided by double-sided polymer coating.
Flat and corrugated slates are used for pitched roofs. The advantage of this material is its affordable price and ease of installation: the sheets are nailed to the frame. Disadvantages include the heavy weight of the boards, their limited service life and the lack of color diversity. A gray slate corner canopy is not able to decorate a residential building.
Glass is rarely used as a roofing material. Transparent panels look good on stainless and chrome profiles, and these materials are difficult to adapt to the facade of the house. In addition, only tempered or laminated glass can be used for slopes. These materials are expensive and difficult to work with.
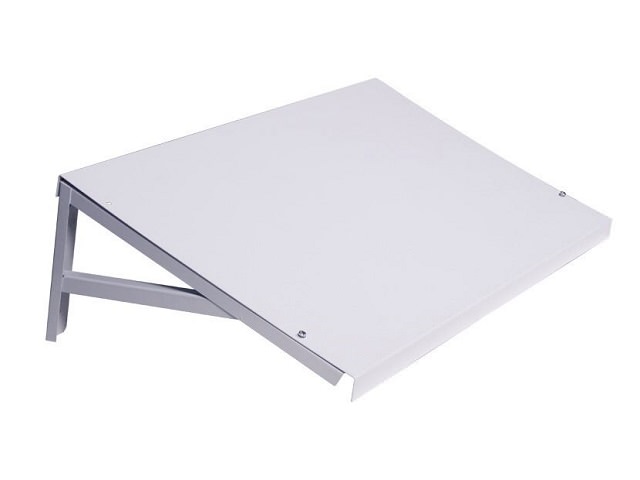
Instructions for installing a simple purchased visor
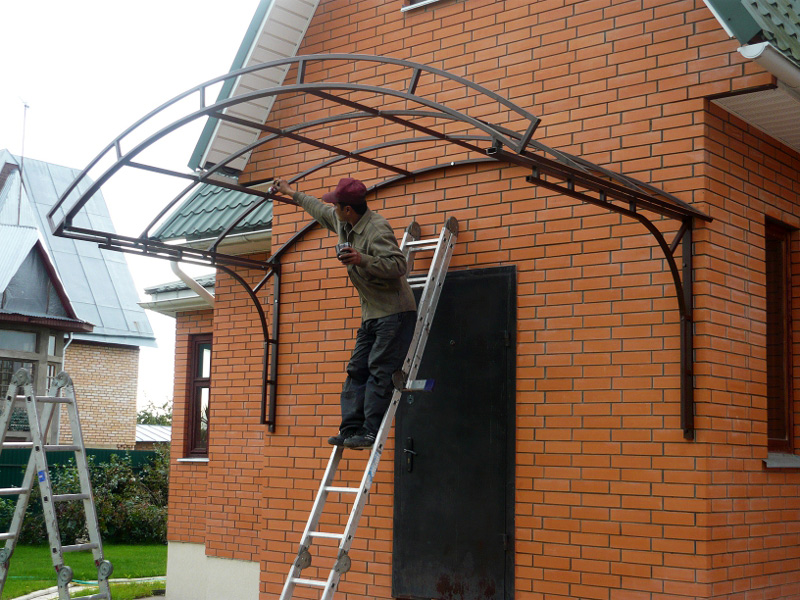
The usual single-sided version with triangular side supports has 4 attachment points, two on each side. To attach such a structure to a concrete or brick wall, you will need:
- perforator;
- building level;
- marker;
- 4 anchor bolts.
It is convenient to install a canopy with two people. The purchased sun visor is fastened according to the following algorithm:
- preparatory work, cleaning the place of attachment;
- marking of mounting holes;
- drilling holes;
- lifting of the structure and installation of anchors.
In order to avoid mistakes when marking and not to install the visor crookedly, it is better to lift it, level it and only after that mark the position of the fixing anchors.
Types of structures
Today you can buy almost any design.But to know why and how a trellis for grapes is made with their own hands in the country, every connoisseur of emerald clusters should know. Let's first understand the types of structures and materials, as well as technologies. Then we proceed directly to the manufacturing process.


Construction types:
- straight column design;
- canopy in the form of a semi-arch;
- arched structure.
Straight column design
A simple trellis. In short, this is a small number of poles, between which several rows of fishing line, wire or cable are stretched. This is a simple, primitive version of the maintenance of the vine and its development. Support poles are buried in the ground. For strength, you can use their concreting. Gardeners choose different distances between poles, but experts and experienced gardeners recommend 2.5 meters. The first row of wire is pulled at the bottom, and the next with an interval of half a meter or 40 cm.
The structure is of two types:
- Single.
- Double.
Any material is suitable for both single and double construction. But knowledgeable people advise for a single structure to still use (if possible) metal support with or without concrete reinforcement, as shown in the photo.
The diameter of the pipes for the support, as practice shows, can be 32 - 57 mm. This is the best option. It is advisable to install square pipes. They will cost less. For fastening, welding or a corner with a self-tapping screw for metal is used
Now about the height, which is important. For the design in question, the optimal height will be up to 2.2 meters from the ground.There is an opinion that the higher the trellis, the larger the bunch
This is an erroneous opinion. In addition, care at altitude is difficult. Can't do without a ladder
There is an opinion that the higher the trellis, the larger the bunch. This is an erroneous opinion. In addition, care at altitude is difficult. Not without a ladder.
Optimal depth for supports
A vertical support for grapes is installed in the ground at 500 - 600 mm. This is the minimum entry. A hole is being prepared with dimensions of 60/600 mm, a depth of 800 mm. Deepening is performed with a traditional tool - a shovel or a drill. You should get a deepening of the shape of the reverse trapezoid.
Such a careful approach can save you a lot of money in the future. Redesigning the structure in five years will not bring joy. After all, grapes can germinate in one place for 50 years, remember this!
Double construction
For those whose plot area allows them to grow grapes in large volumes, we recommend using the two-lane trellis option. These are identical supports vertically dug into the ground at a short distance or a structure of two pillars in the shape of the letter V. Thanks to two-lane trellises, it becomes possible to more freely place the vine, which significantly increases the yield. A trellis for grapes, the photo of which, you see, is a double design. Design feature. More space needed. It is impossible to grow other crops in the aisle. The principle of work is similar to the previous one. Therefore, it makes no sense to dwell on the issues of depth and height.
The only thing you need to pay attention to is the distance between the rows. It directly affects the formation of the grape vine!
Canopy in the form of a semi-arch
This version of the support involves the cultivation of several table varieties of different ripening periods and serves as a small canopy, shelter from the sun. It is used for single-row planting of grapes in the yard for arranging a recreation area near the house. The windows of the house are simultaneously closed from the scorching rays of the sun, but the view remains free. At the top, it is preferable to install a plastic cover to protect against rain.
Arched option
On a large spacious courtyard, the installation of an arched canopy is preferable. This is a two-row planting of grapes or a combined version of fruit bushes with decorative vines. The owner of the farmstead has the opportunity to simultaneously provide the family with delicious berries and create an unusual flowering paradise.
But there is one drawback. Both in the semi-arch variant and when using the arched structure, the recommended height from the ground should be 3.2 meters. This makes it difficult to care for the top. The use of a ladder is required. But in the shade you can put a table to relax or cover the car from ultraviolet sunlight. Also, the arched version has a decorative function, closely related to landscape design. The arched design, in essence, is a canopy for grapes, climbing roses, clematis and other vines.
In order for the vine to develop well and produce a harvest, it is necessary to learn how to properly tie it up.
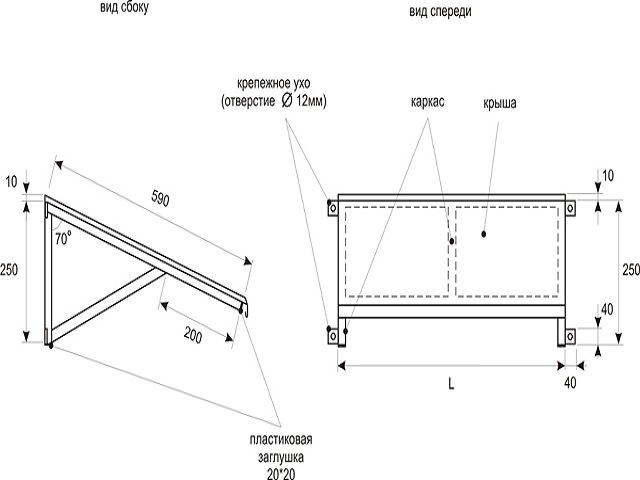
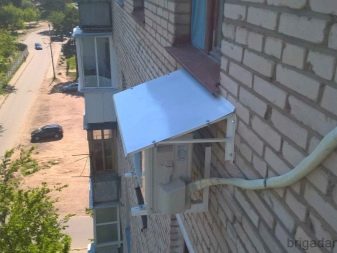
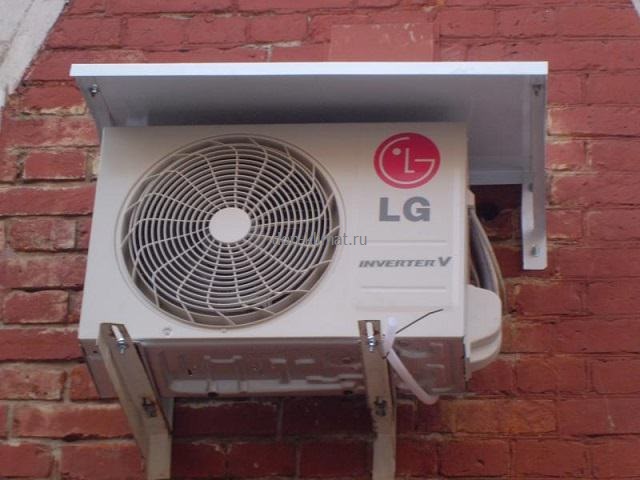
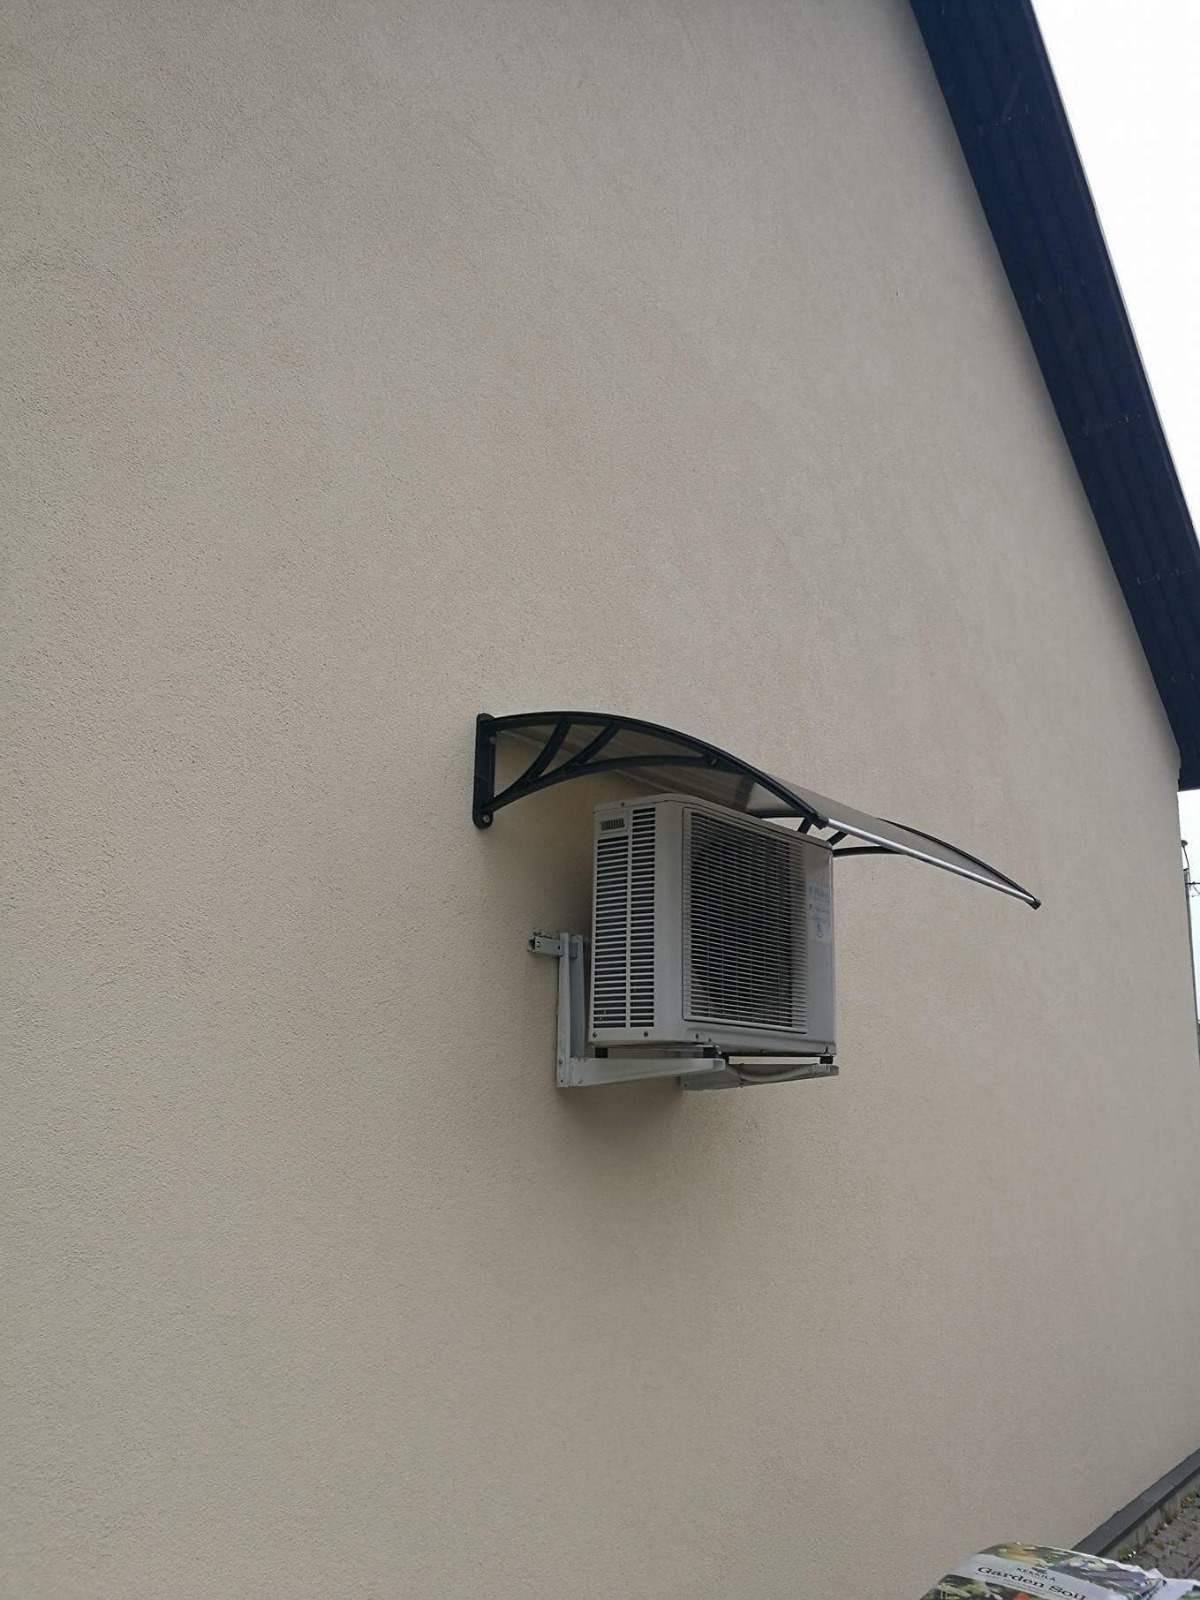
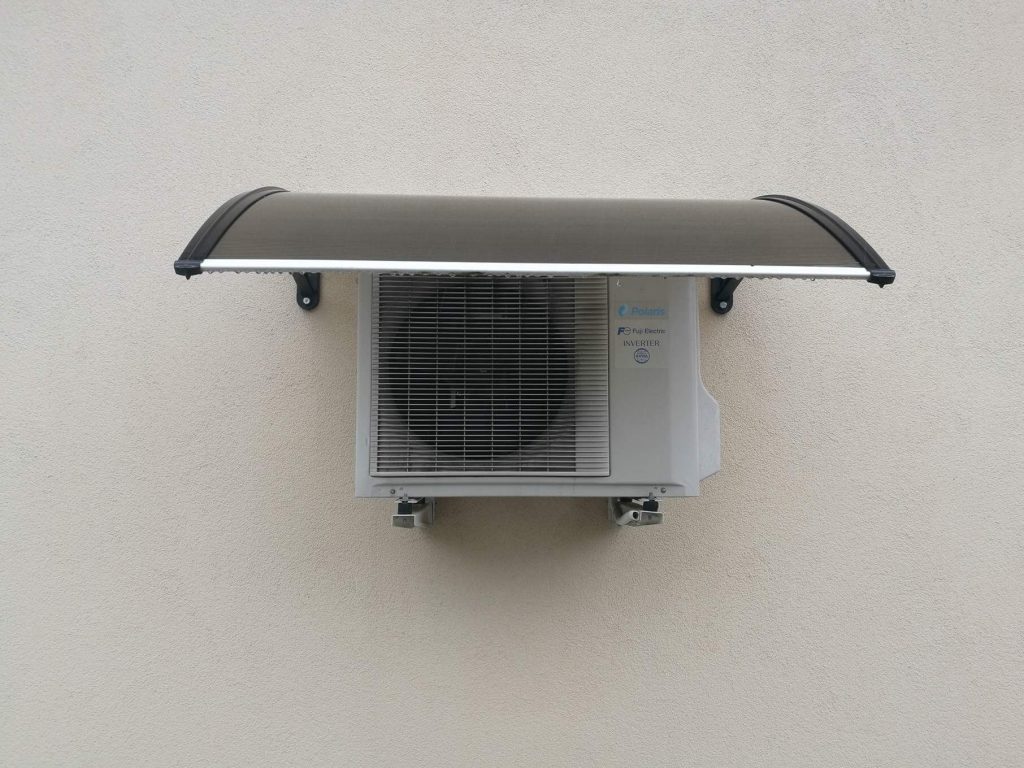
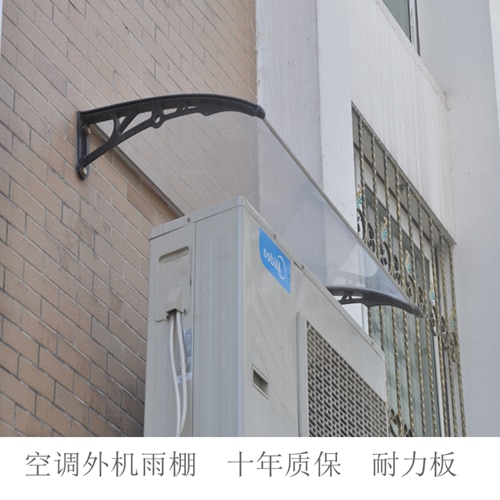
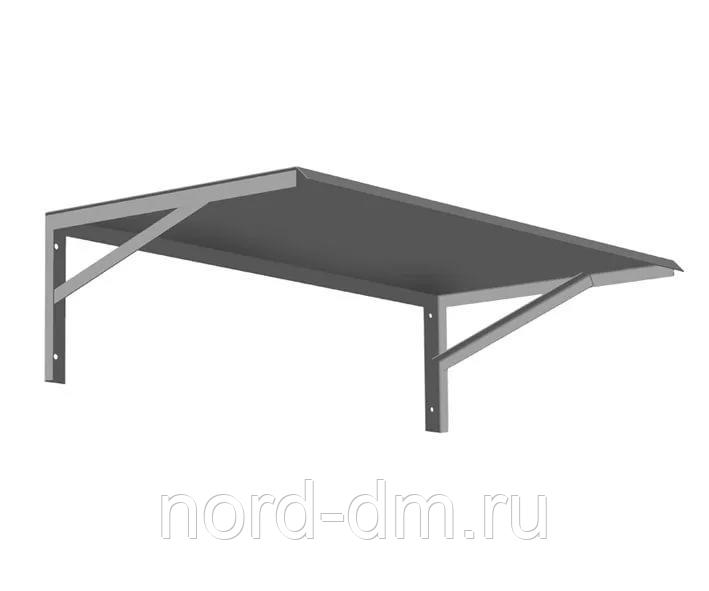
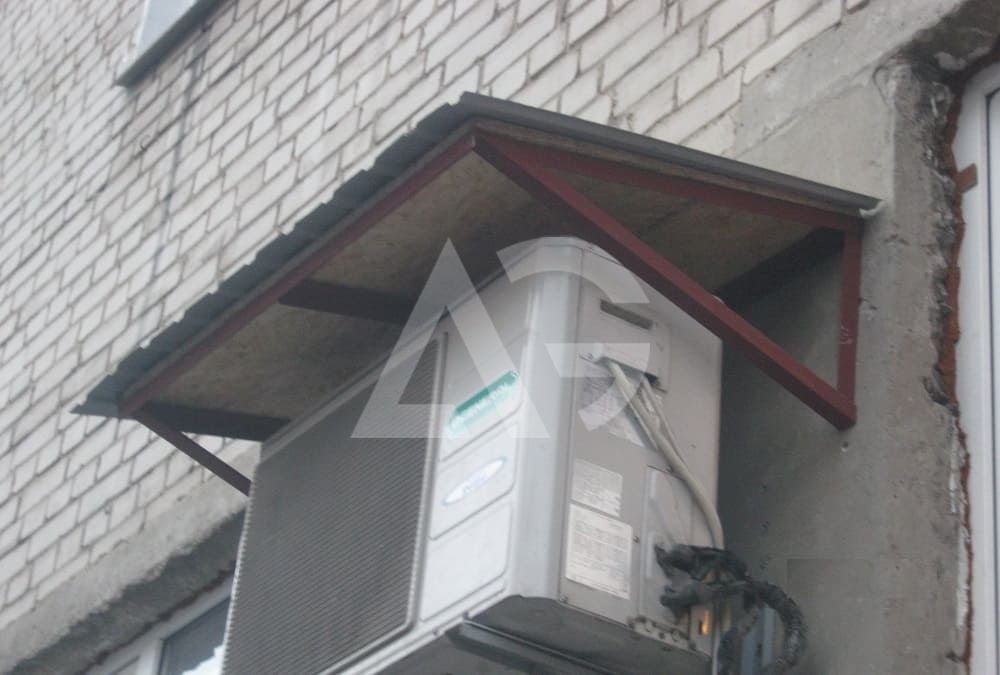
Design and assembly of a visor for an air conditioner
The visor for the air conditioner is a lightweight metal structure. It will be required to make it.


- steel sheet,
- corner,
- welding machine.
The corners will serve as a support for the structure, and the steel sheet will directly protect.If a reinforced visor is needed, then it is worth using a thicker sheet of iron, or galvanized steel.
Assembling such a structure with your own hands will not be difficult. The main thing is to determine the size and angle of the visor. To create a visor, you can use the step-by-step instructions below.

Visor drawing
- First you need to measure the air conditioner: in length, width and height. In the assembly of the protective visor, it is necessary to rely on these data. To the resulting measurements, in addition to height, you must add 100 millimeters each. After all, the visor should not be closely fitted to the air conditioner on the sides. And the protrusion of the upper part of the visor should be significant. No additional centimeters are added to the height due to the fact that there is no lower limit in the visor. As a rule, you will get standard dimensions: 1000x550x250 mm. Where 1000 is the length, 550 is the width, and 250 is the height of the structure.
- The next step is to create the frame of the visor. To do this, you need three corners of different lengths: 550 mm, 250 mm, and 230 mm. At an angle of 70-75 degrees, we weld corners of 550 and 250 mm. In no case should you connect them at a large angle. Snow and other objects that have fallen on the visor will not roll off it, and if a lot of all objects accumulate on it, the steel sheet used as protection may bend or even come off. Next, you need to take the third corner with a size of 230 mm and weld it with one end to the free end of the corner with a size of 250 mm, and with the second - almost to the center of the corner of 550 mm. In the end, a triangle is formed with a protruding rib by 200 mm.
- Next, repeat the procedure, collect the second part of the base.
- The next step directly depends on the height of the air conditioner. If, for example, it is located on the first or second floor, then it is worth assembling the structure to the end on the ground. To do this, you need two transverse, if you want to install enhanced protection. If a reinforced visor over the air conditioner is not needed, then you can do with one transverse or without them at all. We weld to the transverse two parts of the base. From above we attach a sheet of iron of the appropriate size. The visor is ready.