- 2 Technology
- 2.1 Open development
- 2.2 Closed development
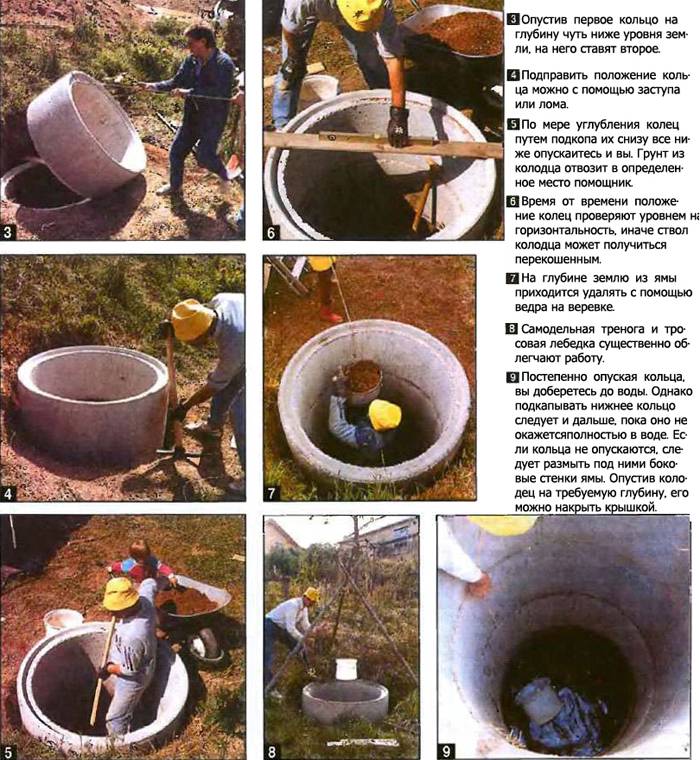
- Type and structure
- Type of well shaft
- How to identify an aquifer
- Bottom filter in the well
- Selection of pumping equipment
- Materials for the construction of wells
- How do you know when to stop digging?
- Types of wells
- Commissioning
- Waterproofing
- Wall cleaning and internal sealing of seams
- Where to dig a well?
- Deepening using repair rings
- Video - Maintenance and operation of the well
- Commissioning
- Waterproofing
- Wall cleaning and internal sealing of seams
- How to dig a well for water supply: a detailed analysis of two basic technologies
- Well digging process
- First option
- Second option
- How to dig wells in winter
- Seam sealing
- How to dig a well with your own hands?
- Source Care
- More from my site
- Stage three. Well construction
2 Technology
If it is meant to work independently and without the use of large construction equipment, then the use of open and closed installation methods is best suited.
They are considered by the people to be the simplest and most effective. Now we will consider each of these methods, as well as evaluate their pros and cons.
2.1 Open development
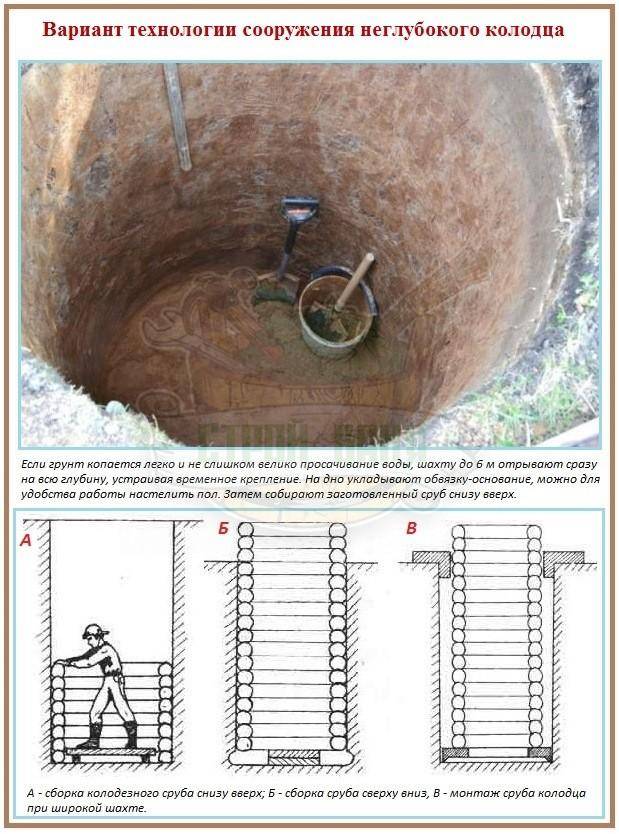
Open well development is much preferable, since it is much easier to dig a well with your own hands using such algorithms.Open work involves first digging a pit of the required size, and then installing the bottom, rings and performing other work.
Stages of work:
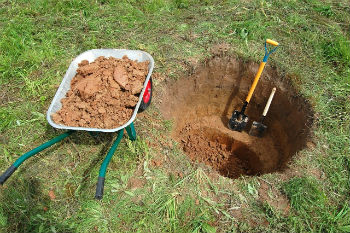
- Determine the location of the well.
- We start digging a pit
- We constantly go deep until we reach the calculated depth.
- We form the bottom of the well from peeled pebbles.
- With the help of winches and special devices, we mount concrete rings. We carry out installation in turn.
- We close the joints between the rings, adjust their position.
- We fall asleep openings between the edge of the pit and the rings.
- We tamp the soil.
- We mount the cover on the well.
- We rinse the source until it is filled with clean and fresh water.
As you can see, it is quite easy to work on this principle. A hole for a well can be dug of any size. This greatly simplifies the work of the diggers themselves.
No stone, cobblestone or layer will interfere with you. The soil and all excess is removed from the well with the help of a winch.
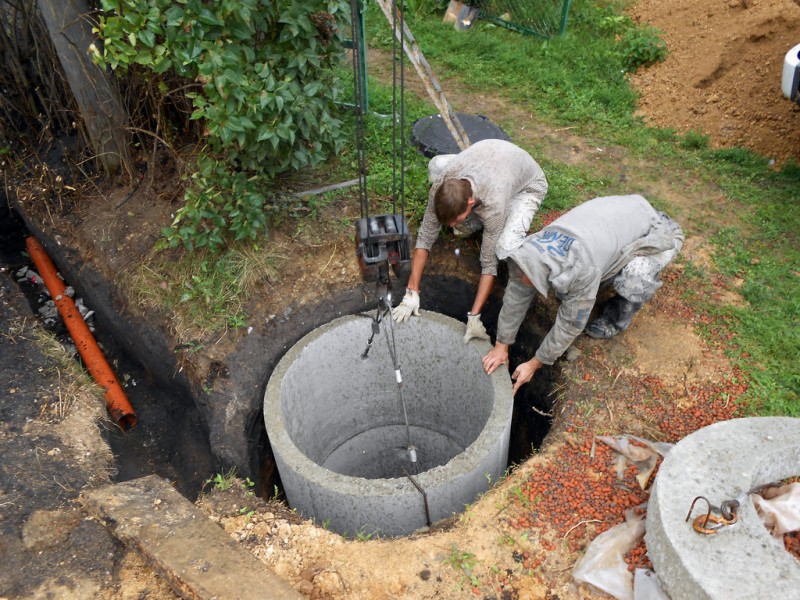
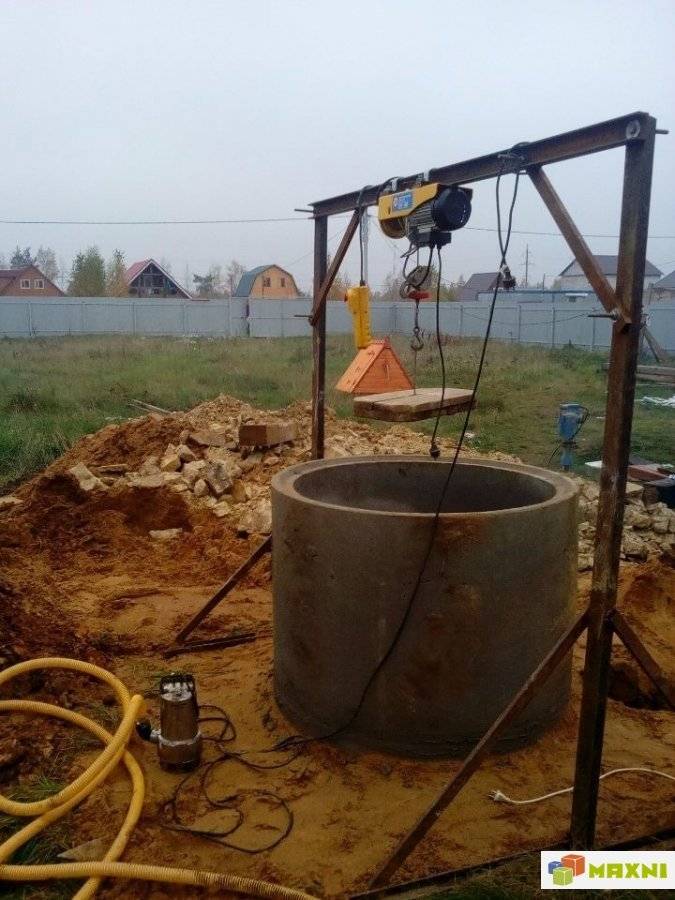
Once developed enough depth is taken for bottom formation. Then the rings are lowered into the pit with the help of tilting and mechanical equipment and their position is corrected. The rings are mounted one by one until the work is completely completed. The latter should rise above ground level by 70-100 cm.
Among the disadvantages of this method, one can note its increased labor intensity, the need to use a winch, etc.
Plus, it is worth noting that the pit under the well can be in the open position for several days. On the third or fourth day, it will begin to crumble. You cannot work in such conditions.
2.2 Closed development
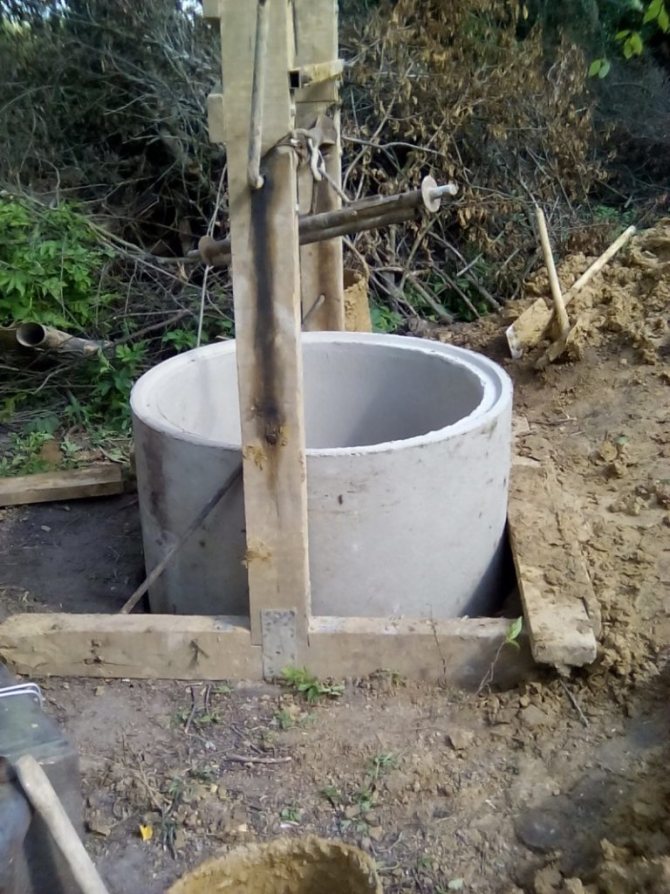
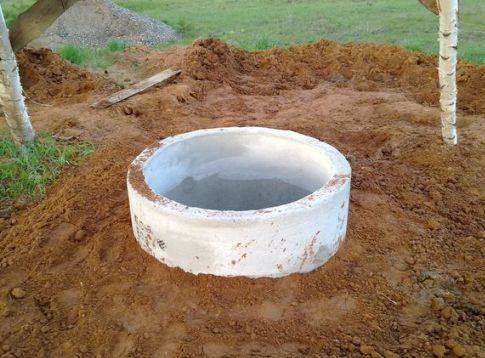
This method differs in that the digging is carried out according to a slightly different algorithm.First, a small but very accurate pit is dug out, into which the first concrete ring is immediately lowered. Then the well is dug.
When the level drops, the ring will sink under its own weight, and then the next element of the mine will also be mounted on it. Thus, the structure will sink under its own weight, which allows us to develop a well with virtually no tools.
Development of soil for the formation of a well in a closed way
Directly for work, you only need a crowbar, a shovel, a pick and a few people.
Stages of work:
- Determine the location of the well
- We measure the circumference, which almost exactly corresponds to the outer diameter of the casing.
- Upon reaching a depth of 1-1.5 m, we lower the first ring and mount it in the correct position.
- We dig a pit for another 1-1.5 meters. We drop the next ring.
- We continue to work until we reach the desired depth.
- We are engaged in the preparation and installation of the bottom of the mine.
- We seal all the joints.
- We wash the mine and prepare it for use.
- Install the well cover.
As you can see, this technology is easier to work with. Even breeds you will have to take out less. However, it should be understood that when faced with obstacles (large boulders, floaters, etc.), much more serious problems await you.
To remove even an ordinary cobblestone from the ground, when a concrete structure limits you from all sides, is not an easy task.
Also, when working on a closed technology, it is very important to be accurate in the calculations and take into account all possible nuances.
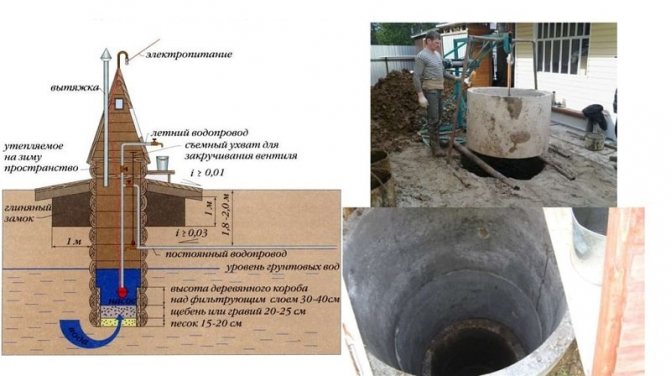
Type and structure
If you have decided on a place, it remains to choose which one you will make your mine. You can only dig a shaft well, and the Abyssinian can be drilled.The technique here is completely different, so further we will talk about the mine well.
Type of well shaft
The most common today is a well made of concrete rings. Common - because it's the easiest way. But it has serious drawbacks: the joints are not airtight at all and through them rain, melt water enters the water, and with it what is dissolved in it, and what is drowned.
Lack of a well made of rings and logs
Of course, they try to seal the joints of the rings, but those methods that will be effective cannot be applied: the water must be at least suitable for irrigation. And just covering the joints with a solution is very short and inefficient. The cracks are constantly growing, and then not only rain or melt water enters through them, but also animals, insects, worms, etc.
There are lock rings. Between them, they say, you can lay rubber gaskets that will ensure tightness. There are rings with locks, but they are more expensive. But gaskets are practically not found, like wells with them.
The log shaft suffers from the same “disease”, only there are even more cracks. Yes, that's what our grandfathers did. But they, firstly, had no other way, and secondly, they did not use so much chemistry in the fields.
From this point of view, a monolithic concrete shaft is better. It is cast right on the spot, putting a removable formwork. They poured out the ring, buried it, put the formwork again, stuck the reinforcement, poured another one. We waited until the concrete "grabbed", again removed the formwork, digging.
Removable formwork for a monolithic concrete well
The process is very slow. This is the main drawback. Otherwise, only pluses. First, it turns out very cheap. The cost is only for two galvanized sheets, and then for cement, sand, water (proportions 1: 3: 0.6).It is much cheaper than rings. Second, it's sealed. No seams. Filling goes about once a day and because of the uneven upper edge, it turns out to be almost a monolith. Just before pouring the next ring, scrape off the risen and almost set cement laitance (gray dense film) from the surface.
How to identify an aquifer
According to the technology, the soil is taken out inside the ring and under it. As a result, under its weight, it settles. Here is the soil that you take out and will serve as a guide.
As a rule, water lies between two water-resistant layers. Most often it is clay or limestone. The aquifer is usually sand. It can be small, like a sea, or large interspersed with small pebbles. Often there are several such layers. As the sand has gone, it means that water will soon appear. As it appeared at the bottom, it is necessary to dig for some more time, taking out the already wet soil. If the water comes actively, you can stop there. The aquifer may not be too large, so there is a risk of passing through it. Then you have to dig until the next one. Deeper water will be cleaner, but how much deeper is unknown.
Next, the well is pumped - a submersible pump is thrown in and water is pumped out. This cleans it, deepening it a little, and also determines its debit. If the speed of the arrival of water suits you, you can stop there. If not enough, you need to quickly pass this layer. With the pump running, they continue to take out the soil until they pass this layer. Then they dig to the next water carrier.
Bottom filter in the well
Bottom filter device for a well
If you are satisfied with the speed of the arriving water and its quality, you can make a bottom filter. These are three layers of cameos of different fractions, which are laid at the bottom.They are needed so that as little silt and sand as possible get into the water. In order for the bottom filter for the well to work, it is necessary to lay out the stones correctly:
- Large stones are placed at the very bottom. These should be fairly large boulders. But in order not to take much of the height of the water column, use a flatter shape. Spread at least in two rows, and do not try to keep them close, but with gaps.
- The middle fraction is poured in a layer of 10-20 cm. The dimensions are such that stones or pebbles do not fall into the gaps between the bottom layer.
- The top, smallest layer. Pebbles or stones of small size with a layer of 10-15 cm. Sand will settle in them.
With this arrangement of fractions, the water will be cleaner: first, the largest inclusions settle on large stones, then, as you move up, smaller ones.
Selection of pumping equipment
Scheme of water supply to the house
As you know, all types of pumps are divided into two types:
1 Surface: they have only a suction pipe in the water; such units are able to lift it only from a depth of up to 10.3 m; it is to such a height that water can rise through the tube, pushed out by atmospheric pressure into the tube; in practice, due to friction losses and fluctuations in atmospheric pressure, this parameter decreases and equals 5-7 m; mechanisms with ejectors (water flow accelerators) can lift water from greater depths, but their efficiency is too low.
2 Submersible: the entire mechanism is completely lowered into the liquid, which allows you to deliver water from a great depth; since such units do not expend suction power, there is no loss of suction; their efficiency is much higher than superficial ones.


Thus, it is desirable to pump water for a summer residence from deep wells with pumping stations equipped with submersible pumps. It remains only to determine their power and performance. It is necessary to take into account not only the needs of the family, but also the flow of water in the well itself. Otherwise, it may turn out that a too powerful unit will run idle.
Please also note that the overall efficiency of the system will depend not only on the power of the unit, but also on the number of turns and narrowing of the water supply. With a small influx of water, it makes sense to purchase a low-power pump, while equipping a storage tank from which water will be supplied to the house to the taps.
Another important parameter for the pump is the pressure force, that is, the ability to transfer (move) the pumped water further through the pipes. This parameter is directly related to the working pressure. That is, for 10 m of a vertically located pipe there is a pressure of 1 atmosphere.
How to make beautiful and unusual wall shelves with your own hands: for flowers, books, TV, kitchen or garage (100+ Photo Ideas & Videos) + Reviews
Materials for the construction of wells
In the private sector, the following materials are used to form a well shaft:
Wood. The log cabin is immersed in the shaft, creating the necessary support for the walls. Water seeps through the gaps and the bottom. The lower part is made of beech, bog oak, ash, elm. These rocks do not emit tannins or resinous substances. The upper crowns are made of pine, larch, cedar. They are not afraid of moisture, do not rot, but are rich in resin.
Natural stone or brick. Wells made of these materials are durable and strong. The construction of mines is long and laborious, but the water in them is clean, without impurities.
Concrete. The barrel is mounted from prefabricated rings or made from a monolith
In the first case, special attention should be paid to sealing the joints, otherwise contaminated surface drains will enter the well.
The top of the structure is protected from precipitation, dust and animals by well houses with a lid. They are made of wood, stone, concrete. Lined with decorative materials.
How do you know when to stop digging?
According to the technology, the soil is removed inside the ring and under it. Because of what he settles under his own weight. The soil that is taken out and will be a guide. Usually water is located between two water-resistant layers. Often it is clay or limestone.
The aquifer is usually sand. It can be either small, like the sea, or large interspersed with small pebbles. Most often there are several such layers. As soon as the sand goes, it means that you need to expect water soon. As soon as it appears at the bottom, you need to dig for some more time, taking out the already wet soil.
In the event that there is a strong influx of water, you can stop. The aquifer is not very large, as there is a chance to pass through it. In this case, you will have to dig until the next one. The deeper, the cleaner the water will be, but how much deeper, no one can say for sure.
After that, the well is pumped - they throw in a submersible pump and pump out water. Thus, it is cleaned, deepening a little, and besides this, its debit is determined. If you are satisfied with the speed at which the water arrives, you can stop there. If not, you need to quickly go through this layer. The soil continues to be washed out with a running pump until this layer is passed. Then they dig to the next aquifer.
If you are satisfied with the incoming water and its quality, you can build a bottom filter. It consists of three layers of stones of different fractions, which are laid on the bottom. This is necessary so that as little silt and sand as possible enter the water. For such a filter to work, you need to correctly lay out the stones:
- The largest stones are placed at the very bottom. These are fairly large boulders. But in order not to take the height of the water column too much, it is better to use the most flat stones. They need to be laid out in two layers, while it is not necessary to lay them close, but with small gaps.
- The middle fraction is poured in a layer of 10-20 cm. Their dimensions should be such that pebbles or stones do not fall into the gaps of the lower layer.
- The topmost, smallest layer. Pebbles and small stones in a layer of 10-15 cm. They are necessary for sand to settle.
With such an embankment of fractions, the water will be cleaner: at first, the largest inclusions settle on large stones, as they move up, smaller and smaller.
Types of wells
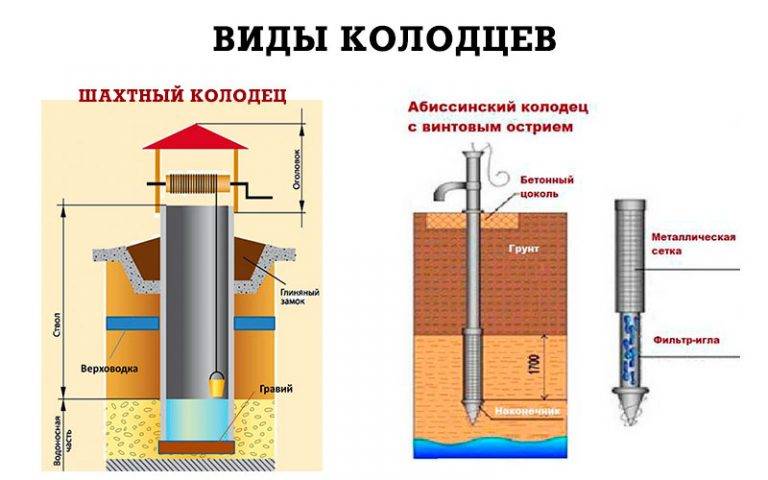
Mine and Abyssinian wells
The choice of the type of well depends on the depth of the aquifer and the type of soil:
- key: used infrequently when underground sources (keys) come close to the surface; a hole sunk 10-20 cm into the ground is covered with rubble, then a log house is prepared with a hole to drain excess water
- mine: the most common, used when aquifers occur at a depth of 5-25 m; consists of a trunk, a water intake in the lower part, which is under water, and a head (above-ground part)
- Abyssinian (tubular): unlike the well, it is less deep and has a smaller casing diameter; plus the pumps it uses are not submersible, but ground (often manual); such a structure is inexpensive, however, its service life is short; plus in winter, when groundwater goes deep into their extraction, it can be difficult
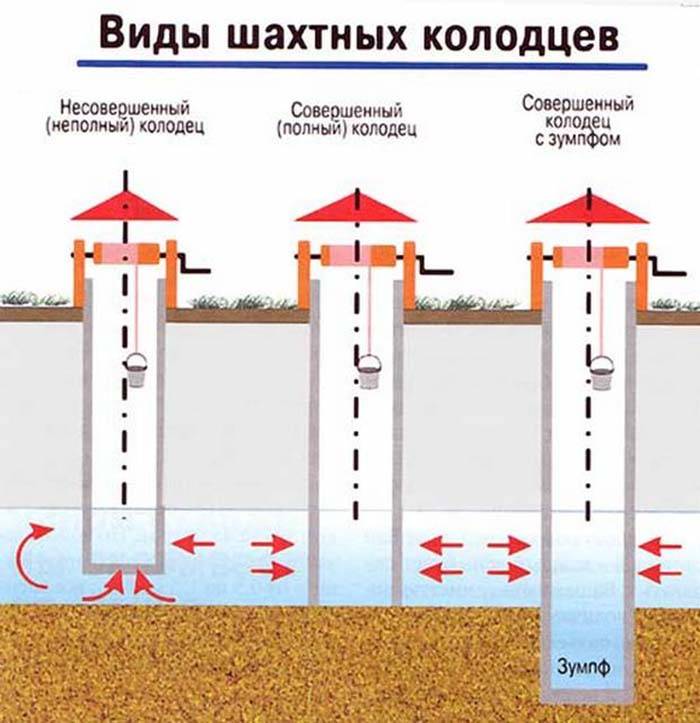
Types of mine structures
Log shaft wells according to the type of the lower (water intake) part, in turn, are divided into three more groups:
- with an imperfect (incomplete) water intake: its lower part does not reach the bottom of the water reservoir, so the liquid seeps through the bottom or walls; this option is more often chosen when building a well with your own hands; the volume of water in it is quite enough for watering and meeting the needs of the family
- with a perfect water intake: it is located at the very bottom of the aquifer; such structures for private homes are rarely used, because if water supplies exceed the usual expenses of the family, the water in it will quickly deteriorate and silt
- with a perfect water intake, supplemented by a sump - a recess in the underlying rock to create a water reserve

Water filter for the country house: flow, main and other filters (Photo & Video) + Reviews
Commissioning
As soon as a new well is dug by hand, a clay castle is built to prevent surface water from penetrating. It is very good to equip a concrete blind area. The first water from the well is pumped out repeatedly until it goes clear.
Waterproofing
Well waterproofing is an important final step. If the well was arranged with the initial digging of the earth, it is easier to perform. The easiest thing is to coat with bituminous mastic to the middle of the second ring.
Well waterproofing process:
Wall cleaning and internal sealing of seams
Wall cleaning works are carried out as follows:
- Water is pumped out several times.
- They descend into the well and clean the rings of dirt and mucus with a metal brush or other device; they disinfect the well.
Where to dig a well?
Proper choice of location is a determining factor in the constant and proper functioning of the well. Groundwater should not lie too high (leads to their drying up during a drought) and not very deep (drilling too deep a mine is impractical). There are several ways to determine the location of groundwater:
- drilling exploration,
- terrain assessment,
- meteorological method.
An effective way is to drill a test well. The work can be done independently using a hand drill. The depth of the well must be at least 10 m. Moreover, even for this method, the drilling site should be determined. For this, other methods are used as auxiliary ones.
The terrain is studied by the nature of depressions, hollows, lowlands. It is under them that groundwater rises to its maximum height. The meteorological method is used in hot weather. In the evening, places with wet ground are determined, since water passing especially close causes fog to fall on the ground.
Deepening using repair rings
Step 1. In the same way as in the previous version, the required inventory is being prepared. These are shovels, a ladder, flashlights, a winch is being installed to excavate excess land. If there is water in the well, then an electric or manual pump will come in handy to remove it.The required materials are also purchased - reinforcing brackets and metal plates, anchors, sealants to ensure the reliability of the seams, repair rings. The diameter of the rings used must be smaller than the diameter of the ring elements used in the construction of the shaft itself. The products themselves should be inspected for flaws and damage that may interfere with the intended work.
Fastening rings with staples
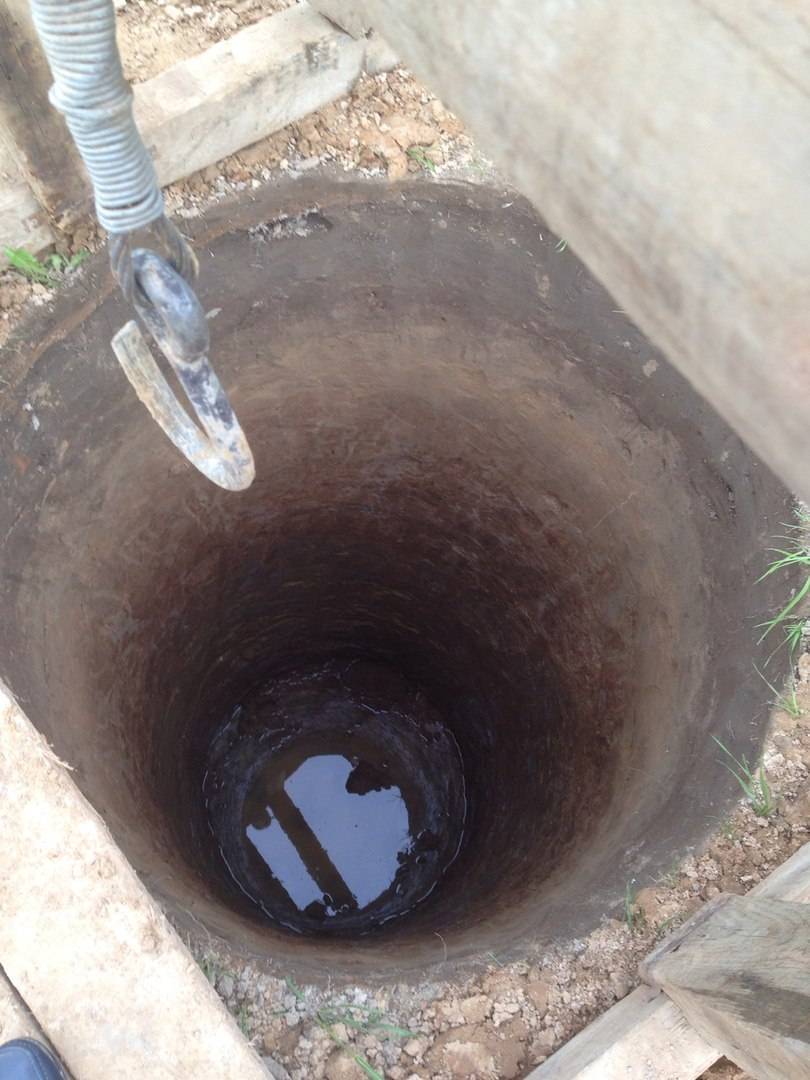
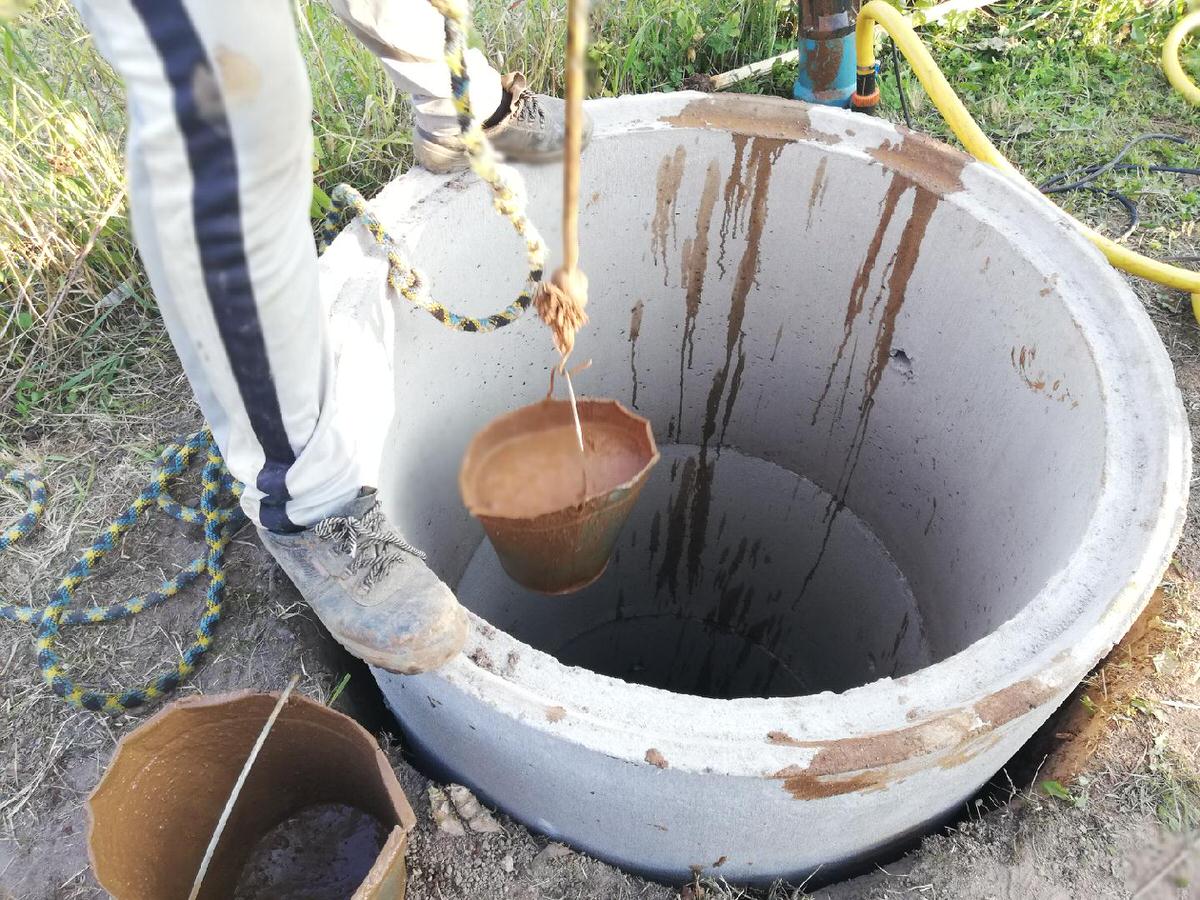
Step 2. Remaining water is pumped out from the bottom of the well, if any.
Pumping water from the bottom of a well
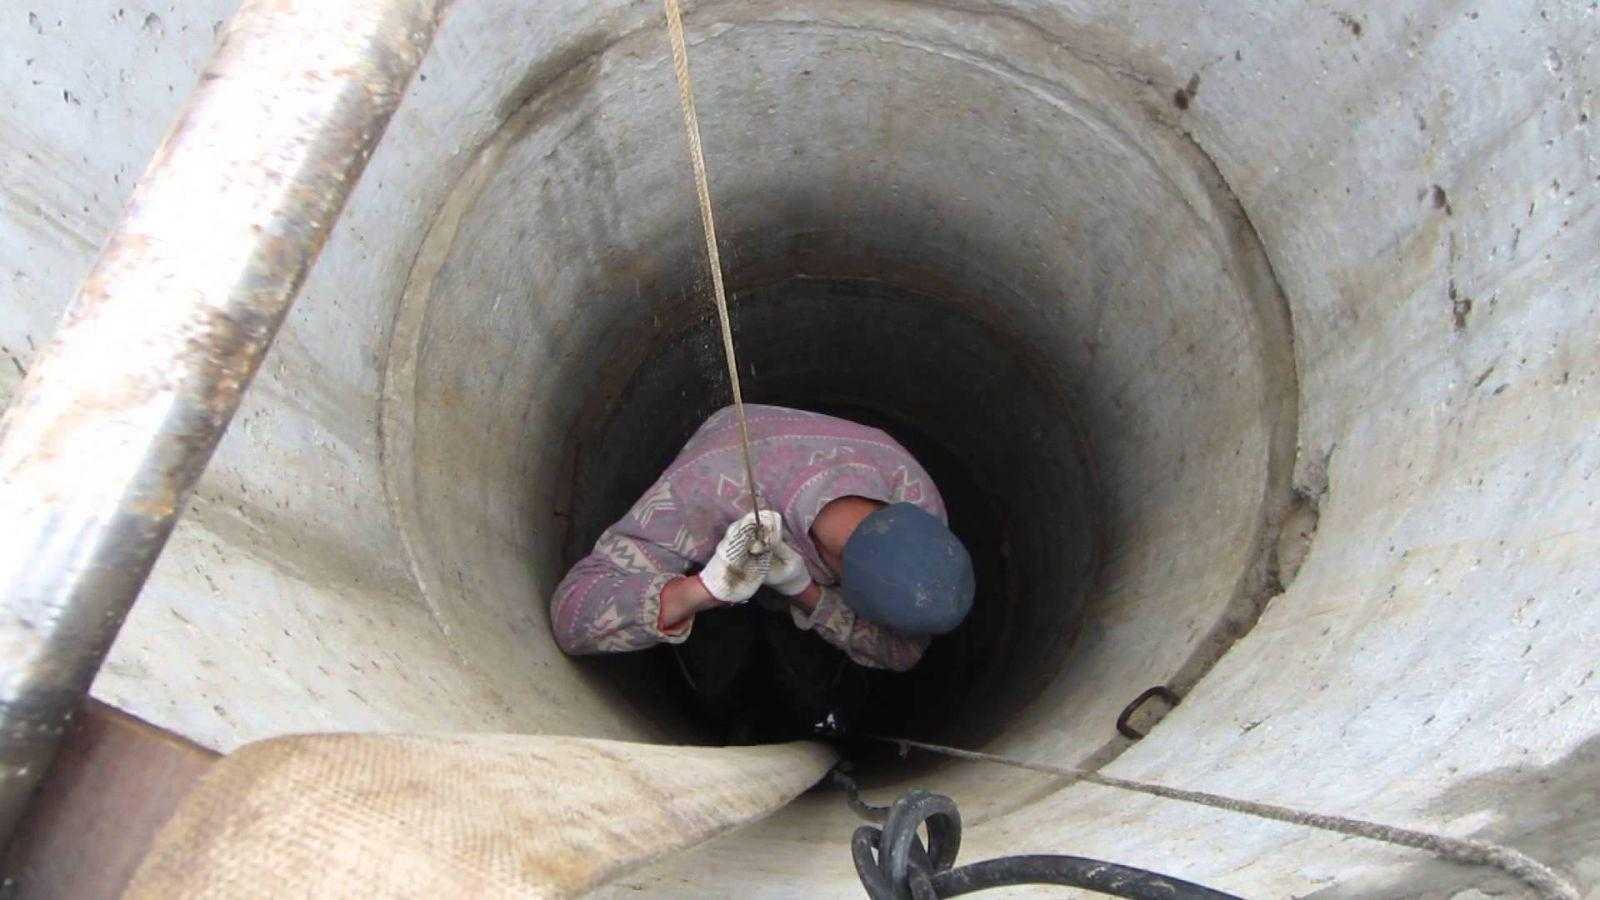
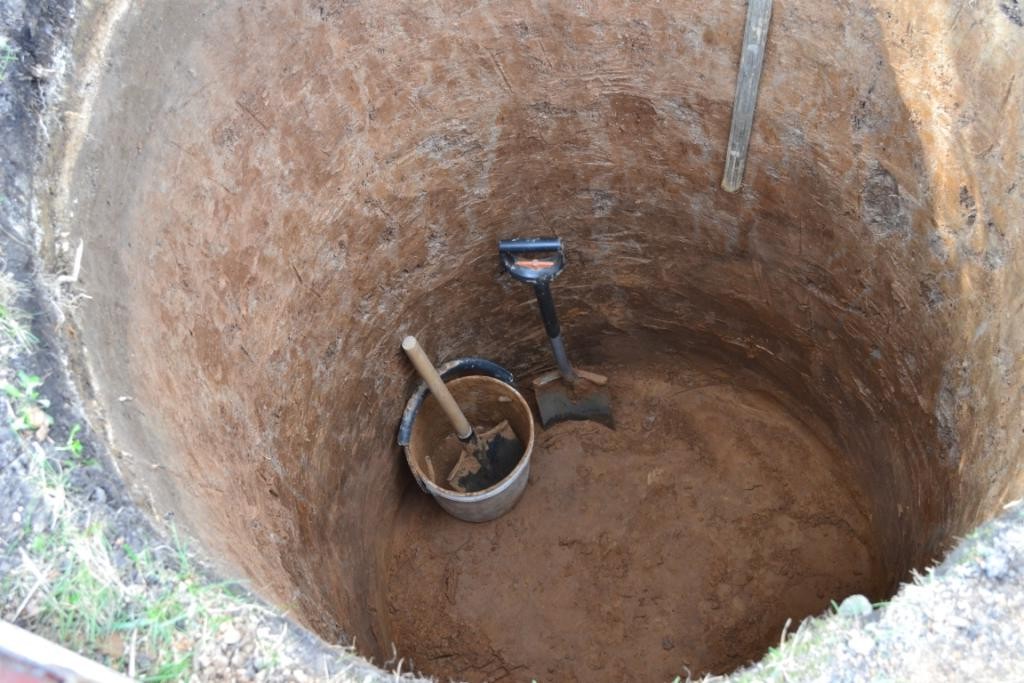
Step 3. Next, the filter and soil are excavated from the bottom of the shaft. A person goes down and fills a bucket with earth, which then goes up. Digging is carried out from the center of the shaft towards its edges. The work ends when the walls gradually begin to crumble.
Excavation
Step 4. A new empty bucket is lowered to the person below, and the soil from the old one is poured into a wheelbarrow, on which it is then taken out of the site.


The excavated soil is poured into a wheelbarrow
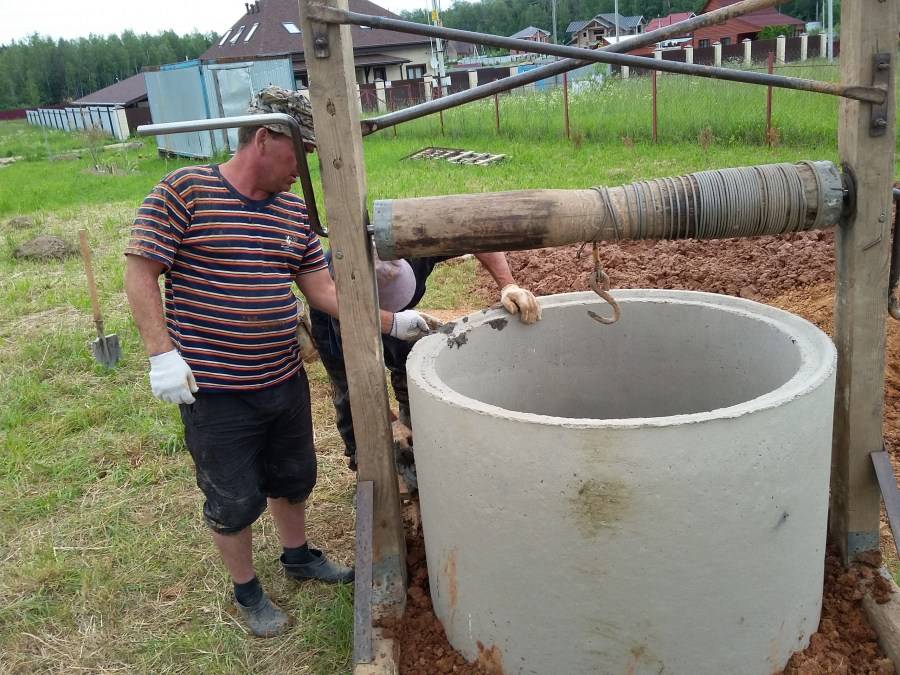
Step 5. As soon as the lower part of the well is prepared, the repair ring is lowered down. There should not be a person at the bottom of the well! The ring, by the efforts of several people, is dragged to the place of work, and then it is hooked to the winch by the hook so that it does not warp during lowering.
The repair ring is dragged to the well
The repair ring is lowered
Step 6. The ring attached to the winch is gently lowered down.
You need to carefully lower the ring
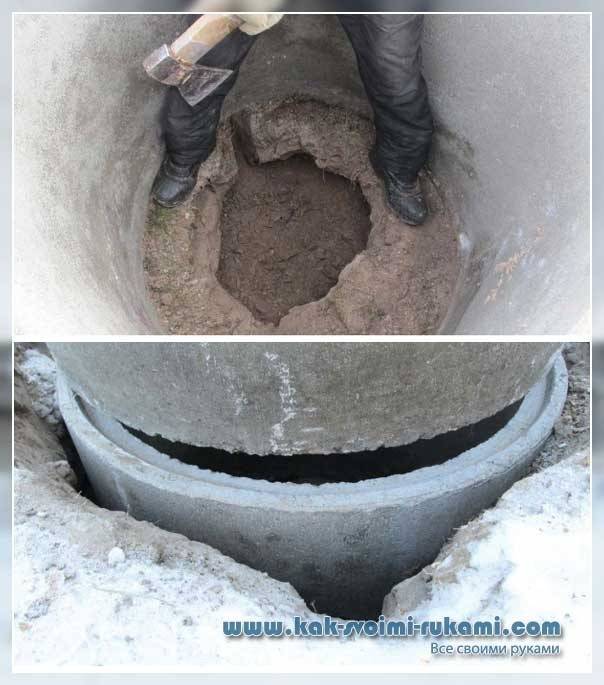
Step 7. The ring is installed on the place prepared for it at the bottom. It is fixed to the main shaft with metal staples, the seams are carefully sealed.At the bottom, a traditional bottom filter is formed from gravel, sand, crushed stone. The work has been completed.
Repair ring installed
Video - Maintenance and operation of the well
Deepening a well is not as easy as it seems. This work is not easy and carries some kind of danger. She does not tolerate haste and requires a very careful and attentive attitude.
Fastening rings with staples
Deepening the well with rings
Concrete rings for a well
Repair ring installed
You need to carefully lower the ring
The repair ring is lowered
The repair ring is dragged to the well
The excavated soil is poured into a wheelbarrow
Excavation
Pumping water from the bottom of a well
The space around the well is smeared with clay
At the end, you need to cover with clay
The remaining voids are filled with soil.
Installation of the well cover
Lower the ring carefully
The ring is attached to the winch
A new ring is placed on top
The well sank to the required depth
The soil is lifted by a winch
Excavation from the bottom of the well
Pumping water from a well
Preparing everything you need
Well cleaning
Deepening and digging wells
There are many reasons for deepening a well.
Plastic deepening pipes wells
Deepening the well with rings of smaller diameter
In the photo - the deepening of the well on a suburban area
How to deepen a well
Well deepening
Filter Depth Enhancement
Demolition of old walls
Wall extension
Settling with weights
Installation of repair rings
Well creation
Undermining
Commissioning
If you think you dug a well and ended up with it, not at all. You still have a series of daily exercises to do. Here they can be done with your own hands, without the involvement of help.First you need to waterproof the walls from the outside, then - clean and wash the walls from the inside and pump out water - clean the well.


After the well is dug, the rings settle for a couple of days, take their places. At this time, nothing needs to be done inside, but you can do external waterproofing.
Waterproofing
If the well was made according to the second method - first they dug a mine, then they put rings - this stage is a little easier. You will need to widen the gap slightly to make the waterproofing. If the rings were installed immediately, you will have to dig a decent ditch around. At least - to the middle of the second ring. When the soil was removed, proceed to the waterproofing.
It is best to use a coating. You can - bituminous mastic, you can - other compounds. In principle, it is possible to fuse or stick rolled waterproofing, in the most extreme case, wrap it with a film. The film is the cheapest, but it will serve no more than two years, and then on the condition of buying an expensive and reinforced
Waterproofing over which insulation is laid (foam shell)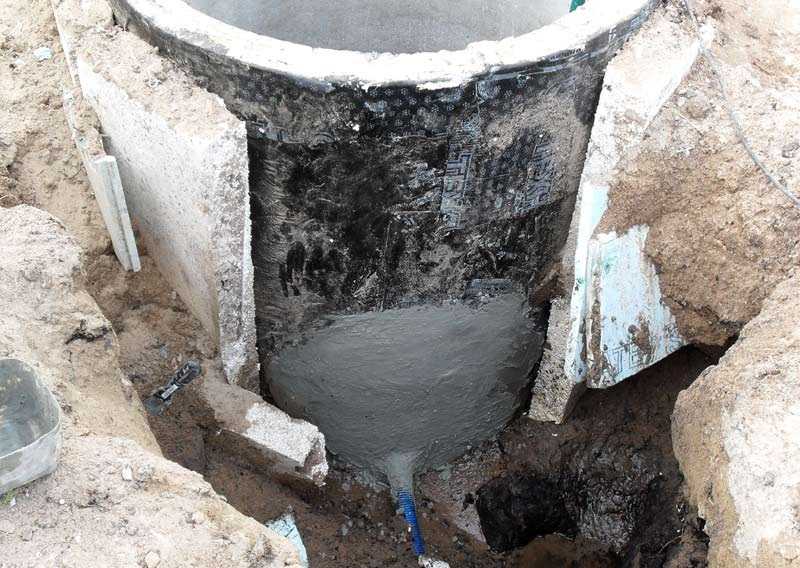
Since you still dug a well, insulate it. Let while you do not appear at the dacha in winter, but maybe later you will come and the cold. So take care of the availability of water in advance.
Wall cleaning and internal sealing of seams
A couple of days after the well was dug and the “glass sat down”, you go down inside with a broom, sweep the walls. Then you wash the walls: pour them over, sweep with a clean broom. Pour again, then - with a broom. The water was pumped out, drained away. The next day the procedure was repeated. So - five-seven-ten days. Until the inside and the water are clear.
One more moment. Not all teams immediately coat the joints of the rings.Then, after the first cleaning, you need to coat the joints with a solution (cement:sand in a ratio of 1:3). To improve the effect, you can add PVA or liquid glass (instead of some part of the water, or dilute the PVA with water). It is also desirable to insure against horizontal shifts of the rings. Especially if they don't have locks. To do this, adjacent rings are fastened with metal plates that are attached to the anchor. This measure is strictly necessary on unstable loose or heavily heaving soils.
Connection of rings with metal (preferably stainless steel) plates
After the walls are washed, the water is pumped several times, you can use the water. But in order for nothing to attack inside, it is necessary to close it.
For some features of digging wells and cleaning it, see the video.
How to dig a well for water supply: a detailed analysis of two basic technologies
The well is quite reasonably recognized as the optimal source for organizing autonomous water supply. Its most attractive quality is rightfully considered a debit that exceeds all available options. The well does not silt up and does not require regular use like a well. The owners of suburban property may not visit the property for a long time, and the water supply will not decrease and the quality will not suffer at all. It can be cleaned without any problems. Even a home “digger” will be able to dig a well with his own hands if he has patience, at least one assistant and information about the rules for constructing a water supply source.
Well digging process
Let's get down to the actual construction work. All work is done entirely by hand, while not forgetting about safety.
The video in this article will show the entire process of doing the work.
First option
This is how you can do the work if your soil wakes up and you cannot immediately make holes in full size.
So:
- At the location of the future well, we mark up in such a way that the diameter of the well exceeds by 10 cm the diameter of the concrete rings used. The hole is dug to a depth that allows the first ring not to sink completely. 8-10 cm should remain above the ground;
- On a trolley, the height of which is also 8-10 cm, the concrete ring is brought to the shaft and lowered vertically. Do not distort the ring, as this will affect the quality of the entire structure. Then we place the next concrete ring, fastening with three brackets;
- In the center we make a hole deeper by 80 cm. Then the hole needs to be dug round so that the concrete ring sinks into the ground through its gravity. If the earth is soft, then it is removed first in the center of the ring, if the earth is hard, then it is removed first under the ring itself, so that nothing prevents it from lowering. Then, when the ring descends and settles, they take out the earth in the center;
- Docking of concrete rings is ensured by tightness by laying a pitched hemp rope, which is then treated with a solution based on cement and sand. We lower the rings into the shaft until water appears at the bottom of the well. The appeared water with sand is taken out from the well mine. The well will be filled with water within 12 hours;
- The next day it is necessary to remove the water from the well again. Cleaning is carried out until the water is completely purified. Then the well is covered and not touched during the day;
- After that, water with sand is pumped out again, filtering gravel or crushed stone is placed on the bottom of the well.First, 10-15 cm of fine fraction, then 30-40 cm of larger gravel. The allowable level of well water is 1.5 meters. It's more than one concrete ring;
- The distance between the walls of the pit and the well shaft must be covered with a mixture of gravel and sand, fixed on the surface of the earth with clay and covered with sand. Clay will not allow rainwater to enter the well, as well as thawed snow in the winter.
Second option
This kind of work is perfect for soil that does not wake up and you can do the work with an open method:
First, we make a hole in the ground. It should be larger than the ring by about 50 cm in diameter;
Now you should bring the second ring and lower it into the pit. For this, it is best to use a crane. This is the least secure. Although some make block structures and use them to do this work
But in their manufacture, special attention should be paid to quiet reliability. After all, the ring does not weigh so little;
Application of blocks for lowering the ring
l>
How to dig wells in winter
Digging a well in winter
The instruction indicates that sometimes, for a number of reasons, it is better to dig a well in winter.
Reasons for this may be:
- The lowest level of groundwater means that it will not dry out in summer.
- In winter, it is easier to find labor.
- The cost of building materials and the rings themselves is much lower.
The disadvantages of this may be:
- Clearing the road from snow for the delivery of goods.
- Providing builders with warm housing.
It is known that in winter the ground freezes by about one meter, which is not very difficult to warm up or beat off with hammers.
The subsequent actions are the same as in other seasons. The shaft can be deepened three rings lower, which will make it possible to use water all year round, and a newly dug well can be used already in the spring.
Seam sealing
After installing the rings, it is necessary to seal the seams. This is necessary so that the upper sewage does not penetrate into the well.
Making seam seals
So:
- We make cement mortar. It consists of sand and cement. For M300 we use the proportion 1/3;
- We cover the seam from the inside of the ring with a spatula;
- After complete solidification, some recommend treating the coating with liquid glass.
Now you see that the price of drinking water in the house is not so big. The most important thing is to follow the rules for doing the job.
How to dig a well with your own hands?
To build a shaft well, you must follow a certain technology, which should not present great difficulties for you.
If we consider the structure from top to bottom in section, then the well consists of:
- head - the upper above-ground part;
- mines - well shaft;
- water intake - the lower part of the mine with water.
At the bottom, it is necessary to arrange a bottom filter, consisting of crushed stone or gravel in three layers - the lower one 10 cm thick (fine fraction), the middle one 15 cm (fractions 7 times larger) and the upper one of the same thickness with even larger fractions.
The mine itself can be made of wood, brick, stone (natural), concrete. We will take a closer look at the last option of concrete rings, as the most durable and simple, meeting all sanitary standards.
You will need to buy the necessary materials in advance, namely concrete rings, sand and gravel for the filter device, staples for fastening the rings together, as well as liquid glass and cement for sealing the joints between the rings.
You will have to dig to a depth that is on average 10-20 m, i.e. to the water. It all depends on the depth of groundwater. Moreover, when we have already reached the water, it is still necessary to go deeper by 1-1.5 m. This is necessary in order to form a supply of water if there is a large consumption of it. And in order for the water not to interfere with your digging, you need to install a drainage pump at the bottom, which will pump it out.

When the mine is dug out, it is possible to start arranging the well, namely, the installation of concrete rings. They are placed on top of each other (thorn in the groove), fastened together with brackets, and the joints are covered with mortar.

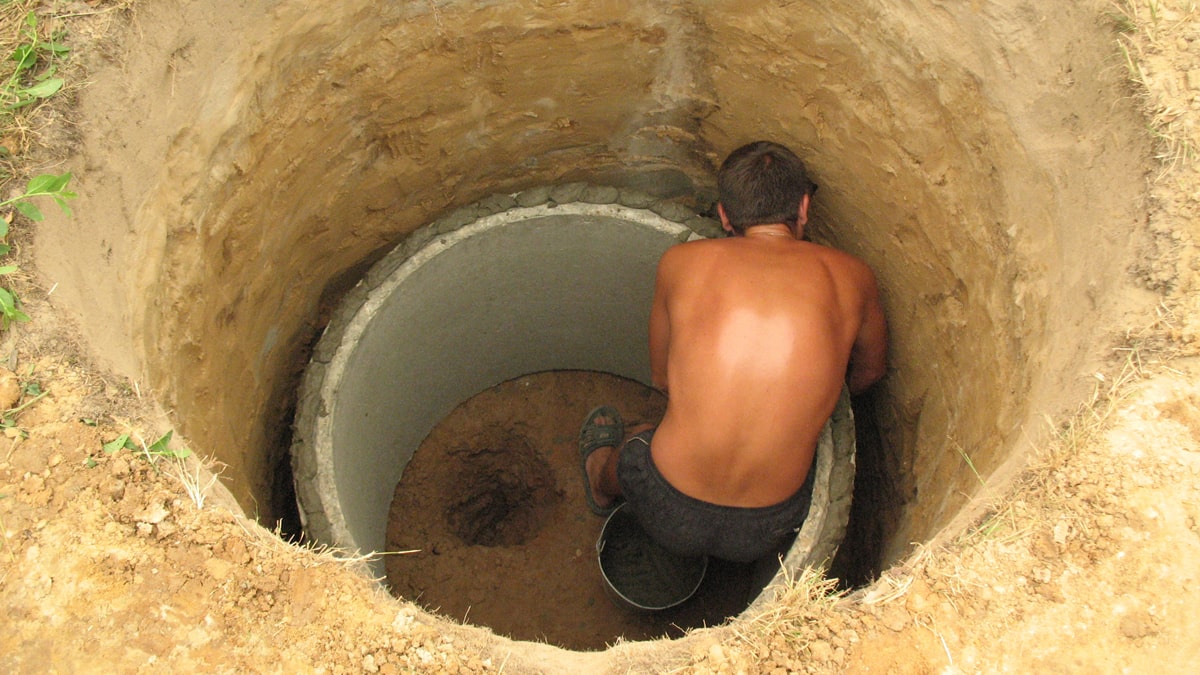


It should be understood that you can first dig a mine, and then install the rings, only if the soil does not collapse. If the soils are loose, it is better to do this: install the ring, dig inside it, and under its own weight it will fall. Thus, you will immediately exclude the shedding of soil, which will be held back by the outer walls of the rings, and also protect people working in the mine, i.e. myself.
Using the technology of gradual build-up of rings, you will reach the aquifer. This method can be used for all types of soils, it is also the most convenient and optimal.
It is also worth knowing that if the soil is soft, it is taken out from the middle to the edges, and if it is hard, then vice versa. The joints of concrete rings, which are located in the water, cannot be covered with cement mortar. For these purposes, it is better to use tarred hemp.
As you can see, the technology of digging a well is not so complicated, the main thing in this matter is to try to maintain the strictly vertical orientation of the mine as much as possible and reliably seal the joints between the concrete rings.
A short video about digging a well:
38_llXsoZWg
Source Care
Wells are subject to high sanitary requirements, and in it, and around it, it must always be clean. Animals should not approach the source of drinking water at least in a three-meter zone, but it is better to make a reliable barrier for them along the perimeter at a distance of 6 m.
Prevent leaves from trees, insects, frogs, beetles, rain, snow and dust, etc. from entering the open well. for which it should be equipped with a tight cover. It can be made from different materials, the main thing is that dust and water cannot pass through it.
Water should be brought to the surface with one public bucket, which must be fixed inside the well. It is advisable to close it on top with a stainless steel mesh so that animals do not drink from it. A preventive inspection and cleaning of the well should be carried out 2-4 times a year.
A source of clean drinking water in a suburban area is not a whim, but a vital necessity, especially when it is not possible to use the central water supply. You can dig a well yourself, or you can hire a team of workers for this, while it is necessary to observe safety precautions during work (see also the article "Reinforced concrete sewer wells: features of construction and operation").
In the presented video in this article you will find additional information on this topic.
More from my site
- How to dig a well in the country - useful tips
- How to equip a well: materials, methods, devices
- How to dig a well: tips, features, step by step guide
- Dig a well - ten steps to make your dream come true
- How to dig a well with your own hands: a guide from "a" to "z"
- How to dig a well - recommendations from personal experience
Stage three. Well construction
Well construction
We’ll make a reservation right away that it won’t work out alone - you need at least one more person.
One of the workers (let's call him a "cutter") starts digging the earth in a selected place along the diameter of the ring
To destroy heavy soil, he uses crowbar, stones that come across on the way are also removed.
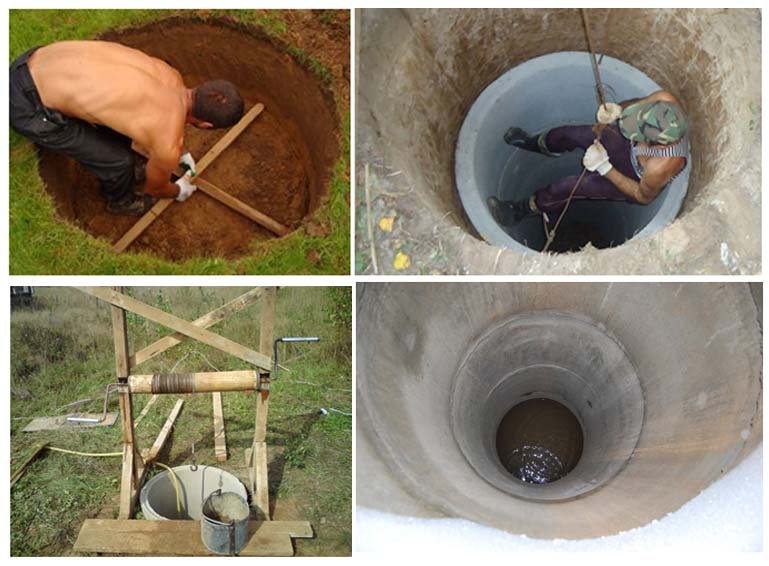
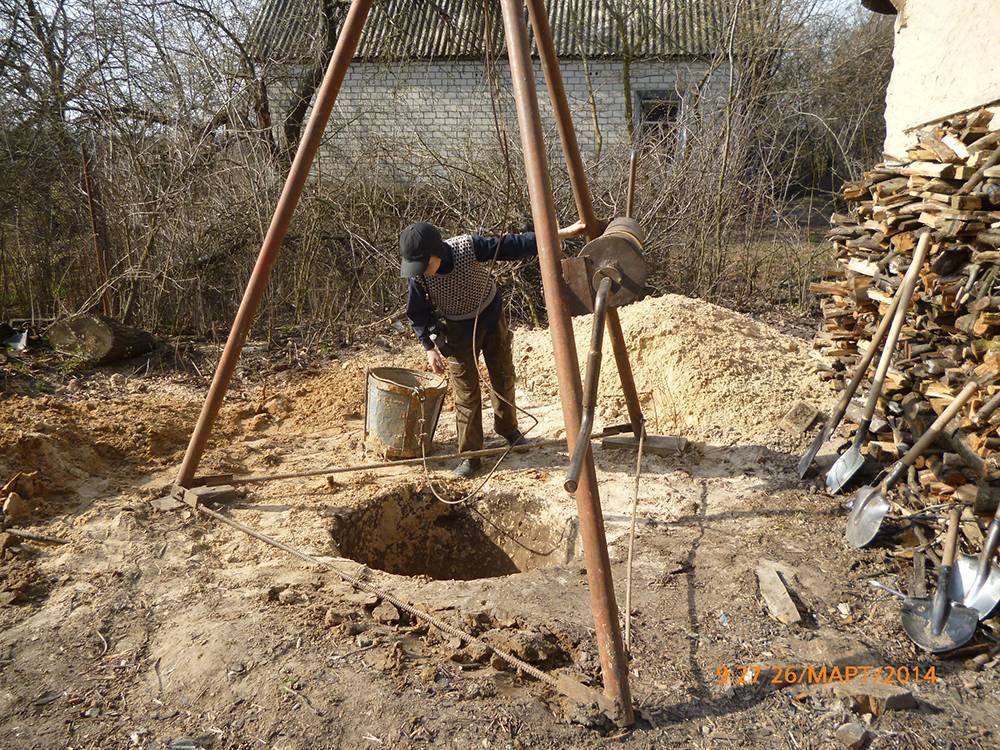
The second person at this time is near the mouth of the mine and raises the selected stones and soil to the surface with the help of a tripod, winch and bucket.
It is recommended to get a third assistant, who will replace the "cutter", say, every half an hour.
It is important that the “cutter” is provided with the most comfortable working environment. To do this, the mine must be ventilated - with a mechanized pumping device or with an ordinary umbrella.
We perform all actions in this sequence.
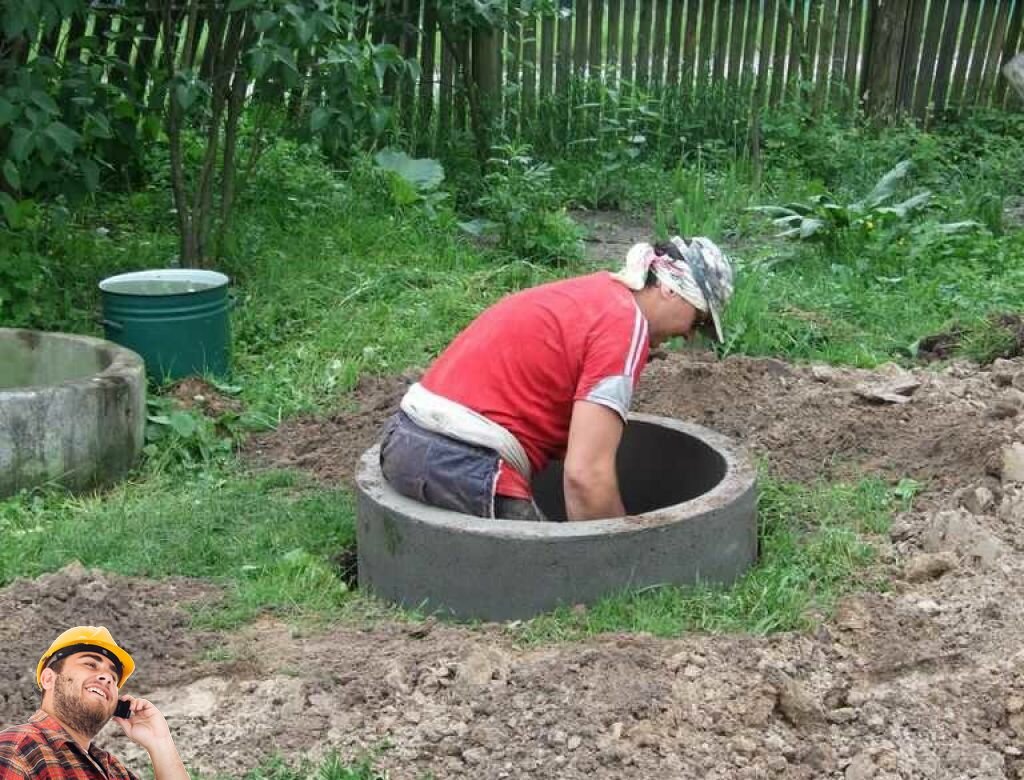
Step 1. We lay the first concrete ring in place of the future mine. The “cutter” digs the walls of the ring, as it deepens, it sinks deeper and deeper. It is advisable to use a product with pins or cone-shaped points for the first ring in order to facilitate downward movement.
Installation of concrete rings
Step 2. After the top edge of the ring reaches the same level with the ground, put another one on top and continue to work. The weight of each ring is approximately 600-700 kg.
Step 3. Two people are enough to roll the ring to the place of work.But if it is possible to use a crane, then it is better not to neglect it, because with the help of such special equipment, you can more accurately lower the ring onto the seat.
If the soil is dry and strong, then you can go deep by 2-3 meters, and after that, using a crane, install several rings in a row.
Digging a well Digging a well Digging a well
Step 4. Similarly, we continue the procedure until the aquifer is reached. As practice shows, for a standard work shift (8 hours), 3 concrete rings can be laid.
After the appearance of fontanelles, we go deeper a few more meters, after which we cover the bottom with a “pillow” of rubble (it will serve as a water filter).
Step 5. The mine is pumped with a drainage submersible pump. The more water is pumped out of the well, the greater its debit will be.
drainage well pumpDrainage pump for well


