
- Reasons for water leaving the well
- Finding a place for a water source
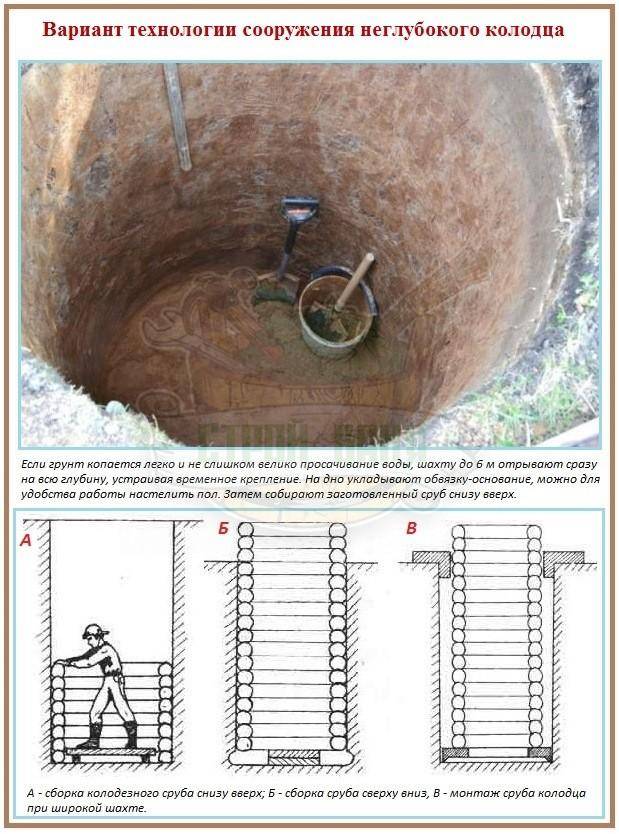
- Tips for building a well with your own hands
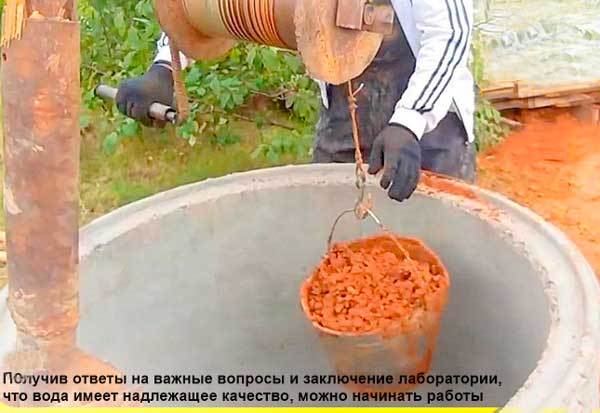
- Commissioning
- Waterproofing
- Wall cleaning and internal sealing of seams
- Do-it-yourself closed house for a well
- How to make a fully enclosed frame
- How to dig a well with your own hands
- Shutdown
- Types of wells
- Well types
- Stage five. We equip the well
- Preparation for work
- Choosing a place to stay
- How to determine the depth of a well
- Selecting a build configuration
- Safety
Reasons for water leaving the well
The water level in the well may not be constant. It depends on a combination of many factors that are not dependent on the owner of the structure.
In the first place are the hydrogeological conditions of the area. Prolonged drought in summer and severe frosts in winter can lead to complete drying of the well. This is completely normal and does not require any human intervention.
Many factors affect the availability of water in a well. Possibly adverse weather conditions caused it to dry out. Then human intervention is not required, after some time it will be filled with water again
Practice shows that after some time the water will return.Most often, those who dug their wells in early summer suffer from the consequences of this phenomenon.
At this time, there is a peak in the rise of the perched water, which makes it wrong to stop work without reaching the real aquifer. Therefore, experts strongly recommend digging a new well during a dry period or late autumn, and even better - in March, before the snow melts.
It often happens that a limited aquifer gradually dries up. Especially if he does not have regular recharge, and the operation was quite active. In this case, the question is brewing, which is better: to deepen the old well or build a new source. In most cases, deepening is more rational as the least costly measure.
The same is done in case of a sharp decrease in the level of groundwater in the area. This occurs when the aquifer or lens cannot be recharged by precipitation infiltration. In addition, the well bottom can become silted up, making it impassable for water and forcing it to look for other ways to get out.
It also happens that the level of precipitation is normal, but there is still no water in the well. In this case, the cause may be the appearance in the immediate vicinity of a new well or a well with an impressive water content, which can temporarily “drain” water.
In this case, you need to wait four to five weeks, if the water level has not recovered, you will have to deepen the well shaft.
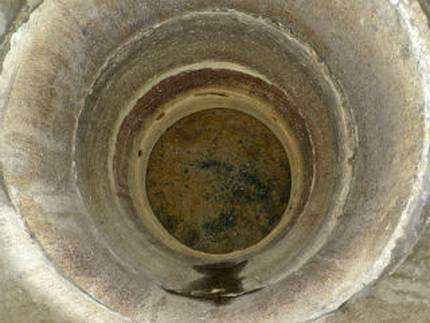
A silted filter is one of the reasons for reducing the flow of water into the well. It should be cleaned regularly. Even in this case, a large amount of silt and dirt rises from the bottom.
And another reason for the disappearance of water can be the wear of the materials of the water intake part of the well shaft. In this case, water will flow weakly due to capillary channels clogged with destroyed material.
In addition, it happens that they are very clogged with dense silt and sandy sediment, which is difficult to distinguish under the water column and remove. To free the water intake from pollution, it will be necessary to clean the well, repair and completely seal it.
Finding a place for a water source
When building a well, it is important to correctly determine the depth of the horizon of clean drinking water, calculate and purchase the required number of concrete rings, equipment for arranging the hydraulic structure itself and the water distribution system. It is also important to choose the right place and time to dig a well.
Choosing the right place for a well depends on several factors:
- Exploration data. There are many ways to search for water on the site, but nothing more reliable than geological studies of the area has yet been invented.
- Information about nearby sources. It will not be superfluous to ask the nearest neighbors how deep their wells are built, what is the quality of the water.
- Suitability of water for drinking. Be sure to take a water sample for chemical and microbiological analysis at the nearest sanitation station. Specialists will determine the concentration of chemicals and the presence of pathogenic bacteria.
- Soil type. The difficulty of digging wells, the need to use special equipment, etc. depends on this. Ultimately, all this affects the cost of the finished well. The hardest thing is to build a well on rocky soils.
- Terrain relief.The greatest difficulties arise when building a well on a hillside. The ideal option is a flat area.
- Distance from pollution sources. Wells are dug at a considerable distance from cesspools, septic tanks, compost heaps, barns. It is undesirable to place them in a lowland, where rain, melt water flows, as well as water with impurities of agricultural fertilizers.
- Degree of distance from home. The closer the source of water to the house, the more convenient.
At the same time, the development should be located so that it does not interfere with the passage, does not block access to outbuildings, utility rooms.
The optimal distances are shown in the diagram below.
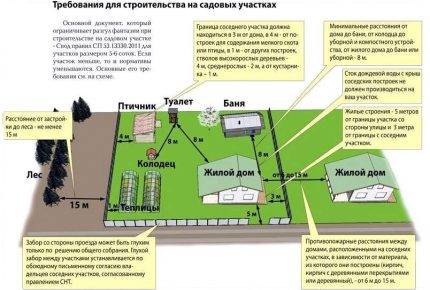 During the construction of water supply and sewerage, one should be guided by SNiP 2.04.03-85. This is necessary to prevent contamination of drinking water sources, washing away the foundations of buildings, disruption of systems
Tips for building a well with your own hands
If you have to dig a well in the country for the first time, and you want to do it as soundly as possible so that there are no problems in the future, consider these tips:
- carefully search and check the suitability of groundwater for consumption. The best way is to conduct geological exploration, which will make it clear at what depth there is water. If there are other capital buildings in the country, you already have results. Also, verification can be done by folk methods, but they will not give a 100% result. If you do not want to spend money on reconnaissance, try to chat with your neighbors in the country and take a water sample from them;
- choose a suitable place to install the well. The fate of other capital structures of your site depends on how you install it.For example, you can not install it closer than 5 meters to the building, so as not to cause problems with the foundation. Water can wash away the soil and partially destroy it;
- take care of the presence of a sanitary zone around the structure with a radius of 50 meters. There should be no garbage dumps, sewers and sewers. Otherwise, their contents may end up in the water.
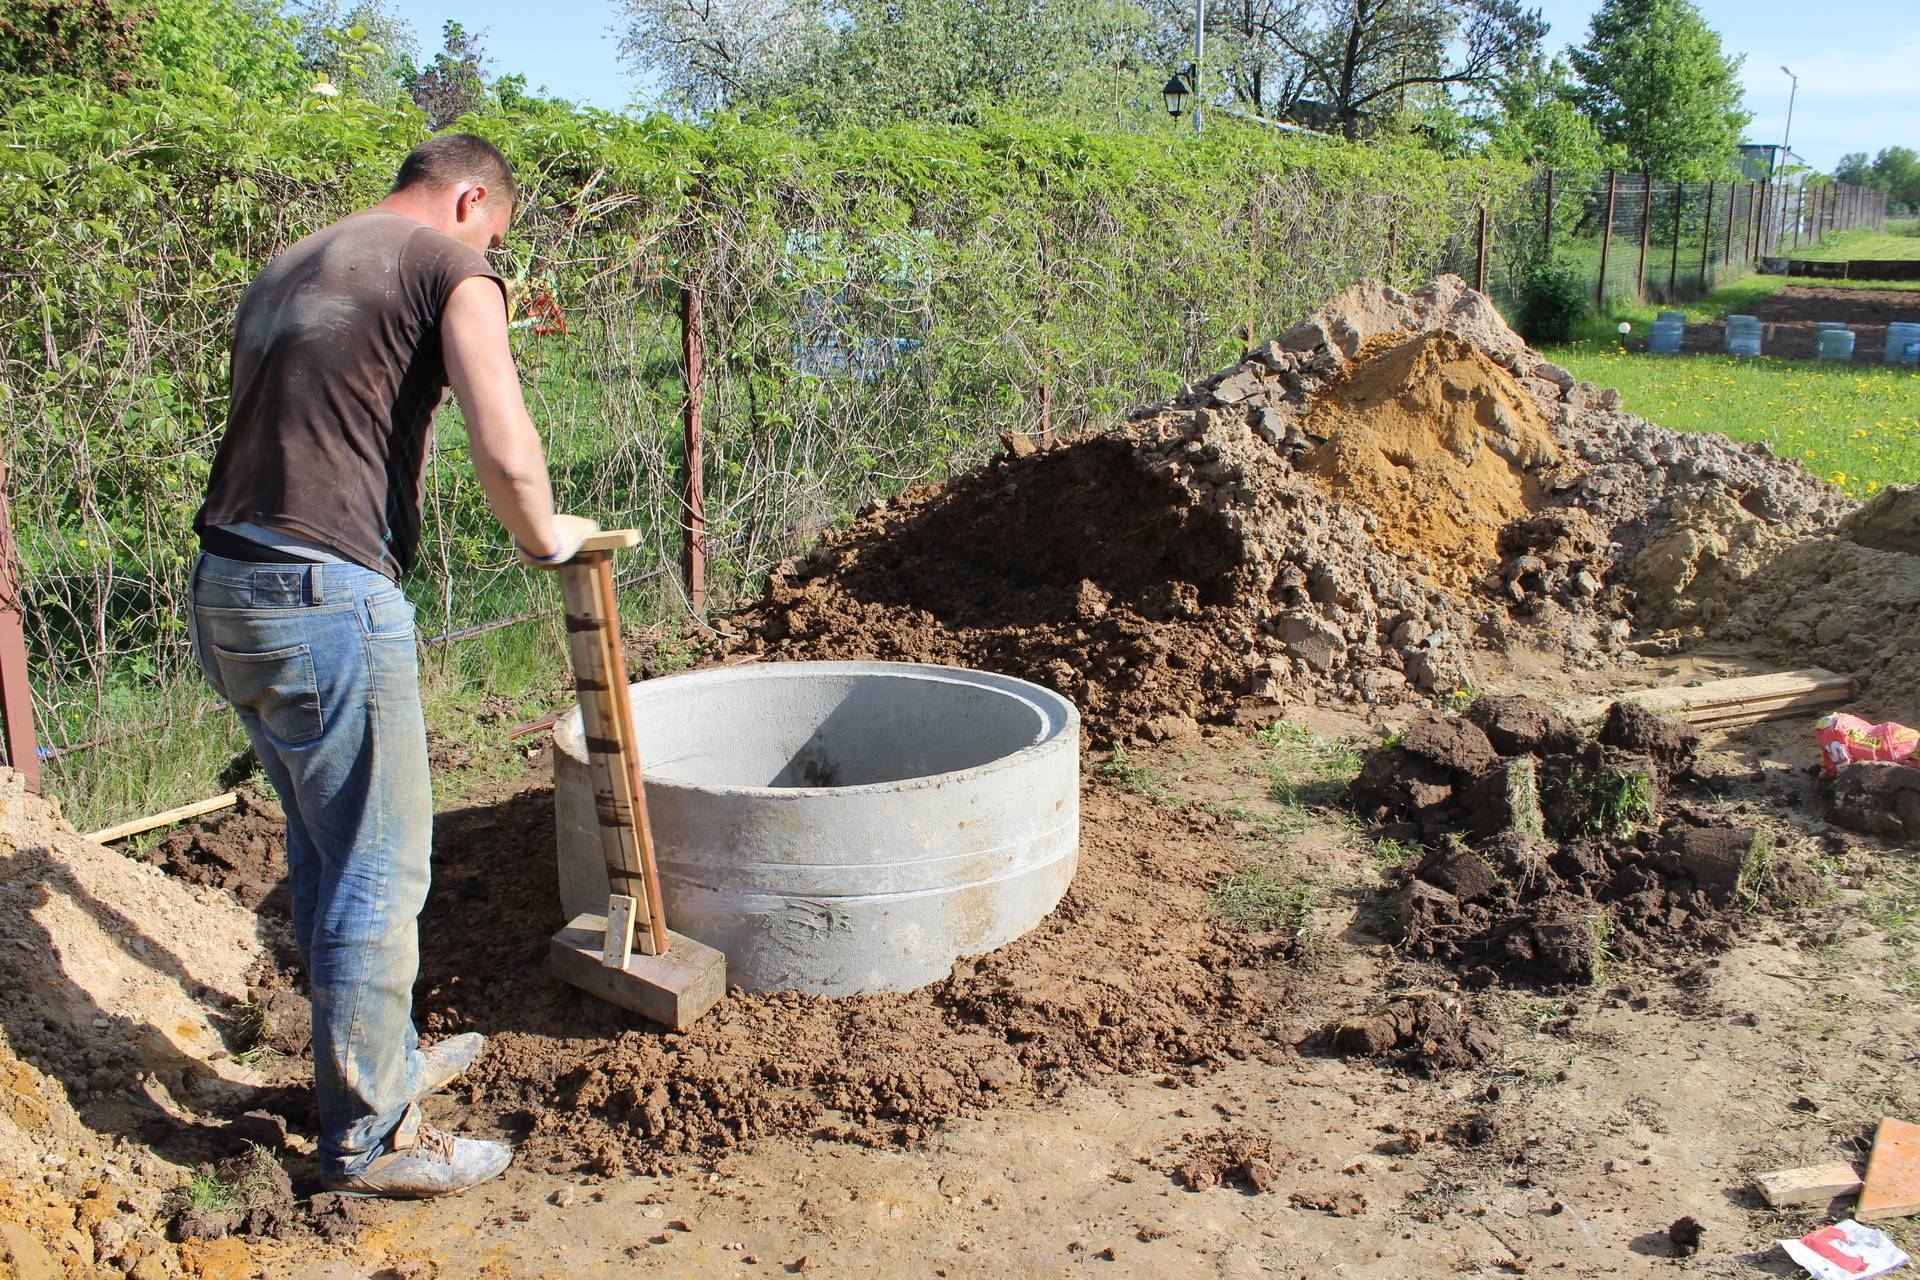
Commissioning
If you think you dug a well and ended up with it, not at all. You still have a series of daily exercises to do. Here they can be done with your own hands, without the involvement of help. First you need to waterproof the walls from the outside, then - clean and wash the walls from the inside and pump out water - clean the well.


After the well is dug, the rings settle for a couple of days, take their places. At this time, nothing needs to be done inside, but you can do external waterproofing.
Waterproofing
If the well was made according to the second method - first they dug a mine, then they put rings - this stage is a little easier. You will need to widen the gap slightly to make the waterproofing. If the rings were installed immediately, you will have to dig a decent ditch around. At least - to the middle of the second ring. When the soil was removed, proceed to the waterproofing.
It is best to use a coating. You can - bituminous mastic, you can - other compounds. In principle, it is possible to fuse or stick rolled waterproofing, in the most extreme case, wrap it with a film. The film is the cheapest, but it will serve no more than two years, and then on the condition of buying an expensive and reinforced one.
Waterproofing over which insulation is laid (foam shell)
Since you still dug a well, insulate it. Let while you do not appear at the dacha in winter, but maybe later you will come and the cold. So take care of the availability of water in advance.
Wall cleaning and internal sealing of seams
A couple of days after the well was dug and the “glass sat down”, you go down inside with a broom, sweep the walls. Then you wash the walls: pour them over, sweep with a clean broom. Pour again, then - with a broom. The water was pumped out, drained away. The next day the procedure was repeated. So - five-seven-ten days. Until the inside and the water are clear.
One more moment. Not all teams immediately coat the joints of the rings. Then, after the first cleaning, you need to coat the joints with a solution (cement:sand in a ratio of 1:3). To improve the effect, you can add PVA or liquid glass (instead of some part of the water, or dilute the PVA with water). It is also desirable to insure against horizontal shifts of the rings. Especially if they don't have locks. To do this, adjacent rings are fastened with metal plates that are attached to the anchor. This measure is strictly necessary on unstable loose or heavily heaving soils.

Connection of rings with metal (preferably stainless steel) plates
For some features of digging wells and cleaning it, see the video.
Do-it-yourself closed house for a well
We are talking about such a variant of shelter for the well - with a door. If you still make a cover inside, it’s sure that dust will not get in.
closed well
A frame is being built, then it is put on the head of the well and fixed with anchor bolts.
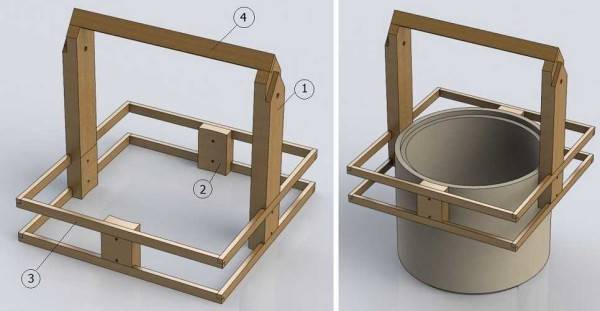
Do-it-yourself house for a well
- support post made of 100*200 mm
- short support posts from the same beam 100 * 200 mm
- fixing bar 30*60 mm
- triangular beam
We assemble the frame, with the help of short bars we fasten it to the ring. After we proceed to the assembly of the pallet. Assemble the flooring from a board of 30 * 100 mm or so. The frame is sheathed with boards or sheet material, such as waterproof plywood.
The procedure for assembling a house for a well
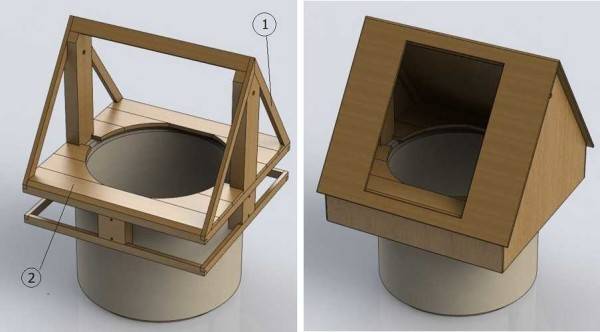
To keep the doors well, you can put additional jibs. We hang doors - one or two, as desired. To make it easier to navigate, below are drawings with dimensions.


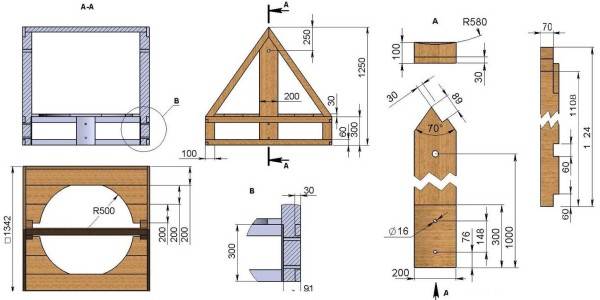
Do-it-yourself house for a well drawings with dimensions
According to the same scheme, you can make a roof for a metal house. If there is a welding machine, you can use a profile pipe. It is easier to attach finishing material to it.
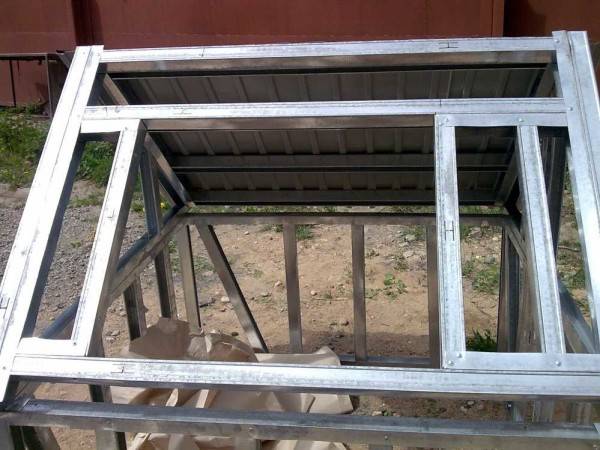
How to make a fully enclosed frame
You can also hide a concrete ring in the house. In this case, the gate, as a rule, stands separately, and then the frame is assembled. Choose the dimensions so that the design freely covers the ring. Height - 20 centimeters higher than your height: so that you can safely bend over and get a bucket.
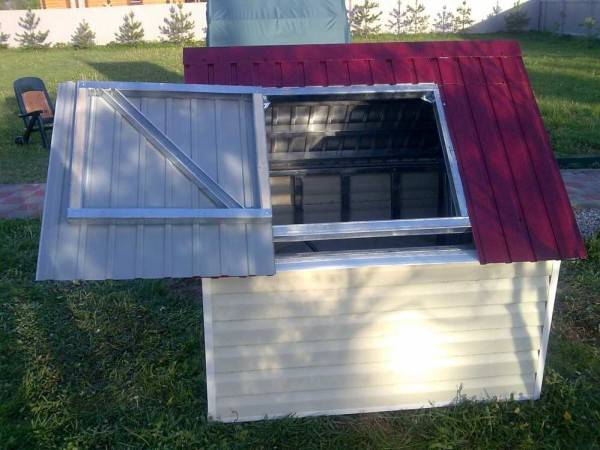
Such a shelter for a well made of galvanized profile for drywall, metal tiles and siding
We take profiles from thick metal, galvanized. From the guide we assemble two identical frames - the “floor” and the upper level of the ring. They are connected by racks (profile for racks). It turned out a cube with filled sidewalls.
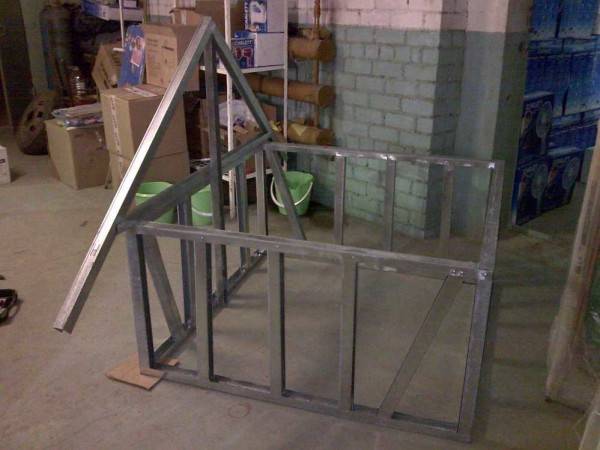
Frame assembly
At the guide profile, we cut the sides, leaving the “back” intact. So you can make a triangle. We fix the rack, which is equal to the height of the entire house. If you want to have equal slopes, the rack is attached in the middle. You can make the far slope steeper, then the stand is moved 15-20 cm from the center.
We attach the notched profile to the fixed rack. We get one of the elements of the truss system. We perform the same operation on the other side. We connect the resulting tops of the triangles with a crossbar.
Preparing for the door
From the side of the door, we add racks - on both sides. It is better to strengthen them - put wooden blocks inside and fasten them with self-tapping screws.
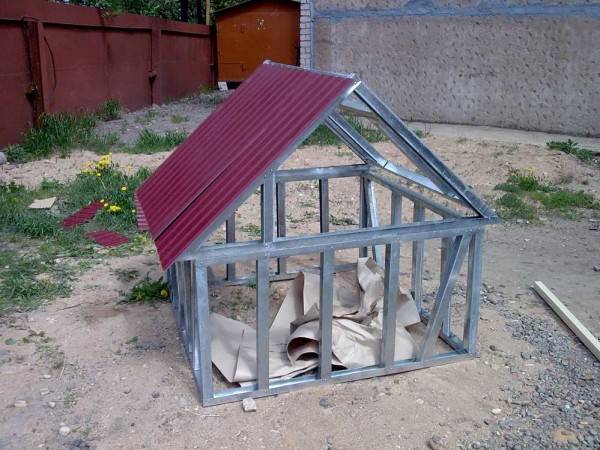
Roof installation start
We fasten the roofing material, for example, a profiled sheet, sheathe it with plywood. Soft tiles are then laid on plywood and nailed - who has what technology. The "foot" and sides of the roof are finished with any material. If you want - you can use wood - clapboard, imitation of a log or timber, if you want - siding.
In this case, the same materials were used as when facing the house: so that everything looks like a single ensemble.
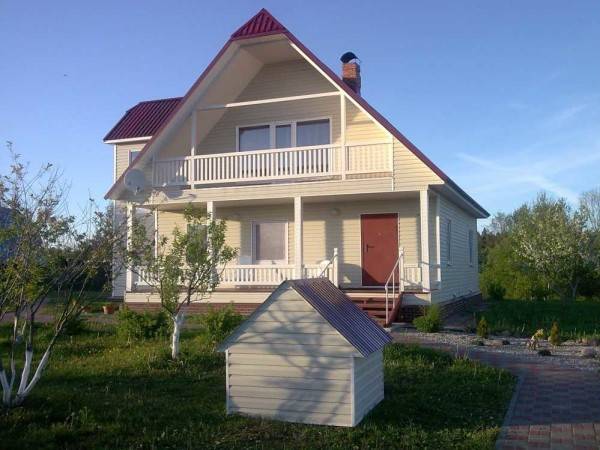
Siding well house
Another video example of an assembly from a drywall profile in video format.


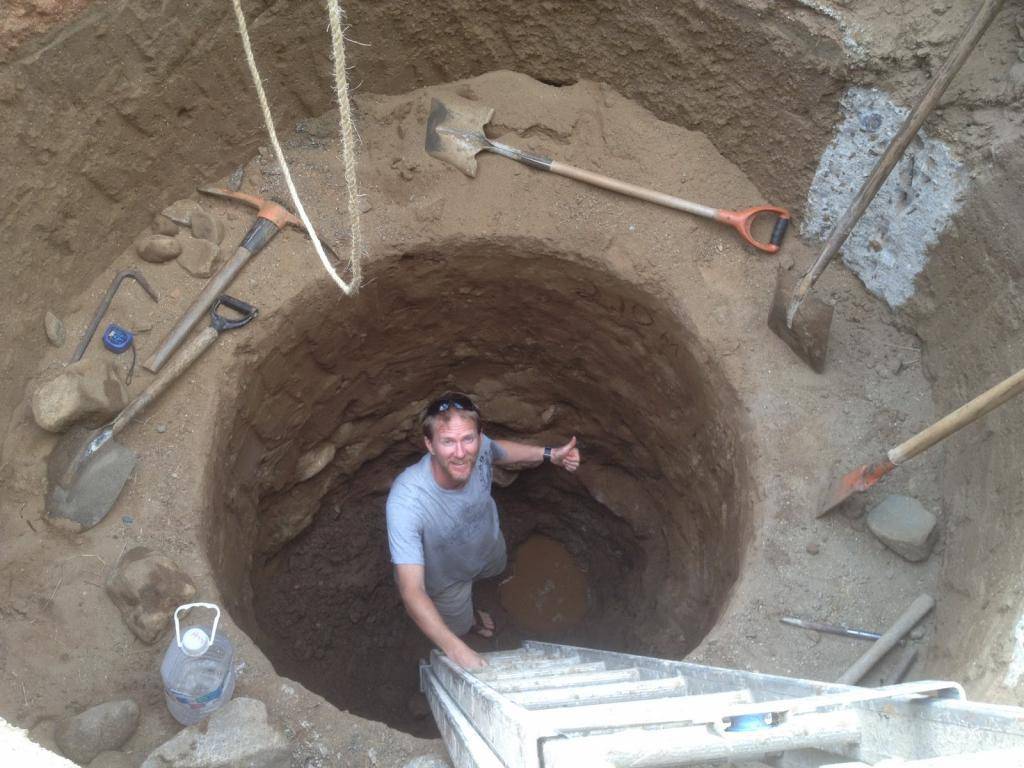

How to dig a well with your own hands
 Before you start digging a well, you need to prepare the necessary equipment.
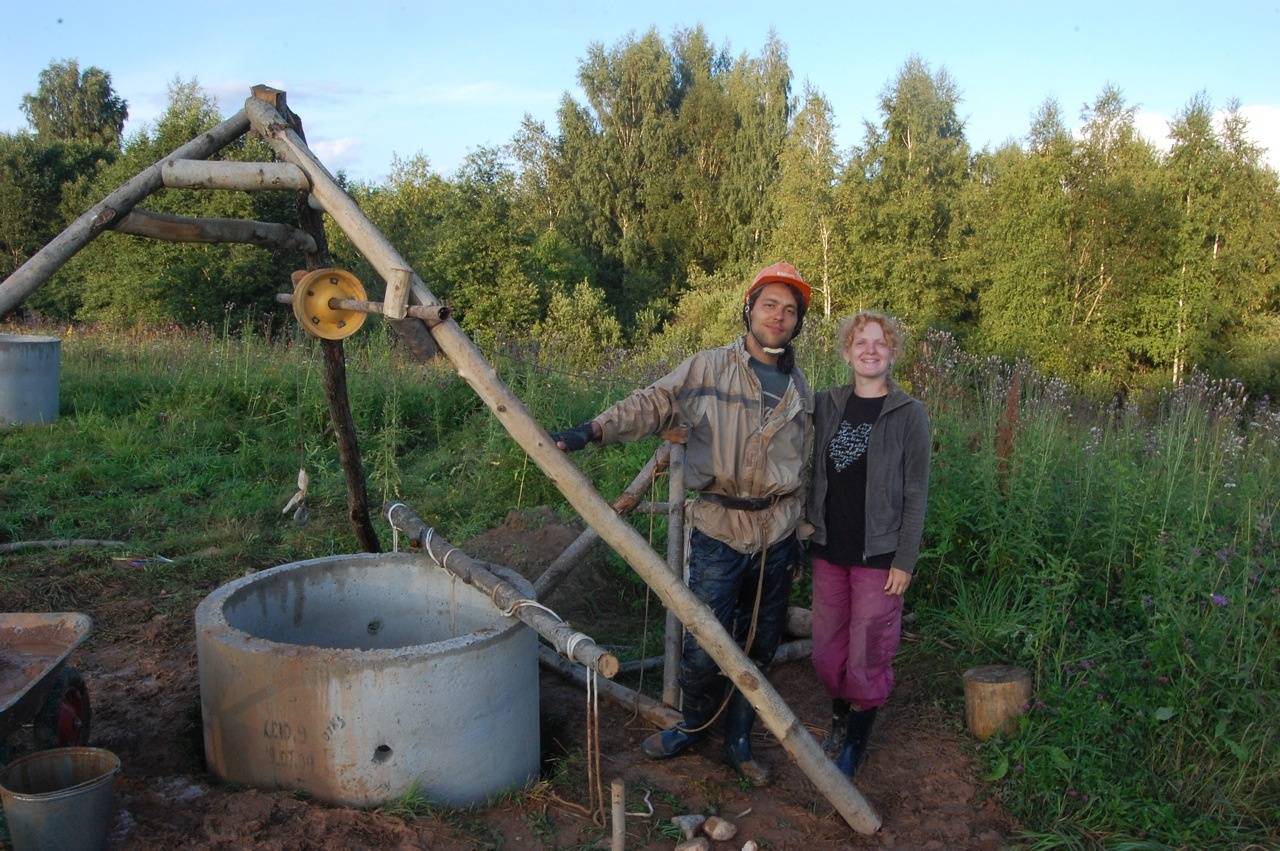
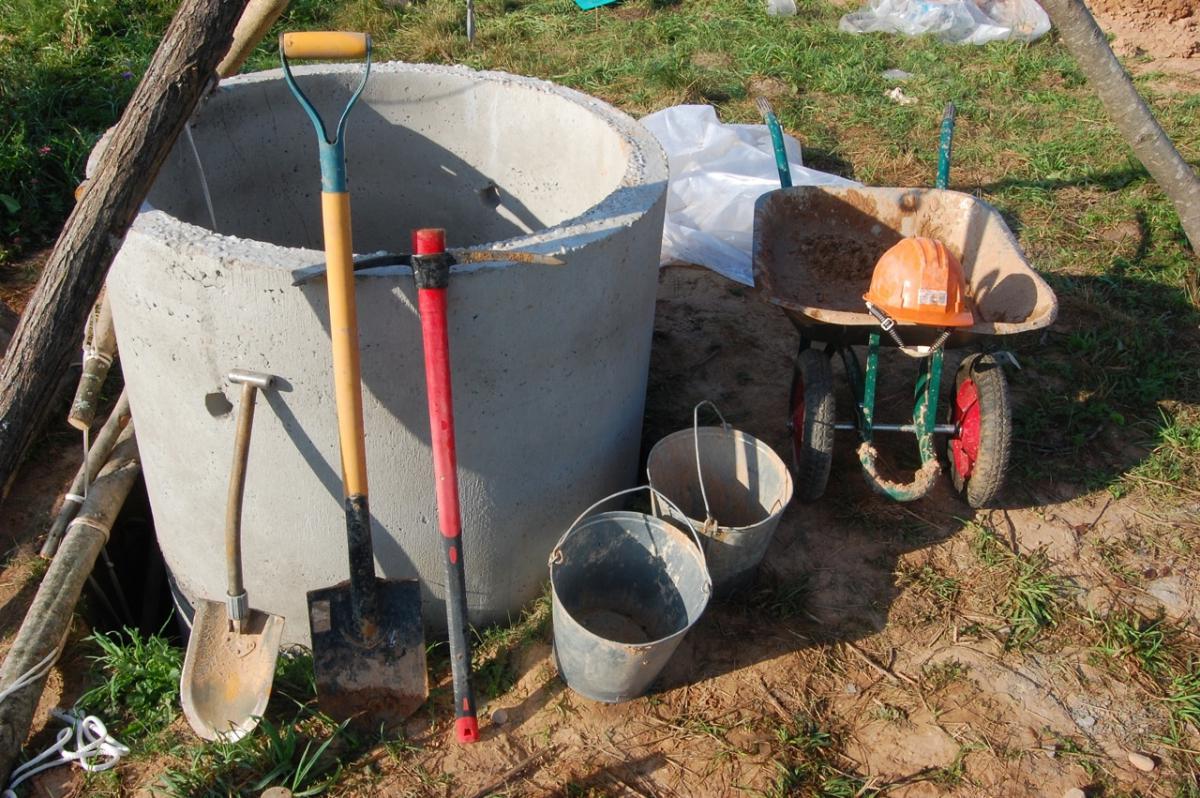
For work you will need:
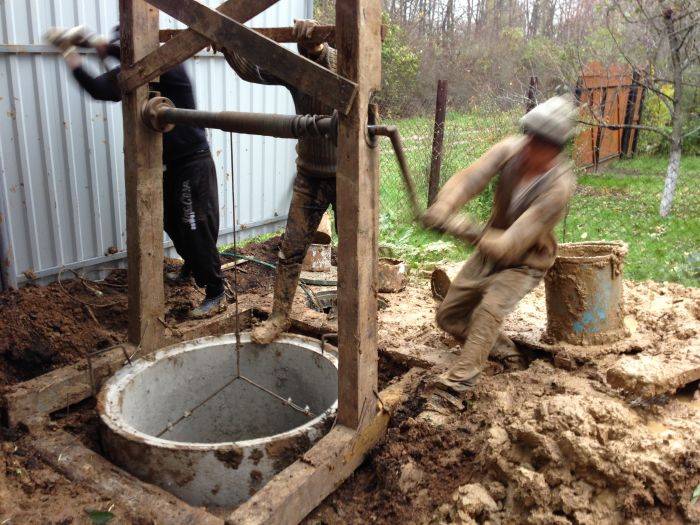
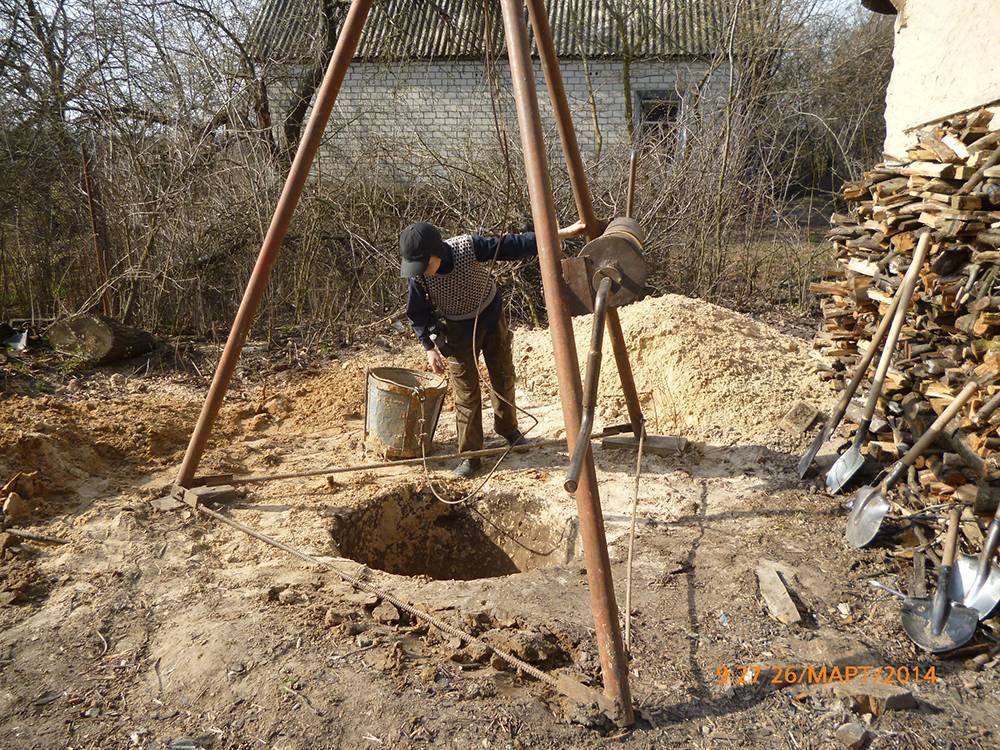
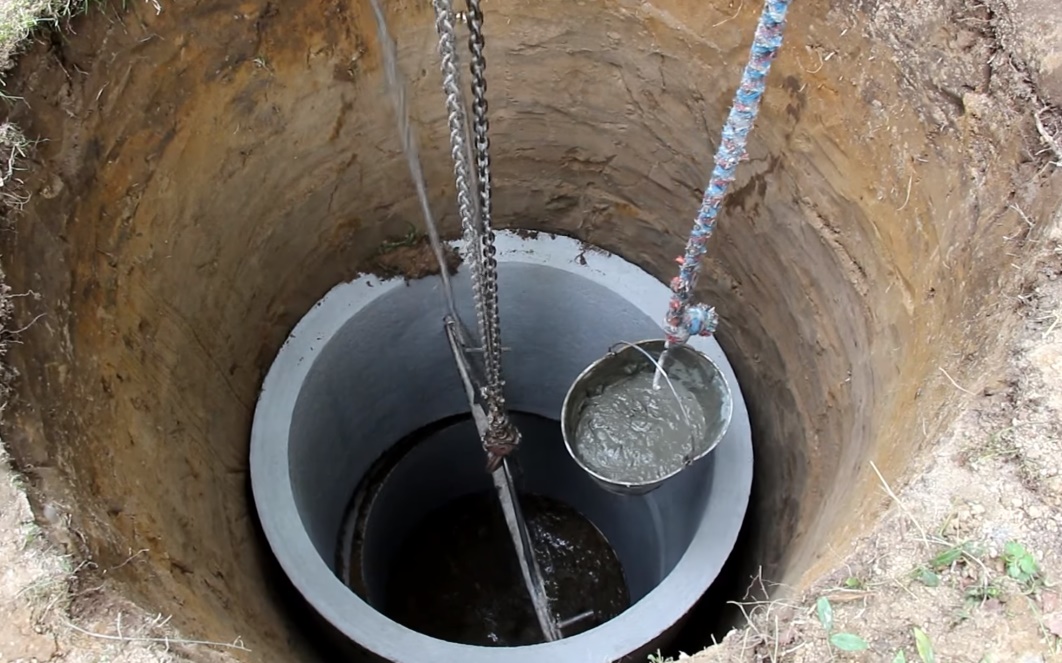
shovels, crowbar, buckets, a pump for pumping water, a rope, a chain, a lifting device (such as a hand hoist), and, of course, concrete rings.To begin with, consider the option of digging a well manually with the installation of concrete rings.
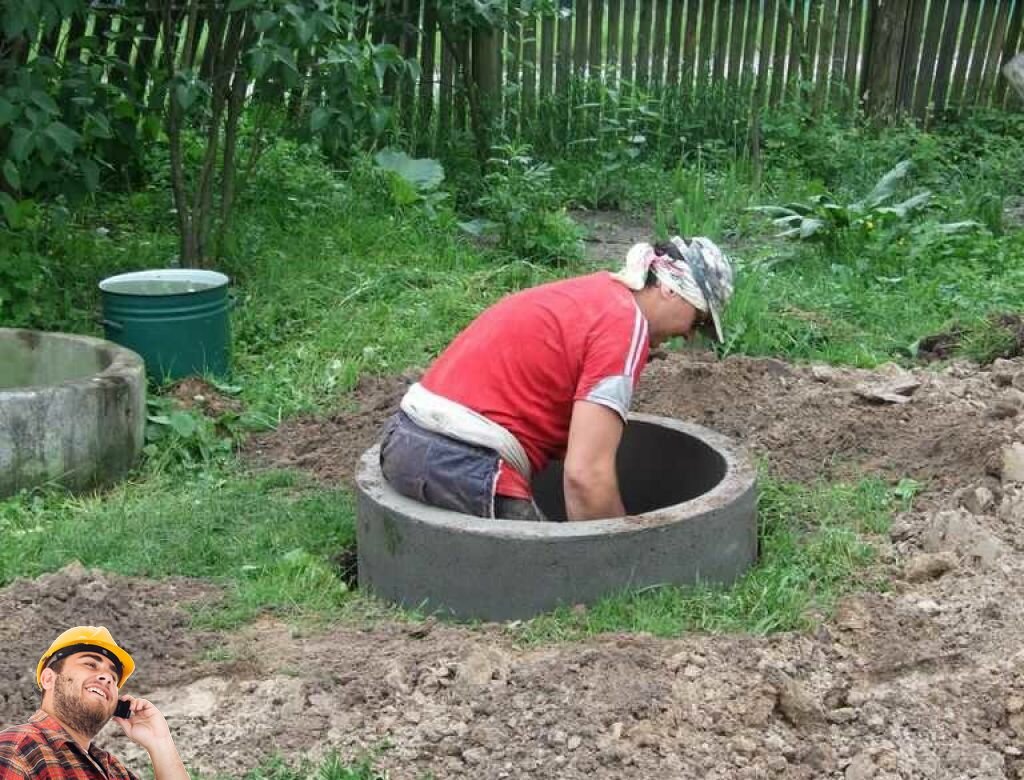
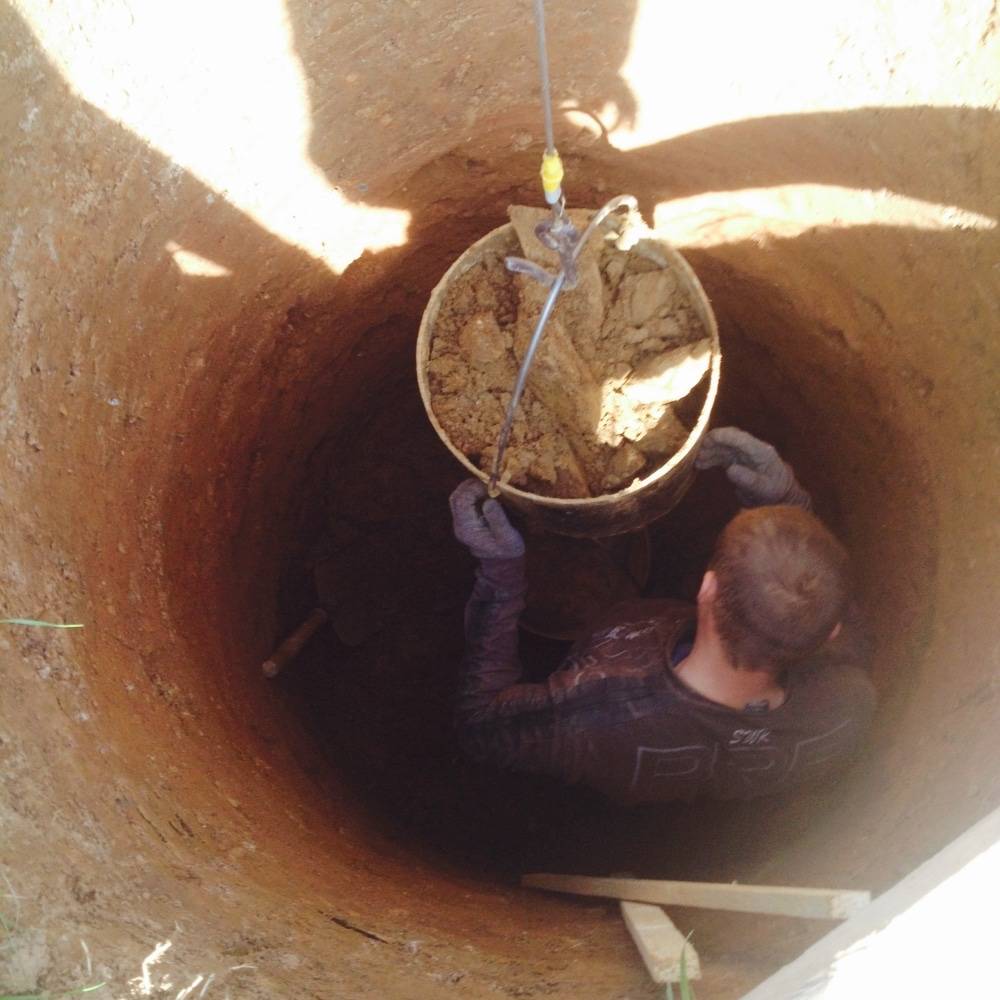
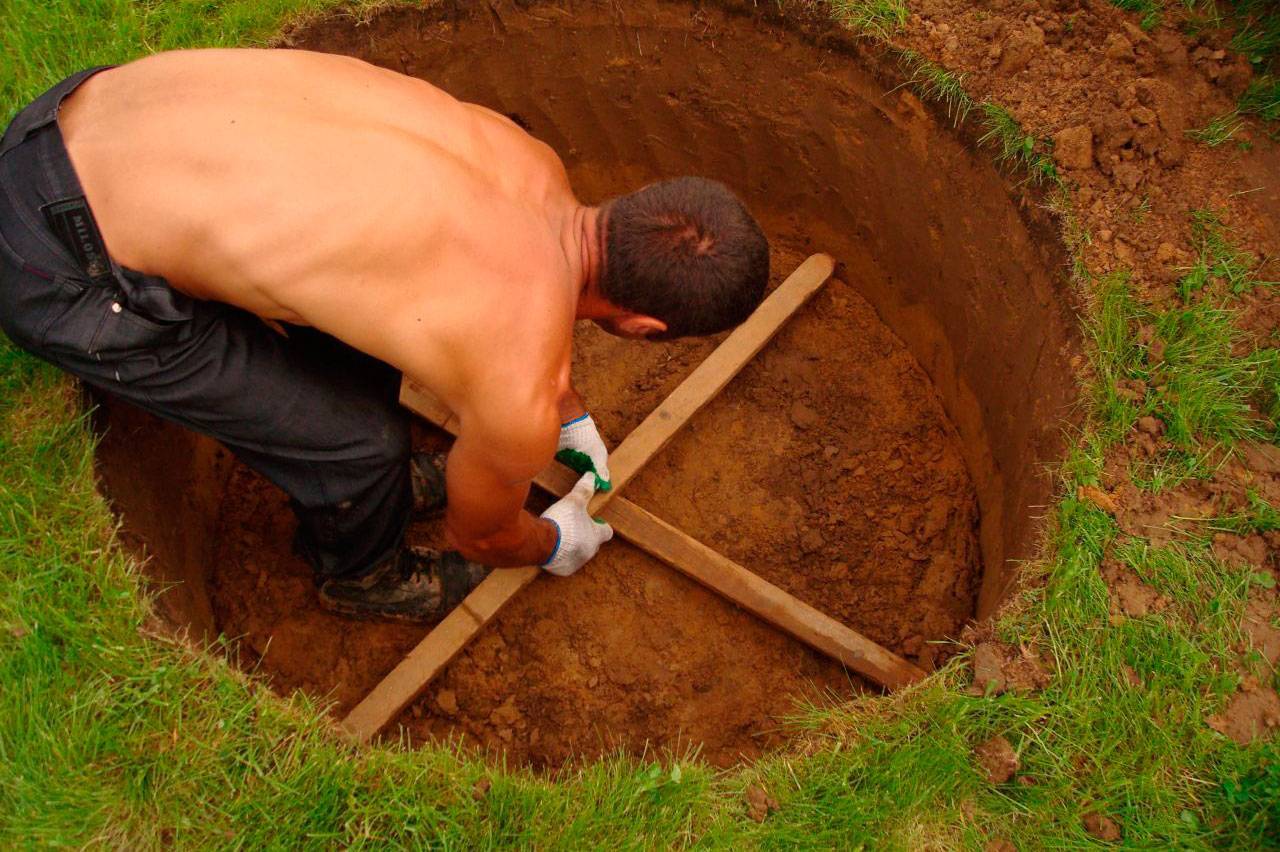
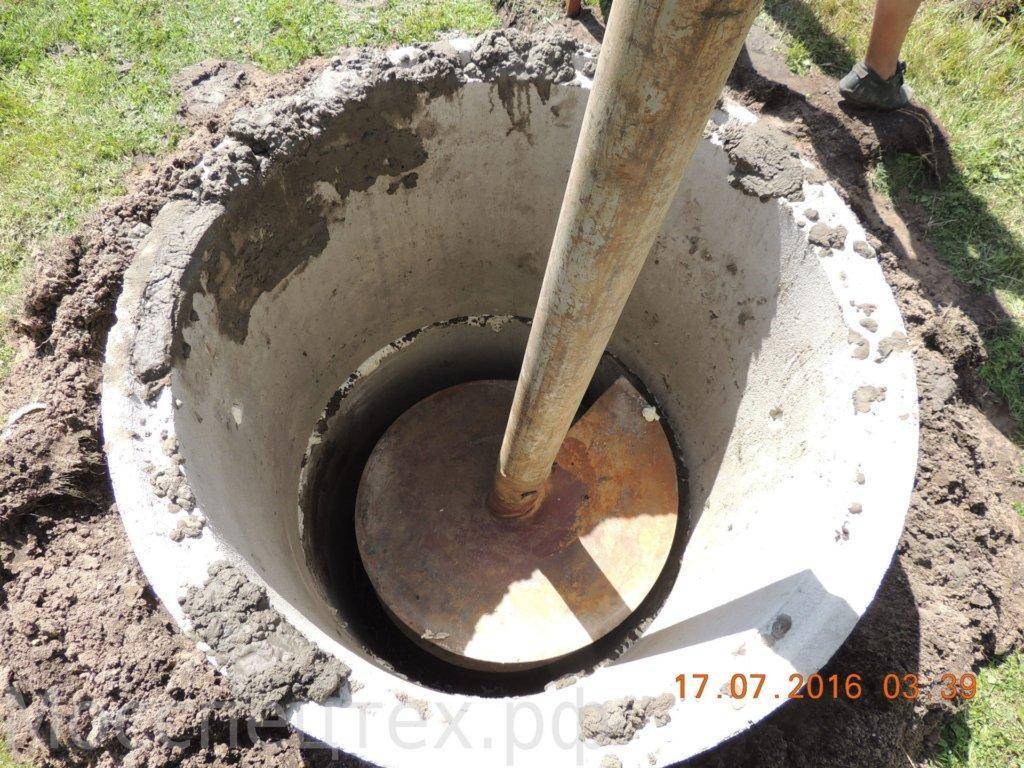
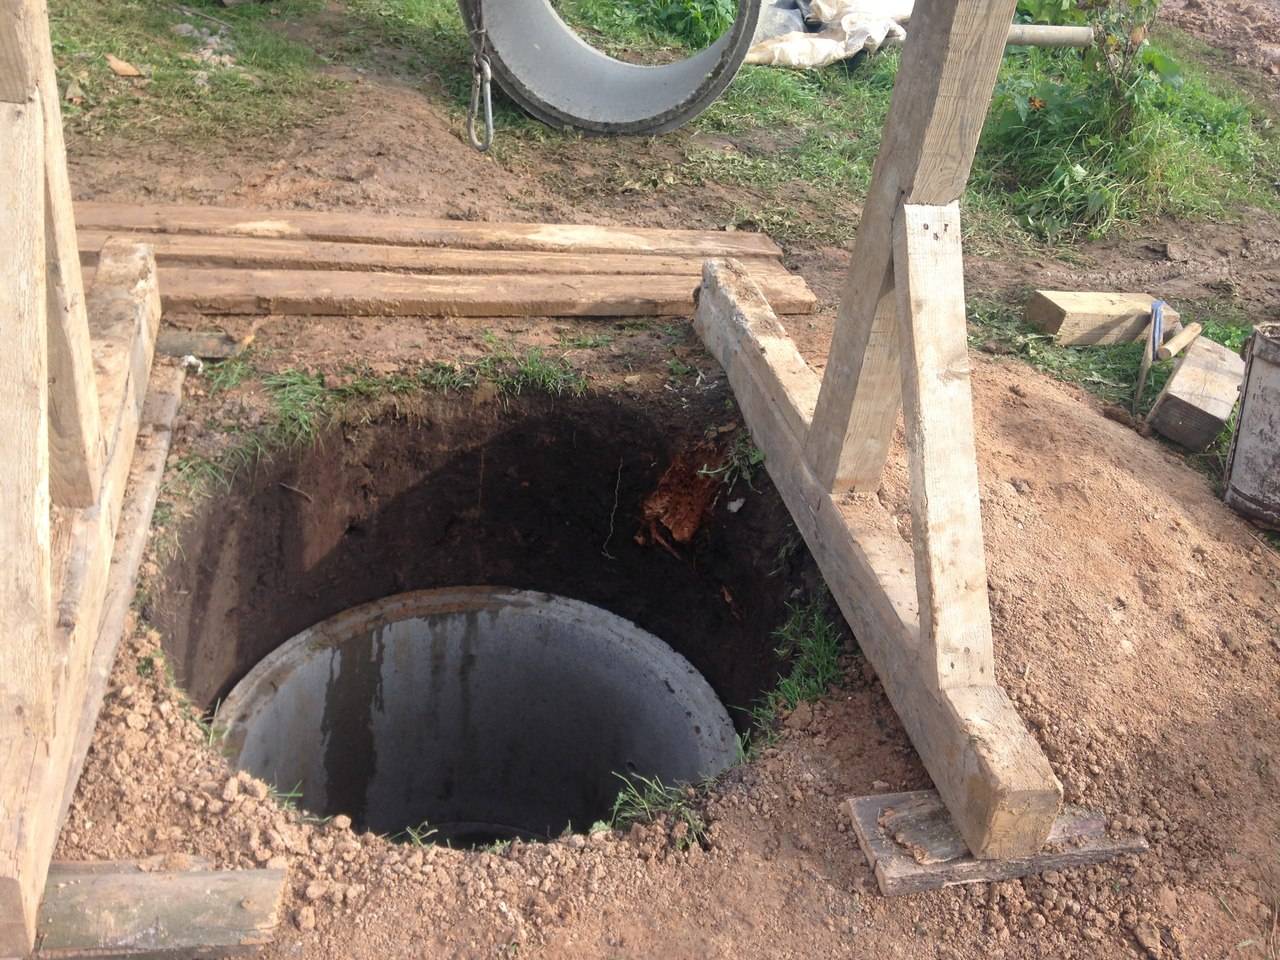
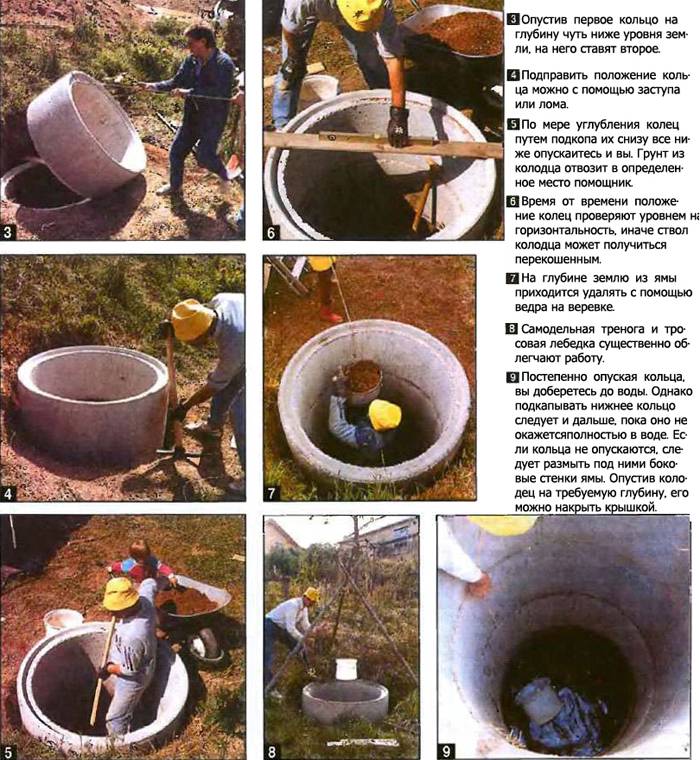
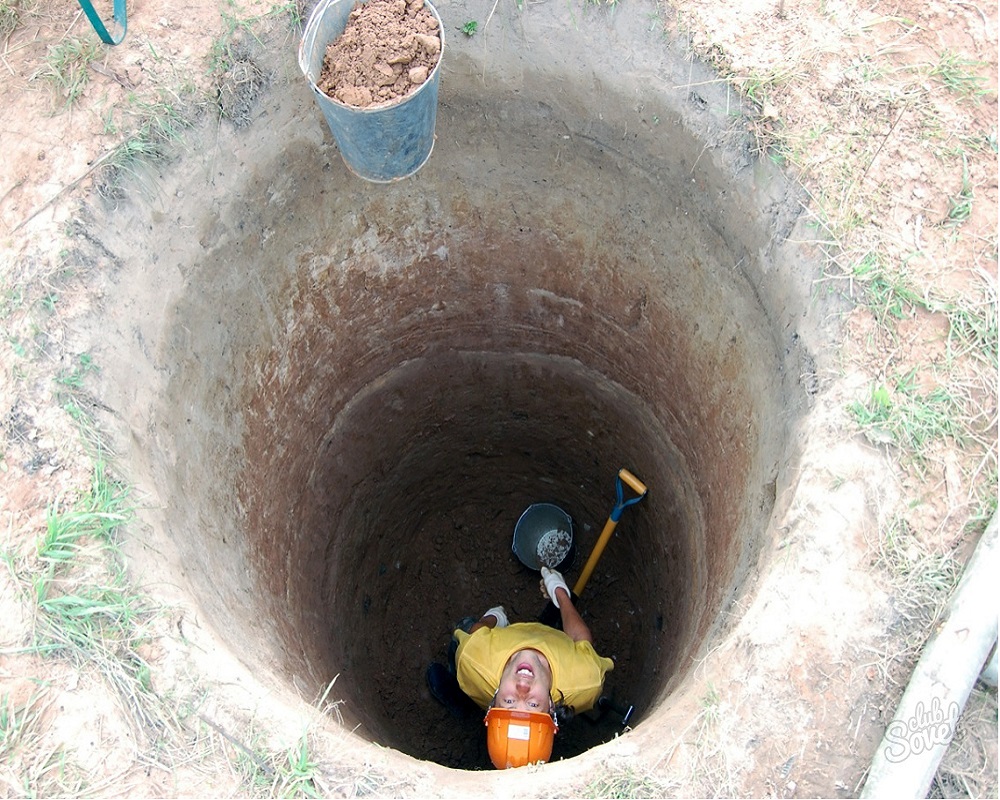
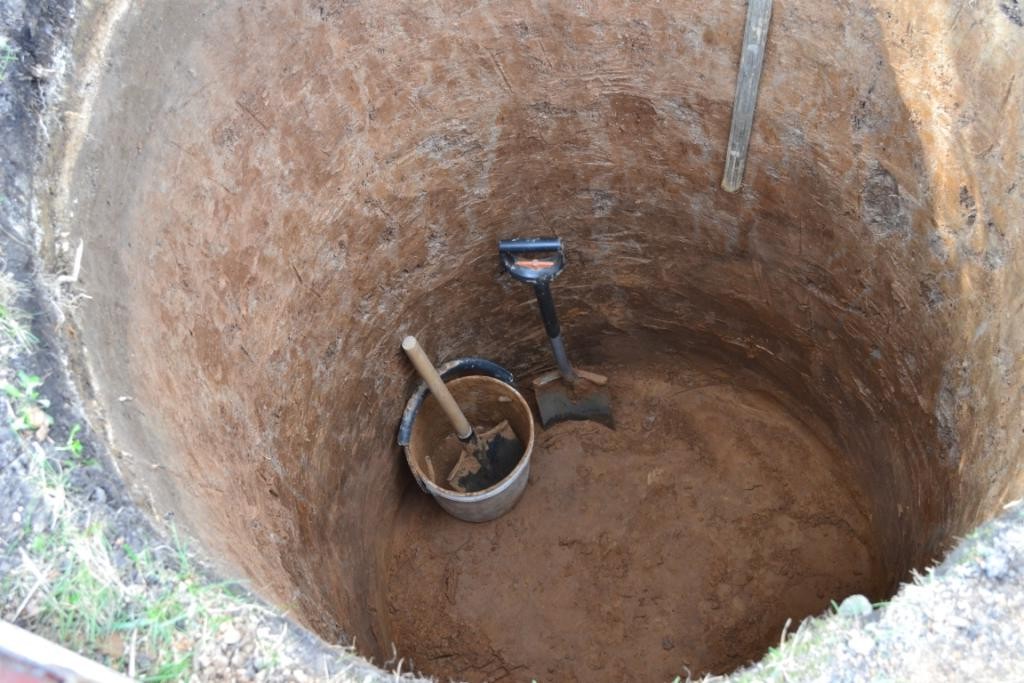
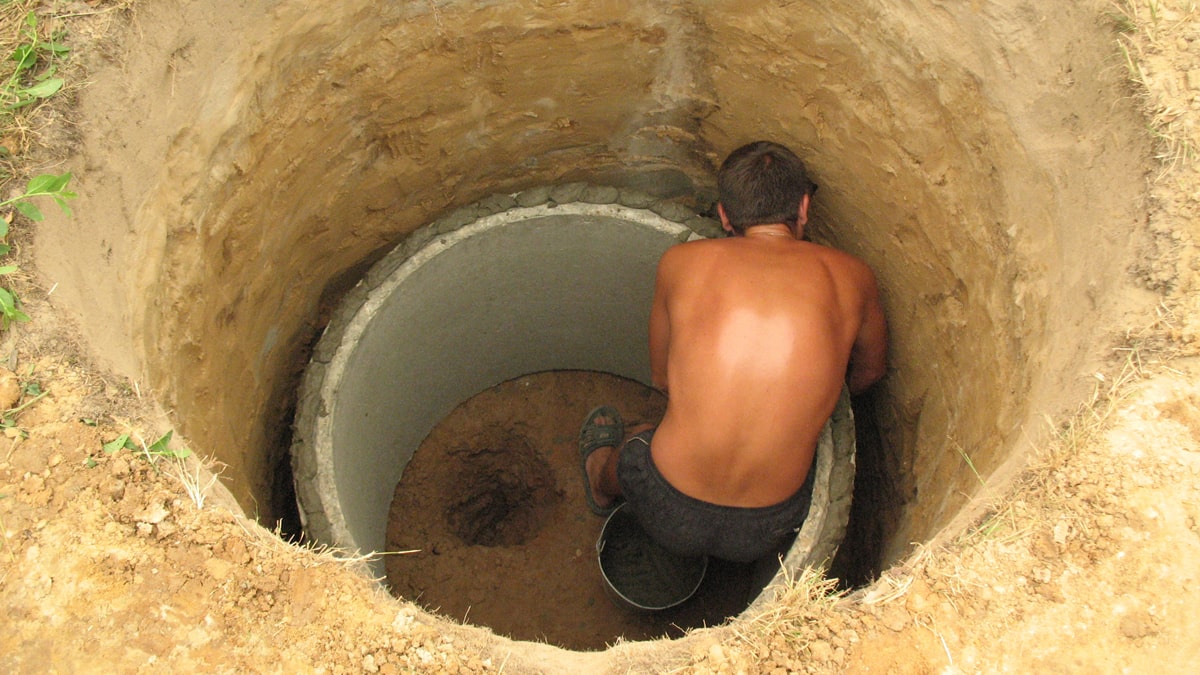
We begin to dig a hole, the diameter of which is equal to the ring, about two meters deep. Then, having installed the ring, we begin to select the earth inside the ring, while taking into account the viscosity of the earth.
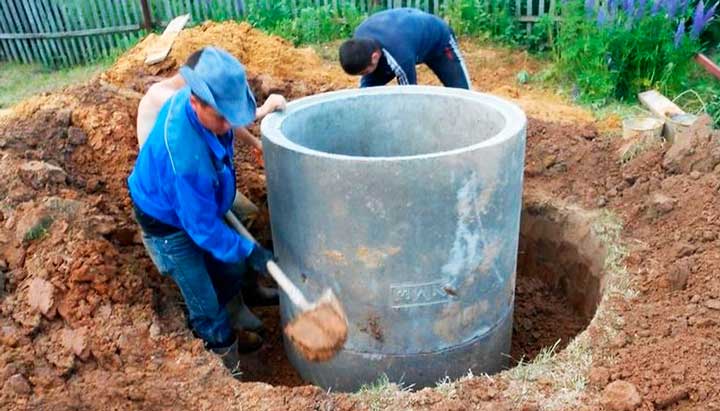
 If the earth is dense, we dig under the ring, if it is loose, we start from the middle of the circle. In the process of digging, the ring lowers under its own weight.
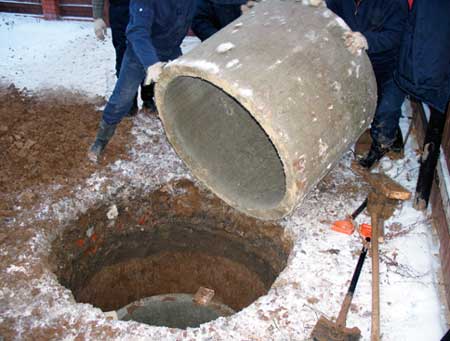
When the ring is deep enough, put the next one on it.
The whole process is repeated.When doing work, it is imperative to watch that the rings fall evenly, otherwise not only distortion, but also clamping may appear, the elimination of such problems is quite laborious.
 We seal the seams between the rings with a cement-sand mortar, having previously laid a tarred hemp rope, and we fasten the rings themselves together with iron plates, screwing them with bolts using special metal eyes.
The depth of the well is usually about 10 meters, but this value can vary up or down depending on the topography of the site.
The depth of the mine is determined by the following parameters:
the soil moisture increases, the clay layer is passed, the air temperature decreases.
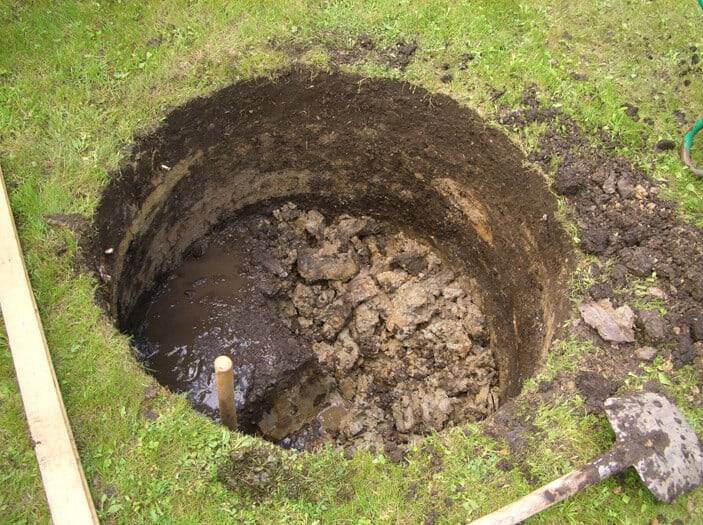
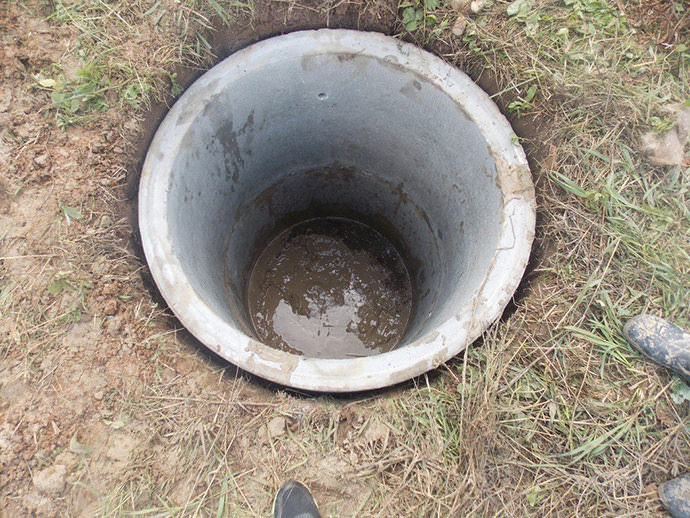
 If water appears in the well, work does not stop, and the water is pumped out using. If there is a rapid set of water, we stop digging. Now you should pump out the water and leave the well for 8-12 hours, then pump out the water again and select more soil until we see aquifers.
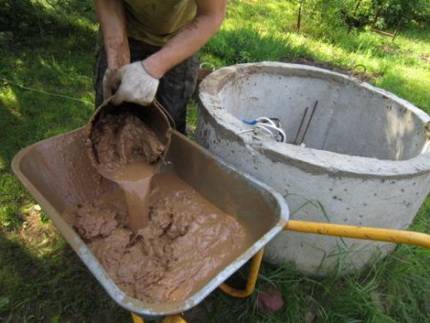
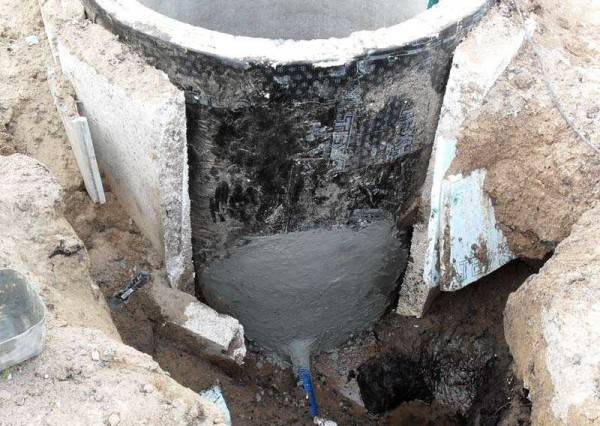
We make a clay castle.
Outside, we dig our well to a depth of about a meter, ram it with clay at ground level, and then make a blind area.
Everything, the digging of the well is completed.
Now we arrange a bottom filter for water purification. It is done like this, at the bottom of the well we lay small and large gravel of about 20 centimeters. If the soil at the bottom of the well is very viscous, then first you need to make it from boards with holes for water, and then lay the bottom filter on top.
Shutdown
We complete the work by installing a water-lifting mechanism, or a pump. Close the well with a lid.
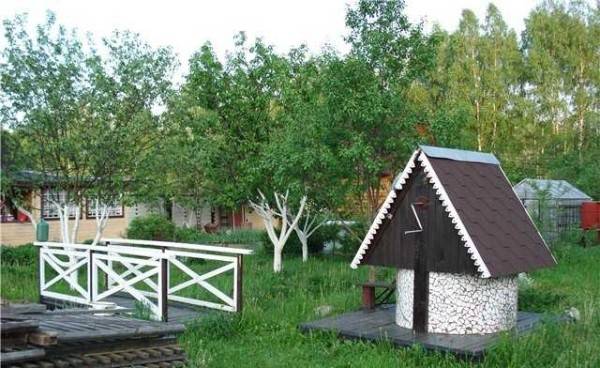
The design of the ground part of the well, the head, everyone chooses to their taste and financial capabilities.Many options are offered.
You can also dig a well without rings. For the device, we need a wooden one, chopped into a paw.
But this method is more time-consuming and it is chosen by lovers of ecological construction.
Own source of water in your favorite suburban area will significantly increase the level of comfort. Eliminates the need to carry water in buckets to care for reverently grown plants, to fill containers in a bath or shower.
The construction of a water intake structure can be entrusted to a team of workers specializing in this field. But it is better to dig and equip a well in the country with your own hands, investing a minimum of funds in it. We will tell you how to choose a place for a water source, how to drill and equip a working.
Any enterprise requires careful preliminary preparation from the future contractor. Especially as laborious as digging a well.
Errors in planning, distribution of forces and work stages will certainly affect the result. In the best case, the construction will stretch for a long, but unknown period, in the worst case, it will end with the construction of a useless tunnel "to nowhere".
Image gallery
Image gallery
Types of wells
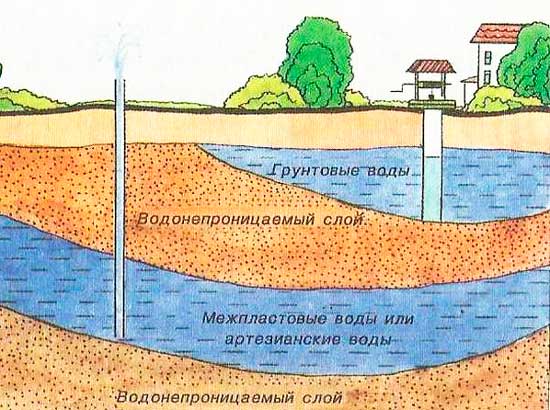
A well is a shaft that reaches the water horizon with water suitable for consumption. Depending on the depth at which the water layer lies, experts divide these hydraulic structures into two types:
- key or superficial
. This is when there is a key in the suburban area, from which the purest drinking water beats. Convenient, inexpensive option.
-
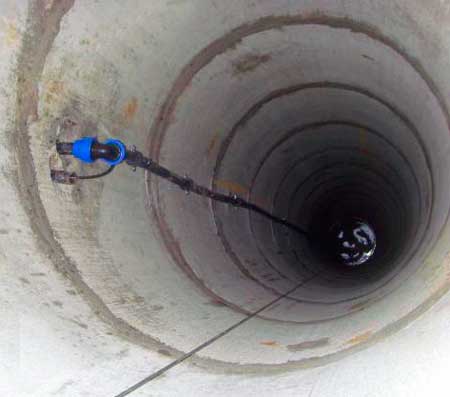
- Mine
. This is when it is necessary to dig up the soil to the water layer, constructing a mine with a round or square section. The depth of the structure can reach up to 10 m.


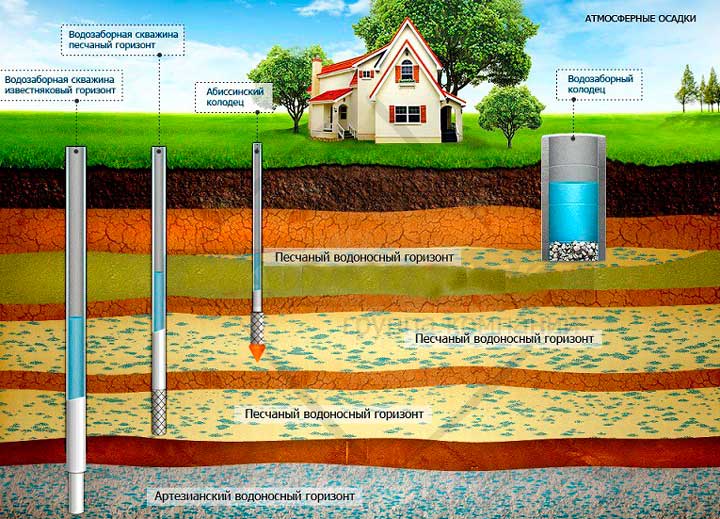
There is such a term - the Abyssinian well. In the form in which we are all accustomed to seeing wells, this structure is not. This is a well formed by a steel pipe that is driven into the ground. To raise the water, either an electric pump or a hand rocker is required. The depth of well formation is up to 30 m.

Key well at their summer cottage
Well types
There are three types that determine the operational supply of water inside the hydraulic structure and the method of its supply to the shaft.
- Imperfect type wells
. This variety is constructed so that the mine does not rest against solid rock. That is, the walls are formed so that the trunk of the structure is immersed in the aquifer by about 70%. That is, water is taken into the well both through the walls of the building and through the bottom.
- perfect type
. This is when the shaft of the mine rests on solid rock. In this case, water enters the well only through the walls.
- Perfect look with a sump
. The latter is a water collector, which is laid in the lower durable layer. And water enters the structure through the walls of the mine.
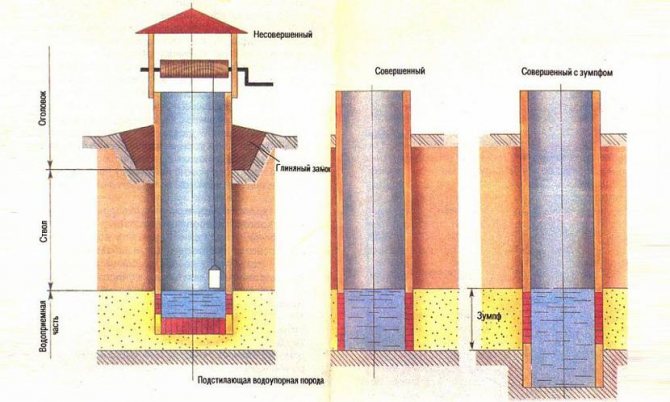
Three types of water wells
Stage five. We equip the well
But the construction of a well is not limited to drilling a mine and its strengthening. To do this, we equip the upper part of the structure - the head.
Well head insulation
We equip a blind area around the well - a small platform made of concrete or carefully compacted rubble
The blind area should go at least 1 m from the mine on each side and, importantly, is built after a certain time after construction is completed, when the soil settles
Blind area around the well Scheme of constructive layers of the blind area Blind area from a mixture of crumpled clay and crushed stone Blind area insulation
We also build a canopy over the structure to prevent precipitation from entering the mine. If a pump is used to supply water, then it is better to close the shaft completely, leaving a small hole for the hose and cable.
Preparation for work
You can start digging a well yourself after carrying out some work, but at the very beginning you should figure out what this design is like, you need to know the basic technological principles and be sure to follow safety precautions.
Choosing a place to stay
You need to dig a well yourself in a properly located place. This structure must be placed according to the rules, otherwise you can harm the structure, for example.
The foundation will simply sag and you will not understand for what reason. There is a detailed article on our website that tells how to search for a driver, but there are still rules that should be considered when choosing a place.
Looking for a place for a well
So:
- It is necessary to dig a well yourself no closer than thirty meters to the toilet and other places of pollution. It can be both a garbage dump and a road;
- After determining the aquifer, it is also necessary to choose a place not in the lowland. There, when it rains, the accumulation of water and the well can become contaminated. It is better to choose a hill;
How to determine the depth of a well
It is necessary to start digging a well with carrying out the simplest geological surveys for the presence of groundwater at the construction site. The depth of their occurrence is determined.


This can be done using special instruments: an aneroid barometer or spirit level. You can determine the presence of deep waters by nearby sources.
There are several ways to determine the depth of water:
- Determination of magnitude by an aneroid barometer. This method is as follows: On the device, the division value is 0.1 millimeters. This corresponds to one meter difference in height. For example: at an existing well at ground level, the atmospheric pressure that the device shows is 745.8 mm, and at the site of the proposed construction, 745.3 mm. The difference is 0.5 mm, which means that we are digging a well five meters deeper, but this is only if the aquifers are horizontal and lie in the form of a water basin.
- Groundwater often has slopes that look like a groundwater flow. In this case, the depth of occurrence is determined by the method of interpolation of the measurement results, but it gives an approximate result.
- The most reliable way is exploratory drilling before starting work.
- If none of the above methods is suitable, then on a hot summer day you need to watch a reservoir that is far from the chosen place for the well. The formation of a small fog (haze) over the site in the evening indicates the presence of water, the thicker it is, the closer it is to the surface.
Selecting a build configuration
Every well is a large round or square shaft dug into the ground to reach artesian water that can be consumed by a person. The depth of such a mine is usually close to 10 meters, but sometimes it can reach a value of 30-30 meters.
The well consists of the following parts:
- Head, which is above the ground;
- Mines - the deepening of the well;
- The receiver for water is the lower part of the well where water is collected.
The well shaft can be made of stone, brick, wood, concrete.The usual and easy option is the use of concrete rings. We will tell you more about the construction of such a well.
Safety
Digging a well shaft is a dangerous occupation for a person.
Therefore, you should adhere to some easy installations aimed at safety:
- It is mandatory for the worker to have a helmet to protect against the ingress of stone and soil on the head, which may fall during the removal of materials from the well;
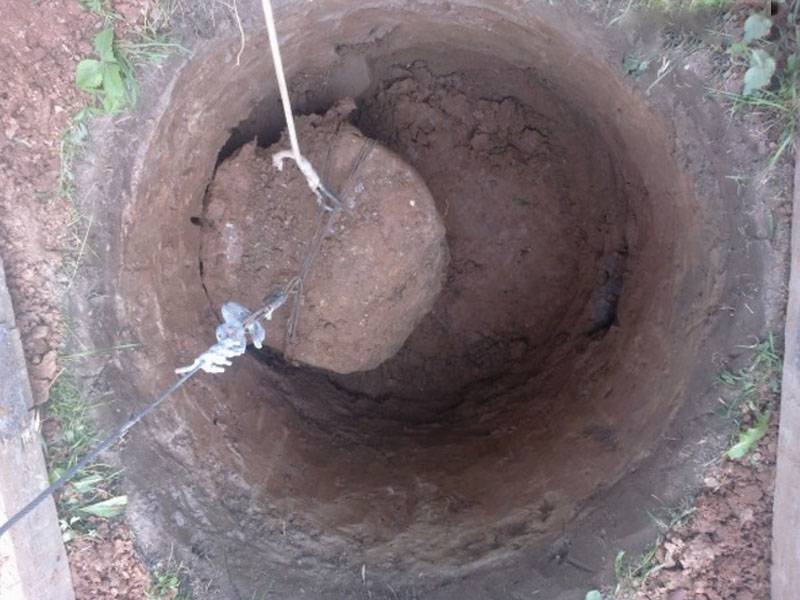
- In the process of earthworks, it is periodically necessary to check the strength of the rope. To do this, a large and heavy sinker is hung to it;
- It is mandatory to check the reliability of all fastenings of the bucket pulling out the earth;
- Due to the fact that high humidity and cold earth are bad for health, do not stay in the well for too long, you can get sick.


