- Construction of a well from concrete rings in stages
- Safety
- well digging
- Clay castle and blind area
- Head construction
- Well buildup
- Arrangement and decorative finishing
- Do-it-yourself closed house for a well
- How to make a fully enclosed frame
- We make a network of channels for draining the site from tires
- How is a shaft type well arranged?
- Do-it-yourself well in the country: choosing the best place
- What materials are best to use?
- Wood
- Stone
- Brick
- Plaster, paint, varnish
- Other options
- Bog oak
- Location selection
- Recommendations for the care and operation of the facility
- Do-it-yourself well: structural components
Construction of a well from concrete rings in stages
When choosing a material for interior cladding, you need to be guided by their features. Wood has been used for centuries, but only because there was no technology for reinforced concrete rings. It rots, parasites start in it, and such a source has to be cleaned more often.
To build a well in the country with your own hands, just do the following:
- Conduct geological exploration or determine the place by folk methods.
- Dig a well to a level where water will naturally accumulate in it.
- Mount the pipe from reinforced concrete structures that form the walls of the source.
- “Seal the joints”, making them airtight so that dirt from the upper layers of the soil does not penetrate inside.
- Lay a clay castle so that the top water does not spoil the quality of the water.
- Improve the source and decorate it outside in a designer style.
At the same time, when starting to build a well for a summer cottage with your own hands, you need to take into account the requirements that are present at all stages.
Safety
When digging, take into account that the soil can collapse, and you can not start digging without helpers. You will have to dig a well with your own hands until the natural influx of water fills it up to a half-meter level.
This means that you need shoe covers. They can be bought at any fishing store that sells hunting equipment. The use of electrical equipment is not recommended as moisture can cause short circuits. And to avoid electric shocks, use a manual mechanical tool.
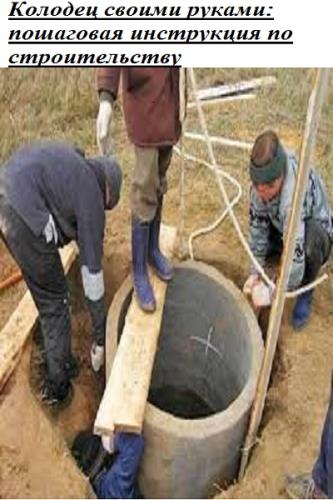
Do-it-yourself installation of rings in a well without the use of special equipment is impossible. The mass of concrete structures is too great to be lifted and moved without a crane. The work with the slings must be carried out by a specialist slinger. It is necessary that for the layout of the crane there is a flat area free from buildings.
well digging
When passing through dense layers of soil, a percussion tool is used - a pickaxe. The loosened soil is loaded into a bucket attached to a rope. The assistant must timely remove it from the surface, release it, and lower it empty into the cut. Care must be taken to ensure that the incoming water is pumped out of the pit. For this, electric pumps and pumps are used.
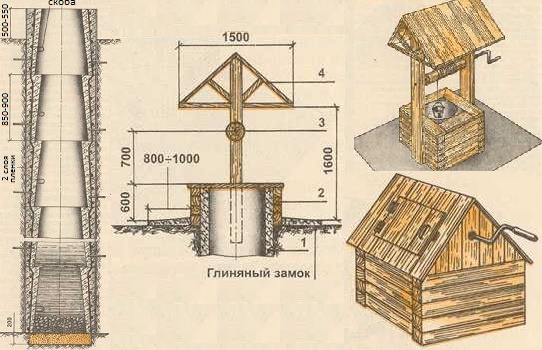
Clay castle and blind area
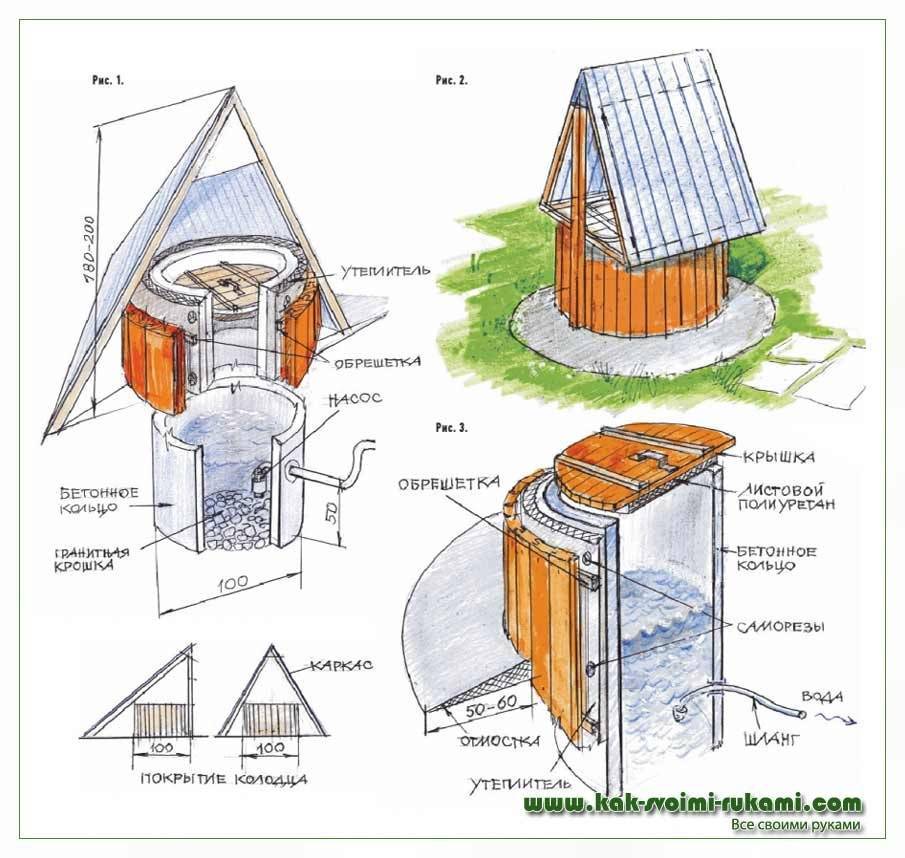
When all the rings are installed, a part of the goaf is placed and compacted as a backfill. This must be done when placing each reinforced concrete element.The two upper rings are not lined, and the space around it is excavated. Digging continues until a hole is dug around a meter from the outer edge of the concrete. Depth - below the junction of the first and second rings, if counted from above.
Next, do the following:
- Lay polyethylene film.
- Lay plastic clay.
- Lay a decorative coating.
Clay is kept wet, must be sufficiently plastic. The laying technology has a number of characteristic features. The work is carried out 2 years after the launch of the source. This is necessary so that the soil around the rings is compacted in a natural way.
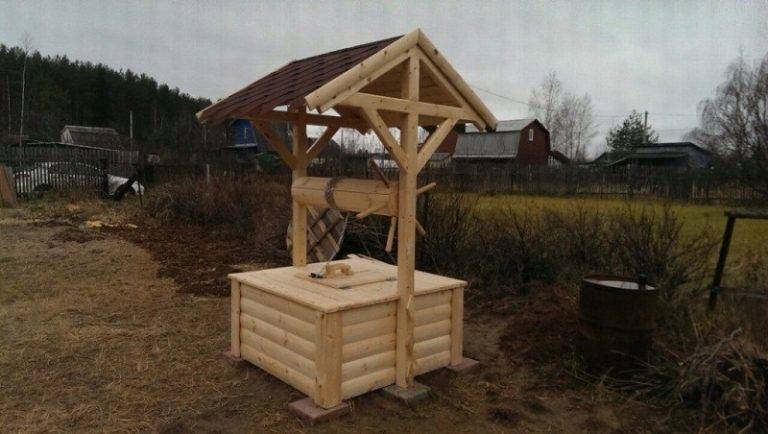
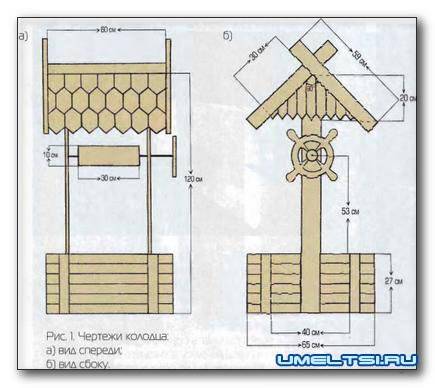
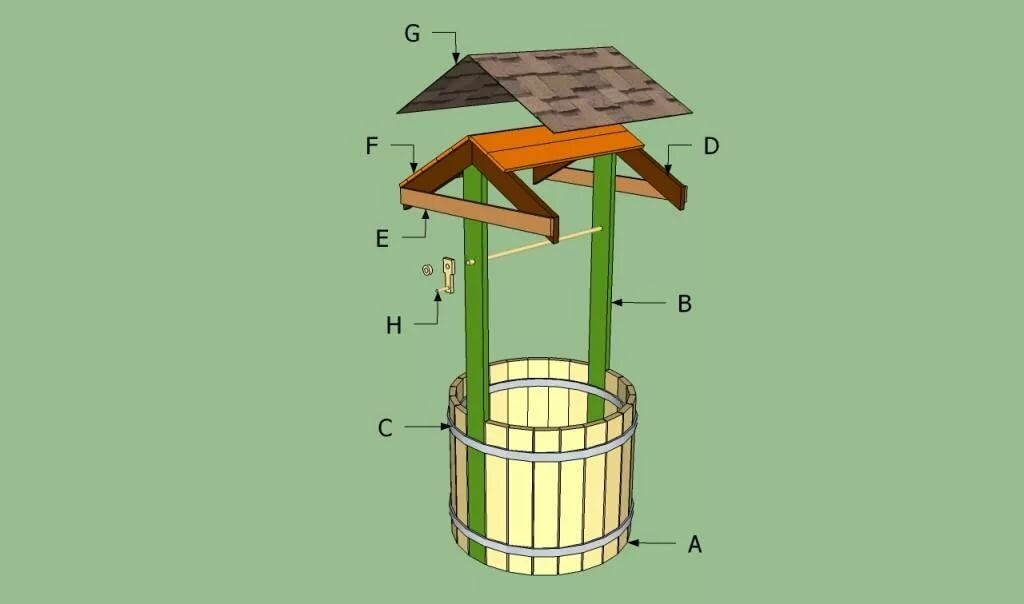
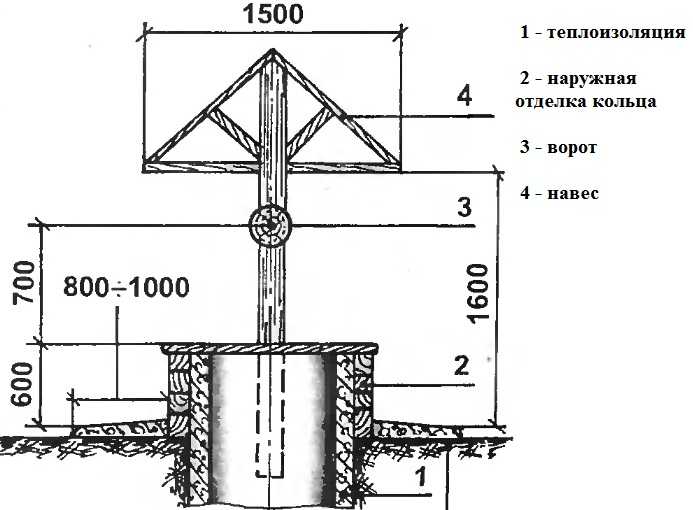
Head construction
The protruding part of the first ring can be ennobled with any finishing material (wood, brick). The main thing is that the head should be 60-90 centimeters above ground level. If you plan to raise water from the bottom with buckets, you will need a special drum with a crank handle. When using deep-well pumps for a well, the installation of this equipment is not necessary.
Well buildup
Knowing how to build a well is not enough to start using water for domestic purposes, drinking and cooking. To remove the dirt that is in the water in the form of suspended soil particles, it is necessary to use a drainage pump. Produce 3-4 procedures for pumping water, and then let it stand. The problem can be solved by installing filtration equipment.
Arrangement and decorative finishing

As additional equipment, a pipeline is mounted, and the system is equipped with a pump, filter, shutoff valves, check valve, etc. This is how an integral autonomous water supply system of a private house is formed, which will provide the family with clean drinking water.
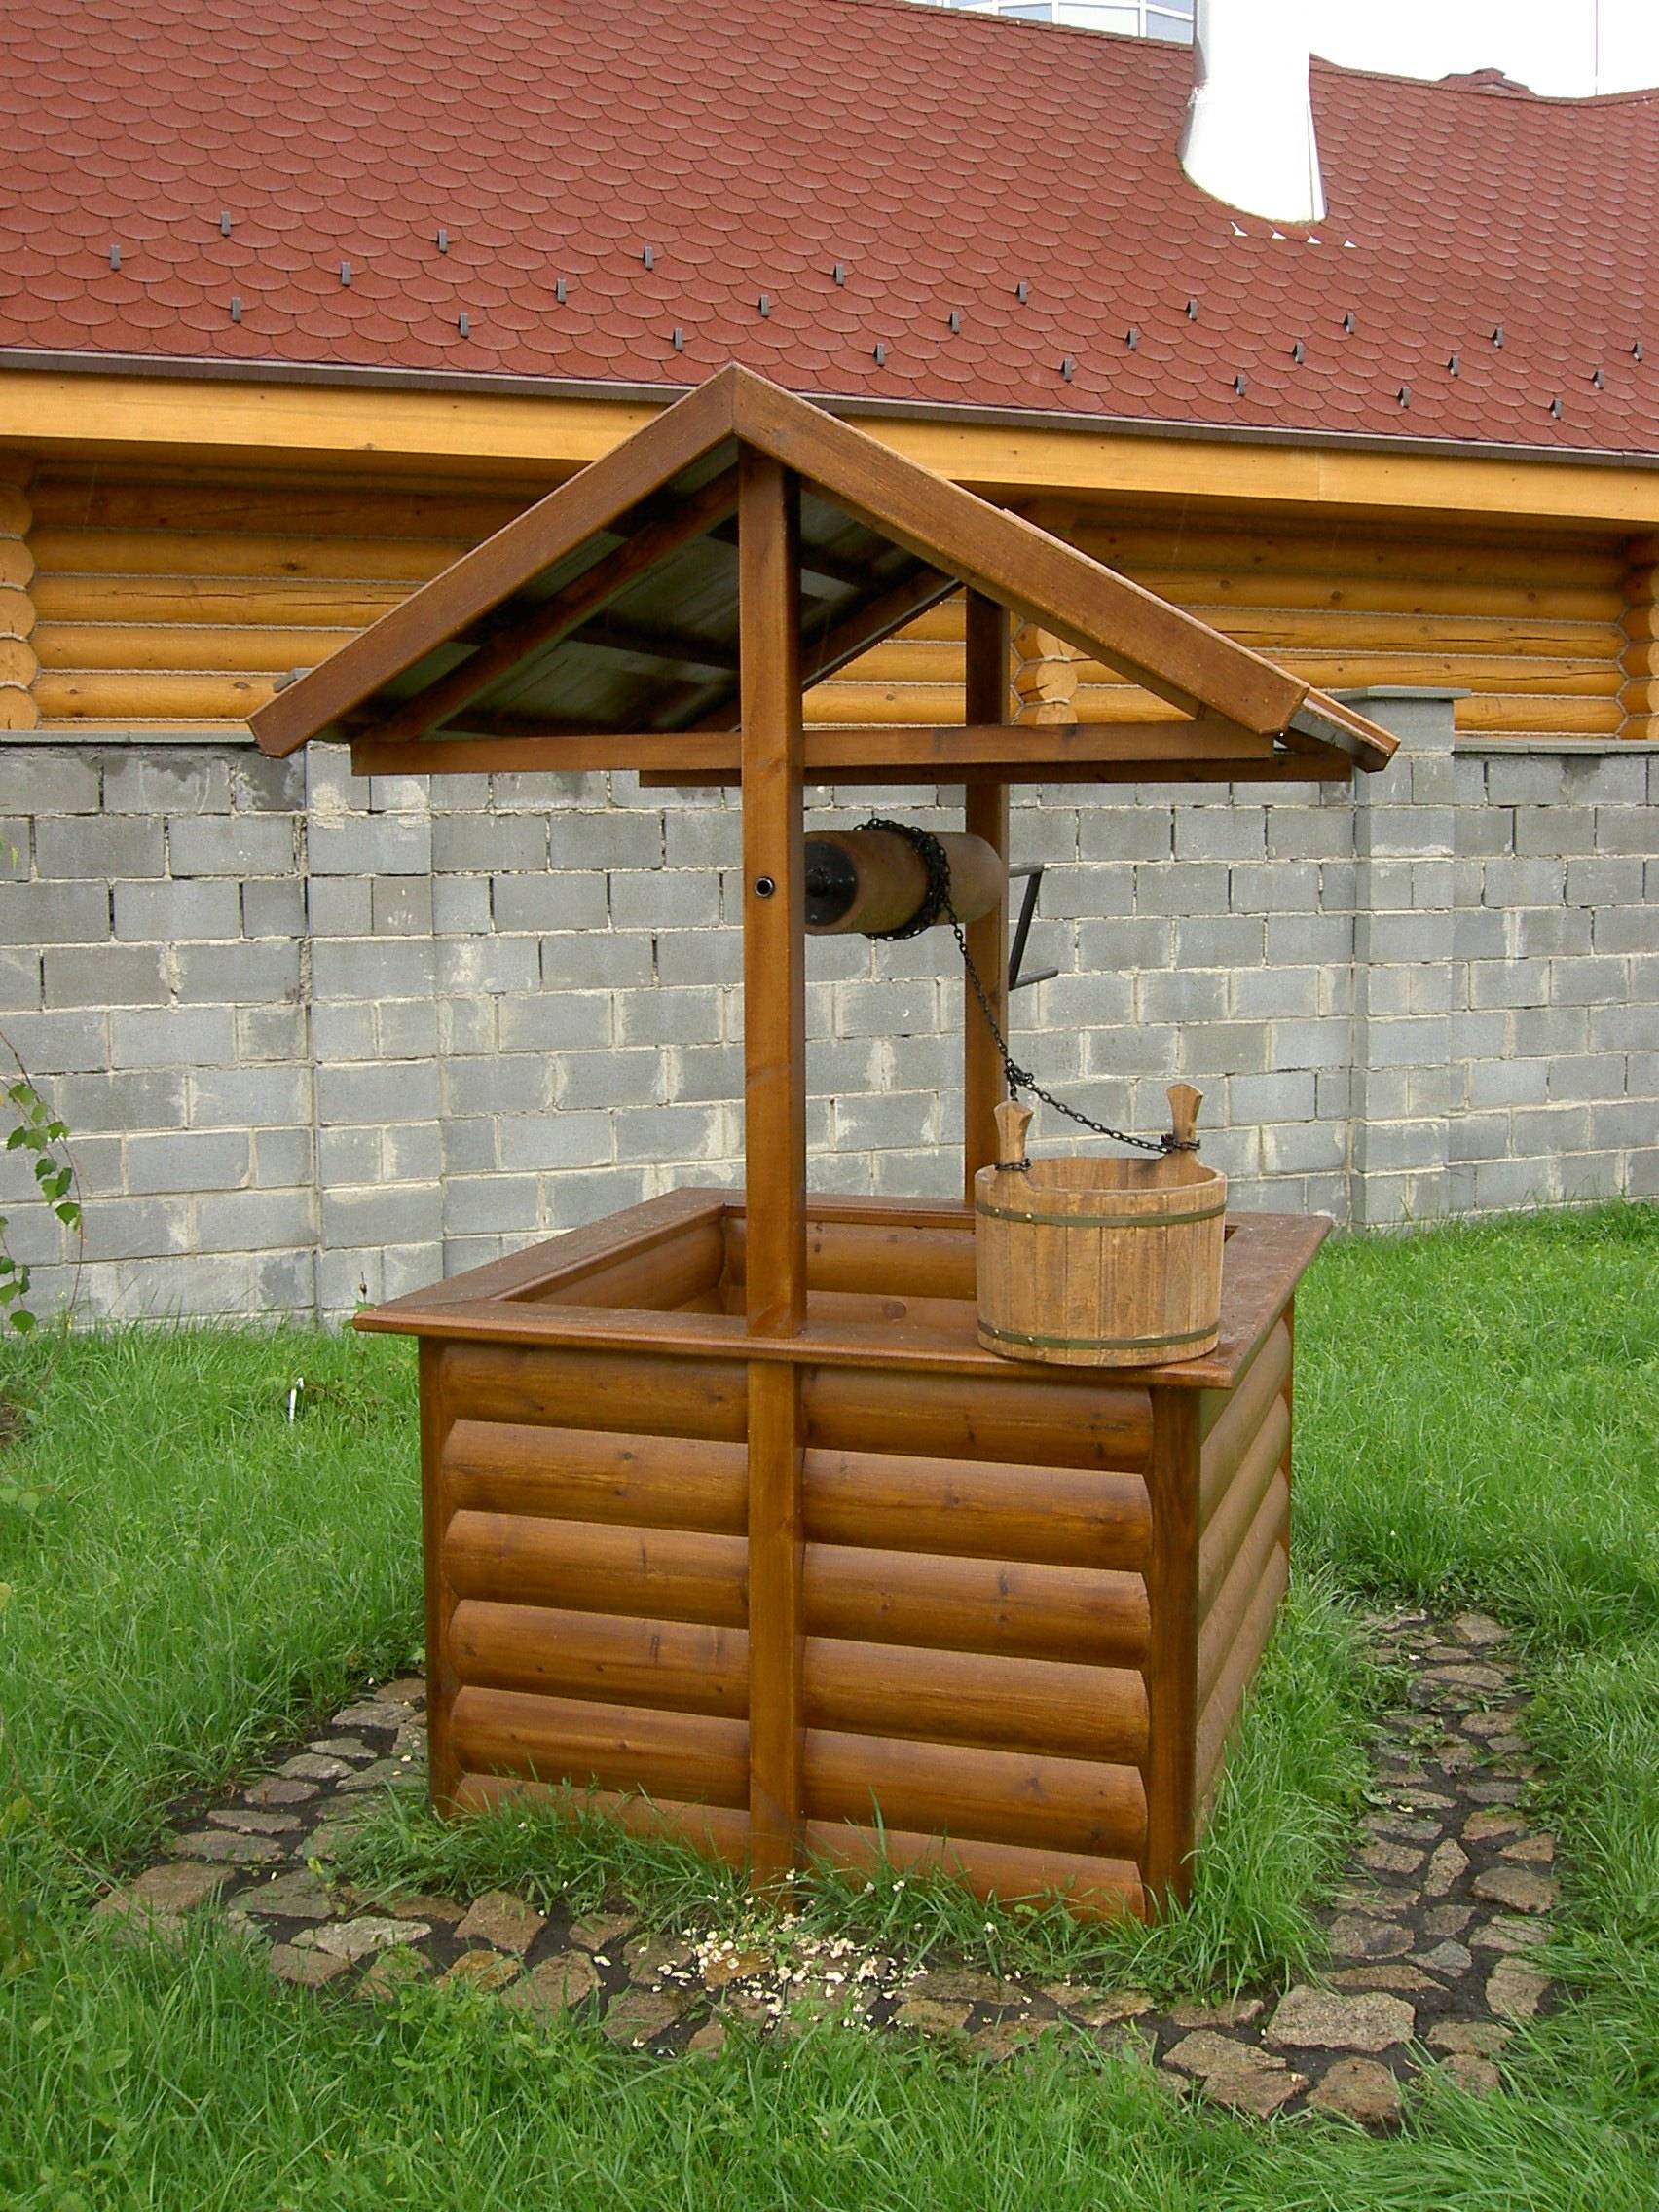
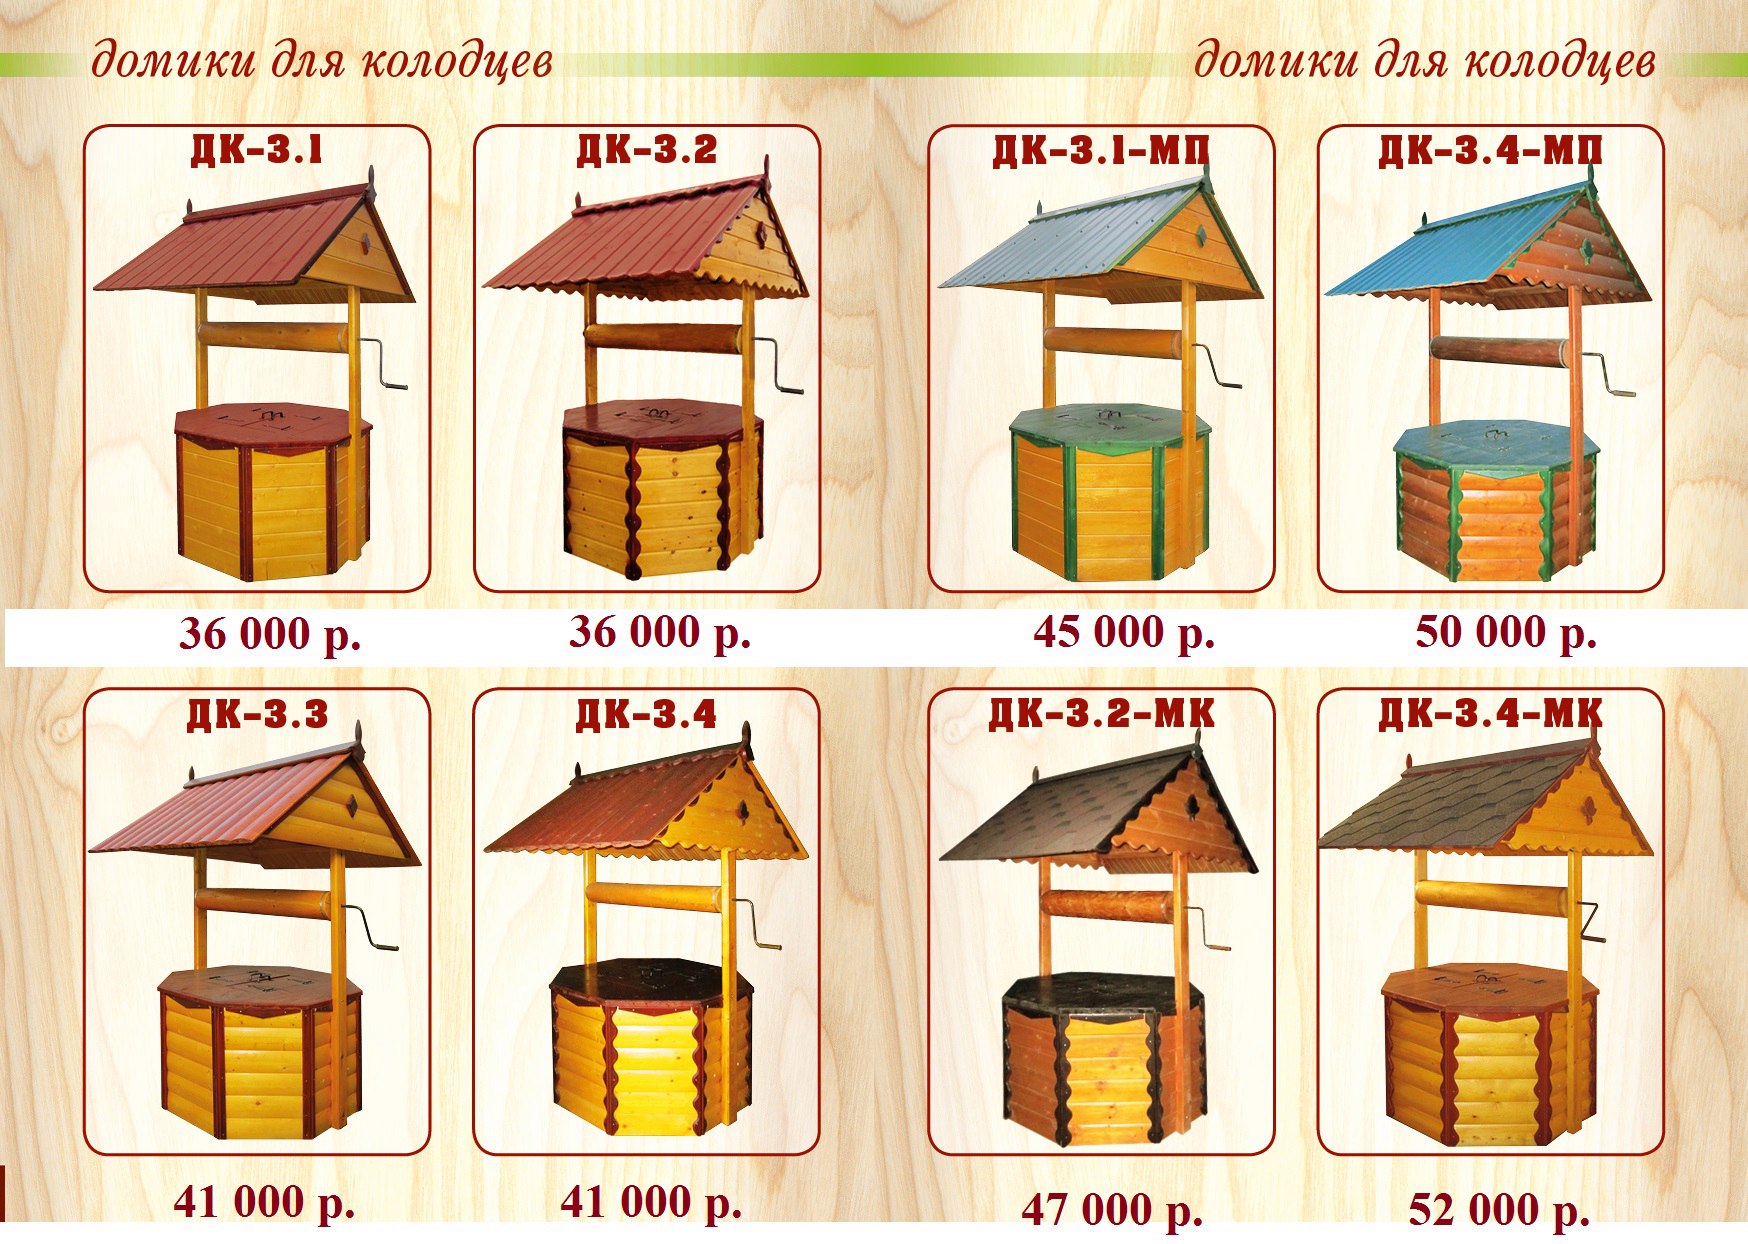
Do-it-yourself closed house for a well
We are talking about such a variant of shelter for the well - with a door. If you still make a cover inside, it’s sure that dust will not get in.
closed well
A frame is being built, then it is put on the head of the well and fixed with anchor bolts.
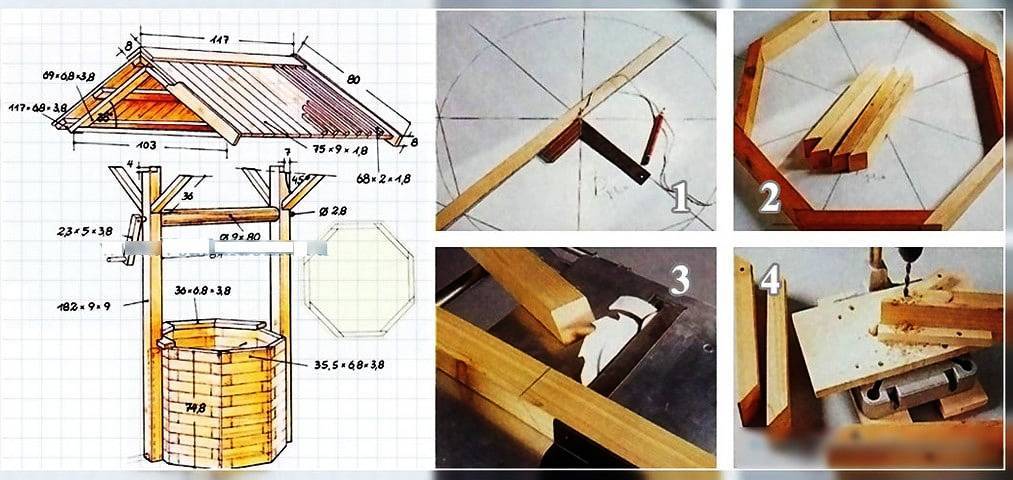
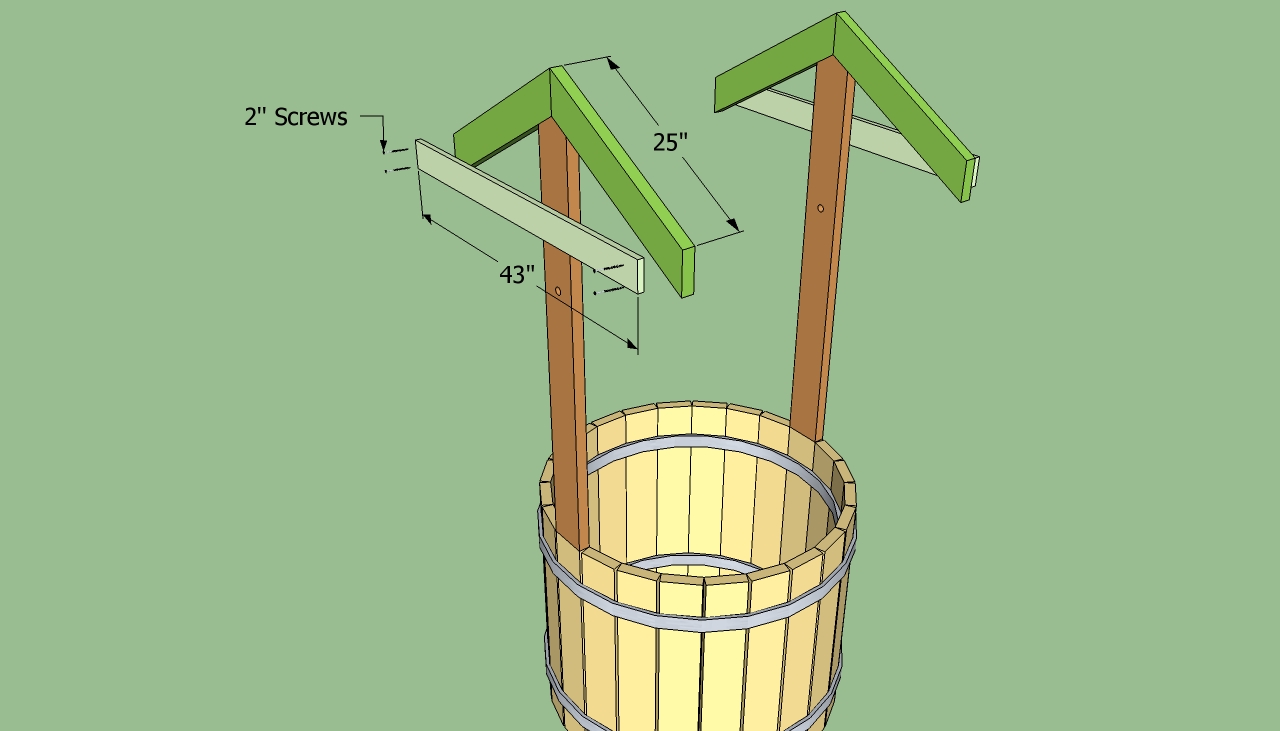
Do-it-yourself house for a well
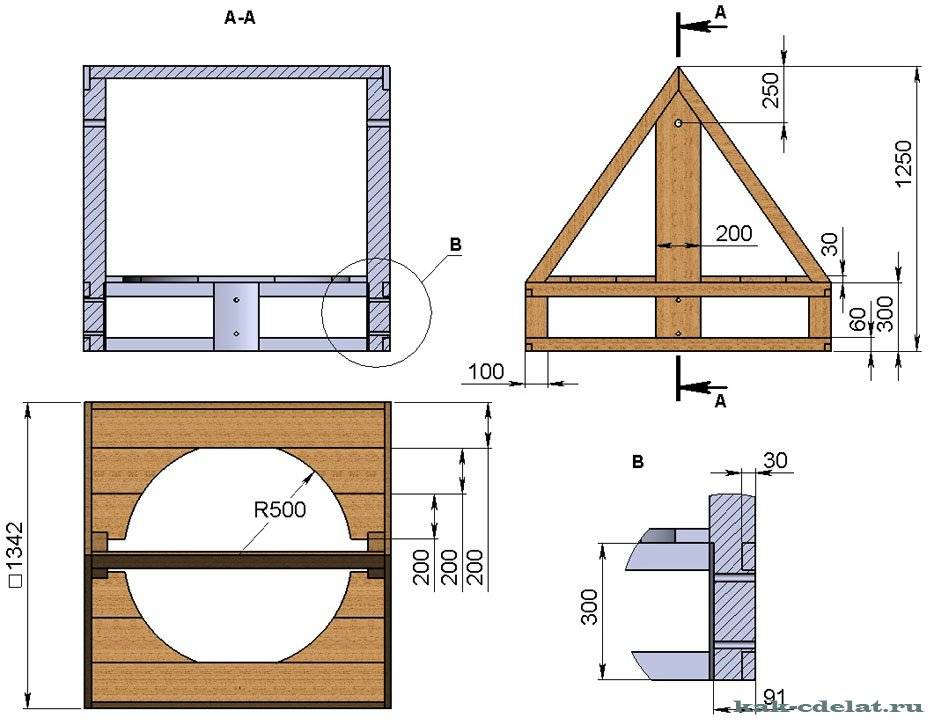
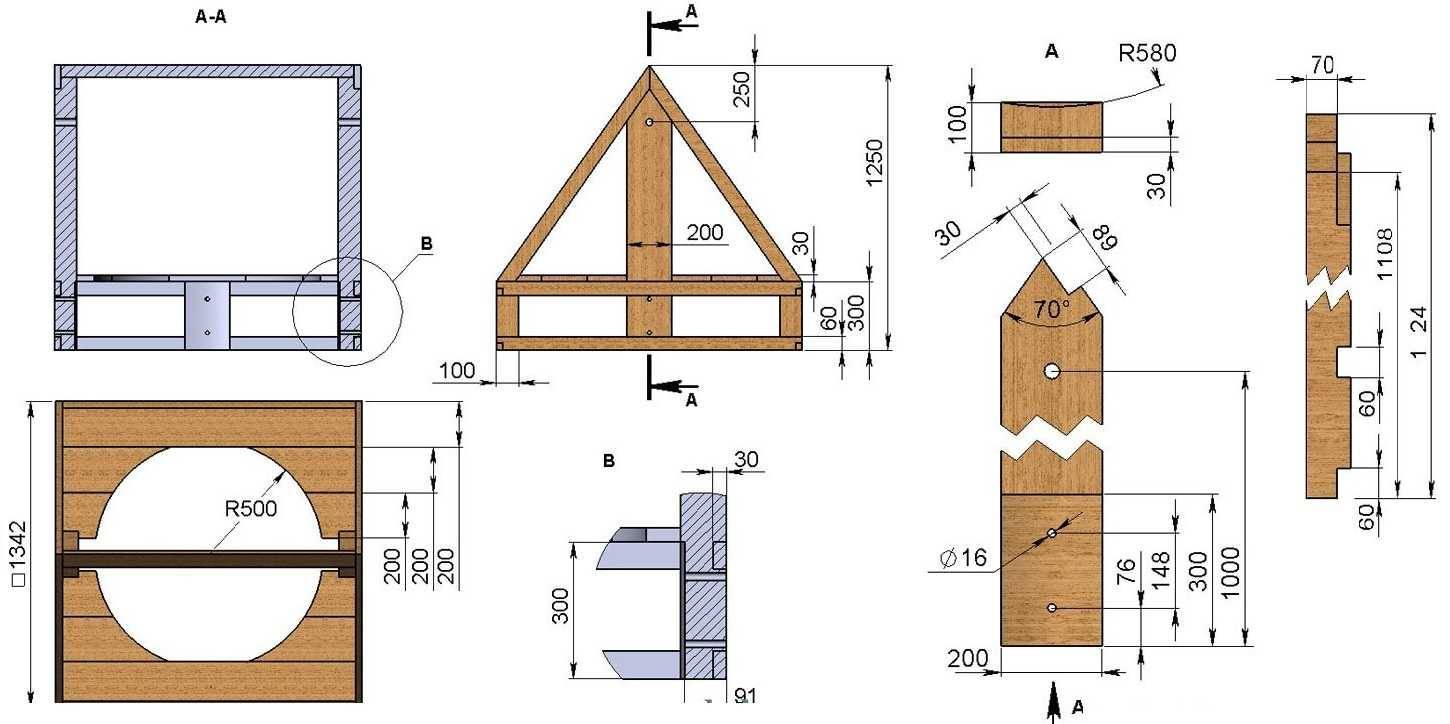
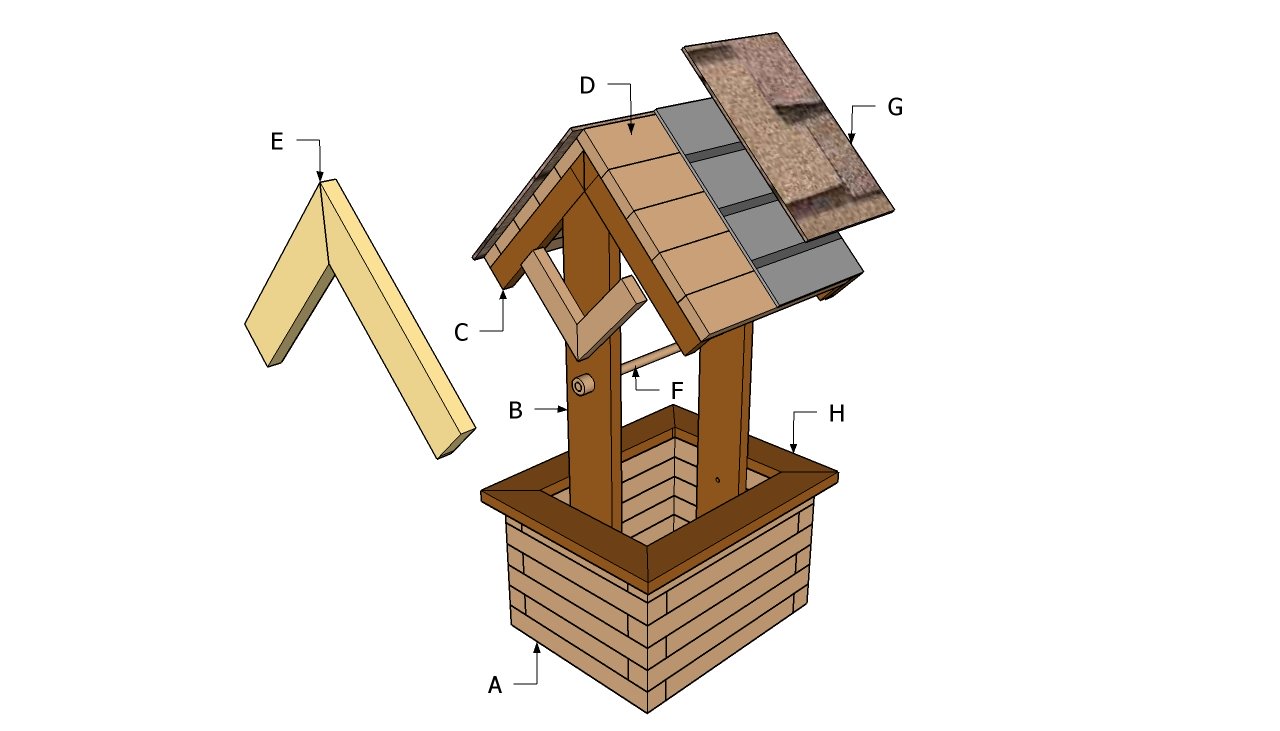
- support post made of 100*200 mm
- short support posts from the same beam 100 * 200 mm
- fixing bar 30*60 mm
- triangular beam
We assemble the frame, with the help of short bars we fasten it to the ring. After we proceed to the assembly of the pallet. Assemble the flooring from a board of 30 * 100 mm or so. The frame is sheathed with boards or sheet material, such as waterproof plywood.
The procedure for assembling a house for a well
To keep the doors well, you can put additional jibs. We hang doors - one or two, as desired. To make it easier to navigate, below are drawings with dimensions.
Do-it-yourself house for a well drawings with dimensions
According to the same scheme, you can make a roof for a metal house. If there is a welding machine, you can use a profile pipe. It is easier to attach finishing material to it.


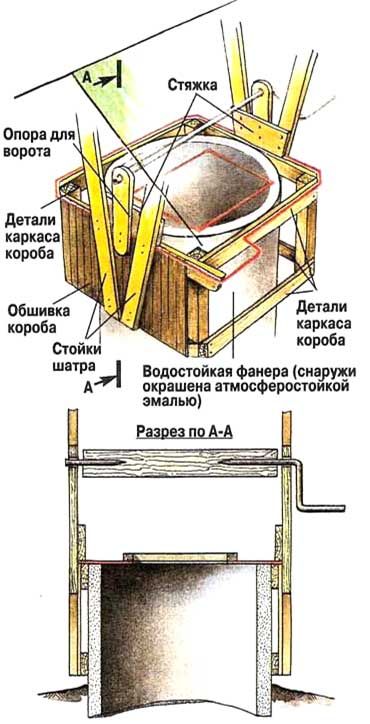
How to make a fully enclosed frame
You can also hide a concrete ring in the house. In this case, the gate, as a rule, stands separately, and then the frame is assembled. Choose the dimensions so that the design freely covers the ring. Height - 20 centimeters higher than your height: so that you can safely bend over and get a bucket.
Such a shelter for a well made of galvanized profile for drywall, metal tiles and siding
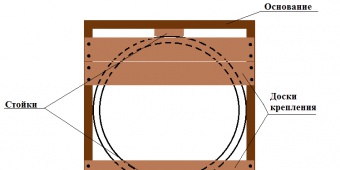
We take profiles from thick metal, galvanized. From the guide we assemble two identical frames - the “floor” and the upper level of the ring. They are connected by racks (profile for racks).It turned out a cube with filled sidewalls.
Frame assembly
At the guide profile, we cut the sides, leaving the “back” intact. So you can make a triangle. We fix the rack, which is equal to the height of the entire house. If you want to have equal slopes, the rack is attached in the middle. You can make the far slope steeper, then the stand is moved 15-20 cm from the center.
We attach the notched profile to the fixed rack. We get one of the elements of the truss system. We perform the same operation on the other side. We connect the resulting tops of the triangles with a crossbar.
Preparing for the door
From the side of the door, we add racks - on both sides. It is better to strengthen them - put wooden blocks inside and fasten them with self-tapping screws.
Roof installation start
We fasten the roofing material, for example, a profiled sheet, sheathe it with plywood. Soft tiles are then laid on plywood and nailed - who has what technology. The "foot" and sides of the roof are finished with any material. If you want - you can use wood - clapboard, imitation of a log or timber, if you want - siding.
In this case, the same materials were used as when facing the house: so that everything looks like a single ensemble.
Siding well house
Another video example of an assembly from a drywall profile in video format.
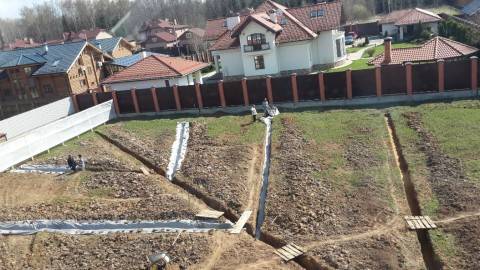
We make a network of channels for draining the site from tires
How to make drainage trenches from tires? Prepare tires: you will need old wheels of different diameters from 13-inch. In addition to tires, you will have to buy sand for backfilling and geotextiles. For a surface ditch, crushed stone is additionally needed. The fraction of backfill materials is large or medium.Fine sand and crushed stone are not suitable for drainage: small particles clog the openings of the canvas.

Tires: fit any size
Auxiliary tools and materials:
Connecting elements: plastic clamps, self-tapping screws.
Pieces of dense rubber for sealing joints.
Drill - for quickly punching holes in rubber.
Shovels, pickaxe, wheelbarrow, level, film, pegs and construction tape (fishing line) - for earthworks.
To make drainage from tires with your own hands, you first need to mark the path, length, plan the depth and width of the branches. Choose a line for arranging the central channel. Branches are marked to the sides of the main line: side branches at an angle to the central one.


Branch layout
At the upper points of the bends, the width of the ditches should correspond to the diameter of the tire with a margin of up to 20 cm. Depth - the diameter of the tire plus up to 30 cm for backfilling.
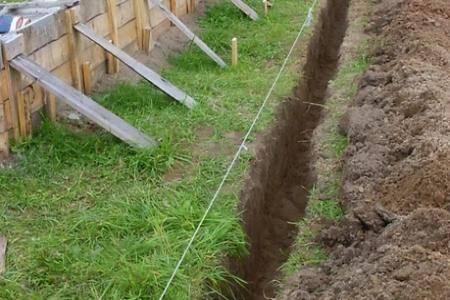
line dug out
Considering that larger diameter tires will be used as you approach the connection point with the center line, the depth and width of the trench is gradually increased towards the main line. In order for the water to drain quickly, a slope is formed: for side branches, a difference of 1–2 cm per meter is sufficient.
In the same order, they dig a central trench. The height difference in the main line must be greater than in the side branches. The optimal slope of the bottom is up to 3 cm per meter.
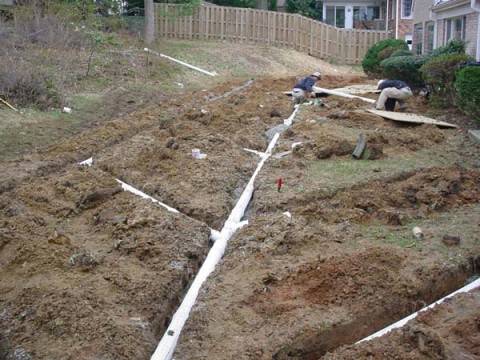
Slope along the natural slope of the site
The bottom of the dug channels is leveled, the observance of the slope is checked. A sand cushion up to 15 cm thick is made from sand.
Geotextiles are laid on the sand cushion. Leave free edges, taking into account the height of the tires in the drainage. For additional filtration, you can put a layer on the canvas crushed stone up to 15 cm high.
Finished drainage sleeve
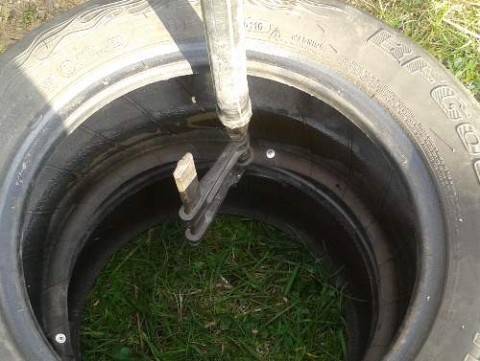
Assembling a pipe from tires:
- Tires are stacked on top of each other. Start the connection with wheels of small diameter.
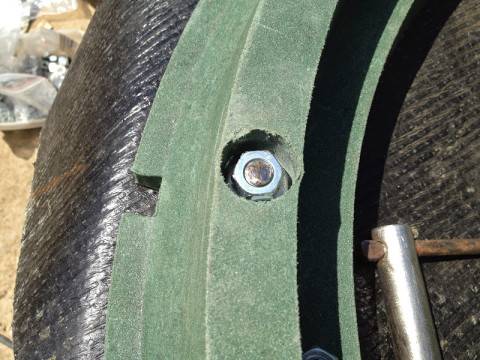
Connection with bolts and nuts
- The side walls of the two tires are connected with clamps through previously drilled holes. Self-tapping screws, or nuts with bolts, are used as fasteners. With this method of connection, gaskets made of a dense film or rubber are placed under the holes: the old rubber crumbles, the thread breaks.
Sidewall connection
- The pipe is assembled vertically, after installing the last tire, the finished drainage pipe is laid in a trench. Due to the large weight, several segments are formed, which are then connected directly in the channel.
To strengthen the structure from above and firmly connect the segments, metal strips with drilled holes are used. Self-tapping screws attach the strip to adjacent tires.
Connection of segments in the channel
The finished pipe is wrapped in geotextile. The edges of the canvas in several places are connected with electrical tape, staples.
Laying a pipe in a ditch
A layer of sand is poured over the finished clip. Top - backfilling with soil. It is advisable to make a ledge above the finished channel of sand and soil to a height of up to 10 cm: over time, the sand will sink, and the ledge will be level with the ground surface.
Surface drainage outlets are also made from tires. To improve the outflow, tires cut into segments are used.
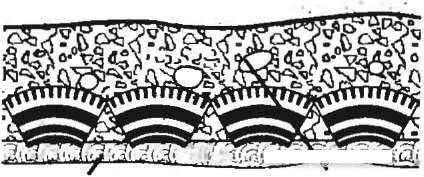
Scheme of installation of surface drainage
The arrangement of the surface line begins with the laying of geotextiles and the backfilling of crushed stone. The height of the crushed stone cushion is up to 25 cm. Parts of the tire are laid on the backfill with an internal cavity to the bottom of the trench.Holes expanding downwards will perform the function of perforation in the factory pipe: through the cracks, water freely seeps into the rubble.
Another layer of rubble is poured on top. Wrap and fix the edges of the canvas with an overlap. Ready clip fall asleep.


How is a shaft type well arranged?
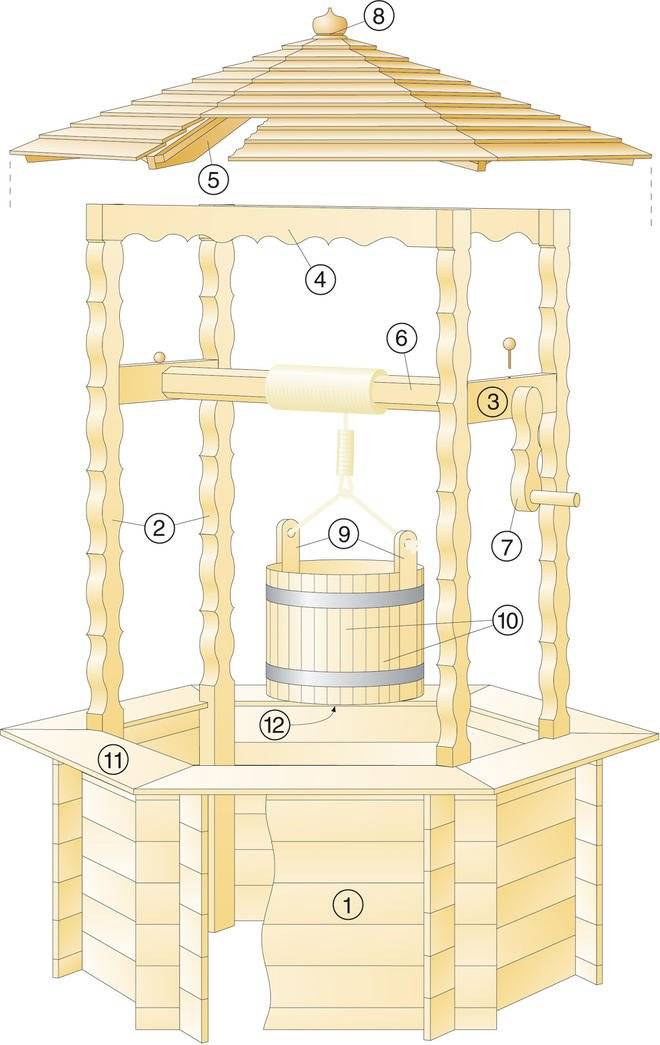
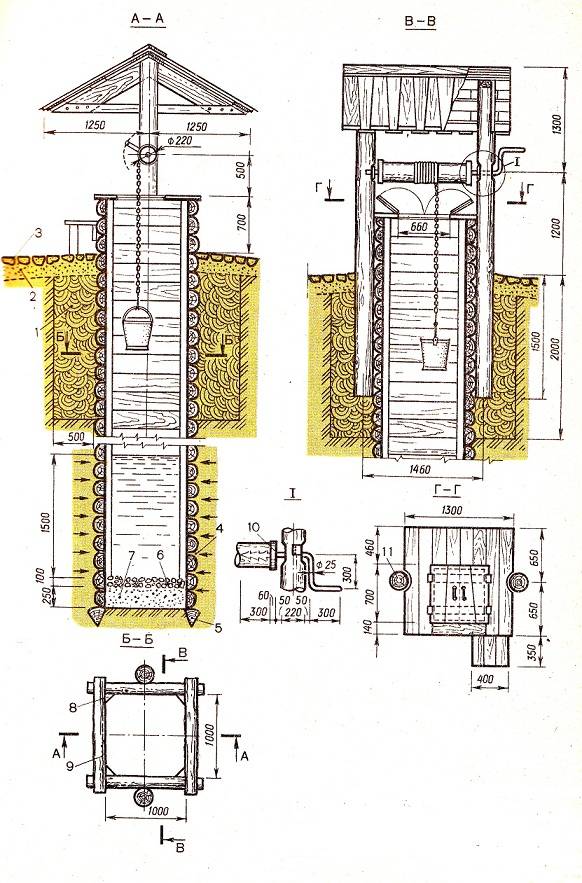
Knowing the structure of the shaft well, it will be easier to create it with your own hands. The design has three main parts:
- water inlet - the lowest part, which serves to collect and filter water.
- trunk - the entire underground structure above the water intake. It does not allow the soil to collapse and does not let the top water inside, while maintaining the quality of the water.
- head - everything that is located outside, above the ground. It does not allow dust particles and debris to penetrate into the water, and in winter it protects from freezing.
In addition to the main elements, we need additional ones with which we raise the water up. This is a collar, a chain, a bucket.
Do-it-yourself well in the country: choosing the best place
If you have chosen a well for the water supply of your private house or suburban area, and not a tubular well, then the first thing to do is to choose a suitable place for it. Consider the rules that should be followed when choosing a location for a well.
Note! Before final installation, it is recommended to analyze the water from the well. There is a possibility that the liquid will be of poor quality or, in general, will be undrinkable
Laboratory analyzes are also carried out during the operation of the water intake structure, since over time the water in the source becomes contaminated.

Before installing a well, you need to do a water analysis
The well must be located at a point remote from probable sources of pollution.The minimum allowed distance from the intake structure to the nearest landfill or cesspool is 25 m. However, experts recommend increasing it by 2 times in order to protect the water source in the well from clogging as much as possible.
Read on Dacha with your own hands:
- Where to dig a well on the site: how to look for water for a well
- Well or well: which is better for water supply at their summer cottage
- Abyssinian well: well design, do-it-yourself filter making
If necessary, you can always use the services of specialists. A professional team will not only carry out a qualified installation of the water intake structure, but also determine the most suitable place for it. The price of a turnkey well depends on the company whose services you want to use. To date, the cost of installing 1 ring is on average 4000 rubles. The cost may also include the organization of a bottom filter (about 2000 rubles) and the installation of an above-ground house (6-6.5 thousand rubles).
The recommended distance from the foundation of a residential or any other building to the well is 8 m. Failure to comply with this rule can lead to serious consequences. Water located underground can erode the soil layer under the foundation, which will lead to its weakening.

The well is recommended to be placed away from the landfill and cesspool
Experts advise equipping a well at the most elevated point (in the direction of the flow of water in the soil) in a suburban area. However, this rule is not decisive.This is due to the fact that no matter what place you choose for arranging the well, in any case, you will reach an underground source.
It is important to remember: in order to buy reinforced concrete rings for a well, it is necessary to accurately calculate their number and dimensions. The depth of the structure can be different
What materials are best to use?
To decorate the wells, the candidate is not chosen from a too large list. The requirements for materials are the same as for the facade decoration of the house. They must:
- intended for facing external walls;
- have a high degree of wear resistance;
- resist moisture.
The list includes wood, stone, brick, paint and plaster. The budget solution is cladding with siding, the simplest is decorating with living plants.
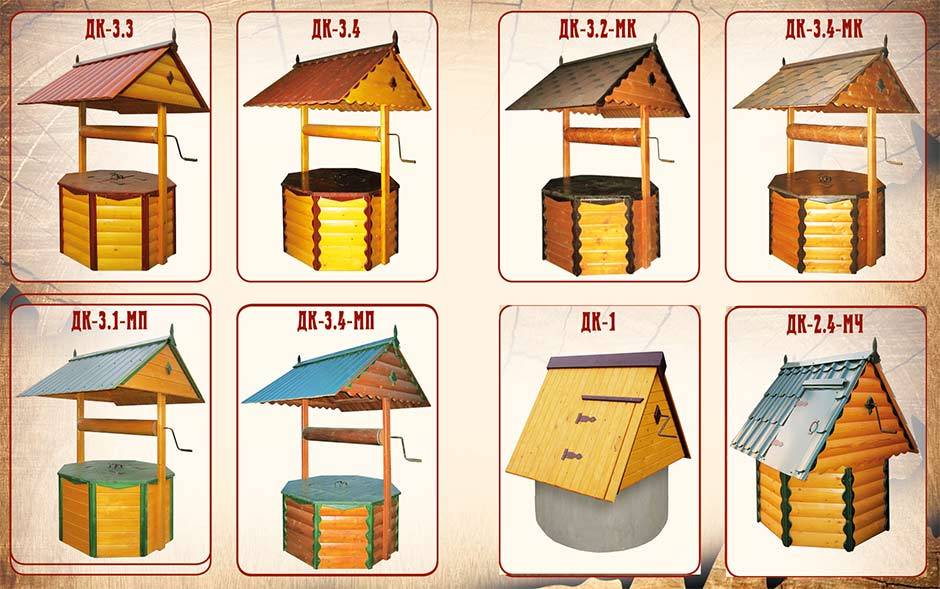
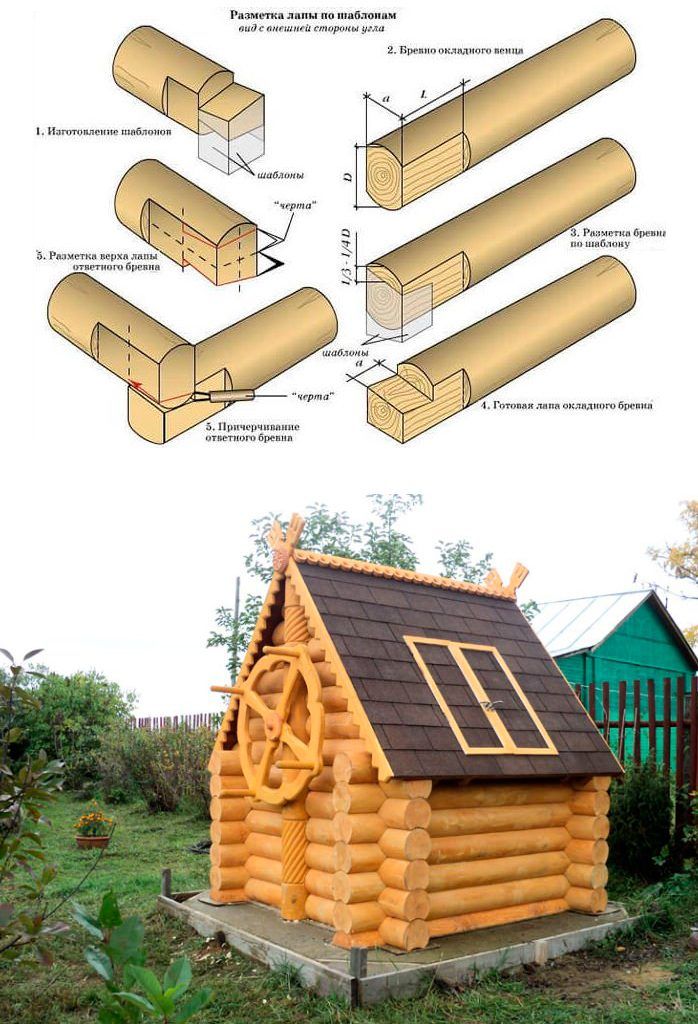
Wood
This material, despite its "sensitivity" to moisture, to various types of living threats, does not lose its popularity due to its magnificent appearance, naturalness. The wood is quite strong, aesthetic, easy to process, so if desired, the walls of the well can even be made carved.
High-quality protection of all wooden elements with moisture protection, antiseptics and flame retardants is always necessary. Above the shaft of such wells, roof-canopies are installed to protect the water from debris and precipitation. They also complete the design.
Several lumber can act as cladding. It:
- log rounded;
- beam profiled;
- croaker;
- board.
To ennoble the well with your own hands, you can choose one of the applicants. A log is more expensive, however, after high-quality processing, other competitors will not yield to this lumber. The choice is influenced by the design of the structure.Simple wells are sheathed with a board. If the construction of a house in the Russian style is conceived, then the logs remain the only candidates.
This category also includes the decoration of wooden clapboard (for example, a block house) or siding. Such a sheathing will require the creation of a crate, on which the lamellas will be attached.
Stone
A natural "heavyweight" is unlikely to be called an ideal option by anyone because of its high price. Artificial stone cladding also cannot be considered a budget option, however, in both cases, the view of the transformed well will be impressive.


This material is usually chosen by those owners whose house also has the same finish. More democratic types of cladding are cobblestones, rubble stones or their imitation, pebbles (large, medium), sandstone or plastushka (wild stone, flagstone).
Brick
This is another serious contender for the title of finish for the well. You can take any type of brick, but the best is still a full-bodied red ceramic block, which costs more. The easiest way is to lay out straight walls around.
A more elegant solution is circular masonry. However, in order to ennoble the well with such a “ring” with your own hands, you will have to cut artificial stones, and this work will not inspire everyone. Knowledge of the features of masonry in this case is required.
Plaster, paint, varnish
The first material is used at the final stage of finishing, if the well was built from concrete rings, the surface of which is far from ideal. Plaster and paint (green) are used together if the concrete walls of the well are planned to be decorated not with ordinary decoration, but with vegetation.
Lacquer is a traditional additional protection for well walls sheathed with wooden elements.Usually it is chosen when it is necessary to preserve the natural look of structures turned into log houses.
Other options
The list of materials does not end there: you can ennoble the well with your own hands in a different way.
- Clinker, ceramic tiles, mosaics. The first materials are usually chosen for lining rectangular wells, the second - for round structures. A wide range of such products makes it possible to choose a finish suitable for any site.
- Vinyl facade siding. This budget option guarantees durability, strength, resistance to all weather conditions. A wide range of products is another plus of the choice of material: you can purchase models that imitate wood, natural stones or bricks.
Tires are another way to change the look of a structure, but it does not make sense to consider this improvised material as a design candidate for a real source. It is unlikely that primitive tires are able to decorate (let alone ennoble) a well, even an Abyssinian one. Tires are sure to be recognized by guests, even if the slopes are painted and then painted to look like brickwork.
Bog oak
The owners of suburban areas who decide to equip a chopped wooden well, first of all, should decide on the type of log. Bog oak is considered the most suitable material for lining the walls of mines. Log cabins made from such round timber can last several decades in the underwater part, and up to 25 years on the surface.
They make bog oak from ordinary oak using a fairly simple technology. To do this, the logs are placed in running water for at least 1-2 years.But, of course, most owners of suburban areas are unlikely to agree to carry out such a lengthy preparation of material for a log house. Therefore, bog oak for lining wells usually just buy.
Location selection
For some reason, it seems to some inhabitants that water should be present everywhere. It is enough to make the hole deeper - and the well is ready. As a result, a wasted mine, wasted time and nerves. Moreover, the vein can pass just a couple of meters from the dug well, which remained dry.
To search for a nearby water reservoir, the dowsing method has been successfully used to this day. Once upon a time, branches of viburnum, hazel or willow served as natural biolocators. Today, even experienced drillers often replace them with pieces of copper or aluminum wire with ends bent at 90 degrees. They are inserted into hollow tubes and, holding them in their hands, pass the site meter by meter. In the place of close passage of water, the wires begin to cross in the direction of the current. To be sure, the site is surveyed in this way several times.
Search using dowsing
When looking for a place for a well in the country, you should also pay attention to the color of the greenery growing on the site. It's more juicy near water.
Willow, meadowsweet, ivy and meadowsweet are very fond of such places - where they have chosen a place for growth, they will definitely live. Nettle, horse sorrel, cinquefoil, naked licorice, coltsfoot, horsetail also grow here. But apple and plum trees, on the contrary, take root worse and often die.
Alder, willow, birch, willow and maple will always tend to the aquifer.Solitary oaks are also a sign of the high standing of the waters. They grow exactly where they intersect.
It has long been noticed that cats like to bask in such places. Dogs, on the other hand, avoid such areas. It is also worth watching the red ants. They try to locate anthills away from water. Near it in the evening, a large number of mosquitoes and midges always hover. In the mornings there is also always more dew and fog.
After finding the alleged location of the aquifer, before digging a well in the country, exploratory drilling is carried out. For these purposes, it is allowed to use an ordinary garden drill. Since it will have to go deep by 6-10 m, its length will have to be increased. If moisture appeared after digging the well, then the location of the water reservoir was determined correctly.
Types of groundwater by depth
If you don't trust the old tried and tested methods, contact a nearby exploration site. In the arsenal of such organizations there are always special geophysical instruments that can accurately determine the close location of an aquifer.
When the formations are below 10-15 m, the idea of digging a well should be abandoned. In this case, well drilling will be required.
How to make a cellar in a private house or in the country with your own hands: diagrams, step by step guide, proper ventilation (55+ Photos & Videos) + Reviews


Recommendations for the care and operation of the facility
After the manufacture of the house for the well, its daily operation begins. To prolong the life of your creation, it is necessary to carefully treat it with antiseptic compounds and impregnations to protect the wood from moisture penetration into its structure and, consequently, from decay.The surface of the house can be varnished or painted. Thanks to this, we will protect areas that are forced to withstand the effects of rain and snow. This design will give the house an aesthetic look. With the help of bright colors and varnish, it is always possible to create a cozy atmosphere on the site.

The metal elements of the house - gates, valves, hinges must be lubricated with grease. This will provide them with good glide and extend the service life.
Even materials as strong as pine or oak will last much longer if properly cared for. It is necessary to annually inspect the house for the formation of chips, small cracks, rotten areas, displacements, holes and prepare it for the next summer season. If there is a breakdown of working parts, they need to be repaired.
Do-it-yourself well: structural components
Drilling equipment can be used if the ground is difficult to pass (rocky or semi-rocky). Arranging a well in a country house with your own hands is possible if the soil on the site belongs to one of the following types:
- sand;
- sandy loam;
- clay;
- loam.

Before you start equipping the well, you need to find out what type of soil is on the site.
Experts recommend that before installing the well, study in detail its design and individual components. Consider what is included in the mine water intake development. The lower part, which performs the intake of fluid, is called the water intake. If the supply of the aquifer is able to meet the needs of consumers, then water enters only through the bottom of the well. However, if the reservoir resource is not large enough, the walls are perforated, which increases the fluid inflow.
The next component of any well is the trunk. This segment originates from the surface and ends at the bottom (at the water level in the well). Such a pipe is mounted from various materials. The most common for the well are reinforced concrete rings, monolithic concrete, as well as brick. In some cases, a tree is used for these purposes.
The wellbore must necessarily meet certain characteristics
For example, it is very important that it be airtight. Otherwise, drinking water may be contaminated with precipitation and chemical compounds contained in the soil.

If you hire workers to dig a well, then the price will be 1000-2000 rubles. per 1 meter
Another part of the well is the head. This design is located above the ground and resembles a small house. The function of this element is to protect the well from low temperatures in winter, and also protects it from precipitation.
The optimal height for this structure is approximately 0.8-0.9 m, and the minimum is 60 cm. It simply does not make sense to build a house below the latter value, since it will cause inconvenience during operation. The head consists of a cover that protects the water in the well, and a lifting mechanism (for a bucket). The latter can be either manual or automatic, depending on the preferences of the owners of the site.
Useful information! The price of digging a well by hand per meter ranges from 1000 to 2000 rubles.
The place of docking of the head with the trunk needs the organization of a protective structure made of clay. It is called the clay castle. It is located along the perimeter and acts as a barrier to waste and melt water, which may be on the soil surface.The depth of such a structure should be lower than the level of soil freezing, and the width should be approximately 0.5 m.

The cap for a well or a well is placed above the ground


