- How to organize an autonomous water supply from a well
- Video description
- Conclusion on the topic
- The device of sewer wells made of concrete
- Production and installation of plastic wells
- How to install an inspection and collector well
- Installation of an absorbent structure made of plastic
- Making containers from plastic pipes
- Choosing a place for construction
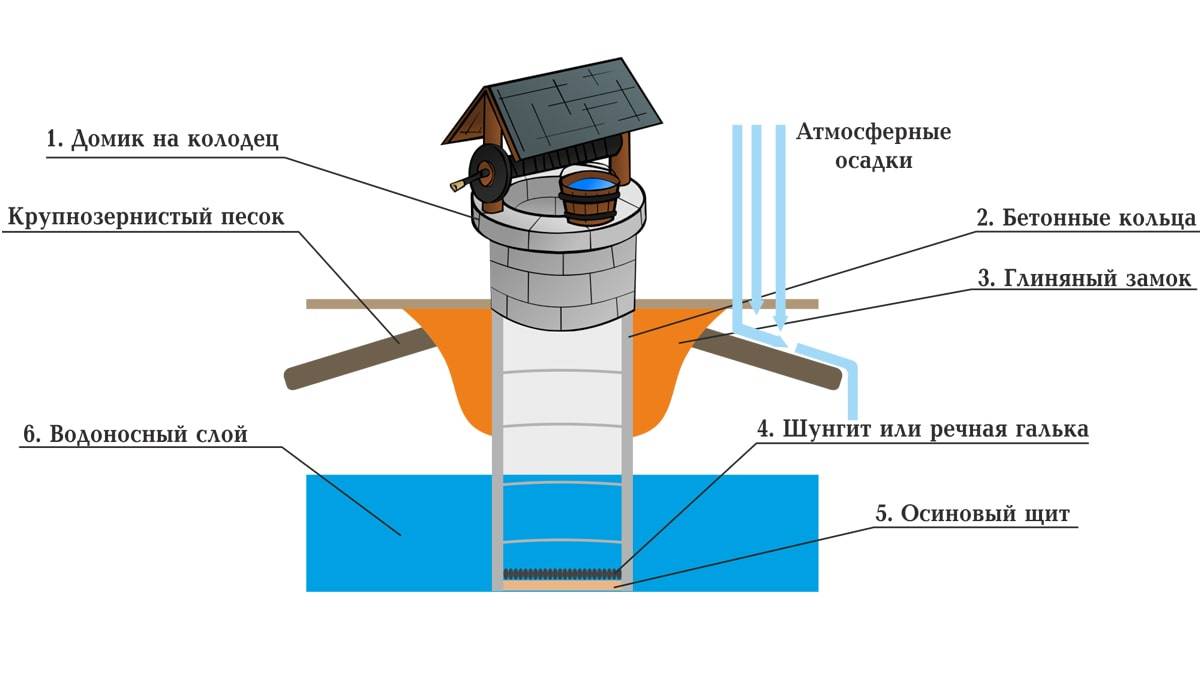
- Arrangement of a clay castle
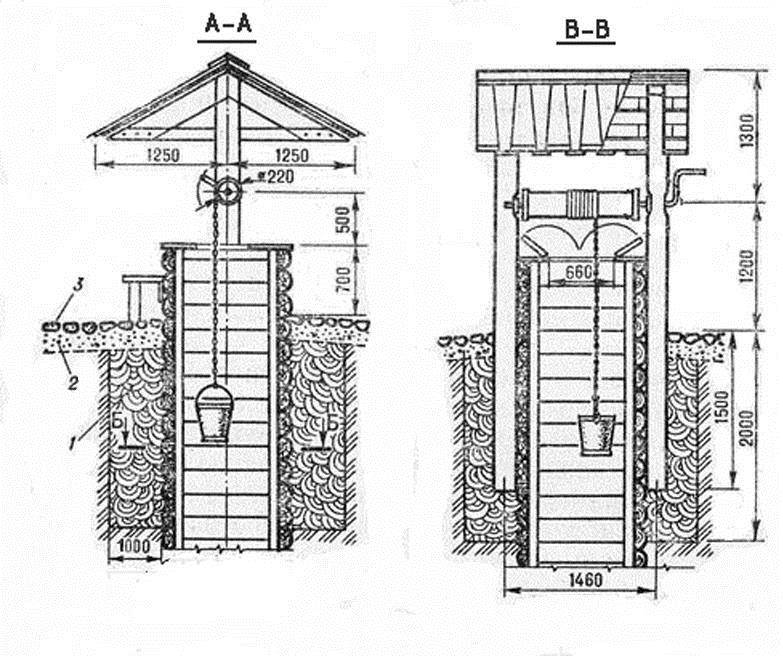
- Step-by-step instructions for making a house for a well
- Well gate
- Do-it-yourself door to the house
- Installation of roofing material
- Floor installation
- How to choose a place and time for digging?
- Stage two. We prepare everything you need
- Advantages and disadvantages of water wells
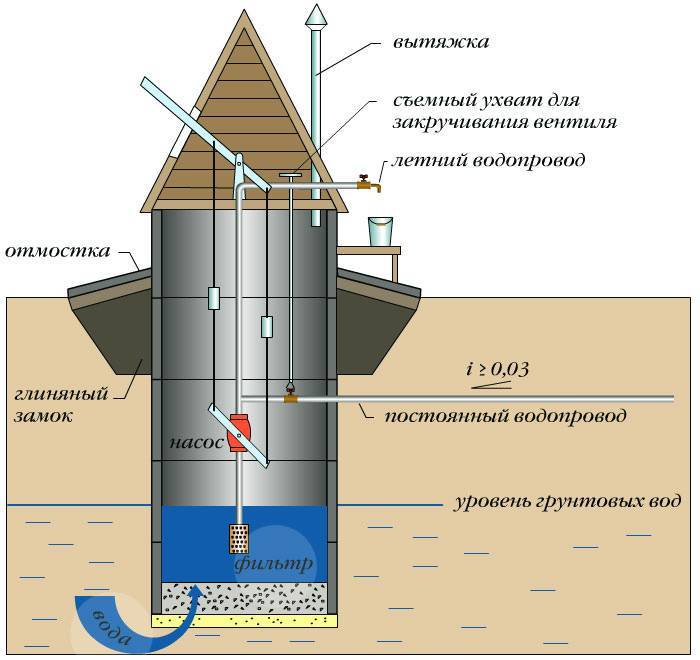
How to organize an autonomous water supply from a well
So, the country well is ready. But do not carry buckets of water from it into the house. If there is enough water in it, then you can organize a small water supply network with a plant right in the house. To do this, you need to choose an electric pump and a plastic pipe.
As for the pump, either a submersible version or a surface one is suitable here. The second one is better because it is always in sight. And if it is necessary to carry out its repair or routine inspection, then there is no need to pull it out of the mine, as a submersible option.
The pump itself is selected by power (capacity - m³ / h or l / s) and pressure. The first characteristic is selected taking into account the required amount of water that is used in the country. For example, the productivity of a standard kitchen sink is 0.1 l / s, a toilet bowl is 0.3 l / s, a valve for watering a garden is 0.3 l / s.
That is, it is necessary to calculate the number of plumbing fixtures that are used in a suburban area, determine the performance of each and add up these indicators. This will be the overall performance of the pump. As for the pressure, it is determined by the depth of the aquifer, that is, the depth of the well.
Installing a submersible pump in a well
If a submersible pump is selected, then it is installed directly in the well shaft, lowering it into the water. It is suspended on a steel cable. A plastic flexible pipe is carried out from the device inside the house. If a surface pump is mounted, then it is installed next to the well: either near the head, or inside the shaft on a special metal stand, or inside the house in a heated room. From it, a pipe is lowered into the well, at the end of which a strainer is installed. And a pipe is also drawn from the device inside the house.
If the cottage is operated only in the warm season, then the pump is dismantled in the fall, the hoses are twisted into a bay. And all this is stored in a dry place. In the spring, the equipment is reinstalled.
Video description
The video shows how you can simply organize water supply for a country house from a well:
Conclusion on the topic
The arrangement of a well in a summer cottage is a difficult, serious and responsible process. It is impossible not to take into account the rules and regulations for the location of this hydraulic structure
It is important to conduct construction correctly, where the option with a pit drill is the fastest, easiest and safest
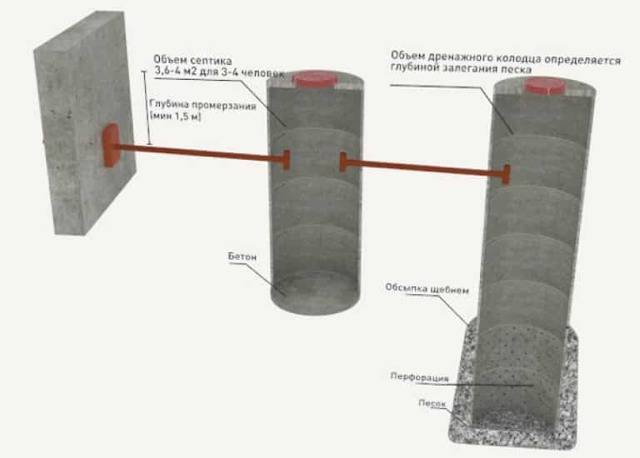
The device of sewer wells made of concrete
When the preparatory work is completed, the process of mounting the well begins.
In the case of a concrete or reinforced concrete structure, the arrangement of the sewer well will look like this:
- first, the base is prepared, for which a monolithic slab or a 100 mm concrete pad is used;
- further, trays are installed in sewer wells, which must be reinforced with a metal mesh;
- pipe ends are sealed with concrete and bitumen;
- the inner surface of the concrete rings must be insulated with bitumen;
- when the tray hardens enough, it is possible to lay the rings of the well itself into it and mount the floor slab, for which cement mortar is used;
- all seams between structural elements must be treated with a solution;
- after grouting with concrete, it is necessary to provide the seams with good waterproofing;
- the tray is treated with cement plaster;
- at the pipe connection points, a clay lock is equipped, which should be 300 mm wider than the outer diameter of the pipeline and 600 mm higher;
- one of the final steps is to check the design for operability, for which the entire system is completely filled with water. If no leaks appear after a day, then the system is functioning normally;
- then the walls of the well are filled up, and all this is compacted;
- a blind area of 1.5 meters wide is installed around the well;
- all visible seams are treated with bitumen.
The device of a sewer well made of concrete rings, described above, is no different from the arrangement of a brick structure, with the only difference being that in the latter, concreting is replaced by brickwork. The rest of the workflow will look the same.

There are also overflow wells, which have a somewhat more complicated structure compared to the structures described above (for more details: “Drop-off sewer wells are an important need“).
In addition to the tray, one or more conditions may be required to equip the overflow well:
- riser installation;
- water tower installation;
- arrangement of a water-breaking element;
- creation of a practical profile;
- pit arrangement.
The basic principle of installing wells does not change, with the exception of minor differences. In particular, before installing a drop well, it is necessary to lay a metal plate under its base, which prevents concrete deformation.
Thus, the composition of the differential well includes:
- riser;
- water pillow;
- metal plate at the base;
- intake funnel.
The funnel is used to neutralize the rarefaction that occurs due to the high speed of movement of effluents. The use of practical profiles is quite rare, since it is justified only on pipes with a diameter of more than 600 mm and with a drop height exceeding 3 m. As a rule, such pipelines are not used in private households, and overflow wells are a rare occurrence, but other types sewer wells are in demand.
According to regulatory enactments, the device of a well for sewerage is justified in such situations:
- if the pipeline needs to be laid at a shallower depth;
- if the main highway crosses other communication networks located underground;
- if necessary, adjust the speed of movement of effluents;
- in the last flooded well, immediately before the discharge of wastewater into the water intake.
In addition to the reasons described in SNiP, there are others that necessitate the installation of a differential sewer well on the site:
- if there is a large difference in heights between the optimal depth of the sewer at the site and the level of the wastewater discharge point into the receiver (this option is often justified, since laying the pipeline at a shallower depth allows you to perform less work);
- in the presence of engineering networks located in the underground space and crossing the sewer system;
- if there is a need to control the rate of movement of wastewater in the system. Too high speed has a bad effect on the self-cleaning of the system from deposits on the walls, as well as too low speed - in this case, deposits will accumulate too quickly, and the use of fast current is required to eliminate them. Its meaning is to increase the fluid flow rate in a small section of the pipeline.
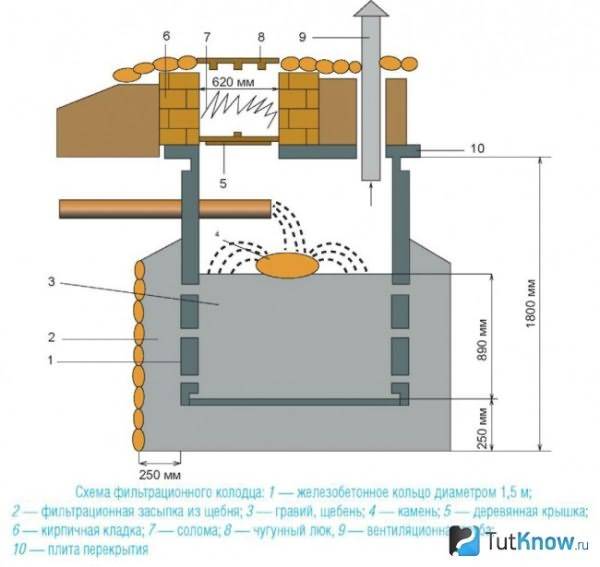
Production and installation of plastic wells
The installation process depends on the type of well. For viewing, rotary and storage structures, it is necessary to make a concrete base. Absorption wells without a bottom require the arrangement of a filter system.
Gallery of imagesPhoto from The assembly of the drainage system with the installation of polymer wells is carried out at the highest possible speed For the construction of the system and the installation of wells, all types of parts are produced that greatly facilitate and speed up installation work Aggressive environments do not affect the structure of polymer wells, they are indifferent to the proximity of water and temperature fluctuations manholes are produced, in the line of which you can find options that are resistant to high loads.
How to install an inspection and collector well
If you purchased a ready-made plastic container, then you only need to install it on a pre-prepared base. Installation of both types of wells is practically the same. The difference can only be in size, the number of outlet pipes, and also in a horizontal or vertical arrangement.
Viewing, as a rule, have a vertical design, accumulative can be made in a horizontal or vertical version. In addition, collector wells are usually equipped with a drainage pump and pipes are diverted to the sump.
Before arranging a well for collecting and discharging drainage water, dig a ditch, carry out preparatory work as described above, and lay pipes, but do not fall asleep yet.
Well installation consists of the following steps:
- deepen the area where the well is supposed to be installed, it should be 40 cm deeper than the level of the pipes;
- pour and compact a layer of sand and gravel;
- prepare a concrete solution (3 parts of sand and 1 part of cement) and fill the bottom with it;
- after the base has hardened and is completely ready (it will take about 2 days), lay a layer of geotextile;
- install the container on the concrete sole, attach it to the pipe bends;
At the end, mount the hatch on top, fill the structure from all sides with rubble and soil.
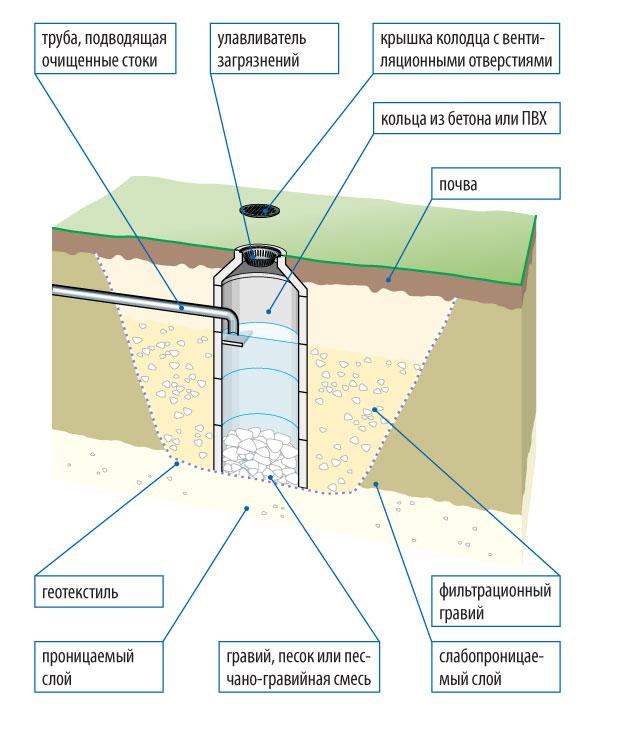
Installation of an absorbent structure made of plastic
To install a filter well, you will need plastic containers without a bottom. Their installation is carried out in the same way as described above, with the exception of pouring the concrete base. Instead, a filter system is made at the bottom of the well that purifies the incoming water in a natural way.

A layer of gravel, crushed stone or other similar material 20-30 cm thick is poured to the bottom. Pipes are brought into the upper part of the well, the structure is covered from all sides rubble or gravel, from above it is covered with geofabric and closed with a hatch.
Making containers from plastic pipes
If you do not have a ready-made plastic container, you can make it yourself. To do this, you need a plastic pipe of a certain diameter (35-45 cm for viewing and rotary structures and 63-95 cm for collector and absorption). In addition, it is necessary to purchase a round bottom and a plastic hatch in accordance with the size of the pipe and rubber gaskets.
Manufacturing algorithm:
- Cut a plastic pipe of the required size, corresponding to the depth of the well.
- At about a distance of 40-50 cm from the bottom, make holes for the pipes and equip them with rubber gaskets.
- Attach the bottom to the container and seal all seams with bitumen mastic or other sealant.
Installation of a home-made drainage tank is carried out according to the above scheme.
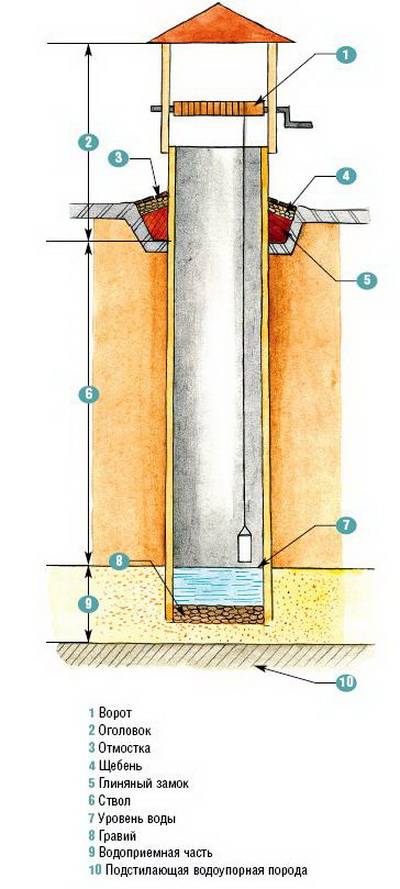
Choosing a place for construction
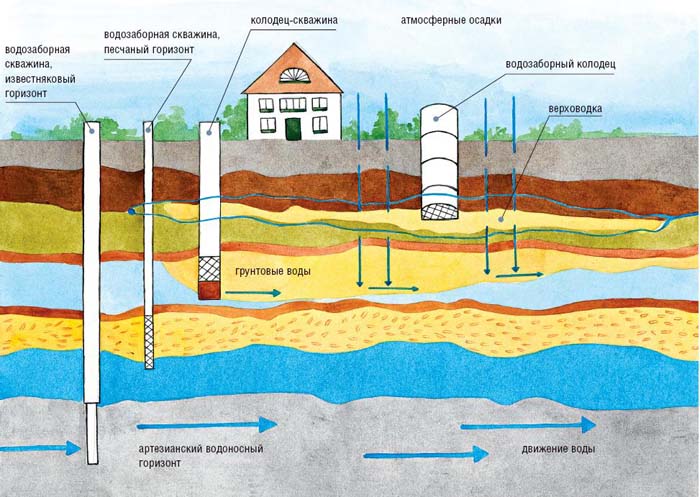
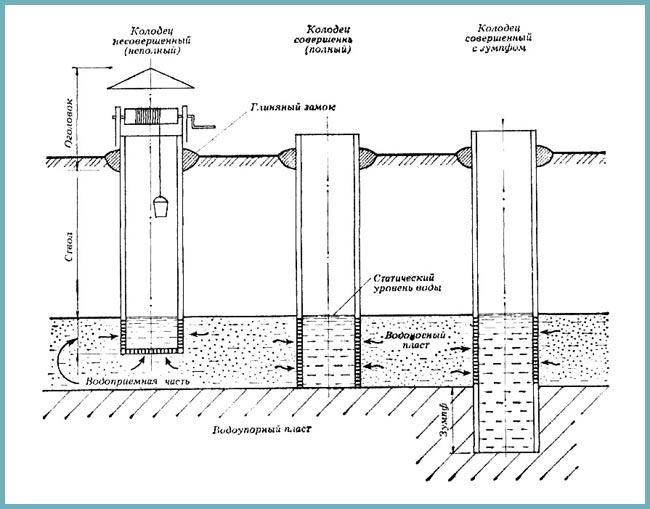
Diagram of aquifer occurrence and types of wells
First of all, it is necessary to find the right place for the construction of the water intake structure and determine its depth. If there are similar structures in neighboring areas, the task is facilitated. To do this, you should talk to your neighbors and ask them for the following information:
- What is the depth of the water intake structure in their area.
- How much water does it give?
- when it was built.
- Features of its use.
When choosing a place for construction, one should be guided by the standard distances from SNiP 30-02-97. According to them, the following minimum distances are allowed between the well and other objects on the site:
- from the foundation of the house to the water intake, the minimum allowable distance is 5 m;
- the minimum distance at which a well can be built from buildings for pets is 4 m;
- to any outbuildings on the site - 1 m;
- trees must be at least 4 m apart;
- at least 1 m retreats from shrubs to the water intake;
- from septic tanks and cesspools to a source of drinking water should be at least 50 m.
According to SNiP, cesspools should not be located above the water intake well.
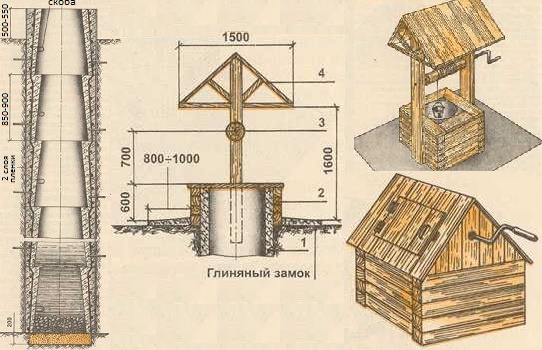
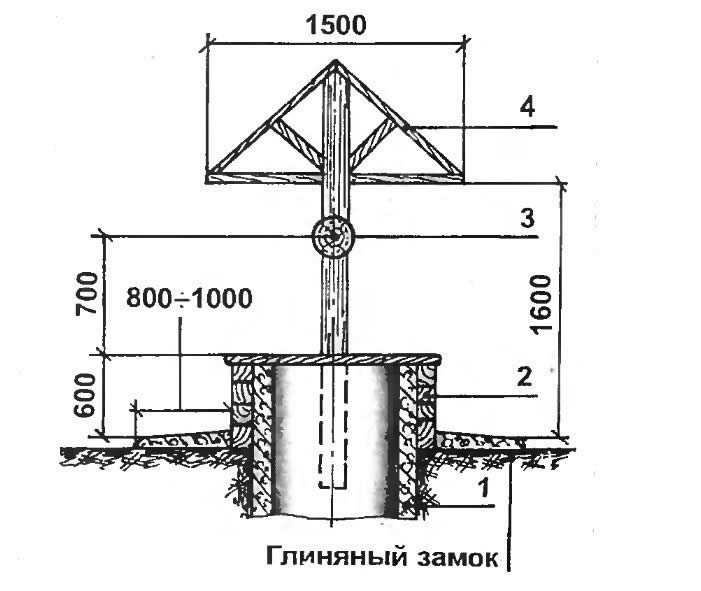
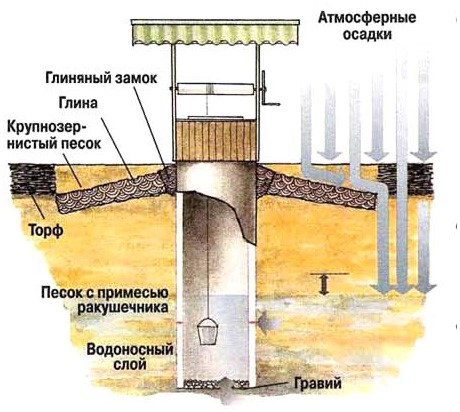
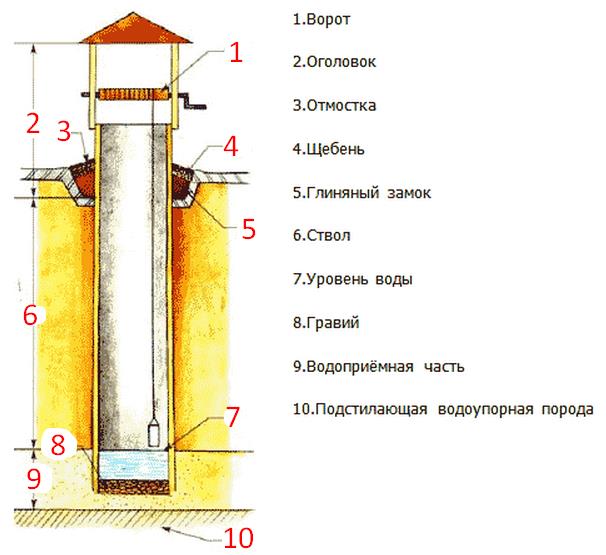
Arrangement of a clay castle
In order for the water in the well to be always clean in the future, it must, among other things, be protected from surface water. To do this, you should equip a clay castle. They make it using this technology:
- clay is diluted with a small amount of water and infused for several days;
- add to the resulting plastic mass of 20% lime;
- around the log house or the upper concrete ring of the well, they dig a pit with a depth of 180 cm;
- lay the clay mass in the pit in layers of 5-10 cm;
- from above they equip a clay blind area;
- crushed stone is poured over the clay, and then earth.
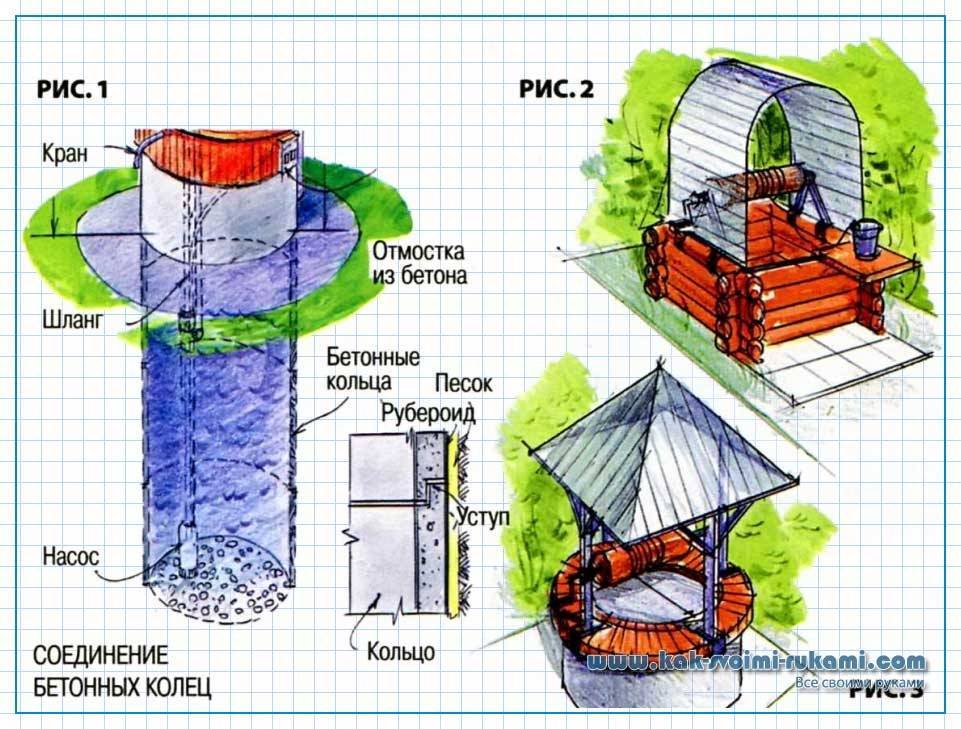
It is advisable to additionally wrap the concrete ring with roofing felt or plastic wrap before arranging the castle.
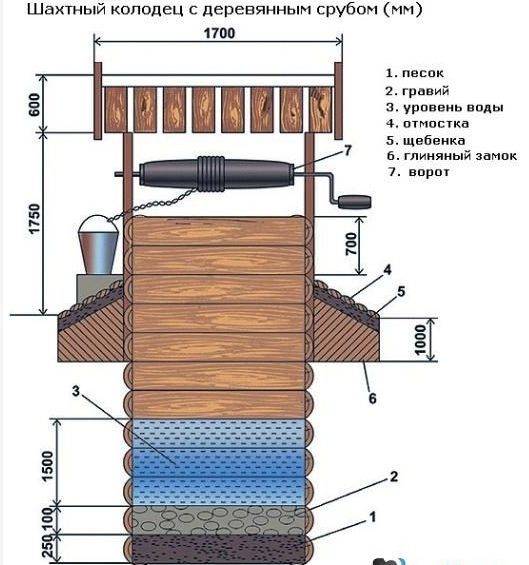
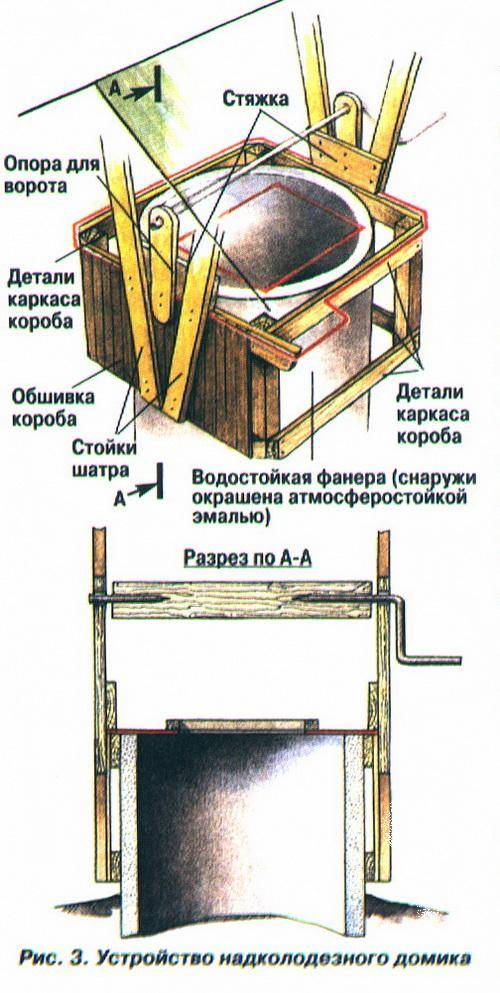
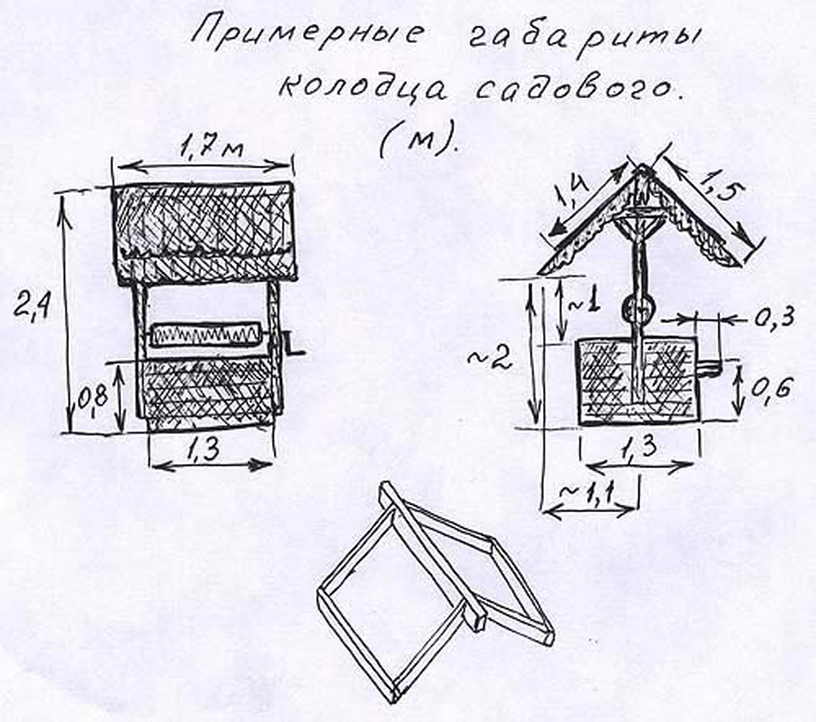
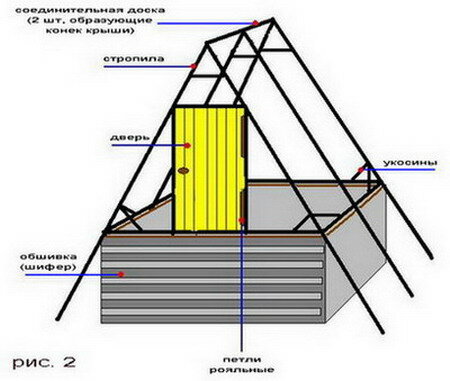
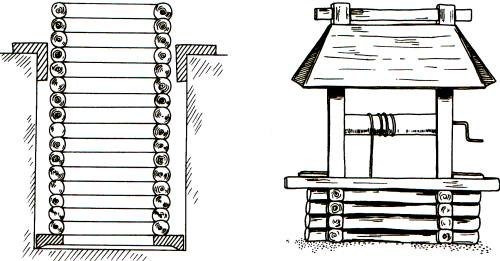
Step-by-step instructions for making a house for a well
-
Measure the diameter or width of the well head. Based on these dimensions, the perimeter of the wooden base of the structure will be calculated.
Frame base
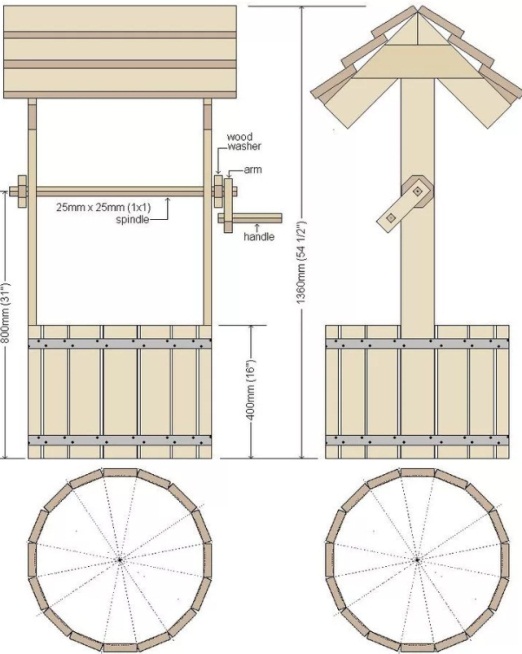
- To make a wooden frame from a bar with a section of 50x100 mm. It is more convenient to do it on a flat surface, checking the design using the building level.
-
To the frame, perpendicular to its base, attach 2 beams (vertical racks) with a section of 50x100 mm and a length of 72 cm. At the top, connect them with a beam with a section of 50x50 mm, which will play the role of a skate.
The design is ready for installation on the well ring
-
Connect the vertical racks to the base of the frame (in its corners) using rafters. In order for the rafters to fit snugly, it is necessary to cut the upper ends of the racks on both sides at angles of 45 degrees.
The upper ends of the vertical posts are sawn on both sides at an angle of 45 degrees
- To the base of one of the sides of the frame (in the place where the door will be), attach a wide board. In the future, buckets of water from the well will be placed on it. Its width should not be less than 30 cm.
-
On the remaining sides, fill boards of smaller width. This is necessary for the strength of the structure and keeping it on the well ring.
Fixing the structure to the concrete ring
-
Attach the finished frame to the concrete ring of the well with bolts. To do this, it is necessary to combine the holes of the racks and the concrete ring, into which insert the bolts and tighten the nuts.
Vertical beams are bolted to the concrete ring
-
Install the gate with the handle on the vertical posts. Attach it to the structure.
The gate is fixed with metal plates to vertical posts
-
Attach a door with a handle and a latch to the frame.
The surface of the slopes is ready for covering with roofing material
- Sheathe the gables and slopes of the frame with boards. The end boards of the slopes should extend beyond the structure. This will play the role of a visor and protect the gables from getting wet.
- Fasten the roofing material to the roof slopes.
The frame must have the correct geometric shape, since displacements and distortions in the future will adversely affect the integrity of the structure. The joints of the wooden frame elements can be further strengthened with metal corners. For this, self-tapping screws with a rare thread pitch with a diameter of 3.0 to 4.0 mm and a length of 20 to 30 mm are suitable.

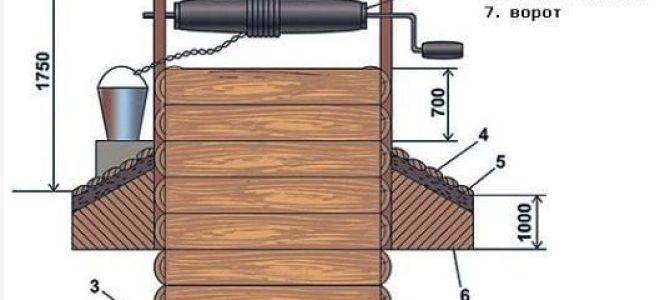

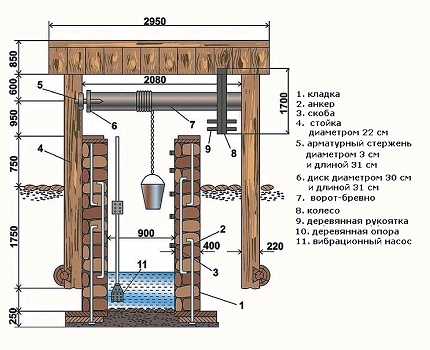
When the structure is installed on the well ring, you can begin to manufacture the gate. This device is necessary for lifting and lowering the bucket.
Well gate
Round log with a length of 90 cm and a diameter of 20 cm or more. The length of the gate should be 4-5 cm less than the distance between the vertical posts. This makes it possible not to touch the post with the edge of the gate.
The dimensions of the metal elements must exactly match the openings of the gate
- It must first be cleaned of bark, leveled with a planer and sanded.
- To maintain a cylindrical shape, wrap the edges of the log with wire or cover with a metal collar.
- At the ends of the log, in the center, drill holes with a diameter of 2 cm and a depth of 5 cm.
Before making the gate, the log must be dry and without cracks.
- Fasten metal washers with similar holes from above. This is necessary to prevent the destruction and cracking of wood during operation.
- Drill the same holes at the same height in the uprights. Then insert metal bushings there.
- Drive metal rods into the finished holes of the log: on the left - 20 cm, on the right - the L-shaped handle of the gate.
Metal parts for manual gate
- Hang the gate with metal parts on vertical posts.
- Attach a chain to the collar and hang a water container from it.
Do-it-yourself door to the house
To one of the sides of the frame, fix 3 bars (intended for the door frame) with a section of 50x50 mm;
The beams are attached to the rafters and the base of the entire structure.
In accordance with the dimensions of the frame, assemble the door from identical boards. Top, bottom and diagonally fitted boards are fastened with bars;
- Attach metal hinges to the door;
- Then install the door on the frame and fasten the hinges to the screws or nails;
Door hinges fixed with nails
- Fasten the handle and latch on the outside of the door;
- Check the door. It should not catch when opening and closing.
Installation of roofing material
The last step in building a house for a well will be installing a waterproofing layer on the roof. This will preserve the wood and extend the life of the structure. Roofing material or, as in our case, soft tiles are used as protection against water.
Soft tile was chosen as the roof
Floor installation
When a well is being built above a well, a particularly important point is the correct installation of the ceiling, for which:
- A monolithic reinforced belt is made on the walls in the upper part, into which a reinforcing mesh is laid, and concrete mortar is poured into the formwork about 15 centimeters high.
- Boards with a thickness of 30 millimeters or more are placed on the contour, observing the minimum gap, while leaving room for the hatch.
- To ensure waterproofing, the boards are covered with polyethylene, fixing it with metal brackets.
- Formwork is built along the edge of the hatch and along the perimeter of the well and concrete is poured there, the mixture is leveled and left to dry. So that the surface slowly loses moisture, and the cement becomes as strong as possible, the well cover is covered with polyethylene. From time to time it is raised in order to moisten the concrete floor.

How to choose a place and time for digging?
The most reliable way is to apply for a hydrogeological study. You will be shown the exact place where it is best to dig a well from concrete rings, plus an analysis of the water that will be in the future well. But this service is not cheap and can only pay for itself if the water in the well is used as drinking water, that is, near a house with people permanently living in it. In the summer cottage, its need is intended mainly for technical needs, and for drinking it can only be cleaned going into the house.
If you are going to do without research, then you need to focus on some signs:
- be guided by the position of the wells in the neighborhood - rock layers usually lie unevenly, the situation is also with aquifers. If the water in a neighboring well is at a depth of 6 meters, this does not mean that your water will be at the same level. It can turn out to be both higher and lower, or even go sharply somewhere to the side.So this is only an approximate "markup" of the project, where well water can be located;
- observation of the behavior of animals and insects. The most accurate guide can serve as a small midge. In a warm period, with calm in the evening before sunset, inspect the site. If there are places on it where midges “hang” in columns, this indicates that aquifers are located quite close in this place. In order to make sure of this, observe the marked area in the morning. If in the morning fog swirls over it, then the water is really close enough;
- folk way. We take earthenware. Best not glazed. You can use an ordinary pan, the main thing is that it is wide. Silica gel dried in the oven is poured into the selected dishes. If it is not there and it is not known where it can be obtained, then you need to take ceramic bricks, break them until only small crumbs remain from them, and dry them for several hours in the oven. After that, it is necessary to fill it in a bowl to the top and tie it with a dry cotton cloth. Only in such a way that it does not unravel. Weigh and record the resulting value. Then, at the site of the proposed well, you dig a hole 1-1.5 meters deep, after which you need to put a vessel in the dug layer and sprinkle it with earth. Wait a day. Then dig and weigh again. The more the mass has changed, the greater the concentration of water in this place;
- analyze the grass growing on the site - this method is well applicable only when the site has not yet been plowed. When examining the vegetation, try to identify the most overgrown islets.You do not need to pay special attention to single plants, since they can be brought here randomly; for this method, it is clearings, islands of vegetation that are needed.
These methods are only an approximate determination of the location of aquifer deposits where it is possible to dig wells from concrete rings. None of them gives a 100% guarantee, but in the case of using several methods, you can determine a more or less exact location and it is worth trying to dig a well in this place.

It is most favorable to dig a well twice a year: either in the second half of August, or in the middle of winter - after two weeks of frost. During these two periods, the lowest level of groundwater and perched water practically does not occur. This will greatly facilitate the work, in addition, it will be much easier to determine the flow rate - during these periods it is at a minimum and in the future you will not experience a lack of water.
If you decide to dig a well or dig a well with your own hands, there may not be enough time in August, as this is the “border zone” before the rainy season. In this case, you need to start work early. Maybe even at the beginning of the month. In general, you need to calculate the time of work in such a way that the access to the aquifer falls on the most “waterless” period. Ideally, it is also desirable to deal with the waterproofing of the walls.
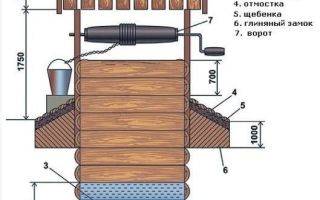
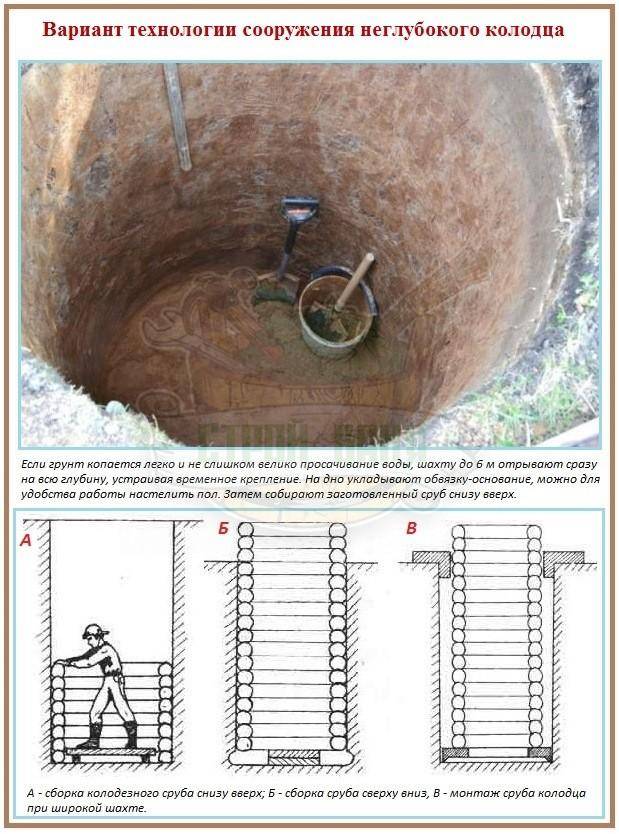
Stage two. We prepare everything you need
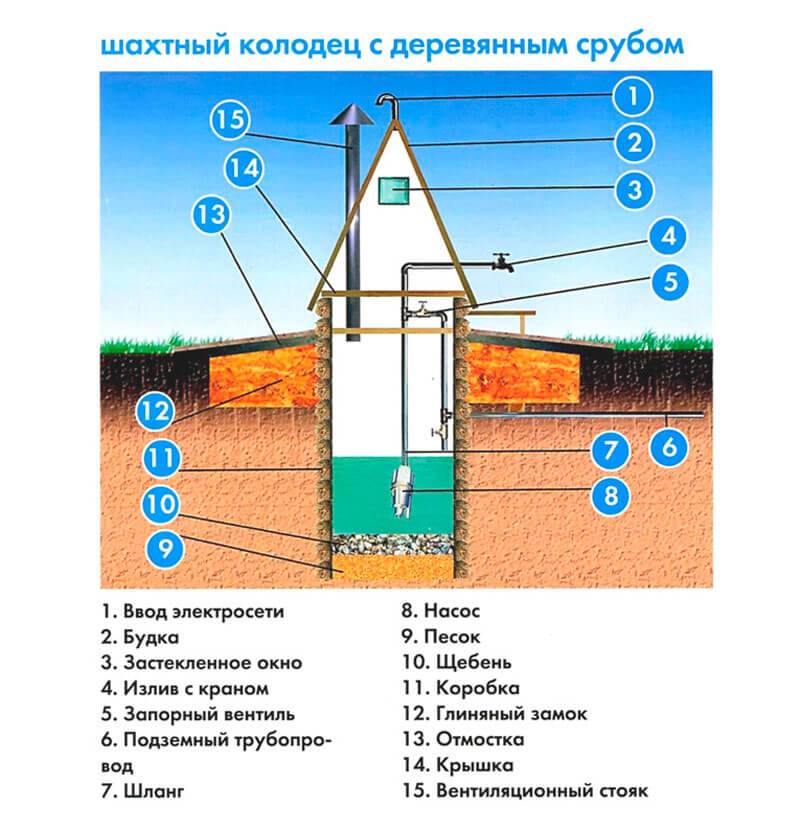
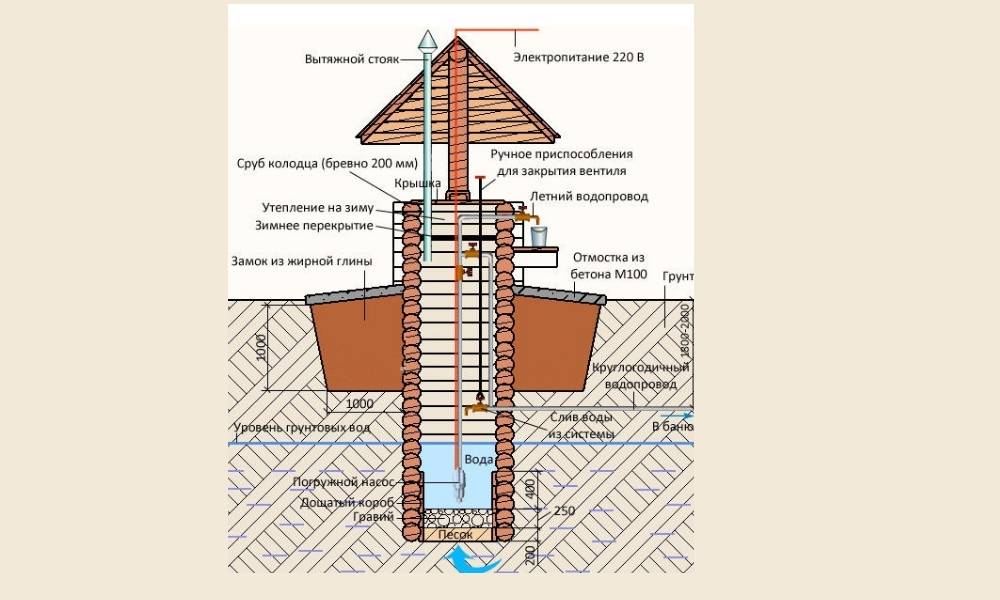
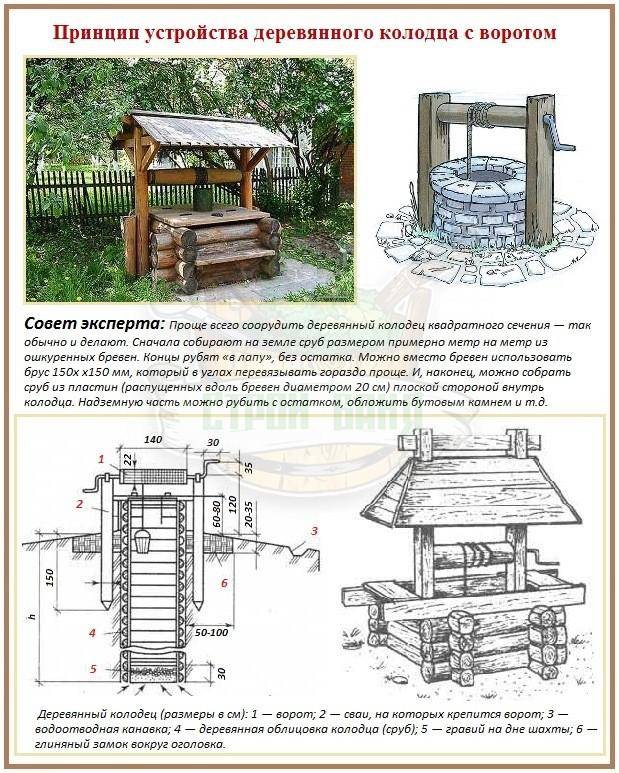
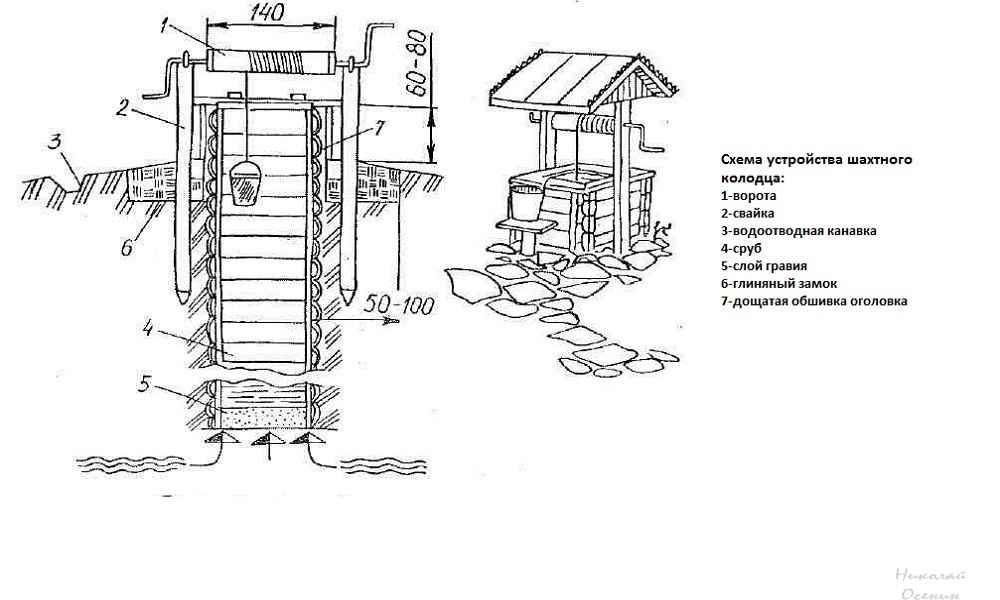
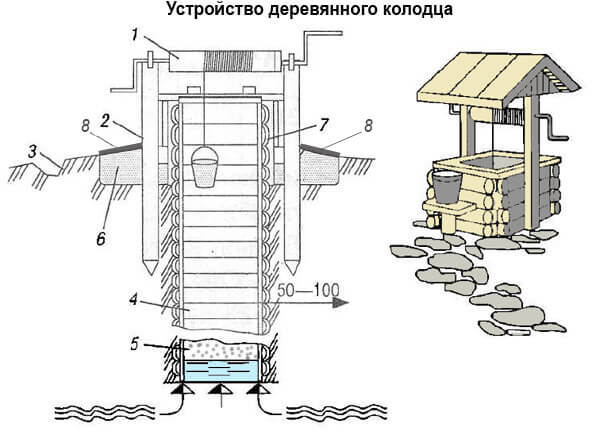
Water supply from a wooden well
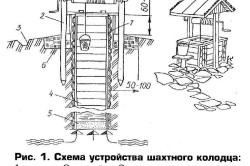
The procedure for the construction of wells is not standardized by any state regulations and standards. The classical device was formed for more than one century, until it acquired a modern look.
To make a well with your own hands, you need to prepare:
- a tripod made of metal corners or wooden poles;
- winch;
- rope ladder;
- shovel;
- scrap;
- material for strengthening the mine.
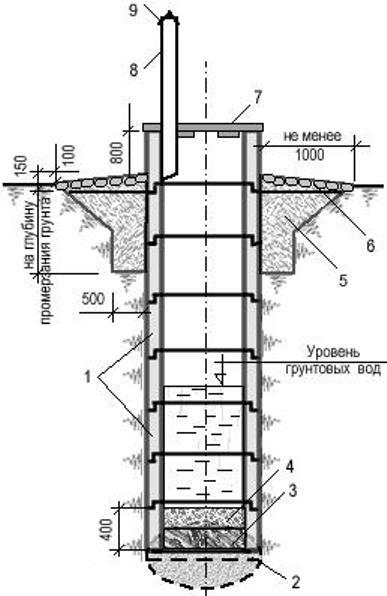
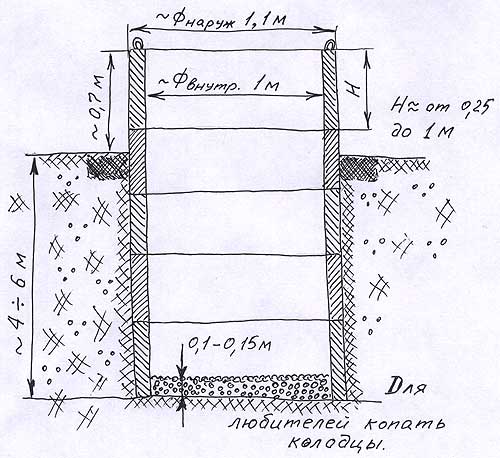
Well made of concrete rings
As for the last point, the most promising material is concrete rings. They are strong (reinforced with steel bars ø1 cm or more), durable (service life is 50 years), frost-resistant and waterproof.
| product name | Height x Wall thickness, cm | Internal diameter, cm | Weight, kg |
|---|---|---|---|
| KS-7−1 | 10x8 | 70 | 46 |
| KS-7−1.5 | 15x8 | 70 | 68 |
| KS-7-3 | 35x8 | 70 | 140 |
| KS-7-5 | 50x8 | 70 | 230 |
| KS-7-9 | 90x8 | 70 | 410 |
| KS-7-10 | 100x8 | 70 | 457 |
| KS-10-5 | 50x8 | 100 | 320 |
| KS-10-6 | 60x8 | 100 | 340 |
| KS-10-9 | 90x8 | 100 | 640 |
| KS-12-10 | 100x8 | 120 | 1050 |
| KS-15-6 | 60x9 | 150 | 900 |
| KS-15-9 | 90x9 | 150 | 1350 |
| KS-20-6 | 60x10 | 200 | 1550 |
| KS-20-9 | 90x10 | 200 | 2300 |
| KO-6 | 7x12 | 58 | 60 |
| KS-7-6 | 60x10 | 70 | 250 |
Concrete rings can be:
- wall (abbreviation - KS), which are used to equip the neck and are suitable for all types of wells;
- additional - used in cases where the standard options are not suitable, because these have non-standard sizes;
- Reinforced concrete rings - used for drainage and sewer wells, communication systems, gas and water pipes.
well ring
There are other types - with an overlapping slab, with a bottom, prefabricated, etc. In order to avoid displacement of the rings after installation, they are equipped with special grooves that prevent the moment of displacement.
After choosing a place and preparing everything necessary, we can begin construction.
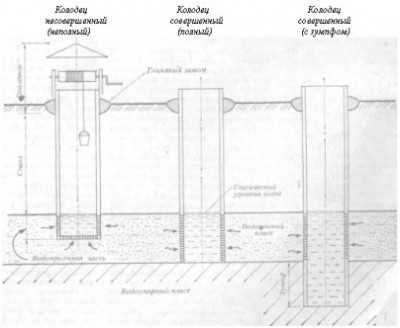
Advantages and disadvantages of water wells
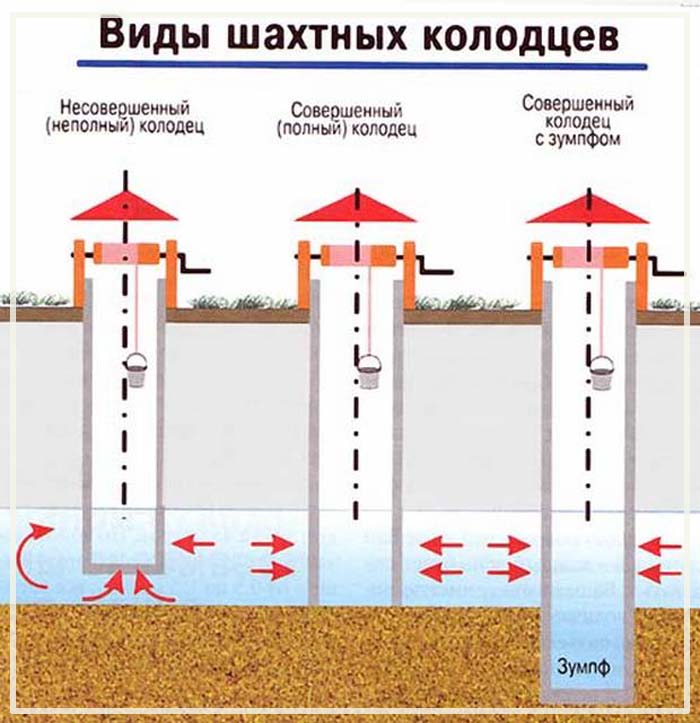
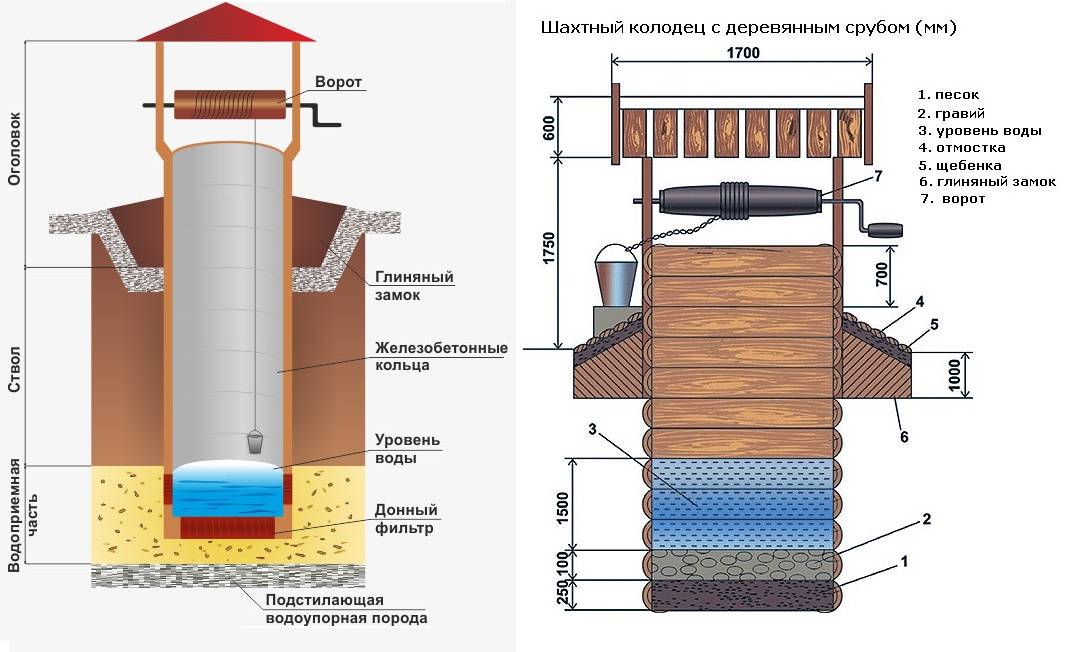
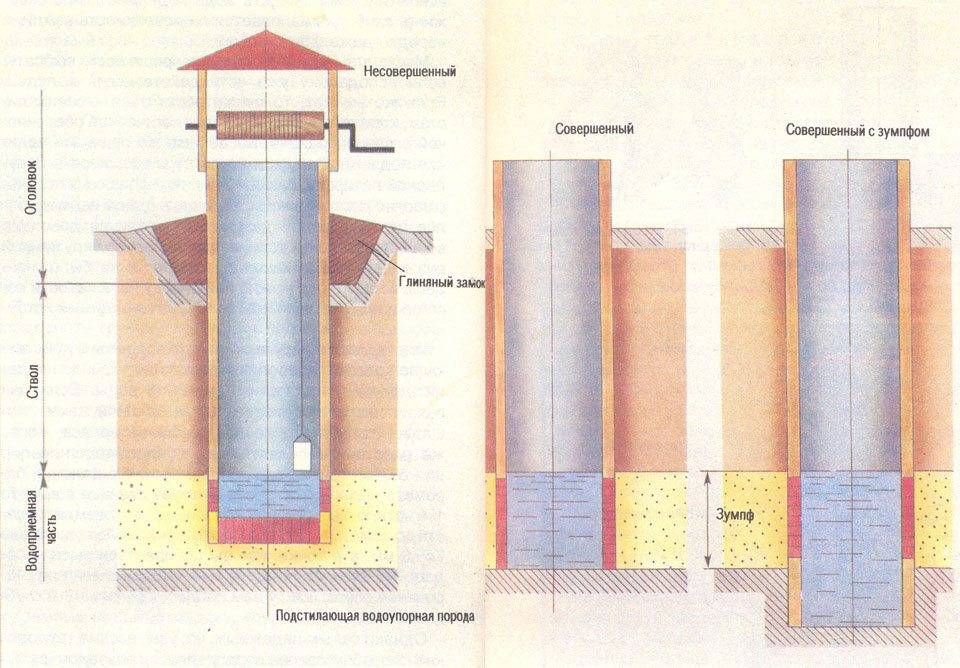
Types of shaft wells depending on the depth
The advantages of such water intake facilities include the following:
- Long service life. Reinforced concrete or plastic construction can last half a century.
- Compared to the cost of a well installation, the cost of constructing a mine structure is much lower.
- The dimensions of such water intakes make it easy to clean them. In addition, the impressive diameter makes it possible to use any deep-well pumps for building a water supply system at home.
- You do not need to obtain any building permits to install a water well. It is enough just to register the building.
However, these water intake structures also have disadvantages:
Digging a deep hole requires significant physical effort. Depending on the depth of the aquifer, the water may not be suitable for drinking (does not meet the requirements of SNiP for drinking water). Such water can only be used for household needs and watering the garden. In order for your well to produce high-quality drinking water, you need a good filter device. This will incur additional costs. If the waterproofing of the structure is performed poorly, then over time, surface and groundwater can enter the trunk and pollute the clean drinking water in it.
That is why, when installing a structure, it is so important to carefully perform a waterproofing and sealing of joints.


