- How to make a decorative well with your own hands: step by step instructions
- Do-it-yourself decorative well in the country: a photo from improvised means
- Video about the construction of a decorative well with your own hands in the country:
- DIY drainage well
- Materials and working principle
- Types of drainage systems
- Construction order
- Digging a trench
- 3 Digging tools - from simple shovels to sophisticated equipment
- Well digging process
- First option
- Second option
- How to dig wells in winter
- Seam sealing
- Making a well ring with your own hands
- stone finish
- Thermal insulation works
- Warming scheme
- Type and structure
- Type of well shaft
- How to identify an aquifer
- Bottom filter in the well
- Briefly about the occurrence of groundwater
- How deep to dig a well
- Digging wells by hand: how to dig or start work
- Preparatory stage
- Blueprints
- Selection and calculation of materials
- Required set of tools
How to make a decorative well with your own hands: step by step instructions
Starting construction, it is worth choosing a suitable place for the well, it is good to place the structure near the resting place in the country. Next, you need to create a test drawing or find it on the Internet. Using the drawings, you can calculate the amount of materials needed and prepare everything you need.
For the construction of the well shaft, a reinforced concrete ring is used, which is further screwed up with stone or sheathed with wood. For this purpose, a steel ring, a large-diameter pipe, is also suitable. You can build a mine out of bricks, and then decorate it with improvised materials.
We suggest that you familiarize yourself with the main stages of the construction of a decorative well with your own hands:
- The reinforced concrete or steel ring is deepened into the ground by 20-30 cm and compacted.
- Poles are buried along the perimeter, which will serve as a support for the roof.
- The bottom of the mine is covered with pebbles and everything is poured with concrete.
- A decorative drum with a chain is installed on the roof support, which in ancient times were used to raise a bucket of water from a well.
- Using sheet iron and boards, the roof of the well is being constructed. After that, tiles, straw, bamboo or other materials are laid to give the well a natural look.
- The final stage is the decoration of the well with stone, timber, tiles.
The final stage of building a decorative well is the most difficult. It can be difficult for owners of cottages to translate into reality the ideas that designers and craftsmen with experience show. However, the main thing here is to decorate the site and create a structure that fits perfectly into its style. Therefore, it is worth choosing the materials, the color of the design of the well, its shape in such a way that it is combined with other buildings, for example, with a house or a gazebo.
Do-it-yourself decorative well in the country: a photo from improvised means
Building a decorative well of stone and wood is one of the best options. We offer you to look at photos of various design solutions in order to choose the option you like.
It is important to pay enough attention to the decoration of the territory adjacent to the well. For these purposes, you need to lay paving slabs around the building, put flowers in flowerpots, or simply plant various plants. It is important to arrange everything as naturally and naturally as possible.
A decorative well looks good, around which lawn grass, stunted shrubs, climbing plants are planted, as shown in the photo
It is important to arrange everything as naturally and naturally as possible. A decorative well looks good, around which lawn grass, stunted shrubs, climbing plants are planted, as shown in the photo
Sometimes you can let your imagination run wild and design a decorative well in Chinese style, a marine style, or try to recreate a well with a crane and a counterweight. Such constructions were often found in antiquity on the territory of Hungary.
Designers recommend decorating decorative wells with painting, woodcarving, or simply varnishing the wooden parts of the structure. All this allows you to design a well in your own unique style. Imitation of antiquity gives the building style and showiness.
In Russia, wells were often made from birch logs. It is not difficult to recreate a similar structure from birch logs even today. Despite the fact that the wood of this tree is short-lived, the well will look chic and respectable.
Video about the construction of a decorative well with your own hands in the country:
A decorative well in the country with your own hands, the step-by-step instructions for making which are presented in the article, will become a true decoration of the backyard territory.If you follow the recommendations of designers and experienced builders, do the work according to the drawings and as shown in the photo, there will be no difficulties.
DIY drainage well
It is unlikely that anyone would think of building a house on a sandy area. For construction, places with groundwater are selected so that in the future there will be no problems with drinking water. But this plus of the area can turn into waterlogging of the soil, and the destruction of the foundation of the building. To protect yourself from this problem, you need to build a drainage well. This design serves to divert groundwater from the site.


Materials and working principle
The work of the well is simple. A trench is pulled out on the site to collect and drain water - a drain. One or more drains are connected to it, which drain the liquid into a reservoir located nearby with the site or into a special reservoir.
Types of drainage systems
Drainage wells are divided into four types according to the type of soil and the movement of groundwater. The principle of operation of each is different, and before make a drainage welldecide which system you need.
Collector well
This version of the drainage system is able to collect and accumulate moisture, which can later be dumped into a ditch or used to water plants. Its construction is appropriate in the lowest part of the terrain.
Rotary wells
They are mounted on drainage bends or in places where several sewers are connected. In such places, there is a high probability of contamination of the internal cavities.
absorption well
Such a well must be equipped in those places where it is impossible to lay pipes to drain liquid, due to the lack of a reservoir for discharge or sewerage.This is the deepest type of drainage system, and the minimum depth must be at least 3 m. The bottom in the well is made of crushed stone or sand, this will allow the liquid to be discharged into the groundwater.
manhole
This option is used to access the drainage system and possible repairs. For convenience, its width should be at least 1 m. In principle, such wells can be made in other systems, because repairs and preventive cleaning will not be superfluous.
Construction order
When choosing the size of the future well, the area of \u200b\u200bthe site is taken into account, namely the part that needs to be drained.
When all the materials are ready, work can begin. We dig a hole at least 2 meters deep, depending on the type of drainage system. At the bottom you need to equip a special pillow. Coarse sand is best suited for this. The bedding should be from 30 to 40 cm thick, in the process of arranging it must be well tamped.
On the backfill, you need to make a square formwork for arranging the foundation, which will serve as the bottom of the well. It should be laid reinforcing mesh, preferably small. This structure is filled with concrete mortar.
After the concrete has set, the inner and outer formwork is installed on the base. The walls from above must be connected with wooden planks. Concreting of the walls of the well is carried out according to the level. After 2 - 3 weeks, when the concrete is completely dry, we remove the formwork and backfill the base. It is better to use fine gravel or expanded clay for this.
Digging a trench
To drain liquid from the well, polyethylene or asbestos pipes are used. Just digging a trench and laying pipes towards the dump site will not be enough.In order for the reset to occur correctly, you need to perform the following steps.
- Fill the bottom of the trench with sand.
- Lay a layer of fine gravel on top of it.
- A drainage pipe is laid on such a pillow, which is also covered with sand and gravel.
Together, the layer of sand and gravel should be half the depth of the trench. The remaining depth is covered with loam, and a fertile layer of earth is laid on top.
When arranging drainage on an already built-up site, work should be carried out in small sections of 15–20 meters each. During operation, the soil removed from the excavated section is poured into the previous section of the trench. It is better to start work in late July - early August. At this time, the groundwater level is the lowest.
3 Digging tools - from simple shovels to sophisticated equipment
Having decided on the site where the construction of the well will begin, it is necessary to choose the optimal time to complete this complex and lengthy operation. As practice shows, the best time for digging the earth is the last weeks of winter. This is due to the fact that groundwater is at its lowest level. Naturally, in winter it is very, very difficult to dig the ground, especially frozen ground. However, you are not threatened by such unpleasant phenomena as downpours and accompanying landslides. In addition, water does not come when digging, which makes the whole process somewhat easier.
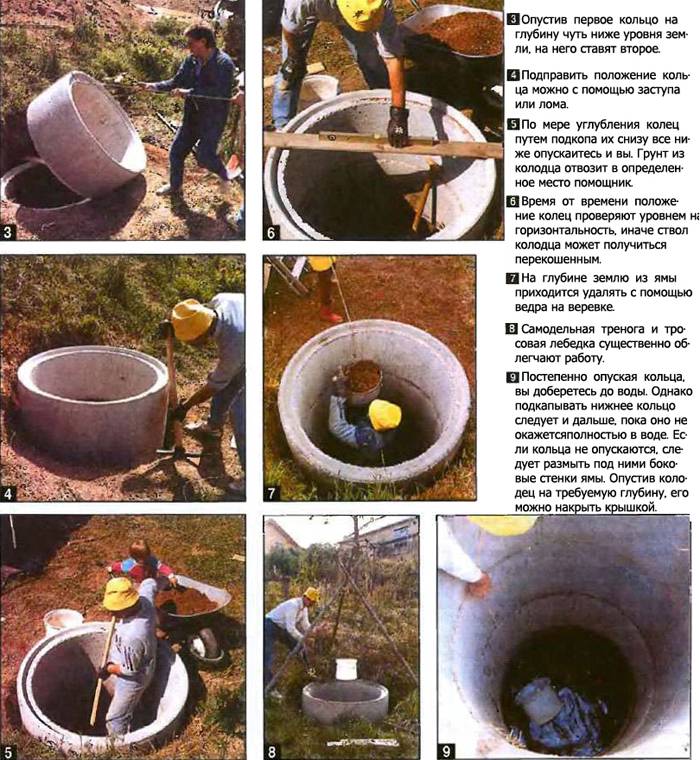
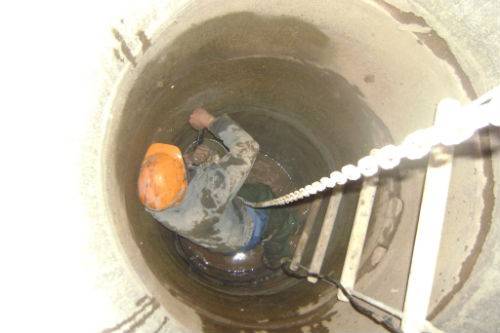
To get the soil, you will need buckets and ropes
But you can dig a well in the summer, it is this decision that most owners of country houses come to. It is much easier and more comfortable to work, because you can undress so that your clothes do not hamper your actions.In addition, cold air can adversely affect health, while in summer the likelihood of catching a viral disease is much lower. The main requirement is to dig before the onset of the rainy season. Work on the arrangement of the structure can take several days, so be sure to make sure that the weather promises to be warm, clear and dry in the near future.


The set of tools is quite diverse. We may need materials such as:
- Several shovels, shovel and bayonet, as well as with a shortened handle
- Soil buckets, as well as a trolley for removing the earth to the side
- Strong ropes, ropes and slings for lifting buckets of earth, lowering people, installing reinforced concrete structures
- Construction level and plumb lines to determine the verticality and evenness of the walls of the mine
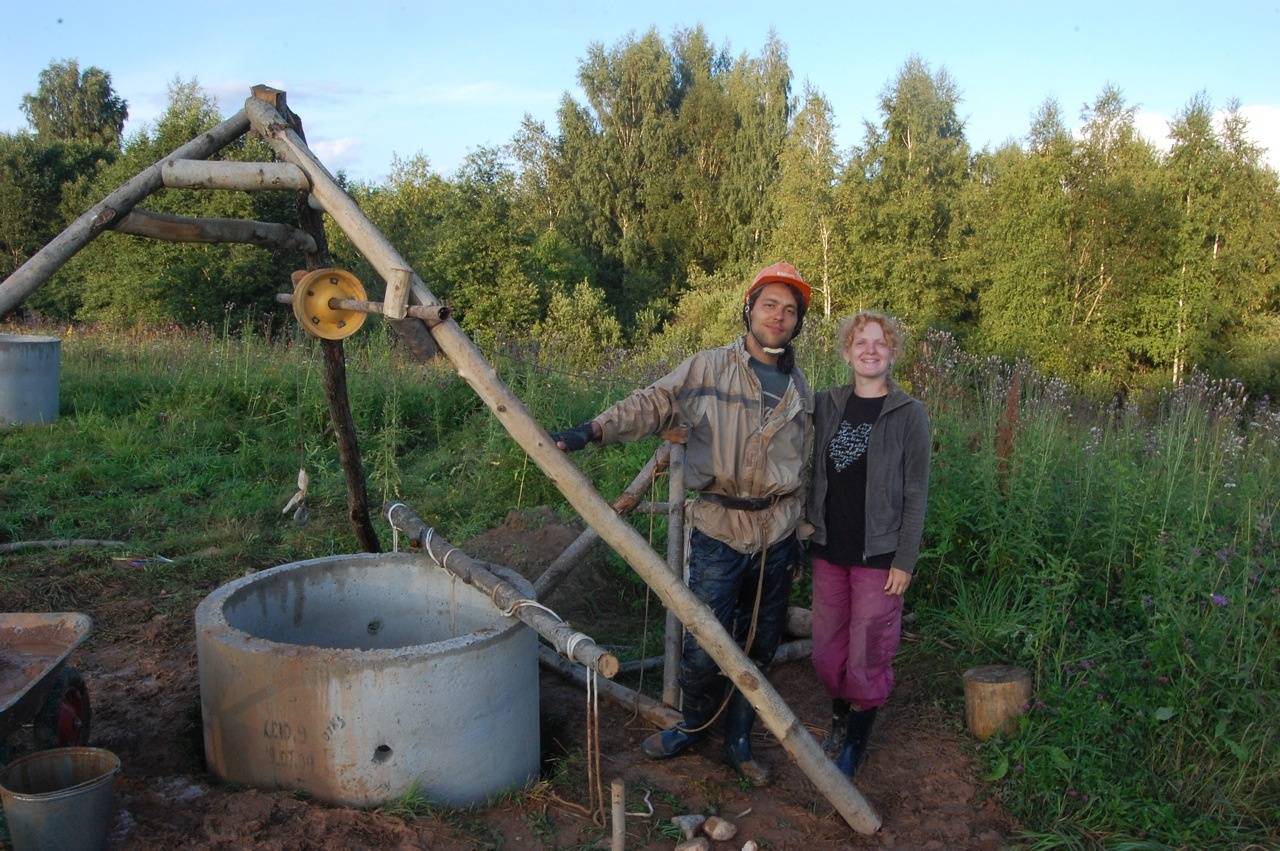
- Tripod with lifting mechanism
- Safety belt, helmet, line and other means of insurance and safety
- Drainage pump in case of surface water
- Tools and items for waterproofing the walls of the well shaft.
Naturally, you can use special equipment, for example, excavators and similar devices. With the help of mechanized buckets, the digging process will go very quickly, which will take significantly less time to create a well and equip it.
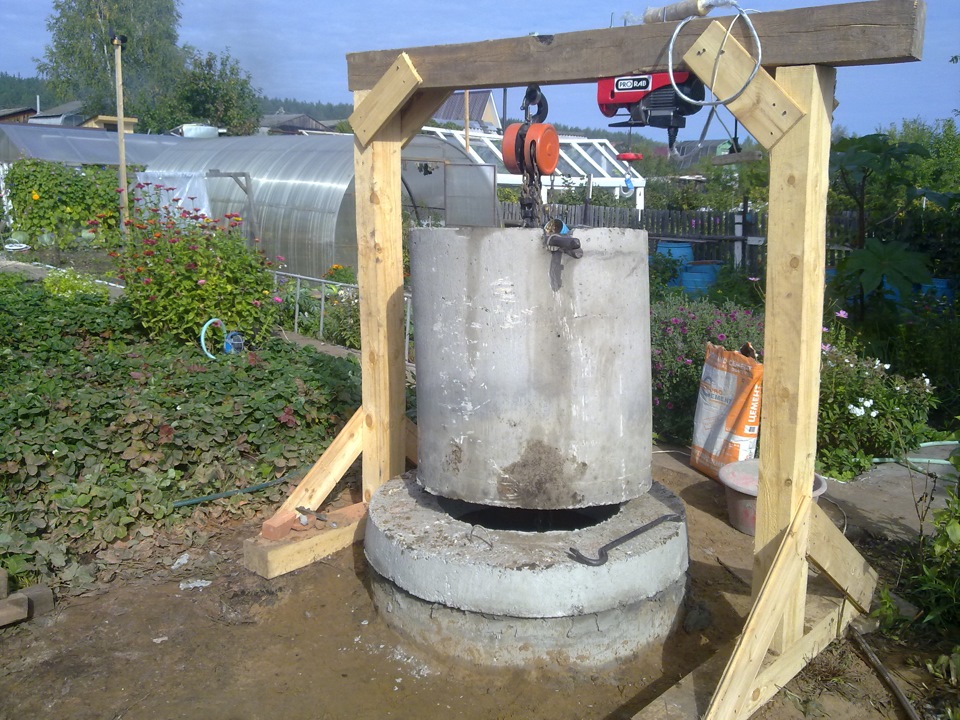
To strengthen the walls of the mine, mainly concrete rings or a monolithic concrete structure are used. However, the first option is more common due to the relative simplicity of working with rings. In addition, the rings are equipped with a “quarter” fastening scheme, which contributes to a tight and centered fit of the elements to each other.The standard dimensions of the rings are usually around 1200 mm outside diameter, 1000 mm inside diameter, with a height of 900 mm and a wall thickness of about 80 mm.
Rings of other diameters are also available, however, the above values are the most popular. If necessary, you can purchase a ring of the same section, but of a lower height - up to 60 cm. The weight of one product can reach up to 900 kg. Therefore, powerful lifting mechanisms, which are usually mounted on a tripod, cannot be dispensed with.
Concrete rings will strengthen the walls of the mine
By carefully examining the design of the concrete ring, you can find special holes that are necessary for hanging by slings in order to lower them into the shaft and center them relative to the already installed elements. The cost of the rings is not very high, but many try to save money even here. We categorically do not recommend buying cheap rings, since poor-quality or, moreover, used products are the main cause of the mine skew, rupture and destruction of the entire structure.
It can be very difficult to determine the number of rings before digging, since the exact depth of groundwater with a suitable water quality for us is still unknown. Ask your neighbors how many rings they needed. Another option is to negotiate with the seller so that the excess can be returned.
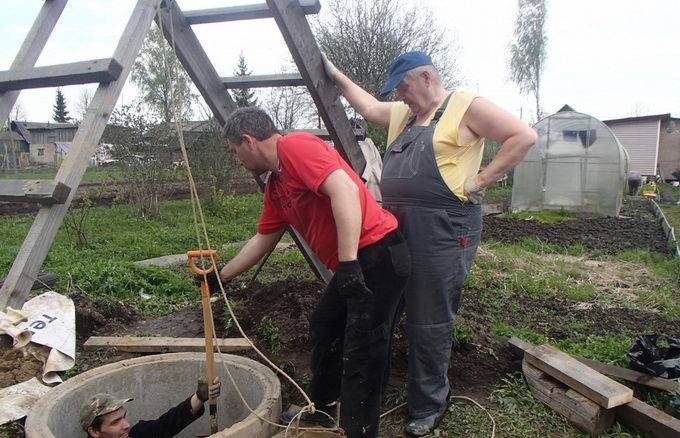
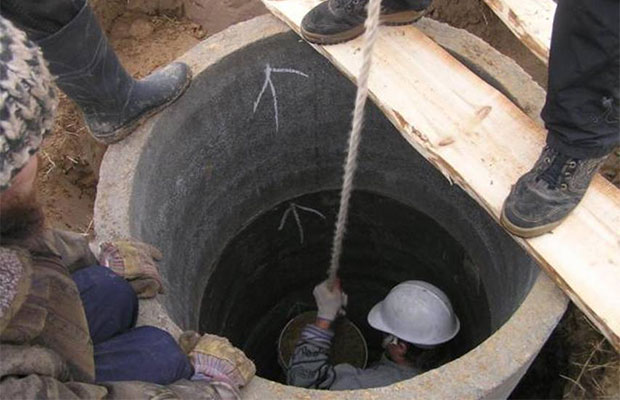
Well digging process
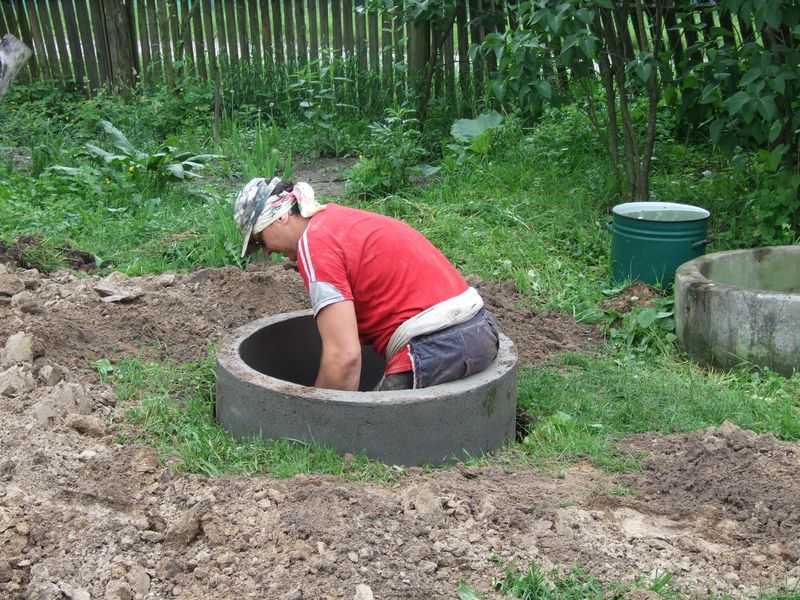
Let's get down to the actual construction work. All work is done entirely by hand, while not forgetting about safety.
The video in this article will show the entire process of doing the work.
First option
This is how you can do the work if your soil wakes up and you cannot immediately make holes in full size.
So:
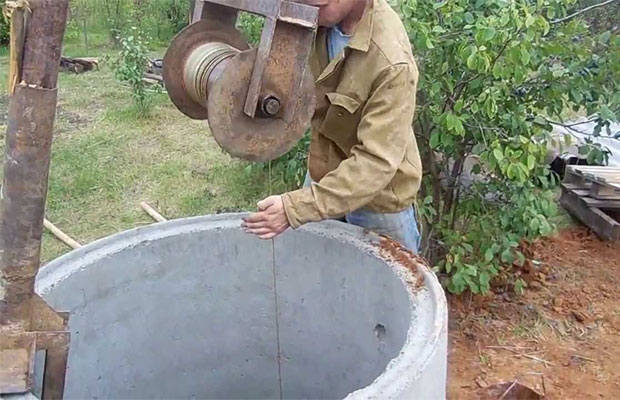
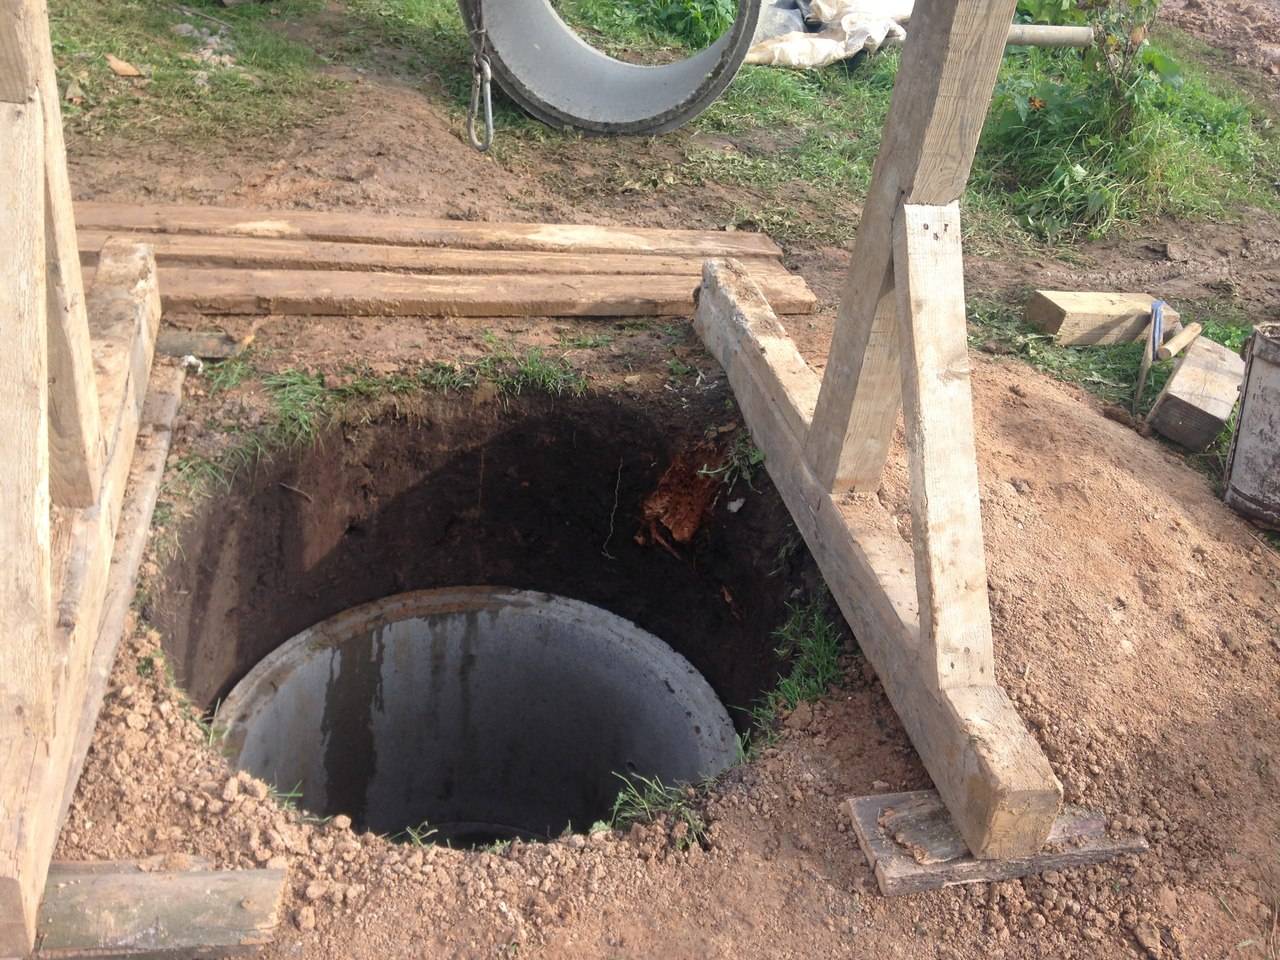
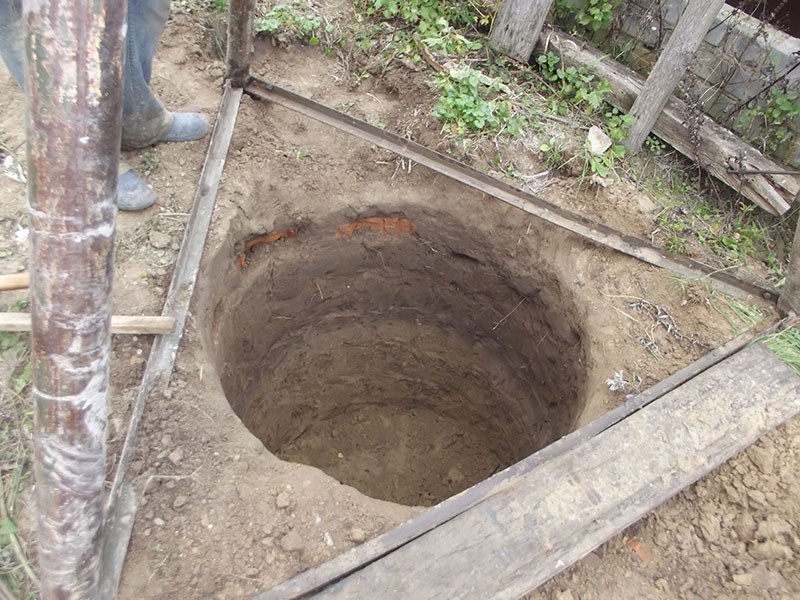
- At the location of the future well, we mark up in such a way that the diameter of the well exceeds by 10 cm the diameter of the concrete rings used. The hole is dug to a depth that allows the first ring not to sink completely. 8-10 cm should remain above the ground;
- On a trolley, the height of which is also 8-10 cm, the concrete ring is brought to the shaft and lowered vertically. Do not distort the ring, as this will affect the quality of the entire structure. Then we place the next concrete ring, fastening with three brackets;
- In the center we make a hole deeper by 80 cm. Then the hole needs to be dug round so that the concrete ring sinks into the ground through its gravity. If the earth is soft, then it is removed first in the center of the ring, if the earth is hard, then it is removed first under the ring itself, so that nothing prevents it from lowering. Then, when the ring descends and settles, they take out the earth in the center;
- Docking of concrete rings is ensured by tightness by laying a pitched hemp rope, which is then treated with a solution based on cement and sand. We lower the rings into the shaft until water appears at the bottom of the well. The appeared water with sand is taken out from the well mine. The well will be filled with water within 12 hours;
- The next day it is necessary to remove the water from the well again. Cleaning is carried out until the water is completely purified. Then the well is covered and not touched during the day;
- After that, water with sand is pumped out again, filtering gravel or crushed stone is placed on the bottom of the well. First, 10-15 cm of fine fraction, then 30-40 cm of larger gravel.The allowable level of well water is 1.5 meters. It's more than one concrete ring;
- The distance between the walls of the pit and the well shaft must be covered with a mixture of gravel and sand, fixed on the surface of the earth with clay and covered with sand. Clay will not allow rainwater to enter the well, as well as thawed snow in the winter.
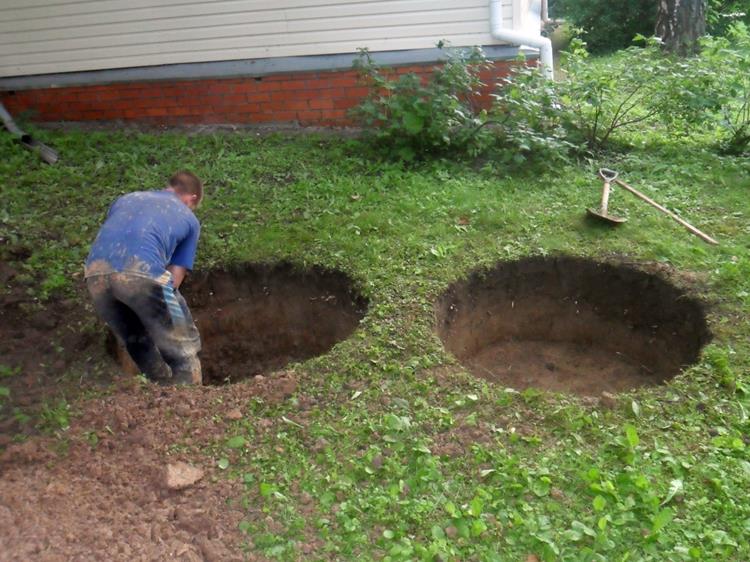
Second option
This kind of work is perfect for soil that does not wake up and you can do the work with an open method:
First, we make a hole in the ground. It should be larger than the ring by about 50 cm in diameter;
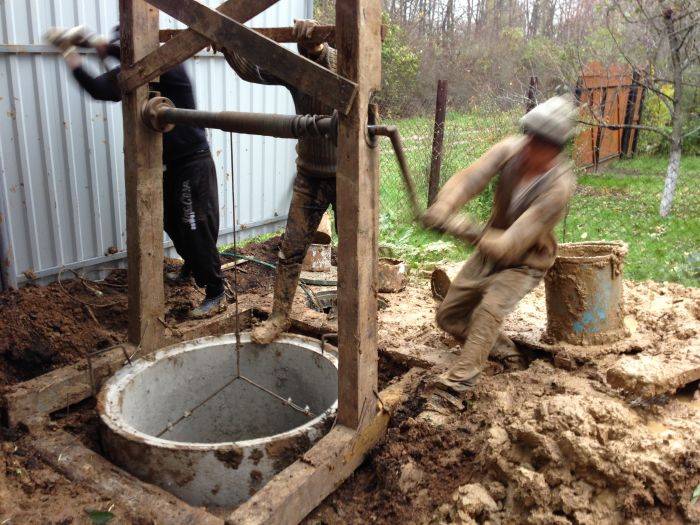
Now you should bring the second ring and lower it into the pit. For this, it is best to use a crane. This is the least secure. Although some make block structures and use them to do this work
But in their manufacture, special attention should be paid to quiet reliability. After all, the ring does not weigh so little;
Application of blocks for lowering the ring
l>
How to dig wells in winter
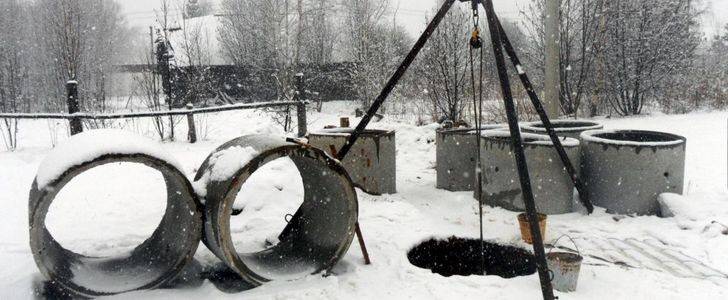
The instruction indicates that sometimes, for a number of reasons, it is better to dig a well in winter.
Reasons for this may be:
- The lowest level of groundwater means that it will not dry out in summer.
- In winter, it is easier to find labor.
- The cost of building materials and the rings themselves is much lower.
The disadvantages of this may be:
- Clearing the road from snow for the delivery of goods.
- Providing builders with warm housing.
It is known that in winter the ground freezes by about one meter, which is not very difficult to warm up or beat off with hammers.
The subsequent actions are the same as in other seasons. The shaft can be deepened three rings lower, which will make it possible to use water all year round, and a newly dug well can be used already in the spring.


Seam sealing
After installing the rings, it is necessary to seal the seams. This is necessary so that the upper sewage does not penetrate into the well.
Making seam seals
So:
- We make cement mortar. It consists of sand and cement. For M300 we use the proportion 1/3;
- We cover the seam from the inside of the ring with a spatula;
- After complete solidification, some recommend treating the coating with liquid glass.
Now you see that the price of drinking water in the house is not so big. The most important thing is to follow the rules for doing the job.
Making a well ring with your own hands
If a cap or canopy is made, the gray concrete ring remains visible. The view is not the most attractive, and I want to decorate it.
stone finish
The most popular way to decorate a well is to finish it with stone - pebbles or medium-sized rubble. If everything is more or less clear with the finishing material - to buy or assemble, then the question of what to cling to it remains. There are several recipes:
-
A bag of glue for tiles and natural stone 25 kg + a bag of dry mix 300 - 50 kg. We mix everything, in a dry form, we dilute to a pasty state with water. Stones are soaked in water. We apply a thin layer on the ring - a vertical strip from top to bottom, select and place the stones, sinking them into the solution. When a piece is made, before the solution has dried up, the stones are cleaned, the seams are overwritten.
- M500 cement - 1 part, sifted medium-grained sand - 3 parts, PVA glue - 1/3 part, water - about 1 part.Work at approx. +20°C, wearing thick rubber gloves: corrosive to hands. Knead immediately a small batch of the solution: 1 part is a 500 ml jar. Such an amount can be worked out before the solution sets. The technology is similar: stones are soaked, but the well ring is also wetted. Then a layer of mortar is applied to it, stones are pressed in.
We offer the third recipe for how to line a well with stone in video format. The composition of the mixture here is very similar, but before applying the solution, a mesh is fixed on the ring. With this technology, nothing will definitely fall off.
An interesting variant of the hinged cover on the well is proposed in the following video: it leans back almost completely, but whether such a device is needed is up to you.
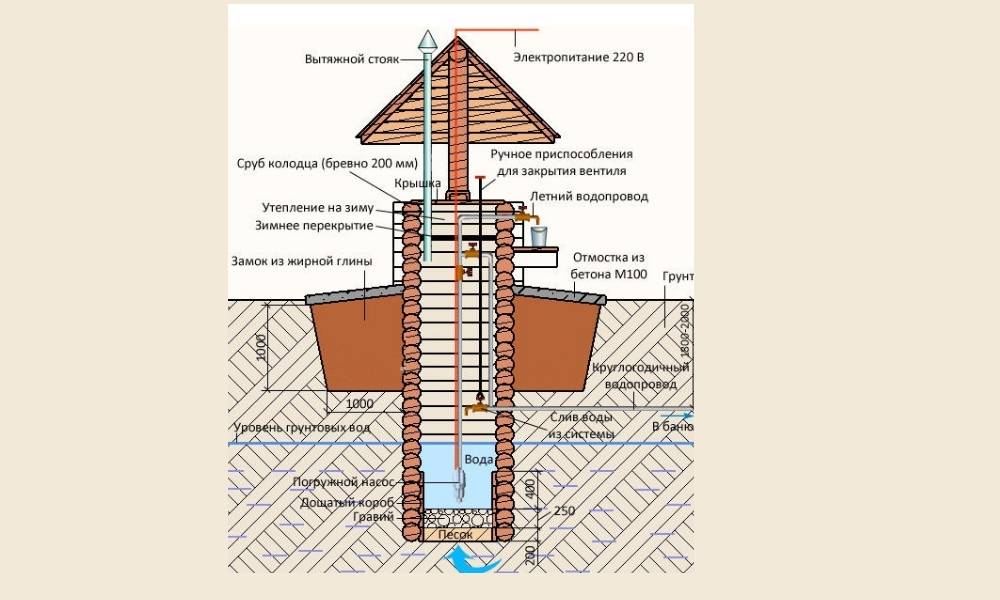
Thermal insulation works
They are necessary if the well is used all year round. At low temperatures, the water inside may freeze. It comes from layers of soil that are far below the freezing line. In the middle lane, ice fetters the top layer of soil, penetrating to a depth of about a meter. Anything below is out of his reach. Streams beating from the depths warm the air they come into contact with and the walls, creating a warm microclimate inside. If you install a hatch on top, it will be easier to maintain the microclimate, however, external buildings do not completely solve the problem. Comprehensive measures are needed.
Wooden structures do not need protection - they can be used all year round. Wood retains heat very well. But the reinforced concrete well should be closed. Consider the scheme of its insulation in more detail.
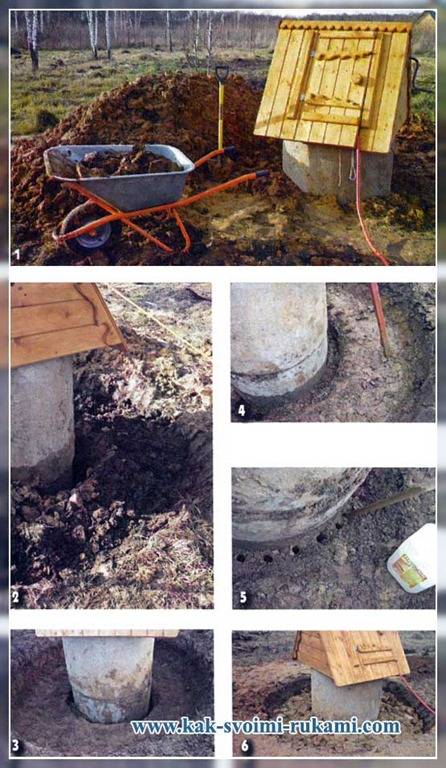
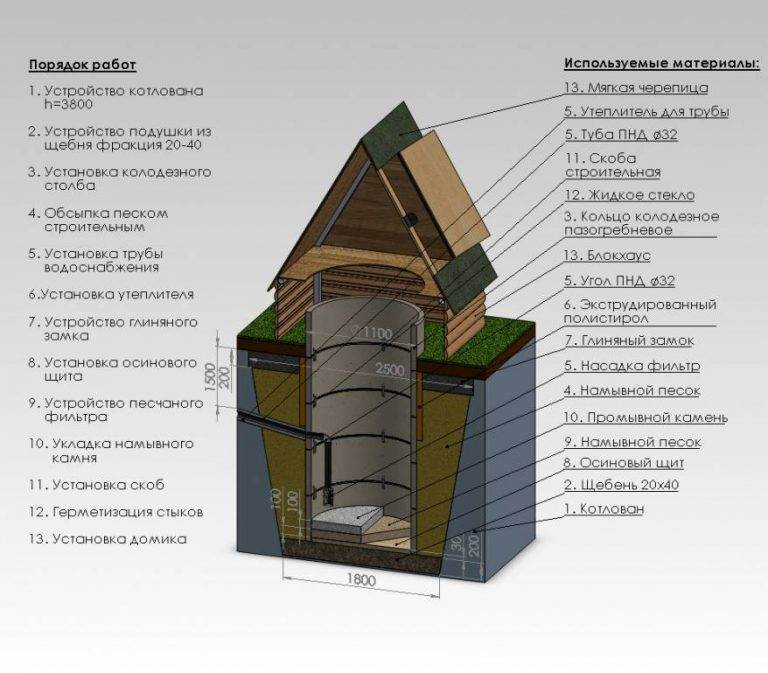
Warming scheme
- The structure is dug up and sealed - cracks are sealed with a cement-sand mixture, and then covered with roofing material on bituminous mastic.
- The next insulating layer is made of a porous material that does not conduct temperature well. Styrofoam will do. There are rounded products that are produced specifically for concrete rings and correspond to them in size. They are attached with glue or dowel-nails. The top is covered with polyethylene. If flat rectangular plates are used, they are pulled together with staples or tape. Do not squeeze them too hard - they break easily.
- One of the insulation options is polyurethane foam. It is sprayed from a cylinder, closing all the voids. On top of it, you can make an additional layer of foam.
- To prevent moisture from accumulating in the insulation, it is tightly covered with plastic wrap from the outside. At the joints, overlaps of 10 cm are made and sealed with mounting tape. The pit is then backfilled and levelled.
Type and structure
If you have decided on a place, it remains to choose which one you will make your mine. You can only dig a shaft well, and the Abyssinian can be drilled. The technique here is completely different, so further we will talk about the mine well.
Type of well shaft
The most common today is a well made of concrete rings. Common - because it's the easiest way. But it has serious drawbacks: the joints are not airtight at all and through them rain, melt water enters the water, and with it what is dissolved in it, and what is drowned.
Lack of a well made of rings and logs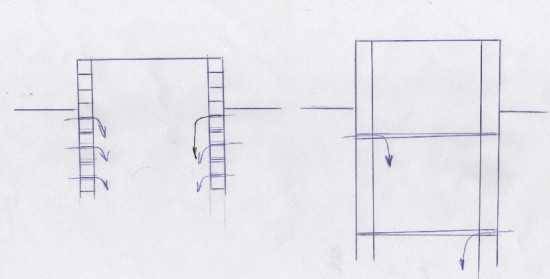
Of course, they try to seal the joints of the rings, but those methods that will be effective cannot be applied: the water must be at least suitable for irrigation.And just covering the joints with a solution is very short and inefficient. The cracks are constantly growing, and then not only rain or melt water enters through them, but also animals, insects, worms, etc.
There are lock rings. Between them, they say, you can lay rubber gaskets that will ensure tightness. There are rings with locks, but they are more expensive. But gaskets are practically not found, like wells with them.
The log shaft suffers from the same “disease”, only there are even more cracks. Yes, that's what our grandfathers did. But they, firstly, had no other way, and secondly, they did not use so much chemistry in the fields.
From this point of view, a monolithic concrete shaft is better. It is cast right on the spot, putting a removable formwork. They poured out the ring, buried it, put the formwork again, stuck the reinforcement, poured another one. We waited until the concrete "grabbed", again removed the formwork, digging.
Removable formwork for a monolithic concrete well
The process is very slow. This is the main drawback. Otherwise, only pluses. First, it turns out very cheap. The cost is only for two galvanized sheets, and then for cement, sand, water (proportions 1: 3: 0.6). It is much cheaper than rings. Second, it's sealed. No seams. Filling goes about once a day and because of the uneven upper edge, it turns out to be almost a monolith. Just before pouring the next ring, scrape off the risen and almost set cement laitance (gray dense film) from the surface.
How to identify an aquifer
According to the technology, the soil is taken out inside the ring and under it. As a result, under its weight, it settles. Here is the soil that you take out and will serve as a guide.


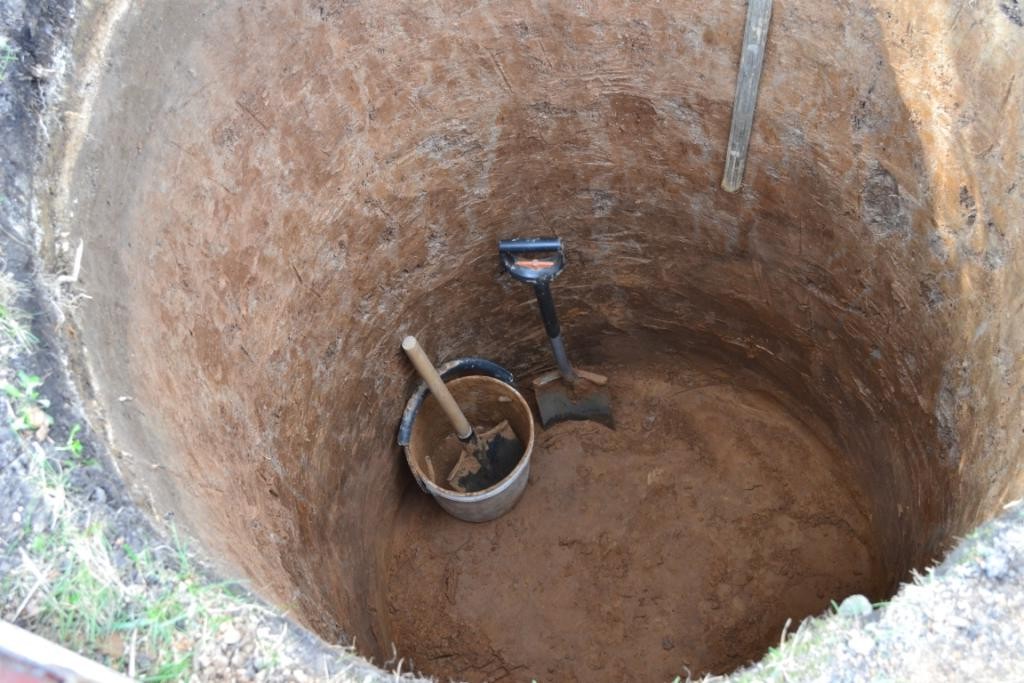


As a rule, water lies between two water-resistant layers.Most often it is clay or limestone. The aquifer is usually sand. It can be small, like a sea, or large interspersed with small pebbles. Often there are several such layers. As the sand has gone, it means that water will soon appear. As it appeared at the bottom, it is necessary to dig for some more time, taking out the already wet soil. If the water comes actively, you can stop there. The aquifer may not be too large, so there is a risk of passing through it. Then you have to dig until the next one. Deeper water will be cleaner, but how much deeper is unknown.
Next, the well is pumped - a submersible pump is thrown in and water is pumped out. This cleans it, deepening it a little, and also determines its debit. If the speed of the arrival of water suits you, you can stop there. If not enough, you need to quickly pass this layer. With the pump running, they continue to take out the soil until they pass this layer. Then they dig to the next water carrier.
Bottom filter in the well
Bottom filter device for a well
If you are satisfied with the speed of the arriving water and its quality, you can make a bottom filter. These are three layers of cameos of different fractions, which are laid at the bottom. They are needed so that as little silt and sand as possible get into the water. In order for the bottom filter for the well to work, it is necessary to lay out the stones correctly:
- Large stones are placed at the very bottom. These should be fairly large boulders. But in order not to take much of the height of the water column, use a flatter shape. Spread at least in two rows, and do not try to keep them close, but with gaps.
- The middle fraction is poured in a layer of 10-20 cm. The dimensions are such that stones or pebbles do not fall into the gaps between the bottom layer.
- The top, smallest layer.Pebbles or stones of small size with a layer of 10-15 cm. Sand will settle in them.
With this arrangement of fractions, the water will be cleaner: first, the largest inclusions settle on large stones, then, as you move up, smaller ones.
Briefly about the occurrence of groundwater
The purpose of building a well in a suburban area is to open an aquifer that can cover the family's needs for drinking or technical water. The first is used according to the name, the second for watering the site, cleaning and similar needs.
It is necessary to decide on the drinking and technical category at the planning stage of the future development, because its depth and design depend on it. There are categories according to the degree of pollution.
There are more mineral impurities in the chemical composition of industrial water, the presence of odor and slight turbidity is allowed. Drinking water must be crystal clear, completely devoid of smell and taste.
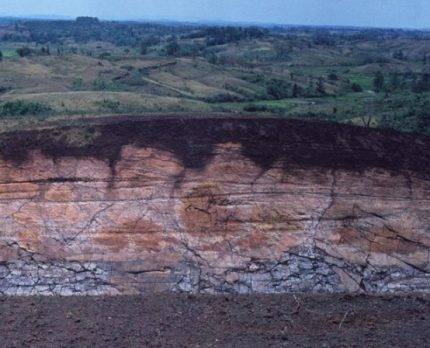 Rocks in the earth's crust occur in layers, within which soils have equivalent physical and mechanical properties and the same structure.
Aquifers are called layers of rock that are equivalent in composition and structure and contain groundwater. On the geological section, they look like bands of arbitrary width, lying at an angle or relatively horizontally.
The upper boundary of the reservoir is called the roof, the lower one is called the sole. Depending on the thickness of the aquifer and the required amount of water, the well can only open the roof, cross 70% of the formation, or be installed with the bottom on the sole.
The roof of the aquifer, in turn, serves as the sole of the overlying layer, and the sole as the roof of the underlying one.
There are two natural ways for the appearance of water in the rock masses, these are:
- Penetration into the soil of atmospheric precipitation or waters of nearby reservoirs. Water freely passes through permeable sediments, which include sands, pebbles, rubble and gravel masses. The process of seepage or penetration is called infiltration, and the layers that let water through themselves are called permeable.
- Moisture condensation in formations sandwiched between two impervious or otherwise impermeable layers. Clays, loams, semi-rocky and rocky rocks that do not have cracks do not let water through. The water lying between them can be pressure: when opened, its level rises, sometimes gushing.
Fractured rock and semi-rock varieties can hold water, but it has little or no pressure. The chemical composition of fissure water will necessarily be influenced by host rocks. Limestones and marls will enrich it with lime, dolomites with magnesium, gypsum coupled with rock salt will saturate it with chloride and sulfate salts.
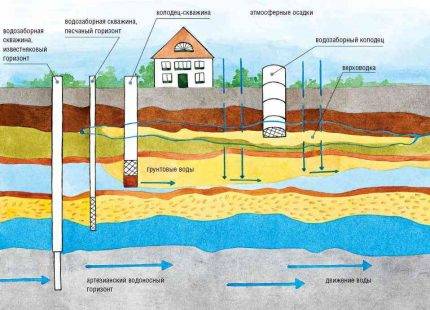 Groundwater is formed as a result of infiltration of atmospheric precipitation or waters of neighboring reservoirs and as a result of condensation inside the reservoir (+)
For those who want to know how to build a full-fledged well with their own hands, you should consider the following:
- The presence of impermeable rock above the aquifer prevents infiltration of dirty effluents into the reservoir. Water extracted from a layer blocked by an aquiclude can be assigned a drinking category.
- The absence of an aquiclude on top of the aquifer signals a ban on the use of water for drinking purposes. It is called verkhovodka and is used exclusively for household needs.
If the owner of the site is interested in the technical category, it is quite enough to open or delve into the layer with perched water. The shaft of the well in such cases is much shorter than the shaft of the production for drinking water.
However, the perch mirror can hardly be called stable. In dry summers and winters, the level in such workings is lower than in rainy autumn and spring periods. Water supplies will fluctuate accordingly.
 Layers capable of releasing water when opened by a mine are called aquifers, rocks that do not pass or release water are called water-resistant or impervious (+)
To obtain a stable amount of water in the well, it is necessary to go through the perch and go deep into the underlying aquifer. Usually there are several permeable and waterproof layers between it and the perch. So, there is a chance to reach drinking water.
However, the trunk of such a well is much longer: it will take more material, time and labor to build it.
Drinking water must be tested by the local sanitary and epidemiological authority. According to the results of the analyzes, conclusions are drawn about its suitability. If necessary, clean-up measures are recommended.


How deep to dig a well
The presence of water as such is not the main factor, it should always be in sufficient quantity. This means that the flow should be such that even if you install a pump and pump liquid to running consumers, it should be enough. In this case, the pressure required for their effective use is necessary.
Before you make a well, you need to calculate how much it will cost. To do this, you need to know how many reinforced concrete rings you need to purchase in order to equip the source.The price is always minimal if you want to reach the perch. This is water that is in the ground, and is formed as a result of seasonal floods.
It is used for irrigation. As a rule, it is several meters. The disadvantage is the difference in level (depth) in accordance with the season and the amount of precipitation. An alternative is to build a well to the level of the sand layers. Water undergoes natural sand filtration, and can be used not only for irrigation, but also for domestic purposes. The main thing is safety. Sand beds are prone to collapse.
Digging wells by hand: how to dig or start work
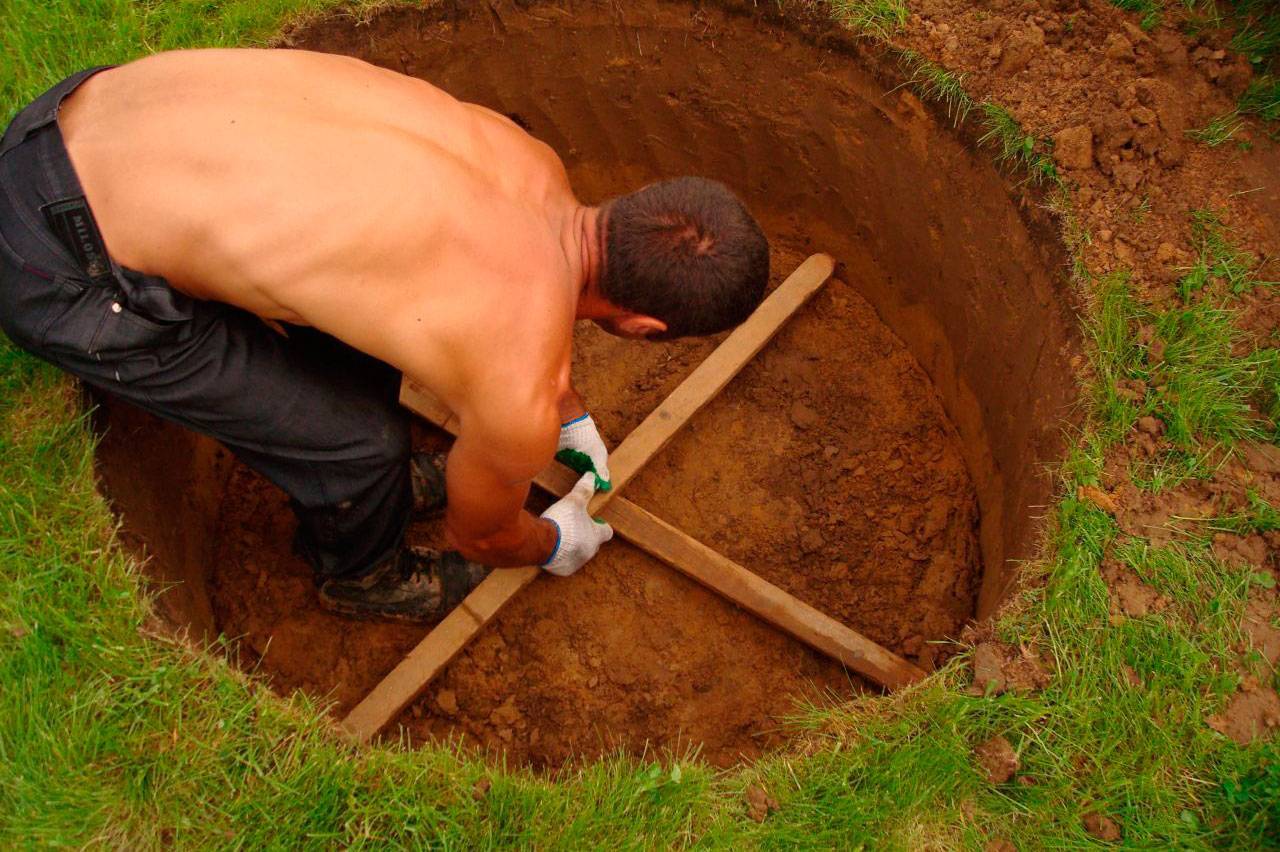
Digging a well, in general, is not difficult, especially at first, until its depth is large - the first meter of the well, it will even be interesting to dig. Everything is new, and the process itself can even tickle your nerves - in this work, there is more than enough extreme, and it is for this reason that you should not take it alone. At least together, and preferably three together - you never know what can happen, and so help will be nearby and most importantly at the right time. But back to the direct process of digging - this process can be represented as the following sequence.
- The first meter of the well is dug into a clean one, according to the size of a concrete ring - everything here is without any wisdom. We just take and dig a round hole, and take the soil taken out of it away. We dig clearly a meter and no more.
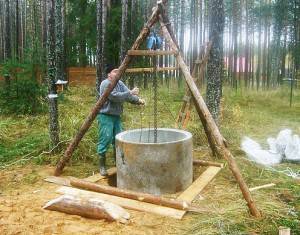
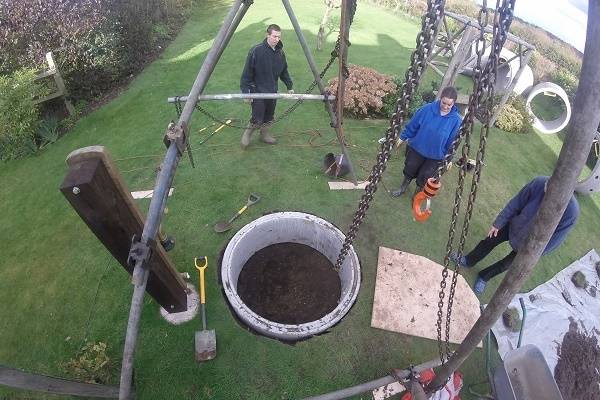
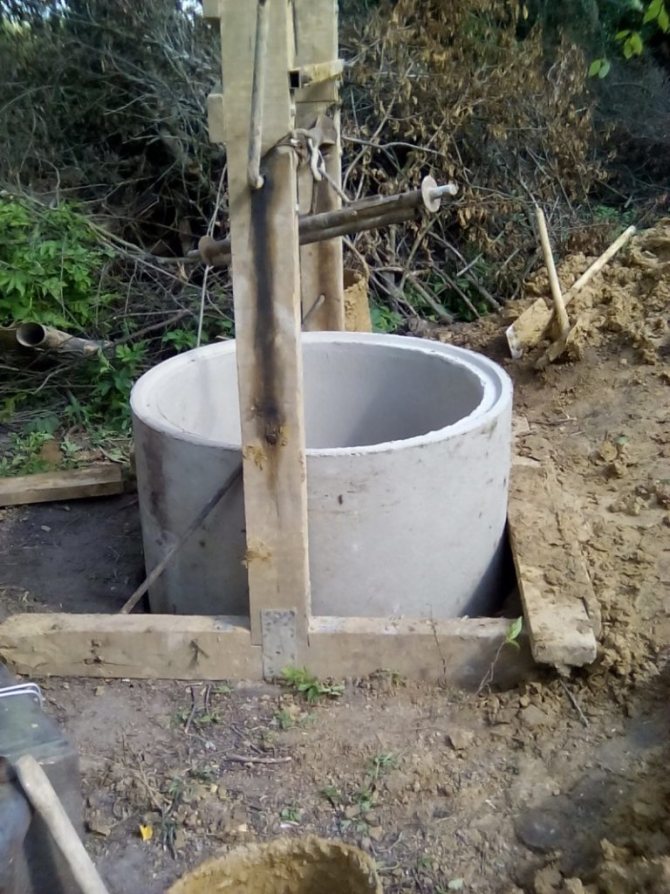
- We put the first ring - three pairs of strong hands can easily cope with this work. We just insert the ring without filling the space around it, after which we roll the second ring onto it - you just have to drag it in or roll it on the rolls, which is simpler and easier. We align them well and prepare the lifting device.
-
The lift can be made in different ways - the chain hoist can be hung on a powerful tripod, or you can build a brick base for it, which will later become the top of the well. Basically, it's up to you to decide.
- Now the fun begins. We tie ourselves with a safety belt, lower a rope ladder into the well that has been started, go down there ourselves, after putting on a helmet, and start digging. First, we select the center of the well, so that there remains a small side on which the ring rests. Then, evenly from all sides, we begin to remove the side. What do we see? Under their weight, the two upper rings begin to sink down. Take care of your legs and arms - stand in the middle of the well and everything will be fine. In the same way, we plant the rings another 15-20 centimeters, and so on until the end, until the top of the concrete ring is level with the soil level.
- We get out, smoke, rest, install the third ring and again into battle.
In general, in this way, centimeter by centimeter, simultaneous digging and installation of casing well rings are carried out. Everything is simple, but you need to be extremely careful. A well is dug until water begins to accumulate at its bottom. At this point, you need to check its depth, and correlate it with the depth of neighboring wells or wells. If everything is about the same, then you can tie it with a dig and move on to further work. Yes, and one more thing - try to dig evenly so that the rings do not lead to the side. This moment is controlled by a plumb line.
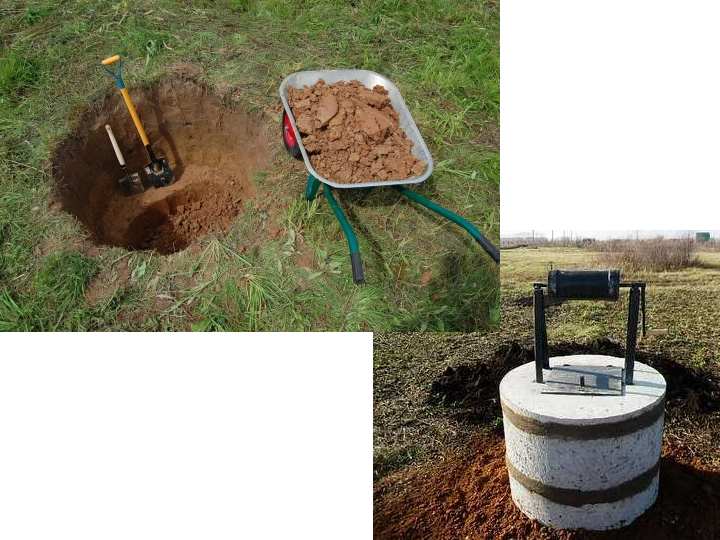
Preparatory stage
First of all, it is necessary to clear the area around the well from debris and grass. Then it is necessary to level this surface and fill it with rubble. To do this, make a layer of 15 to 20 cm, which must be compacted.First you need to fill the surface with large gravel, and then with smaller ones. The result is a platform that should exceed the house for the well.
Wood is traditionally used to build a well shelter structure. This material is easy to process, durable in operation and has a beautiful natural look. At the preparatory stage, you need to cut all the parts in accordance with the drawing. This will speed up the assembly process of the house.
Blueprints
The dimensions of the future house are based on the diameter of the well ring. After receiving all the measurement data, a design drawing is drawn up, the material of manufacture is selected and further construction activities are planned.
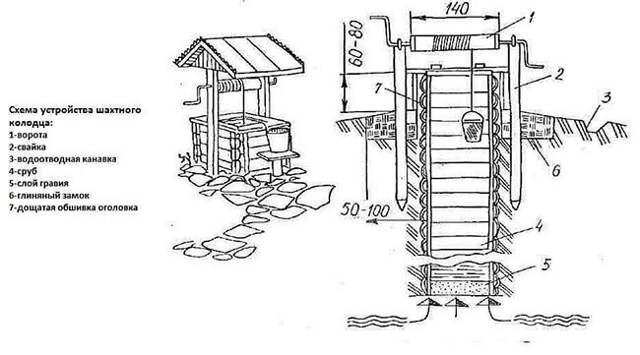
As an example, the creation of a house design for a well from wooden boards and beams will be described. This house has a gable roof with soft roofing tiles.
Presented with a double-skinned roof
1 - frame base; 2 - gables; 3 - vertical stand; 4 - roof ridge; 5 - gate; 6 - sheathing of gables; 7–8 - roof slopes
Selection and calculation of materials
To build a house for a well, you will need the following materials:
- 4 wooden beams (rafters) with a section of 50x50 mm, 84 cm long;
- 1 wooden beam (ridge roof board) with a section of 50x50 mm, 100 cm long;
- 4 wooden beams (base) with a section of 100x100 mm, 100 cm long;
- 2 wooden beams (for attaching rafters and bases) with a section of 100x50 mm, 100 cm long;
- 2 wooden beams (columnar support) with a section of 100x50 mm, length from 72 to 172 cm (depending on the method and height of fastening);
- A log (for a well gate) with a diameter of 20 to 25 cm, a length of 90 cm;
- Board (on which buckets are placed) with a section of 30x300 mm, 100 cm long;
- Boards (for gables and roof slopes) with a section of 20x100 mm;
- 4 metal corners;
- 2 metal rods with a diameter of 20 mm each: one is from 20 to 30 cm long, the other is L-shaped, 40x35x25 cm in size;
- 2 metal bushings (pipe cuts);
- 5 metal washers with a hole diameter of 26mm;
- 2 door hinges, handle, latch;
- Nails, screws, self-tapping screws;
- Roofing material (soft tiles);
- Chain and water tank.
First you need to level and trim the wood. All parts made of wood can be subject to rotting and damage by wood-boring insects. To prevent this from happening, the structure must be treated with antiseptic solutions, antifungal agents or oil protective agents.
Required set of tools
It is almost impossible to build a house for a well without special tools:
- Shershebel and circular saw (with these tools you can quickly and efficiently process all wooden structural elements).
- Electric jigsaw or hacksaw (handy when sawing boards along the length).
- Impact drill or puncher (for drilling holes in the concrete ring when attaching racks).
- Hammer (it is better to take a medium size).
- Screwdriver (with a Phillips tip).
- Building level.
- Roulette.
- Pencil.
This is interesting: Crafts for the garden with your own hands - all the new items for the original design of the site


