- Design features
- The nuances of finishing the stove
- Is it worth it to build a brick brazier with a smokehouse with your own hands?
- Varieties of brick ovens
- dutch stove
- Sauna brick stoves on wood
- Russian oven
- Heating and cooking stove
- How to build a long burning stove
- Special Requirements
- Video: laying a heating and cooking stove
- Features of safe operation
- Russian oven on the street
- With barbecue
- In the gazebo under a canopy
- Bread oven
- How to build on the street
- Construction of a country stove made of bricks
- Russian oven in the house
- How to lay a stove brick
Design features
Due to the special internal structure of the oven, it heats up quickly and retains heat for a long time. Historians claim that the Pompeian oven appeared on the Iberian Peninsula and was originally used specifically for making an open cheese pie, where the structure was not needed to heat the room.
Decoration of the Pompeian oven
Later it spread throughout the world. It is also called the Neapolitan, Italian oven, tandoor.
The Pompeian oven will not only be an ideal design for making pizza, pies and bread, but will also decorate any suburban area.In combination with a gazebo or barbecue, it becomes a real landscape decoration, becoming a favorite vacation spot for the whole family.
Oven in the yard
Basically, such a stove is installed in suburban areas on the street, in a barbecue area, in an outdoor garden, but if desired and some technical improvements are made, a Pompeian stove can also be built in the house. To do this, of course, it will be necessary to provide not only a reliable solid foundation, but also a chimney.
In this article, we will look at the classic option for building an Italian outdoor stove. Before proceeding with the step-by-step instructions, I would like to warn you that the laying of the Pompeii oven is a very difficult and expensive undertaking.
But if you do everything right, then such an oven will delight you for decades, giving an authentic look to the cottage and helping to cook delicious homemade cakes. Thanks to our clear and simple instructions, even a beginner can master the laying of the Pompeian oven with his own hands.
The device of the Pompeian oven is somewhat similar to the design of the ancient Slavic oven.
Construction of the Pompeian oven
But, unlike the traditional Russian stove, it heats up much faster. You can cook pies in it literally 30 minutes after heating, while the Russian oven will take at least 3-4 hours before reaching the optimum temperature for cooking.
Such a heating rate in the Pompeian furnace is achieved due to the lower thermal mass. The layer of brick that is heated is only 12 cm. Already 45 minutes after kindling, the temperature in this oven reaches 260 degrees, and an hour later - 370 degrees.
How is the temperature distribution in the Pompeii oven?
| In 30 minutes | After 45 minutes | After 60 minutes | After 90 minutes | |
|---|---|---|---|---|
| The outer part of the vault | 150 | 260 | 370 | 370 |
| The inner part of the vault | 315 | 370 | 370 | 370 |
The peculiarity and main advantage of the Pompeii oven is that almost any dish can be cooked in it in a short time. Due to the high temperature that is reached inside the vault, pizza and bread are perfectly baked in it. Smoke gives a special piquancy to baking.
The nuances of finishing the stove
The walls of the stove, built of good brick, and even decorated with the outside, do not have to be finished: whitewash and plaster. If there are no chips and cracks on the masonry elements, verticals with horizontals were observed during construction, the heating structure will look great anyway.
For oven masonry made of high-quality bricks, it is enough to grout and carefully embroider the seams. Without unnecessary finishing, the heating and cooking structure looks better.
If there are still complaints about the oven walls, defects are observed on them, and the masonry is not ideal, then the finish is very necessary. Before finishing work, the outer surface is carefully moped, rubbed with a piece of brick to improve adhesion, and then they are waiting for it to dry.
The dried unit can be plastered using the clay-sand mortar used in the masonry. To increase the strength, it is permissible to add 1% asbestos chips to the composition. Heating options for stoves are tiled - this is the most reliable and gas-tight, but also the most time-consuming type of finish.
Is it worth it to build a brick brazier with a smokehouse with your own hands?
Thanks to the material used to make the brazier-smokehouse, such a device acquires a number of advantages:
- durability;
- reliability;
- aesthetics;
- convenience of the cooking process.
But there are also disadvantages:
- construction requires experience in brick building;
- the inability to move the finished product, because of which you need to carefully consider the placement.
To select a suitable project, barbecue lovers are guided by the cost of raw materials, the ability to work with them. You also need to consider functionality.


Complex projects of the “brazier-cauldron-smokehouse” format should be used if all functions are in demand. Often the external characteristics of the device become the decisive factor. Regardless of the option of building a barbecue smokehouse made of bricks, convenience and high quality cooking are provided in it.
Varieties of brick ovens
Next, we will consider all the main models of furnaces. At the same time, you will learn that they can be not only cooking, but also heating and cooking. Another variety is a wood-fired sauna brick oven (it can be equipped with a conventional or fireplace insert). Let's take a closer look at them.
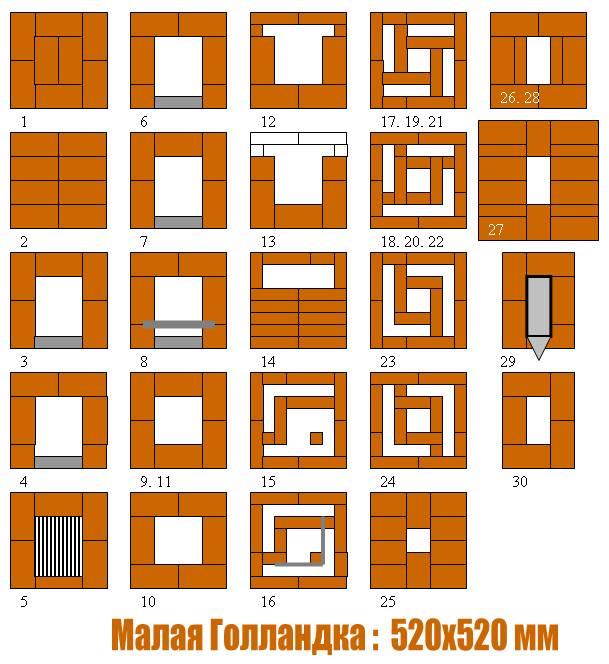
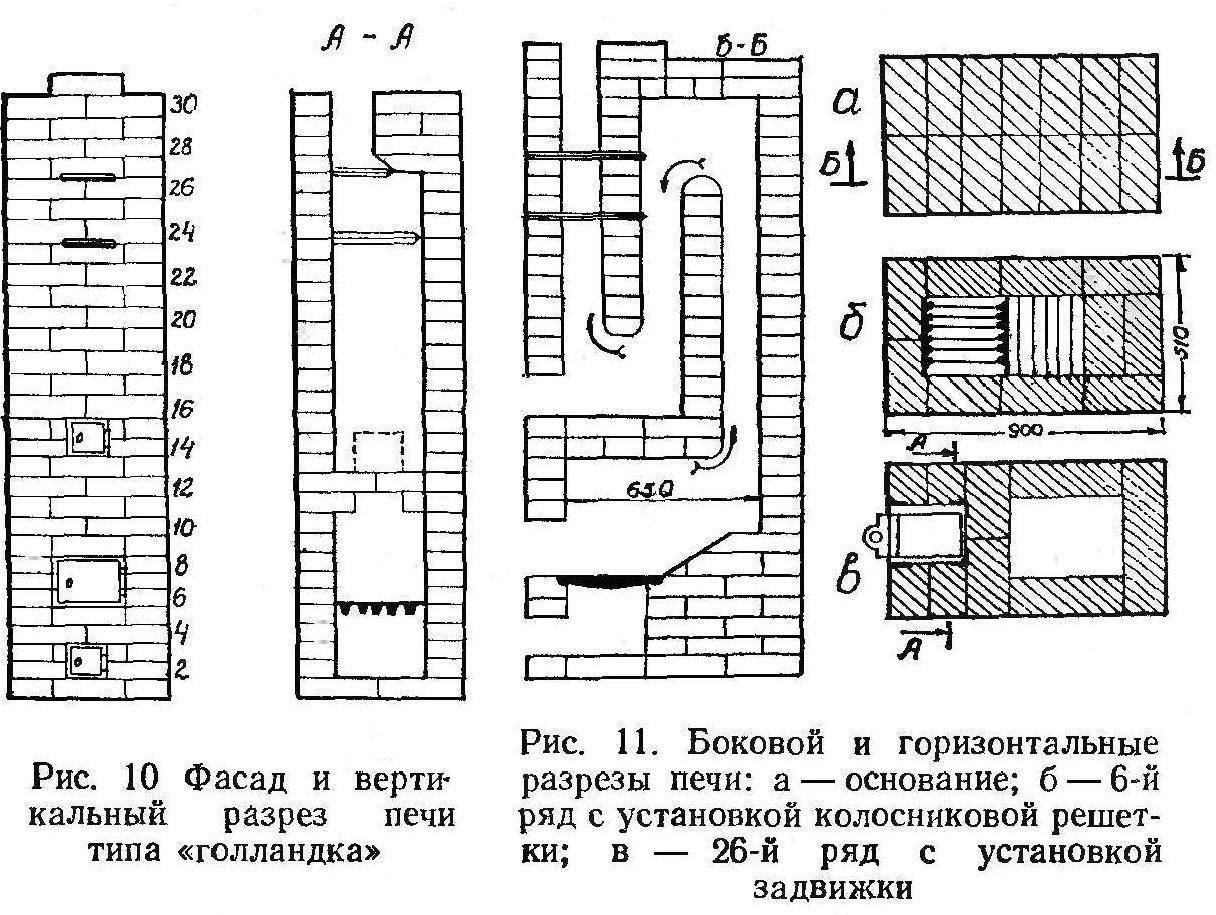
dutch stove
She is a rough oven - the simplest and most compact, which is why its efficiency suffers somewhat. Therefore, a large amount of generated heat simply flies into the pipe. Furnace heating with coarse is characterized by its simplicity. For example, a Dutch woman may simply not have a blower - in this way she is somewhat similar to the most ordinary fireplace. But in order to increase efficiency, it is still recommended to make a blower.
But such a brick oven is extremely simple in laying - the scheme of the stove is distinguished by its simplicity. Because of this, she earned her popularity. But it does not have a cooking surface. And this is also a plus, since the unit is compact. Channels for the passage of smoke rise in it like a snake from the bottom up, located one above the other.The main advantages of this furnace:
- Compactness - if you want to create stove heating for a private house of a small area, with a limited area of \u200b\u200brooms, then the Dutch rough stove will be the best option;
- A simple masonry scheme is available for a beginner stove-maker;
- The ability to give any shape - from rectangular to round or some other.
It should also be noted that there is a small load on the foundation - this is due to the low weight of the Dutch wood-fired brick oven. Therefore, a strong foundation can not be done.
Sauna brick stoves on wood
In some ways, they are similar to the above-described coarse ones, but they differ in a special design - in their design there are heaters filled with stones. The firebox in them does not go into the steam room, but into the next room. If necessary, the doors of the fireboxes are made of glass - thanks to this, a fireplace is formed in the dressing room, which serves as an excellent decoration.
Russian oven
Considering the schemes of brick ovens for the home, you should definitely pay attention to the scheme of the Russian wood-burning stove. Such a stove will become a worthy decoration of the home. It is universal in use - it acts as a heater, is used for cooking (and right in the firebox), and is used to dry clothes at home.
And you can sleep on it, enjoying the warmth emanating from it.
It is universal in use - it acts as a heater, is used for cooking (and right in the firebox), and is used to dry clothes at home. And you can sleep on it, enjoying the warmth emanating from it.
Sleeping on a Russian stove is a special pleasure, now almost inaccessible.But at least once in your life you should give yourself such pleasure and sleep on a Russian stove heated with firewood.
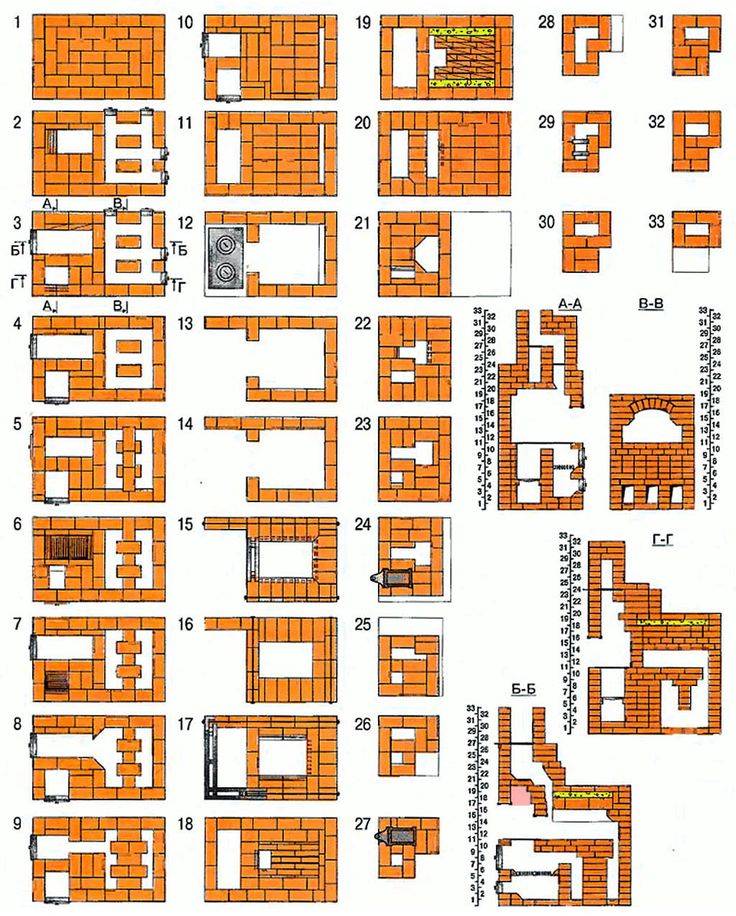
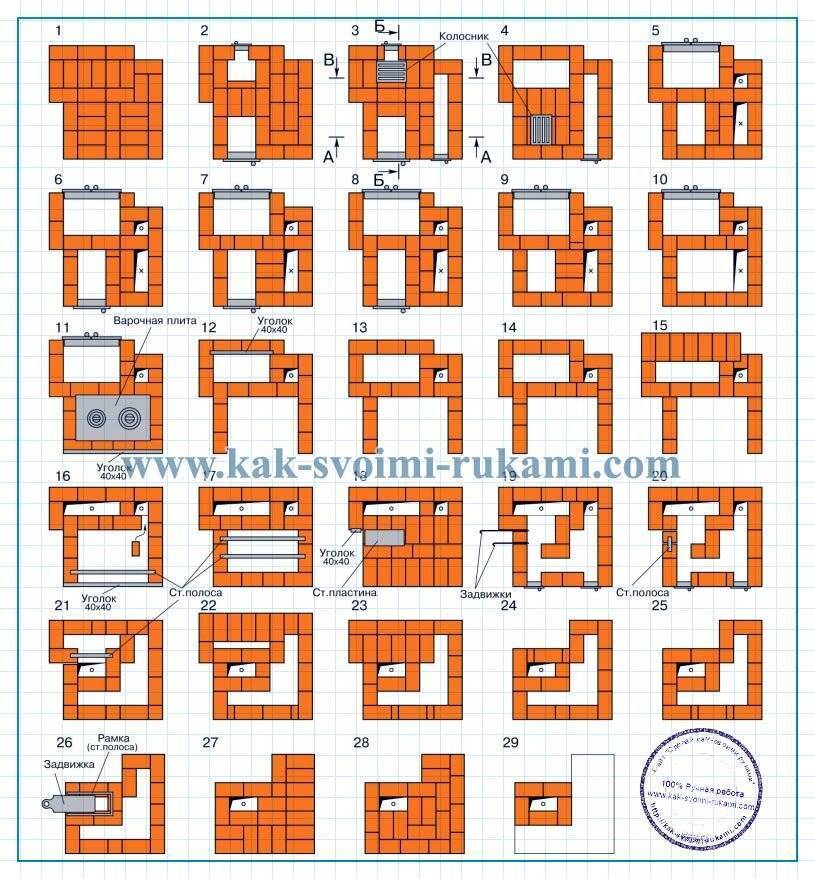
Heating and cooking stove
The assembled brick oven for the house with your own hands can be made according to the universal scheme - according to Swedish. Such a stove (often referred to as a Swede) is wood-burning and is a multi-purpose device. It works as a heating unit, it can heat water and bake pies in the oven, it can be used to cook food in traditional dishes - using a simple hob.
Let's look at the features and advantages of such a brick oven:
- Large firebox for laying firewood - provides long-term burning;
- The presence of an impressive convector - efficient heating of rooms;
- The possibility of embedding water tanks and ovens - expands the functionality of the stove;
- The maximum use of the generated heat - the temperature of the combustion products here is quite low.
It is quite difficult to bring any specific typical drawing of the stove, since the laying patterns are different everywhere. There are also differences in filling - ovens are used somewhere, and somewhere there are built-in tanks for heating water.
The sizes of Swedish brick ovens on wood can be very different. Narrow options include the use of only the hob. If you need an oven, then the stove will increase slightly in size. That is, it can be not only compact, literally a few bricks wide, but also quite overall, occupying a decent area.
Some of these versatile wood-fired brick ovens require a strong foundation for themselves, which imposes restrictions on the possibility of their construction.
How to build a long burning stove
Quite a few owners of homes with stove heating would be interested in converting their brick stove so that it works in a long-burning mode. However, this cannot be done at home.
The fact is that in order to work in this mode, the tightness of the furnace must be ensured, in which smoke with a high concentration of carbon monoxide will be collected. These gases must not be allowed to enter the room. At the same time, for smoldering, it is necessary to minimize the flow of air, which can be done using the blower door, but this is very inconvenient.
To some extent, smoldering of fuel can be achieved in a Russian or Dutch oven. However, this is not safe, so it is still better to opt for a stove that retains heat for a long time. Alternatively, you can buy a factory-made long-burning metal stove, which, by the way, will be cheaper than building a brick stove for a house with your own hands according to the drawings. Yes, and their efficiency will not be lower.
If you still decide to build a brick oven yourself, weigh all the arguments and decide on the design. Then you will need to find an order with a description of the masonry and purchase consumables
Please note that furnace work requires certain skills.
Before laying the stove, it is necessary to pour a powerful foundation, and its dimensions should exceed the body of the stove by 10-15 cm on each side. You can use concrete mortar with reinforcing mesh, rubble stone or concrete blocks. Remember that the stove foundation should not be connected to the main foundation of the house, otherwise the stove or chimney may burst during interseasonal ground shifts.


The body of the furnace is laid out from two types of bricks - solid and fireclay. Refractory fireclay bricks are used for laying especially hot places - a combustion chamber and smoke channels. For adhesion of refractory bricks, a solution based on fireclay clay or with the addition of fireclay powder is used.
Please note that to compensate for the difference in thermal expansion between refractory and ceramic bricks, a gap of 5 mm is left.
All factory parts - views, grates, doors, dampers, hob - must be installed in the places provided for by the scheme. For the strength of fastening the door, a calcined wire 30-40 cm long is threaded into it and walled up in masonry. As for the grate and cast-iron plate, grooves are made under them in bricks, taking into account gaps to the metal of 5 mm for thermal expansion and laying a cord or asbestos fabric.
The last element of the furnace is the chimney. It can be made of ceramic bricks or you can purchase a ready-made block chimney. Factory products are not only durable, but also resistant to condensate containing carbonic acid, do not clog for a long time and provide good traction.
The finishing of the finished furnace is made at the discretion of the owners. You can use clinker, ceramic tiles or finishing stone. This will give the stove a finished and attractive look, as well as protect it from moisture and dust, which will extend its life.
Not only its durability, but also the safety of residents will depend on how responsibly and competently you approach the choice of stove design and its manufacture. Be that as it may, a wood-burning brick oven always fills the house with living warmth and brings coziness and comfort.
Special Requirements
We repeat: the advantages are rude - compactness and the possibility of building in an existing house without capital construction work. But it is not so easy to place a more powerful furnace in the structure of the furnace in general of the same dimensions, it will quickly become unusable from excessive heat load. If special requirements are not met for:
- Furnace foundation.
- Masonry solutions.
- Ways of laying the structure of the furnace.
- The choice and methods of installation of furnace fittings.
The design of the foundation for the rough is given in Fig. The crushed stone pillow without sand filling is leveled into the horizon before pouring. Filling mortar M150 - cement M300 and sand 1: 2. The gap between the rubble foundation and flooring is 30-40 mm. Do not forget to support the cut logs! Leaving their ends hanging is a common but gross mistake. The dimensions of the foundation in the plan should protrude on the contour of the furnace by at least 100-150 mm.
The device of the foundation of the furnace-coarse
Note: the brick bed on the foundation for the stove is laid out with dressing in rows and between rows in the same way as the first 2 rows of masonry of the stove structure, see below.
To fold the rough, 3 types of solutions are used, see fig. below. The bed on the foundation and the chimney are laid out on a lime mortar, as it combines sufficient heat and moisture resistance, but the rubble must be laid only on a completely moisture-resistant cement-sand mortar. Sand for clay mortar is highly desirable to take mountain or ravine, with rough grains. Ordinary clay - purchased oven, guaranteed fat content and, most importantly, purity.Self-digging clay, brought to the desired fat content with sand, is of little use for rough masonry.
Compositions of masonry mortars for a coarse oven
For masonry, a stove is used and, if the order (see below) is provided, fireclay bricks; the red worker is suitable for the highest quality - light red in color (completely annealed), without burn marks, warping and swelling. Dry molded brick is absolutely unsuitable. The masonry of the structure is rough. rules:
- If you are an inexperienced stove-maker, each row of masonry is first laid out dry; detected defects in trimming / chipping of bricks are eliminated.
- Before laying on the mortar, each brick is soaked until the release of air bubbles stops. It is impossible to plump all the bricks into a barrel indiscriminately!
- A layer of mortar 5 mm is applied to the bed and poke of the brick being laid.
- The brick to be laid is laid with a smooth movement slightly with an inclination and moved to the previous one so that there are no air bubbles left in the seam.
- The brick is pressed until the seam converges to 3 mm; can't be tapped!
- Between fireclay and ordinary masonry, the initial seam is 8-10 mm; after pressing - 6 mm.
- The seam between bricks and metal embedded parts (see below) is 10 mm.
- Excess mortar squeezed out of the seam is removed with a trowel (trowel).
- The recesses in the seams found after cleaning the excess mortar are filled with mortar by indentation without transverse movements, but not by rubbing!
Those who prefer to learn visually can watch a video tutorial on laying heating and cooking stoves below:
Video: laying a heating and cooking stove
Incorrect oven door installation
Fittings and grates for coarse need cast iron; doors and latches - with an installation skirt and holes in it for diagonal wire whiskers.Welded steel or cast iron fittings with lugs for straight whiskers (laid along the corresponding furnace wall) are unsuitable in this case. However, install the doors/latches as in fig. on the right, it’s impossible to be rude; It's not by oven rules at all. For a country Dutch woman 2.5 bricks in plan, which is heated once or twice a season, maybe it will work, but not for being rude.


It is necessary, firstly, to compress the whiskers (wire - galvanized 2-3 mm) with wrapping so that they do not move. Press at first not tight, set at the desired angle (at least 12 mm should remain from the far end of the mustache to the inside of the masonry). Then gently tighten, shake the door/latch lightly. Haven't left? Good. Then, secondly, you need to wrap the skirt tightly with asbestos cord (or basalt fiber), and only now put it in place. You can also watch the following videos about installing accessories in the oven.
Features of safe operation
The Swede is designed for a permanent home, as it requires regular heating. It is less convenient to install it in the country for periodic visits - you will have to warm up the stove with preliminary kindling.
To prevent a coal from accidentally falling out of the firebox from causing a fire, it is recommended to put a sheet of iron in front of the stove or tile the floor. The chimney, in the place where it comes into contact with the ceiling and roof, must be insulated. Also, for fire safety purposes, do not stick wallpaper on the heating shield. Only decorative stone or tile cladding is allowed.
Russian oven on the street
Both the construction of a Russian stove outside the home and its operation have features. They are caused by more aggressive effects of atmospheric phenomena during combustion and during long winter downtime.Left in the cold for at least a few days without use, the stove is unevenly heated by the rays of the sun. And masonry joints are saturated with atmospheric moisture.
When melting for the first time after a break, a small amount of wood chips should be used. The gases leaving the pipe should become transparent, which takes an average of one and a half to two hours. After that, you can lay ordinary firewood.
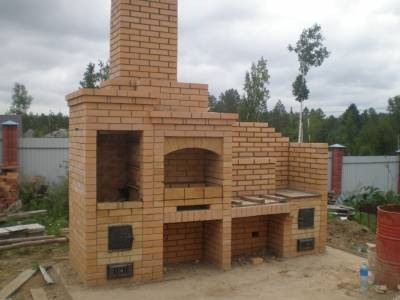
With barbecue
The primitive design of a stationary outdoor barbecue involves a brick box open on one side with a chimney tapering upwards. This option is closer not to the Russian stove, but to the English fireplace.
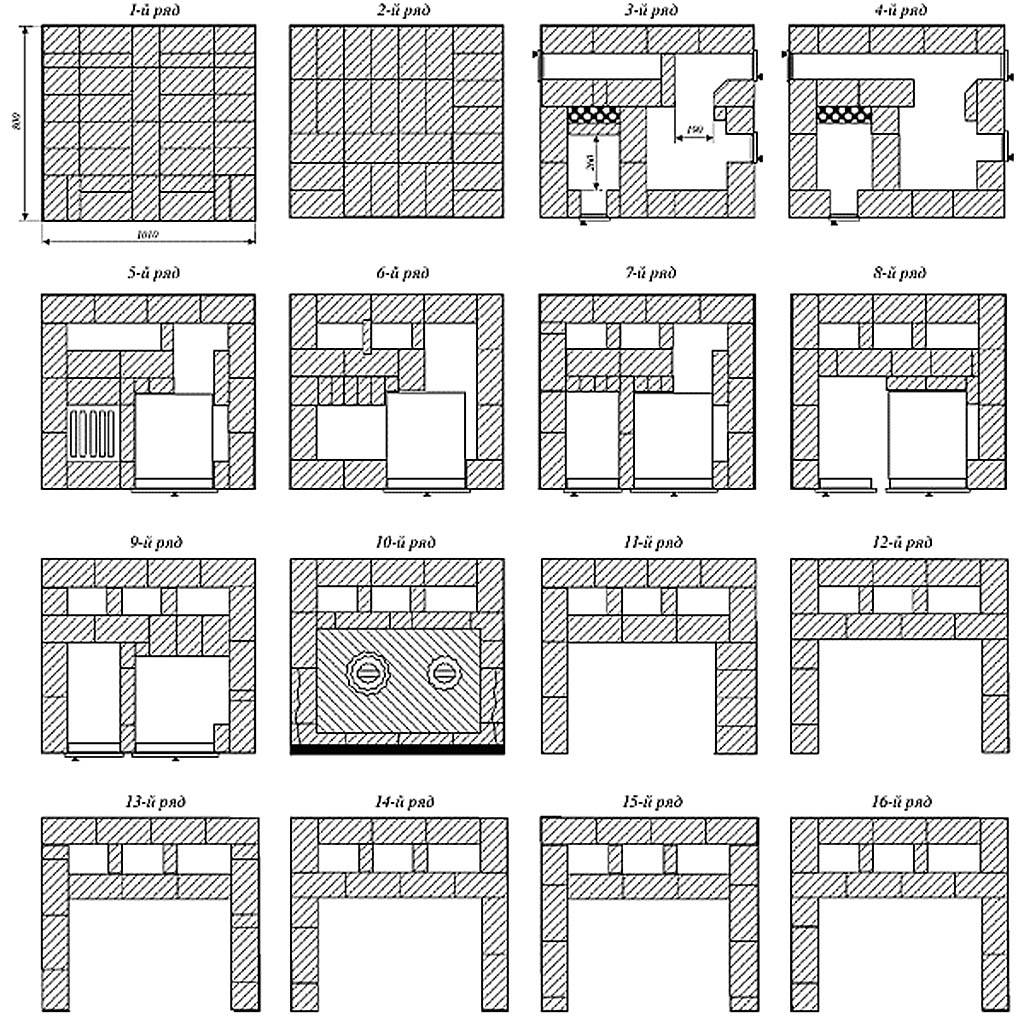
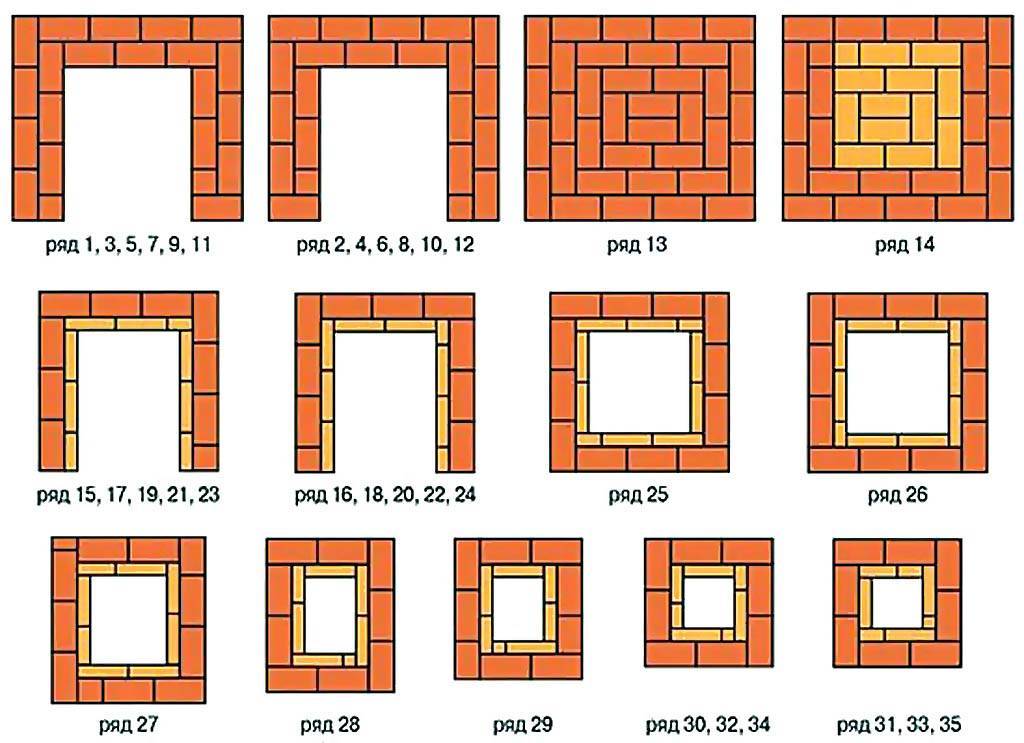
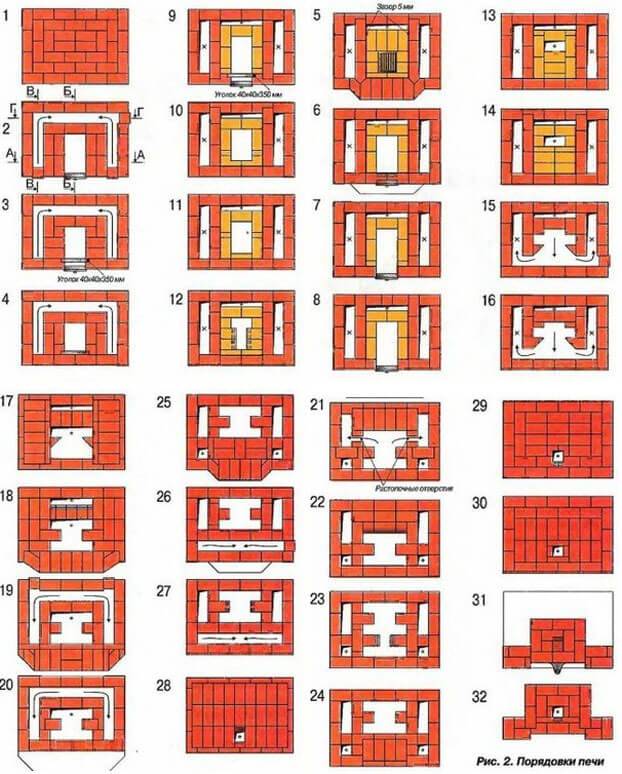
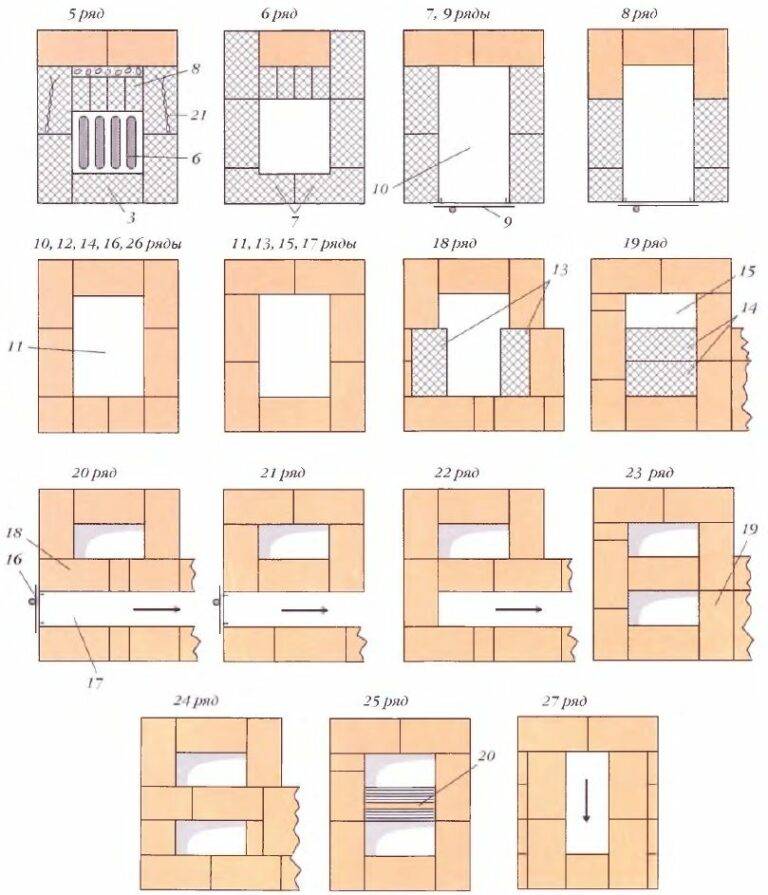
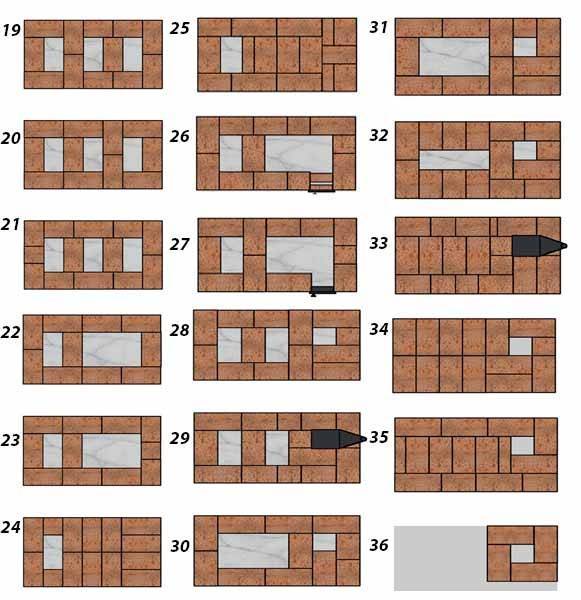
To arrange a more time-consuming to manufacture, but effective Russian-type outdoor hearth, much more brick will be required. The scheme of laying a Russian stove on the street with your own hands is shown in the figure:
The scheme of laying a Russian stove on the street with your own hands
This device performs the functions of an ordinary hearth structure equipped with a charcoal grill.
In the gazebo under a canopy
For the construction of a furnace in non-permanent wooden buildings (verandas, gazebos, covered terraces), fire safety requirements become relevant. A non-combustible belt must be created around the masonry: at least 30 cm from the walls and 60 cm from the side of the door. For this, a heat-resistant material is suitable - sheet asbestos cardboard with a thickness of over 4 mm. From above it should be sheathed with roofing iron.
Bread oven
The device of a wood-fired baking oven may have a simplified design. Many requirements for a traditional hearth for this type of stove are optional.
The most important requirements:
- sufficient size of the combustion chamber to fit a tray with molds inside;
- a pronounced spherical arch so that the thermal radiation is focused in the center of the crucible and maintains the desired temperature.
Placing the bread oven on the street allows you to not lay out the outlet channels very carefully. After all, the threat of carbon monoxide poisoning in the fresh air is much less than indoors.
How to build on the street
The main feature of the design of an outdoor stove is the need to provide protection from atmospheric moisture. You will need to build a reliable canopy. For him, a truss structure is erected on wooden or metal poles. You can arrange a power system and metal welding. The main requirement: the ability of the canopy to hold both its own weight in windy weather and the snow load in winter.
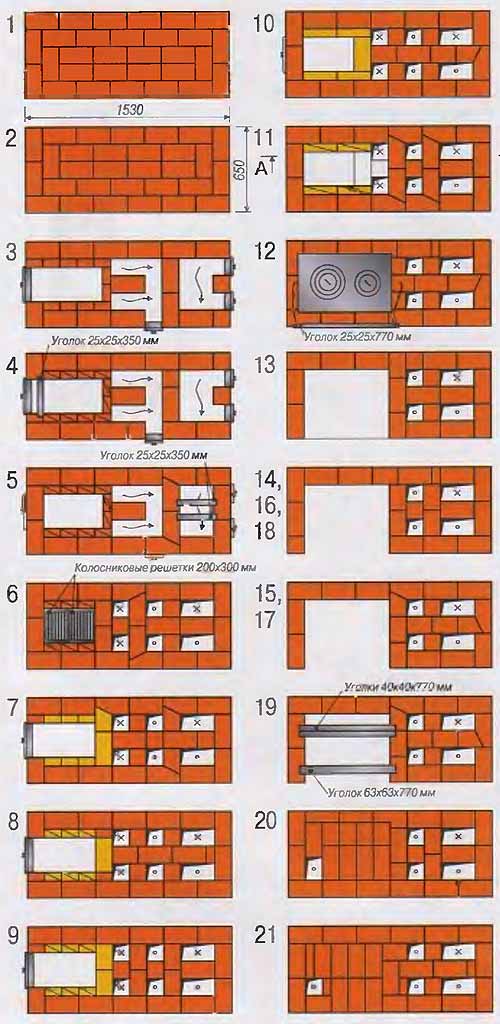
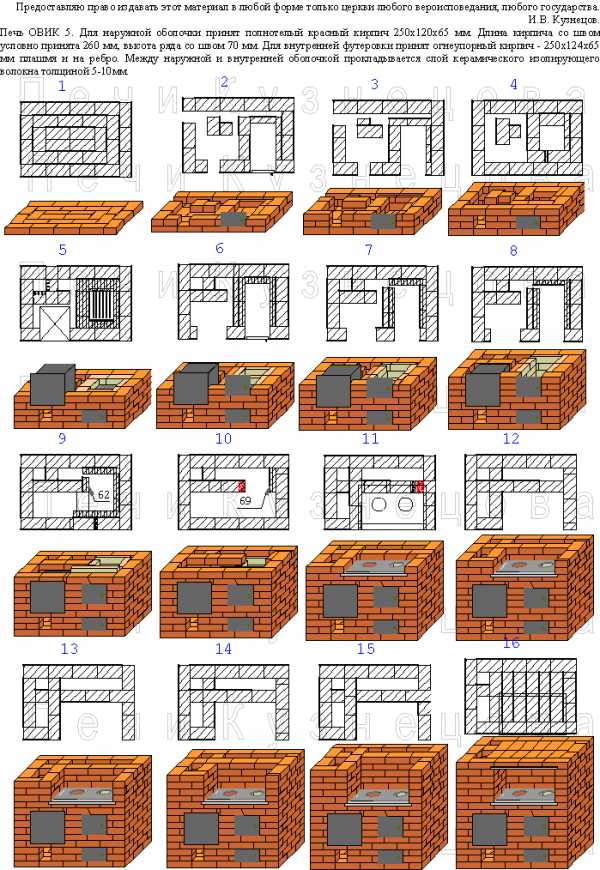
Construction of a country stove made of bricks
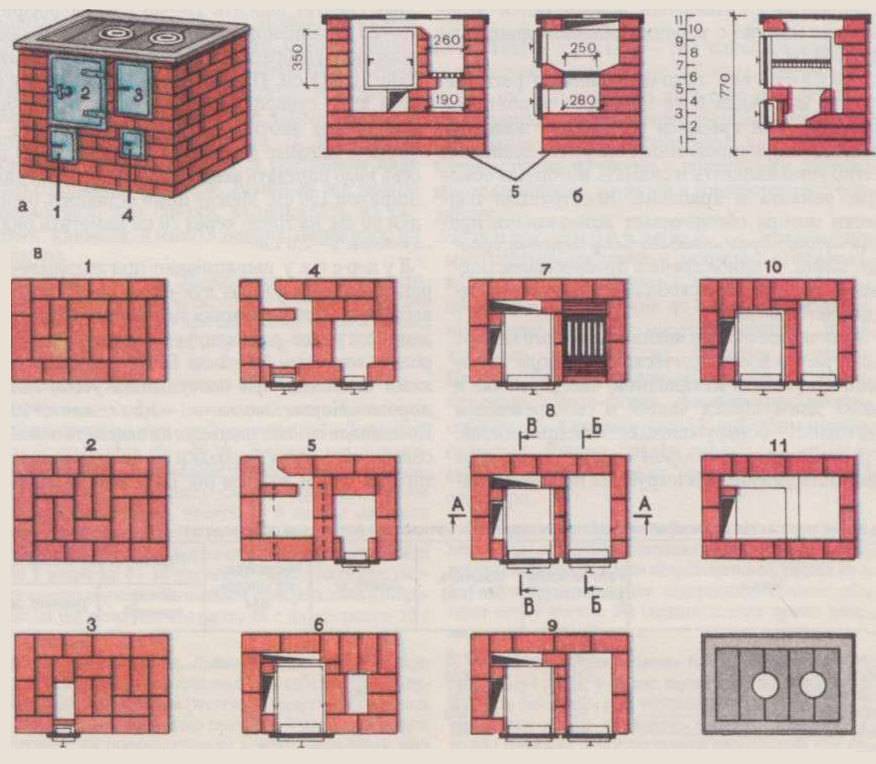
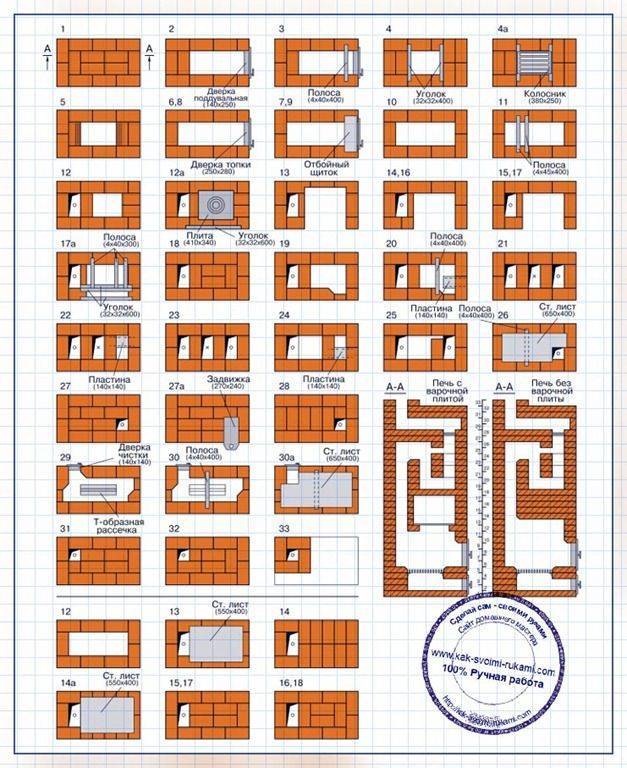
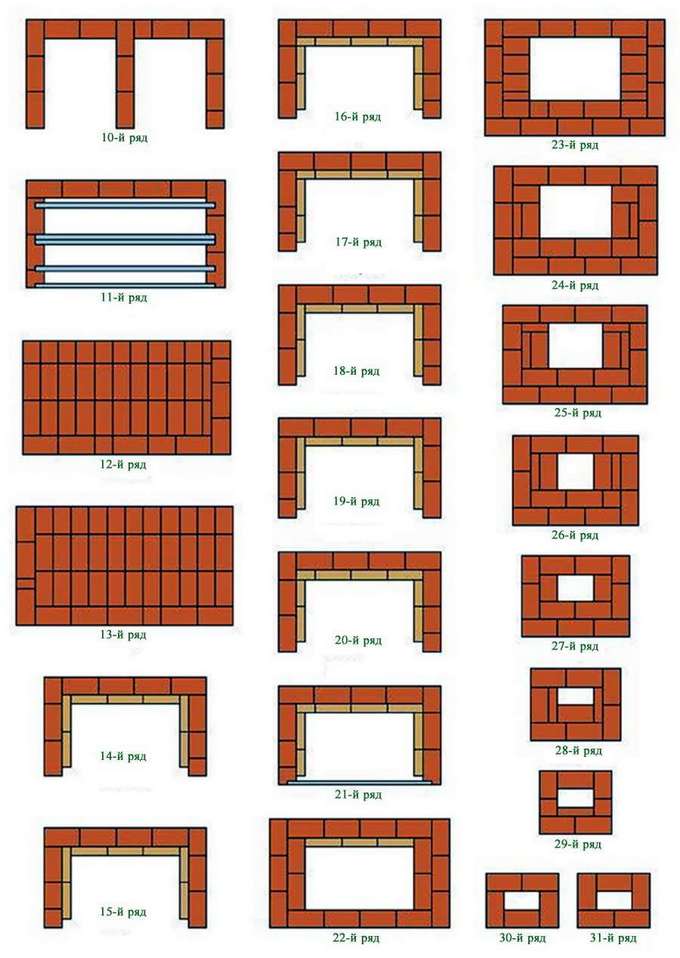
Order drawings for masonry with explanations.
We will need a clay-sand mortar, building bricks (double silicate brick M 150 will not work, we need clay), a trowel, a bucket, a mixing trough, a plumb line, a level, an asbestos cord, fireclay bricks, doors, valves and other furnace fittings, galvanized steel wire, a hammer with a pickaxe, a grinder with a disc for concrete.
The oven will take 0.4 m², while its weight will be insignificant, so you can do without a foundation. If your floor is weak, then it is better to make a screed for masonry.
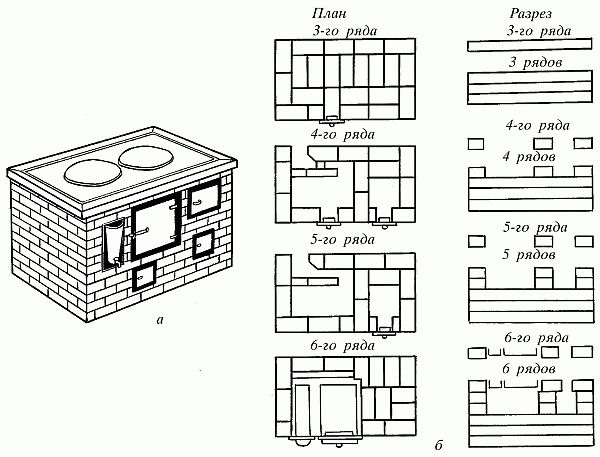
So, laying a small country stove in steps:
- On the place chosen for the stove we put roofing material or glassine 530 × 780 mm in size for waterproofing;
- Pour sand one centimeter thick on top and level it;
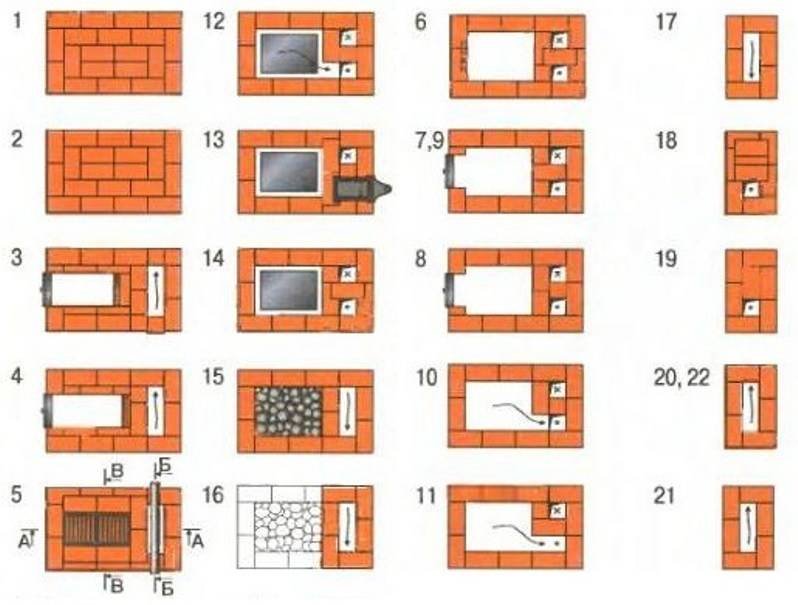
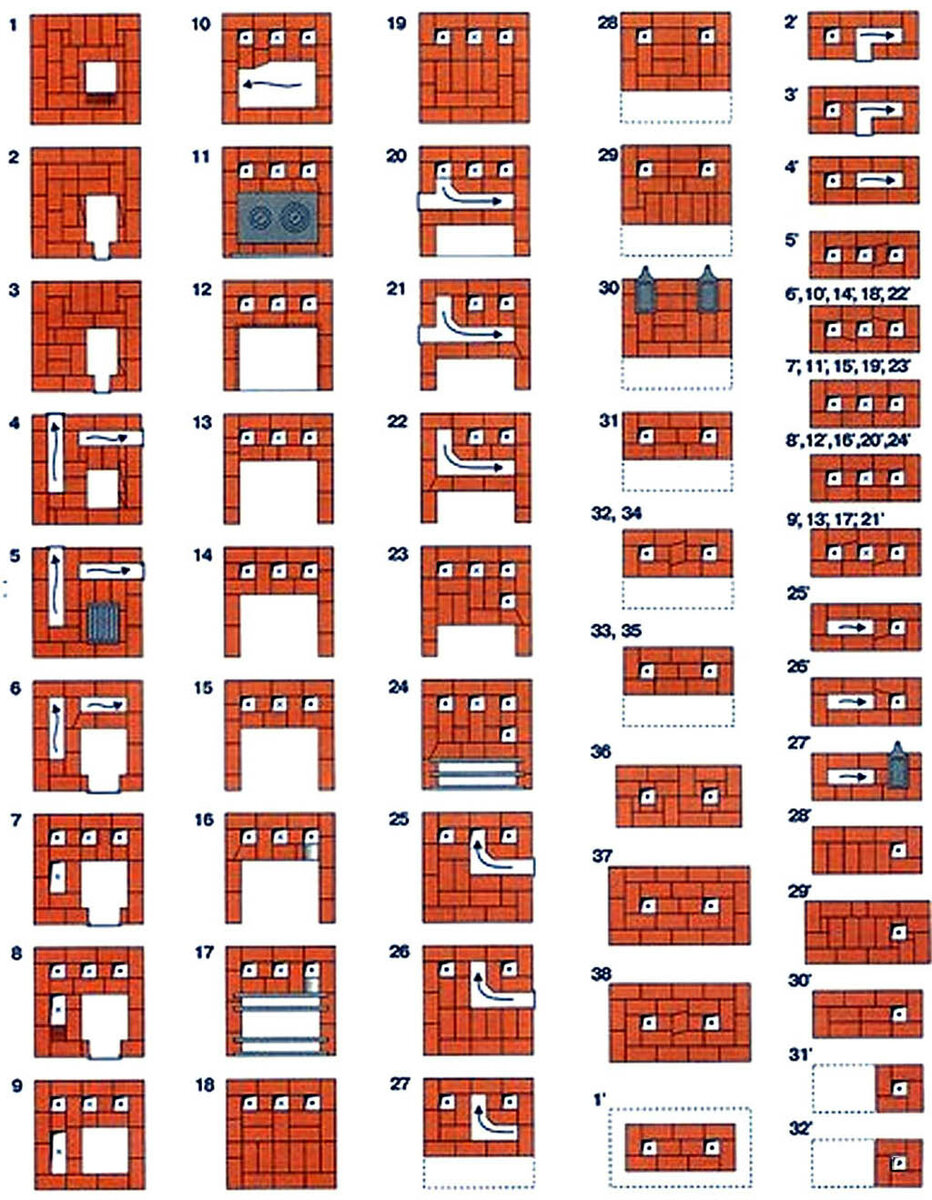
- According to scheme No. 1 (the figure at the beginning of the paragraph), we lay out the first row of bricks without fastening them, and level it with a level;
Lay out the first row.
- We apply a thin layer of clay mortar. We take a blower door, wrap it with a double layer of asbestos cord and fix it with twisted wire.
- We lay out the second row of bricks.
Second row with door.
We take fireclay bricks and lay out the third row. After its formation, we install a grate. We observe gaps for thermal expansion of materials up to 1 cm.


We lay out a row of fireclay bricks with a place under the grate.
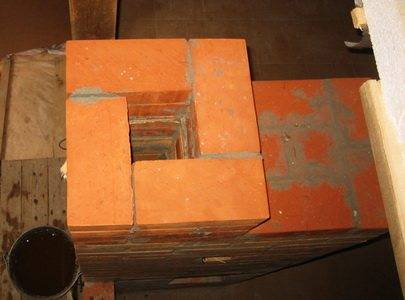
- With a brick installed on the edge, we lay out the fourth row. Inside the chimney channel we make stands for the internal partition. We put the “knock-out bricks” of the back wall without clay with a slight protrusion outward.
- We install the furnace door, pre-wrapped with asbestos. We fasten it with twisted wire and temporarily fix it with two bricks: we put one on the back of the priest, the other on him and the door on top.
Installing the firebox door.
We lay out the fifth row flat along the contour of the fourth, and the sixth on the edge. We wipe the chimney walls with a wet cloth.
We fasten the door with wire.
We lay the seventh row flat out of three-fours (we cut off 3/4 of the whole brick with a grinder) for a bunch with the eighth row. The back wall is on edge again.
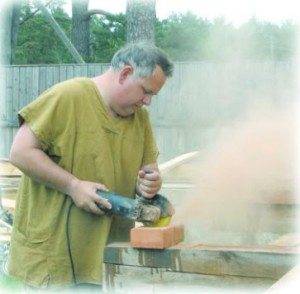
We cut the bricks with a grinder.
In the eighth row, we close the furnace door with two bricks above it. We install a beveled brick above the firebox to center the flame under the burner.
We cover the furnace door.
- We put the ninth row with an offset back (small) to maintain the open door. Before laying, we lay out a wet asbestos cord to seal the joints of the brick and the hob.
- With the tenth row, we begin the formation of a chimney, which will gradually expand back. We will make a pipe attached, so as not to shift the center of gravity of the structure, or a pipe made of light iron.
We begin the formation of the pipe.
In the eleventh row, we lay the valve, seal it with an asbestos cord coated with clay.
There will be a latch here.
Next comes a chimney in a quadruple, which is joined to a light metal pipe.
We continue the chimney to the docking point.
Now we take out the knockout bricks and clean the bottom of the chimney from debris.
We bring the chimney under the pipe.
- We close the gap between the first row of bricks and the floor of the metal L-shaped sleeve and nail the plinth.
- We whiten the oven or cover it with oven varnish, seal all joints between metal and brick. Metal parts can be painted with black refractory paint.
We whiten and decorate the oven.
We make a test furnace with paper and small branches, then we give 2 weeks to dry.
As you can see, all the manipulations are not so difficult to do on your own. Material and labor costs are relatively small, the construction does not take up much space.
At the same time, we received a heating and cooking device that will perfectly heat a small country house, give your cooking a unique taste and aroma of smoke, and create a pleasant atmosphere and comfort.
Advice! If there is an opportunity to invite a person who is more or less experienced in the furnace business, at least as a consultant, by all means use it, since it is rather difficult to build stoves according to the book, it is better to see once.
Brick stoves are considered bulky, expensive and difficult to build.However, it is easy to see with concrete examples that these opinions are somewhat exaggerated, and it is possible to build an inexpensive compact cottage stove out of bricks, and on your own.


In the presented video in this article you will find additional information on this topic.
Russian oven in the house
The traditional home life of the Russian peasant was literally built around the stove. Under it, during the construction of the hut, a significant part of the internal space was allocated. The stove not only heated the room, but also served as a place for the whole family to sleep, cook food and bake bread.
Old Russian oven in the hut
The advantages of such ovens include:
- long service life with proper care;
- the ability to keep warm for hours;
- many additional uses - drying berries and mushrooms, use for household chores and crafts;
- the ability to protect the body from disease.
The latter means that on the bench of a well-heated stove, for almost the entire heating period, a temperature of approximately 25-28 degrees Celsius is maintained.
This design also had disadvantages:
- the stove in the house took up a lot of usable space;
- due to its significant weight, it assumed its own foundation (therefore, it was not possible to equip it in a multi-storey building);
- required a large amount of fuel;
- the furnace could not withstand high temperatures.
The main drawback of the historical design of the Russian stove was that the heating of the room occurred only in the middle and upper zones, and did not come closer to the floor at all. In part, this disadvantage was compensated by the installation of additional fire chambers (fire chambers).
How to lay a stove brick
To successfully fold a workable outdoor stove, be sure to follow the following masonry rules:
- First fold each level as a constructor, without mortar. The fitting will allow you to accurately cut the stones in the right places and fit them together.
- Ceramic brick is soaked for 2-3 minutes in a container of water, then placed in place. Refractory stone is only rinsed from dust.
- The maximum thickness of the masonry seam on a clay-sand mortar is 5 mm. Excess threatens the formation of cracks.
- Do not bind a refractory wall with a normal one. Insert sheets of basalt cardboard into the gaps between assorted bricks.
- Check the horizontalness of each tier with a building level, and the vertical with a plumb line.
Remove the mortar protruding outward with a trowel, and wipe the inner surfaces with a damp cloth. With a lack of experience, do not try to chop stones with a pick, it is better to use a grinder with a cutting wheel for concrete.


