
- How to install a caisson for a well with your own hands
- How to make a caisson yourself
- Monolithic concrete structure
- Caisson from concrete rings
- Budget camera made of bricks
- Sealed metal container
- Stages of work
- Excavation
- Waterproofing
- Mounting
- What is a caisson
- Types of caissons
- The device and features of pits for wells
- How to install a caisson for a well?
- Plastic caisson for wells RODLEX KS 2.0
- Prices for plastic caissons
- Step by step installation instructions
- Prices for water pipes
- Important points when arranging
- Nuance # 1 - the choice of a well drilling method
- Nuance # 2 - the secrets of drilling a well
- Nuance # 3 - the optimal material for the caisson
- Step by step instructions for arrangement
How to install a caisson for a well with your own hands
| A photo | Description of works |
| Before buying a tank and starting work, carefully measure and calculate the dimensions. Check the groundwater level. | |
| Experts recommend buying a PFRK sealing sleeve. It is durable and has a good fit. Not all couplings that are attached to the caisson can boast of such data. | |
| Tanks are sold with a solid bottom. It needs to cut a hole along the inner diameter of the coupling. The tightness of the structure depends on how correctly you made the calculations and selected the coupling. | |
| The hole is cut with a conventional jigsaw. | |
| Holes for fasteners are drilled around the hole in the marked places. | |
| Before installing the coupling, all surfaces are thoroughly degreased with a solvent. | |
| The coupling is treated with a sealant. For installation, a paronite gasket is used. | |
| It is more convenient to install the coupling with a partner. One works outside, the second - inside. | |
| While the sealant hardens, you can start digging a well under the caisson. The diameter of the well should be 20 centimeters larger than the diameter of the caisson. | |
| Outside, the coupling is coated with a waterproofing compound. It will keep metal elements from corrosion and ensure the tightness of the structure. | |
| The cover of the caisson should protrude 7–10 centimeters above the ground, and under it you will need to arrange a concrete pad about 2 cm thick. Keep this in mind when digging a pit. | |
| The bottom of the pit is reinforced with reinforcement. A concrete-sand mixture is poured on it. For the formation of the "sole" will take a day. | |
| Before planting the caisson, the casing pipe is cut to the desired height and the edges are slightly processed so that they do not break the coupling. | |
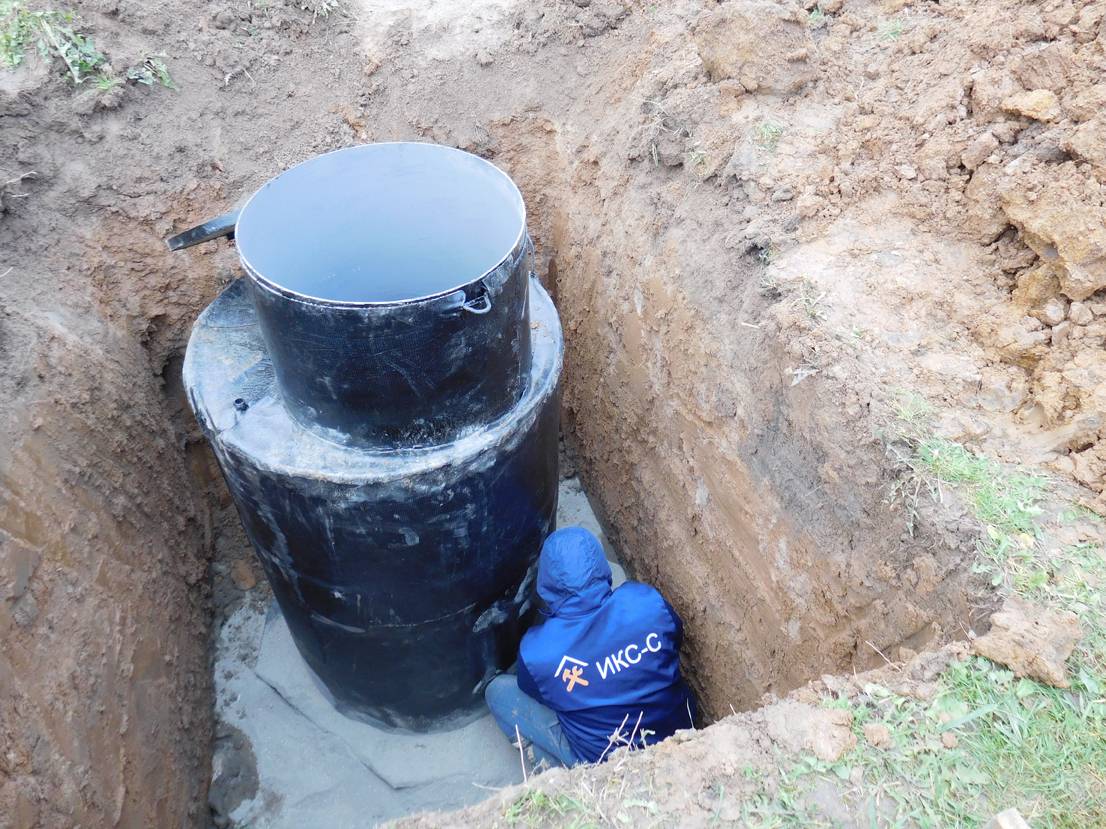
| It is better to install the caisson with assistants. It will take at least 4 people to put it on the pipe and lower it evenly into the pit. | |
| Professionals recommend pouring a concrete-sand mixture at the bottom of the caisson with a layer of about 5 ÷ 10 centimeters. It will strengthen the bottom and will not allow the caisson to float. | |
| After installation, pipes are brought to the caisson and connected using couplings. Further, the walls of the pit are poured with concrete in two stages: first to a height of 30 centimeters, then to the top. If you try to immediately fill the entire space with concrete, the container will float. | |
| The last stage of work is the installation of equipment for the well. This completes the arrangement of the caisson. |
Learn more about installing a caisson in the following video:
How to make a caisson yourself
To do it yourself, first you need to decide on the material, system parameters.
Monolithic concrete structure
A square shape is suitable for the device, it is also much easier to build formwork.
First you need to decide on the size of the pit, which is dug under the structure. The length and width are standardly equal, so they can be calculated as follows: measure the size of the caisson from the inside, add the thickness of 2 walls (10 cm).
It is also necessary to calculate the depth of the pit, which should be 300-400 cm more than the height of the chamber. If everything is calculated, then the drainage layer can be installed at the bottom of the pit.
If further concreting of the base of the structure is not planned, then the following procedure is chosen
But when it is necessary to fill the bottom with concrete, the height must be taken into account. In addition, the pit should be such that the surface of the cover of the structure is flush with the soil. In order to have more space for a person when repairing the system, it is best to place the camera not in the middle in relation to the casing, but on the side
And the equipment will be conveniently placed
In order to have more space for a person when repairing the system, it is best to place the camera not in the middle in relation to the casing, but on the side. And the equipment will be conveniently placed.
Construction of a monolithic concrete caisson.
The work is carried out as follows:
- Start by digging a hole. At this point, you can immediately dig a trench for water pipes to the house. Then they begin to install drainage, which consists of 2 layers: sand (up to 10 cm high) and crushed stone (up to 15 cm).With such drainage, even if water gets inside the caisson, it will not stay inside, but will quickly go into the soil.
- After you need to equip the formwork. Often the wall of the pit is used as the outer layer of the formwork. The side of the pit must be covered with polyethylene to avoid seepage of water from the concrete into the soil. After you need to make a frame using reinforcement.
- Mix concrete solution. Pour it in small parts, compacting well with an electric vibrator. If there is no device, then you can use a pin, a thin pipe and weld the handles. This device is quickly lowered into the concrete, and then slowly pulled out to get rid of air and water bubbles, thereby making the concrete denser.
- After that, it is necessary to dry the structures, regularly spraying the surface with water so that the concrete does not crack. If it's hot, you can cover it with a damp cloth.
- After a week, the formwork can be removed. And in 4 weeks to install the equipment.
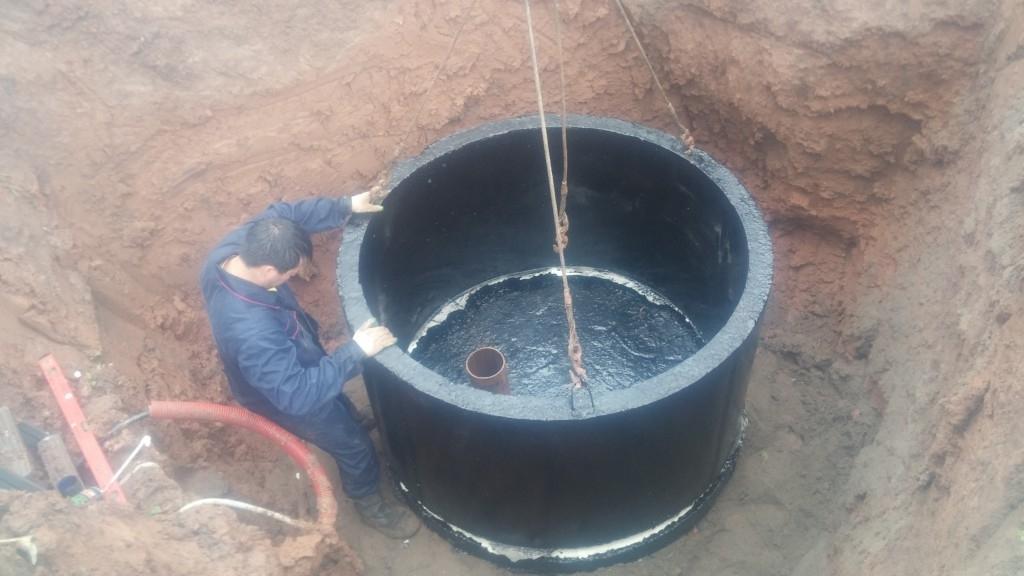
Caisson from concrete rings
The borehole system of concrete rings provides for the following:
- First, the pit is prepared. The calculations are the same as in the previous manufacturing method.
- Fill the bottom with concrete and drill a hole for the pipe.
- They take concrete rings, which are pre-coated with a special waterproofing compound. Let dry.
- After each ring is lowered into the pit, while connecting the joints with a mixture for bonding. The seams are foamy.
- There may be voids around the structure that need to be filled.
From concrete rings, a caisson for a well.
Budget camera made of bricks
Brick caisson device:
- First, a foundation pit is dug out, a strip foundation and a trench are installed at the bottom, which are covered with sand and rammed.
- It is necessary to lay waterproofing on the foundation (for example, roofing material).
- Brick laying starts from the corner, be sure to fill the seams with a special solution.
- After bringing the masonry to the desired height, let it dry, plaster.
Sealed metal container
The process is like this:
- Dig a hole again, suitable for the size and shape of the chamber.
- A hole for the casing pipe is cut out at the bottom.
- Install the cover, clean the seams of slag. The seams must be double-sided to ensure the tightness of the caisson.
- The structure must be treated with a protective layer.
If necessary, the chamber can be insulated, after which the caisson can be lowered into the pit and a column, sleeves, and cable can be installed. The sleeve is welded, everyone falls asleep.


Stages of work
The caisson is tied to the location of the well or septic tank. Therefore, the design is carried out under local conditions:
- analysis of the composition of the earth;
- identification of the groundwater horizon;
- clarification of the depth of soil freezing;
- accounting for the dimensions of the equipment located in the internal cavity of the caisson;
- ease of installation and maintenance of water pump units.
The practical device of a caisson for a well made of concrete rings is divided into several stages:
- earthworks:
- choice of location (tied to the location of the well);
- laying trenches for pipelines;
- excavation;
- carrying out measures to protect against shedding;
- filling the remaining free space with earth;
- mounting:
- arrangement of drainage;
- base manufacturing;
- installation of rings;
- waterproofing and thermal insulation measures;
- arrangement of the caisson:
- installation of pumping equipment;
- connection of pipelines;
- commissioning operations.
- cover installation.
Excavation
Digging a pit for a caisson is carried out by mechanical means or manually. This is determined by the size of the pit and the composition of the soil. Clay and loam, rocks are processed with the help of an excavator. Light sandstones, sandy loams lend themselves to manual labor, provided that the depth should not exceed two or three meters.
Work is carried out in the spring and summer. The best option is in the absence of precipitation.
The depth of the pit is determined by the size of the structure and the level of soil freezing. Drainage is performed at the bottom of the pit, - a trench is dug along the contour up to 20 ~ 40 cm deep, a width of a spade bayonet, covered with rubble.
The base is being made - the bottom is made of concrete. Reminds me of a monolithic foundation. It is advisable to provide embedded metal parts for connection with the vertical structure. The slab is installed on a cushion of coarse sand (grass).
Waterproofing
Unlike metal or polymer products, the caisson is prefabricated, consisting of individual parts. In addition, concrete is a hygroscopic substance. Due to such factors, it is required to carry out waterproofing of the caisson from concrete rings:
- The outer wall, the seams are coated with waterproofing material. To improve adhesion, pre-treatment with a deep penetration primer of the AQUA-stop series is recommended. As insulation, it is advisable to use bitumen-based mastics or molten tar.
- The ends, before direct installation in place, are treated with silicone sealant. This substance can simultaneously serve as a connecting element between adjacent parts.But, the mechanical shear strength of the seam will be less than that of a cement-sand mortar.
- The seam, to increase strength and tightness, is recommended to be bandaged with a mesh material (tape "serpyanka").
- The inner cavity of the caisson is impregnated with sealant of the AQUA-stop series, treated with Penetron or a similar waterproofing material.
Mounting
The assembly of the structure is carried out as soon as the pit, pipeline is ready. A lifting mechanism is used. When installing a caisson of concrete rings, it is necessary to monitor the alignment of adjacent parts.
Subsequence:
A cement-sand mortar or silicone sealant is applied to the joints. In the presence of embedded metal parts, additional fixation by welding is carried out.
Waterproofing works are being carried out. Mastic is applied in two or three layers
Particular attention - the junction of the lower part and the bottom. In this place, the pressure of ground and melted snow is the greatest.
The top ring is installed 10~20 cm above ground level
This will prevent the ingress of melt water and precipitation.
The caisson is insulated, - with the material of the Penoplex series on the outside or with foam plastic inside. It is advisable to wrap the outer layer with a polyethylene film in three or four layers.
Arrangement of the caisson - the necessary equipment is installed inside, pipelines are connected. Carry out commissioning work.
The top cover is mounted, ventilation is installed. Along the perimeter, at a distance of up to 0.5 ~ 1 meter from the outer wall, thermal insulation (penoplex) is laid in a continuous field, covered with earth.
During operation, especially in the spring-autumn period, it is necessary to periodically check the caisson.In the event of the ingress of external water, take measures to eliminate it.
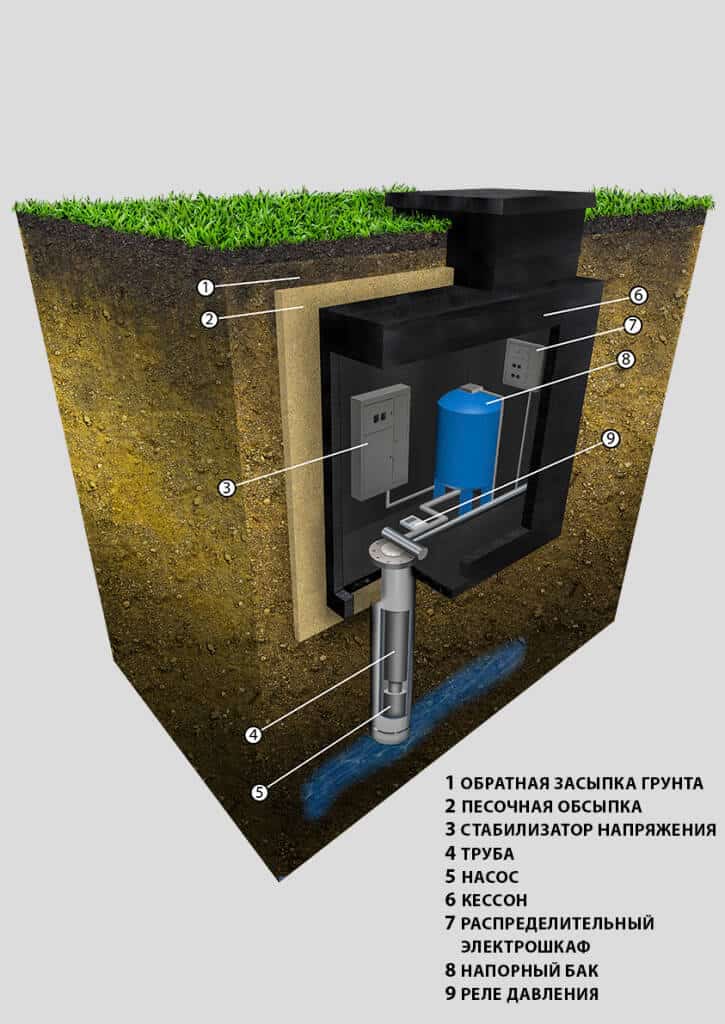
2 id="chto-takoe-kesson">What is a caisson
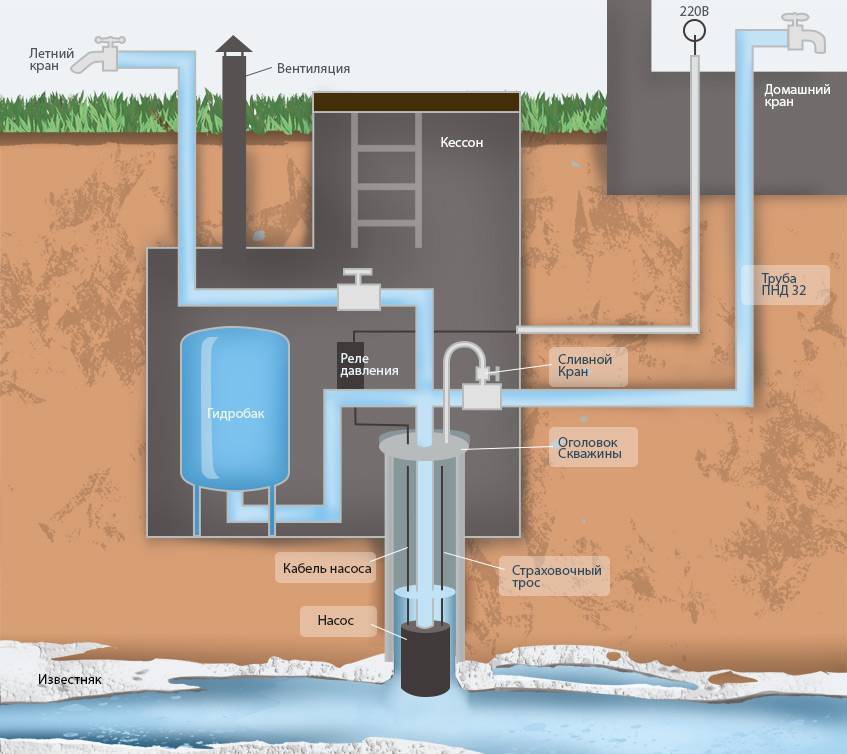
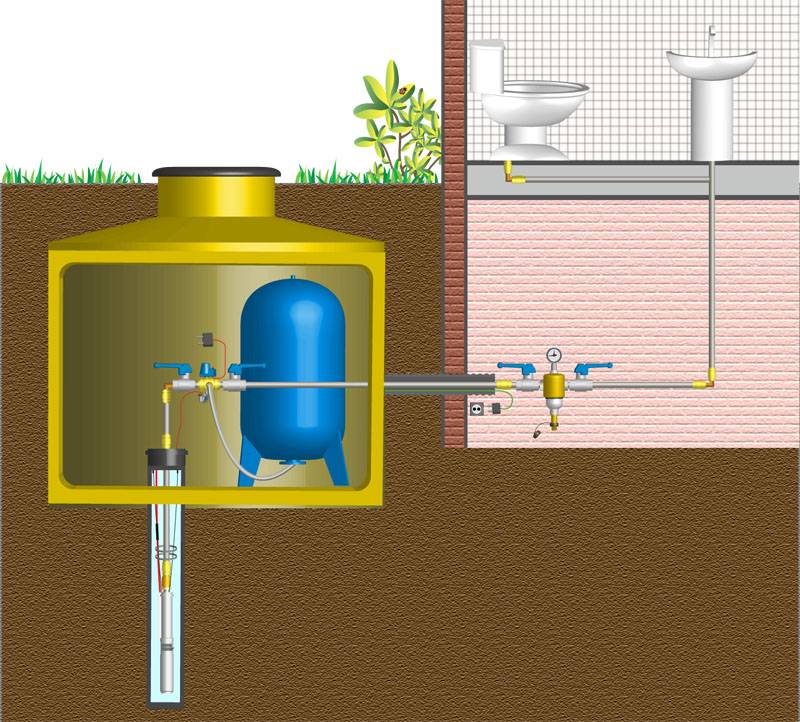
In order for an autonomous water supply system to please with its reliable, trouble-free operation, when arranging it, it is necessary to think over not only technical points, but also issues related to the installation and protection of equipment from external factors. Despite the fact that underground water aquifers lie at considerable depths, equipment for uninterrupted water supply is installed on the surface. Of course, if the water intake takes place near the house, then it is possible to install a hydraulic accumulator and automation in the basement of the building. If the well is located at a considerable distance, then it is necessary to protect the pipes, wellhead and pumping equipment from moisture and low temperatures.
The caisson is an integral part of the autonomous water supply system of a suburban area
In order to prevent the harmful effects of precipitation and frost on the devices of the autonomous water supply system, a caisson is installed above the well. In fact, it is a large insulated reservoir, equipped at a sufficient depth. Thanks to the insulation of the walls and the lid of the tank, all the equipment installed in it can function all year round. The advantages of this structure include not only the possibility of installing and protecting a hydraulic accumulator and automation devices, but also providing convenient access for their maintenance and repair.
Types of caissons
Standard dimensions of caissons of various types
Caissons can be metal, concrete (reinforced concrete) or brick.Very convenient to install and operate are plastic containers that have appeared in the distribution network in recent years. In form, all protective structures can be divided into several types:


- round pits - most often made of concrete rings or plastic;
- square caissons - welded from metal sheets, brick, concrete or plastic tanks;
- rectangular tanks - made mainly from the same materials as square products, but are used in case of installation of additional equipment - expansion tanks, filters, etc.
Metal caissons are at the top of the rating of devices of this type. Most often, structural or stainless steel, as well as aluminum-based alloys, are used for their manufacture. Due to its strength, the metal perfectly resists mechanical stress, and its flexibility allows it to resist the appearance of cracks. For the manufacture of metal caissons, rolled steel with a thickness of at least 3 mm is used. After welding, the caisson is painted inside, and an anti-corrosion coating is applied on the outside. This allows the containers to serve for decades, justifying the rather high cost of manufacture.
Plastic caisson has many advantages over other designs
Plastic containers have the highest performance, excellent hydro and thermal insulation, low weight and long service life. Their cost is lower than metal and reinforced concrete counterparts. If you look for an option suitable for making your own hands, then there is nothing simpler and cheaper than a caisson built of brick or concrete.
The device and features of pits for wells
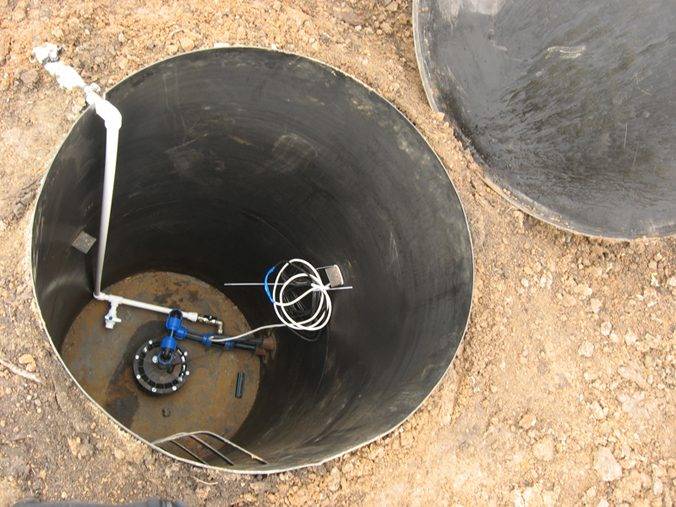
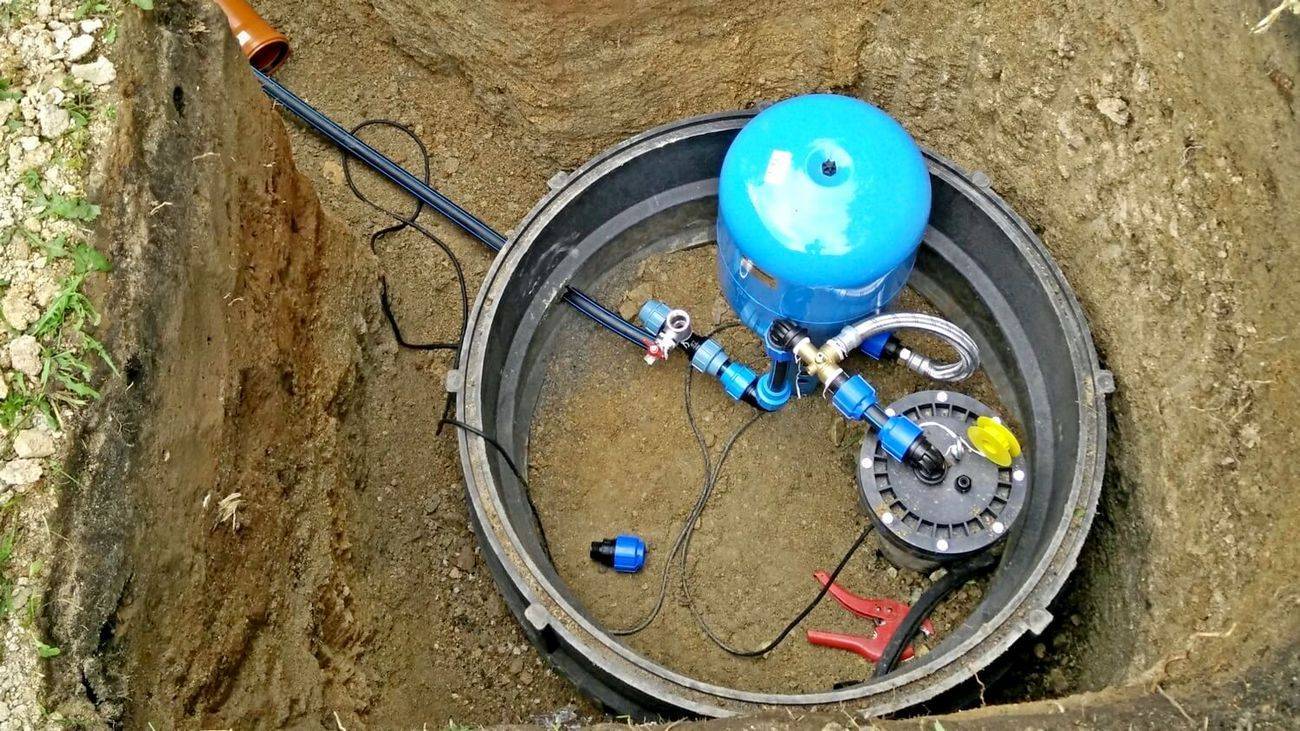
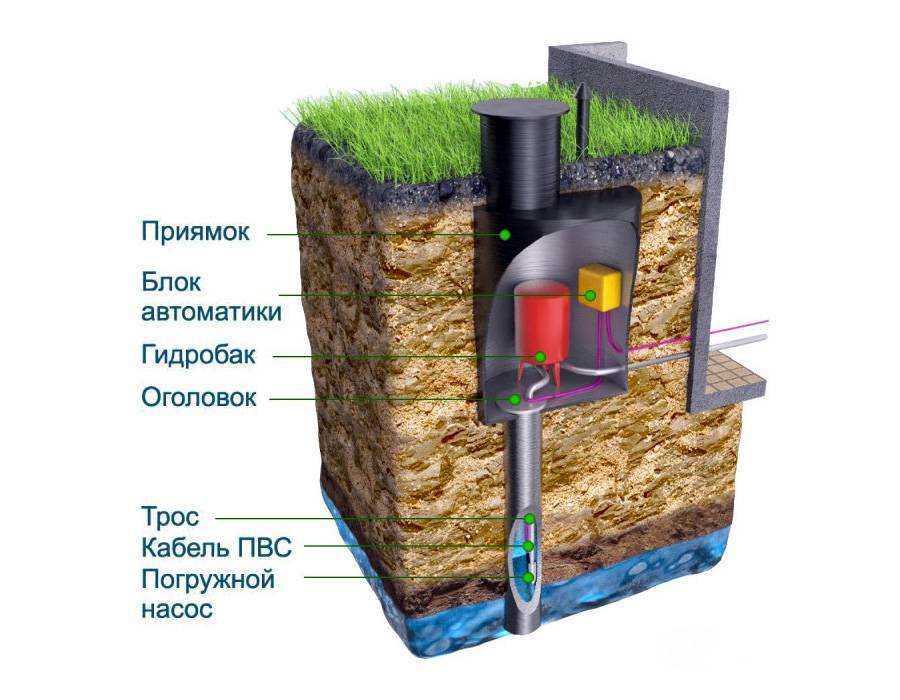
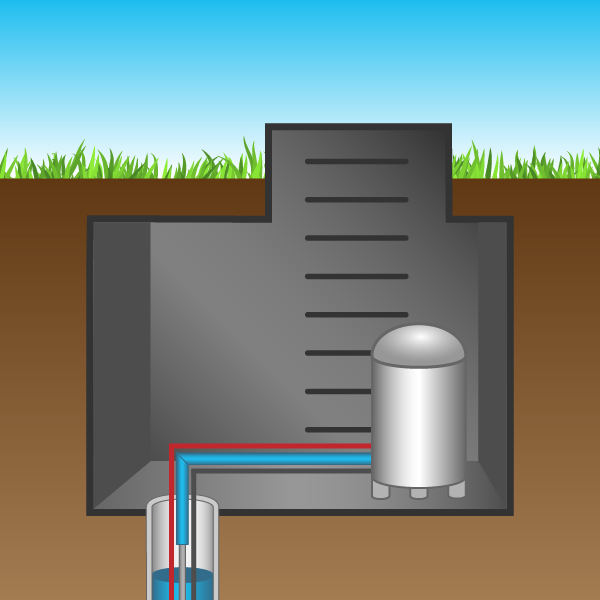
The caisson, first of all, must provide positive temperatures inside, so the tank is made airtight, and it is insulated by installation in the lower, non-freezing layers of the soil. Since the head necessary for access to pumping equipment is brought to the surface, the caisson is equipped with a heat-insulated hinged lid or a removable hatch. Often the drain door is a double structure - one head cover is equipped at ground level, and the second is about 20 - 30 cm higher. In addition, the design is equipped with ventilation, outlets (the so-called sleeves, nipples or barrels) are provided for the neck of the well, water supply and input of the supply cable. Often, an outlet with a ball valve is installed next to the lid - a kind of water column. This design allows the selection of water for irrigation and household needs in the summer.
Schematic representation of a caisson for a well
When constructing a caisson, the size of the pressure tank and the installed equipment must be taken into account. Depending on this, the casing pipe entry is shifted away from the center of the tank to provide convenient access for servicing the water supply system. All barrels are oriented in the right direction at the installation stage and carefully sealed to prevent groundwater from entering the structure.
How to install a caisson for a well?
Proper installation of a caisson on a well is a relatively complex and extremely responsible process.If during installation the waterproofing of the vessel is violated, then during the operation of the well, serious problems may arise, the elimination of which will require another cash outlay.
The technology for arranging a water supply source consists of a sequential series of critical steps:
- Place. It is necessary to start preparing for the process of installing the caisson by choosing a place for the well.
- Well. The first stage is direct drilling of the well.
- Caisson. The second step is to start the installation process of the caisson.
- Warming. The third stage is that they fill the pit with earth to the very cover, then the hatch is insulated.
- Installation of equipment. Stage four - after completion of work, they begin to install equipment that should ensure uninterrupted and efficient water supply to the house and to the site.
Step-by-step installation of a caisson for a well also consists of several step-by-step operations:
- The pit for the caisson is chosen at least 30 cm larger than the caisson itself. This will help and more accurately install it, adjusting the coincidence of the well pipe and the sleeve for its passage. In addition, this will insulate or strengthen the walls of the plastic structure.
- In the bottom of the caisson with some shift from its center, make a hole for the subsequent installation of the sleeve under the casing string. The diameter of the sleeve must exceed the corresponding parameter of the pipe, measured along the outer contour, by 10-15 millimeters.
- Weld branch pipes for water pipes and cables into the side walls of the caisson.
- Dig a pit so that the neck after installation is completed rises above the ground by no more than 20 cm.
- The bottom of the pit is covered with a sand cushion 20-30 cm thick. The sand filling is poured with water for compaction.A concrete slab with steel mesh reinforcement is cast over the pillow. You can place anchor bolts on it in advance to secure the caisson. However, you can be wrong here. Therefore, it is better to first install the camera in place, and then drill holes for fasteners in the plate.
- Cut the casing at ground level. The casing pipe of the well is cut off taking into account the future height of the chamber floor.
- Lay supports in the form of bars on the foundation pit. Place a caisson on them.
- Dock the casing pipe with the caisson sleeve, adjust the structure horizontally, and then weld hermetically.
- Remove the bars from under the tank.
- Insert pipes and cables into the corresponding nipples.
The water that immediately fills the well will be dirty, so it must be pumped out. It is better to do this with a cheap temporary pump, and not with equipment for permanent use.
It should be noted that the installation of a caisson is not appropriate in all cases. Sometimes, in the immediate vicinity of the location of the well, there is already a structure that is suitable for placing equipment for the water supply system. Then it is more rational to use this space for its intended purpose, and not to equip the well with a caisson.
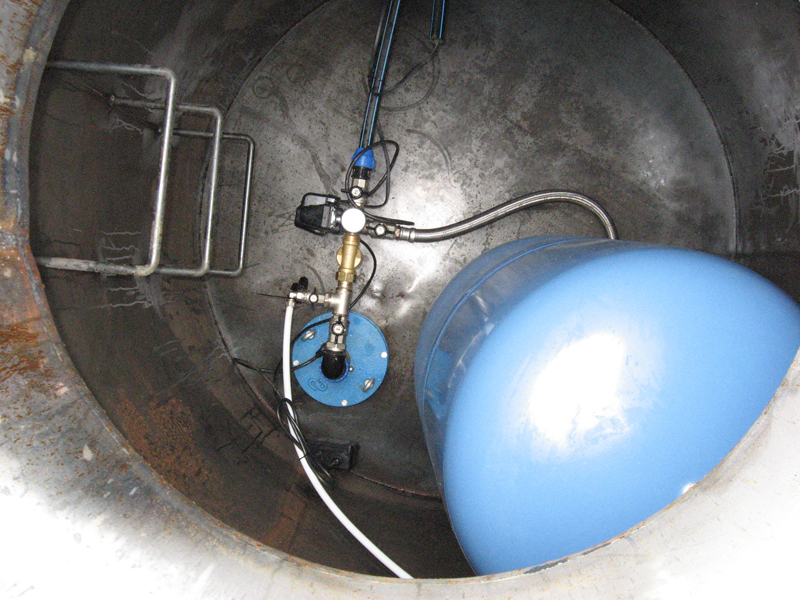
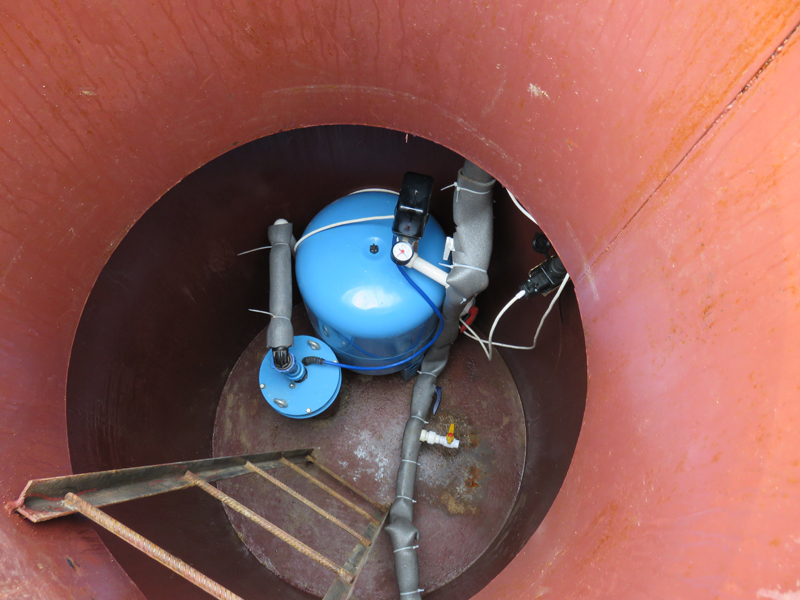
Water-lifting equipment can be placed on the ground floor of the house or in the basement, but there is no such possibility, then the accumulator, electrical equipment, automatic pump control systems and coarse filters are placed in the caisson.
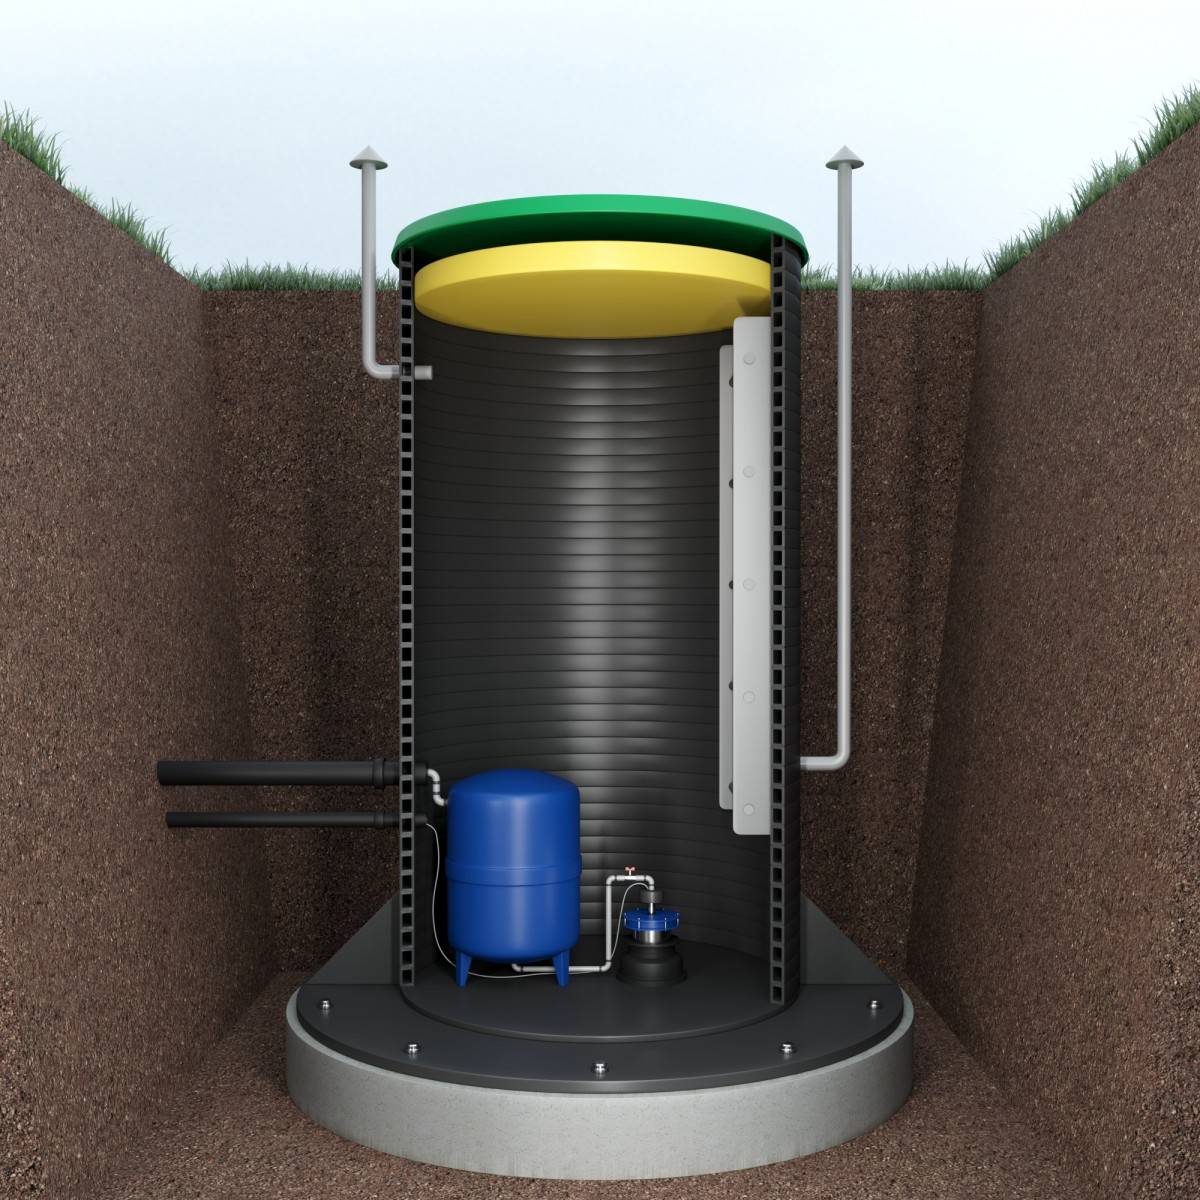
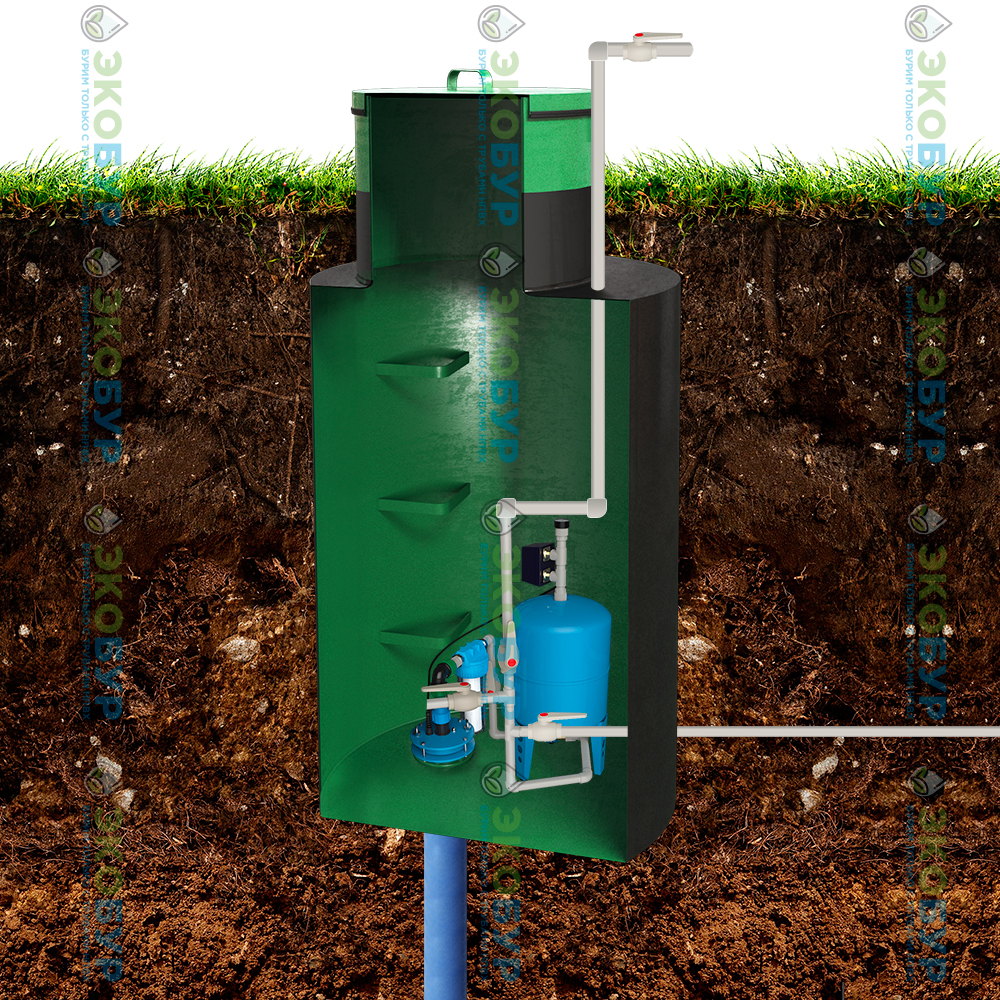
Plastic caisson for wells RODLEX KS 2.0
The new generation model developed by the company was named RODLEX KS2. The use of the most modern technologies in the production increases the functionality and ease of use of this caisson.
RODLEX KS2
Prices for plastic caissons
Plastic caisson
The ease of use of this model of the caisson is increased by the use of the following new elements in the design:
- located in the lower part of the loading skirt, which eliminates the need for time-consuming construction of a concrete slab under the base for cable fastening;
- increasing the strength of the structure with the help of additional stiffeners located at the bottom;
- refinement of the landing site for the use of casing pipes of all standard sizes with a cross section from 12.4 to 15.9 cm.
Tanks are made of special food-grade polyethylene LLDPE. In a material that is environmentally friendly, not only do corrosion processes not develop, but it is not even subject to decay, which leads to a long service life of products made from it, often exceeding half a century.


Step by step installation instructions
With self-assembly of the caisson "Rolex", the following sequence of actions is performed:
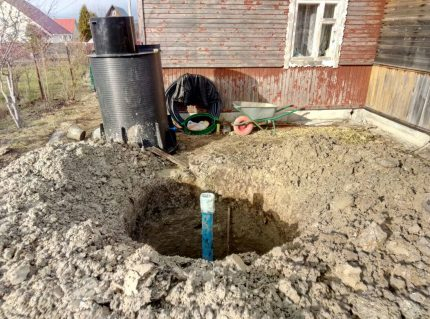
Step 1. Earthwork
The initial stage is characterized by significant labor costs when working manually. Under the capacity to be installed, it is necessary to dig a pit and a trench for laying a pipeline water supply system. The pit should exceed the dimensions of the caisson by 300 mm to adjust the position of the body when inserting the casing into the sleeve. If necessary, a heater is laid in the gap.
Pit and trench for laying communications
Step 2. Arrangement of the base
Since the design provides for a special loading skirt, there is no need for an expensive construction of a concrete slab for anchoring the product using cables.To make a base for installing a container, it is enough to pour a 200 mm layer of sifted sand onto the bottom of the pit. To compact the backfill, the sand cushion is abundantly wetted with water.
Foundation arrangement
Step 3. Laying and insulation of the water supply network
At this stage, pipes are laid in the trench dug from the well to the residential building, through which water will be supplied. To prevent freezing of the liquid at negative ambient temperatures, the pipeline network is carefully insulated.
Laying of water pipes
Prices for water pipes
Water pipes
Step 4. Connecting the casing
The casing pipe is carefully inserted into the bottom of the caisson, while making sure that the tank body takes a strictly vertical position. To prevent moisture seepage, the connection is carefully sealed with an adhesive that fixes PVC products.
Installation of the lower part of the structure
Step 4. Connecting the water supply network and power cable
Pipes for supplying water from an underground source are inserted into the tank body through the holes provided for this purpose to the point of connection to the house water distribution. An electric cable is being laid to supply the pumping station and other equipment that ensures the functioning of the autonomous water supply system.
Connecting the water supply network and power cable
Step 5 Backfill
Backfilling of the installed caisson with sifted sand is carried out sequentially in layers of 300 mm thick.
Pit filled with sand
At the final stage, the site is concreted around the neck of the caisson. After complete curing of the solution, the neck is closed with a hatch.


manhole container
For security reasons and to prevent acts of vandalism, eyelets should be attached to the cover and a reliable lock should be hung, especially in seasonal residences, such as summer cottages.
Important points when arranging
Given some technical nuances, you can significantly save on the arrangement of a well equipped with a caisson.
If you place the well closer to the house, then:
- the volume of earthworks will decrease;
- less pipes required;
- you will need a pump of small power, sufficient only to raise water to the surface.
You can also save money when choosing a drilling method. To make a well for personal use, you can do the work using a hand drill. Sometimes they use an electric tool, percussion devices.
Nuance # 1 - the choice of a well drilling method
When choosing a specific tool, you need to proceed from the characteristics of the soil. When drilling a well on your own by hand, you will have to make considerable efforts, but under favorable conditions you can get to an aquifer lying at a depth of up to 15 m.
It is recommended to make no more than five turns of the drill in one penetration, otherwise it will be difficult to remove it.
A hand-made drill gives the best result. The reason is that it is made for specific conditions, so it is more convenient for them to work.
A well of shallow depth can also be drilled with an auger. Its rotation is carried out both manually and with the help of mechanisms.
In any case, a tripod-shaped tower is built above the future well to facilitate the lifting of the tool. When choosing the second method, you will also need an electric motor that is suitable in power.
For cutting a well, the shock-rope method is also used. The working tool here is a pipe, the edges of which are sharply sharpened (a driving glass with a strong edge along the lower edge).
Due to its considerable weight, it crashes into the ground with great effort, then it is removed using a rope system and freed from the ground.
With the shock-rope method of drilling, a tripod up to two meters high is used. At its highest point there is a block with a rope thrown over it. A percussion instrument is attached to it
The casing string (pipe) is taken with a slightly larger diameter than that of a pipe segment called a glass. It should be placed strictly observing verticality.
This is important for any drilling method. If this nuance is neglected, the soils can collapse. Experts advise using PVC pipes with a cross section of 12.5 cm
The first pipe is lowered after passing one meter. Further, the length of the casing string is added as it deepens. Connect the segments using threads on the ends of the pipes
Experts advise using PVC pipes with a cross section of 12.5 cm. The first pipe is lowered after passing one meter. Further, the length of the casing string is added as it deepens. Connect the segments using threads on the ends of the pipes.
Nuance # 2 - the secrets of drilling a well
You can drill a well in any season, but the complexity of the work will be different. The worst option is spring. During this period, groundwater is at its highest level. Under such conditions, it is difficult to determine the location of the main aquifer.
The device of a well in the summer is considered the best option, because. the water level stabilizes and its location is easy to determine.


In autumn, the best month for this work is September.At this time, the rainy season usually does not yet begin, it is possible to determine the aquifer without difficulty.
Precipitation in winter does not affect the state of groundwater. Manual drilling in winter is contraindicated, because. soils are heavily frozen
In winter, you can drill a well as long as the temperature does not drop below -20°. Due to the freezing of the soil, the walls of the well are insured against collapses. Groundwater is at a minimum level.
Nuance # 3 - the optimal material for the caisson
There are several types of caissons:
- from reinforced concrete rings;
- metal;
- plastic;
- brick.
Reinforced concrete rings and bricks. This type of caisson practically does not provide tightness for a long time. This threatens the equipment with flooding and subsequent loss of performance.
Metal. If all the requirements were met in the manufacture of metal caissons, they will have good tightness.
Earth in relation to metal is an aggressive environment, therefore, the enclosing structures of such chambers are subject to oxidation, as a result of which depressurization may occur.
Plastic. Caissons made of polymeric materials are comfortable, light in weight, easy to install and operate. The probability of depressurization is rather small, because the material is not subject to corrosion. Plastic caissons serve much longer than metal ones.
Step by step instructions for arrangement
It all starts with choosing a place for a well and choosing a method for arranging a water source.
The technology for arranging a water supply source consists of a number of consistent and responsible steps:
- Well. The first stage is drilling the well itself.
- Caisson. The second step is to start the installation process of the caisson.
- Warming.The third stage is that they fill the pit with earth to the very cover, then the hatch is insulated.
- Installation of equipment. Stage four - after completion of work, they begin to install equipment that should ensure uninterrupted and efficient water supply to the house and to the site.
The installation process of the caisson structure also consists of several operations.
Let's consider the main ones:
- In the bottom of the caisson, with some shift from its center, a hole is made for the subsequent installation of the sleeve under the casing string. The diameter of the sleeve must exceed the corresponding parameter of the pipe, measured along the outer contour, by 10-15 millimeters.
- Branch pipes for water pipes and cables are welded into the side walls of the caisson.
- They dig a pit in such a way that the neck, after installation is completed, rises above the ground by no more than 20 cm. For the convenience of docking the chamber with the casing, the diameter of the pit should be 0.2-0.3 m larger than its own corresponding size.
- Cut the casing at ground level.
- Lay supports in the form of beams on the foundation pit. A caisson is placed on them.
- The casing pipe is joined with the caisson sleeve, the structure is adjusted horizontally, and then hermetically welded.
- The bars are removed from under the chamber, lowered into the well.
- Pipes and cables are inserted into the corresponding nipples.
The water in a freshly drilled well is always dirty, so pumping should be done to clean it. Drillers are advised not to use equipment purchased for permanent use for this purpose. The cheapest temporary pump will do just fine with this work, and when the well is pumped, you can start a permanent one.
When choosing a well arrangement option, in order to avoid irrational costs, it is better to get advice from specialists. They will take into account all the factors and justify the feasibility of implementing a particular project.
In this case, a more rational solution would be to use it for its intended purpose and save on the installation of the caisson.


