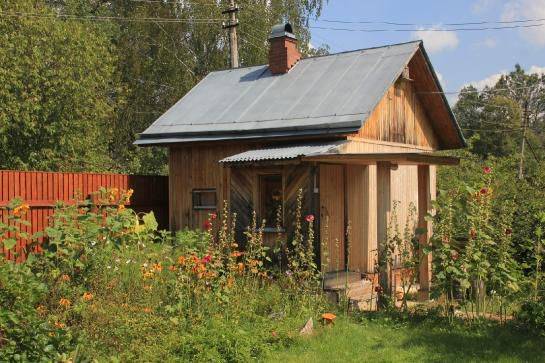
- Construction of a frame bath
- Foundation for a frame bath
- Installation of the bottom trim
- Installation of the frame walls of the bath
- Roof installation
- Warming and finishing
- Pros and cons
- Pros and cons of frame baths
- Finishing touches
- How to choose a place to build a bath.
- Drain arrangement
- Peculiarities
- Turnkey frame baths
- Frame bath: its pros and cons
- Serious advantages of the frame
- Are there significant disadvantages?
- Frame: yes or no?
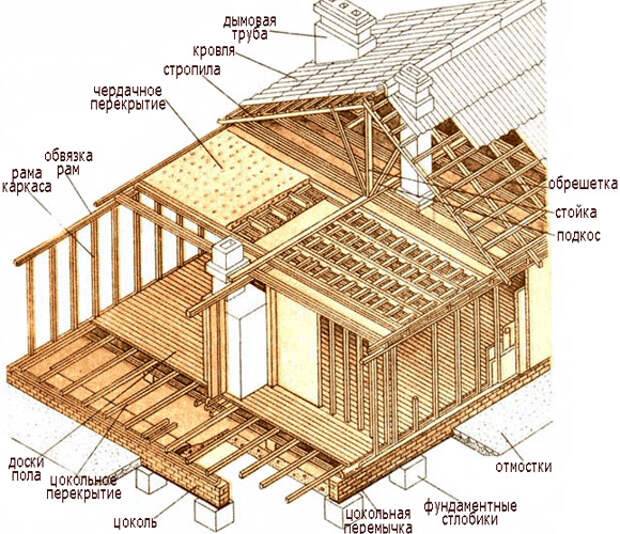
- Arrangement of the roof structure
- erection
- Foundation and floor
- Walls
- Windows and doors
- Ceilings and roof
- Communications
- Material calculations
- Stage I. We design
- What you need to know about protective materials?
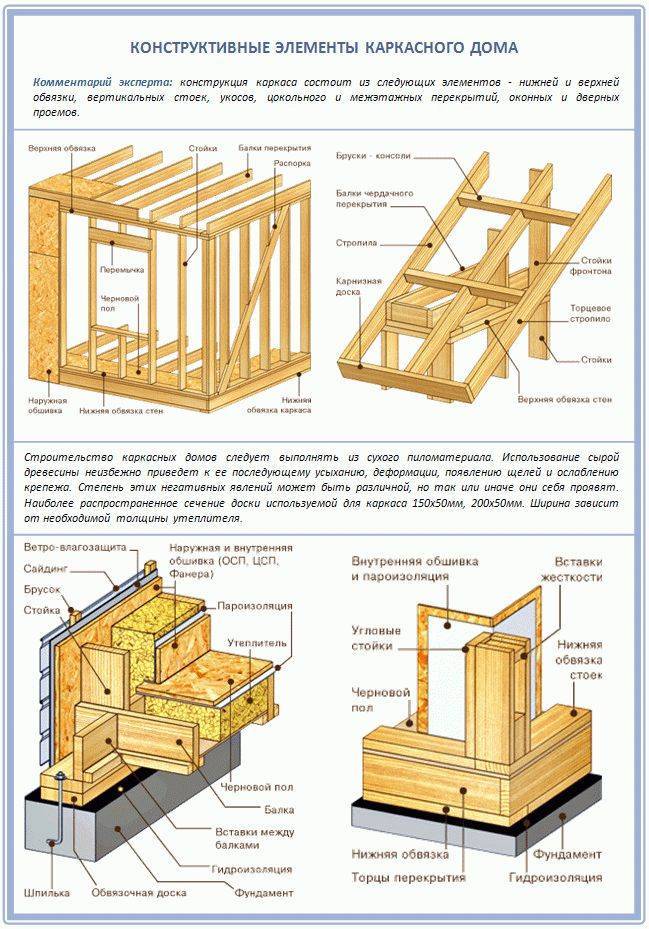
- frame material
- wooden beam
- Metallic profile
- Stage VI. We decorate the walls with modern materials
- clapboard
- Thermal panels
- Vinyl siding
- Block house
- Conclusions and useful video on the topic
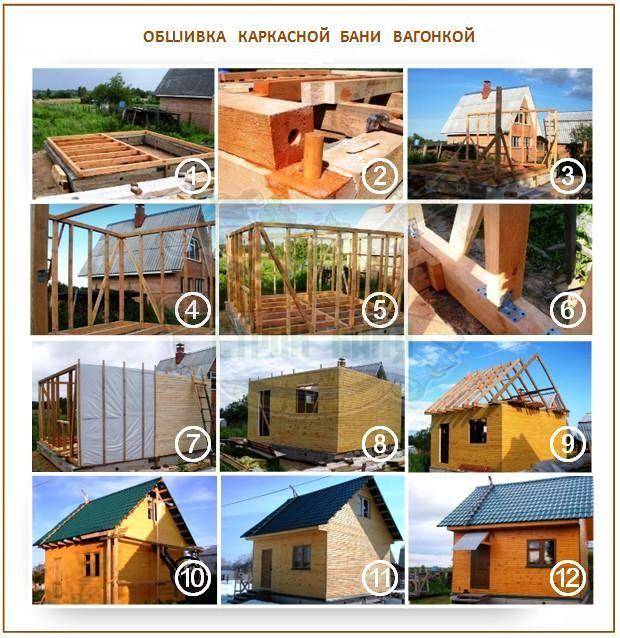
Construction of a frame bath
Since frame construction is lightweight, all work can be done by hand. You need to build a frame bath in the following successive steps.
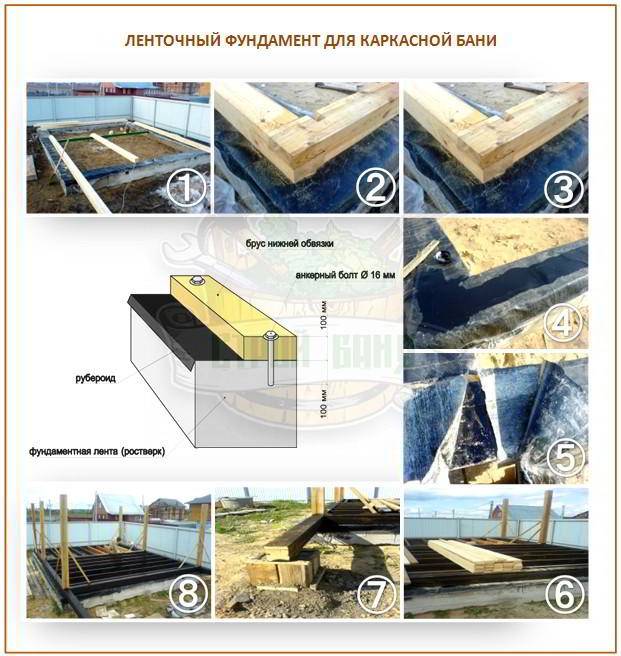
Foundation for a frame bath
Ready-made columnar foundation for a bath with an upper trim.
The lightweight foundation of a frame bath is easiest to assemble from asbestos-cement pipes (with a diameter of 100 mm or more), reinforced with concrete. This is a columnar type of foundation.
The contour of the bath is marked and wells are drilled with a drill to a depth of 1–2 m. The depth depends on the proximity of groundwater and the type of soil.
Pipes are placed in wells and sprinkled with coarse sand. The sand is carefully compacted. The entire structure is poured from above with concrete, which should consist of:
1 part waterproof cement M200;
4 parts of sand;
7.5 parts of crushed stone of fine fraction;
3 parts water.
Pipes are poured alternately and they are allowed to dry completely. At the pouring stage, an iron plate is installed on top of each. The first link is laid on them in the future. Only after that you can do the bottom strapping.
Installation of the bottom trim
The lower strapping from a bar under a frame bath.
For the lower strapping, you can use a beam with a section of 150x150 mm, but in order to save money, you can take boards 50x150 and splice them with self-tapping screws. Before laying, the entire structure must be treated with an antiseptic and waterproofed. For waterproofing, roofing material is laid on the pillars in 2 layers.
After that, lags for future floors are fixed on the strapping. Between the lags and the strapping, roofing material should also be laid or smeared with mastic.
You can attach the strapping to the pipes using special screws or brackets.
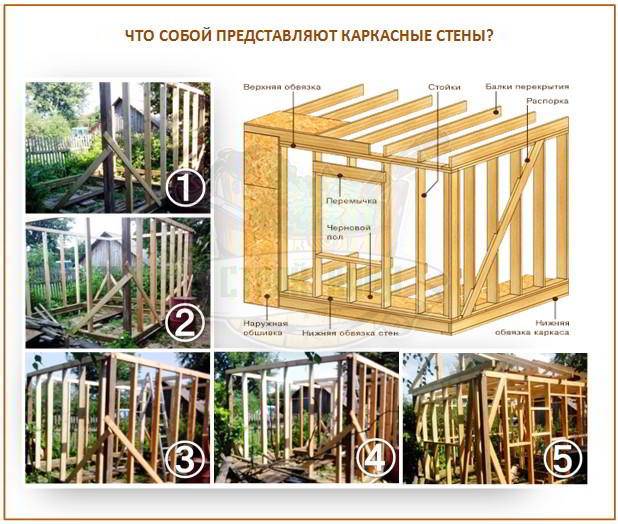
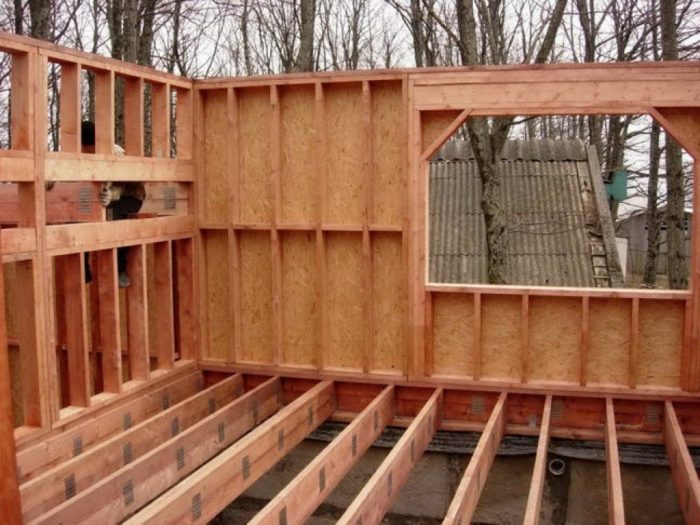
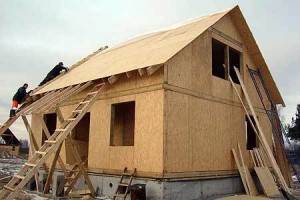
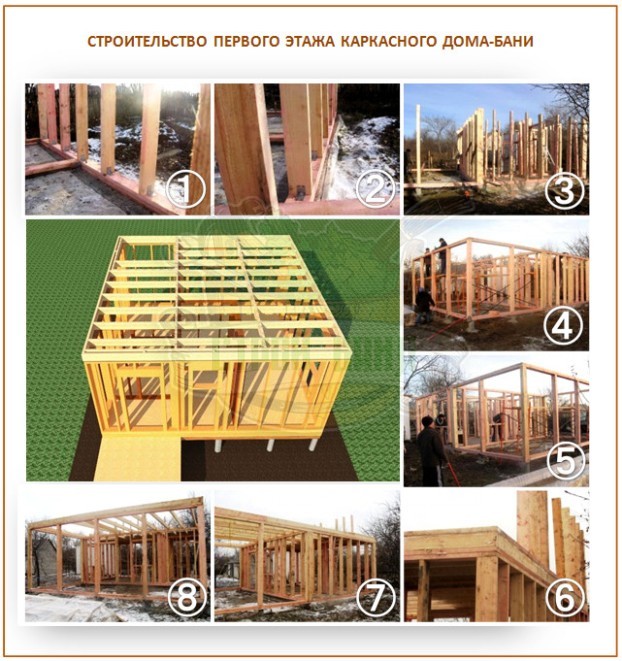
Installation of the frame walls of the bath
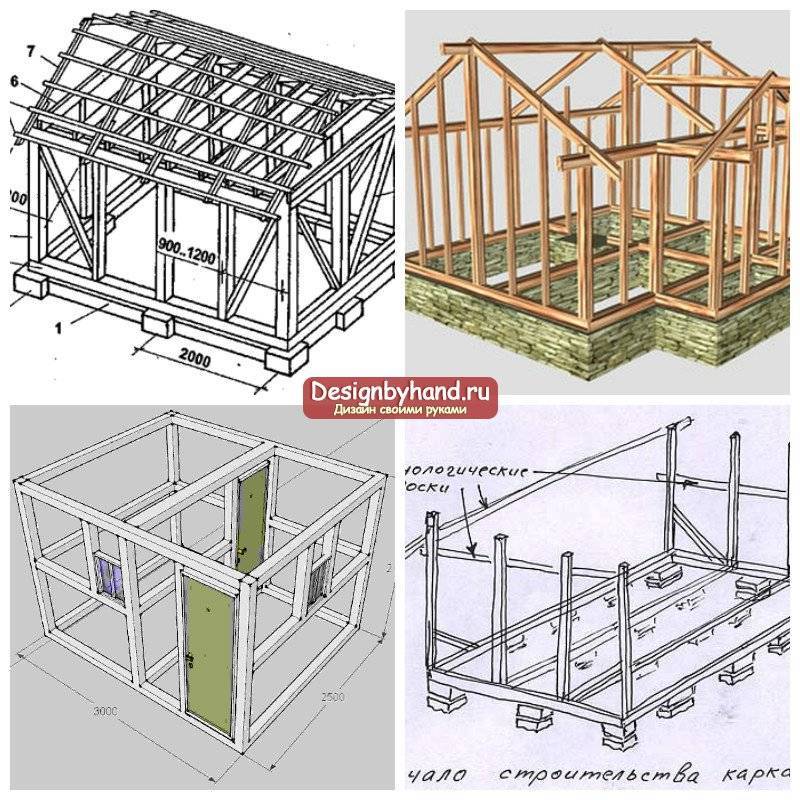
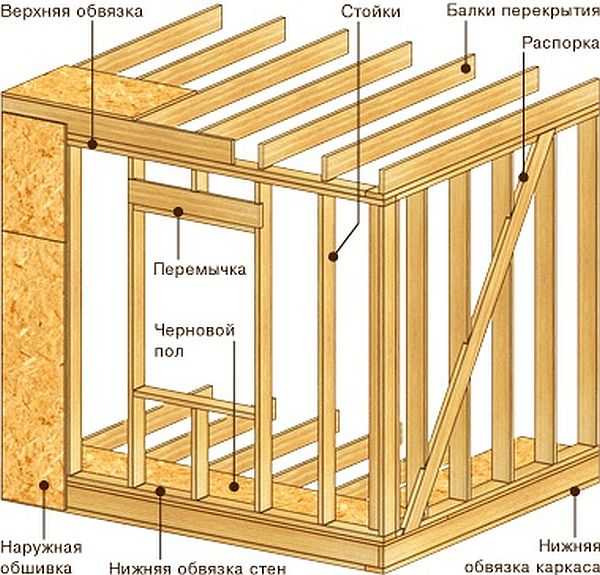
Frame walls of a bath without a truss system - assembly.
All material, including the edged board, is dried and treated with antiseptics before laying. Instead of timber, you can take all the same spliced boards as a basis.
They are selected according to the specified dimensions for racks and rafters.
Assembly is carried out in the following steps:
- Racks are installed in the corners, they are fastened together with an upper trim.
- Intermediate ones are mounted between the racks, they will strengthen the structure.
- The resulting structure is sheathed with boards or chipboard, using self-tapping screws.
- Install the remaining racks and are also sheathed with boards or OSB.
So, gradually adding the links of the racks, they assemble the whole bath. At the same time, openings for windows and doors must be taken into account; in frame construction, they should be done immediately.
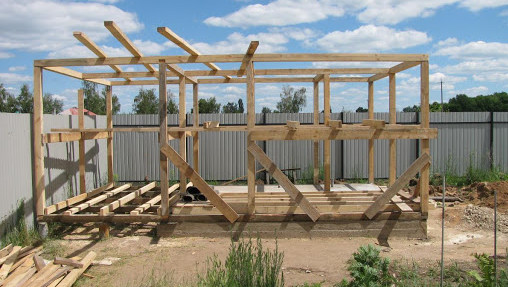
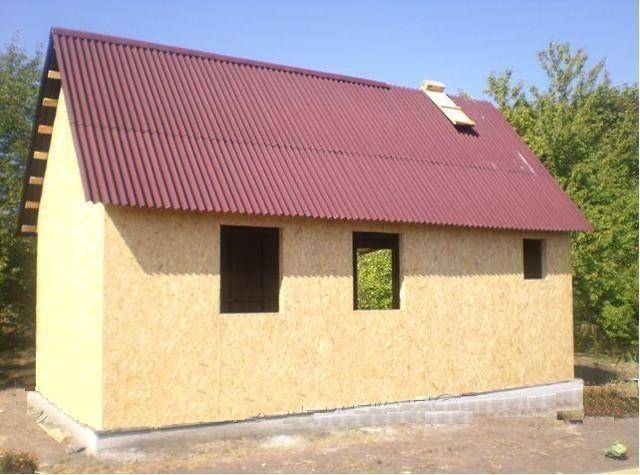
Roof installation
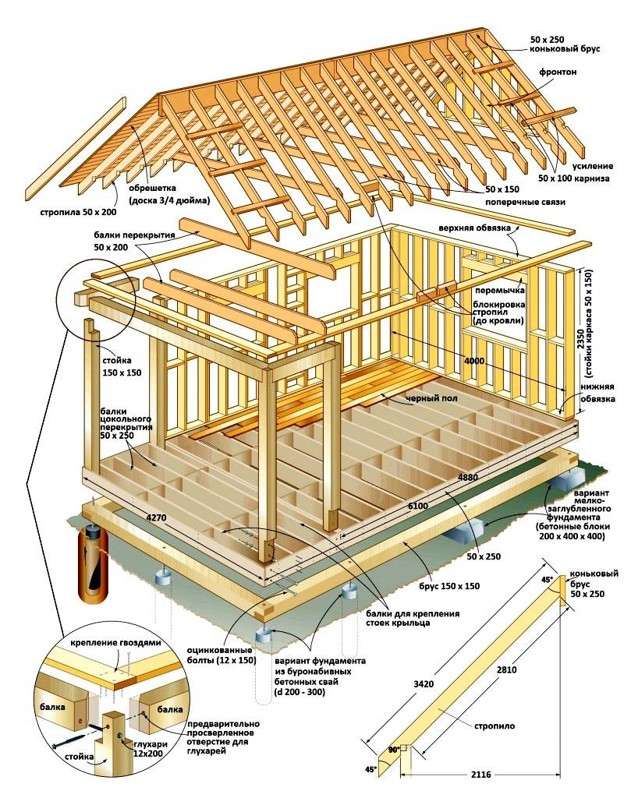
Rafter system of the roof of a frame bath made of timber and boards.
The rafter system for a frame bath is mounted in parts. Each is assembled at the construction site, gradually lifting and mounting on the roof. Each truss is attached to its frame rack. When installing the last truss, an OSB is attached to it to obtain a pediment.
It is more convenient to assemble the roof by first laying a rough flooring from boards on the frame.
It is better to make the roof structure ventilated, for this, a vapor barrier is placed in the gap between the rafters and the counter beam, and the crate is mounted on the beam.
For the roof of a frame bath, it is better to use light material: ondulin, corrugated board, soft tiles. After that, gables are installed using OSB or boards.
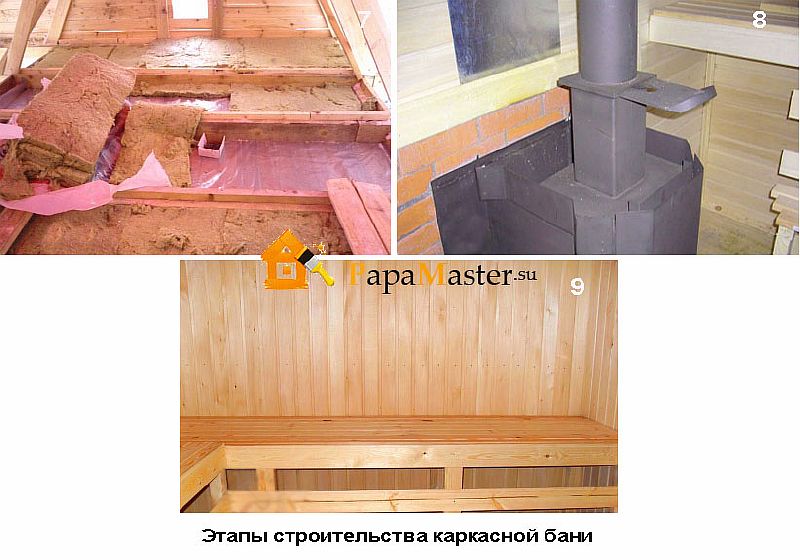
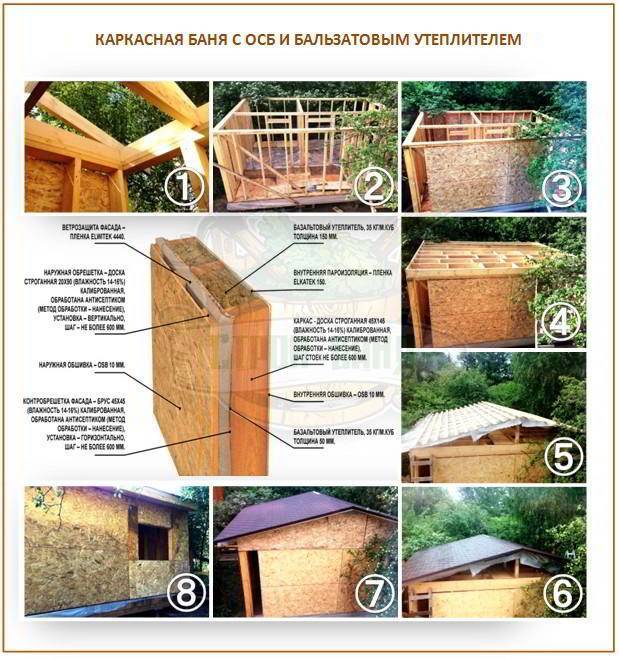
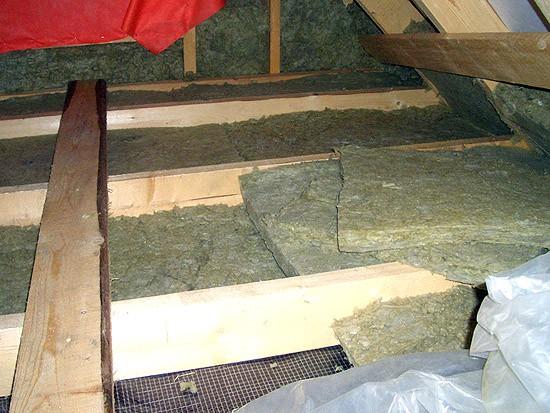
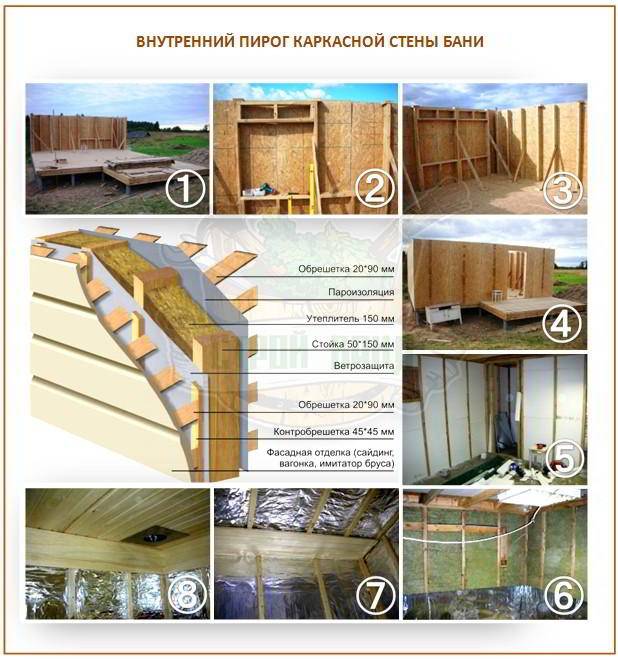
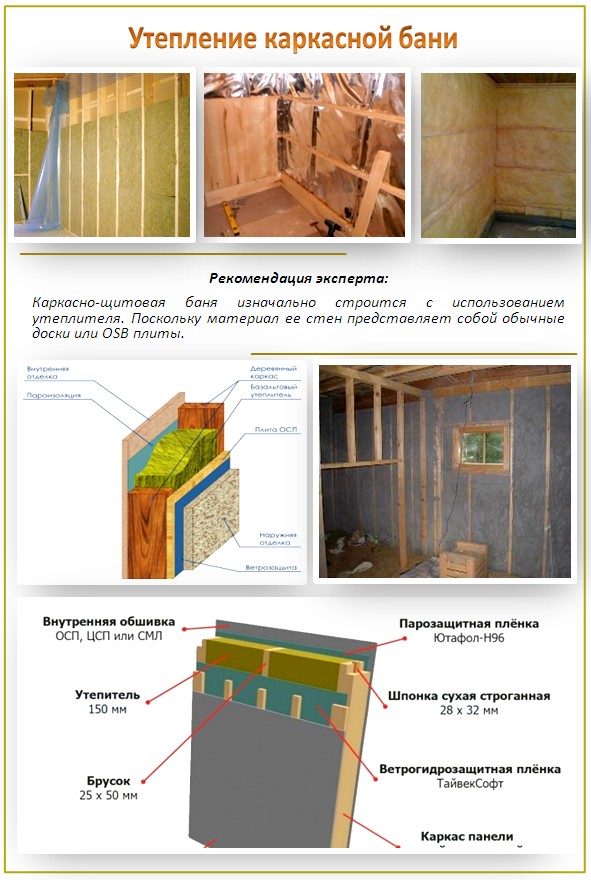
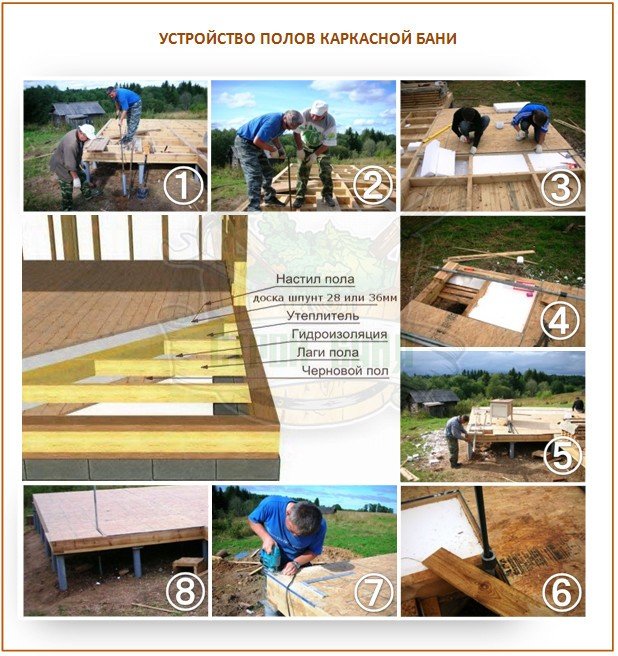
Warming and finishing
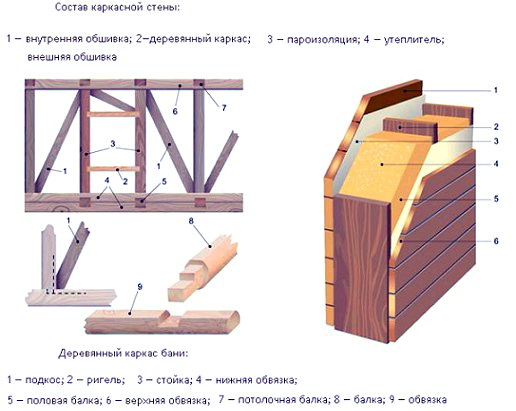
The scheme of warming the frame bath - the main layers.
The frame bath must be insulated and finished. Initially, OSB sheets or a board are sewn onto the inside of the ceiling, this will be a draft ceiling. It needs to be insulated in 3 layers with a fire-resistant insulation. The walls are insulated with 2 layers of insulation and glassine. In the steam room, an additional layer of foil insulation is made.
Only after that it is possible to finish with clapboard or imitation of timber.
A stove is mounted, which serves as a fireplace in the dressing room and, in the steam room, as a heating element.To protect the frame tree from fire, a partition with a built-in stove is laid out of brick.
Do not forget about ventilation and holes in the ceiling for the pipe. It is treated on all sides with special fire-resistant compounds and laid with iron plates and asbestos paper.
If the bath is built without an attic, then a hatch is made into the attic and additional lighting is installed.
The ceiling in the firing chamber can be lowered up to 210 cm, this will make it possible to carry out insulation and sheathe it with a clapboard made of linden. All parts in the steam room are also best made from linden.
Pros and cons
The undeniable advantages of the construction of frame baths are:
- Ease of construction;
- cheap construction (small payment for materials);
- simplification of foundation work in comparison with other options;
- poor thermal conductivity;
- the ability to make communication channels inside the walls and not spoil the appearance;
- exclusion of shrinkage;
- no need for complex construction equipment;
- environmental safety (a rarity for country budget buildings);
- the ability to perform all the work without the involvement of specialists;
- exclusion of wet work - you can build in winter and even where there is no sustainable water supply;
- a wide variety of finishes.
11photos
But after carefully studying the reviews of owners and developers, you can immediately find certain shortcomings. Each of them can be eliminated by timely measures, only because it is necessary to properly understand possible problems. Frame baths in their pure form cool down quickly, and therefore an ugly fungus appears inside after a short time.To cope with this difficulty, you need to use only the highest quality heaters.


You can extend the life of the shield bath if you impregnate all used timber and boards with special antiseptics. After 18-24 months, the frame shrinkage is sometimes 80-100 mm. As a result, the outer and inner finishes are deformed. You can reduce this risk if you take lumber that has undergone chamber drying.
Pros and cons of frame baths
Frame baths are of great interest due to their undoubted advantages over other structures:
- Profitability. The cost of 1 m² is lower due to lower labor costs and the cost of materials (starts from 5 thousand rubles).
- Construction period. The construction of a frame bath takes 3 times less time than a bath from a bar (especially from a brick); installation (together with finishing and insulation) takes 20-40 days (depending on the complexity of the work) and can take place at any time of the year.
- Exploitation. The bath can be used for its intended purpose immediately after construction.
- Thermal insulation. The bath from the frame quickly melts and retains heat well at any time of the year.
- Reliability. The service life of a building erected without technological mistakes is from 10 to 20 years.
- Ecology. The bath maintains a comfortable microclimate and is safe for health.

Frame construction pleases owners in any weather
The features of frame bath projects include:
- Lightweight foundation. The finished structure is lightweight, since it requires 1.5-2 times less wood than buildings made of timber or logs.This allows the use of a columnar or shallow foundation.
- Insulation. Properly selected insulation contributes to energy saving; a frame bath retains heat no worse than a timber bath.
- architecture. Features of the technology allow you to create a variety of planning and facade solutions (with a veranda, attic).
- Accommodation. A frame bath can be placed in a problem area (with a high level of groundwater, in a flooded place).
The negatives include:
- Expenses for insulation and finishing. They make up a significant part of the cost of the structure, but you cannot save on them. Cheap mineral wool will not provide high-quality insulation, foam plastic is fire hazardous.
- Shrinkage. The shrinkage process can last up to 2 years (if wood of natural moisture was used during construction); at the same time, there is a high probability of damage to the finish (plaster or decorative panels). Almost imperceptible shrinkage has kiln-dried wood, but its use will cost more.
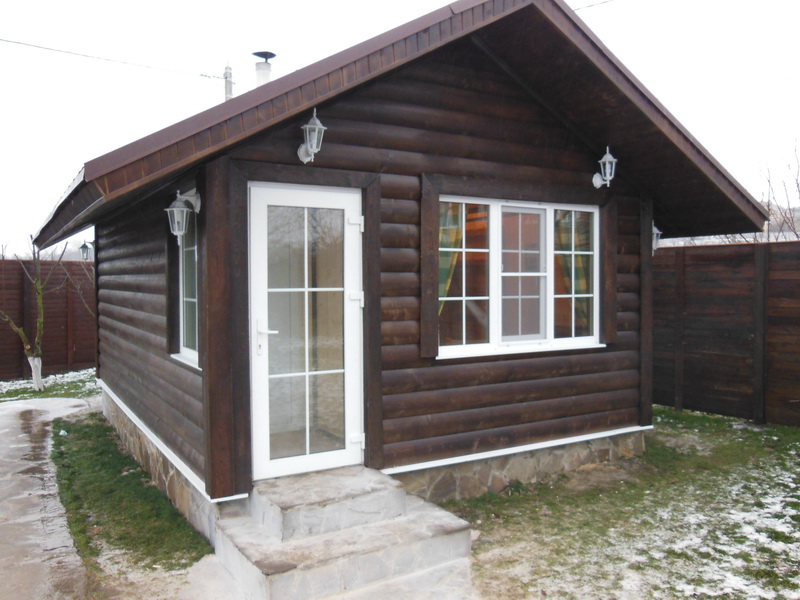
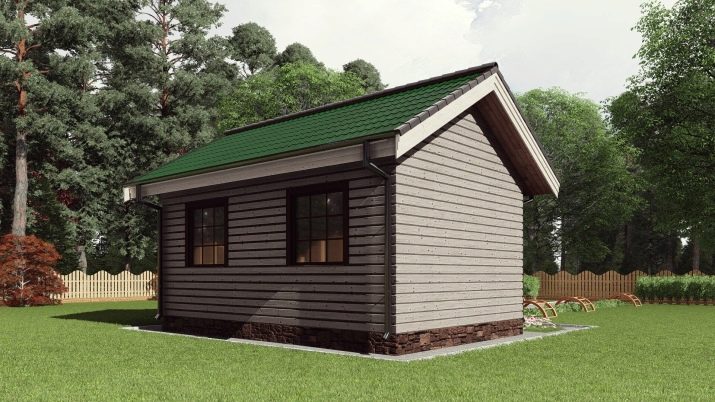
Photo of the frame bath project - a modern interpretation of the traditional building
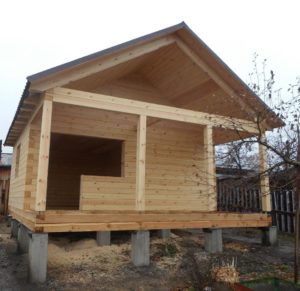
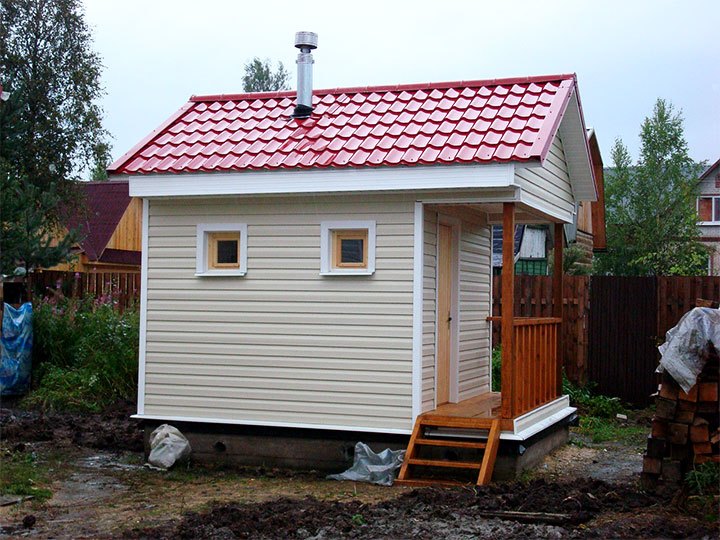
Finishing touches
In order for the bathhouse to take on a finished look, we equipped the porch with a canopy and a makeshift staircase. The height of the steps at the stairs is 18 cm, the parts were assembled on mounting brackets and self-tapping screws.
Path leading to the bathhouse
Venichki
Rest corner
From the gate to the entrance I made a path, near the bath I managed to collect a compost box and a decent firewood rack. We brought furniture inside the bathhouse, hung shelves and curtains there, hung brooms. In the future, I plan to equip a front garden near the bathhouse and build an outdoor barbecue.
8 cubes of firewood
How to choose a place to build a bath.
One of the most important points is the choice of the location of the future building. The place must satisfy both existing legislation and usability. Here are some basic tips to help you choose:
- if there is a reservoir nearby, you should not place the bathhouse too close to it, as the building will be threatened by flooding;
- it is necessary to decide how the bath will be located relative to the house: a separate building or will be attached to it, since each option has its positive and negative sides;
- it is believed that it is better to build a bath in the backyard, in relative seclusion;
- it is necessary to provide mandatory ventilation during construction, as well as provide for the disposal of wastewater;
- it is highly discouraged to determine the location next to the road passing nearby;
- when placing a building, it is necessary to take into account the cardinal points and the direction of the wind: the best place is the southern part of the site, protected from the wind so that it does not interfere with vacationers, it is better to have windows facing west;
- it is desirable that the bathhouse be at some distance from other buildings, and if it is an extension to the house, it is imperative that fire safety rules be observed during construction, as, indeed, when erecting a separate building;
- when determining the placement of the bath and its size, it is necessary to observe the distances established by the rules from the boundaries of the site so that the neighbors do not experience discomfort in the future and do not make claims to the owner;
- it is recommended to observe the distance to the water intake (well or well) - no more than 20 meters.
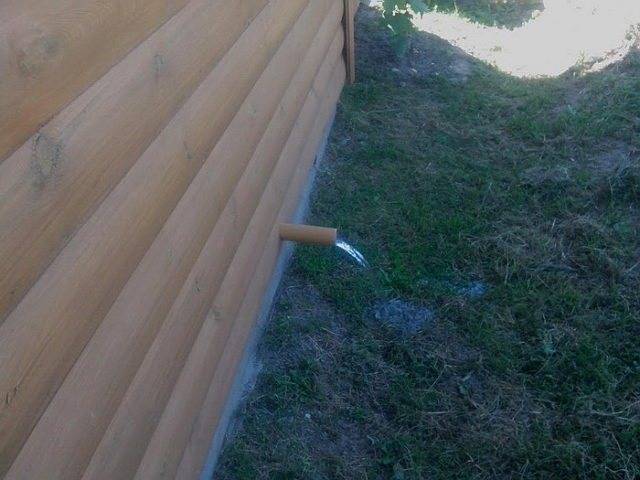
Drain arrangement
The arrangement of the drain from the existing water intakes must be taken care of at an early stage in the construction of the bath.
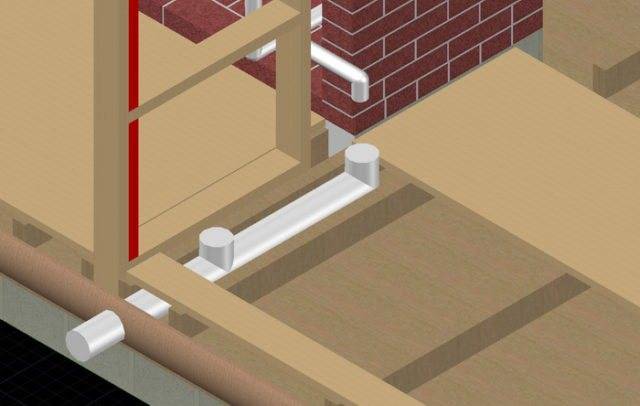
Drain arrangement
Firstly, it is necessary to lay a sewer pipe with a slope of 1 meter 3–5 cm. Such a pipe should go from the shower room and from the tap for draining water from the pipeline system. It is located at the bottom of the pipeline. Such a tap is needed to drain the water from the system and preserve the bath for a long time, for example, for the whole winter. It is better if the drain pipe does not have branches and turns. A straight pipe is a way to avoid blockages. The diagram shows how best to connect two water receivers into one system.
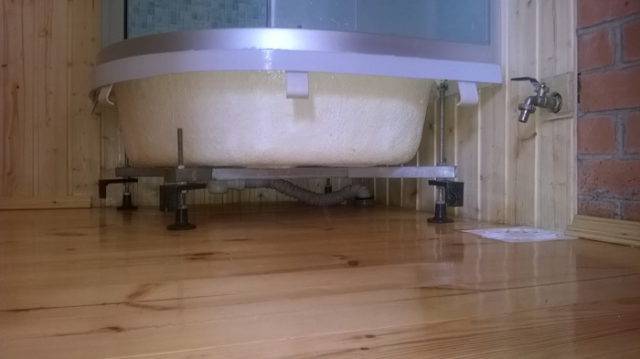
We make a gasket for the sewer pipe
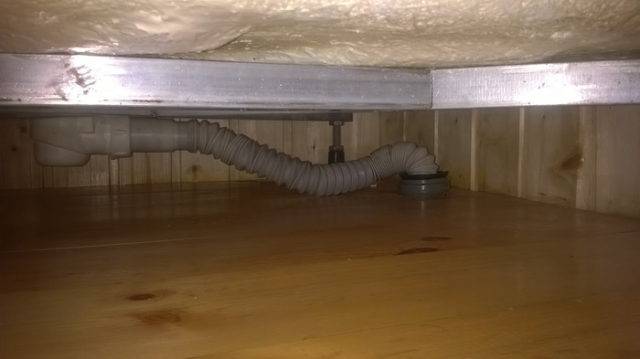
Piping system
Draining
It is better to connect the sewer pipe to the septic tank so that the drain water does not go into the ground.
Peculiarities
It is very difficult to build buildings, even such minor ones as a bathhouse, with your own hands from brick or logs. You will need to spend a lot of money on materials, prepare flawless drawings. And without the help of someone, it will not be possible to do such a job at all. Therefore, frame projects deserve increased attention. Moreover, the consumption of wood, compared with conventional timber structures, is reduced by exactly half.


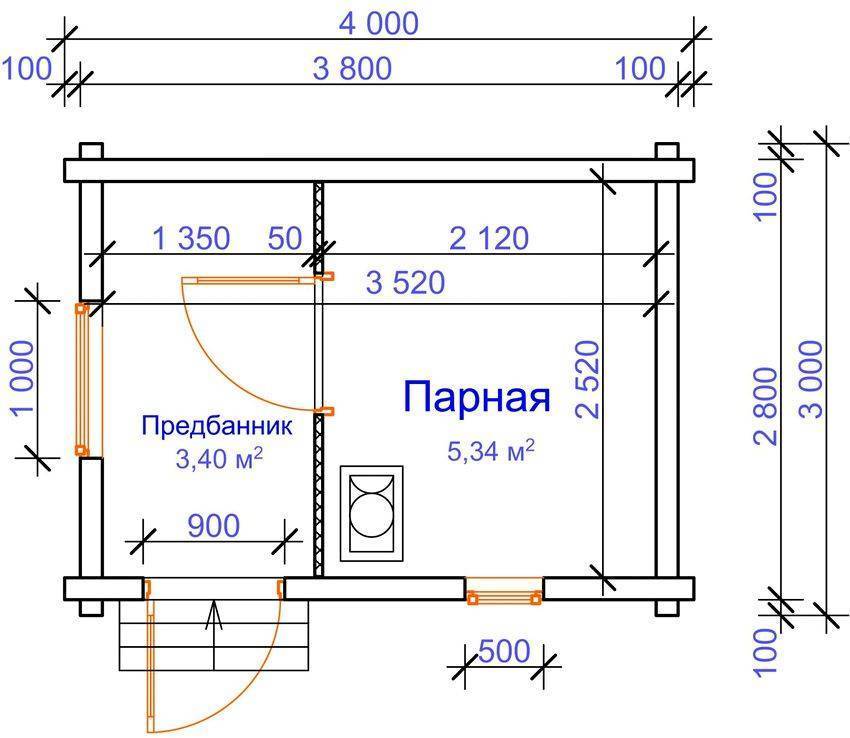
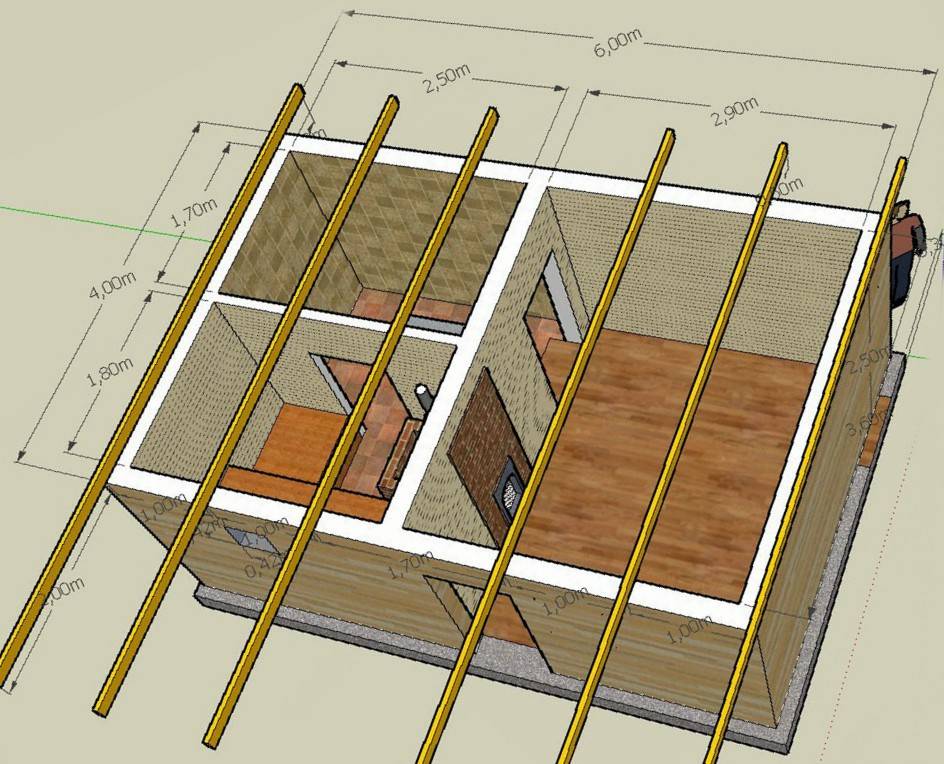
The buildings are relatively light, even if they are made in dimensions of 6 by 4 or 6x6 m; if the size of the structure is 3x4, 4x4 m, this circumstance manifests itself even more. Therefore, there is no need to prepare solid foundations. It is possible to finish external and internal walls at the same time, and the overall installation speed increases markedly. The smallest area of the steam room is 250x250 cm. It is recommended to use asbestos-cement pipes with a diameter of 100 and a length of 4000 mm for the foundation, which are filled with concrete.
All wooden elements are thoroughly dried before installation. The rafters are assembled on the ground, after which they are alternately lifted and placed above the frame racks. The roof is made only in a ventilated version.
Turnkey frame baths
Construction companies offer projects of frame baths of various sizes and designs, containing all the necessary elements - a dressing room, a washing room and a steam room. The package may include a veranda, terrace, balcony or bay window. When ordering a turnkey frame bath, you can be sure that:
- The project will be adapted to the conditions of a particular land plot: if necessary, a geological study will be carried out.
- The cost of construction includes the delivery and unloading of materials.
- The foundation will be built taking into account the characteristics of the soil.
- During the construction, environmentally friendly building materials will be used.
- The design is reliably insulated and protected from moisture.
- The work will be completed within the agreed time (under the contract).
The project of the frame house of the bath - the attic floor of the bath is suitable for arranging a rest room
The result of a turnkey order will be a bath, completely ready for operation. Additional bonuses that exist in many companies include:
- Possibility of installment. Allows you to plan family expenses.
- Direct cooperation with lumber suppliers. This allows you to keep prices at an affordable level.
- Gift. When ordering on a turnkey basis, some works (installation of the furnace, electrical wiring) are performed free of charge.
Frame bath: its pros and cons
Any construction technology has its own characteristics and advantages that other methods do not have.But each method, in addition to the advantages, also has disadvantages that you need to know before you make a verdict on the appropriateness of the choice.
Serious advantages of the frame
Among the main advantages of frame structures, many call the relatively low price of materials: both construction and finishing. This category also includes high-quality thermal insulation, environmental friendliness of the future bath, ease of construction. It lies in the fact that the task can be completed with only one or two assistants.
They attract communications that are easy to hide inside the walls. For baths, this is not just a big, but a huge plus. The construction of a prefabricated structure can be started at any time of the year, since a small frame building will be relatively light, which means that it will not require a very strong monolithic foundation.
Are there significant disadvantages?
Cons exist, without them in any way. First of all, the flammability of building materials is among the shortcomings of frame structures, so the possibility of a fire cannot be ruled out. However, it is necessary to follow all fire safety rules, such a scenario can be easily avoided.
The second serious claim to frame buildings is the need for high-quality insulation. Of course, the organization of thermal insulation will take a lot of effort and time, and besides, it will be expensive if you compare a frame building with a classic wooden one - from logs or timber. But such sacrifices for the construction, which will serve as a rest for "soul and body", can be made.
Many owners complain about the very rapid cooling of the room, and it inevitably leads to the appearance of mold.Shrinkage of the building, lasting from 1.5 to 2 years, is another negative point that the owners of frame baths found. The amount of subsidence sometimes reaches 80-100 mm. Its consequence is the deformation of the finish - both external and internal.
Frame: yes or no?
The main disadvantages of frame baths are not so serious as to completely abandon this construction technology. Such an object needs serious insulation, high-quality, prepared materials (chamber drying), the same antiseptic treatment and fire protection.
Arrangement of the roof structure
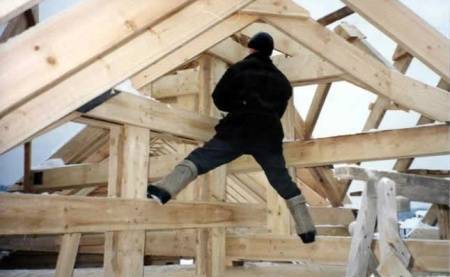
Arrangement of the roof structure
Make a template for assembling truss structures. All elements of the truss system are assembled below, on the ground, and already ready to go up. Each element of the truss structure must be installed above its rack.
For greater convenience, you can lay a temporary ceiling from ordinary boards on the beams.
It is better that the roof of the frame bath is ventilated. Lay ondulin or other suitable material between the counter beam and the rafters. Nail the crate directly to the timber.
Close the gables with pre-prepared sheets. Usually, OSBs that are already familiar to you are used.
Arrangement of the roof structure
At the end, windows and doors are installed, after which you can proceed to the finishing of the bath.
erection
The process of building a frame bath consists of several stages, each of which has certain features.
Foundation and floor
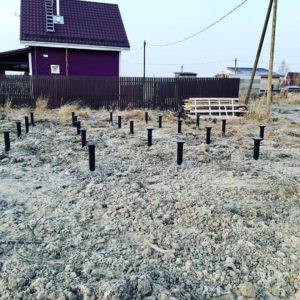 For the construction of a small bath, it is better to make a pile foundation. Foundation building process:
- Mark the dimensions of the site using pegs with a stretched thread.
- Clear the ground of debris, remove the top layer of soil 5-10 cm thick. It is also necessary to get rid of unnecessary stones, insects, anthills.
- Mark the location of the piles. The optimal distance between them is 1.5 meters.
- Dig wells with a hand drill to a depth of 1.5 meters.
- Immerse asbestos-cement pipes with a diameter of at least 10 cm into the wells.
- Fill the space between the walls of the pipe with earth with cement mortar.
- From the top of the tube, mark one level between all the piles, cut them off.
It remains to fill the pipes with concrete mortar.
Walls
Manufacturing process:
- Before the construction of the building, it is necessary to make a basement strapping of timber. They need to be saturated with used engine oil. The connection takes place according to the half-beam system.
- The base beam is attached to the pile with anchors through 2 layers of roofing material (waterproofing).
- After fixing the basement beam, you can begin to build walls.
- Fasten the bearing racks at a distance of 60 cm from each other. It is easier to attach them to the basement beam with metal corners and self-tapping screws.
- Fasten diagonal reinforcing struts between the uprights.
- When all the racks are installed, it is necessary to fasten them with the upper trim according to the level.
The frame of the walls is ready. After its assembly, you can proceed to the next stages of construction.


Windows and doors
 The process of manufacturing door, window openings:
- It is necessary to think over the location of windows and doors in advance.
- Cut the vertical posts horizontally with a chainsaw according to the level of the openings. The top and bottom of the windows will be limited by horizontal beams that will be held on wooden racks.
It is important that the doorway does not fall out at the junction of the individual parts of the basement beam
Ceilings and roof
The process of building a roof, ceilings:
- The roof in frame buildings is erected as in log cabins.
- Place the beams on the upper strapping crown. The distance between them is from 60 to 100 cm.
- Cut the "paws" of the rafters at the corners so that they join together at one angle.
- Stuff the crate, counter-crate. Further work with the roof depends on the material chosen.
Draft ceiling boards need to be stuffed on the back side of the beams.
Communications
 Communications inside the walls must be laid even before sheathing. You can drill load-bearing beams with feather drills.
Material calculations
A frame bath is being built with your own hands of different sizes. We will consider the standard option, which is suitable for construction by novice craftsmen.
Finishing the bath from the inside and outside is often carried out with a clapboard made of coniferous wood. The roof is equipped with a gable roof, and metal tiles are used for the roof.
Based on the dimensions of 5 by 4 meters, for the manufacture of the foundation we need:
- two cubes of concrete;
- 0.3 cubes of edged boards;
- 80 linear meters of reinforcement.
A turnkey frame bath requires large financial investments specifically for the construction of the frame. To make a frame, you will need: 
- 5.3 cubes of timber, with a section of 12 by 12 centimeters;
- 36 square meters, mineral wool, 10 centimeters thick;
- about forty squares of vapor barrier material;
- 75 squares of wooden lining;
- 40 squares of waterproofing material.
If you need to save money, then the timber can be replaced with a board. Floor installation is also an important point. To make the floor in the bath with your own hands you will need:
- 0.2 cube boards 150 to 50;
- twenty linear meters of plinth;
- twenty squares of mineral wool and 20 squares of lining.
If you want to save on the construction of a frame bath, then it is on the construction of the roof that you can do it. You can buy the cheapest insulation, and close it with a non-edged board.

But since our bath will have a gable roof, the attic can be used to store various tools and unnecessary items. To build a roof, you need:
- one set of drains;
- 0.2 cube battens for rafters;
- 0.1 cube planks for battens;
- 0.1 cube of eaves;
- twenty squares of metal tiles.
In addition to the materials listed, you will need:
- asbestos pipes;
- screws and nails;
- staples;
- cement, sand and gravel.
If a frame bath is being built, using step-by-step instructions with your own hands, you need:
- level, square and tape measure;
- hammer, screwdrivers and pliers;
- electric drill;
- mixer for concrete;
- container for dosing bulk materials;
- screwdriver;
- hand saw or electric saw.
Having made the necessary measurements and selected materials according to them, we proceed to the design of the future premises.
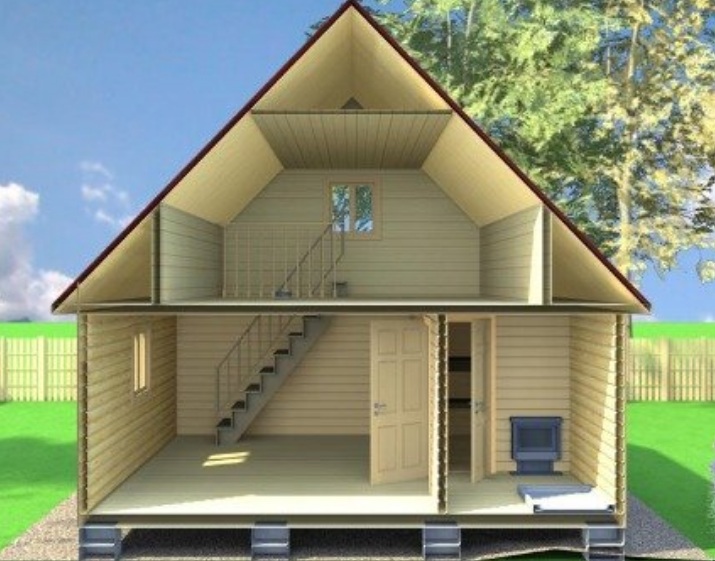
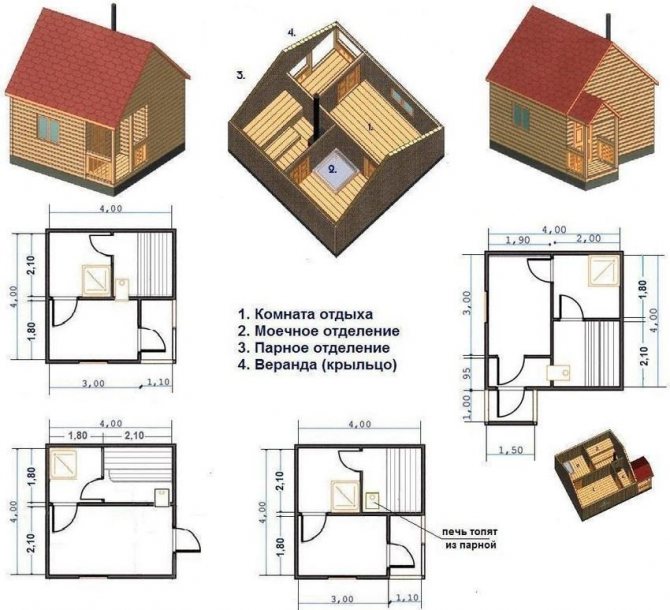
Stage I. We design
So, using frame technology, you can build both a small steam room for a steam room and a dressing room, and a two-story country house-bath. It all depends on your imagination and financial capabilities!
For a small frame bath, you will need to make a simple strip or column foundation, purchase a dry beam with a section of at least 20x20 for racks and an edged board:
For a frame bath, where there will be at least three rooms, an unpretentious foundation made of timber is no longer enough:
Optionally, in order to save building materials, you can make a dressing room separately, like an attached veranda, then there will be enough space inside for a steam room and a washing room:
But abroad, the frame construction of entire two-story houses is quite popular. Naturally, a reliable foundation is also needed here (more on this below), and the material is good:
Or make your bath more spacious in area, instead of the second floor:
Why is this option better? The fact is that frame baths are the most fireproof. And the worst option is if you and your friends are in the billiard room on the second floor during a fire. The fire rises quickly, and you simply have to jump into the snowdrift - this time not for reasons of health and extremism after heated procedures. But if it's summer...


What you need to know about protective materials?
The construction of a bath is inextricably linked with the construction of a variety of protective materials. Excessive moisture and high temperature have an adverse effect on the structural elements, so the use of special materials is indispensable.
Various materials are used to protect against moisture. Most often it is polyethylene, glassine and roofing material. The vapor barrier is placed between the heat-insulating material and the sheathing. If possible, the use of roofing material should be abandoned, because. under the influence of high temperature, it emits an unpleasant odor.
The issue of thermal insulation deserves special attention. With the right choice and proper installation of insulation, heat loss will be significantly reduced, and hence the cost of heating the bath.

Most often, mineral wool is used to insulate frame baths. Fiberglass is also popular.It is also possible to use other materials. For example, ceilings are sometimes insulated with polystyrene foam, and floors with expanded clay or other backfills.
frame material
Main raw material:
- timber;
- metal profile.
Let's analyze pros and cons of using for the frame of each of the materials.
wooden beam
Often acts as a raw material for the frame of houses, verandas, baths.
The thickness (section) of the beam is selected in accordance with the bearing capacity of the structure, the type of heat-insulating material.

Wood raw materials are purchased, impregnated in the factory, or treated with antiseptics on their own before installation. The costs in both cases are almost the same. But if you buy a ready-made timber, you can save time.
The frame consists of an upper, lower strapping.
Advantages of a wooden frame:
- convenience and ease of material processing, installation;
- affordable price;
- environmental friendliness of the material;
- attractive look.
The main disadvantage is the limited service life and the need for periodic wood maintenance. In addition, do not forget about the high probability of shrinkage.
Metallic profile
The craftsmen call such structures LSTK - light steel thin-walled structures.
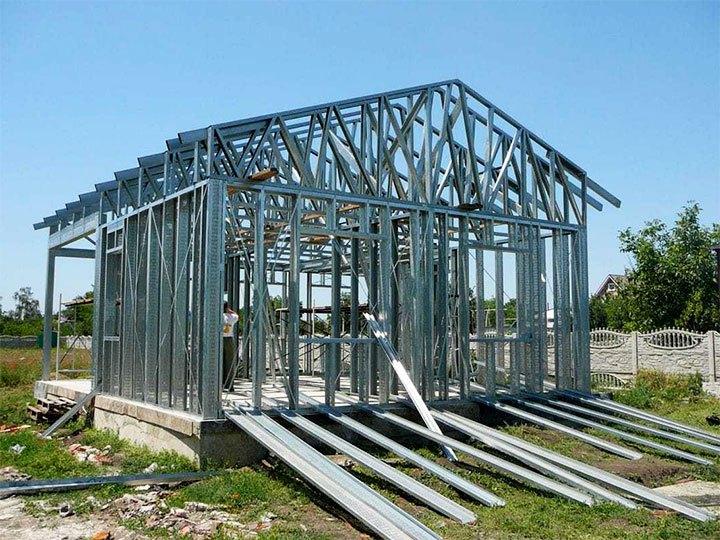
The raw materials are profile pipes, channels, corners (optional).
The metal frame is compatible with any type of foundation. For the arrangement of baths is not used so often.
The key factor that affects the cost of the structure is the section of the profile. The larger the cross section, the more difficult the pipe is to bend, so the price of work increases.
For the outer skin of the frame, corrugated board, siding, PVC panels are suitable.
Among the advantages of a metal frame structure:
- Fast installation.
- The ability to assemble the building at any time of the year.The metal is not afraid of temperature changes, at a time when a brick or aerated concrete bath should be laid out only at positive temperatures, otherwise the masonry mortar will lose its properties.
- Does not shrink throughout the entire period of use.
- Under the condition of high-quality anti-corrosion treatment, it has a long service life.
- Light weight simplifies the process of transportation and installation.
- Low price in comparison with stone, brick baths.
Of the minuses - the need for high-quality anti-corrosion treatment of metal. Otherwise, the metal will begin to rust.
Stage VI. We decorate the walls with modern materials
And now - to the most interesting part of the construction of a frame bath. We're not leaving her in the RSD, are we? Of course, it's time to pick up a "fur coat" for her.
But painting with paint and plastering are not the only options for exterior finishes that a frame bath can have: reviews of experienced summer residents say that it doesn’t matter, its design is so simple - from the outside it is quite possible to give it an expensive and chic look. And the modern construction market offers a sea of finishes for such buildings, the most successful of them for the bath will be the following
clapboard
Decorative and imitation wall paneling is the simplest and most affordable way to upholster frame baths on the outside: such structures turn out to be very solid, and it is not a shame to show them to acquaintances and friends, inviting them to a bath broom and a barbecue in nature.
It is necessary to place the lining on the outer wall horizontally, and after putting waterproofing from glassine under the upholstery
At the same time, fasten the whole sheets with an overlap, gluing all the edges with adhesive tape - it is important to do this operation carefully so that unnecessary moisture does not occur in the bath
Thermal panels
The traditional construction of a frame bath still provides for mandatory wall insulation, so why not do this with the help of thermal panels? At their core, they are a three-layer structure with insulation - mineral wool or foam, enclosed between two PVC layers. Their outer surface is usually made in the form of masonry and sprinkled with compressed stone chips.


At the same time, the panels themselves have mutual grooves, and therefore form a monolithic pattern of a stone or brick wall. And you can make such a finish in the bath with the most common self-tapping screws that will fix the panels to the profiles on the facades.
Vinyl siding
Siding is the lightest and most popular material for sheathing frame baths. It's not expensive and it's surprisingly easy to install. And the variety of colors, textures and thickness cannot but rejoice.
Block house
For those owners who have dreamed of a beautiful log bath all their lives, but have built only a frame sauna on the site so far, there is good news - with the help of the latest material for finishing the block house, it will now be impossible to distinguish a steam room from a real log house from the outside:

Conclusions and useful video on the topic
The procedure for warming and waterproofing the bath, the nuances of laying the material:
How to build a bath frame yourself:
As you can see, there is nothing complicated in the construction of a frame bath. The main thing is to take all the preparatory work responsibly, paying maximum attention to drafting the project and calculating the required amount of materials.
And the heat and waterproofing carried out in accordance with all the rules will contribute to the long service life of the structure.
Perhaps you had to deal with the construction of a frame bath on your own site? Please share your experience with our readers.Tell us if there were any difficulties during the construction and how you managed to cope with them. Leave your comments in the contact block located under the article.
Despite the simplicity of erecting the structure of the frame bath, you need to take all the preparatory work and miscalculations of the necessary materials responsibly. In this case, the bath will turn out to be of high quality and will bring maximum benefit and pleasure for many years. Proper waterproofing and thermal insulation will contribute to the long life of the structure.


