
- We make a frame for drywall on the wall
- Summing up communications
- Installation and installation of plasterboard partitions - economically, simply
- How the frame is arranged and what it is made of
- Selection Tips
- Choice of plumbing and fittings
- Advantages and disadvantages of acrylic bathtubs
- Peculiarities
- List of Common Mistakes
- bath frame
- Bath frame: what material to make it from
- Options for a homemade bath frame
- We prepare equipment and make markup
- Frame assembly
- Wooden frame
- Welded metal frame
- Installing a purchased screen
- Bath Frame Assembly: General Manufacturing Principles
- Installing a bathtub on a homemade frame and bricks
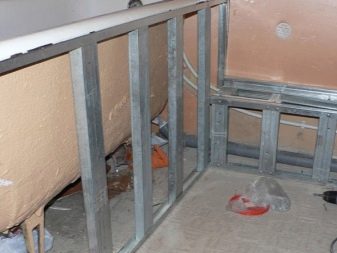
We make a frame for drywall on the wall
Drywall is mounted on the wall to level the surface and hide communications - pipes, wires, ventilation systems. The frame for drywall on the wall can be made from a profile of metal or wooden bars.
For a wooden frame, prepare the material:
- Treat each bar with an antifungal compound;
- Dry all wooden frame elements;
- Remove unsuitable bars with knots, cracks, material with defects can break and ruin the frame;
- The size of the bar must be at least 30 mm by 50 mm, while the drywall is wound on the wide side of the bar.
If the frame on the wall is made of profiles, then it is worth using only wall rack and rail profiles. They are specially reinforced with an additional stiffener. Guides are attached to the ceiling and floor, which serve as a frame for the frame. Rack profiles are attached to the guide profiles with a step of at least 60 cm.
Upon completion of the installation of the frame, it is possible to lay communications and insulating materials in the body of the frame and sew up the wall with plasterboard sheets.
Summing up communications
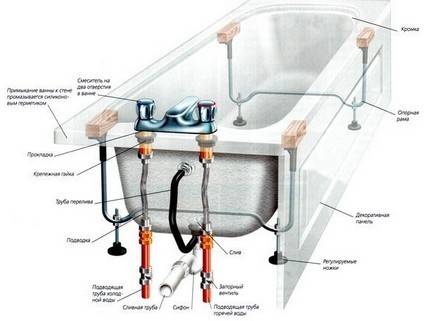
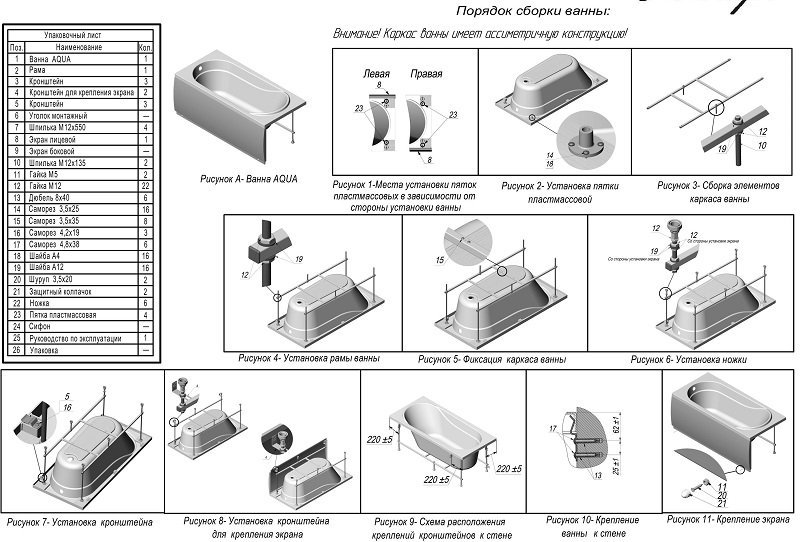
The assembly of the steel bath must be carried out in accordance with the instructions attached to it. When installing the bath, you need to attach a siphon, install an overflow funnel, attach taps and dock pipes for water outflow.
To do this, it is necessary to connect the corrugated pipe and the strapping. The main nuances when connecting:
- Rubber gaskets are treated with silicone before installation.
- The drain gasket is mounted outside.
- The gasket between the overflow and the hose is positioned with a cone in the direction of the piping.
- In the presence of threaded connections, it is necessary to use fum-tape.
The easiest way to determine the correct connection is to fill the container with water. If there are no leaks, the job is done correctly. If the plug is tightly closed, but the junctions of the drain with the pipe are leaking, this indicates an incorrect installation of the gasket.
 Having connected the main elements of the system, until the sealant has hardened, gently tighten all joints with a fork wrench, and after it hardens, check for leaks
After making sure that there are no leaks, they drain the collected water, checking at this moment the connection of the strapping. If leakage occurs, carefully tighten the nut.
Having corrected all the shortcomings, you need to carefully wipe all the binding connections with a dry cloth.To perform a control check, cover the floor under the pipe with paper napkins or toilet paper. The drain hole is closed with a stopper, and the bathtub is half filled with hot water. After that, the plug is removed from the drain and the water is drained. If during this time interval the paper remains dry, the installation is done correctly.
When installing metal structures, it is important to take care of grounding. In the event of a wiring fault, there is a high probability of life-threatening voltage appearing on the case
To do this, a copper wire with a cross section of 2.5 sq. mm is attached at one end to the bath, fixing it with a screw, and at the other - to a metal structure. It is not allowed to ground the housing to the water supply pipes or the heating system.
And let's finish with useful tips from the masters - watch the video clip:
Installation and installation of plasterboard partitions - economically, simply
Increasingly, when starting repairs, the owners of an apartment, office or premises for other purposes resort to redevelopment. This is done with the aim of more ergonomic use of the available space, in which the old walls are dismantled and new partitions are erected from modern building materials. Particularly popular at the moment is the installation of plasterboard partitions, which requires a minimum amount of time, effort and money. This lightweight building material is an excellent alternative to conventional bricks and foam blocks, given the optimal combination of price and quality. Plasterboard sheets are also attracted by the simplicity of the interior partitions, requiring a minimum of tools and additional materials.Drywall is a three-layer sheet consisting of building gypsum (grade G4), which is glued on both sides with thick paper. The width of the sheets is 1200 mm, the length varies from 2000 to 3000 mm, and the thickness varies from 6 to 12.5 mm. Depending on the purpose of the room, you can choose the appropriate version of drywall, divided into types:
1) ordinary drywall sheet (GKL);
2) moisture resistant (GKLV);
3) refractory (GKLO)
4) drywall with combined properties of moisture resistance and fire resistance.
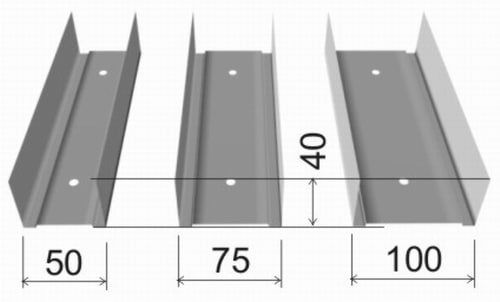
- Guide profiles PN (UW). Marking is different, so experts recommend focusing on the dimensions of metal profiles. For the manufacture of partitions, guide profiles with dimensions of 50x40, 100x40 and 75x40 are suitable. The length is a constant value equal to 3 m. To determine the required number of profiles, the perimeter of the partition is divided by three and rounded up to a whole value. If the partition implies the presence of a double frame, then the number obtained in the calculation is doubled.
How the frame is arranged and what it is made of
Frames for acrylic bathtubs can be divided into two types:
- Metal carcass;
- brick frame;
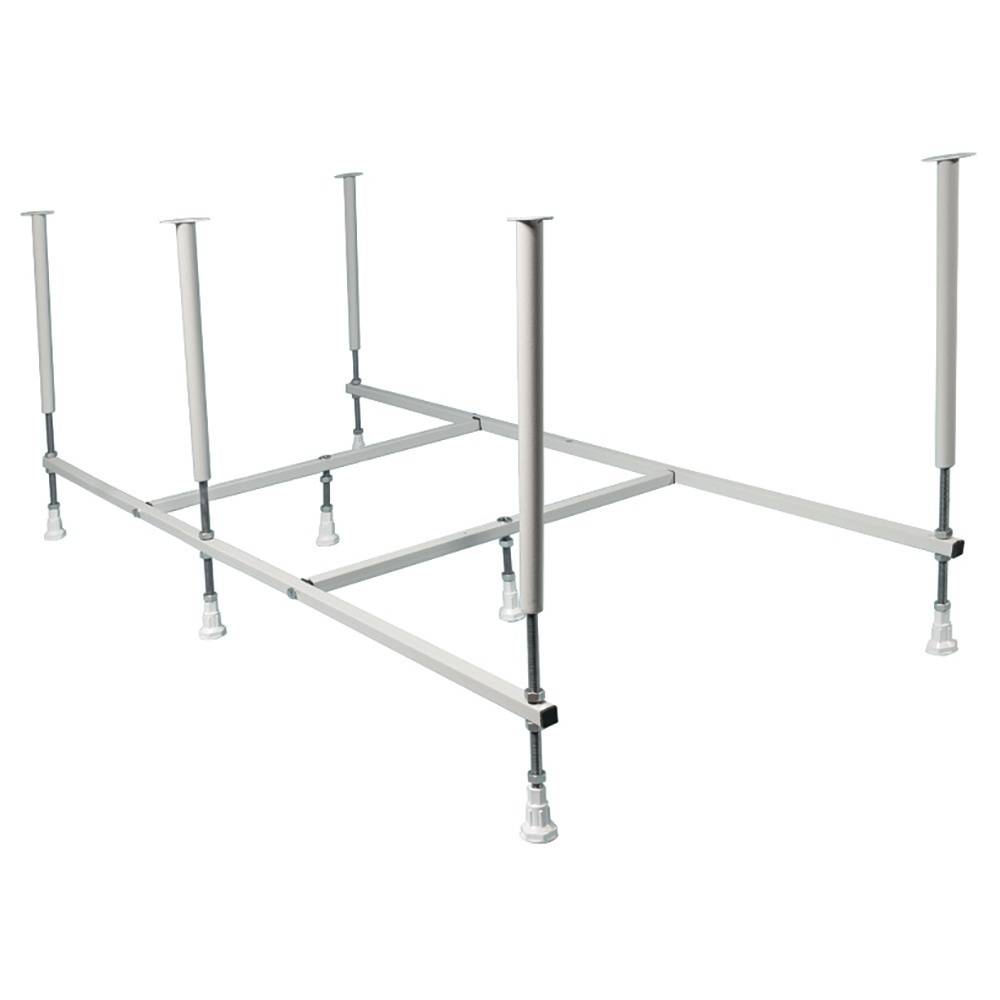
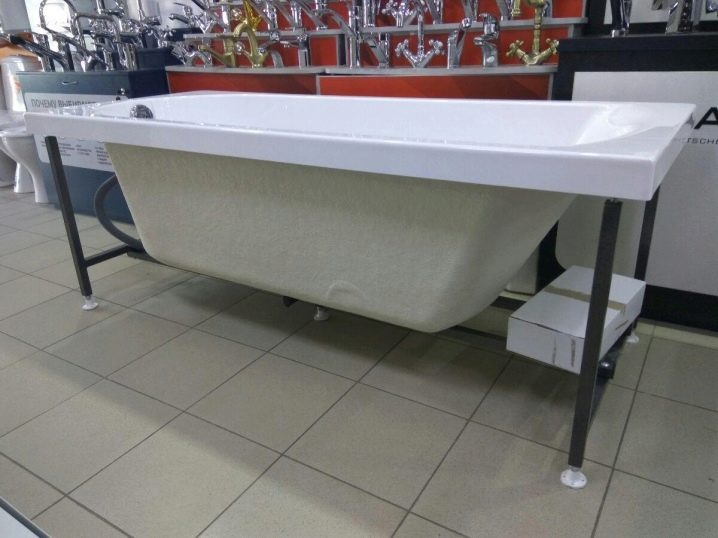
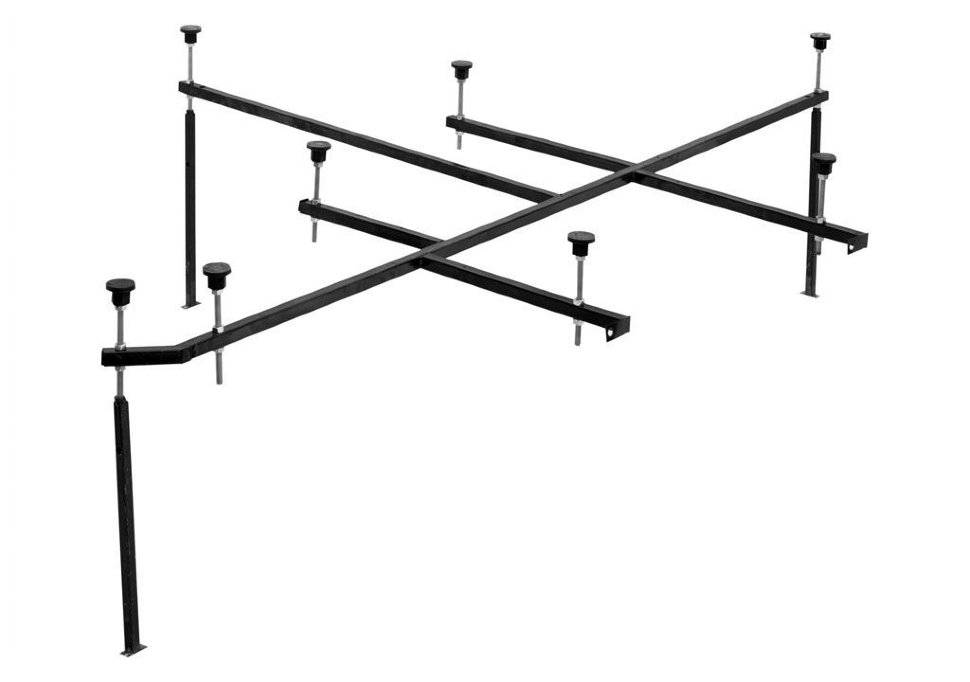
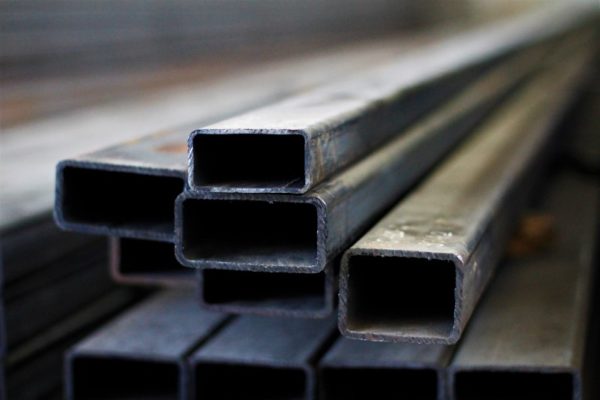
Let us consider in more detail what and how the metal frame is made of - it is made of a profile square or rectangular pipe assembled using welded joints. Such a frame, as a rule, is painted with corrosion-resistant paint, and it also has adjustable legs.
Metal frames are made most often for rectangular standard bath sizes:
- 150x70;
- 170x70;
- 185x70.
For bathtubs with a non-standard shape, the frames can be sold as a set, if the frame is not included in the kit, then you will be offered to buy it separately or make it individually.
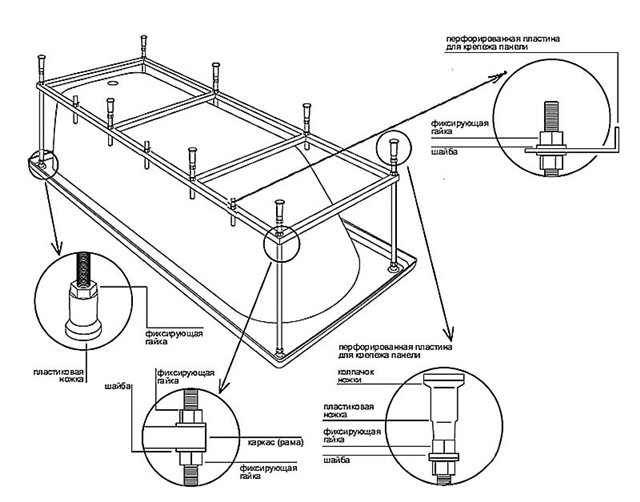
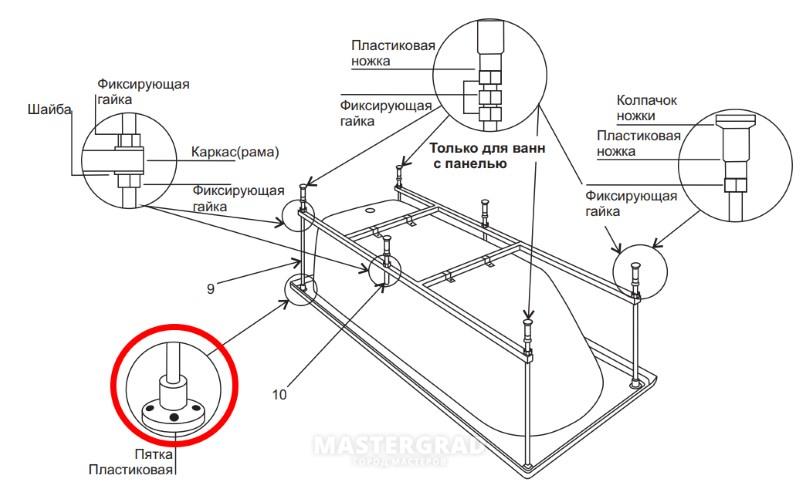
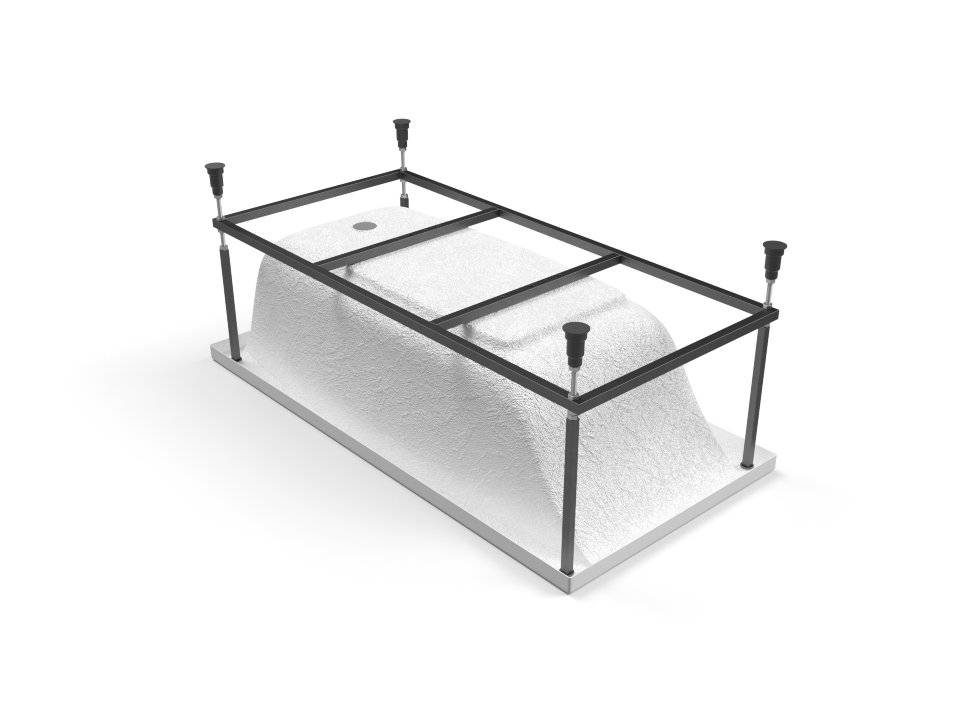
The frame itself should include the following: a frame around the entire perimeter of the side of the bath, regardless of its shape. Support posts with adjustable legs are welded to such a frame at the corners and to the longest sides in the middle. There must also be at least two support bars for the bowl itself.


In addition to its main bearing function, the frame also plays the role of the basis for fixing decorative panels, behind which it will be possible to remove various accessories for.
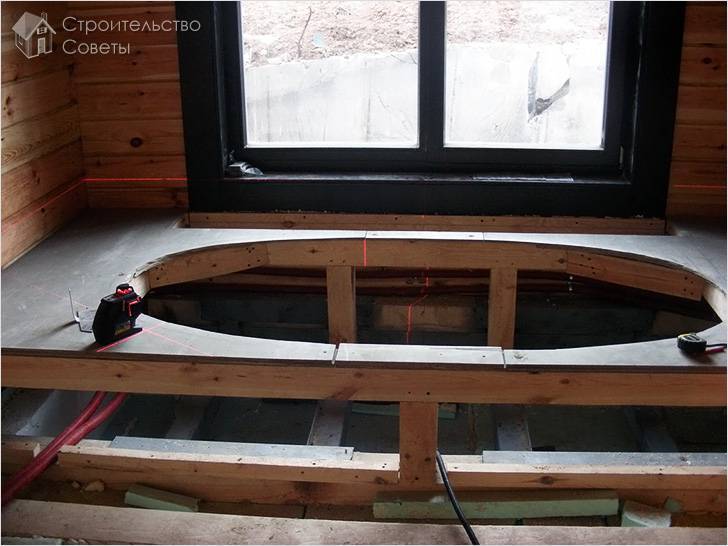
Now consider such a question as installing a bath on bricks. The device of such a frame consists in the fact that instead of a metal bearing part, two brick partitions are laid out, on a cement-sand mortar, the bath itself is installed on these partitions. Although this method is much more reliable, it is worth noting that it is much more complicated.
So, in order to properly install the bathroom on a brick, you must first markup. To do this, put the bath next to the place where it will be installed. The marking is carried out as follows, on each side of the edge of the bowl it recedes by about 20 cm - these will be the points from which the brick will be laid as a result. When the markings are done, it is necessary to prepare a brick and mix the cement mortar. When you start laying, remember that the thickness of the seams in the partition that is closer to the drain must be made thin, and in the one that is further away, thicker. This is necessary to create a slope towards the drain.After when the supporting partitions are laid out on the edges, it will be necessary to lay the halves to create stops.
The next step is to install a siphon on the bath, knead the solution again, put it in a thick layer on the partitions and install the bath on top. Using a level to control the slope. It is also necessary to ensure that the sides fit as closely as possible to the walls. After all, after it will be necessary to seal these joints. We wait about a day for the solution to solidify, and then you can proceed to further work, for example, installing a decorative screen.
Selection Tips
frame for acrylic making a bath with your own hands is quite difficult, but before forming it, you should decide on its parameters and design. For this, some important recommendations are taken into account:
a bathtub is initially selected, after which a frame optimal in size and shape is selected for it;
the condition of the existing floor is preliminarily assessed, since it is important to make sure that it can cope with specific loads;
when choosing materials used during work, it is taken into account that the operation of the structure will be carried out in difficult conditions, which include high humidity and temperature changes;
the shape must fully correspond to the configuration of the bath;
it is important to provide for the subsequent sheathing of the frame so that the appearance of the room is attractive and interesting.
Thus, the installation of the frame is carried out after its optimal choice. It is allowed not only to purchase it in finished form, but also to make it yourself.
Choice of plumbing and fittings
Initially, you need to choose a model that is suitable in size and shape. If the bathroom is spacious, then there are no special requirements for the configuration, but for rooms with limited space, it is better to stop at compact or corner products.
Together with the device, it is also necessary to purchase fittings for connecting to the sewer network. Drainage devices differ in design, size, material of manufacture.
Combined devices made of polypropylene with a water seal and a corrugated overflow pipe have proven themselves well. Visible parts may have a different shade (white, silver, gold), usually they are chosen according to the color of the mixer.
Advantages and disadvantages of acrylic bathtubs
Acrylic bathtubs are very beautiful, have an original design and a variety of colors. At the same time, they have their weaknesses and vulnerabilities.
Therefore, it will not be superfluous to find out what problems you may encounter during installation and subsequent operation, and how to prevent them.
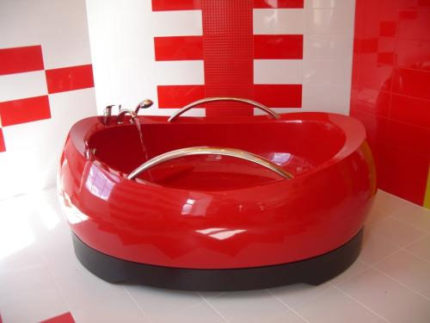 Colored acrylic bath of an unusual shape will become a bright and original element that can decorate the interior of any bathroom.
Among the advantages are:
- Plastic. Acrylic lends itself well to molding and subsequent processing. This property of the material determines the presence of a huge variety of forms of acrylic bowls.
- Lightness. The acrylic bathtub is lightweight (15-25 kg), so one adult man can easily handle its installation.
- Priority heating technology. Acrylic itself is a warm material. In addition, it has low thermal conductivity, acrylic bathtubs are able to retain heat for a long time, the water in them cools down much more slowly than in cast iron structures.
- Maintainability. Plumbing and acrylic products in general lend themselves well to repair and restoration. If the damage is significant, then you can restore the bath using an acrylic liner, which is made for a specific design, and then simply inserted into the old container.
As for the shortcomings, they are also present. We must not forget about the disadvantages of acrylic products. Compliance with the recommendations below will help to avoid possible problems and extend the life of the acrylic bath.
The disadvantages of acrylic plumbing include:
- Sensitivity to high temperatures. Acrylic does not withstand very high temperatures. When heated above 60 degrees, it can be deformed, so you should not pour too hot water into the bath.
- Fragility. If you accidentally drop a heavy metal object, a step, like an uneven surface into the bath, its bottom can be pierced through.
- Vulnerability. Acrylic bathtub is capricious in care - it cannot be rubbed with hard brushes, washed with powders containing abrasives, since the enamel is very susceptible and can be easily scratched from exposure to solid particles.
And it should also be noted, if not a drawback, then the inconvenience that the one who first sank into an acrylic bathtub faces. Due to the thinness of the material, the bottom may sag slightly under the weight of a person. However, you get used to this feature of an acrylic bath quite quickly.
Peculiarities
Many people are sure that unnecessary manipulations are not needed to install the bath; it is quite possible to get by with the legs holding the bowl. Of course, in many cases this is true, and the installation of additional frame structures is simply not required.
The stability of such plumbing is ensured by its massiveness and impressive weight. Lighter and more affordable models made of steel and acrylic cannot boast of such stability, therefore, to install them, it is necessary to prepare a frame.
Very often, frame structures come with bathtubs. If there are none in the kit, then all the parts must be purchased separately.
Such design solutions look original and stylish. In this case, the plumbing configuration itself does not play any role. With this design, the frame will also need a cast-iron structure.
Not all bathtubs have simple symmetrical shapes. Today, many original variants of non-standard forms are sold in stores. Complete with these options are unusual frames, and entire platforms of a suitable structure. In addition, in such plumbing most often there are wide sides, with the help of which the installation of the model is faster and more convenient.


In order for the product to lose its original appearance, it is necessary to put it on a frame base. You can handle the installation of the frame under the bath on your own. Such work cannot be called difficult. Moreover, the frame can not only be installed, but also made by hand. To do this, it is necessary to use only high-quality and durable materials - the platform must be as strong and durable as possible.
List of Common Mistakes
Given that the bowl is installed for a long period, and sometimes “tightly” sits on a sealant or mounting foam, you need to carefully and accurately perform all the installation steps.
Here are the mistakes that tenants face most often:
- Late overflow installation.Once the tub is already fixed in place, the fittings are much more difficult to mount, especially given the low stance of the bowl.
- Inaccurate leg height adjustment. Tightening the bolts when the bowl is already glued to the sealant is very difficult. You will need a special tool and additional effort.
- No gap between floor and screen. It is very inconvenient to perform some actions while standing near a bathroom with a blank front wall.
- Loose leg fittings. Loose nuts can weaken the structure. The bathtub will not fall to the floor, but it can move to the side.
- Installation without taking into account the location of sewer pipes. If the outlet into the pipe is higher than the bottom of the bowl, the drainage of water will become difficult.
Some shortcomings lead to the fact that repairs have to be done unscheduled, and not only at home, but also with neighbors. Unpleasant moments are associated with inaccurate sealing of the gap between the bathroom and the wall and with poor waterproofing of the floor under the bowl.
Sometimes they do not produce preliminary sound insulation. It is not necessary for all steel bathtubs, but if the jet of water makes a loud noise, the bottom on the underside must be covered with mounting foam. This can also be done after installation.
bath frame
Most manufacturers produce frames for bathtubs, not counting on the weight of a person. They are made from a thin profile. A person who has bought a bathtub with a similar frame is trying to strengthen it or make a new one, taking into account all the loads.
The frame is called an additional structure that strengthens the bath bowl, mounted under it. It securely fixes the sides of the bowl, protects the product from deformation and bending.
Modern bathtubs can have different shapes, choosing the right design for them is very difficult.When buying a product in a store, you will be offered the option that is available.
Bath frame: what material to make it from
A do-it-yourself bath frame can be made from different materials - the only condition according to which they can be chosen is the ability to accept high loads and successfully withstand high humidity. Such materials include wooden timber, pre-treated with water-repellent impregnation, galvanized profile for plasterboard structures, as well as an iron profile pipe. You can’t imagine better than these materials, and it is them that we will consider for suitability for the manufacture of a frame for a bath.
- Wooden bar. Excellent material, but has one drawback - it rots over time. In addition, the tree is largely subject to deformation depending on the ambient temperature and humidity. In principle, this problem is solved with the help of modern impregnations, which can make wood resistant to water and temperature, as well as protect it from decay. The advantages of using a wooden beam include ease of processing - in order to build a frame for a bath with it, you do not need a special tool. If desired, you can easily get by with a hacksaw and a screwdriver.
- Profiles for drywall constructions. The main disadvantage of this material is its low strength. Let's face it - the profiles are not designed to withstand such a load, which usually falls on the bath frame. Therefore, this material is used for the most part for the manufacture of a decorative or auxiliary frame - in such situations, the main load from the weight of the bath and the water in it falls on the legs.If we talk about a full-fledged supporting frame made of this material, then it needs to be strengthened, and this is done using the same wooden beam. You yourself understand that acquiring two materials at the same time is, at least, wasteful.
-
Metal frame for a bathtub, made of a profile pipe. In my opinion, this is what you need - depending on the pipe used, even a heavy cast-iron bathtub can be placed on such a frame, if, of course, such a need arises. This material has one significant drawback - to make a bath frame from it, you will need welding equipment and the skills to use it. The disadvantages include perhaps the susceptibility of the metal to corrosion, but this problem is quite simply solved by means of modern primers.
In principle, the question of how to make a frame for a bath can be solved with the help of other similar materials, there are a lot of them in the modern world.
When choosing these materials, be sure to pay attention to the strength characteristics and correlate them with the load that the bath will exert on them.
How to assemble a bath on a frame is shown in the video.
Options for a homemade bath frame
What material is most often taken to make a bath frame? The usual profile for drywall. It is plated with zinc, which means it is quite durable and reliable. And will last a long time. It can be used under the frame of an acrylic and steel bath.
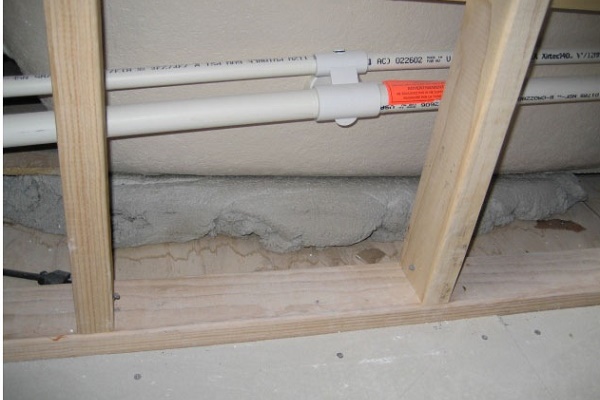
Before starting installation work, it is necessary to level the walls, dilute the sewer and water supply pipes.
Let us trace the entire procedure for the construction of this structure step by step.
We prepare equipment and make markup
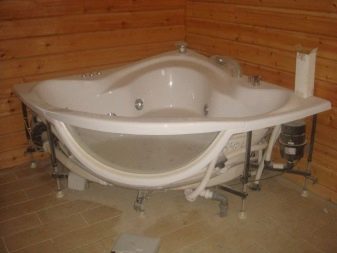
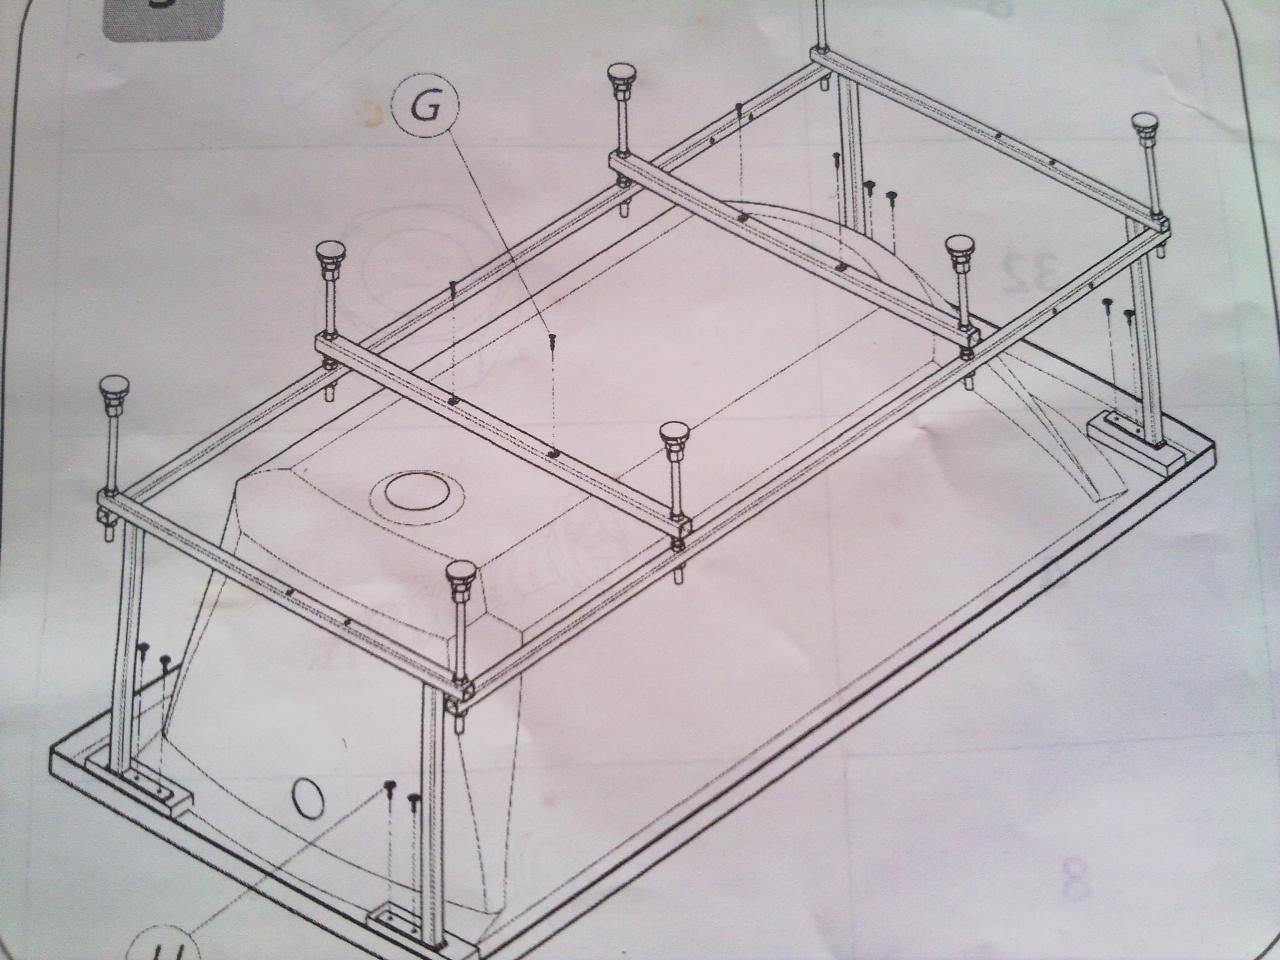
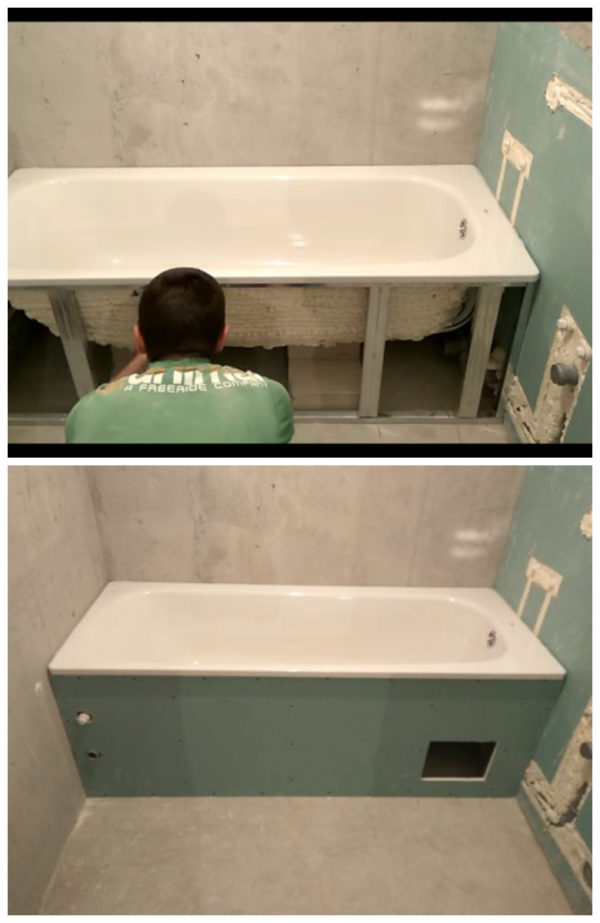
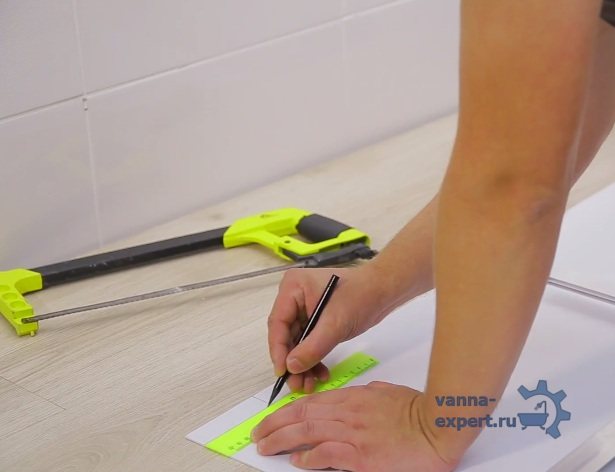
First of all, turn the bath over. We fasten profiles for legs on self-tapping screws. To do this, the design of the bath provides for strengthening the bottom with a plywood sheet. And already on the profile we fix the legs. Without departing far from the bath, we install a drain and overflow system.
Now you can bring the structure into the room and, having adjusted the legs in height, put it in place. On the lower edge of the side we apply markings for mounting the frame.
Next, again, you need to pull the bath out of the room and start assembling the frame.
Frame assembly
To make a frame from a metal profile, it is enough to do a few manipulations:
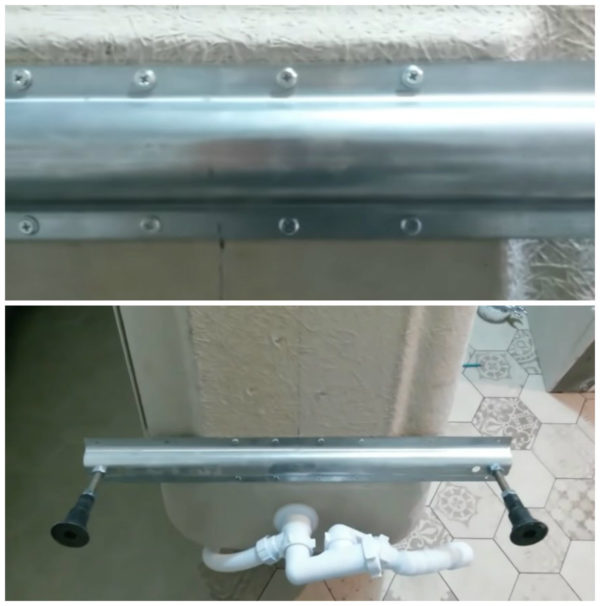
- Cut the profile according to the marks. Holes are made in the cut segments so that they can be fixed on the wall.
- Apply sealant to the shelf adjacent to the wall. Next, following the marks, we fasten the profile to the wall. If the wall is made of brick or concrete, then we drill holes and insert dowels. No dowels are needed in the gypsum board, self-tapping screws hold perfectly.
- Next, install the side racks and the lower screen rail.
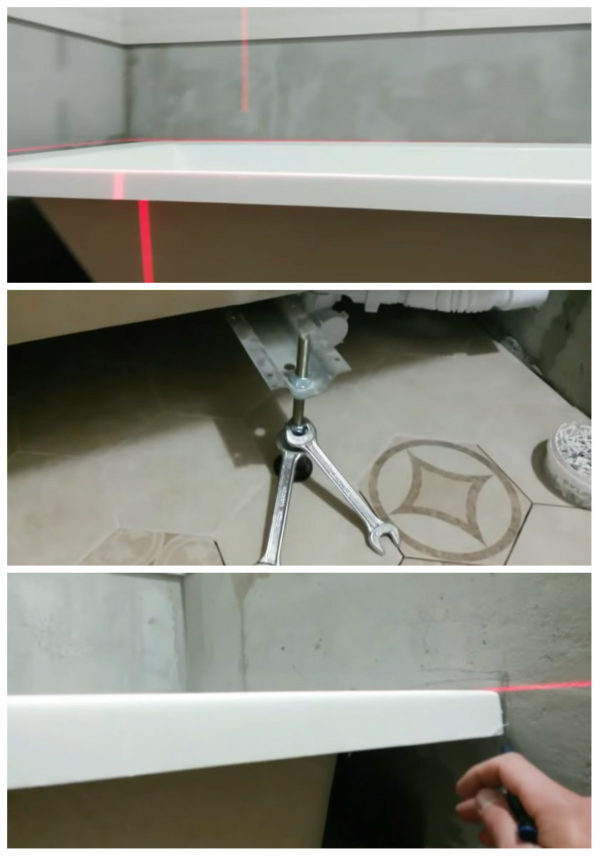
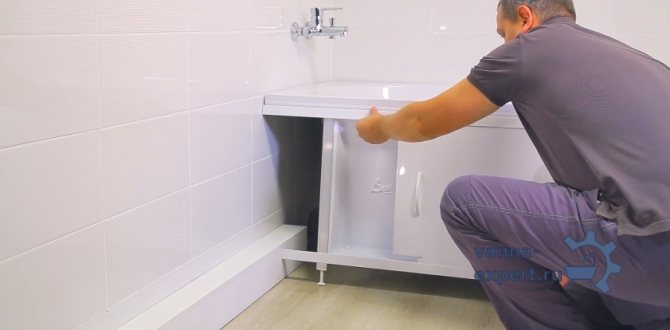
- Apply sealant to the top of the profiles. Bring back the bath, install and connect it.
Now you need to make a stand on which the bottom of the bowl will rest. You can take brick, cinder block for these purposes. We put in several rows and fasten with the usual cement mixture.


After the foam has hardened, we proceed to the installation of the frame under the screen and hide it with a sheet of drywall.
Wooden frame
To create a frame for a bathtub, wood is not as good as metal. In rooms where people bathe: in bathrooms, baths, saunas, it is always very humid. As you know, moisture for a tree is the worst enemy.To protect our structure from the harmful effects of moisture, care should be taken to protect it.
The material must be impregnated with an antiseptic or other protection that will repel water and protect against fungus and mold. We assemble the frame from bars with sides of 50 by 50 millimeters. We do this in the same way as a frame is assembled from a metal profile. Let's go through the main points:
- we level and prime the walls, after which the frame can be fixed;
- to give additional rigidity, we supplement the horizontal slats with vertically standing slats;
- as soon as the frame is assembled, we cover the beams with a waterproofing solution; if the walls located behind the bathroom are not planned to be tiled, then it is better to cover them with waterproofing.
When the waterproofing composition dries, you can put and connect the bath. To make it more stable, a support is made of brick under it. A foam layer is arranged between the support and the bottom of the bowl. Next, the screen and its casing are mounted.

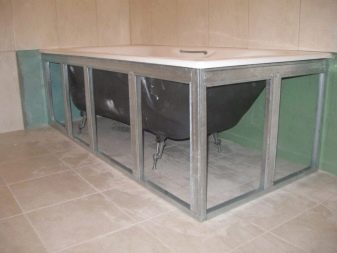
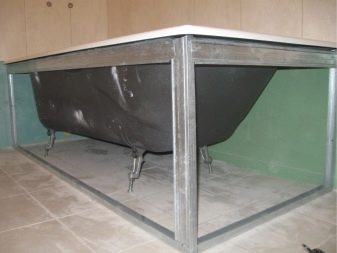
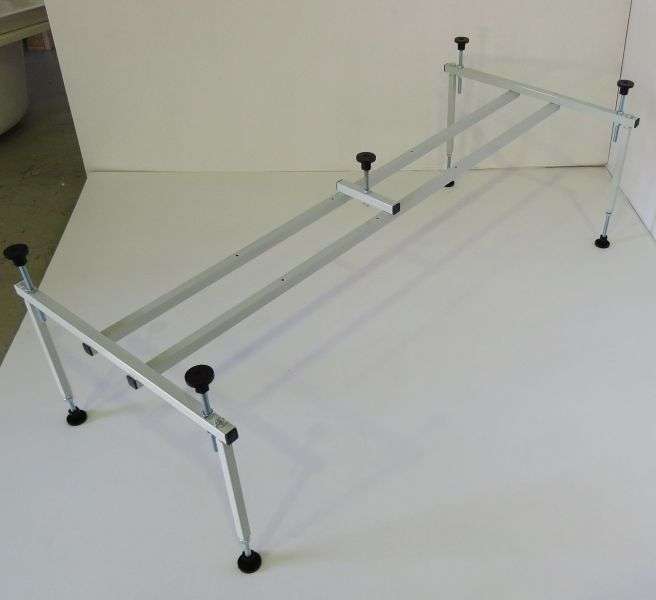
Welded metal frame
Naturally, you can weld a metal frame. For this design, a profile pipe is suitable. In fact, this is a metal rectangular object that does not look like a pipe. Such a frame can be arranged both for an acrylic bath, and for a cast-iron or steel bath. Its strength is such that it can withstand any weight. This design allows, in addition to the bath itself, to install a glass screen for the shower.
How to make a frame using welding? Consider the main points:
- first you need to make all the measurements and draw a diagram of the future design;
- cut blanks of the required length;
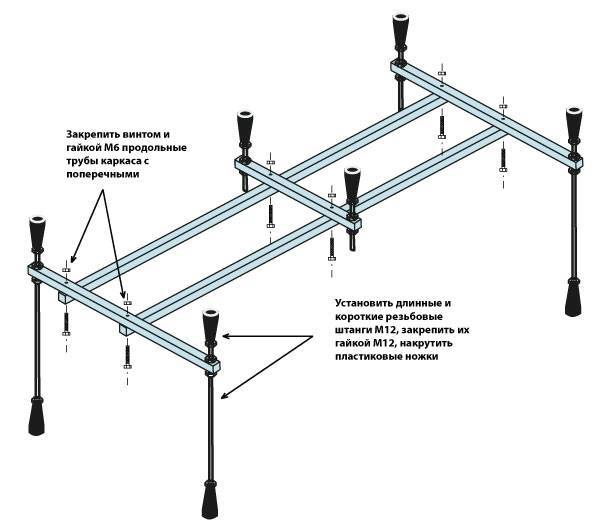
- by welding to connect the base of the frame - these are three supports, with two guides fixed to them, the bottom of the bath will “rest” on the guides;
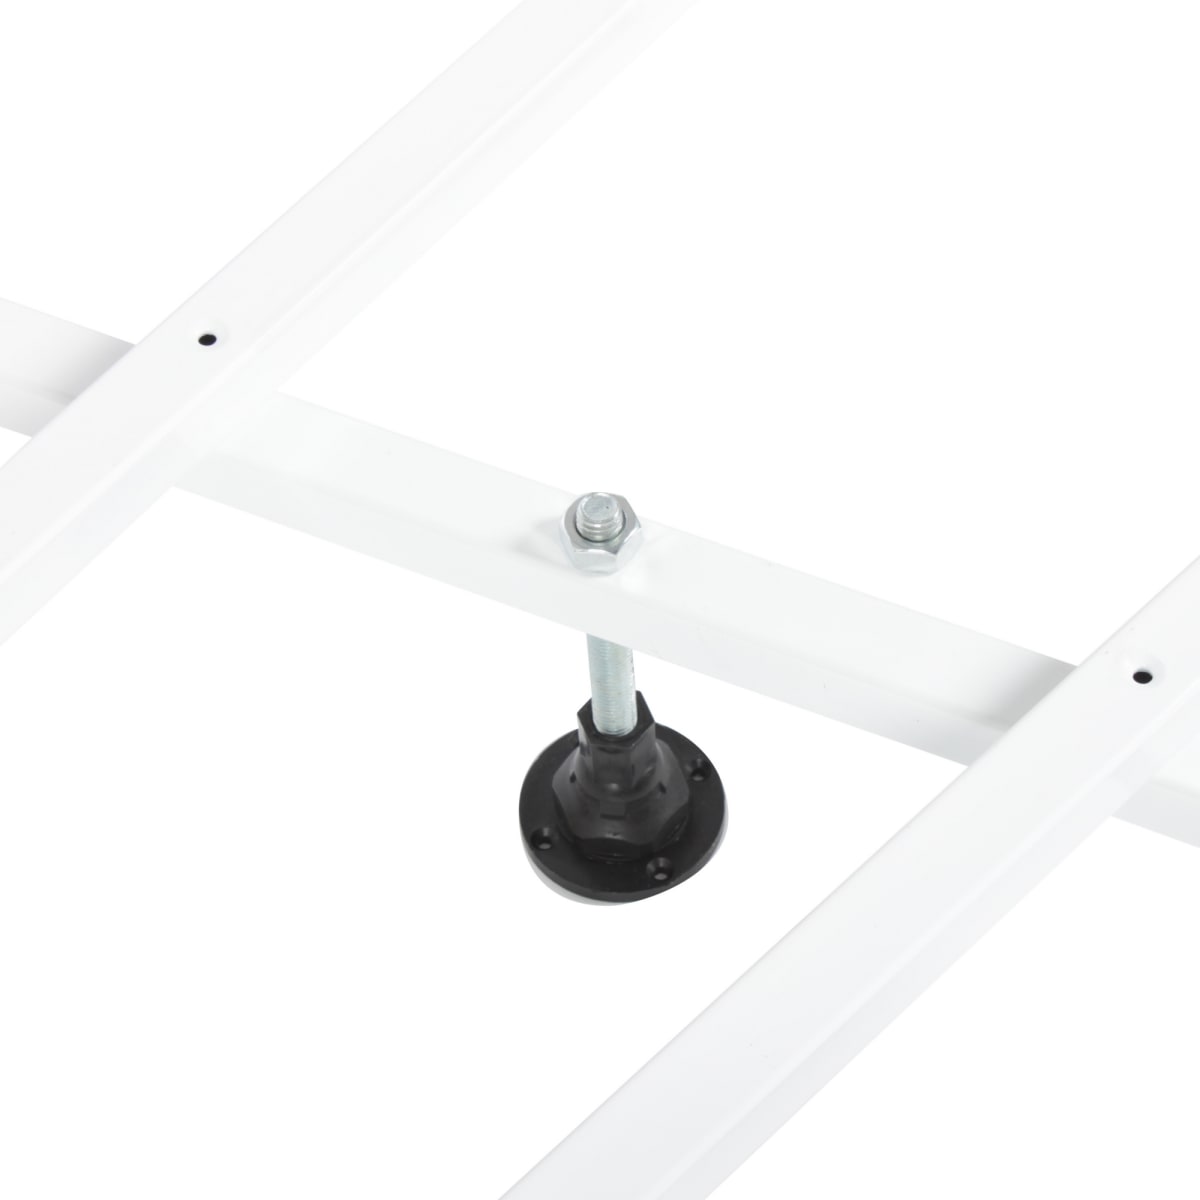
- install the legs - we select small sections of the profile pipe and weld them to the support legs;
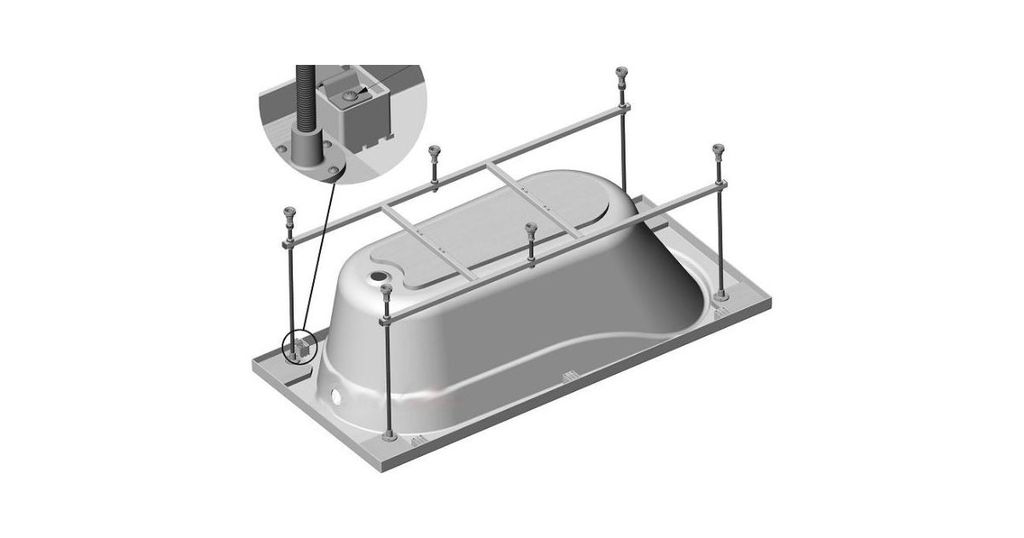
- at the lower end we weld a washer and a nut to it, suitable in diameter to the screw;
- when all the elements are assembled, the frame can be set horizontally and vertically;
- now you need to weld a stand located vertically, and install horizontal crossbars on it, on which the lower part of the side will rest;
- to be able to sheathe the front side of the bath, we weld the front racks.
We install the assembled structure in the room, align it and put the bath itself. We connect, test the operation of the drain and overflow systems. We sheathe the frame with a sheet of drywall.
Installing a purchased screen
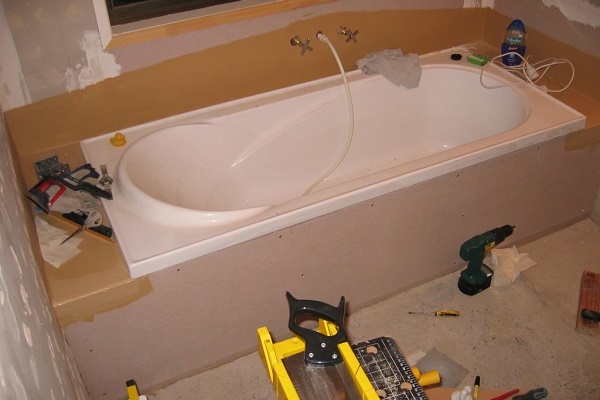
By the time the screen is installed, all repairs in the bathroom must be completed, communications are connected. If the bath has been used for some time without a screen, you need to inspect the space under it, remove dust, make sure that there is no dampness, mold and damage to the finish on the floor and walls. It is impossible to leave such defects, especially if you plan to install a blank screen.
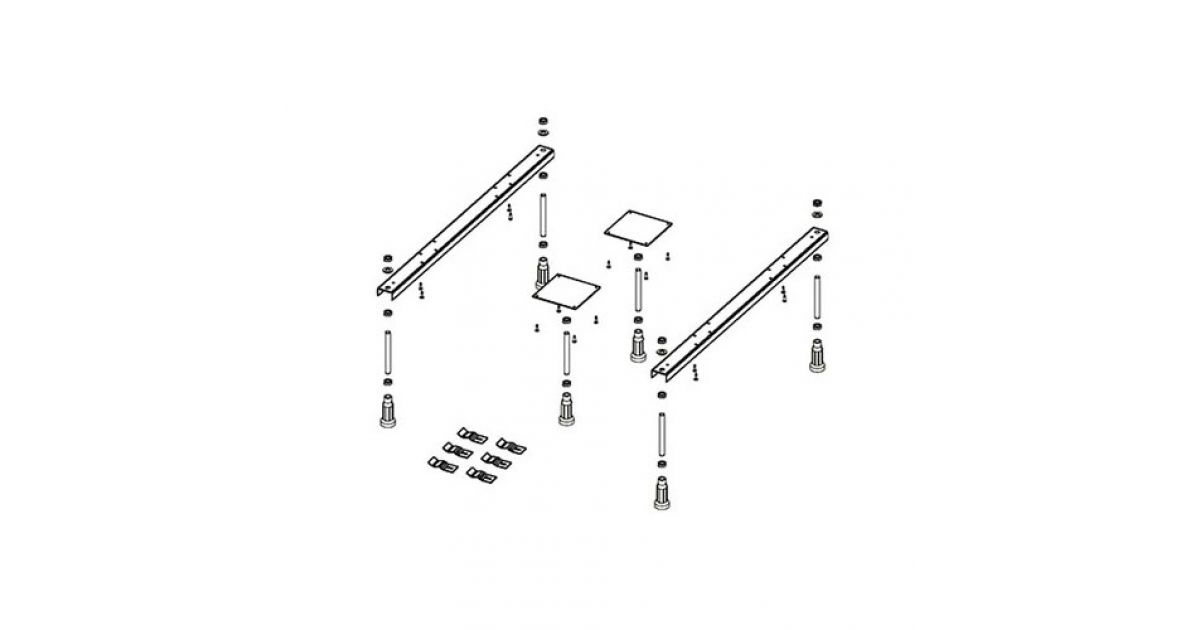
When everything is ready for installation, you should unpack the product and check the contents. Standard model includes:
- aluminum guides and racks for the frame;
- legs;
- plugs;
- self-tapping screws;
- panels with holes;
- handles with fixing screws;
- assembly instructions.

Screen package
Step 1. On a flat surface, both guides are laid parallel to each other with grooves inward.

Guides
Step 2From above, racks are laid across the guides and the mounting holes on the profiles are aligned.
Racks are laid on the rails
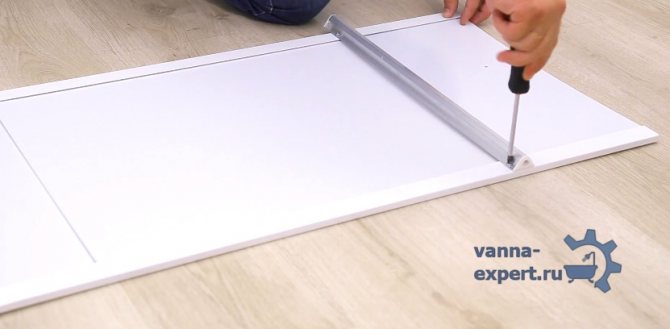
Step 3. Insert self-tapping screws into the holes and twist them slightly to fix the racks in the desired position.

Fixing racks
Step 4. The panels are carefully inserted into the grooves of the guides, after which the structure is adjusted in height, the screws on the racks are tightened, and the ends of the guides are closed with plugs.


Installing panels in grooves
Self-tapping screws on the racks tighten

Plug installation
Step 5 Screws are inserted into the holes on the panels and the handles are screwed on.

Fixing handles
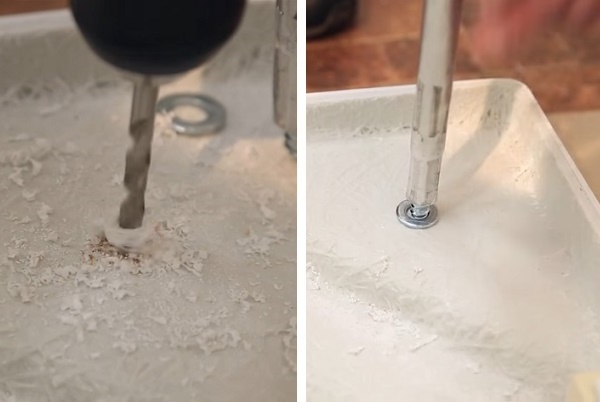
Step 6. If a pipeline runs along the floor to the side of the bathtub, measure the width and height of the indentation from the wall and make a cutout in the screen. First, measure the required distance on the guide profile, mark the cut line with a marker and saw off with a hacksaw. Then, a corresponding hole is cut in the panel itself using a mounting knife.
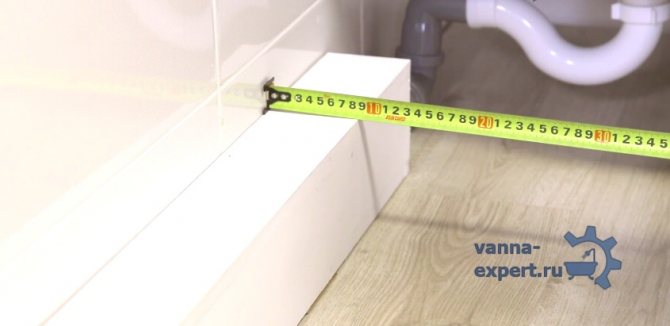
measurements

Transferring measurements to the panel
Cutting line drawing

Cutting with a knife
Step 7. Insert the legs into the racks from the lower end and twist them a little. They lift the structure, bring the upper edge under the side of the bathtub and level it vertically. After that, unscrew the legs until they stop so that the screen fits snugly into place.
Installing a screen under the bath
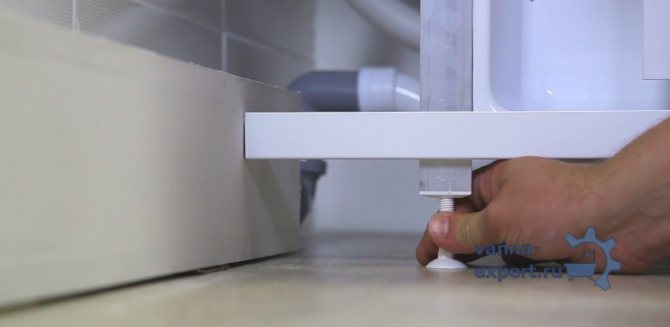
Leg adjustment
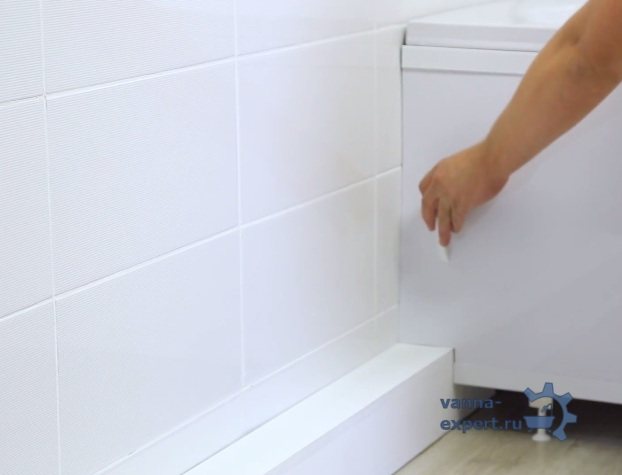
Checking the position of the screen with closed shutters

The screen closes and the end of the bath

Fixing additional elements
Bath Frame Assembly: General Manufacturing Principles
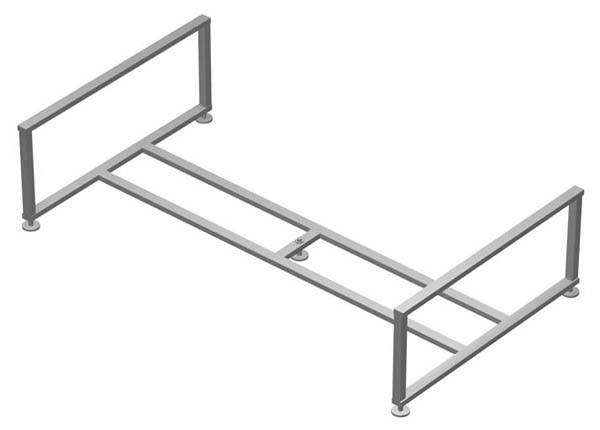
To begin with, let's deal with the question, what is a frame? In fact, this is a non-continuous supporting frame, in which the loads are distributed by means of racks and jumpers.In some way, such structures can be called a farm. It is such a product, closed around the perimeter, that you will have to assemble in your bathroom, and then install the bath itself on it. We will deal with this further, having studied in detail the technology for mounting the frame for the bath.


- We take measurements and decide on the choice of material, or rather, with the cross section of a beam or a profile pipe. As for drywall profiles, there is no need to be smart here, the most suitable of them is UD and CD. Since we are talking about the dimensions of the material, we should immediately stipulate the moment that the most suitable would be a wooden beam with a section of 20x100mm, and if we talk about a profile pipe, then this is 20x40mm. The key here is the size of 20mm - this is the distance between the sidewall of the bathtub and the bend of its side. Now, as for the rest of the dimensions - with linear dimensions, the length and width of the bath, I think there will be no questions (they need to be measured from the bottom side of the bath, from the edge of one side bend to the edge of the other, located on the opposite side). Another dimension required to correctly resolve the issue of how to assemble a frame for a steel bath is the installation height - as a rule, it is 600mm. Well, in general, when choosing the installation height of the bath, you need to proceed from two factors: the first is the ease of use of the plumbing fixture, and the second is the features of the laid communications. In particular, the sewer, to which the installation height of the bath is attached.
- We lay the reference perimeter according to the dimensions defined above. If we are talking about a plasterboard profile or a wooden beam, then we simply nail their parts cut to the required size to the floor with dowels.If it was decided to assemble the frame from a profile pipe, then simply lay the tubes on the floor and weld them into a rectangle.
-
We mount the corner support posts - it is on them that the entire load from the bath and water will fall along with the person in it. To begin with, we install racks in the corners of the resulting rectangle. If, again, we are talking about wood or plasterboard profiles, then we additionally nail these racks to the walls. If the frame is assembled from a pipe, then we simply weld them to the corners of the floor rectangle.
- We assemble the upper support triangle - it is necessary in order to evenly distribute the load from the bath and its contents over all support posts. It is done similarly to the bottom one - a beam or profiles (or a pipe) are laid on the corner posts, after which they are attached to them with self-tapping screws or welding.
-
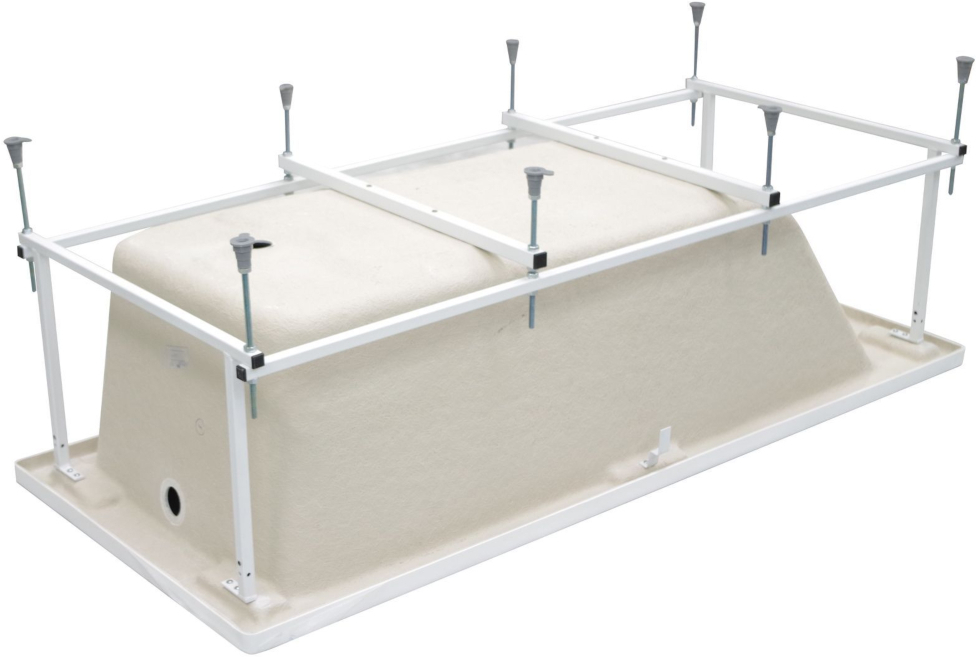
We install additional load-bearing racks that will serve as reinforcement for the frame and allow it to fully withstand the load from the bath and everything that will be in it. Such racks will need to be installed and strengthened in increments of 0.5 m along the long side of the frame - on its short sides, they additionally mount one rack exactly in the middle.
After the last support is installed, the question of how to make a frame for a bath can be considered resolved. The only thing to add here is that the number of additional supports depends entirely on the material from which the frame is made. The above step is acceptable only for a profiled iron pipe and a wooden beam with a section of 100x20mm. For drywall profiles, the pitch should be reduced to 300mm. Also, the step of the racks must be reduced when using a beam of a smaller section.
Now it remains only to bring the work begun to the end, namely, to install the bathtub on the frame and sheathe it with decorative finishing material. Both plastic panels and drywall, subsequently tiled and any other finishing material, can act as decorations.
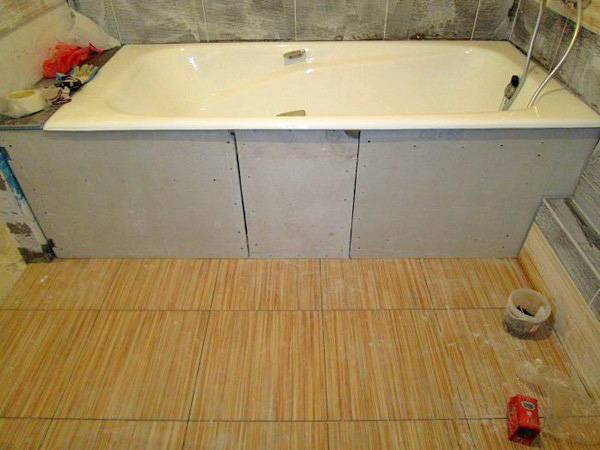
How to sheathe the frame of the bath
That, in principle, is all that can be said about the frame for the bath. As you can see, there is nothing complicated in its manufacture, the main thing is to choose the right material in accordance with your capabilities and skills, as well as accurately determine its dimensions and assemble it in accordance with the requirements of rigidity and strength that the bath itself puts forward and the features of its operation.
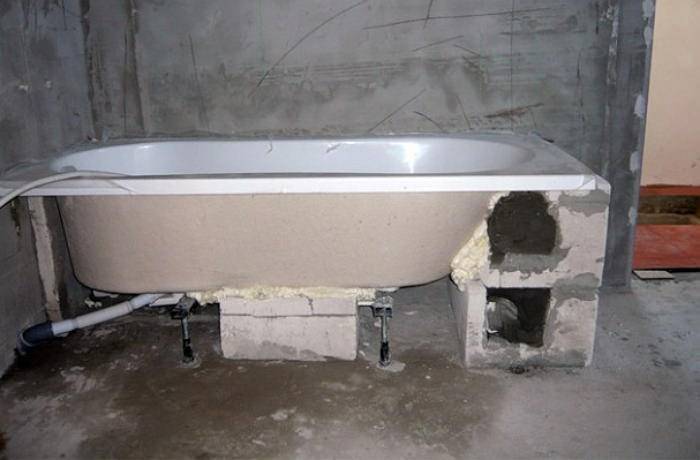
Installing a bathtub on a homemade frame and bricks
The most famous method of attaching acrylic baths is the combined method, when the installation is carried out on a metal frame made of aluminum profiles, and ordinary bricks are used to prevent the bottom from bending or deforming. In order to build such a structure, you will need:
- bricks that will support the bottom of the font;
- for the manufacture of the supporting structure, a metal or aluminum profile is required;
- in order to fix the brickwork, cement mortar is required;
- to seal the seams, it is recommended to use a sealant;
- self-tapping screws will help to assemble the frame;
- for stirring the cement mortar, use a special container and a trowel.
Worth remembering! When working with sharp and heavy objects, care should be taken, since an accidentally dropped tool can easily make a hole in the bathroom, thereby damaging the product.It is better to take precautions in advance by covering the font with thick paper or thick film. In order to properly install an acrylic bathtub on the wall, it is necessary to note what its future height will be, starting from which we will form the height of the brickwork
We measure from the floor to the indicated line, from the results obtained we subtract the height of the bath itself, and what happened will be the thickness of the brick lining on which the bath will be mounted
In order to properly install an acrylic bathtub on the wall, it is necessary to note what its future height will be, starting from which we will form the height of the brickwork. We measure from the floor to the indicated line, from the results obtained we subtract the height of the bath itself, and what happened will be the thickness of the brick lining on which the bath will be mounted.
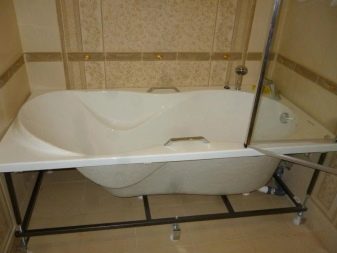
It is recommended to start installing an acrylic bathtub against the wall by mounting a metal profile, which will subsequently serve as a support for the bathtub. Then, along the lower level of the edge of the edge of the bathtub, you need to install a metal profile around the entire perimeter with the help of dowels, where the bathtub will come into contact with the wall. It is on him that the sides of the bath will rest. Next, before installing the acrylic bath, we make a brick pillow along the bottom of the bath of the required height.
Need to know! Before fixing acrylic bathtubs in this way, everything must be calculated so that during installation it exactly lies with its sides on the previously installed profile, and the bottom slightly touches the brickwork along it. Attachment to the wall in this situation is done with the help of a sealant, which is applied to the profile, and at the same time is a sealant preventing the flow of water.
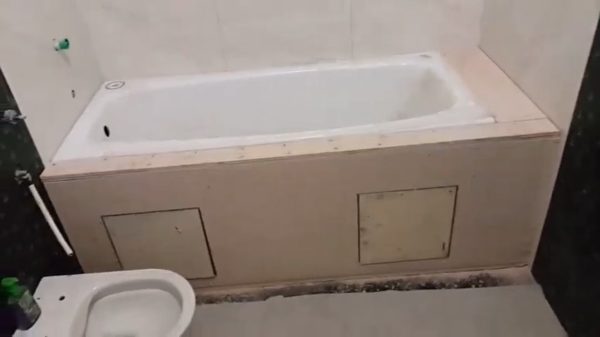
Thus, the manufacture of the frame can be considered complete, but it is possible to create a front protective screen from the same metal profile. This screen will make it possible to hide the inside and be able to provide additional protection for the outer side, as well as make it possible to make a special hatch for the repair and maintenance of the siphon. You have learned how to properly install an acrylic bath on a do-it-yourself frame.
How to assemble an acrylic bath frame


