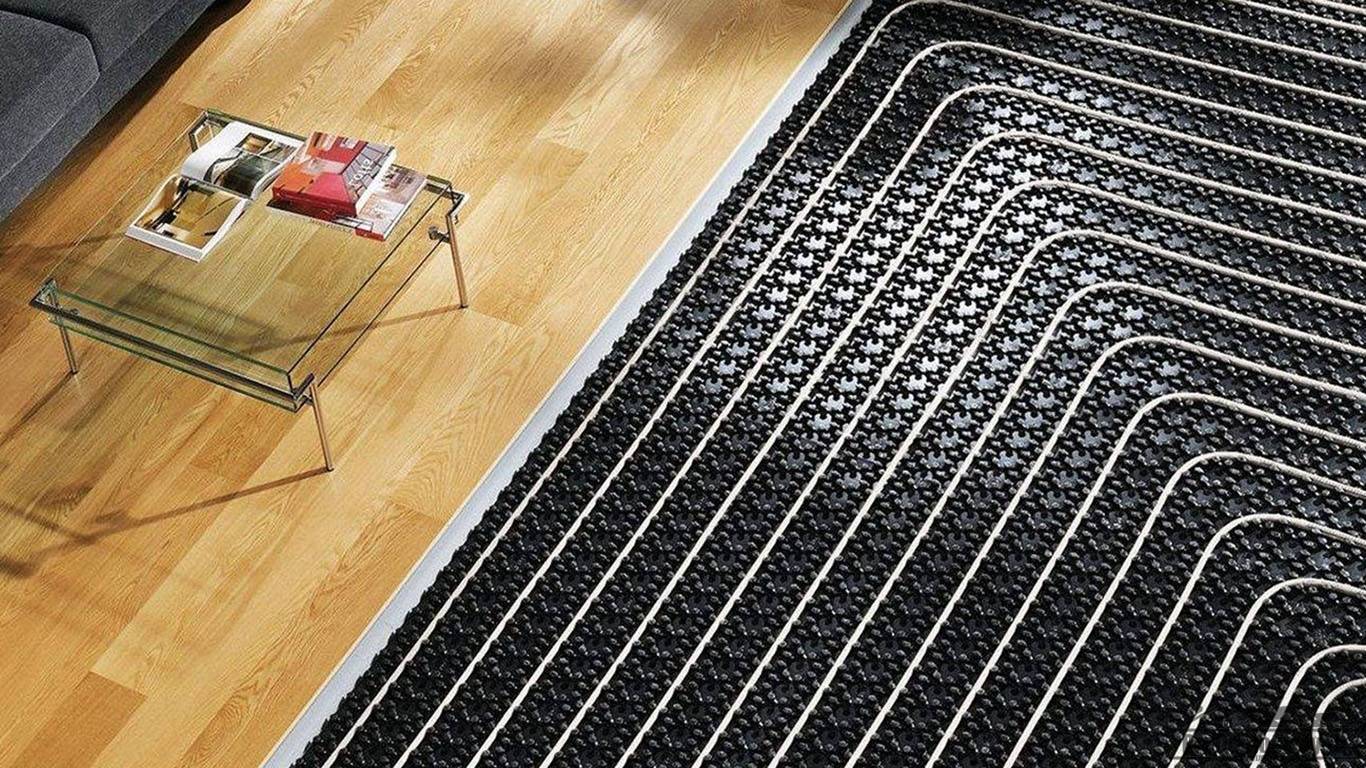
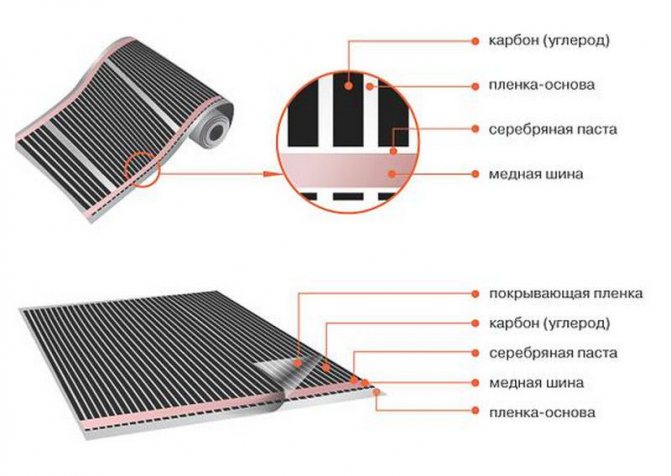
- Film floor installation
- When to Choose Infrared Underfloor Heating
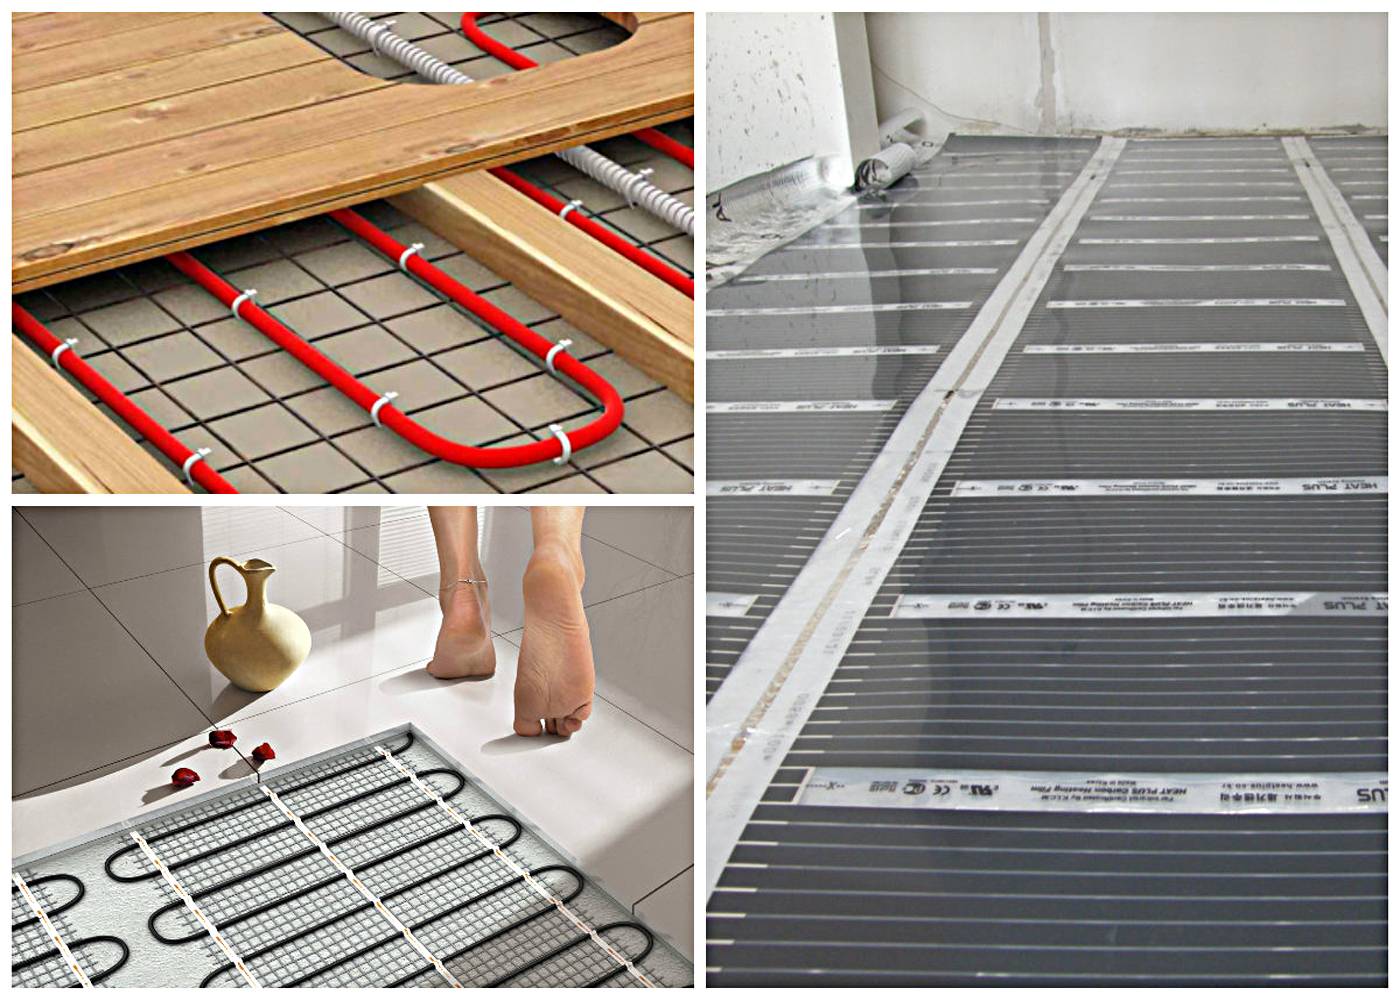
- Electric or infrared underfloor heating
- Water or infrared warm floor
- Rules for calculating pipe footage
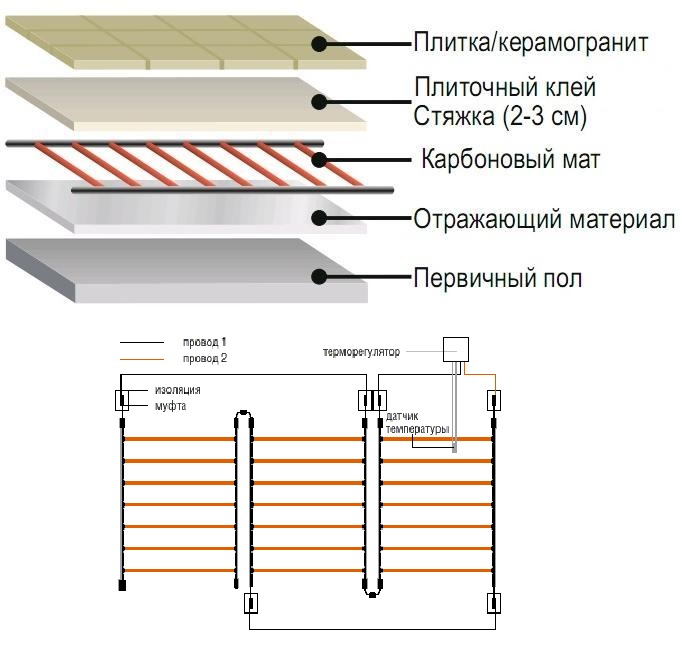
- What is a warm floor "carbon mat"?
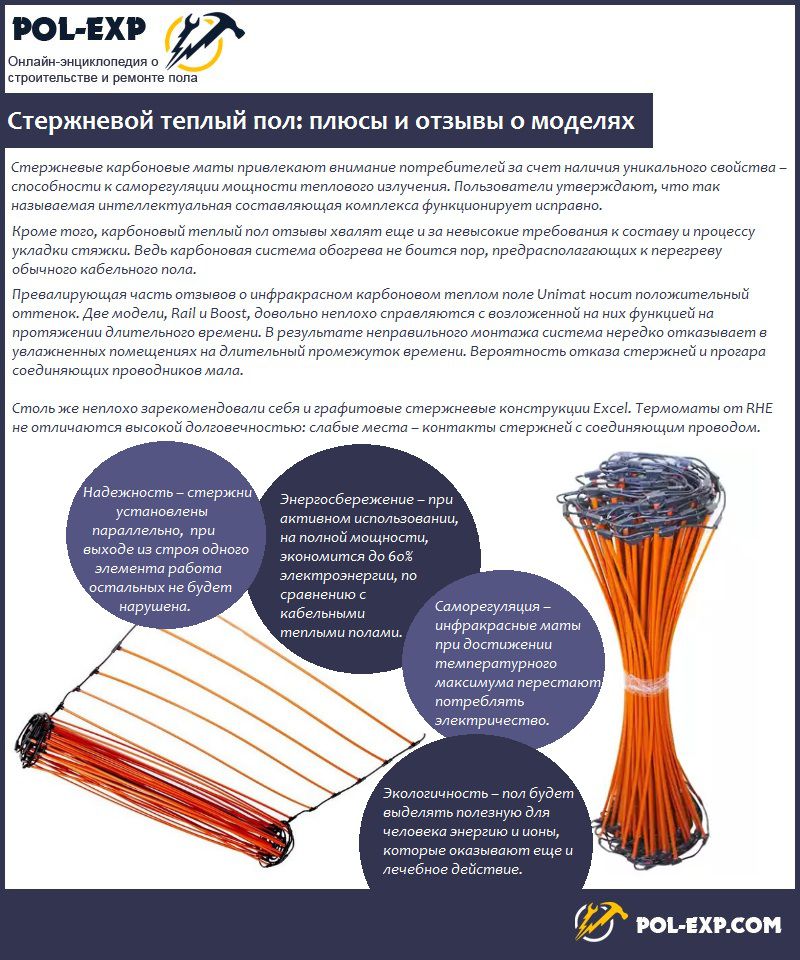
- Rod underfloor heating Unimat
- Rod
- Wiring diagram for infrared floor heating
- Benefits of rod carbon underfloor heating
- Features of installing a carbon fiber underfloor heating
- How to choose a carbon heater
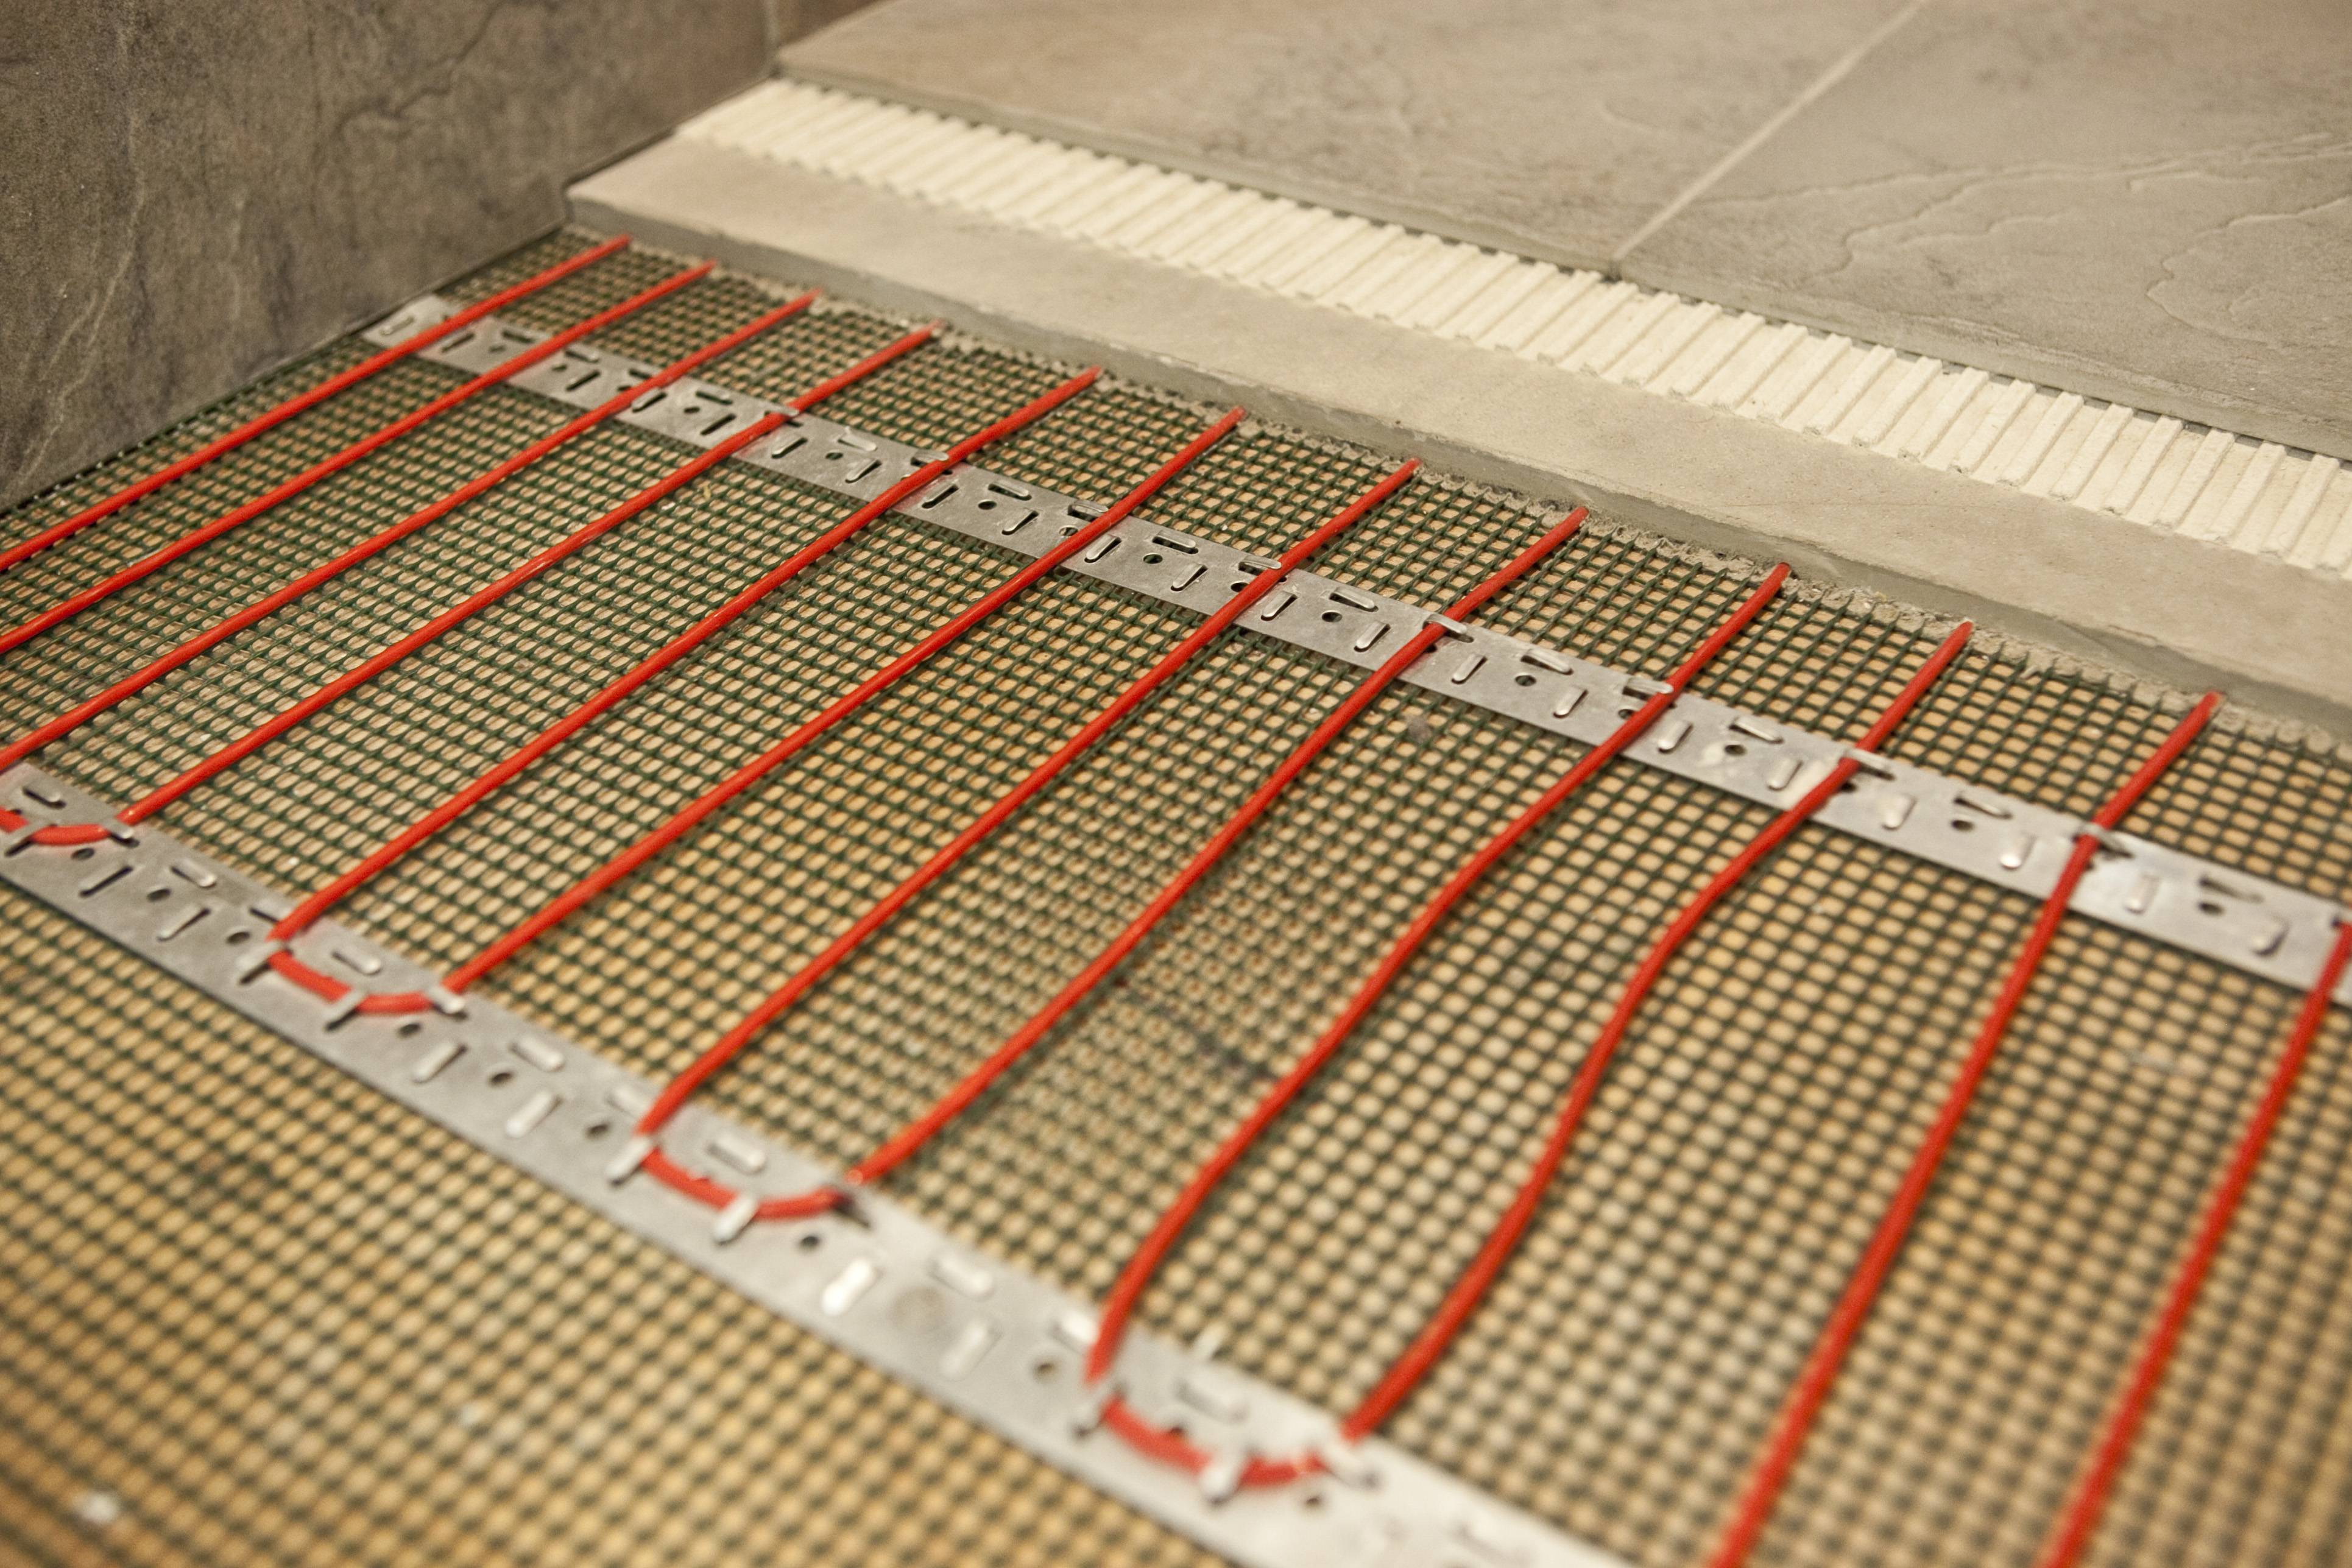
- Do-it-yourself electric underfloor heating from a cable under a tile
- Preparing the foundation
- We measure the heating cable
- Preparing control equipment for electric underfloor heating
- Laying tiles on a warm electric floor
- Why is this underfloor heating better than others?
- Self-regulation
- Reliability and security
- Economy
- How to make an infrared warm floor?
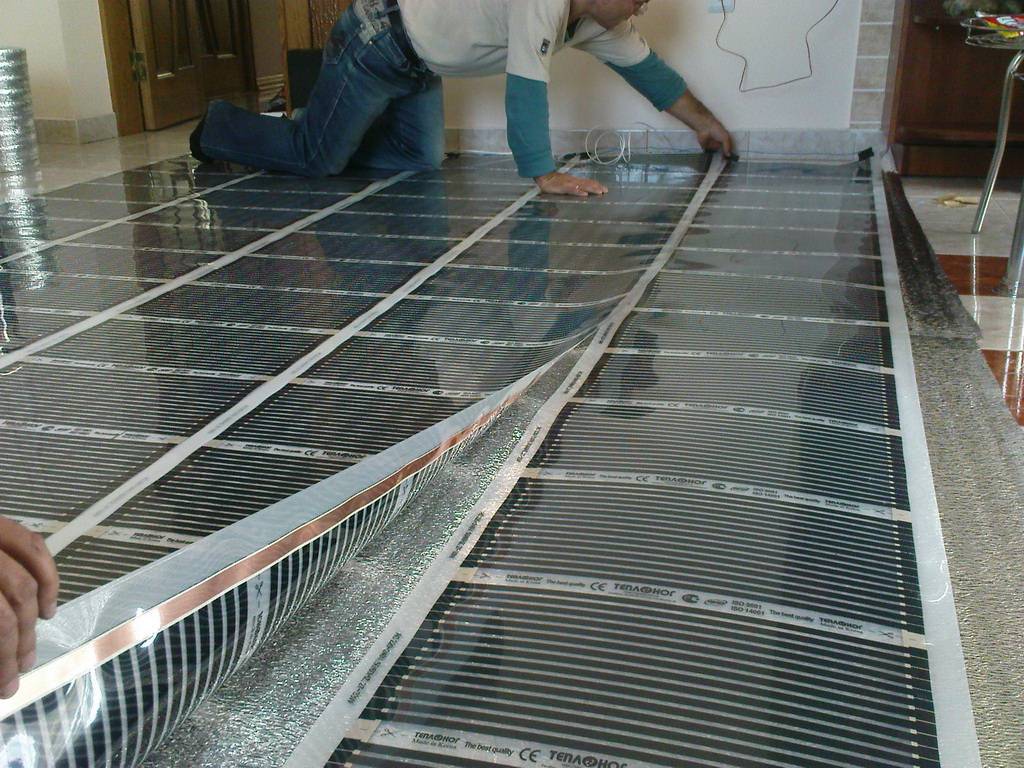
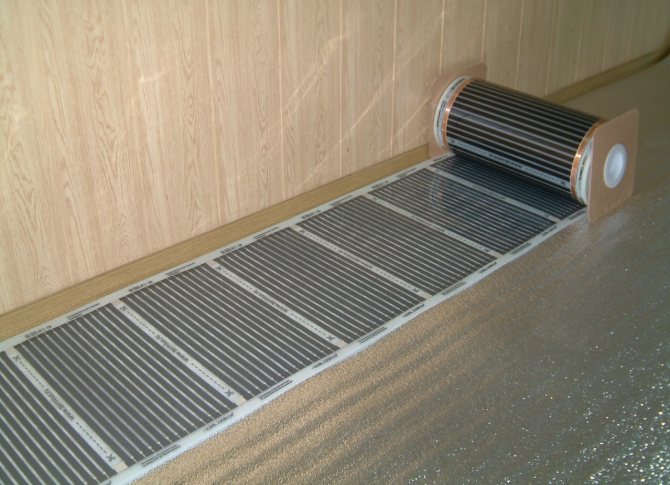
Film floor installation
All carbon systems are laid on a flat surface. The base is recommended to be leveled. Differences of 1 mm per 1 linear meter are allowed. m. Thermal film and rods heat the entire surface around: not only the floor covering, but also the lower base, the foundation. In order for warm air to pass upwards, thermal insulation and a reflective screen are laid on the base. In the future, the installation of a thermal film is carried out.
On the floor, the boundaries of the "warm floor" are marked.From the wall and from furniture, the film is placed at a distance of at least 5 cm. The gap between the strips is 2 cm
Pay attention to the width of the roll. If the width is 50 cm, then the length of the tape must not exceed 13 m. The larger the width of the roll, the smaller the allowable length of the tape will be: width 80 cm - length 10 m; width 100 cm - length 7 m
The film is recommended to be pre-marked and divided into separate tapes.
There is space for a thermostat on the wall. Make a hole into which a plastic cup is inserted. It will contain the entire electrical part of the system and the control unit. The control panel is left on the wall surface.
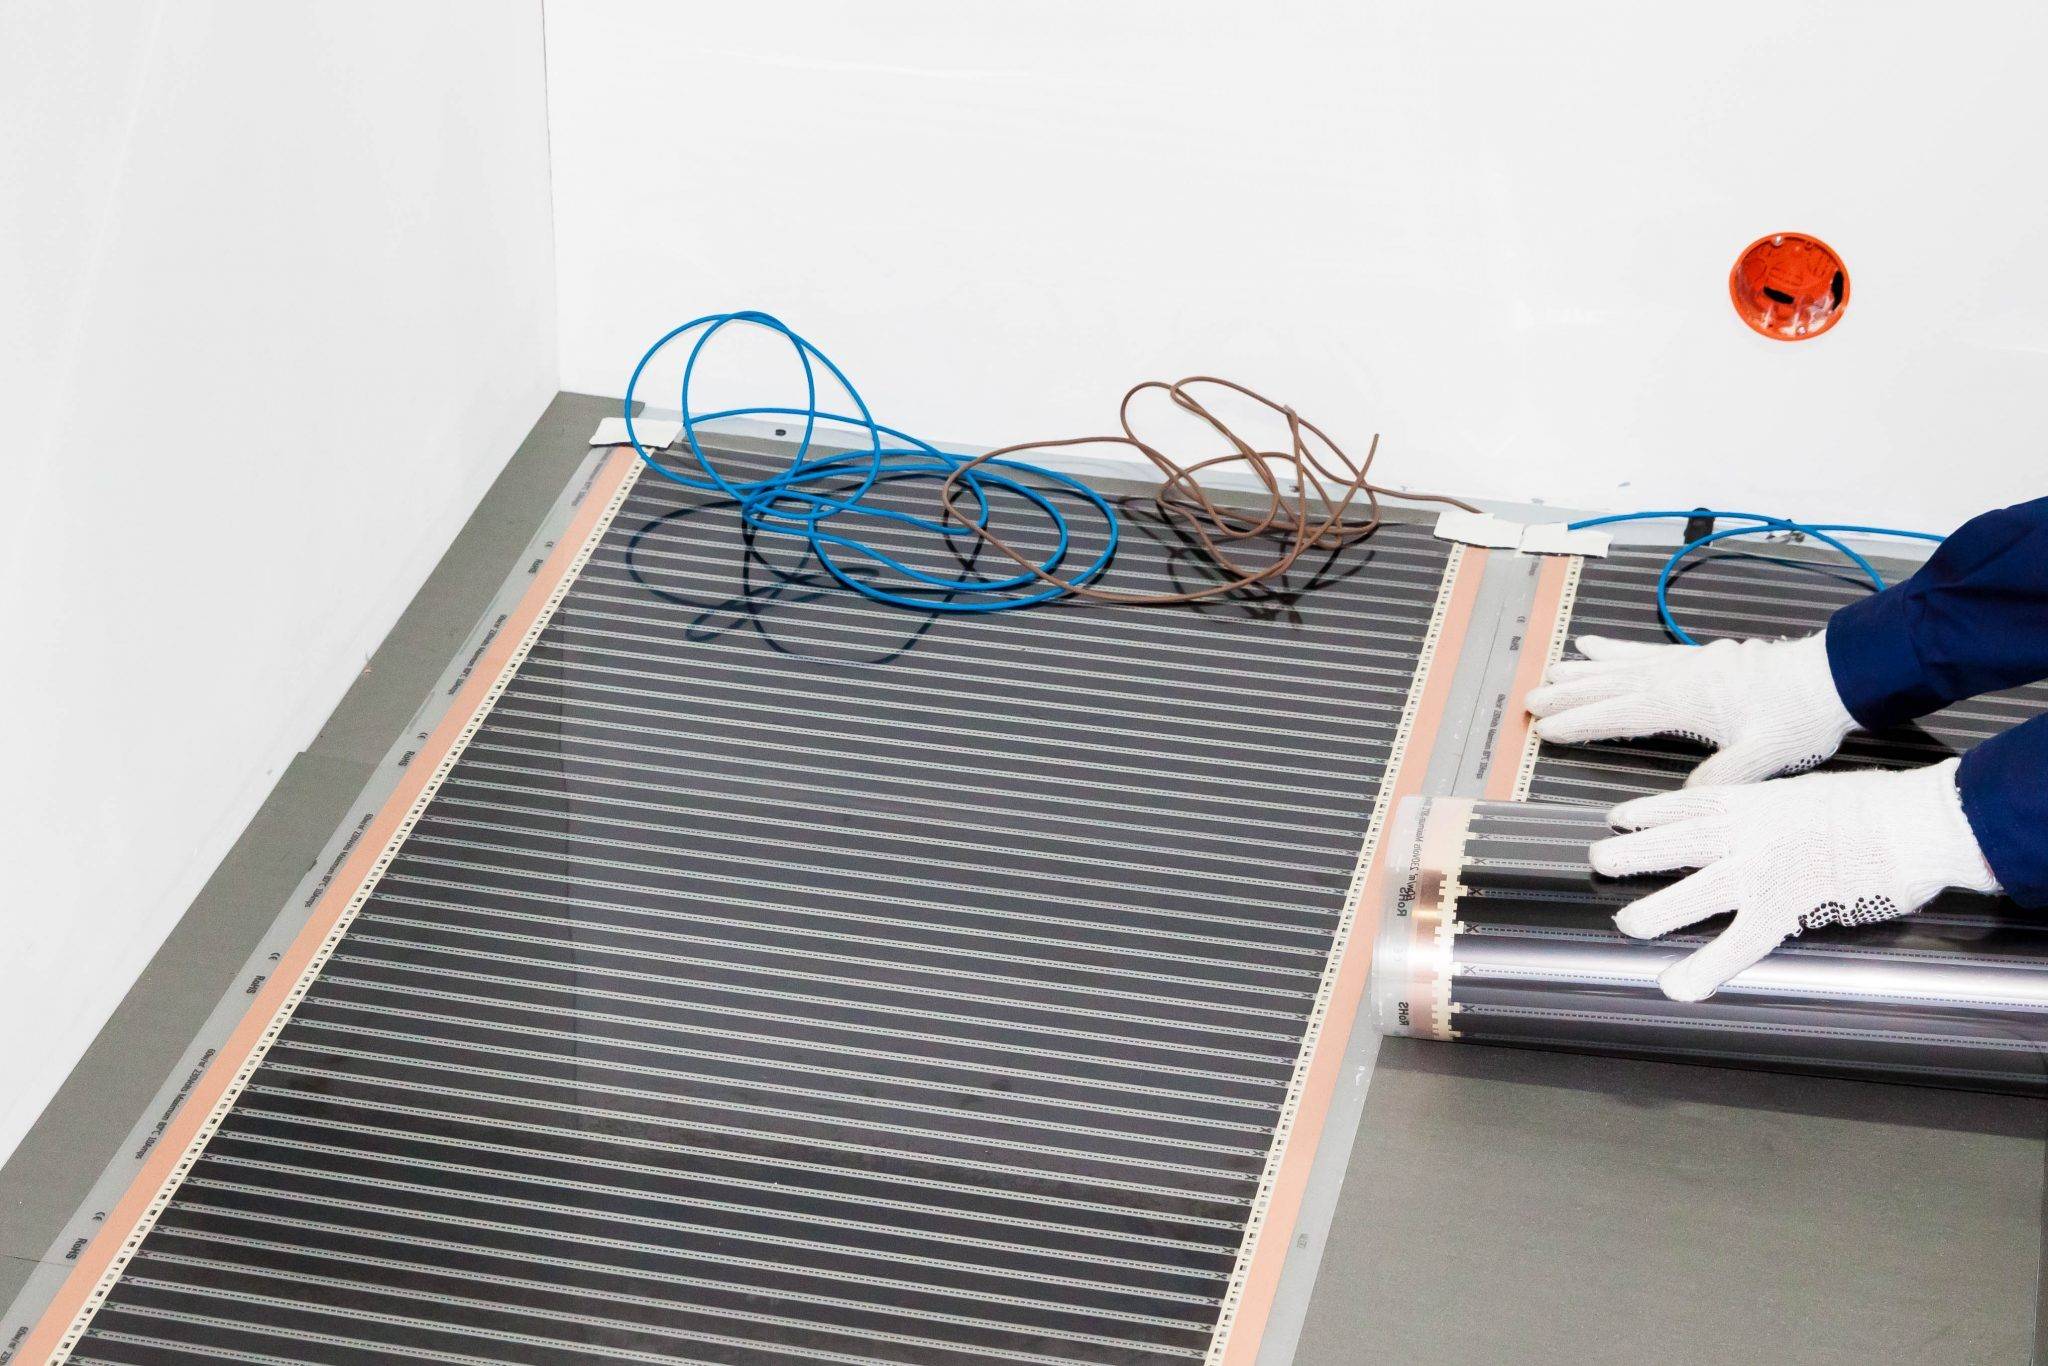
Thermal film tapes are laid according to the marking. They are connected with adhesive tape.
Contacts are connected to each sheet. The terminals are installed in the area of the copper and silver bus. Strengthen the terminals with pliers.
Install wiring; connect terminals. The connection scheme is parallel.
The joints are isolated with bituminous tape. Insulation covers the places of cuts in the area of \u200b\u200bmetal tires. So that the joints do not stand out on the surface and do not experience a large load from the floor cladding, a recess is made for them in the substrate or in the reflective screen.
A temperature sensor is installed on one of the tapes. A distance of 60 cm is maintained from the wall to the sensor, and 10 cm from the edge of the film. A niche is cut out under the sensor in the substrate.
All wires are led into a corrugated tube, which is connected to a thermostat. For the pipe, a groove is made in the floor and in the wall, which is then sealed with mortar.
The system is being tested. With a positive result, the carbon floor is covered with a substrate and a laminate is laid.
To lay the tiles, use tile adhesive.
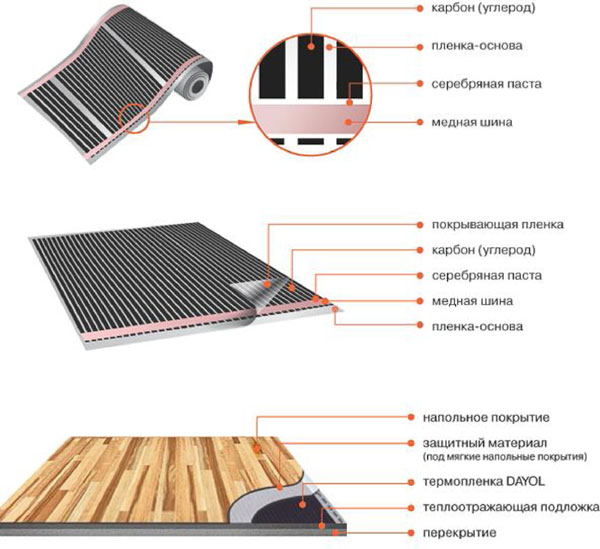
The larger the width of the roll, the smaller the allowable length of the tape will be: width 80 cm - length 10 m; width 100 cm - length 7 m. It is recommended to pre-mark the film and divide it into separate tapes.
There is space for a thermostat on the wall. Make a hole into which a plastic cup is inserted. It will contain the entire electrical part of the system and the control unit. The control panel is left on the wall surface.
Thermal film tapes are laid according to the marking. They are connected with adhesive tape.
Contacts are connected to each sheet. The terminals are installed in the area of the copper and silver bus. Strengthen the terminals with pliers.
Install wiring; connect terminals. The connection scheme is parallel.
The joints are isolated with bituminous tape. Insulation covers the places of cuts in the area of \u200b\u200bmetal tires. So that the joints do not stand out on the surface and do not experience a large load from the floor cladding, a recess is made for them in the substrate or in the reflective screen.
A temperature sensor is installed on one of the tapes. A distance of 60 cm is maintained from the wall to the sensor, and 10 cm from the edge of the film. A niche is cut out under the sensor in the substrate.
All wires are led into a corrugated tube, which is connected to a thermostat. For the pipe, a groove is made in the floor and in the wall, which is then sealed with mortar.
The system is being tested. With a positive result, the carbon floor is covered with a substrate and a laminate is laid.
To lay the tiles, use tile adhesive.
When to Choose Infrared Underfloor Heating
Electric or infrared underfloor heating
Both cable and film options are electric underfloor heating.The presented options can be compared in terms of energy consumption, efficiency and equipment reliability. The advantage of infrared heaters in this case is less energy consumption, no energy loss for heating the screed. But it must also be taken into account that the screed also serves to protect electrical equipment from possible mechanical damage.
For example, linoleum without a screed can be pierced with a sharp object along with a film underfloor heating. If we compare the systems in terms of their level of reliability, the disadvantage of infrared underfloor heating can be called the fact that it structurally consists of separate tapes that are electrically interconnected. It is at the junctions of the elements that problems most often occur (especially in the case of frequent wet equipment).
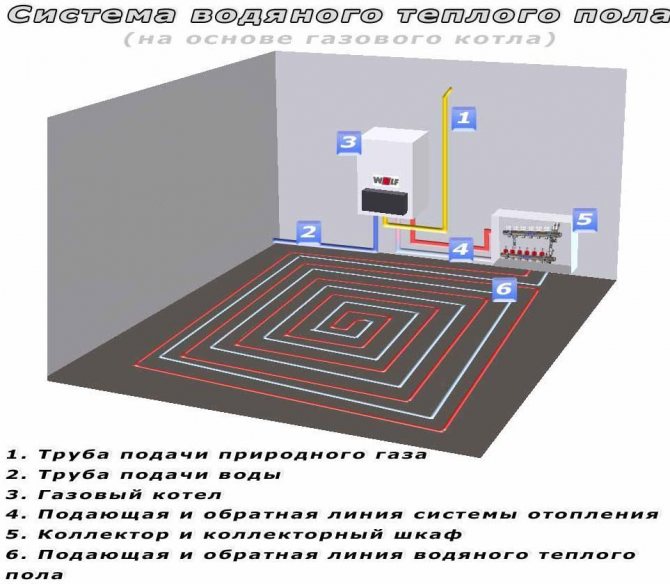
Water or infrared warm floor
When comparing infrared and water heated floor First of all, it is worth noting the fact that the first option is more suitable for use as an auxiliary heating system. At the same time, water heaters can be successfully used as independent equipment that fully provides heat to the house.
On the other hand, one of the key advantages of electric infrared floors is the ability to mount them on vertical and inclined surfaces, which is not possible for water systems. In addition, the use of both types of underfloor heating (infrared and water) is only possible in private homes. In an apartment, connecting additional heating devices to a centralized system requires special permission and leads to a significant increase in hydraulic resistance in the system.
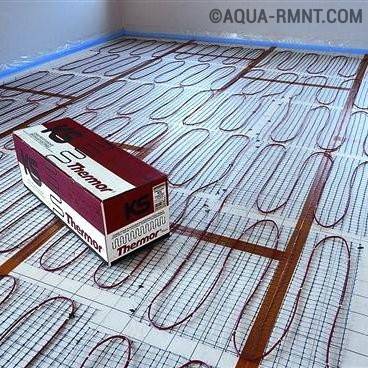
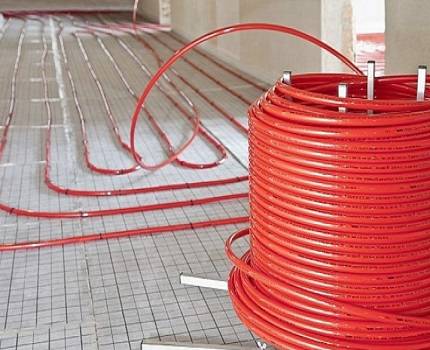
Rules for calculating pipe footage
You can calculate the footage of elements for assembling underfloor heating after drawing up a diagram of the entire system.
When calculating, the following nuances are taken into account:
- Pipes are not laid in places where furniture, large outdoor equipment, household appliances are located.
- The length of contours with different section sizes must correspond to the following parameters: at 16 mm it should not exceed 70 m, 20 mm - no more than 120 m. The location of each circuit corresponds to an area of 15 m2. If you do not follow these recommendations in the heating network, the pressure will be low.
- The discrepancy between the length of the lines is not more than 15 m. For a large room, several branches of heating are made.
- Provided that effective heat-insulating materials are used, the optimal pipe spacing is 15 cm. If the house is located in an area with harsh climatic conditions, where the temperature drops below -15 ° C, the distance should be reduced to 10 cm.
- If the laying option was chosen in increments of 15 cm, the cost of materials is 6.7 m per 1 m2. Laying pipes with an interval of 10 cm - 10 m per 1 m2.
The heat-insulated floor can be completed only with an integral pipe. Depending on the footage, several or one bay with pipes for the water circuit is purchased. Then it is divided into the required number of lines.


At the time of laying pipes, it is necessary to take into account hydraulic losses, which increase with each subsequent turn. It is considered that contours exceeding 70 m should not be used.
Work on the arrangement of underfloor heating always begins on the coldest side of the room.The question of choosing the optimal route of the heat carrier is very important - the water temperature decreases closer to the end of the circuit.
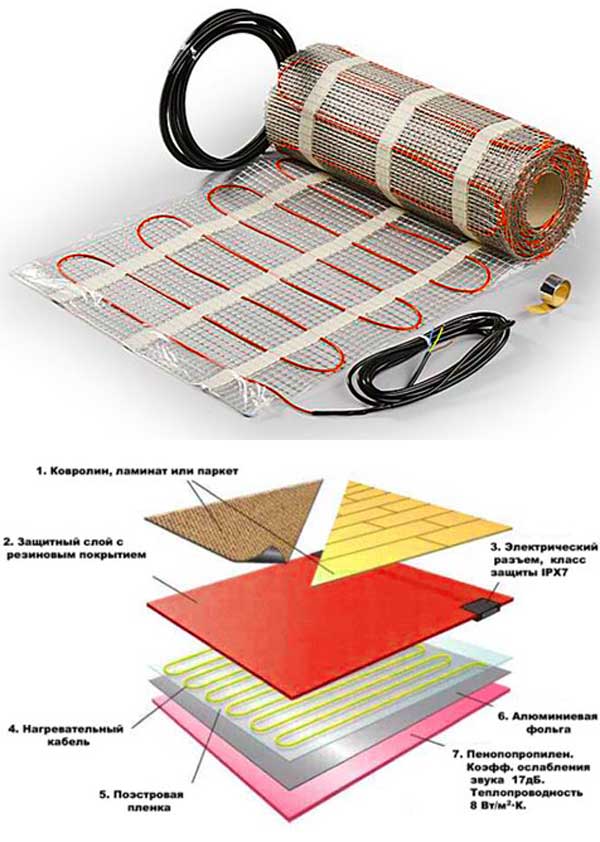
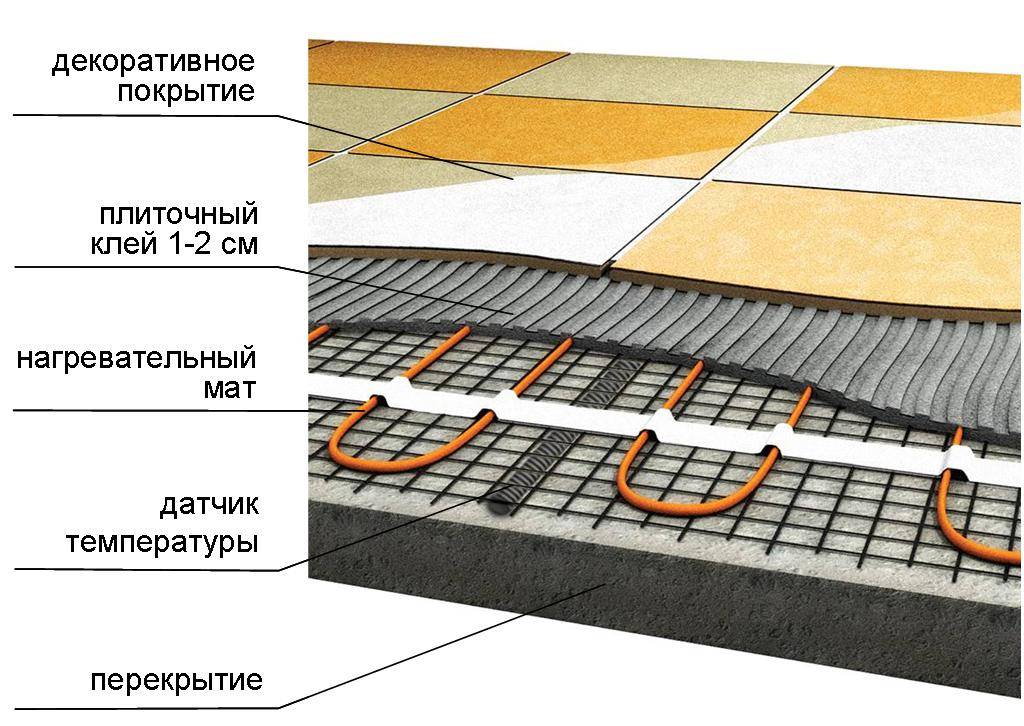
What is a warm floor "carbon mat"?
Carbon underfloor heating should be considered as an additional source of heat, and as an independent heating system. Panel heating of this type is carried out in different modifications, which allows consumers to choose the most optimal type. The system is highly adaptable and economical.
An innovative version of home heating is powered by an infrared energy source. Most often, graphite-silver rods connected in parallel to each other are used for this. For this, wires are used in production. increased protection against overheating.
The insulating material is a substance based on polyester and polyethylene. The main component of the product is the heating element, which consists of carbon fiber and polymers. The cable used for these purposes is made of copper. Its cross section is 2.5 mm. It is insulated with a sheath up to 3 mm thick.
Everyone who has used carbon fiber underfloor heating argues that the modern market cannot offer a more profitable option for panel heating. In a house where this type of heating is installed, natural air humidity is always maintained. This is helped by an intelligent heating system with modern thermostats and temperature sensors.
All currently existing variations of carbon-based panel heating are supplemented by a detailed description of the installation and instructions for use. The buyer only needs to choose the most optimal option, show a bit of effort in order to surround himself with warmth and comfort for a long time.
Rod underfloor heating Unimat
Rod underfloor heating Unimat is a Korean manufacturer of electric panel heating. Under the brand, 2 types of heating are produced:
- Rod warm floor RHE Unimat. This is a simple design with a width of 830 mm. Product power - 120 watts. It is recommended to carry out installation in adhesive liquid under a tile or in a thin coupler. In this case, the thickness of the floor covering should not be less than 2 cm.
- Rod warm floor Unimat Boost. This type is characterized by a shorter step between the heating components. The distance between the rods is 9 cm. The rated heating power is 160 watts. Suitable for heating rooms with large heat losses. It is used in unheated cellars, balconies and outbuildings such as a loggia.
Such floors are produced in batches. Each set includes: mats, connecting elements, wires, a corrugation for connecting a temperature sensor, a set of "End". Comes with a warranty card, printed instructions and videos. This is quite enough to carry out independent laying of heating.
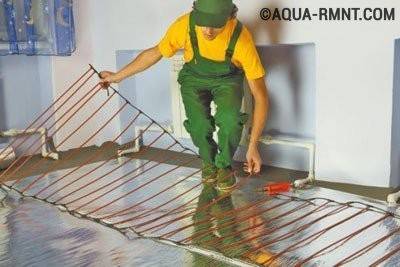
Rod
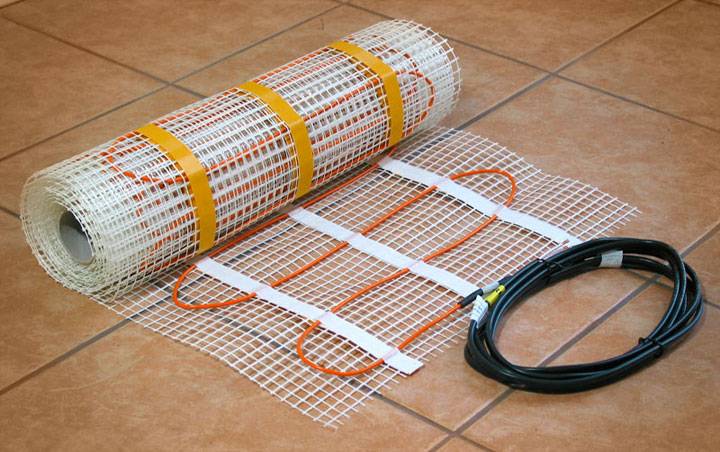
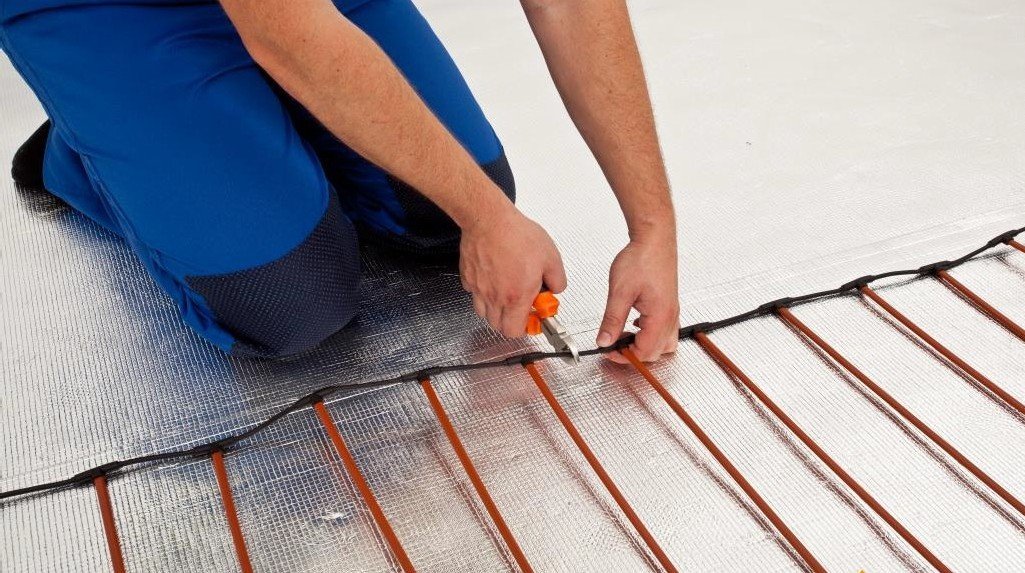
The rod carbon warm floor is made in the form of a structure based on conductive rods made of a composite material. The composition of the material includes an amorphous form of carbon, graphite and silver are also contained. The photo shows a separate rod:
The rods of the infrared floor are connected in parallel. The connection is made with a copper stranded wire in a heat-resistant sheath. The assembled structure looks like a wire mat, which is spread on a prepared base under the floor covering.
Element connection scheme:
Type of assembled mat:
Carbon fiber underfloor heating in the rod version has a number of features that determine its advantages over other systems:
- the lightness of the heating elements, due to which the heating does not load the floors of the building;
- high corrosion resistance, ensuring the efficiency of heating throughout the entire period of operation of the building;
- increased level of fire safety due to the use of non-combustible materials;
- the possibility of using in rooms with high humidity;
- the ability to install under almost any type of flooring;
- high reliability - if one or more rods fail (which is unlikely in itself), the system does not lose performance;
- unique effect of load self-regulation, determined by the property of the conductive material used.
Self-regulation lies in the fact that the applied carbon composite increases electrical resistance with increasing temperature, unlike metal conductors. This property prevents overheating of the heating elements even under conditions of poor heat dissipation (for example, when the area of the heated floor is covered by standing furniture).


The only property of the rod system, which can conditionally be attributed to disadvantages, is that this structure must be placed in a thin screed or adhesive layer under the tile.
Technical characteristics of rod heating elements:
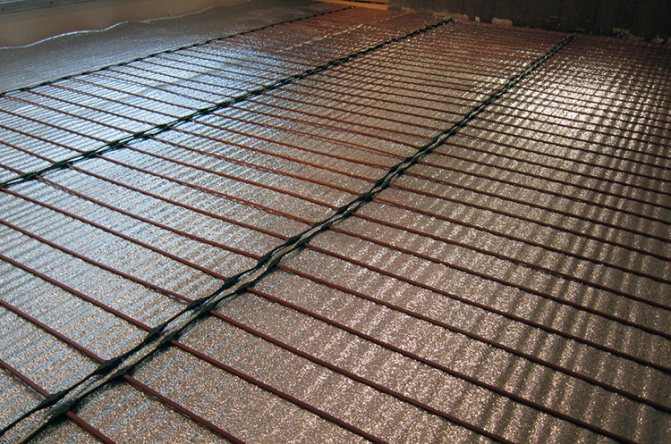
Mounting the rod infrared underfloor heating start with laying heat-insulating substrate on a previously prepared surface.As a substrate, a two-layer material is used, consisting of a layer of foamed insulation and a heat-reflecting lavsan film. This procedure will allow more rational use of electricity when heating the room. At the next stage, the mats are laid out, as shown in the photo below:
The system must include connection instructions, according to which all electrical connections must be made. After performing these operations, it is the turn to fill the rods with a layer of screed or tile adhesive. It is desirable to limit the thickness of the screed to two to three centimeters. Electricity is supplied after the screed or adhesive layer has completely dried.
Laying scheme for tiles and laminate:
Do-it-yourself instructions for installing an infrared rod floor are provided on the video:
Laying carbon rods
In addition to the mentioned tiles, the installation of a heated floor can be carried out under a laminate, under a linoleum, and also under a board.
Wiring diagram for infrared floor heating
Two wires should come out of each section of the infrared film and be connected to the contacts of the thermostat. There are two ways to connect wires to an infrared warm floor. In both options, a parallel connection scheme is used sections to each other.
The first way from each piece of film, the supply wires (phase and zero) are brought out to the socket or junction box, where the wires are connected in parallel to each other. After that, their conclusions are connected to the thermostat.
The disadvantage of this connection is a large number of connected wires. In addition, to connect the wires, you need to bring them into some kind of box. And where can I get it if the repair is already completed?
The second way is simpler. Connect by looping. For example, a phase wire approaches the bus of one piece of film, connects in a terminal, and then goes to the terminal of another piece of film. And so on. Moreover, the connection should be made with a solid wire (you do not need to cut it near the terminals).


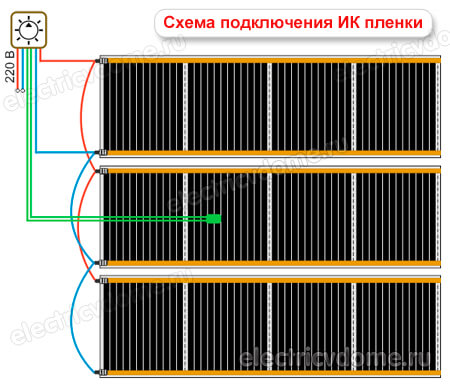
The neutral wire is connected in the same way. As a result, we get a parallel connection without desoldering.
Benefits of rod carbon underfloor heating
This device for heating floor coverings has a lot of advantages:
- Low indicator of electromagnetic radiation. Although the carbon element is capable of operating at higher powers than a conventional cable heating element, it generates less electromagnetic radiation.
- Self-regulation of work intensity. This type of mats can be classified as self-regulating. That is, when a certain temperature of the floor covering is reached, the degree of radiation decreases. This reduces the consumption of electricity. This function is especially important in places with impaired heat exchange. Floors under furniture often overheat when conventional heating cables are used.
- Safety. As already noted, self-regulation of the heating intensity will not harm the floor covering by excessive heating, and the very principle of operation provides that the elements cannot heat up and fail.
- Economy heating mode. Not much electricity is used, and with the help of programmable controllers, you can optimize the operation of the system.

Reducing the energy consumption of the film As you can see, this system has many advantages that are associated with installation and economical operation.
Features of installing a carbon fiber underfloor heating
Laying the device will not take much time. In this case, the user does not need any special skills. The installation can be divided into several stages:
- Preparation of materials and premises.
- preliminary calculations. It is necessary to calculate the heat loss, the required area for heating, make a sketch of the surface where the warm floor will function.
- Laying thermal insulation.
- Installation of mats or foil (depending on the choice of heat source).
- Preparing a place for a temperature sensor.
- Installation of a thermostat, connection to the system and temperature sensor.
- Heating element connection tests.
- Connecting the thermostat to the power supply.
- Checking the correct operation of panel heating.
- Applying a finishing coat.
How to choose a carbon heater
On the mass market, solid carbon heating films are offered by Heat Plus (Korea), HitLife, OKondol, Exel. There are also local products. They differ in the degree of strength, permissible operating conditions, energy consumption, and released thermal power.
Solid carbon film heaters are positioned as the most successful technological solution on the market. They are easy to use if you need heating of an apartment or a private house. Individual products will find their application in greenhouses and greenhouses.
At the same time, in the mass market, it is possible to select a product for specific conditions of use that meets the criteria for an optimal price-performance ratio. For example, it is easy to purchase a solid carbon heater for laying under a thin screed, laminate, linoleum or carpet.
Do-it-yourself electric underfloor heating from a cable under a tile
Preparing the foundation
-
If it is not planned to install additional heat sources in the room, except for a warm floor, then the base surface must be well insulated. This is especially true if your room is located directly above unheated rooms.
Thermal insulation material
- Prepare the surface, fill large pits with mortar, cover the floor with a primer to improve adhesion and prevent mold.
- Place sheets of expanded polystyrene on the prepared surface. It is desirable that they have a metallized layer that reflects heat rays.
- In ordinary rooms, 30 mm slabs are enough for insulation, but if you are insulating a balcony or loggia, use 50 mm slabs, but if there is ordinary soil under your room, the thickness of the plates should be at least 100 millimeters.
- Attach the boards to the floor with self-tapping screws.
- On top of the heat-insulating plates, place a reinforcing fastening mesh, attach it with long long self-tapping screws with wide washers, so as to create additional fasteners for polystyrene foam boards.
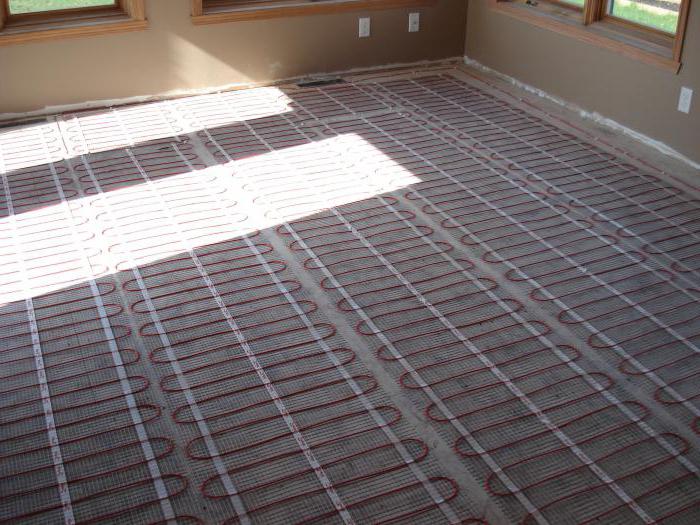
We measure the heating cable
heating cable for underfloor heating
- A drawing of a room for calculating the required length of an electrical cable can be made to scale on graph paper. Mark large non-movable furniture on the drawing.
- Based on the required heating power specified in the characteristics of the heating cable and at least 5 centimeters away from the perimeter, draw a layout of the heating cable. When calculating the length of the cable, consider whether your underfloor heating will be the only or additional source of heating.
- When calculating the required length, take into account the characteristics of the cable. It happens with one core, which is connected to the network from both ends or with two cores - in this case, it is connected to the wiring at only one end.
Preparing control equipment for electric underfloor heating
Thermostat control panel - photo
1. Adjustment of the heat flow given out by the electric heated floor is regulated by a thermostat. They come in various modifications (electronic and mechanical) and designs (overhead and built-in).


2. The location for the thermostat is selected close to the main wiring. In the event that the thermostat has an external temperature sensor, check the length of its cable and choose a place for the control device.
3. The built-in temperature controller is installed in the gate, and the cables of the electrical wiring and the temperature sensor are also laid in the gate.
4. To protect the temperature sensor from external influences, the screed is placed in a corrugated tube, the end of which is tightly packed with insulating tape. The remote part of the sensor should be located about 40 cm from the wall.
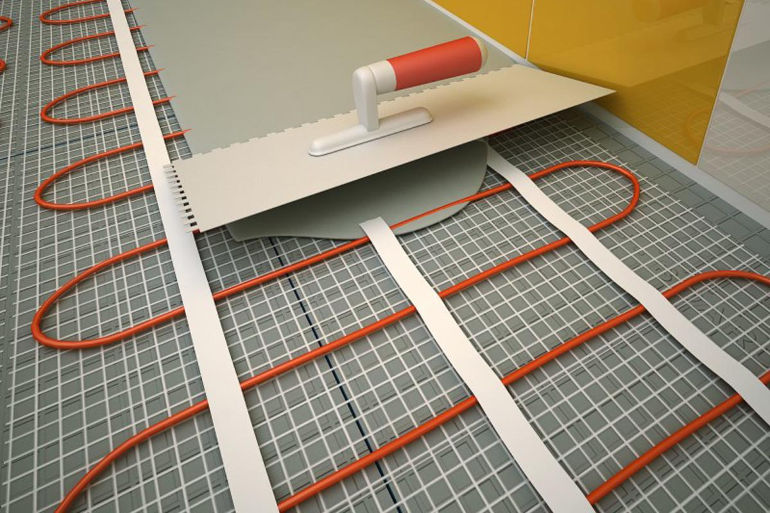
We lay the heating cable of a warm electric floor
Laying the heating cable on the floor - photo
- The heating cable is fixed on the mounting grid according to the selected laying pattern. We fix the heating cable with plastic clamps.
- Connect the thermostat to the heating element. Test its operation first at maximum power, bringing it to maximum.
- Leave the heated floor in working condition for a while.
- Turn off the power to the heated electric floor.
Laying tiles on a warm electric floor
Laying the heating cable on the electric floor
- Place the second mounting grid on the heating cable. This will make it easier for you to lay the tiles.
- Lay tiles or porcelain tiles on the floor using ordinary tile adhesive.
In order to get acquainted in detail with the procedure for laying electric warm floor under tiles DIY, you can watch the instructional video.
Why is this underfloor heating better than others?
Carbon floors can be used for space heating and outdoor sites. Their advantages:
Self-regulation
These are "smart" systems that control the temperature and, accordingly, the consumption of electricity without installing complex expensive equipment. The higher the temperature, the more the distance between the particles of the heating elements increases, and the heating is automatically reduced by increasing the resistance. Thus, the power consumption is reduced. When the temperature drops, the reverse process occurs.
In areas of the floor with increased load, for example, in places where furniture is installed, the system will heat up significantly less. The rearrangement of furniture and heavy objects is not a problem, no additional measures to protect the heating are required.
Reliability and security
Since the infrared carbon floor cannot overheat due to the nature of thermoregulation, there is no risk of damage or deformation of the floor covering. The heating system is extremely reliable, does not fail.
Infrared radiation from a warm floor has no negative side effects, it is used in chambers for premature babies for gentle heating of babies and a healing effect. The scope of infrared systems is constantly expanding. They are used in spas, infrared saunas.
Economy
The power of the carbon floor is 116 watts per linear meter. When the layer of tile adhesive or screed in which the systems are installed warms up, the power consumption is reduced. Usually it is 87 watts per linear meter.


To ensure maximum control of electricity consumption, thermostats are installed. This allows you to save up to 30% on energy costs. Today, carbon floors are the most economical of all heating systems.
Carbon heating allows you to significantly save on energy costs. Systems are ultra-reliable and safe
How to make an infrared warm floor?
Underfloor heating can be installed independently. In this case, you must follow certain rules and follow the plan. In order for the system to serve for a long time, be of high quality and durable, you should choose modern materials and take into account the advice of specialists.
Humidity indoors, in which the underfloor heating film system is installed, must correspond to installation instructions and the use of board, parquet or laminate flooring.
The standard procedure for laying a structure includes several steps. Most of the steps correspond to different types of coatings:
- Opening the packaging with the material.
- Connection of all contacts and mounting of clamps.
- Fixing structural elements with pliers.
- Preparing a blank for contour isolation.
- Fixing previously prepared insulation with a special construction adhesive tape.
- Connecting and checking clamps.
- Preparing the sensor to determine the temperature in the room.
- Preparing a hole for a part.
- Placement in the sensor hole.
- Fixing the structure.
- Laying the system on the surface.
- Connecting the circuit to the electrical system of the house.


