- Tools and materials for arranging sewerage
- Basic layout and design issues
- Alternative. Dry closets
- Do-it-yourself sewerage arrangement in the bath: a step-by-step guide
- A step-by-step guide to building a sewer in a bath with your own hands
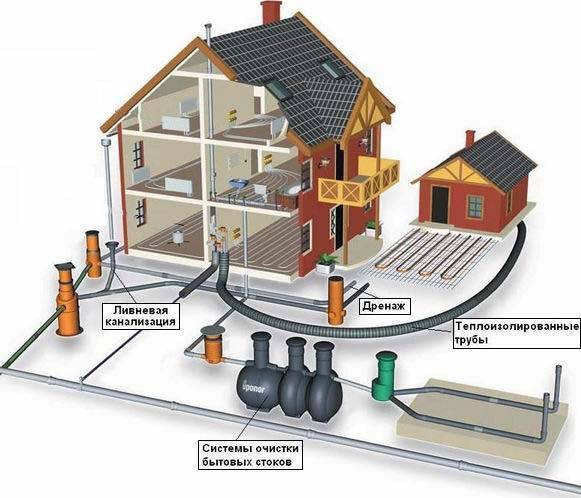
- Sewerage construction in a private house: ventilation scheme in the bath
- The device of intra-house communications and release
- The nuances of arranging country sewerage
- Do-it-yourself installation of external sewage in a private house
- Preliminary preparation
- Calculations and installation
- System design
- Tilt rules
- Internal piping
- Riser installation
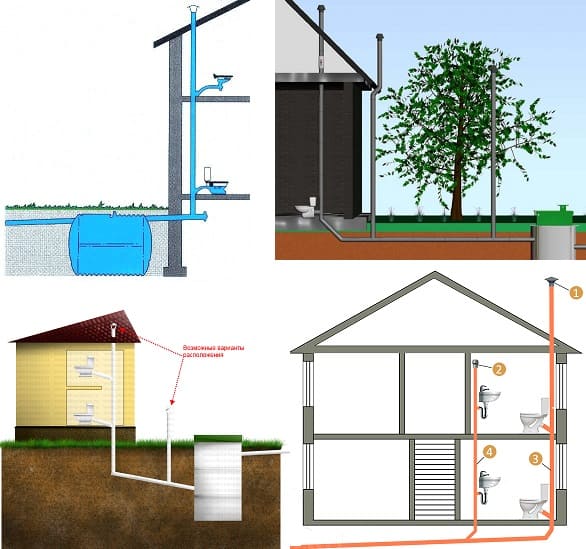
- Kinds
- Stage 1. Project
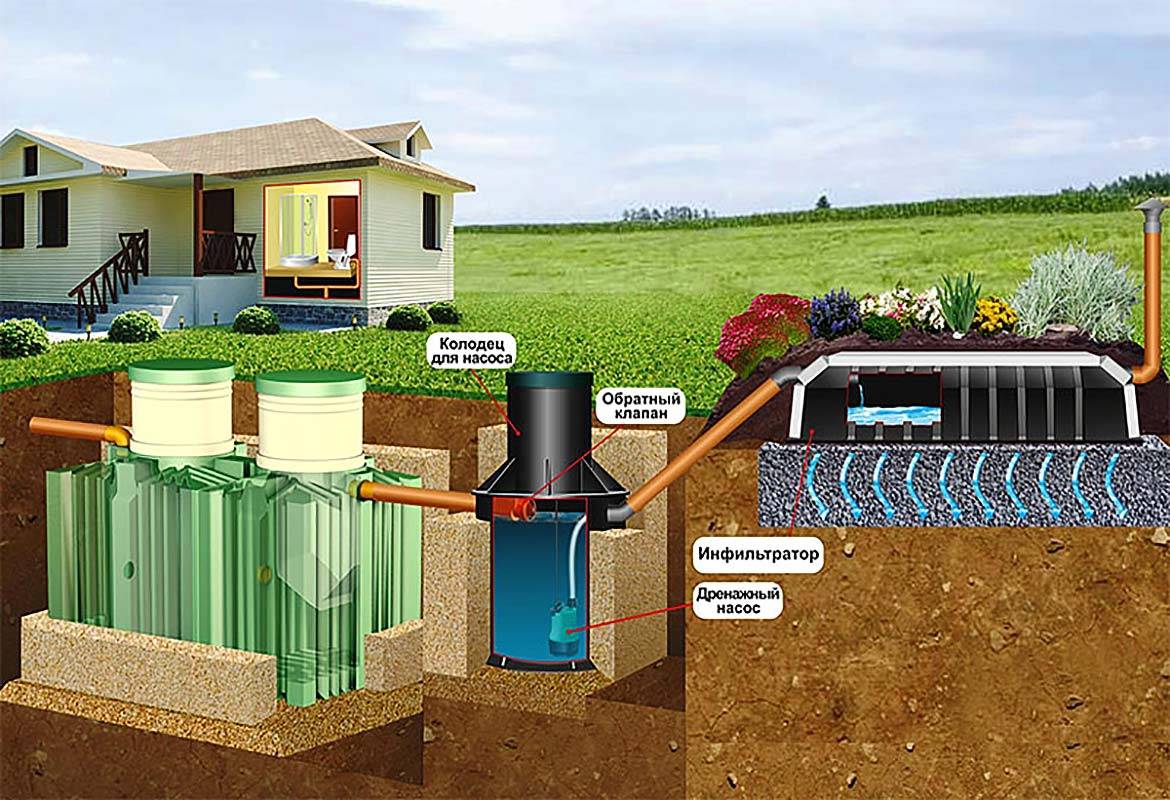
- How to bring the sewer to the septic tank
- How deep to dig the tuba
- Warming
- Basic provisions of sanitary norms and rules
- Conclusions and useful video on the topic
Tools and materials for arranging sewerage
For a sewerage device in a country house with your own hands, you will need tools and materials. They are selected taking into account the materials from which the containers are made.
For concrete rings, you will need tools for working with mortar and materials for preparing concrete. As well as a drill for mixing the solution with a mixer and working with a crown.
For steel containers, an electric welding machine, bitumen, or bituminous mastic and brushes for their application are useful.
For plastic containers, you will need a drill with a drill and a jigsaw to cut holes.
It is possible to seal the joints of pipes inserted into the containers with the help of tow with cement mortar, subsequently covering them with bitumen.
Basic layout and design issues
A "smart" septic tank will take care of the safety of the flora and fauna of the site. At the design stage, it is important to consider the following points:
Peak load on the sewer, or the so-called "volley discharge"
Usually, the morning and evening load on the network is taken into account. This indicator directly depends on the number of drains and plumbing fixtures in the house or on the floor.
How water is supplied to the house - a centralized source, a well or a well.
The principle of disposal of treated wastewater
They can be removed into the soil or water. In both cases, sanitary standards must be taken into account. If in the first option the most important indicator is the volume of water, then in the second - not only the mass, but also the quality of its purification.
Septic material. This can be either a self-created structure made of brick, cement or metal, or purchased options for treatment tanks made of polypropylene or polyethylene. A lot depends on the choice of material: the service life of treatment plants, the simplicity and convenience of their maintenance, the installation option of the system and, ultimately, the final amount that will have to be spent.
Additional equipment: the possibility of electronic control, pumping system and all kinds of sensors.
The topology of the site: the terrain, the direction of the slope, the proximity of water bodies and the presence of potential places for the discharge of treated sewer water.
The quality and composition of the soil: its type and depth of freezing, the proximity of groundwater.
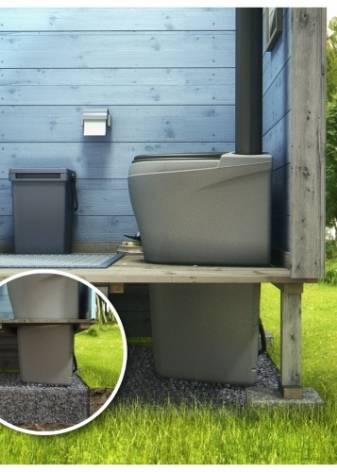
Alternative. Dry closets
Dry closets
In the absence of a central water supply in the country, you can put a dry closet (preferably peat). Such devices are compact and consist of two containers:
- the upper one, intended for storing dry peat, also has a seat installed on it;
- the lower one, where excrement is composted.
The dry closet needs regular cleaning, but the peat waste removed from the lower tank can be used as fertilizer in the future.
peat toilet
Despite the plastic case, the dry closet is strong enough and able to withstand weight up to 250 kg. It is worth noting that there are also electric models of such toilets - they are no less effective than peat ones, but they also cost accordingly. In addition, they need to be connected to an uninterruptible power supply.
Do-it-yourself sewerage arrangement in the bath: a step-by-step guide
As in the case of a residential building, the sewerage of a bath includes an internal and external system. Even if the building has a dry steam room, it will be necessary to drain the liquid from the shower. The water collection system depends on how the floors are installed. The sewerage scheme is entered into the bath project at the development stage and is laid at the initial stage of construction even before the floors are equipped.
If it is planned to install wooden floors from boards, then the elements can be laid closely or with small gaps. If the coating is installed tightly, the floors are formed with a slope from one wall to another. Next, you should find the lowest point near the wall and leave a gap in this place, where the gutter will be subsequently installed (also with a slope).At the lowest point of its placement, a connection is made to the sewer outlet pipe.
If the wooden flooring will be made with slots, small gaps (5 mm) should be left between the boards. A concrete base is made under the floor with a slope towards the central part of the room. A gutter and a sewer pipe will be installed in this area. Instead of a concrete base, metal pallets can be laid on top of the insulated floor under a wooden deck. If the floors are self-leveling or tiled, a water intake ladder is installed at the lower point of the slope, which drains the drains into the pipe.
Using septic tanks for drains from the bath
A step-by-step guide to building a sewer in a bath with your own hands
For the installation of sewer pipes, it is necessary to form ditches with a slope of 2 cm per 1 m. Their depth is 50-60 cm. A pillow should be made at the bottom of these trenches. To do this, a layer of sand 15 cm thick is poured and carefully compacted. In this case, do not forget about the slope.
Next, the installation of the sewer line is carried out. Polypropylene pipes with a diameter of 100 mm are laid in trenches. If necessary, a sewer riser is equipped. It must be fixed to the wall with clamps. Be sure to organize ventilation. When the system is ready, the flooring is installed using one of the previously discussed methods.
Upon completion of all work, the ladders and gratings provided for by the project are connected to the system at the designated locations. In the area where the water intake is connected to the outlet pipe, it is desirable to install a siphon. It will prevent the penetration of odors from the sewer back into the room. Most often, ladders are equipped with built-in water seals.
Sewer pipes in the bath
On sale you can find gutters made of asbestos cement, plastic or cast iron. It is not recommended to use products made of wood and steel, because. they quickly break down under the influence of moisture. The minimum allowable diameter of the gutter is 5 cm. If the project provides for the presence of a toilet bowl or other sanitary equipment, it is installed and connected. This completes the work on the organization of internal sewage. The external system is carried out in the manner described earlier, and may be a septic tank or a drainage well.


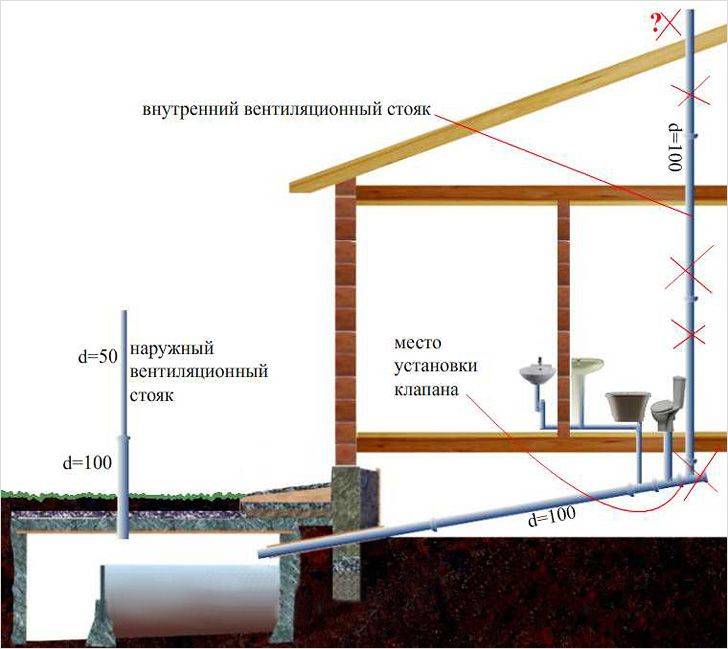
Sewerage construction in a private house: ventilation scheme in the bath
Air exchange in the bath can be organized in various ways. Each of them has its own characteristics and advantages. Having studied the specifics of each method, you can choose the best option for a bath.
The first method involves creating an opening designed to supply fresh air. It should be placed behind the stove-heater at a height of 0.5 m from the floor level. The exhaust air will be discharged through the opening on the opposite side. It must be placed at a height of 0.3 m from the floor. To increase the movement of air flow at the outlet, you need to install an exhaust fan. All openings are closed with gratings.
Sewerage scheme for a toilet in a bath with a septic tank and ventilation
The second method involves placing both holes in the same plane. In this case, the work will affect the wall opposite to the one where the furnace is located. The inlet duct is placed at a height of 0.3 m from the floor level, at a similar distance from the ceiling, an exhaust hole must be made and a fan installed in it. Channels are closed with gratings.
The third method is suitable for flooring where the boards are laid with gaps to drain liquid. The inlet is made at a height of 0.3 m from the floor on the wall behind the stove. In this case, installation of an outlet duct is not required, since the exhaust air will exit through the gaps between the boards.
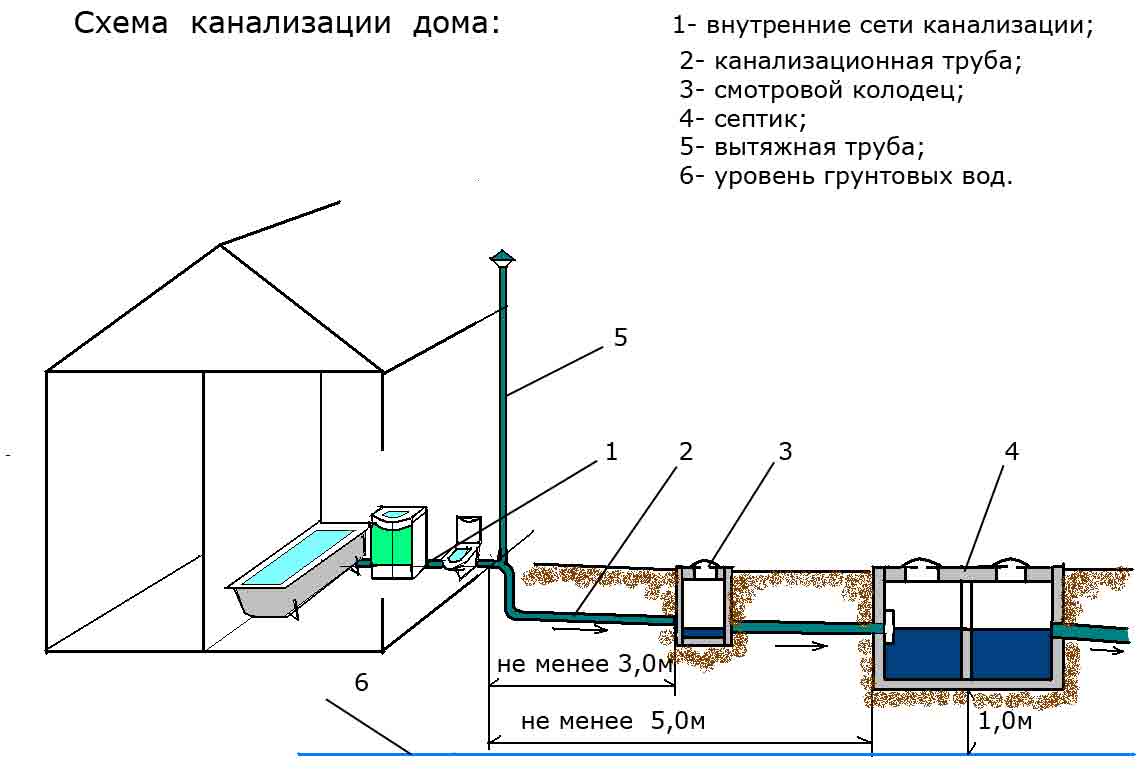
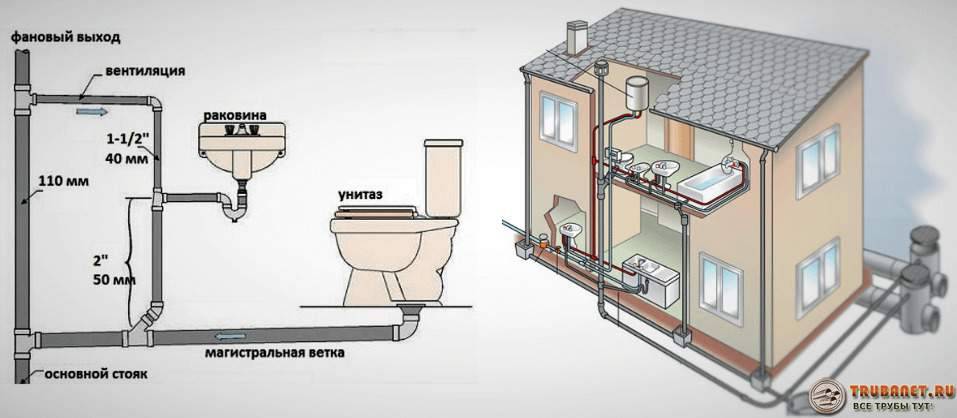
The device of intra-house communications and release
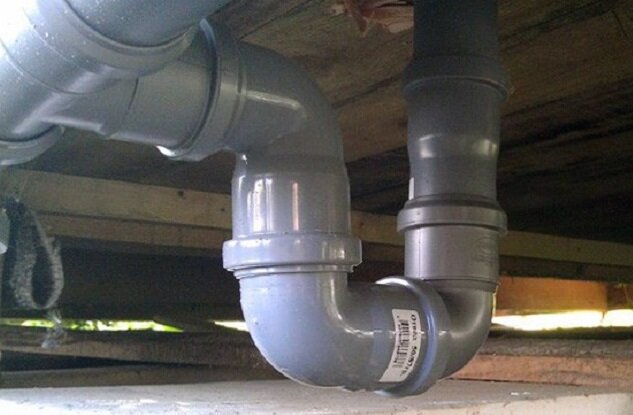
The riser is assembled from pipes made of the same material - cast iron, plastic or steel. Cast iron does not combine well with plastic and metal - it can crush them. Steel can damage the PVC surface. Details are connected through sockets. Walls of different thicknesses are difficult to connect.
Joints must not leak. They must be carefully sealed. The standard reinforcement diameter is 11 cm. Clamps mounted on self-tapping screws are used for fastening to walls. Channels to which plumbing is connected lead to the riser. They are installed with a slope. With a diameter of 11 cm, the slope should be 20 cm per 1 rm (linear meter), with a diameter of 5 cm - 30 cm per 1 rm. To enter the riser, oblique crosses and L-shaped elements are placed. The entrance should not be done at a right angle - this will worsen the drain.
Instagram @santehnika__vlg
Instagram @salder_san
Wiring must not be wall-mounted. It should be permanently accessible in the event of an accident. It is allowed to hide it in a technical cabinet or a removable decorative box. Stationary boxes and screens must have covers and doors that allow for inspection and repair. Communications are forbidden to be placed in residential premises.
The release is arranged in the basement. It is assembled from two 45 degree corner adapters.If you put the adapter at 90 degrees, the liquid will stagnate in the corner, turning into solid deposits. In addition, sharp turns make it difficult to flow.
Pipes are laid through a hole in the foundation. It is left during the construction of the building or cut through with a diamond crown. Do not use a puncher - it leaves torn edges, which then have to be strengthened with cement mortar. The diameter of the hole is made 20 cm larger than the diameter of the sleeve. The edges are covered with roofing material fused with bituminous mastic. A sleeve is inserted inside and a sleeve is inserted into it, coming from the riser. The remaining space is filled with mounting foam.
The nuances of arranging country sewerage
As you know, dacha communities and suburban villages are located far from large settlements, so the owners of garden houses cannot rely on centralized service. The way out is the organization of a separate local system for each suburban area separately.
In elite villages, powerful VOCs are often installed that can simultaneously serve several large cottages, but this is rather an exception to the general rule. More often, the owners of garden plots ranging from 6 to 15 acres manage with more modest budgetary devices - cesspools or simple septic tanks.

Scheme of the simplest sewer system in the country: simple internal wiring (sink + toilet), a straight pipe for domestic wastewater, a cesspool with an access road for special equipment
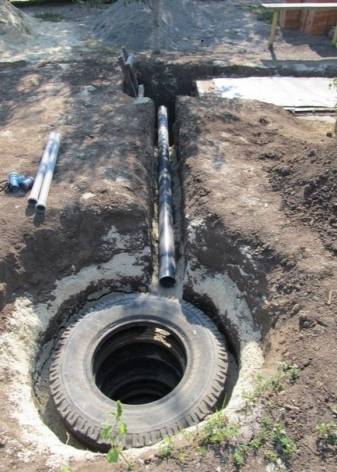
Both can be built from inexpensive building or alternative materials, such as:
- factory concrete blanks;
- red or white brick;
- cement mortar (to create a sealed monolithic container);
- tires.
There is another way, more expensive, but quite effective - installing a ready-made factory-made container made of modified plastic, equipped with a branch pipe for connecting to a pipe, ventilation and a technical hatch.
Digging a drain hole without creating a sealed tank is prohibited, as this is contrary to sanitary standards. Sewage, teeming with pathogenic bacteria and aggressive chemical substances, enters directly into the soil and groundwater, polluting them.
A variant of the device of a country street toilet. The cesspool partially extends beyond the "house", and the technical hatch for emptying the storage tank is located near the building - this makes it possible to do without a pipeline
It also makes no sense to install expensive biological treatment plants, since the volume of wastewater is likely to be minimal, and the treatment plant will more resemble the same storage tank.
So it turns out that the best option is a voluminous cesspool or a structure similar to a septic tank. There may be several cesspools on a large plot, for example, a peat pit for an outdoor toilet and two drives - near the bathhouse and at home.
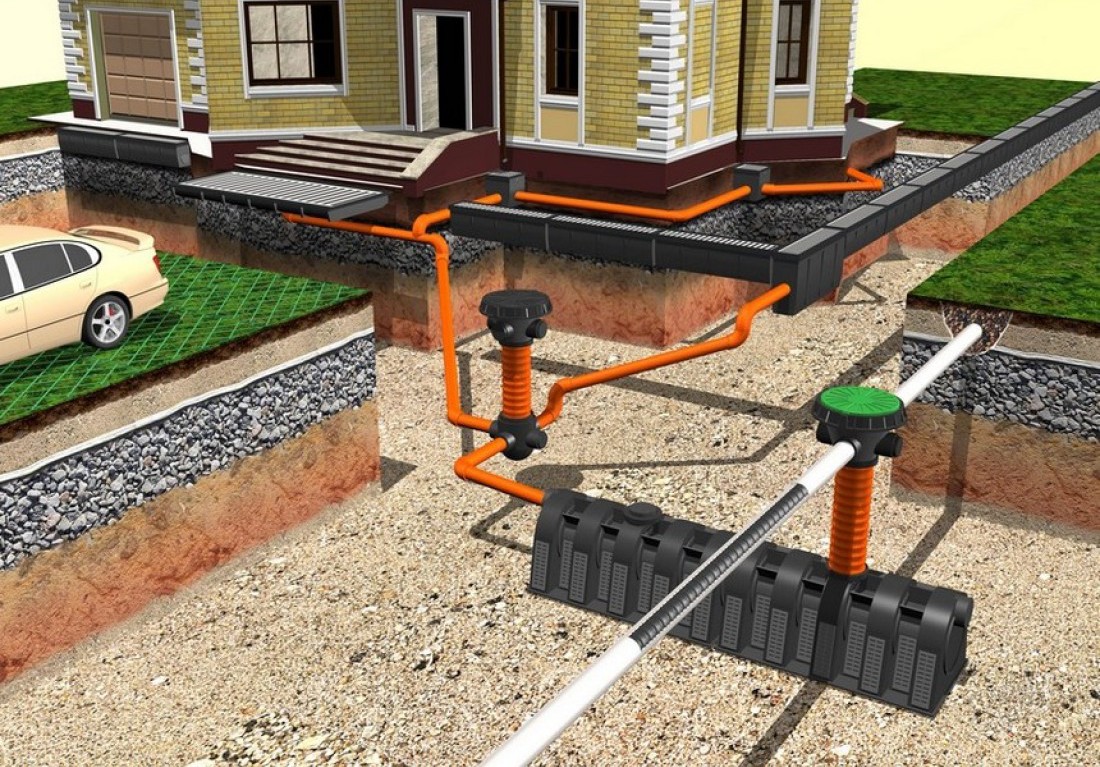
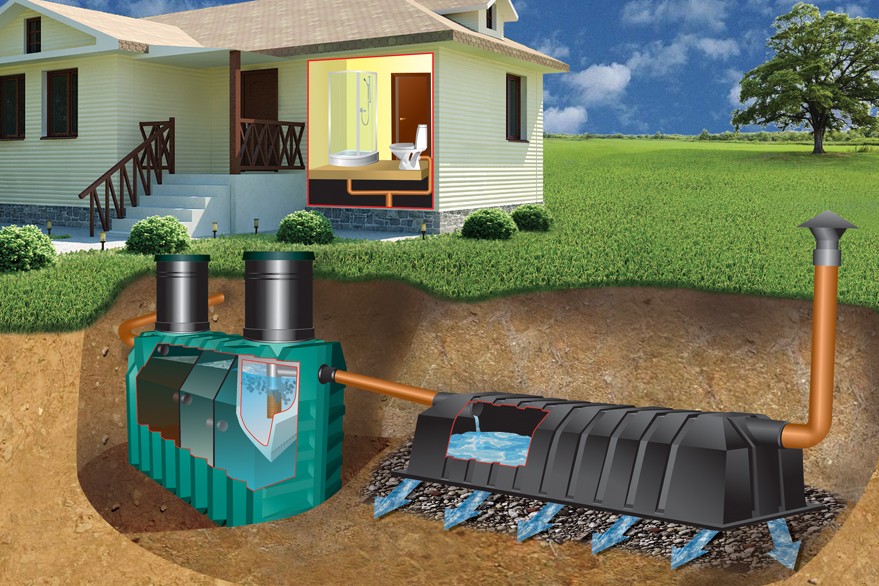
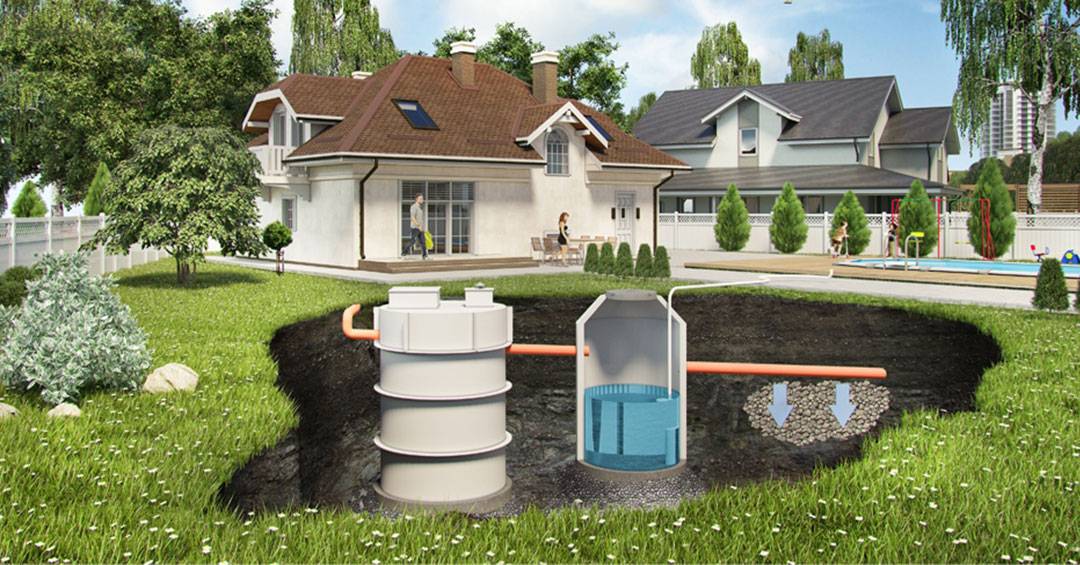
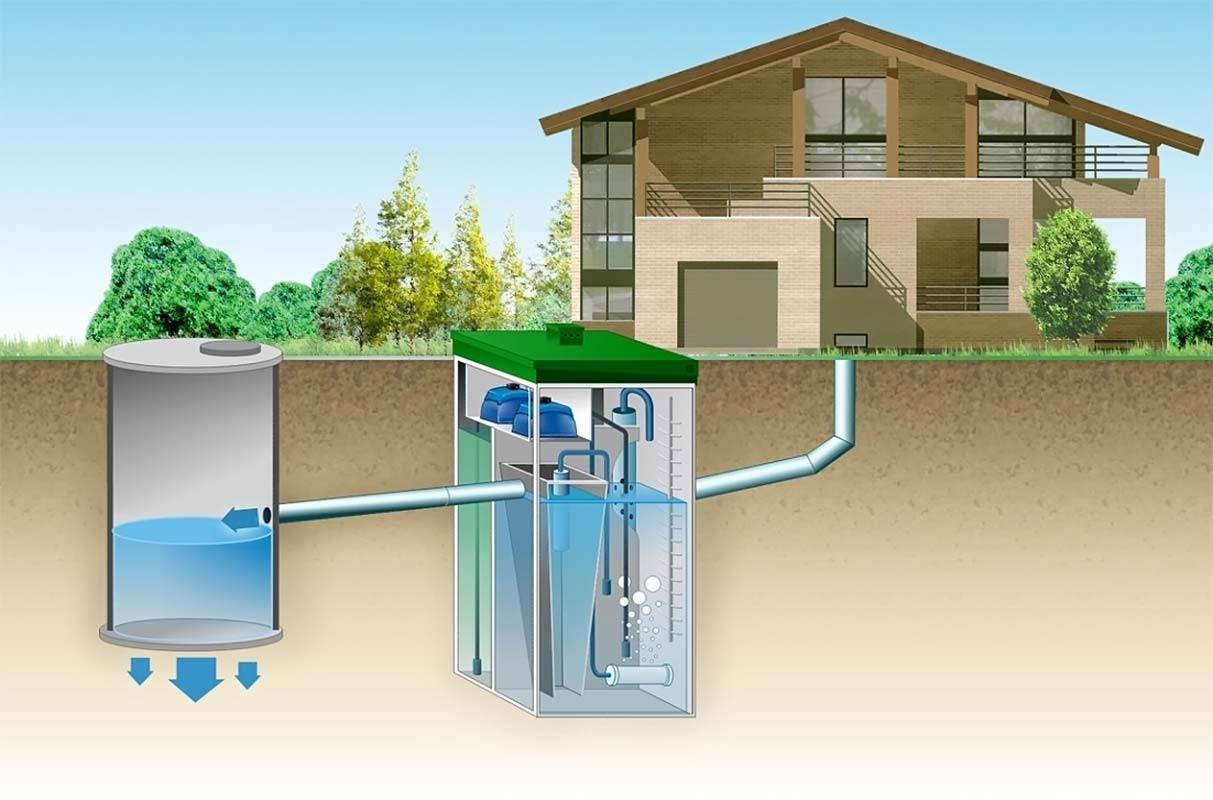
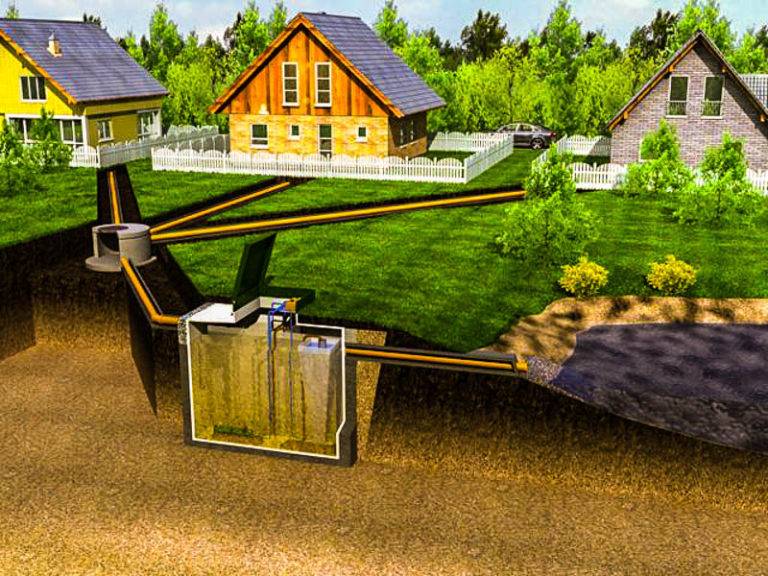
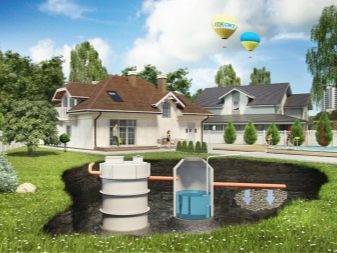
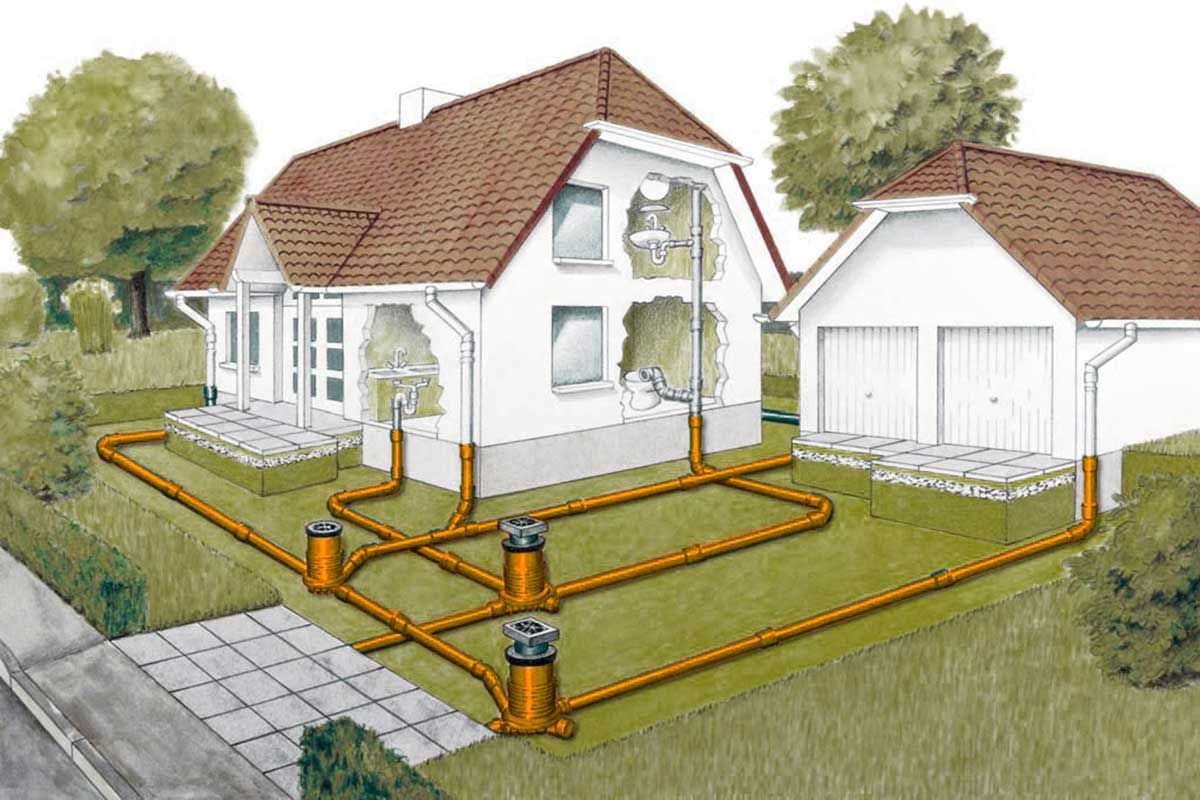
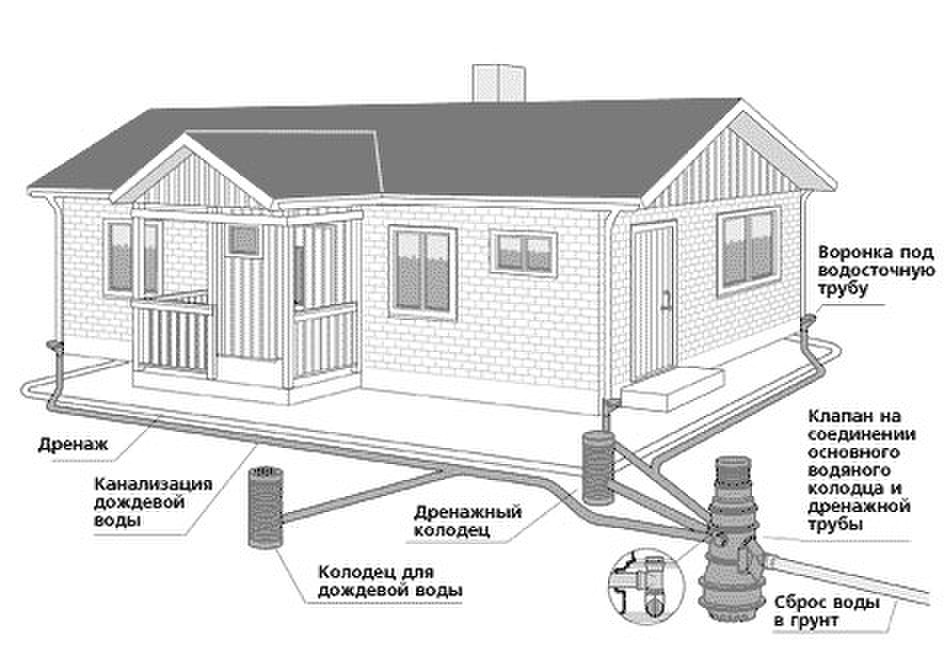
Do-it-yourself installation of external sewage in a private house
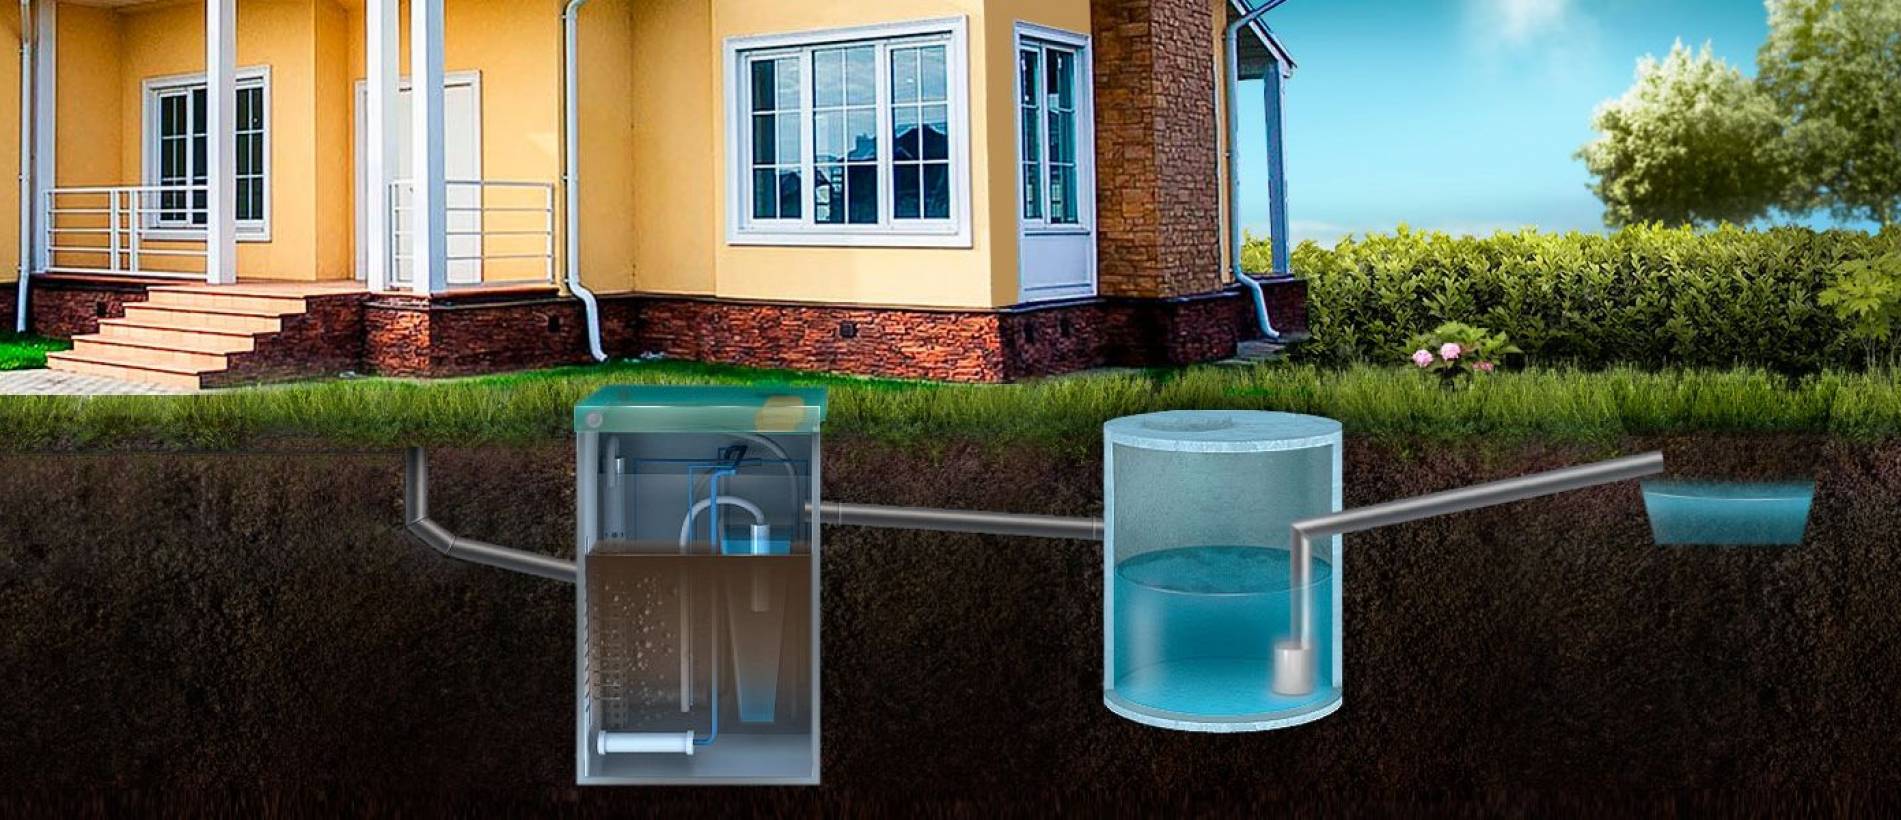
External sewerage consists of a cleaning tank and a pipeline system connecting the septic tank to the house. Before performing installation work, an external sewerage scheme is applied on the site plan.


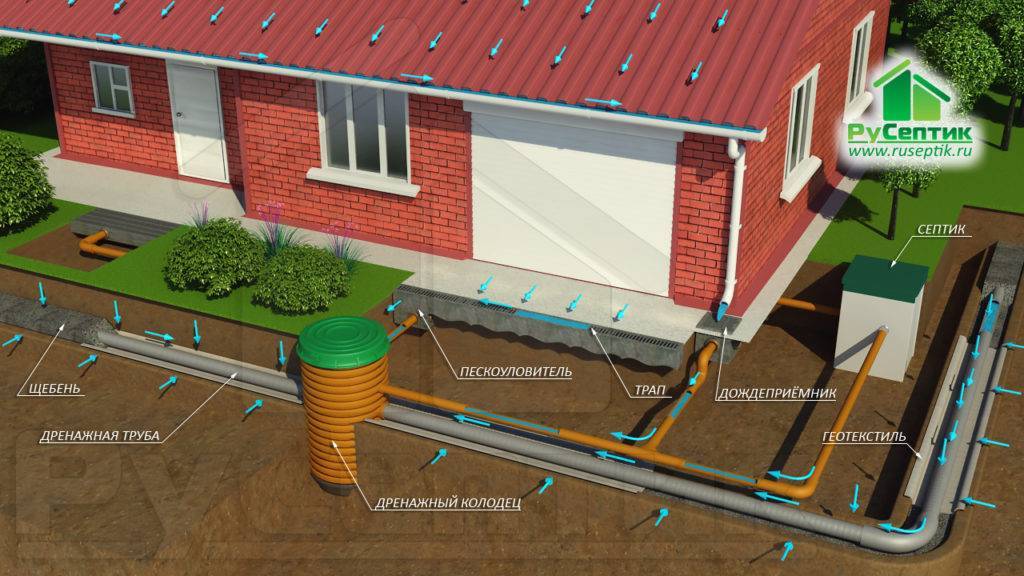
Practical options for removing sewers from the house
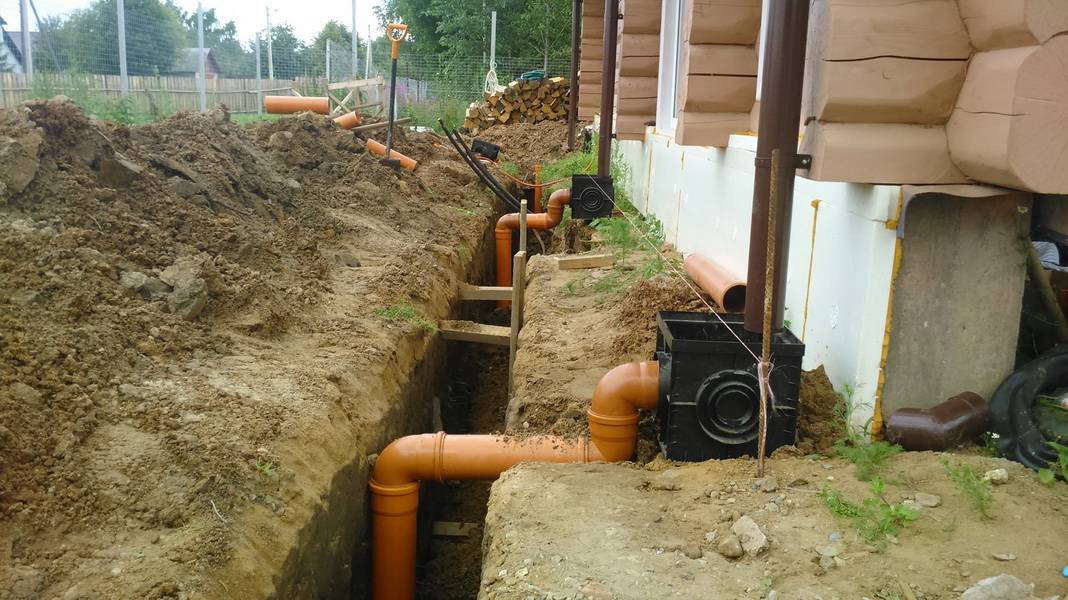
Then special pipes with a diameter of at least 100 mm are selected, intended for outdoor use. They are usually orange in color.A trench is dug to lay the pipeline. Its depth is selected depending on the climatic features of the area, the composition and characteristics of the soil, as well as other factors. If necessary, the pipeline network is insulated.
The most time-consuming part of the work when installing a sewer with your own hands in a private house is digging a pit for a cesspool or septic tank. The optimal distance at which the septic tank is removed from the house is about ten meters.
The volume of storage capacity directly depends on the number of people permanently residing in the house and the frequency of their use of plumbing fixtures.
It is best to connect the storage tank to the outlet of the internal sewer in a straight line, bends and turns of the pipeline system increase the likelihood of clogging. For the convenience of cleaning, a long line in places of change of direction must be equipped with inspection hatches.
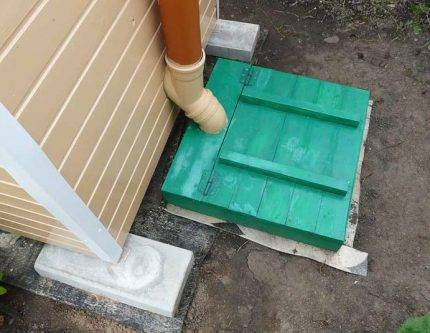
This is what a properly equipped external sewer looks like
Wastewater moves through the pipeline system by gravity, under the influence of gravitational forces, so you need to maintain the correct angle of inclination. If it is too small, large fragments of waste will be retained and the sewer will become clogged.
If the slope is too great, solid fractions will be thrown to the walls of the pipe, and again it will become clogged. You will find information on the correct slope of the sewer in the article “What should be the slope according to SNIP for a 1 meter sewer pipe in a private house?”
The desired angle is maintained and controlled by the building level when digging a trench, its depth increases as it approaches the storage tank or central sewer.A shock-absorbing cushion is laid at the bottom of the ditch, which is a sand mound, pipes are laid directly on it. If it is necessary to change the slope of the pipes, sand is poured in the right place.
An important operational parameter of the sewer system is the depth of the pipeline network. It must necessarily be below the freezing point of the soil in the region. Otherwise, in winter, frozen sewage can break the pipeline network and drain the sewer building. To carry out repairs will have to wait for the spring thaw.
Preliminary preparation
 Project for a country house Before starting construction work, you must perform several sequential steps:
determine the location of the sewer well: it should be below the level of housing;
mark the place where the sewer pipe exits the house;
pay attention to the outlet of the collector pipe, since it is there that all the sewage from the dwelling will be concentrated. No defects, irregularities or distortions are allowed;
when drafting, calculate all the bends and corners along which the pipes will pass, especially the internal sewer system;
after performing the above steps, you can go to a specialized store to purchase materials.
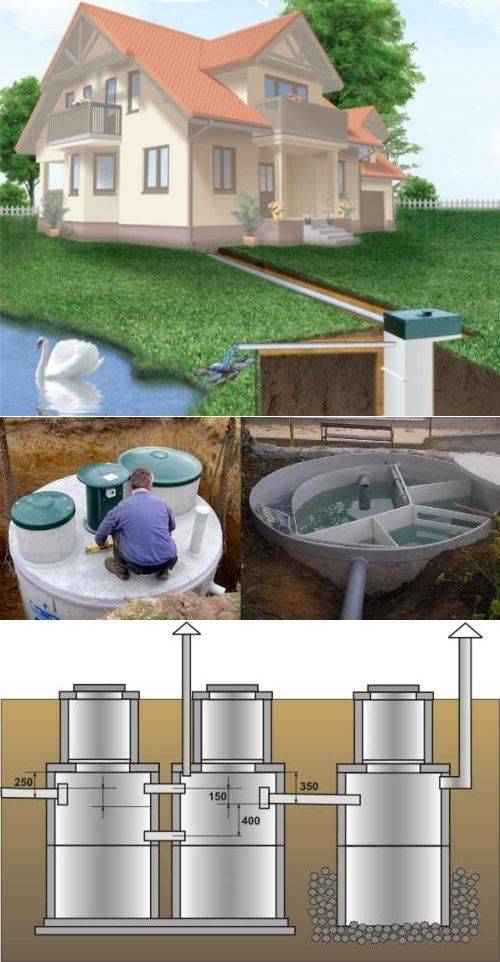
Calculations and installation
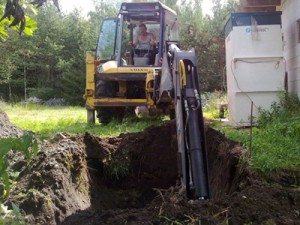
The pit can be dug with an excavator
Calculating the volume of a septic tank that you need is very simple. It is enough to multiply the standard two hundred liters consumed by one person per day for domestic needs by three.
We get 600 liters, which we multiply by the number of people living in the country. It is this volume of liquid that successfully processes a standard septic tank without difficulty and overvoltage.
Too small a container, unable to process everything at once, will simply overflow and independently process your garden with fragrant waste that did not have time to reach the condition in the tank with beneficial bacteria.
After all, it is they who not only neutralize the unpleasant smell from the sewer, but also turn feces into a wonderful fertilizer for the garden.
In order for the sewerage and water supply of the cottage to work properly, do not purchase corrugated pipes, but elements with a smooth inner surface. Everything that is discharged into the septic tank will pass smoothly and unhindered through them.
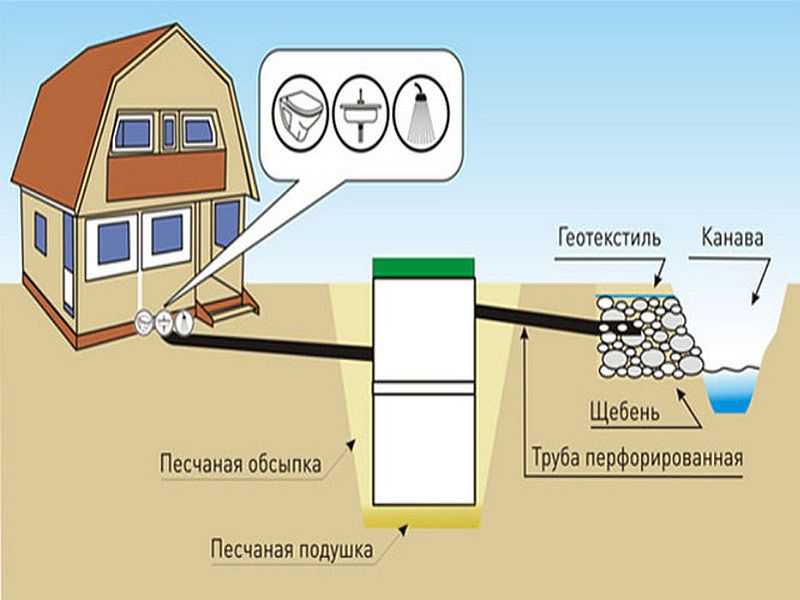
First of all, a hole is dug where the receiving container will be dug. Along the way, a trench is being dug for the installation of sewer pipes. In the direction from the house to the septic tank, the trench must necessarily have a slope of about two centimeters per linear meter - for unimpeded draining of the liquid.
Since the pipes are plastic, it is desirable to provide the trench with a concrete gutter so that the pipes do not deform from soil subsidence in the future.
Now we are considering the simplest sewage for a summer residence, therefore, your self-assembly is assumed. It will not take much time and will not be difficult.
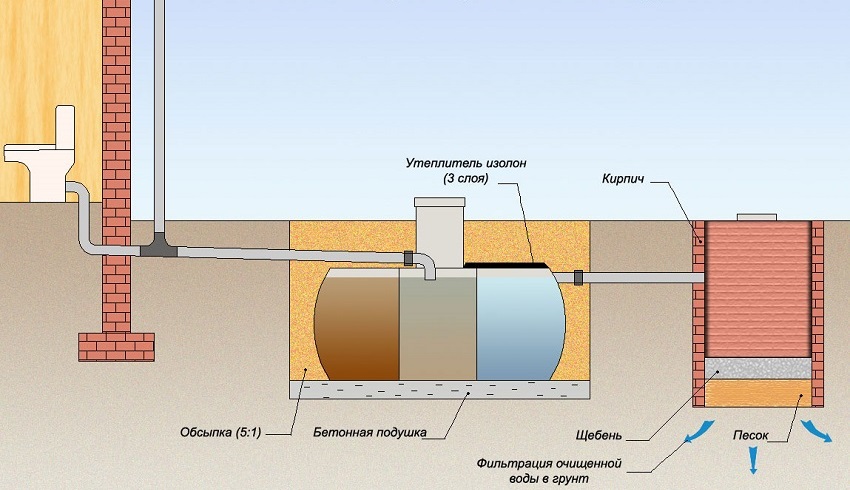
After you have designed the trench and laid the supply pipe, insert the septic tank into the prepared hole. At its bottom, fill a pillow of gravel or sand, lower the tank there, then fill it with water. This must be done so that the plastic barrel does not lose its shape when it is buried in the ground.


It is desirable to insulate the space between the container and the edges of the pit. To prevent the septic tank from freezing in winter, pour expanded clay, sand with sawdust or foam chips between its walls and the pit. Then finally fill everything with soil and carefully tamp. Make sure the top of the septic tank is just above ground level.
If you do not follow this rule, after the rains, the tank will be flooded with storm water, which is highly undesirable for its full operation.
After the pipes are connected, the container is installed in the pit, do not forget to dock well one to the other, and then seal the joints of the supply and exhaust pipes at the junctions with the container.
This is done using silicone sealant, it is not in short supply in stores. Pipes are also sprinkled with gravel or expanded clay, and then covered with earth and rammed.
Now we can say that the autonomous sewage system in the country is almost ready. For final readiness, you need to check it in action by passing a test volume of water through it. Insulate the lid of the septic tank, this is easiest to do by putting a piece of film on it and sprinkling it with sand or soil.
System design
Designing an internal sewage system in the cottage itself is also quite simple. Difficulties can arise only if the house is built on several floors and with a lot of plumbing. For ordinary low-rise housing of 100-150 square meters, everything can be designed independently. It is no more difficult than choosing an uninterruptible power supply for a gas boiler or an emergency gas generator. It is only necessary to comply with the relevant building codes.
Tilt rules
All horizontal sections of sewerage in a private house should be made at a slope of three (for pipes D = 50 mm) and two degrees (at D = 110 mm) in the direction of the flow of effluents. It is no longer possible to tilt pipelines, as water will flow through them too quickly, leaving feces and solid waste inside. And with a smaller slope, the sewage, on the contrary, will stagnate in the outlets, not reaching the central riser.
Internal piping
The internal sewage system consists of:
- horizontal outlet (pipes to the septic tank);
- vertical riser with a vent at the top;
- horizontal outlets to each plumbing fixture.
Installation of sewer pipes in the house
Riser installation
The connection of the outlets to the vertical pipe is made by means of tees, and turning it to the outlet is done by a bend with a smooth bend. In general, the installation of the sewerage of a private house begins with the installation of a riser, assembled from the bottom up and strictly vertically. It is attached to the wall with clamps with a distance between the fasteners of a maximum of 2 meters. To pass it through the interfloor ceilings, metal sleeves are used a couple of centimeters wider than the pipeline itself.
Kinds
In your own home, sewage can be of several types and is classified according to various criteria.
There are usually three of these criteria:
- the location of the sewer;
- the purposes for which it will be used;
- difference in the type of waste that will be collected.
If we take the first two criteria, then the system under consideration is as follows.
- outdoor.It is a complex for receiving wastewater from buildings and other facilities and transporting them to special treatment facilities or a place of discharge into a centralized sewerage intake. Typically, this includes pipelines, as well as wells of a rotary and revision type.
- Internal. Such a sewerage system collects wastewater inside the house thanks to special water intake devices and pipeline systems, after which it transports them along the main line to a special external sewerage complex.
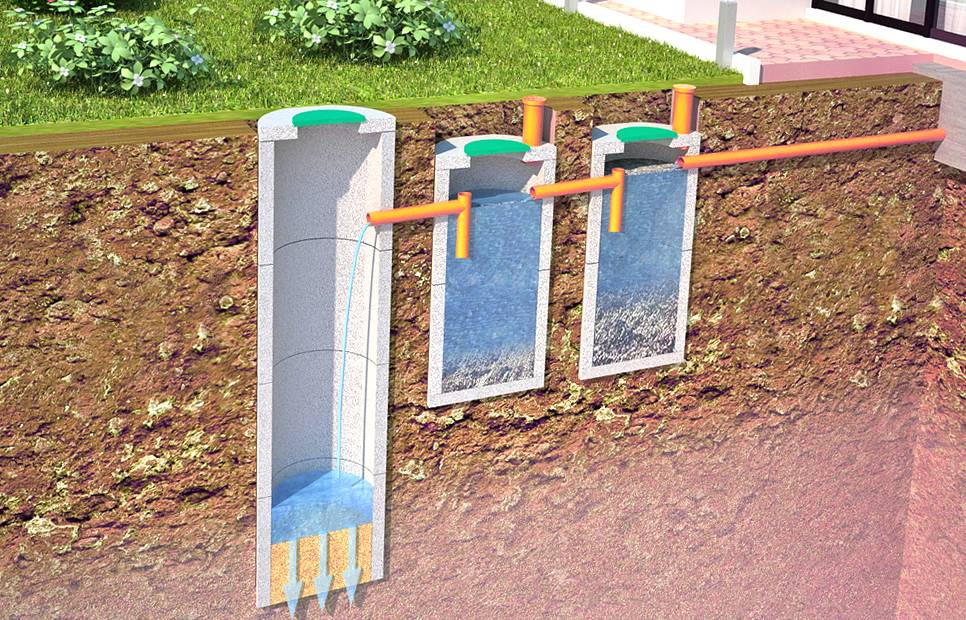
- Cleaning waste. Before wastewater is discharged into the ground or a reservoir, it must be cleaned thanks to a special four-stage system, which consists of several levels (physical-chemical, disinfection, mechanical, biological).
If we take the criterion of collected effluents, then sewage is next.
- Domestic. It can also be called household or household fecal. It is usually referred to as K1. This type of sewage includes the whole complex of devices that are connected to various plumbing fixtures. This includes trays, drains, siphons, funnels, as well as a network of various pipelines, which consist of pipes of different sizes, fasteners and fittings.
- Industrial or industrial. Usually in the schemes, its designation goes under the abbreviation K3. This type of sewage is intended to divert water, which is used in some kind of technological process. This type of sewerage is not used in their own homes, but it is impossible not to say about it.
- Stormy or rainy. This type is usually referred to as K2. Such a system is a whole collection of downpipes, gutters, sand traps, storm water inlets, funnels, and so on.Usually, most of such a mechanism is laid in the open, but pipelines under the foundation can also be used to transport rainwater somewhere outside the site.
It should also be noted that sewerage in a private house can be of two types:
- autonomous;
- centralized.
The type chosen will depend on where exactly the sewage type will be drained - into your own septic tank or into the central line through a collector-type well. If the local sewerage runs close to the house and connection to it will be cheap, then it will be more profitable to connect to it due to the fact that the costs of use in this case will still be lower.
In addition, treatment systems can be different in nature.
These are the following types:
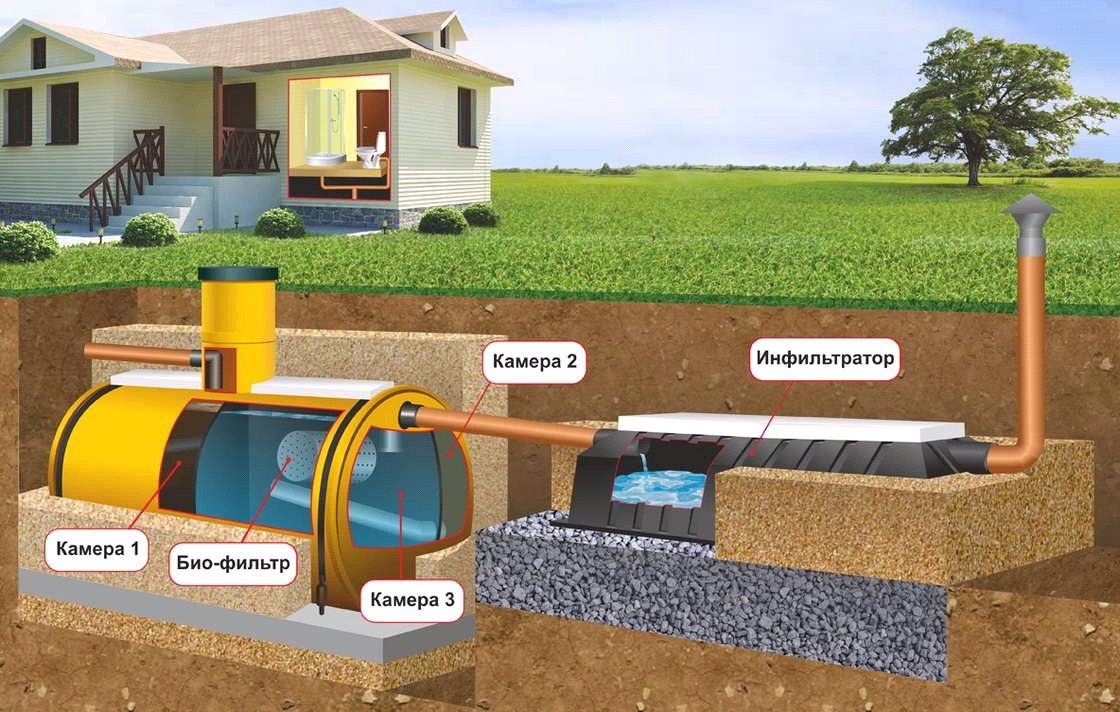
- septic tank:
- dry closet;
- biocleaning with the help of a special unit;
- cesspool.

The septic tank has already been mentioned, and therefore let's talk about other types. A dry closet would be a suitable solution only for a cottage where the owners rarely live. Yes, and he does not solve the issue of drains from the shower and kitchen. Purification using a special station is advantageous due to high performance and a good degree of wastewater treatment. But the costs for this option will be considerable due to the need for energy costs and the high cost of equipment. The cesspool option was the most common not so long ago. But recently, the number of drains has increased significantly, and few cesspools can cope with it. In addition, the risk of land pollution has increased significantly for this reason.
Stage 1. Project
First, a project is drawn up.The drawing can be made on plain graph paper, but it is better to use a special utility - it's faster and more convenient. The project indicates the location of plumbing equipment, pipelines and treatment facilities.


In advance, it is possible to connect other buildings on the site to the system - for example, baths. When calculating the size of the sewer network, first of all, the number of residents is taken into account. It is generally accepted that approximately 200 liters of wastewater per day is generated from the average person.
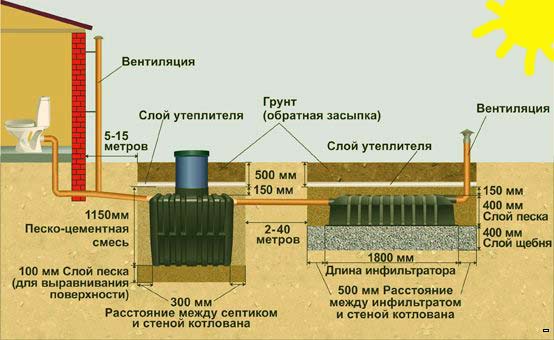
In addition, climatic features are taken into account. If we are talking about the northern regions of the country, then the outlet pipe is laid below the soil freezing line or insulated
Otherwise, there is a risk of the system freezing in winter.
How to bring the sewer to the septic tank
Judging by the standards, the sewer pipe to the septic tank will have to be at least 7-8 meters. So the trench will be long. It should go with a bias:
- pipe diameter 100-110 mm, slope 20 mm per linear meter;
- 50 mm in diameter - slope 30 mm/m.
Please note that it is undesirable to change the level of inclination in either direction. In the direction of increase can be a maximum of 5-6 mm
Why not more? With a large slope, the water will run off very quickly, and heavy inclusions will move much less. As a result, the water will leave, and the solid particles will remain in the pipe. You can imagine the consequences.
The second important condition is that the pipe should not freeze through. Solutions two
The first is to dig below the freezing depth, which, taking into account the slope, gives a solid depth. The second is to bury about 60-80 cm, and insulate from above.
Scheme of country sewerage with a septic tank
How deep to dig the tuba
In reality, the depth to which you will bury the sewer pipe coming from the house depends on the location of the septic tank, or rather, its inlet. The septic tank itself must be arranged so that there is only a lid on the surface of the soil, and the entire “body”, including the neck, is in the ground. Having buried a septic tank (or having decided on its type and model), you will know where to bring the pipe, the required slope is also known. Based on these data, you can calculate at what depth you need to make an exit from the house.
This area of work also has its own nuances. So it is better to dig a trench immediately to the desired depth. If you have to add soil, it must be very well tamped - not just throw in the earth, walk with a rammer to a high density. This is necessary, because just the laid soil will settle, and the pipe will sag with it. In the place of subsidence, a traffic jam forms over time. Even if it manages to break through, periodically it will appear there again.
Install pipes correctly
Warming
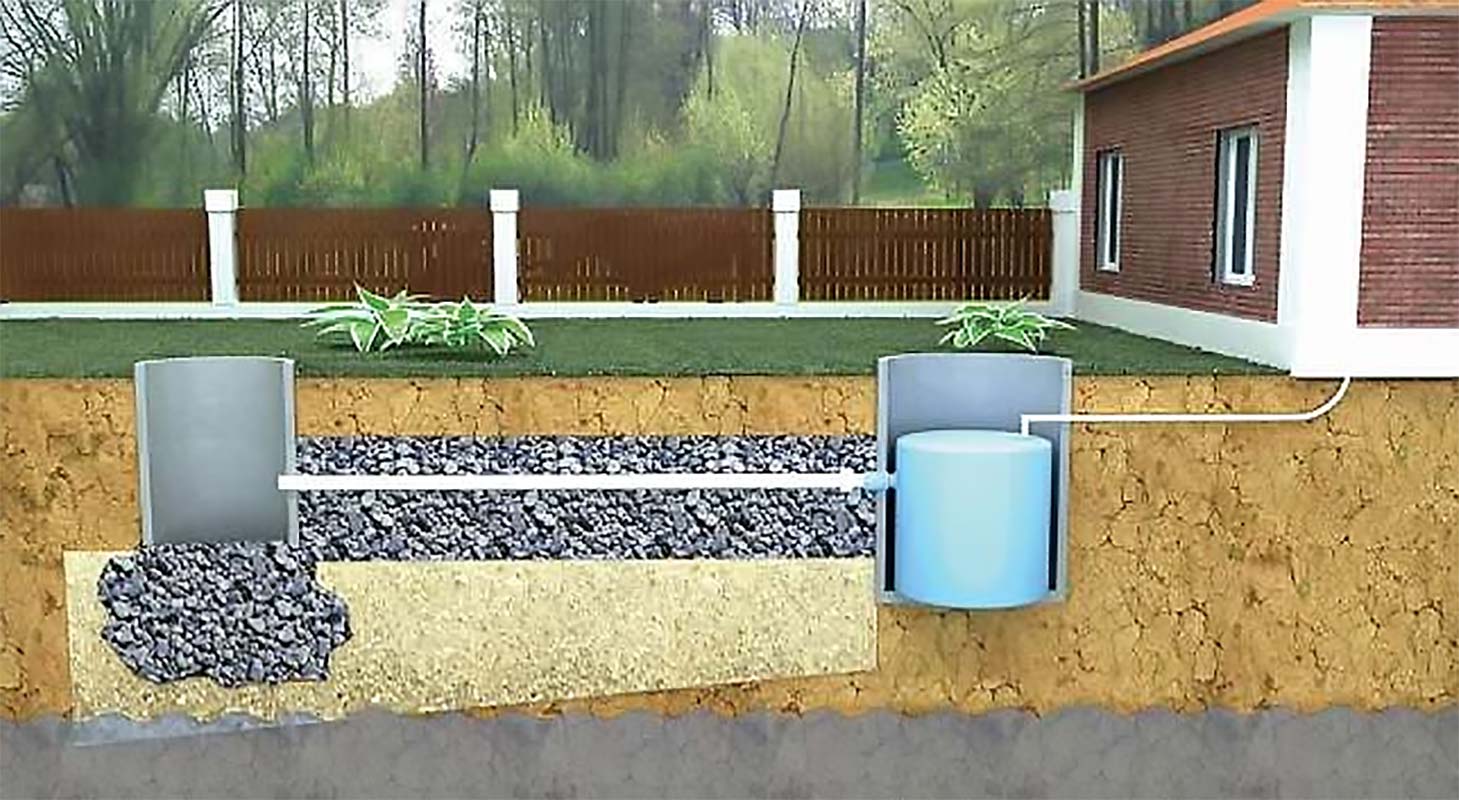
One more thing: the laid and hermetically connected pipe is covered with a layer of sand about 15 cm thick (so much should be above the pipe), the sand is shed, lightly rammed. An EPPS with a thickness of at least 5 cm is laid on the sand, on both sides of the pipe it must go to a distance of at least 30 cm. The second option for insulating the sewer pipe is the same EPPS, but in the form of a shell of a suitable size.
Special insulation for pipes - shell
Other heaters are not recommended. Mineral wool, when wet, loses its properties - it simply stops working. Styrofoam collapses under pressure. If you build a full-fledged sewer trench with walls and a lid, then you can do it.But if the sewer pipe is laid in the ground, the foam may crumple. The second point is that mice like to gnaw on it (EPPS - they don’t like it).
Basic provisions of sanitary norms and rules
In 1985, Sanitary Norms and Rules were approved, according to which sewer systems should be installed.
The same document contains recommendations regarding the nuances of the installation work. In particular, it contains information regarding the depth of the pipeline and other important points.
When work is carried out in areas with increased load exerted on the soil surface (for example, under the roadway), the products should be laid deeper, sometimes at around 9 meters.
The document regulates how the installation of sewer pipes in trenches should be carried out:
- In a place where it is planned to lay a sewerage outlet from a private household, it is imperative to compact the earth. This will prevent erosion of the engineering structure by groundwater during heavy precipitation.
- The laying of the external pipeline is considered to be correctly performed if the slope of the main line is created, which should be from 1 to 2 centimeters per linear meter. This requirement must be observed because there is no pressure pressure in domestic sewer structures.
The technology for laying sewer pipes in a trench provides that in your own house in a place where the pipeline bends sharply, you need to equip a special well.
This allows you to make the repair work easier and in the shortest possible time to change the section of the highway that has become unusable.
A similar layer should be covered with a sewer line from above. The use of backfill will simplify access to the pipeline if repairs are necessary.


Experts also recommend installing manholes in areas where there are significant differences in the depth of pipe laying. If the length of the network is large, several of them should be installed, observing a gap of about 25 meters.
Conclusions and useful video on the topic
Which source of water supply to choose: a well or a well:
How to equip the internal plumbing:
Installation of the water supply entry unit inside the building:
Plumbing in a private building, whether it is a summer house or a full-fledged residential building, is necessary. Moreover, you can design and assemble the system yourself
At the same time, it is important to listen to the advice of experts and not deviate from the instructions.
If this seems too complicated, you can entrust the work to a construction company. Professionals will quickly and efficiently perform all the necessary work, and the owner will only have to accept the finished structure into operation.
If your experience with home plumbing differs from the installation rules outlined here, please leave your comments below the article.