- Checking pipe joints
- Types of engineering communications wiring
- Type #1. Serial type wiring
- Type #2. Collector type wiring
- Dismantling the old system
- Connection to sewerage networks, what documents are required
- Dismantling of the old pipeline
- Dismantling steps
- 7 High-quality laying of internal pipes - comfort of living
- Types of plumbing schemes
- tee
- Collector
- With pass-through sockets
- Dismantling of the old sewer
- Accounting and control
- HMS, aquastop, filter
- Internal wiring and installation
- Parallel mounting
- Mounting in series
- Plumbing in private homes
- Pipe laying methods
- Mounting Features
- Recommendations for the installation of the toilet
Checking pipe joints
To make sure that the pipes are hermetically connected to each other in a divorce and a riser, you must proceed as follows.
- Dial the bathroom by closing the overflow hole.
- Release the drains and at the same time open the hot and cold water valves to full capacity.
- Plug the drain hole on the toilet. It is convenient to use a plunger for this.
- Fill the toilet with a bucket of water to the brim and open the drain.
- Ask the neighbors from above to drain the water to check the tightness of the riser.
If the work is done qualitatively, then there should be no water at all at the joints.
Such difficult work remains to be done to replace the sewer network inside the apartment. If you doubt that you can do it efficiently and in a short time, then contact the specialists. After all, neighbors also do not come to wait while you are on the spot to deal with the nuances of dismantling the old and installing a new network.
Types of engineering communications wiring
Before designing the wiring, you should get acquainted with what varieties of such structures exist. There are only three of them. And one, with through sockets, is practically not used. Therefore, we will not consider it.
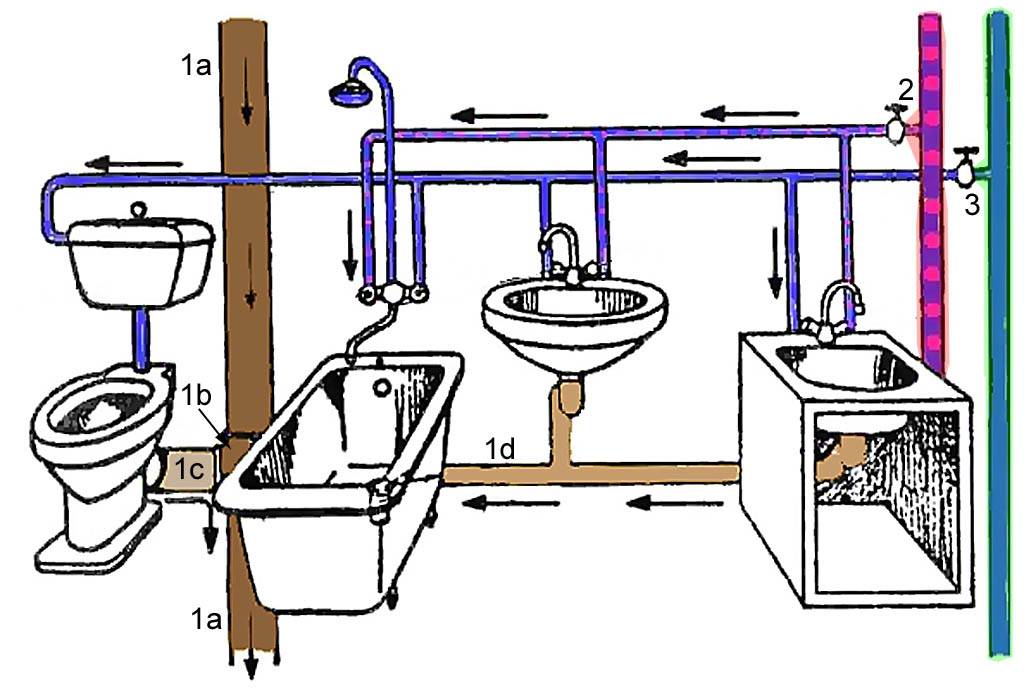
Type #1. Serial type wiring
For its implementation, taps are made from the risers of cold and hot water supply, leading to the first consumer. Pipes are laid from it to the second and further. Each tapping point is equipped with a tee, to one of the outlets of which the consumer is connected.
In general, this is a very simple scheme. It can be used only where the number of water consumers is small.
This is due to the fact that with the simultaneous activation of several points of water intake at once, the pressure in them will weaken, and may not be sufficient for the correct operation of the equipment. This is the main disadvantage of serial wiring.
However, for apartments with one bathroom and a small amount of used plumbing, this option may be the best. A significant drawback of the system is the inability to turn off one of the plumbing fixtures for replacement or repair.
Serial wiring is extremely easy to implement, but not very convenient to use. However, for small bathrooms, this solution may be quite acceptable.
The advantages of serial wiring are much greater.First of all, it is simplicity in design and installation. There will be no complicated schemes, everything is very simple.
In addition, such wiring is considered the most economical option. The consumption of pipes and other elements will be significantly lower than in other systems, installation costs are also minimal.
Even a novice plumber can handle the design and subsequent arrangement of a consistent, otherwise tee wiring
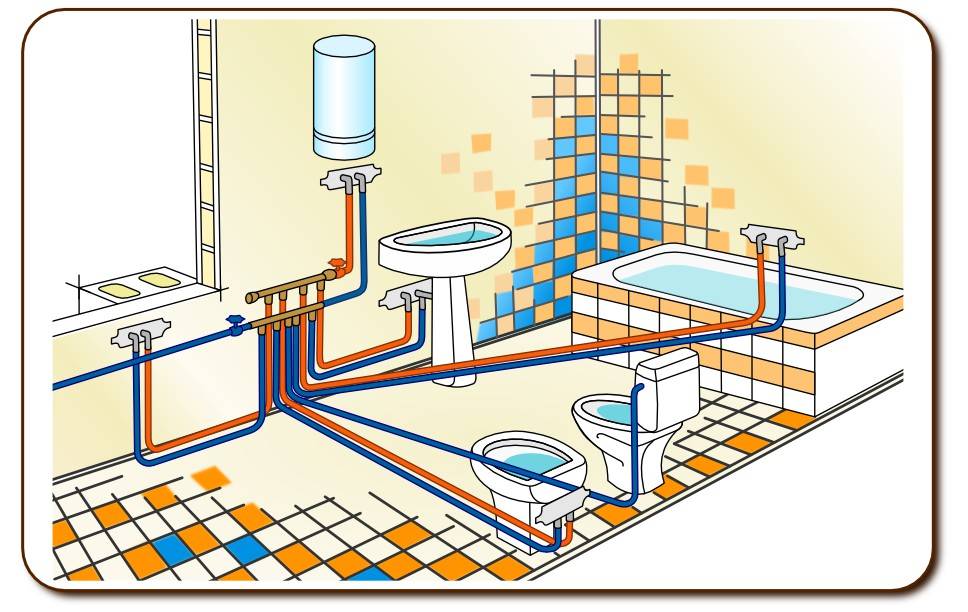
Type #2. Collector type wiring
The collector type scheme involves the connection of each of the consumers to the main line. For this, a special element is used, which is called a collector - a device that distributes water flows.
In a more complex version, and this is best, each collector outlet is equipped with a shut-off valve. Collector-type wiring can be considered the most convenient option to use. There are several reasons for this.
First, the absence of pressure drops in the system. All consumers receive equally good water pressure, even if all draw-off points operate simultaneously.
If the pressure in the system of an apartment or a private house, or for some reason is too low, you can temporarily limit the water supply to one of the consumers, for example, to the toilet, in order to thereby increase the pressure for others.
The collector type of wiring is more convenient to use than the serial one. In this case, a separate line goes to each consumer, which ensures that there are no pressure problems. However, in the design and installation of such a system is more complex.
Secondly, the ability to turn off plumbing fixtures from the water supply if they need to be replaced or repaired.
Thirdly, reliability.In fact, a single pipe goes to each consumer, without any connections and other elements. A leak can appear only in the area of \u200b\u200bthe collector or near the device itself. Here it will be very easy to find. For this reason, pipes with collector wiring can be safely installed using a hidden method.
Fourth, ease of use. If there is a problem with a plumbing fixture and a leak appears, for example, at a mixer, you do not need to crawl under the sink. It is enough to close the shut-off valve on the collector leading to the faulty device and wait for the arrival of specialists.
Even a woman or child unfamiliar with plumbing intricacies can do this. In this case, all other equipment will work properly.


Professionals recommend using manifolds with stopcocks for installation in plumbing systems. With their help, if necessary, you can easily stop the water supply to a branch or plumbing fixture in need of repair.
However, collector wiring also has some disadvantages. First of all, it will cost the owner more than the serial circuit, the amount. This is due to the fact that you need to lay a branch to each consumer. It will take a lot more material.
In addition, the installation of manifolds and shut-off valves will be required if the distributors are not equipped with them. And the circuit itself will be much more complicated than the sequential one.
Dismantling the old system
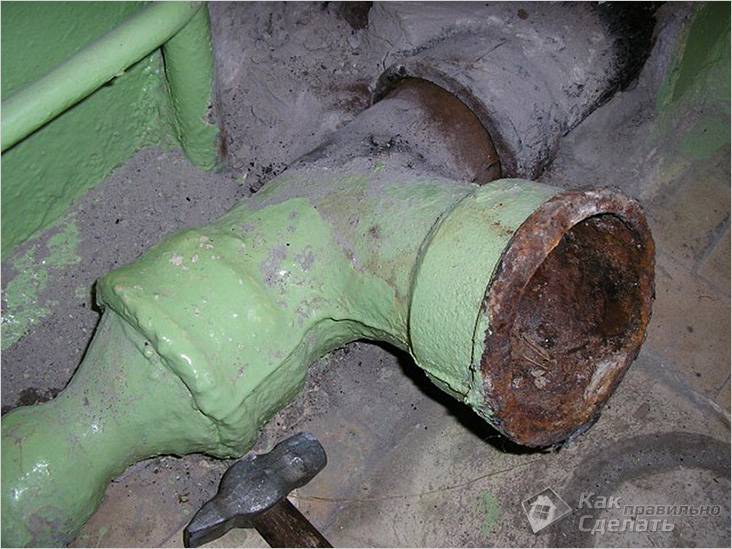
Sewer replacement begins with a riser. This is the most difficult section, drains from neighboring apartments pass through it, therefore, while replacing the pipe, neighbors should be asked not to use the sewer for some time. Dismantling proceeds as follows:
- Opens access to the docking point of the riser with a neighboring site. This may require breaking up part of the floor.
- Part of the cast-iron pipe is cut out by a grinder. If it is completely impossible to cut through, then it can be broken with a hammer. Work must be carried out carefully, as a broken piece of pipe can remain inside and block the entire pipe.
- A tee is installed at the bottom of the riser near the floor. The straight plastic pipe selected for the riser is connected at the top to the rest of the cast-iron pipe using a transitional cuff. Fastening with a tee is carried out by a bell. The tightness of the joint is provided by a rubber ring and silicone sealant.
- The pipe is attached to the wall with clamps. In the area of the sockets, the pipe is fixed rigidly, in other places the fixation is floating.
After completing the installation of the riser, proceed to the wiring.
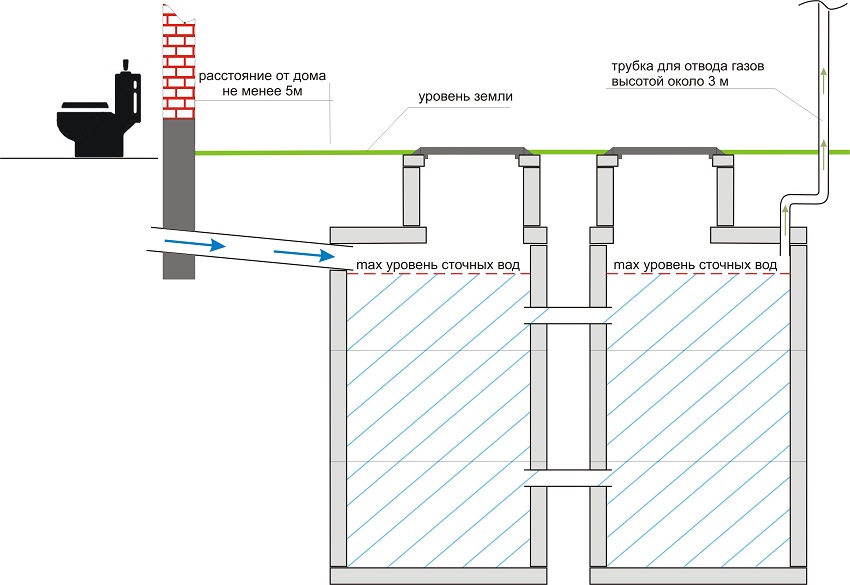
Connection to sewerage networks, what documents are required
Finished house plan. Mandatory, on paper, a diagram of the laying of a sewer pipeline must be presented. This process is carried out with the help of a company that conducts geodetic expertise.
All technical conditions for connecting sewerage. All these issues are considered by the organization.
The scheme on which the plan will be indicated, it is according to it that it is necessary to connect the sewer. This document must be provided by a specialist who designs and installs technical functions. It relies on the basis of the specification, thus producing a new plan.
The project, which is prepared in the water utility, with their approval. This process is carried out by architectural management.
It is also necessary to remember one main nuance. Before starting construction work, you must obtain permission from your neighboring residents. They are required to sign their consent. If additional questions arise regarding the pipeline that will pass through the places where other electrical or thermal networks have already been laid, then in this case, it is necessary to take another permit. It is necessary to require a special document in the organization. If the owner does not pursue certain requirements, he will have to pay a huge fine.
To lay the pipeline to the central highway, you need to take permission. If there is a well nearby. The pipe that will pass through the site to the well will be directed at a certain slope and angle. To determine the laying depth with accuracy, it is necessary to use the special values \u200b\u200bprovided by the data in SNiP.
There is also one main piece of advice to keep in mind. This question concerns the existence of existing curves on the track. As shown in practice, turns on the track should not exist, but if such a problem suddenly arises, then it is necessary to turn the highway a few degrees, about 90. It is also recommended to install an inspection well. Since, in this case, the well performs the function of control over this system.
A significant role is played by the correct selection of the height of the trench digging. Certain elements must be taken into account. The pipe diameter must be larger than the inner diameter. The usual size is up to 250 mm. Basically, pipes with a diameter of 150 to 250 mm are used. After the specialist decides on the size of the pipes, it is necessary to dig the bottom of the trench.As soon as the process is completed, the pillow can be provided for laying the pipeline.
Dismantling of the old pipeline
To carry out work on dismantling the old and assembling a new sewerage system, the following tools will be required:
- grinder or hacksaw;
- impact drill or hammer drill;
- a hammer;
- chisel;
- wrench;
- file;
- Screwdriver Set;
- mounting gun (if not available, you can use the hammer handle).
Dismantling steps
Dismantling is carried out in the following sequence:
Completely free the room, gaining access to all pipes.
Turning off the water supply.
Disconnect the hose from the toilet cistern with a wrench.
Loosen the screws holding the toilet to the floor. Remove the toilet.
Dismantle the old system
At a distance from the riser, you can use a hammer to break cast-iron pipes (cast iron is a brittle material).
Carefully, using a grinder or a hacksaw, disassemble the sewer pipes in the apartment adjacent to the input tee installed on the riser.
Clean the inlet tee socket. The remains of the old grease must be removed.
Dismantling of cast iron pipes
You should be especially careful when dismantling pipes adjacent to the riser, since excessive force can damage the riser and break the tightness of the sewer system in all apartments that are above and below you.
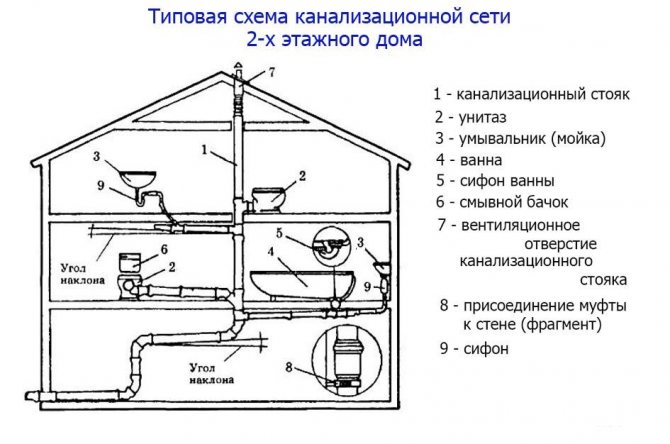
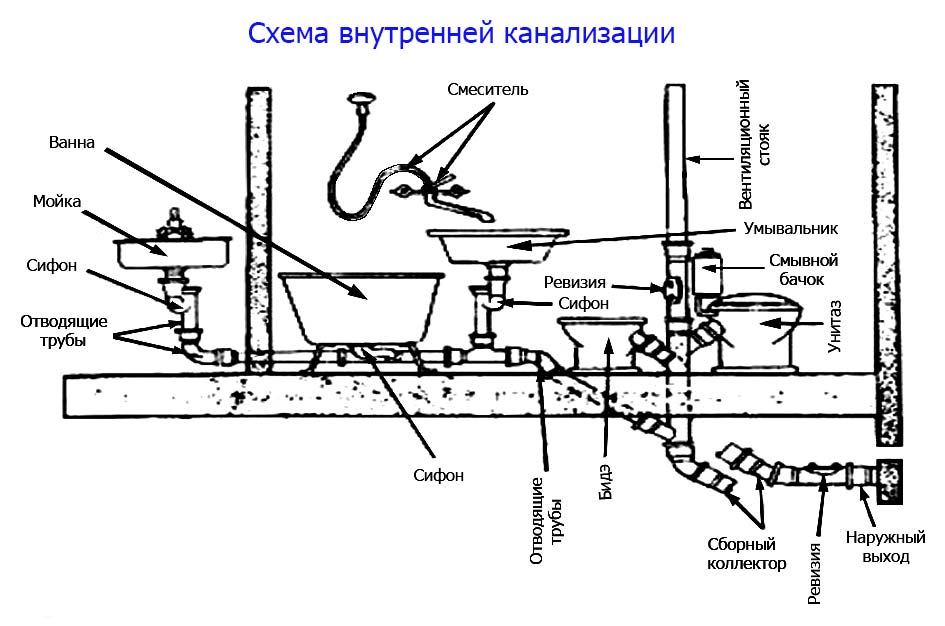
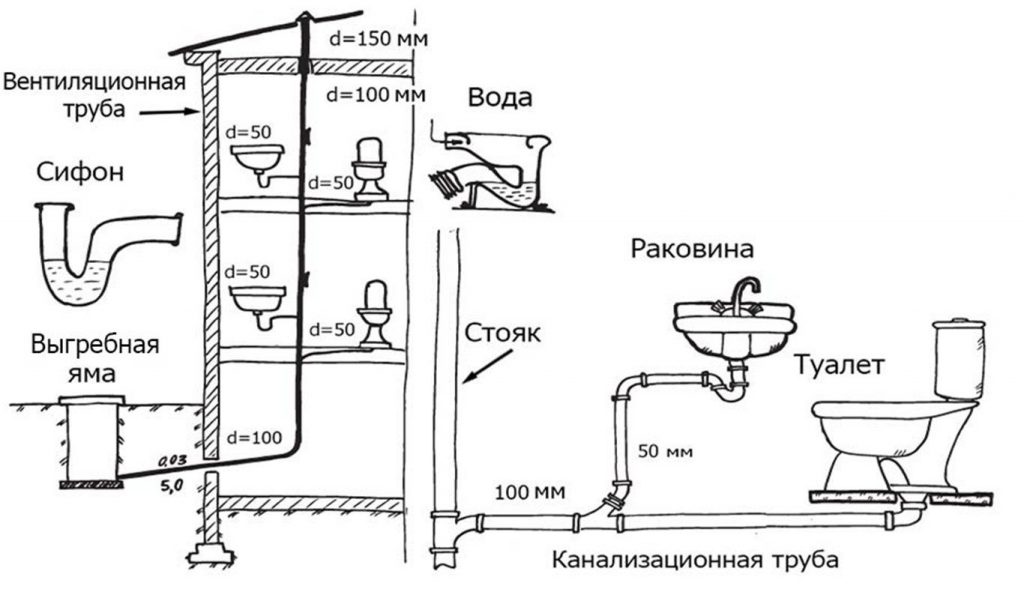
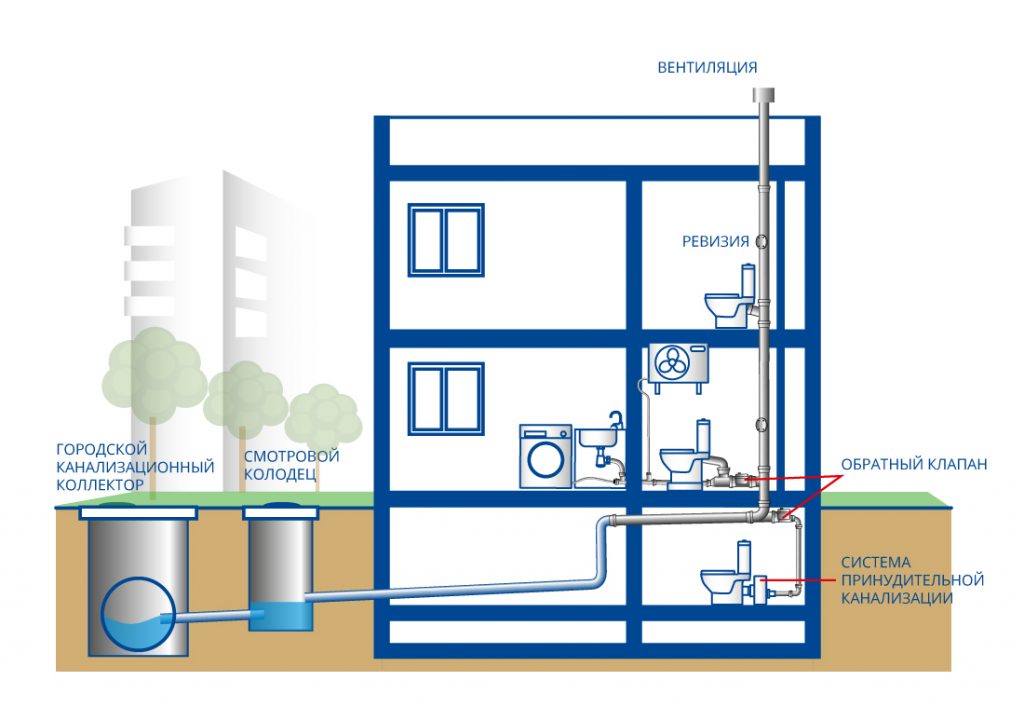
7 High-quality laying of internal pipes - comfort of living
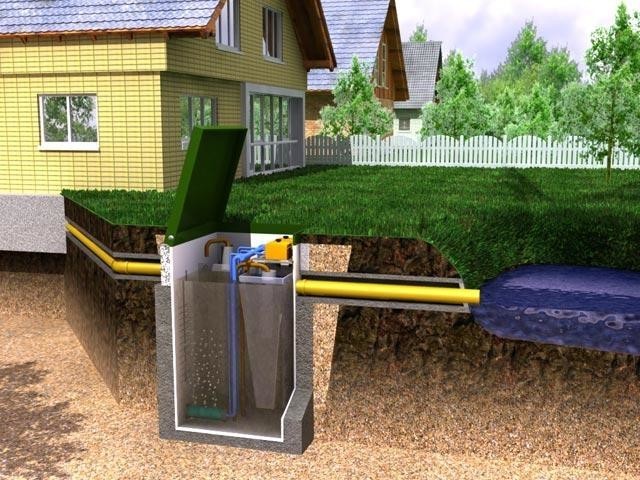
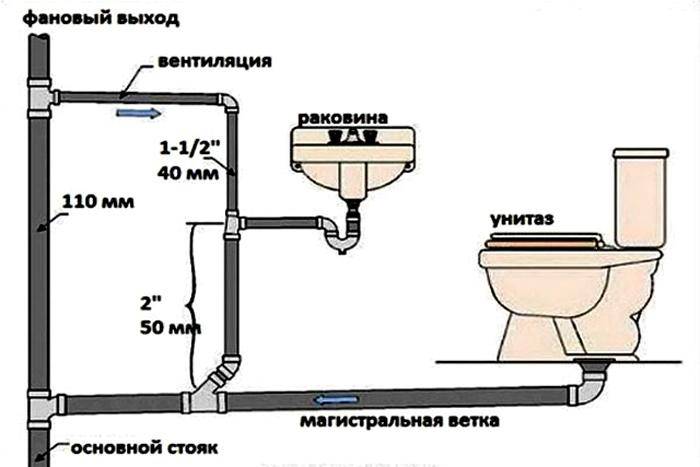
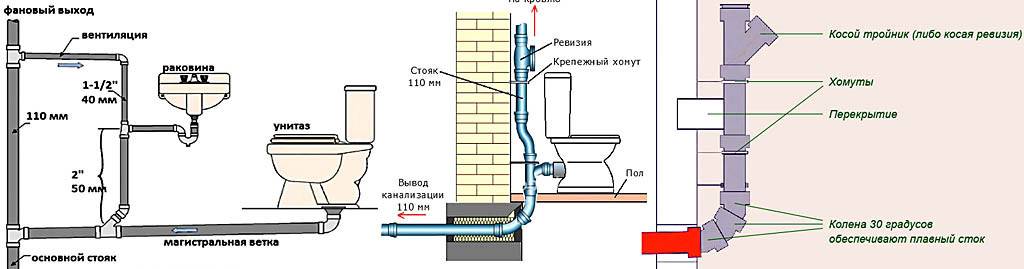
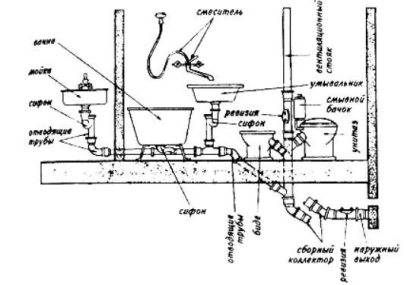
The boundary zone between the internal and external sewerage is the outlet - the junction of the riser with a pipe that is connected to a reservoir for storing and processing human waste products.We mount the outlet through the foundation: using a perforator, we make a hole corresponding to the diameter of the riser pipe. The laying depth should be below the freezing depth of the soil in order to avoid problems in winter. We mount the pipe placed in the sleeve. The length of the sleeve must exceed the length of the hole, on each side it must protrude by at least 15 cm. We cover all the cracks with a solution.
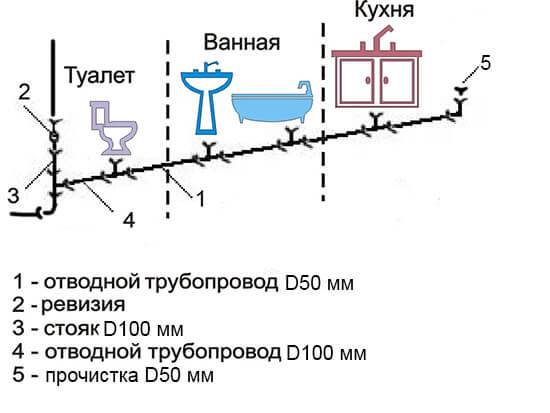


We start laying the internal sewerage from the riser. If there are no specially prepared shafts for communications in the house, we place the riser in the corner of the bathroom, close to the wall. The place of cutting for laying pipes should be laid with mortar. We assemble the riser from the bottom up, while making sure that the socket of the pipes is directed upwards. We install an inspection on each floor to clean the pipes if they are clogged. It should be at a distance of more than a meter from the floor.
It is impossible to assemble a riser from nozzles of different diameters, it must be strictly vertical, without slopes. After installation, the riser can be overlaid with soundproofing material and give it an aesthetic appearance. It can be mounted in a niche, channel or box. If the riser is located in an unheated room, it is necessary to carry out work on its thermal insulation. If it is necessary to install an additional riser, an oblique tee with an angle of 45 degrees is mounted and an additional outlet is installed.
In addition to the riser pipe, it is necessary to install a fan pipe - a continuation that leads to the roof. It is installed on the riser, at the junction you need to mount a revision. The fan pipe is brought to the attic under a slope.It should be located at a distance of more than 4 meters from windows and doors, at different levels with a chimney and ventilation pipes. Ventilation pipes for sewerage should protrude at least 70 cm above the roof. The organization of ventilation for the sewer system allows you to get rid of unpleasant odors that are possible with the accumulation of gas and polluted air.
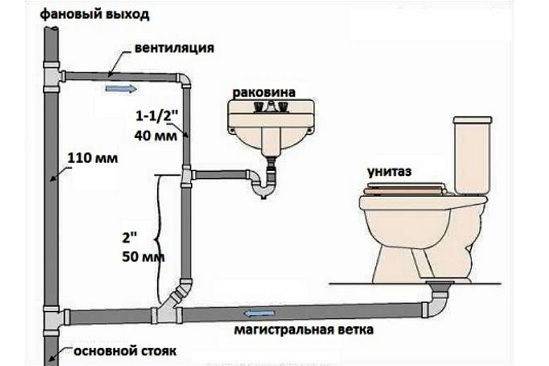
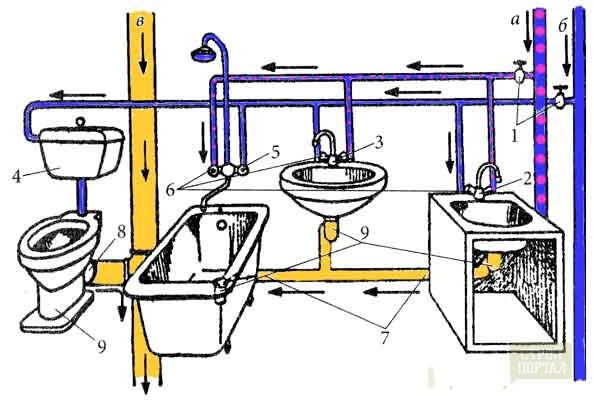
To switch from a vertical to a horizontal drain, we install connections with an angle of 45 degrees, this will reduce the pressure of the water pressure on the pipes when draining. To drain water from bathtubs and sinks, we use pipes with a diameter of 50 mm. Pipes should be brought to the riser with a slope of 2-3 cm for each meter of length. We fix the pipes with special clamps of the appropriate size.
At the intersection of the elements that come from the shower, sinks and bathtubs, we mount a collector pipe with a diameter of 10-11 cm. We install water seals along the entire pipeline to prevent the penetration of unpleasant odors into the living quarters. His device has a similar design, differs in size. Water acts as a stopper for the penetration of odors. If the sewer system is idle for a long time, the water evaporates and the water seal loses its performance.
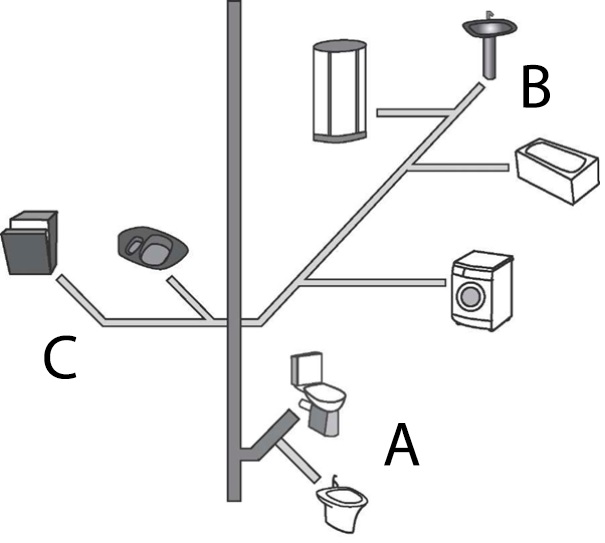
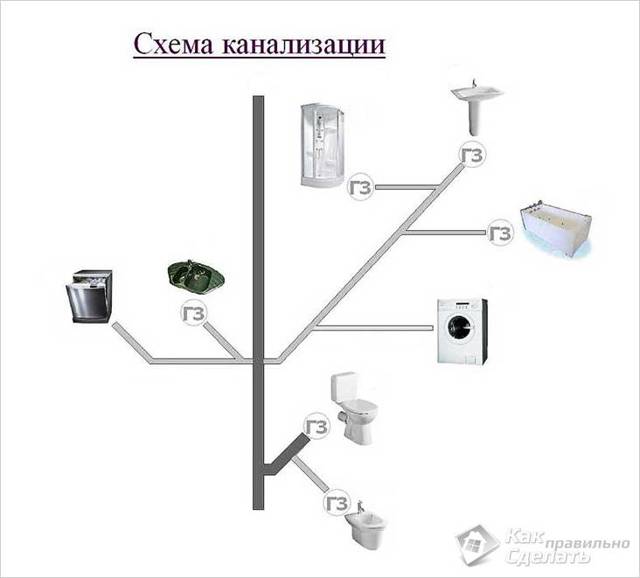
Types of plumbing schemes
In practice, wiring is performed in three ways:
- using tees-distributors - sequential;
- through the collector
- with pass-through elements - sockets.
The choice of the water supply distribution scheme in the apartment depends on the individual needs of the homeowner and the design features of the room. In some cases, it is appropriate to use serial and collector wiring at the same time.
tee
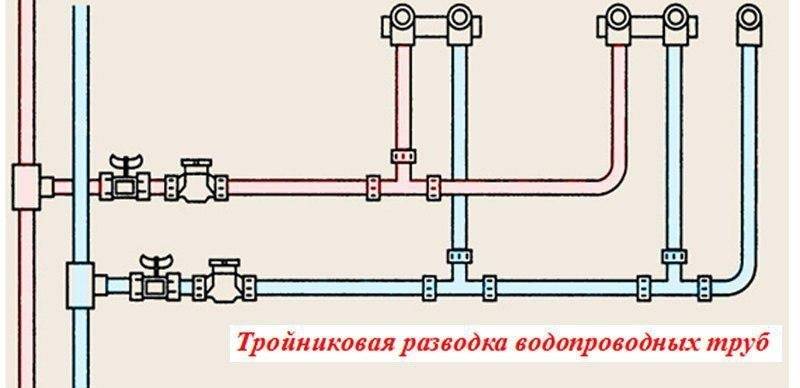
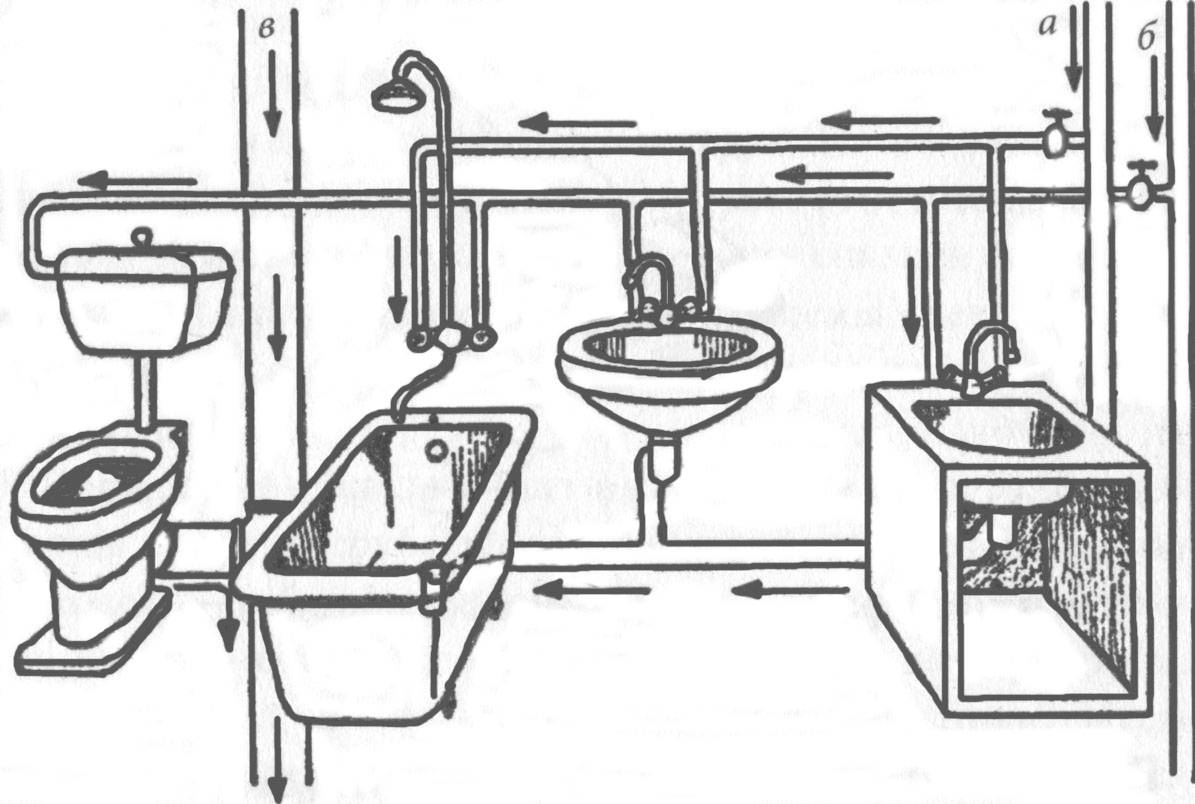
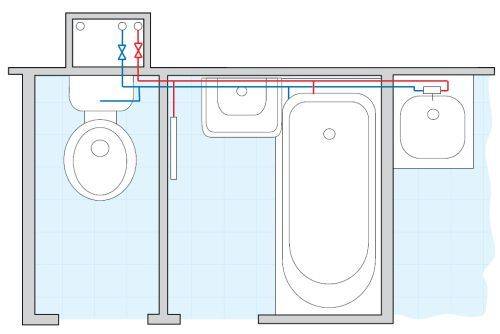
This scheme for distributing water supply in an apartment is based on the transportation of cold and hot water through two central pipelines. At the locations of the points of water intake, with the help of tees, branches are mounted through which water reaches the consumer.
Since after the start of the flow of water through any tap, the pressure of the liquid in the line decreases, the central pipe is selected with a larger diameter than the internal dimensions of the outlets.
In addition, it is required to correctly position the joints of the pipes. It is best to arrange them in places hidden from view. For example, in closed parts of sinks, bathtubs, wall niches. There, the connections will be available for maintenance, but will not spoil the appearance of the room.
The disadvantage of serial connection is the complete cut-off of the branch from the input in case of repair. To solve this problem, additional emergency valves can be installed, but an increase in their number leads to a decrease in pressure. In addition, the tee scheme is characterized by the sealing of joints into the walls. If the pipe leaks, you will have to disassemble the finish and break the wall.
Serial wiring will be ineffective in rooms with a large number of water points on one branch. In such a section, a pressure drop will inevitably occur at the points farthest from the inlet, especially when several devices are operating simultaneously. These fluctuations can result in equipment failure.
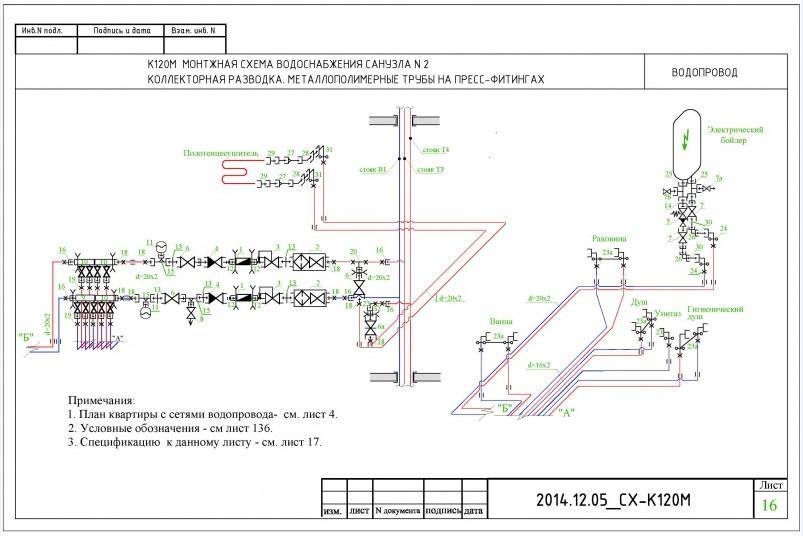
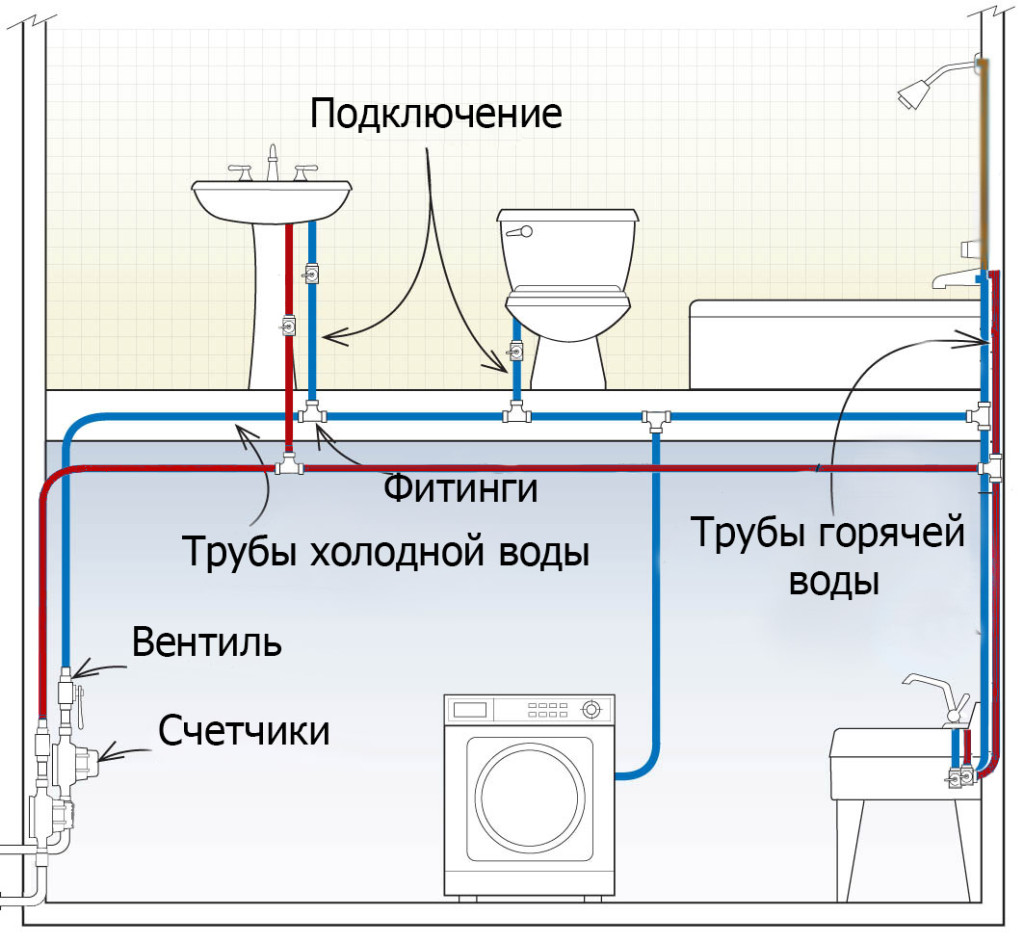
Collector

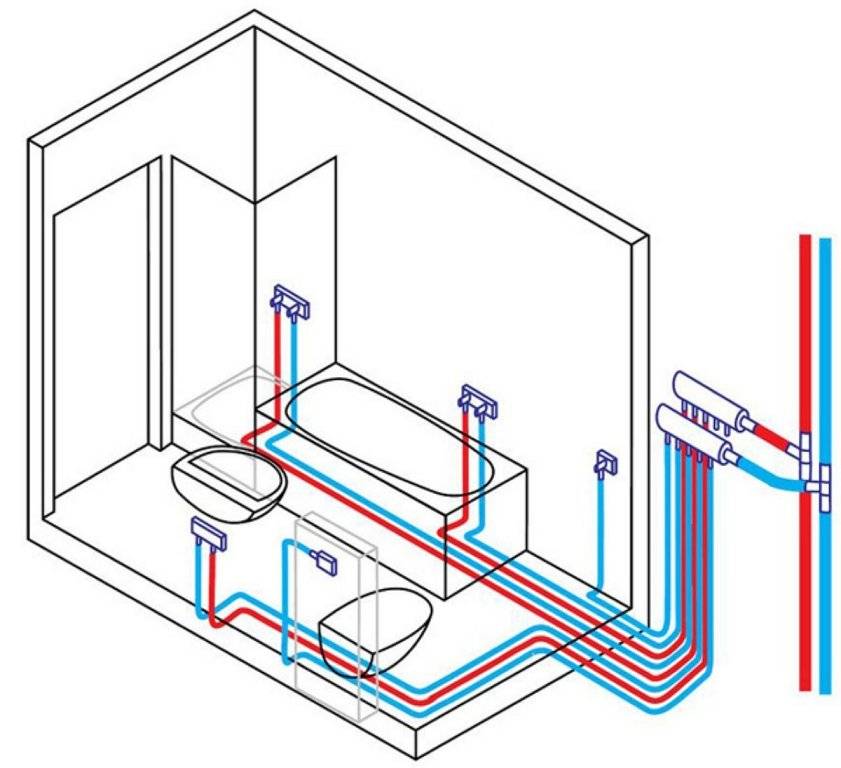
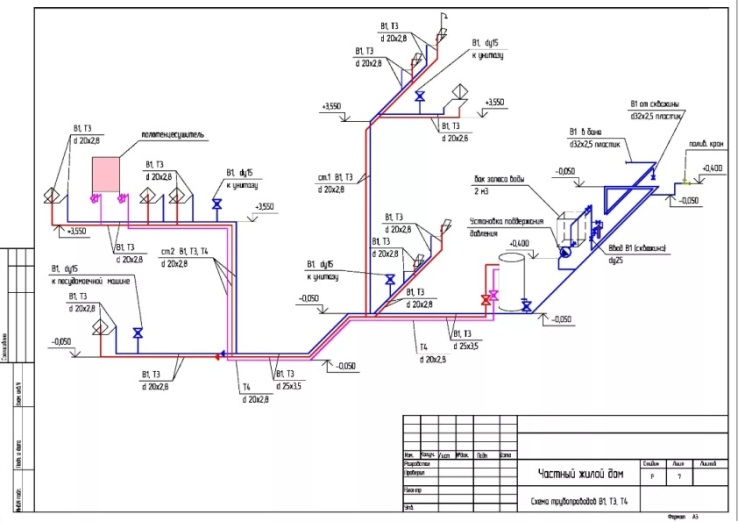
It is more profitable to use a collector scheme for water distribution in the case of a large number of water supply units in an apartment.
The main difference from the tee version is the use of a manifold. From the central riser, water is supplied to the collector, and from it to each individual plumbing fixture. Thanks to this, it is distributed evenly. Therefore, the pressure in the pipeline does not decrease at the points farthest from the input.
If repairs are necessary, only the branch with damage is cut off, and not the entire water supply. For the same reason, each branch can be mounted uniquely for the needs of a single consumer. It may be necessary to install additional filters in the area that supplies water to the washing machine. And for the operation of the toilet bowl, they will not be needed.
Separate collectors are purchased for distributing hot and cold water. Between them and the risers, taps are installed to stop the water supply in an emergency or during repairs. Consumers receive water from collectors, and hot water and cold water are supplied to the bath, sinks. To the toilet and washing machine - only cold water, and to the heated towel rail - only hot water.


If there are a lot of drawdown points, then several consumers can be connected to one branch of the collector in a tee scheme.
With pass-through sockets
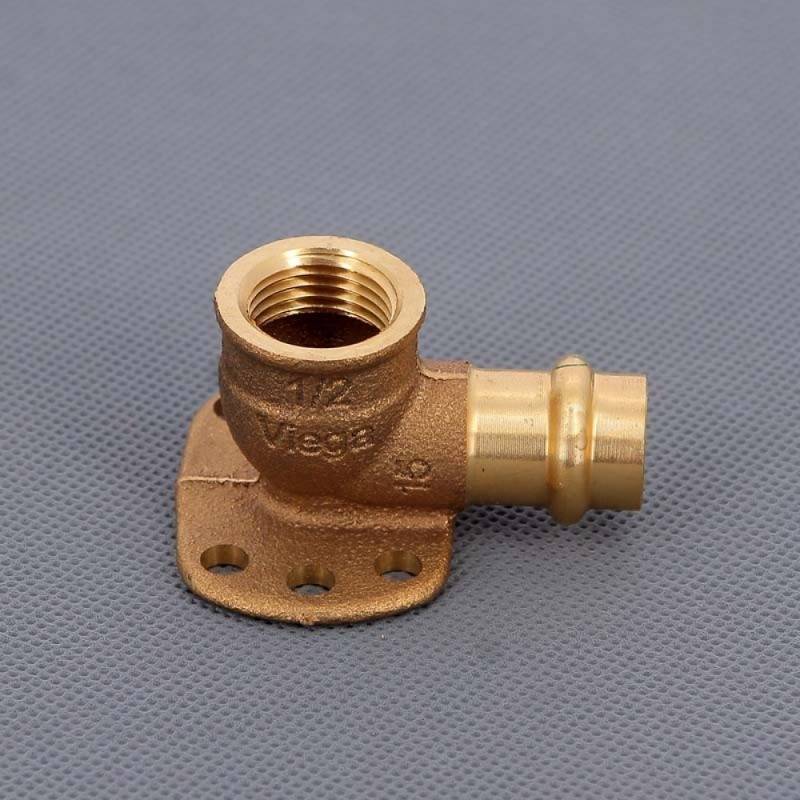
A pass-through socket is a connector in the form of an elbow with a 90° bend, with which you connect the water supply in the apartment. The design of the sockets includes brackets for fastening to the wall, threads on the consumer connection side and inlets for soldering with a pipe through which water is supplied.
To connect mixers, double sockets on the bar are produced. Such connectors are used for faucets in the bathroom or shower cabin. A significant drawback is the complexity of installation - you have to solder two pipes at the same time.
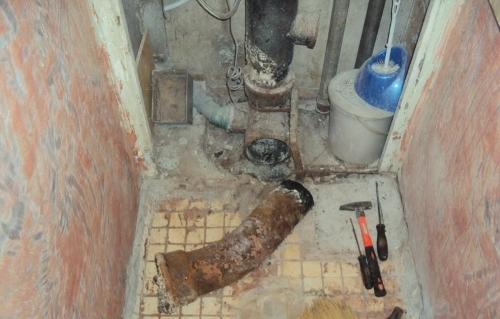
Dismantling of the old sewer
To prepare the basis for the installation of a new sewer, you need to dismantle the old sewer system.
It is desirable to carry out the dismantling of the sewer in the apartment in stages.
Stages of dismantling the old sewerage:
- First you need to turn off the water.
- Using an adjustable wrench, disconnect the hose that conducts water to the toilet flush barrel.
- Unscrew the bolts securing the toilet bowl and dismantle it.
- Clear out the bathroom. To do this, you need to take out all plumbing fixtures.
- Disassemble the previous sewer system.
- Dismantle the pipes that are attached to the riser.
- Clean the tee socket. To install a new cuff, you need to get rid of the remnants of the old grease, as this can become an obstacle to the quality installation of a new sewer system.
These are the main stages of dismantling the sewer
However, you should first pay attention to the wiring of the sewer in the room.
Accounting and control
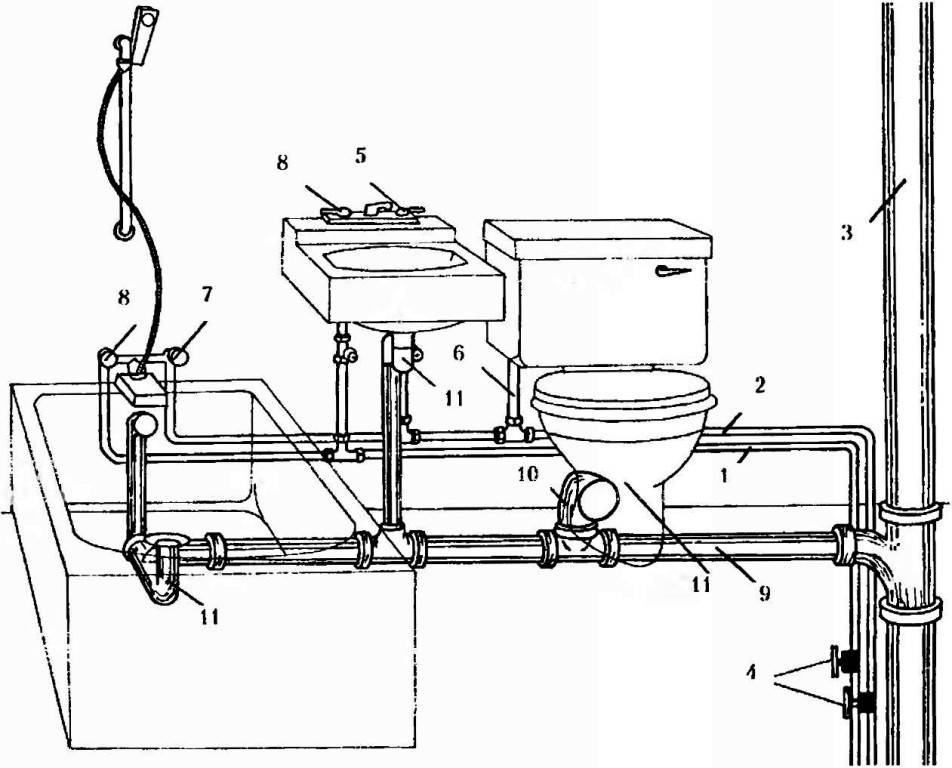
The selection and accounting unit consists of a shut-off valve, a coarse filter, a water meter and a check valve. Assembled as shown in the picture. Each of the devices indicates the direction of the water flow for it, it must be observed during assembly.
Selective-accounting water supply unit, assembly
The assembly is assembled with waterproofing of the joints with FUM tape and is also connected to the riser, having previously blocked the water; Remember to close the shut-off valve before supplying water. This is the only operation, and a short one, that requires turning off the water supply to the neighbors in the riser.
Separate meter units are needed for cold and hot water. It is highly desirable that the counters and valve handles be highlighted in color.The meter readings should be clearly readable without any additional operations (hatch removal, etc.), so it is often necessary to pre-assemble a part of an integral pipeline, sometimes of a rather bizarre configuration, to connect metering devices to the riser. In addition to pipes and a soldering iron, for this you will need transitional couplings from plastic to metal MPV - a threaded inner coupling. Plastic is connected to metering units using MRN - external threaded couplings.
The meters are sold sealed, but this does not mean that you can immediately call the water utility and pay for water according to consumption. The factory seal is for this (the Russian land is rich in craftsmen) so that no one gets into the meter and twists or files anything there. The factory seal must be protected; without it, the meter is considered unusable, as well as without a certificate for it.
When installing water meters, you need to declare to the water utility and call its inspector. You can use water before he arrives, the inspector does not need zero readings, he will write down the initial ones, seal the meter and drain the filter with his seal. Payment for water consumption will go after registration of metering devices.
HMS, aquastop, filter
Although the design of the HMS is non-separable and does not allow stealing water with its help, and this device is not subject to sealing, connecting the HMS to the meter is unacceptable: the meter impeller can become clogged with sludge. HMS with a flask filter is connected after metering devices; filter - immediately after HMS. An aquastop can be connected immediately after the filter, but if it is electrodynamic, the magnetic field of the HMS can cause its false operation, but it makes no sense to attribute the aquastop far from the riser: it does not react to a breakthrough before it.
Internal wiring and installation
Installation of pipes inside the house is an important and crucial stage. It is really possible to do the installation of pipes with your own hands, but only taking into account the design features of the pipe layout inside the house.
Making the right pipe layout means simplifying your life in the future. With proper wiring for any pipe, the risk of destruction is reduced, its repair is extremely rare, and the useful return is improved.


There are two main types of distribution of water supply systems in private homes. There is a breakdown:
- parallel;
- consistent.
Parallel wiring is better suited for large houses, where pipes diverge into many rooms that are far from each other. Sequential is suitable for apartment-type buildings, where bathrooms are located compactly.
Parallel mounting
The parallel pipe laying scheme provides for the installation of many branches, the diameter of which is equal to the minimum values, namely, it does not exceed the mark of 30-40 mm, except in rare cases.
The small diameter of the pipe has a positive effect on cost savings. The point here is that parallel wiring provides for the need to make many parallel water supply branches. Each branch serves its specific direction. There are one or two nodes per branch.
The branches are isolated from each other, the input is carried out in the boiler room, where they are connected to the finished collector outlet. Cranes are mounted at each outlet, allowing any pipe to be cut off from the supply.
Such a scheme allows you to make the most safe and autonomous pipeline. Each pipe operates separately, breakage in any area is easily localized.
But at the same time, a parallel wiring scheme, even taking into account the fact that the minimum diameter of the pipes is required for it, requires a significant amount of funds, because each branch needs to be laid, and this costs money.
Mounting in series
The sequential scheme takes a slightly different approach. It has one or two base pipes, the diameter of which starts from 80 mm. These pipes are a kind of clusters, they pass through all the premises with bathrooms.
At the location of the bathroom, a smaller branch is diverted from the main pipe, whose diameter is calculated depending on the water demand of a particular device.
The larger the diameter, the more water the knot will receive. A series circuit is a more traditional option. Sewerage is collected according to the same system.
The large diameter of the pipes slightly increases their cost, but this approach is still cheaper than the parallel one, since in the end you save on the length of the pipes.
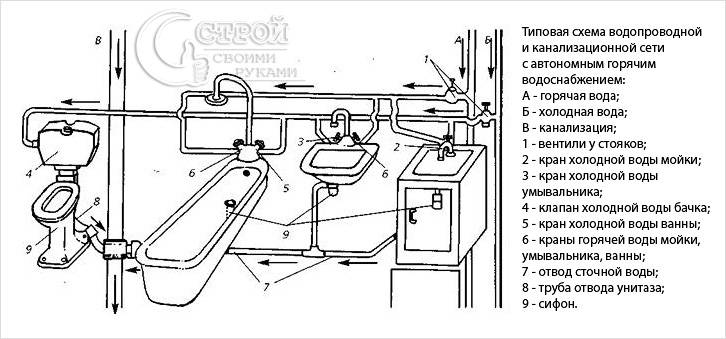
Plumbing in private homes
- Prepared pipes are laid in the house, starting from water consumers.
- The pipes are connected to the consuming point with an adapter so that a tap can be installed to shut off the water.
- Pipes are laid to the collector. It is advisable not to pass pipes through walls, as well as partitions, and if this has to be done, enclose them in glasses.
For easier repairs, place pipes 20-25 mm from wall surfaces. When installing drain taps, create a slight slope in their direction. Pipes are attached to the walls with special clips, installing them on straight sections every 1.5-2 meters, as well as in all corner joints. Fittings, as well as tees, are used to combine pipes at angles.
When connecting pipes to the collector, shut-off valves are always installed (it is needed for repairs and the possibility of turning off water consumption).
Pipe laying methods
There are two laying methods:
- open. Pipes are attached to the wall using special support elements (clamps);
- hidden. In the walls (sometimes in the floor) recesses are made into which pipes are laid.
The first option is found in houses with relatively thin walls that do not allow making recesses. This method is simpler, but, during finishing, you will have to hide the wiring behind special designs. Most often, boxes are made of drywall or other sheet material, on which a finish is installed. Boxes take up the space of the room, spoil the even shape of the walls. When assembling, it is necessary to think in advance about the possibility of quick dismantling for urgent repair work. Many apartment owners do not take into account the risk of leaks or other problems when making repairs. In emergency situations, they have to break the finish and subsequently restore it, spending money and time.
With hidden installation, the plane of the walls and the space of the room are kept intact. However, laying the wall finish (usually tiles) makes it impossible to access the pipes. It is impossible to provide the possibility of temporary dismantling of the tile. This puts forward special requirements for the assembly and quality of connections. If there are leaks, they will not be noticed immediately. Sometimes neighbors from the lower floor, who have seriously damaged expensive repairs, inform about this. Therefore, it is necessary to perform all connections very carefully, without the slightest error.
The choice of one method or another is the prerogative of the owner of the apartment.It is necessary to carefully weigh the pros and cons of each option, taking into account the configuration of the apartment, the type and composition of the wiring. Usually, the thickness of the walls becomes the main criterion - if they allow, they do concealed installation.
Mounting Features
Actually, most of the information has already been told, it remains only to assemble the purchased components in accordance with
with a design idea.
The pipes are assembled from the riser (inlet pipe) towards the consumer. In other words, pipes are installed first, which
closer to the point of discharge into the common house riser.


In each connection, the pipe must enter the socket of the previous one by about 50 mm. If the cuffs in the bell are too
dense and it is impossible to insert a tap, then you need to lubricate the cuffs with liquid soap or detergent - it will work
much easier.
Plastic pipes are cut by any improvised means: a grinder, a hacksaw for metal. You can even cut
with an ordinary wood saw. The main thing is to clean the cut edge from all kinds of burrs - burrs inside the pipe will
provoke blockage, and burrs on the outside will not allow you to properly assemble the parts.
Some craftsmen practice applying silicone to the cuffs of the assembled parts - supposedly the joint is even more
sealed. I would like to note that the cuff connections that any sewer plastic pipe is equipped with
do their job very well without silicone. Therefore, it is still recommended to refrain from amateur performance.
In some situations, it is necessary to fix two parts together so that during operation one does not come out of the other.
It is categorically impossible to do this with the help of self-tapping screws, which some masters twist into the end of the socket. Sticking
inside the pipe, the sharp tip of the self-tapping screw will collect hair and cause blockage. If for any reason the collected
the assembly experiences mechanical stress “for undocking” - you need to fix both parts with brackets or other
fastening methods.
To form and control the required pipe slopes, it is very convenient to use a laser level. By constructing a horizontal
the beam is slightly higher than the horizontal lounger, you can control the slope by substituting a tape measure on the controlled areas and
comparing the distances from the pipe to the beam.
On this, in principle, and all. We considered the main points of installing sewerage in the bathroom, maybe I’ll add something
with time.
Rate this post:
- Currently 4.78
Rating: 4.8 (63 votes)
Recommendations for the installation of the toilet
The most popular toilet model is floor standing. If the floor in the bathroom is lined with ceramic tiles, you need to put something soft under the toilet - for example, a piece of linoleum or rubber. To connect the toilet to the sewer, you need to use a special cuff. One end is connected to the outlet of the toilet, and the other to the sewer pipe.
The toilet bowl is attached to the floor with special studs, which are inserted into dowels fixed in pre-made holes.
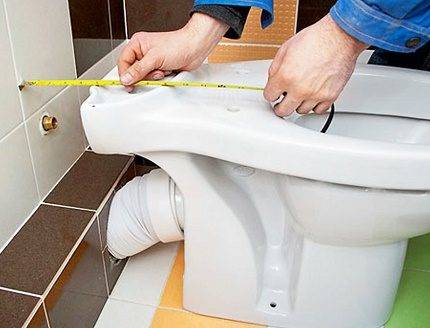
The toilet is usually sold already assembled. You just have to attach it to the floor and connect it to the water supply and sewerage.
In some cases, the toilet is glued to the floor with epoxy. In this case, the toilet should not be used for about 12 hours until the adhesive has completely cured.