- Connection to sewerage networks, what documents are required
- Do-it-yourself work
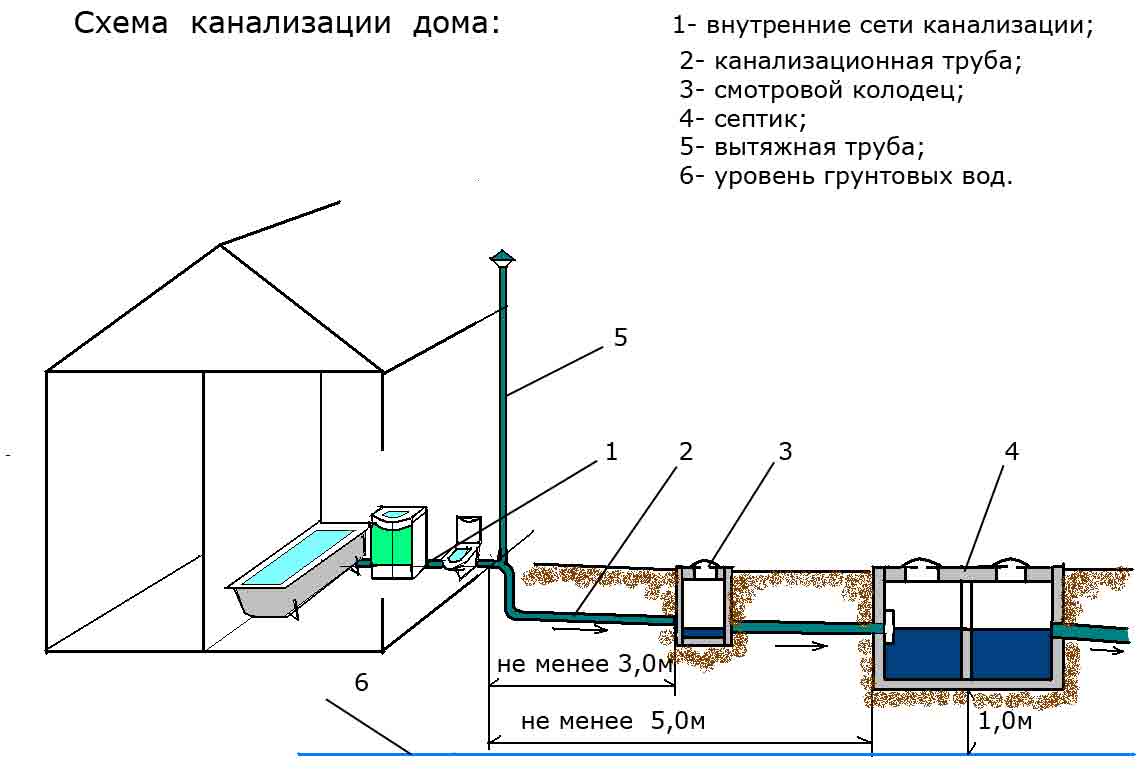
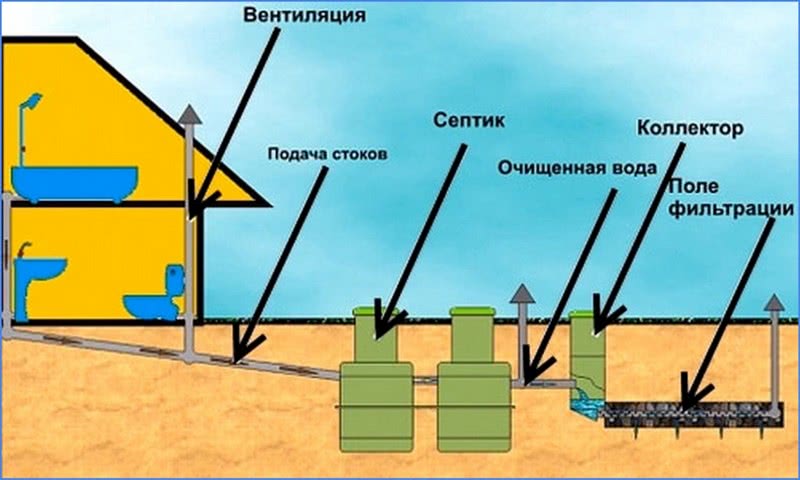
- Scheme of the sewer system
- Self-assembly
- Paving depth
- How to make a sewer in a private house
- Location for a septic tank
- Proper organization of sewerage inside the house
- Choosing a drain location
- Do-it-yourself sewerage arrangement in the bath: a step-by-step guide
- A step-by-step guide to building a sewer in a bath with your own hands
- Sewerage construction in a private house: ventilation scheme in the bath
- Sewerage device from concrete rings
- Advantages and disadvantages of the system
- Scheme and calculations
- Preparatory processes
- Mounting rings
- Sealing
- Installation of ceilings / backfill
- Independent production of a septic tank (two-chamber cesspool)
- Making a septic tank
- How to make a sewer in a private house from reinforced concrete rings
- Exhaust pipe outlet
Connection to sewerage networks, what documents are required
Finished house plan. Mandatory, on paper, a diagram of the laying of a sewer pipeline must be presented. This process is carried out with the help of a company that conducts geodetic expertise.
All technical conditions for connecting sewerage. All these issues are considered by the organization.
The scheme on which the plan will be indicated, it is according to it that it is necessary to connect the sewer. This document must be provided by a specialist who designs and installs technical functions. It relies on the basis of the specification, thus producing a new plan.
The project, which is prepared in the water utility, with their approval. This process is carried out by architectural management.
It is also necessary to remember one main nuance. Before starting construction work, you must obtain permission from your neighboring residents. They are required to sign their consent. If additional questions arise regarding the pipeline that will pass through the places where other electrical or thermal networks have already been laid, then in this case, it is necessary to take another permit. It is necessary to require a special document in the organization. If the owner does not pursue certain requirements, he will have to pay a huge fine.
To lay the pipeline to the central highway, you need to take permission. If there is a well nearby. The pipe that will pass through the site to the well will be directed at a certain slope and angle. To determine the laying depth with accuracy, it is necessary to use the special values \u200b\u200bprovided by the data in SNiP.
There is also one main piece of advice to keep in mind. This question concerns the existence of existing curves on the track. As shown in practice, turns on the track should not exist, but if such a problem suddenly arises, then it is necessary to turn the highway a few degrees, about 90. It is also recommended to install an inspection well.Since, in this case, the well performs the function of control over this system.
A significant role is played by the correct selection of the height of the trench digging. Certain elements must be taken into account. The pipe diameter must be larger than the inner diameter. The usual size is up to 250 mm. Basically, pipes with a diameter of 150 to 250 mm are used. After the specialist decides on the size of the pipes, it is necessary to dig the bottom of the trench. As soon as the process is completed, the pillow can be provided for laying the pipeline.
Do-it-yourself work
To organize a sewerage device in a house with your own hands, you need a scheme with which you can calculate what types of materials and plumbing will be needed and in what quantity. The drawing must be drawn to scale.
You also need to take into account factors such as:
- Soil type;
- Groundwater level;
- Volume of water use;
- Climatic features of the area.
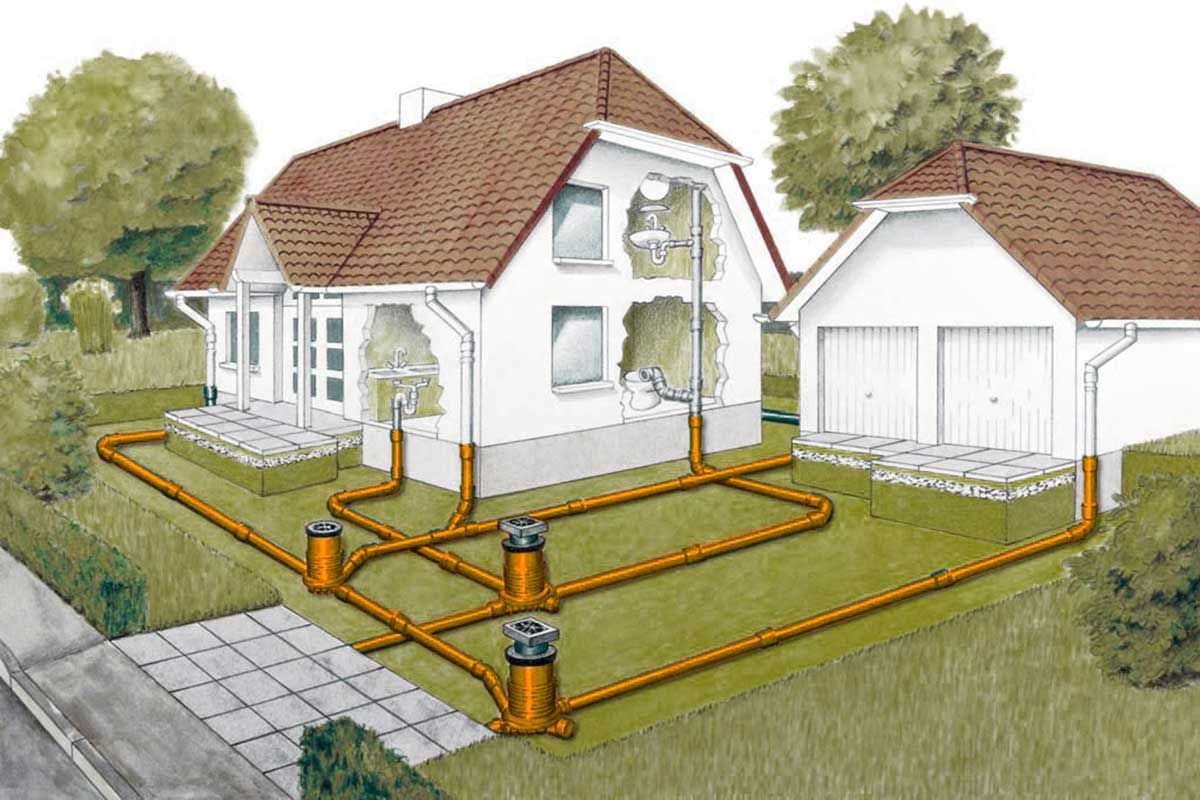
Several types of laying sewer pipes are possible: under the floor, inside the walls, outside, but this is less aesthetically pleasing. Pipes laid in walls or under the floor are plastered 2 cm or filled with cement. To reduce the noise of the system, the pipes are wound without air gaps.
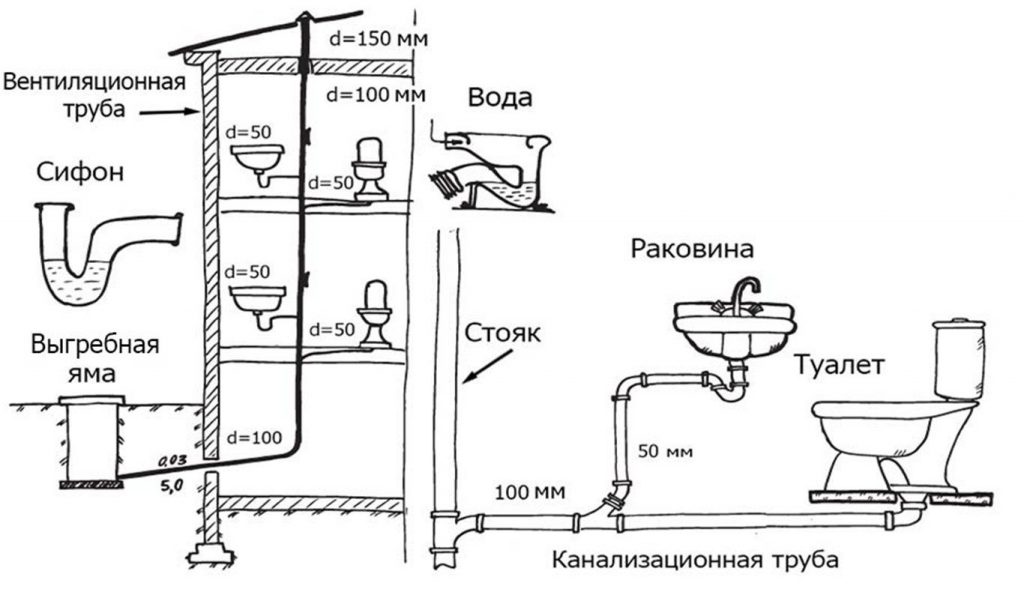
Scheme of the sewer system
The sewer system in a private house has a complicated scheme; it must take into account, in addition to depth and materials, the location, taking into account the requirements.
Namely:
- To install a septic tank or other type of wastewater treatment, the lowest place on the site is selected.
- The distance to the source of drinking water is at least 20 m.
- To the roadway - at least 5 m.
- To an open reservoir - at least 30 m.
- To a residential building - at least 5 m.
Plastic pipes are well suited for arranging sewage
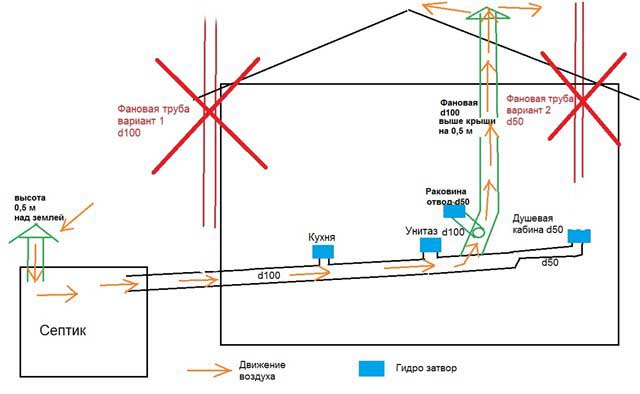
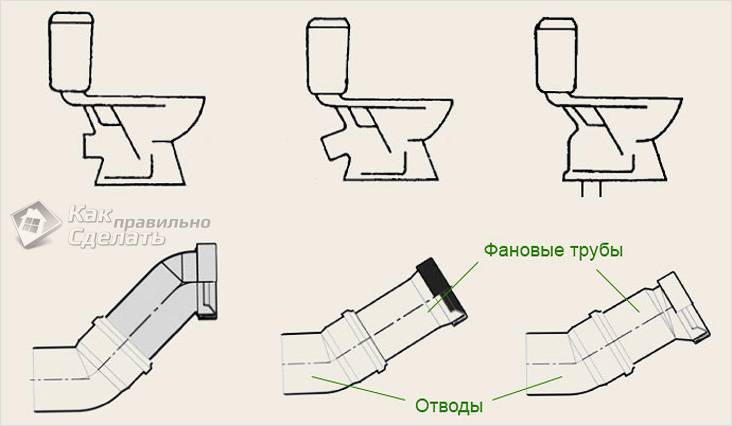
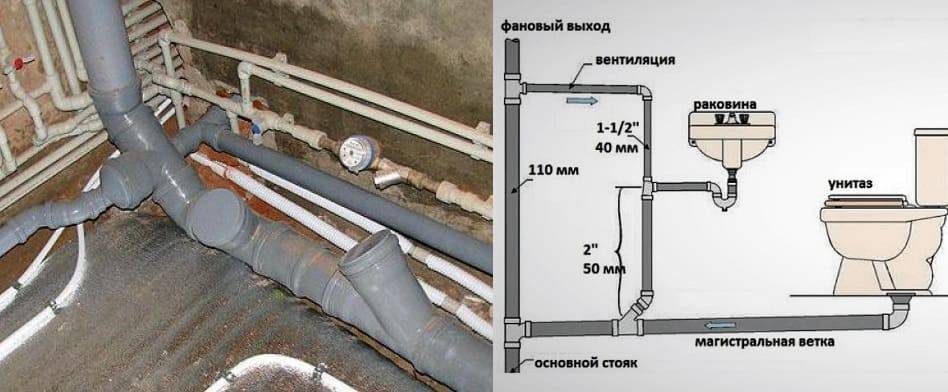
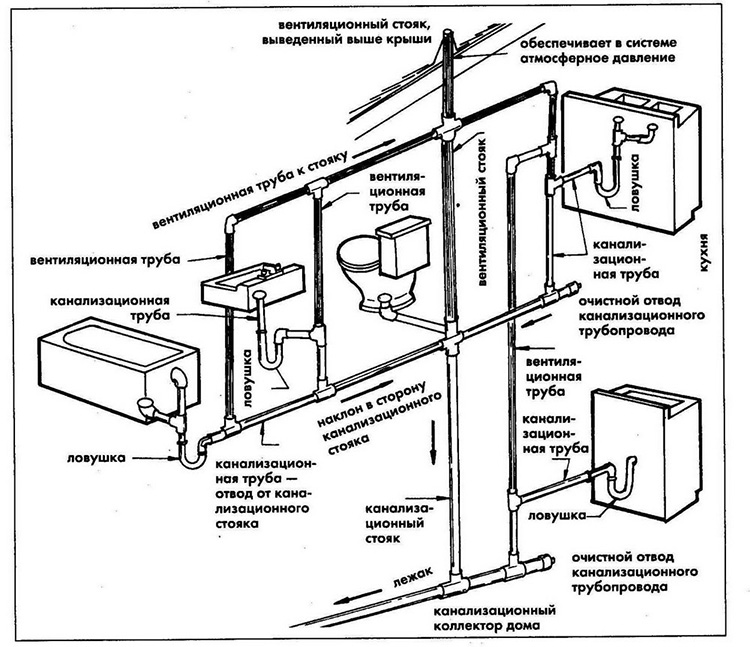
When drawing up a diagram, it is necessary to mark all the water drain points and the riser. The stand must be within easy reach. Usually it is installed in the toilet, because the toilet drain pipe has a diameter of 110 mm, like that of the riser.
Outflow pipes from the bathtub and sink are usually combined into one line.
It is important to remember that the toilet pipe should not have any inlets from other pipes. In addition, the diagram should include the location of the vent pipe.
Self-assembly
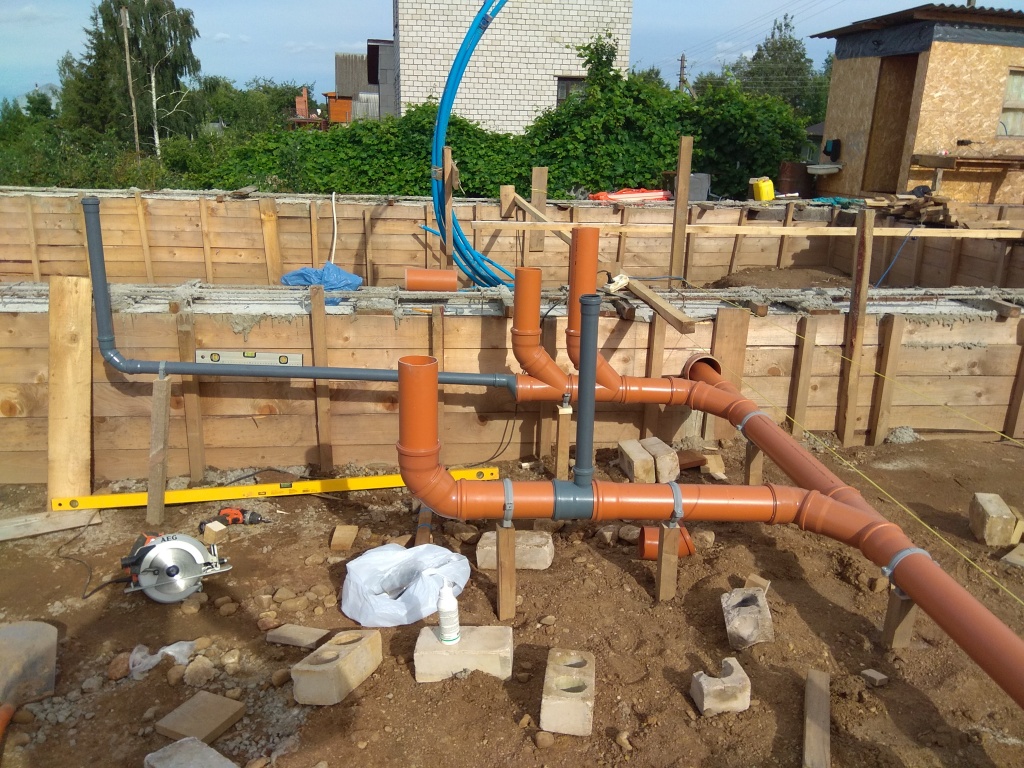
It is recommended to start installation in the house on your own from the inside of the sewer, as well as ventilation for it. The sewer system must contain hatches in the pipeline for inspection and repair. Pipes are fastened to the walls with clamps, hangers, etc. Crosses, tees and manifolds of large diameter (about 100 mm) must be used at the joints. Adapters will help to connect pipes of different diameters.

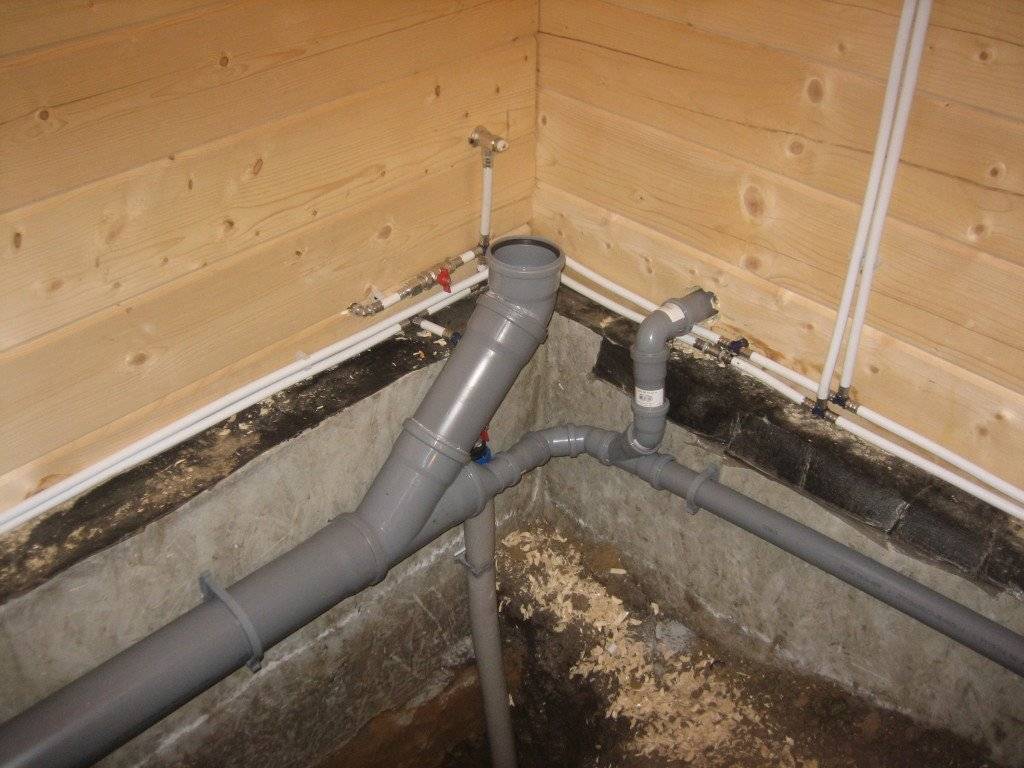


Ventilation is also important, which performs 2 functions at once - air inflow in rarefied areas, exhaust gases. Vacuum is more often formed when water is drained in the toilet bowl and when the pump for draining the washing machine is running. The influx of air prevents the capture of water in the siphon and the formation of a water seal, which has a loud unpleasant sound. A continuation of the riser on the roof is a fan pipe.
To install it correctly, you need to follow the rules:
- The diameter of the fan pipe is 110 mm to prevent ice blocking the passage.
- The height of the pipe on the roof is higher than the rest, including stoves, fireplaces, etc.
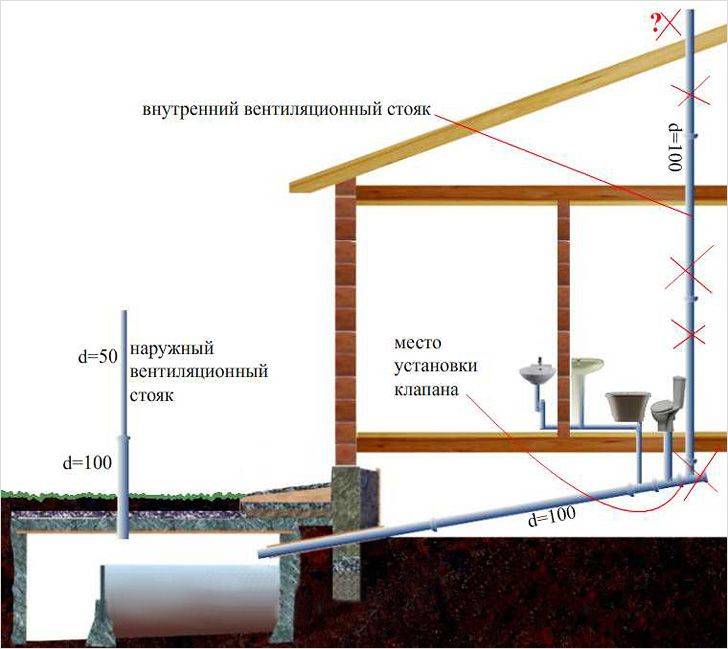
- Location at a distance of 4 m from windows and balconies.
- The fan pipe must be separate from the general ventilation and with a subsequent exit to the attic.
When arranging sewerage, safety regulations must be observed
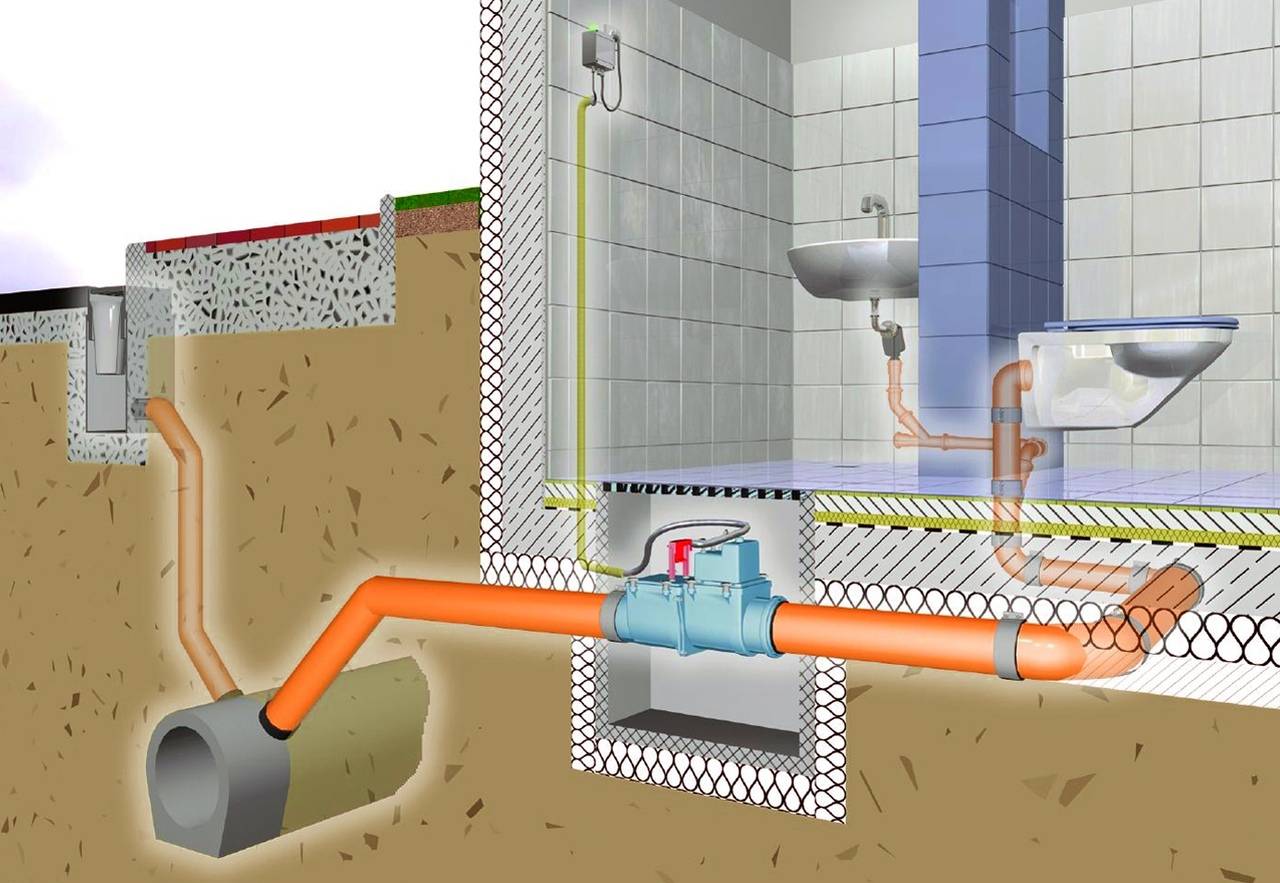
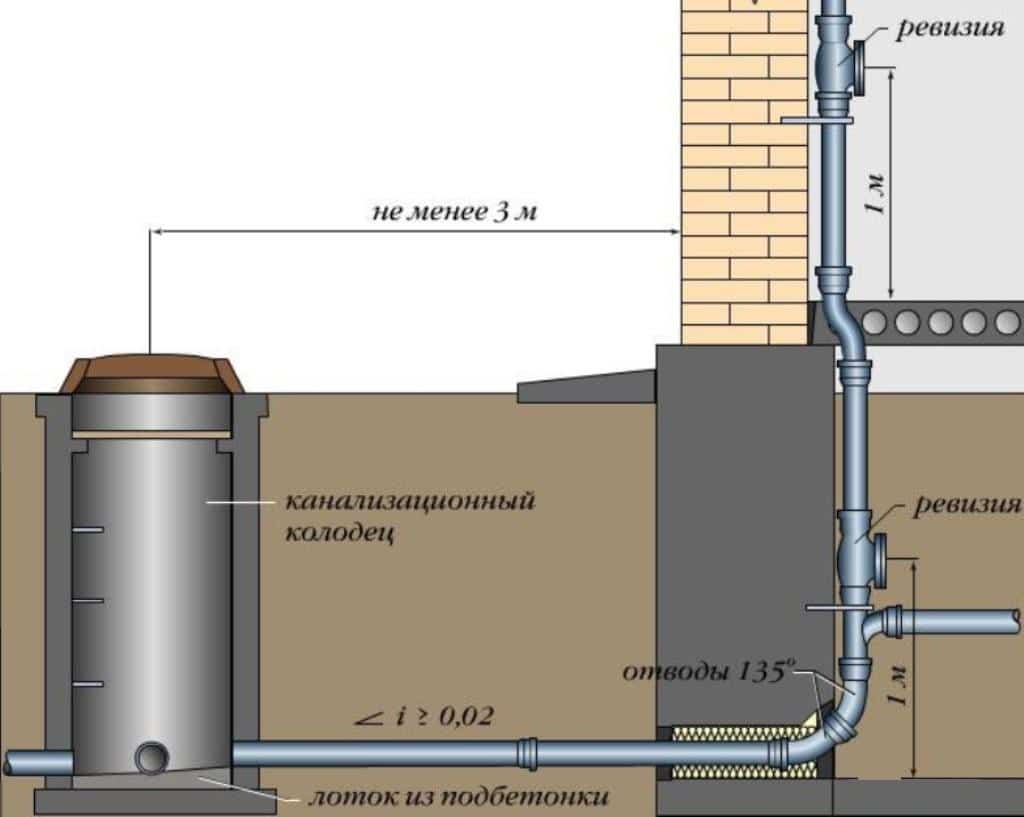
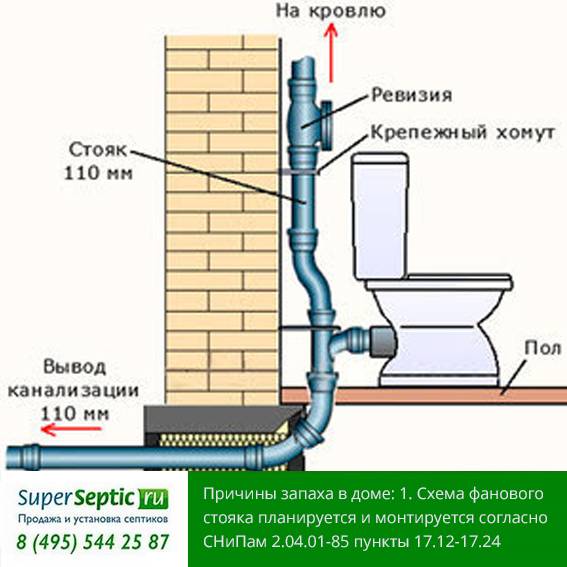
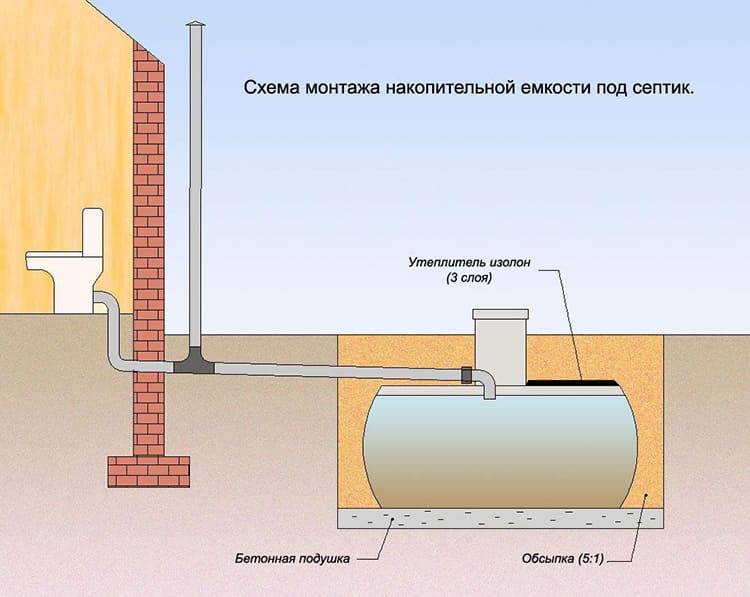
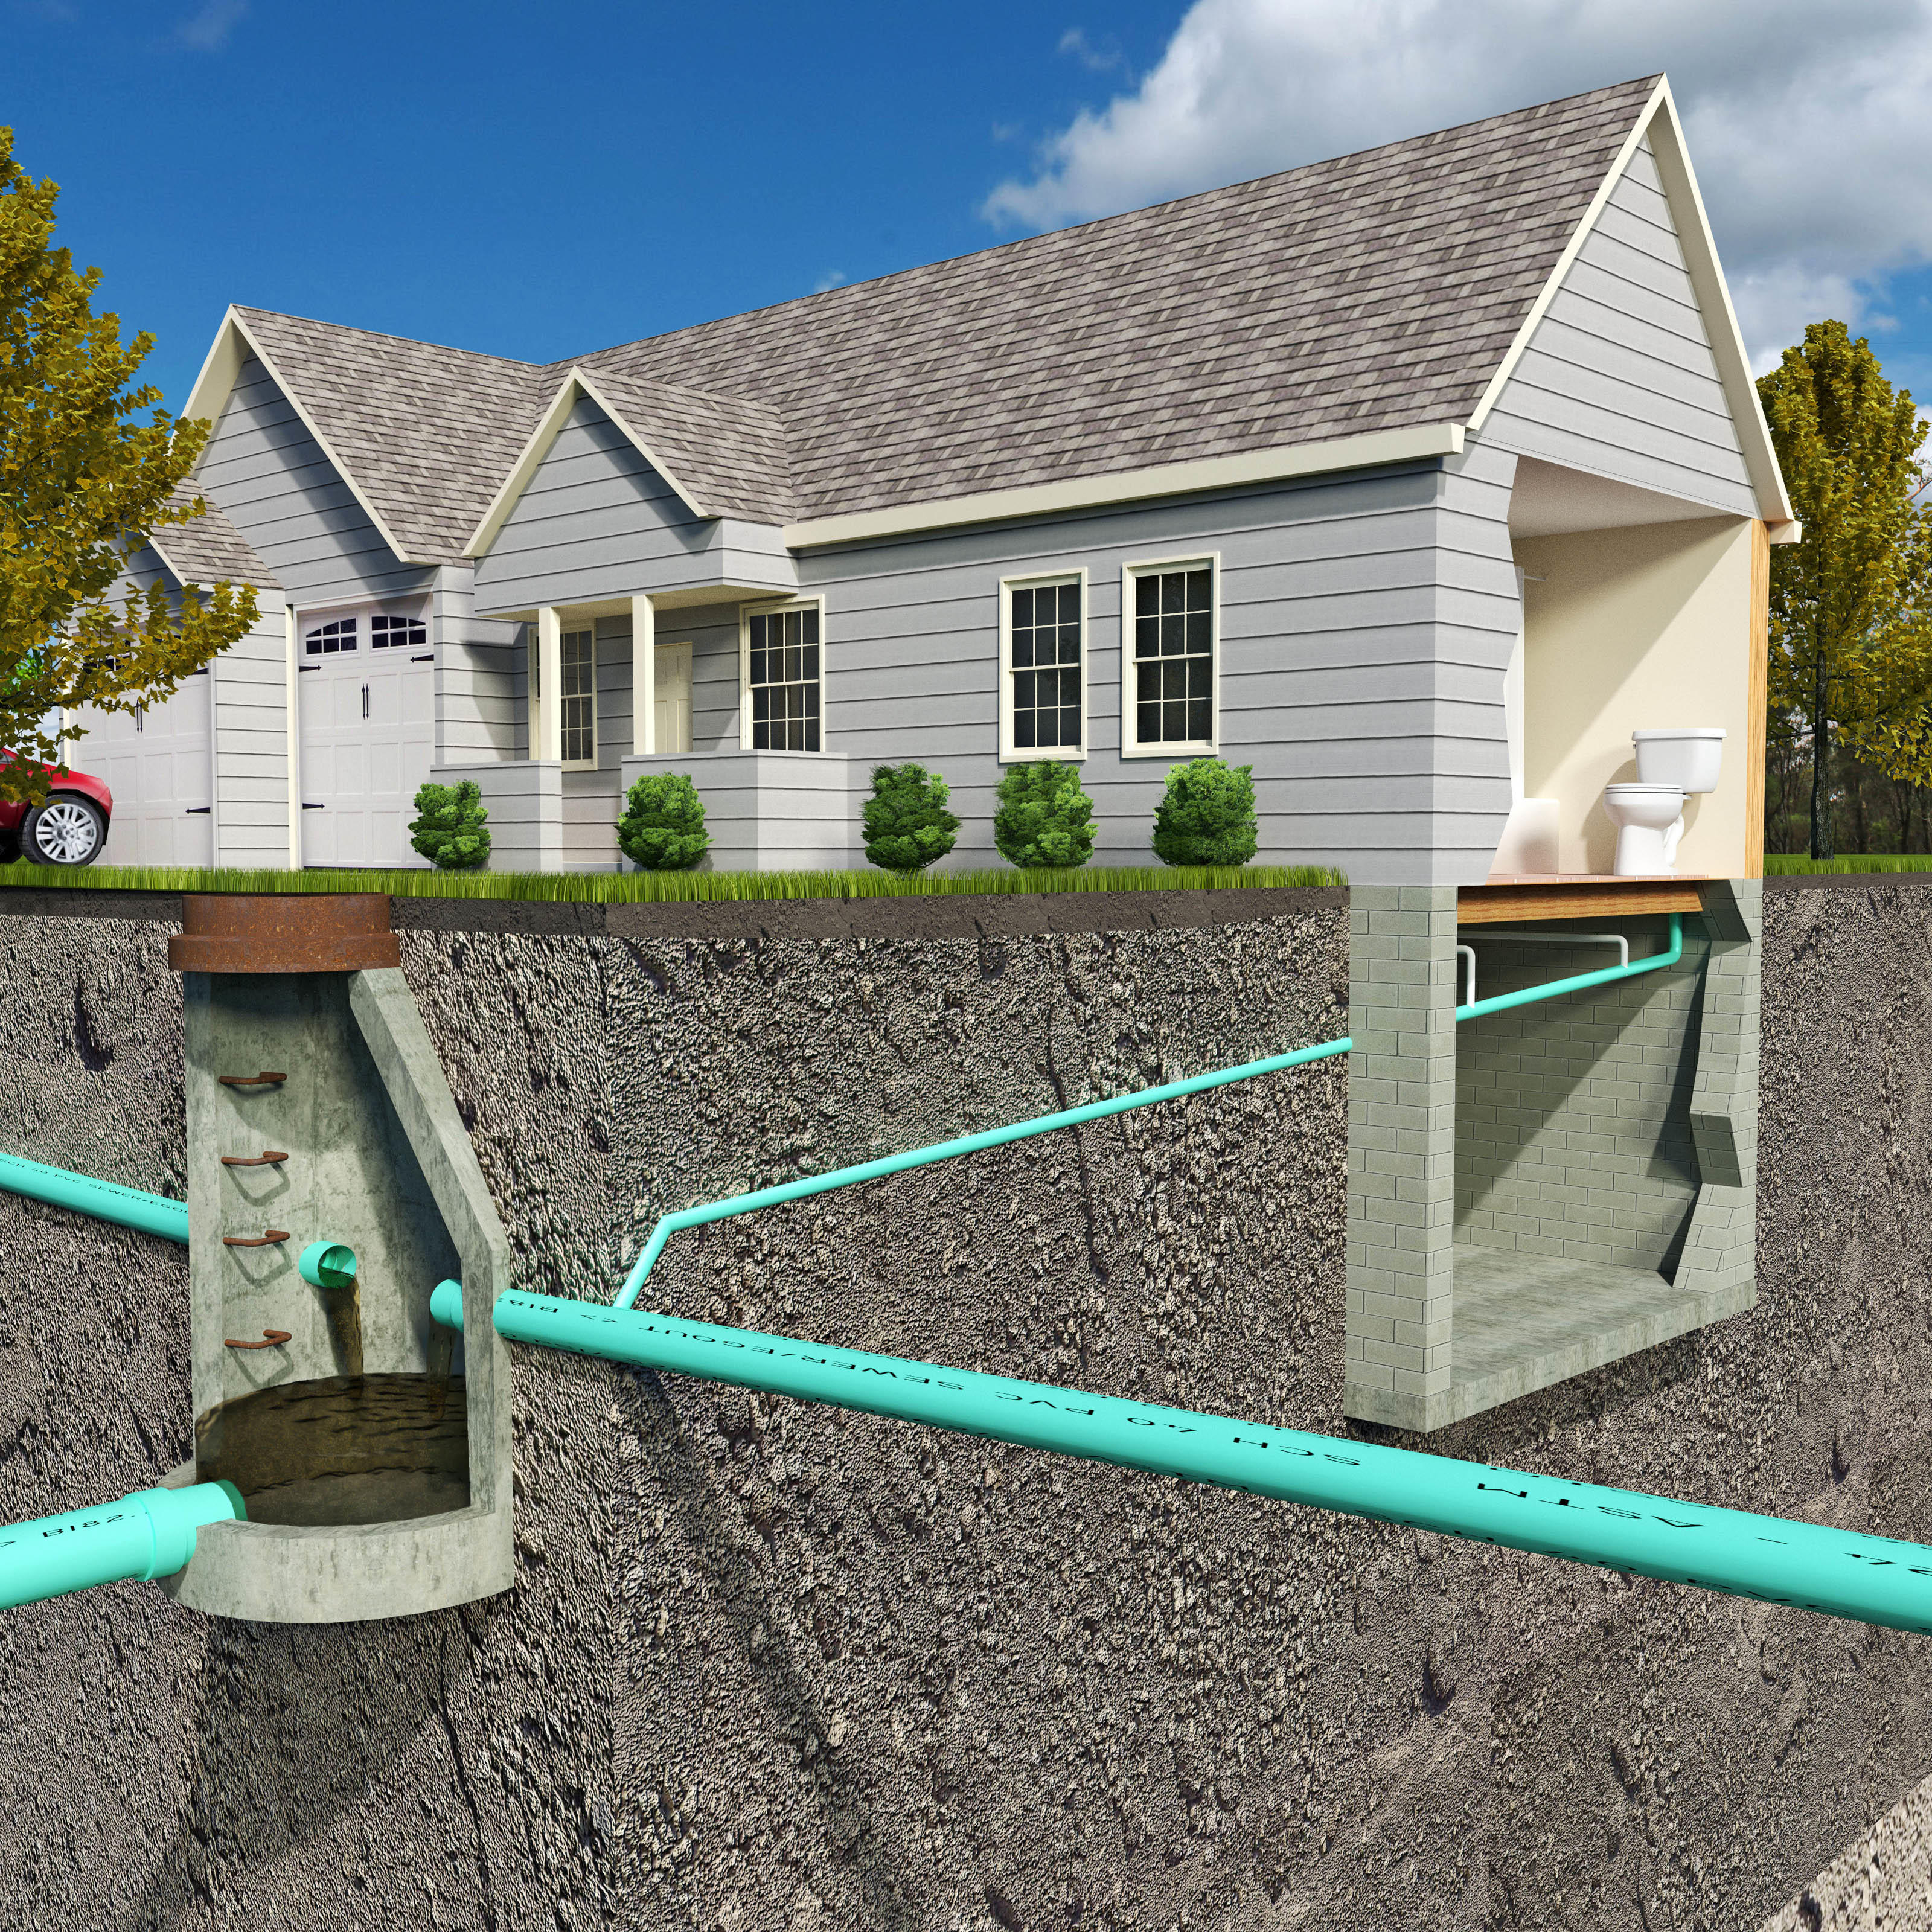
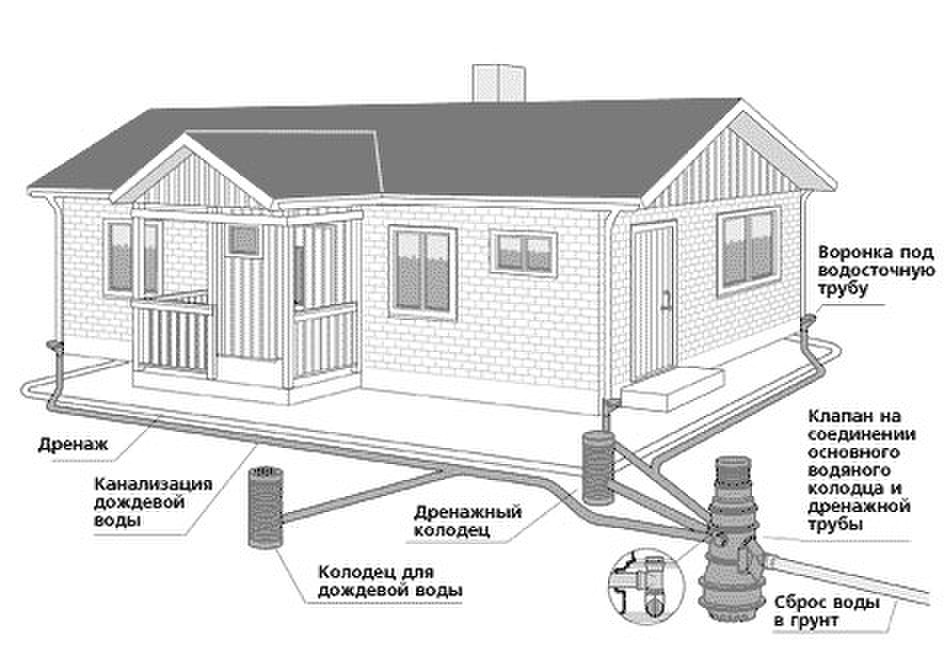
Through a sleeve with a non-return valve, the collector in the foundation exits to the external sewer. The sleeve diameter is 150-160 mm. The reverse flow of wastewater in the presence of a check valve is not possible in the event of contamination of the pipeline or overflow of the wastewater receiver.
Paving depth
At what depth to lay the pipes depends on the deepening of the septic tank and the depth of soil freezing in the region. Moreover, pipes must be laid below this level.
They are laid according to the following scheme and rules:
- Lack of turns from the house to the septic tank to prevent blockages.
- Pipes of the correct diameter.
- The same pipe material in the same pipeline.
- Compliance with the slope (approximately 0.03 m per 1 linear).
If there is no slope or it has an insufficient degree, then you will need to install a sewer pump. Also, additional wells should be included in the external sewerage scheme, especially if there are pipeline turns from the house to the septic tank. They will help in the maintenance of sewers and the elimination of blockages or freezing.
Sewerage, like plumbing, is recommended to be supplemented with thermal insulation made of polyurethane foam and polyethylene or to lay an electric cable.
How to make a sewer in a private house
The creation of any communication systems begins with the development of a working draft. It indicates the piping layout and the installation location of the septic tank. After the project has been prepared and approved, you can choose a suitable sewer, determine the required diameter, and how much material will be needed for the job.
Location for a septic tank
When creating a sewer system, it is important to choose the right location for the septic tank. The choice is influenced by such factors as:
- the depth of the location of soil water;
- relief features (you need to take into account the direction of the slope on the site);
- location of water sources;
- depth of soil freezing;
- soil structure.
Installation of septic tanks must be carried out taking into account several requirements:
- you can install the structure no closer than 5 meters from a residential building;
- the distance to the well is at least 30 meters;
- from green spaces, the septic tank is placed no closer than 3 meters.
For a septic tank and a cesspool, it is necessary to provide a place for the arrival of a sewage truck.
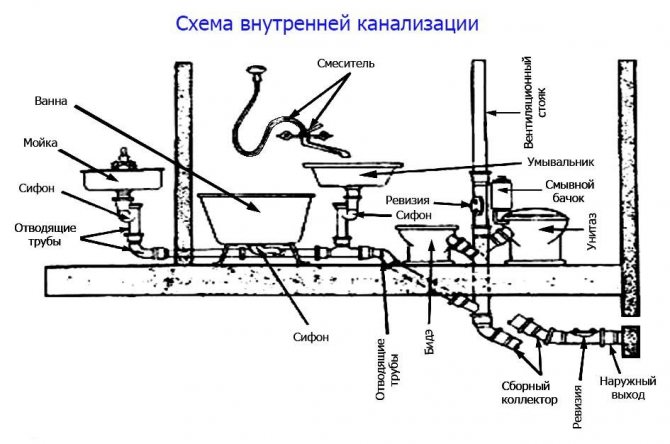
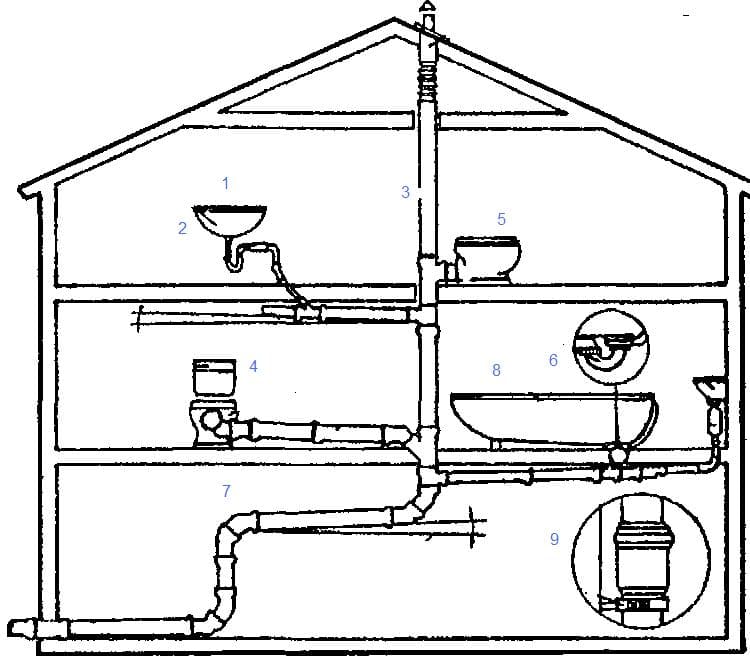
Proper organization of sewerage inside the house
First, a central riser is installed, for which you need to use a pipe with a diameter of 110 mm. For unhindered removal of gases, the riser is positioned in such a way that its top protrudes above the roof of the house or goes into the attic. Inside the house, the central riser must be installed no closer than 4 m from the windows.
After that, horizontal pipes are laid, inspection hatches must be provided, they will allow, if necessary, to check the condition of the pipes and it will be easier to remove the blockage. The hatches must be installed above the toilet and near the lowest parts of the system.
All plumbing fixtures must have siphons with a water seal. This will prevent bad odors from entering the house. It is undesirable to lay pipes with 90 ° turns, this will significantly complicate the movement of drains.
The toilet is connected directly to the sewer, it is necessary to use a pipe of at least 100 mm in diameter. Washbasin and bathtub can be connected with a 50 mm diameter pipe.They need to be placed with a slight slope - about 5 mm per 1 linear meter, this will facilitate the movement of drains.


Choosing a drain location
When choosing the location of the drain, you should, first of all, make sure that the unpleasant smell does not penetrate into the living quarters. As a result, it should be located no closer than five meters from the house. The optimal distance will be ten meters, it is also not worth placing a septic tank too far, since this significantly increases the cost of laying the pipeline network. The external sewerage connection to the house should not be carried out at a right angle. In addition, the following must be taken into account:
- water sources should be located no closer than thirty meters;
- a septic tank cannot be installed on the border of a neighboring plot;
- for the convenience of pumping out sewage, it is better to place drains near the road;
- especially careful sealing of the storage tank is needed when the groundwater is located close to each other;
- the laying of the pipeline network facilitates the natural slope of the terrain.
Rules for placing a septic tank on the site
A cesspool for sewerage has been used since ancient times. Previously, they did not waste energy on sealing its walls, and when the pit was filled, it was covered with earth and a new one was dug out. Now the walls are made of bricks, concrete rings and other building materials.
Liquid waste fractions seep through the soil at the bottom, being filtered, solid components gradually fill the mine, and after a while they need to be pumped out.
The arrangement of a cesspool is advisable if the volume of wastewater in a private house does not exceed the value of one cubic meter per day. If this limit is exceeded, environmental pollution will occur.
Instead of a cesspool, you can equip a sealed container for the accumulation of wastewater. In this case, a thorough waterproofing of the bottom and walls of the shaft is performed. Thus, the possibility of contamination of the soil and drinking sources is prevented. The disadvantage of this system is the need for frequent cleaning, since the sealed container fills up rather quickly.
Do-it-yourself sewerage arrangement in the bath: a step-by-step guide
As in the case of a residential building, the sewerage of a bath includes an internal and external system. Even if the building has a dry steam room, it will be necessary to drain the liquid from the shower. The water collection system depends on how the floors are installed. The sewerage scheme is entered into the bath project at the development stage and is laid at the initial stage of construction even before the floors are equipped.
If it is planned to install wooden floors from boards, then the elements can be laid closely or with small gaps. If the coating is installed tightly, the floors are formed with a slope from one wall to another. Next, you should find the lowest point near the wall and leave a gap in this place, where the gutter will be subsequently installed (also with a slope). At the lowest point of its placement, a connection is made to the sewer outlet pipe.
If the wooden flooring will be made with slots, small gaps (5 mm) should be left between the boards. A concrete base is made under the floor with a slope towards the central part of the room. A gutter and a sewer pipe will be installed in this area.Instead of a concrete base, metal pallets can be laid on top of the insulated floor under a wooden deck. If the floors are self-leveling or tiled, a water intake ladder is installed at the lower point of the slope, which drains the drains into the pipe.
Using septic tanks for drains from the bath
A step-by-step guide to building a sewer in a bath with your own hands
For the installation of sewer pipes, it is necessary to form ditches with a slope of 2 cm per 1 m. Their depth is 50-60 cm. A pillow should be made at the bottom of these trenches. To do this, a layer of sand 15 cm thick is poured and carefully compacted. In this case, do not forget about the slope.
Next, the installation of the sewer line is carried out. Polypropylene pipes with a diameter of 100 mm are laid in trenches. If necessary, a sewer riser is equipped. It must be fixed to the wall with clamps. Be sure to organize ventilation. When the system is ready, the flooring is installed using one of the previously discussed methods.
Upon completion of all work, the ladders and gratings provided for by the project are connected to the system at the designated locations. In the area where the water intake is connected to the outlet pipe, it is desirable to install a siphon. It will prevent the penetration of odors from the sewer back into the room. Most often, ladders are equipped with built-in water seals.
Sewer pipes in the bath
On sale you can find gutters made of asbestos cement, plastic or cast iron. It is not recommended to use products made of wood and steel, because. they quickly break down under the influence of moisture. The minimum allowable gutter diameter is 5 cm.If the project provides for the presence of a toilet bowl or other sanitary equipment, it is installed and connected. This completes the work on the organization of internal sewage. The external system is carried out in the manner described earlier, and may be a septic tank or a drainage well.
Sewerage construction in a private house: ventilation scheme in the bath
Air exchange in the bath can be organized in various ways. Each of them has its own characteristics and advantages. Having studied the specifics of each method, you can choose the best option for a bath.
The first method involves creating an opening designed to supply fresh air. It should be placed behind the stove-heater at a height of 0.5 m from the floor level. The exhaust air will be discharged through the opening on the opposite side. It must be placed at a height of 0.3 m from the floor. To increase the movement of air flow at the outlet, you need to install an exhaust fan. All openings are closed with gratings.


Sewerage scheme for a toilet in a bath with a septic tank and ventilation
The second method involves placing both holes in the same plane. In this case, the work will affect the wall opposite to the one where the furnace is located. The inlet duct is placed at a height of 0.3 m from the floor level, at a similar distance from the ceiling, an exhaust hole must be made and a fan installed in it. Channels are closed with gratings.
The third method is suitable for flooring where the boards are laid with gaps to drain liquid. The inlet is made at a height of 0.3 m from the floor on the wall behind the stove. In this case, installation of an outlet duct is not required, since the exhaust air will exit through the gaps between the boards.
Sewerage device from concrete rings
If you are not satisfied with a ready-made plastic autonomous sewage treatment system, due to its size or cost, then you can make a septic tank from several compartments yourself. An excellent inexpensive material for the implementation of the plan is concrete rings. You can do all the work yourself.
Advantages and disadvantages of the system
Among the advantages of a septic tank from reinforced concrete rings, we note the following:
- Affordable price.
- Unpretentiousness during operation.
- The ability to perform work without the help of specialists.
Of the shortcomings, the following deserve attention:
- The presence of an unpleasant odor. It is impossible to make the structure absolutely airtight, and therefore the formation of an unpleasant odor near the septic tank cannot be avoided.
- The need to clean the chambers from solid waste using sewage equipment.
If the installation of the rings is illiterate, then the septic tank will be leaky, which will increase the risk of untreated sewage penetrating into the ground. But, with proper installation, the septic tank will be airtight, so this drawback of the system is rightfully called conditional.
Scheme and calculations
The scheme for the construction of a septic tank, as a rule, includes 1-2 chambers designed for settling and treating wastewater and a filtration field / filter well.
If few people live in your house and a minimum of plumbing devices are connected to the sewer, then you can easily get by with a septic tank, consisting of one sump and a filter well. And vice versa, if you have many households and many devices connected to the sewer, then it is better to make a septic tank from two chambers and a filtration well.
Rings for a septic tank
How to calculate the required volume for a septic tank has already been described above. According to building codes, the septic tank chamber must contain a three-day volume of wastewater. The volume of the reinforced concrete ring is 0.62 m3, which means that in order to build a septic tank for 5 people, you will need a sump of five rings. Where did this amount come from? For 5 people, you need a septic tank with a volume of 3 m3. This figure must be divided by the volume of the ring, equal to 0.62 m3. You will get a value of 4.83. It needs to be rounded up, which means that in order to equip a septic tank in this particular case, you will need 5 rings.
Preparatory processes
The pit must be of such a size that it can accommodate the septic tank chambers and the filter well. These works, of course, can be done manually, but it is long and very difficult, so it is more cost-effective to order digging a pit from a company with earthmoving equipment.
The bottom of the pit at the installation site of the sedimentation chambers must be concreted in order to avoid the possibility of penetration of untreated effluents into the ground. Before starting concrete work, it is necessary to drain a part of the bottom of the pit for the installation of sedimentation tanks, laying a sand cushion on it, with a layer of 30–50 cm.
The place for the filter well also requires the preparation of the base. Under it, you need to make a pillow of sand, crushed stone and gravel with a thickness of at least 50 cm.


Mounting rings
Now it's time to organize an overflow, and for this you need to bring pipes to the rings. It is better that they work on the principle of a water seal, that is, they must be installed with a bend.
Sealing
To seal the joints, you need to use a solution with an aqua barrier.From the outside, the tanks must be treated with coating or built-up waterproofing.
Another option is to purchase plastic cylinders that are installed inside the well. In this case, the likelihood of dirty water ingress will be minimized.
Installation of ceilings / backfill
Installation of ceilings and backfilling
Finished wells must be covered with special concrete slabs, in which holes are provided for mounting sewer manholes. Ideally, the backfill of the excavation should be carried out with soil with a high percentage of sand in its composition. But if it is impossible to realize this, the pit can be covered with soil taken out of it before.
Now the septic tank can be put into operation.
Independent production of a septic tank (two-chamber cesspool)
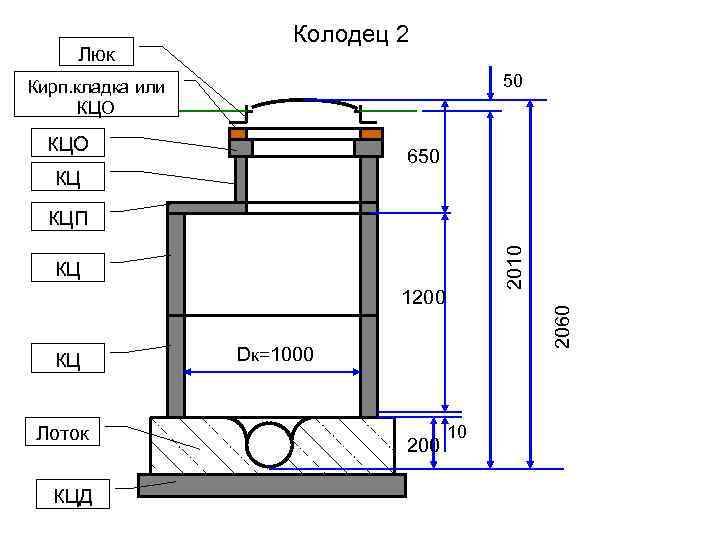
It is not necessary to buy a septic tank, it can be made on your own from reinforced concrete. It is possible to install concrete rings with a diameter of 1-2 m - the size of the rings directly depends on the required volume.
Making a septic tank
By its design, it is a two-chamber manifold, in which the individual chambers are connected by an overflow pipe. When installing a septic tank, first we make a pit 3 m deep, length and width slightly larger than the dimensions of the septic tank. A sand cushion about 15 cm thick is formed at the bottom.
After that, a formwork is made from boards or chipboard, a reinforcing cage is made along its perimeter, connecting the reinforcement with a knitting wire. Then 2 pipe sections are fixed in the formwork, they are necessary for laying the inlet of the sewer system and the overflow pipe connecting the septic tank chambers. Formwork with a reinforcing cage is concreted, it is advisable to use a vibrator to evenly distribute the mortar.The frame of the septic tank must be made monolithic, for this reason it is poured in one go.
The bottom of the 1st chamber is formed from a concrete solution. The chamber should turn out to be airtight, large, solid fractions of effluents will settle in it. The upper part of the compartment will be occupied by partially purified liquid, which will flow through the connecting pipe to the second compartment.
In the second compartment of the septic tank, there is no need to form a bottom, this part will contain a partially purified liquid, which will be absorbed into the soil through the bottom with a gravel cushion, for this you can use fine gravel, medium fraction crushed stone or pebbles.
Between the compartments of the septic tank, in its upper part, you need to install an overflow pipe. Most often, a structure with 2 sections is made in a private house, although sometimes a septic tank is made with 3 or even 4 compartments, this will significantly increase the level of wastewater treatment.
The septic tank is blocked by fixing the formwork, laying the reinforcing cage and pouring concrete. Instead, you can lay reinforced concrete slabs, it is imperative to provide an inspection hatch. After concreting, the pit is filled with sand or soil. The sump must be cleaned at least once every 2-3 years.
How to make a sewer in a private house from reinforced concrete rings
Reinforced concrete rings with a diameter of 1-2 m are suitable - it depends on the required volume of the septic tank.
Stage 1. Not closer than 5 m from buildings with a foundation, they dig a foundation pit of the required size. At its bottom, a base is made of reinforced concrete, at least 100 mm thick. It will have cast iron rings on it, you can purchase a factory round base. All joints between concrete elements must be covered with cement mortar.With a high location of groundwater, it is necessary to waterproof the structure.
Attention! You can place the cast iron rings not side by side, but one by one. To do this, a ring is placed on the ground, and soil is selected from inside it, as a result, the ring will gradually sink into the ground under its mass
After one ring reaches the level of the soil, another one is placed on it, and the soil continues to be removed.
Stage 2. It is necessary to make an outlet and an inlet in the 2 upper rings, only an inlet is made in the filtration ring.


Stage 3. The pipe from the sewerage system (connect to the inlet) is placed 150 mm above the pipe into the second compartment.
Stage 4. The compartments of the septic tank are covered with reinforced concrete slabs with inspection hatches and holes for ventilation.
Stage 6 The pipe of the sewer system is laid in a trench of the required depth, it must be dug with a slope of 5 mm by 1 meter towards the septic tank. It is necessary to fill the bottom of the trench with sand 5 cm thick. Stage 7. The pipes laid in the trench are covered with sand, then with soil. Stage 8. Ventilation ducts and inspection hatches are installed on the reinforced concrete rings. Stage 9 The finished septic tank is covered with earth.
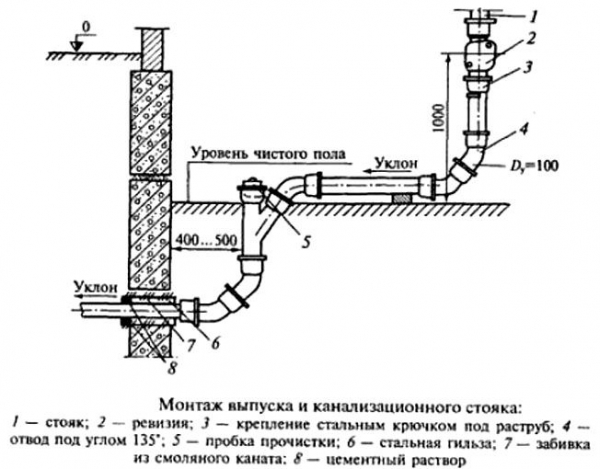
Exhaust pipe outlet
Fan pipe functions:
- maintains atmospheric pressure inside the system;
- increases the durability of the sewer system;
- ventilates the entire sewerage system.
A fan pipe is called a continuation of the riser. This is a pipe leading to the roof
Before connecting the fan pipe and riser, it is important to install a revision. After that, the pipe is brought out at a convenient angle to the attic
Do not combine a fan pipe with a chimney or ventilation at home. The outlet of the fan pipe must be located at a distance of 4 meters from windows and balconies.The height of the retreat from the roof should be 70 cm
It is also important to place sewer ventilation, houses and a chimney at different levels.