- Independent study of the geology of the site
- Which pipes to choose
- Gutter Rules
- Installation of the internal sewerage system of the bath
- Installation of sewerage at the construction stage of the bath
- Installation of internal sewerage in the room
- DIY device
- Video: how to equip a drain from a bath
- General principles
- Spatial orientation
- Ability to heat up
- Normative base
- Preparing for system installation
- Drainage system drawing
- Material selection
- Pipe length calculation
- Required Tools
- The dependence of the design on the floor of the Russian bath
- pouring floor
- Leak-proof floor
- Manhole device
- How to make a drain in the bath under the floor
- Septic tank for a bath without pumping
- Device, principle of operation
- Choosing a septic tank
- Drainage device in the washing room of the bath
Independent study of the geology of the site
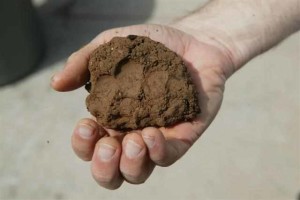
To determine the type of soil, you can conduct an express study that does not require special knowledge and is based on visual inspection and tactile sensations. For this purpose, a hole is dug 25-30 cm below the TPG at the proposed place for laying pipes. Information on the depth of soil freezing in a given area can be obtained from neighbors, from reference books, on specialized Internet resources.
| Regions | Depth of soil freezing, cm |
|---|---|
| Vorkuta, Surgut, Nizhnevartovsk, Salekhard | 240 |
| Omsk, Novosibirsk | 220 |
| Tobolsk, Petropavlovsk | 210 |
| Kurgan, Kustanay | 200 |
| Yekaterinburg, Chelyabinsk, Perm | 190 |
| Syktyvkar, Ufa, Aktyubinsk, Orenburg | 180 |
| Kirov, Izhevsk, Kazan, Ulyanovsk | 170 |
| Samara, Uralsk | 160 |
| Vologda, Kostroma, Penza, Saratov | 150 |
| Voronezh, Perm, Moscow, St. Petersburg, Novgorod, Ryazan, Tambov, Tula, Yaroslavl | 140 |
| Volgograd, Kursk, Smolensk | 120 |
| Pskov, Astrakhan | 110 |
| Belgorod, Kursk, Kaliningrad | 100 |
| Rostov | 90 |
| Krasnodar | 80 |
| Nalchik, Stavropol | 60 |

Soil freezing depth
It is important to take a soil sample exactly at the bottom of the pit, since sewer pipes will be laid at this level. After that, the soil sample is carefully studied visually, rubbed between the palms, rolled into a tourniquet
- clod of earth
- Clay tourniquet
And evaluate the results according to the table.
Methods for determining soils
If it turns out that the soil is clay or loam, you should know that these categories of soils are classified as strongly heaving. In this case, the pipes will need to be laid on a sand "pillow" by analogy with "floating" foundations. The sand will act as a shock absorber during seasonal soil movements and the integrity of the underground part of the sewer system will not be violated.
- An example of a trench with a sand cushion
- An example of laying a sewer pipe
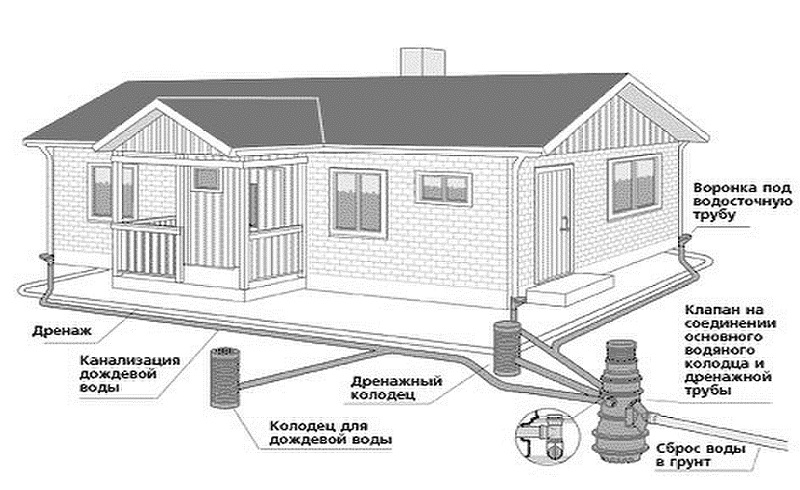
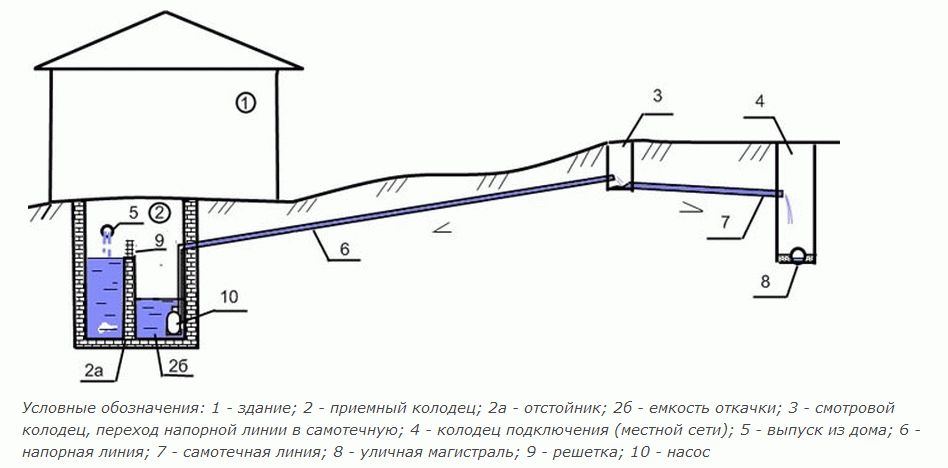
After the safe depth of the pipeline is clarified, the issue with the location of the septic tank (filtration well) is resolved. The wastewater collection point must be separated from the water intake point by at least 15 m and located no closer than 7 m from the foundation of the bath.
- The location of the septic tank on the site

- Features of the location of the sepik on the site
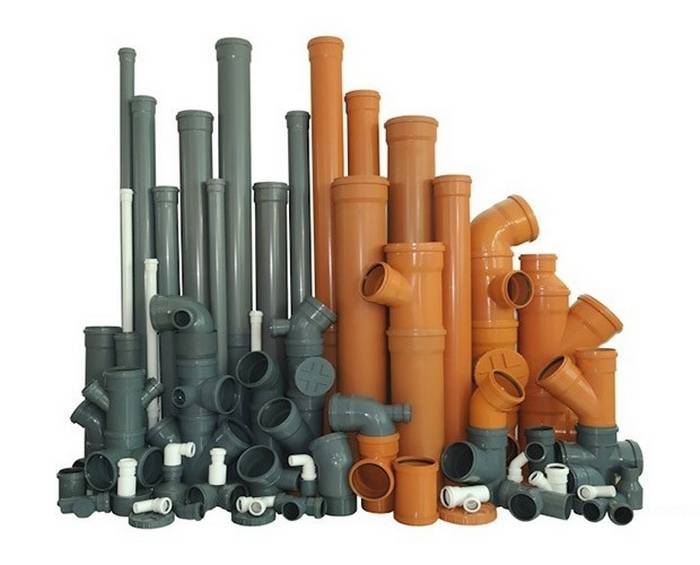
Which pipes to choose
In fact, the choice of pipes for sewerage is not so great.
| Type of pipes | Description |
|---|---|
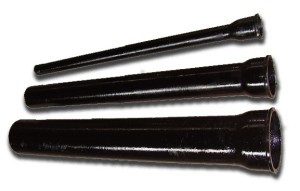 Pig-iron pipes for sewerage | It is irrational to use cast iron in our time: they are expensive, heavy and inconvenient to install. Ceramic are ideal in every respect, but also have a high cost. |
 Asbestos-cement pipes | Asbestos-cement - the cheapest of all possible, but often disappointing with their defects. In addition, when installing a non-pressure sewer system, products with smooth and even walls are required. And asbestos-cement ones have a rough, often dotted with depressions, inner surface. |
| plastic pipes | The best choice is plastic pipes that are resistant to all types of destructive influences. These products are excellent for the installation of internal and external sewerage systems, are malleable in processing, are available with and without a socket. The warranty period for plastic pipes is 50 years. For long products, shaped elements (fittings) are proposed, with the help of which the installation of the sewer system is carried out. |
The category of plastic pipes includes:
- PVC (polyvinyl chloride);
- PVCC (chlorinated polyvinyl chloride);
- PP (polypropylene);
- HDPE (low pressure polyethylene);
- polyethylene corrugated.
Any of these products can be safely used in a sewerage device. The diameter of the main line is chosen based on the expected intensity of operation of the building and the number of drain points. For an average bath with a steam room, a washing room and a toilet, when installing a gravity drain system, pipes with a cross section of 100-110 mm are required. If the toilet is not provided, a diameter of 50 mm is sufficient. Sanitary equipment is connected to the main line with pipes with a cross section of 50 mm.
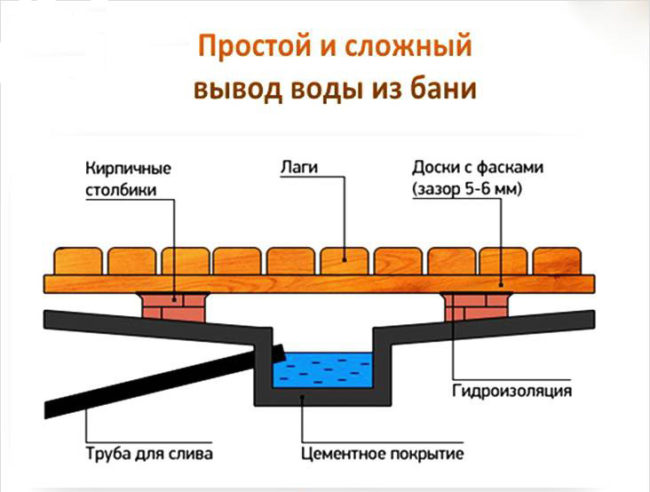
Gutter Rules
Before you make a sewer in the bath with your own hands, you need to know that the floors in the bath are made as dense and insulated as possible, and always with a slope towards the sewer grate. A gutter is placed under it - a pipe with a diameter of 50 mm or more.
Scheme of solid floors in a bath with a gutter
The gutter can also be mounted under the partition that will separate the steam room and the sink - in this case, the partition is raised by 20 mm. As a result, water from the floor in the bath immediately enters the pit or is quickly discharged through the gutter into the sewer pipe, and then into the drainage well.
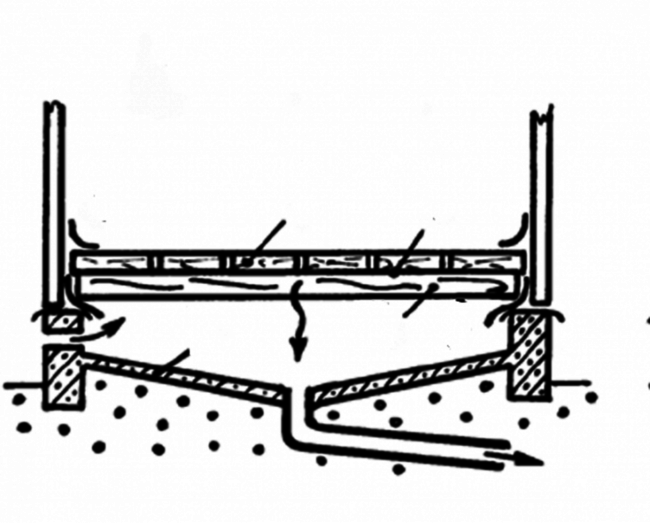
The sewerage under the bathhouse also includes another floor installation option: installation on logs with 5 mm gaps between the floorboards.
Scheme of installation of floors in a bath with gaps and a pit located under them
Please note that in the photo at number 6 there is a metal plate that serves as a water seal and prevents the penetration of unpleasant odors into the bath
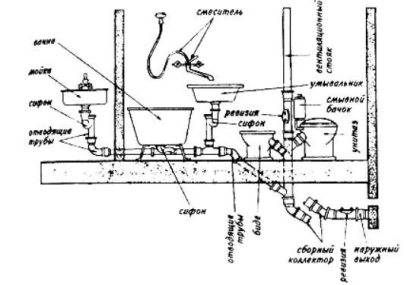
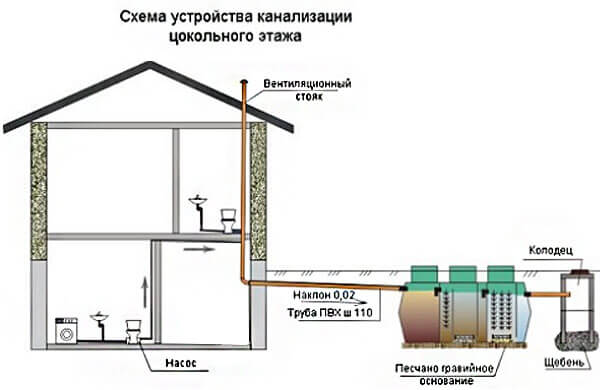
Installation of the internal sewerage system of the bath
It is necessary to start sewerage at the construction stage of the bath. But it is also possible to equip a ready-made, long-term exploited building. The scope of work and their sequence in both cases are different, so each of the options must be considered separately.
Pipes for the internal sewerage of the bath
Installation of sewerage at the construction stage of the bath
To perform the work, a previously drawn up plan (scheme) of the sewer system will be required. In order to accurately find the connection points for plumbing elements (ladders, showers, toilet bowls, sinks, etc.), they start marking after the foundation has been erected.In places where the main highway is laid, trenches of the appropriate width and depth are dug.


- Leveling trench for pipe laying
- Ditch for laying pipes
Then proceed to the laying of pipes. Experts advise starting the installation of the sewer system with the installation of the main pipe and large (nodal) elements, to which side branches of a smaller diameter are subsequently brought.
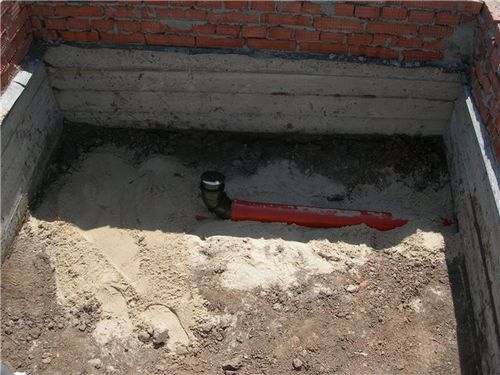
Sewer system installation
In places where plumbing is connected, vertical pipes are installed. To prevent foreign objects from entering the network, each outlet is closed with a plug. Mount the ventilation stack.
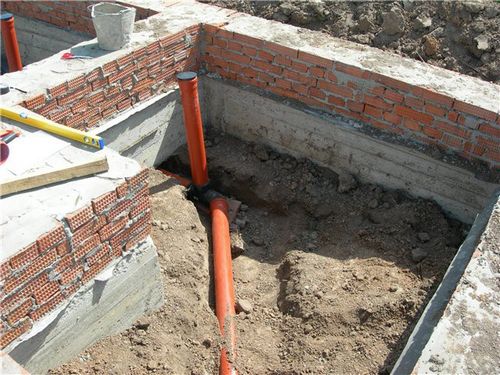
At the connection points of plumbing, vertical pipes with plugs are installed.
In regions with a cold climate, pipe insulation is performed. For this purpose, fibrous materials (mineral wool and its analogues), polystyrene half-cylinders, foamed polyethylene are used. If desired, you can pre-wrap the pipes with noise-absorbing material, which will significantly reduce the volume of sounds emitted by the operating system.
Pipe insulation
Lay geotextiles.

Insulation flooring
Form a sand cushion.
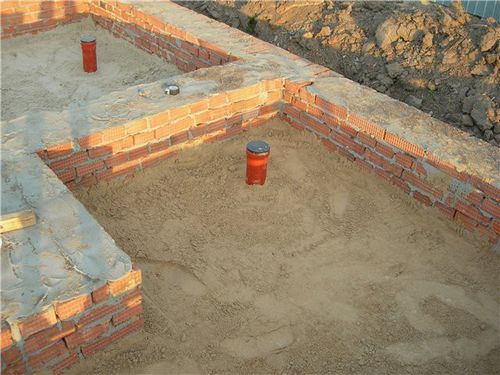
sand cushion
Installation of internal sewerage in the room
If the bath has been in operation for more than a year, it is also possible to arrange a dirty water drainage system in it. To do this, you need to draw up a diagram and open the floor in the right places. Installation of pipes is carried out at the level of the foundation, in one of the walls of which a hole is drilled to output the main line.

- drain drain
- Floor and drain installation
Drains are installed in the washing and steam rooms. In the performance of work adhere to the following rules:
- the ladder must be level with the floor;
- gaps are closed with moisture-resistant grouts;
- tiles are laid after installing the ladder.
DIY device
If you want to buy a factory-made septic tank, you will always get advice on installation. You can tell the sales assistant directly in the store. It will also be easy to find workers who have experience installing exactly the system that you need.
If you want to save money, you can always take up the construction of a septic tank from concrete rings.
A drainage well for a bath - this option is just for those who have free time and a desire to work with their own hands. You can make a system from such materials:
- Reinforced concrete rings.
- Concrete (structure with formwork).
- Brick.
If you decide to get down to business on your own, it is important to determine the size of the future design. Usually, 200 liters per person living in the house are taken as a standard. This volume should be taken into account if you are building bath septic tank for sauna and home at the same time

When constructing a septic tank, remember that the bottom ring of the well must have a bottom. Thus, sewage will not seep into the soil until the liquid is partially cleaned.
Concrete septic tank - Pretty heavy build. Remember that if it begins to settle and fall into unstable ground, in this case the pipes will be broken, and sewage, seeping in, will begin to pollute the soil in your area.
What to do if the bathroom smells like sewage? This will be a signal that the pipe system is broken, and the damage should be found and repaired.
Do-it-yourself construction of a septic tank is chosen in the case when savings are in the first place.If you approach the construction wisely, you can make a quality structure that will last for many years.
Video: how to equip a drain from a bath
Which sewage is better for a bath, each owner chooses for himself. If you need a reliable and durable design, then a two-chamber concrete septic tank will do the job perfectly. For sandy soil, it is worth choosing a drainage well, and for clay soils, a cesspool.


Plastic containers are very easy to install, but you should always remember that they do not resist mechanical stress well. Therefore, it makes sense to use polymeric materials where people rarely walk over the tank and vehicles do not pass by.
If metal is chosen, then the design is unlikely to be too durable, because. the material is destroyed by corrosion, but within 5-15 years it is quite capable of serving. This is a good solution for a seasonal bath in the country.
General principles
Can you relax in a stale steam room, where there is little oxygen, and the steam is tiring? The question is rhetorical. Fortunately, do-it-yourself ventilation in the bath is easy and inexpensive.
There are several reasons why you should pay special attention to ventilation: firstly, a damp space requires a draft in order to dry it well between working periods. Secondly, during procedures, good ventilation increases the pleasure of steam, since it is saturated with oxygen, and cold sweaty air is removed in time.
Secondly, during procedures, good ventilation increases the pleasure of steam, since it is saturated with oxygen, and cold sweaty air is removed in time.
Modern building elements and materials have increased the tightness of the premises by an order of magnitude.This is the answer to the question why our grandfathers did not bother with a special ventilation device in their bathhouses. The hole under the ceiling for drying was and remains its only element. The influx of fresh air was provided not by the density of the log house itself, the floor, doors, windows.
Before you take up ventilation in a new or reconstructed bath, you need to take into account such factors.
Spatial orientation
The prevailing winds significantly affect the removal of exhaust air. The inflow must always be organized from the pressure side of the air masses, the outlet - from the opposite side.
The logic is simple: the building creates an obstacle to the wind, behind it a rarefaction zone is formed, which enhances natural ventilation, helps the exhaust air to leave the steam room faster. Of course, the roof slope and other obstacles should not interfere with the free exit.
Ability to heat up
System ventilation will not workif the bath does not warm up well.
The reasons:
- The power of the oven does not match the size of the room.
- Ventilation produces increased air exchange.
- Too high ceilings.
- Poor thermal insulation, especially the floor.
- Unsuitable interior materials.
Incomplete drying of space and materials under the shelf will also require additional heat to warm up. Doors, windows must be heat-saving. Ceramic tiles on the floor and walls will always be cold to the touch and will condense steam.
Normative base
You don't have to figure out how to make ventilation in the bath: everything has been invented for a long time. Section 6 "Methodological recommendations for the design of baths dated 12/30/1993" says (with reference to the relevant SNiPs) about ventilation.
Data on the frequency of air exchange are given.This is the starting point for the correct calculation of duct diameters. It is also worth giving the initial data for the thermal calculation, in which the ventilation works correctly.
Preparing for system installation
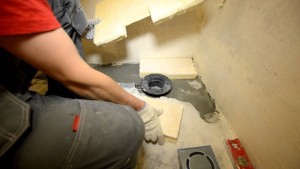
Consider the option with a concrete floor. First you need to imagine at least in your mind a communication scheme. The length of the drain line directly depends on the distance between the cesspool and the planned location of the sewer drain. This node itself, installed in the floor, has a grate on top.
The bottom outlet of this product has a standard diameter for connecting classic PVC pipes used in any modern sewer.
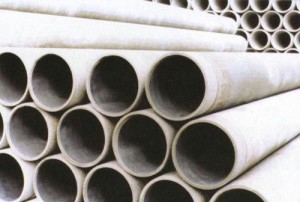
Red pipes are used for laying sewers outside, and gray pipes are used indoors.
Drainage system drawing
It is necessary to draw on paper an approximate sketch of the structure of the floor, as well as the drainage system itself, mounted under the flooring. In the figure, it is desirable to indicate the entire path of the drained water from the washing to the pit.
The exact dimensions for the sketch are not obligatory.
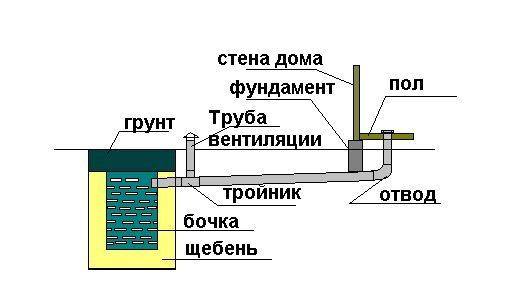
By the way, the pit is often equipped with a simple metal barrel. It is enough to dig a cavity of a suitable size and lower the old watering capacity of fifty liters there.
Before the drain pipe enters the sewer pit, a vertical outlet is often made, leading up the ventilation pipe. This helps to get rid of excess odors.
Material selection
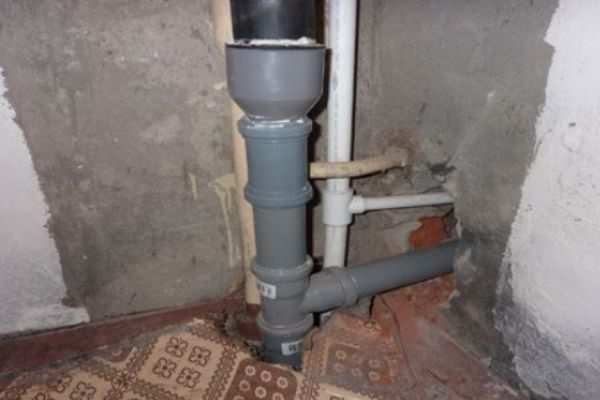
For the drain line, as a rule, a PVC sewer pipe with a standard diameter of 100 mm is used. The main is assembled from two-meter or meter-long segments, which are joined together by means of the sockets that they have at the ends.
To connect a simple drain that does not have a side outlet, you will need to use a standard type elbow to the drain pipe.
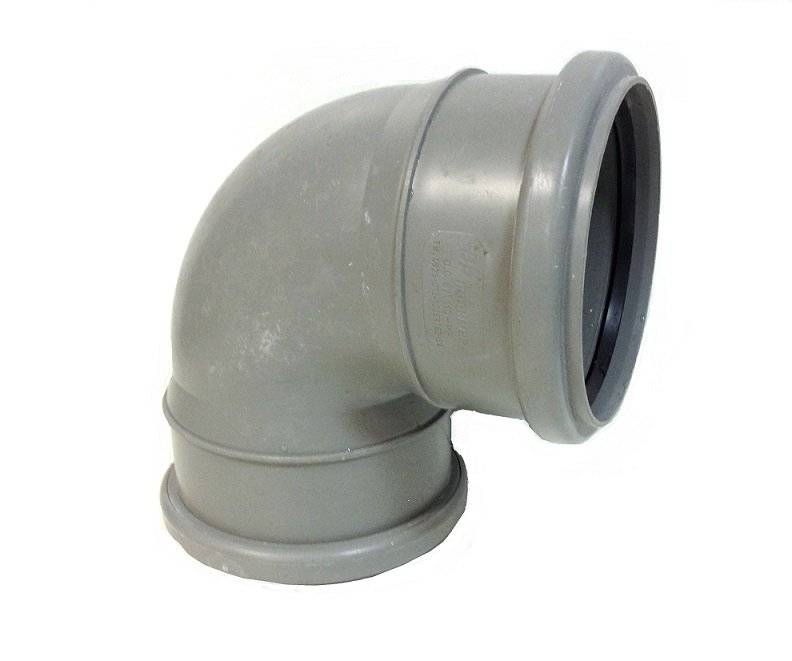
There must be an o-ring inside the knee
At the same time, the sewer ladder itself has a typical design in various variations. For a bath, you can choose both the simplest and most complicated ones, since such products come with various additional functions.


The tightness of the device is of great importance for the operation of the drain system, therefore, before purchasing a ladder, it is recommended to assemble the device and evaluate the fit of the parts
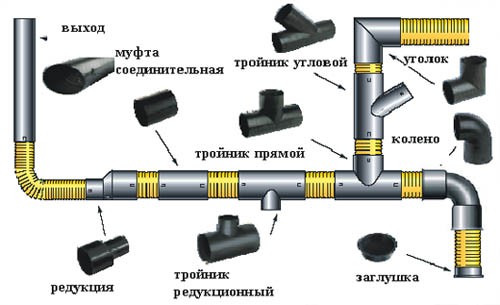
Also, for the construction of a drainage line, you may need a sewer tee with a branch at forty-five or thirty degrees.

A tee is needed if you want to make an additional drainage from the sink
In addition to PVC parts, we will need a “cold” mastic for sealing gaps if the sewer pit is equipped with an iron barrel. This material is sold in metal cans in building hypermarkets. Before purchasing all the parts and consumables, it is better to make a list.

Mastic can be purchased at any hardware store
Pipe length calculation
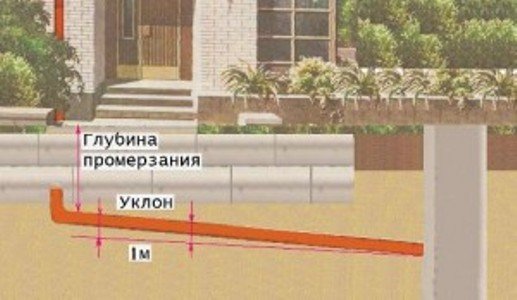
To calculate the length of the drain pipe, you need to know the distance from the washing ladder to the sewer pit. Suppose this value is 10 meters. We take the slope of the drain pipe equal to 15 degrees. Then the length of the drain line can be found from the formula for the cosine of an acute angle in a right triangle.
As you know, the cosine of an acute angle of a right triangle is equal to the ratio of the adjacent leg to the hypotenuse.In our case, the leg is the same distance from the pit to the drain on the surface of the earth, and the hypotenuse is the length of the inclined pipe. Use the calculator to find the cosine of an angle of 15 degrees. Then we calculate the desired length of the line: L = 10 m / cos 15 = 10 m / 0.966 = 10.35 m.
If you take the slope angle steeper, then the drain pipe will be longer.
Required Tools
From the tools we need the following positions:
- rubber mallet (useful for hammering nozzles into each other);
- shovel;
- Bulgarian;
- putty knife.
A grinder will be needed to cut an opening in a metal underground container through which a drain pipe will enter.
The dependence of the design on the floor of the Russian bath
The floors in the Russian bath are different.
- Leaking or pouring wooden floors - horizontal boards are not laid close, but with slots for free flow of water over the area of the entire floor. This is a traditional design that has long been used in Russian baths. The main disadvantage is the need for the most thorough primary and subsequent regular treatment of the boards with hydrophobic impregnations.
- Non-leaking wood floors - boards are laid tightly at an angle towards the drain hole so that water flows unhindered. The slope is carried out with the help of slightly wedge-shaped logs.
- Tiled (only possible in the washing room). They are also laid with a slight slope to the ladder. The slope is carried out either when creating a concrete base, or using a different thickness of the solution.
Plums for different floors of a Russian steam room are strikingly different in design. But the largest variety of drains is in the pouring, or leaky floor.
pouring floor
With the simplest method of seeping water through the entire floor into a drainage pad located under the entire bath, there is no drain device at all.
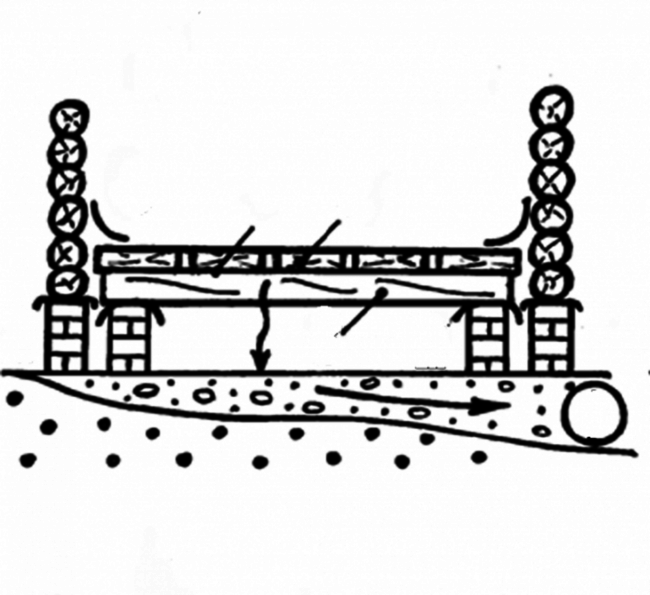
Drainage through the pouring floor into the drainage pad; drain device missing
A more complex subfloor design: there is a slope towards the concrete channel, preferably with insulation and screed. The drain is also missing.
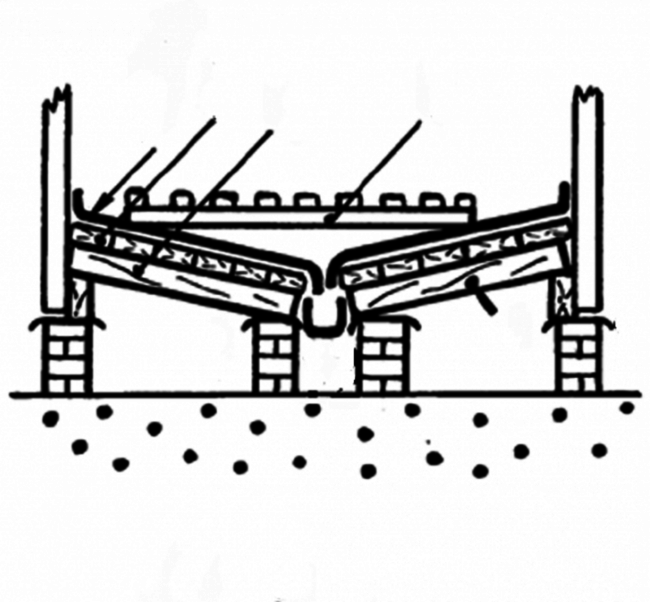
When draining into a concrete channel, there is also no drain device
When draining into a concrete pit, the role of a water seal is performed by the pipe itself, located in a special way - with the possibility of air access.
The pipe in such a pit plays the role of a water seal
If there is a drain into the sewer in the underground, then in addition to warming and waterproofing the underground, you need a simple drain with a water seal to prevent unpleasant odors into the underground, and from there into the bathhouse through the cracks in the floor.
When draining into the sewer from under the pouring floor, a simple drain device is required
Leak-proof floor
Here the only possible solution is a classic drain. It can be of different designs - from a complex modern ladder to the usual siphon familiar to us. The ladder is a compact and reliable design.

The ladder will work for a long time, it is easy to clean
The siphon is cheap and familiar.
Drainage scheme on a non-leaking floor in a bath using a siphon
The question is your financial capabilities and the availability of space under the floor.
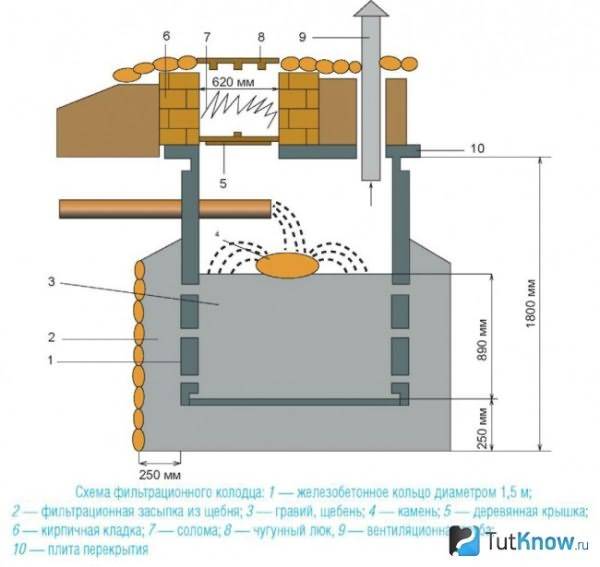
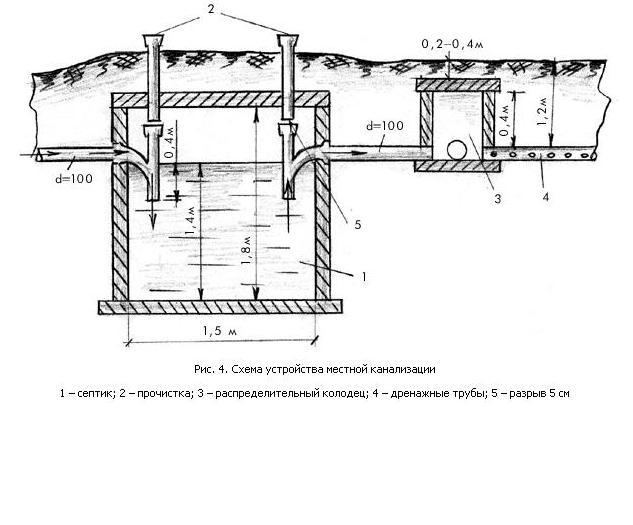
Manhole device
In the event that you get too long a sewer for a bath with your own hands, the system should be equipped with a manhole with a diameter of about a meter. At the bottom of the well, it is necessary to build a pit of concrete. The walls can be laid out with bricks or also made of concrete mortar.

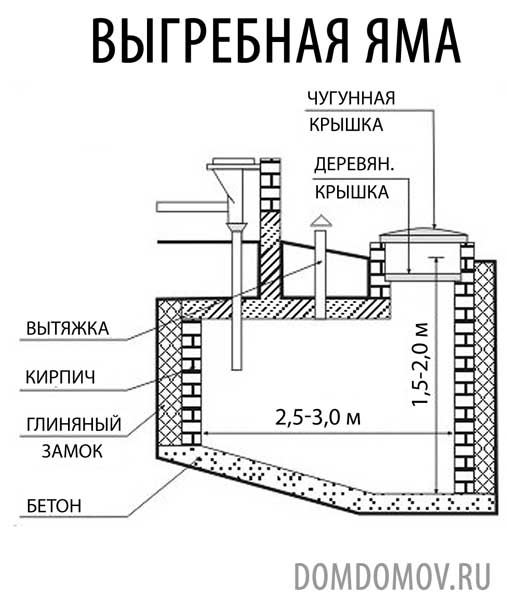


In the cold season, the water in the well can freeze, so it must be equipped with two covers. The outer cover can be covered with sawdust and earth, and the inner cover can be made with an additional layer of heat-insulating material.
After completion of the work, the trench and the pit inside the steam room must be covered with sand. Also, a well of one meter and the outer part of the trench must be covered with sand and earth and carefully compacted. And, of course, don't forget to clean the well, as the pores of the soil will quickly become clogged with solids contained in the sewage.
We hope that this article was able to answer all your basic questions, and you now have an idea how to make a sewer for a bath. Following these simple tips, you can handle the creation of sewers yourself. Of course, it will take a lot of time and effort, but the good result is worth it.
How to make a drain in the bath under the floor
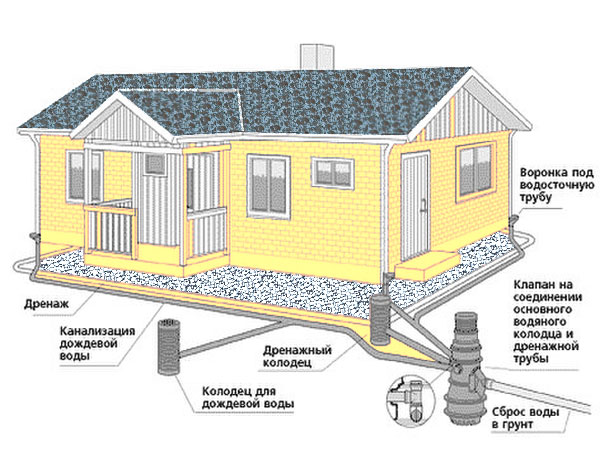
During bathing procedures, water flows directly onto the floor (if we are not talking about taking a shower in a specially equipped shower cabin). Therefore, this floor must either allow water to pass below into the sump, or be waterproof and arranged with a slope towards the sump. The first type of construction is implemented when installing wooden floors with intentionally left gaps or a wooden lattice.
Water, penetrating into the cracks, flows down below, into the basement or through the plank floor to the ground, gradually evaporates. The boards dry out and are ready for new use.
However, such a floor still dries for a long time (especially with a small gap between the flooring and the base), so it is better to arrange a two-layer wooden flooring, as shown in the figure below.
In this embodiment, first a rough flooring is arranged with gaps between the boards of 20 ... 50 mm, then the logs are laid so as to provide a drain to the drain hole, after that - another layer of boards with already smaller (10 ... 15 mm) gaps. Of course, the boards of the finishing floor are laid in such a way that the gaps between them do not coincide with the gaps in the bottom layer. But this option is acceptable mainly for the "summer" bath, when drafts and cold from below are not critical for the temperature in the steam room and washing room.
Another, relatively budgetary option for a “cold” floor is to install a log on asbestos or other pipes.
In this case, the pipes are placed on a pillow compacted with crushed stone and sand, and the logs are placed directly on the pipes. In this case, the leaking floor is better ventilated, and the water goes into the ground through a layer of gravel and sand, thus being cleaned. In addition, the compacted pad prevents wet soil from spreading as quickly.
Interesting: if there is no desire or opportunity to arrange a pillow over the entire area of \u200b\u200bthe underground, you can make a thinner layer and make a trench with greater depth in the place of the most active flow.
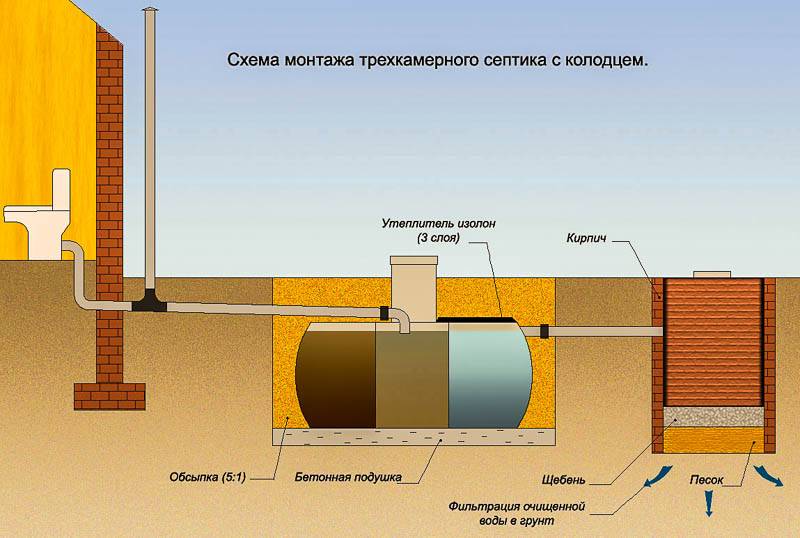
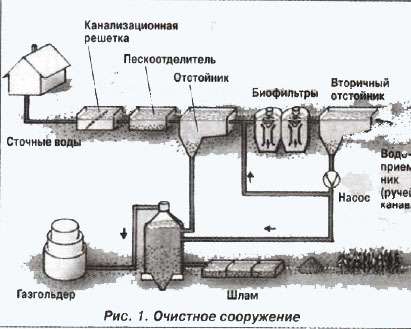
Septic tank for a bath without pumping
Many country houses have baths that can be used both infrequently and every day. With frequent use, a lot of water goes into the drains, but you don’t want to constantly pump it out.
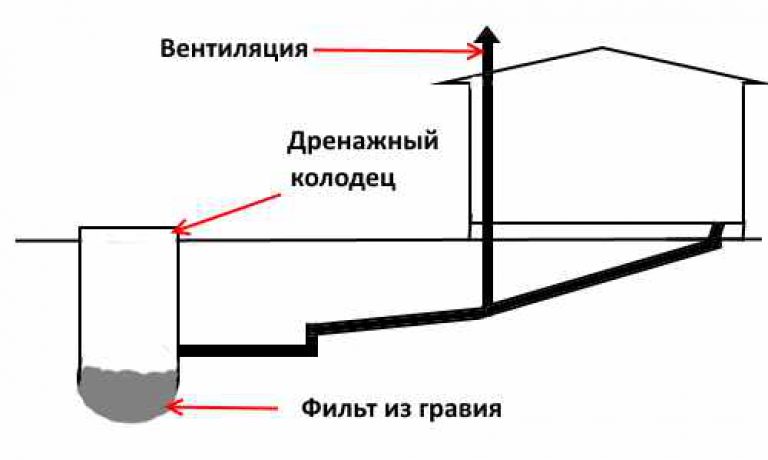
Therefore, it is advisable to equip the sewer, that is, a septic tank for a bath without pumping. In this case, the water will either be diverted from the bath to sewers, reservoirs or other suitable places, or it will move to a filtration absorbing well, from which water will flow into the soil.
You can see an example of a device for draining water into a ditch in the figure.
There are many options for building a septic tank without pumping out, they differ both in the cost of all work, and in tightness, and in the quality of the material.
There are also ready-made treatment plants in the form of containers that are buried in the ground. They come in different volumes and provide different degrees of water purification.
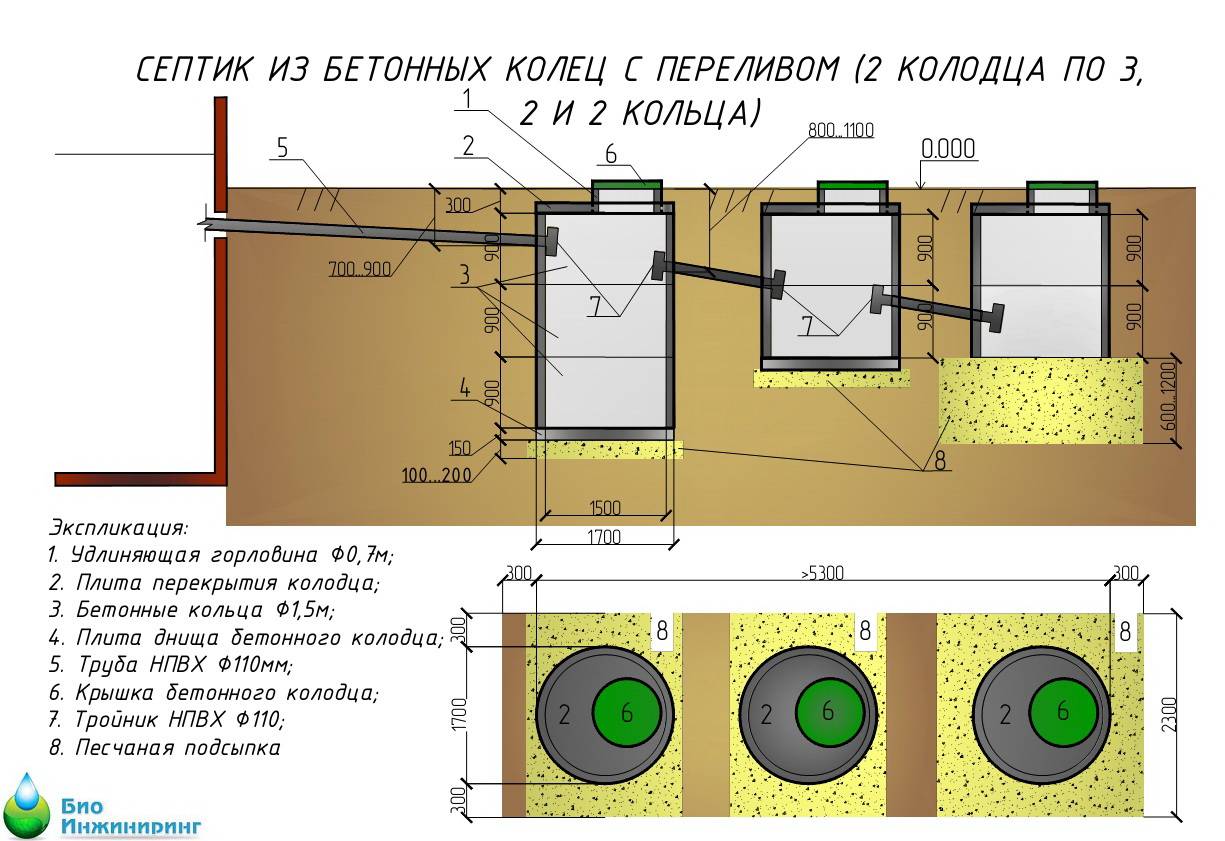
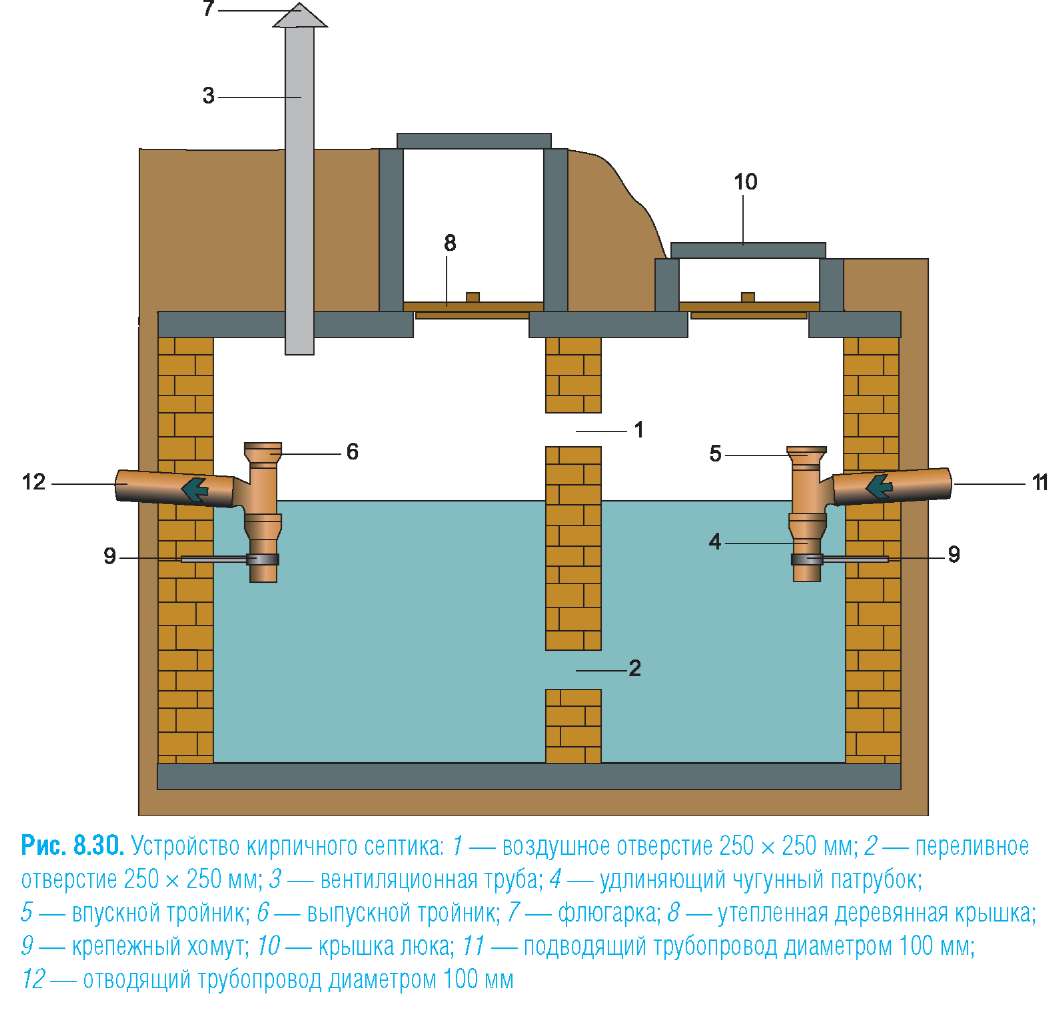
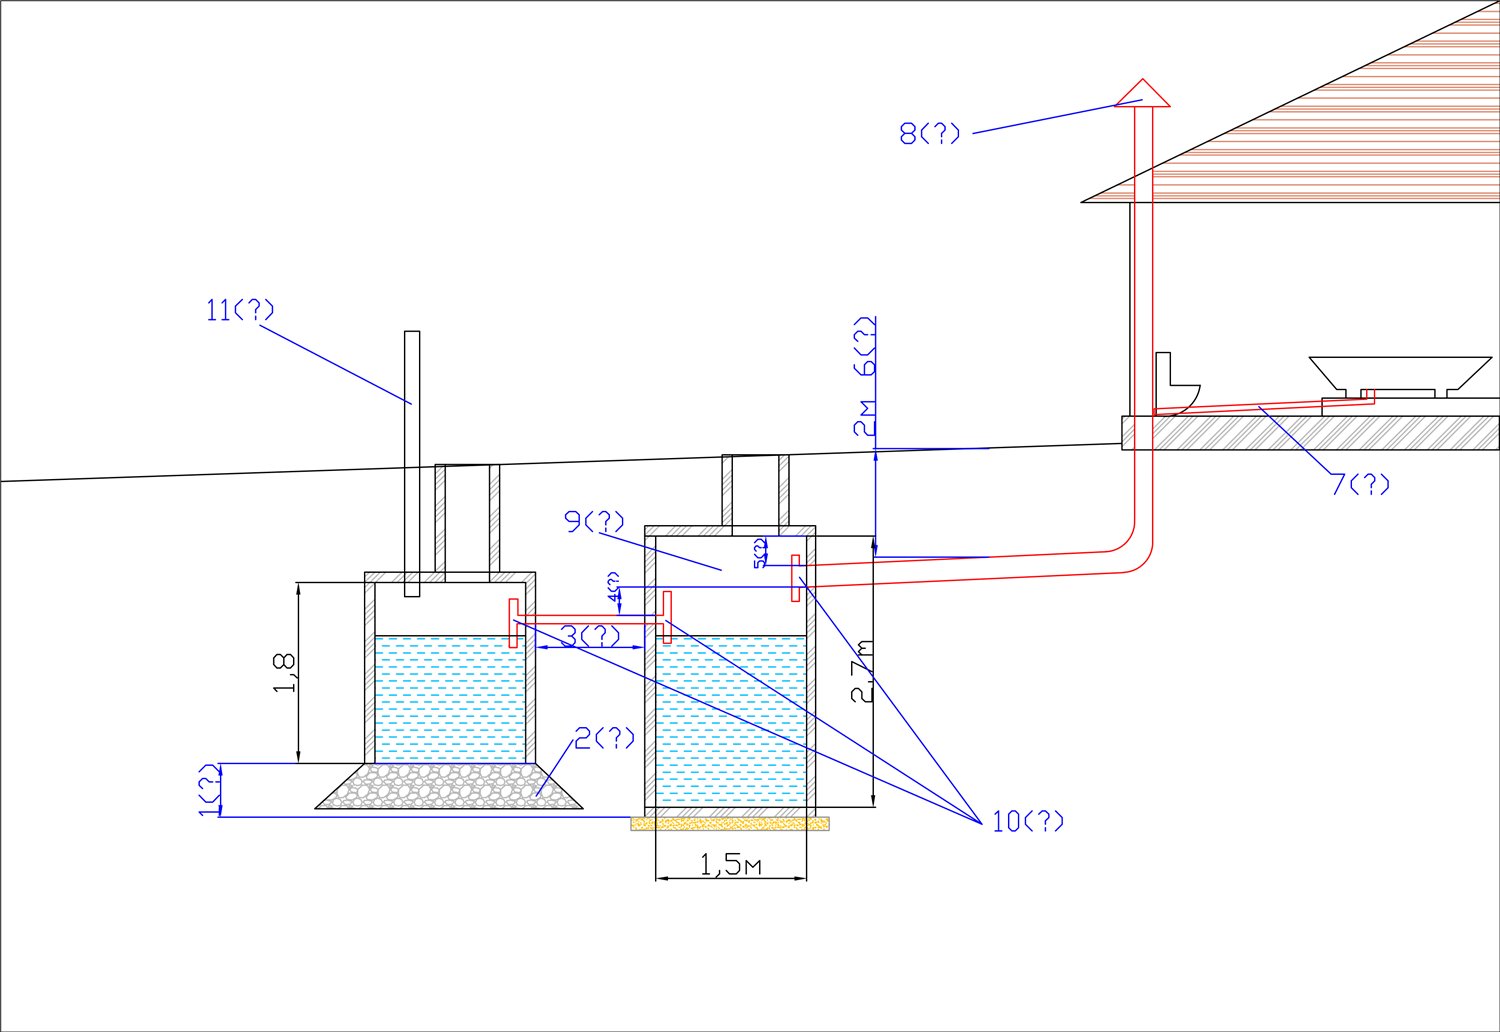
Device, principle of operation
In order for the water to be well purified, it is better to make a multi-chamber septic tank. In each of the chambers, the water is additionally purified, clarified, and the output is environmentally safe water that does not have an unpleasant odor.
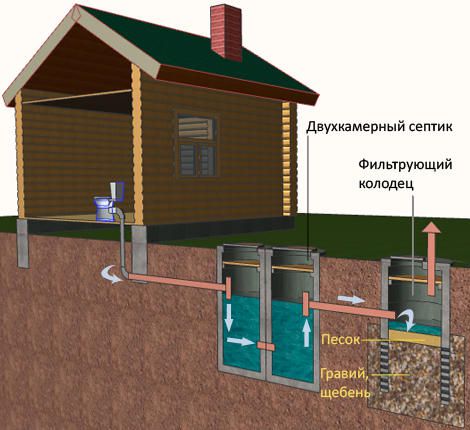
Most often, the septic tank is made two-chamber, as shown in the photo below.

Two-chamber septic tank for a bath
Sometimes a single-chamber septic tank is also made for a bath, since there is practically no solid waste in the wastewater that needs to decompose.
The operation of a two-chamber septic tank without pumping consists of the following steps:
- Water through the pipes leaving the bath enters the first chamber, where the waste is sorted and the heavy sediment remains at the bottom;
- At the same time, the dirty water in the first chamber is purified by microorganisms that do not require oxygen for normal functioning;
- Upon reaching the level of the pipe connecting the two chambers, the water flows into the second section. It may be without a bottom, in which case water is absorbed into the soil through a pillow of crushed stone or gravel;
- If there is a bottom in the second compartment of the septic tank, then when a sufficient amount of water is collected in it, it moves through the outlet pipe into a well or ditch.
It must be said that the bacteria working to purify water are not specifically removed. They are already in sufficient quantities in the soil and decompose waste into gas and water.
To remove harmful gases ventilation is made from a septic tank and when the gases come out, they quickly disappear, that is, they are safe for humans.
If for some reason bacteria are not in the right amount, then their growth is specially stimulated with drugs intended for this purpose.
Thus, the waste water is self-cleaning and is discharged from the sewer already in its pure form.
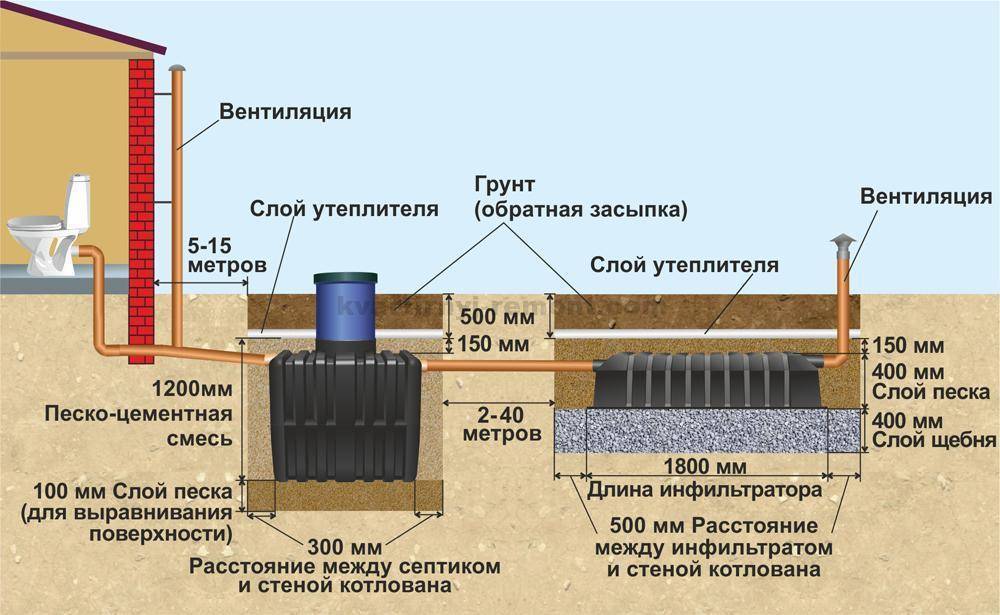
Choosing a septic tank
Since the design of the septic tank can be different, and the independent drainage of water from the sewer occurs in different ways, you need to choose the type of septic tank that is right for you.
The device of a septic tank for a bath depends on the following conditions:
- The composition of the land on the site and the level of groundwater flow;
- The relief and the availability of free space for a septic tank;
- Distance from sources of clean, drinking water.
How the water will be drained depends on the composition of the land on your site. If the earth is sandy, then it can absorb a large amount of water, which means that it would be a reasonable solution to arrange an absorbing well that will absorb the water purified by the septic tank.


If the earth is clayey or the groundwater flows high in the area, then water leaving the ground is almost impossible.
In this case, you need to immediately think about where the water from the septic tank will go. It can be a storm sewer nearby or any body of water. You can independently arrange a gutter in the form of a concrete tray for water outside the site.
The relief also plays an important role, because the septic tank must be installed evenly and correctly, and all pipes must be sloped so that water flows freely into the containers.
You can see an example of the correct drainage of water from a bath to a septic tank in the diagram below.
Location of sewer pipes
If the water from the septic tank is absorbed into the soil, then according to all standards and requirements, the distance from the septic tank to drinking water wells must be at least 20 meters, otherwise this water may become contaminated.
Also, the septic tank must keep a distance of 10-15 meters from housing or baths.
The choice of a septic tank also depends on the materials that you can use in construction. It can be concrete or ready-made concrete rings, as well as metal rings. You can even make a septic tank from car tires, but this device is only suitable for infrequent drains into the sewer.
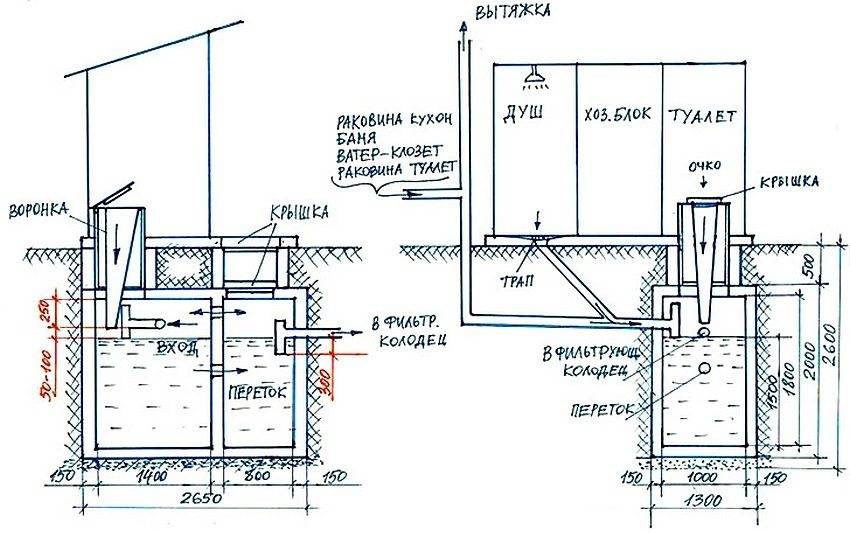
Drainage device in the washing room of the bath
There are two main schemes for drainage communications in the washing room.
-
If the floor is wood. In this case, during paving, special gaps of about 5 mm are left between the boards. Water through these slots enters a small reservoir made under the floor, from which it leaves through a drain pipe into the general sewer.
-
If the floor is concrete. In this flooring design, a slight slope to a common drain hole with a grate is equipped. The latter is an element of a special sewer drain, which, in turn, is connected through a knee to the outlet of the central line. But this ladder can also replace a small underground tank.
At the same time, in both cases, a drain pipe is always mounted under the floor (for example, after a drain), which slopes into a common sewer line or into a separate well for a bath.
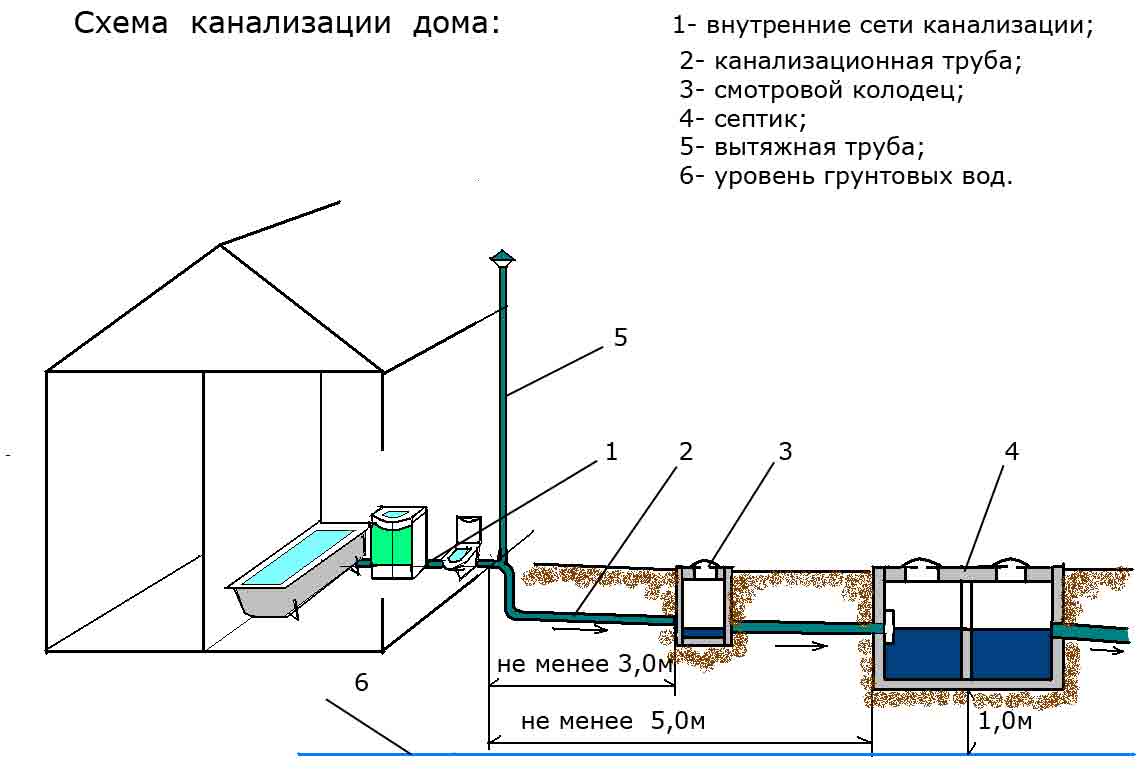
Most often, septic tanks are made in modern country houses - underground tanks in which waste products accumulate, flowing down through a common pipe from the entire household - from the toilet, shower, kitchen, bath, and so on.Once every few months, a filled septic tank is emptied using a pumping cesspool machine.

The presence of a septic tank minimizes the level of contamination of groundwater and soil with substances that are in excess in sewage water
In the absence of a septic tank on the site, there is only one way out - to dig a hole for a bath. But it should be located at a distance at least three meters from the building. The design of the drain from the washing room does not depend on whether a common septic tank or a local pit is used. In any case, a sewer pipe should come out of the bath to one of these objects.