- How to do it right in a car wash
- Homemade sewer shutter for a bath
- Preparing for system installation
- Drainage system drawing
- Material selection
- Pipe length calculation
- Required Tools
- What should be taken into account?
- Features of the installation work
- Stage # 1 - sizing and excavation
- Stage # 2 - installation of plastic containers
- Stage # 3 - filter field device
- Selection rules
- wooden floors
- Leaking floors
- Leak-proof floors
- There are two sewerage systems: centralized, local (autonomous).
- How to make a drainage system in the general sewer system
- Step-by-step instructions for making a drain design in a bath
- Bath drain device
- Leaking floors
- Leak-proof floor
- Combined scheme for draining water for a bath
How to do it right in a car wash
The arrangement of the floor in the washing room should be given special attention
Even at the design stage, it should be borne in mind that in this room the temperature changes quite often, the floor is constantly under the influence of moisture.
It also depends on the type of floors in the washing room, in what ways the drainage in the bath will be carried out.
The structure of the floor covering can be wood (leaking and non-leaking), as well as concrete.
In the first option, one cannot do without arranging a special reservoir into which water flows, then it is poured into the sewer.
In the second case, a slight slope is made on the floor so that water flows more easily into the ladder, gutters are installed.
Do not forget about the water seal for sewage in the bath. According to the rules, the floors are mounted only after the drainage system is equipped.
Homemade sewer shutter for a bath
It is not difficult to make a sewer shutter for a bath with your own hands, it is enough to prepare working tools and the necessary materials. The easiest option is a knee valve made of plastic pipe.
- A piece of plastic pipe is bent so that it takes a U-shape.
- The workpiece is fixed with couplings to the pipe in the area where the sewer pipe is brought to the drain funnel.
- The optimal height of the device is up to 75 mm. The installation of the shutter is carried out at the stage of pouring the foundation and concrete floor screed. However, the installation of a water seal is possible even in a finished bath. If the building is erected on a pile foundation, then the connection of the shutter to the outlet of the drain pipe is carried out outside under the steam room. If the bath is built on a different type of foundation, a preliminary breakdown of the floor will be required, and the shutter is mounted inside to the sewer pipe.
Preparing for system installation
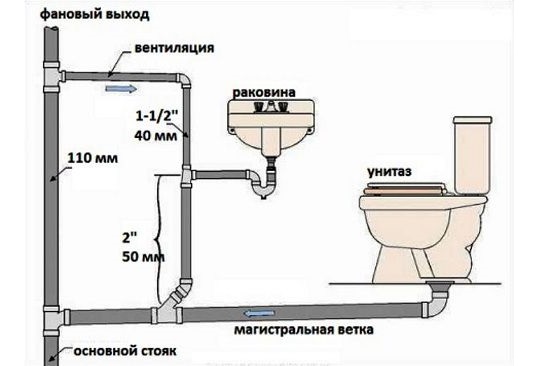
Consider the option with a concrete floor. First you need to imagine at least in your mind a communication scheme. The length of the drain line directly depends on the distance between the cesspool and the planned location of the sewer drain. This node itself, installed in the floor, has a grate on top.
The bottom outlet of this product has a standard diameter for connecting classic PVC pipes used in any modern sewer.
Red pipes are used for laying sewers outside, and gray pipes are used indoors.
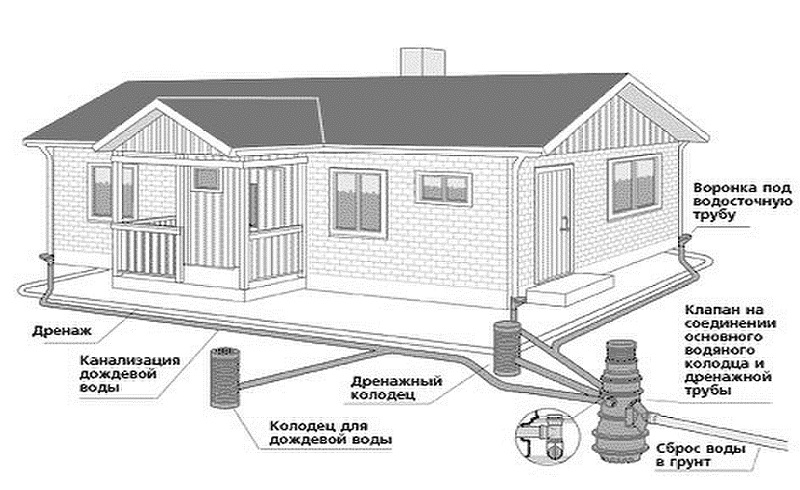
Drainage system drawing
It is necessary to draw on paper an approximate sketch of the structure of the floor, as well as the drainage system itself, mounted under the flooring. In the figure, it is desirable to indicate the entire path of the drained water from the washing to the pit.
The exact dimensions for the sketch are not obligatory.
By the way, the pit is often equipped with a simple metal barrel. It is enough to dig a cavity of a suitable size and lower the old watering capacity of fifty liters there.
Before the drain pipe enters the sewer pit, a vertical outlet is often made, leading up the ventilation pipe. This helps to get rid of excess odors.


Material selection
For the drain line, as a rule, a PVC sewer pipe with a standard diameter of 100 mm is used. The main is assembled from two-meter or meter-long segments, which are joined together by means of the sockets that they have at the ends.
To connect a simple drain that does not have a side outlet, you will need to use a standard type elbow to the drain pipe.
There must be an o-ring inside the knee
At the same time, the sewer ladder itself has a typical design in various variations. For a bath, you can choose both the simplest and most complicated ones, since such products come with various additional functions.
The tightness of the device is of great importance for the operation of the drain system, therefore, before purchasing a ladder, it is recommended to assemble the device and evaluate the fit of the parts
Also, for the construction of a drainage line, you may need a sewer tee with a branch at forty-five or thirty degrees.
A tee is needed if you want to make an additional drainage from the sink
In addition to PVC parts, we will need a “cold” mastic for sealing gaps if the sewer pit is equipped with an iron barrel. This material is sold in metal cans in building hypermarkets. Before purchasing all the parts and consumables, it is better to make a list.
Mastic can be purchased at any hardware store
Pipe length calculation
To calculate the length of the drain pipe, you need to know the distance from the washing ladder to the sewer pit. Suppose this value is 10 meters. We take the slope of the drain pipe equal to 15 degrees. Then the length of the drain line can be found from the formula for the cosine of an acute angle in a right triangle.
As you know, the cosine of an acute angle of a right triangle is equal to the ratio of the adjacent leg to the hypotenuse. In our case, the leg is the same distance from the pit to the drain on the surface of the earth, and the hypotenuse is the length of the inclined pipe. Use the calculator to find the cosine of an angle of 15 degrees. Then we calculate the desired length of the line: L = 10 m / cos 15 = 10 m / 0.966 = 10.35 m.
If you take the slope angle steeper, then the drain pipe will be longer.
Required Tools
From the tools we need the following positions:
- rubber mallet (useful for hammering nozzles into each other);
- shovel;
- Bulgarian;
- putty knife.
A grinder will be needed to cut an opening in a metal underground container through which a drain pipe will enter.
What should be taken into account?
In order for the system for draining liquid from the bath to work efficiently and for a long time, several rules must be observed.
It is necessary to plan and install the sewerage even at the stage of laying the foundation and arranging the floor
It is important to leave a hole in the base of the building for the outlet pipe, and before pouring the screed, dig trenches and lay the pipes.
Planning the sewer system should be done long before the construction of the bath
Even if you plan to bathe and wash in different rooms, you still need to install a drain in the steam room. After all, after each bathing procedure, this compartment must be thoroughly rinsed from a hygienic point of view.
Drain hole with grate
Since most often in the bath I use gravity-flow sewage, when laying pipes, it is necessary to observe a slope of 2-3 cm per linear meter
Floors also need to be done with a slope towards the drain hole.
If a gravity sewer will divert effluents from different rooms, then it is necessary to install a riser for ventilation.
Where water enters the drain hole and enters the sewer pipe, there must be a water seal that prevents the penetration of unpleasant odors into the bathhouse.


In addition, when designing an external sewage system, it is necessary to take into account 2 natural parameters:
- type of soil;
- soil freezing depth.
The last factor is important to know when laying internal drainage pipes. This point for some subjects of Russia is indicated in the table
| Regions | Maximum depth of zero soil temperatures, m |
| Moscow region | 1,2–1,32 |
| Leningrad region | 1,2–1,32 |
| Nizhny Novgorod Region | 1,4-1,54 |
| Oryol Region | 1,0-1,1 |
| Novosibirsk region | 2,2-2,42 |
| Astrakhan region | 0,8-0,88 |
| Arhangelsk region | 1,6-1,76 |
| Khanty-Mansi Autonomous Okrug | 2,4-2,64 |
| Sverdlovsk region | 1,8-1,98 |
| Chelyabinsk region | 1,8-1,98 |
| Saratov region | 1,4-1,54 |
| Samara Region | 1,6-1,76 |
| Omsk region | 2,0-2,2 |
| Orenburg region | 1,6-1,76 |
| Rostov region | 0,8-0,88 |
| Smolensk region | 1,0-1,1 |
| Tomsk region | 2,0-2,2 |
| Tyumen region | 1,8-1,98 |
| Republic of Bashkortostan | 1,8-1,98 |
| Stavropol region | 0,6 – 0,66 |
More detailed information, taking into account the type of soil, as well as calculations, are given in SNiP 2.02.01-83 and SNiP 23-01-99. If it is not possible to lay communications deeper than this mark, then the pipes must be insulated.
Let us consider in more detail the process of laying a system for removing and utilizing wastewater from a bath.
Features of the installation work
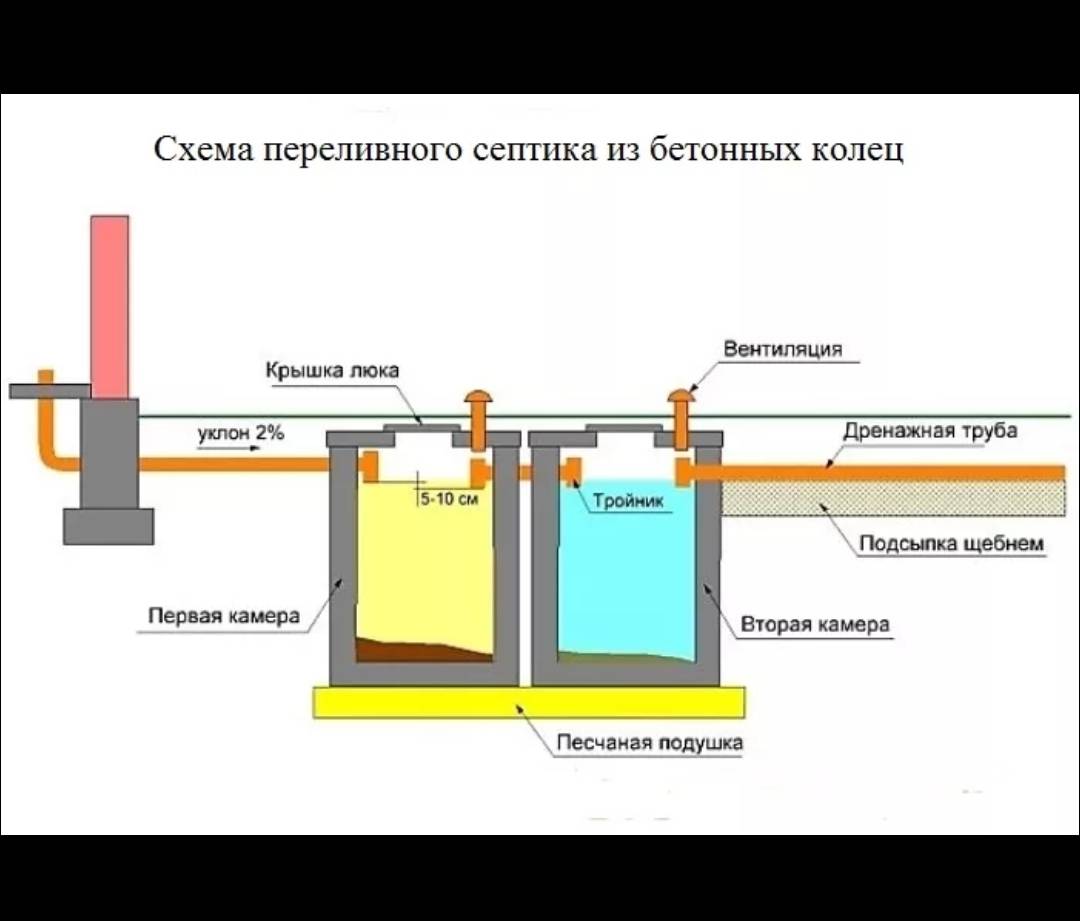
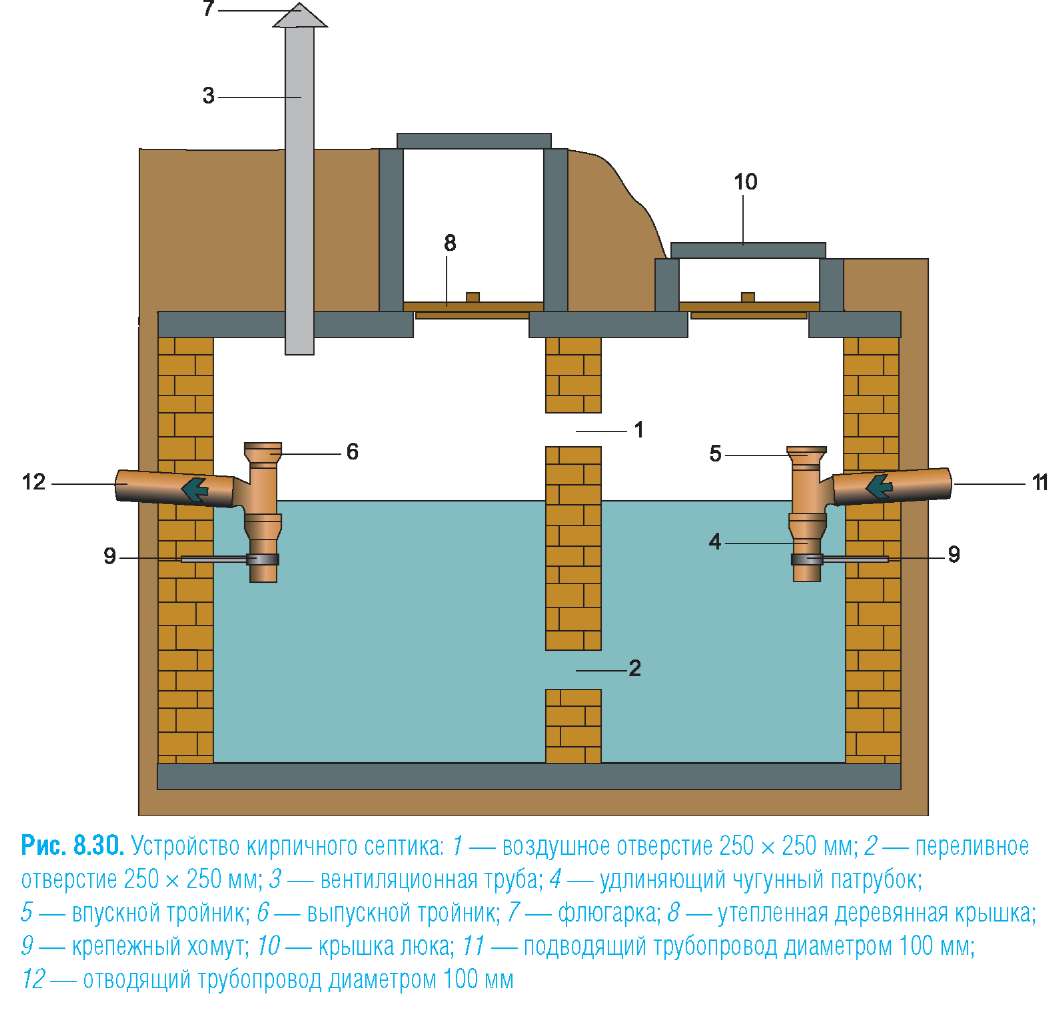
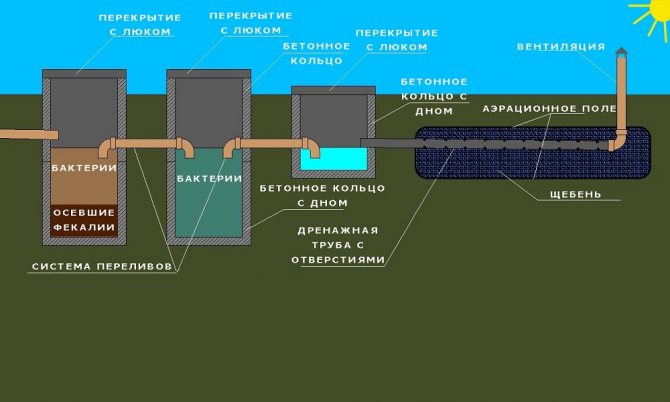
First, using a jigsaw, holes are cut in the barrels for installing overflow pipes and a ventilation riser. The hole for connecting the incoming pipe to the chamber is made at a distance of 20 cm from the upper edge of the container. The outlet is made on the opposite side of the chamber 10 cm below the inlet, that is, at a distance of 30 cm from the top edge of the barrel.
Installing the overflow pipe into the hole cut in the first plastic sump drum and filling the gap with a two-component epoxy sealant
The ventilation riser for the removal of gases is mounted only in the first settling barrel. It is also desirable to provide for this chamber to have a removable cover, which makes it possible to periodically clean the bottom of settled solid particles. In the second settling tank, two holes are made at the bottom, located relative to each other at an angle of 45 degrees, for connecting drainage pipes laid along the filtration field.
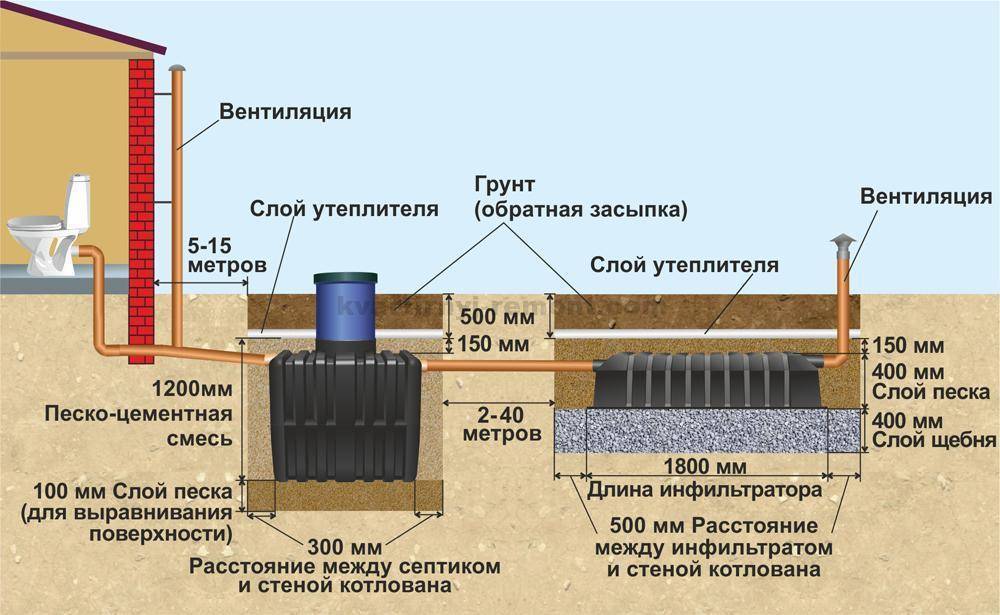
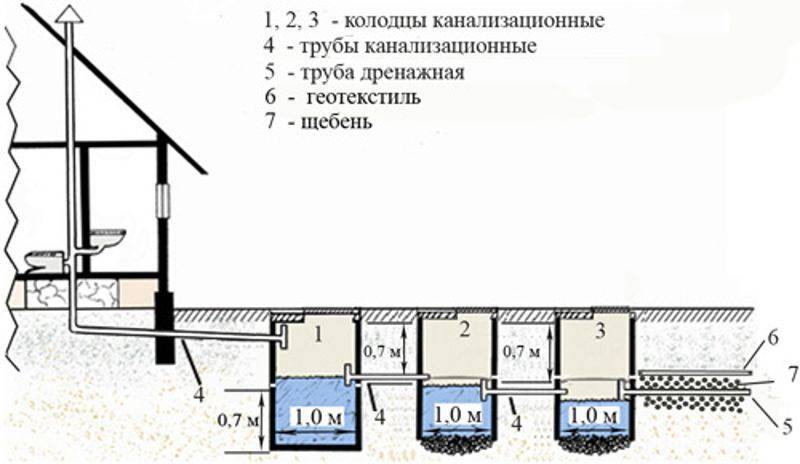
Stage # 1 - sizing and excavation
When calculating the dimensions of the pit, it is assumed that between the barrels and its walls there should be a gap of 25 cm around the entire perimeter. This gap will later be filled with a dry sand-cement mixture, which serves to protect the walls of the septic tank from damage during seasonal soil movement.
If you have finances, the bottom under the settling chambers can be filled with concrete mortar, providing in the “cushion” the presence of embedded metal parts with loops that will serve to secure the plastic containers. Such fastening will not allow the barrels to “float” with a vein, and, thereby, disrupt the equipped autonomous sewage system.
The stepped bottom of the pit must be leveled and covered with a layer of compacted sand, the thickness of which must be at least 10 cm.
Stage # 2 - installation of plastic containers
Barrels are installed on the prepared bottom of the pit, fixed with straps to metal loops immured in concrete. Connect all pipes and seal the gaps in the holes. The remaining space between the walls of the pit and the tanks is filled with a mixture of cement and sand, not forgetting to carry out layer-by-layer tamping. As the pit is filled with backfill, water is poured into the containers to prevent deformation of the walls of the barrels under the pressure of the sand-cement mixture.
Preparation of a hole in the second settling barrel for connecting an overflow pipe. In this version, the flange is connected not from the side, but from above
Stage # 3 - filter field device
In the immediate vicinity of the septic tank, a trench is dug 60-70 cm deep, the dimensions of which should allow the placement of two perforated pipes.The bottom and walls of the trench are lined with a geotextile fabric with a margin, which is necessary to cover pipes covered with rubble from above.
A 30-cm layer of crushed stone is poured onto the geotextile, the bulk material is leveled and rammed
Drainage pipes with perforation in the walls are laid, which are connected to the second settling barrel. Then another 10 cm of crushed stone is poured on top of the pipes, leveled and covered with a geotextile cloth so that the edges overlap each other by 15-20 cm. Then it remains to fill the filtration field with soil and decorate this place with lawn grass.


As you can see, any summer resident can make a septic tank from barrels. It should only be remembered that this facility is designed for the collection and disposal of a small amount of liquid household waste.
Selection rules
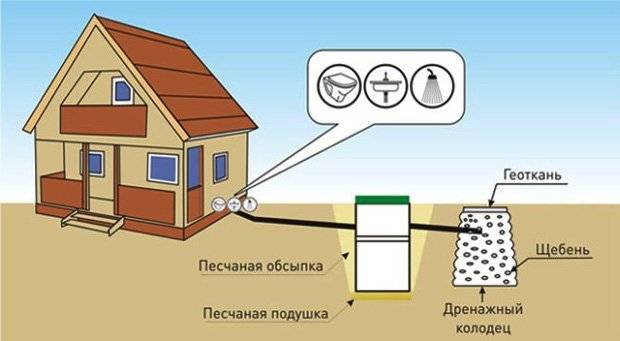
When purchasing or manufacturing a septic tank for a bath, it is necessary to take into account the nature of the effluents that it has to process. As a rule, the bulk of the waste from this facility is "gray water", consisting of water with soap suds, surfactants and derivatives of fatty acids. They also contain small amounts of hair and skin particles.
If the bath is equipped with a toilet, then the nature of the drains will be somewhat different. It is customary to call sewage water of this type "black", and it is more responsible to treat and dispose of them. In this case, the construction of a reliable treatment plant with several sealed sedimentation chambers is mandatory.
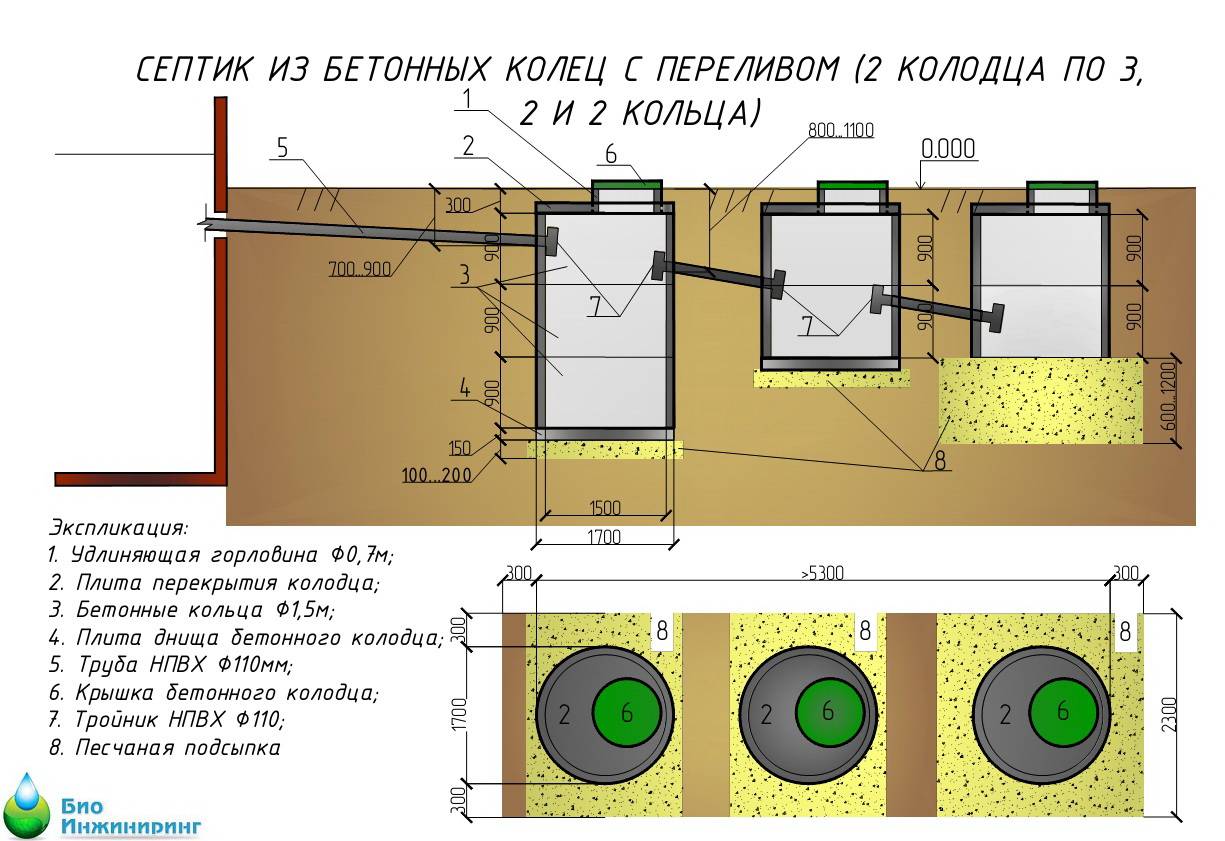
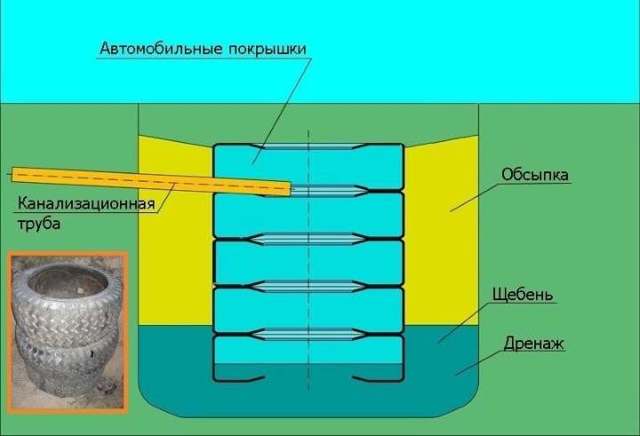
A septic tank for a bath can be single-chamber and two-chamber. A single-chamber septic tank is the simplest treatment plant, consisting of a tank without a bottom and operating on the principle of a filtering well.In this case, the function of a reservoir can be performed by various devices such as metal barrels without a bottom, as well as plastic containers with holes made in them, reinforced concrete rings, old car tires, etc., and the filter is a layer of crushed stone at the bottom.

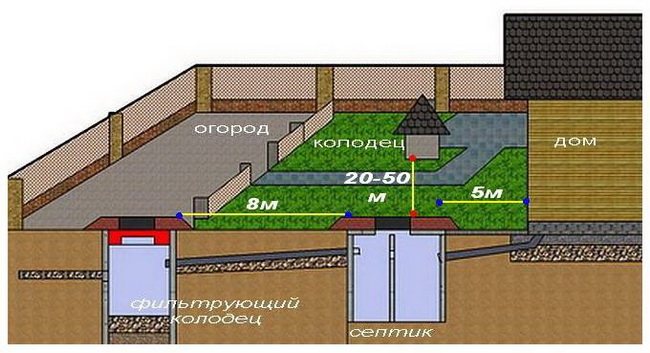
Please note, when constructing such a septic tank on your own site, it is necessary to take into account the location of groundwater in the place where it will be located. If their level is high enough, the treatment chamber must be of sufficient volume so that the large amount of waste water generated at the same time during the use of the bath can completely fit inside the tank. A septic tank for a bath with a toilet should ideally be at least two-chamber
This option should also be used when the use of the bath is planned quite often. It can be purchased ready-made or built independently, using reinforced concrete well rings, concrete mortar or plastic containers (Eurocubes) and the same tires
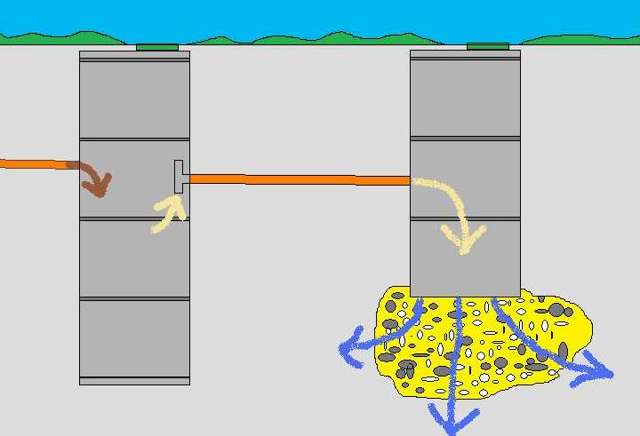
A septic tank for a bath with a toilet should ideally be at least two-chamber. This option should also be used when the use of the bath is planned quite often. It can be purchased ready-made or built independently, using reinforced concrete well rings, concrete mortar or plastic containers (Eurocubes) and the same tires for this.
The first chamber in this case is used as a mechanical cleaning filter. A mixture of crushed stone and gravel of small fractions is poured into it, which cleans the "gray drains" from larger impurities.The second chamber functions as a sump in which the water that has passed through the mechanical filter settles. Then the water moves into the drainage well, from which it is gradually absorbed into the ground. This option is good for those who need a septic tank for a bath without pumping. A septic tank has a similar principle of operation, in which the first chamber will be used for mechanical cleaning, and the second will be a drainage well with a bottom filter.

wooden floors
There are two options - floors leaking or non-leaking. The first ones will not cost too much, they are quite simple, the second ones are not so elementary.
Leaking floors
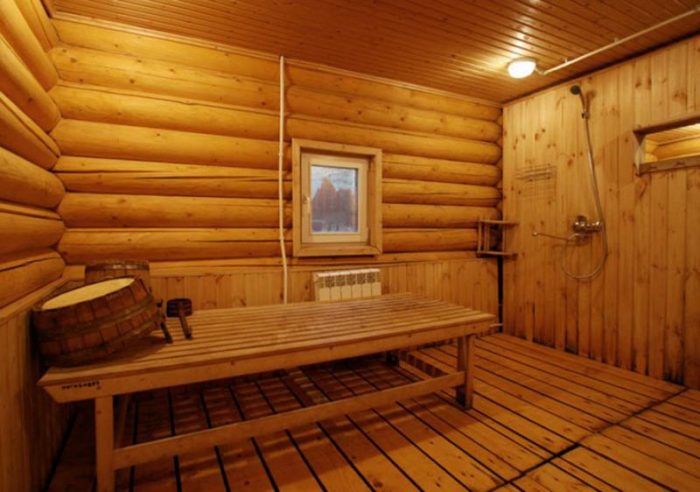
In this case, the boards are laid on the floor beams, the distance between the elements is 5-7 mm. Thanks to good gaps, water leaves the room. This solution allows you to do without the arrangement of sewage. Under the floor, located 500-550 mm from the ground, they dig a pit of the same depth, then a layer of crushed stone or sand with expanded clay is poured into it.
The second method is combined, since a concrete screed is made under the floor boards. This option involves the organization of a removable wooden flooring, which at any time can be taken out into the street, dried, ventilated.
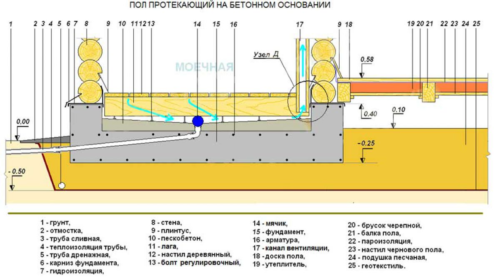
Leak-proof floors

This type is more complex: the design consists of two layers - a draft, as well as a white floor. The last coating is mounted with a slope towards the drain hole. A heater is laid between them, and at the bottom of the structure, in the place where the slope leads, a drain ladder and a sewer pipe are installed. If this variant of the floor for the bath is chosen, then good ventilation of the room, its regular airing are mandatory conditions.
For non-leaking floors, the selection of high-quality material is very important: wood must have low hygroscopicity. A worthy contender is oak, an alternative to it is high-quality pine. The advantage of the first breed is high density, the second is resinousness, which makes it possible to successfully restrain the “creeps” of moisture. The boards must be tongue-and-groove, have a tenon-groove connection. Dangerous for wood, even the slightest gaps between them.
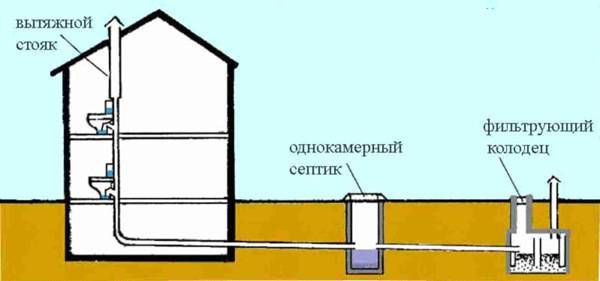
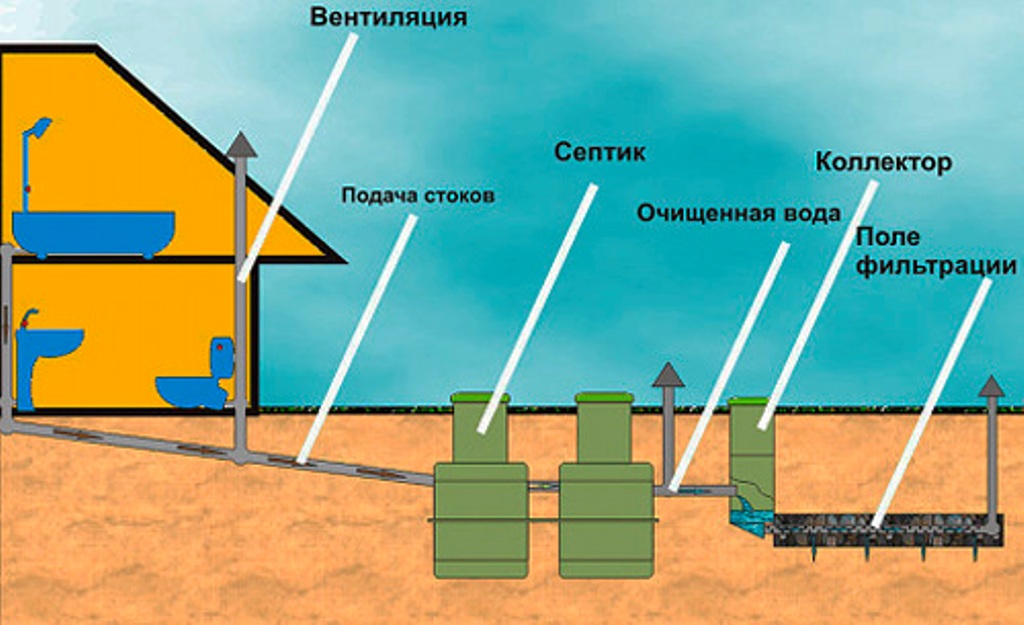
There are two sewerage systems: centralized, local (autonomous).
The advantage of the first is that there is no need to dispose of waste products. It is enough to connect to the system and regularly pay for the use. Installation of communications can be no cheaper than arranging a simple septic tank. But such a system is reliable in operation, cheaper to maintain and does not harm the environment.
Sewer pipes are laid in a trench with a slope.
Important! Height difference from 10 to 15 mm per 1 p/m for pipes with an inner diameter of 110 mm. Suitable pipes are PP (polypropylene) or PVC (polyvinyl chloride)
They are easy to mount. One side of the pipe has a socket with a rubber seal. The smooth end of the next pipe is lubricated with silicone and inserted into the socket. Makes a hermetic connection
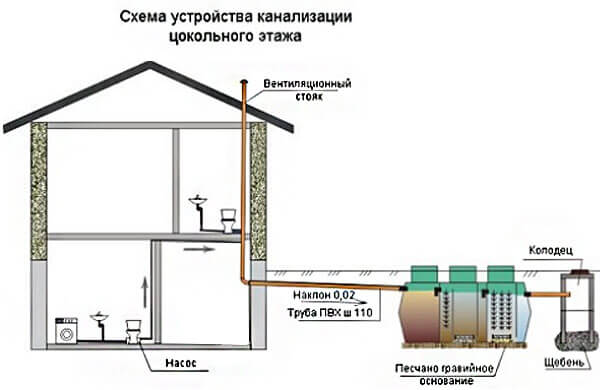


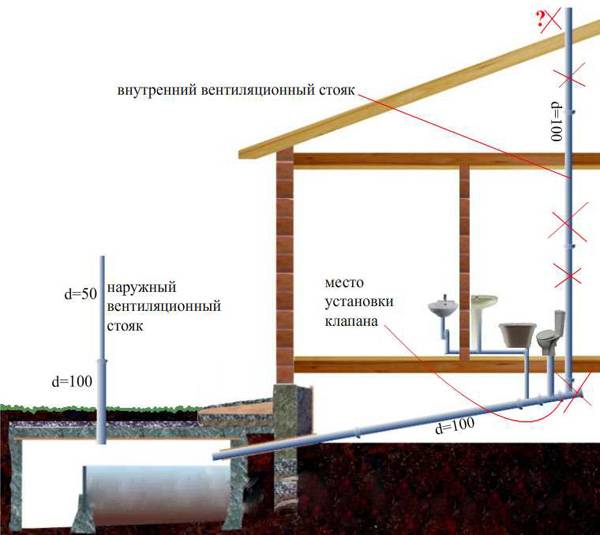
Suitable pipes are PP (polypropylene) or PVC (polyvinyl chloride). They are easy to mount. One side of the pipe has a socket with a rubber seal. The smooth end of the next pipe is lubricated with silicone and inserted into the socket. It turns out a tight connection.
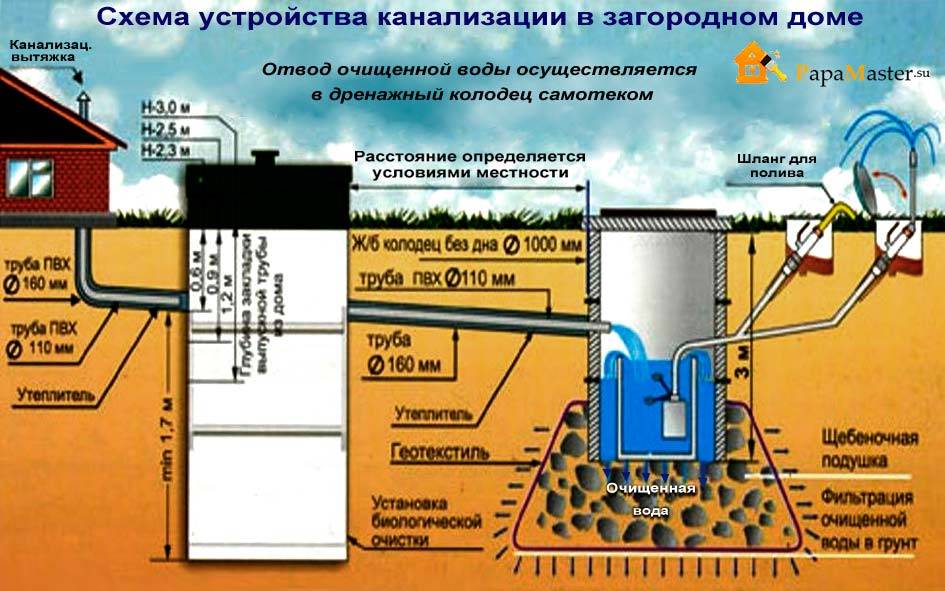
The slope must be maintained up to the connection well to the central system. The recommended laying depth is 0.5 meters below the freezing zone for the area. In this case, it is not necessary to insulate the pipes.If this condition is not feasible, they must be thermally insulated.
How to make a drainage system in the general sewer system
If there is a sewer system not far from the future steam room, then you can connect the drainage system directly to it. This option is great for those who are thinking about how to make a drain in the bath to use it in the winter. No additional filter cleaning will be necessary, plus there are no restrictions on the number of people who can use the steam room.
Work is also carried out at the initial stages of construction. A drain gutter is installed at the lowest point of the floor.

Installation of sewer pipes is carried out at the first stage of construction
Before installing the outgoing pipe into the general sewerage system, a permit is required. To do this, contact the service company with:
- The agreement of the design bureau that developed the drain system. The organization must be certified and authorized to carry out installation work.
- The consent of the neighbors to carry out the installation of the pipeline into the general sewer system.
A manhole should be placed on the site, which will give direct access to the pipes in the event of an accident.
Step-by-step instructions for making a drain design in a bath
We proceed directly to the installation of the drainage system.
-
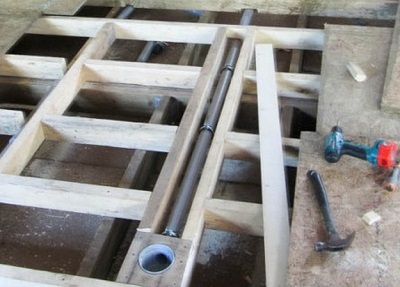
The drain system is installed before pouring the concrete floor of the washroom. First of all, they dig a trench for the drain pipe with a shovel from the sewer pit to the bathhouse. This is done in such a way that a slope of 15 degrees is obtained.That is, the depth of the channel is taken equal to the diameter of the pipe (100 mm), plus another twenty centimeters offhand.
-
In the metal wall of the sewer pit, we cut a square of 100 mm x 100 mm with a grinder. We insert the first branch pipe into the resulting opening - with a socket inside the container. All the remaining space around the gap is sealed with mastic. It seals the connection, and at the same time fixes the end of the pipe.
-
After the mastic dries, we continue the process. We insert the remaining pipes, in such a way as to bring the line to the bath. If necessary, hammer each link with a rubber mallet.
-
The last link should fall between the pillars of the foundation of the bath and go under the floor logs. We continue to work indoors. We attach a rectangular elbow or two elements to the final pipe, creating a right angle so that the line goes vertically upwards. You may also need to insert a vertical pipe if it is far from the floor level.
-
Installing a sewer.
- Having paved the temporary flooring from the boards as a formwork, we fill the floor with concrete.
In many baths, a special layer of waterproofing is additionally made.
Drying of the coating is carried out up to three days.
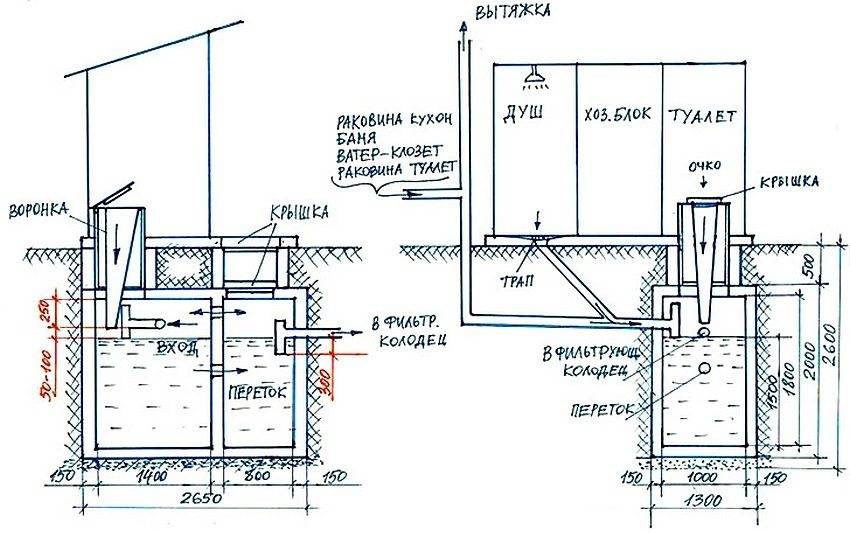
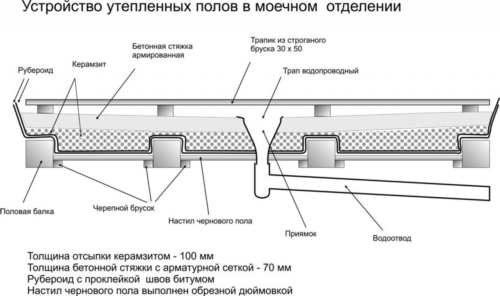
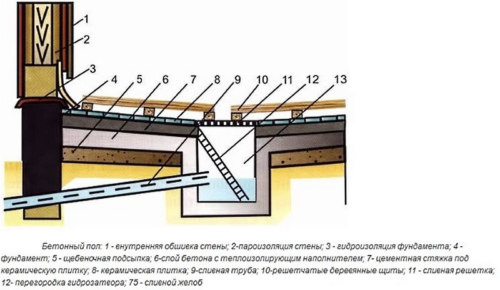
Bath drain device
In different rooms of the bath, it is customary to make drain devices that are different in design and principle of operation. There are three options for building a drain in the bath room:
- Raised floors with poured floorboards. Often used in the steam room, where there should be a warm wooden floor, providing a comfortable stay in conditions of high temperature. Whereas the washroom traditionally uses sloping tiles with a shower drain;
- Non-leaking floors.All liquid, dirty water remains on the floor and is washed off the surface through a standard bellows drain into a septic tank or collection tank;
- The combined version is used only in small baths or in full-fledged washing departments of baths. In modern projects, baths are used to a limited extent, as they do not meet sanitary standards.
The choice of a specific scheme depends on the foundation device, the method of insulation and the arrangement of the water seal. For small steam rooms and washing departments of the bath, a double floor system is used, which is convenient, especially when the building is installed on a pile foundation. If you plan to build a bath box in the form of an extension to the house, then the most suitable option would be a non-leaking floor with a drain through the drain. This will make it easier to connect the bath's sewer to the building's general wastewater disposal system.
Leaking floors
Similar variants of the drain device in a bath with a wooden floor were also called pouring. The essence of the design was that the upper part of the floor consisted of boards laid with a gap of up to 10 mm, so most of the water simply flows through the cracks and collects on the lower tier or is absorbed into the ground. At the same time, the floorboards themselves, as a rule, were made with a slight rounding of the surface, which ensured a normal flow of water and its discharge to the lower level in the underground. One of the options for draining water in a bath with wooden floors is shown in the diagram below.
The gap between the floorboards helps dry the floor
The advantages of such a device for the collection and drainage of water include:
- Simple cleaning of the premises;
- Absence of puddles and water residues on the surface on wooden floorboards;
- Durability of lags, insulation and wooden parts of the floor and drain system.
Important! Despite the fact that the lower tier, where moisture and dirt accumulated, actually remains covered with fine wooden floors, the entire system for draining water from the bath is well suited for ventilation and drying of the underground.
As a rule, ventilation ducts from the stove located either in the steam room or in the dressing room go to the lower tier. Upon completion of the bathing procedures, the channels were opened, the ventilation windows in the steam room itself or in the washing department were opened, and the warm air from the stove dried quickly enough and removed traces of water if it was not removed through the drain system.


Leak-proof floor
It is clear that the manufacture of pouring or deck floors requires quite serious costs associated with the manufacture of two levels of water collection, the installation of a drain system and the connection of a sewer pipe leading to a pit or septic tank.
It is much easier during the construction process to make classic concrete floors in the bath with a slight slope towards the drain. The concrete screed must be insulated with polystyrene foam or extruded polystyrene foam. To ensure the flow of water through the system, a classic version with an elbow and a corrugated pipe is used, or a more modern shower drain can be installed.
Scheme for draining with a warm floor for a bath - extensions to the house
At the same time, the floor of the bath does not have to be tiled; the surface can quite realistically be revetted with wooden floorboards. This solution is most often used for steam rooms. The amount of water discharged through the drain system is relatively small, so you can get by with a small drain pipe installed in the corner of the room.
Combined scheme for draining water for a bath
This option for organizing water drainage is traditionally used for large bath rooms with an insulated base and a concrete strip foundation.
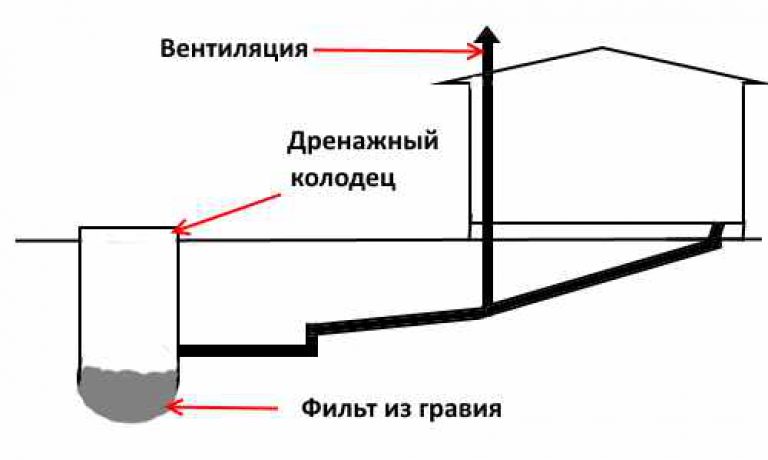
The essence of the drain system is that water is collected in the center of the room in a special gutter or pit. The channel is covered with a protective grating, and the drain surfaces are usually laid with gratings.
The drainage channel or gutter usually has an additional slope, along which water flows directly into the ground or into a septic tank located in the subfield of the bath. The design is quite simple, so it is often used for country options for steam rooms and baths built by oneself.