- Driver circuits and their principle of operation
- Driver with current stabilization
- Voltage stabilized driver
- Driver without stabilization
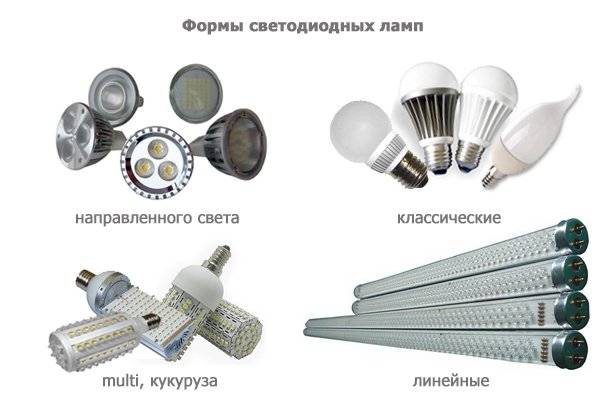
- Rating of manufacturers of LED lamps.
- How to choose LEDs?
- DIY lamp making
- Tools and materials
- Step-by-step instructions for making a lamp
- Making a driver
- Video: making a DIY LED lamp
- Switching power supplies
- How to choose a driver for LEDs. Ways to connect LED
- How to choose a driver for LEDs
- Do-it-yourself LED driver for high-power LEDs
- Circuit modifications with an additional resistor and a zener diode
- Modification of the circuit for "dimming" LEDs
- LED driver - what is it
- Conclusion
Driver circuits and their principle of operation
To carry out a successful repair, you must clearly understand how the lamp works. One of the main components of any LED lamp is the driver. Driver schemes for LED lamps on There are many 220 V, but conditionally they can be divided into 3 types:
- with current stabilization.
- With voltage stabilization.
- No stabilization.
Only devices of the first type are inherently drivers. They limit the current through the LEDs. The second type is better called a power supply for LED strip. The third one is generally difficult to name, but its repair, as I indicated above, is the easiest.Consider lamp circuits on drivers of each type.
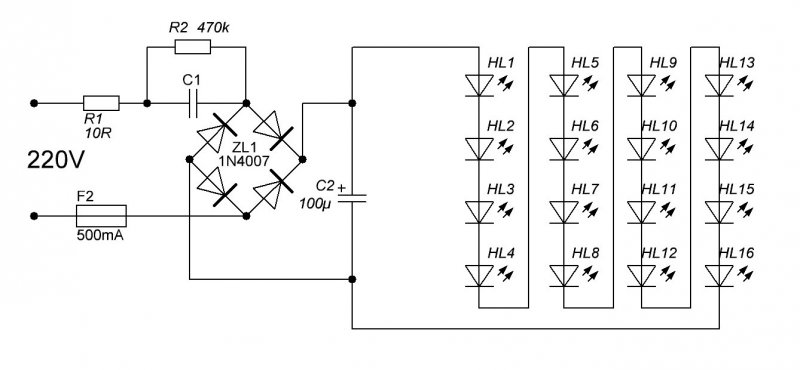
Driver with current stabilization
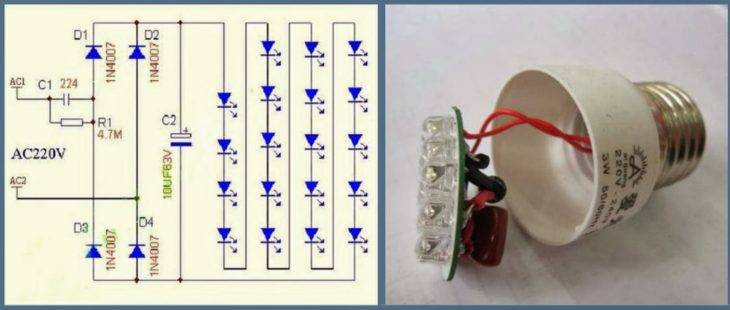
The lamp driver, the circuit of which you see below, is assembled on an integrated current stabilizer SM2082D. Despite its apparent simplicity, it is full-fledged and of high quality, and its repair is not difficult.
The mains voltage through the fuse F is supplied to the diode bridge VD1-VD4, and then, already rectified, to the smoothing capacitor C1. The constant voltage thus obtained is fed to the LEDs of the HL1-HL14 lamp, connected in series, and pin 2 of the DA1 chip.
From the very first output of this microcircuit, a current-stabilized voltage is supplied to the LEDs. The amount of current depends on the value of the resistor R2. Resistor R1 of a rather large value, a shunt capacitor, is not involved in the operation of the circuit. It is needed in order to quickly discharge the capacitor when you unscrew the light bulb. Otherwise, holding the base, you risk getting a serious electric shock, because C1 will remain charged up to a voltage of 300 V.
Voltage stabilized driver
This circuit, in principle, is also quite high-quality, but you need to connect it to the LEDs in a slightly different way. As I said above, it would be more correct to call such a driver a power supply, since it stabilizes not the current, but the voltage.
Here, the mains voltage is first supplied to the ballast capacitor C1, which reduces it to a value of approximately 20 V, and then to the diode bridge VD1-VD4. Further, the rectified voltage is smoothed by capacitor C2 and fed to the integrated voltage regulator. It is smoothed again (C3) and through the current-limiting resistor R2 feeds a chain of LEDs connected in series.Thus, even with fluctuations in the mains voltage, the current through the LEDs will remain constant.
The difference between this circuit and the previous one is precisely in this current-limiting resistor. In fact, this is an LED strip circuit with a ballast power supply.
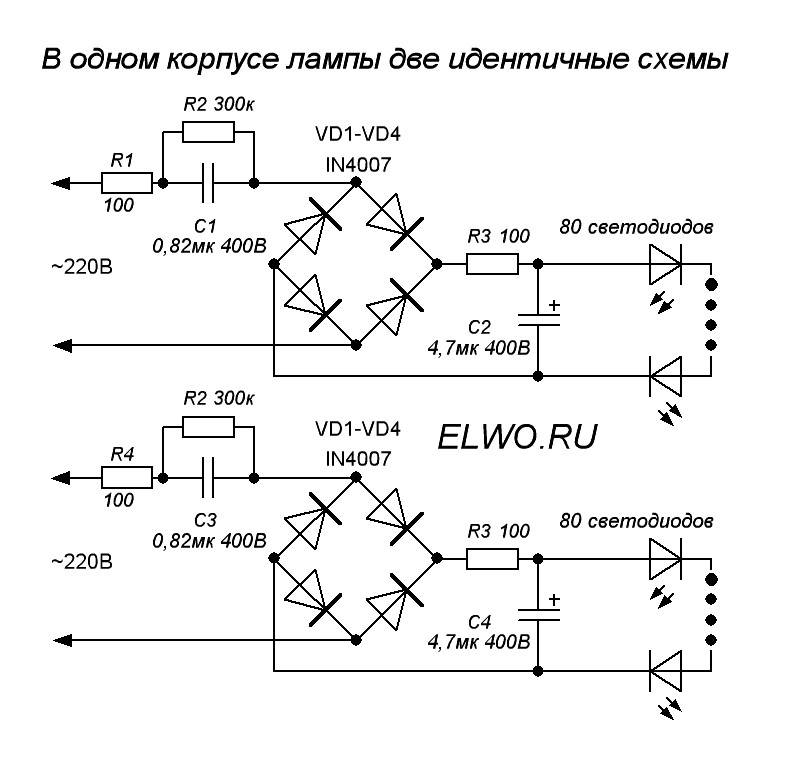
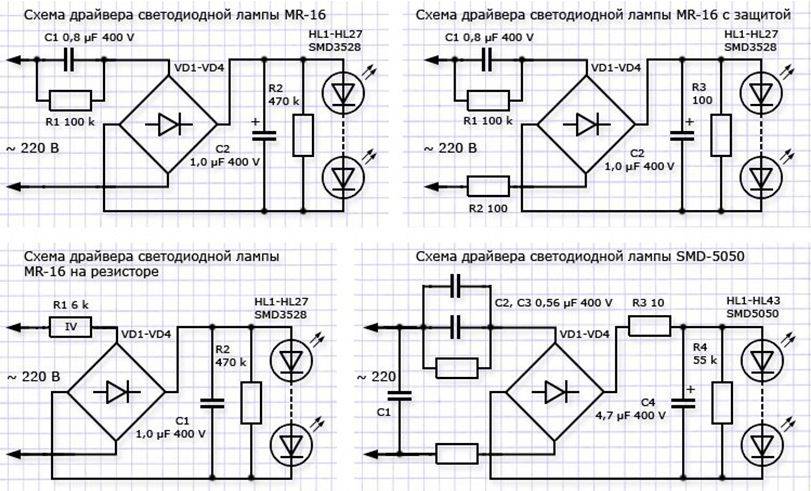
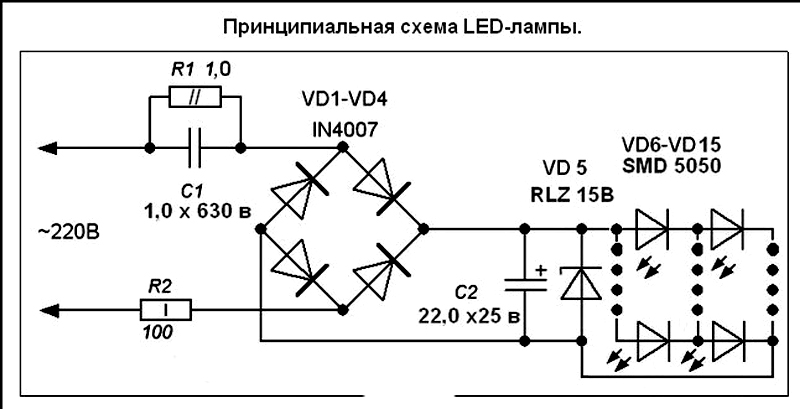
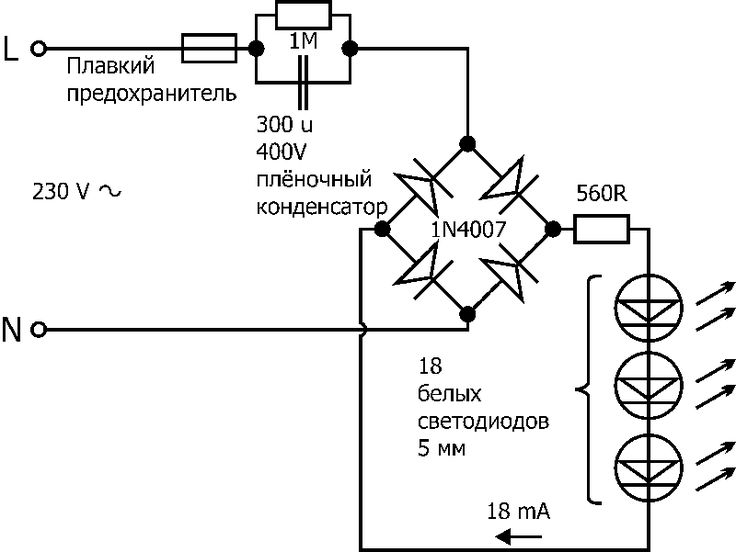
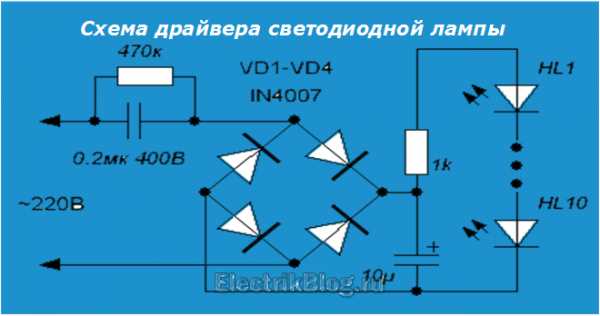
Driver without stabilization
The driver assembled according to this scheme is a miracle of Chinese circuitry. However, if the mains voltage is normal and does not jump much, it works. The device is assembled according to the simplest scheme and does not stabilize either current or voltage. It simply lowers it (voltage) to the approximate desired value and straightens it.
In this diagram, you see a quenching (ballast) capacitor already familiar to you, shunted by a resistor for safety. Next, the voltage is supplied to the rectifier bridge, smoothed out by a capacitor of offensively small capacity - only 10 microfarads - and through a current-limiting resistor it enters the chain of LEDs.
What can be said about such a "driver"? Since it does not stabilize anything, the voltage on the LEDs and, accordingly, the current through them are directly dependent on the input voltage. If it is too high, the lamp will quickly burn out. If it jumps, the light will also flash.
This solution is usually used in budget lamps from Chinese manufacturers. Of course, it is difficult to call it successful, but it occurs quite often and, with normal network voltage, can work for a long time. In addition, such circuits are easily repairable.
Rating of manufacturers of LED lamps.
The rating is based on data from online stores based on consumer feedback. This top is presented from led lamps with an E27 base and an average power of 7W. OSRAM (4.8 points).
The German brand produces bright, reliable led models with a good cooling system.
pros
- Low ripple (10%);
- Good color rendering index (80) does not burden the eyes.;
- A wide range of products and prices (from 150 rubles to 1500);
- The ability to connect some models to a "smart home", but only directly, without a base. All models are equipped with a voltage stabilizer;
Minuses
Pay attention to the country of the manufacturer, these lamps are produced both in Russia, China, and in Germany itself. Gauss (4.7 points)
Gauss (4.7 points).
Russian brand.
pros
- There is no flicker.
- There are powerful led light sources e27 35W
- Very high color rendering index (above 90).
- The longest service life among those presented is up to 50,000 hours.
- One of the brightest light sources.
- Models with unusual flask shapes are available
- Affordable prices (from 200 rubles).
Minuses
- Small lighting area (for most models),
- Sales are mostly online.
Navigator (4.6 points).
Russian brand, although production is based in China.
pros
- Availability. Models are widely represented in the stores of the country
- Huge range of light sources of different shapes and colors. There are a number of models for specialized lighting fixtures.
- Low prices (about 200 rubles apiece).
- Service life 40,000 hours
- No flicker
- High color rendering (89)
- Works with temperature fluctuations
Minuses
- The absence of a voltage stabilizer in inexpensive models
- Radiator heating
ASD (4.5 points).
Russian brand, products adapted to the specifics of the country's power supply.
pros
- Large selection of professional LED light sources available
- Prices are low
- Service life 30,000 hours
- Good color rendering (89)
Minuses
- The range of household light sources is small
- Poor cooling
- Relatively high marriage rate
Philips Led (4.5 points).
pros
- All light sources of this company are laboratory tested for eye safety. This is achieved due to the low flicker factor.
- Light sources of this brand have the best cooling system.
- Prices in a wide range: from 200 rubles to 2000.
- All models have a built-in voltage regulator. Many models are built into the "smart home".
Minuses
Xiaomi Yeelight (4.5 points).
Chinese brand Xiaomi LED light sources.
pros
- The color temperature range is from 1500 to 6500 K, which provides about 16 million shades of colors.
- Ripple coefficient - 10%.
- Service life - 25000 hours.
- Compatible with smart home. Can be controlled via smartphone, Yandex Alice or Google Assistant. Cons:
Minuses
Hum when turned on at full brightness
High cost (over a thousand rubles apiece).
ERA (4.3 points).
Russian brand, manufactures products in China.
pros
- The firm produces some of the cheapest light bulbs on the market.
- Good service life of 30,000 hours.
- Like the Navigator, ERA models are available in most stores across the country. Several hundred models of lamps are presented.
- They have very good cooling.
Minuses
- Fairly high flicker factor (15-20%)
- Small spread angle
- Poor fixation in the plinth
Camelion (4.3 points).
German brand, made in China.
pros
- Long service life of 40,000 hours
- No flicker
- bright light
- Increased light output
- The model range is represented by light sources of various shapes and colors.
- There are lamps for special purposes, up to phytolamps
- The price range is wide (from 100 rubles)
Minuses
- Shorter warranty period than others
- A long service life is ensured if the lamp is operated for 3 hours a day.
Ecola (3 points).
Joint Russian-Chinese firm.
pros
- Produced in China.
- Service life 30,000 hours.
- Price (from 100 rubles apiece).
- The color temperature of 4000 K is well suited for office environments.
Minuses
How to choose LEDs?
It all depends on where you will use these homemade lamps. If you need a bright light in the living room, then you need super-bright fixtures in large quantities. And if for a corridor, toilet, bathroom or hallway - a few pieces are enough.


It's pretty simple - more LEDs, more light. Sometimes you just need indicator lights to show the operation of the device, or that the voltage is applied. This is sometimes necessary in factories and factory equipment. In this case, one ordinary red or green LED is sufficient. You can even use the Soviet AL307, widely used in old tape recorders and other equipment.
DIY lamp making
It's hard to imagine, but even an LED lamp can be made by hand and save a lot on the purchase of appliances.
Tools and materials
The quality of the materials and tools needed to create a 220V lamp plays an important role. The reliability and safety, durability of the product depend on this.
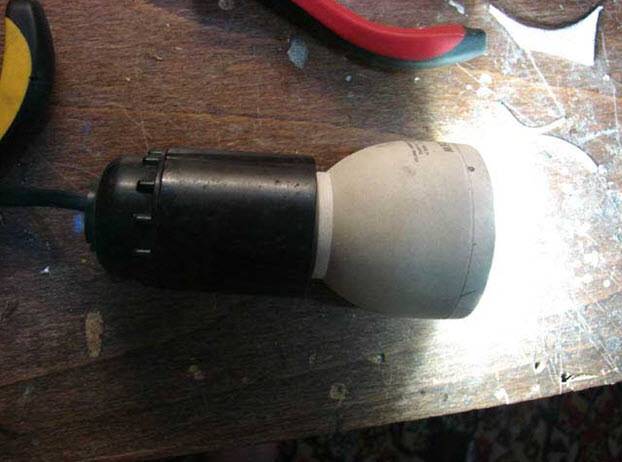
 It is easy to make directional light lamps with your own hands
To work, you need elements such as:
- halogen lamp without glass;
- up to 22 LEDs;
- fast adhesive;
- copper wire and aluminum sheet, the thickness of which is 0.2 mm;
- resistors, selected depending on the circuit.
Before work to draw up a connection diagram all the details, depending on the specific situation. For this purpose, a variety of online calculators are used to obtain an accurate result. With more than 22 LEDs, the connection is complex and requires a special approach.
 The scheme is selected depending on the situation.
The tools used are a screwdriver, a hammer, a hole punch, a small soldering iron. In the process of work, you will also need a small stand, which allows you to conveniently place the diodes on the reflective disk.
Step-by-step instructions for making a lamp
Making a 220 V LED lamp with your own hands does not require professional knowledge and complex tools.
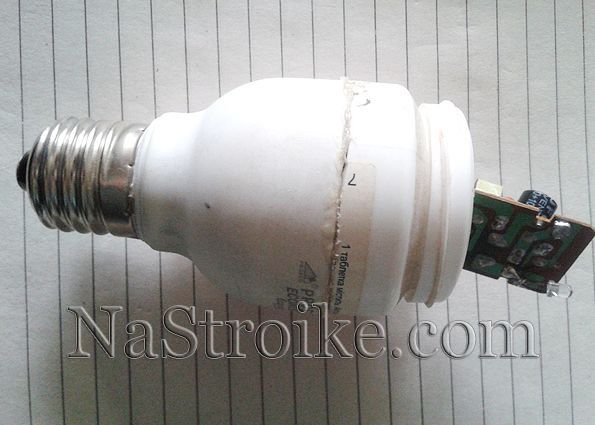
- First you need to prepare a faulty lamp by opening the case. The base is detached from it very carefully, and for this you can use a screwdriver.
- Inside the design there is a board of a ballast electronic device, which will be needed for further work. You also need LEDs. The top of the product has a lid with holes. The tubes should be removed from it. The base is made of plastic or thick cardboard.
- On a plastic base, the LEDs will hold more securely than on cardboard. Therefore, it is best to use a piece of plastic.
- The lamp will be powered by the RLD2-1 driver, which is suitable for a 220 V network. In this case, 3 white one-watt LEDs can be connected in series. Three elements are connected in parallel, and then all chains are fixed in series.
- The wires in the base can be damaged during disassembly of the lamp structure.In this case, you need to solder the elements in place, which will provide a simple technique for further assembly of the product.
- A piece of plastic must also be placed between the driver and the board. This avoids closure. In this case, you can also use cardboard, because the LED lamp does not heat up. After that, the design is assembled, and the device is screwed into the cartridge and checked for performance.
 After assembly, you need to check the performance of the device
The power of such a lamp is approximately 3 watts. The device is connected to a network with a voltage of 220 V and provides bright lighting. The lamp is effective as an auxiliary light source. Based on this DIY example, it is easy to create more powerful designs.
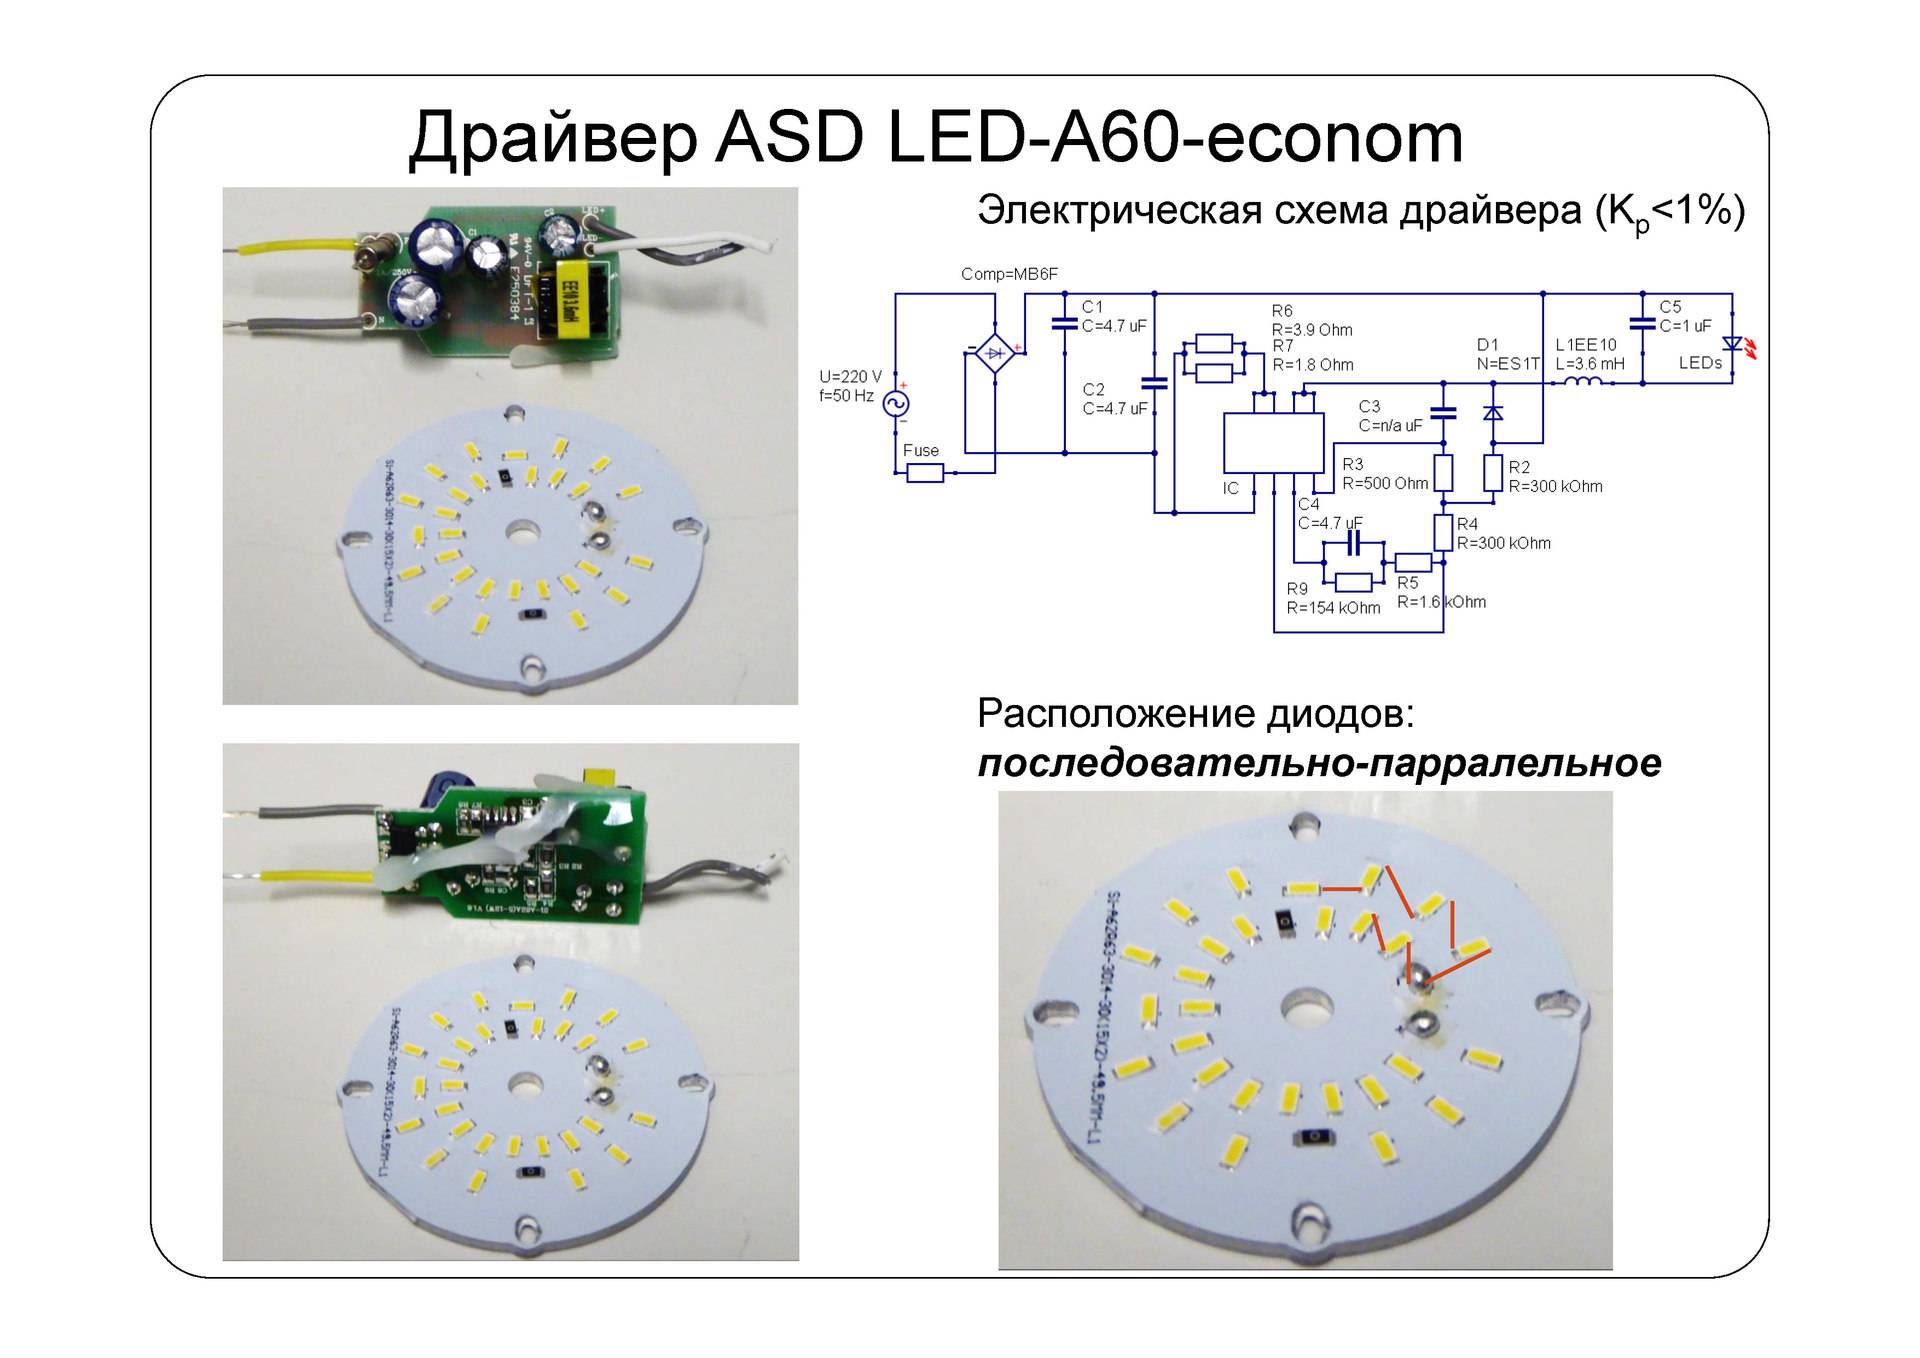
Making a driver
A current stabilization device and a constant voltage source - a driver - are present in the design of a lamp connected to a network with a voltage of 220 V. Without it, it is impossible to create a light source, and you can make such an element with your own hands. To do this, carefully disassemble the lamp, cut off the wires leading to the base and to the glass bulbs. It is worth considering that one of the roundabout wires may have a resistor. In this case, the cut element follows the resistor, as it is needed when creating the driver.
After cutting off the wires, such a detail remains
Each board option differs depending on the manufacturer, device power and other features. For 10W LEDs, there is no need to modify the driver. If the lamp differs in the intensity of the light flux, then it is best to take a converter from a device of greater power. 18 turns of enamel wire should be wound on a 20 W lamp inductor, and then soldered to its output to the diode bridge.Next, voltage is applied to the lamp and the output power is checked. So you can create a product whose characteristics meet the requirements.
Video: making a DIY LED lamp
Making a 220 V LED lamp with your own hands is easy, but first you need to determine the required power, circuit and select all the elements. Further, the process does not cause difficulties even for novice masters. The result is an economical and reliable device for lighting any premises.
Switching power supplies
First, the rectification of the voltage occurs immediately. That is, AC 220V is supplied to the input and immediately at the input it is converted to DC 220V.
Next is the pulse generator. Its main task is to create an artificially alternating voltage with a very high frequency. Several tens or even hundreds of kilohertz (from 30 to 150 kHz). Compare that to the 50Hz we're used to at home outlets.
By the way, due to such a huge frequency, we practically do not hear the hum of pulse transformers. This is explained by the fact that the human ear is able to distinguish sound up to 20 kHz, no more.

The third element in the circuit is a pulse transformer. It resembles the usual one in shape and design. However, its main difference is its small overall dimensions.
This is exactly what is achieved due to the high frequency.
Of these three elements, the most important is the pulse generator. Without it, there would be no such relatively small power supply.


Advantages of impulse blocks:
a small price, unless of course it is compared in terms of power, and the same unit assembled on a conventional transformer
Efficiency from 90 to 98%
supply voltage can be applied in a wide range
with a quality power supply manufacturer, pulsed UPSs have a higher cosine phi
There are also disadvantages:
the complexity of the assembly scheme
complex structure
if you come across a low-quality impulse unit, then it will emit a bunch of high-frequency interference into the network, which will affect the operation of the rest of the equipment
Simply put, a power supply that is normal or pulsed is a device that has exactly one voltage at the output. Of course, it can be "twisted", but not in large ranges.
For LED lamps, such blocks are not suitable. Therefore, drivers are used to power them.
How to choose a driver for LEDs. Ways to connect LED
Let's say there are 6 LEDs with a voltage drop of 2V and a current of 300mA. You can connect them in various ways, and in each case you will need a driver with certain parameters:
- Consistently. With this connection method, a driver with a voltage of 12 V and a current of 300 mA is required. The advantage of this method is that the same current flows through the entire circuit, and the LEDs light up with the same brightness. The disadvantage is that to drive a large number of LEDs, a driver with a very high voltage is required.
- Parallel. A 6 V driver will already be enough here, but the current consumption will be about 2 times more than with a serial connection. Disadvantage: the currents flowing in each circuit are slightly different due to the variation in the parameters of the LEDs, so one circuit will shine a little brighter than the other.
- Two in succession. Here you will need the same driver as in the second case.The brightness of the glow will be more uniform, but there is one significant drawback: when the power is turned on in each pair of LEDs, due to the spread of characteristics, one may open earlier than the other, and a current 2 times higher than the nominal current will flow through it. Most LEDs are designed for such short-term current surges, but still this method is the least preferred.
Please note that in all cases the driver power is 3.6 W and does not depend on the way the load is connected. Thus, it is more expedient to choose a driver for LEDs already at the stage of purchasing the latter, having previously determined the connection scheme
If you first purchase the LEDs themselves, and then select a driver for them, this can be a difficult task, since the likelihood that you will find exactly the power source that can provide the operation of this particular number of LEDs, included in a particular scheme, is small
Thus, it is more expedient to choose a driver for LEDs already at the stage of purchasing the latter, having previously determined the connection scheme. If you first purchase the LEDs themselves, and then select a driver for them, this can be a difficult task, since the likelihood that you will find exactly the power source that can provide the operation of this particular number of LEDs, included in a particular scheme, is small.
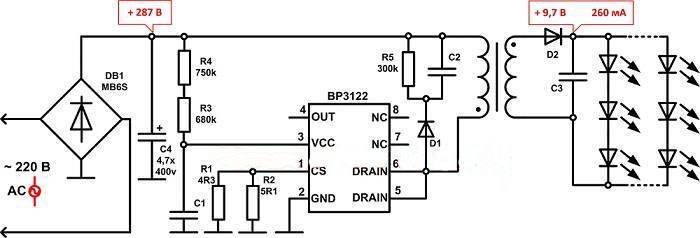
How to choose a driver for LEDs
Having dealt with the principle of operation of the led driver, it remains to learn how to choose them correctly. If you have not forgotten the basics of electrical engineering received at school, then this is a simple matter. We list the main characteristics of the converter for LEDs that will be involved in the selection:
- input voltage;
- output voltage;
- output current;
- output power;
- degree of protection from the environment.
First of all, you need to decide from which source your LED lamp will be powered. This can be a 220 V network, an on-board network of a car, or any other source of both AC and DC. The first requirement: the voltage that you will use must fit into the range indicated in the passport for the driver in the "input voltage" column. In addition to the magnitude, it is necessary to take into account the type of current: direct or alternating. Indeed, in the outlet, for example, the current is alternating, and in the car - direct. The first is usually abbreviated AC, the second DC. Almost always, this information can be seen on the case of the device itself.
Next, we move on to the output parameters. Suppose you have three LEDs for an operating voltage of 3.3 V and a current of 300 mA each (indicated in the accompanying documentation). You decided to make a table lamp, the diodes are connected in series. We add up the operating voltages of all semiconductors, we get the voltage drop across the entire chain: 3.3 * 3 = 9.9 V. The current with this connection remains the same - 300 mA. So you need a driver with an output voltage of 9.9 V, which provides current stabilization at the level of 300 mA.
Of course, it is for this voltage that the device cannot be found, but this is not necessary. All drivers are not designed for a specific voltage, but for a certain range. Your task is to fit your value into this range. But the output current must exactly correspond to 300 mA. In extreme cases, it can be somewhat less (the lamp will not shine so brightly), but never more. Otherwise, your homemade product will burn out immediately or in a month.
Move on. We find out what kind of driver power we need. This parameter should at least match the power consumption of our future lamp, and it is better to exceed this value by 10-20%. How to calculate the power of our "garland" of three LEDs? Remember: the electrical power of the load is the current flowing through it, multiplied by the applied voltage. We take a calculator and multiply the total operating voltage of all LEDs by the current, after converting the latter into amperes: 9.9 * 0.3 = 2.97 W.
Finishing touch. Structural execution. The device can be both in the case, and without it. The first, of course, is afraid of dust and moisture, and in terms of electrical safety, it is not the best option. If you decide to embed the driver in a lamp whose housing is a good environmental protection, then it will do. But if the lamp housing has a bunch of ventilation holes (the LEDs need to be cooled), and the device itself will be in the garage, then it is better to choose a power source in your own housing.
So, we need an LED driver with the following characteristics:
- supply voltage - network 220 V AC;
- output voltage - 9.9 V;
- output current - 300 mA;
- output power - not less than 3 W;
- housing - dustproof.
Let's go to the store and take a look. Here he is:
And not just suitable, but ideally suited to the needs. A slightly lower output current will extend the life of the LEDs, but this will not affect the brightness of their glow in any way. The power consumption will drop to 2.7 W - there will be a driver power reserve.


Do-it-yourself LED driver for high-power LEDs
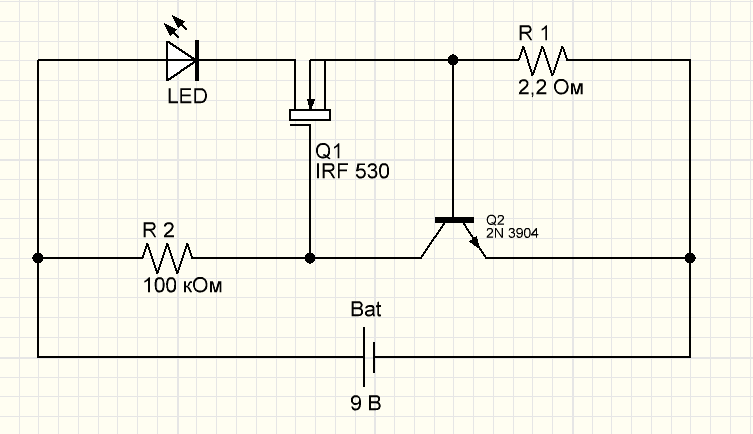
This is one of the simplest schemes that you can assemble with your own hands from improvised materials.
Q1 - N-channel field effect transistor (IRFZ48 or IRF530);
Q2 - bipolar npn transistor (2N3004, or equivalent);
R2 - 2.2 Ohm, 0.5-2 W resistor;
Input voltage up to 15 V;
The driver will turn out to be linear and the efficiency is determined by the formula: VLED /VIN
where vLED - voltage drop across the LED,
VIN - input voltage.
According to the laws of physics, the greater the difference between the input voltage and the drop across the diode and the greater the driver current, the more the transistor Q1 and the resistor R2 heat up.
VIN must be greater than VLED at least 1-2V.
I repeat that the circuit is very simple and it can even be assembled with a simple hinged installation and it WILL work without problems.
Calculations:
- LED current is approximately equal to: 0.5 / R1
- Power R1: The power dissipated by the resistor is approximately: 0.25 / R3. select a resistor value of at least twice the calculated power so that the resistor does not become hot.
So, for a 700mA LED current:
R3 = 0.5 / 0.7 = 0.71 ohm. The nearest standard resistor is 0.75 ohm.
Power R3 \u003d 0.25 / 0.71 \u003d 0.35 W. we'll need at least 1/2 watt of nominal resistor.
Circuit modifications with an additional resistor and a zener diode
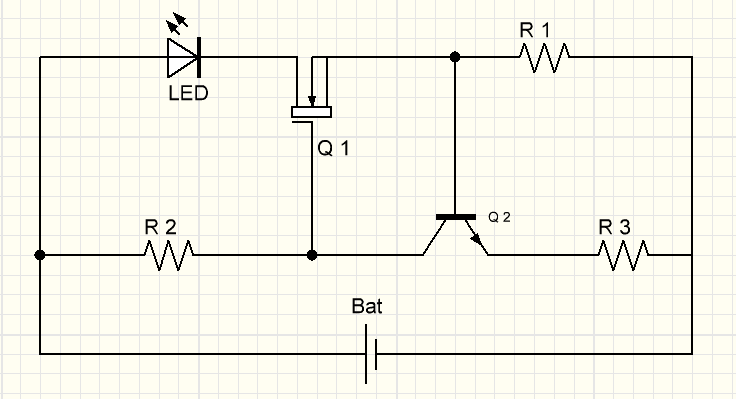 Modification of the circuit with an additional resistor
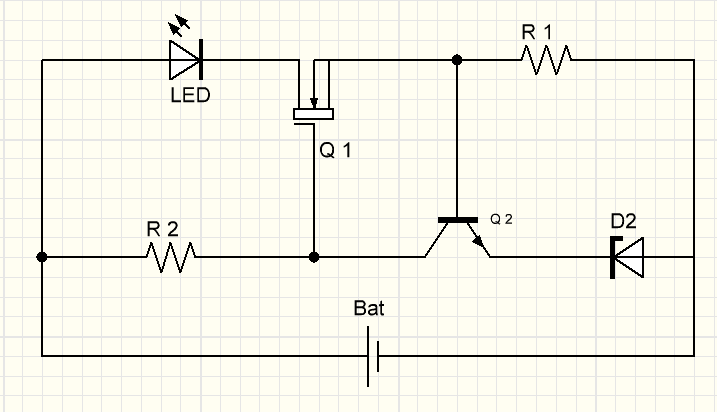 Zener Diode Circuit Modification
And now we will assemble the LED driver with our own hands, using some modifications. These modifications have changes regarding the voltage limitation of the first circuit. Let's say we need to keep the NFET (G-pin) under 20V and if we wish to use a power supply above 20V.These changes are necessary if we use a microcontroller with the circuit or connect a computer.
In the first circuit, a resistor R3 is added, and in the second, the same resistor is replaced by D2 - a zener diode.
If we want to set the G-pin voltage to about 5 volts, use a 4.7 or 5.1 volt zener diode (for example: 1N4732A or 1N4733A).
If the input voltage is less than 10V, replace R1 with 22kΩ.
Using these modifications, you can get the ability to operate the circuit with a voltage of 60 V.
Using these modifications, you can now safely use microcontrollers, PWM, or even connect to a computer.
These things will not be considered. But if you are interested, I will add an article with such schemes.
Modification of the circuit for "dimming" LEDs
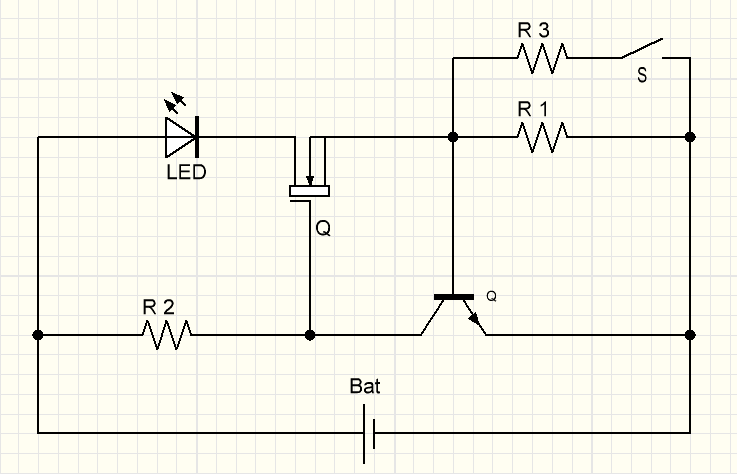
Consider another modification. This assembled driver for LEDs with your own hands will allow you to "dimming" LEDs. Rather, it will not be a full-fledged dimmer. Here, the main role is played by 2 resistors, which are designed in such a way that when the switch is turned on or off, the brightness of the diode will change. Those. "in Russian - a dimmer with a crutch." But this option also has a right to exist. You can always find calculators for calculating resistors on our portal and use them.


Someone will say - that "you can use" a tuning resistor. I can bet - for such small values, unfortunately, there are no tuning resistors. There are completely different schemes for this.
LED driver - what is it
The direct translation of the word "driver" means "driver". Thus, the driver of any LED lamp performs the function of controlling the voltage supplied to the device and adjusts the lighting parameters.
Picture 1.LED driver
LEDs are electrical devices capable of emitting light in a certain spectrum. For the device to work correctly, it is necessary to apply exclusively constant voltage to it with minimal ripple. The condition is especially true for high-power LEDs. Even minimal voltage drops can damage the device. A slight decrease in the input voltage will instantly affect the light output parameters. Exceeding the set value leads to overheating of the crystal and its burnout without the possibility of recovery.
Conclusion
The cost of LED lamps is slowly but surely declining. However, the price still remains high. Not everyone can afford to change low-quality, but cheap, lamps or buy expensive ones. In this case, the repair of such lighting fixtures is a good way out.
If you follow the rules and precautions, then the savings will be a decent amount.
 The corn lamp gives more light, but it also consumes more energy
We hope that the information presented in today's article will be useful to readers. Questions that arise in the course of reading can be asked in the discussions. We will answer them as completely as possible. If someone had experience of similar works, we will be grateful if you share it with other readers.
And finally, by tradition, a short educational video on today's topic:


