- Cable, its types and equipment for installation
- Rules for performing internal wiring in a wooden house
- Special wiring hazard
- We distribute electrical wiring inside the house
- How to wire correctly
- Retro-style wiring - components with a photo in the interior
- Twisted retro wire
- Retro sockets and switches for exposed wiring
- Terminal blocks and distribution (soldering) boxes
- Cartridges, passages and rollers (insulators) for retro wiring
- Lighting fixtures in vintage style
- Advantages of concealed wiring
- Helpful Hints
- What are the rules for installing hidden wiring in a wooden house: an overview of technologies from around the world
- Entering the house
- Electrical wiring in a wooden house: how to correctly and safely implement electrical wiring (105 photos)
- Doing work on your own?
- Stages of work
- Cable selection
- Development of a home power supply project
- The main thing is home safety!
- Common causes of a short circuit
- Wiring Requirements
- Regulations
- Regulations
Cable, its types and equipment for installation
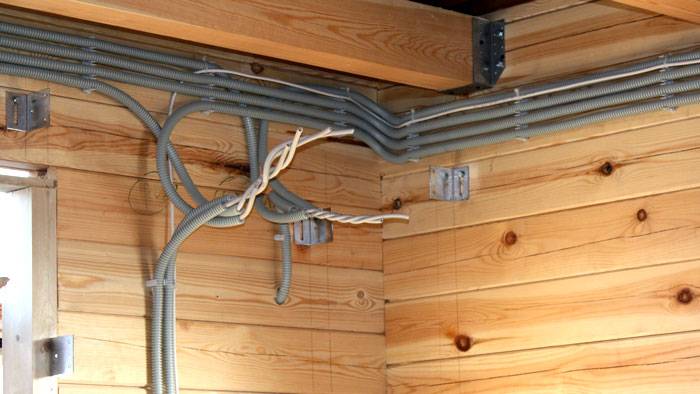
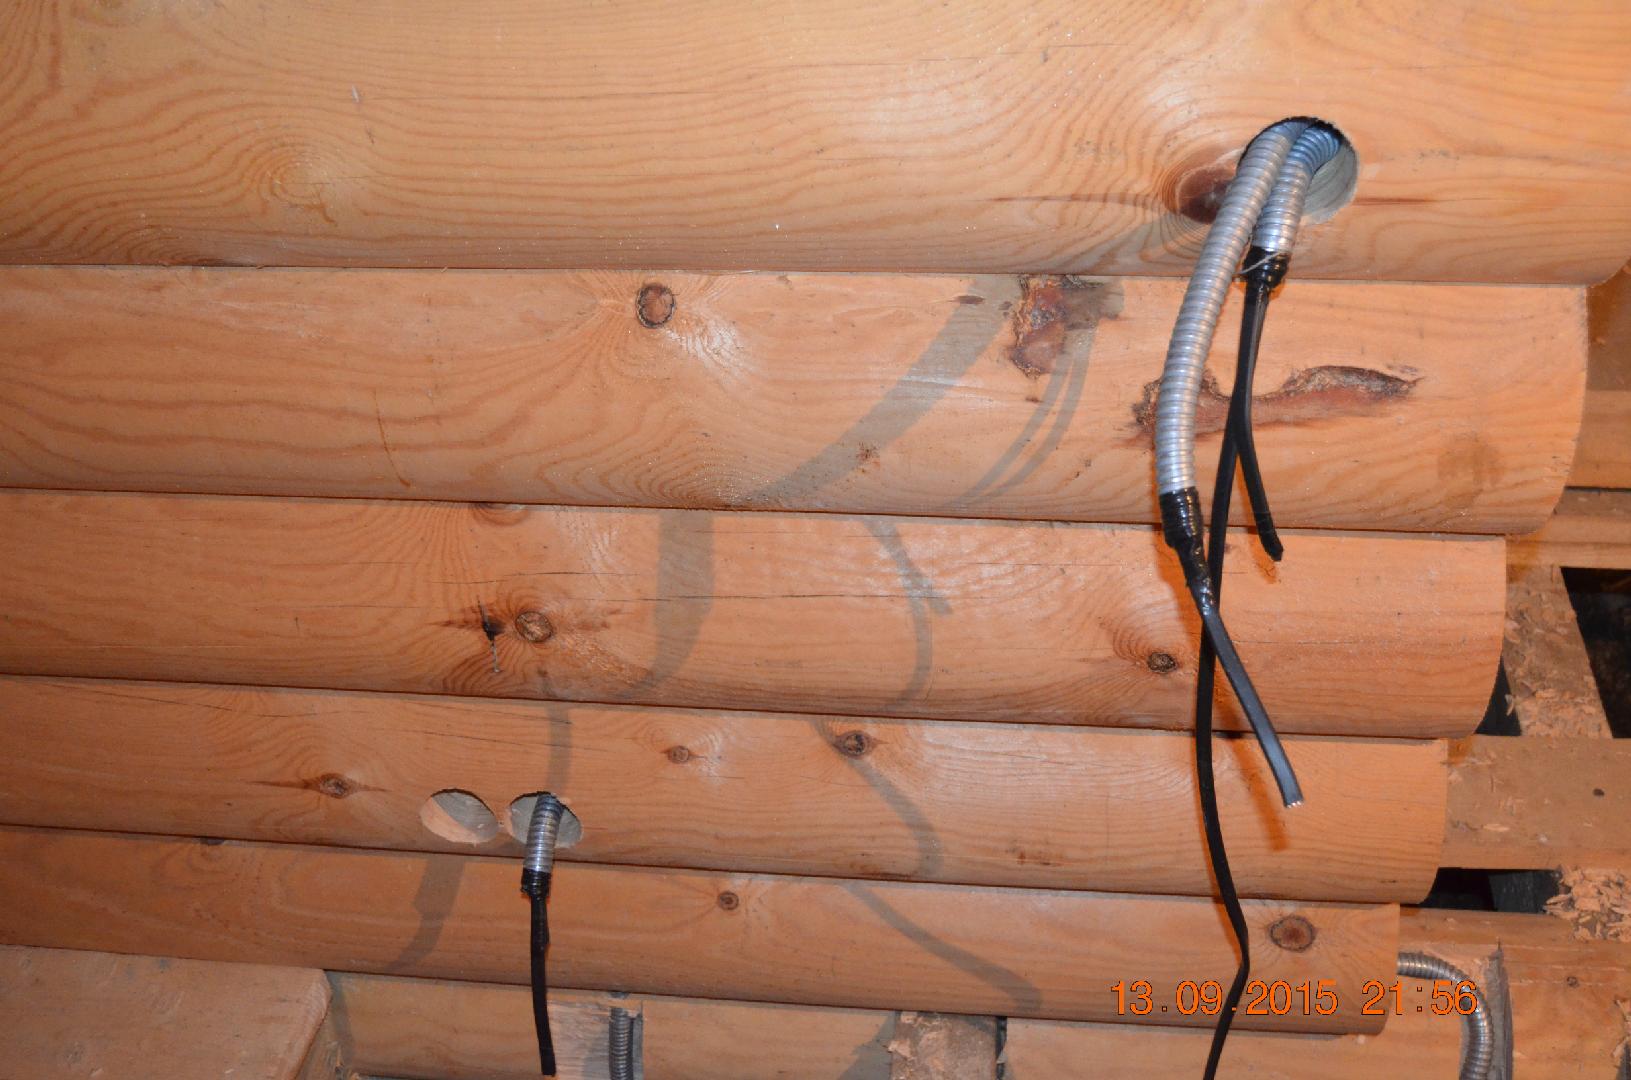
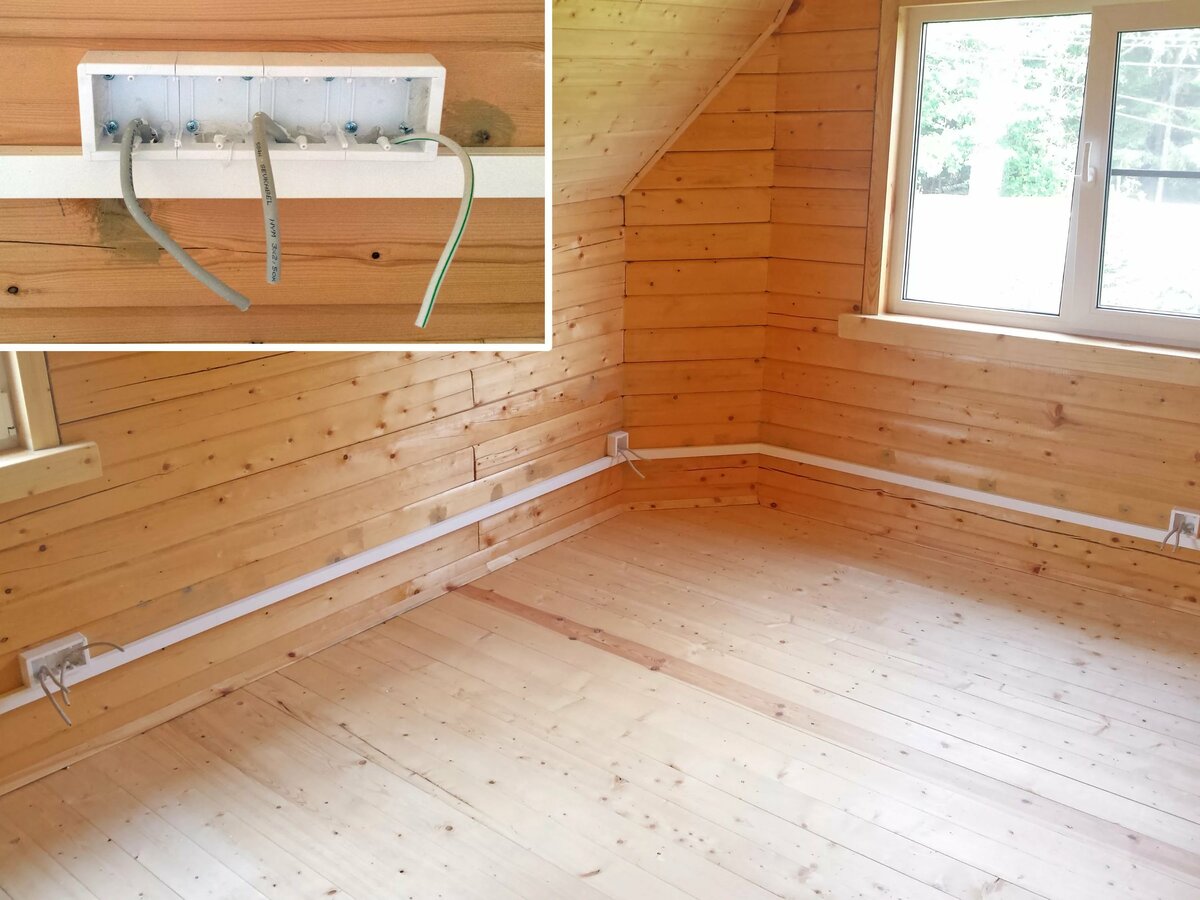
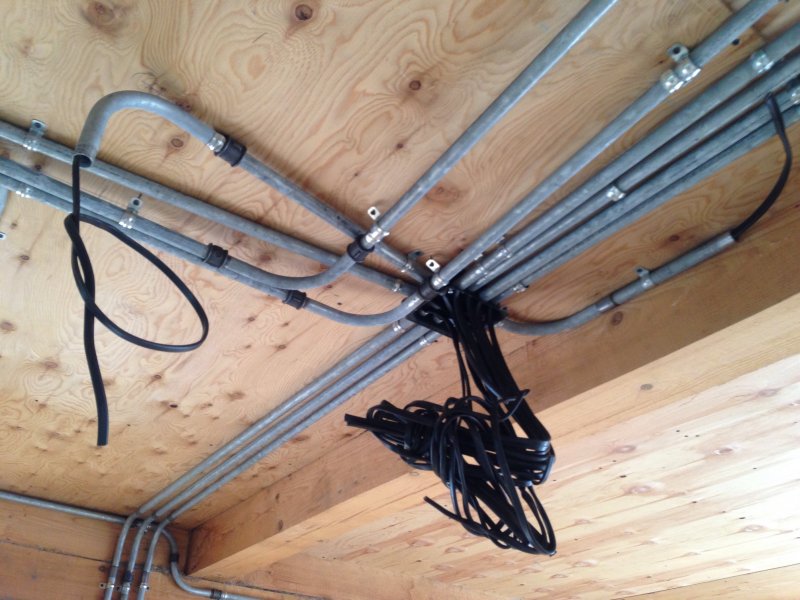
In a private wooden house, open wiring is mainly used, less often hidden wiring. The cable is laid along the walls and ceiling and mounted in protective devices.
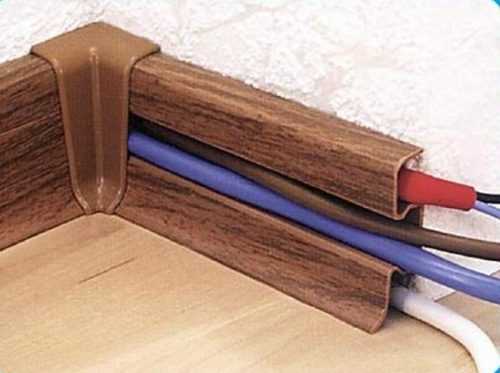
The most common type of protection is plastic boxes, but there are other solutions, such as electrical skirting boards, metal and corrugated pipes. Open placement on special insulators is also common.
The copper cable is mainly used, which is characterized by low cost and reliable insulation. If wiring is done in a brick house, then a good alternative to a copper cable is an aluminum cable.
However, in a private wooden house, electrical wiring using aluminum is not recommended for fire safety reasons, especially if it is hidden wiring. Sockets and switches are selected based on their specification. The current strength and type of installation of this equipment are taken into account.
Grounding is an integral part of the connection process! To do this, use a three-core cable equipped with a ground wire.
In general, the list of necessary material for successful electrical wiring in a private house looks like this:
- cable;
- protective devices;
- electricity meter;
- sockets;
- switches;
- shield;
- parts for fasteners;
- indicators;
- junction boxes;
- various tools for work (screwdrivers, pliers, pliers, drill, grinder, electrical tape, mounting knives, terminal blocks).
Thanks to these devices, open wiring in a private wooden house will come true very quickly and correctly.

Rules for performing internal wiring in a wooden house
Electrical wiring is carried out only on the basis of a scheme agreed with specialists, with a minimum number of turns and bends.
The electric main is laid exclusively in non-combustible materials.
During installation, priority is given to fire safety tasks, not so important - aesthetic wishes.
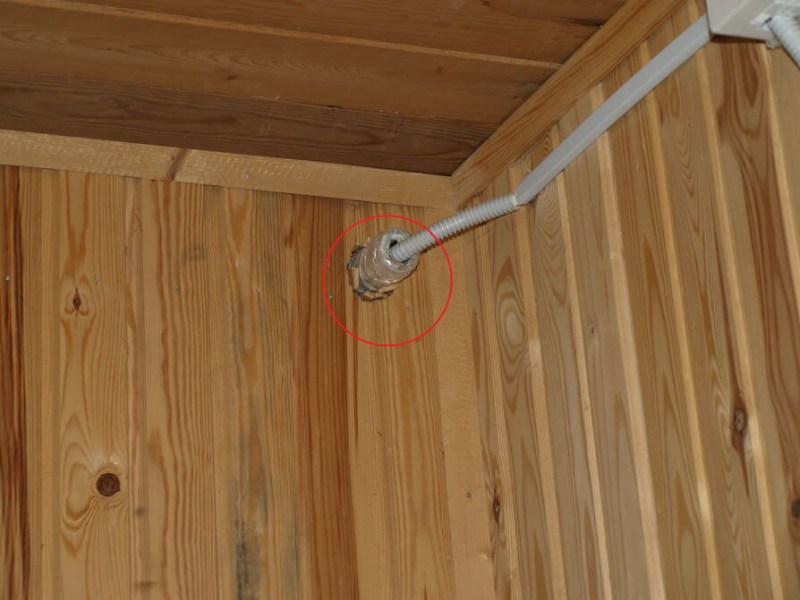
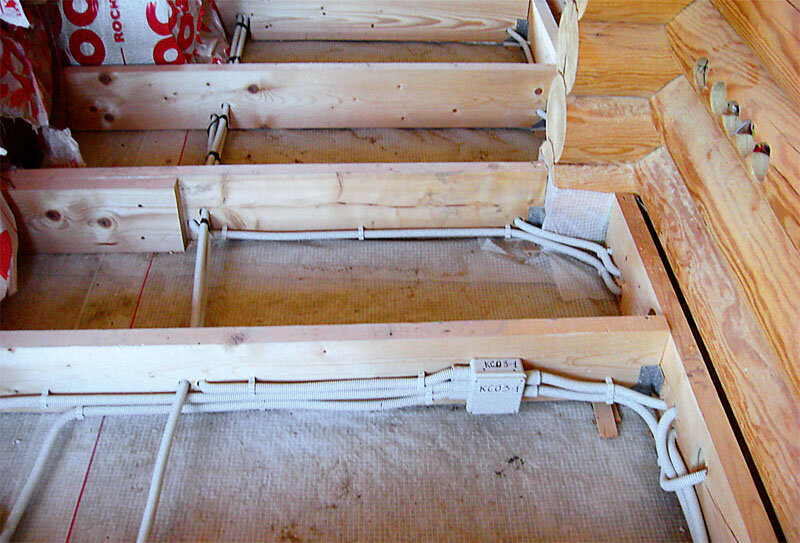
It is advisable to lay channels in the structural recesses of door and window openings, under skirting boards, and false ceiling lining.
Corrugated pipes used as channel insulation are protected from all sides with asbestos gaskets during installation. For the same purposes, taking into account the estimated power of the wiring, alabaster or cement plaster, concreting is used.
Galvanized insulating pipes and boxes are connected by threading, welding
Sharp edges are protected by plastic caps. Copper protective elements in the connection are flared.
The wall thickness of the pipe is selected taking into account the cross-section of the conductors of the wire (example: 2.8 mm - for an aluminum conductor of 10 mm2, or a copper conductor of 4 mm2).
The cable (together with the insulating layer) inside the insulating pipe must occupy up to 40% of the internal volume.
The insulation resistance is measured twice: before pulling through the pipe and after.
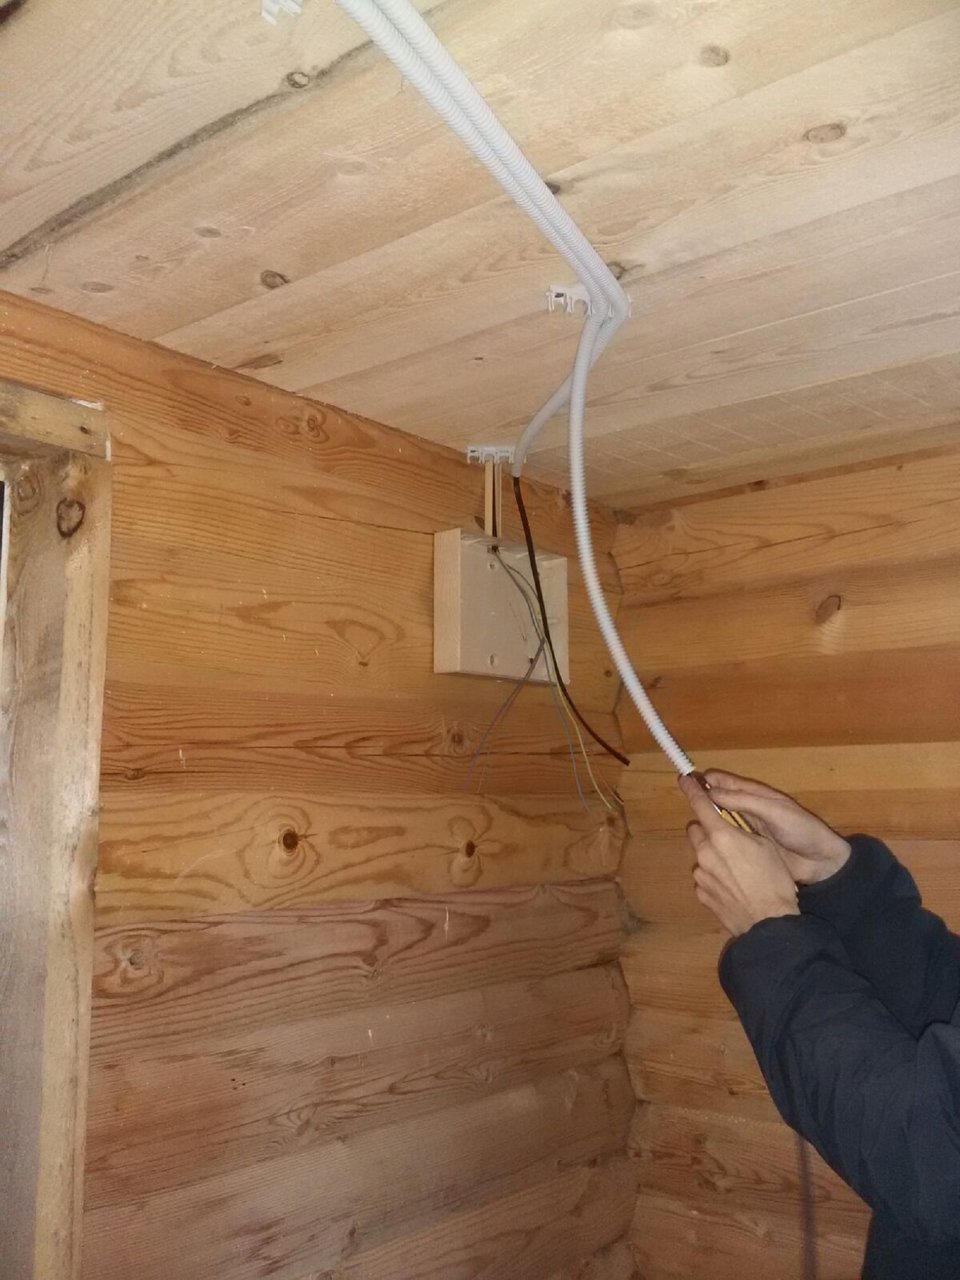
Distribution boxes must remain freely accessible.
For concealed wiring, wires and cables with a triple insulating coating and marking "ng" are used.
 Wood mosaic for walls. You will read about this in our next article.
And this article tells about the forms and types of drywall arches.
Special wiring hazard
One of the most common mistakes
Along with a whole list of advantages, there are also disadvantages of such wiring, as well as the danger of using it:
- The wiring is not available in order to periodically monitor its condition and change those sections that are outdated and destroyed, and, as you know, even the smallest damage can ultimately cause a short circuit;
- It is quite difficult to carry out any kind of subsequent work after the wiring is completely completed, that is, adding new points to the electrical circuit will be quite problematic;
- The installation of the wiring itself is not so simple, it is most effective to carry it out during the construction of the house itself, and not after its completion;
- Among other things, it is necessary to create false structures that will completely hide all existing insulating pipes;
- The materials necessary for installation are quite expensive, and if workers are hired for installation, it will cost quite an expensive pleasure;
- You will need a special tool for independent work, while most likely such a tool in the future may not be useful at all.
Back to content
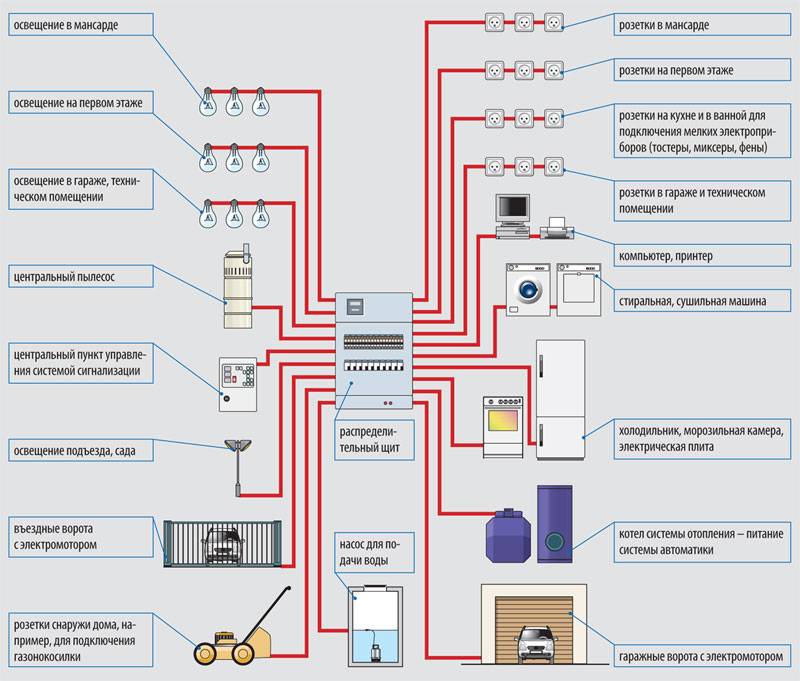
We distribute electrical wiring inside the house

Wiring example
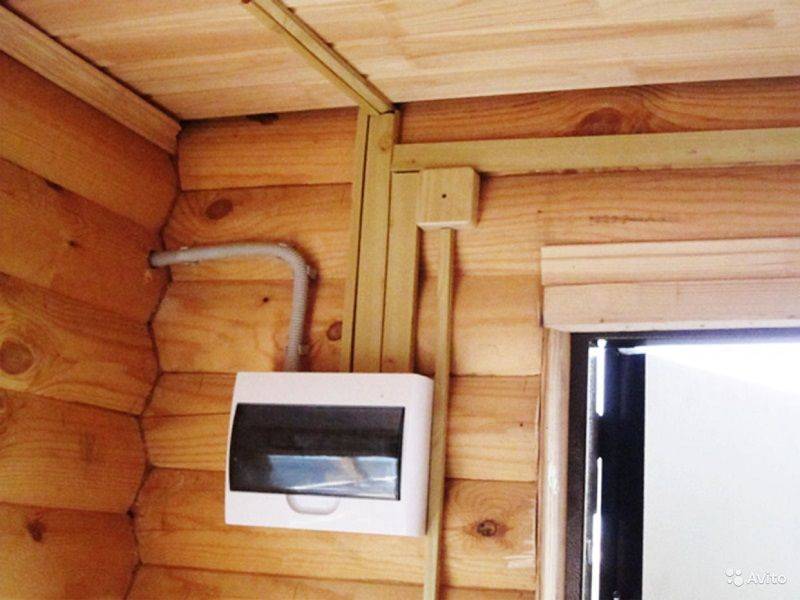
Inside the house, in its heated part, an electrical panel is installed. It usually includes:
- automatic protection against external overloads - so that the problems of your neighbors do not concern you
- circuit breakers and residual current devices for each of the power lines of your home
- ground bus made of twisted copper wire with a cross section of at least 10 mm2
- electric meter - if it is not in the case of the outdoor machine
Circuit breakers are needed in order to de-energize that phase line in which the current began to exceed the allowable one. The rating of the machine must be chosen based on the maximum allowable current of the “weakest link” of the electrical circuit.So, the limit on standard household sockets is 16 A. This indicator should provide a circuit breaker. If a device designed for high currents is installed, then the sockets, everything to which they are screwed, and what will be connected to them, will remain unprotected, which negates the adoption of other measures.


Residual current devices operate even before a short circuit occurs. This automaton does not respond to some specific threshold value of the current, but to the rate of its change. The RCD cuts off the voltage in the circuit if the current in the line begins to rise very quickly. This helps to protect people from electric shock, and faulty electrical appliances from “burnout”.
The best option is to put such a device on each of the phase lines in the house. However, due to its high price, it is far from affordable for everyone. Therefore, the installation of two protective earthing devices seems to be the optimal solution. One - to the power lines of the house, the other - to external sockets in the garage, bathhouse, shed and right on the street for connecting various power tools. However, in this case, one must be prepared for the fact that it will be much more difficult to find a network malfunction or a non-working electrical appliance.
Differential circuit breakers combine the functions of the two devices described above. This is a new generation of electrical protective devices. But while their high cost and rather large dimensions hinder the wide distribution of this modification in our market.
How to wire correctly
Open wiring.
Laying the internal electrical network can be done in various ways:
Open cable wiring.It is carried out directly along the wall using special electrical clamps, which is allowed for a single conductor with a cable cross section of not more than 6 mm2. In the simplest case, you can use the same VVGng or NYM in double isolation for this.
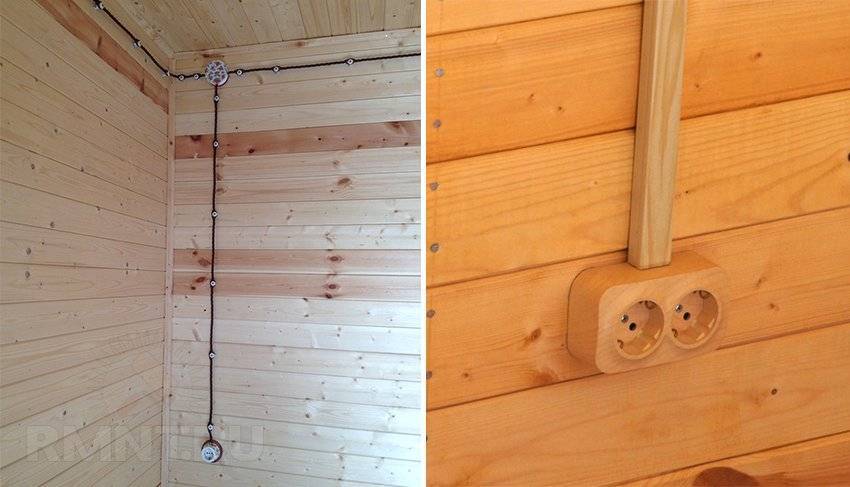
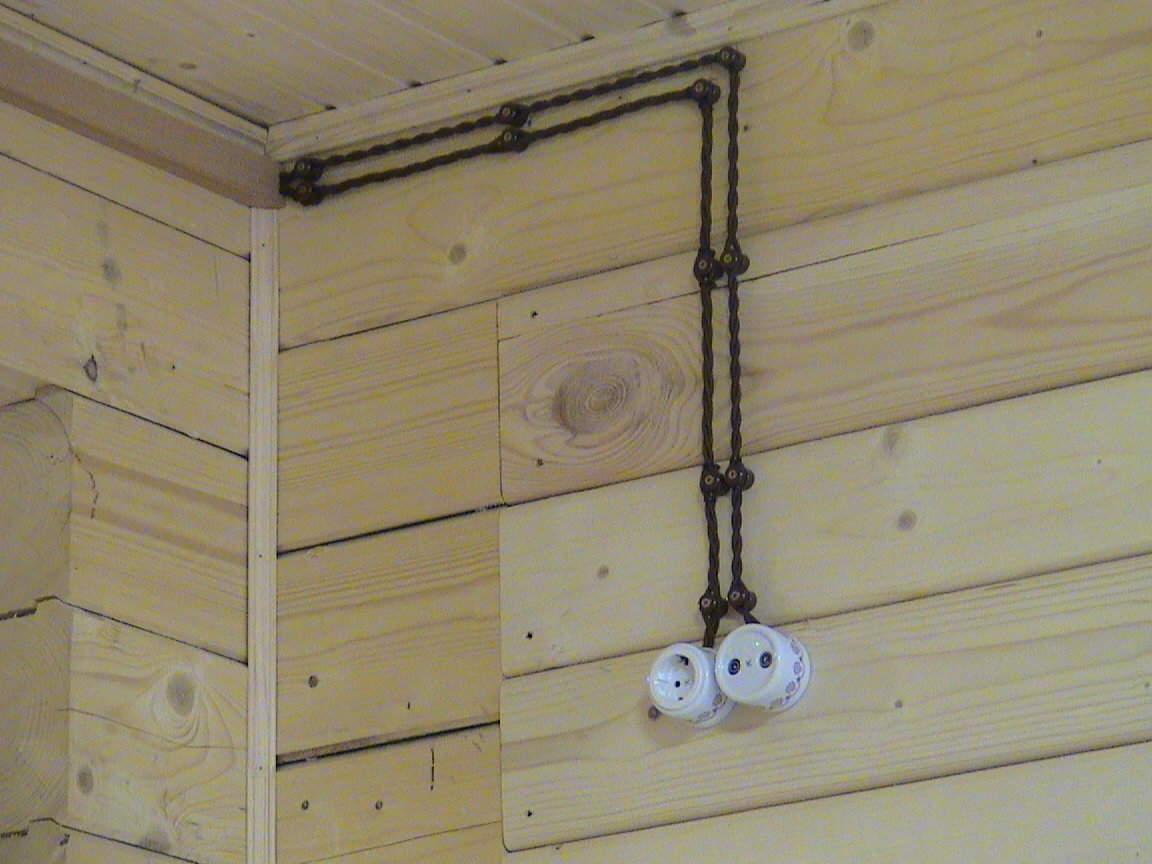
Of course, the look of white insulation and fasteners does not go well with the walls of a wooden house. Therefore, given the increased demand, many manufacturers have included in their product line electrical products made in the spirit of the beginning of the last century. These are twisted power cables in rubberized non-combustible braids, and ceramic mounting coils, and screw switches. Such a set not only harmoniously fits into the image of a traditional village house, but also allows you to perform electrical wiring in compliance with all fire and electrical safety standards.
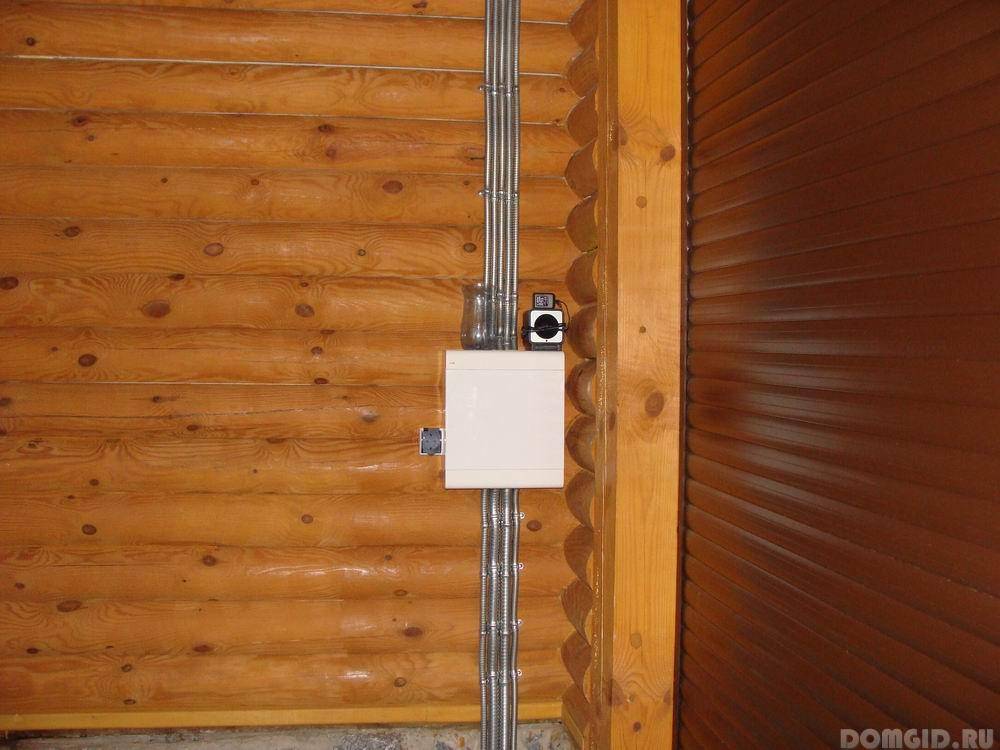
- Wiring is carried out by the same brands of cable, but not just attached to the wall. To ensure fire safety, it is pulled through a corrugated tube made of non-combustible materials. The appearance of such a solution, of course, leaves much to be desired.
- Instead of an ugly corrugated hose, the wiring is laid through a special wiring box. It is a hollow collapsible structure, consisting of materials that do not support combustion. The mounting part is attached to the wall. It lays out the wiring from the same universal cables and fixes them. Then the boxes are closed with a front part, which hides the wires behind it, preventing them from accidental damage.Having a decent appearance, this design does not hurt the eyes with undisguised communications and protects the wooden walls and ceiling from contact with potentially dangerous current lines. Electrical boxes are available in various sizes and colors. Therefore, you can always choose them for any interior and color design.
And finally...
Retro-style wiring - components with a photo in the interior
Retro wiring, especially in a wooden house, requires a more careful approach to fire and electrical safety
When buying cables and accessories, it is necessary to pay attention not only to the design and external data, but also to the quality, manufacturability and reliability of execution. It is best to purchase brand name products.
The leading products of Italian companies:
- Bironi;
retro wiring Bironi - Fontini;
retro wiring Fontini - Villaris;
retro wiring Villaris - Aldo Bernardi;
retro wiring Aldo Bernardi - Gl Gambarelli.
retro wiring Gl Gambarelli
retro wiring Salvador
It is advisable to purchase the necessary materials from one manufacturer. For example, Lindas offers ready-made matched kits:
Lindas
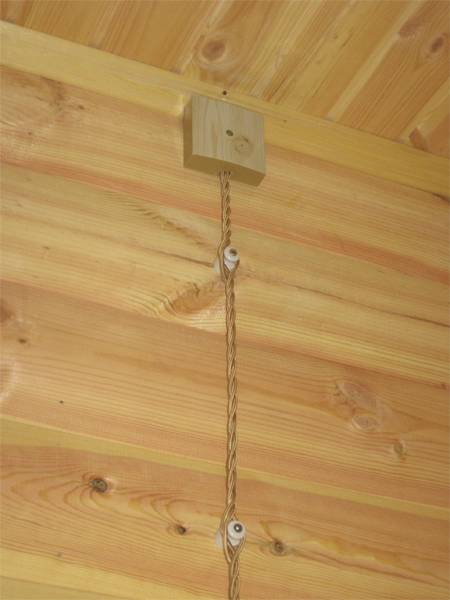
Twisted retro wire
The cable for retro wiring is available in the form of stranded copper wires with a cross section of 1.5 and 2.5 mm². Other types of sections are very rare. The wires are polymer insulated from the following materials:
- PVC - elastic, but with low strength, is used only stationary;
- elastomer - during operation it can stretch, therefore it requires more frequent fastenings;
- polyurethane - durable, has mediocre elasticity, requires bending along a large radius.
External decorative insulation (braid) is made of technical cotton or silk. Brand manufacturers impregnate the braid with flame retardant compounds or fill it with varnish. A wide range of colors and patterns on the surface of the wiring is very diverse, which allows you to choose the right option for any design solution.
An example of Bironi retro wiring cable products
Retro sockets and switches for exposed wiring
Sockets - overhead, often have special installation frames (for 1-3 places) made of wood, plastic "under the metal" or ceramics. For devices that are frequently used, it is best to use ceramic, as they prevent heat.
Switches have several options for mechanisms:
- tumbler - more reliable and familiar to use;
- rotary - it can be one, two and three-pin, due to which it can switch several circuits.
As a rule, sockets, switches and junction boxes are selected from the same collection
Related article:
Terminal blocks and distribution (soldering) boxes
Junction boxes are used to switch wires and significantly reduce their number. Otherwise, you would have to run a wire from the terminal block to each electrical appliance or outlet. The overall dimensions of the junction boxes vary:


- diameter 70-90 mm;
- height 35-55 mm.
Junction box from a technical device can turn into a decorative element
Cartridges, passages and rollers (insulators) for retro wiring
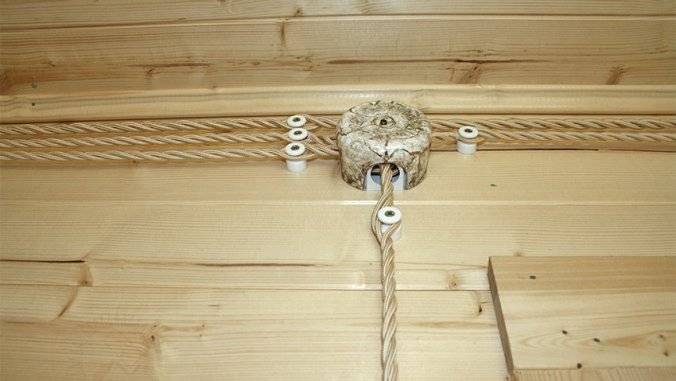
Outdoor retro wiring in a wooden house it is fixed on the walls by means of special insulators. They look like small embossed cylinders with a base diameter of 18-22 mm and a height of 18-24 mm.The upper part - the “hat” can be narrow for mounting a two-core cable and wide for a three-core cable. Production material - plastic or porcelain. Fastening to the wall is carried out through a hole in the center with ordinary or decorative screws.
The rollers are produced in various colors, often complete with other elements of electrical accessories.
Passages refer to decorative and protective electrical elements. They are a decorative sleeve with a collar covering the hole through which the cable is led out of the wall. Production material - porcelain.
Vintage cartridges are made from brass, aluminum alloys, copper, carbolite or polymeric materials painted "under the metal". As a rule, their design provides for a switch, as well as technological holes, threads and washers for attaching lampshades, etc.
Vintage brass chuck with swivel
Lighting fixtures in vintage style
Professional designers, when developing a retro interior, usually create author's lighting fixtures. You can try to create them yourself by combining vintage cartridges and unusual decorative light bulbs with a base. An electric cable fixed on several rollers is used as suspensions. It is much easier, but more expensive, to purchase ready-made retro lighting fixtures, both ceiling lamps and chandeliers, and wall sconces.
Homemade and factory-made lamps and chandeliers made in vintage style
Advantages of concealed wiring
When installing electrical wiring, many choose a hidden installation option that does not spoil the interior design of the room.
The advantages of the method are obvious:
- The absence of cable channels on the walls, conspicuous and interfering with wallpapering the surface.
- Low risk of fire with strict observance of the rules of the PUE in the process of flush mounting.
- Ease of cable replacement if it is laid in a corrugated pipe.
- Low risk of mechanical damage due to installation of the product in concrete, metal products or plaster layer.
- Safety for residents of the house, because the wires are hidden from view, and access to them is limited.
- No difficulties in finishing work, because the cable is inside the finish.
- There are no negative environmental influences.
These reasons are enough to give preference to hidden wiring when arranging an electrical network in a wooden house.

Helpful Hints
In conclusion, we give tips and results regarding the implementation of hidden wiring in wooden houses.
Basic points:
For electrical wiring in a wooden house, it is better to use NYM - a cable with triple electrical insulation.
The best circuit protection is provided by differential circuit breakers that protect the network from short circuits and leakage (RCD).
Grounding junction boxes and metal pipes is a mandatory safety feature.
During installation, it is necessary to take into account the shrinkage of a wooden house in order to avoid distortion and damage to the wires.
The pipe connection must be as reliable as possible. For joining, welding and soldering are used.
The best pipes are copper
Their advantages are corrosion resistance and ease of bending.
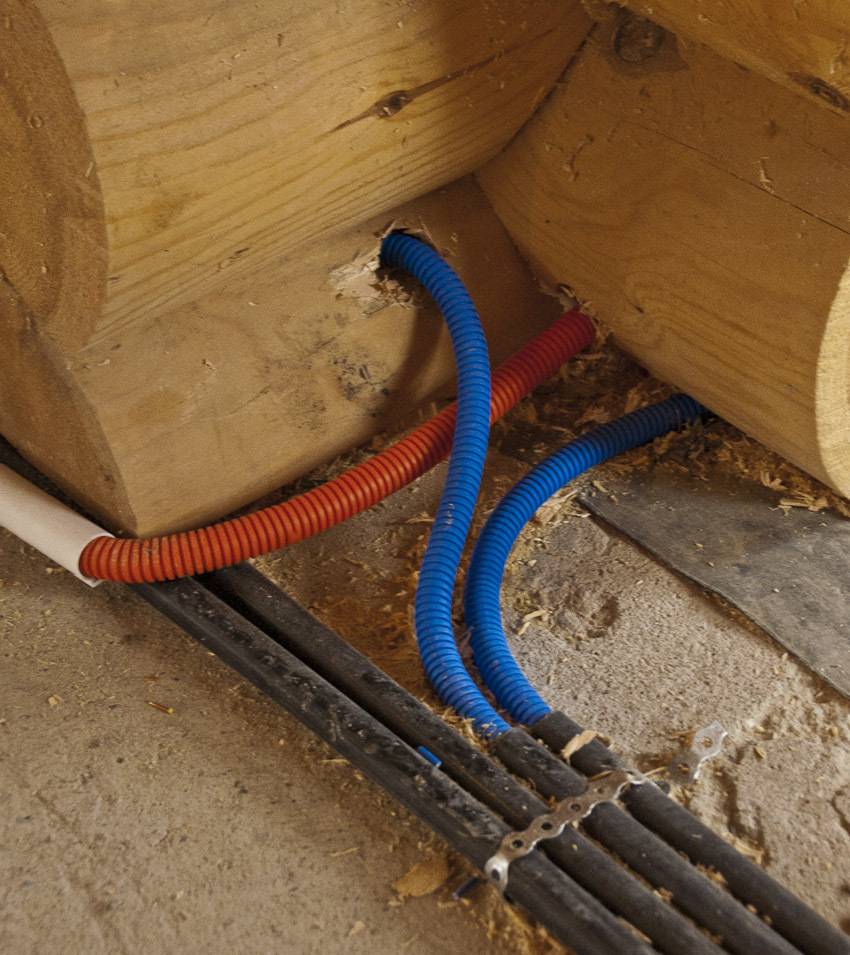
Plastic inserts are used at the ends of the pipes to protect the cable from damage.
If lining or wooden wallpaper is used during installation, pipes can be run through the existing recesses.
In a wooden house, it is allowed to combine hidden and open wiring.
Installation is done exclusively according to the scheme agreed with the experts.
The main attention is paid to protection against fire, and only after the aesthetic component.
The optimal solution is to lay channels in existing recesses, window and door openings, under skirting boards or ceiling cladding.
When using corrugated pipes, it is necessary to cover the surface with plaster or asbestos gaskets.
Pipes are combined by threading or welding.
Junction boxes must be freely accessible.
What are the rules for installing hidden wiring in a wooden house: an overview of technologies from around the world
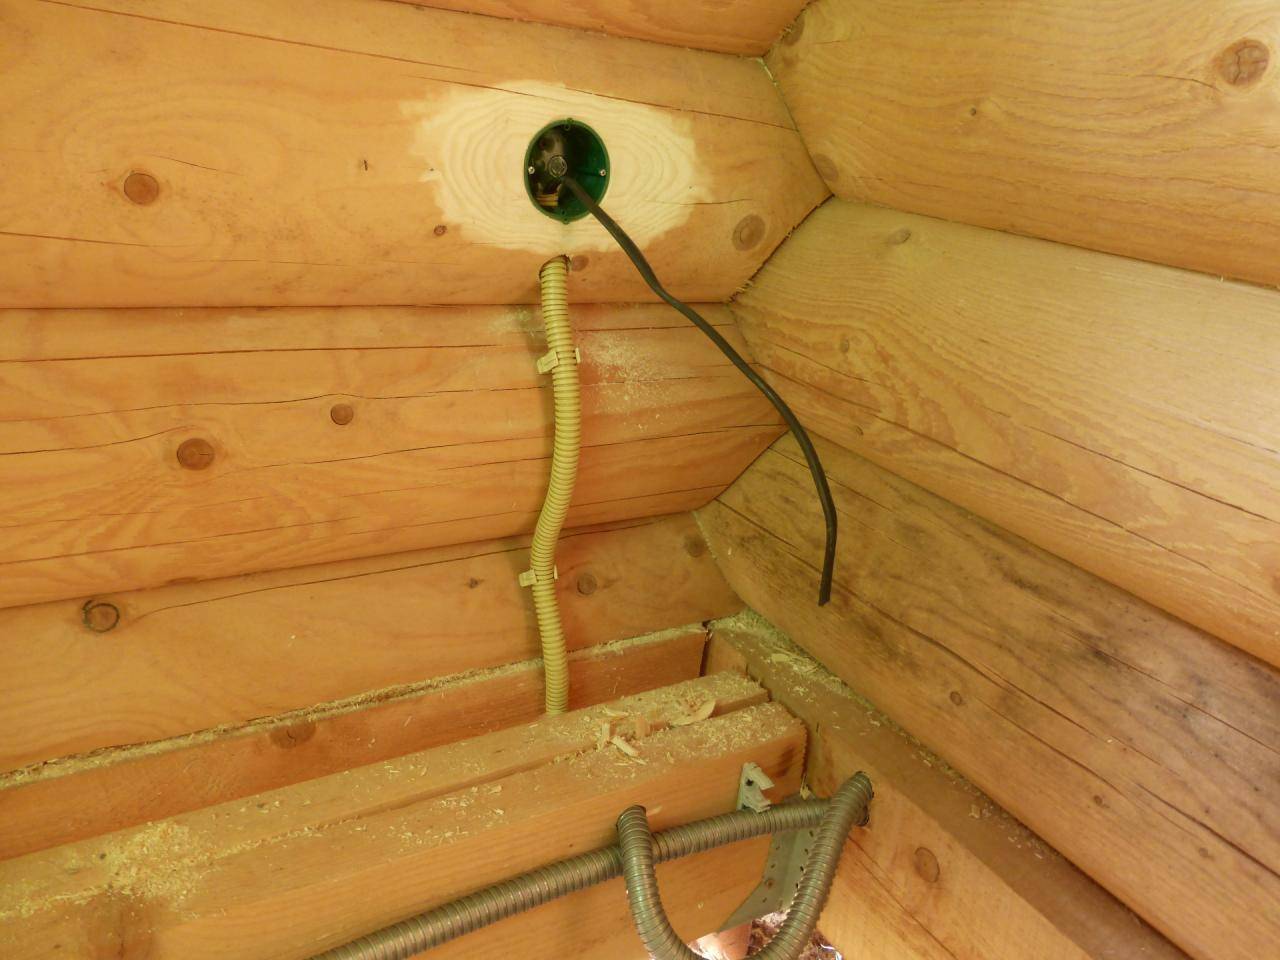
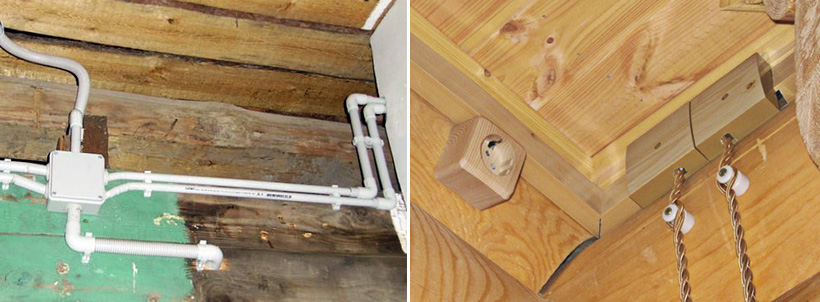
PUE, which is the main regulatory document for an electrician, in its paragraph 7.1.38 requires hidden electrical wiring to be placed in pipes or boxes made of non-combustible materials, grounded to a common circuit.
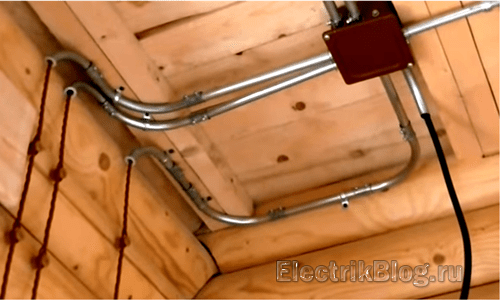
At the stage of assembling the circuit, such a wiring looks something like this.
However, the Code design and installation rules electrical installations of residential and public buildings does not support this requirement. We open its paragraph 15.5 and see other requirements.


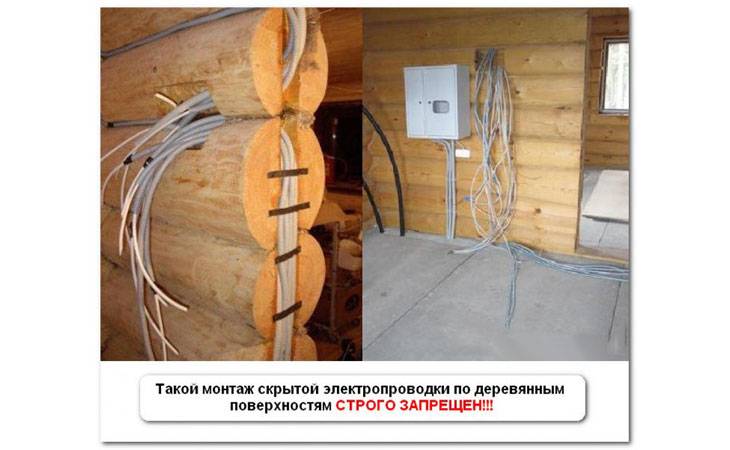
We are not talking about any pipes of the joint venture. Hidden laying of cables can be carried out under plaster, according to the outline of the plaster.
The requirements of the Code of Rules are contrary to the standards of the PUE on the placement of hidden electrical wiring and constantly cause controversy among electricians and installers.
Proponents of PUE believe that:
- a metal pipe protects the wood of the building from cable fire (the ignited wire burns out, and the arc does not have time to burn through its walls);
- in the event of an open fire, the limited internal space of the pipe prevents the entry of fresh air, reduces ignition;
- metal is difficult not only to gnaw through to mice and rats, but also to pierce with nails or self-tapping screws during repair work.
There is an opinion among installers that a metal pipe can be replaced with a metal hose. It is erroneous. Its thin walls do not withstand heating from short circuit currents and quickly burn out.
Opponents of paragraph PUE 7.1.38 give three serious arguments:
- Sockets for hidden electrical wiring must be made of metal boxes hermetically fastened to pipes. Making them is not easy.
- Any wooden structure shrinks over time, which will inevitably lead to deformation of the metal pipes built into the building structures and tear the wiring. At the construction stage, it is necessary to provide for complex expansion joints, and during operation to monitor their condition.
- In cold winter, condensate forms from the air inside such pipes under the influence of different temperatures on the street and in the room. In severe frost, moisture accumulates inside them. Drops of water, and sometimes small trickles, ooze from sockets and switches. It is technically difficult to solve this problem by protecting the insulation layer.
Abroad, the contradiction of the legislative base (PUE and SP) created in our country does not exist. There are different installation rules.
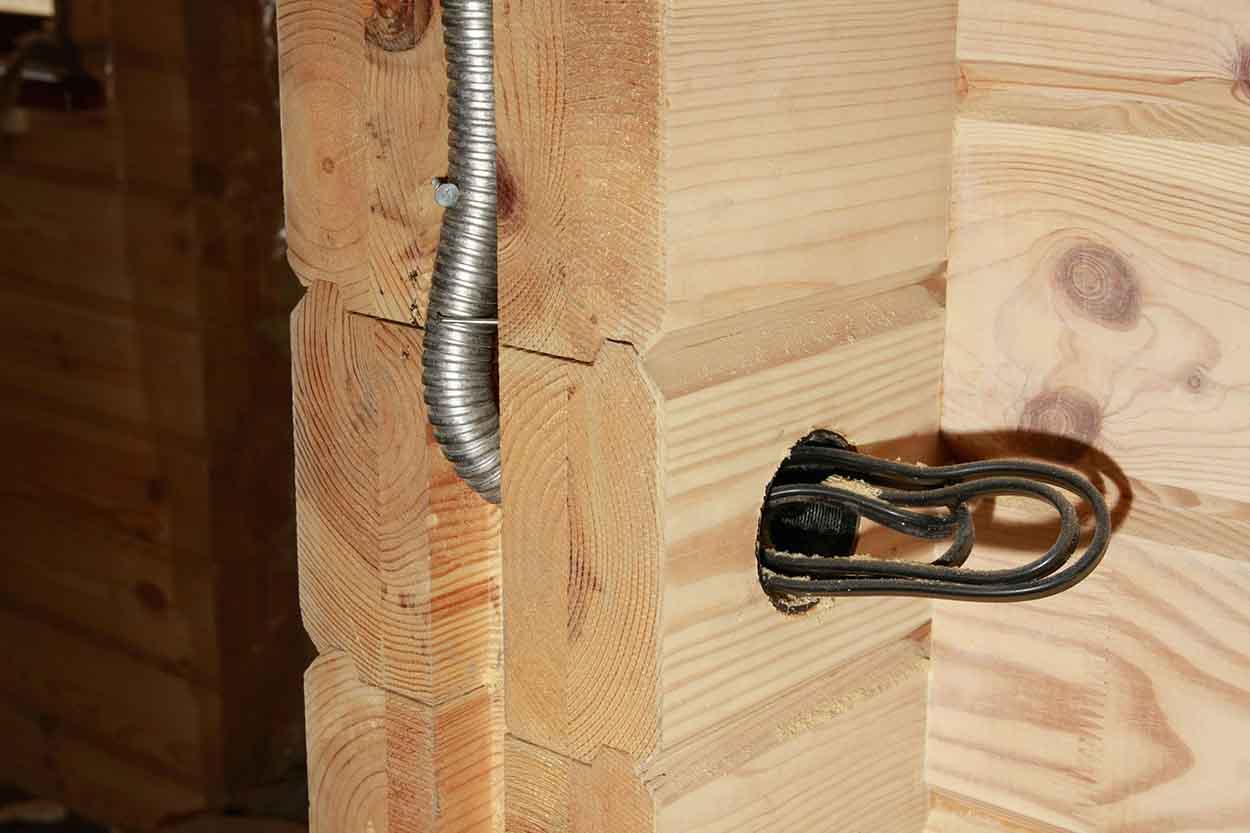
For example, among the widespread frame construction, the simplest methods of laying wiring inside the building pillars are used. When the load-bearing elements are assembled, through holes are drilled through them, and then the cable network is pulled through.
Then this entire wall is simply filled with a layer of insulation and covered with decorative sheathing.
This is explained by the fact that a safe approach to the construction of houses from combustible materials is built according to other principles and is achieved by the powerful introduction of electrical protection systems with a complex combination of automatic warning devices and fire extinguishing.
In our country, in recent years, this technique is also gaining popularity.
Entering the house
The house is connected to power lines using a thick cable with aluminum conductors. It is laid in the air or in the ground. Accordingly, holes should be made in the ceiling plate or plinth.
Air laying is carried out using a powerful and elastic steel cable. First, it is stretched, and then an electric cable is attached to it with the help of clips. Underground input involves digging a trench, laying a pipe and pulling a wire through it. The pipe will protect the line from breaks due to heaving of the soil. A flexible steel adapter is placed at the cable entry point into the house.
Entering electricity into a frame house with a SIP cable
Do not forget to be guided by SNiP. In accordance with this document, the cable is connected to a meter located outside the building. To protect the device from environmental influences, it is hidden in a sealed box and behind a transparent window. Behind the meter is a package switch that interrupts the supply of electricity in the event of an emergency.
Electrical wiring in a wooden house: how to correctly and safely implement electrical wiring (105 photos)
Conducting electrical work is one of the most important stages in construction.The supply of electricity to the house is vital for the full existence of a person. This is especially relevant for those living in the countryside.
Compliance with all safety rules is an important point in the construction of wooden structures. The electrical supply of the house must always strictly follow the established norms and rules.
Doing work on your own?
If the construction of a house and finishing work can be done without problems on your own, then the installation of electrical wiring in a wooden house in most cases requires the hands of a specialist. Although quite often the owners of country houses (meaning the male half) carry out such work on their own.
This is understandable. A real owner needs to be able to understand such things. For beginners, “electricians”, there is a step-by-step methodology for implementing the process of mounting electrical wiring, taking into account the necessary requirements, following which you can carry out the appropriate work with high quality.
Stages of work
Proper wiring in a wooden house consists in strict observance of the following steps:
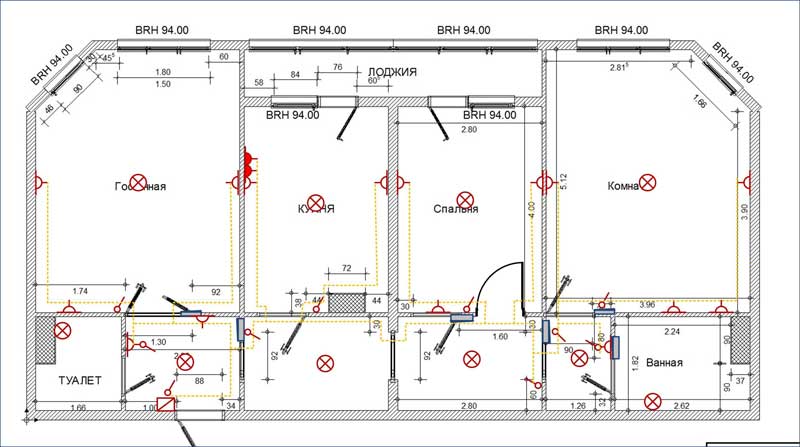
It is necessary to determine the total amount of power of electrical equipment and carry out a project for the location of the power supply line. This stage requires seeking help from experts in a particular field.
Here you should not rely on your own strength. And it will be right. Only a specialist will be able to carry out high-quality design development for laying power supply lines. Determine the places of concentration of electric points, calculate the cable sections, the place of mounting and connection of the circuit breaker, the point of entry into the house of power supply.
The format of sockets and switches is selected based on the calculated current value, the type of wiring, which implies a hidden or open form of the device, as well as the ability to connect a combined unit that includes a socket and a switch located under a single frame.
Cable selection
The wiring itself in a wooden house, especially if done by hand, requires contacting competent sources to obtain the necessary information. Such a source can be an electrical reference book and the table contained in it with calculations of cable cross-sections relative to the load.


The data contained in the table make it possible to select a cable of the required section, which will fully correspond to the calculated power of electrical appliances
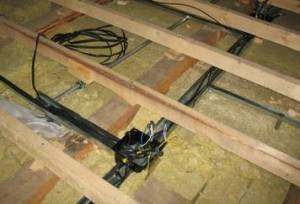
After purchasing all the necessary devices, they carry out the installation of electrical wiring. Wiring in a wooden house, as mentioned above, can be of two types: open and closed. In the first case, the wires are placed in cable channels.
The cross sections of the channels are selected according to the number and cross section of the wires that need to be hidden. Fastening to the surface is carried out with special clamps.
note
Hidden electrical wiring in a wooden house is more efficient, because it makes the room more attractive. At the same time, you need to remember about home safety rules. The wires are usually hidden in a corrugated pipe and placed behind the frame of suspended or false ceilings.
After the installation of wires and electrical appliances, the organization of preventive tests is carried out.
After the wiring is mounted, it must be checked for quality. Therefore, a verification test is made using electrical measuring instruments.
The tests are again carried out by a specialist.The full range of work performed includes:
- conducting a visual inspection;
- measurement of the resistance force of the insulating cable coating;
- carrying out preventive measurement of ground resistance;
- analysis of the operation of automatic switches.
Development of a home power supply project
To develop an individual project, you must first of all contact the power supply organization (RES) and obtain technical conditions. They will serve as the basis for further work.
The developed power supply scheme takes into account the totality of all power consumption of electrical appliances.
Based on this factor, the maximum power is calculated, which is simultaneously consumed by all electrical appliances. The nominal load on the introductory machine is determined.
The main thing is home safety!
It can be repeated once again, saying that electrical work carried out in houses with wooden structures of walls, floors and ceilings requires a special approach. It is necessary to take into account the composition of the main building material and especially its susceptibility to combustion.
Common causes of a short circuit
 Connection options
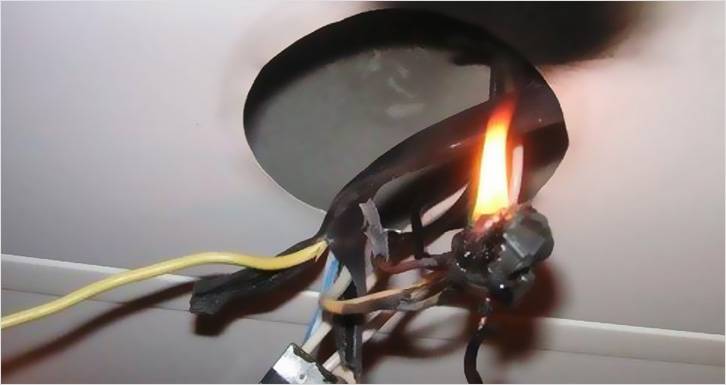
Cable quality or incorrect installation is not always the main cause of a network failure. For example, a short circuit happens for other reasons:
Insufficient section - at a high load, a cable with an insufficient section heats up, melts the insulation and the phase closes with the neutral, after which the entire wire literally “burns”.
Mechanical damage to the cable, in which the phase is in contact with zero. After that, the wiring sparks and everything around the contact zone is burned.
Incorrectly selected type of cable - for example, if you lay VVG with a PVC sheath from the outside into the open, the insulation will collapse under the sun. Over time, it will crumble and the bare sections of the wires will touch, which will lead to a short circuit.
Incorrect wiring is one of the most common causes. When installing electrical wiring, you have to add and connect a cable, often a short circuit occurs precisely because of the wrong connection.
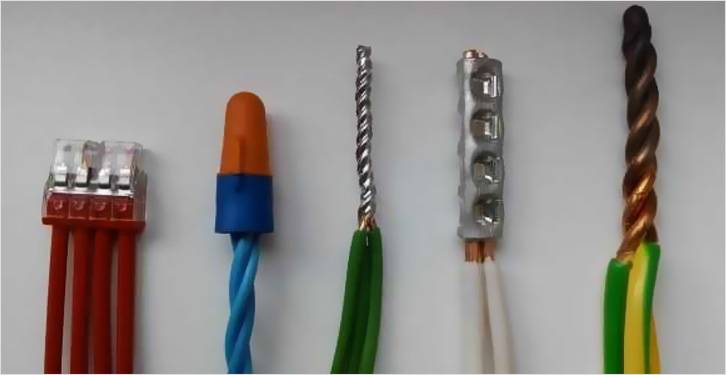
In everyday life, different methods of connecting wires are used:
Twisting is the “grandfather method”, when the bare ends are twisted and then wrapped with electrical tape. An unreliable method, since the electrical tape often weakens, which breaks the insulation. Subsequently, a short circuit or current leakage may occur.
Soldering - similar to twisting, only the cores are still soldered. The problem is the same as in twisting - the tape slips and the insulation is broken with all the ensuing consequences. It is used mainly for conductors with a small cross section.
Welding - for cables with a large cross section. The cores are welded together, then the connection is wrapped with electrical tape. It is not always possible to weld evenly, so the insulation at the junction does not fit tightly, respectively, there is a risk of a short circuit.


Crimping - the bare cores are pressed in a special sleeve, then the junction is closed with a heat shrink tube. This is a reliable connection method, and the sleeves themselves are inexpensive. However, the connection is mounted longer than the twist.
PPE - the cores are twisted in a connecting clamp - a cap with insulation. The connection is quickly mounted, but keeps contact worse than the terminal block.
Screw connections - wires are connected using screw terminals in a dielectric housing. The only problem is that the clamp can loosen, which will reduce the contact strength and it will start to heat up, melting the case.
Bolted connections - two cores are screwed onto the bolt, between which a washer is placed, and then tightened with a nut. The problem with this method is that it is difficult to isolate the connection. Mainly used for power lines.
Self-clamping terminal blocks (Wago) - the wires are fixed in the terminal block housing with self-clamping handles. This is the fastest and most convenient installation method. Over time, the connection does not lose strength and the insulation is not broken. Before buying, it is recommended to see in detail how the original WAGOs look and “twist” the three-dimensional photos.
 Fake Wago terminal block can burn out
On the forums you can read that the Wago terminal blocks are on fire. In fact, mostly fakes burn. They use cheaper plastic and have a smaller contact area. Because of this, the contact heats up and melts the case.
It is important to read more about how to distinguish real Vagos from fake ones.
In a wooden house, the risk of fire is very high, so it's better to play it safe and make quality connections. Short circuits occur in places with broken insulation or with a weak connection of contacts. "Grandfather" twist is cheaper, but is it worth it ?! Better buy a set of sleeves or terminal blocks and make high-quality wiring.
Even if you have the ideal type of cable of the correct section and all connections are made correctly and in accordance with GOST, there is still no 100% guarantee that there will be no short circuit or current leakage.
Wiring Requirements
Wood is the most popular material used in the construction of private housing. Despite its merits, wood is a fire hazardous and highly flammable material.
Basic requirements for electrical wiring in wooden buildings:
- Safety - Wiring must be routed in such a way as to minimize the possibility of overheating and ignition of the cable, as well as to prevent the transmission of open flames to adjacent wooden structures.
- Design - the technical characteristics and performance of the applied wires and components must correspond to the calculated peak load in a particular section of the electrical network. To prevent heating, the cable cross-section is selected with a margin of 20–30%.
- Laying method - it is preferable to carry out electrification of wooden buildings in an open way. This allows you to easily and at regular intervals to diagnose the state of the power grid.
- Isolation - the location of the input node (electric panel) must be isolated from the interface with wooden structures. Ideally, if the electrical panel is installed in a room with a partition made of non-combustible materials.
- Conductor - as a conductor, it is better to use a three-core copper cable with insulation from non-combustible materials. Laying the cable in PVC corrugation is strictly prohibited.
- Automation - each group in the electrical network must be equipped with a circuit breaker. The circuit breaker current rating is selected in accordance with the load on the site. It is highly not recommended to overestimate the current rating, as this will lead to overheating of the conductor.
It is not recommended to carry out independent laying of a power cable and installation of an electrical network without appropriate experience - this should be done by specialists. But every owner of a private house must know the basic rules of electrification. This will allow him to diagnose the existing wiring, and also make it possible to control the quality of work of hired electricians.
Regulations
Rules for the installation of electrical installations is the main document for the design of electrical wiring
General requirements and rules for electrical wiring are described in the following documents:
- PUE, edition 7 - the main document used in the design of the electrical network. It describes in detail the choice of conductor, switchgear, automation and lighting.
- SNiP 3.05-06-85 - electrical wiring in old and new houses. Connection methods and rules for entering a power cable into a dwelling.
- SNiP 31-02 - requirements for the installation of a power supply system in residential buildings. The document complies with the rules and regulations described in the PUE.
The information contained in these sources is described in technical language and may be incomprehensible to an unqualified specialist. For self-study, we recommend that you rely on the "Electrical Installation Rules", since this document most clearly articulates the meanings and concepts necessary for wiring in private homes.
Regulations
The provisions governing the arrangement of power supply in wooden buildings are contained in the "Electrical Installation Rules" (PUE) and in the Code of Rules "Design and installation of electrical installations of residential and public buildings".
They give criteria for choosing switchgears, conductors, automation, lighting, the terms used and their meaning are indicated.
Conducting electrical wiring is also regulated by Building Codes and Rules (SNiP).
SNiP 3.05-06-85 describes how to enter a power cable into a dwelling, and SNiP 31-02 describes the requirements for installing a power supply system in residential buildings.


