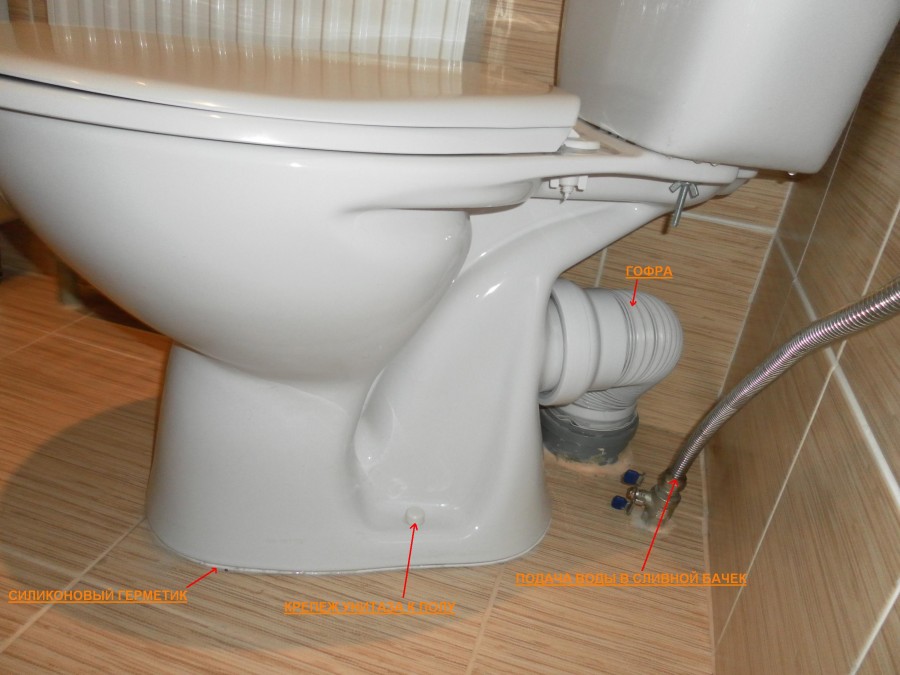
- Corrugation installation process
- Possible options for installing corrugations under the toilet
- Briefly - about how to install a toilet bowl on a tiled floor
- The choice of glue for the toilet
- Preparatory work before installing the toilet
- How to install a toilet bowl with an internal mount
- Methods for fixing the toilet to the floor
- Flush classification
- Removing an old toilet
- Building a new toilet
- Fixing the toilet to the floor with dowels
- Dismantling the toilet
- water shutoff
- Disconnecting the water supply hose
- Removing the drain tank
- Removing a floor standing toilet
- Removing a wall hung toilet
- Cost of installation by third-party workers
- Mounting the toilet lid
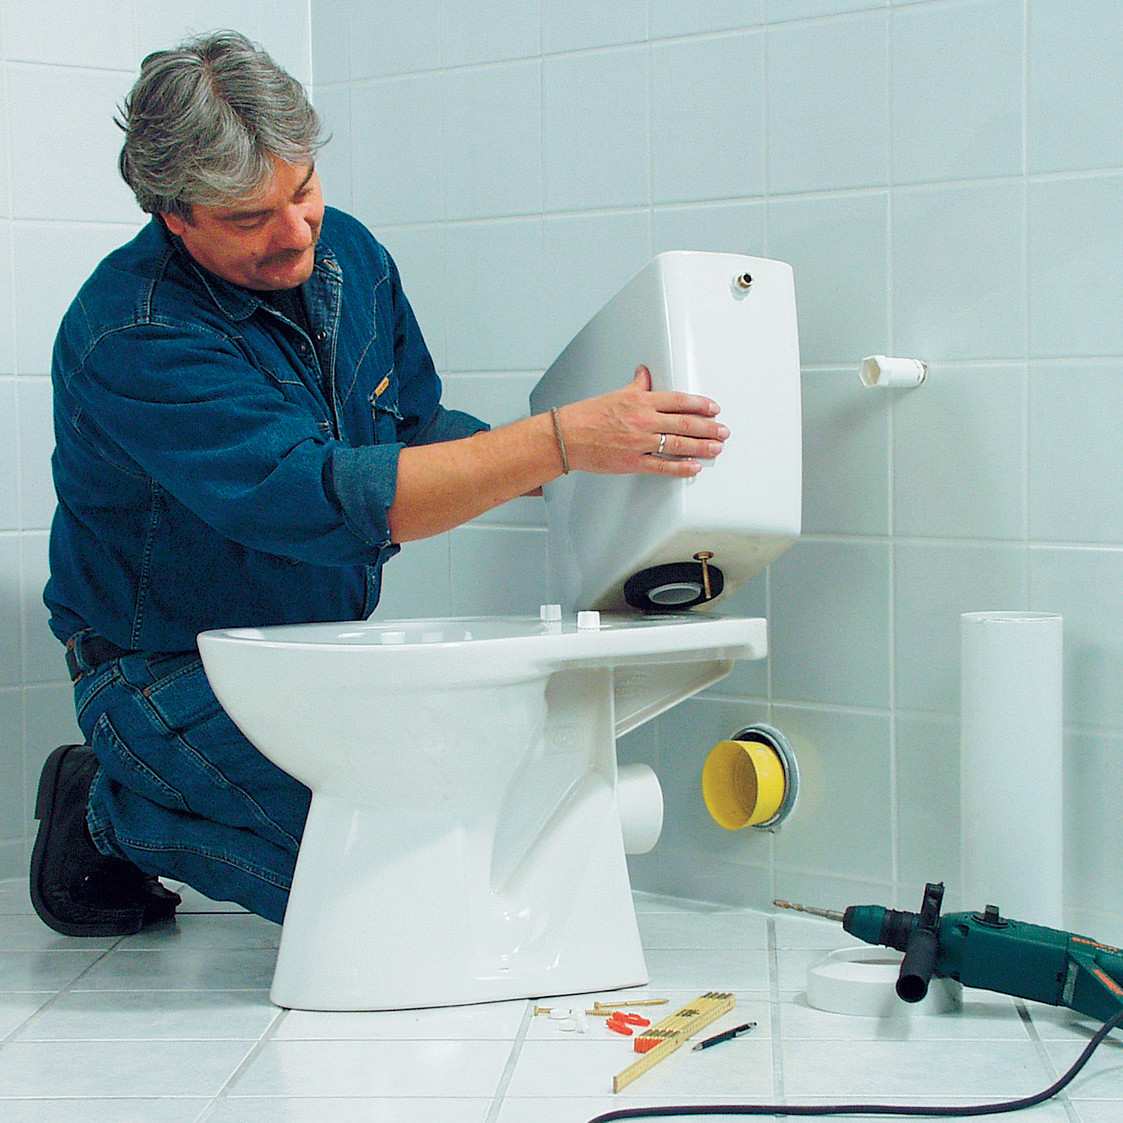
Corrugation installation process
To ensure the correct installation of the corrugations under the toilet, you will first have to prepare tools such as:
- perforator or drill with a percussion function;
- ruler or tape measure;
- silicone-based sealant;
- flexible corrugated pipe of required length;
- FUM tape (can be replaced with tow);
- a hose for supplying cold water to the toilet;
- toilet of the selected design;
- set of adjustable wrenches for connecting water supply to the tank.
After the tools are prepared, you can proceed with the installation of the toilet and its connection to the general sewerage system of the house.
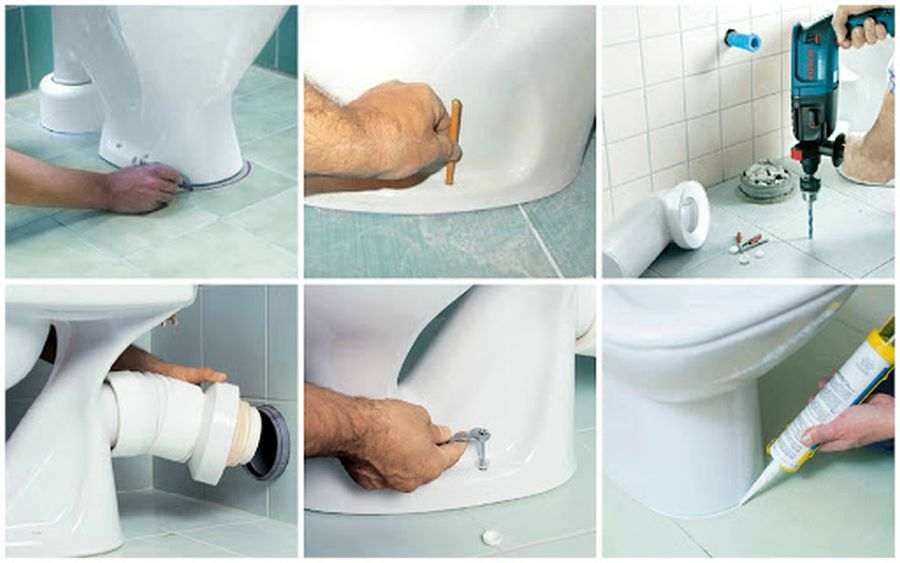
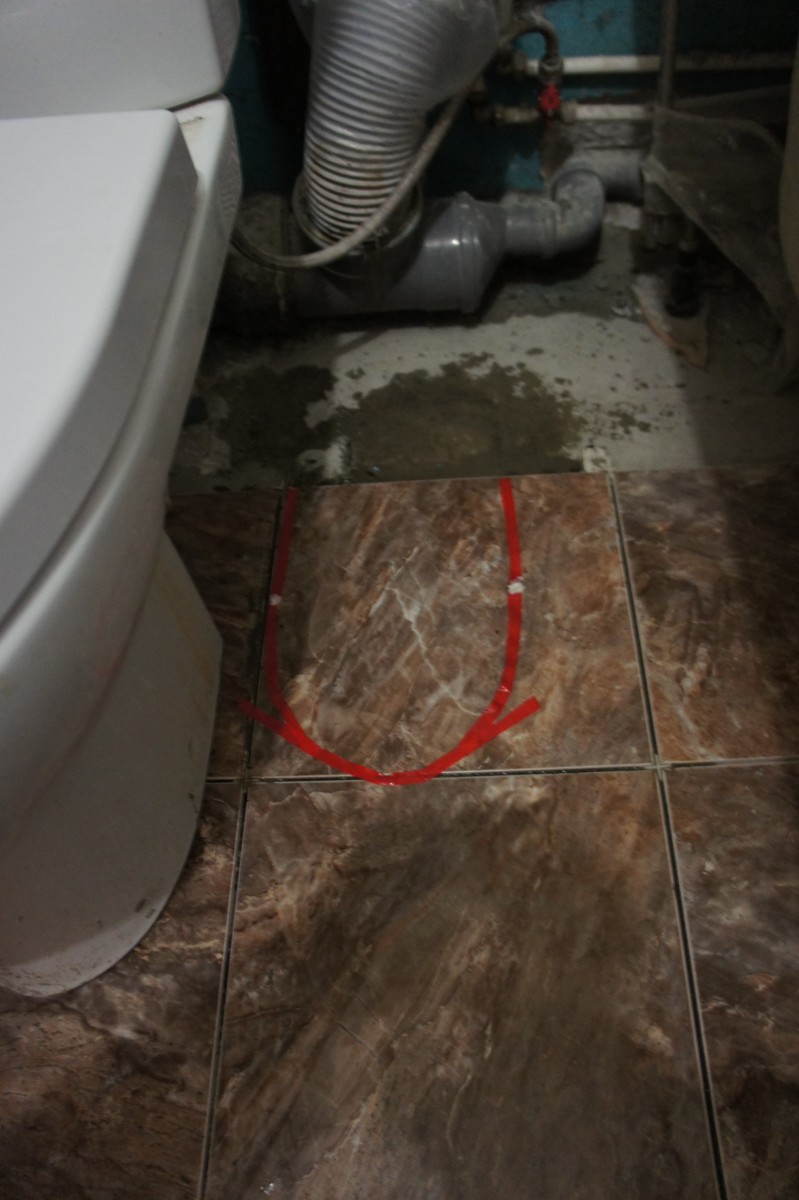
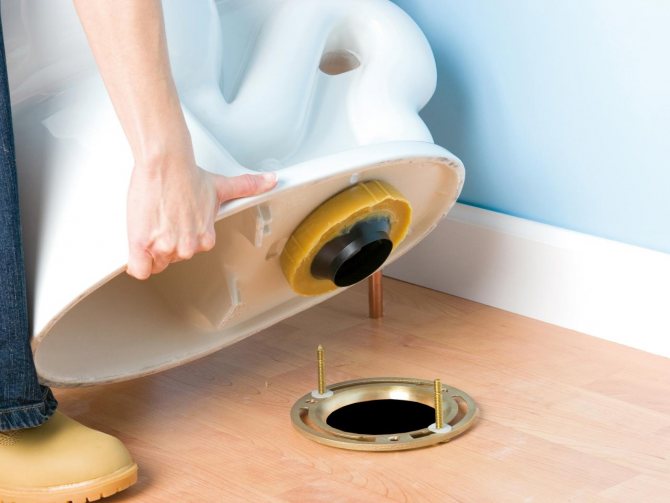
First you need to properly position the toilet, fix it on the floor surface.After that, the outlet is cleaned, as well as the socket of the sewer pipe. It is necessary to ensure that the inside of the socket is as clean and even as possible, knock off all the remaining cement with a chisel or a special nozzle on the puncher. Then wipe the bell inside with a dry rag.
The corrugated pipe itself is very easy to install, a special rubber seal is pulled over the outlet. In this case, you can apply force, it stretches perfectly, after which it takes its previous position, tightening the knot.
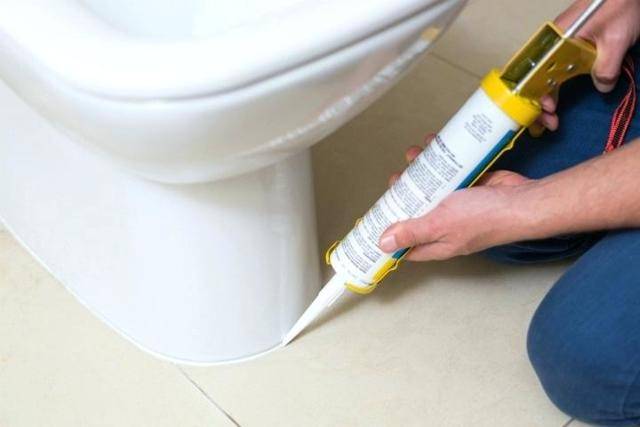
To treat the joints to avoid leaks, it is recommended to use silicone sealant. The composition is applied in a circle, after which the corrugation is fixed. It is necessary to try not to displace it until the sealant is completely dry. Outside, it is completely useless to process the pipe, so do not forget about this most important step.
After that, you can fix the toilet in the chosen place so that it does not stagger or move. After that, the corrugation for the toilet can be attached to the sewer socket
A sealant is also used here, which will not only protect against possible leaks, but also prevent unpleasant odors from entering the room, which is very important when using plumbing equipment such as a toilet.
Possible options for installing corrugations under the toilet
The corrugation can be mounted using two methods, we will consider each of them in more detail.
In the first case, a soft corrugated pipe and a pipe are used for installation, the location of the sewer hole and the toilet bowl does not matter at all. That is, this option is great in the case when there is a need to move the toilet, turn it around, move it into a corner.At first glance, the installation is quite simple, but this is only apparent simplicity. For many, the problem is that it is impossible to put the toilet close to the wall, since the corrugation simply will not allow this. To avoid such difficulties, it is necessary to carefully determine the location of the toilet bowl, the required length of the corrugation, and the possibility of its placement before work.
During installation, it is necessary to ensure that the bends of the corrugated adapter do not become an obstacle to the normal draining of drains, while clamping such a pipe with the help of walls and other elements that can break through the soft corrugation is not allowed.
According to the second option, a rigid corrugation for the toilet is used, the installation itself is more complicated, but it simply has no drawbacks. In this case, the most reliable connection is achieved, but for this it is necessary to correctly determine the size of the nozzle. The nuance of this method is that it can be used to release horizontal or oblique. With horizontal, an angled pipe is not needed, a straight one is used when installing for an oblique outlet at a certain angle.
Corrugation for installing a toilet bowl is an excellent replacement for rigid pipes, the use of which requires certain skills during installation. Corrugated pipes are extremely easy to install. In addition, they can be used for toilets with different types of outlet, since the corrugation can be bent at any desired angle.
Briefly - about how to install a toilet bowl on a tiled floor
Which installation method should I choose? This, of course, depends to a greater extent on the characteristics of the room - how ready it is, whether there is a cladding on the floor. Well, from the skill and instrumental equipment of the owner of the apartment (house) - too.
Let's explain this "verbosity":
The "classic" installation of a toilet bowl is its installation on a floor already fully tiled with ceramic tiles. It is clear that this becomes possible only taking into account the design features of the toilet bowl, since some models involve the supply of a sewer pipe from below. But this is a special case of installation, for the implementation of which it is better to invite an experienced craftsman.
The entire cycle of supplying communications, preparing and installing a toilet with a vertical outlet is a rather large-scale task, and for its implementation it is better to use the services of specialists.
The installation of a conventional toilet bowl directly on the tile can be divided into two more "subspecies":
— Mounting with fixation to the floor on standard fasteners. The most correct approach, which should be used.
- Mortar mounting, if it is not possible to drill holes in the floor for standard fasteners. It is difficult to call this method successful, but it is also practiced from time to time. By the way, a lot of toilet bowls in old high-rise buildings were “sculpted” in this way.
A diametrically opposite approach - first a toilet is installed on the floor (using one of the methods mentioned above), and only then the floor is tiled with ceramic tiles.
This option can be called almost "force majeure", but it also has, as they say, the right to exist.
Well, now, about all these installation methods - step by step, with details.
The choice of glue for the toilet
Do not experiment with self-preparation of adhesive compositions.
Epoxy can be used to repair small scratches and chips (see epoxy glue). It reliably glues defects, although it is quite inconvenient to use.


Liquid nails are used to glue the lid of the tank, and the method is not suitable for restoring the toilet bowl. To seal chips, cracks and even leaks, you can use cold welding, for example, Almaz-press glue.
Ceramic and porcelain bowls can be glued with Porzellan UHU instant glue. It hardens quickly, creating a high-strength bond. You can work at any ambient temperature. Before processing, the cracked surface is thoroughly cleaned and degreased.
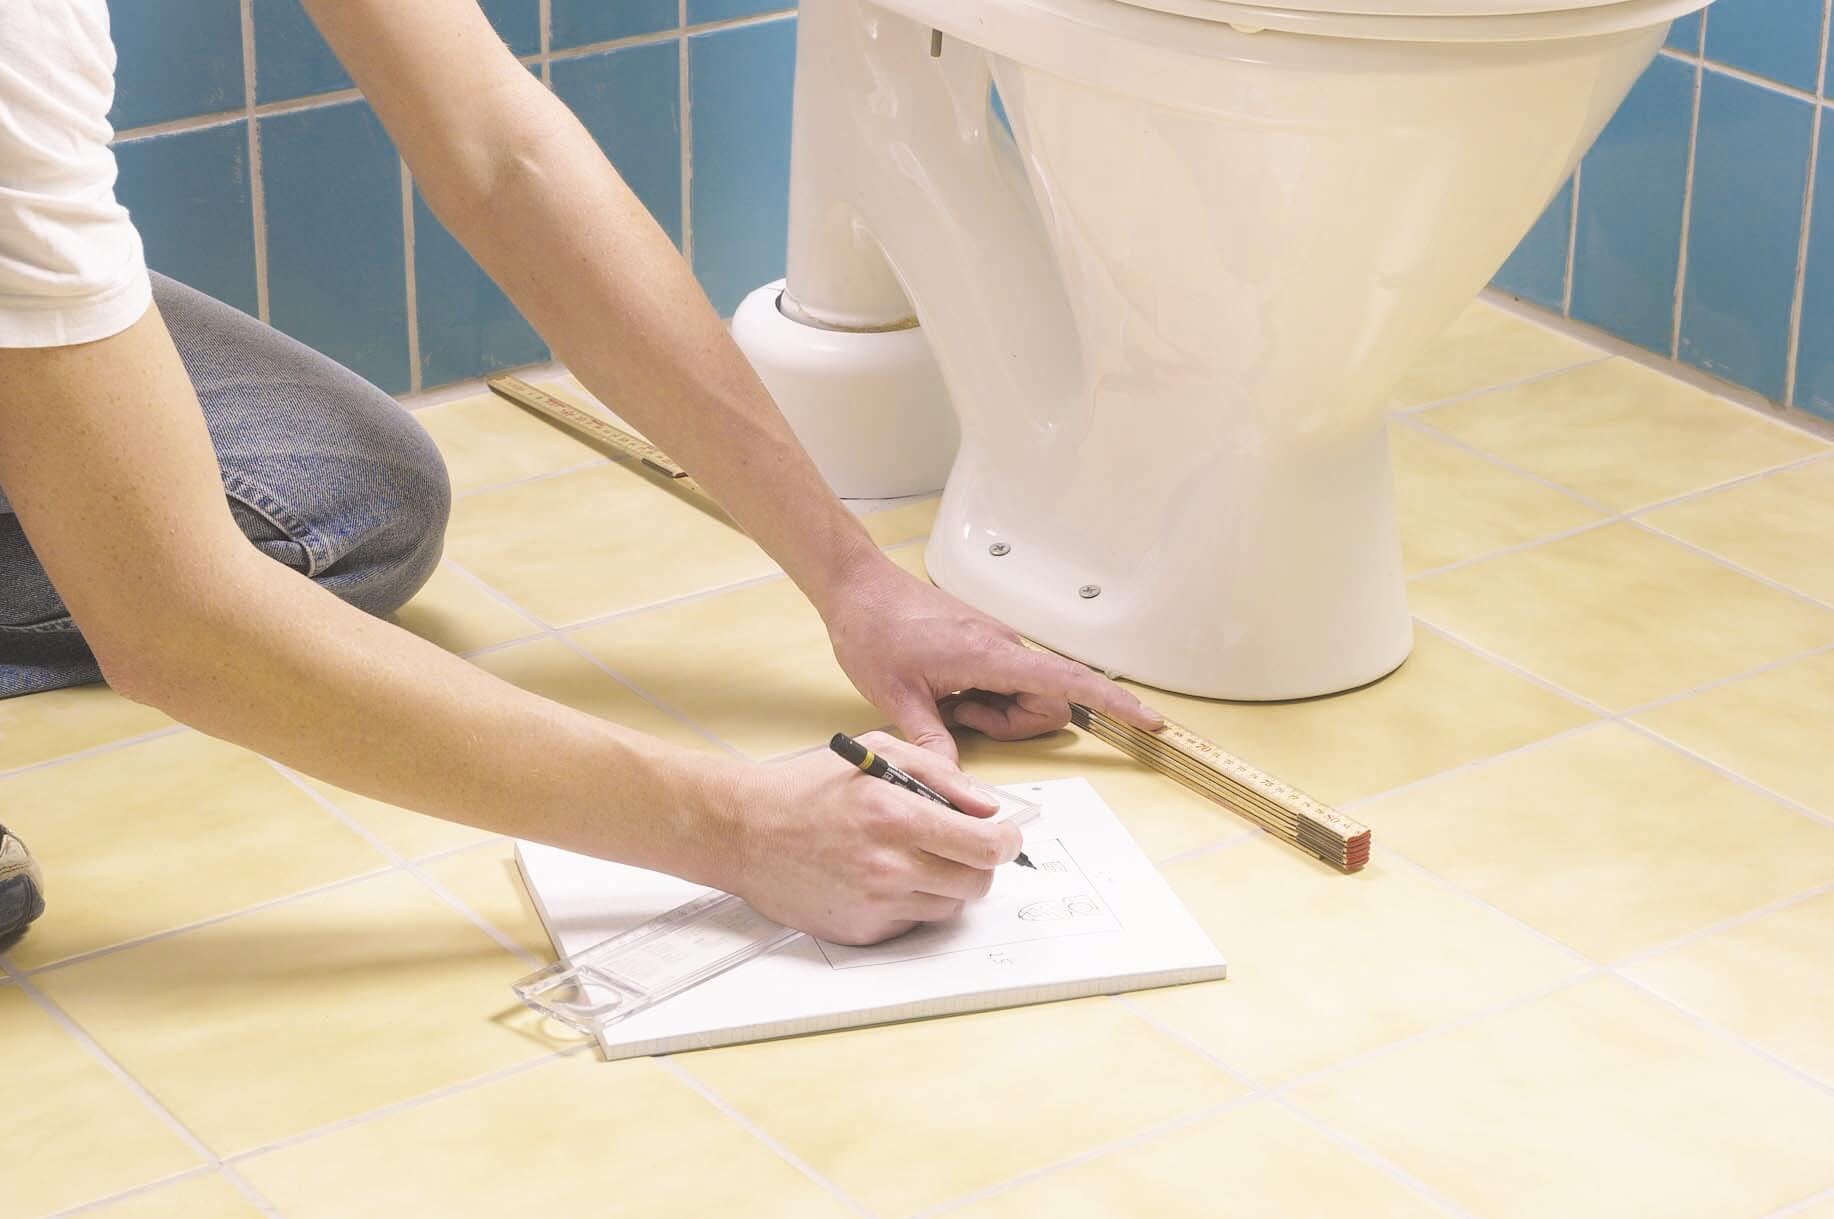
Before starting the installation of the toilet bowl, the location of the device is marked on the floor. The marker also marks the centers of the holes available on the sole of the toilet bowl and intended for fixing plumbing. After that, fixing the toilet bowl to the floor on the dowels with your own hands can be considered complete. If for some reason their quality does not suit you, replace the fasteners with your own.
Experts in this field recommend putting the toilet on a special gasket, which you can make yourself from a sheet of old linoleum, rubber is also perfect for such purposes. To make a gasket, you need to put the product on a sheet of material, and then circle its leg with a marker, pen or pencil. After that, cut the gasket according to the markup. We “try on” the toilet bowl on the place prepared for the equipment and draw it around the contour.
Another way of attaching the toilet to the floor - landing on glue - provides a high level of bonding strength. But in this case, the quick dismantling of the product, if necessary, is excluded.Therefore, the method of installation on glue is used where installation involves the long-term operation of plumbing without the prospect of replacing it.
Important! As mentioned above, the adhesive for attaching the toilet to the floor can be prepared independently. To do this, warm up to 50 ° C 20 parts of epoxy, then add 4 parts of solvent and 7 hardener to it. Previously, a very popular way to fix the toilet was to wall it up with concrete - a small recess was made in the floor, plumbing was installed there and its lower part was smeared with mortar
Very often, products mounted in this way can be found in old multi-storey buildings (if the residents did not replace the toilet bowl). And they do it themselves in order to save on installation services.
Previously, a very popular way to fix the toilet was to wall it up with concrete - a small recess was made in the floor, plumbing was installed there and its lower part was smeared with mortar. Very often, products mounted in this way can be found in old multi-storey buildings (if the residents did not replace the toilet bowl). And they do it themselves in order to save on installation services.
We offer you to familiarize yourself with Effective remedies for removing blockages in the toilet
You can fix the toilet bowl to the floor on a tile or other even and solid base using a standard set of fasteners. This method can only be used if there are no large drops and irregularities on the floor surface. Floor tiles can be sanded to make them rougher.
Installation of a wall-hung toilet is only possible on anchor fasteners, otherwise it will fall off along with the tiles.This mounting option is used in practice more often than others. We drive dowels into the holes prepared in the floor. We install the toilet and carefully screw it. It must be remembered that excessively strong tightening of the ceramic from which the device is made can be damaged. Experts advise lubricating the screws with grease or graphite before work, so that later, if necessary, they can be easily unscrewed.
The most common way to install a toilet on the toilet floor is by dowels and bolts. This is a practical and relatively simple method, but it has two problems. First - you need to drill a tile
This event requires special care and accuracy - any mistake will lead to damage to the flooring. The second problem of fixing plumbing with dowels is that this installation method is designed for relatively light products.
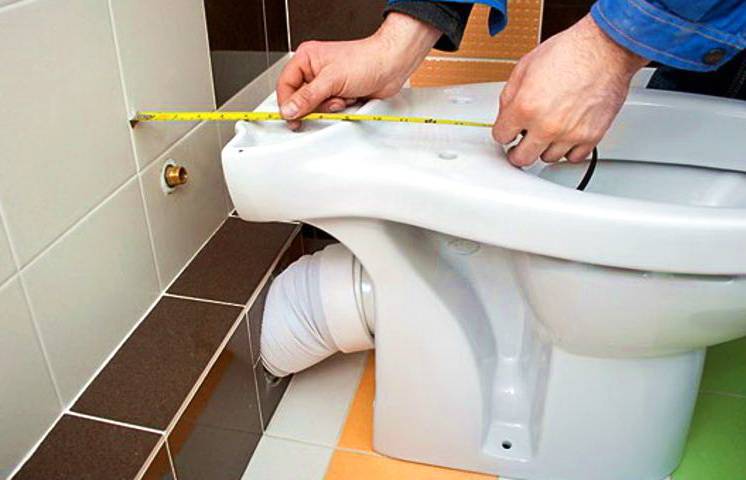
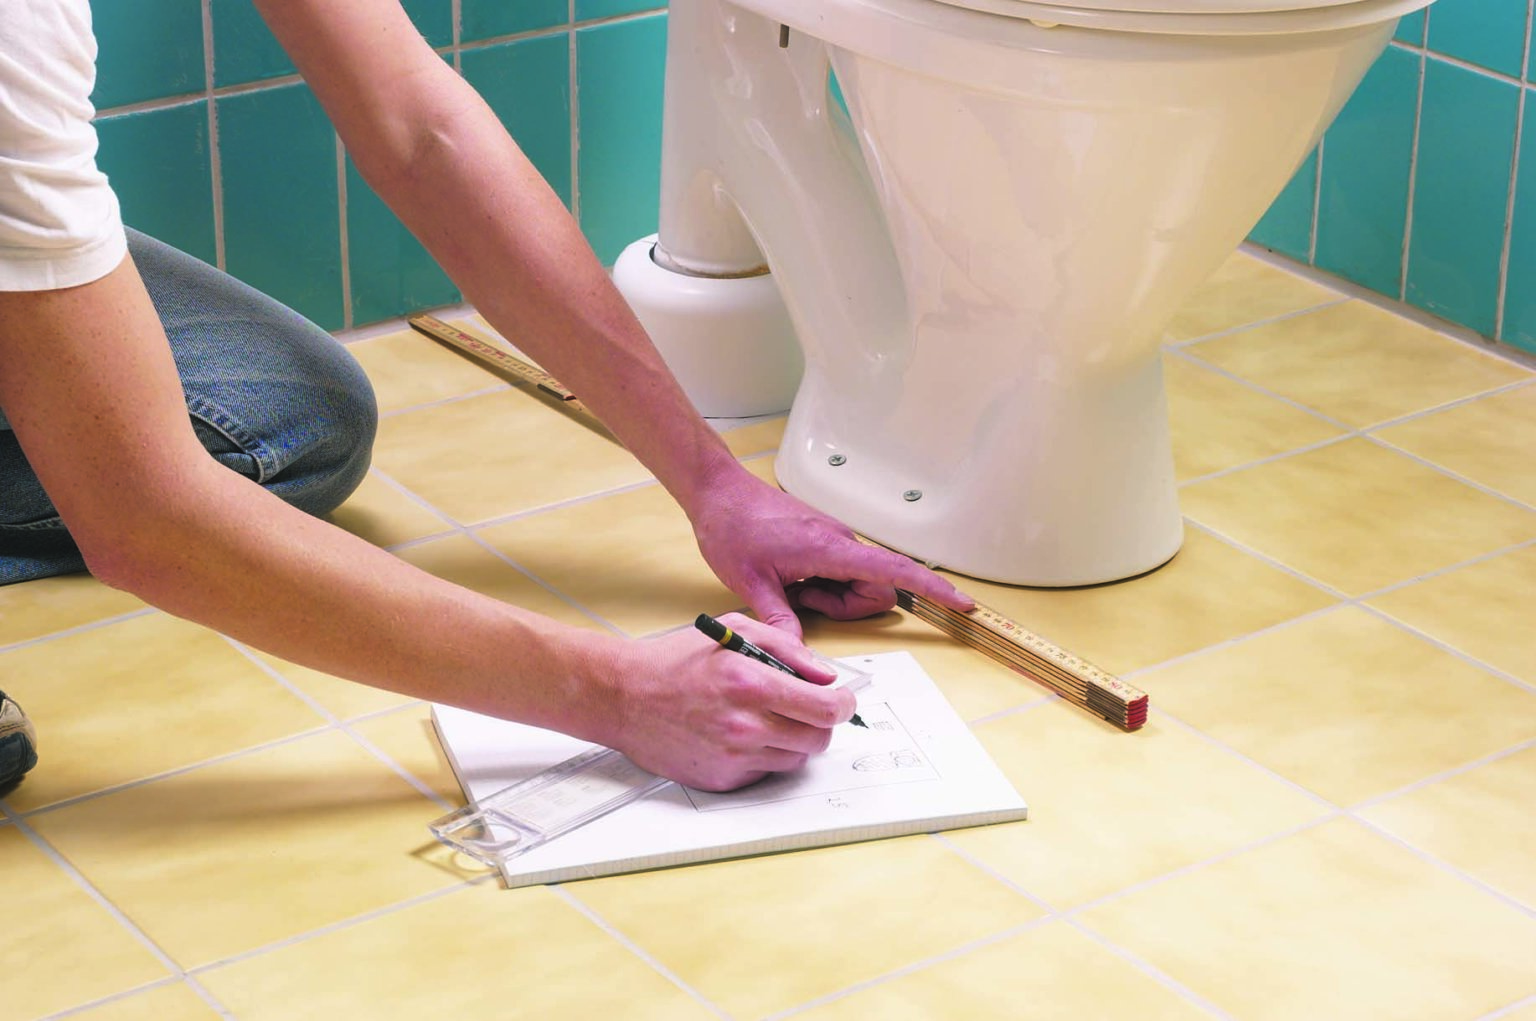
Preparatory work before installing the toilet
Achieve a comfortable toilet pipe length
The drain sink is installed when the wall and floor tiling work is completed.
If you install the plumbing first, and then proceed with the ceramic flooring, you will have to deal with a rather complex cut in the slabs to bypass the base of the pedestal of the plumbing fixture.
This will cause the risk of damage to the cladding if the selection of cut tiles is unsuccessful.
When facing walls and floors with ceramic tiles, you need to achieve a convenient protrusion length from the wall of the water pipe.
The outlet of the water pipe must be such that a stopcock can be installed.
How to install a toilet bowl with an internal mount
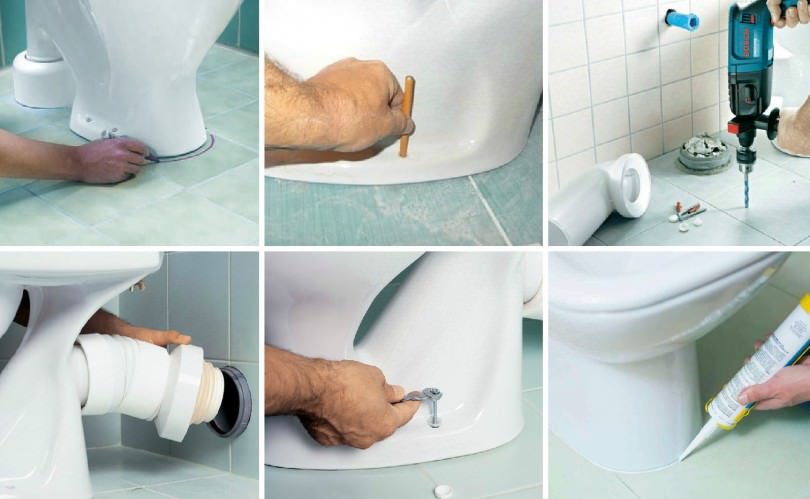
Before fixing the toilet bowl to the tile, it is necessary to prepare the outlets in advance for connecting it to the water pipe and to the sewerage system.
The holes must be located as close as possible to the product to be installed. In the same way as in the case of installing a toilet with an open mount, it is necessary to outline the contour of the base of the products on the floor tiles and transfer the marks of the mounting holes in the product to the floor.
Place the concealed mount on the floor and make marks for drilling holes in the same way as the previous method. The mount must be installed on the floor and firmly bolted. Next, you need to install the toilet with a void on the mount and fix it through the side holes with bolts with the mount installed inside.


You do not need to immediately tighten the bolts to the stop, because most likely you will have to make adjustments when connecting the product to the water supply and sewer system. However, there are cases when the floor cannot be drilled, because. under the tiles laid underfloor heating system. In this case, silicone glue, liquid nails, or epoxy with a hardener can be used to attach the toilet.
In all cases, it is necessary to prepare the tiles and the lower plane of the toilet bowl. The toilet bowl and tiles are processed with sandpaper, which will make them rough for better adhesion of the adhesive to the surfaces of the toilet bowl and the floor.
Methods for fixing the toilet to the floor
There are several methods for installing the toilet to the floor, which are used not only by home consumers, but also by professionals - representatives of elite construction companies. They differ in the list of tools used.The most popular following methods of attaching the toilet to the floor:
- with the help of dowels;
- using sealant or glue;
- on taffeta.

Each method has its own characteristics, advantages and disadvantages. Mounting on dowels is the most popular method, due to its accessibility and primitiveness. Causes the need to drill holes in tiles. This should be done as carefully as possible, since any wrong movement will lead to its damage. Ideally, there should be no tiles on the floor at all. It is better to fix light products on dowels.
The popularity of fastening with building glue is inferior to dowels. Alternatively, silicone sealant or epoxy based mixtures can be used. Prepare them yourself, following the attached instructions. You need to purchase them in specialized construction stores. It is better to give preference to popular brands.
The method of fixing the toilet bowl to the floor with taffeta is outdated, but still used. Taffeta is a wooden substrate, the height of which is about 5 cm. It is installed on a specially prepared recess with a concrete solution. A large number of nails are dug into the underside (anchors will do). Thus, the wooden taffeta is securely fixed in the recess.
A toilet bowl is already installed on the taffeta and fastened with special screws
It is important to remember that wood is susceptible to the humidity found in a toilet or bathroom. For this reason, this part must be treated with a special solution.
Flush classification
There are two main types of flush - straight and circular.
- Direct (or horizontal) is more common in simple budget models of plumbing equipment. Water from the tank flows down the back wall of the toilet bowl, which does not allow you to remove dirt under the rim. During the collection and discharge of water, such a toilet creates a lot of noise.
- Circular flush effectively cleans the entire surface of the bowl due to the ring device. However, toilets with this type of flush are significantly more expensive.
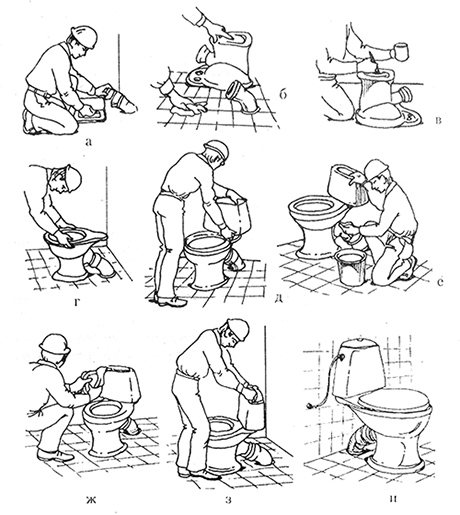
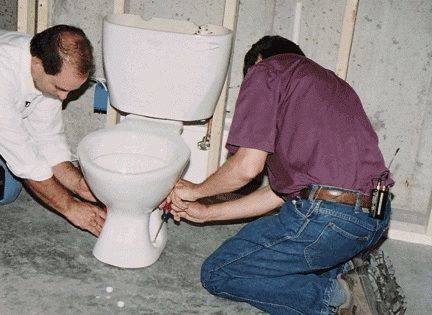
Removing an old toilet
Dismantling and installation of the toilet follow each other in the event that you need to replace the old plumbing with a new one. This happens during the overhaul of an apartment or a bathroom.
All actions must be carried out in a strictly defined order:
- Put on safety goggles and work clothes;
- Turn off the cold water, and then drain the water from the tank;
- Disconnect the water pipe and remove the tank;
- Unscrew the floor-mounted toilet from the floor;
- To detach the toilet bowl from the sewer pipe, use a sledgehammer or hammer. Gently tap on the cement or adhesive covering the joint. Make sure that the fragments do not fall into the pipe and do not clog the drain;
- Shaking the toilet, remove the remnants of the sealant and remove it from its place;
- Now you can clean the bathroom, clearing the place for a new plumbing fixture. Clean the sewer and water pipes from rust and plaque, and then treat with a lubricant that prevents metal corrosion.

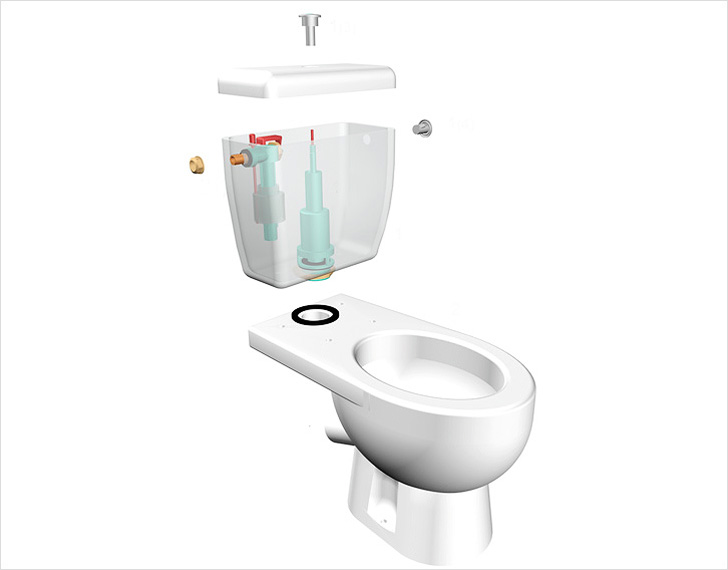
Building a new toilet
Installing a bidet and toilet is not an easy task, but doable. Any floor-standing toilet bowl consists of two main parts - a bowl and a drain tank. Our first task is to connect these two parts into a complete plumbing fixture using screws, nuts and various gaskets.
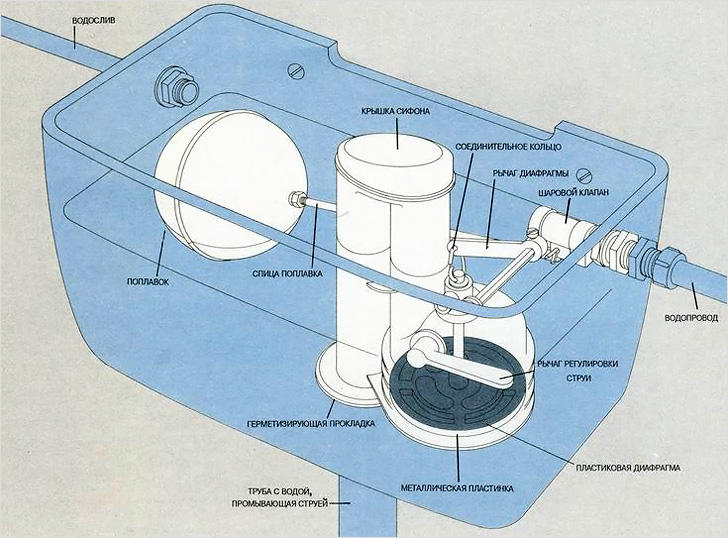
The assembly of the toilet bowl begins with a drain tank. First you need to mount the drain mechanism, and then the float. The drain mechanism, which is usually attached assembled, is not difficult to install. Insert it into a special hole on the bottom and secure with a plastic nut, on which then put on a rubber seal.
The toilet assembly instructions do not end there. Before proceeding with the installation, you need to connect the drain tank to the bowl. To do this, you will need metal studs. Install the tank on the bowl and secure it tightly by putting a special washer on the stud, a rubber gasket and securing it with a nut. Repeat all this with the second hole.
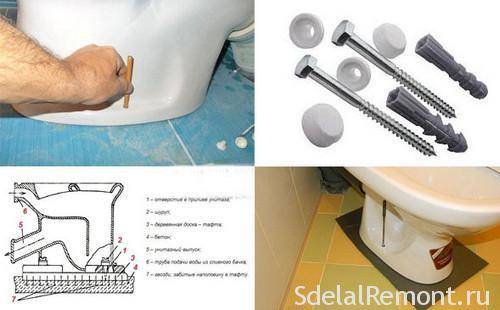
Fixing the toilet to the floor with dowels
The most common way to install a toilet on the toilet floor is by dowels and bolts. This is a practical and relatively simple method, but it has two problems. First - you need to drill a tile
This event requires special care and accuracy - any mistake will lead to damage to the flooring. The second problem of fixing plumbing with dowels is that this installation method is designed for relatively light products.
Therefore, if you have a heavy toilet, it is better to use glue.
Mounting the toilet on dowels
But back to the dowels and screws - in order to use them to fix the toilet on the floor yourself, you will need the following tools:
- measuring tape;
- marker or pencil for marking;
- electric drill;
- drill bit for concrete (preferably a spare tool);
- a rag or microfiber cloth;
- ammonia.
Dowel-nails and dowels for the toilet
In some cases, you may still need a sealant and a glue gun, or a small sheet of linoleum. And now we will describe step by step the process of attaching the toilet bowl to the floor with dowels.

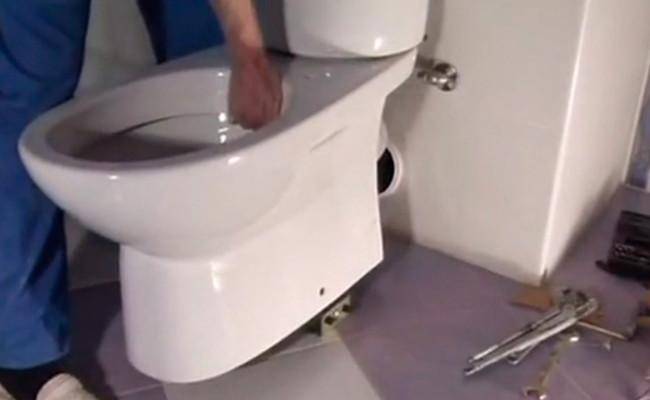

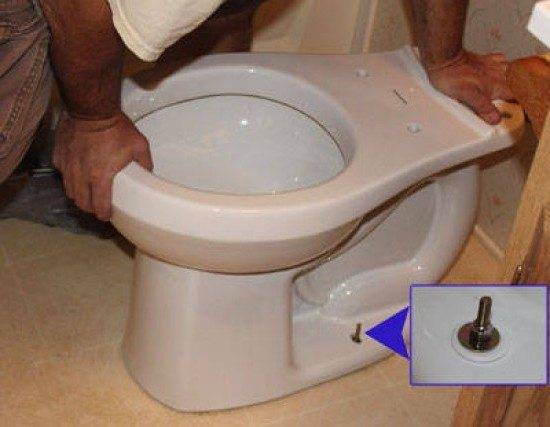


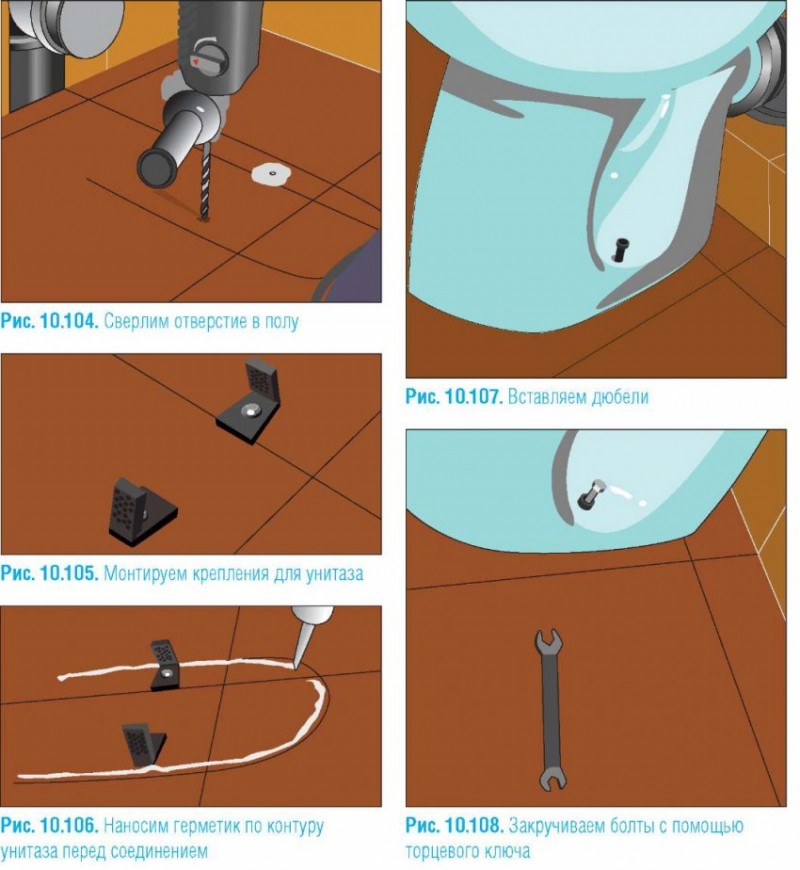
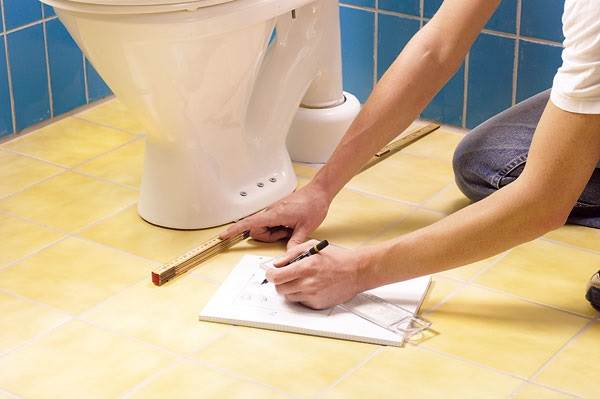
Step 1. "Try on" the toilet, making a preliminary installation in the place where it should be. Evaluate how convenient it is to use it, how to connect the toilet to the sewer and the water connection points to the tank. Try to shake the toilet bowl - you need to determine if the floor is flat under it.
"Trying on" the toilet
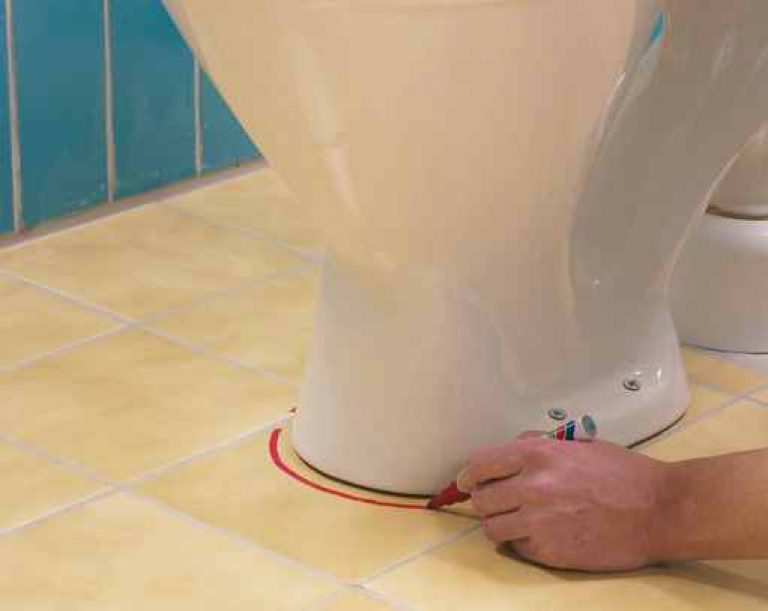
Step 2. Using a tape measure, determine the place where the toilet should be, more accurately. Make preliminary marks in the holes for the fasteners.
In the holes for the fasteners you need to make marks
Step 3. Remove the toilet bowl from this place and make sufficiently large and noticeable marks in the form of crosses from the previously applied dots.
Next, you need to make marks in the form of crosses.
Step 4. Prepare a drill with a drill bit for concrete. First, drill holes in the tile. At the same time, the drill should work at low speeds, and all work should be done very carefully so that cracks and other damage to the tiles do not occur in the process.
First you need to drill at low speeds
Drilling tiles at low speed
Drilling process
It is recommended to periodically wet the drill bit in cold water.
Step 5. Then finish the holes, but already in the concrete floor. Either set the drill to a higher speed, or replace it with a rotary hammer, which will do a much better job of this task.
Drilling in concrete
Be prepared for the fact that after drilling holes for dowels and bolts there will be a lot of dust and dirt
Step 6Clean the tiles at the installation site of the toilet from dust and other contaminants formed during the drilling of holes for the dowels. Also, do not forget to degrease the surface with ammonia.
Tiles need to be cleaned
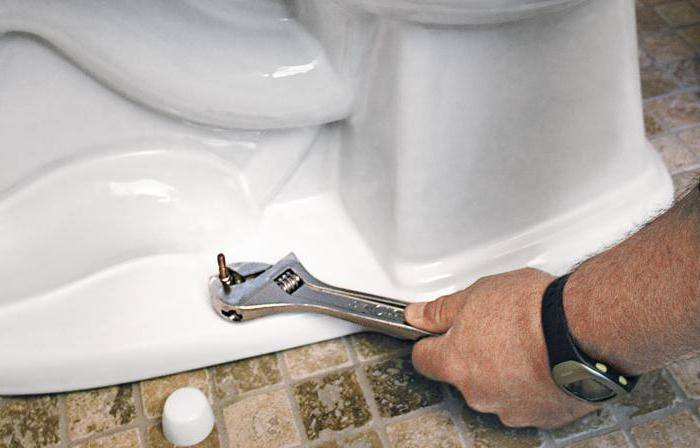
Step 7 Insert the dowels into the previously drilled holes.


Dowels are inserted into holes
Step 8. Check if the bolts from the toilet bowl kit fit into the dowels normally. If for some reason their quality does not suit you, replace the fasteners with your own.
Check if the bolts fit properly into the dowels
Step 9. Install the toilet in place. Check if the holes in the tile are aligned with those in the bowl support of the sanitary ware.
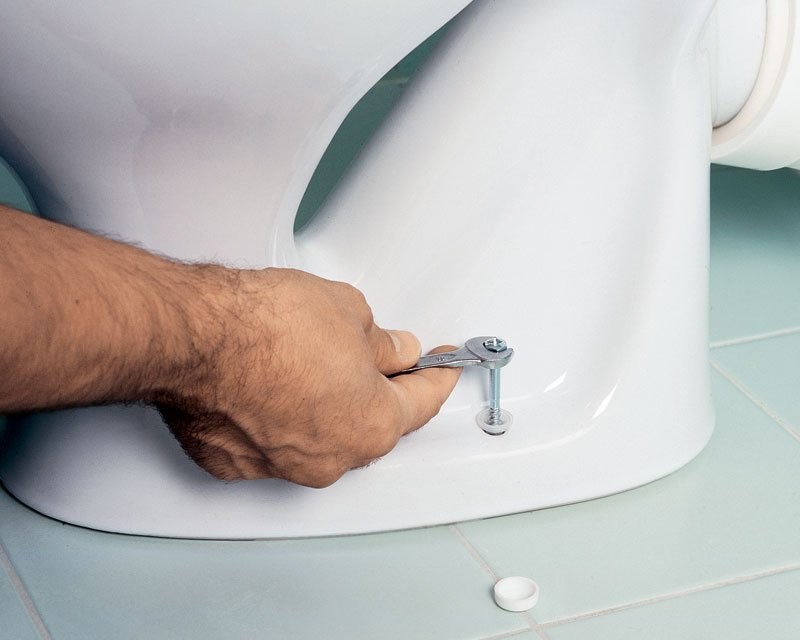
Step 10. Insert the bolts into the dowels through the holes in the toilet support. Don't forget the plastic or rubber washers. Tighten the bolts, but be careful - there is a risk of damaging the toilet itself when overtightening. The last thing to do is to cover the fastener caps with decorative plastic overlays. After that, fixing the toilet bowl to the floor on the dowels with your own hands can be considered complete.
It remains only to tighten the bolts
Dismantling the toilet
When removing an old toilet, special precautions must be taken to avoid water leakage, which, in the worst case, will require further refurbishment measures. Therefore, in order to avoid typical mistakes, below is a step-by-step guide for non-professionals
water shutoff
The first step in dismantling a toilet is to turn off the water. This can be done by simply turning off the faucet. However, there are situations when the valves are no longer used for a long time, and they have time to rust. In this case, it is necessary to block the main riser and, during the repair process, change the faucet at the same time.
After shutting off the tap, completely drain the water from the tank.
Disconnecting the water supply hose
On the side of the drain tank there is a flexible hose through which water flows for flushing. It is fastened with ordinary nuts, which are unscrewed very simply.

Removing the drain tank
The flush tank is attached to the toilet with two long bolts. In order to unscrew them, you first need to remove the tank cover. Then, if necessary, blot excess moisture with a sponge (if water remains inside, it will surely spill onto the floor through the holes of the removed bolts). A situation may arise when the screws are rusted, because. have been in contact with water for many years, then a special anti-rust agent will help.
After loosening the bolts, carefully remove the drain tank, swinging it in different directions for even extraction.
Removing a floor standing toilet
The toilet bowl, as a rule, is attached to the floor with several bolts (it is possible that a wooden board is first placed under the toilet bowl). To facilitate the workflow, you first need to remove the toilet lid. Then be sure to put rags on the floor or substitute a bucket. The toilet has a water seal, where water is constantly located - this is a kind of barrier against unpleasant odors from the public sewer. When removing plumbing, a fair amount of liquid is poured out, as a result of which it is possible to flood the neighbors.
Then you need to unscrew the bolts at the base of the toilet. If they are rusty, then you need to use a special tool or cut them off with a grinder.
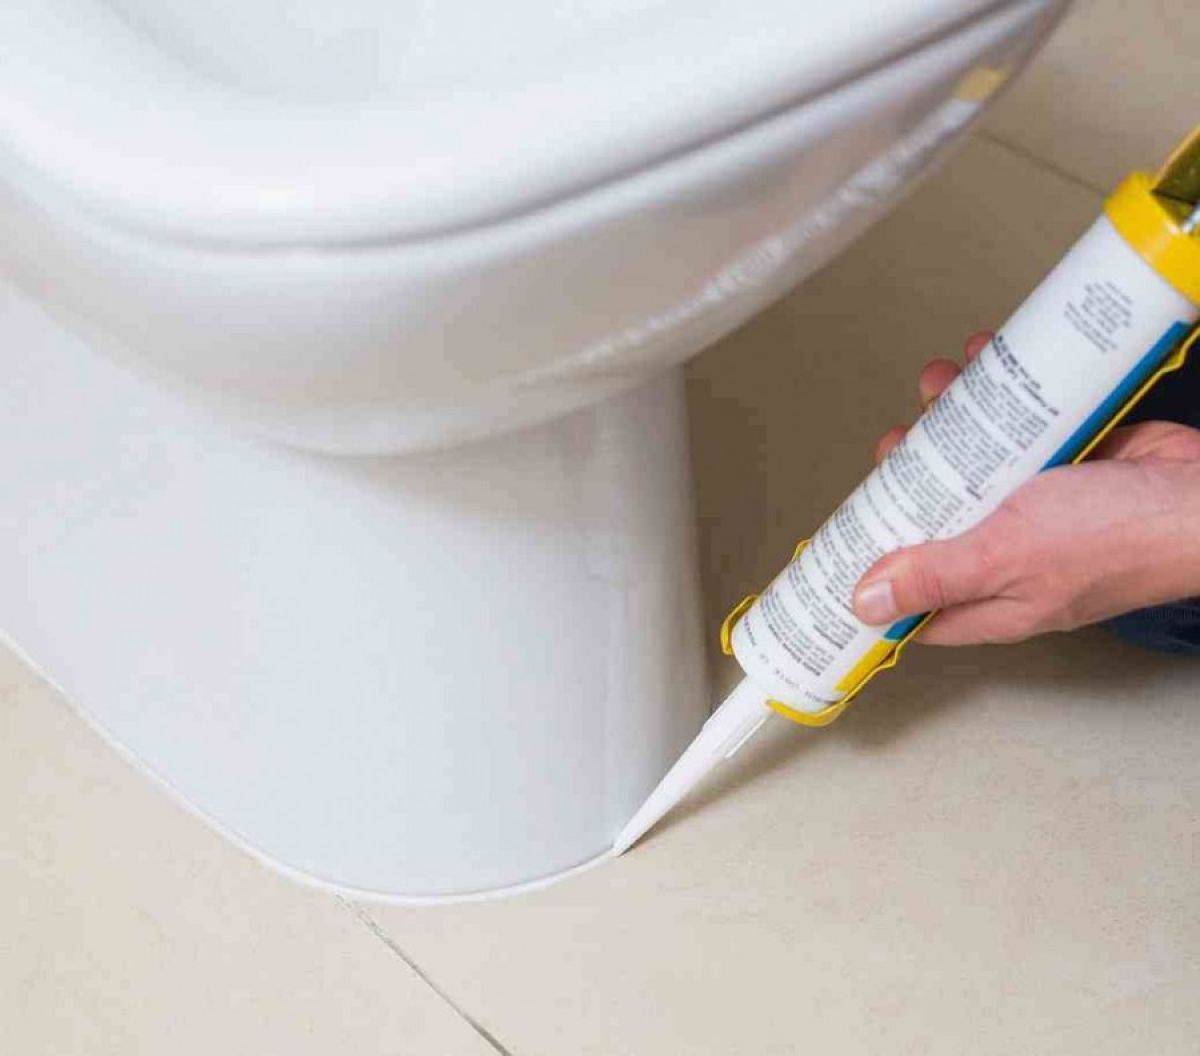
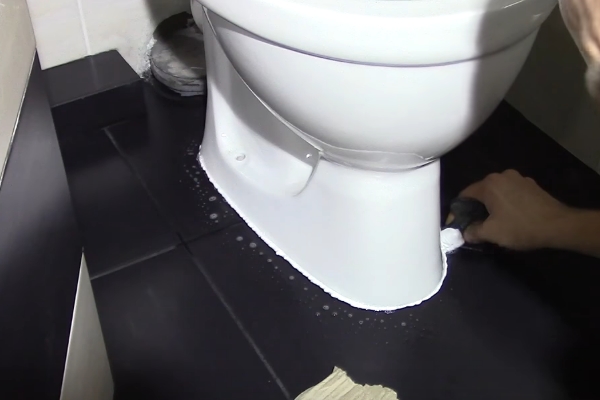
Along the entire line of the base you need to walk with a sharp knife or blade, because. often the joint between the toilet and the floor is coated with sealant.
Fastening to a common sewer pipe, very often, is fixed with cement. In order to get rid of it, you can use a drill with a medium drill.
Now the old toilet can be removed, and this completes the dismantling work.

Removing a wall hung toilet
When dismantling the wall-mounted toilet, the procedure is approximately the same:
- first you need to loosen the bolts that hold the toilet in the wall installation;
- then disconnect the toilet from the drain tank and the general sewer;
- finally remove the toilet.
Cost of installation by third-party workers
The question of how much it costs to install a toilet bowl does not have a clear answer, since the cost of work depends on so many nuances, for example, on the type of toilet bowl itself, on the initial position of the sewer outlet, on the need to dismantle the old structure, and so on.
If it is necessary to install a toilet bowl, the price will always be calculated by the plumber on site, based on the actual data, in the same way as, for example, when installing windows. That is, measurements are made, walls are assessed, and so on, the master comes twice, the first time to draw up an estimate and determine the cost, and the second time for installation.


On average, the installation of a simple, familiar outdoor compact costs from 1,500 to 2,000 rubles; for the dismantling of old plumbing, they charge from 260 to 700 rubles, again depending on the complexity of the design. Installing a hanging toilet will be many times more expensive, if you do not need to “crash” into a sewer riser, then the work will cost from 3,000 rubles.
Installation in a building under construction will be inexpensive - from 2000 rubles, but in an apartment where partial demolition of the wall or some other technically complex work is required, the installation of a built-in structure will be much more expensive.
Mounting the toilet lid
The last step in installing a floor-mounted toilet with your own hands is to install the seat and lid. This is a very simple operation. Special fasteners are already included with the seat, as a rule, they are made of plastic.
Such parts are very easy to unscrew and twist. In addition, high humidity does not harm plastic elements.
Another plus is that the design with plastic fasteners moves less on sanitary ware. We attach the lid to the toilet so that the fasteners enter the grooves intended for them.
We shift the entire structure forward and tighten the nuts tightly, thus fixing the seat.
 To prevent the toilet lid and seat from sliding on the surface of the toilet, you need to tighten the fasteners well
Self-installation of a toilet bowl is quite feasible for a home master
It is important to correctly determine the type of device and, in accordance with this, choose the best installation method.
It is important to carefully read the instructions from the equipment manufacturer, which describes the installation procedure in detail, and strictly follow it during the work. If all these conditions are met, do-it-yourself equipment will work for a long time and without problems.