- Recommendations for installing cabinets and sinks
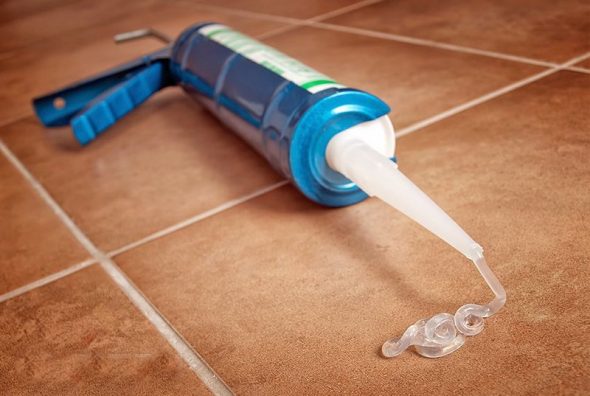
- Sealant selection
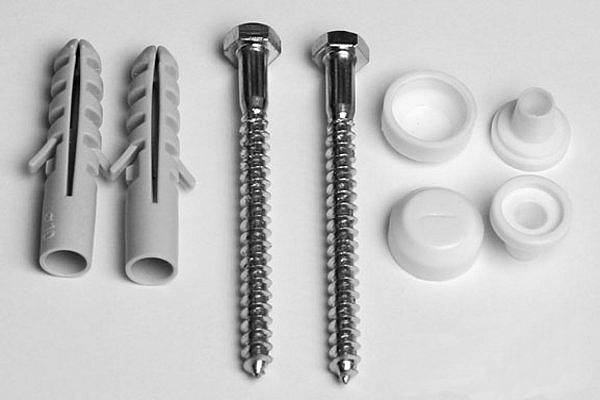
- Types of fasteners for sinks
- Installation Tips
- Installation requirements
- Features of mounting a built-in sink
- Marking the installation site
- Sawing and edging
- Installing the bowl and connecting equipment
- Important "little things" to pay attention to
- Mounting a sink without brackets
- Types of shells
- Types of bathroom sinks by installation method
- Shape and size
- Production material
- Features of work depending on the model
- Preparatory work
- Conclusions and useful video on the topic
Recommendations for installing cabinets and sinks
Installing a sink with a cabinet in the bathroom is not difficult on your own, if you listen to some recommendations:
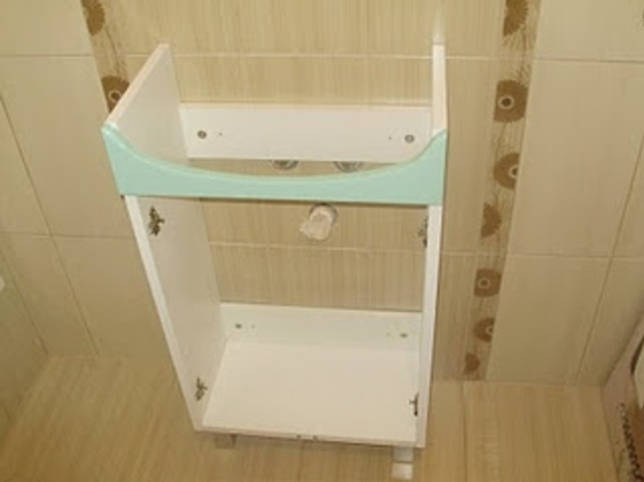
First of all, we start assembling the cabinets. Usually they should be accompanied by instructions to facilitate the work, but they are unlikely to come in handy. This process is quite simple. The main thing is to make sure that the screws, fasteners are firmly fixed. After installing the cabinet under the sink, this will be difficult to implement;
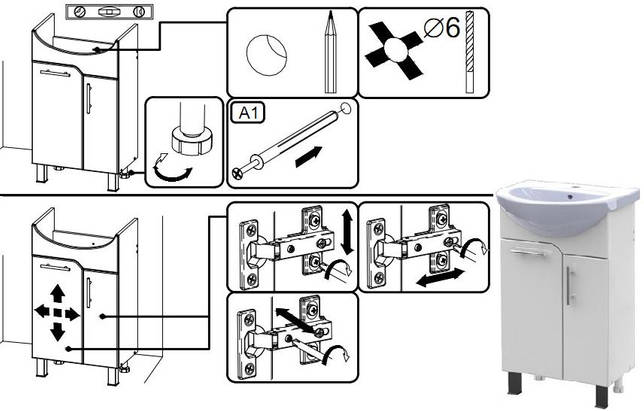
Scheme of assembly cabinets under the washbasin
- once the cabinet is assembled, we proceed to the arrangement of the sink.It is in its appearance, functions no different from those sold separately, just the washbasin is made to fit the bedside table and is used to complete it;
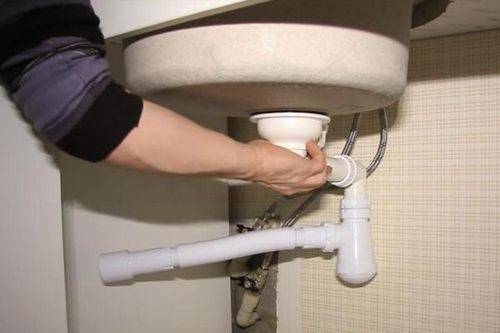
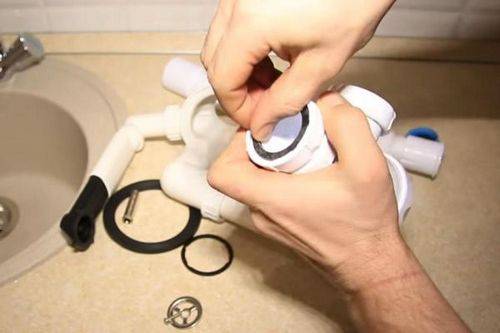
- we connect the siphon to the drain;
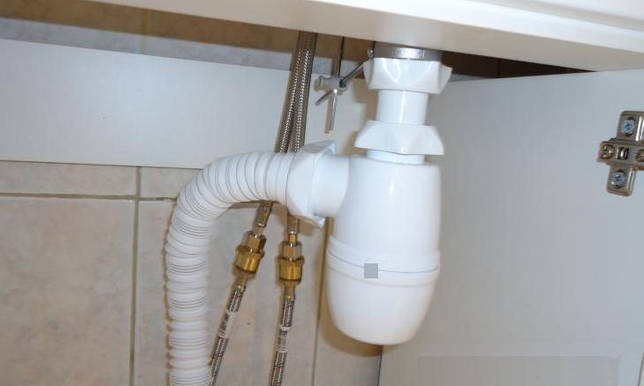
The siphon is installed by screwing it to the washbasin drain
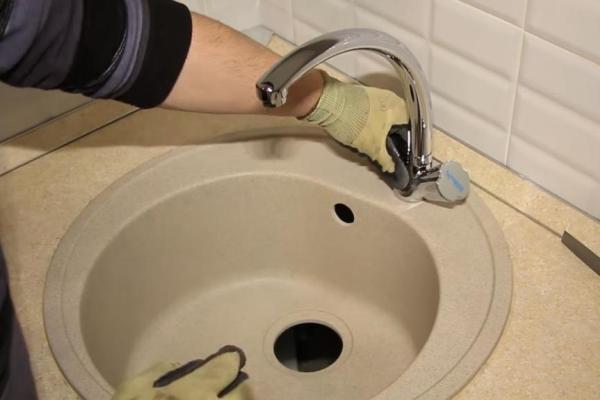
- We put the sink with the faucet already installed on it on the cabinet. Usually, metal corners are used to fasten these elements;
- we move the washbasin and cabinet closer to the place where these elements are planned to be installed;
A sink with a siphon and a mixer is placed on a cabinet and moved up to the wall
on the surface of the wall, points for bolts should already be marked, on which the washbasin should then be fixed. Marking is done independently. For greater accuracy, it is better to bring the washbasin to the wall, accurately measure the points. With the help of a tape measure, it will still not be possible to achieve the desired accuracy;

Marking on the wall for a future cabinet
- we take the washbasin with the cabinet back and make drilling at the marked points;
- after the holes are made, the bolts that come with the product should be inserted into them. When buying a product, be sure to check the availability of these elements, sometimes sellers simply forget to put them. And so that you do not have to buy them separately, see their availability;
- now you need to install the sink and cabinet in place, screw everything with bolts;
- check how the sink and cabinet stand. If everything is stable, does not stagger, the product stands tightly to the wall surface, then everything is done correctly;
Sink cabinet installation process
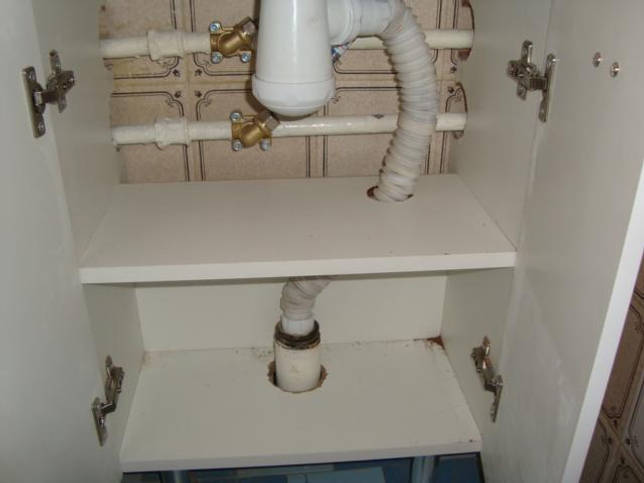
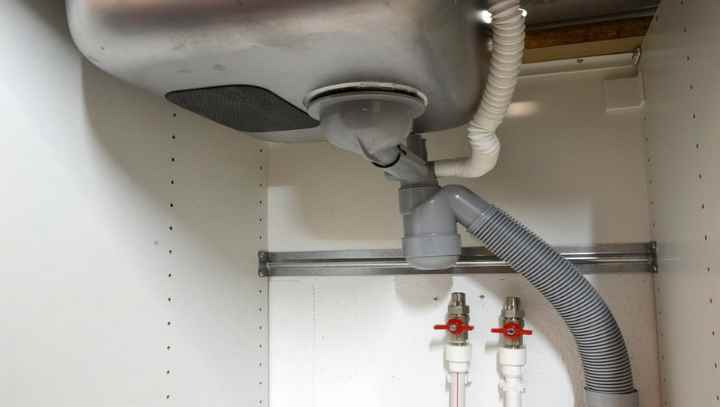
- at the end we connect the sewer. Mixer hoses must be connected to pipes with cold and hot water.The hoses are connected with a union nut and a rubber base gasket;
- then we seal the holes, connections. Sealing must be done necessarily, this will help to avoid unforeseen leaks;
- at the end, the siphon is connected to the sewer pipe. In order to seal all kinds of holes, you need to use a special rubber gasket or corrugated cuff;

Installing the sink on the cabinet - the final stage of work
it is important that before you start using the washbasin, it is better to check it for leaks, if there are none, then you can safely proceed to its operation.


Sealant selection
Sealing material plays an important role in installation work. The following types of funds are on the market:
- silicone acrylic;
- Elastic silicone;
- Polyurethane silicone.
When buying, you need to pay attention to the features and characteristics of the sealant: shrinkage, adhesion, purpose. Apply the product to a dry, cleaned surface for maximum adhesion.
If the surfaces are not fully prepared for sealing, then moisture can penetrate into the cracks, which is fraught with the reproduction of fungus and mold.
The agent is applied to a dry, cleaned surface so that there is maximum adhesion. If the surface is not fully prepared for sealing, then moisture can penetrate into the cracks, which is fraught with the reproduction of fungus and mold.

A flexible silicone sealing material is usually used. It is easy to use and quite reliable.
Types of fasteners for sinks
Hanging washbasin on brackets has long been considered a familiar accessory in bathrooms. For a long time of operation of these devices, different types of brackets have been created, differing in design, standard sizes and high permissible load (see also the article “Round sink: materials, installation methods”).
In accordance with the operational highlights, these devices are of the following types:
Standard modifications with which it is possible to attach a solid part of the sanitary equipment currently being created to the walls.
Most of the mounts on the market fall into the standard bracket category. By choosing such products, you have the opportunity to believe that they will fit virtually any sink.
In most cases, such products are sold in a set with one or another model of the sink. Based on this, in a simple sale, these components are seen infrequently and their price is high.
Designer accessories are in many ways similar to special brackets, in addition to the fact that they are designed for a specific model, they have one or another decorative shape.
According to the type of production material used and the configuration, the following are distinguished:
Cast iron brackets with a T-shape configuration and monolithic structure are distinguished by a reinforced base and a solid mounting platform.
- Metal fasteners made by welding. Such accessories are made in the form of the letters "G" and "T". From time to time, simplified versions of welded fasteners made of profiled pipes are seen.
- Iron fasteners of frame type (sector, arc and rectangular).Certain models have sliding units designed to mount sinks with different sizes.
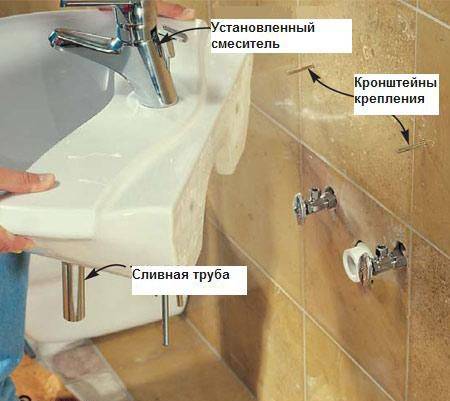
Installation Tips
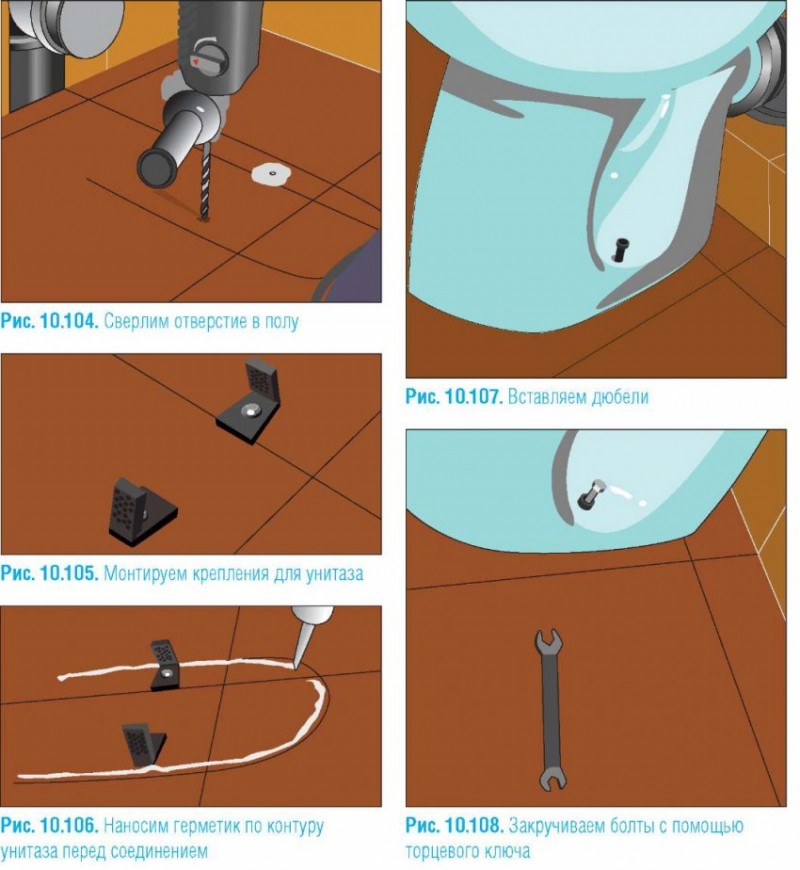
The installation instructions for sinks on the walls with the help of special fastening components do not seem to be something very complicated. From the tools you will need a puncher with a drill of the appropriate diameter, a water level, a tape measure, a pencil, dowels and a hammer with plastic seals.


Installation instructions are as follows:
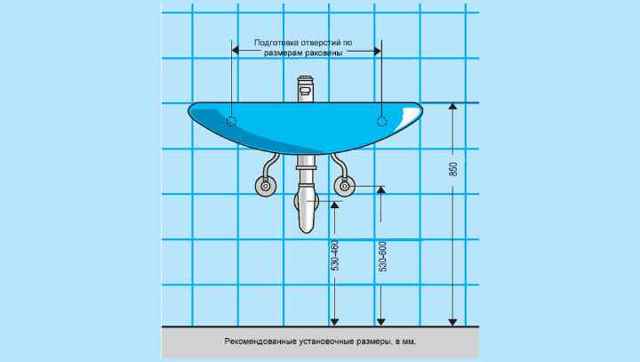
- We measure 80 cm from the floor. As a result, the sink will be located at a distance of approximately 85 cm. If the device is used by people with small stature, these parameters may be revised in favor of a reduction.
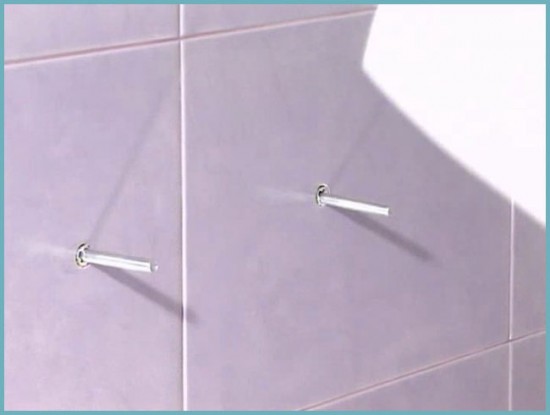
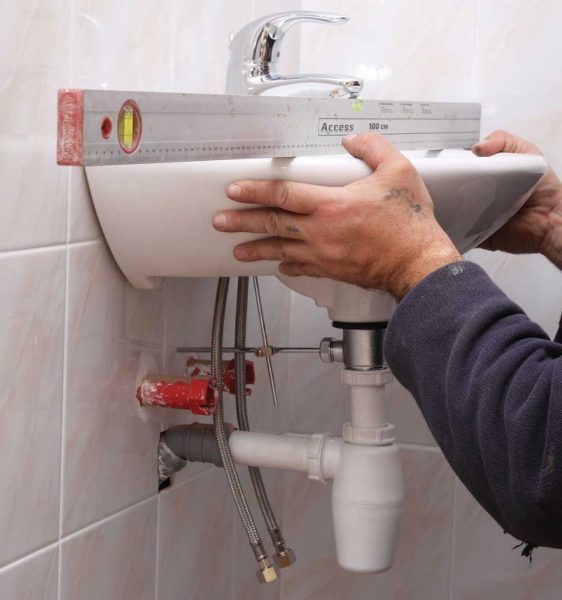
- We measure the distance between the mounting holes in the back of the sink and mark the screws on the wall. We control the horizontalness of the applied marks with a level, after which it is possible to start drilling.
- We drill holes using a drill of the same diameter as the sealant that will be used with the dowel. While drilling, we try to keep the puncher with our own hands in a strictly horizontal position, without moving it from side to side.
If you pull the puncher on the sides, the hole will be broken, and the seal will simply not hold in it. We drill the surface to a depth of 1.25 of the length of the seal.
- After the hole is ready, blow the dust out of it and insert the seal. For greater strength of the connection in the hole, pre-moisten with a small amount of water.The seal is hammered in with a small hammer until it is flush with the wall surface.
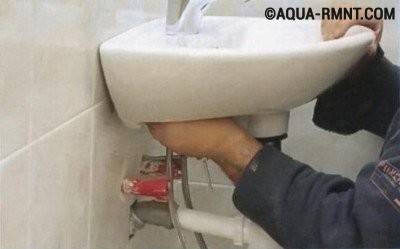
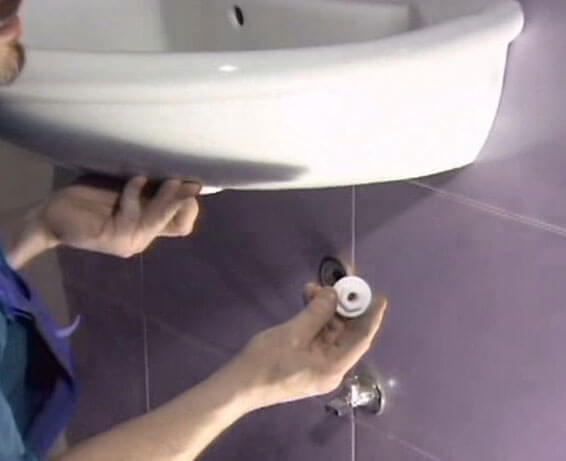
- Then we fix the bracket chosen for the installation of plumbing.
- After the brackets are mounted, it remains to put the washbasin on them and check the level of quality of the work done.
Installation requirements
- Installation of plumbing fixtures must be carried out at the end of the installation of the pipeline and at the end of the preparatory and finishing work.
- Before fixing the sink, the plumbing pipes must be equipped with water sockets, tees, elbows, or couplings with an internal diameter of 1/2 inch.
- The supply of pipes with warm and cold water to the sink should be carried out taking into account a distance of 15 cm between the pipes.
- Regardless of which pipe connection is used - hidden or open, water outlets must be placed in such a way that they are virtually invisible behind the installed washbasin.
- Plumbing fixed on brackets should not be mobile and should not creak. If there is a swing and a creak, the installation should be done again.
Features of mounting a built-in sink
Built-in models are cut into the countertop from below or from above.
Each installation method has its own nuances:
- When installed on top of the bowl, it will protrude above the surface from one to three centimeters.
- The lower tie-in method is preferable because during operation it is convenient to collect splashes with just one movement.
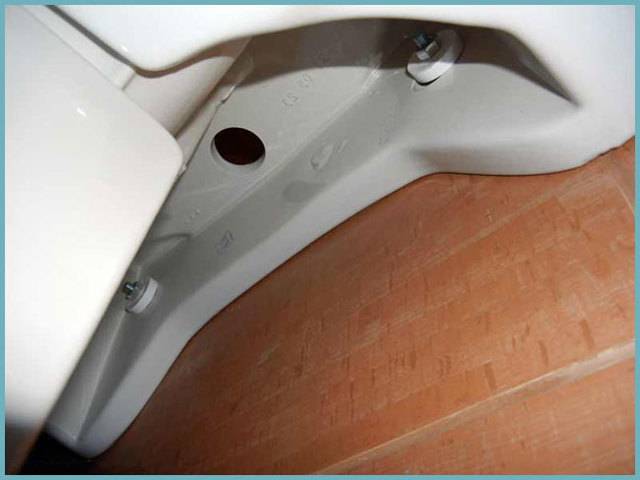
Regardless of whether the sink is completely recessed into the cabinet, or it will partially rise above the surface, the drain fittings will still be located inside the cabinet.
If you plan to mount a built-in sink, be prepared for the fact that you will need to perform the perfect processing of all joints
L-shaped fasteners are used to carry out the tie-in from below, and the fixation is performed to the base of the support.
Marking the installation site
To simplify the marking of the countertop for the installation of a recessed sink, the use of a template will help. Many leading manufacturers include it in the kit with most built-in models.
When determining a place for installing a washbasin, two conditions are guided:
- The sink should not be on the very edge or right up against the wall.
- It should provide free access and ease of use.
The point of creating the correct markup is that the washbasin is firmly fixed in the countertop, but at the same time does not fall through the hole in it.
For lack of a template, the shell is turned upside down and applied to the surface. Draw a contour with a simple pencil.
The line of the inner contour traditionally recedes to the center by 1.5-2 cm relative to the outer line; it serves as a guide when cutting a hole for the bowl
In order to correctly calculate the distance from the edges of the plumbing to the eyelets of the fasteners, measurements are taken and transferred to the circled contour. The resulting size determines the distance that should be retreated from the line in order to create an internal contour that acts as a support for the sides of the bowl.
Sawing and edging
The hole for installing the bowl is made using a jigsaw. If you have to work with a hacksaw, be prepared for the fact that you need to trim the edges.
When working with a hacksaw, in order to get a neat cut, first a hole is drilled in the region of the marking line inside the outlined contour.Its diameter should be such that the hacksaw blade fits freely.
Important! To minimize the risk of chips on the decorative surface of the countertop, sawing should be done slowly and without excessive effort. The end surfaces of the created hole are treated with fine-grained sandpaper or polished with a file.
The end surfaces of the created hole are treated with fine-grained sandpaper or polished with a file.
To avoid problems with leakage during operation of the equipment, the cleaned edges of the tabletop cut in 2-3 layers are covered with a sealing compound.
When choosing a sealant, it is important to focus on the type of material used in the manufacture of countertops. So for plastic and wood coatings, sealing impregnations based on alcohol are used.
Installing the bowl and connecting equipment
The bowl is installed in the countertop and deepened. To ensure a tight fit, the product is rotated slightly back and forth. After that, it remains only to tighten the installed fasteners and remove the silicone with a napkin, which is squeezed out when the bowl is seated in place. The assembled and fixed structure is left for a day until the adhesive composition dries completely.


To connect the equipment, a mixer is installed in the hole, connected to the hoses and fixed with fasteners. The outlet of the siphon is brought into the sink, a pipe is attached to it, which is led out into the sewer socket.
In general, the technology for connecting the faucet and siphon of the built-in sink is almost identical to that described when installing the console model.
The specifics of assembling a complex from a countertop and a countertop sink are given here, we recommend that you familiarize yourself with a very useful material.
Important "little things" to pay attention to
Ideally, all the necessary fasteners are in the repair kit that comes with the product. But this must be checked when buying a plumbing product. If the manufacturer did not provide fasteners or their quality does not satisfy, then it is better to purchase them in advance.
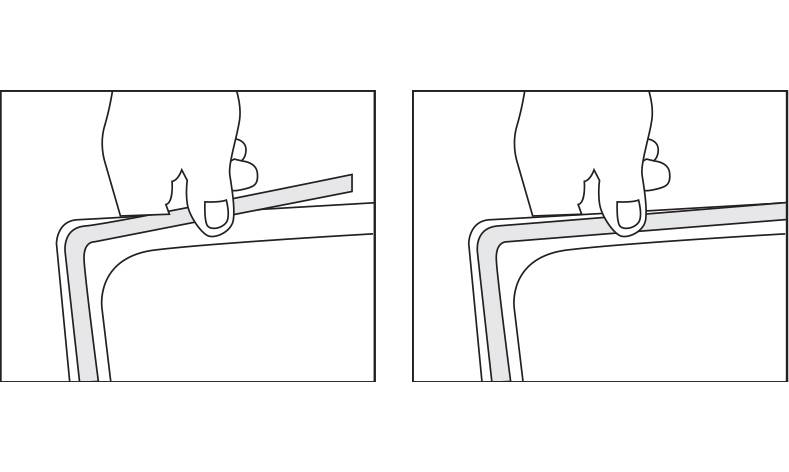
To prevent moisture from entering the gap between the wall and the sink, the latter is sealed with silicone. After completing the installation work, the tightness of the drain section of the system must be checked using the volume of water that filled the siphon. If a leak is detected, the threaded connections are tightened more tightly, insulated additionally with a sealant.
The installation of the sink is carried out after finishing work is completed.
In this case, special attention is paid to the execution of mounting holes. Fixing plumbing equipment to the wall only pays off when the wall surface is strong and reliable.
Otherwise, a supporting frame should be provided.
Fixing plumbing equipment to the wall only pays off when the wall surface is strong and reliable. Otherwise, a supporting frame should be provided.
The water supply to the bowl and the siphon can be closed with a cabinet or cabinet, which is also a place to store toiletries. An increase in free space under the sink can be achieved using a flat siphon. The correct installation of the bowl is evidenced by its stable state without staggering and moving.
Skillfully executed installation of the sink guarantees not only its constant functionality, but also extends its service life. Therefore, before starting installation, ask the advice of an experienced plumber.
Mounting a sink without brackets
The mounting kit must be included with the sink upon purchase, if for some reason it is not available or the quality leaves much to be desired, purchase such a kit separately. Focus on products of well-known brands, so as not to worry about the quality of installation later.
Decide on the place where the sink will be installed, and take measurements. It is usually recommended to install the bowl at a height of 70 - 85 cm from the floor.
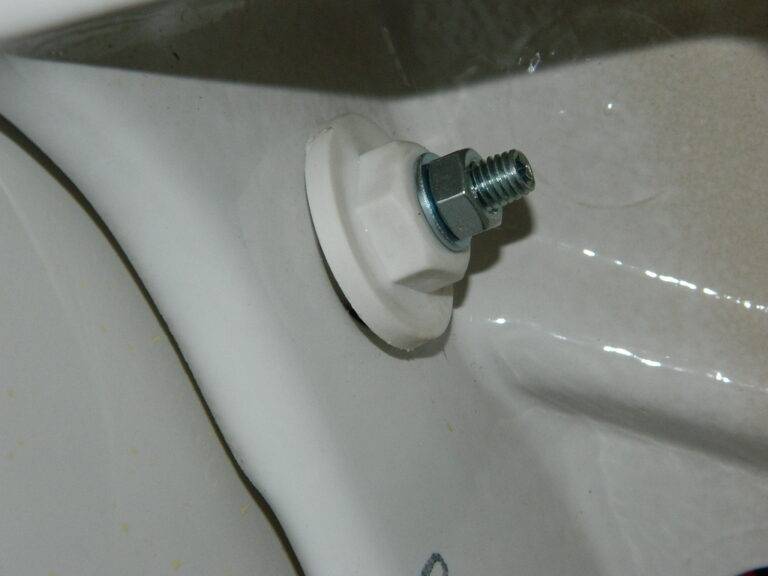
At the selected height, draw a horizontal line along the building level. Now we attach the upper edge of the bowl to the postponed line and mark the attachment points. We drill holes according to the marks and insert the dowels. We screw the studs into the dowels. The screwed-in stud should be 2 cm longer than the width of the washbasin. After the final installation, we tighten the nuts until they stop.
Types of shells
Unlike kitchen sinks, bathroom sinks come in a much wider range.
In order to choose the right accessory, you need to pay attention to the following characteristics:
- type of instalation;
- shape and size;
- manufacturing material.
Types of bathroom sinks by installation method
According to the installation method, sinks are divided into the following types:
-
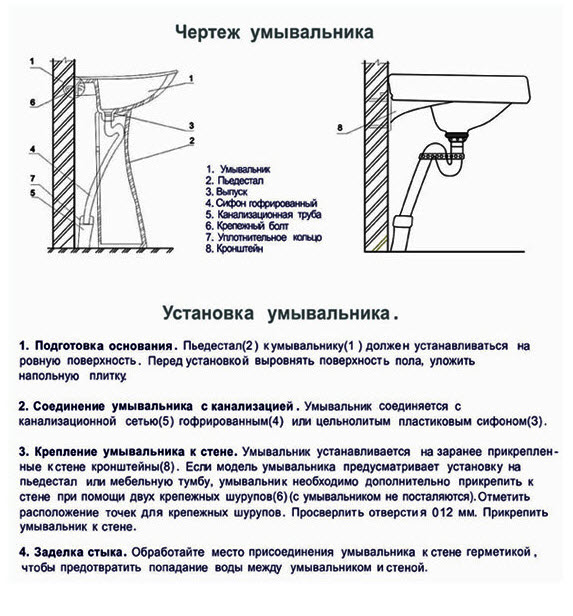
With a pedestal In the people, this design is also called a tulip. Its main feature is the presence of a leg or pedestal. This solution allows you to hide the siphon and water pipes, and also provides a reliable support for the bowl.These structures have a predetermined height, usually 70-80 cm, and in the case when it is not enough, you will have to additionally make a stand or pedestal. It is not possible to reduce the height of the pedestal.
-
Overhead. Such models are installed on the countertop and protrude above it at a distance not exceeding 10 cm. After installing the overhead sink, it seems that it is a separate object. Such designs do not have holes for installing a mixer, so the faucet is mounted on a countertop. For ease of use, the height of the countertop should be no more than 85 cm.
-
Mortise. Such a sink crashes into the countertop, this can be done both from below and from above. When inserting from below, plumbing is flush with the countertop, which greatly simplifies the removal of water that has fallen on it. When installing the sink on top of the countertop, it protrudes a few centimeters above it. The faucet can be installed both in the hole on the sink and on the countertop.
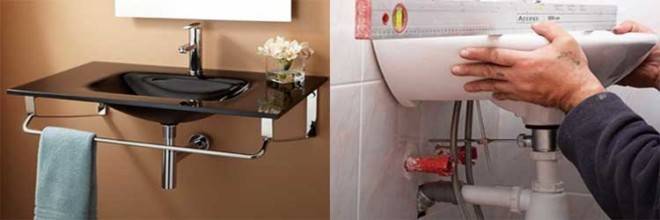
-
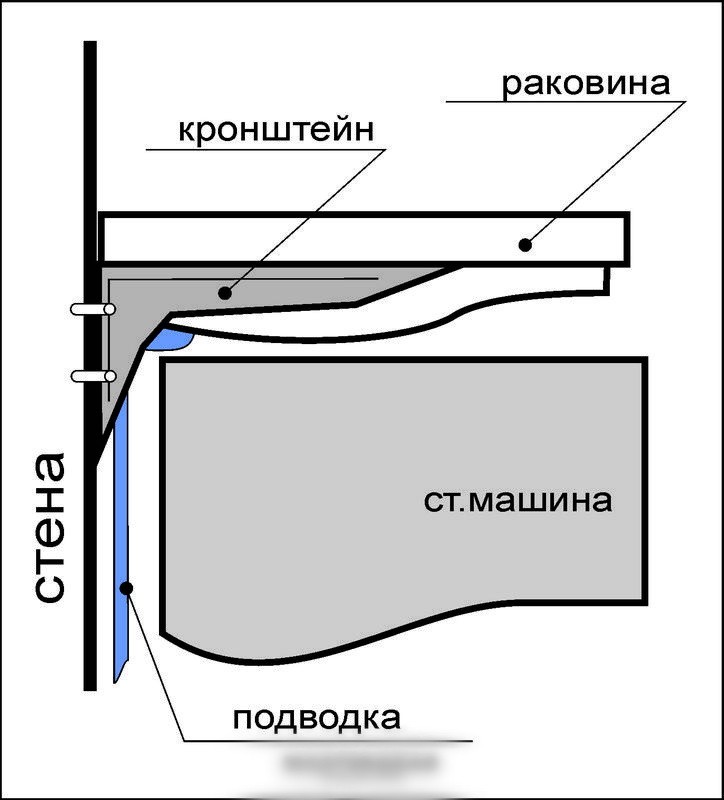
With wall mount. This design is also called console. There is no need to install a cabinet or countertop, as the sink is fixed directly on the wall using special fasteners. There are models of sinks with wide wings that allow you to imitate a countertop. The faucet can be installed both on the sink itself and on the wall. The main disadvantage of such models is that the connection to the plumbing and sewer system remains in sight. The advantage is the release of free space, and this is an important point for small spaces. Under flat models, you can install a washing machine.
-
Furniture. Typically, these models come with bathroom furniture.They can be mounted on a separate countertop, but most often furniture sinks are installed on a stand or bedside table that matches their size.
Shape and size
One of the main parameters that you need to pay attention to when choosing a bathroom sink is its size. Only a properly sized washbasin will ensure its comfortable use and will not take up a lot of free space.
For small rooms, sinks 50–65 cm long and 40 cm wide are usually chosen. If you have a large room, you can install models up to 75 cm long or a double sink, in which case two people can wash at the same time.


Having decided on the size of the sink, you can proceed to the choice of its shape. Sinks are:
- round;
- oval;
- rectangular or square;
- complex shape.
Production material
In the manufacture of bathroom sinks, a variety of materials are used:
-
ceramics are the most common products. Porcelain is more expensive and of high quality, sanitary faience is simpler and cheaper;
-
natural or artificial marble. Although natural marble is a more expensive material, the presence of pores in it requires more careful maintenance. Sinks made of artificial marble outwardly practically do not differ from those made of natural stone, but they are cheaper. In addition, they have a smoother surface, which greatly facilitates maintenance;
-
Corian is a composite material, which includes acrylic resins and mineral filler, and with the help of a pigment, any color can be applied.Since this material is easy to process, shells of any shape can be made from it. Such models have a smooth surface, so they are easy to care for;
-
glass. Glass sinks, although they are expensive, look very beautiful. For their manufacture, special glass is used, so their strength is high. The disadvantage of such models is that traces of water are visible on them, so you need to take care of them more carefully;
-
Stainless steel. Such sinks have a long service life, high strength and hygiene. The disadvantage is that when hit by a jet of water, a lot of noise is created. Care must be taken of metal models carefully so as not to scratch their surface.
Features of work depending on the model
The types of fastening for the sink to the wall are very different depending on the modifications of the fixture:
For suspended mounting is carried out directly to the wall, so gravity is directed not only to the mount itself, but also to the wall
Therefore, it is very important that the base is strong and thick. Usually there are no problems with this if the installation is carried out in the place allotted by the builders.
Hanging sink
Mounting on a pedestal called "Tulip" holds the sink in the bathroom with a support ("legs") that hides the plumbing and sewer communications
In this version, brackets are not used at all.
Sink "Tulip"
A bowl with a supporting pedestal (built-in models) is one of the most reliable ways to fix plumbing. The support in this case falls on a strong stable furniture structure.
Sink built into countertop
The Tulip model will look good in a spacious bathroom.During installation, polymer gaskets are installed between the planes of the sink, floor and wall, gluing them to the silicone sealant
This technique prevents the appearance of squeaks and the ringing of ceramics during careless impact. Another important point is that the fastening and pulling up to the wall of the bowl should in no case cause it to be raised on its “leg” in order to avoid splitting
Preparatory work
The bathroom sink has been purchased, the necessary tools are ready, it remains to install the structure correctly. To do this, it is necessary to prepare a wall on which the fixtures for the washbasin will be mounted, and make markings so that the bowl is located at a height convenient for all households.
Fasteners for the sink to the wall must be installed after careful preparation of the surface. It is best if it has passed the finishing (textured plaster, tile or any other finishing material for the bathroom). If the wall is simply plastered, it must be treated with an antiseptic. There are many varieties of them in different price categories.
It is more convenient and easier to use liquid glass. It will perfectly protect the surface from water and at the same time destroy possible bacteria and fungi. After processing, you need to wait a while until the surface is completely dry, then paint and proceed with the installation of the sink.

- Shut off cold and hot water.
- Stand up to your full height in front of the installation site of the future sink.
- Choose the upper limit of the installation of the bowl so that it is convenient for all households to reach the sink.
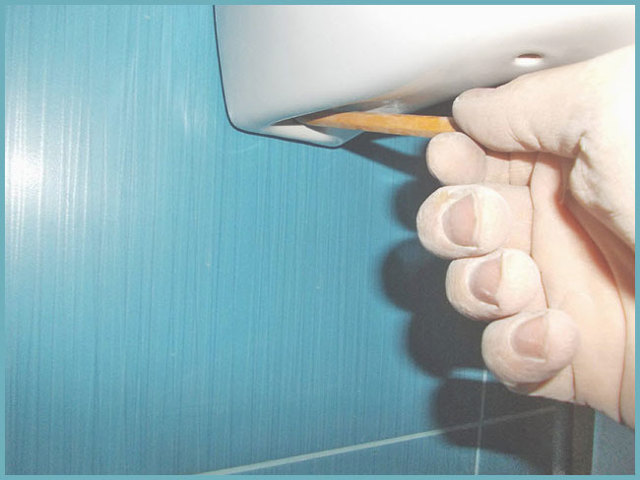
- At the marked place, using a long ruler, a pencil and a level, draw a horizontal line along which the main work will be carried out.
- Specify the dimensions of the sides of the bowl (measure it).
- Fix the size with marks on both sides.
- Connect the marks with a horizontal line, thus obtaining the installation height of the sink brackets.
- Flip the bowl over and place it against the wall. Mark where the slots for the brackets are.
Conclusions and useful video on the topic
Much during the installation process depends on the model of the plumbing fixture for the bathroom. To find out the details, we suggest getting to know the different solutions closer.
Video #1 Installation of a block of suspended structures - sinks, cabinets and cabinets:
Video #2. Step-by-step instructions for mounting the front model:


The work on installing the sink in the bathroom is classified as easy, so you can do it yourself. Simplifies the process and the fact that you do not need a special tool, a traditional home kit is enough.
Once you attach the sink to the wall, install the faucet and the water seal, you will be able to independently repair or replace equipment in the future.
Please write comments, post photos, ask questions in the block below. Tell us about how you bought and installed a sink in your own bathroom. It is possible that in your arsenal there are technological subtleties that will be useful to site visitors.