- Types of facade dowels
- Ties with a platform
- Dowel clamp
- What is important to consider
- How to fix the dowel in the wall?
- Plastic dowels
- Tips and tricks from experienced builders
- The process of driving a dowel
- How to remove an anchor
- If the bolt is rusted
- If the bolt is broken or its slot is torn off
- If the sleeve is installed incorrectly
- What is the difference between a concrete dowel and a brick dowel
- How to remove an anchor
- If the bolt is rusted
- If the bolt is broken or its slot is torn off
- If the sleeve is installed incorrectly
- Dowel selection
- Features of mounting the dowel in the wall
- Radical Methods
- Gluing plasterboard
- Surface preparation
- Drywall installation
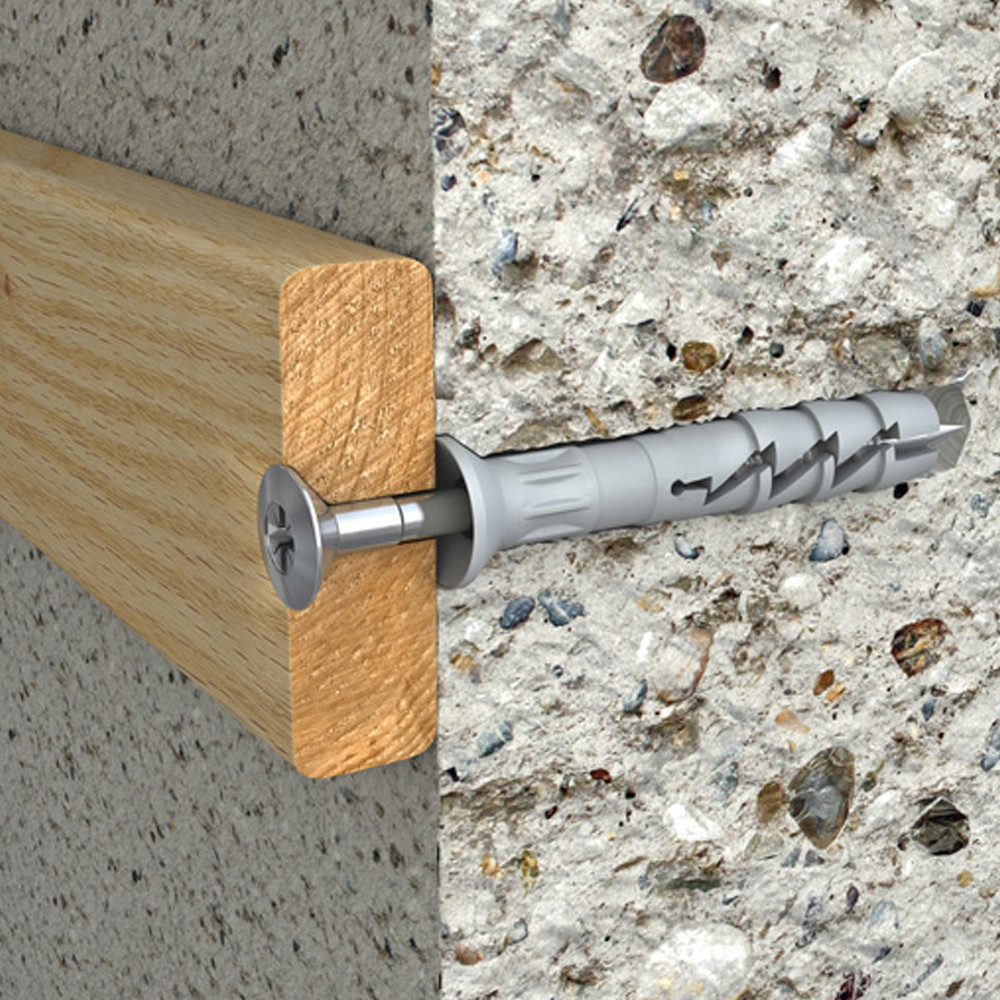
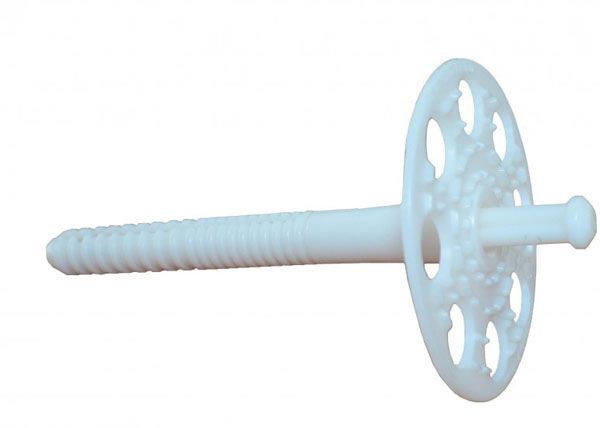
Types of facade dowels
Facade fasteners are usually divided into two types - these are dish-shaped and anchor. The latter, as a rule, are used for mounting various brackets. And for facade cladding, it is most preferable to purchase dowels with a wide hat, since they most reliably fix various materials, including heat-insulating ones. This type of fastener has several different names. Facade dowel, dish-shaped or mushroom dowel - it can be called differently, but a professional builder will immediately understand what it is about. Such plate-shaped dowels differ depending on the materials of manufacture.
Facade dowels
Table. Types of dish-shaped facade dowels.
| View | Description |
|
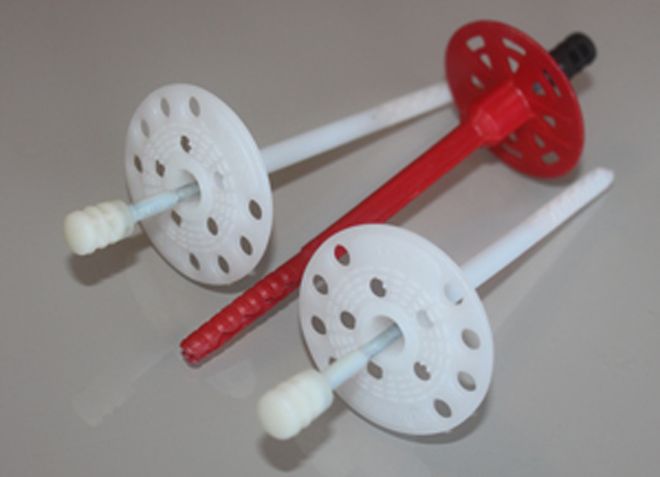
Polymer | The material used for manufacturing is nylon, polypropylene or cross-linked polypropylene with frost-resistant properties. At the same time, nylon is considered one of the highest quality and durable materials. Such a dowel will serve for a very long time. The spacer is made of two materials - either fiberglass or basalt plastic. |
|
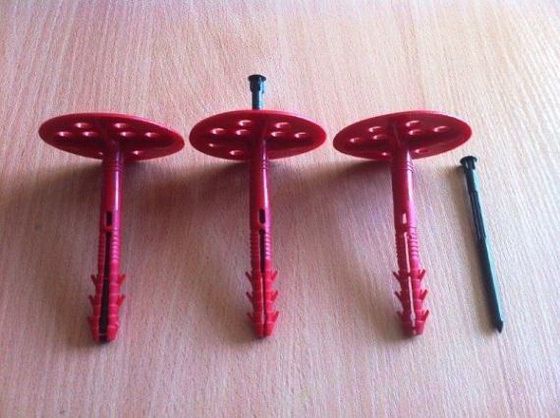
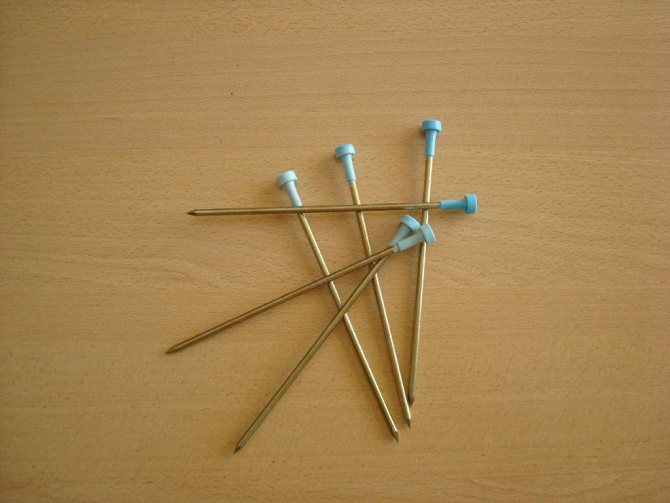
With metal nail | This type of dowel uses an uncoated metal nail. It is applied to installation of heat-insulating materials of high density. |
Advantages of using polymer fasteners:
- small mass, due to which the wall does not receive additional load. This is especially true in relation to building materials such as aerated concrete, foam concrete;
- fasteners are not afraid of moisture - such a dowel cannot be damaged by corrosion;
- flexibility and elasticity, due to which the dowel perfectly fixes the insulation and other facade materials;
- “cold bridges” do not appear - the walls in the attachment points will not freeze through during severe frosts;
- low price.
This dowel has many advantages.
Advantages of dowels with a nail:
- the most durable;
- perfectly able to hold very dense and heavy materials;
- dowels with a thermal head are not subject to corrosion.
The main disadvantage of metal dowels is their thermal conductivity. In winter, they will create "cold bridges", because of which the walls will freeze through more, and a gap will appear in the thermal insulation system. To prevent this from happening, a special thermal head is made of polymeric materials for such dowels. It will protect the facades from moisture penetration, and the house from heat loss.Usually, for the manufacture of such a head, impact-resistant glass-filled polyamide is used, which has a minimum thermal conductivity.

Dowel with thermal head
Ties with a platform
It is a dowel with a thread and a platform (square or rectangular), to which a coupler is attached. These fasteners (KSP) are convenient for quick installation. Made from non-flammable plastic.
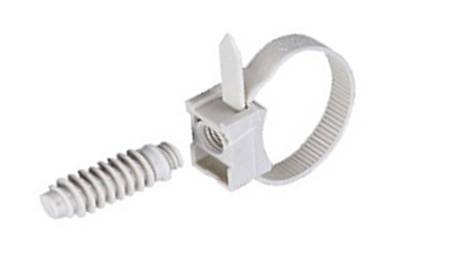
KSP - screed with mounting platform for dowel
Initially, a dowel is installed, on which a platform with a screed is wound. After that, the wires are attached. Installation is suitable for wooden, brick and concrete walls and ceilings. With the help of such platforms, several cables can be attached at once.
Dowel clamp
Used for quick fastening of one cable. The clamp is very easy to install. A puncher (if the wall is concrete) drills a hole of the required length and diameter. After that, the clamp is carefully opened, the cable is laid in it and the sharp end is thrust into the hole. The clamp will not fall out of it due to the double-sided notches on its sides.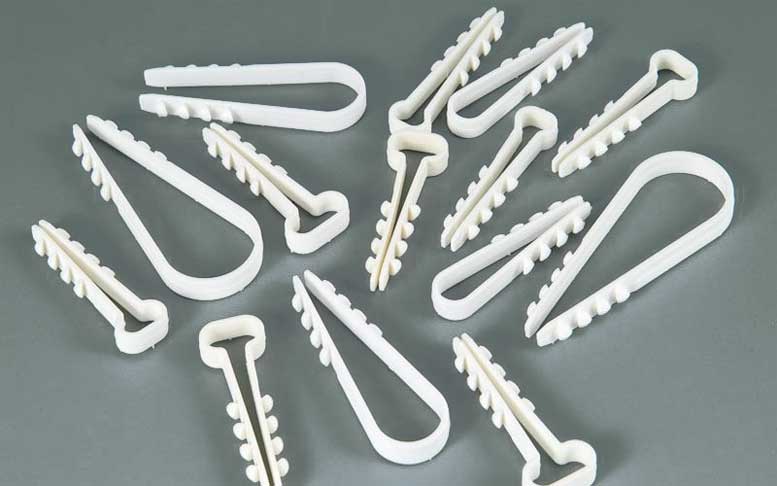
The shape of the clamp must match the cross-sectional shape of the cable. Basically it is either round or rectangular. These installation elements are low cost and reliable in fastening.


What is important to consider
It is very important, in the selection process, to correctly designate the sequence. To begin with, a dowel is selected
The larger it is, the greater the load it can withstand.
It is necessary to take into account the circumference and length of the product, both the self-tapping screw and the dowel.For small loads, a dowel with a circumference of 4 - 5 mm is used. 6 mm and 8 mm for medium, 10 mm and 12 mm for heavy loads, 14 mm and 16 mm for very heavy loads, for attaching scaffolding, etc.
You should also take into account the density of the material in which the dowel will be located. The stronger the material, the more load the dowel of the same size can withstand.
The strength of the material used, where the fastener is used, is always taken into account. The higher the seal, the greater the load the fastener can withstand. Two elements inserted into the concrete surface are able to withstand a significant load, despite their small size. After selecting the dowel of the required size, a self-tapping screw is selected for it. When choosing a self-tapping screw, it is desirable to rely on several criteria:
• The thickness of the self-tapping screw must be so that it is not loose inside the dowel and is tightly fixed. It takes a little bit of force to screw it in until it's installed.
• The length of the self-tapping screw must be similar in length to the dowel, or exaggerate by 5 millimeters, but no more. When attaching any thing to the wall, use a longer length.
• It is difficult to determine the carving because of their diversity. During a mismatch between two elements according to the type of thread, there is a possibility that the latter will fall out or not be screwed in at all.
How to fix the dowel in the wall?
What are the ways to fix the dowel in a "bad" wall?
There are modern materials that will help strengthen the dowel in a “bad” wall, for example, the same plaster bandage, the dowel is wrapped around, then soaked in water and into the wall, after hardening it will hold. I will dwell on the "grandfather's" methods, they really work.I often come across, in my work, rolled walls that are plastered with a lime mixture, there is practically no cement there and therefore the walls are extremely loose
If you need to fix something quickly and there is no time to wait until the same “liquid nails” or another mixture hardens, I take a drill for a diameter, two less, for example, a dowel for eight, I drill with a six, but with a victorious tip, the tip is larger than the drill and the hole is obtained slightly larger, it is important to drill without a puncher (without impact), such walls are easy to drill with a conventional drill, after which a dowel of the desired diameter fits well and tightly into such a hole (in our case, 8). The second option: everything is the same, but we take the dowel with a “skirt” limiter, this will not allow the dowel to go into the wall
Another “trick”, if everything is completely bad, then feel free to drive in a wooden chop, do not believe those who say that the tree is short-lived, I worked in “Stalinist” houses, everything is on such chops, it has been holding on for seventy years and the same amount will sag. And finally, if there is time, then drill a hole, liquid nails, or “hot” glue, plus a dowel, screws the next day.
There are a few little tricks when installing the dowel into the wall for better fixing.
Rule number 1 - Never be too lazy to clean the hole where the dowel will be installed from foreign debris and drilling flour.
Rule number 2 - Always check the depth of the hole for the dowel, it should be a little more than the dowel itself.
Rule #3 - The dowel itself should be hammered either flush with the wall or even slightly recessed so that the entire length of the dowel is involved in the clutch.
Rule number 4 - If the wall is made of fragile material, then the dowel must be dipped in some kind of solution or glue before installation for better adhesion to the material.
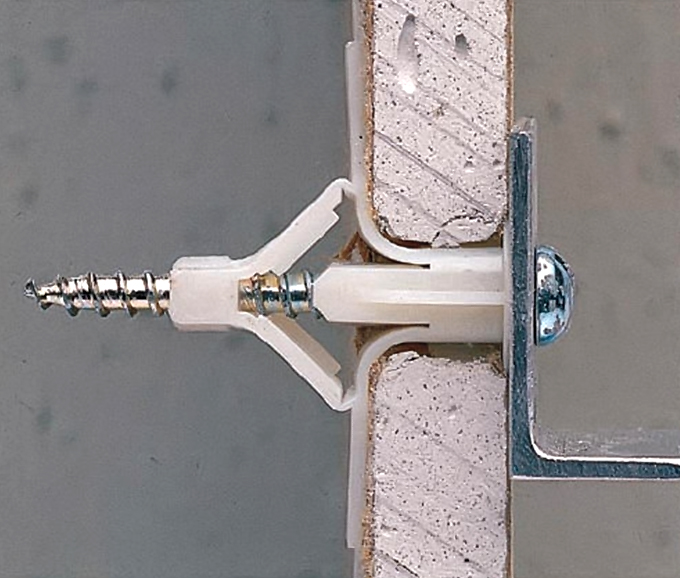
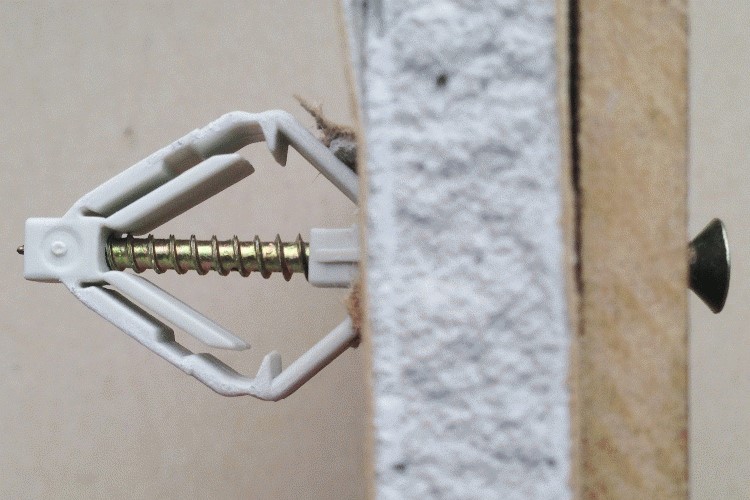
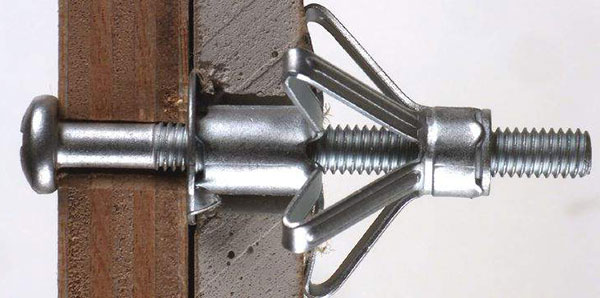
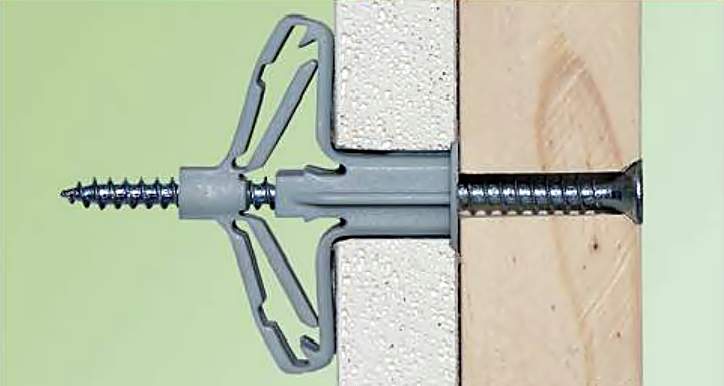
Rule number 5 - If during drilling you find voids there, then use the wire to study them, you may need to use a different type of dowel, for example, a butterfly dowel.
Rule number 6 - Drilling soft walls is necessary in the drilling mode, not the puncher, so as not to break the hole for the dowel.
Rule number 7 - Before drilling a hole, you need to mark it so that it does not “leave” to the side, for this, hit the point with a core.
Rule No. 8 - Drill the hole at a slight angle from top to bottom, this is especially true for those dowels that will hold heavy structures.
Rule #9 - Use only drills that match the diameter of the dowel and do not use old drills with a curvature or a damaged drill - the hole diameter may be wrong.
Rule number 10 - When installing the dowel, it should freely penetrate into the hole, do not apply much effort, it is best to remove the dowel and determine why it does not go further.
Rule #11 - Do not use those types of dowels that are not designed for certain materials of which the walls are made, choose the right one depending on the material of the wall.
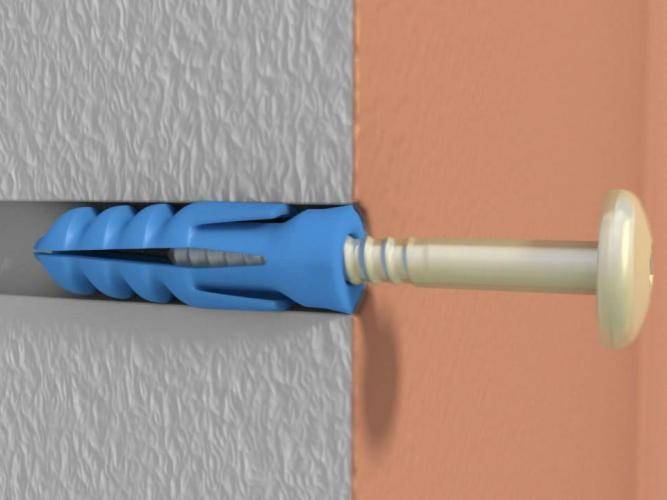
Plastic dowels
To get a plastic dowel, you may need certain tools, skills. But often the removal of such fasteners is easy and fast. Plastic dowels can be made from nylon, plastic, or other flexible materials. Produced with different profiles, any depth of spikes, can be made with a mustache that fixes the sleeve in the monolith.


The main ways to remove plastic dowels:
Driving into the wall - if the dowel sticks out strongly and it is not possible to pull it out, the element can be hammered. To do this, you will need a hammer and a core, putty and a spatula. The core is placed on a protruding mount, knocked with a hammer, and then the hole is sealed with putty.
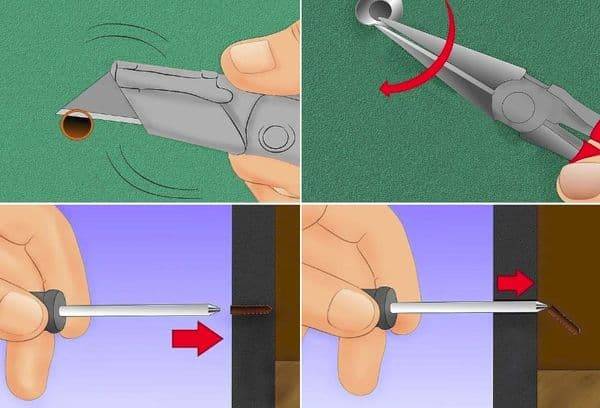
- Removing the dowel with pliers, wire cutters - for this you need to fix the tool on a plastic element, and then gently pull with force and at the same time loosen it.
- Melting with a soldering iron - there is also such a method for removing the dowel. Suitable for when the plastic element is broken. It is melted with a soldering iron, then removed or hammered into the wall monolith.
- Using a metal tube - find a suitable tube, stuff it onto a plastic rod and simply remove it.
- Screwing in a suitable self-tapping screw 2/3 of the length of the dowel, then pulling out sharply.
- With the use of a drill and a drill, equal in length to a dowel, several holes are made around the element with a drill, then the staggering rod is picked up with wire cutters / pliers and it remains only to easily remove it.
If you plan to pull out a plastic dowel from aerated concrete, then you need to dismantle it more carefully, since the monolith is very fragile and capricious, the fasteners for it are equipped with special blades running in a spiral
It is necessary to work with such a dowel carefully ..
Tips and tricks from experienced builders
Recommendations on how to fix the dowel part in the wall correctly:
- Pre-clean the funnel where the self-tapping screw will be inserted.
- The hole must be deeper than the length of the dowel.
- If the wall is fragile, moisten the plastic part of the fastener with glue before starting the installation.
- In the presence of voids in the wall, it is advisable to use fasteners of the butterfly type.
- It is advisable to drill the funnel at a slight angle, tilting the drill towards the floor.
- It is advisable to use new drills of the same diameter with the dowel.
- During installation, if complications arise, the fasteners are removed and the wire is checked to prevent it from entering deeper.
- Choose fasteners according to the type of wall.
The process of driving a dowel
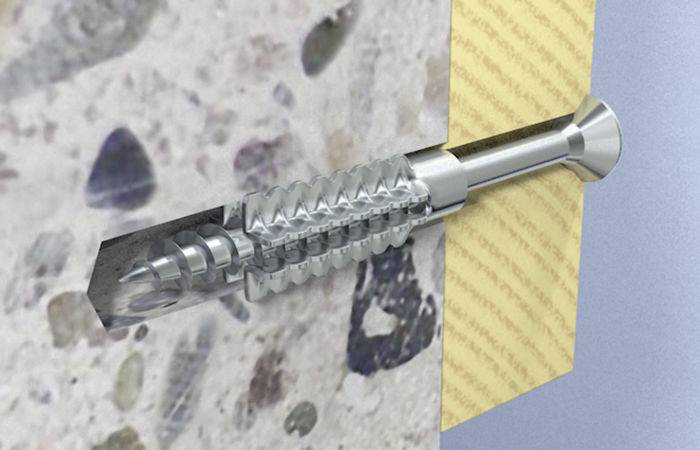
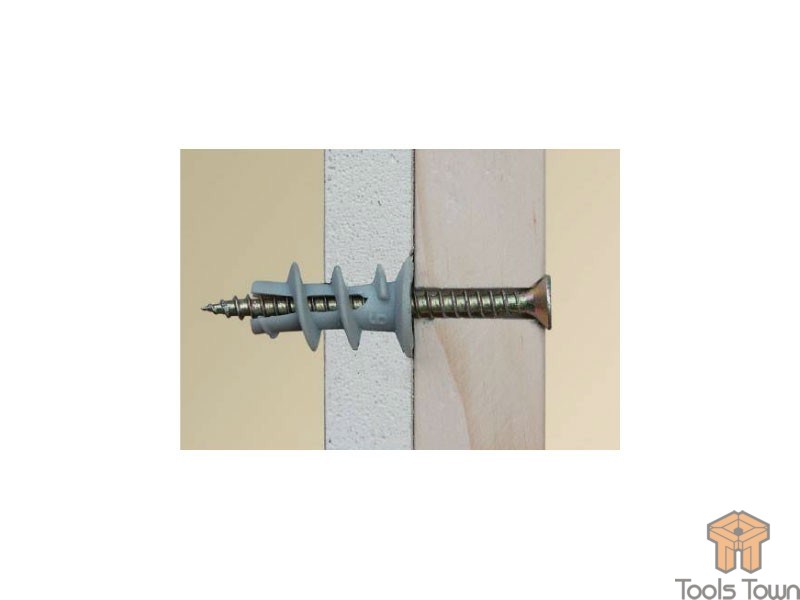
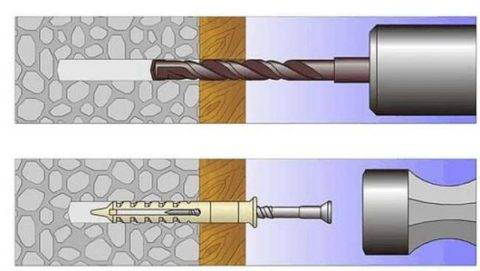
During construction and repair, a dowel with a self-tapping screw or a dowel-nail is most in demand, they can be fixed in different materials. In order to properly fix them in the wall, ensuring high-quality fastening, certain conditions must be observed. Only at first glance it seems that hammering dowels into the wall is very simple. In order not to damage the material, you must follow the rule that the dowel body should not protrude beyond the edge of the wall surface.
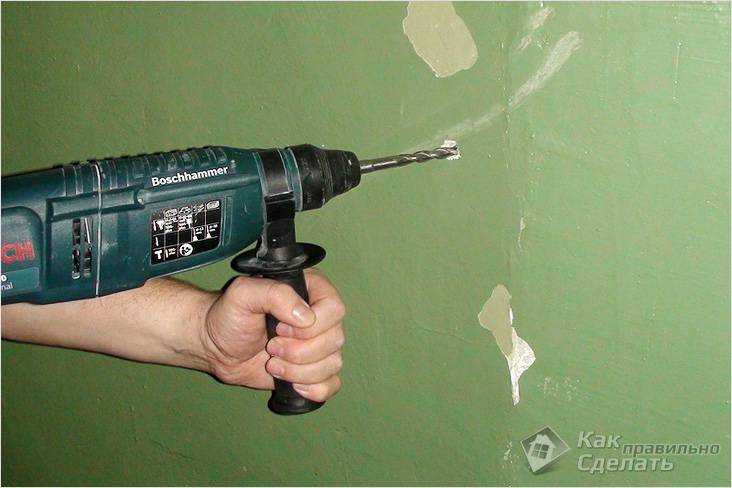 Drilling a hole
A hole is made in the wall with a perforator, while the diameter of the drill must match the size of the dowel sleeve in cross section
It is important that the depth of the hole is 0.5 cm more length dowel.
After the hole is made, it must be cleaned with a long improvised object. To get rid of dust, the hole can be blown with air or, for example, cleaned with a vacuum cleaner.
Then it is necessary to insert the dowel body into the hole and hammer it with a hammer until the edge of the part coincides with the surface of the wall.
After that, the self-tapping screw is screwed into the plastic base almost to the stop.
In the version with a nail, the latter is hammered. The core, after entering the body of the outer shell of the part, will have a bursting effect on the base in the hole, while it will be almost impossible to pull out the dowel.To install the dowel qualitatively, you must follow all the necessary rules.
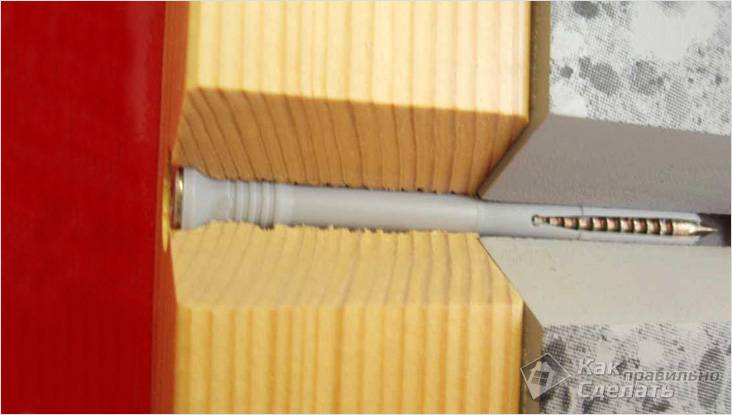 dowel in hole
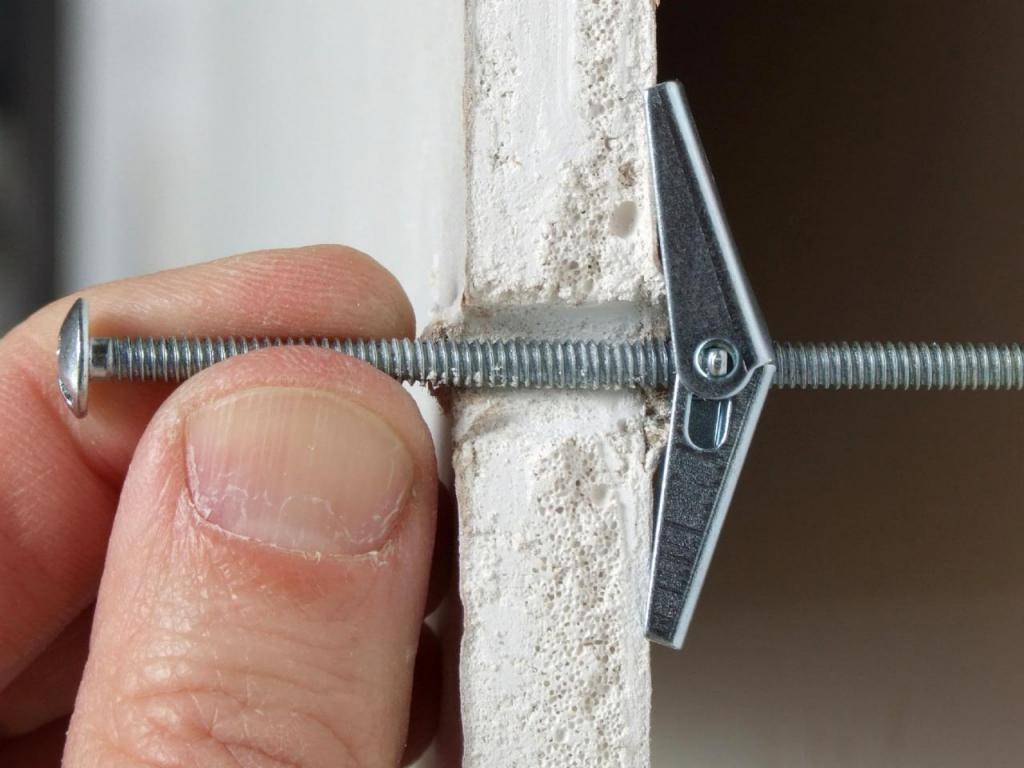
How to remove an anchor
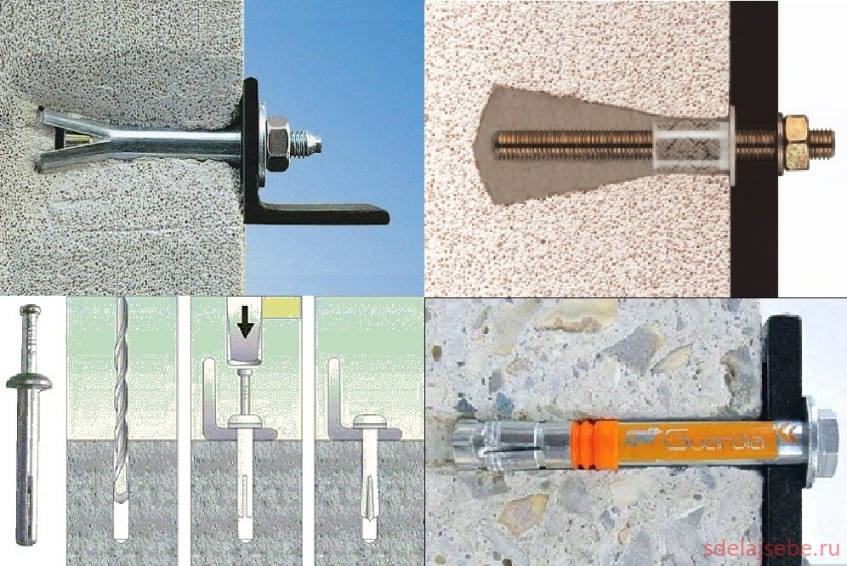
Usually, not a screw or bolt is inserted into the anchor, but a stud (the same bolt, only without a hat) or a hook. A bolt is screwed into the frame anchors, at the lower end of which the expanding element is held by means of a thread.
In the general case, the anchor is pulled out with pliers:
- Remove the nut.
- Hit the stud with a hammer and push it into the hole.
- Grab the sleeve with pliers and remove.
- Unscrew the bolt.
- Remove the anchor sleeve with pliers or pliers.
- Insert the bolt into the cleared hole and turn clockwise to fit the wedge onto the bolt.
- Remove both items.
If the bolt is rusted
If you can’t remove the bolt because it has oxidized, you should try to reanimate it. To do this, the parts are well moistened with a rust converter, kerosene or WD-40. Leave for the time indicated on the package, or longer (up to half a day). During this time, the oxides should go away. After cleaning the bolt, you need to try to remove the nut or unscrew the bolt.
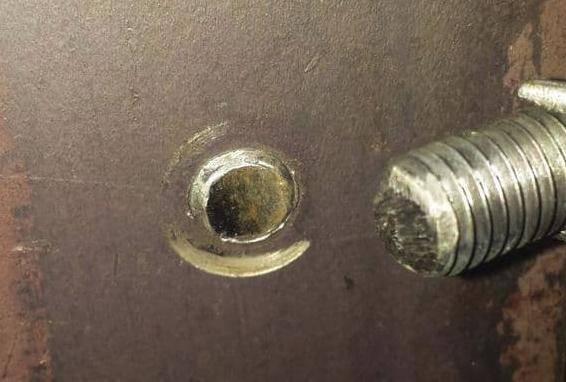
If the bolt is broken or its slot is torn off
If you turn a bolt, screw or screw too fast or with the wrong screwdriver, it is easy to strip its grooves. Less often, but it happens that the head is torn off completely or partially - in particular, when an unsuccessful attempt is made to pull out the frame anchor without removing the conical “anchor”.
To unscrew a broken self-tapping screw or bolt, it is drilled out and a chopik (extractor: left-handed wedge-shaped screw) is driven into it, fixed in a drill, screwdriver or pliers. Then the whole structure is rotated counterclockwise.


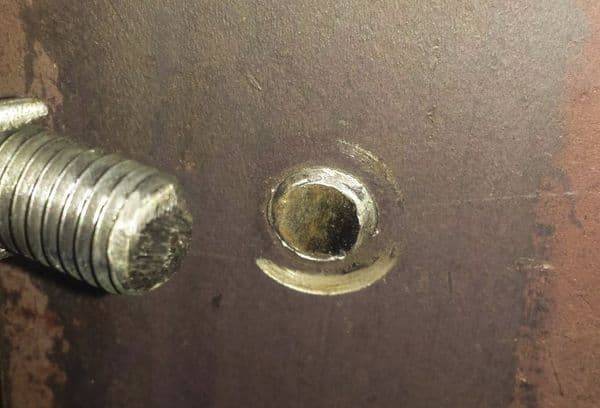
If the sleeve is installed incorrectly
The most common problem with anchor dowels is that they cannot be hooked over the edge with either pliers or even narrow-nose pliers. To avoid this, it is enough to install the anchor correctly: leaving at least 2 mm above the wall level. This length is enough to pick up the sleeve, but it is easily covered with plaster or any profile.
What to do if the sleeve cannot be hooked:
- Screw in a self-tapping screw between the sleeve and the stud and pull it out, grabbing the stud if possible.
- Remove or push the stud / bolt, drive a self-tapping screw or other tool between the wall and the sleeve, tearing and bending the edge of the anchor. After that, pull the resulting corner of the metal.
- Drill out the top layer of the wall around the dowel to release the edge of the sleeve.
In extreme cases, the anchor is cut with a circular saw and its parts are taken out separately.
As a rule, metal dowels and anchors are installed where their dismantling is not required, and the load will be significant. In some cases, it makes sense not to pull out the sleeve, but to hammer it deeper and close it with cement or other mortar or plastic / wooden chock. In any case, there are no unsolvable problems: the dowel or anchor is almost always removed, it is worth making patience and effort.
What is the difference between a concrete dowel and a brick dowel
High reliability of fastening obtained using dowel-type products will be achieved only if they are correctly selected not only taking into account their dimensions, but also the material of the structure in which they will be mounted.
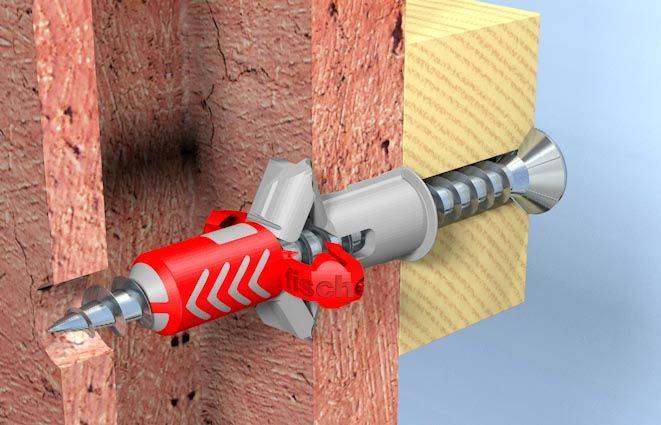
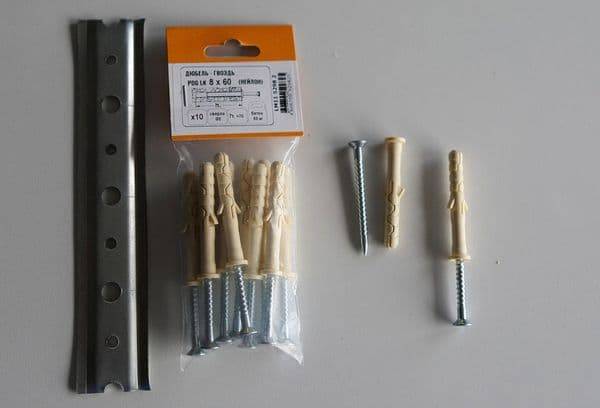
Experts do not recommend the use of a concrete dowel for installation in brick building structures.This recommendation is especially relevant when it comes to hollow bricks. In this case, special fasteners are used for installation, which differ from the usual dowel-nail both in the device and in the features of use.

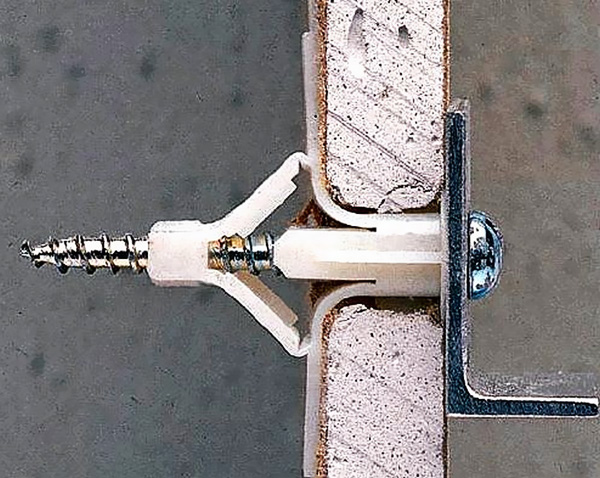
An elongated dowel for hollow bricks is distinguished by certain design features
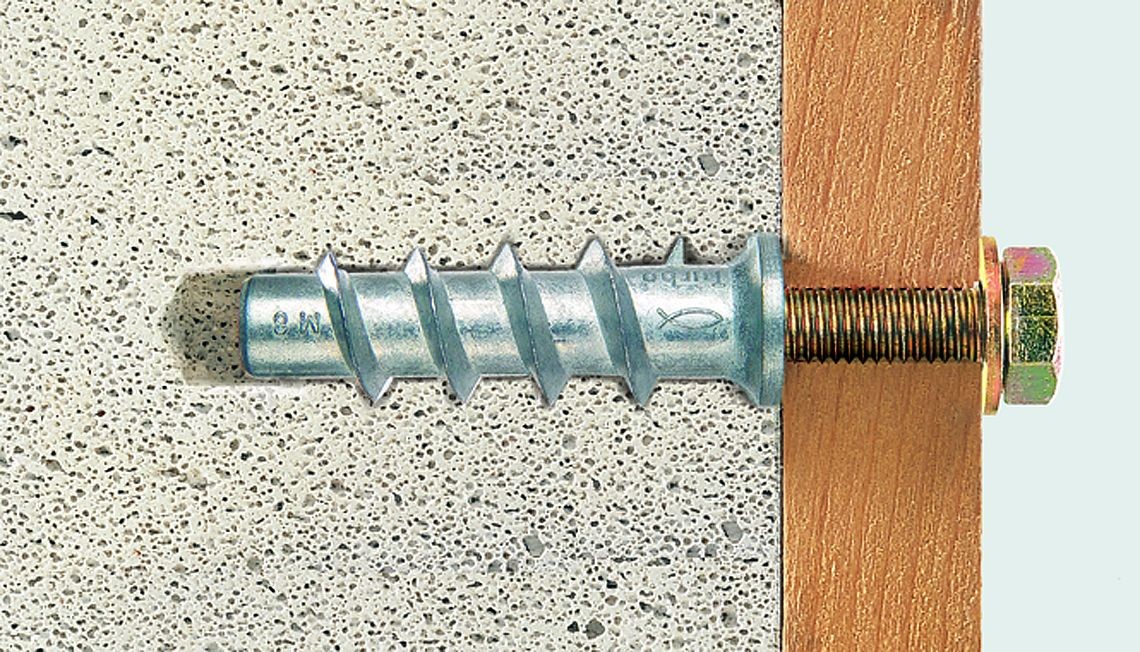
Fasteners for masonry have elongated dimensions and a double expansion mechanism. Like a dowel designed for concrete work, such a fastener can be plastic or metal. The reliability of fastening the dowel for bricks is ensured by the fact that at least one of its expansion elements does not fall into the cavity in the brickwork, but into its solid part, it is he who ensures the required fixation of the anchor in the wall or any other building structure. The expansion sleeve of the dowel is unclenched when a threaded stud or screw is screwed into it, the diameter of which must be selected correctly.

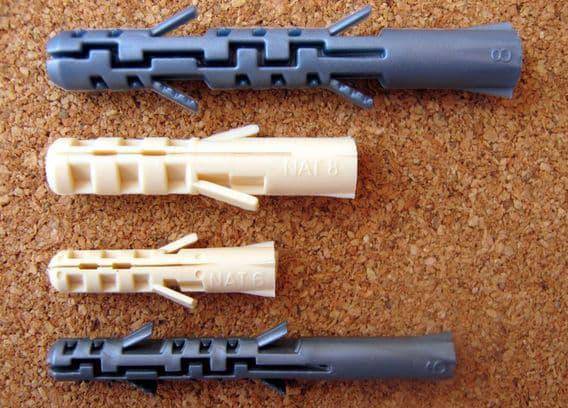
Some varieties of universal dowels (click to enlarge). It is simply impossible to show the entire numerous range
A dowel designed for concrete works on a completely different principle and can only be used for installation in solid solid materials. Such a dowel is hammered with an interference fit (which is why it is often called a nail) into a previously prepared hole. If you try to fix fasteners for concrete in a brick wall, in the internal structure of which there are many air cavities, then you can simply destroy the landing hole.Even if such a dowel is metal and has a considerable length, you still will not achieve its reliable fixation in a brick or in any other porous, hollow and not very strong material.
How to remove an anchor
Usually, not a bolt or screw is inserted into the anchor, but a stud (bolt without a hat) or a hook. A bolt is screwed into the frame-type anchor, and an expanding element is held on the thread at its lower end.
General scheme for removing the anchor:
- Nut removal.
- Hitting the pin with a hammer, pushing it inward into the hole.
- Capturing the sleeve with pliers, removing fasteners.
Removing the frame anchor: unscrewing the bolt, dismantling the anchor sleeve with pliers or pliers, inserting the bolt into the vacant hole, turning it clockwise (to fit the bolt or wedge), removing both elements.

If the bolt is rusted
In this case, it is worth trying to reanimate the bolt - lubricate it with a rust converter, WD-40 or kerosene. Then you can leave it for the time indicated in the instructions or longer (up to 12 hours) so that the oxides are gone. The bolt will be clean, you can try to remove the nut or unscrew the fasteners
Rusty elements must be handled very carefully so as not to break parts of the product.
If the bolt is broken or its slot is torn off
It happens that fasteners break due to screwing in too fast when using the wrong tools. In this case, special measures are needed - to unscrew the broken fastener, it must be drilled out, a chopstick fixed in a screwdriver, drill or pliers should be driven in. Then the entire structure is gently rotated in a counterclockwise direction.


Dowels for construction pistols cannot be drilled, as they are made of very strong (often hardened) steel and you can simply break the drill, injure yourself with fragments. Such fasteners are best knocked out or heated.
If the sleeve is installed incorrectly
The most common problem in working with anchor dowels is the inability to catch on their edge with pliers. The installation of the anchor must be done correctly: usually leave at least 2 millimeters above the wall level, which is enough to pick up the sleeve, along with the ability to easily close the fastener.
If it is not possible to engage the sleeve:
- It is necessary to screw a self-tapping screw between the sleeve and the stud, try to pull it out, catching on the stud if possible.
- Push or remove the bolt / stud, drive a self-tapping screw between the sleeve and the wall, bending or breaking the edge of the anchor. Next, you need to pull the formed corner of the metal.
- To release the edge of the sleeve, you can drill the top layer of the wall around the dowel.
- If nothing can be done at all, the anchor is cut with a circular saw and taken out in parts.
- You can not pull out the sleeve, but hammer it even deeper and mask it with concrete mortar or a wooden / plastic chock.
Usually the question of how to pull the dowel out is not worth it, because this type of fastener is used where it is not planned to dismantle. But situations are different and knowing how to do everything right is useful for every master.
Dowel selection
When purchasing various objects for fastening to a concrete wall, you should choose the right dowel for concrete, its approximate dimensions can be selected from the table:
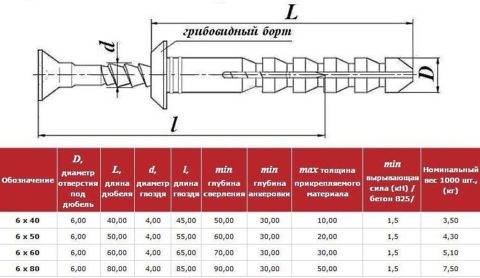 Table for determining the dimensions of the fastener from the type of load on it
Fasteners are selected depending on the type of place where it will be used.
Before driving a dowel into a concrete wall, the future load must be taken into account:
To fix structures of a large mass, for example, a Swedish wall or mounted simulators, it is best to use dowels with a fastening depth of at least 85 mm;
When fixing horizontally into a concrete wall, it is recommended to purchase fasteners with a fastening depth of at least 30 mm, and a dowel diameter on the outside of 7 - 11 mm;
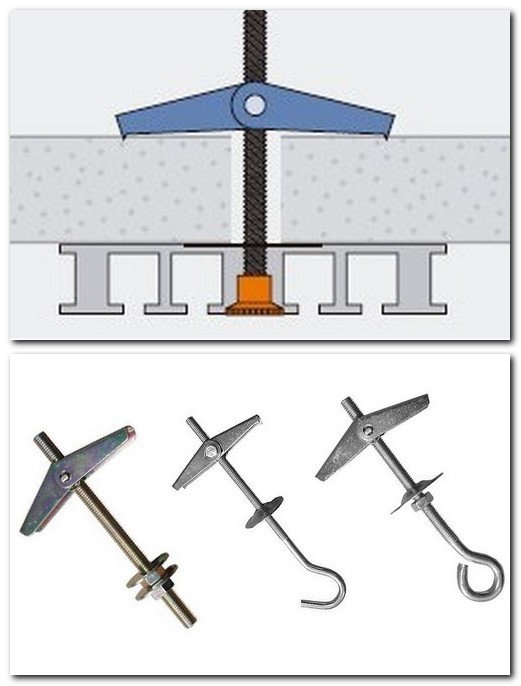
For the device of a false ceiling, lamps, where the main load is located from below, fasteners should be selected with expansion antennae and transverse notches;
When selecting dowels for an already drilled hole, it is important that the parameters of the fastener and the diameter of the hole match each other. In this case, the dowel for expanded clay concrete or other material must have a diameter not less than the size of the hole;
When using mounting fasteners, in order to prevent the destruction of weak walls, the dowel should serve as a softening gasket
In this case, the fastener fits snugly enough to the fastener, and the load is distributed evenly throughout the product.
Features of mounting the dowel in the wall
 Technology for installing dowels in a concrete wall
To do the work yourself, you need to purchase:
- Electric drill;
- Drill from Pobeda;
- Sharp nail;
- Dowel of the desired design;
- electrical tape;
- Small mallet.
After preparing all the tools, you can start installing the dowels.
Work instructions:
- The place of installation of fasteners is planned with a ballpoint pen or a simple pencil;
- A small indentation is made with a nail, hacksaw or pin. This will allow you to correctly set the drill when making a hole;
- If the number of dowels was calculated incorrectly, the product can be made by yourself. For this, wooden bars of the required length are taken. They are given rounded sections, with a thickening from above, and a decrease in diameter from top to bottom. After that, self-tapping screws are screwed into concrete without a dowel;
- A drill of the desired diameter is inserted into an electric drill;
- The drill is placed in the previously made recess. The drill is located strictly perpendicular to the surface;
- The resulting dust and cement chips are removed from the drilled hole. This can be done with a vacuum cleaner;
- The dowel is carefully inserted and hammered with a hammer, but not too hard, until it stops;
- A screw is screwed into the dowel, if it is included in the structure.
To properly hammer a dowel into the wall, you should get acquainted with the video in this article.
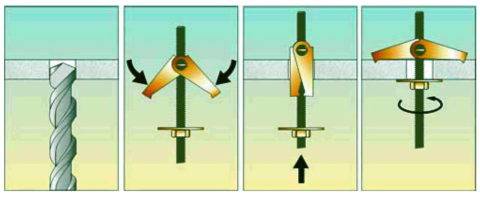 Installing the spring dowel
Radical Methods
To remove hard-to-remove dowels, you can use the following methods:
- drilling;
- dissolution by strong acids.
For drilling, you will need a powerful drill, which has protection against biting the drill. This is necessary to protect the hands of the worker, as the remains of fasteners can jam the tool and harm it. In order not to aggravate the damage, you need to act slowly. If the hole is not to be reused, then only the uppermost parts of the dowel can be removed, and the remaining damage can be plastered or painted over.
How to remove the dowel from the wall, when it is impossible not to remove it and the mandatory use of this particular hole is required? You can apply the most radical method. To do this, with a brush, apply a concentrated solution of sulfuric acid to the protruding parts of the dowel and leave for a while. Acid breaks the bonds of mortars, dissolves metal oxides, organic glue and paint


After such treatment, it is important to thoroughly wash off the remaining acid, as it has a toxic effect. You need to work in personal protective equipment (in a respirator) and in a well-ventilated area
Gluing plasterboard
For gluing plasterboard panels, compositions based on cement or plaster. Sometimes polyurethane mastic and polyurethane foam are used.
Surface preparation
The walls on which the plasterboard will be glued must be carefully prepared:
- remove a layer of old finish from them (wallpaper, paint, etc.);
- remove areas of peeling plaster to the base;
- clean the surface of loose plaster;
- remove dust, dirt, oil stains from the walls;
- clean the surface of the fungus;
- knock down significant protrusions and cut off elements sticking out of the wall (hooks, etc.);
- plaster cracks and deep depressions (as condensation can accumulate in them).
After repair, the walls are alternately treated with an antiseptic and a deep penetration primer.
The next step is marking the walls. It is carried out using a building level, a square and a tape measure. The ideal marking tool is a laser level, but not everyone has it.
What is this operation for? In most cases, the walls are not perfectly level.Firstly, after marking, the first sheet of drywall will be accurately glued, which will allow avoid installation errors the rest of the panels. Secondly, deformation gap marks are applied to the walls, the width of which should be:
- at the ceiling - 3-5 mm;
- at the floor - 8-10 mm;
- between GKL - 3-4 mm.
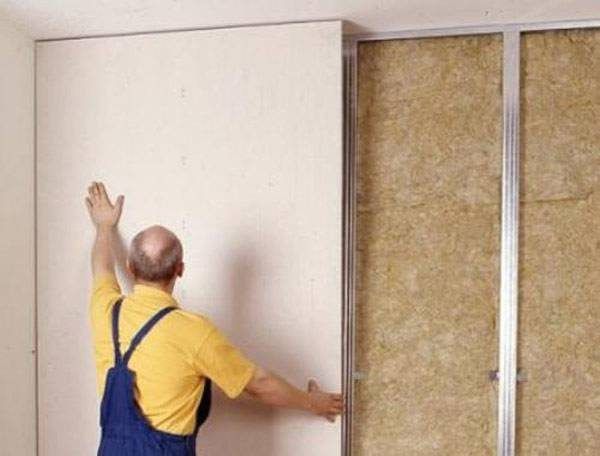
Before attaching drywall to a wall without profiles, sometimes a plane is built on it, screwing in dowel-nails in increments of 200-300 mm. This work is performed on surfaces with significant differences. The screwing depth of the dowel-nails is adjusted according to the level or tension of the thread. The fastener caps will become reference points for the plasterboard. In these areas, an adhesive mixture will need to be applied to the wall. In addition, the adhesive composition is applied to drywall panels.
Drywall installation
Relatively flat surfaces include concrete and plastered walls. For gluing GKL to them, any adhesive is suitable, including polyurethane foam. Glue is applied dotted along the edges of the sheet and in its central part. The diameter of the adhesive “cakes” is about 150 mm.
Before gluing the GKL to the wall, pieces of plywood, tiles, etc. are placed on the floor. Drywall boards will rest on them until the glue dries. After that, the linings can be removed: the necessary deformation gap will remain between the panel and the floor.
Drywall is pressed tightly to the surface, tapping lightly so that the adhesive mass spreads over it. The correct installation of the GKL is checked by applying a level to it. The next sheet is glued, departing from the first by a few millimeters.
The edges of the latter are treated with a drywall planer or a construction knife before installation. Subsequently, the gaps will be easier to fill with putty.
Mounting foam on the panel and the walls are applied in a zigzag pattern or in lines. Polyurethane-based mastic is placed on the GKL along the perimeter of the slab. In addition, the adhesive composition is applied to the sheet in lines every 150-200 mm.


