- Seam sealing and sealing
- The most common joint materials
- Mounting foam
- How to close the gap between the bathroom and the wall
- Useful tips for sealing the space between the bathroom and the wall
- How to close the gap between the bathroom and the wall
- How to seal the junction of the bath and the wall
- Cement
- Mounting foam
- Silicone sealant
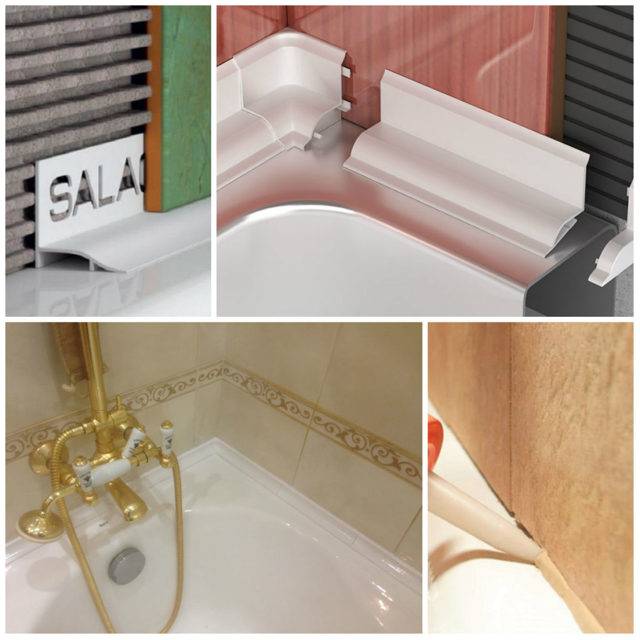
- Skirting boards, corners and borders made of plastic
- Acrylic bathroom sealants
- Bathroom Silicone Sealants
- plastic borders
- Causes of a gap between the bathroom and the wall
- Interim measures
- How to close the space between the bathroom and the wall
- Cement
- Mounting foam
- sealant
- plastic fillet
- border tape
- Plastic plinth or corner
- ceramic border
- Slit up to 10 mm
- Ceramic border adjacent to the wall
- Joint when installing a bath after wall cladding
Seam sealing and sealing
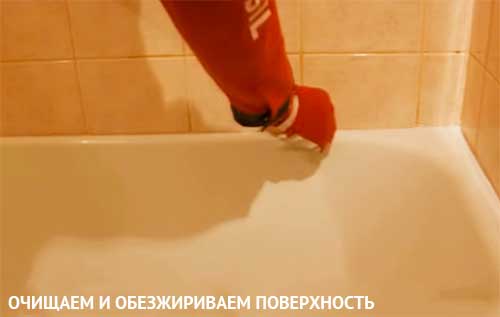
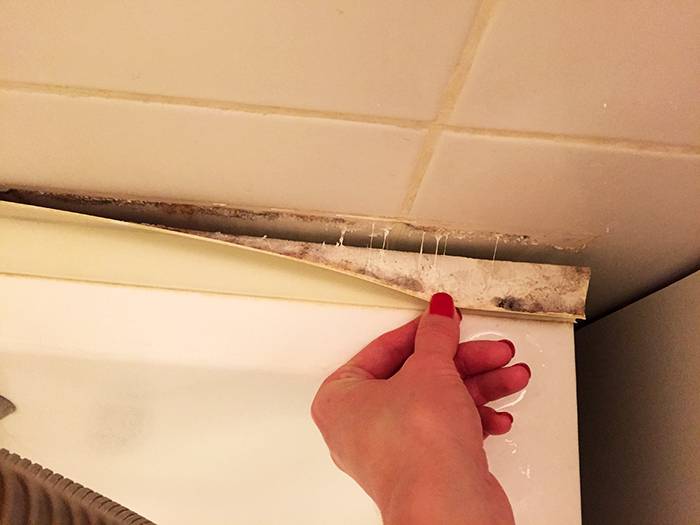
The side of the bathtub and the section of the wall along it must be cleaned of mechanical impurities, degreased with a suitable agent and dried well.
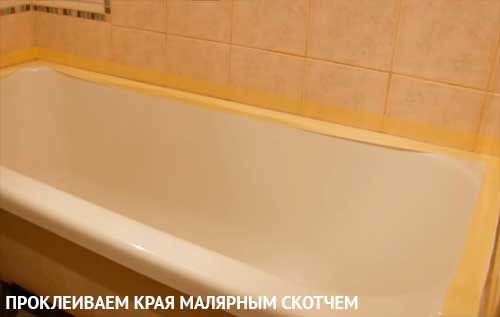
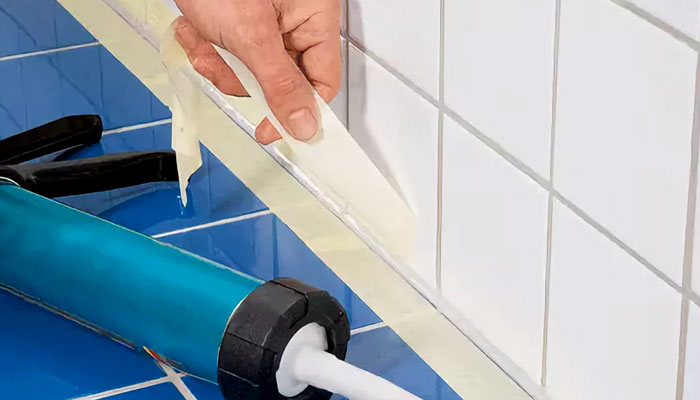
Then stick the masking tape on the edges of the bathtub and on the wall, starting from the mark to which the layer of mounting foam should reach
It is important that there is a little space left for a layer of sealant, which will have to fill the free space flush with the rim of the bath.
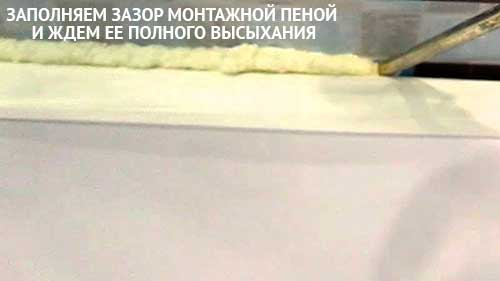
Tip: when working with mounting foam, it is recommended to use gloves, since this material is very difficult to remove from the skin. Masking tape will help protect the walls and bathtub from foam.
Apply the foam in small fragments - it expands approximately 30 times, filling the gap with itself. At room temperature, the mounting foam will take about 40 minutes to harden. Excess foam is cut off with a sharp blade. As a result, you should get a neatly sealed seam just below the rim of the bath.
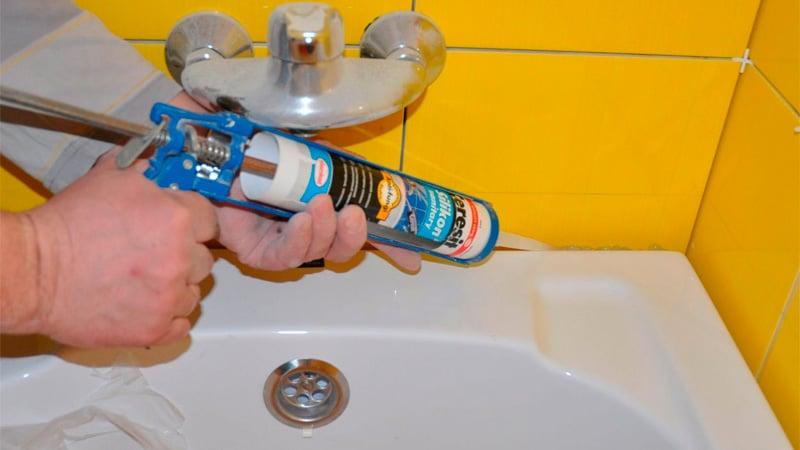
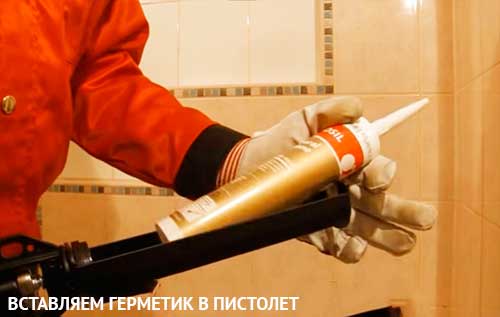
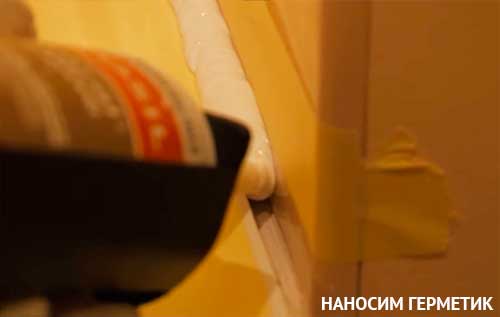
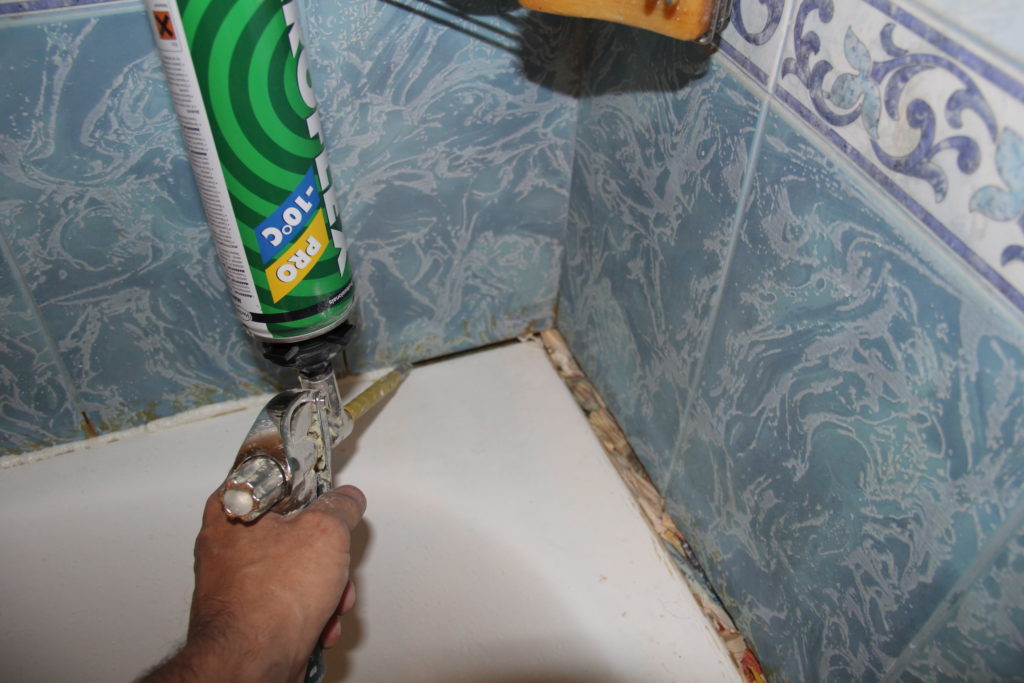
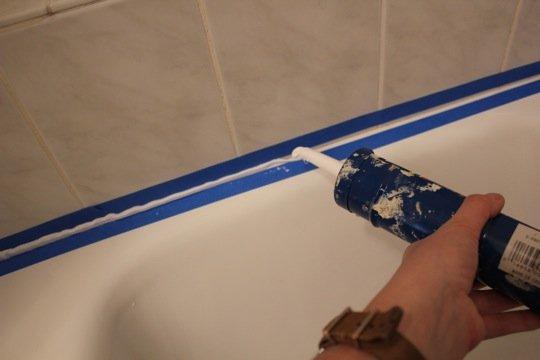
The next step is to apply a colorless or white silicone sealant. This material is packaged in cartridges or tubes and squeezed out of the container using a construction plunger gun.
Clean the edge of the bathtub and the section of the wall along the gap from dirt, degrease and dry. Insert the tube of sealant into the gun, remove the cap from the spout and cut off the spout at an angle with a sharp blade
It is important to note that the width of the strip when applying the material depends on the cut diameter. This parameter is selected independently - the tube spout is made in the shape of a cone, the cut is made at an angle
When applying sealant, it is important to take your time and act carefully. It is advisable to lay the silicone compound in a continuous tape
Then, using a spatula or spatula, the sealant is leveled - it must qualitatively fill the gap left under it. If there is no suitable tool, you can smooth the silicone material with a finger dipped in soapy water.


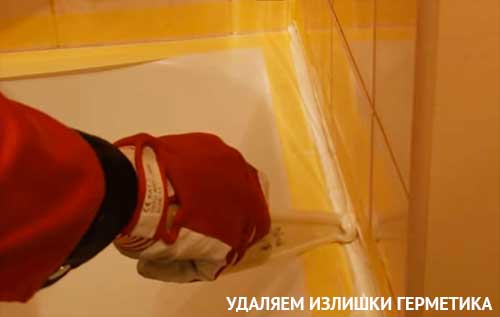
While the sealant has not hardened, its excess is removed with a damp cloth. Cured sealant can be trimmed with a sharp blade if necessary. After the material has dried, remove the masking tape. It takes about 12 hours for the silicone to cure.

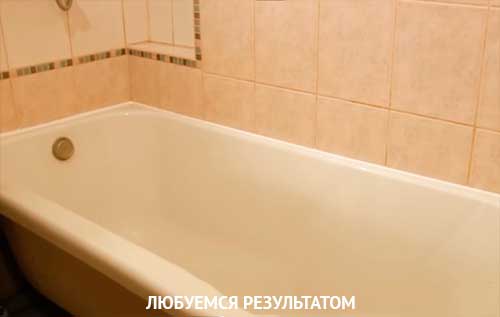
This work has been completed.
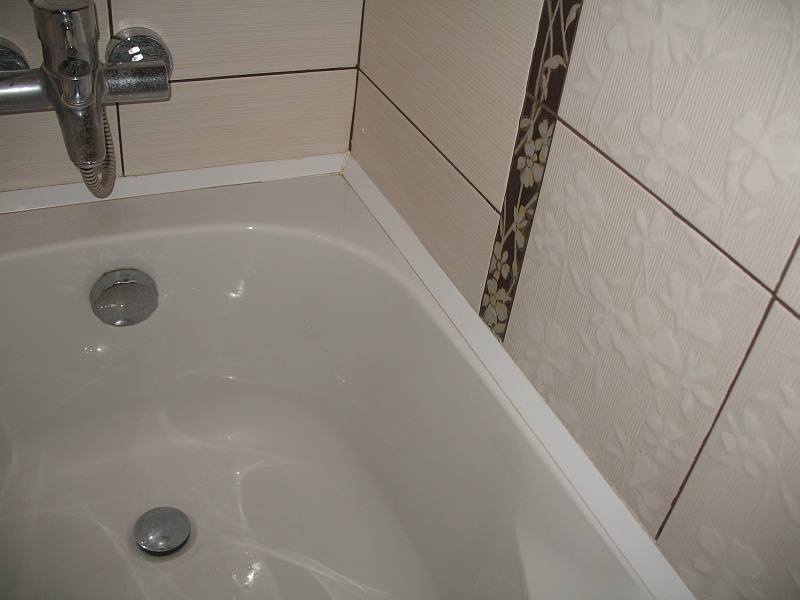
For aesthetics and additional protection, the closed gap is closed with a special plinth. Polymer skirting (rigid or self-adhesive tape) is suitable for acrylic bathtubs in combination with any cladding, as well as for indoor cast iron bathtubs with plastic paneling or painted walls.

It is better to close the junction of tiles and the side of the cast-iron bathtub with a special ceramic or marble plinth, if the width of the silicone-filled joint is relatively small and allows you to securely attach the plinth to the cement adhesive to the side and wall.
Conclusion. The combined method of sealing wide gaps is the most reliable and durable option.
Video on the topic "how to close the seam between the bathroom and the wall":
The most common joint materials
Each of the above list works in its own “niche” and in its own way. For example, purely acrylic substances have no place in the gap when sealing against water. But modern suspensions of fillers in acrylic aqueous dispersion give excellent results thanks to auxiliary substances.

Silicone have a full range of performance indicators and meet all the requirements for sealing materials. They easily tolerate moisture, household chemicals and shampoos. Even without a primer, the walls demonstrate excellent adhesion (international requirements ISO 10590, ISO 9047), i.e. the ability to hold materials together. Their resilient-elastic properties are not afraid of temperatures up to + 200 ºС.
Mounting foam
Sealing a bathtub with a wall using mounting foam is one of the easiest ways to solve a problem. Tools that will be needed for work:
- alcohol or solvent;
- construction (dummy) knife;
- gloves;
- spray foam;
- finishing material.
- Thoroughly clean the joint and adjacent surfaces from dirt, debris, etc.
- Degrease the joint with solvent or alcohol. Dry.
- Put on gloves.
- Shake the bottle with mounting foam and evenly apply it to the joint, avoiding contact with the walls and the surface of the bath. When applying, be sure to take into account the fact that after drying, the volume of the foam increases significantly.
- Dry for an hour.
- Use a construction knife to remove excess dried foam.
- Depending on the type of bathroom wall decoration, you can putty the seam and then cover it with paint of a suitable color or glue a border made of tiles, plastic, etc.
How is a bathtub sealed with a wall using cement mortar? Materials and tools for work:
- rags;
- plaster spatula;
- solution container;
- quarry sand;
- if there is only river sand at hand, then you will need a plasticizer (professional or its replacement: lime, clay or washing powder);
- cement M400 or M500;
- spray;
- water;
- finishing material.
- Thoroughly clean the joint and adjacent surfaces from dirt, debris, etc.
- Prepare a solution of medium density.
- Lay the joint with a rag soaked in a liquid solution. This will help prevent the composition from getting on the floor.
- Moisten the surface of the walls and bath at the junction.
- Carefully apply the mortar, being careful not to make the seam too wide.
- After drying, depending on the type of bathroom wall decoration, you can putty the seam and then cover it with paint of a suitable color or glue a border made of tiles, plastic, etc.
- If there is river sand, and not quarry sand, you first need to add a plasticizer, otherwise the solution will not be dense enough, which means that the seam will be fragile as a result. Instead of a professional plasticizer, you can use lime, clay or washing powder. The ratio of the components of the mixture should be as follows: 4:0.8 sand/lime; 4:0.5 sand/clay; 4:0.2 sand/washing powder.
- Add one part of cement to the sand or its mixture with a plasticizer in the ratio: 4:1 for M400 cement and 5:1 for M500 composition.
- Stir the mixture thoroughly with a spatula.
- Gradually add water until a solution of medium density is obtained.
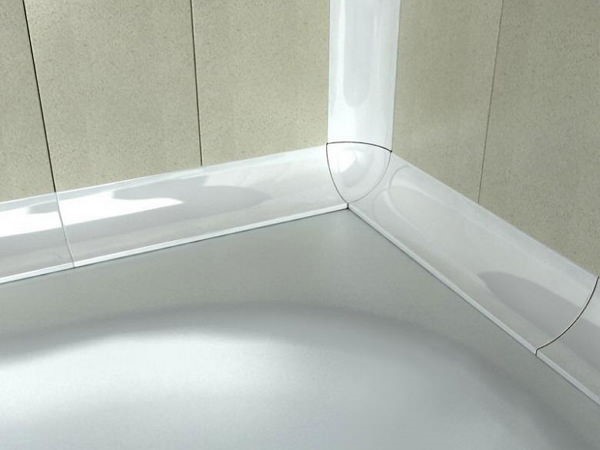
A corner for sealing a bathtub with a wall is another fairly simple and reliable way to solve the problem of sealing a joint. Its other names are plastic plinth, PVC border for the bath. For tiles, a ceramic border is more suitable. Materials and tools for mounting the corner:
- transparent quick-drying glue (tile glue for tiles);
- alcohol or solvent;
- plastic or ceramic plinth (border) for the bath;
- construction knife;
- masking tape;
- mounting gun;
- transparent silicone sealant.
On sale there are skirting boards with a layer of glue already applied. It is better not to use them, since this glue does not have moisture resistance. If such a corner is acquired by mistake, then the layer of glue must be carefully peeled off from it. To do this, you need a knife and a solvent. Stronger compounds are not recommended, as they can seriously damage the surface of the baseboard.


- Thoroughly clean the joint and adjacent surfaces from dirt, debris, etc.
- Degrease the joint with solvent or alcohol.Dry.
- Cut the border with a construction knife into planks of the desired length at an angle of 45 degrees.
- Attach the curb pieces to the joint.
- Apply masking tape along the edges of each piece to prevent glue from getting on the wall and tub surfaces.
- Remove border.
- Apply glue to the joint.
- Re-attach and tightly glue the pieces of the border.
- Let the glue dry and then remove the masking tape.
- Treat the place where the curb adjoins the wall with a thin layer of transparent silicone sealant.
How to close the gap between the bathroom and the wall
The most popular such methods of sealing the gap:
- cement mortar, in its pure form or with inserts from other materials;
- polyurethane foam (similarly);
- sealant - only for narrow gaps (up to 5 ... 8 mm) or in combination with other materials;
- borders and inserts made of metal or plastic;
- self-adhesive border tape;
- panels made of plastic or other materials, with additional sealing of joints (with wide gaps, more than 20 mm);
- facing with tiles, mosaics, other materials according to the design of the bathroom with a pre-installed support insert and joint sealing (gap 20 ... 30 mm or more).
The choice of a specific method depends on the skills of the repairman, his budget, as well as the time of work and the required duration of operation of the protection. So, if you need to close up the gap that has arisen in a rented apartment or temporarily seal the bath in your own, before a major overhaul, options 1, 3, 5 are suitable.
The following are more detailed instructions on how to eliminate the gap in general and seal the joints.
Useful tips for sealing the space between the bathroom and the wall
Repair specialists advise the following:
- The plumbing fixture is selected in accordance with the length of the niche where it is installed. The ideal distance from the object to each wall is no more than one cm.
- The minimum required amount of mortar, sealant, foam is used - otherwise the result looks sloppy.
- Before starting work, all processed surfaces are cleaned of contaminants, degreased.
- The seam filled with something is made continuous - even the smallest gaps break the tightness, and water gets inside.
- In the presence of mold, damaged areas are treated with special compounds that prevent its development.
- If the plumbing fixture is made of acrylic, which has a “habit” to bend, deform, you will need to install fasteners from several sides.
- Before sealing, cast-iron plumbing is installed by any means as stably as possible, evenly, relative to horizontal and vertical surfaces. A metal frame will do, less often bricks are placed under the bottom.
- The most beautiful option is when the design is the same on all sides of the bath. To do this, the bath is placed in a niche so that the gap everywhere matches in width, closing it in one of the appropriate ways.
Some sealants and bathroom decorating processes are unhealthy, so some work is done with gloves and a respirator.
Whichever method you choose, the main condition is water resistance and aesthetic appearance.
High-quality installation, docking the bathtub with the wall is a guarantee that there will be no extra holes in unwanted places through which water easily penetrates.If, for some reason, leakage nevertheless arose, sealing is done as soon as possible - before the neighbors from below were flooded or mold appeared. Sealing is carried out independently or with the participation of invited experts.
How to close the gap between the bathroom and the wall
Based on the width of the resulting seams, the appearance of the bath, its shape and material of manufacture, the best tool is selected for sealing large gaps and masking small seams.
Next, we recommend watching the video, which describes in detail how and what is better to close the gap:
h3 id="chem-germetizirovat-mesto-styka-vanny-i-steny">How to seal the junction of the bathtub and the wall
For sealing, both time-tested products and modern sealants can be used. The choice of means depends on the width of the gap.
Cement
The most reliable, albeit outdated, solution to the clearance problem is cementing. The advantage of cement is that it is strong enough and is not afraid of moisture.
It is necessary to mix sand with cement in a ratio of 3: 1 and dilute the resulting mixture with water, not forgetting to add PVA glue as well. The resulting composition must be stirred to the consistency of sour cream. Since the composition dries quickly, it should be applied and leveled as quickly as possible.
Mounting foam
One-component polyurethane foam has good moisture resistance, so it is great for this kind of work.
/wp-content/uploads/2016/02/Zadelat-shhel-mezhdu-vannoj-i-stenoj-montazhnaja-pena.jpg
To protect the surface near the seams, masking tape should be applied to the wall and bathtub.Moreover, this must be done in such a way that it is located as close as possible to the joint, because then it will be very difficult to clean the tiles or painted walls from accidentally falling mounting foam. After the foam hardens, the adhesive tape is removed, and the excess foam is cut off.
In accordance with sanitary standards, the foam must be closed, as it is quickly contaminated or tends to turn yellow and crumble. Usually, the foam is closed with a plastic corner, plastic tape, or a decorative ceramic border. Such materials are widely represented in hardware stores, so choosing them to match the color of the bathroom is not difficult.
Silicone sealant
This option for sealing the seam is only suitable if its width does not exceed 0.5 cm. In this case, it is necessary to use only a waterproof sanitary sealant with an antifungal effect. In the assortment of hardware stores, sealants of different colors are presented, but it is wiser to use transparent ones.
After applying a layer of sealant with a special gun, it is leveled with a finger dipped in soapy water. A finger is drawn along the joint, trying to press the sealant into the seam, and thus securely close it.
The bathroom should always be kept clean and hygienic, so there should be no poorly sealed joints. In conditions of high humidity, bacteria and fungi settle in them. Therefore, in order to avoid their spread throughout the bathroom, all joints and gaps must be securely sealed with cement, foam or sanitary sealant.


Skirting boards, corners and borders made of plastic
Sealing can be done in another way, much easier. To do this, you will need plastic corners that are used when installing PVC panels. There is also such an option as plastic rubberized corners. They are glued with liquid nails. Please note that the surface must be degreased, dust and moisture must be completely removed. Only in this case, liquid nails will hold well.
This sealing technology is best used for wall cladding. Due to the fact that the plastic is elastic in its structure, it is possible to compensate for the movement of the tub. As for the installation of the corner itself, it can be pre-treated with a sealant. This will allow you to prevent moisture from seeping in even if the plastic peels off.
Like these skirting boards, plastic bathtub borders are used. Their installation is carried out in a similar way.
Acrylic bathroom sealants
If the consumer chooses an acrylic sealant to seal the joint between the bathtub and the wall, he will have to take care of the reliable fixation of the bathtub. After all, the main drawback of all acrylic compositions is the lack of elasticity. But such material suitable for subsequent coloring or plastering.
According to other characteristics, acrylic bathroom sealants are similar to silicone ones: they are easy to apply, adhere well to various surfaces, freely tolerate temperatures from -25°C to +80°C. In addition, they dry very quickly.
Attention: if you decide to choose an acrylic sealant for processing the joint between the wall and the bathroom, pay attention to the markings on the package. Not all acrylic compounds are designed for waterproofing seams.
Look for tubes labeled "moisture resistant".
Bathroom Silicone Sealants
When deciding which sealant is better to choose for processing the joint between the wall and the bathroom, many craftsmen prefer silicone. It cannot be called cheap, but it is durable, fits perfectly on any surface, withstands large temperature changes and gives minimal shrinkage when dried (up to 2%).
At the same time, silicone retains its elasticity for many years, which allows it to be used even in places where some deformations are observed.
Silicone sealants are divided into acidic and neutral. Acid (another name is acetic) is cheaper than neutral, but has a limited scope. They cannot be applied to metal products, because during the vulcanization process such compounds lead to corrosion of the metal.
Neutral silicone sealants are more expensive, but they can be used on both acrylic and metal surfaces.
plastic borders
This method is one of the simplest and is possible even with a fully installed bathtub and a lined wall. In fact, this is a relatively flexible plastic profile, which is glued with a sealant to the junction between the side and the wall.
There are two main types - overhead (left) and plug-in (right) profiles. They are used depending on the width of the gap and the location of the bath in relation to the wall. With a tight joint, you can refuse to use a sealant, simply insert the “with interference” profile into the cleaned slot, but it is still better to attach the plastic plinth to the sealant.
Causes of a gap between the bathroom and the wall
The main causes of large (more than three cm) or minor (0.1-0.2 cm) gaps between the bathtub and the wall are usually:
- the angle between the walls where the plumbing stands must be strictly 90 degrees - otherwise a gap will form, which requires leveling the surfaces;
- the bath is crooked on the floor - it will not fit snugly against the wall either. In the latter case, the height-adjustable legs will save the situation;
- the length of the bath is less than the wall near which it is placed;
- the installation technology is violated or it occurred after gluing the tiles:
- the container itself is too unstable;
- the sides of the plumbing fixture have noticeable irregularities.
There are several reasons for the appearance of a gap, and almost all of them come down to the imperfection of the geometry of the room.
Interim measures
If the gap appeared unexpectedly, and repairs are not planned to be carried out in the near future, you can use the budgetary and fast, but, unfortunately, not very durable way to seal the seam - use self-adhesive tape.
The tape is simply glued over the joint so that the fold falls on the line separating the two surfaces. The procedure is very fast, does not require special efforts and skills.


The surface must first, of course, be cleaned and degreased - this will improve adhesion and help the tape last not 8 ... 12 months, but at least two years. However, the duration of use also depends on how actively the bathroom is used.
You can watch the installation process on the video.
How to close the space between the bathroom and the wall
There are several ways to close up even a large gap between the sink, bathroom and wall.
When choosing materials for work, it is important to take into account their wear resistance, strength and complexity of application.
Cement
Residues of grout, which often remain after repairs, can be a good solution to the problem of gaps.Cement is only suitable if the gap width does not exceed 4 cm.
Cement mortar is suitable when the gap is less than 40 mm
- The wall around the bathroom is carefully treated with a deep penetration primer.
- The solution is applied in a dense layer around the perimeter of the bathroom.
- Using a spatula, the cement is leveled.
- After that, as the cement layer dries, it can be painted or decorated with a plinth.
Mounting foam
It will be possible to quickly and efficiently seal the gap with mounting foam, subject to experience with this material. In conditions of high humidity, it is best to use a fine-pored polyurethane-based foam. It will help close gaps up to 8 cm wide.
Foam can be used to fill large gaps
- Prepare mounting foam, rubber gloves and a construction gun.
- Shake the can thoroughly and apply a thin line of foam along the joint.
- If necessary, immediately remove traces of foam from the surfaces.
- Leave the foam to dry (during this time it will increase in size).
- Trim off excess foam.
sealant
The only nuance that must be taken into account when choosing this material is the limited size of the gap (no more than 3 mm)
Also, when choosing a sealant for work, pay attention to its color.
- Thoroughly clean surfaces from contamination. Wipe down the edge of the tub with a degreaser.
- Using a caulking gun, carefully seal the gap with caulk. It is necessary to start squeezing out the solution from the edge. So that the sealant lays down evenly - do not rush.
- Using a special spatula (or just your finger), level the sealant so that it completely merges with the sides. Secret: so that the sealant does not stick to your fingers, moisten them with water.
- After the solution has hardened, remove the residue with a knife.
It is better to choose a special sanitary acrylic or silicone sealant
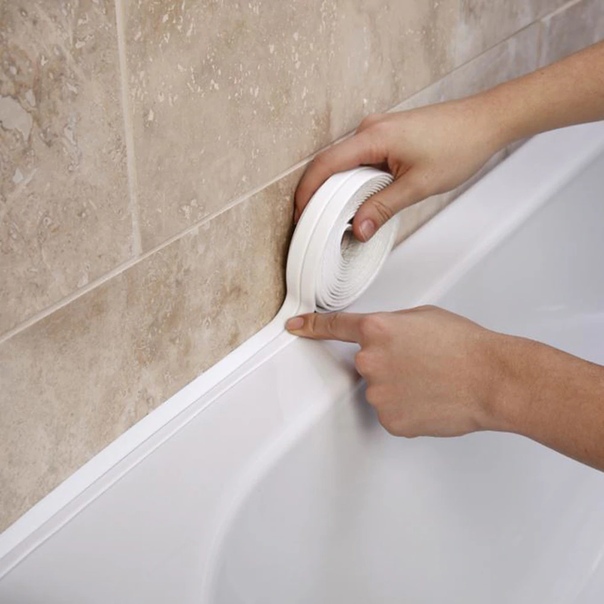
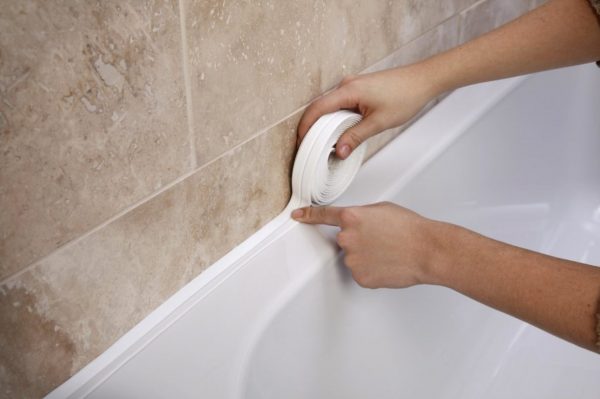
plastic fillet
PVC plinth of a special shape (has a special protrusion that goes into the slot) is called a plastic fillet or corner. A flexible, durable element, thanks to the rich color range, simple installation, will quickly solve the problem of gaps.
Plastic plinth - an aesthetic and reliable way to close the gap
- We degrease the junction.
- We cut the plastic fillet to the required size.
- We apply glue to the place of the gap and, having attached the fillet, press it tightly.
border tape
The use of border tape is more useful as a decoration for an already closed gap. On the one hand, the border is covered with an adhesive composition, and on the other - with a waterproof material.
Curb tape is a quick and inexpensive way to deal with the problem yourself
- The wall and the surface of the bathroom side are cleaned of dirt and moisture.
- The joint is filled with silicone sealant.
- Glue the border tape so that one edge covers the edge of the bathroom, the other - part of the wall.
- The joints of the tape, the joints are additionally treated with a sealant.
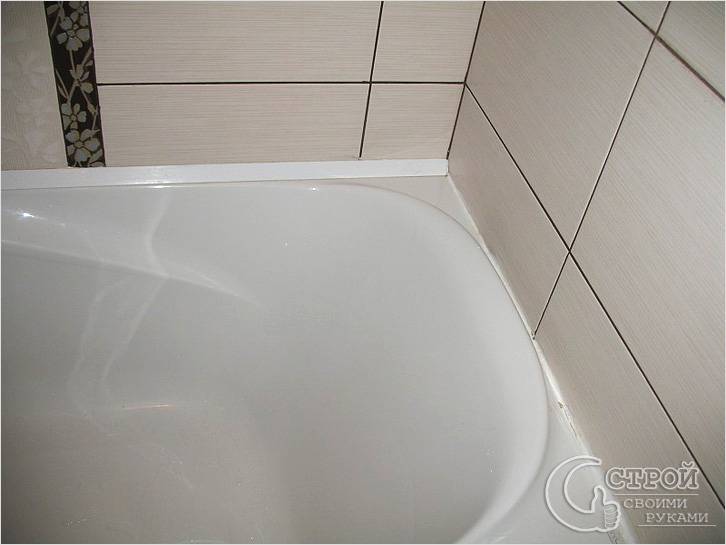
Plastic plinth or corner
Lightweight, inexpensive, easy-to-install plastic plinth will help you quickly solve the gap problem. The curved edges of the plinth greatly simplifies the work.
The plastic corner is glued to the sealant
- The surface of the bathroom and the wall must be cleaned and degreased.
- The plinth is cut into pieces, equal in width and length to the bathroom.
- An adhesive composition is applied to the edges of the plinth.Scotch tape will help protect the surface of the bathroom and the wall from glue.
- Firmly press the plinth.
- After the glue has set, you can remove the protective masking tape. Additionally, you can walk along the edge of the plinth with a transparent sealant.
ceramic border
A ceramic or tiled border will help to close the gap on the wall surface lined with ceramic tiles. It is necessary to work with it very carefully (in case of damage to the tile, you must have several elements of the border in stock).


Tile skirting can be matched to the tile design
- We clean the place of the gap from dirt and seal it with a cement solution.
- We apply tile glue to the elements of the ceramic border with a spatula (liquid nails can be used).
- We lay a border around the perimeter of the bath. Between the elements, the seams are rubbed with a special grout.
Slit up to 10 mm
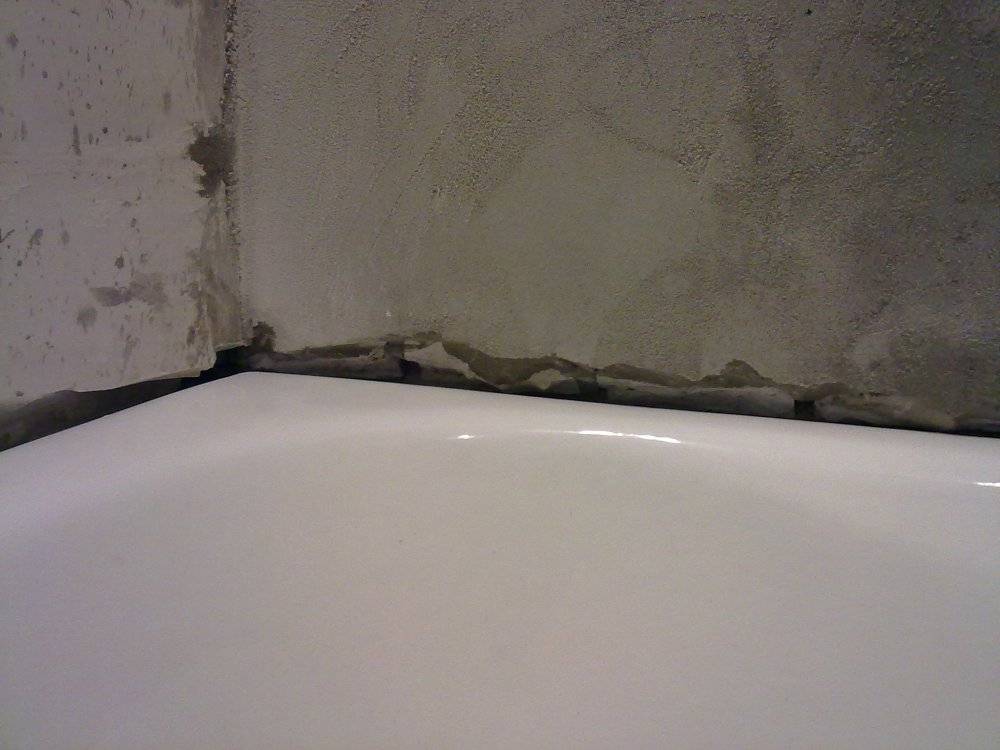
Otherwise, false expectations may be provoked, which may even end up in a court charge of fraudulent deception. When installing bathtubs, washbasins, toilets, etc. mistakes are still being made in the field of wall and floor connections. The tool brings not only trouble, but, of course, costs.
Here are two examples from practice. In the first case, the artisan artisans installed all of the porcelain objects directly onto the tiled or ceramic cladding without backfill, and then wound them elastically. Due to the supposedly flat or planned surfaces of the ceramic wall and floor covering, there was no reason for proper backfilling.
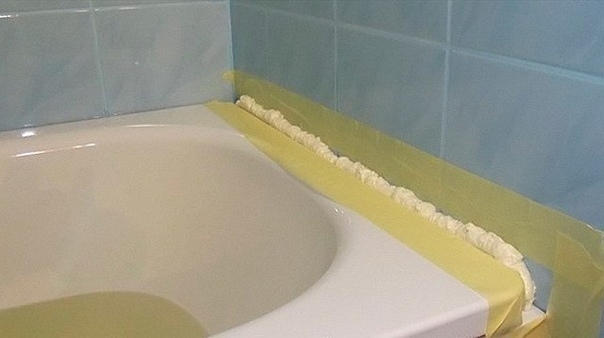
To close a gap of this size, you will need to prepare a white outer corner, usually used for tiles and white silicone sealant.Crack sealing operations are carried out in this case in the following order:
- We cut off the blank of the corner, measured exactly along the length of your bath, and cut its ends at an angle of 45 °.
- We fill the free gap between the bathtub and the wall with silicone.
- From above the seal is closed with a plastic corner.
There should be enough silicone in the voids so that when pressed with a corner, it appears not only against the wall, but also from the side of the bath. Excess silicone is then removed with a damp cloth. In the case of an acrylic bathtub, the gaps must be sealed after filling it with water and maintained for 12 hours.
In the second example, installers conveniently coated the back walls or support surfaces of the sanitary items with a permanently elastic silicone sealant and then attached them. Consequence: In the case of the subsequent dismantling of the object in connection with the repair, significant damage in the area of the surfaces of the glazed tiles occurred due to the very intense adhesion to the silicone material. As a result, the client demanded, as part of the guarantee, a free renovation of the incorrectly installed sanitary facilities.
The described cases are not, as you might think, the so-called "installation exotic" - quite the contrary! The reason for such erroneous versions is often due to the fact that professional wall connections are, firstly, expensive and time-consuming, and on the other hand, it is surprising that there is still considerable uncertainty regarding the correct installation of the version.
Ceramic border adjacent to the wall
The procedure for installing a ceramic border is no different from installing a plastic corner.Despite such advantages as a more solid appearance and a wide range of colors offered on the market, ceramic skirting boards have found less widespread use. This is primarily due to the difficulty of trimming such a corner during installation, as well as its higher price.
But, such a horizontal side will serve you for many years.
Although it is important to close the gaps between the bathtub and the wall, this process is not particularly difficult and can be easily done using one of the methods described. To achieve greater efficiency in sealing joints, it is better to use combined methods (the video above shows just such a “capital” method)
Therefore, before starting repairs, you need to draw up a plan of all work in advance.
Joint when installing a bath after wall cladding
Probably the most difficult thing is to make repairs in the bathroom due to the occurrence of various unforeseen situations during the installation of the bath. Who installs it before tiling, who after. Entrust the installation of the tank to specialists. But its dimensions are not always ideal for the size of the room; therefore, gaps of various sizes are formed.
If the installation of the bath had to be carried out after facing with ceramics, try to move it closer to the wall, carefully align it. If the gap in width is more than 10 mm, seal it with moisture-resistant concrete, then decorate it with a plastic or ceramic rim. The main thing is not to rush, it all depends on what the bath is made of. If cast iron, then auxiliary fixation is not required here. If from a different material, then this stage of work cannot be dispensed with.
If the gap is small, use a ceramic bead


