- How to close the space between the bathroom and the wall
- Cement
- Mounting foam
- sealant
- plastic fillet
- border tape
- Plastic plinth or corner
- ceramic border
- How to close the gap between the bathroom and the wall
- How to fix a joint between a bathroom and a tile with cement
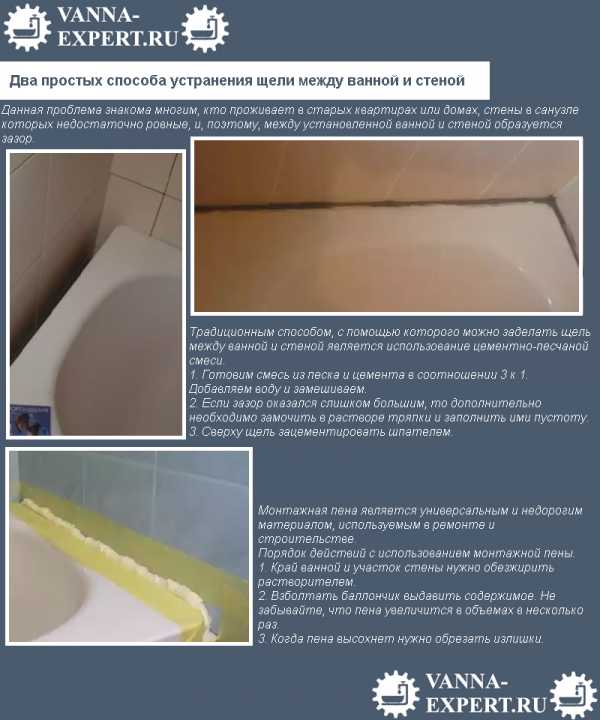
- Seal the seams between the wall and the bathroom. Ways to eliminate gaps of different sizes
- Features of installing a skirting board for a bath
- Decorative curtain
- How to close the gap between the bathroom and the wall
- How to close the gap between the bathroom and the wall
- How to seal the junction of the bath and the wall
- Cement
- Mounting foam
- Silicone sealant
- Necessary tools and materials
- What else is important to know?
- How to close up small gaps between the bathroom and the wall up to 10mm in size
- Method 4: ceramic skirting boards - an aesthetic solution
- curb laying
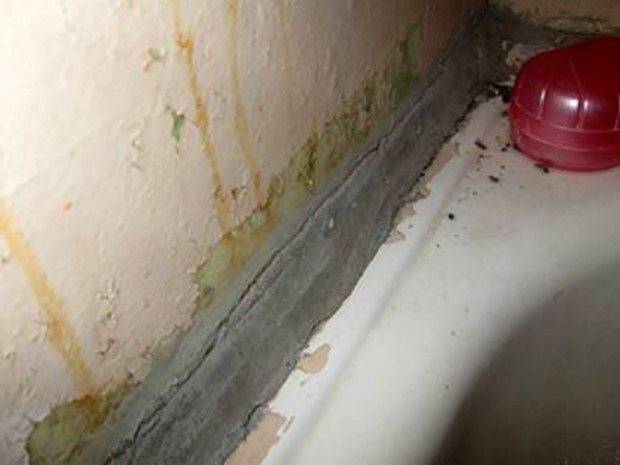
- Causes of a gap at the wall
How to close the space between the bathroom and the wall
There are several ways to close up even a large gap between the sink, bathroom and wall.
When choosing materials for work, it is important to take into account their wear resistance, strength and complexity of application.
Cement
Residues of grout, which often remain after repairs, can be a good solution to the problem of gaps. Cement is only suitable if the gap width does not exceed 4 cm.
Cement mortar is suitable when the gap is less than 40 mm
- The wall around the bathroom is carefully treated with a deep penetration primer.
- The solution is applied in a dense layer around the perimeter of the bathroom.
- Using a spatula, the cement is leveled.
- After that, as the cement layer dries, it can be painted or decorated with a plinth.
Mounting foam
It will be possible to quickly and efficiently seal the gap with mounting foam, subject to experience with this material. In conditions of high humidity, it is best to use a fine-pored polyurethane-based foam. It will help close gaps up to 8 cm wide.
Foam can be used to fill large gaps
- Prepare mounting foam, rubber gloves and a construction gun.
- Shake the can thoroughly and apply a thin line of foam along the joint.
- If necessary, immediately remove traces of foam from the surfaces.
- Leave the foam to dry (during this time it will increase in size).
- Trim off excess foam.
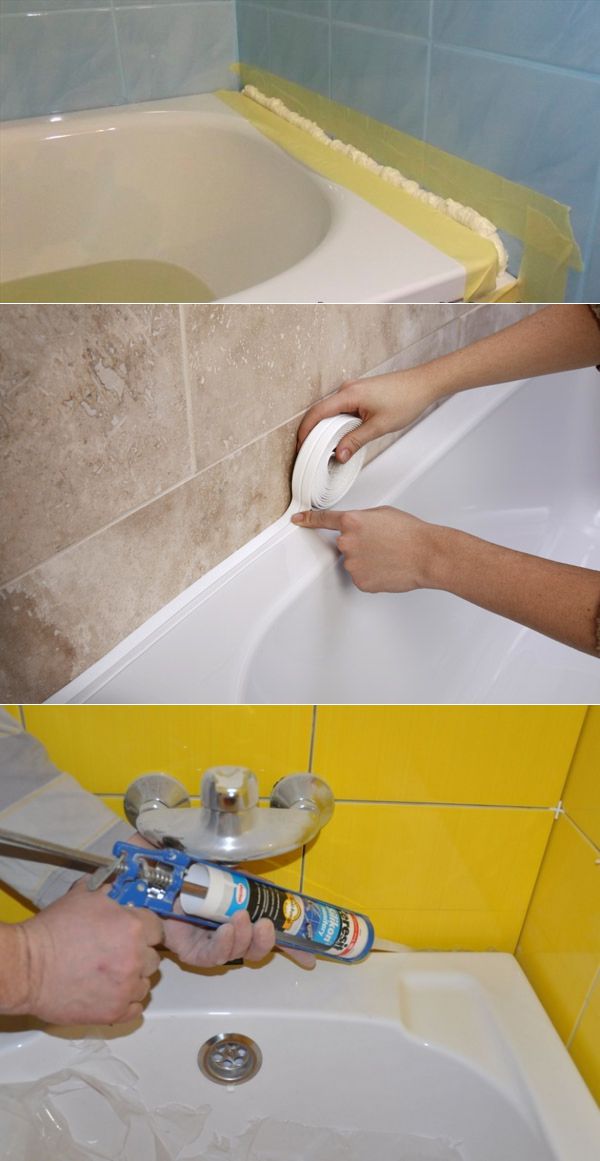
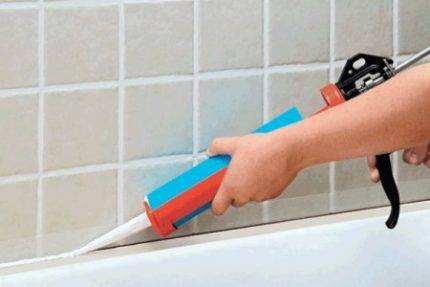
sealant
The only nuance that must be taken into account when choosing this material is the limited size of the gap (no more than 3 mm)
Also, when choosing a sealant for work, pay attention to its color.
- Thoroughly clean surfaces from contamination. Wipe down the edge of the tub with a degreaser.
- Using a caulking gun, carefully seal the gap with caulk. It is necessary to start squeezing out the solution from the edge. So that the sealant lays down evenly - do not rush.
- Using a special spatula (or just your finger), level the sealant so that it completely merges with the sides. Secret: so that the sealant does not stick to your fingers, moisten them with water.
- After the solution has hardened, remove the residue with a knife.
It is better to choose a special sanitary acrylic or silicone sealant
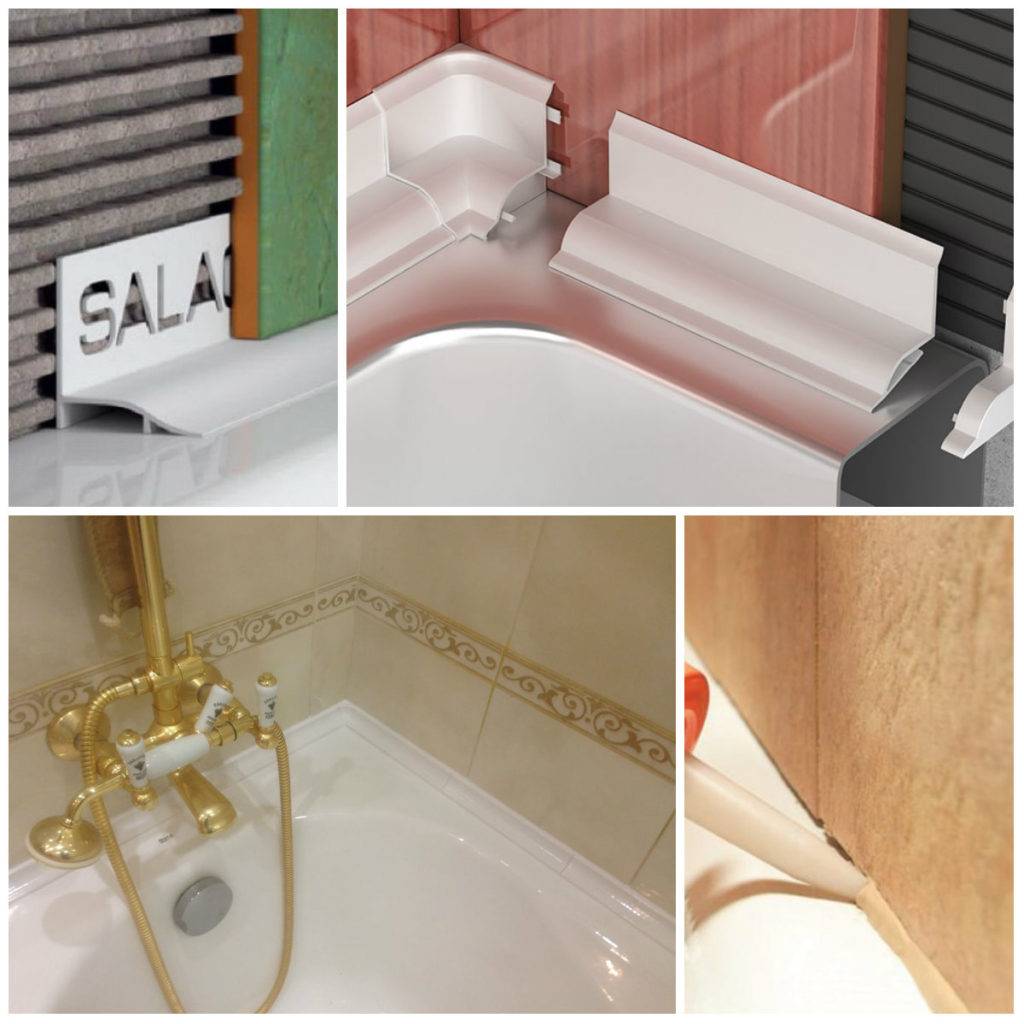
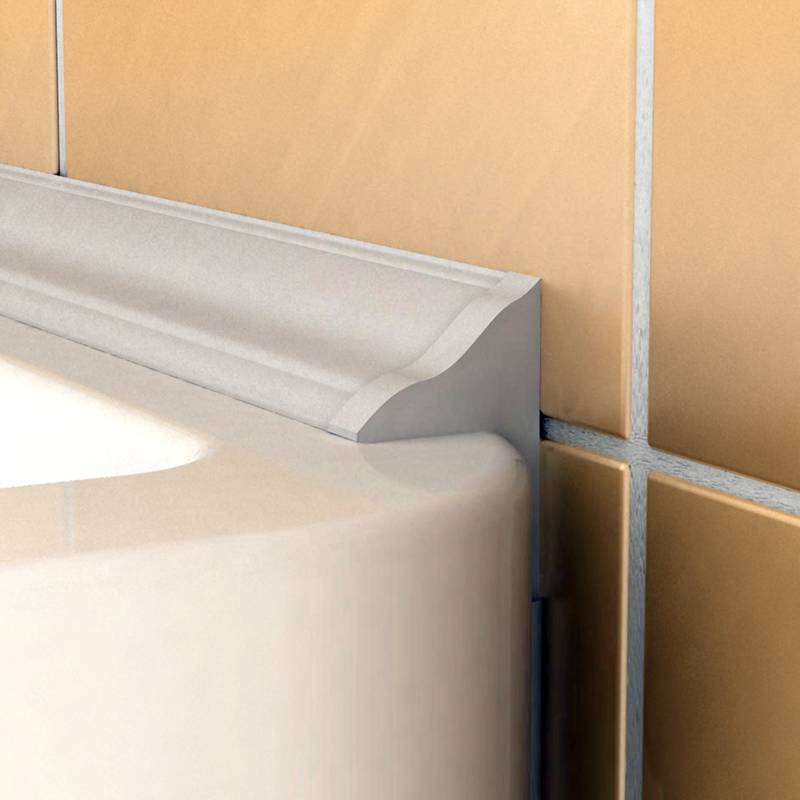
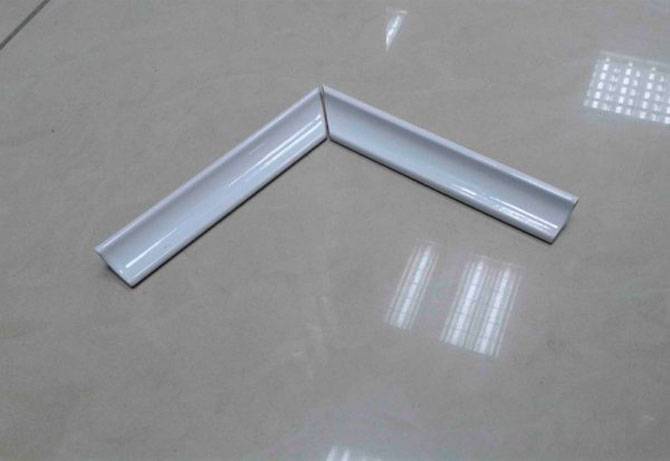
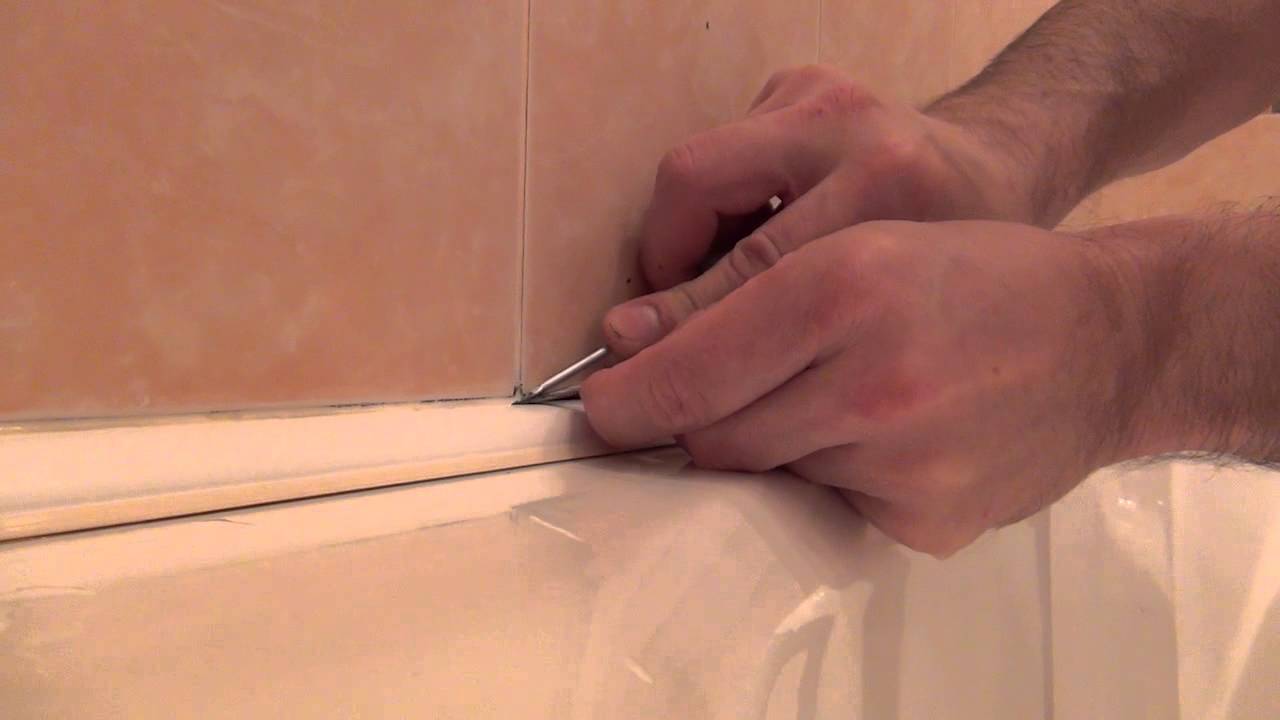
plastic fillet
PVC plinth of a special shape (has a special protrusion that goes into the slot) is called a plastic fillet or corner. A flexible, durable element, thanks to the rich color range, simple installation, will quickly solve the problem of gaps.
Plastic plinth - an aesthetic and reliable way to close the gap
- We degrease the junction.
- We cut the plastic fillet to the required size.
- We apply glue to the place of the gap and, having attached the fillet, press it tightly.
border tape
The use of border tape is more useful as a decoration for an already closed gap. On the one hand, the border is covered with an adhesive composition, and on the other - with a waterproof material.

Curb tape is a quick and inexpensive way to deal with the problem yourself
- The wall and the surface of the bathroom side are cleaned of dirt and moisture.
- The joint is filled with silicone sealant.
- Glue the border tape so that one edge covers the edge of the bathroom, the other - part of the wall.
- The joints of the tape, the joints are additionally treated with a sealant.
Plastic plinth or corner
Lightweight, inexpensive, easy-to-install plastic plinth will help you quickly solve the gap problem. The curved edges of the plinth greatly simplifies the work.
The plastic corner is glued to the sealant
- The surface of the bathroom and the wall must be cleaned and degreased.
- The plinth is cut into pieces, equal in width and length to the bathroom.
- An adhesive composition is applied to the edges of the plinth. Scotch tape will help protect the surface of the bathroom and the wall from glue.
- Firmly press the plinth.
- After the glue has set, you can remove the protective masking tape.Additionally, you can walk along the edge of the plinth with a transparent sealant.
ceramic border
A ceramic or tiled border will help to close the gap on the wall surface lined with ceramic tiles. It is necessary to work with it very carefully (in case of damage to the tile, you must have several elements of the border in stock).
Tile skirting can be matched to the tile design
- We clean the place of the gap from dirt and seal it with a cement solution.
- We apply tile glue to the elements of the ceramic border with a spatula (liquid nails can be used).
- We lay a border around the perimeter of the bath. Between the elements, the seams are rubbed with a special grout.
How to close the gap between the bathroom and the wall
So, sealing a small gap that has arisen between the wall and the bathroom itself is actually a disguise. So that at the end of the work the “disguised” area itself does not catch the eye, it is necessary, taking into account each situation, to choose the desired method of embedding.
So, the material that will be used to carry out our task, ultimately, should:
- correspond to the general atmosphere of the room in terms of shade and texture;
- be of good quality and last a long time.
A small gap does not imply a global seal, but rather a masking
Quality in this case also implies very specific characteristics, for example:
- water resistance;
- strength;
- density, etc.
If you buy a cheap product that does not meet any of the requirements presented, then, as a result, after some time you will have to redo the work.
There are two categories of construction tools with which you can carry out the work of interest to us:
- building mortars;
- special covering products for equipping the spaces between the bathroom and the wall of the room.
There are various sealing materials
This is interesting: How is the tile laid in the pool?
How to fix a joint between a bathroom and a tile with cement
When choosing this method, one must remember that cement is gradually destroyed by water, so either it is necessary to protect the material from water from above, or use this method as a temporary solution.
Sequence of work:
- the surface of the walls and the bathtub is cleaned of dirt, grease, debris, moistened for better adhesion to cement;
- the gap width is checked - if the gap is more than 2 ... 3 mm, the solution will flow (fall out) down. Filler is inserted into wide slots. This can be an elastic tube of a suitable diameter (slightly larger than the width of the gap), cut strips of porous rubber, even just a rag soaked in cement mortar;
- the cement mortar of the density of sour cream is kneaded (proportions can be found in the article);
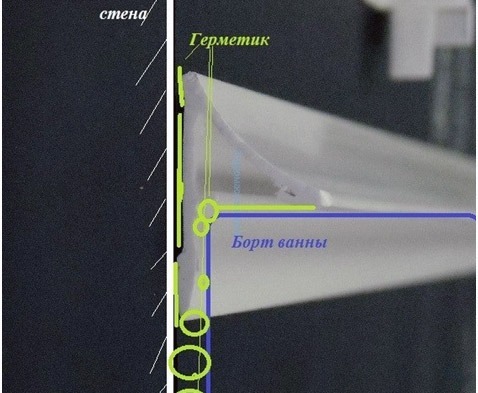
- the finished solution is first laid in the gap, after which it is removed as much as possible from the surface of the bath rim. Ideally, the seam should not protrude beyond the level of the upper plane of the bath - this will help to better mask it during further finishing. A good option is to make a smooth transition from the side to the wall, as shown in the illustration.
Below is the WRONG way to seal the gap with cement - the rim is made very massive, goes beyond the boundaries of the upper plane of the bath, has a loose connection with the rim and walls. This happens if a very dense solution is used and the rules for the gradual curing of the mixture are not followed.


Such a "seal" needs additional sealing.
Important: in order not to wash the bathtub and the wall from cement mortar particles in the future, it does not hurt to seal the planes near the place where the seam is created with masking tape. This method of surface protection is suitable for almost all termination methods.
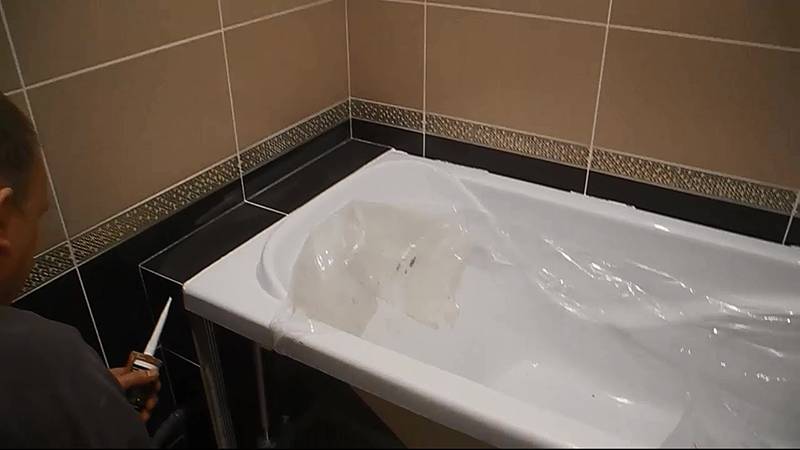
If a new bathtub is being installed, you can partially leave the packaging film on it, securing it with masking tape or tape so that it does not move out during operation.
After complete curing of the solution (depending on humidity and temperature, as well as the amount of solution, the process may take 2…10 days), sealing with a moisture-resistant material and finishing is performed.
Seal the seams between the wall and the bathroom. Ways to eliminate gaps of different sizes
There are 2 types of standard products that can be used to seal the gap between the bathroom and the wall. This is possible if the gap size does not exceed 30 mm. This can be done using a plinth or the so-called curb tape. Both materials will help to completely get rid of the problem and, most importantly, for a very long time, if, of course, everything is done correctly.
With the help of a plastic plinth, a gap of up to 15 mm can be sealed. Products of this type are installed using silicone.
First you need to make a solid base for the plinth.
The gap is recommended with a special adhesive for wall tiles. If the gap has a width of no more than 10 mm, then you should use light-colored silicone and simply fill the seam with it.
After the glue or silicone has dried, the plinth is glued into the corner. Its main purpose is to decorate this connection. If the gap is very small (no more than 5 mm), then it is more expedient to use an outer corner for tiles instead of a bulky plinth.The perforated part of it should be cut off and glued to the silicone.
Excessive silicone residues are simply removed with a cloth from the surface of the bath. To do this, dampen the cloth with soapy water.
The curb tape is essentially rubber, which is on a self-adhesive basis. When using it, you can seal and cultivate the inner and outer corner. As with the baseboard, the gap should be properly sealed with tile adhesive before installation. There is no need to use any silicone with curb tape. The silicone components interact negatively with the tape, which causes it to bend and peel off. Installing such a tape is very simple - you need to remove the protective paper from the adhesive side, the field of which the tape is glued with one side to the bathtub and the other to the tile. All surfaces must be completely dry. With the help of a curb tape, a gap up to 35 millimeters wide can be eliminated. Curb tape comes in different sizes, it should be purchased only after measuring the width of the gap.
This is all very well, but how to close the joint between the bathroom and the wall with a width of more than 35 millimeters. What to do in such cases? In this case, there is only one correct way out - to close it with tiles. However, first you need to make a reliable base. To prevent the mortar from falling off, a small formwork in the form of a board of the required width must be installed under the bathtub.
To prevent the board from falling, it should be supported from below with a few more planks.
After that, a cement-sand mortar is prepared and poured into the resulting recess. To give such a base reliability, it should be reinforced with a piece of wire or metal mesh. The formwork is removed when the solution turns gray and hardens.Now you can lay the tile on top. For beauty, you can install an outer corner on one tile. Tiles should be laid with a slight slope towards the bath. So you will ensure the flow of water from the resulting site. If you do not make the minimum slope, then water will stagnate there, and after a while mold will form there.
So the question is how to effectively close up gaps between bathroom and wall.
You can use absolutely any material that you consider suitable. It is only necessary to take into account the tightness of the connection and of course the appearance.
Features of installing a skirting board for a bath
Installation of the plinth is carried out on a special sealant
The choice of sealant here must be given special attention. The fact is that if you take ordinary silicone, then its service life may not be long enough. Now manufacturers have begun to produce formulations in which, in order to save money, there are cheap and unreliable components.
With regular contact with water, they are gradually washed out of the material and form pores in it, contributing to the formation of fungus.
Now manufacturers have begun to produce formulations in which, in order to save money, there are cheap and unreliable components. With regular contact with water, they are gradually washed out of the material and form pores in it, which contribute to the formation of fungus.


At the moment, the optimal bathtub sealant is based sealant MS polymers (MS Polymer).

The plinth is attached to both the wall and the bathtub so that water does not have the opportunity to penetrate under it. However, if the bathtub is not fixed enough and moves a little each time during use, then the plinth is glued only to the wall. This ensures the integrity of the connection between the curb and the wall.If the plinth glued to the tile is well pressed against the bathtub, then water will practically not leak under it, even when there is no sealant. And a good connection with the wall is guaranteed to exclude cases when the bathtub flows between the wall.

Borders come in various shapes and some models allow not only to close the outer corner from water ingress, but also fill the gap between the bathroom and the wall.
With it, you can achieve additional fixing of the bath in its place. The lower plank, previously treated with sealant on both sides, of the plinth is inserted between the bathroom and the wall. This solution adds stability to the structure and serves as a kind of latch, which is very convenient if the bath is located at a short distance from the wall.
Decorative curtain
Usually this element is selected for the design of the apartment, for example, for a rustic style. This is the most affordable option in terms of cost, allowing you to decorate the lower space of the bathroom, hiding communications and pipes.
For curtains, materials such as:
- ordinary fabric;
- polyethylene;
- polyester.
To make a light curtain, it is enough to take directly the required material, a string and several rings, which are necessary for hanging the fabric on the string.
A kit of this type is sold in special stores, if you buy a ready-made kit, all that remains is to fix the fabric under the bathtub. But there is an opportunity to make a curtain with your own hands, choosing the right material. To carry out this work, you must:
- A special mount is made on the wall under the bathroom, designed for the string.
- A selected string is attached to the mount, it is preliminarily measured in size.
- They put rings on the string, on which the curtain will be attached.
- A fabric is put on the rings, and the design of the bottom of the bathroom is obtained.
There is a small nuance in the design of the bathroom curtain, the fact is that the fabric quickly becomes dirty with frequent use. For this reason, it needs to be removed and washed, as well as an additional curtain to be prepared for a change.
How to close the gap between the bathroom and the wall
The most popular such methods of sealing the gap:
- cement mortar, in its pure form or with inserts from other materials;
- polyurethane foam (similarly);
- sealant - only for narrow gaps (up to 5 ... 8 mm) or in combination with other materials;
- borders and inserts made of metal or plastic;
- self-adhesive border tape;
- panels made of plastic or other materials, with additional sealing of joints (with wide gaps, more than 20 mm);
- facing with tiles, mosaics, other materials according to the design of the bathroom with a pre-installed support insert and joint sealing (gap 20 ... 30 mm or more).
The choice of a specific method depends on the skills of the repairman, his budget, as well as the time of work and the required duration of operation of the protection. So, if you need to close up the gap that has arisen in a rented apartment or temporarily seal the bath in your own, before a major overhaul, options 1, 3, 5 are suitable.
The following are more detailed instructions on how to eliminate the gap in general and seal the joints.
How to close the gap between the bathroom and the wall
Based on the width of the resulting seams, the appearance of the bath, its shape and material of manufacture, the best tool is selected for sealing large gaps and masking small seams.
Next, we recommend watching the video, which describes in detail how and what is better to close the gap:
How to seal the junction of the bath and the wall
For sealing, both time-tested products and modern sealants can be used. The choice of means depends on the width of the gap.
Cement
The most reliable, albeit outdated, solution to the clearance problem is cementing. The advantage of cement is that it is strong enough and is not afraid of moisture.


It is necessary to mix sand with cement in a ratio of 3: 1 and dilute the resulting mixture with water, not forgetting to add PVA glue as well. The resulting composition must be stirred to the consistency of sour cream. Since the composition dries quickly, it should be applied and leveled as quickly as possible.
Mounting foam
One-component polyurethane foam has good moisture resistance, so it is great for this kind of work.
/wp-content/uploads/2016/02/Zadelat-shhel-mezhdu-vannoj-i-stenoj-montazhnaja-pena.jpg
To protect the surface near the seams, masking tape should be applied to the wall and bathtub. Moreover, this must be done in such a way that it is located as close as possible to the joint, because then it will be very difficult to clean the tiles or painted walls from accidentally falling mounting foam. After the foam hardens, the adhesive tape is removed, and the excess foam is cut off.
In accordance with sanitary standards, the foam must be closed, as it is quickly contaminated or tends to turn yellow and crumble. Usually, the foam is closed with a plastic corner, plastic tape, or a decorative ceramic border.Such materials are widely represented in hardware stores, so choosing them to match the color of the bathroom is not difficult.
Silicone sealant
This option for sealing the seam is only suitable if its width does not exceed 0.5 cm. In this case, it is necessary to use only a waterproof sanitary sealant with an antifungal effect. In the assortment of hardware stores, sealants of different colors are presented, but it is wiser to use transparent ones.
After applying a layer of sealant with a special gun, it is leveled with a finger dipped in soapy water. A finger is drawn along the joint, trying to press the sealant into the seam, and thus securely close it.
The bathroom should always be kept clean and hygienic, so there should be no poorly sealed joints. In conditions of high humidity, bacteria and fungi settle in them. Therefore, in order to avoid their spread throughout the bathroom, all joints and gaps must be securely sealed with cement, foam or sanitary sealant.
Necessary tools and materials
After evaluating the situation in your bathroom, choose the right way to get rid of the gap. Then think about what materials you need to buy for embedding and what tools you will need.
Most options will require silicone sealant. Buy a special sealant for bathrooms "Sanitary" or "Aquarium". Silicone is available in tubes and tubes for a plunger syringe gun. With a pistol, work is more comfortable and better. The trigger is pressed smoothly, the sealant strip falls into the gap evenly and thinly.
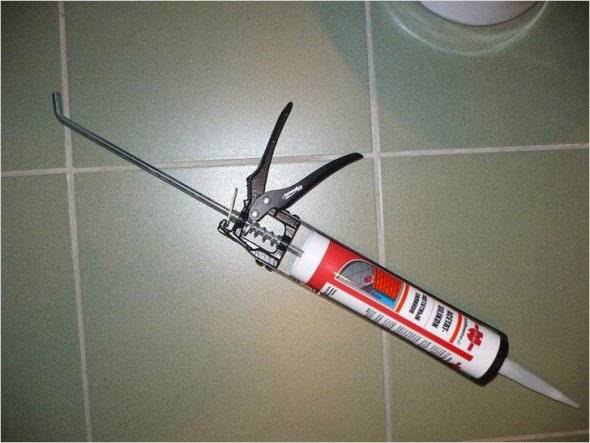
A tube of silicone sealant in a plunger syringe gun
In addition to sealants, you will need:
- masking tape - for all options;
- white spirit, turpentine, alcohol, acetone or other solvent - for degreasing surfaces, for all options;
- rubber or plastic spatula - for leveling silicone sealant;
- glue "liquid nails" - for gluing the cornice and tape;
- a hacksaw with a miter box - for mounting a PVC cornice;
- tile cutter - for laying ceramic tiles and borders;
- wallpaper knife - for cutting off excess mounting foam, sealant and glue;
- rags - to fill the gap under the mortar;
- wooden slats - for formwork for concreting.
What else is important to know?
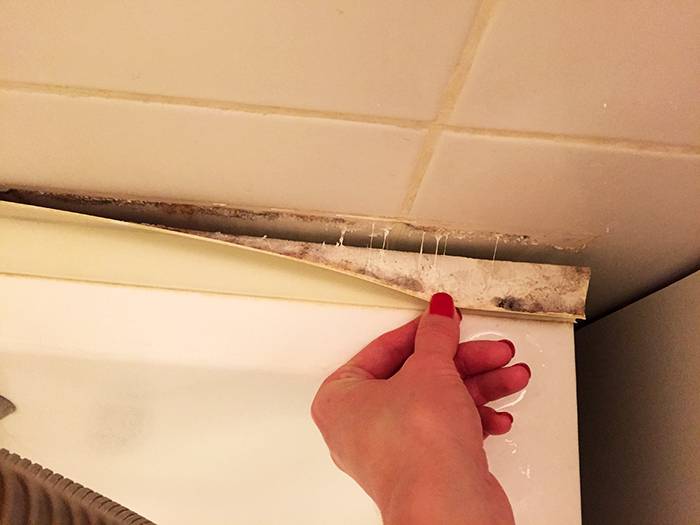
- If you have acrylic plumbing installed, then you should know that it tends to sag. Such a characteristic runs the risk of leveling all sealing work. Therefore, you need to take care of the fasteners - two fasteners should go on both sides in width. And two - in length.
- When sealing occurs, the acrylic bath must be filled. Drain the water only after the materials have dried.
- Plumbing made of cast iron and steel must also stand firmly to eliminate vibrations.
So, we found out that sealing the seams is very important for the quality of the repair. You can choose any method - it depends on what requirements you place on the aesthetics and style of the bathroom
How to close up small gaps between the bathroom and the wall up to 10mm in size
To cover a small gap, you will need a white tile corner and white sanitary silicone. The ends of the corner, measured clearly according to the dimensions of the bath, are cut at an angle of 45 °. The space between the bathtub and the wall is tightly filled with silicone, after which it is closed with a plastic corner.You need to pump enough silicone into the void so that when the corner is pressed in, it crawls out not only near the wall, but also near the bathtub. Subsequently, excess silicone is removed with a damp cotton cloth.
In the case of an acrylic bathtub, it must be sealed only in a filled state. The water collected in it should be in the bath until the silicone dries. And this is at least 12 hours - in this case, it is best to eliminate the gap between the bathroom and the wall in the evening and leave the bath under load all night.
How to close a small gap between the bathroom and the wall
Method 4: ceramic skirting boards - an aesthetic solution
Ceramic borders come in 4 types:
- "Pencil" - a narrow long tile. Standard size - 4x30 cm.
- "Corner" - the most common form of plinth, having a triangular section.
- "Frieze" - a special tile designed for laying out the first layer over the bathroom. On the lower edge has a slight influx that closes the gap. It can only be used during the repair phase.
- "Asterisk" - a detail necessary for decorating joints at the corners of the bathroom.
Installation of ceramic plinth is a complex process that is best left to professionals.
Most ceramic manufacturers include at least 2 types of skirting boards in their collections. If it is not possible to find a suitable one, use a border made independently from the remnants of the tile.


The main advantages of the plinth:
- moisture resistance;
- aesthetics;
- long service life;
- resistance to aggressive detergents.
But such a solution is not suitable for those who decide not to cover the walls with tiles, but use other finishing materials. But the main disadvantages are the high cost and complexity of installation.
curb laying
Before you start creating a ceramic border, you need to carry out preparatory work:
- Seal the gap with cement, foam or sealant.
- Clean the wall and bath from dust, treat with a degreasing liquid.
- Apply the markup on which the tiles will be laid.
- Cut borders if necessary. For example, to finish the corner, a cut is made at 450. This will require a grinder with a diamond blade. When working with pliers, you can damage the tile.
- Dilute the adhesive following the manufacturer's instructions. The consistency should resemble thick sour cream. For the bath, mold and mildew resistant compounds are used.
Work starts from the corner. Crosses are inserted between the borders to ensure the same gap width around the entire perimeter. Glue is applied with a spatula to the back of the ceramic. The excess mass that has come out after fixing the element is immediately removed. The masonry is compacted by tapping with a rubber tool (mallet). After the glue dries, the seams are rubbed with a special compound based on latex.
You can also make a ceramic plinth after the repair is completed. In this case, it will not be attached to the wall, but to the already laid tile. Therefore, instead of soluble tile adhesive, "liquid nails" should be used. The substance is applied to the back side of the curb, after which it is strongly pressed against the surface for 2-3 minutes.
If the bathtub is made of acrylic, silicone sealant must be used to install the ceramic baseboard, and not tile adhesive and grout. These compounds become rigid after drying, so they can crack due to thermal expansion.
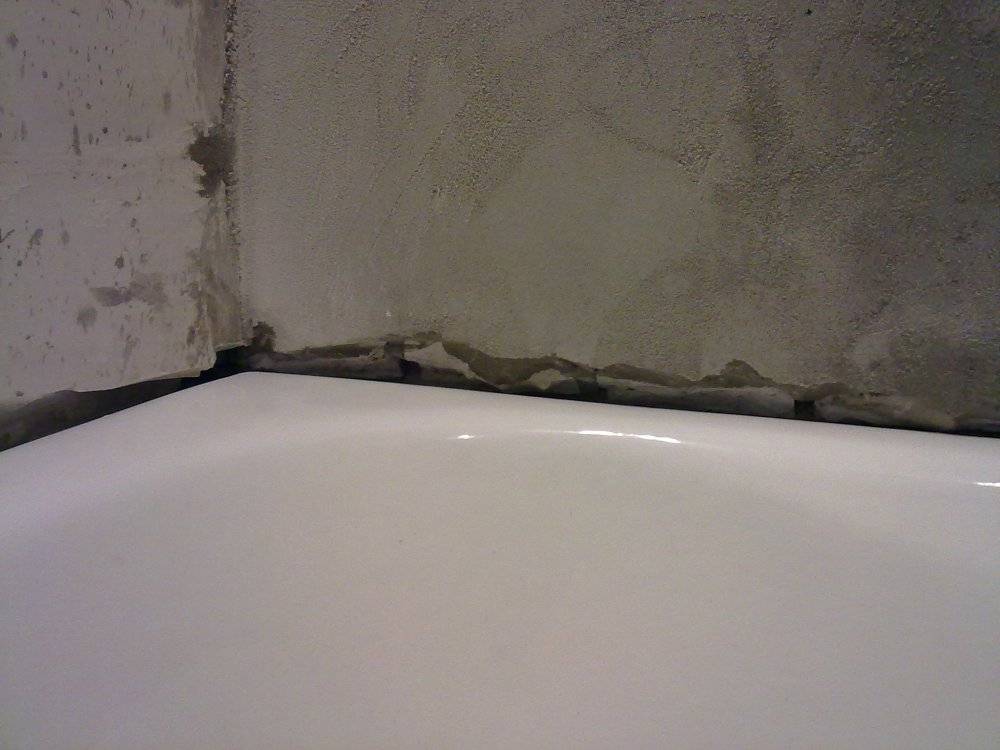
Causes of a gap at the wall
No matter how smoothly you try to install the bath, there will still be a small gap between its side and the tile or concrete wall. The minimum gap is 0.1 cm, but in some cases it reaches 2-3 cm in width.
We do not take into account the distance to the wall of 10 cm or more, which remains on the narrow side of the bath - it can only be repaired using a profile structure and drywall or other materials at hand. There are several reasons for the appearance of a gap, and almost all of them come down to the imperfection of the geometry of the room.
There are several reasons for the appearance of a gap, and almost all of them come down to the imperfection of the geometry of the room.
Even a small gap can cause big trouble for the family of the owners of the apartment, and for the neighbors from the lower floor.
Among the most common shortcomings are the following:
- uneven screed on the floor, causing the bathtub to skew - part of the problem can be solved by leveling the floor or tightening the bathtub mounting bolts;
- "wavy" walls formed by a layer of illiterately laid plaster;
- non-standard angles - sharper or obtuse than 90 degrees;
- defects in the plumbing product - not a perfectly even side.
The last problem is extremely rare, mainly in economy class baths. Sometimes it is easier to seal an unaesthetic joint between steel or acrylic bath and a wall than to change the product or re-plaster several walls.
You can't even leave a small gap. While bathing or taking a shower, the liquid will definitely fall on the wall, and then not into the bath, as usual, but straight to the floor.And water on the floor will certainly lead to conflict with the neighbors from the apartment below, regardless of the quality and reliability of the waterproofing made in the bathroom.

Through a narrow gap, water drops roll under the bath, where they accumulate and begin to destroy building materials, provoke the appearance of mold and fungus
You can get rid of trouble in different ways: with your own hands or with the help of professional finishers. Since special skills are not needed to seal the gap, many manage on their own.


