- A simple water heater installation diagram
- Technical features of connecting the boiler
- How to connect a heater to steel pipes
- Working with polypropylene pipes
- Connection to structures made of metal-plastic
- Single point heating connection
- How to connect a instantaneous water heater to the water supply and electrical network with your own hands
- Do-it-yourself instantaneous water heater installation
- Connecting the instantaneous water heater to the water supply
- Connecting the instantaneous water heater to the mains
- Connection
- Power connection
- Connecting a watering can and a tap
- Some features of the water supply scheme
- Low power feeders
- Getting ready to connect
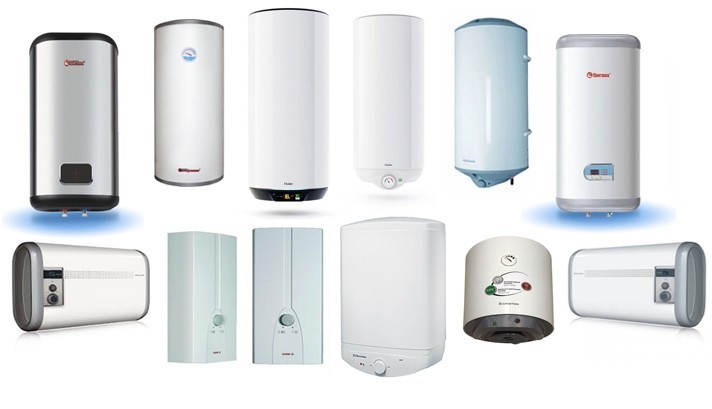
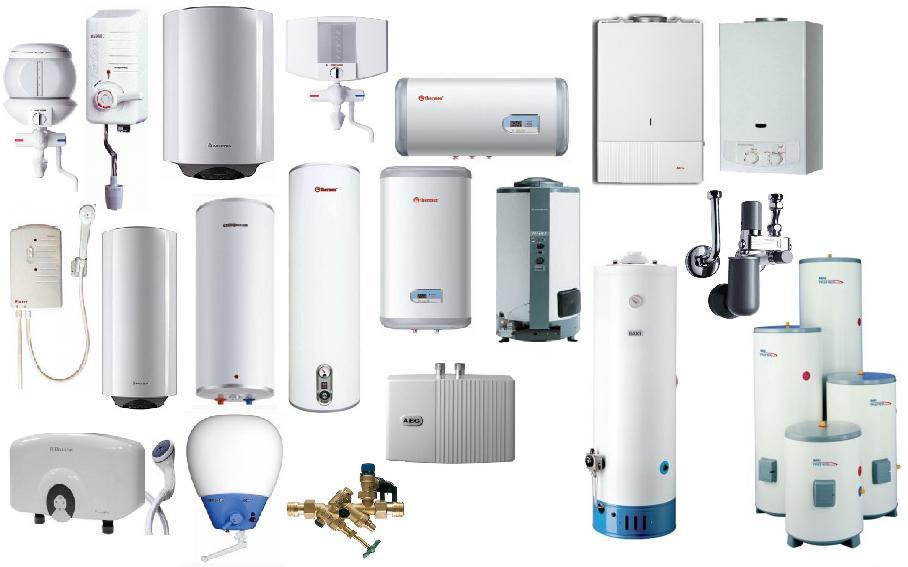
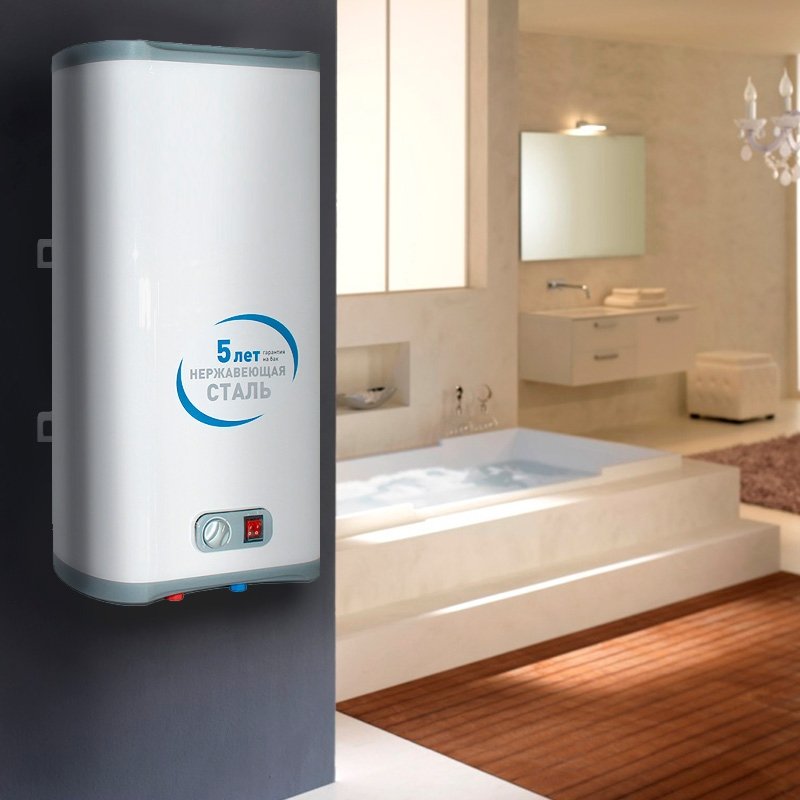
- Types of storage water heaters
- Type #1: Accumulation type pressure equipment
- Type #2: Pressureless storage water heaters
- Accumulative water heater for giving
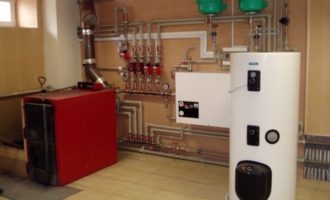
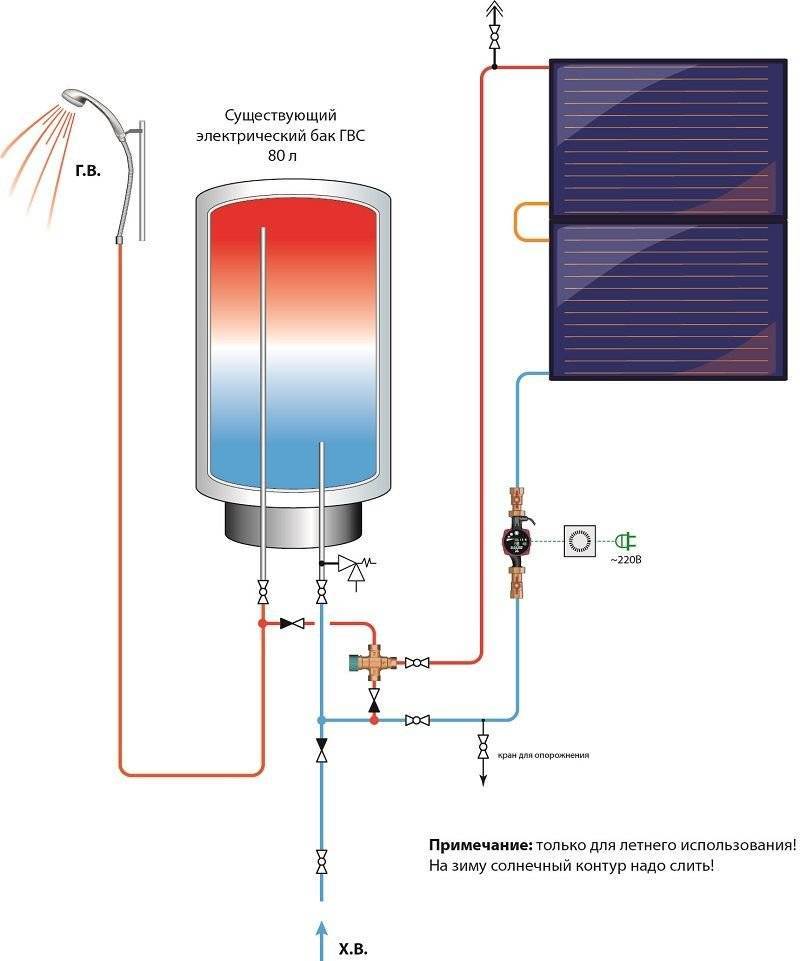
- Indirect heating tanks
- Typical strapping scheme
- Positive and negative points
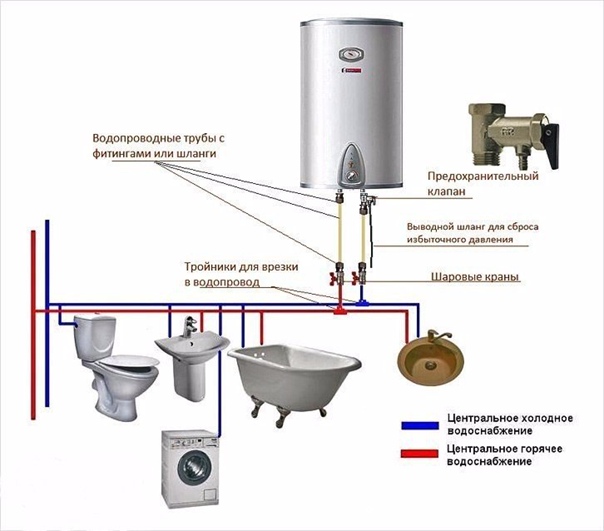
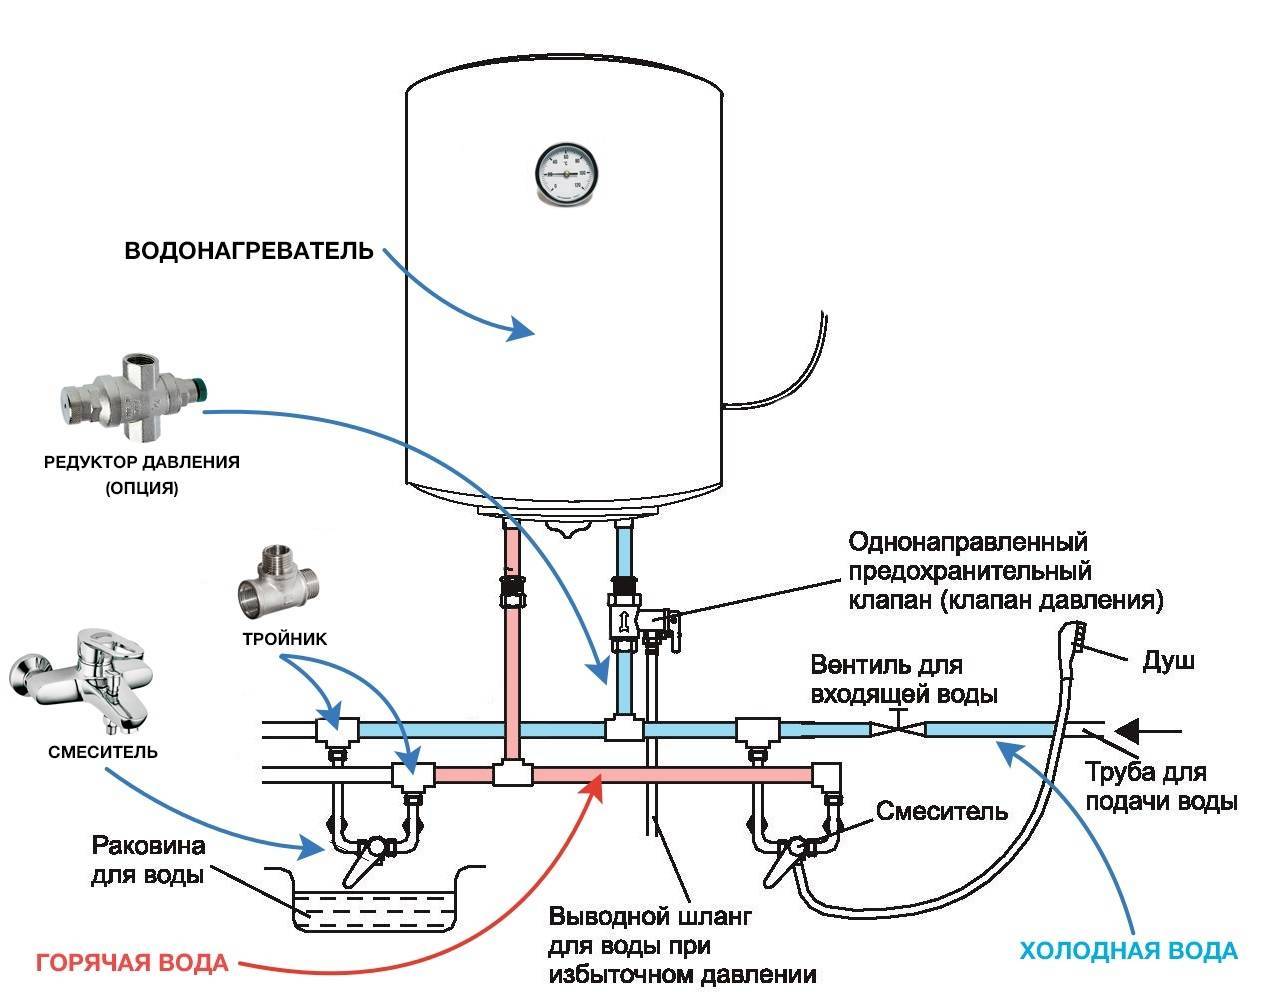
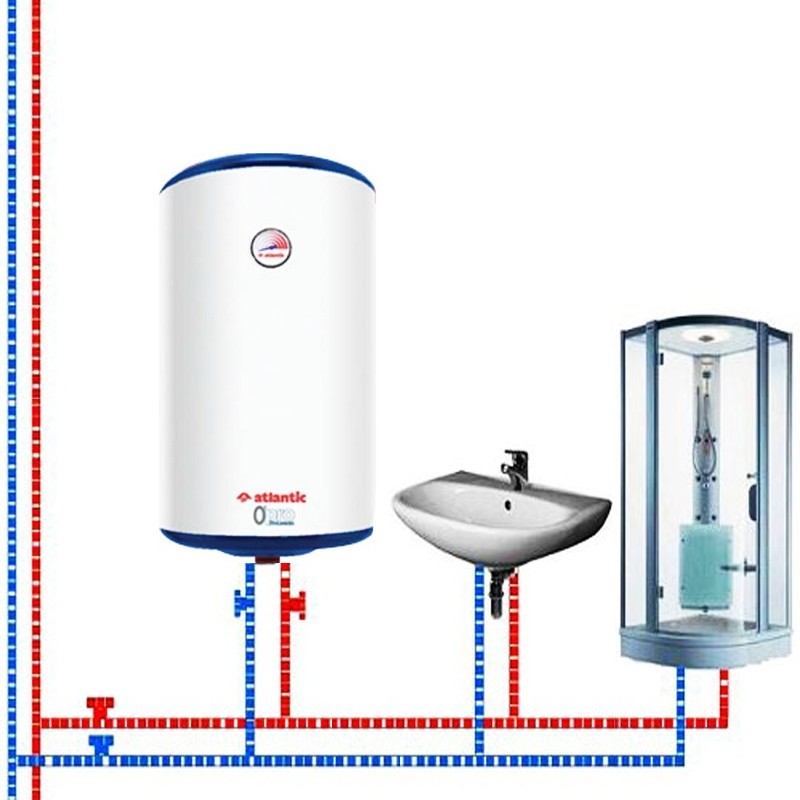
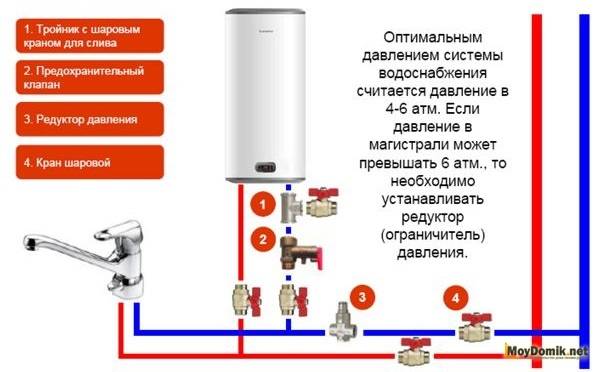
A simple water heater installation diagram
To accurately perform the process of connecting the boiler to the water supply, you must follow the instructions:
- The first step is to install risers of cold and hot water.
- Connect the pipelines to the already installed mixer.
- Install an electric water heater.
- Connect hot and cold water pipes to it.
- If a situation is possible when the pressure in the line exceeds six atmospheres, then it is necessary to install a pressure reducer to reduce the inlet pressure to the tank.
- A ball valve and a safety valve must be installed at the cold water inlet to the electric heater. The latter performs two important functions: it protects the water heater from overpressure and protects the internal tank from emptying.
- At the same cold water inlet, it is necessary to install a tee with a ball valve, which will allow the water to be drained from the water heater.
- A ball valve must also be installed on the hot water pipeline.
In theory, the process of connecting a water heater to a water supply is simple, but you need to monitor it so that you do not accidentally make a mistake during installation.
Technical features of connecting the boiler
If the diagram for the correct connection of the boiler to the water supply is drawn up, it's time to start implementing it. In this case, a lot depends on which pipes were used to create the water supply.
In old houses, steel pipes can often be found, although they are often replaced with more fashionable polypropylene or metal-plastic. When installing the boiler, you should take into account the features of working with pipes of various types.
There are no special requirements for the material of the structures connecting the boiler and the water supply. They can even be connected with a sufficiently strong hose of a suitable diameter and length.
Regardless of the type of pipes, before starting any work on connecting equipment to the water supply, be sure to turn off the water supply in the risers.
How to connect a heater to steel pipes
For this, it is not necessary to use a welding machine, since the connection can be made using special tees, the so-called “vampires”.
The design of such a tee resembles a conventional tightening collar, on the sides of which there are branch pipes. The ends are already threaded.
To install the vampire tee, first install it in a suitable place and tighten it with screws.
Between the metal part of the tee and the pipe, put the gasket that comes with the device
It is important that the gaps in the gasket and the tee intended for mounting the hole match exactly.
Then, using a metal drill, make a hole in the pipe through a special clearance in the pipe and rubber gasket. After that, a pipe or a hose is screwed onto the opening of the pipe, with the help of which water will be supplied to the heater.
To connect the storage water heater to a steel water supply, a metal coupling is used with special threaded pipes, onto which a stopcock, hose or pipe section can be screwed
The most important point when connecting a water heater is the sealing of all connections. To seal the thread, FUM tape, linen thread or other similar sealant is used. There should be enough of this material, but not too much.
It is believed that if the seal protrudes slightly from under the thread, this will provide a sufficiently tight connection.
Working with polypropylene pipes
If the boiler is supposed to be connected to a polypropylene water supply, you should immediately stock up on stopcocks, tees and couplings intended for them.
In addition, you will need special equipment: a device for cutting such pipes, as well as a device for soldering them.
To connect the boiler to a polypropylene water supply, the following procedure is usually followed:
- Shut off the water in the riser (sometimes you need to contact the housing office for this).
- Using a cutter, make cuts on polypropylene pipes.
- Solder tees at the outlets.
- Connect the pipes designed to connect the boiler to the water supply.
- Install couplings and valves.
- Connect the boiler to the faucet using a hose.
If the water pipes are hidden in the wall, you will have to dismantle the finish in order to gain free access to them.
It happens that access to pipes laid in strobes is still significantly limited. In this case, a special split-type repair coupling can be used.
The polypropylene side of such a device is soldered to a tee, and the threaded part is connected to the water supply. After that, the removable part of the coupling is removed from the structure.
To connect the water supply from PVC pipes to the storage water heater, you can use a special adapter, part of which is soldered to the pipe, and a hose can be screwed onto the other part
Connection to structures made of metal-plastic
It is not as difficult to work with metal-plastic pipes as with polypropylene products. Such pipes are very rarely laid in strobes, but are connected with very convenient fittings.
To connect the boiler to such a water supply, you can use the following procedure:
- Shut off the water supply to the pipes in the house.
- In the place of installation of the branch pipe, make a cut using a special pipe cutter.
- Install a tee in the section.
- Attach a piece of a new metal-plastic pipe or hose to the branches of the tee, depending on the situation.
After that, all connections should be checked for tightness. To do this, water is supplied to the system and it is observed whether a leak appears.
If the tightness of the connection is insufficient, the gap should be sealed or the work should be done again.
Single point heating connection
For a temporary hut at a separate point, popular models such as Electrolux Smartfix, Ariston Aures or Atmor Basic at 3.5-5.5 kW are suitable.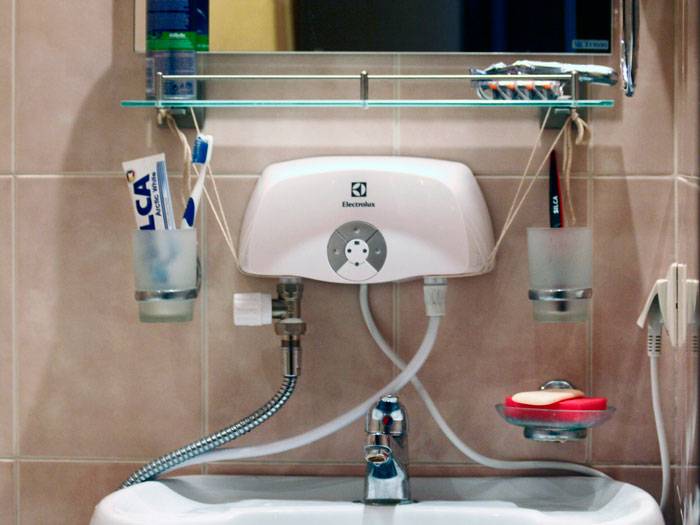
They are popular primarily for their ease of installation. The entire installation is completed in just 20-30 minutes.


For installation you will need:
PVA wire (to the socket) or cable VVGng-Ls 3*4mm2 (to the shield)
screws + dowels
Mistake #1
Someone generally farms and hangs everything on a wire - which is a gross mistake, we will talk about this a little later.
flexible eyeliner
It is better to immediately replace the factory plastic one (from flexibility there is only a name) with a metal corrugation.
First of all, unscrew the screws and remove the cover of the device case.
Find three terminals inside:
phase - L
zero - N
Earth
Connect the stripped end of the PVA wire here. Brown or white - phase, blue - zero, yellow-green - earth.
If you confuse the phase and zero, in principle, nothing critical. You do not check each time which side you insert the plug into the outlet.
At the other end of the wire, install the euro plug.
Mistake #2
Do not try to use models without a ground contact!
This socket must be protected by a differential automatic, or by an RCD + automatic assembly. Leakage current 10mA, like a washing machine.
Mistake #3
Do not connect the socket only through a modular circuit breaker!
The rated current of the RCD + automaton or differential automaton should not exceed 16A.
Suddenly, your child wants hot water without you and turns on the device on his own at a maximum of 5.5 kW. A standard outlet is not designed for such a load.
How to connect a instantaneous water heater to the water supply and electrical network with your own hands
Previously, we conducted a review in which the device of an instantaneous water heater is thoroughly covered, as well as recommendations for choosing.
So, the new "protochnik" got rid of the packaging, read the instructions and now is the time to think about where it is better to install the instantaneous water heater.
It is advisable to choose a place for installing an instantaneous water heater based on the following considerations:
- whether in this place spray from the shower will fall on the device;
- how convenient it will be to turn the device on and off;
- how convenient it will be to use the shower (or faucet) of the device.
Before proceeding with the installation, you need to decide:
- whether it will be convenient to use the device directly in the place of taking a shower (or, say, washing dishes);
- whether it will be convenient to use different modes of operation (if there are such adjustments);
- whether moisture or water will get on the device (after all, there are clean 220V!).
- It is also necessary to take into account the future water supply - how convenient it will be to connect the instantaneous water heater to the water supply. There will be no special conditions for the wall - the weight of the device is small. Naturally, it will be somewhat more difficult to mount the device on curved and very uneven walls.
Do-it-yourself instantaneous water heater installation
Usually, the kit contains the necessary fasteners, but it often happens that the dowels themselves are short (for example, there is a thick layer of plaster on the wall) and the screws themselves are short, so I would recommend purchasing the necessary fasteners of the required dimension in advance. On this installation can be considered complete.
Connecting the instantaneous water heater to the water supply
An instantaneous electric water heater can be connected to water in several ways.
The first method is simple
We take a shower hose, unscrew the “watering can” and connect the hose to the cold water inlet to the water heater. Now, by setting the faucet handle to the “shower” position, we can use the water heater. If we put the handle in the "tap" position, then cold water comes out of the tap, bypassing the heater. As soon as the centralized supply of hot water is restored, we turn off the water heater from the “shower”, fasten the “watering can” of the shower back and continue to enjoy the benefits of civilization.


The second method is more complicated, but more correct
Connecting the water heater to the water supply of the apartment through the outlet for the washing machine. To do this, we use a tee and a skein of fumlents or threads. After the tee, a tap is needed to disconnect the water heater from the water and to adjust the pressure and temperature of the water from the water heater.
When installing a crane, you should also pay attention to the ease of use of the latter. After all, we will repeatedly open and close it in the future. The section of our water pipeline from the faucet to the water heater can be mounted using various pipes: from metal-plastic and PVC to ordinary flexible pipes
The fastest way, of course, is to make an eyeliner using flexible hoses.If necessary, our plumbing can be fixed to the wall (or other surfaces) using brackets or any other means of fastening
The section of our water pipeline from the faucet to the water heater can be mounted using various pipes: from metal-plastic and PVC to ordinary flexible pipes. The fastest way, of course, is to make an eyeliner using flexible hoses. If necessary, our plumbing can be fixed to the wall (or other surfaces) using brackets or any other means of fastening.
Connecting the instantaneous water heater to the mains
It is forbidden to use standard sockets for power supply, due to the fact that in most cases they do not have proper grounding.
When connecting wires to screw terminals, phasing must be observed:
– L, A or P1 – phase;
- N, B or P2 - zero.
It is not recommended to perform electrical work on your own, it is better to use the services of a specialist.
Connection
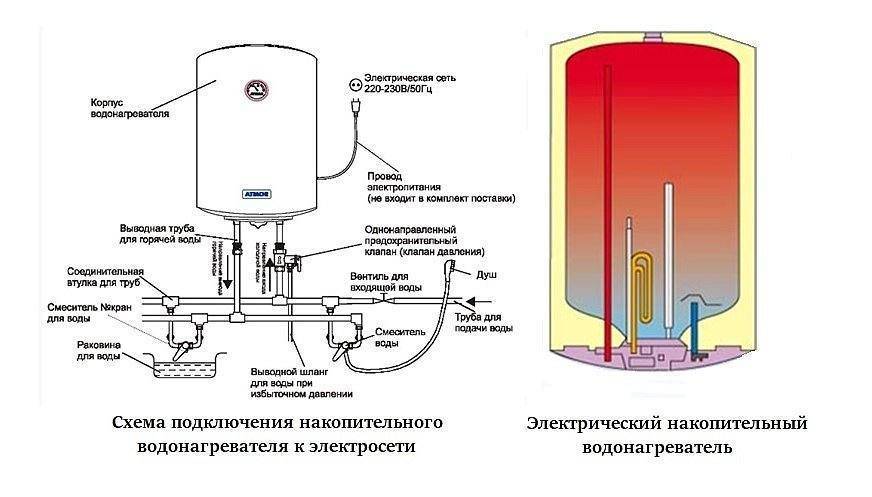
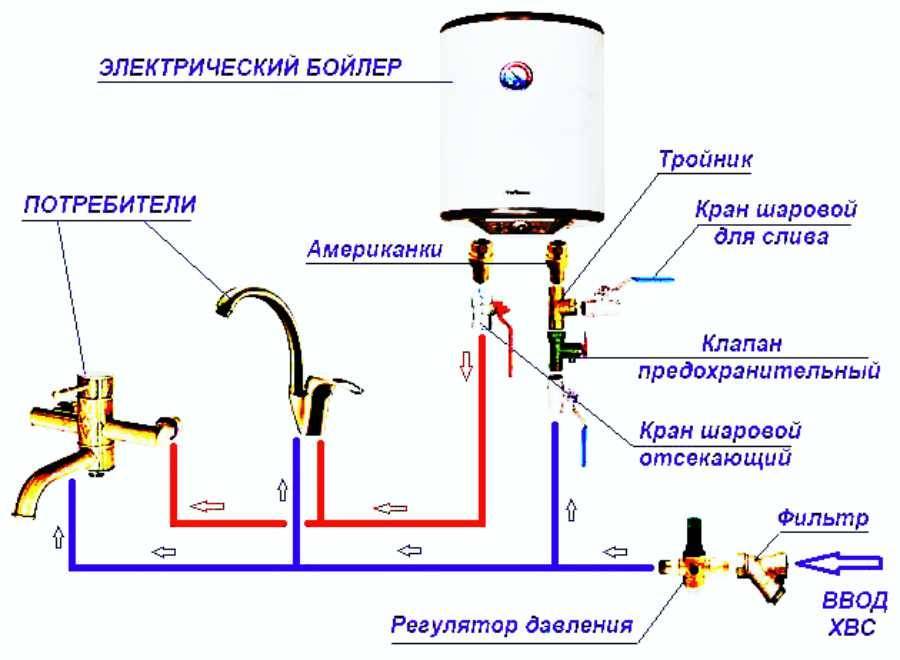
Requirements for installing any water heater:
- The equipment is located closer to the input of the water supply, ideally between the input and the water intake point.
- Increased power consumption does not allow connection to a regular outlet. It is necessary to lay a separate line from the switchboard.
- To protect equipment that operates in conditions of high humidity, it is imperative to install an RCD (residual current device) that protects against electric shock, and an automatic device for protection against overvoltage and short circuit.
- The water heater is a source of heat, so when installing it, a distance must be observed on all sides from obstacles and other equipment, excluding overheating.
If there is a centralized hot water supply system, the water heater is installed as a jumper between hot and cold water pipes. The system of non-return valves and shut-off valves determines the flow of water only from cold water to the tank and from its hot outlet towards the consumer.
If there is no hot water inlet, then the water heater is installed on a branch from cold water and forms an internal wiring in the apartment from its outlet.
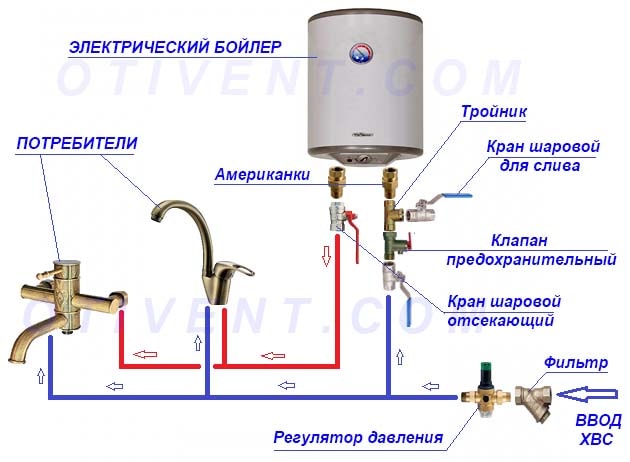
Any electric water heater is sensitive to water purity, so coarse and fine filters in front of it are a must.
Connection of cold water from the input after the meter and the fine filter to the cold (blue) input of the heater:
- Ball valve.
- Safety valve for water heater.
- A tee with a connected drain valve for water discharge.
- Fitting for connection to the cold input of the heater.
A hose with a diameter of 8-10 mm is led from the pressure relief valve of the safety valve to the sewer pipe. To do this, provide a special "dry" siphon or outlet from the pipe with a rise of at least 50 cm and a plug in which a hole for the hose is drilled.
Connecting hot water from the hot (red) output of the heater to the mixers:
- Fitting for connection to the water heater.
- Ball valve.
- Tee for connection to the DHW line
- Non-return valve, on the input side, preventing water from entering the central DHW system from the boiler.
For polypropylene pipes you will need: a soldering iron, a pipe cutter, a set of fittings, including tees, elbows and adapters from plastic to metal with an external thread, an American.For cold water, an unreinforced pipe PN16 (20) is used, for hot water - reinforced with glass fiber or aluminum PN20 (25).
For metal plastics, only a pipe cutter and a calibrator are needed from the tool when using clamp fittings. A set of fittings is selected with the same composition as in the first case (tees, elbows and adapters from plastic to metal).
Power connection
To connect the power, in most cases, a terminal block is used, located under a protective cover on the water heater body. Where exactly it is located and how to get to it, you should specify in the instructions. Only low-power heaters of 1.5-2 kW are supplied with a power cord with a plug for connecting to an outlet. However, in this case, it is also desirable to get by with a direct connection to a separate line, for which an automatic machine and an RCD are allocated in the shield.
The connection is made with a three-core copper cable with a cross section of at least 2.5 mm2, unless otherwise specified in the instructions. The higher the consumption, the thicker the cable should be. The table shows the requirements for the cable, based on power and current.
| Aluminum | Wire section, mm2 | Copper | ||
| Current strength, A | power, kWt | Current strength, A | power, kWt | |
| 14 | — | 1,0 | 14 | 3,0 |
| 15 | — | 1,5 | 15 | 3,3 |
| 19 | 3 | 2 | 19 | 4,1 |
| 21 | 3,5 | 2,5 | 21 | 4,6 |
| 27 | 4,6 | 4,0 | 27 | 5,9 |
| 34 | 5,7 | 6,0 | 34 | 7,4 |
| 50 | 8,3 | 10 | 50 | 11 |
There should no longer be equipment on the line for the water heater, as well as on the machine with RCD. It is allowed to install protection and the machine directly near the water heater, however, they should be mounted in special moisture-proof boxes
Connecting a watering can and a tap
Unscrew the water supply hose from your stationary shower head and wind it onto the inlet of the flow port (blue). There and there the thread is the same - ½ inch.
If necessary, change the internal rubber gasket (included).
On the second red outlet, wind the hose with the factory watering can from the heater.
Thus, what you used to have as a shower head has become a supply of cold water to the trough. A watering can with a hose from the kit is the very hot water at the outlet.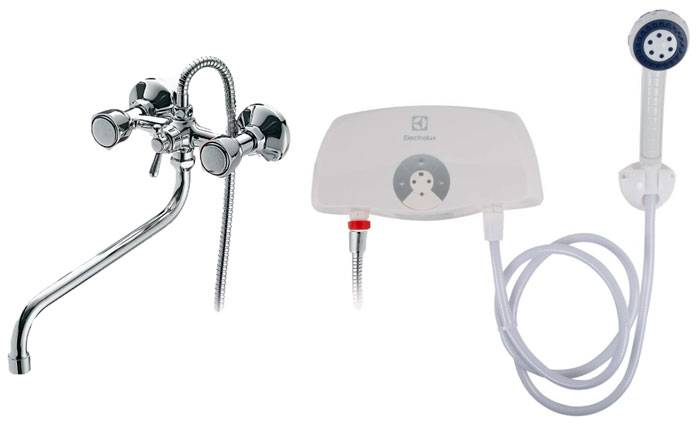


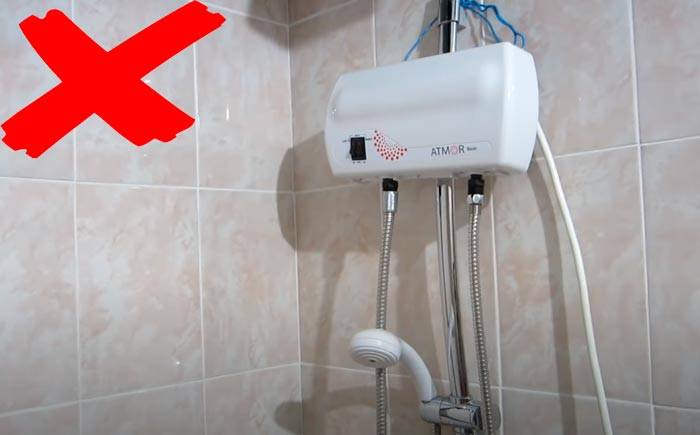
Mistake #5
Never install any faucets or valves on the outlet.
Although such things have internal protection, there have been cases when, when the pressure in the system dropped, overheating occurred inside the heating element with the formation of steam and it all exploded.
Therefore, when the tap water barely flows (pressure is less than 0.03 MPa), do not use such heating and turn off all the buttons on the case, but rather immediately pull the plug out of the socket. This will help you avoid emergency situations.
As for the working pressure in the system, such a device should be designed for a level up to 0.6 MPa. Please refer to the purchase instructions for details.
To start the instantaneous water heater for the first time, turn off the general DHW valve at the entrance to the apartment, and switch the position of the switch on the mixer from the tap to the watering can.
Next, open the hot water tap for 10-20 seconds and expel the air from the pipes. Only then can heating be started at medium or minimum level.
In addition to the watering can, a special tee can be screwed into the outlet, and a mixer tap from the kit can be attached to it. This is if the device is placed above the sink.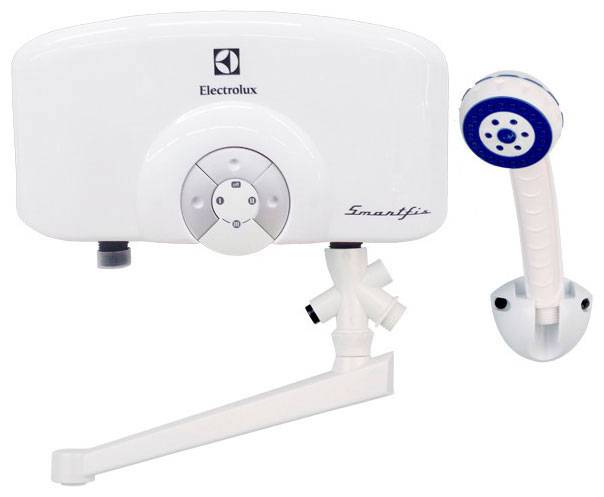
On the tee there is a switch-button from the shower to the faucet.
On this, in principle, and all. Do not expect boiling water and powerful pressure from such a temporary house, not to mention a tropical shower. But washing under warm water in the summer will do just fine.
If you do not have a stationary shower head or the water heater is installed in the kitchen, then you will have to make a tap on any flat section of the main pipe through a tee and connect from it with a flexible connection.
Some features of the water supply scheme
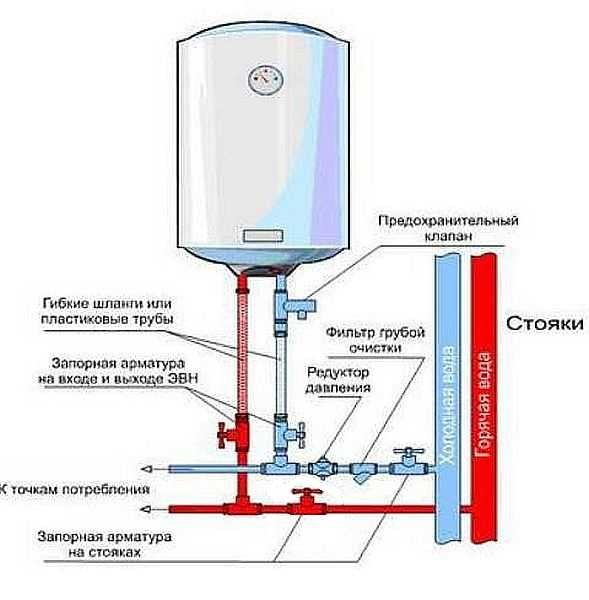
Connecting a storage boiler. The supply of cold water to the boiler system is carried out through a pipeline, which is connected directly to the centralized supply riser.
At the same time, a number of components necessary for the normal functioning of the equipment are mounted on the cold water line:
- Stopcock.
- Filter (not always).
- Safety valve.
- Drain tap.
The specified elements of the circuit are installed in the area between the cold water supply pipe and the boiler in the marked sequence.
The line for the outlet of the heated liquid is also equipped with a shut-off valve by default. However, this requirement is not mandatory, and if a tap is not installed at the DHW outlet, a serious mistake is not seen in this.
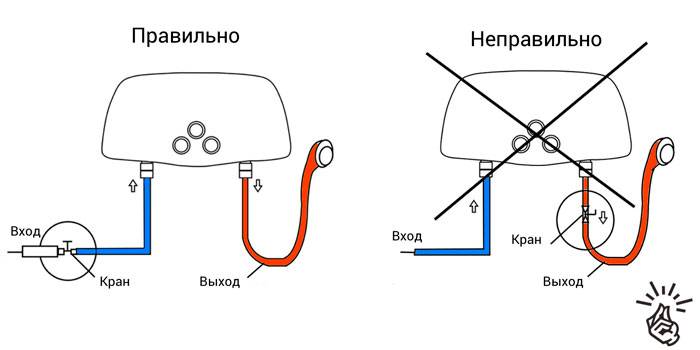
All water heater connection schemes have common features. The cold water supply point is located at the bottom, filters and a reducer must be installed in front of it to reduce the flow pressure (+)
Connecting an instantaneous water heater. Compared to a storage boiler, work is carried out according to a simplified scheme. Here it is enough to install only one shut-off valve in front of the cold water inlet fitting.
But the installation of a shut-off valve at the DHW outlet of the flow heater is regarded by many manufacturers as a gross installation error.
It should also be taken into account: if a well, a well, a water tower, etc. acts as a source of cold water supply for an instantaneous water heater, it is recommended to turn on a coarse filter in series with the tap (after the tap).
Often, an installation error with the filter connection or refusal to install it leads to the loss of the manufacturer's warranty.
Low power feeders
However, the main advantage of such low-power protochnik (up to 3.5 kW) is that they can be connected to a regular 16A outlet.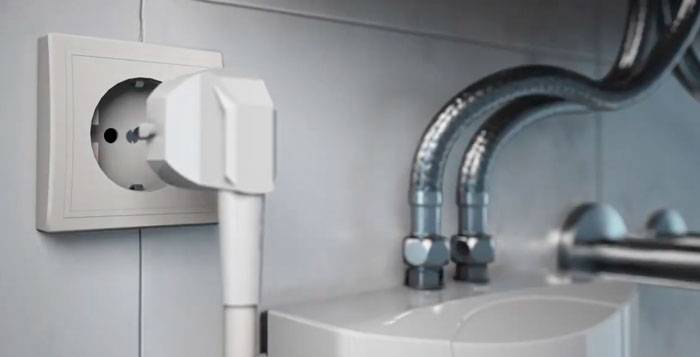
Even the one where you turn on the washing machine will do.
Everything above requires separate wiring from the switchboard
At the same time, please note that most models for 5.5 kW-6.5 kW have two switches on the panel that start the device in three modes: minimum - 2.2-3.0 kW
minimum - 2.2-3.0 kW
average - 3.3-3.5 kW
maximum - 5.5-6.5 kW (heating temperature in summer 43C)
For temporary use, it is quite acceptable to connect the device through a plug with a socket at medium power values. But do not expect full hot water in this case.


Especially in winter, when the water in the pipes is already cold (+5C).
Even with a power of 6.5 kW, you definitely can’t dial a bathroom, and not everyone dares to get up under the “electric odor”. Not to mention the voltage drop.
However, due to the ease of connection, this option suits many. This is much more convenient than those homemade products that residents of high-rise buildings are sometimes forced to resort to.
Let's take a closer look at all the stages of connecting the protochnik in two variations:
to a single point
for the whole house or apartment
We will study both electrical installation work (cable selection, RCD, machine), and plumbing.
Getting ready to connect
The best option for installing a boiler is a bathroom. If, due to limited free space, it is not possible to install a boiler in this place, then you should choose a place in the kitchen or in the utility room. When choosing an installation site, care should be taken to ensure the possibility of supplying a 220 V electrical network and cold water supply.
The boiler is installed at a considerable distance from the floor. In most models, communications are connected from below, so the device should be placed at a height of at least 50 cm. If the boiler is connected in the bathroom, then it should be placed at least 1 meter from the bathtub and sink.
This eliminates the possibility of water on the surface of the device and reduces the possibility of electric shock in the event of a malfunction of the device.
It should be borne in mind that a boiler filled with water has a significant mass and must be securely fixed. Water heaters are usually installed on the wall. For the correct location of the mounting holes, you can use a very simple marking method. It is necessary to prepare a sheet of cardboard and a marker.
The measurements are carried out in the following order:
-
A sheet of cardboard is laid on the floor.
- The boiler is placed flat on top of the cardboard, while the mounting brackets must fit snugly against the cardboard.
- The holes for the mounting bolts are marked on the cardboard with a marker.
- Marked cardboard is applied to the place where the boiler will be installed, and the points for drilling holes for anchor bolts are marked with a marker. When marking is done, holes are made in the wall with a diameter of 12 mm with a puncher. The depth of the holes depends on the bolts used.
For proper installation of the boiler, you will need to install a separate outlet and supply cold water to the device.
To do this, you will need to prepare the following materials and tools:
- Hammer drill or impact drill.
- Pliers.
- A hammer.
- Socket.
- Socket box.
- Anchor bolts.
- Electric cable with a core diameter of at least 3 mm.
- Spanners.
- Screwdriver.
- Building gypsum.
- Automatic switch 20 A.
- Chisel.
Types of storage water heaters
One of the most important criteria for choosing a device is its type according to the connection method. There are two types of such devices.
Type #1: Accumulation type pressure equipment
Used in systems where the water pressure is constant
In this case, the type of water supply does not matter, it is important that pressure is maintained in the line. Pressure devices have many advantages:
- Constant availability of hot water, because the tank of the device is never empty. As the heated water is consumed, cold water is poured into its place under pressure.
- Good water pressure. It is determined by the maximum pressure in the pipeline and is usually quite high, especially compared to a non-pressure counterpart.
- Ease of connection to the mains. Given that the device has a power of 3-4 kW, there are no problems with the power grid.
The equipment also has disadvantages. The most significant is the rapid decrease in the temperature in the tank when a large amount of cold water enters.
Low power does not allow the heating element to quickly heat the water, so you have to wait until the device copes with its task.This disadvantage is especially noticeable in small-volume devices.
For example, a 50-liter tank when using a shower with a flow rate of 3-5 liters of water per minute after 15 minutes. will be filled with cold water. You will have to wait a while to continue the water procedures.
This disadvantage is leveled by the correct choice of the volume of the device.
Type #2: Pressureless storage water heaters
The equipment is designed to work with pipelines in which there is no constant pressure. Water is supplied to the tank by means of a pump that is switched on manually or automatically.
In the latter case, a float switch is mounted inside the tank. A non-pressure system is considered by many to be inconvenient and outdated, but in some cases its use is fully justified.
For example, the device will be very appropriate in a country house, whose owners do not want to equip a full-fledged plumbing system. The advantages of non-pressure equipment include:
- Low power consumption, which allows you to install the device in houses with old wiring.
- Ease of installation and connection.
- Slow mixing inside the tank of hot and re-incoming cold water.
The disadvantages of non-pressure water heaters are not very many. Among them is low power, which makes it long enough to wait until the water warms up to the desired temperature.
In addition, you need to remember that the liquid enters the container slowly. Therefore, the water level may drop below the minimum mark, and this will lead to failure of the heating element.


It is important to always keep track of this moment. When choosing a place for a water heater, it is important to consider its type.
Horizontal models must not be placed vertically, otherwise serious damage to the equipment cannot be avoided.
When choosing a place for a water heater, it is important to consider its type. Horizontal models must not be placed vertically, otherwise serious damage to the equipment cannot be avoided.
Accumulative water heater for giving
Electric water heaters are very often used in apartments and country houses on an ongoing basis. This option is more suitable for permanent residence and is rarely installed in houses that are used only for the summer period, because. the water in it stagnates and must be drained if the water heater will not be used for a long time.
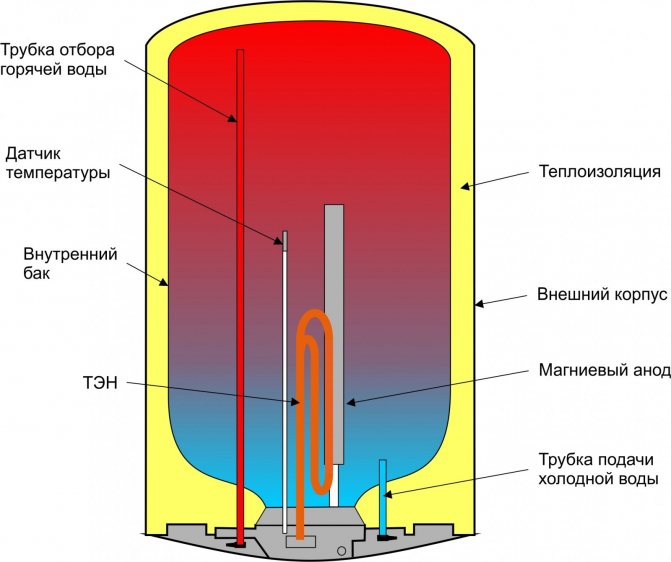
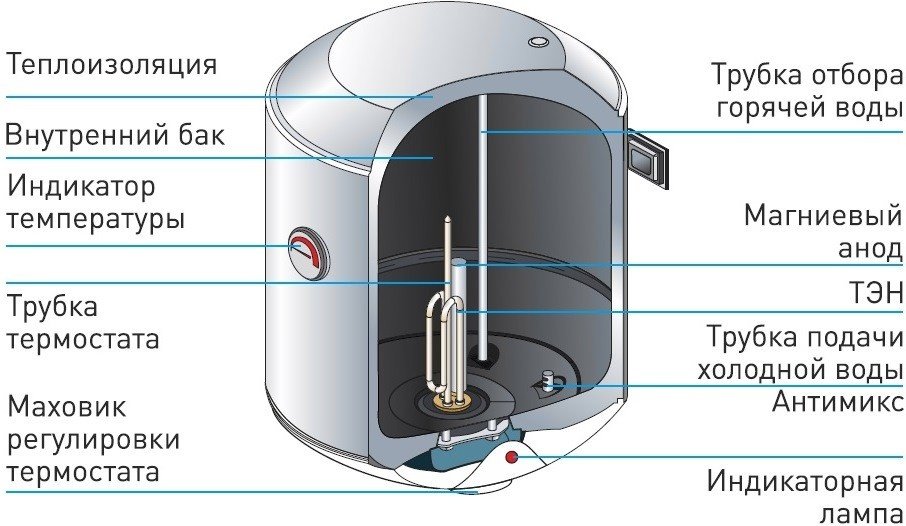
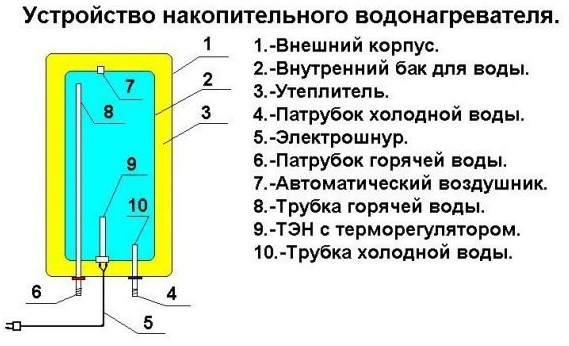
Electric storage water heater in section
Of the main advantages over bulk country water heaters:
- Water enters the water heater from the water supply - you do not need to fill anything into the tank, it is automatically filled and maintains a constantly set temperature.
- Thermal insulation between the inner tank and its body can significantly reduce heat loss and thus keep water hot longer and save energy.
- The volume of the storage tank varies from 8 to 500 liters, which allows you to cover almost any need.
- A huge number of functions up to smart inclusion. Those. the water heater remembers when water is most often required and heats it up in advance, and the rest of the time it works at minimum power.
All these advantages by themselves significantly increase comfort, but they are all aimed at the full and comfortable use of domestic hot water on an ongoing basis. And we are considering exactly the best water heater for giving.
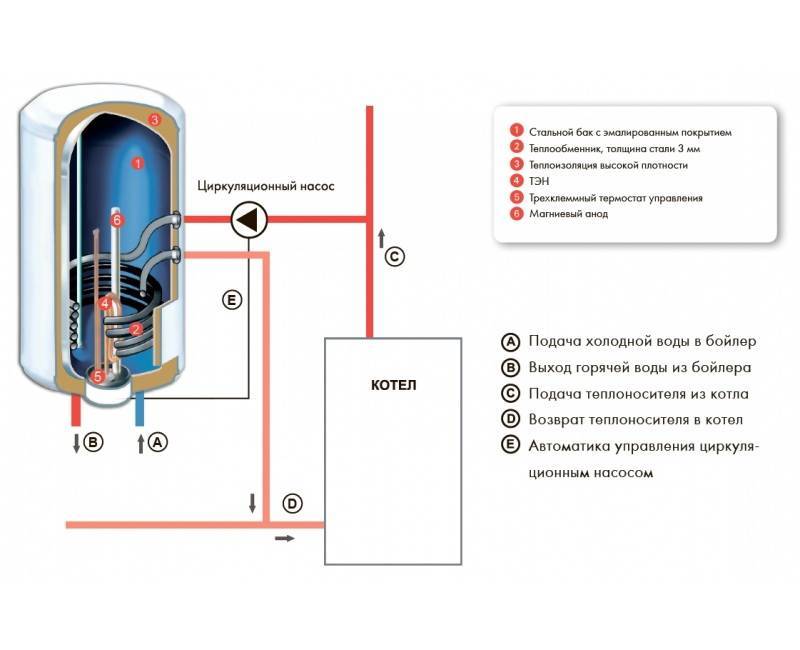
Indirect heating tanks
If we compare the designs of different water heaters, then an indirect boiler is the simplest and most reliable option for a storage tank for hot water. The unit does not produce heat on its own, but receives energy from outside, from any hot water boiler. To do this, a heat exchanger is installed inside the insulated tank - a coil, where hot coolant is supplied.
The structure of the boiler repeats the previous designs, only without burners and heating elements. The main heat exchanger is located in the lower zone of the barrel, the secondary one is in the upper zone. All pipes are located accordingly, the tank is protected from corrosion by a magnesium anode. How does the "indirect" function:
- A coolant heated to 80-90 degrees (minimum - 60 ° C) enters the coil from the boiler. The circulation through the heat exchanger is provided by the boiler circuit pump.
- The water in the tank is heated up to 60-70 °C. The rate of temperature rise depends on the power of the heat generator and the initial temperature of the cold water.
- The water intake goes from the upper zone of the tank, the supply from the main line goes to the lower one.
- The increase in the volume of water during heating perceives an expansion tank installed on the "cold" side and withstanding a pressure of 7 bar. Its usable volume is calculated as 1/5 of the capacity of the tank, at least 1/10.
- An air vent, safety and check valve must be placed next to the tank.
- The case is provided with a sleeve for the temperature sensor of the thermostat. The latter controls a three-way valve that switches the coolant flows between the heating and hot water branches.
The water pipes of the tank are conventionally not shown.
Typical strapping scheme
Indirect boilers are produced in horizontal and vertical design, capacity - from 75 to 1000 liters. There are combined models with an additional heating source - a heating element that maintains the temperature in the event of a heat generator stopping or burning firewood in the furnace of a TT boiler. How to tie an indirect heater with a wall heater correctly is shown in the diagram above.
The heat exchange circuit pump is switched on by the command of the contact thermostat installed in the heating tank
Not all wood and gas boilers are equipped with "brains" - electronics that control the heating and operation of the circulation pump. Then you need to install a separate pumping unit and connect it to the boiler according to the scheme proposed by our expert in the training video:
Positive and negative points
Compared to gas models of boilers, indirect boilers are inexpensive. For example, a wall-mounted unit from the Hungarian manufacturer Hajdu AQ IND FC 100 l costs 290 USD. e. But do not forget: the hot water tank is not able to work independently, without a heat source. It is necessary to take into account the costs of piping - the purchase of valves, a thermostat, a circulation pump and pipes with fittings.
Why is an indirect heating boiler good:
- water heating from any thermal power equipment, solar collectors and electric heating elements;
- a large margin of productivity for hot water supply;
- reliability in operation, minimum maintenance (once a month, warming up to the maximum from legionella and timely replacement of the anode);
- boiler loading time can be adjusted, for example, moved to the night.
The main condition for the correct operation of the unit is sufficient power of the thermal installation.If the boiler is chosen purely for the heating system without a reserve, the connected boiler will not allow you to warm up the home or you will be left without hot water.
In order for hot water to immediately flow from the mixers, it is worth installing a return recirculation line with a separate pump
The disadvantages of an indirect heating tank are its decent size (small ones are installed less often) and the need to heat the boiler in the summer to provide hot water. These disadvantages cannot be called critical, especially against the background of high performance and versatility of such equipment.