
- Connection errors
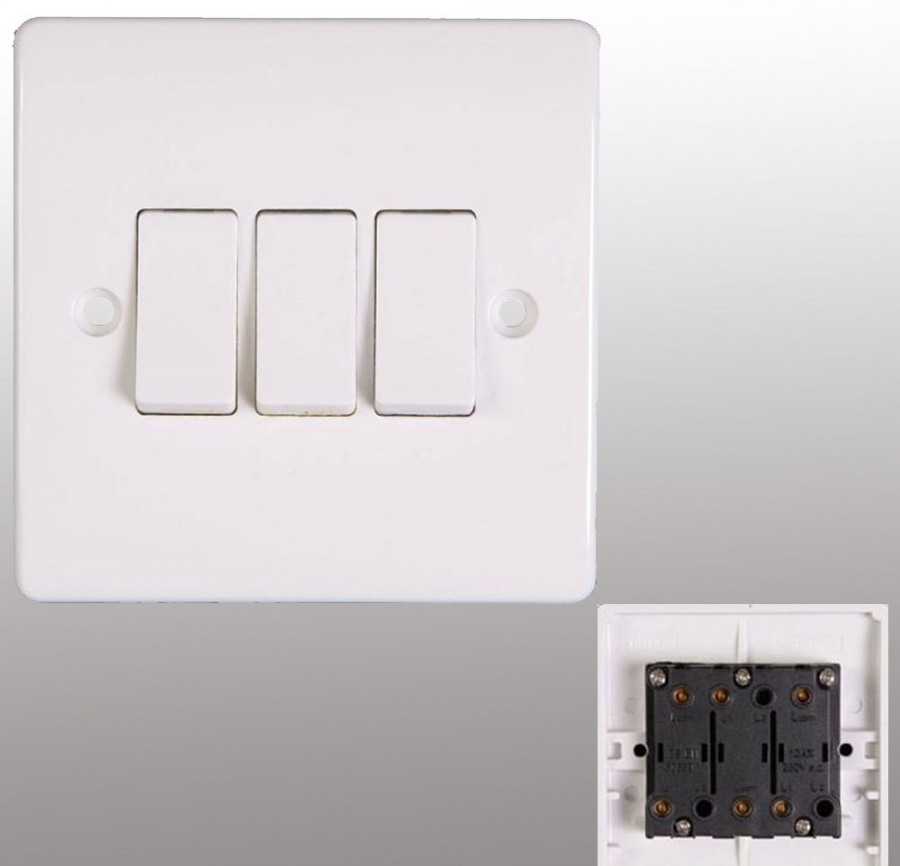
- How to connect a three-gang switch with your own hands
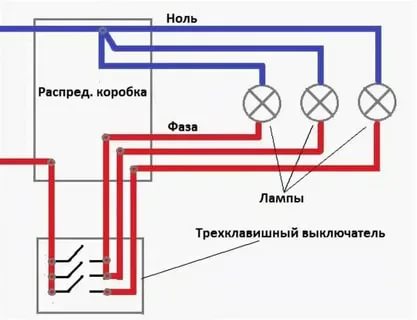
- Wiring diagram for a triple switch
- Connecting wires to the switch
- Wiring connections in the junction box
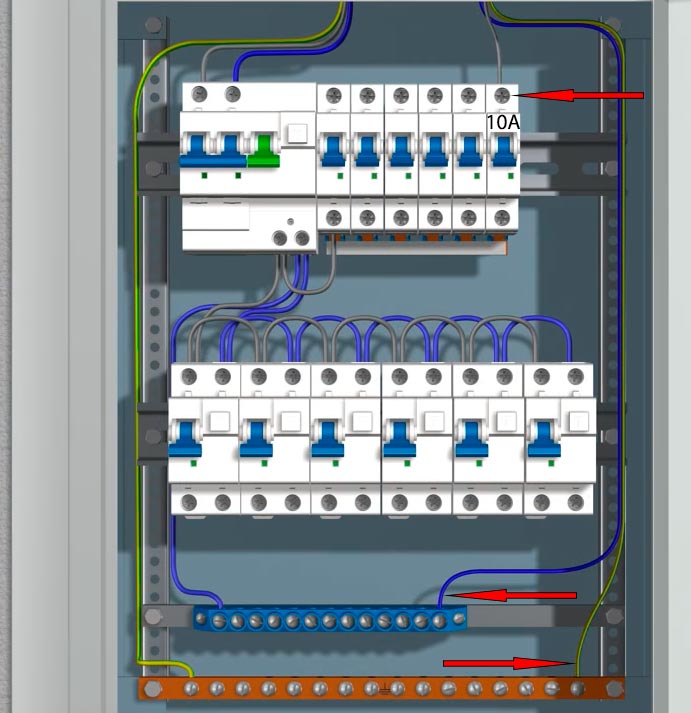
- Preparatory work before installing the circuit breaker
- Wiring Features
- Photo of connecting a three-gang switch
- Do-it-yourself installation of a three-gang switch
- Selection Tips
- Three-gang switch in everyday life
- Installation of electrical wiring
- Criteria for a competent choice
- Where are they applied?
- Let's analyze the wiring diagram for connecting the switch
- 5 Tips for Choosing a Three Position Switch
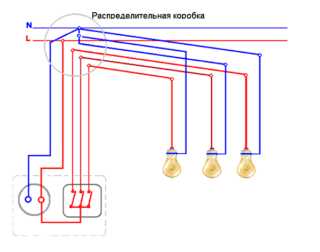
- Wiring through junction box
Connection errors
1
The point here may be that you simply mixed up the phase and zero on the outlet. And accordingly, they launched with a jumper on the common terminal of the switch not a phase wire, but a zero one.
Using an indicator screwdriver, double-check where the phase comes in.
2
Often, some electricians have separate wiring for the outlet and a separate one for the switch. As a result, you can have two power supplies at the same time in the block. And by assembling the circuit according to the above guide, you can inadvertently create a short circuit.
3
4
But the fact is that the switch in this case does not break the phase, but zero!
So it turned out that where there was a phase before, a zero was formed.Often, it is not easy even for the fitters themselves to understand the switchboards.
At the same time, the indicator glows on the contacts, because the bulbs are screwed into the cartridges. As a result, the circuit is closed through the filament.
Unscrew all the lamps and check the phase conductors again. The glow on the three phases should disappear. For the correct connection, it is already necessary to find a common zero here and just throw it on the central contact of the new three-gang switch.
And it is best to find the cause in the switchboard by inviting a professional electrician and restore the normal power supply circuit.
5
It seems convenient to many - you pressed a key and the light in the outlet disappeared. It is not recommended to do so. This is due to the fact that usually a powerful load is connected through the socket contacts, for example, a 1.5-2 kW hair dryer.


But through it you can still connect a tee or extension cord! Switch contacts for a current of such magnitude and duration are not designed at all. As a result, after a while, the voltage in the entire unit will disappear, if a fire does not happen even earlier.
How to connect a three-gang switch with your own hands
Connecting a three-circuit device is extremely simple. To do this correctly, you need to follow a lot of step-by-step actions. The entire connection process is divided into stages:
- connecting the cable to the three-keyboard;
- connection of wires in the box;
- checking the correct connection and troubleshooting.
Before carrying out the process, it is advisable to study the connection diagram. This measure will help minimize possible misses.
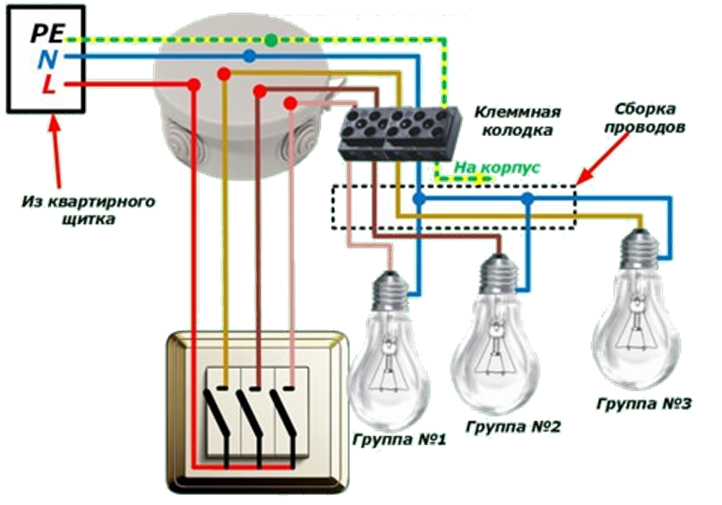
Wiring diagram for a triple switch
There are several conductors in the box. Each performs its own function:
- The cable with 3 cores is located in the machine present in the control room.
- A four-core wire goes down to a three-keyboard connected to the bottom.
- The wiring diagram for a triple switch for 3 lamps implies connection with a 4- or 5-wire VVGnG-Ls wire. Its cross section is 1.5–2 mm. A chandelier with 6 or 9 lights requires the same connection.
- With 3 different luminaires, 3 different three-core cables must be pulled. This method is common.
Now the number of requests for “triple switch with socket circuit” has increased on the network. It is easy to find detailed connection algorithms with photographs or drawings there.
Useful video on the topic:
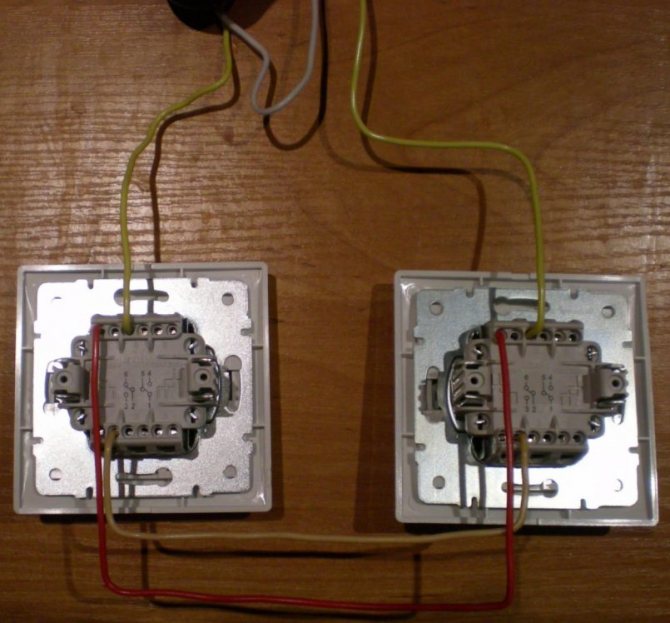
Connecting wires to the switch
Often the device is installed in a block with a socket. People are interested in how to connect a three-gang switch. You need to take several consecutive steps:
- You will need a copper wire with a cross section of 2.5 mm². Direct the cable from the common shield. When he goes from the box to the switch, this is a mistake.
- Copper wire 5 * 2.5 mm² down the gate. Then it will be near the switch and socket block. Connect the common wire to the contact. This is due to a more powerful load on the sockets. On the lamps, it is not so pronounced.
- By means of a jumper, put the phase on the upper clamp of the device. Zero send to 2 contact. Lead the rest of the conductors under the lower contacts.
Connecting the cable in the box is carried out by the method described above. The difference lies in the connection of the auxiliary zero conductor to the central point.
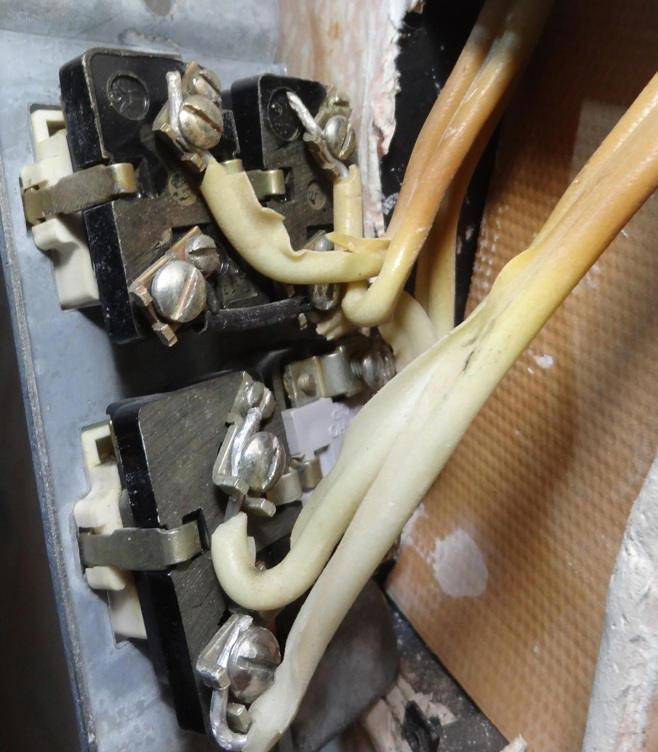
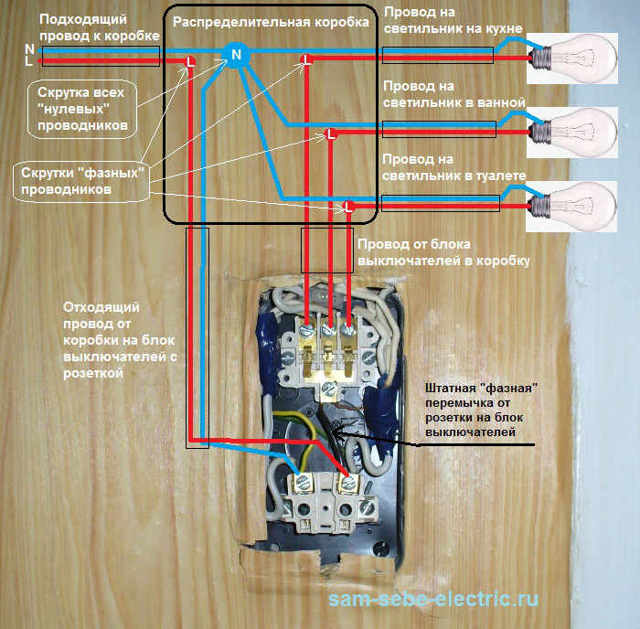
Wiring connections in the junction box
There are 5 conductors in the box. It is necessary not to confuse them and connect the wires correctly. It is worth starting with 2 cores: zero and ground. The number of bulbs doesn't matter. All zeros will be at the same point.
The rule of reduction to a common point applies to grounding conductors. On fixtures, they should be connected to the body. Sometimes wires are missing.
You can quickly connect the cores with clamps for Vago terminals. They are suitable for lighting loads. It is better to choose the colors of the lived, based on existing standards. The blue wires are null. Ground wires are colored yellow-green.
We must not forget that zero is not directed to the switch. It goes directly to the lamps. Through the contact of the device with three keys, 1 phase is broken.
Then you need to connect the cores of the phases. Start with the conductor coming from the input machine. Combine a phase with a common phase conductor. It goes to the common terminal of the three-keyboard. If the core is not directed anywhere else, the phase starts on the switch.
Combine 3 conductors coming out of the keys with 3 phases. They depart from the circuits to the lamps using Vago clamps. The correct marking of the cores will help to quickly recognize them. Each controls a light bulb in the room. There will be 6 connection points in the box.
Before switching on, check the circuit of the triple switch again. Then turn on the machine and start the lighting devices with the keys.
We recommend watching a video on the topic:


Preparatory work before installing the circuit breaker
For example, point 7.
We fix the plastic case in the designated place on the wall using dowels - the best option for fixing on concrete and brick bases. Remove the elastic plug located in the upper part of the switch case, insert the wire into the hole and the end of the corrugated pipe coming from the ceiling.
With a two-button switch, you can control only two groups of lighting fixtures. Sometimes it is mistakenly connected to the secondary phase wire. So, these additional wires come from mini-indicators located on the keys.
Determine in advance and ensure the presence of connecting material for the wires. We test the operation of the device, although it is better to make the first check even before the internal mechanism is completely fixed - so that you do not have to redo it. So, to install a new switch, we needed tools: a screwdriver, pliers, a knife, wire cutters, an indicator screwdriver, some insulating material and 20 minutes of time . The difference between a single-key device and a two-key one is only in adapters, which allow you to supply current to one or the second connection, or both at the same time.
After that, you need to find the phase wire and the entrance under it, unlike the outputs, is one. Zero N blue wire for all lamps is common. One of them is the input - phase, and the other two are output, which will supply voltage directly to the lamp itself.
To ensure the safety and stability of the installation of the built-in switch, use a mounting box under the socket - a protective plastic case. Illuminated two-gang switch A backlit switch differs from a conventional one only in that it contains a backlight indicator. Connection to contacts in the absence of a grounding line Wiring diagram double switches on two bulbs to TN-C system. The input phase is sent to break, and after that it is divided into three different phase conductors, each of which is sent to its own group of light bulbs.In the off state, the switch is illuminated by an LED, and you do not need to look for it for a long time in a dark room.
Wiring Features
And of course, it is necessary to fully comply with the rules of electrical safety. You need to open the outlet and check the voltage. Sometimes there are switch cases made of ceramics. Determine in advance and ensure the presence of connecting material for the wires.
However, if you are not sure of the correctness of the actions, it is better to play it safe and make the first connection under the supervision of an experienced electrician. We test the operation of the device, although it is better to make the first check even before the internal mechanism is completely fixed - so that you do not have to redo it. So, to install a new switch, we needed tools: a screwdriver, pliers, a knife, wire cutters, an indicator screwdriver, some insulating material and 20 minutes of time . The twists in the box are protected with electrical tape or use all the same terminals. At the switch installation site, the corrugated pipe, fixed on the wall with special clips, is cut open, and the working insulated wire is pulled out. Under the switch there will be another electrical device - a socket, so the cables for both devices are enclosed in one corrugation for aesthetic reasons. It is necessary to strip the ends of the wires so that they are only enough to connect to the terminals.
How to connect a double switch #Electrician's Secrets / How to connect a double switch
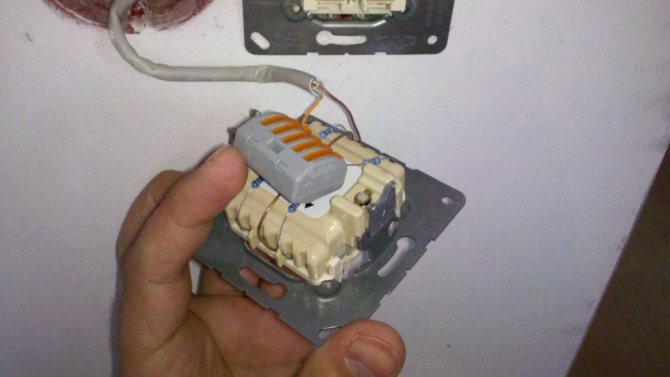
Photo of connecting a three-gang switch
- Smart GSM sockets: device, principle of operation and overview of the most modern devices. 150 photos of the best models
-
Location of outlets in the kitchen - layout planning, rules and common mistakes when placing kitchen outlets. 135 photos of comfortable accommodation ideas
-
How to install an outlet block in a wall - instructions for planning and installing multiple outlets. Schemes, photos and videos
-
Instructions on how to move the outlet to another place: detailed step-by-step instructions on how to transfer and mask the outlet (135 photos and videos)
-
How to choose a circuit breaker for a house and an apartment: tips for choosing and calculating the parameters of the circuit breaker for current. Which machine is better - an overview of the leading manufacturers (175 photos + video)
-
How to check the voltage in the outlet with a multimeter: a step-by-step description of how to measure the main parameters of the current in the network (120 photos + video)
1+
Do-it-yourself installation of a three-gang switch
The main stages of installation and connection of a three-gang switch:
- Turn off the power supply at the switchboard.
- Disassemble the switch. Disconnect the housing from the base part, and loosen the clamps of the terminals. There are models with latch terminals, they do not need to be loosened, here the wire is fixed by a clamping mechanism. Loosen the spacer screws to mount the appliance in the socket.
- Connect wires. Here you need to act carefully. The phase is connected to a common terminal, from where it is bred to 3 lighting fixtures or 3 groups of lamps in a chandelier. It is necessary to strip the wire from insulation by no more than 1 cm. In the case of stranded wires, use special sleeves or pre-tin the ends.
- Connect the wires in the junction box. This can be done using special terminal blocks or by soldering the wires.
- Check if the connection is correct. Before assembling the switch, check that the keys work correctly.To do this, temporarily turn on the power supply on the panel.
- Assemble the switch and junction box. In the socket box, the switch is fixed with complete fixing screws. After mounting the inner part, install the protective and decorative casing on the switch.
- Turn on the power on the board.
It is important to ensure that the switch opens exactly the phase, and not the neutral wire. Otherwise, there is a risk of electric shock, as there will be a constant voltage present on the lighting fixture.

Selection Tips
The choice of a three-gang switch will depend only on your wishes.
But when choosing it, you need to pay attention to the following details:
- There should be no burrs on the top side of the product. They may indicate a poor quality product.
- The keys should work without jamming.
- When you turn it on or off, you should clearly hear clicks.
- On the reverse side of the product there should be a wiring diagram for the product.
- All terminals should work properly.
- The three-gang switch must have butt terminals. They greatly simplify the installation process.


Three-gang switch in everyday life
Today, many people use a large number of light sources in their home. Their number can sometimes exceed twice the human need. After conducting research, it was possible to find out that if a person stops lighting extra lamps, then he can save electricity by 30%. On the other hand, a three-gang switch allows you to make the house much more comfortable.

The device of the three-gang switch is quite simple. But thanks to its simple design, it allows you to solve most problems. With it, you can divide your room into several illuminated zones. Thanks to him, you can turn on additional lighting only when necessary.
Installation of electrical wiring
We will assume that no wires have been laid anywhere yet. Therefore, first of all, you lay a three-core power cable VVGng-Ls 3 * 1.5mm2 in the strobe from the switchboard to the junction box.

To further disconnect the wires inside, leave a margin of about 10-15cm. You will need it when, for any reason, you have a short circuit or burnout of the contacts, and you can easily bite out the burnt wires and reconnect everything again, without chasing and laying a new cable.
In the shield core of the cable, they are connected to a separate lighting machine with a rated current of not more than 10A.
In the junction box, the cable is stripped and the cores are signed according to the color and how you connected them in the shield:
L - phase
N - zero
Pe - ground conductor
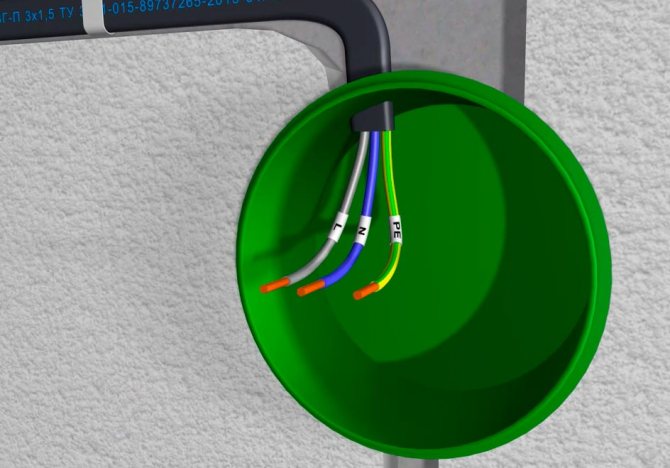
By the way, it is advisable to keep all the markings, including the cables themselves, and not just their cores. This will help you in the future, when connecting new lines or repairing this wiring, quickly figure out which cable comes from and where it goes.
You can sign with a marker directly on the walls of the box itself.
When marking the cores, try to comply with the colors approved by the rules.
Blue - zero
Yellow-green - earth
Gray, white, brown, etc. - phase
Criteria for a competent choice
When purchasing a triple switch, carefully inspect it, study the physical quantities, check the connection diagram.
Key points to consider when choosing a product:
- The body of the product - it must be free from any kind of defects: burrs, dents and chips.
- Key actuation - should be easy and without jamming.
- Sound effects - when you turn on each of the keys, a characteristic click should be heard.
- Core - should also be devoid of burrs, and its terminals should work properly.
When planning to install a switch in a room with high humidity, it is necessary to choose a device with protection.
The working elements of the waterproof switch have an additional rubber or plastic shell that protects the mechanism from direct contact with water.
To simplify the installation procedure and at the same time ensure the durability of the device, preference should be given to models whose cores are equipped with screw or clamp-type terminals.
During the installation of imported triple switches, especially Korean and Chinese products, difficulties may arise that you should think about in advance:
Where are they applied?
Modern repairs and design solutions are increasingly offering lighting to be divided into different groups.
For example, a room has a complex configuration - niches, ledges, partitions or curtains. Very often now large one-room apartments are divided into zones, so-called studios are made of them. In this case, a switch with three keys is the best fit. By means of a specially thought out and mounted zone lighting, it is possible to distinguish a working area where there will be a computer desk, a sofa, shelves with books, here the lighting becomes brighter. The second zone is the sleeping area, where a more subdued light is quite suitable.The third zone is the living room, where there is a coffee table, armchairs, a TV, here the lighting can be combined.


When else is it advisable to use a three-gang household switch?
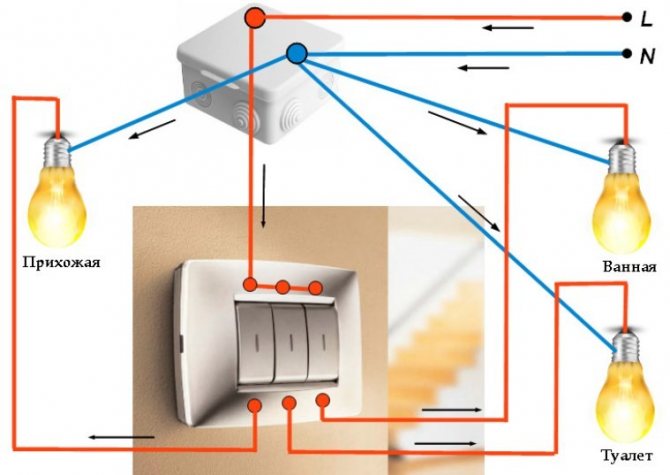
- If from one point it is necessary to control the lighting of three rooms at once, for example, a corridor, a bathroom and a bathroom, when they are close to each other.
- In the case of combined lighting in the room - central and spot.
- When in a large room lighting is provided by a multi-track chandelier.
- If a multi-level plasterboard ceiling is installed in the room.
- When the lighting of a long corridor is divided into three zones.
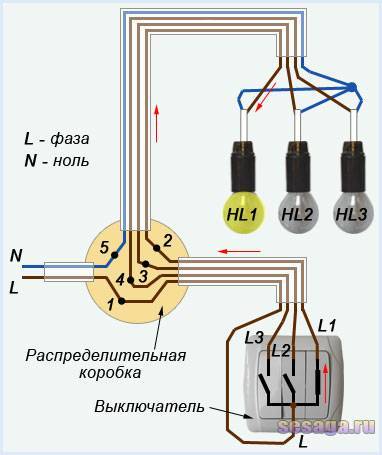
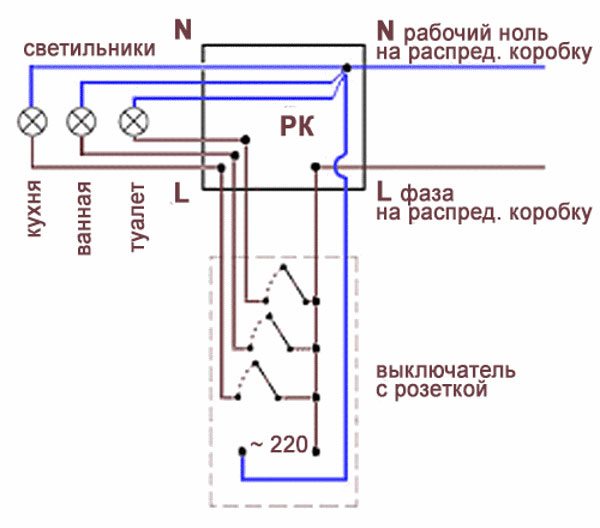
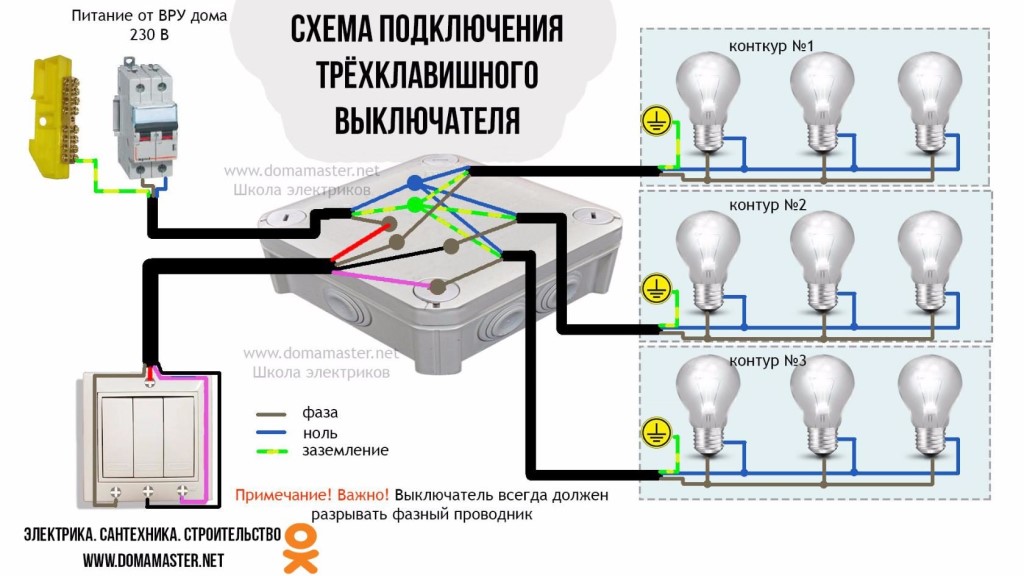
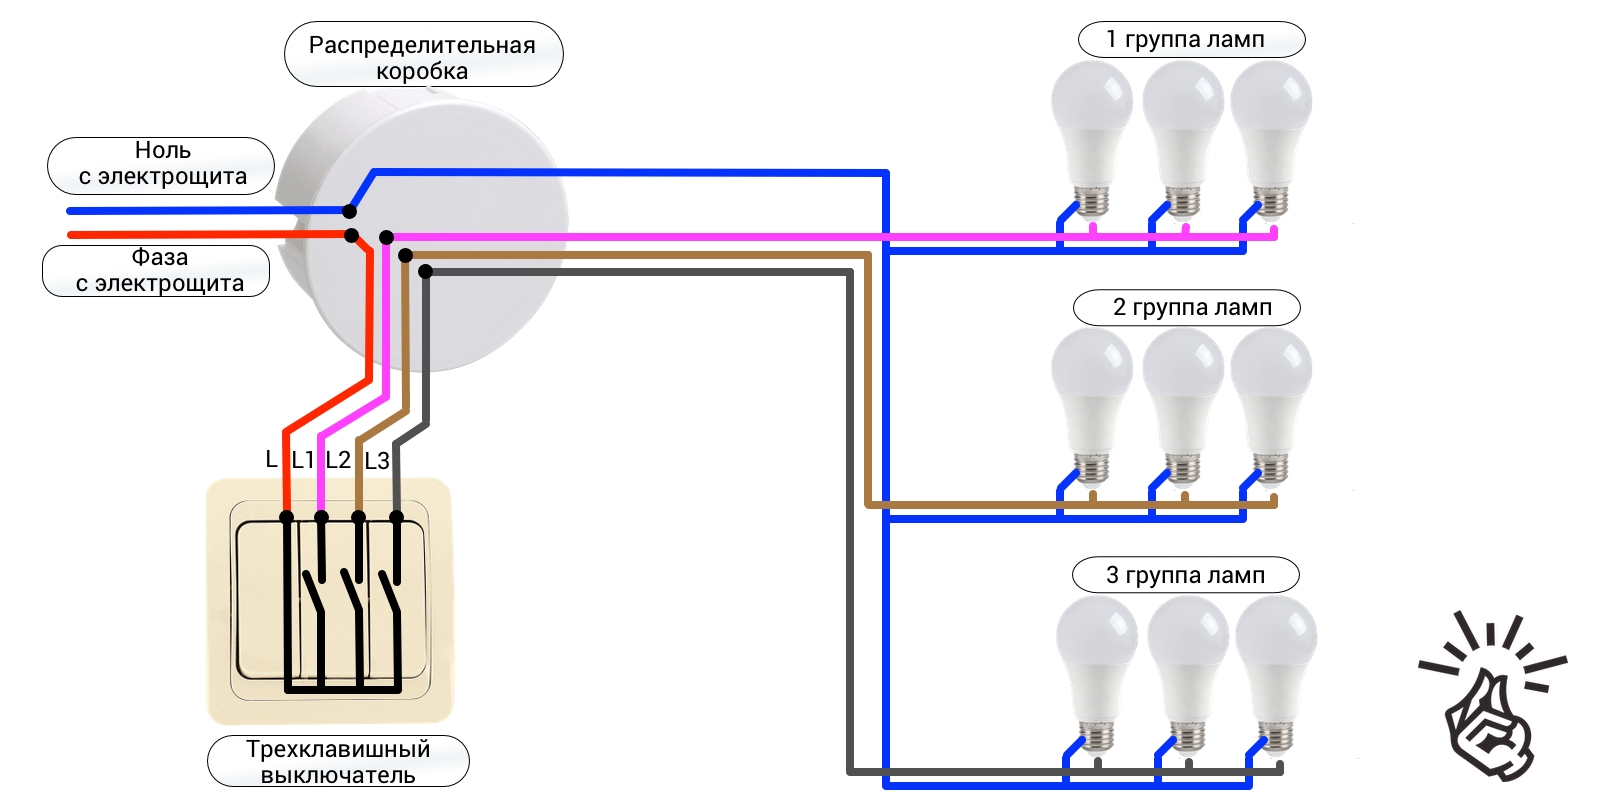
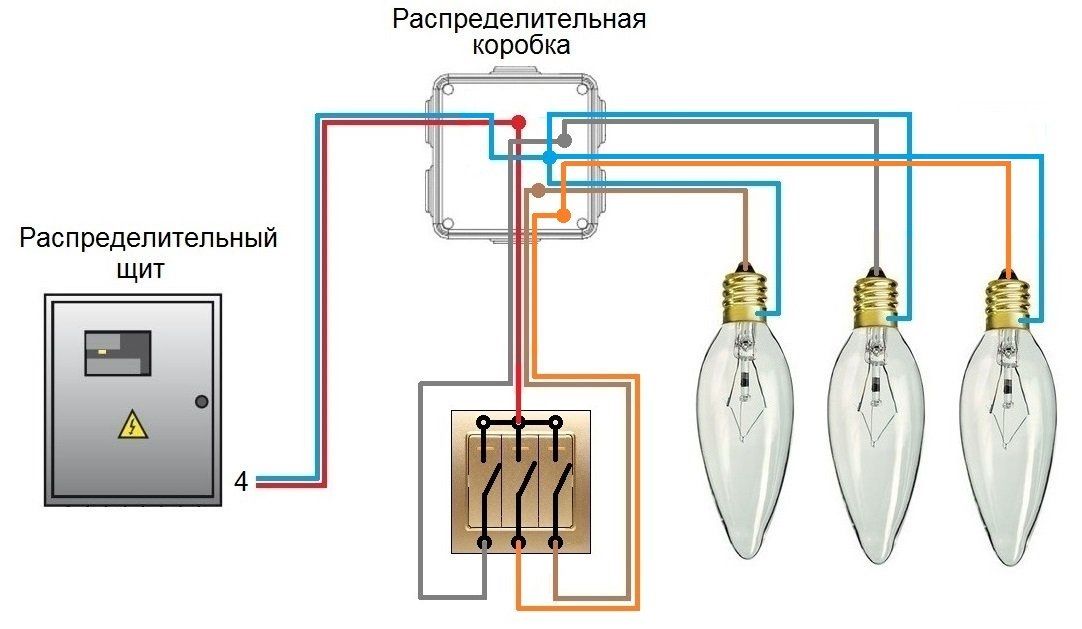
Let's analyze the wiring diagram for connecting the switch
Phase L enters the junction box and at the point 1 connects to the cable wire going to the switch. Coming to the switch, the phase enters its lower input contact and on this contact is constantly.
From the top three output contacts of the switch phase wires L1, L2, L3 the same cable goes to the junction box, where at the points 2, 3, 4 connected to the wires of the cable going to the ceiling. On the ceiling phase wires L1, L2, L3 connect to the brown terminals of the lamps HL1, HL2, HL3.
Zero N enters the junction box and at the point 5 connects to the cable wire going to the ceiling. On the ceiling, zero is connected to the blue terminals of the lamps connected at one point, forming general conclusion.
This is interesting: A branch for connecting an outlet - how to connect it correctly
5 Tips for Choosing a Three Position Switch
Some rules:
Carefully inspect the device in the store.All three keys should work smoothly, without jamming, with characteristic clicks.
There should be no scuffs, scratches or cracks on the outside.
It is preferable to take breakers with a block base made of ceramic or thick metal
They better withstand overheating and high stress, unlike plastic.
Pay attention to the degree of protection of the shell, if, of course, this matters to you. It is marked with the letters IP and two numbers.
The first digit is protection against foreign objects: 0, 1 - not used in everyday life; 2 - protection against getting a finger; 3 - protection against ingress of wires and tools with a diameter of up to 2.5 mm; 4 - protection against small parts (wire, pins, etc.); 5, 6 - dustproof models. The second digit is moisture protection: 0 - absent; 1, 2 - protection against vertically falling drops of water; 3, 4 - for the street; 5, 6 - protection from strong jets (shower, ship, etc.); 7, 8 - withstand immersion in water, but such models are almost never found.
Do not forget that switches are made for three positions with illumination. They are very handy if you need to turn on or control the lights in the dark. This way you will see which key is enabled and which is not. Illuminated switches come in one and two positions.
These are not all models of triple switches that can be found in electrical stores. There are decorative (colored, cherry, wood, etc.), waterproof, child-resistant, USB output, LED backlight and many other options.
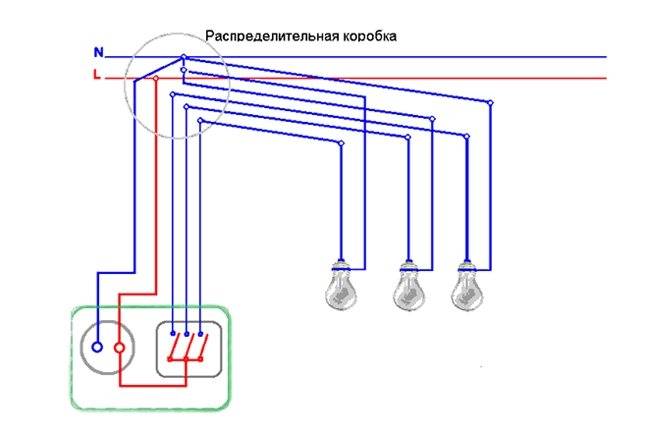
Wiring through junction box
It is better to bring the same one stroke again all three phase wires to the junction box, and then bring them to the lamps along the common upper gate.If we are wiring to the chandelier, then the last option is the best.
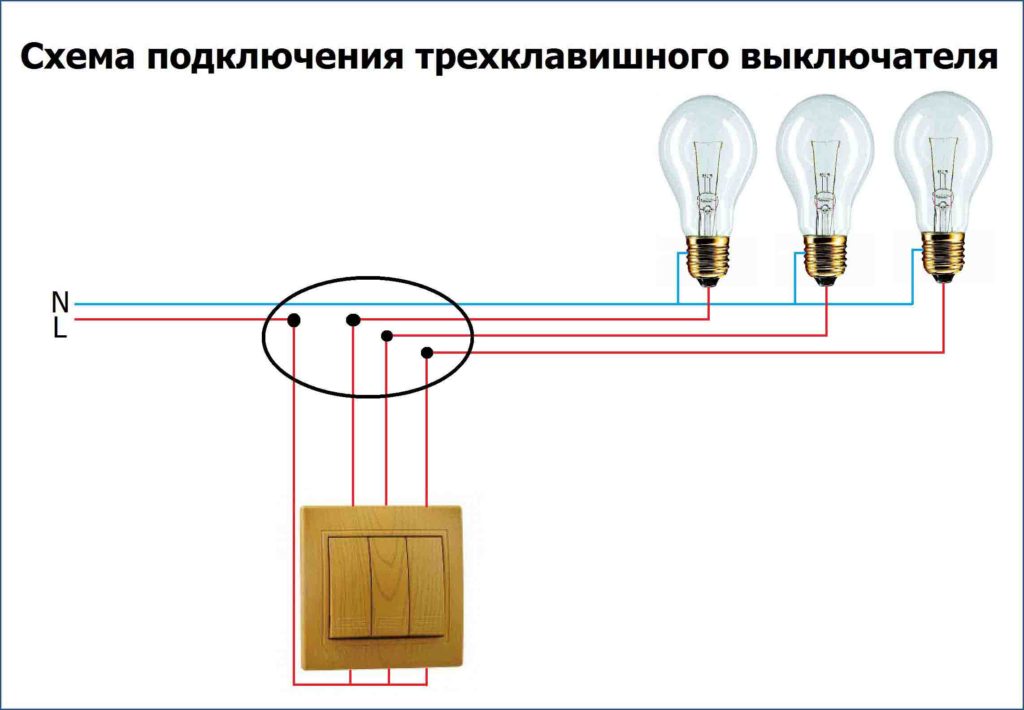
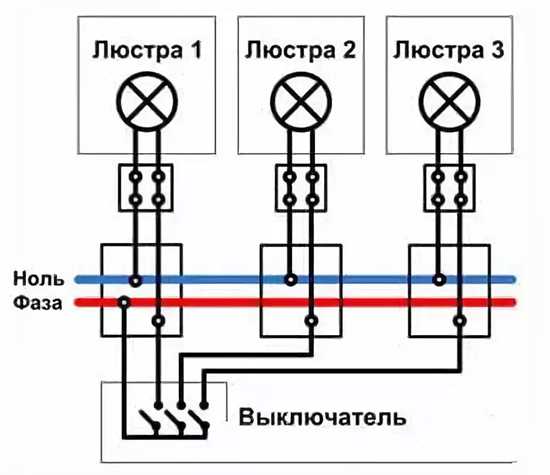
Triple switch: chandelier connection diagram
L - phase to the switch (red); then the phase (yellow, brown, pink) goes to three groups of chandelier lamps; N - working zero (blue), goes directly to the chandelier and is bred by the chandelier's terminal block in groups; PE - grounding (yellow-green), connected to the body of the chandelier
Thus, before connecting the triple switch, it is necessary to prepare all the wiring.
All work should be carried out with the power supply of the lighting network turned off by automatic machines. To search for zero and phase, the power turns on, but after finding them with an indicator and marking, it turns off again.
Next, the following work is carried out:
- Search for existing wiring: you need to find a junction box, lines that will participate in the wiring. It is necessary to mark the walls for processing. A place is planned for the hole where the three-gang switch will be installed, and for wiring to and from it.
- Opening existing channels and punching new ones.
- Laying and securing cables from the box to the installation site. Wires for phase, zero and ground (if any) should be marked. If possible, you need to adhere to the standard colors of the wires: blue for zero, yellow-green for grounding and other colors for the phase.
- Installation and fixing of socket boxes. Wires are held inside them.

Triple switch connection
Determine the wires in the junction box to which to wire. Phase and zero are indicator. They are marked (with electrical tape).
This work is carried out after the inspection made sure that the previous actions did not cause damage to the wiring.After that, the automatic lighting network is turned on and the phase of the wires of the junction box is determined, to which it is necessary to make a connection. The wires are marked, after which the power is turned off again.
The wires of the new wiring are connected to the junction box, their ends are securely insulated with special caps.
To check the correct connection, turn on the machine again and, making sure that everything is fine, check the phase on all wires. It should be on only one phase wire going through the socket to the switch. The rest should be zero: on the neutral wires going to the lamps, on the ground wires and phase wires going from the switch to the lamps, since they are open.


- Turning off the machine again, you can connect the switch by connecting the wires to the terminals according to the connection diagram. After that, the switch can be put in its place, fixed in the socket according to the design.
- Wires are connected to lamp sockets or chandelier terminal blocks. Two wires should be suitable for each cartridge - zero and open phase.
Before connecting each wire to a chandelier or lamp, you need to know exactly which of them are zero (coming from the junction box, blue according to the norm) and which are phase. Color identification of each wire helps. But in order for them to connect correctly, it is necessary to turn on the machine to determine and check each of them in turn with an indicator, including the corresponding button of the three-button switch.
After installing and checking that all lamp units are connected, the work can be considered completed.


