- What difficulties arise in horizontal welding
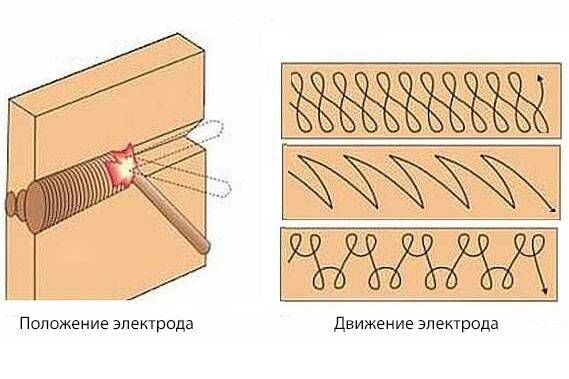
- Technique for moving the electrode in horizontal welding
- Tools used for horizontal welding
- Conclusion
- Creating a seam with an electrode
- Conditions for a quality vertical seam
- What does a beginner welder need to work
- Tools and means of protection
- Defects
- Lack of fusion
- undercut
- burn
- Pores and bulges
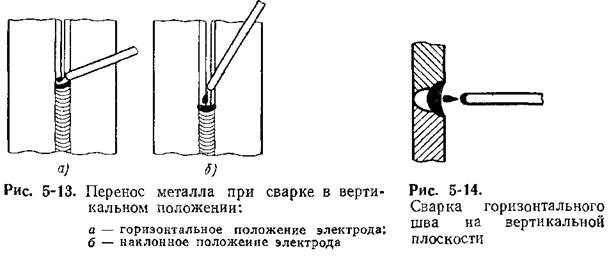
- Vertical Welding Technology
- Cooking with an electrode
- Using a semi-automatic
- Instruction for beginners
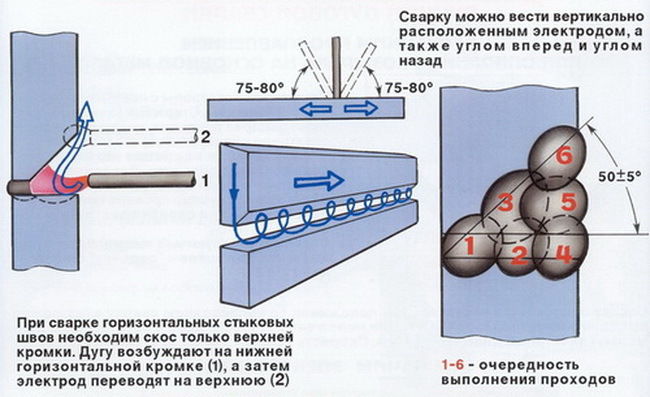
- Principles of horizontal seam welding
- Recommendations for welders
- Arc start to work
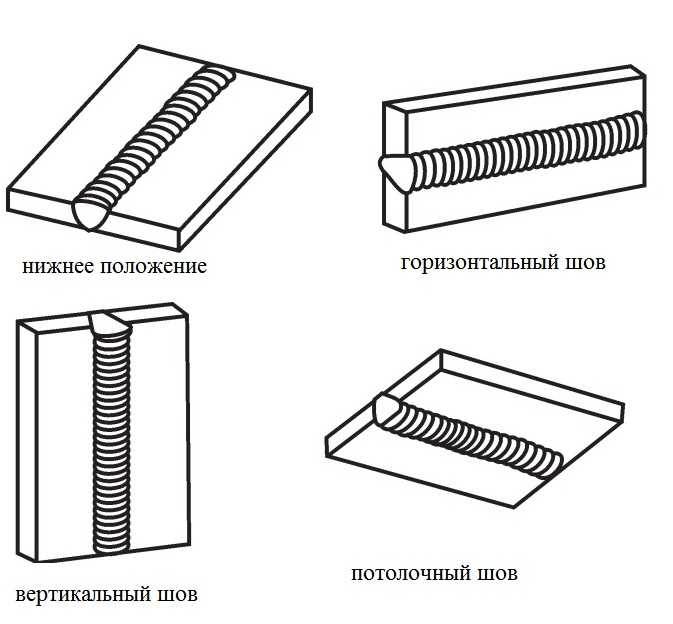
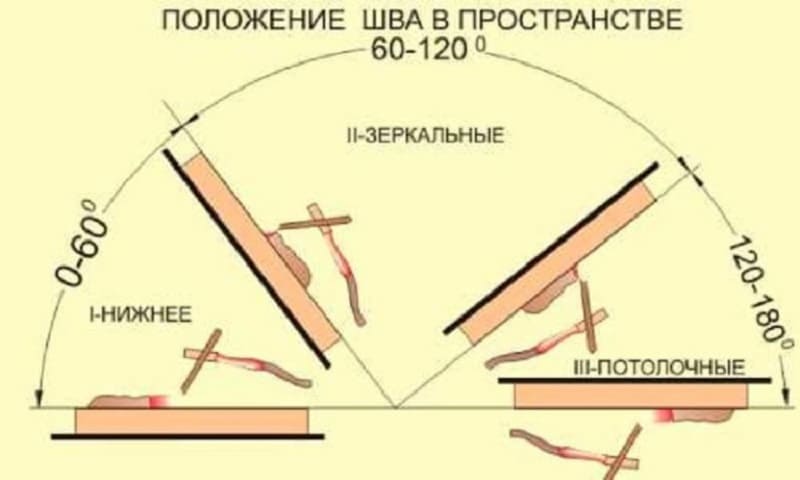
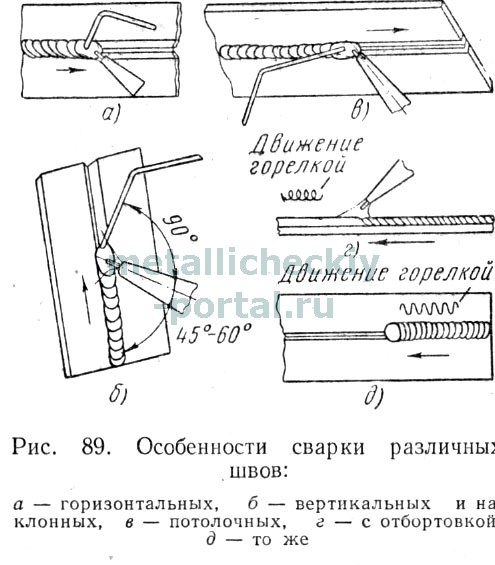
- Types of fillet welds (welding positions)
- Lower
- Vertical and horizontal
- Ceiling joints
- Into the boat
- Selection of welding electrodes
- Preparing for the process
- How to cook
- Video
- Welding in the lower position
What difficulties arise in horizontal welding
This connection is far from the easiest and you need to prepare for its implementation. When performing welding work, a number of difficulties can arise. These include:
- Molten metal flowing out of the weld pool. Under the force of gravity, the molten metal, instead of creating a weld, simply flows down, so that the connection does not form properly.
- A very large seal can be created on the bottom edge due to the fact that the metal from the top flows down to it. This leads to the formation of a deep undercut on the upper part, which negatively affects the quality of the connection.
- An uncomfortable position for the welder himself, in which he can make more mistakes due to such difficulties.
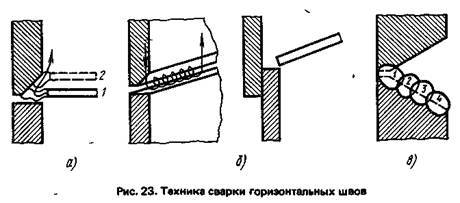
Technique for moving the electrode in horizontal welding
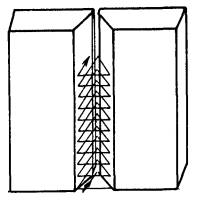
The technique of welding bayonet seams in a horizontal position is carried out according to the following points:
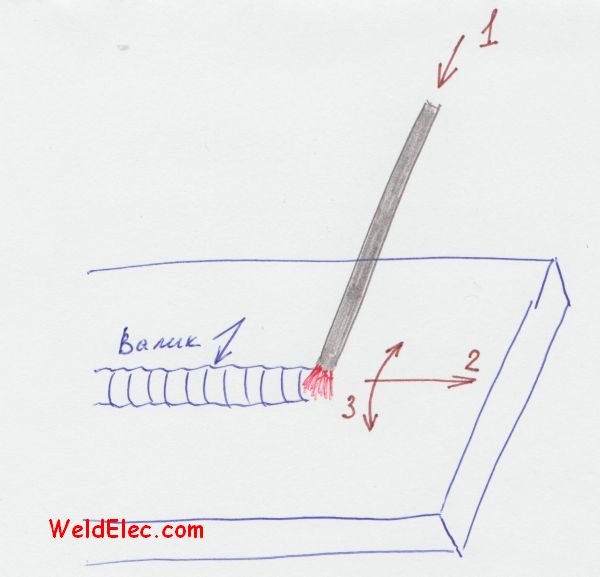
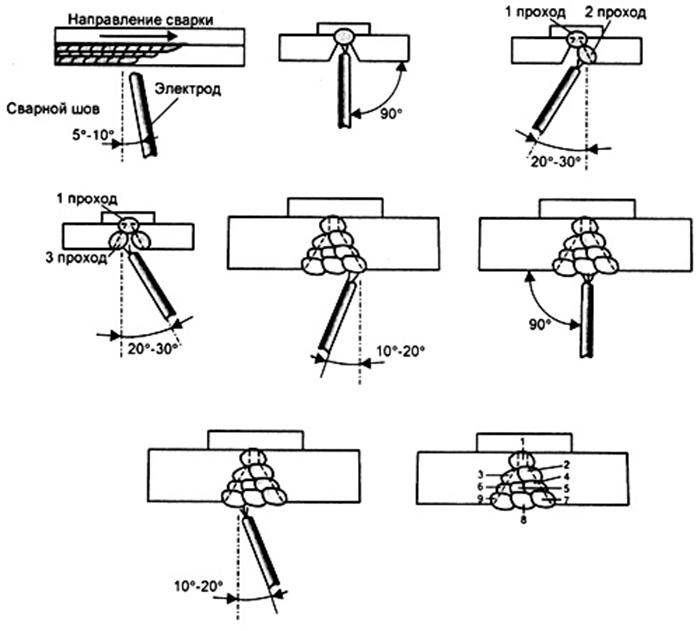
- First of all, the first weld bead is formed, for which a short arc of the welding machine is used. Here the electrode must be moved without oscillation in the transverse plane. The angle of inclination of the electrode is about 80 degrees, which will make it possible to melt the joint well.
- After creating the first roller, a second pass follows using a small current. Oscillatory movements are also not applied here, and the electrode is placed at an angle "forward" to the growth of the seam. Here you need a wider electrode than in the first pass.
- After passing through several beads, a final surfacing is created, which provides a top layer that has aesthetic qualities, but at the same time it must be melted to the rest. You should try to do everything in one pass.
Horizontal Seam Welding Technique
Tools used for horizontal welding
The following types of equipment may be suitable for welding horizontal seams:
The welding inverter is one of the most popular modern devices, which is used both in the private and industrial sectors. It is used for thin and thick parts, and you can find both portable and stationary models.Welding of a horizontal seam by a semi-automatic device is carried out with a high level of protection.
Transformer - less advanced, but still used inexpensive apparatus for welding
It is more suitable for creating thick seams.
A rectifier is a device that creates a stable arc, which is very important for creating seams in an uncomfortable position. The device can be powered from ordinary household networks.
A gas burner is the best choice for both beginners and professionals, if you want to ensure the simplicity and reliability of the process.
It is not very convenient in terms of preparation, since with electric welding everything is much easier and faster.
Conclusion
Despite the various methods available for how to weld horizontal seams and how to make them stronger, when possible, experts still prefer to use the standard lower position. If this is not possible, then experienced welders devote time to preparatory work, which provides most of the success.
Creating a seam with an electrode
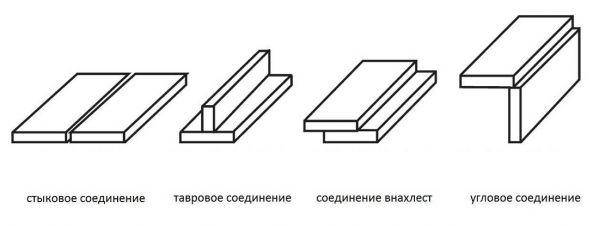
The seams created by the electric inverter have a fairly extensive classification. When determining the main parameters, the type of parts to be connected is taken into account. When considering how to properly weld a vertical seam by electric welding, their features must be taken into account. The following types of compounds are most widely used:
- Butt.
- Tavrovoe.
- Overlap.
- Angular.
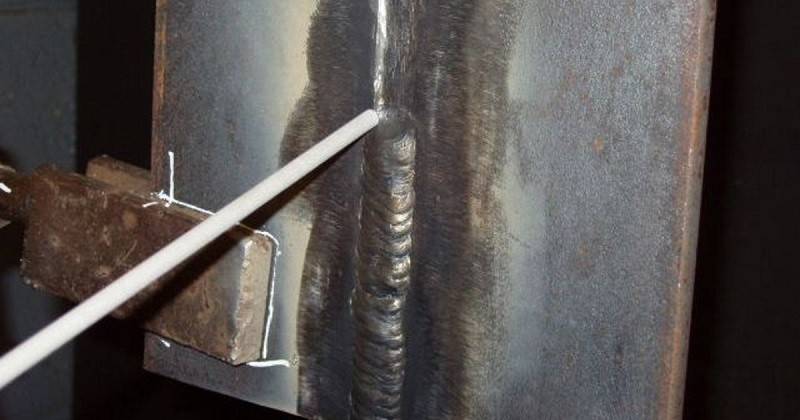
Creating a seam with an electrode
That is why welding of a vertical seam is carried out with careful surface preparation. The technologies used make it possible to obtain a high-quality seam only with the right choice of electrode thickness.It should be slightly less than the width of the seam, since it is recommended to drive the rod from side to side to eliminate the possibility of alloy dripping.
Conditions for a quality vertical seam
Almost all novice specialists are not familiar with the basic conditions for obtaining a high-quality vertical seam. In addition, it must be characterized by high strength, be of high quality and have an aesthetic appearance.
There are several main mistakes that are made when carrying out such work:
- At the time of ignition, the rod must be in a perpendicular state. If there is an angle, then the arc may be unstable.
- The shorter the arc length, the faster the crystallization of the material. This reduces the risk of leaks. However, many do not follow this recommendation, as a small arc reduces the performance indicator.
- The rod bends to reduce the likelihood of smudges, but maintaining a sharp angle is quite difficult.
- If a smudge appears, it is recommended to increase the current strength and the width of the seam. Due to this, it is possible to significantly accelerate the process of crystallization of the substance.
To obtain a connection with a high quality indicator, attention must be paid to the preparatory stage. An example is the removal of dust and dirt, paint and oil residues, rust
In some cases, spot welding is carried out, due to which the risk of streaks is reduced several times.
High quality vertical seam
In conclusion, we note that the quality of the weld depends on a fairly large number of parameters. An example is the skill of the welder or the characteristics of the materials being joined.Depending on some of the above parameters, the most appropriate technology is selected.


What does a beginner welder need to work
First of all, you need to prepare equipment and overalls.
Tools and means of protection
You will definitely need a welding machine, a set of electrodes, a hammer and a chisel for churning slag, a metal brush for cleaning the seams. The electric holder is used to clamp, hold the electrode and supply current to it. You also need a set of templates to check the dimensions of the seam. The electrode diameter is selected depending on the thickness of the metal sheet. Don't forget about protection. We are preparing a welding mask with a special light filter that does not transmit infrared rays and protects the eyes. Screens and shields perform the same function. A canvas suit consisting of a long-sleeved jacket and smooth trousers without lapels, leather or felted shoes to protect against metal splashes and gloves or mittens, canvas or suede with an overlap on the sleeves. Such tight, closed clothing prevents the welder from getting molten metal on the body.
There are special protective equipment that are used to work at heights and inside metal objects, when working in a prone position. In such cases, you will need dielectric boots, a helmet, gloves, a rug, knee pads, armrests, and for high-altitude welding you need a safety belt with straps.
Defects
We will tell you what everyone can face if the work is done incorrectly.
Lack of fusion
At the joint, cavities of air or unconnected steel remain.
The result is a weak connection.The reason is a low current or too fast movement of the electrode.
undercut
In fact, this is a groove that is formed like this - the weld pool is very wide, so the workpiece is heated over a long distance. A drop of melt descends, and a cavity forms in place. To prevent this, reduce the electric arc. Very characteristic of verticals or corners.
burn
Every newcomer who wants to increase the supply of electricity faces this. A cavity is formed. Here, one thing can be advised - you need to smoothly guide the electrode, do not leave it in one place for a long time. More about defects and causes in the video:
Pores and bulges
In fact, these are irregularities - in one place crystallization was faster, and in another - more slowly. Usually this is due to incorrectly selected electrodes (simply of poor quality) or a draft. It looks like this:
Vertical Welding Technology
The vertical plane provides for the use of different methods (depending on the type of metals being joined, the availability of appropriate skills).
Cooking with an electrode
Seams created in this way have different types.
When welding with an electrode, the following methods of forming a seam are used:
- butt;
- overlap;
- tee;
- angular.
To maintain a stable arc, the edges of the parts are cleaned of dirt. The fillet weld is welded by correctly selecting the thickness of the rod. It must be smaller than the width of the treated area.
To prevent the formation of smudges, the electrode is led, moving in different directions.
Using a semi-automatic
When using an inverter welding machine, consider the following points:
- The method of pre-treatment of parts is chosen in accordance with the type of work to be done.In this case, the thickness of the metal and its machinability are determined.
- The arc should be short, the current strength should be medium.
- The rod treated with a special composition is placed at an inclination of 80º against the products to be welded.
- Creating a vertical seam, the rod is driven across the entire width of the weld pool.
A high-quality welded joint is obtained by breaking the arc. This method should be used by beginners, because. it is simple and convenient. During the period of separation, the metal cools down, the likelihood of smudges is reduced. However, this negatively impacts performance.
During the welding process, it is important to observe the following conditions:
- Place the tip on the crater shelf.
- Move the working part from side to side, covering the entire area to be treated. You can use the principle of loops or a short roller.
- Reduce the current strength by 5 A from the average value, which will allow you to set a different shape and other parameters of the seam.
The main indicators are chosen experimentally. Therefore, the quality of the joint depends on whether the worker knows how to properly weld a vertical seam (electric welding helps to form any joints).


Instruction for beginners
Working with the inverter for beginners requires wearing the following items of protective equipment:
- work suit, gloves, boots made of refractory materials;
- headdress covering the back of the head;
- welder's mask protecting the eyes and face.
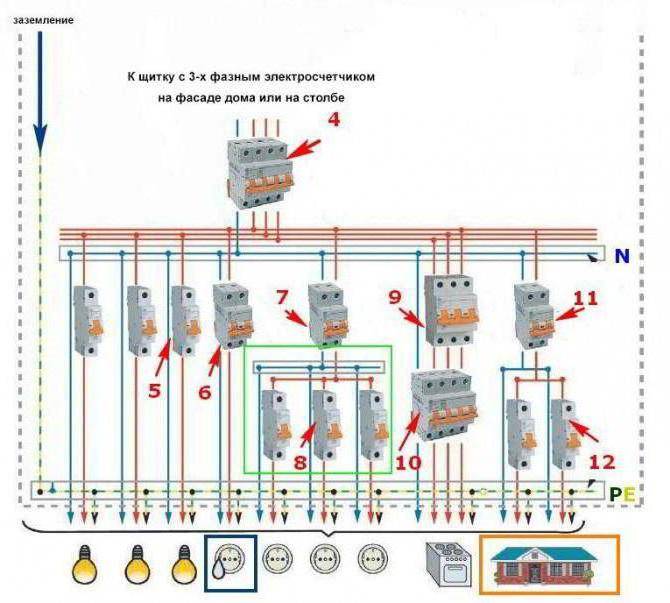
To join metals, serviceable manual or semi-automatic equipment is used. Electrical components must be isolated from other parts by a robust housing. Do not use cables with damaged sheaths that do not meet the technical specifications of the device.The workplace of the welder is supplied with everything necessary: a special table, a ground bus, a lighting device, and fire protection equipment.
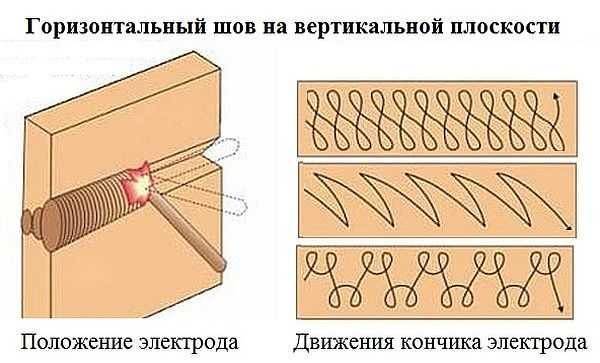
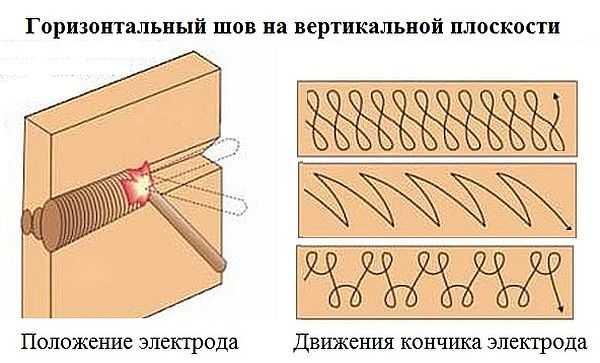
Principles of horizontal seam welding
In this case, the working tip is carried out both from right to left and in the opposite direction.
When welding horizontal seams on a vertical surface, the pool moves down, so a sufficiently large angle of inclination of the electrode is required. The value is set taking into account the speed of the rod, the current strength, which prevents the displacement of the weld pool. If the metal forms sags in the lower part, the speed of movement is increased, heating the material to a lesser extent.
Another way is welding with arc separation (arc welding). During periods of respite, you can slightly reduce the current strength: the metal, cooling down, will stop draining. These methods are used alternately.
Recommendations for welders
When forming seams in vertical and horizontal positions, the specialist should not allow the melt to separate from the treated area.
This is possible if you follow the recommendations depending on the welding technique:
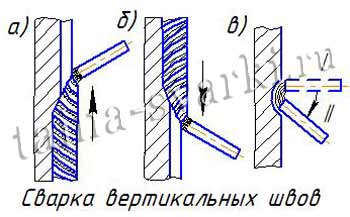
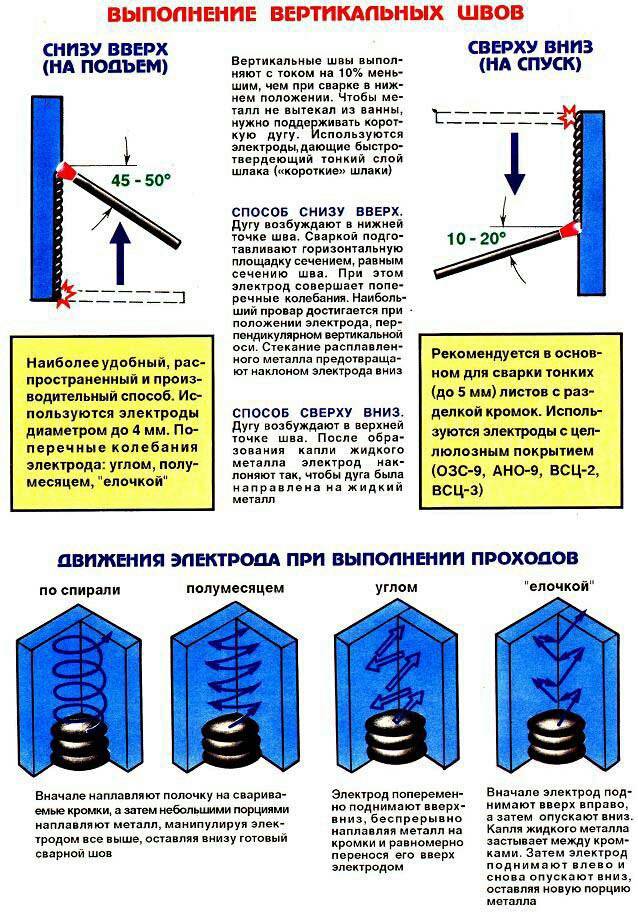
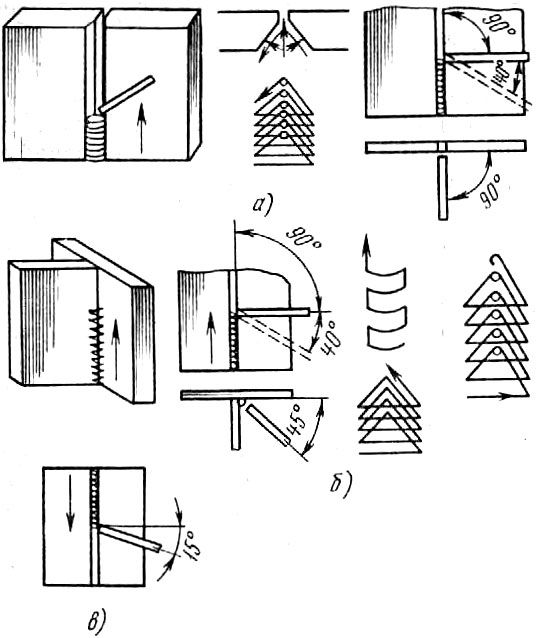
- Upwards. The electrode is led from the bottom point to the top. In this way, it is possible to obtain the highest quality connection. To form a seam of sufficient width, different options for the movement of the rod are used, for example, a herringbone pattern. At the first stage, the joints are tacked in several places, excluding the displacement of the workpieces to be welded. The angle of inclination of the rod is kept within 45-90°. The electrode is moved at medium speed. Zigzag movements are allowed.
- Top down. This method is suitable for an experienced welder. The rod is set at a right angle. When melting, the slope is changed by 15-20º.In this case, other movement options are used - rectangular, sawtooth or wavy zigzags.
The top-down method is also considered correct, but difficult. It allows you to get the highest quality joints.
Arc start to work
Let's consider the two most probable options that are preferable for the technique of welding vertical seams.
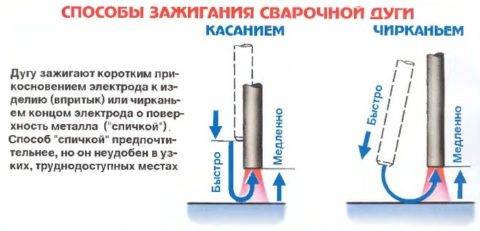
The welder, using the holder where the electrode is embedded, begins a gradual movement where it is necessary to touch the metal surface. Next, you need to quickly take the electrode back, about 2-4 mm. As a result, the required arc flame will appear. The working valley of the arc is provided by the slow lowering of the device. The principle of the task of how to weld a vertical seam by arc welding depends primarily on the melting parameter
The welder must take precautions before the arc appears, it is necessary to wear a protective mask or goggles to protect the face or eyes.
The welder quickly draws the tip of the electrode over the metal surface, and then just as quickly pushes the holder towards himself, but about 2 mm from the surface of the metal product. At a certain moment, an electric arc is formed between the electrode and the surface
In the process of completing the task of how to weld a vertical seam with an electrode, it is necessary to adhere to the same arc length. The arc itself at the initial stage should be exceptionally short. Near the seam, small working drops of metal are formed. The melting process will be as smooth and calm as possible. The seam is deep and even.If the working length of the arc is too long, then the main surface of the metal will not be completely melted. The metal surface of the electrode will begin to oxidize, significant splashes will appear on the metal surface. The seam after welding will look completely uneven, having numerous oxide inclusions.
The total length of the working arc can be determined by the peculiar sound that is characteristic of the process of how to properly weld a vertical seam by manual arc welding. An arc that is too long has a characteristic sound that is emitted during operation, and therefore popping is possible.
In the place where the crater has formed, they are carefully brewed, otherwise there is a risk of violating the general principle of technological work. If it is necessary to weld a unit that is used for the main operation in the general technological process, then the so-called technological “fatigue” may appear. It is strictly forbidden to start an arc in this place, otherwise the vertical seam by electric arc welding causes the so-called working "burn" of the metal. In this knead, during the operation of the structural part, destruction is possible in the future.
Types of fillet welds (welding positions)
Compounds are classified according to a variety of features. First of all, this is a way to install blanks. Depending on the requirements for the strength of the finished structure, the seam is made one- or two-sided.
In the second case, the seam is reliable, keeps its shape longer. With one-sided welding, the structure may be deformed.
Lower
When working in this way, one part is in a horizontal position, the other is in a vertical position. The seam is formed in a right angle between the surfaces.
If the thickness of the workpiece does not exceed 12 mm, cutting the edge is not required, but the lower part of the perpendicular sheet is cut so that the distance between the edges is less than 2 mm. When working with thick parts, a V-shaped cut is made.


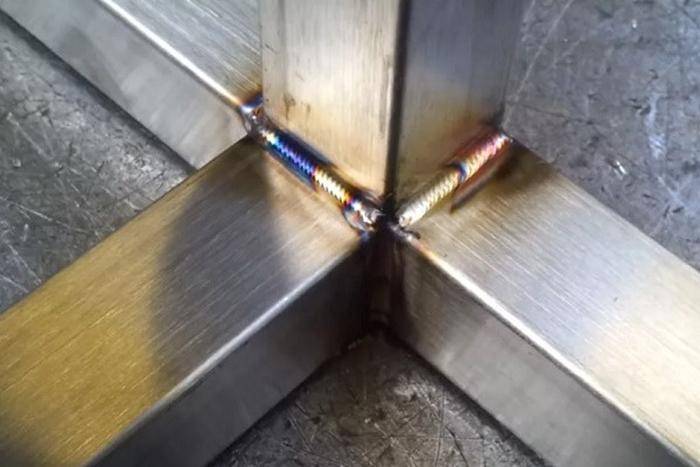
An example of a fillet weld.
Vertical and horizontal
When welding parts located vertically, the melt flows down. To eliminate the formation of drops helps to reduce the length of the arc, for this the electrode tip is brought closer to the treated area.
Seam welding has the following features:
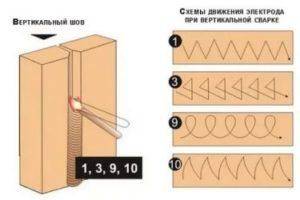
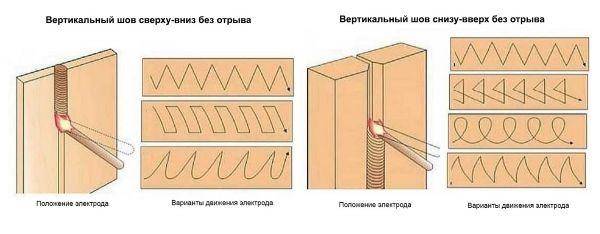
Vertical welding seam and electrode movement pattern.
- The metal is prepared taking into account the type of connection and the thickness of the workpieces. The parts are fixed in the desired position, short tacks are applied. This prevents the structure from moving during operation.
- The seam is formed both from the bottom up and in the opposite direction. The first method is considered more convenient. Under the influence of the arc, the weld pool moves upward. The seam is of better quality.
- It is possible to carry out fillet welding in a vertical position with arc separation. During the break, the melt has time to cool down. In this case, the same movements of the electrode are used as when welding without separation: in different directions, round or in a loop.
- When welding from top to bottom, the rod is set at a right angle with respect to the surface of the workpiece. After excitation of the arc, the part is heated, the tip is released and welding is carried out in this position. The method is not entirely convenient, since it requires constant monitoring. However, the seam acquires the required characteristics.
Horizontal connections can also be formed in different directions. The method is chosen taking into account the preferences of the welder
The bath also moves down, so the angle of the electrode is increased, taking into account the speed of welding and the strength of the current.
When the melt drains, they make faster movements, periodically tear off the arc. During these breaks, the metal cools down, drops are not formed. You can try changing the voltage. These methods are used in stages.

Horizontal weld.
Ceiling joints
This is the most difficult way to form connections. It requires experience, constant monitoring of the treated area. During welding, the electrode is held perpendicular to the ceiling.
The length of the arc is minimal, the speed of movement is unchanged. The rod is driven in a circular motion, expanding the melting area.
Ceiling seam welding.
Into the boat
Corner joints often have to be welded on both sides. For the correct conduct of the process, the workpieces are installed so that their planes are at the same inclination. This method is called "boat" welding. This simplifies the choice of electrode movements, improves the quality of the seam.
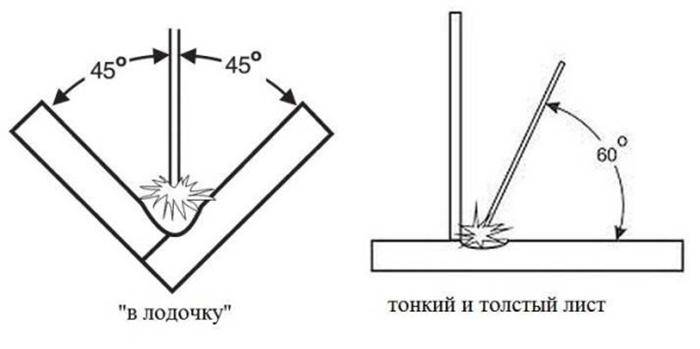
Boat welding.
Selection of welding electrodes
In order to choose the right electrode correctly, several important parameters must be taken into account:
- workpiece thickness;
- Mark became.
Depending on the type of electrode, the value of the current strength is selected. Welding can be performed in a variety of positions. The lower one is divided into groups:
- horizontal;
- Tavrovaya.
Vertical type welding can be:
- Upwards;
- Ceiling;
- Tavrovaya,
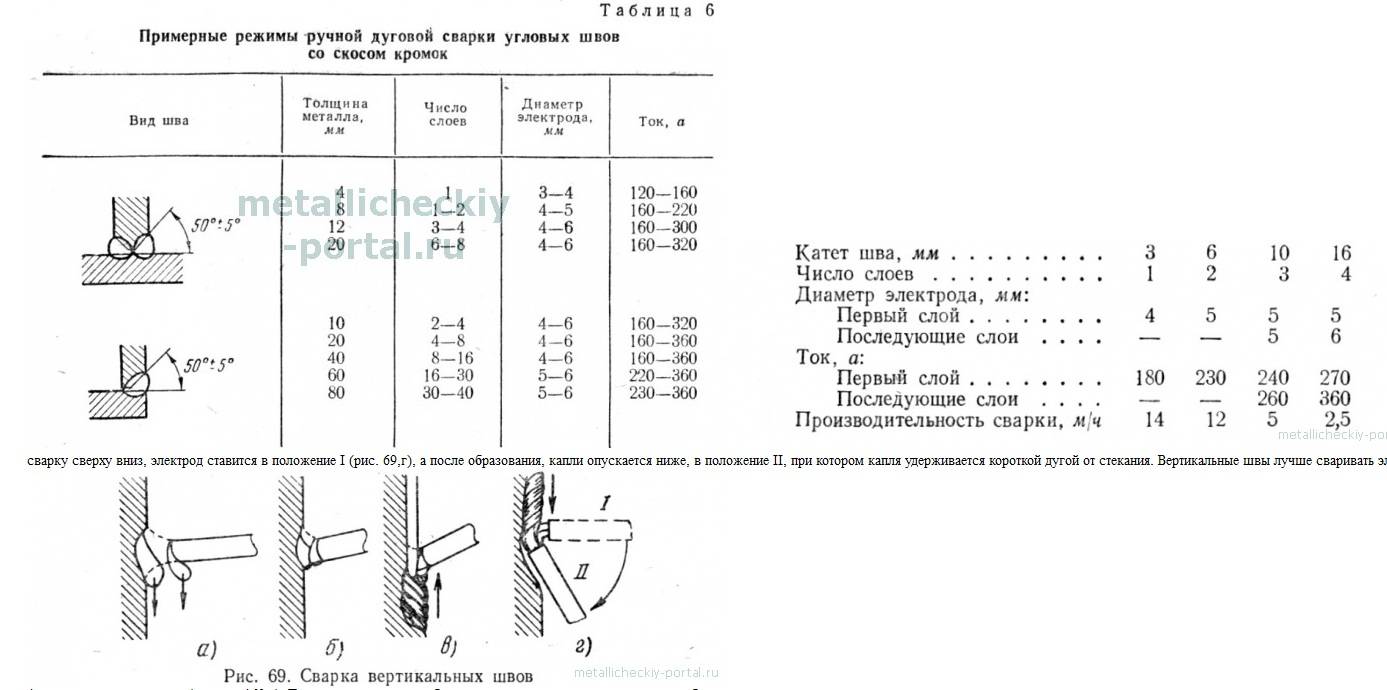
Each manufacturer in the instructions for the electrodes, be sure to report the value of the welding current at which they will work normally. The table shows the classic parameters used by experienced welders.
The magnitude of the current strength is influenced by the spatial position, as well as the size of the gap. For example, to work with a 3 mm electrode, the current must reach 70–80 amperes. This current can be used to perform ceiling welding. This will be sufficient for welding parts when the gap is much larger than the diameter of the electrode.


To cook from below, in the absence of a gap and the corresponding thickness of the metal, it is allowed to set the current strength to 120 amperes for an ordinary electrode.
Welders with extensive experience recommend using a certain formula for calculation.
To determine the current strength, 30–40 amperes are taken, which must correspond to one millimeter of the electrode diameter. In other words, for a 3 mm electrode, you need to set the current to 90-120 amperes. If the diameter is 4 mm, the current strength will be 120-160 amperes. If vertical welding is performed, the amperage is reduced by 15%.
For 2 mm, approximately 40 - 80 amperes are set. Such a “two” is always considered very capricious.
There is an opinion that if the electrode diameter is small, then it is very easy to work with it. However, this opinion is erroneous. For example, to work with the "two" you need a certain skill. The electrode burns quickly, it starts to get very hot when a high current is set. Such a “two” can weld thin metals at low current, but experience and great patience are needed.
Electrode 3 - 3.2 mm. Current strength 70–80 Amps. Welding must be carried out only on direct current. Experienced welders find that above 80 amps it is impossible to perform normal welding. This value is suitable for cutting metal.
Welding should be started with 70 amperes. If you see that it is impossible to boil the part, add another 5-10 Amps. With a lack of penetration of 80 amperes, you can set 120 amperes.
For welding on alternating current, you can set the current strength to 110-130 amperes. In some cases, even 150 amperes are installed. Such values are typical for a transformer apparatus. When welding with an inverter, these values are much lower.
Electrode 4 mm. Current strength 110-160 Amps. In this case, a spread of 50 amps depends on the thickness of the metal, as well as your experience. "Four" also requires special skill. Professionals advise starting with 110 amps, gradually increasing the current.
Electrode 5 mm or more. Such products are considered professional, they are used only by professionals. They are mainly used for surfacing metal. They practically do not participate in the welding process.
Preparing for the process
Before starting work, you need to prepare the welding machine:
- Check the value of the voltage and frequency of the current, the data must match both in the network and on the body of the device;
- If there is a voltage selection mode, then it is better to set it immediately, then set the current value. The power parameter must correspond to the number of the electrode, that is, the diameter.
- Check cable insulation. Securely fasten the ground clamp.
- Check all cables, whether they are insulated, connections, plugs.
- Insert the electrode into the holder, which can be screw or spring. Be sure to make sure that the electrode is held firmly.
For example, the inverter has two cables. One is connected to the part, the second holds the electrode. They are supplied with different current values: plus - to the part, minus - to the electrode with "straight polarity".In some cases, it is necessary to cook in the “reverse polarity” mode, that is, plus on the electrode, minus on the part.
The place of welding must also be prepared. It is necessary to clean the metal surface from any contaminants, rust, scale, oil. Most welding defects are due to a poorly prepared surface. Before welding, the electrodes must be checked for integrity: its coating must be uniform, without chips. It is also often necessary to dry or ignite consumables.
Another important question: what current to set. The higher the current, the more stable the arc, but a very large value can burn through the metal. The set current directly depends on the number of the electrode and the thickness of the part. For horizontal welding, you can focus on the following amperage values: (tab. 1)
For vertical welding, the values must be reduced by 15%, for ceiling welds by 20%. However, in practice, many other factors interfere with the welding process, so the correct amperage can only be determined empirically.
How to cook
Before starting welding, technological preparation is made. Details should be marked, cut, surfaces cleaned from dirt, rust and dried in the presence of moisture.
Two parts to be welded should lie on a flat surface and have a gap of 2-3 mm between them, we light the electrode with a blow or “strike” like a match, we perform two tacks to avoid deformation of the joint to be welded.
Video
The video below shows what welding can lead to if you do not tack (what you need to know about tacks here).
lined (removable or remaining)
You can lead the electrode towards yourself, away from you, from right to left and from left to right.Depending on the thickness of the metal and the recommended spatial position of the electrode, the method of movement of the electrode is selected for better welding, the electrode is also kept at an angle of 45 degrees during operation.


After the seam is completed, the slag is removed and the surface is cleaned. To avoid burns, linings are used, work with them is more confident, you can increase the current and not cook on the other side of the seam (see photo on the left).
Welding in the lower position
The parts are cleaned, for thin metal the cutting is not performed, the gap between the parts to be welded is 1-3 mm. Assembly is carried out, tacks are installed (after the tacks are cleaned), then welding is carried out on the reverse side of the tacks.
The thickness of the roller should not exceed 9 mm, and the height 1.5 mm. We carry out welding from left to right, perform circular oscillatory movements counterclockwise, we also weld the second side, on the second side you can increase the current, after welding we clean the surfaces.
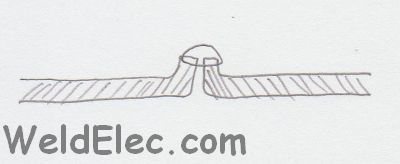
butt joint with flanged edges (for thin metal)
In the process of welding, the electrode makes 2-3 movements.
- The electrode is lowered down as it melts, ensuring stable burning of the welding arc.
- The electrode is moved at a uniform speed by tilting it at an angle of 15-30 degrees from the vertical. In another plane, the electrode is perpendicular to the connection surface.
- If it is necessary to obtain a weld of increased width, various oscillatory movements are used.