- Do-it-yourself thermal insulation stages
- Caisson
- Casing pipe and head
- street plumbing
- Lead to the house
- Briefly about the main
- Recommendations and installation instructions
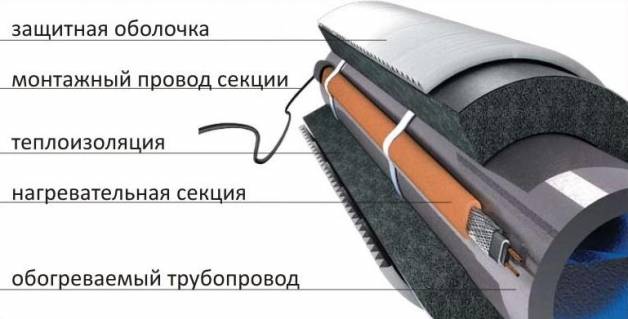
- External installation of the heating cable
- The nuances of connecting a self-regulating cable
- Laying pipes below freezing depth
- Where can a well freeze?
- Well insulation options depending on the mode of use
- We install passive winter insulation on the well
- Building a caisson for a well
- We warm the well with a casing pipe
- We warm the well with improvised materials
- A group of well insulation methods
- Insulation of a well with a caisson
- How to make / install a caisson for a well
- Well insulation without a caisson
- Casing pipe insulation
- Well insulation with heating cable
- How to insulate a well?
- 1. Insulation for mild climates (up to -15 °C)
- 2. Insulation for cold climates (over -15 °C)
- Criteria for the selection of thermal insulation material
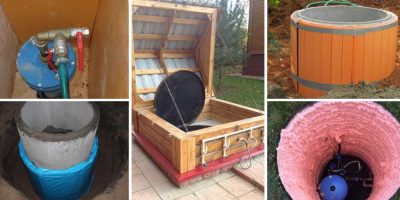
Do-it-yourself thermal insulation stages
The further fate of the entire water supply system will depend on how well the thermal insulation will be carried out. Therefore, it is better to entrust it to professional companies with extensive experience. However, every private homeowner has the right to know how to insulate the well and plumbing for the winter. on the surface - a well for your own home for the entire period of turnkey cold weather with your own hands.
Visually about the insulation of the well, see this video:
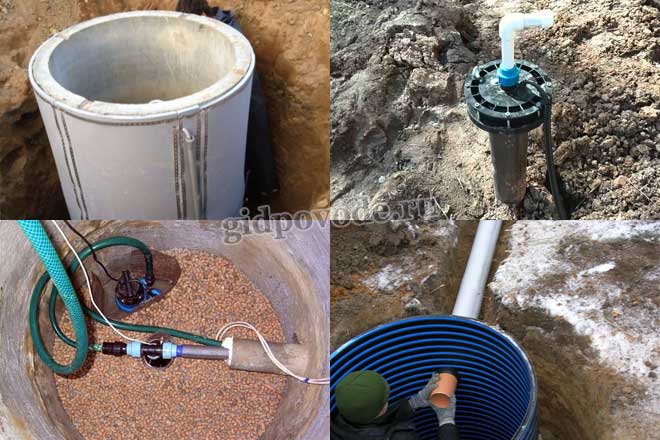
In the standard case, the procedure consists of sequential thermal insulation of the following main elements:
Caisson
Stages of work:
- The required amount of foam or other heat insulator is prepared.
- Further, the material is cut into the necessary fragments, based on the shape and size of the caisson.
- The outer part of the caisson is waterproofed with bitumen, except when it is made of plastic or iron.
- The prepared fragments are applied to the outer walls and fastened with wire, stops, mesh or tape.
- The joints between the sheets are filled with mounting foam - for sealing.
- Upon completion of the fastening, the structure is covered with a layer of expanded clay.
Casing pipe and head
Subsequence:
- From pieces of chipboard, boards, plywood, sheets of metal or rigid insulation, a box is made for external closing of the casing and head.
- The box is installed over the casing pipe and the head.
- Its internal space is filled with parts of mineral wool, glass wool or natural components (hay, straw, paper).
Alternatively, instead of a box, a cylinder is formed from a chain-link mesh with a diameter exceeding the head by 0.3 m.

Do-it-yourself well insulation
street plumbing
Sequence of work:
- At the outlet of the pressure pipe of the well, at the point of connection to the domestic water supply, a piece of heating cable is wound or a special tee with a gland is installed.
- Next, the water pipe is placed in a PPS shell or in a sewer pipe of a larger diameter, which creates an air gap.
- The structure is laid in a previously dug trench and then filled with expanded clay, then with a layer of sand and previously removed soil.
Lead to the house
In view of the fact that the wellhead is already heated by a heating cable, and the supply water supply is insulated with shells, it is not necessary to make special heating of the liner. As a standard, it is thermally insulated along with the supply pipe.
See in this video how to mount the heating wire inside the pipe
Briefly about the main
Depending on the frequency of operation, there are the following ways to insulate a well on the street:
- Seasonal, when the well is not in operation, but simply drained and turned off for the winter.
- Periodic, when water is taken on weekends or every few days. To maintain efficiency, heat-insulating materials and heaters are used.
- Constant, when the well is practically not idle, so the flow never stops for a long time. However, in cold weather, icing can begin. Therefore, professional insulation is required.
At the same time, 4 technologies are used for thermal insulation - by means of a heater, with a coffered structure, without it, and with the installation of a heating cable. In most cases, combined methods are used. The heat-insulating materials are polystyrene foam, foam plastic, foamed polyethylene, mineral or glass wool, as well as penoizol, foamed polyurethane foam and expanded clay. You can do the thermal insulation yourself, but it is better to entrust the matter to a professional team.
Recommendations and installation instructions
Closing the water supply with thermal insulation is not as difficult as connecting heating cables, so we will consider the technical nuances of installation relating specifically to electrical equipment.
External installation of the heating cable
Fastening along the outer surface of the pipe is often practiced when it is necessary to heat open sections of the water supply located in the basement, basement, caisson.
There are two ways to fix the wire on the pipe:
- stretch along the surface along the entire length;
- wrap in a spiral.
The first option is more economical and practical if the cable power is enough to heat the pipe. In particularly cold areas, you can apply the second method, but the wire consumption will increase.
Fastening takes place in the following order:
This is the easiest way to install a heating cable.
Device Recommendations:
- To heat a polypropylene water pipe with a diameter of up to 32 mm, it is enough to fix the cable along one side - it does not matter which one. However, if it is necessary to insulate the sewer, the wire is fixed exclusively from below.
- If there is a choice of insulation, then you need to take a thicker one. Overheating of the self-regulating cable does not threaten, but the heat loss will be significantly reduced. The thicker the “fur coat”, the less the samreg will spend electricity, the greater the savings.
- Aluminum self-adhesive is the best material for attaching to the pipe. Acrylic adhesive does not collapse under the influence of heat, which is evenly distributed over the entire heated surface.
- The sun's rays destroy some types of insulation and fasteners, so for open areas it is better to choose black clamps and adhesive tape that does not react to UV radiation.
If the cable is not fixed in a straight line, but in a spiral, then the insulation will occur according to the same principle - putting on a “fur coat” and fixing it with clamps. Without a heater, part of the energy will be wasted on heating the air.


The nuances of connecting a self-regulating cable
It is impractical to pull the wires to the pipe from the shield, so the samreg is connected to the power cable, which, in turn, is simply plugged into the outlet if necessary. To work, you will need a building hair dryer, a knife, a set of heat shrink tubing for crimping and sleeves for connecting contacts.
It should be remembered that electrical equipment becomes more dangerous in a humid environment, so special attention must be paid to tightness. Photo instructions for connection:
Photo instructions for connection:
As you can see, there are no difficulties with the internal installation of the cable, it’s just that all manipulations must be performed very carefully and consistently.
When choosing a power cable, consider the location of the outlet. If it is next to the pipe, you can buy the shortest product, but more often you have to purchase a 4-5-meter cord.
It remains to compress the end of the samreg:
With a sealed end, the cable is completely ready for use. So that the water pipe does not freeze, it remains to fix the samreg along the entire length of the line, insulate it and insert the plug into the outlet.
In some cases, the installation of an external cable is considered unsuccessful, for example, if it passes through floor slabs or concrete blocks of the well. Then apply internal installation.
If it is better to use a flat type product for outdoor heating, then for the inner a special cable with a round cross-section and a particularly reliable waterproofing is suitable.
The internal installation of the heating cable requires special care and compliance with certain rules.For example, do not pass the cord through knots where threaded connections protrude from the inside - sharp edges can damage the protective sheath
Laying pipes below freezing depth
This method is advisable to use if in winter the soil freezes no deeper than 170 cm. A trench is dug from a well or well, the bottom of which is 10-20 cm below this value. Sand (10-15 cm) is poured to the bottom, the pipes are laid in a protective casing (corrugated sleeve), then they are covered with earth.
In order not to have to insulate the water supply on the street in frosts, it is better to do this in advance
This is the easiest way to make winter plumbing in the country, but it is not the best, although it is the cheapest. Its main drawback is that if repairs are needed, you will have to dig again, and to the full depth. And since it is difficult to determine the place of a leak with this method of laying a water pipe, there will be a lot of work.
In order to have as few repairs as possible, there should be as few pipe connections as possible. Ideally, they should not be at all. If the distance from the water source to the cottage is greater, make the connections carefully, achieving perfect tightness. It is the joints that leak most often.


The choice of material for pipes in this case is not an easy task. On the one hand, a solid mass presses from above, therefore, a strong material is needed, and this is steel. But steel laid in the ground will actively corrode, especially if the groundwater is high. The problem can be solved by well primed and painted over the entire surface of the pipes. Moreover, it is desirable to use thick-walled ones - they will last longer.
The second option is polymer or metal-polymer pipes. They are not subject to corrosion, but they must be protected from pressure - they must be placed in a protective corrugated sleeve.
Even if the ditch was dug below frost level, it is better to insulate the pipes after all
One more moment. The depth of soil freezing in the region is determined over the past 10 years - its average indicators are calculated. But firstly, very cold and little snow winters occur periodically, and the ground freezes deeper. Secondly, this value is the average for the region and does not take into account the conditions of the site. Perhaps it is on your piece that freezing can be greater. All this is said to the fact that when laying pipes, it is still better to insulate them, lay sheets of foam or polystyrene foam on top, as in the photo on the right, or lay them in thermal insulation, as on the left.
You may be interested in reading "How to do automatic watering".
Where can a well freeze?
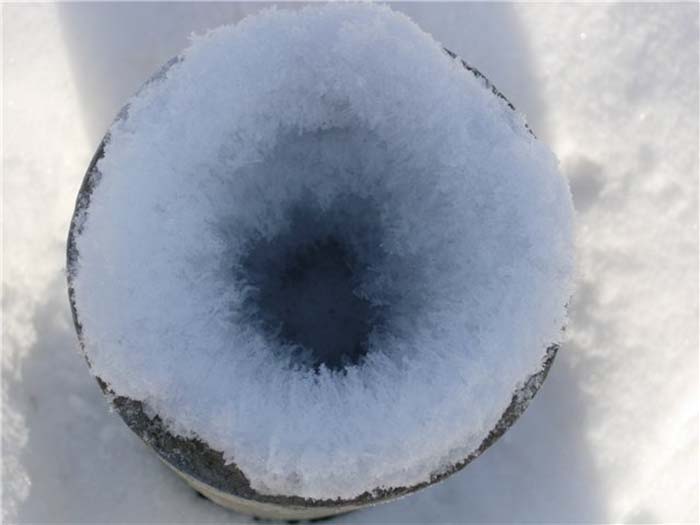
To begin with, it is worth saying that water cannot freeze in the trunk of a hydraulic structure. The thing is that the depth of groundwater and artesian water suitable for drinking is from 7 meters. Even in the most severe snowless winter, the ground can freeze only 2 meters, so water cannot freeze along the entire length of the pipeline of a hydraulic structure, even in areas with high groundwater levels. Then the question arises, in what places can a well freeze, and why does this happen?
A well in a private house can freeze in such places:
Often, water will freeze in the casing at or just below the soil surface. If the well is properly insulated in this place, then problems can be avoided. In this case, it is worth considering the type of structure and the average daily temperatures for the area.
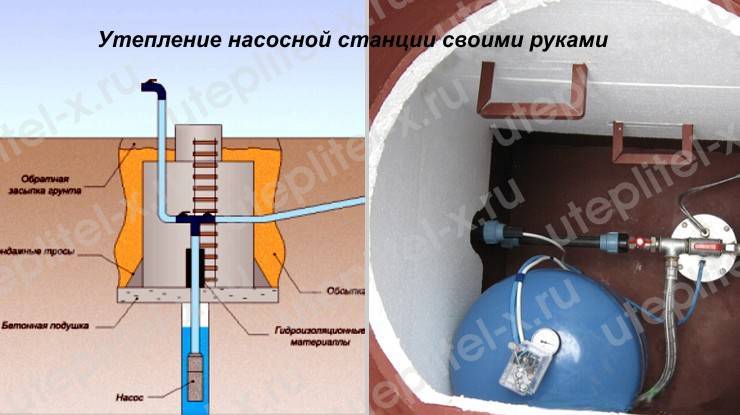
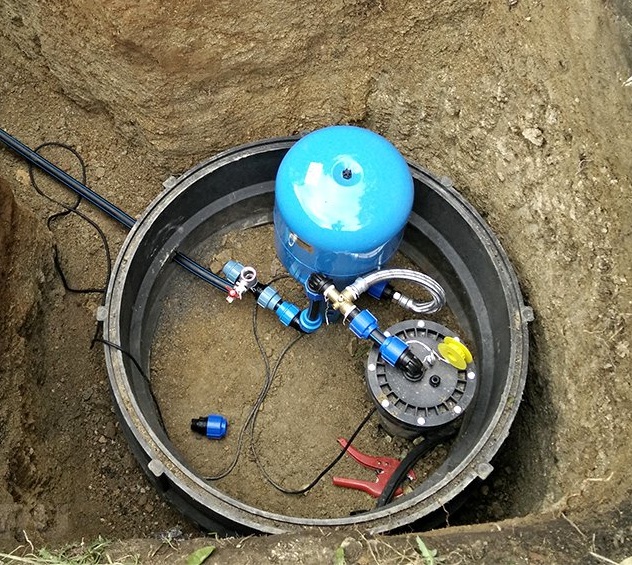
If the pump is located on the street, and not in the house, then the water may freeze in the caisson
That is why it is very important to insulate this part of the structure with strict adherence to technology. What exactly needs to be done in order to avoid such a problem, we will tell further.
Water can freeze in pipes running from the waterworks down the street to the house or distribution system.
In any case, problems with freezing of liquid in the pipeline may arise due to the absence or improper insulation of pipes, the pump and the well itself. If such a hydraulic structure is located at an object of seasonal use, for example, in a country house, then before frosts it is necessary to drain the water from the system. If you forget or do not have time to do this in time, this may lead to the replacement or repair of the equipment of the water intake structure.
BC 1xBet has released an application, now you can officially download 1xBet for Android by clicking on the active link for free and without any registration.
When water freezes inside a plastic pipe laid in the casing string, the pipeline will not burst, but the metal parts of the structure - steel slings, ball valves and other products made of this material - may be damaged. Pumps installed above the well and not insulated can also fail. Since water collects in them, when it freezes, the casing and pump parts break. What to do to avoid such problems, you will learn from our article further.
Well insulation options depending on the mode of use
The choice of method for warming a water well depends on the mode of its use.
- With constant use, the water pipelines maintain a constant pressure and, in theory, the water in it should not freeze. However, water through pipes may not move constantly, but depending on consumption, therefore, during long periods of inactivity, for example, at night, water can freeze even in a pipeline under pressure. In addition, hydraulic devices (pump, hydraulic accumulator), which are also extremely sensitive to low temperatures, can be located at the well head.
Therefore, well insulation is highly recommended even with constant use of water supply. However, in this case, passive methods of insulation can be dispensed with - the creation of a heat-insulating layer or caisson. - When using the water supply system seasonally (only in the warm season), it is necessary to turn off the pumping equipment for the winter and preserve the well. Before the start of frost, it is necessary to drain the water from the pipe for the well, sprinkle sand on the water flowing out of the pipes and taps to quickly freeze the water. And pipes and taps should be mothballed.
- In case of occasional use, when you take water even in winter, but, for example, only on weekends, it makes sense to install external electric heating at the head of the well and the supply tube. Such devices are switched on upon arrival at the site and after some time after switching on they allow the full use of the water supply.
We install passive winter insulation on the well
Depending on the volume of water consumed and the design of the well, you can choose the following technologies for its winter insulation with constant use.
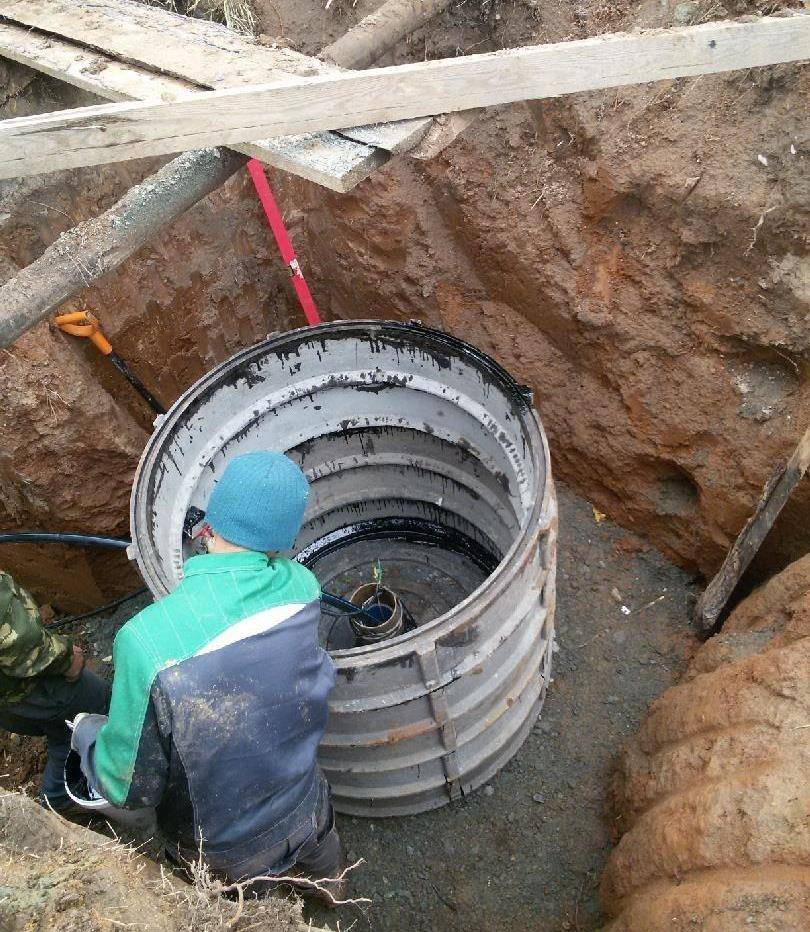
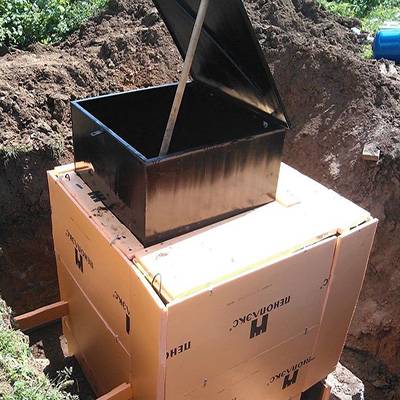
Building a caisson for a well
The classic method of winter insulation of a permanent well is the construction of a caisson.
Finished steel caissons for well insulation
The caisson is a kind of structure around that part of the well column, which is located in the frozen soil layer. Caisson construction materials can be very different: from monolithic concrete to a finished product made of durable plastic or iron. Also, the forms of the caisson can be very different, but the most common is the barrel.


Caisson construction technology
-
Choose a suitable plastic or metal container. You can use 200 liter drums. If you do not intend to place additional hydraulic equipment in the caisson, then these dimensions will be quite enough.
- Dig a pit around the head of the well. The bottom of the pit should be below the level of soil freezing in your area by about 30-40 centimeters, based on particularly severe winters. The horizontal dimensions of the pit should exceed the dimensions of the barrel by about half a meter.
- At the bottom of the pit, pour a pillow of sand and gravel. 10 centimeters of embankment will be enough.
- Cut holes in the barrel - at the bottom under the head of the well and in the side wall under the supply pipe.
- Lower the barrel to the bottom of the pit, putting its bottom on the head of the well.
-
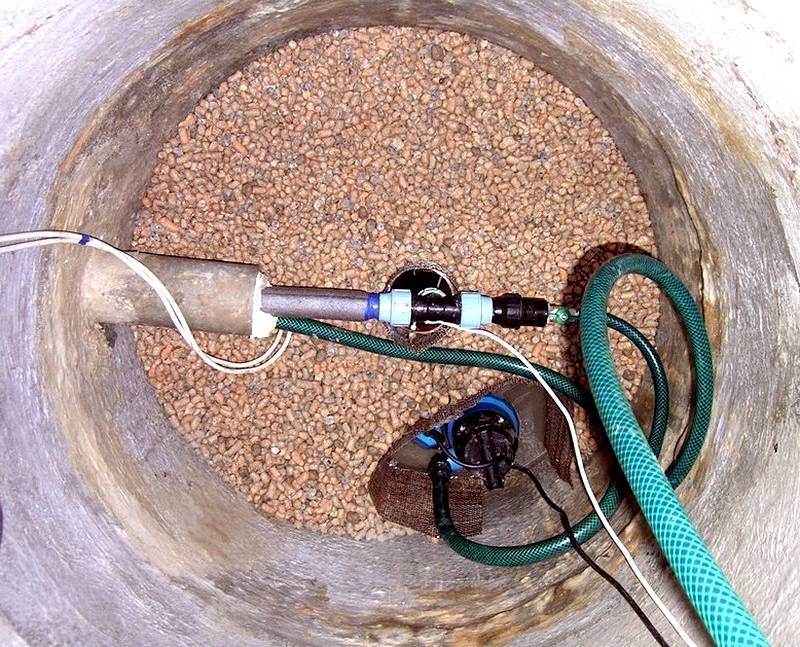
Mount the connection of the supply pipe of the water supply and the head of the well inside the barrel. In principle, even a surface pump or automatic water distribution equipment can be accommodated in a 200 liter drum. At the bottom of the caisson barrel, it is also possible to insert a drainage tube, which will drain the accumulated water condensate deep into the ground.
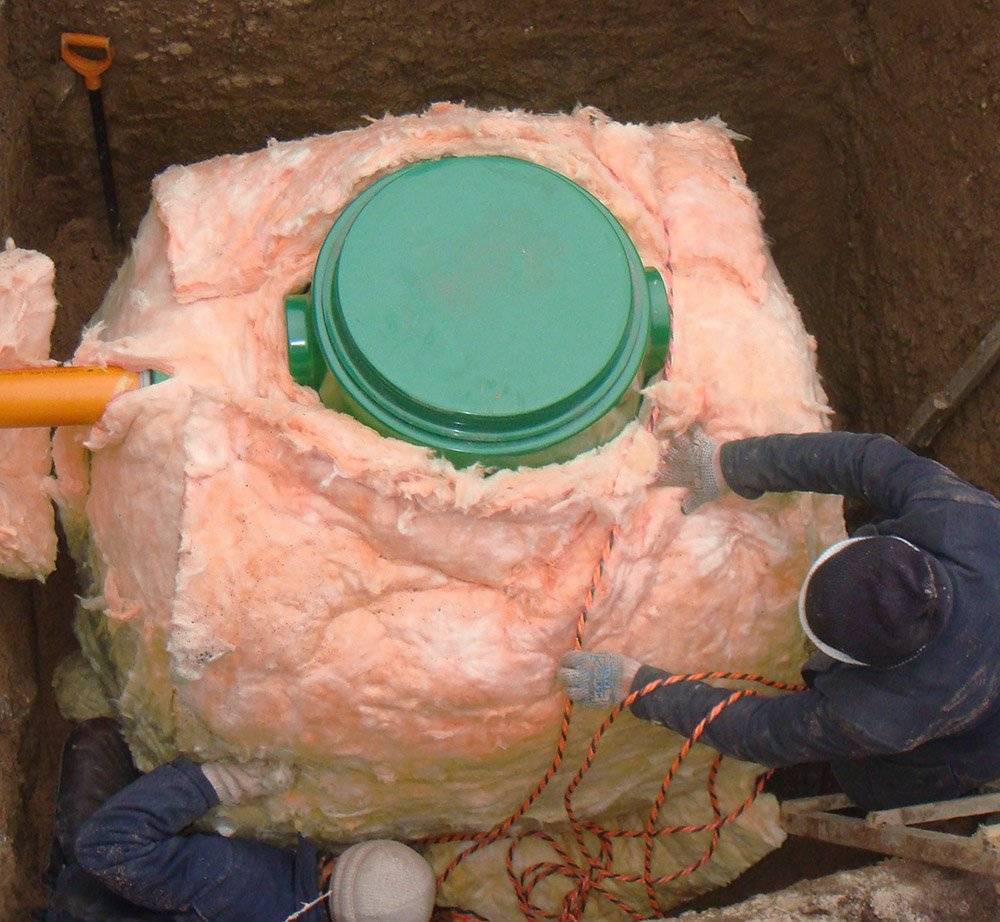
-
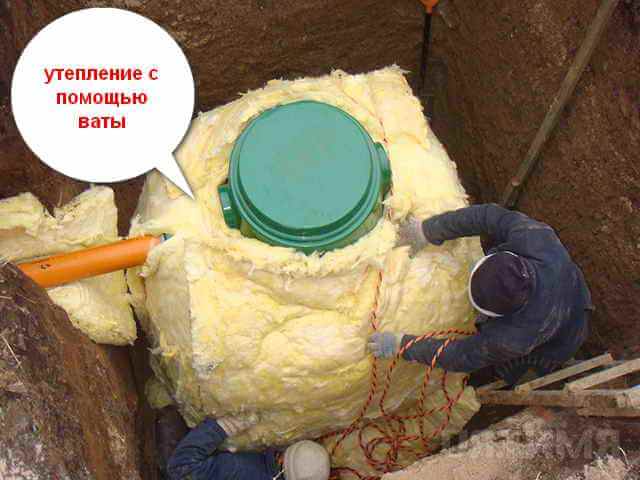
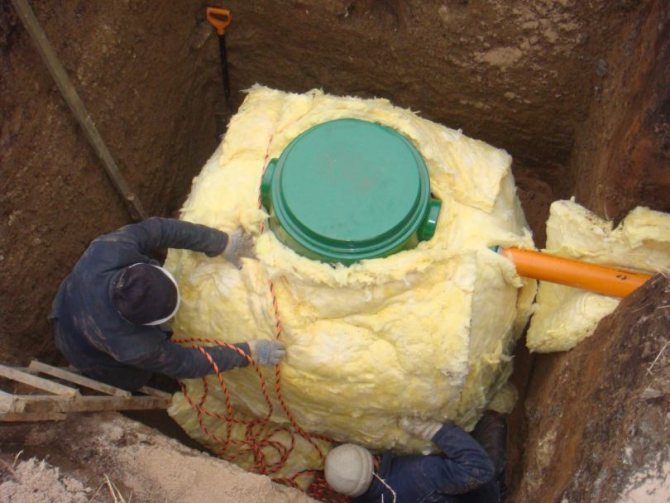
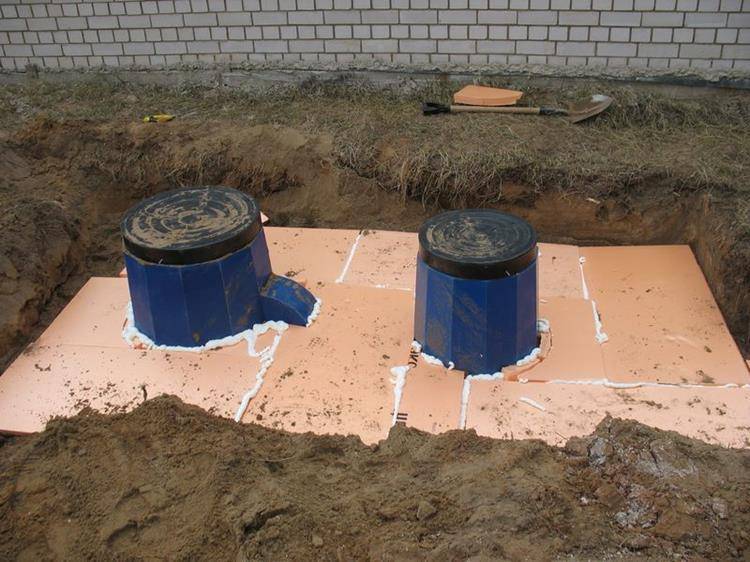
A layer of thermal insulation is laid around the barrel in the pit. To create it, you can use a material that is not subject to the aggressive influence of the soil, for example, expanded polystyrene. It is possible to wrap the barrel from the sides with a layer of mineral wool with a mandatory subsequent wrapping with a layer of waterproofing.
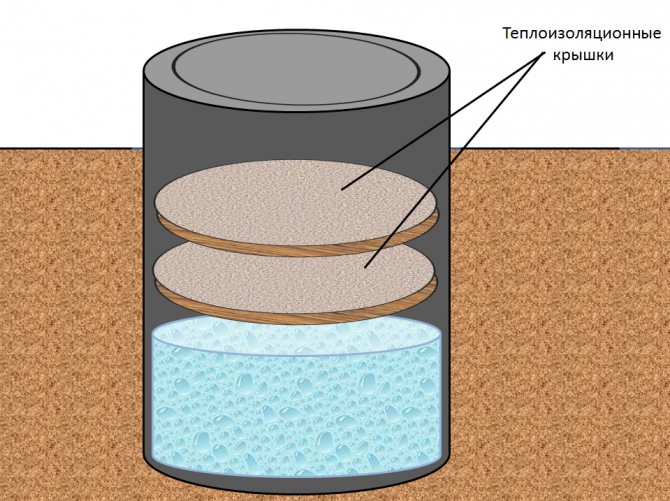
- The caisson barrel is closed with a lid with a ventilation pipe. The upper part of the barrel is also insulated with a layer of thermal insulation.
- Backfilling of the excavation is in progress. The mini-caisson is ready for winter use.
Such a caisson may well serve a small water intake well for a private house.
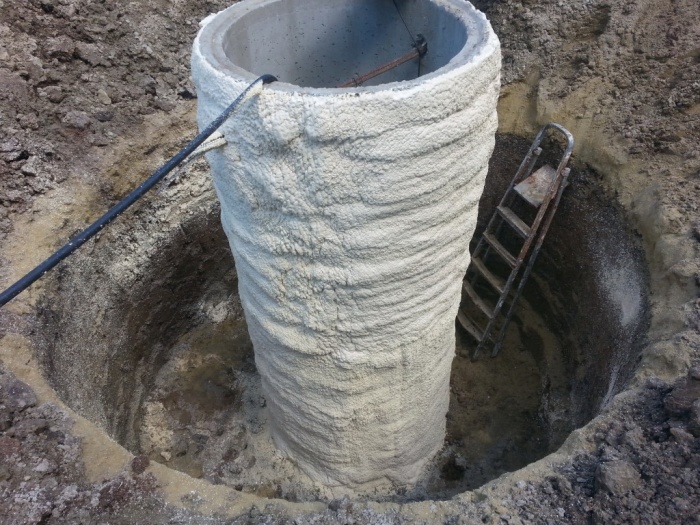
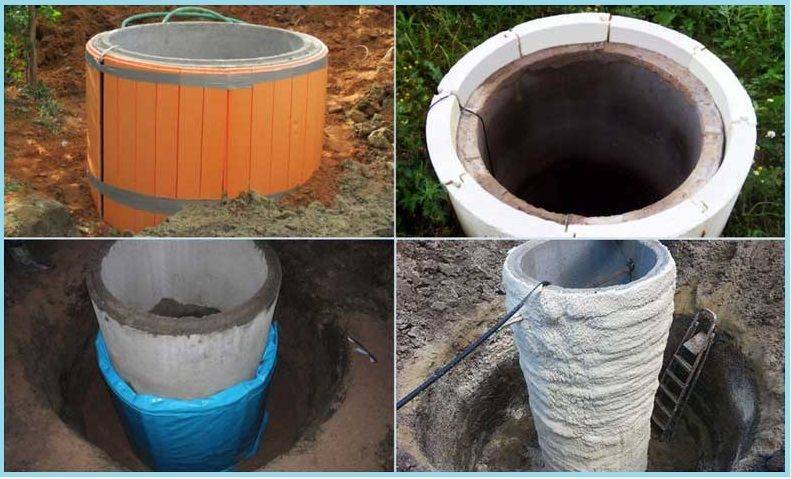
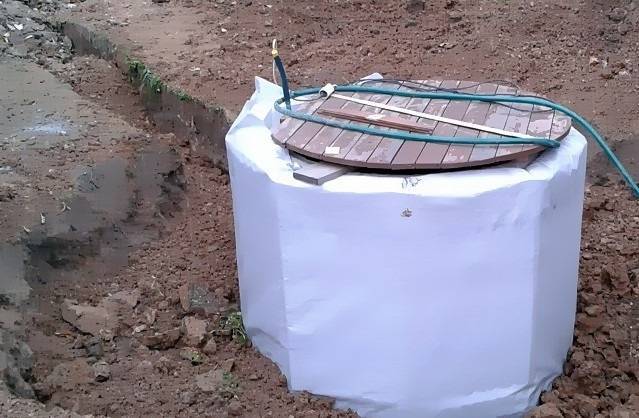
We warm the well with a casing pipe
It is also possible to insulate the well by creating an additional casing pipe. When choosing this option, you will not be able to place hydraulic equipment in the immediate vicinity of the head, but if there is, for example, a surface pump that pumps water from a well, this is not required directly in the house or in a heated room. We operate on the following technology:
- we dig a pit around the casing pipe of the well to the level of soil freezing in your area;
- we wrap the well casing with a heat-insulating material, for example, mineral wool;
- we put a larger diameter pipe on top of the resulting structure;
- we backfill the previously excavated pit.
Insulated well pipe
We warm the well with improvised materials
You can insulate a water well with any improvised materials. This method can be used in regions with a mild climate, where the temperature in winter does not fall below 15 degrees. Consider possible materials for insulation.
- Sawdust.This material can be found on almost every personal plot or borrowed from neighbors. Sawdust is suitable for various insulation works, including for the equipment of water wells.
Dig a pit around the well with a cross section of 0.5-0.6 meters just below the freezing line of the soil and fill the sawdust into the resulting cavity. In the pit, you can fill up not just a layer of sawdust, but mix it with liquid clay. When solidified, you will get both an insulating and strengthening layer at the same time. - It is even easier to insulate the space around the water well with a layer of straw and dry leaves with a similar cross-section. During the natural decomposition of this material, a certain amount of heat will be released. However, such a mixture is short-lived and after a couple of years the insulation layer around the water well will have to be renewed.
A group of well insulation methods
Thermal insulation can be passive (insulated caisson) and active (heating cable).
Insulation of a well with a caisson
The construction and insulation of the caisson is considered a classic way of thermal insulation of a well. The caisson can be purchased as a finished structure or built independently.
The acquired caisson has an undoubted advantage, which is tightness. Homemade will be cheaper.
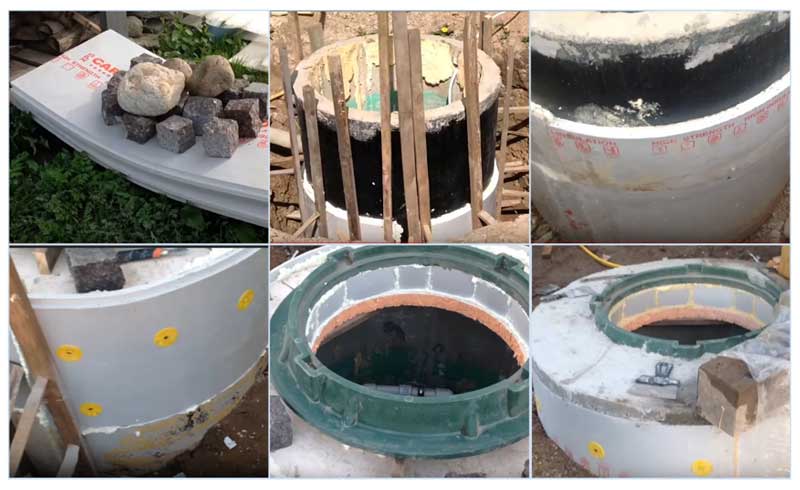
How to make / install a caisson for a well
dig a pit. The lowest point of the pit should be below the freezing level. Therefore, the depth of the pit often reaches 2.5-3 m. To determine the exact required depth, you need to find out the freezing depth and add half a meter to be sure.The width of the pit should exceed the dimensions of the future caisson by 0.5 m;
equip a sand and gravel cushion at the bottom of the pit (height 0.1 m);
cut a hole for the supply and distribution pipes (for a purchased caisson), install the caisson;
Advice. An additional hole can be made at the bottom of the pipe through which condensate will be discharged.
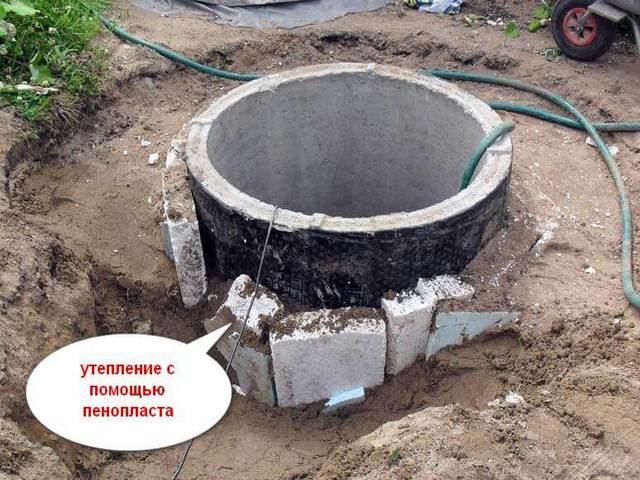
lay out brick caisson or lay a concrete circle (concrete rings), the amount will vary depending on the depth of the pit;
mount the necessary equipment in the caisson;
perform insulation of the caisson from the outside (insulation layer - 50 mm)
Please note that a self-built caisson can be insulated from the inside if reliable waterproofing of the structure is provided; close the caisson with an insulated lid
It is advisable to make a ventilation pipe in the lid;
close the caisson with an insulated lid. It is advisable to make a ventilation pipe in the lid;
backfill the pit. For additional insulation, you can mix the earth with expanded clay.


In such a caisson, it is already possible to leave all the equipment for the winter without consequences.
Note that the arrangement of the caisson is also required by the Abyssinian well.
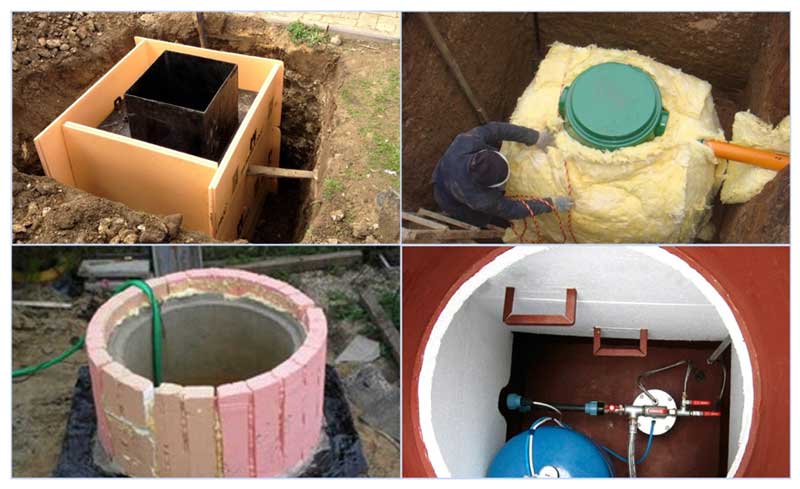
Well insulation without a caisson
In regions with slight sub-zero temperatures, the construction of a caisson can be avoided, and insulation will consist in arranging an insulated box located at soil level. The presence of an insulated cover on the box is a mandatory element.
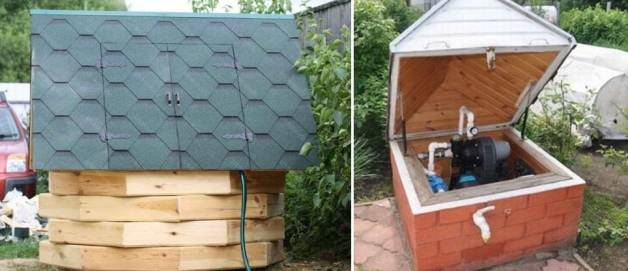 The device of a protective house above the well
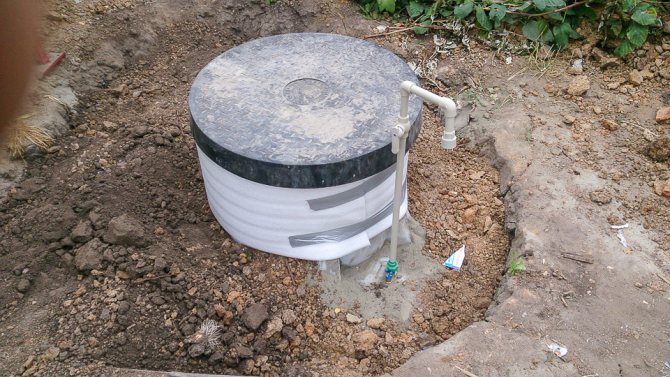
Casing pipe insulation
Such insulation allows you to do without the construction of a caisson.
How to insulate a well casing
dig the casing pipe to the estimated depth.The sufficient width of the trench (0.7-0.8 m.) will simplify further work;
insulate the pipe with heat-insulating material. PPU shell is ideal for well insulation. This material is hygroscopic, durable, resistant to rotting, thanks to a wide range of diameters it provides reliable sealing, and besides, it is easy to install. If the insulation is made with mineral wool, it is advisable to protect it by wrapping it in a film or putting another pipe of a larger diameter on the insulated casing pipe;
fill up the trench;
equip a clay castle near the head, which will prevent water from flowing along the pipe.
Well insulation with heating cable
The heating cable is considered an active method of insulation and the most effective. However, it is also the most expensive of the listed.
 How to insulate a well with a heating cable
Heating cable installation technology involves:
trenches are being excavateddepth - below the freezing point);
heating cable installation around the casing. For a low-power cable, a small pitch of turns is selected, a powerful cable is laid in a straight line;
the pipe is additionally insulated with heat-insulating casings;
if necessary, waterproofing of the insulation is carried out;
the soil removed from the trench is backfilled.
The electric heating system is good because you can use it all the time and not guess if the well will freeze in winter, but you can operate it from time to time. For example, installing a sensor will regulate the period of operation and downtime of the system. Also, this approach will allow you to defrost the system after winter or freezing. Of course, installing a sensor involves extra costs, but they will pay off with savings on electricity.


How to insulate a well?
Thermal insulation material for well insulation is selected taking into account the climate in the region, which determines the level of soil freezing. Based on the temperature regime, all materials used can be combined into two groups
1. Insulation for mild climates (up to -15 °C)
Theoretically, the operation of the water supply system in winter, with a shallow depth of freezing, does not need to be insulated, however, thermal insulation helps protect the system from rupture due to freezing.
Light insulation is possible using natural insulation, these include: straw, dry leaves, sawdust, high-moor peat, expanded clay.
The advantage of natural heaters in low cost and ease of installation. The whole process includes: excavation around the well, installation of a box into which the selected material is poured. The disadvantage is that such heaters rot in the soil (with the exception of expanded clay), and also need to be protected from moisture.
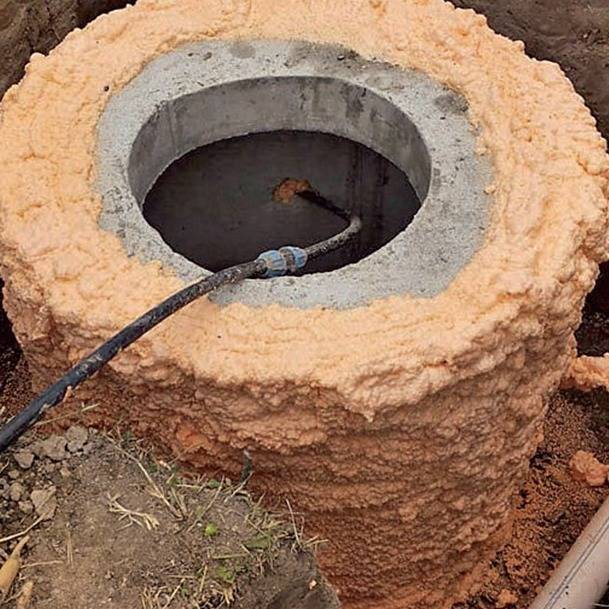
2. Insulation for cold climates (over -15 °C)
In practice, the effectiveness of artificial heat-insulating materials for regions with a harsh climate has been proven. Well proven: penoizol, polystyrene, polystyrene foam, polyurethane foam.
The use of cotton wool is limited, since its use requires high-quality waterproofing. Otherwise, the mineral wool will get wet and lose its heat-saving properties.
Criteria for the selection of thermal insulation material
- availability;
- ease of installation. Do-it-yourself work should be simple and not require the use of sophisticated equipment;
- hygroscopicity;
- strength, incl. resistance to deformations caused by heaving of the soil;
- cheapness.
Arrangement of a water well in the country Having determined the frequency of use of the well, assessing the required degree of its insulation and choosing a suitable insulation, we can assume that the preparation for work has been completed and it's time to start implementing the insulation project.
Consider the main methods of insulation
We focus on the fact that we are talking only about that part of the well that falls into the zone of soil freezing for a certain region.


