- Proper insulation of the balcony. Step-by-step instruction
- A bit of theory
- Which penoplex to choose
- How to insulate the floor on the balcony with penoplex
- Insulation of the floor with penoplex on the loggia along the logs
- Floor insulation on the balcony with penoplex without lag
- Floor insulation on the balcony with foam under the screed
- Insulation of the floor on the balcony with foam plastic under the laminate
- Preparation for foam insulation
- Video:
- Preparation for floor insulation
- Carrying out minor repairs before warming
- Floor surface waterproofing
- Option # 2 - installation of film underfloor heating
- Assembly of the crate
- Preparatory work
- What are insulating boards attached to?
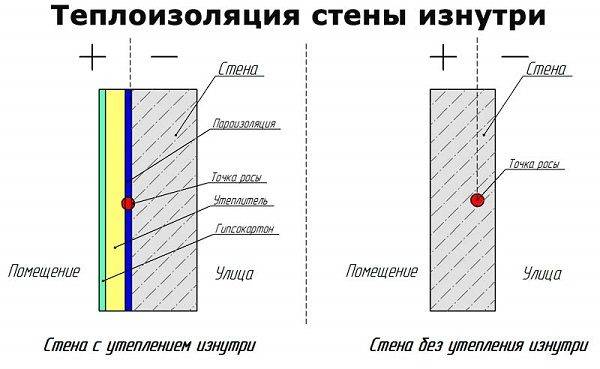
- Insulation inside or outside, which is better
- Insulation with polyurethane foam
- Choosing a foam brand
Proper insulation of the balcony. Step-by-step instruction
In reality, everything looks much more complicated. One of the main works is competent insulation of the balcony. Without this, it is impossible to expand the living space, having received a full-fledged recreation area, a small dining room or a sports area.
A bit of theory
 According to the laws of physics, any insulation must be installed from the street side. Moisture formed inside the balcony, freely penetrating through the walls of the balcony, collides with a cold front coming from the outside of the balcony, creating condensation on the outside of the wall.
When installing insulation inside the balcony, moisture meets cold air already on the inside of the balcony wall. A wall built of porous bricks is not a barrier to the cold. The dew point is formed in the area where the insulation is adjacent to the balcony wall. The resulting condensate leads to wetting of the finishing material and the appearance of mold and mildew.
In practice, it is almost impossible to install insulation from the outside. Everyone installs it from the inside, using proven technologies that have stood the test of time with positive results.
Which penoplex to choose
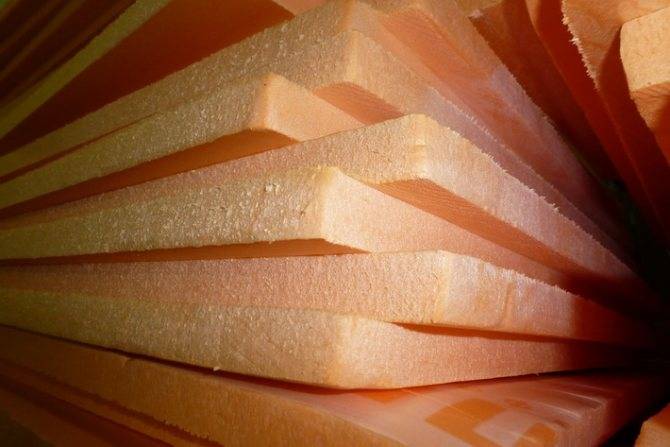
Penoplex plates are produced in different thicknesses, densities and thermal conductivity. Each type of material has its own marking and is used for its intended purpose. The softest type of penoplex brand 31C. It is designed to insulate surfaces that will not be subjected to strong mechanical stress. It is recommended to be used for ceiling and wall mounting.
It is better to put penoplex brand 35 on the floor, since it is endowed with increased density and does not deform under the weight of furniture, you can walk freely on it without leaving dents. You can pour a cement screed on it or install a "warm floor" system.
The thickness of the plates varies from 20 to 100 mm. The 20 mm thick material has smooth edges, while thicker sheets are produced with protrusions on the edges. Through these protrusions, the sheets are tightly connected to each other, due to which cold bridges are not formed. Such a connection system eliminates the need for additional sealing of the seams and does not require gluing the joints.
For insulation of walls and ceilings, foam sheets with a thickness of 50 mm are suitable.It does not make sense to buy a thicker material, since it will “steal” the useful area of \u200b\u200bthe balcony, while the insulation efficiency will not increase much. On the floor, the thickness of the sheets is selected based on how many centimeters it can be raised. In any case, it is necessary to carry out calculations so that, taking into account the screed and flooring, the floor height does not rise above the threshold.
How to insulate the floor on the balcony with penoplex
Insulation methods largely depend on which topcoat is chosen. The procedure is performed according to two technologies: the plates are laid along the logs and under the screed. However, it is precisely because of the chosen finishing coating that each technology has its own nuances.
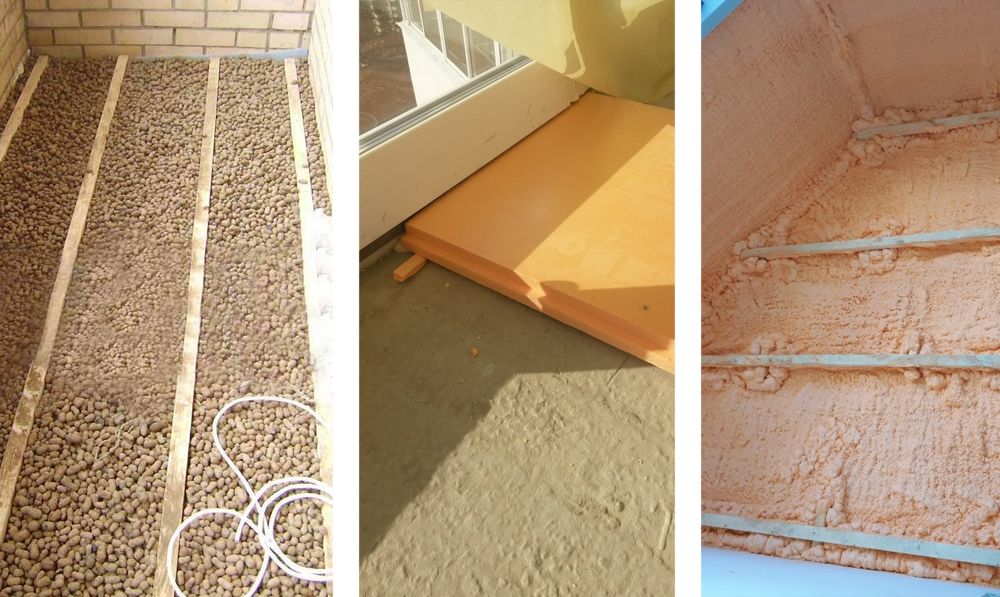
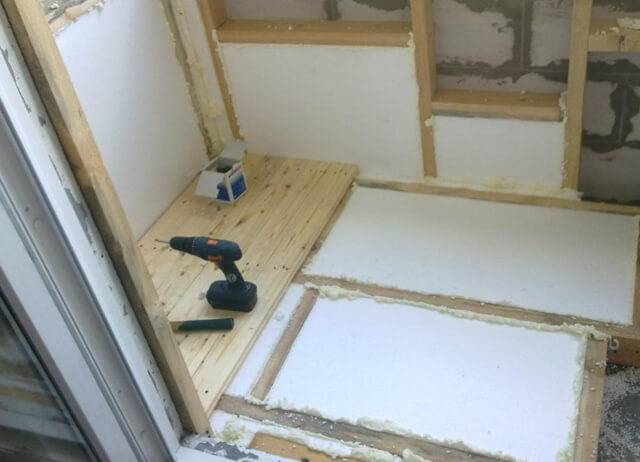
Insulation of the floor with penoplex on the loggia along the logs
The method is considered the most difficult and costly. More often it is used if the floor needs to be raised high. Logs allow you to do this with a minimum load on the balcony slab. If you lift with a thick concrete screed, then the structure may not withstand great weight.
With the help of a log, you can raise the floor high without creating a large load on the balcony slab
The process consists of the following steps:
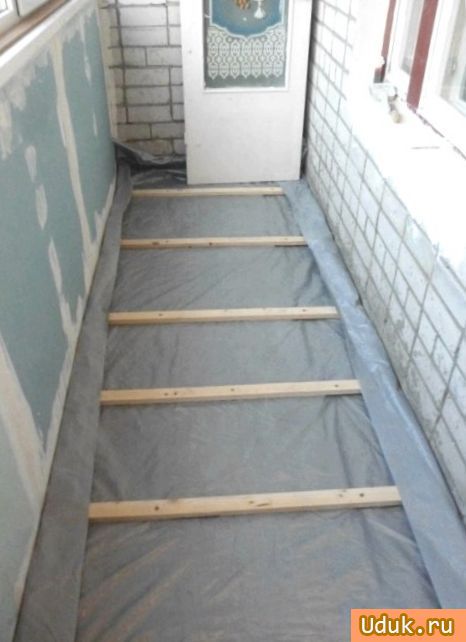
- The concrete slab is covered with waterproofing. The choice of material is at the discretion of the owner. A film, roofing felt, a special membrane or bituminous mastic is suitable. The edges of the waterproofing should go to the walls.
- With the help of a laser and water level, markup is performed. The laying level of the log is calculated so that the finishing flooring of the balcony does not protrude above the threshold and floor of the adjacent room.
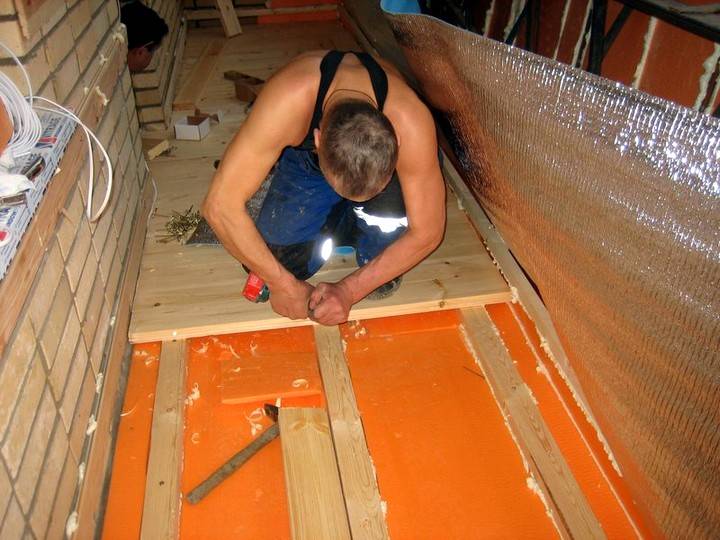
- For the log, a dry, even pine beam with a side size of 50 × 50 mm is used. The elements are laid in steps of 30-40 cm. From the walls, the extreme logs are laid with an indent of 10 cm. A gap of 3 cm is left between the ends of each beam and the walls.Each lag is attached to the balcony slab with anchors.
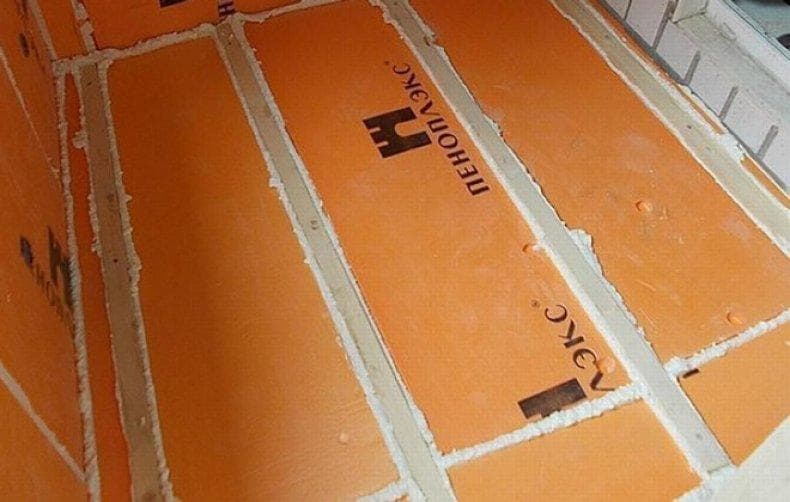
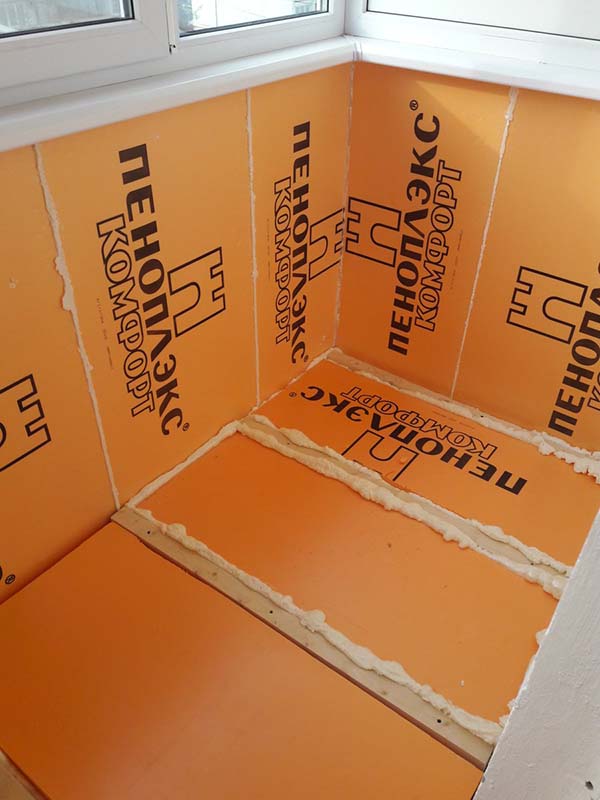
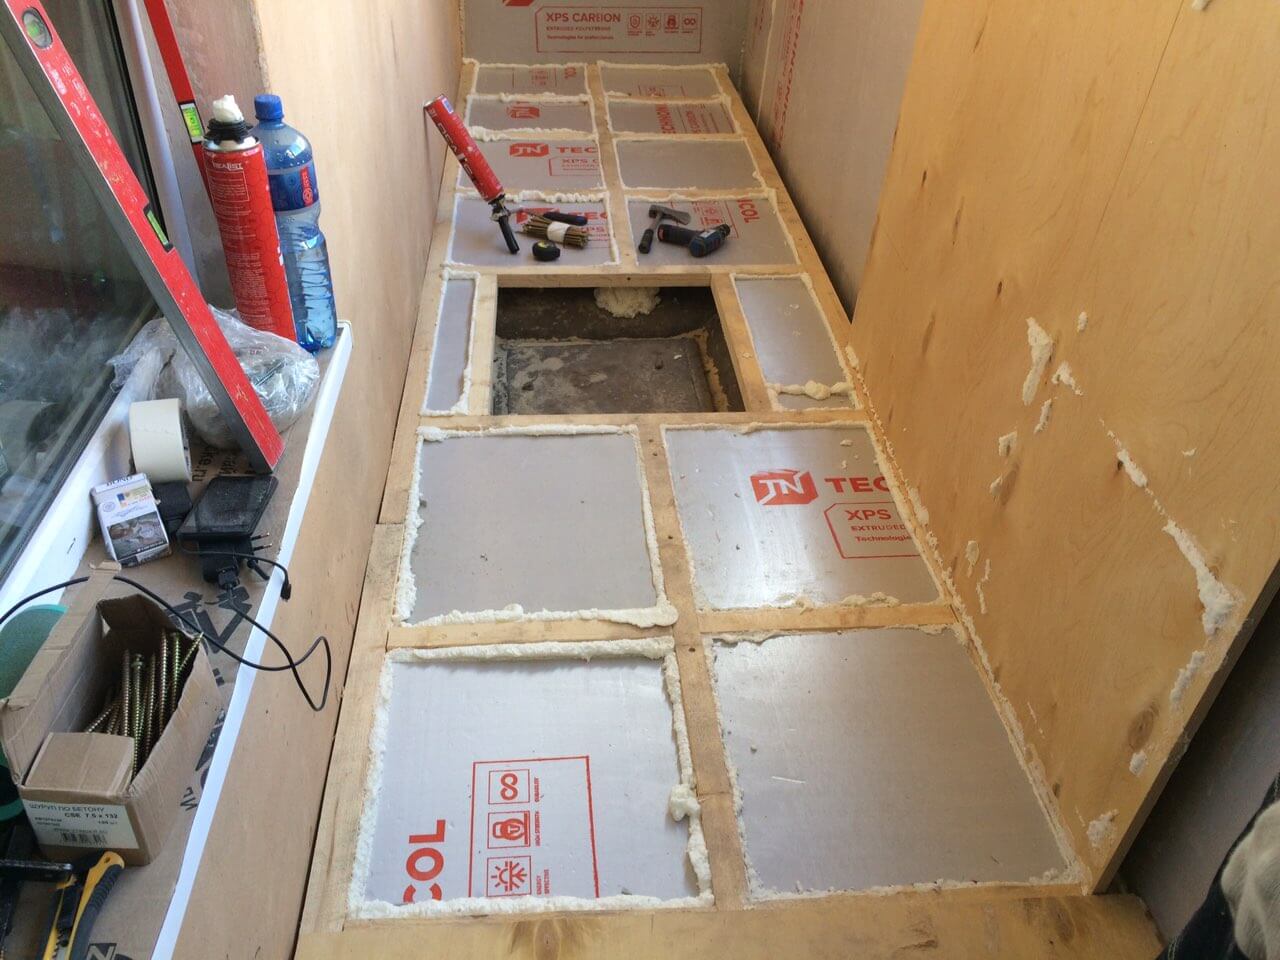
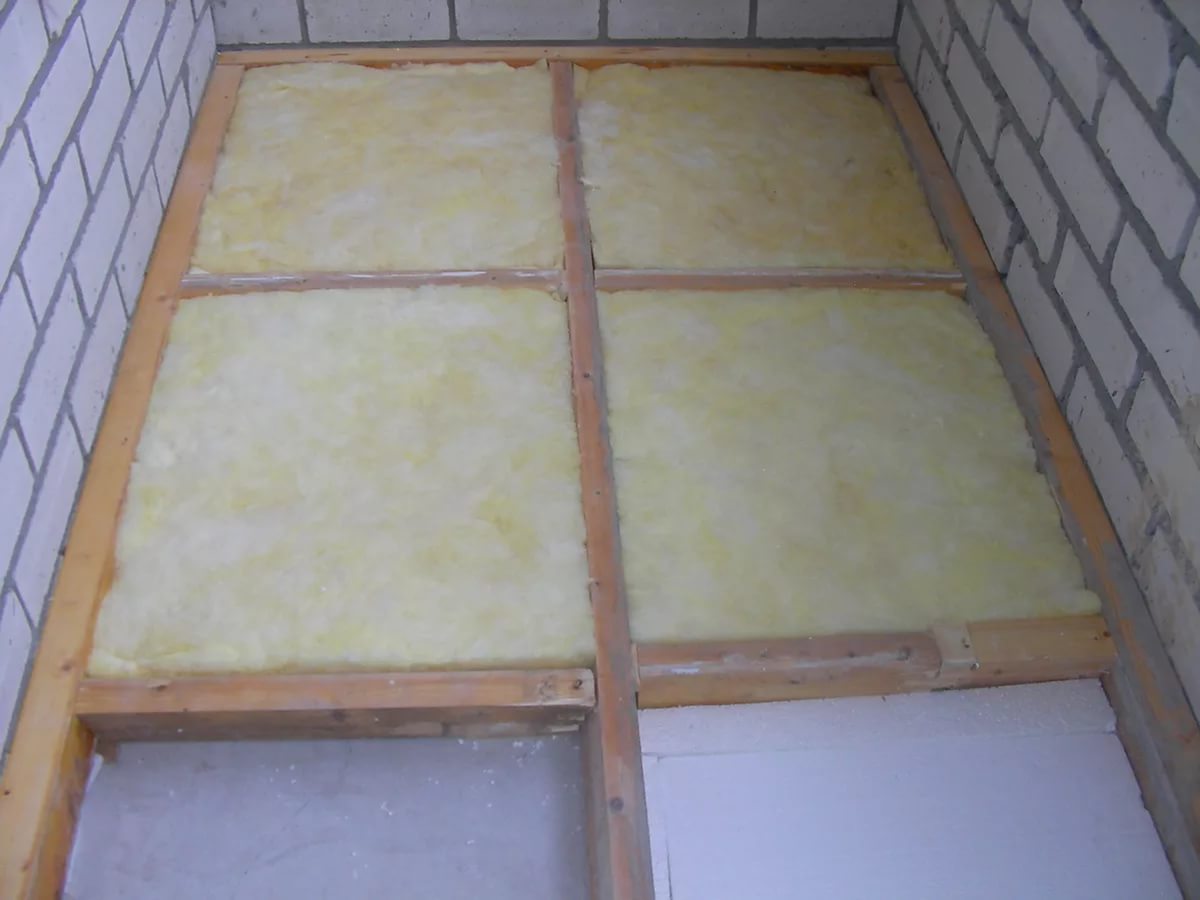
- Penoplex plates are cut to the desired size, inserted inside the cells between the lags so that they fit tightly. The gaps are filled with mounting foam.
- After laying all the plates, they are covered with a vapor barrier film or foil insulation made of polyethylene foam.
The warming process is over. On the logs, it remains to lay a rough floor from boards or chipboards and lay the finish coating. You can just paint the boards.
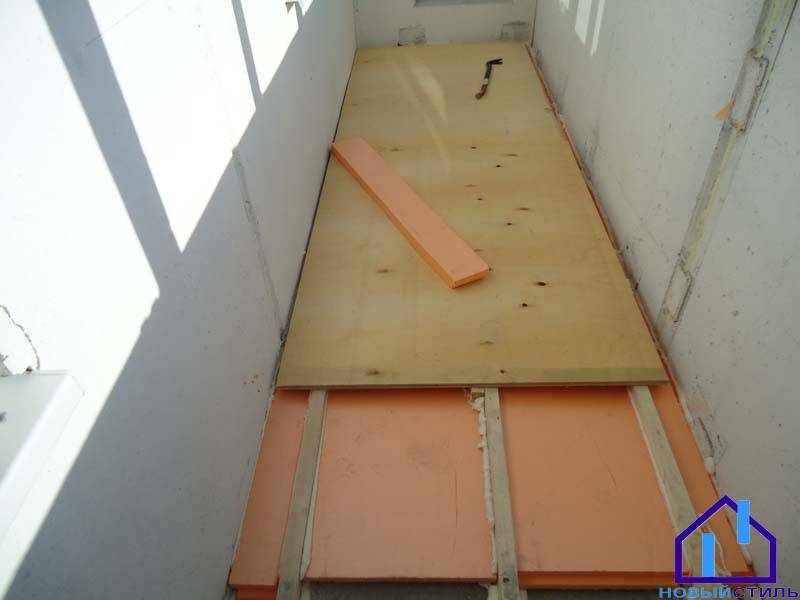
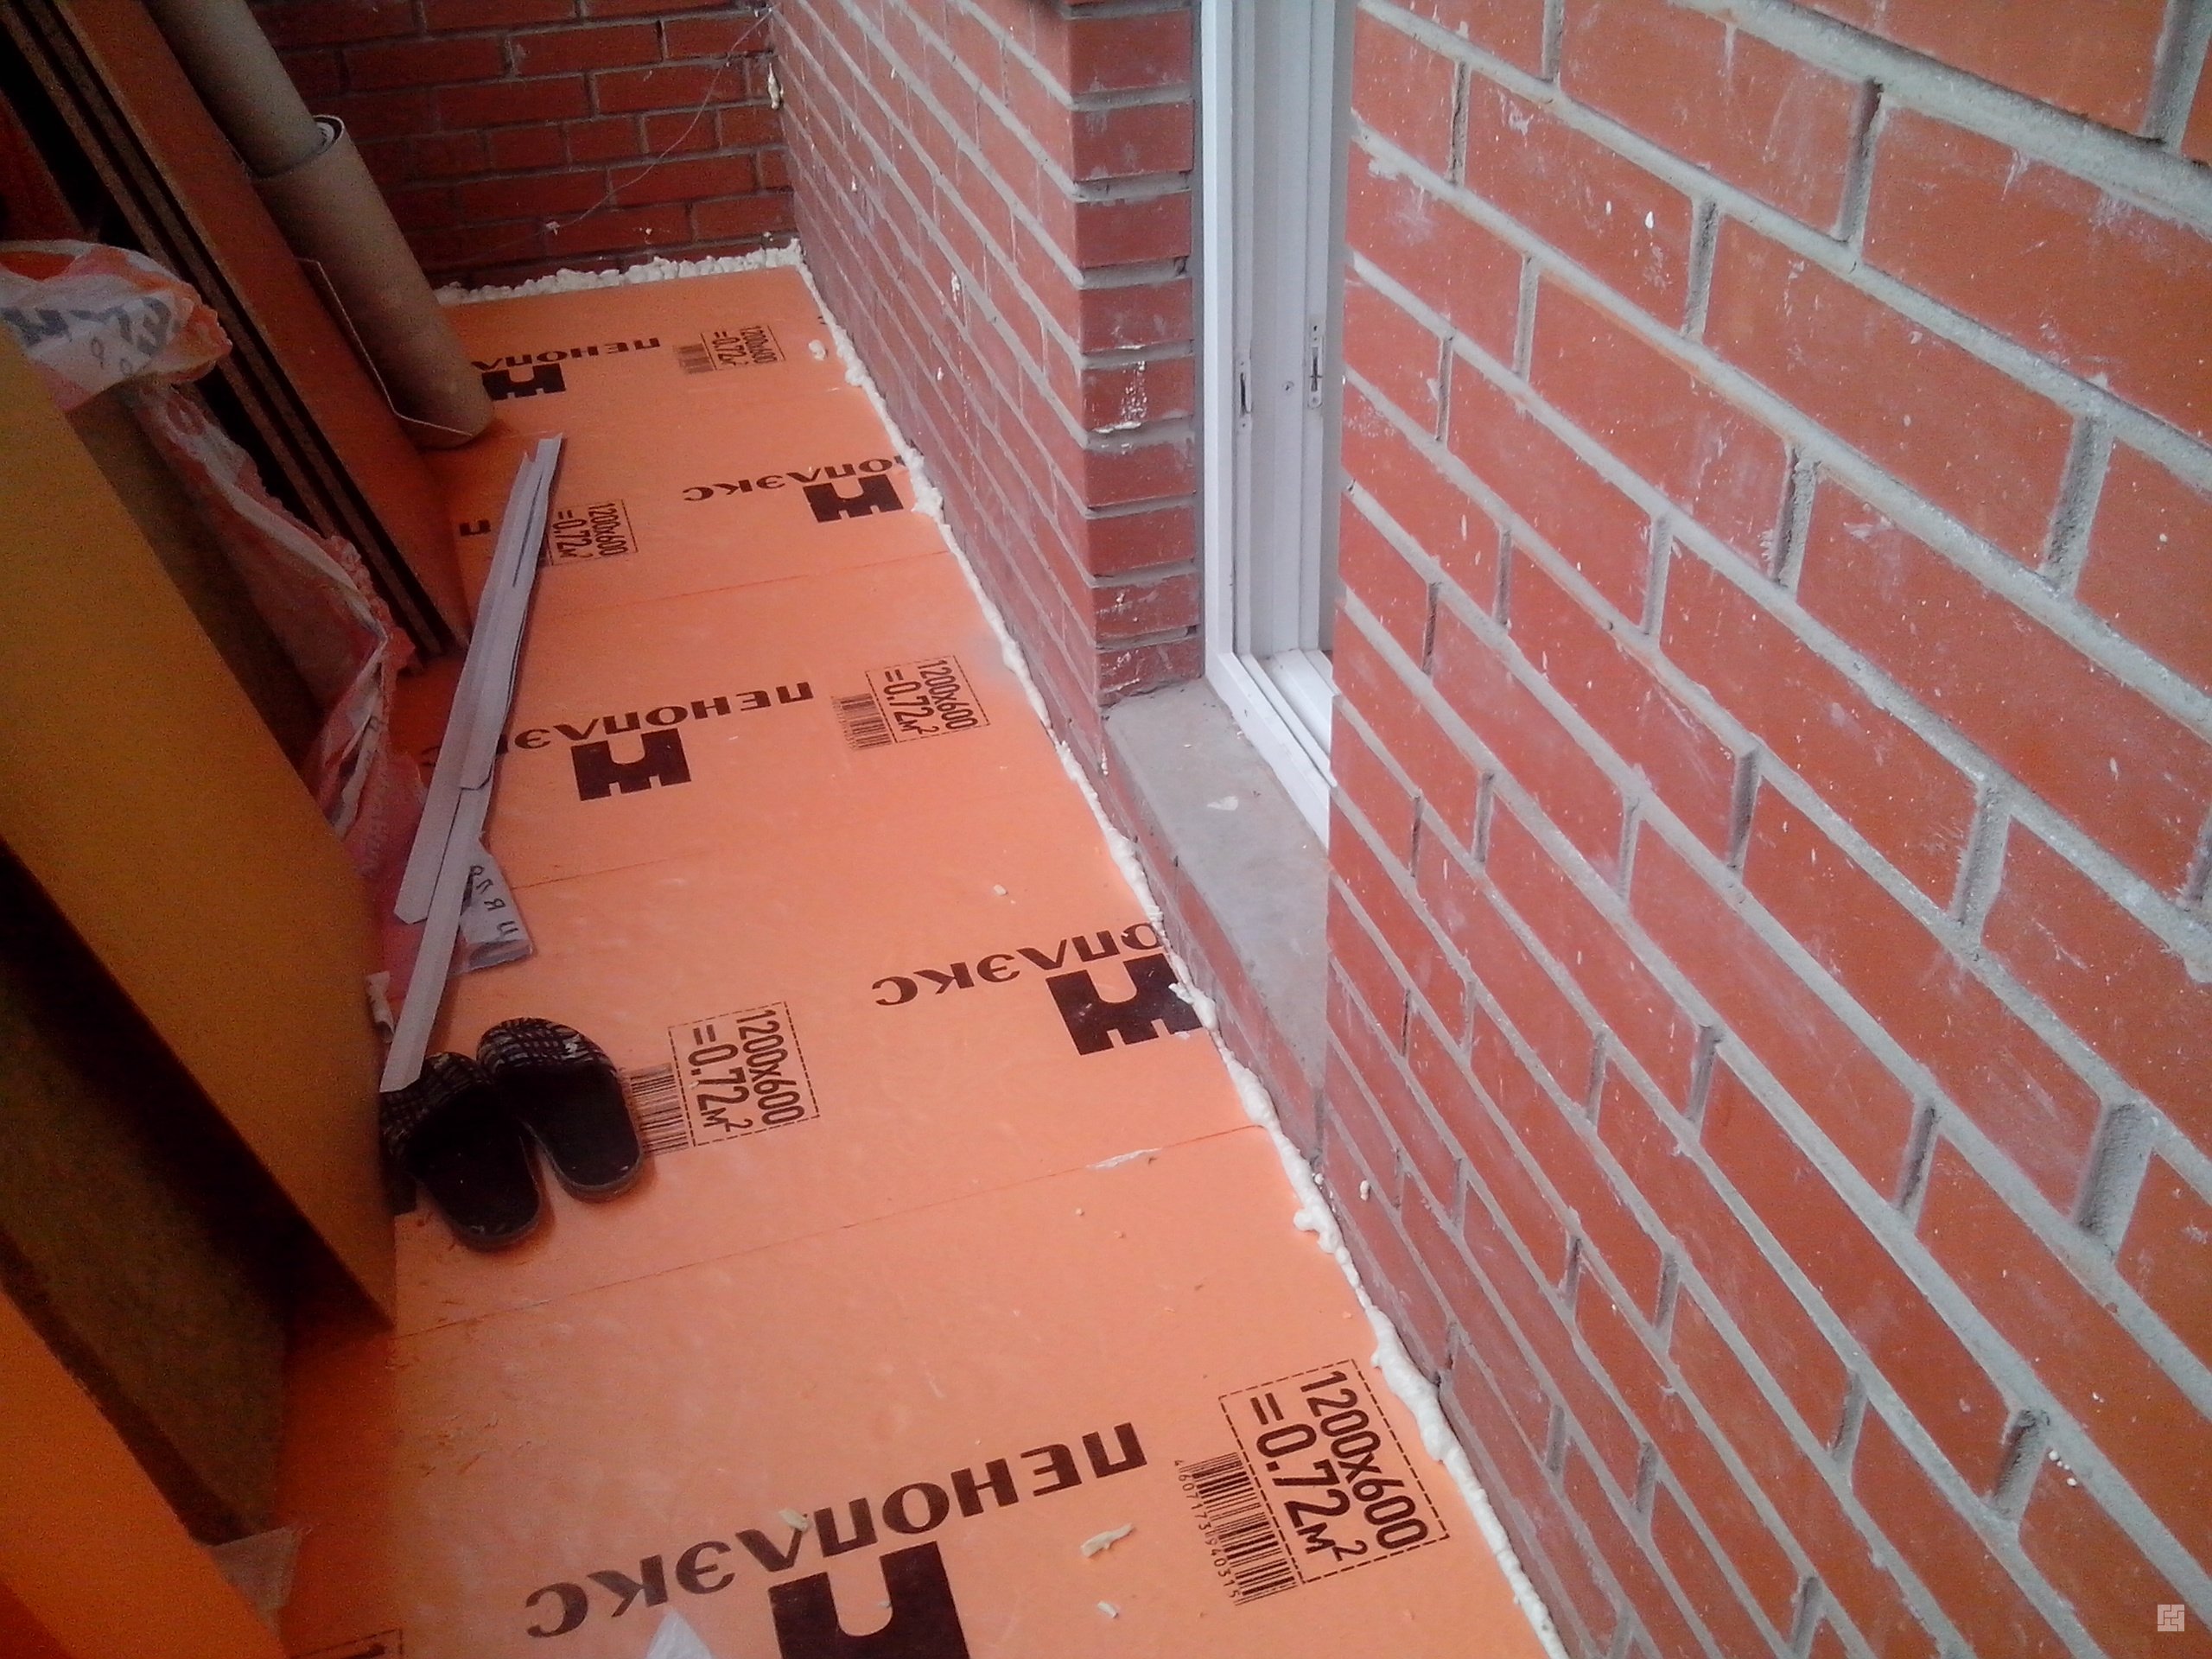
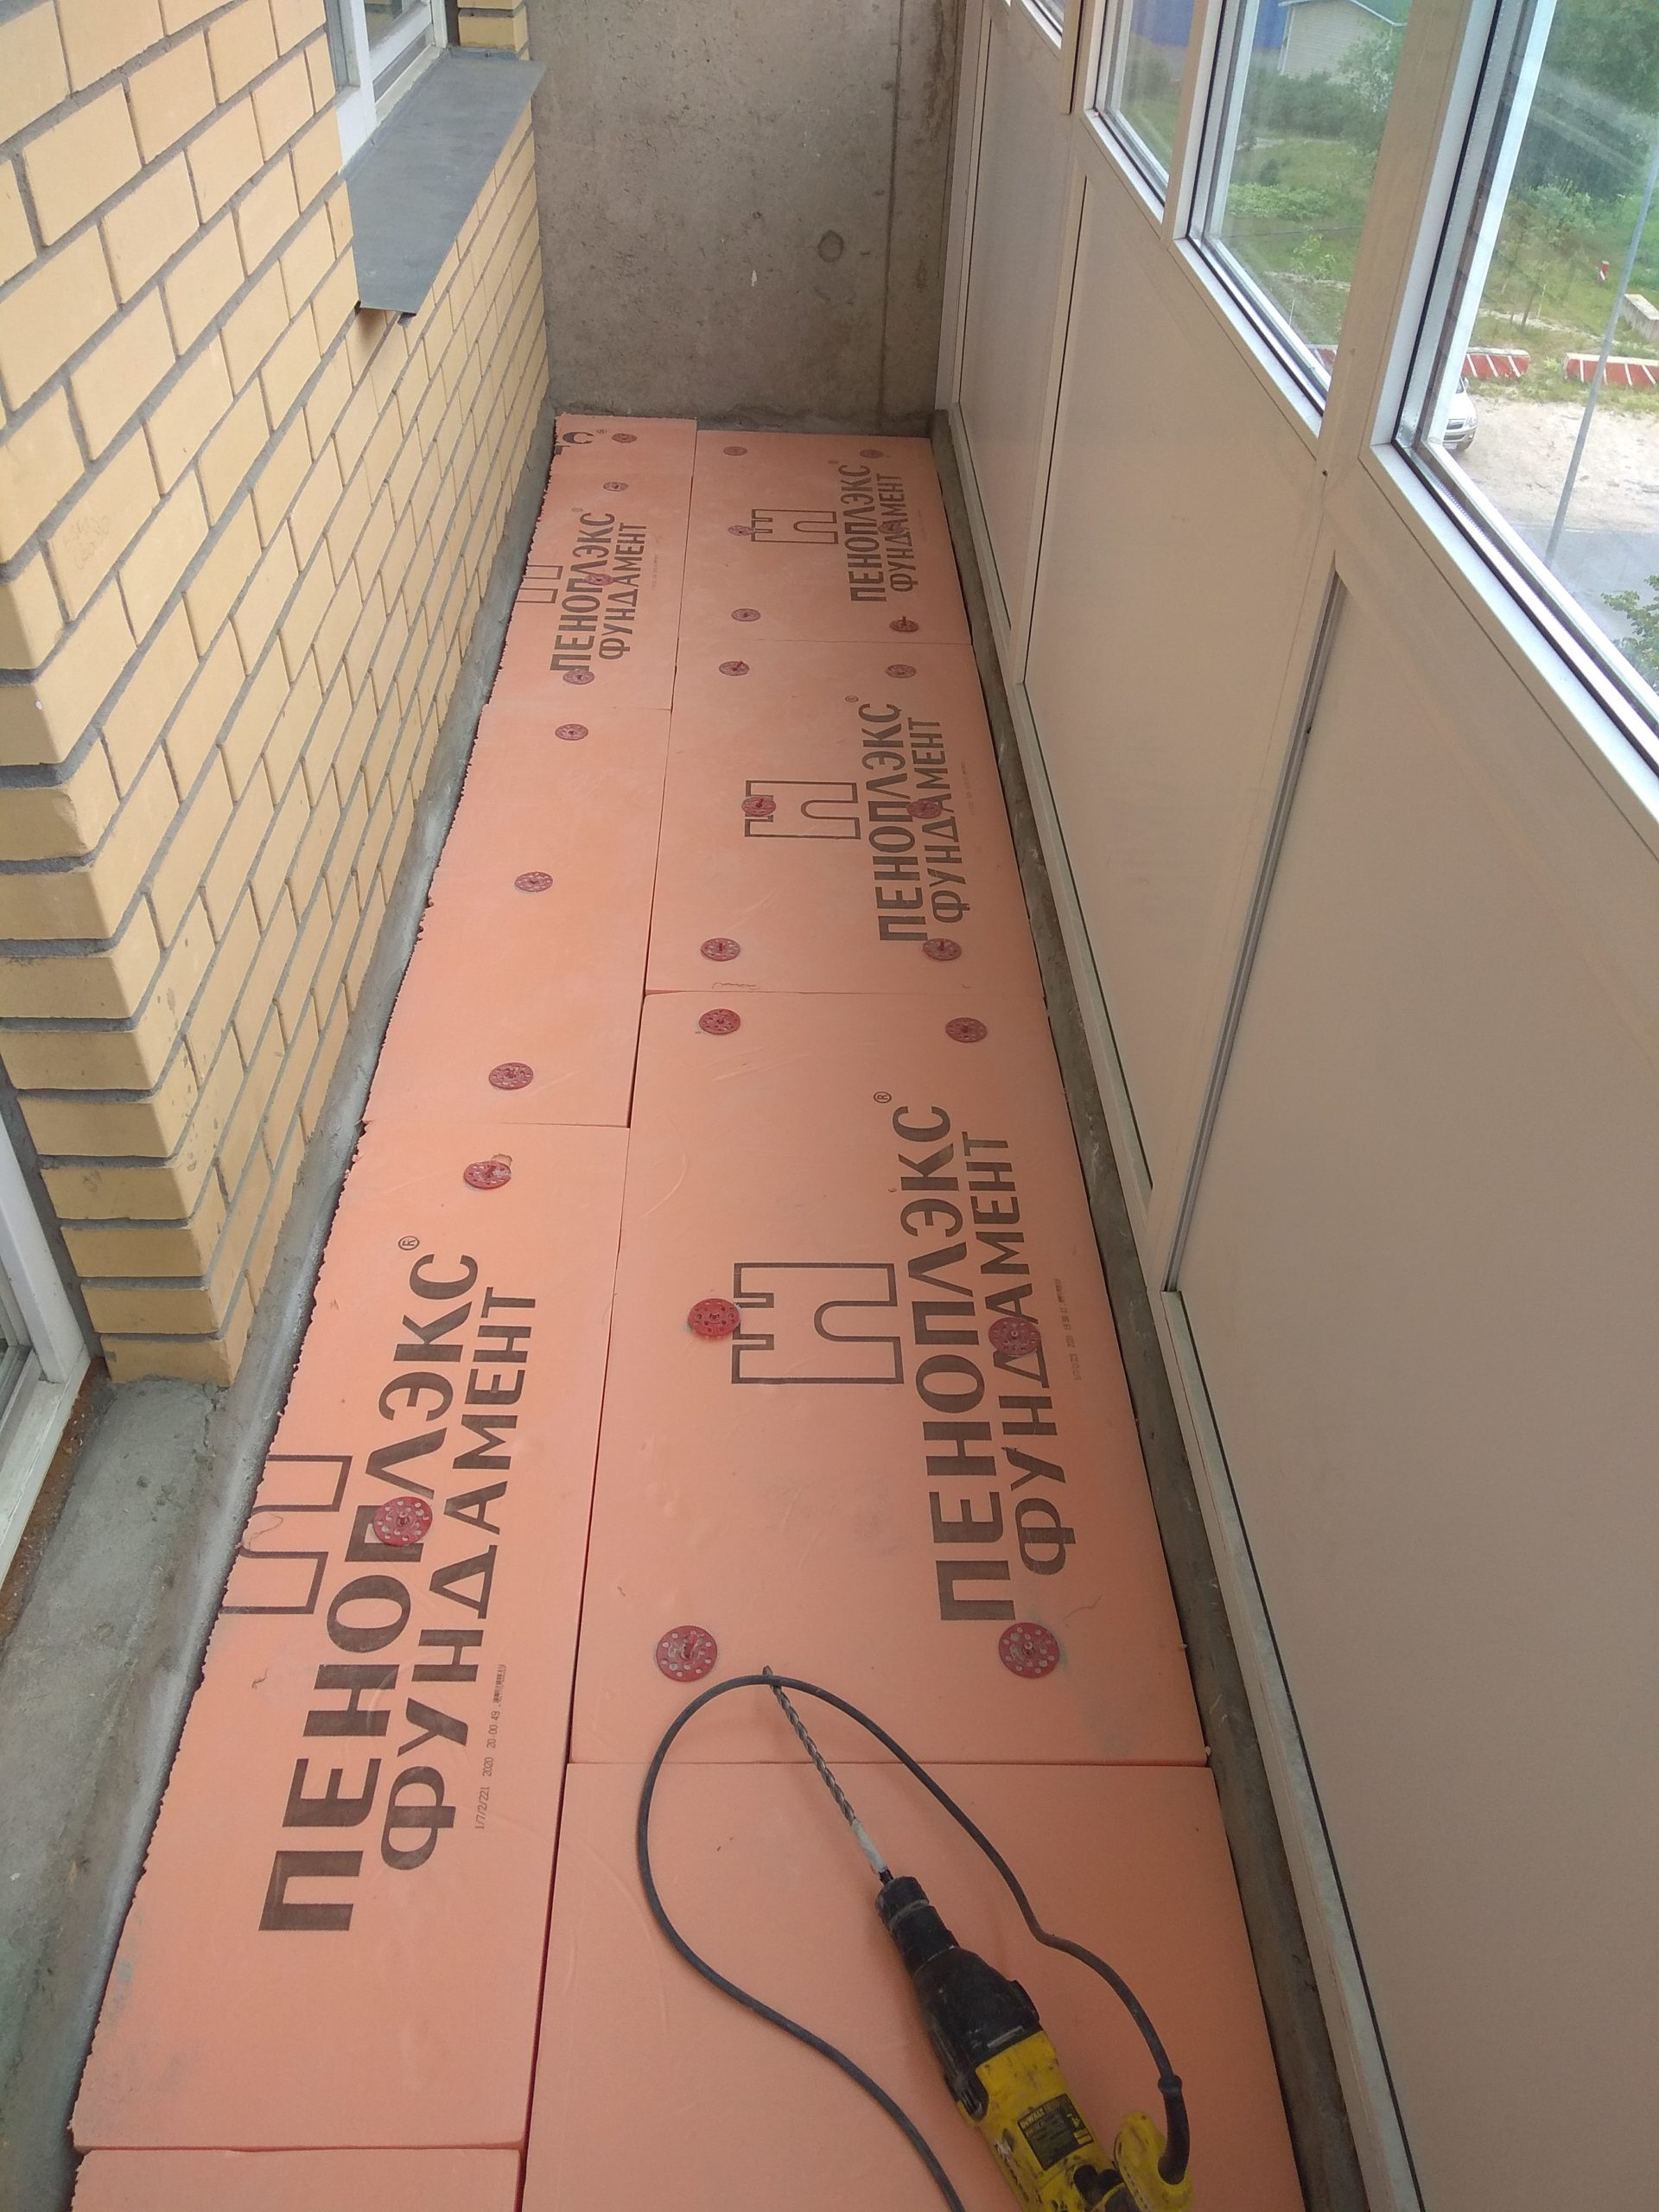
Floor insulation on the balcony with penoplex without lag
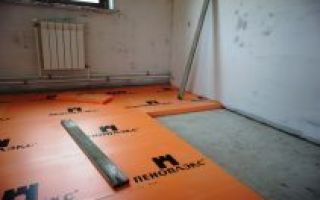
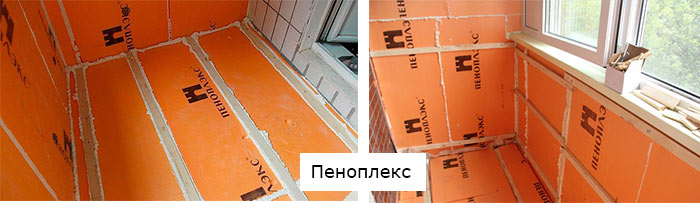
The simplest way to insulate the floor of a balcony is to glue penoplex onto a concrete slab without using a log. Surface preparation requires careful cleaning of dust. The base is treated with deep penetration soil. As a waterproofing membrane or mastic is used.
When laying without a lag, the thermal insulation is glued to the balcony slab
Plates are cut to size. In a bucket with a drill with a nozzle, glue is kneaded. Any will do, for example, Ceresit CT-83. The finished adhesive is applied with a notched trowel onto a concrete base and a thin layer onto the slab itself. Penoplex is pressed tightly to the floor, pressed down with a heavy load.
When all the elements are glued, the joints are blown with mounting foam. The weights are removed after the adhesive has completely cured. Lay directly on top of the thermal insulation plywood floor, particle boards or pour concrete screed.
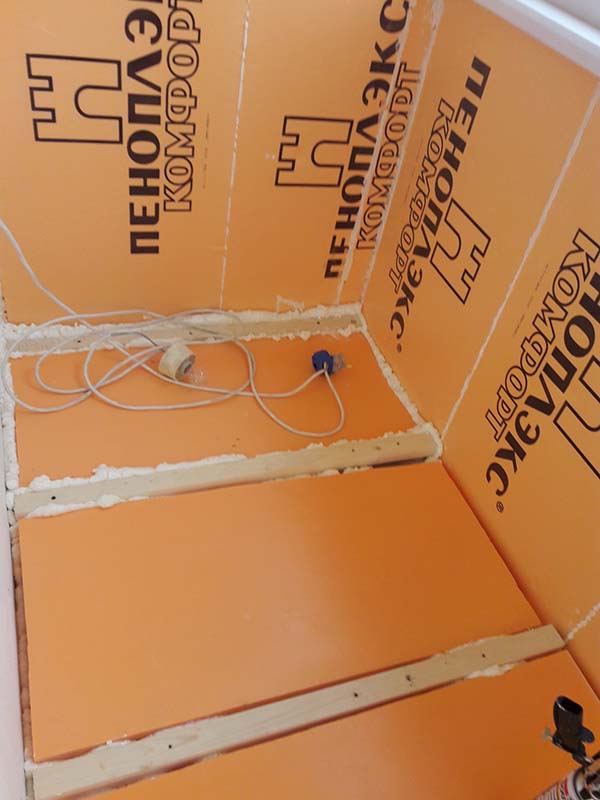
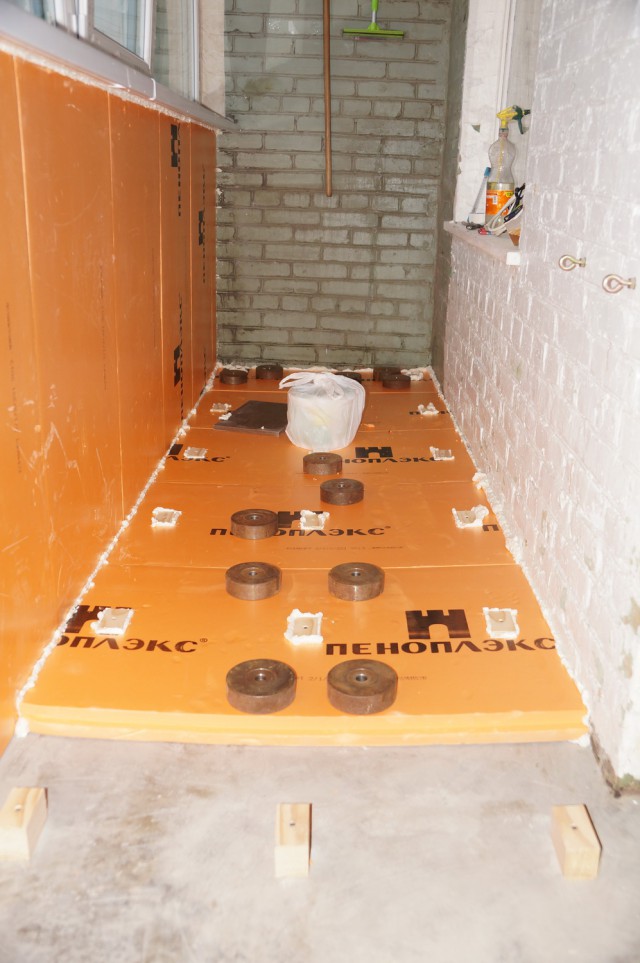
Floor insulation on the balcony with foam under the screed
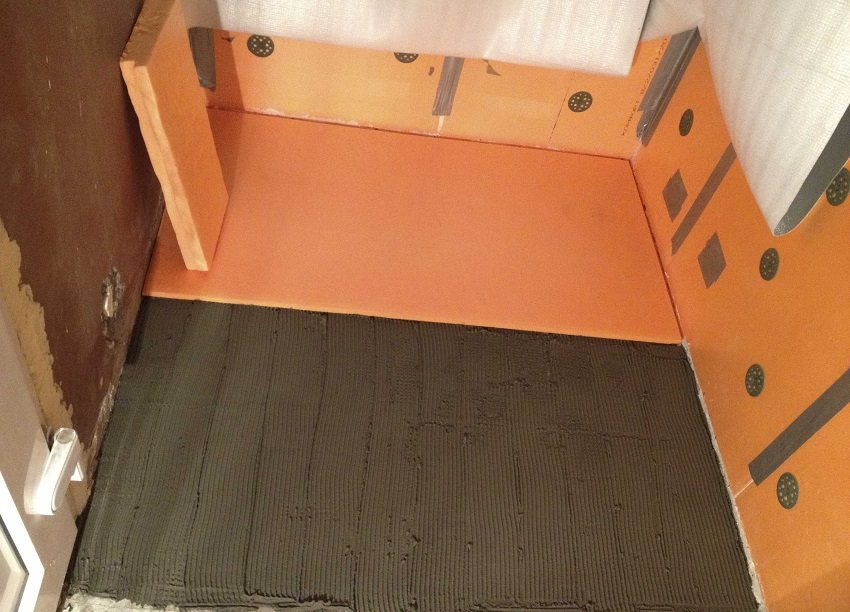
The pouring of the screed over the thermal insulation is most often carried out when the "warm floor" system is mounted on the balcony. Initially, the technology requires the implementation of similar actions taken for the method without lag.When the penoplex is glued, the joints are foamed, they start laying the heating circuit.
For strength, the screed must be reinforced with a mesh
First, the entire floor area is covered with a vapor barrier. Lay the foil heat reflector with the mirror surface up. The contour of the "warm floor" system is distributed over the floor. The first layer of the screed 2-5 cm thick is poured with concrete mortar. After the mortar has set, a reinforcing mesh is laid, beacons are set up. The final layer of the floor screed on the balcony is poured onto the penoplex with a thickness of 4 cm. It is ideally aligned with the lighthouses, since the finishing coating will already be laid on this surface.


Important! If it is not supposed to lay the heating circuit of the “warm floor” system on the balcony, the total thickness of the screed is reduced, but not less than 4 cm
Insulation of the floor on the balcony with foam plastic under the laminate
A feature of the laminate is the need to lay it on a hard surface. Despite the elasticity of the penoplex, it still remains a soft material. It is impossible to lay the laminate directly on the thermal insulation. There will be a pinpoint effect. That is, dents will remain at the load points.
On top of the penoplex under the laminate equip a rigid base
To organize a rigid state, insulation is done according to the technologies discussed above: under a screed or logs. You can just glue foam without lag. Plywood or particle boards are laid on top. Such a rigid base is sufficient for laying laminate flooring.
Preparation for foam insulation
The balcony can play the role of an additional room, but this is impossible without good insulation.Insulation work can be entrusted to specialists, or you can do it yourself.
If you take up the matter yourself, you should try to avoid common mistakes.
It is not enough just to put double-glazed windows, seal them with mounting foam and turn on the heater.
Before proceeding, a certain set of tools is being prepared:
- perforator with a drill;
- drill with a nozzle;
- a hammer;
- electric jigsaw;
- building level;
- pencil and tape measure;
- special gun for foam;
- stepladder;
- construction knife;
- drill with nozzle.
Before starting work, it is necessary to free the entire balcony from foreign objects. There are several successive stages of warming:
- Installation of double-glazed windows;
- Crack processing.
- Heater selection.
- Balcony insulation.
- Finishing and decoration.
- Installation of an additional heat source.
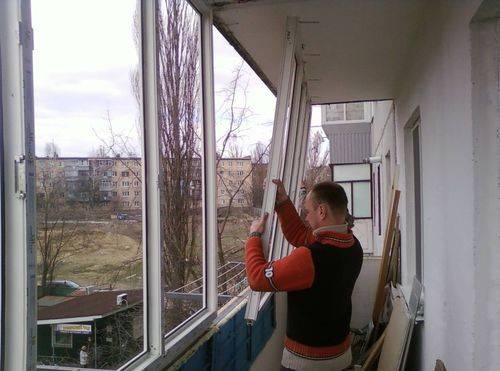
Before installation, you need to remove the double-glazed window from the frame.
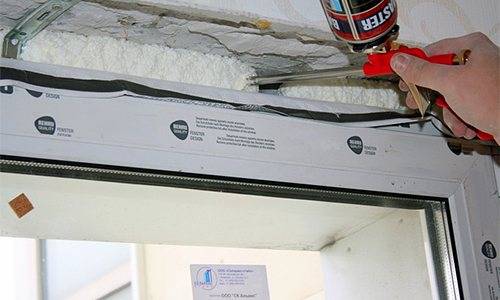
When processing cracks, the foam must be applied evenly to all cracks.
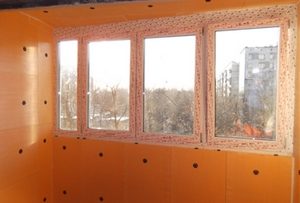
Penoplex is suitable for warming all surfaces.
Balcony wall insulation. To install windows that are suitable for a future balcony, you need to understand what the design of the parapet is. If it is strong enough, then you can proceed with the installation of double-glazed windows immediately. In cases where there are doubts about the strength of the parapet, it is necessary to strengthen it. For this, an additional parapet is used.
Read about how to strengthen the parapet here.
After installing window frames, the problem with heat will not disappear. It will go through numerous gaps and cracks. To seal them, it is necessary to use sealants and mastics based on polyurethane.
As a heater, one of the most optimal is penoplex. It meets all the criteria that are important for optimizing the microclimate on the balcony - low heat conductivity, lightness, small thickness, complete safety for health, as well as the ability to use only a knife for cutting.
Characteristics of penoplex in thickness:
The process of insulation includes several stages of work on the walls of the balcony, its floor and ceiling. The details of each stage are described below.


After the process of warming is completely completed, you can proceed to the cosmetic finish. The choice of materials depends on the tastes of the owner of the apartment. Radiators or air conditioning can be used as an additional source of heat.
Video:
Back to content
Preparation for floor insulation
A fundamentally standard scheme for floor insulation on a balcony can be depicted as follows:
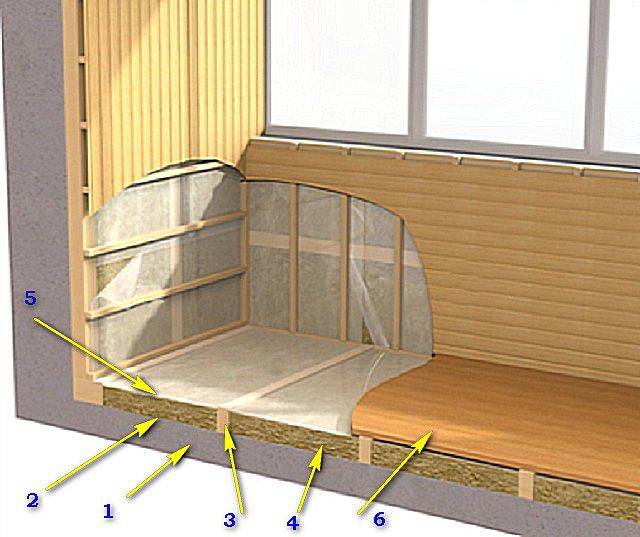
Scheme of standard balcony insulation
1 - reinforced concrete base.
2 - waterproofing, preventing the capillary spread of moisture into the insulation layer.
3 - logs. Often the floor on the balcony is raised to the level of the threshold of the door leading to the room, so the height of the log can be different. Often a two-tier arrangement is used when the upper logs are perpendicular to the lower, supporting ones.
4 - a layer of insulating material laid out between the lag.
5 - a waterproofing layer that does not prevent the free exit of moisture from the insulation. Can be used when used as a thermal insulation layer.
6 - sheet material (plywood, OSB) for laying the finish coating.
If it is planned to make a comfortable room out of the balcony, you can additionally use an electric floor heating system.In these conditions, it is most convenient to use film infrared heaters.
In order for the insulation to be of high quality and reliable, it is necessary to do some preparatory work.
Carrying out minor repairs before warming
Thermal insulation of the floor is carried out simultaneously with the insulation of all surfaces of the balcony, otherwise the work simply loses its meaning.
It is good if the floor is in excellent condition - the surface is even, whole and without defects. If the floor is tiled and it sits well, then it is quite possible to leave it without resorting to dismantling.
However, if the concrete base has cracks, potholes, chips, and there are gaps between the floor and walls, then all defects must be eliminated before starting work.
Preparation of the concrete base is necessary to prevent the accumulation of moisture and the occurrence of mold and fungus.
- If there are small protrusions on the surface, they can be carefully chopped off to a general level.
- Cracks need to be cut to a depth of 10 mm and expanded for a deeper and denser filling of the repair compound. This can be done manually or by using a grinder with a circle on the stone.
- Places to be repaired are thoroughly cleaned of dirt and dust.
- After that, it is necessary to prime the emergency areas with a deep penetration composition.
- After the primer dries, all cracks and potholes are densely filled with a cement-sand mortar. Wide gaps between the slab and the walls can be filled with sealant or foam.
- After drying, the surface is cleaned to the general level of the floor.
Floor surface waterproofing
If the base of the floor is in good condition, and the neighboring insulated balcony is located below, then you can do without waterproofing, it will be enough just to carry out priming.
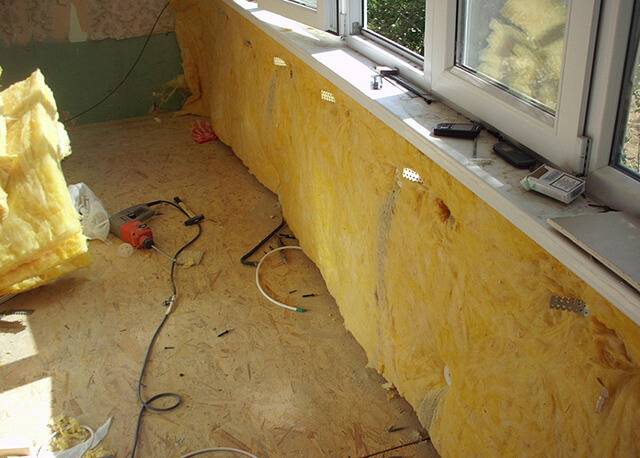
Another thing is when the bottom of the concrete canopy of the balcony is open to “all winds”. In no way can the possibility of moisture penetration through the reinforced concrete structure be excluded. Well, the harmfulness of excessive humidity has already been mentioned above, and in addition, some heaters (mineral wool, for example) may lose their thermal insulation qualities from saturation with water.


To protect the insulation layer from waterlogging, it is necessary to carry out waterproofing. Simply covering the surface with plastic wrap is not an option. Yes, the insulation will remain dry, but in the thin gap between the film and the concrete slab, moisture will begin to accumulate, and sooner or later it will make itself felt. A better approach is needed.
You can do this in several ways:
- Cover the surface with a layer of penetrating waterproofing composition such as "Penetron" or "Hydrotex". These compounds, getting into the pores, close the microcracks in the concrete, blocking the spread of moisture.
- Apply coating waterproofing. The range of similar compositions on a bitumen or polymer basis is quite wide. They are used in accordance with the instructions attached to them in a cold or heated form.
- Cover the entire surface with roll-up adhesive waterproofing, also on a bitumen or polymer basis. In this case, it is necessary to achieve a tight fit of the material to the base.
After waterproofing, you can proceed to work on floor insulation.
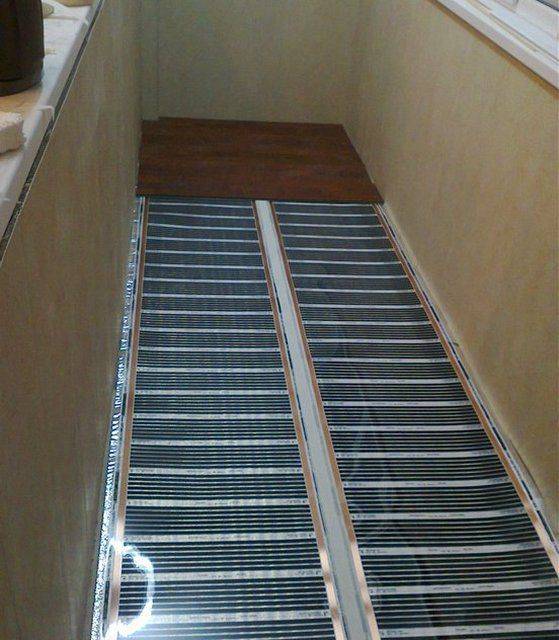
Option # 2 - installation of film underfloor heating
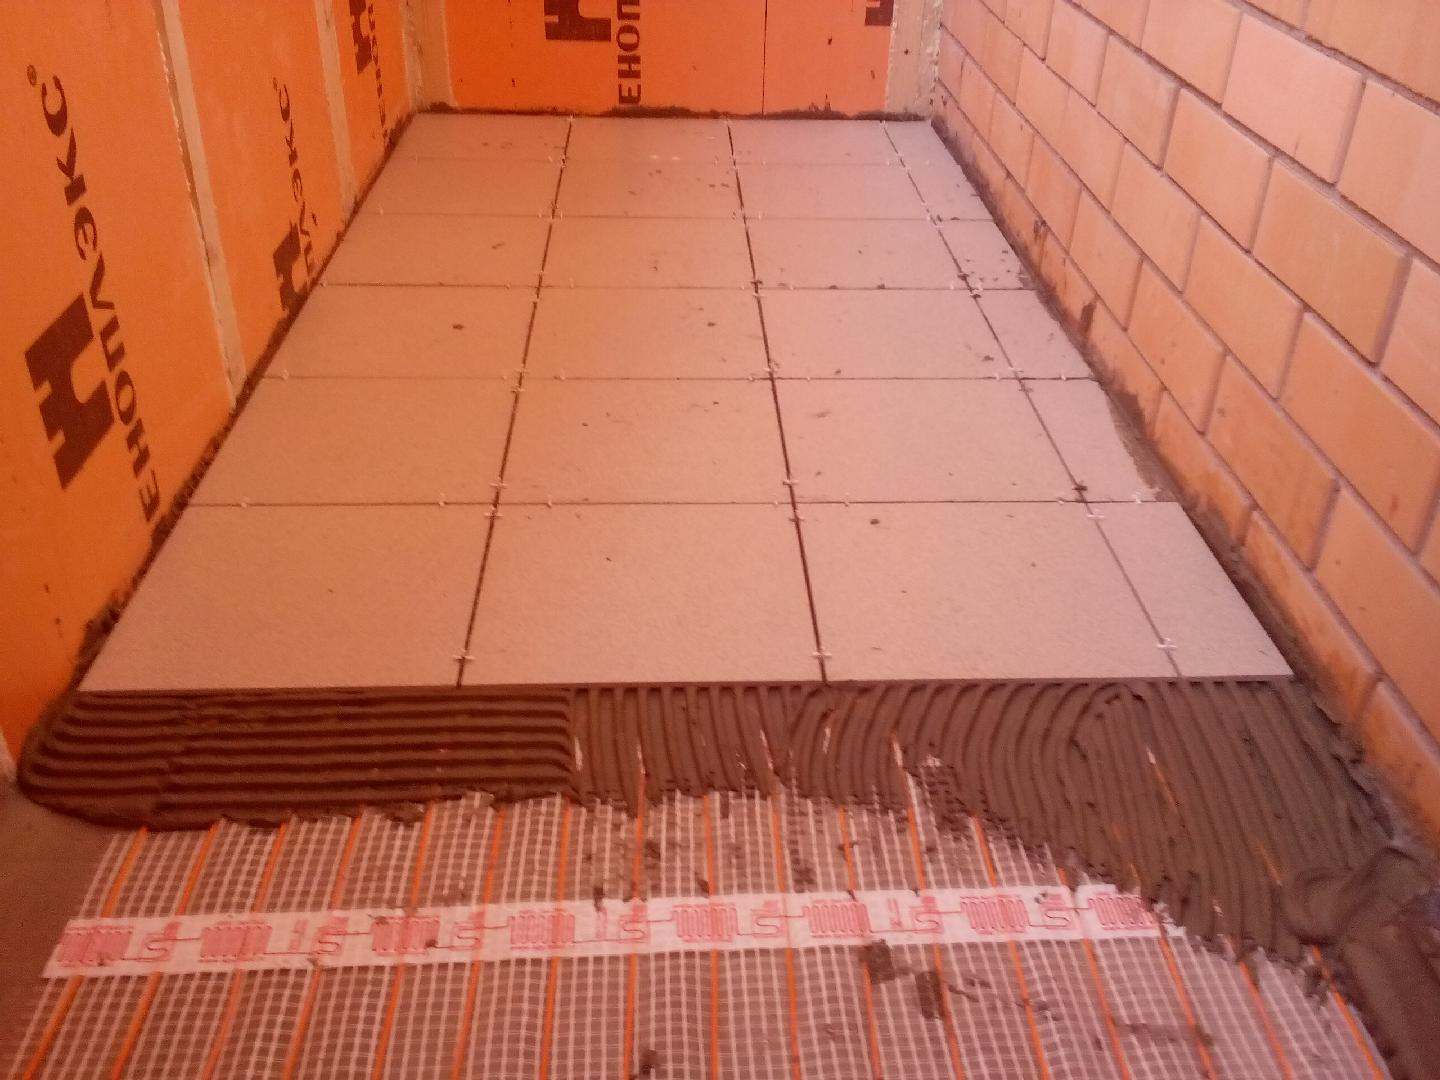
To circumvent the problem of laying a concrete screed, an alternative mounting option must be selected.In the role of such an alternative are the film infrared floor systems, which do not accumulate heat, but only warm up the floor covering. In this case, a laminate or linoleum is used as a finishing floor. When choosing a laminate, do not forget about laying the substrate. Installation of an infrared underfloor heating system requires high-quality hydro and vapor barrier.
The floor is lined with foam, on top of which there is a special thermal film that emits infrared heat. Under its influence, both the floor covering and furniture are heated. Therefore, this system is not laid under furniture. Installation of a film system is much easier and faster than a cable system.
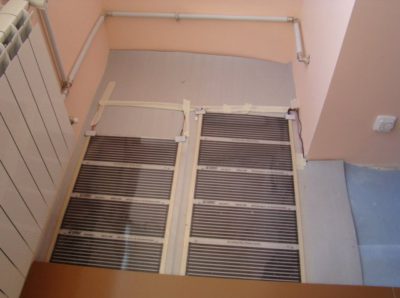
Film floor heating on the loggia under the finish coating
Advantages of these heating systems:
- the implementation of widespread heating of the floor surface;
- the invisibility of heating devices improves the overall appearance of the interior of the room;
- low cost of installation work;
- heating large areas at low energy costs;
- balcony windows do not freeze through;
- the room is protected from the occurrence of dampness and the negative consequences that it can cause.
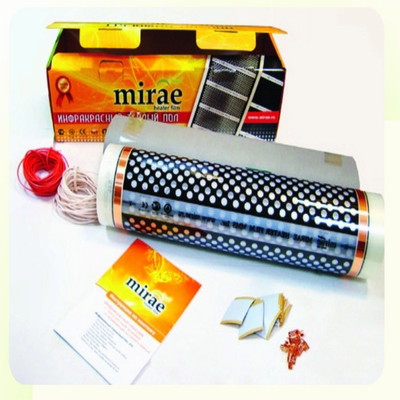
The classic composition of the infrared floor heating kit: thermal film; contact terminals; connecting wires; insulation kit
With the help of the instructions included in the package, competent installation is facilitated. When choosing a suitable film underfloor heating kit, the total area of the heated floor is taken into account. It is also necessary to calculate the power of the system at the rate of 200 W per square meter of area.
In addition to the kit, a thermostat is purchased separately, the power of which should exceed the power of the future underfloor heating system by 15-20%. Also, a heat-reflecting material is purchased for the entire area of the balcony, which has a lavsan or polypropylene film. To enhance the waterproofing, you can purchase a regular plastic film.
Infrared heating film is used not only for floor heating. It is possible to carry out installation of a thermofilm on ceilings and walls. This allows you to provide additional comfort in any weather. The ideal microclimate will not be disturbed even by severe frosts.
You see, everyone can make a warm floor on a loggia or balcony. There are plenty of materials for the installation of the selected system on the market. There is a choice between the offers of manufacturers, while, of course, you should not save on quality. Well-known brands should be preferred. If you feel that you can not cope with the installation, then attract specialists involved in the installation of underfloor heating at a professional level.
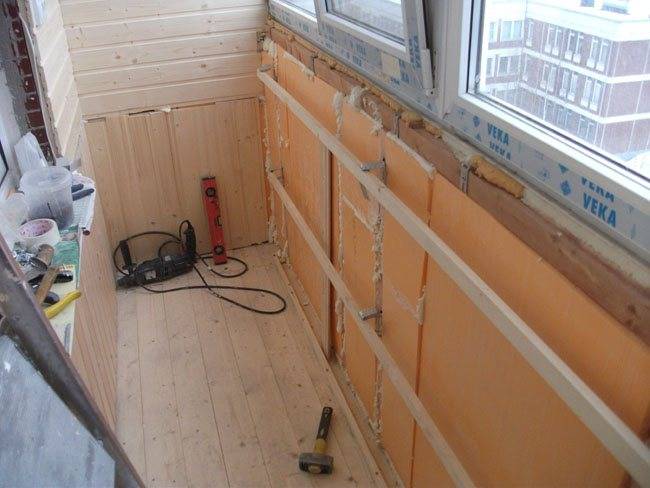
Assembly of the crate
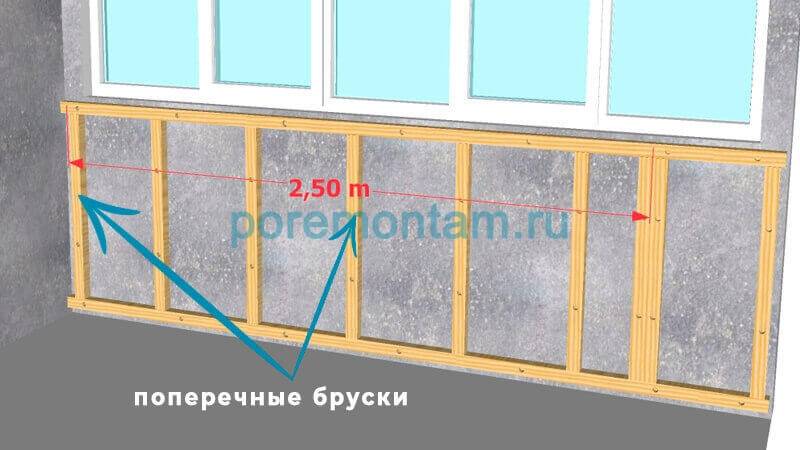
First, we fasten the beam under the window sill, leaving a gap of 1-1.5 cm on top. We cut off the beam 1.5-2 cm shorter than the length of the parapet, put the beam against the wall and drill holes with a diameter of 8 mm for the dowel with a 50-70 cm step.
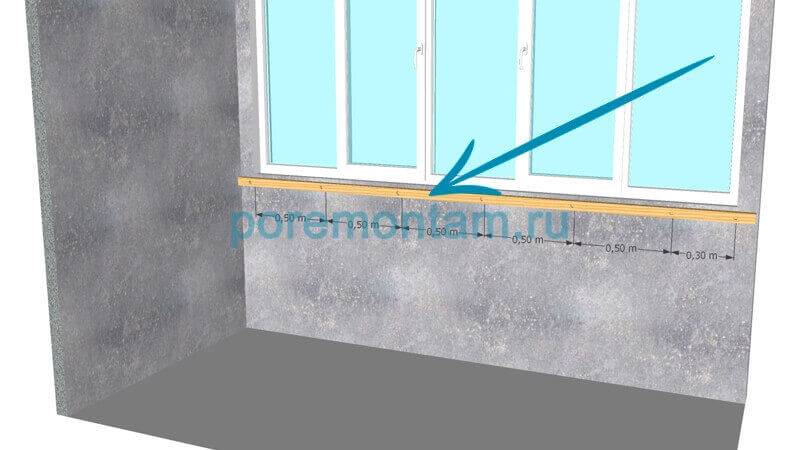
In the same way, we fix the lower beam, retreating from the floor by 1-2 cm.
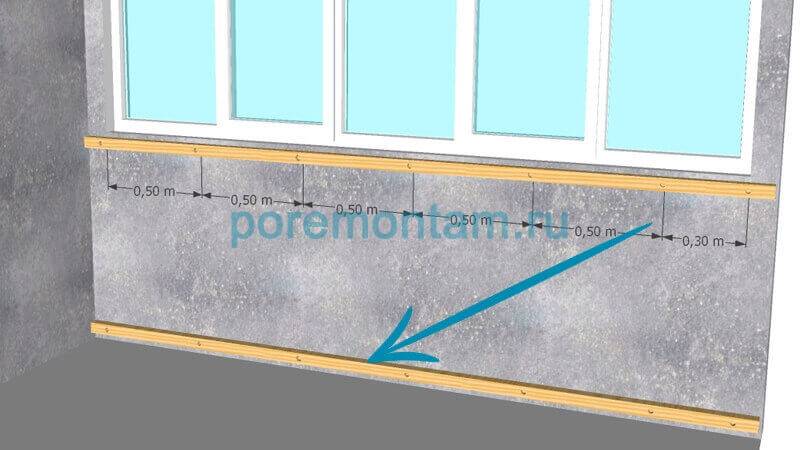
After we have fixed the upper and lower beams, we proceed to fastening the transverse bars using the same method. The distance between the transverse bars should be 60 cm. If the balcony is often exposed to wind load, we reduce the fastening step of the transverse bars to 40 cm.
Every 2.5 meters, two beams are fastened in a row (see the picture below!) This is done so that we can then fix a sheet of drywall on them!
After all the transverse bars are fixed, we move on to the side walls of the balcony. How to understand which walls to insulate and which not? Everything is very simple, if the wall is load-bearing, it can not be insulated. But to achieve the perfect result, you will have to insulate both side walls, the ceiling and the floor. The wall adjacent to the room, as a rule, is not insulated. We will do so!


Preparatory work
The first thing to do before insulating the floor on a loggia or balcony is to check whether the floor is well reinforced. For example, if the balcony is not reinforced with a lower support, then this disadvantage will have to be compensated for, for which support brackets are used. Unfortunately, they are not always possible to establish, since this requires the consent of the neighbors below.
You can strengthen the balcony using a metal frame, which is mounted on top of a concrete slab and attached to the wall of the building. The installation of such a frame allows you to reduce the load that falls on the ceiling. However, in most cases, the balcony slab was initially laid on concrete supports, and there are no problems with such a design.
The next important point is the material from which the outer wall of the balcony is made. Often, for the manufacture of the outer wall, a metal grate sheathed with sheets of thin material is used.
If the floor slab lies on a reliable support, then the outer wall will need to be laid with foam concrete. True, such work will require coordination with architectural services so that there are no problems in the future.Things will be much better if the outer balcony wall is made of concrete - this design will not have to be changed or redone.
Next, the balcony needs to be glazed with high quality. The meaning of this stage is clear: in the absence of high-quality window frames or their poor-quality installation, all the heat will come out of the balcony to the street. The choice of suitable frames is completely individual: most often, apartment owners choose reliable double-glazed windows with low thermal conductivity, but sometimes good wooden frames are chosen for balconies, which, if properly processed, can also retain heat well.
This is important: any leaky joint can cause dampness, which will significantly worsen the characteristics of the insulation. After some time, mold will appear and all building materials will begin to collapse, and sealing gaps is needed precisely to prevent such effects. Wide gaps in the slabs are best eliminated with the help of special rollers, for the manufacture of which polyethylene foam is used.
By laying such rollers in the gaps and sealing them with sealant, you can achieve good tightness.
Wide gaps in the plates are best eliminated with the help of special rollers, for the manufacture of which polyethylene foam is used. By laying such rollers in the gaps and sealing them with sealant, you can achieve good tightness.
Often, insulation rollers are used instead of mounting foam to save money. This is done as follows: first, a little foam is applied to the required place, and a roller is placed on top of it.As the foam expands, it will fill all the free space and make a good seal with the seal. You can eliminate small gaps with the help of ordinary sealant.
Having dealt with the problems at the joints and walls of the balcony, you need to deal with the elimination of such flaws in the floor. All cracks are cleaned from dust pollution and various debris, after which the floor surface must be treated with a primer. After that, each slot is filled with a sealant or cement-based adhesive mixture.
Having noticed deep and narrow cracks, you need to expand them with a drill or grinder, and then fill them with sealant: in this case, the composition will penetrate well into the surface and fill the entire space.
What are insulating boards attached to?
The choice of the method of fastening the XPS mats depends on the coating itself, on which the installation takes place, as well as the operating conditions of the balcony. For fixing on concrete, stone and brick walls use:
-
Mastics. For gluing on a bitumen-polymer composition, a special gun is required. Mastic is applied to the edges and center of the plate, then pressed to the surface. Penoplex can still be moved within an hour.
-
cement mixtures. Dry powder is diluted with water according to the instructions on the package and infused for 2 hours. After that, the mixture is applied to the panel with a notched trowel, pressed against the base for several minutes.
-
Glue. Special adhesives may have cement in their formula. The adhesive is applied to the EPPS board pointwise, in stripes or in a continuous layer. After that, the penoplex is pressed to the surface. The adhesive method requires additional fixation with dowels.
-
Glue foam. A special polyurethane foam binder ensures good adhesion of the balcony wall to the foam.Foam is distributed along the edge and center of the plate. Press the product to the base for 20 minutes.
-
Liquid Nails. Such a fixative is used in small areas, since glue costs increase significantly over a large area. The agent is applied pointwise: along the perimeter and in the middle. Penoplex is pressed to the surface for one minute.
-
-
Dowel dowels. Mechanical fasteners are used simultaneously with glue. The hole for the dowel creates a passage for cold air, so the hat should not rise above the surface of the plate.
-
Self-tapping screws. This type of fixation is used if there is a wooden base. Before tightening the screw, a washer is placed under the head.


Insulation inside or outside, which is better
For balconies, two insulation technologies are used: inside and outside. Internal insulation is less effective, since the outer walls of the balcony freeze in severe frosts, and condensation forms between the insulation and the wall surface. The advantage of this method is that you can do it yourself and save on wages for hired workers.
 When insulated from the outside, the wall is protected from freezing with insulating material, which contributes to better heat retention. Although the technology of external insulation is more effective, it cannot always be applied. You can carry out work on the 1st and 2nd floors from the ground or using a stepladder, but if the balcony is above the second floor, it is very difficult to do the work with your own hands. Also, after gluing the foam, you need to finish the surface, so another issue is solved - the decoration of the balcony from the street.
Insulation with polyurethane foam
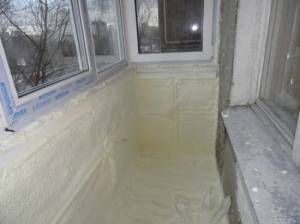
Insulation with polyurethane foam
The sprayed insulation cannot be applied independently, as a special installation is required. But all the preparatory work can be done by hand. Polyurethane foam has many positive qualities:
- does not pass sounds, water and air;
- very light;
- adheres well to any surface;
- durable;
- not affected by mold.
The insulation is combustible, but the problem can be solved by painting it with refractory paint. After it dries, be sure to isolate the material from the sun. A clean hardwood floor is fine. If a decision is made to insulate all surfaces of the balcony with polyurethane foam, do not forget to organize mandatory ventilation (micro-ventilation), otherwise you will feel like in a thermos (the insulation does not breathe!).
Choosing a foam brand
In a technical aspect, this substance is a derived substance from the extrusion (melt) of expanded polystyrene - a more advanced type of foam, because it contains special improvers (antistatic agents, antioxidants, substances that increase resistance to fire).
There are many brands of foam plastic on the building materials market. Their choice depends on:
- material class properties;
- functional purpose of the balcony;
- layer thickness;
- mounting technology.
The marking of heat insulators is reflected in a symbolic-numeric code. The brand classification is as follows:
- 31 and 31C - these types of insulators are characterized by low density (up to 30.5 kg / m³) and strength, suitable for static objects - engineering and communication systems (not desirable for insulating balconies);
- 35 is a versatile material with a compressive strength of 83 kPa and a volume density of 28-38 kg/m³. Differs in a wide range of use.
- 45 and 45C. These brands have the following density - 35-40 kg / m³. This indicator is sufficient for warming foundations and industrial facilities (suitable for balconies if it is planned to make a screed on the floor).
Penoplex is also produced in series:
- "C" ("Wall") - suitable for insulation of external walls, including facade ones;
- "K" ("Roof") - for attics and roofing;
- "F" ("Foundation") - for plinths and foundations;
- "K" ("Comfort") - for interior work, including on balconies and loggias.


