- What I had to face and what our loggia looked like before insulation
- The balcony (loggia) is glazed with stained glass. How to insulate it?
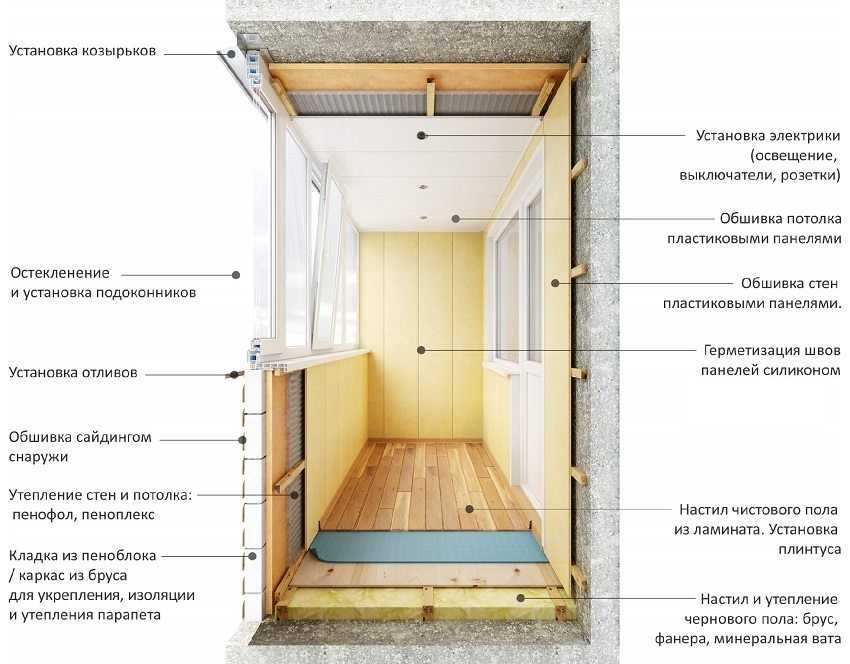
- Balcony insulation from the outside
- Features of the roof-visor for the balcony
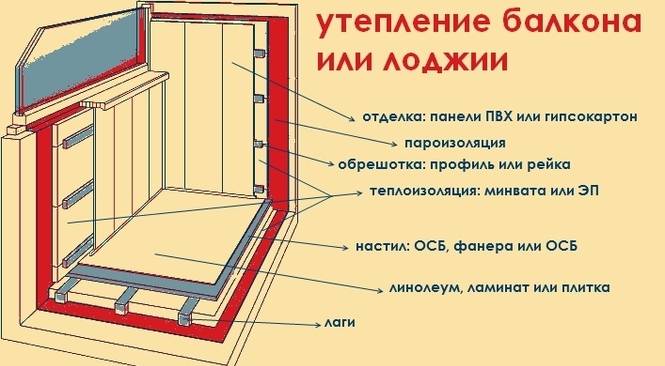
- Do-it-yourself warming of the balcony with mineral wool
- The choice of insulation for internal surfaces
- Expanded polystyrene foam
- Extruded polystyrene foam
- Foamed polyethylene
- Ceiling insulation on the loggia
- Insulation of walls and ceilings with classic heaters
- Finishing the walls of the loggia
- Ceiling insulation
- Finishing
- Balcony and loggia: differences and features of insulation
- Loggia: characteristics and distinctive features
- Balcony: design features
- The floor is not properly insulated
- Panoramic loggia insulation methods
- Recommendations for choosing a heater
- We warm the floor
- Preparing the loggia for the installation of insulation
- Wall and ceiling cleaning
- Sealing cracks and crevices
- Waterproofing device
- Conclusions and useful video on the topic
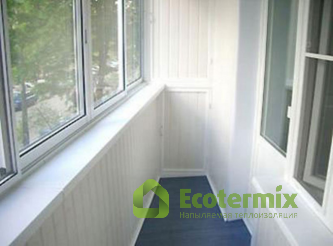
What I had to face and what our loggia looked like before insulation
When I told my friends about my idea, at first everyone laughed at me. They began to talk about how little space there was, and they were frightened by the cold of the unheated room - after all, our loggia was essentially an outdoor space. In order for you to imagine what I had to face, I am attaching a plan of the balcony.I had to turn three and a half squares of usable area into a full-fledged study, where my two sewing machines with a table, a cutting table, and an ironing board could fit.
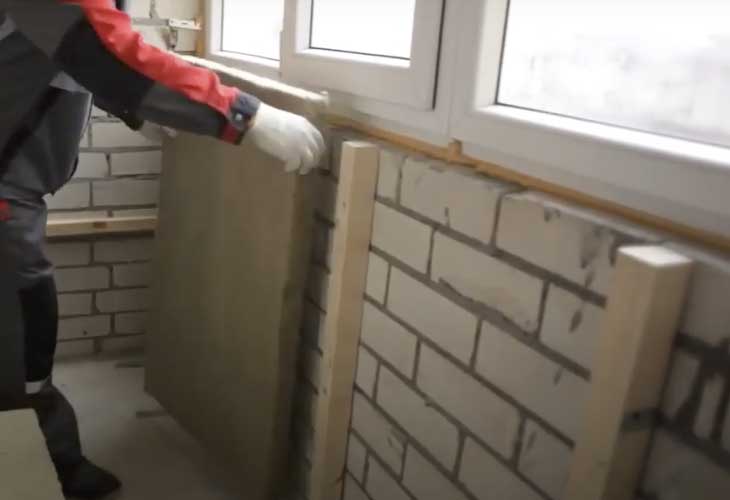
The first window with a balcony door and access to the kitchen. This wall is the main one - it is already warm, so you can not sheathe it. Subsequently, we refused to cover it with plaster, since the brick itself looks quite interesting in the interior. We only cleaned its surface with a sandpaper from dirt.
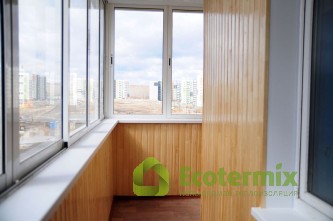
The second window is located on the wall of the loggia; it required a complete replacement and touched the stained-glass windows. The photo was taken after the installation of a new double-glazed window.
The balcony (loggia) is glazed with stained glass. How to insulate it?
Many owners, having listened to the opinion of experts, install a thermal compensator. This device protects the structure from deformation and temperature fluctuations during the off-season. The temperature compensator is not installed on the territory of the balcony, but in the adjacent room, in which room temperature is constantly maintained.
Before installing new frames, the master cleans the window openings from building debris and makes sure that the lower edge of the double-glazed window coincides with the rubber insert, and the upper part of the package is joined to the H-shaped guide. The correct installation of rubber seals is also checked - it depends on them whether the thermal insulation will be airtight.
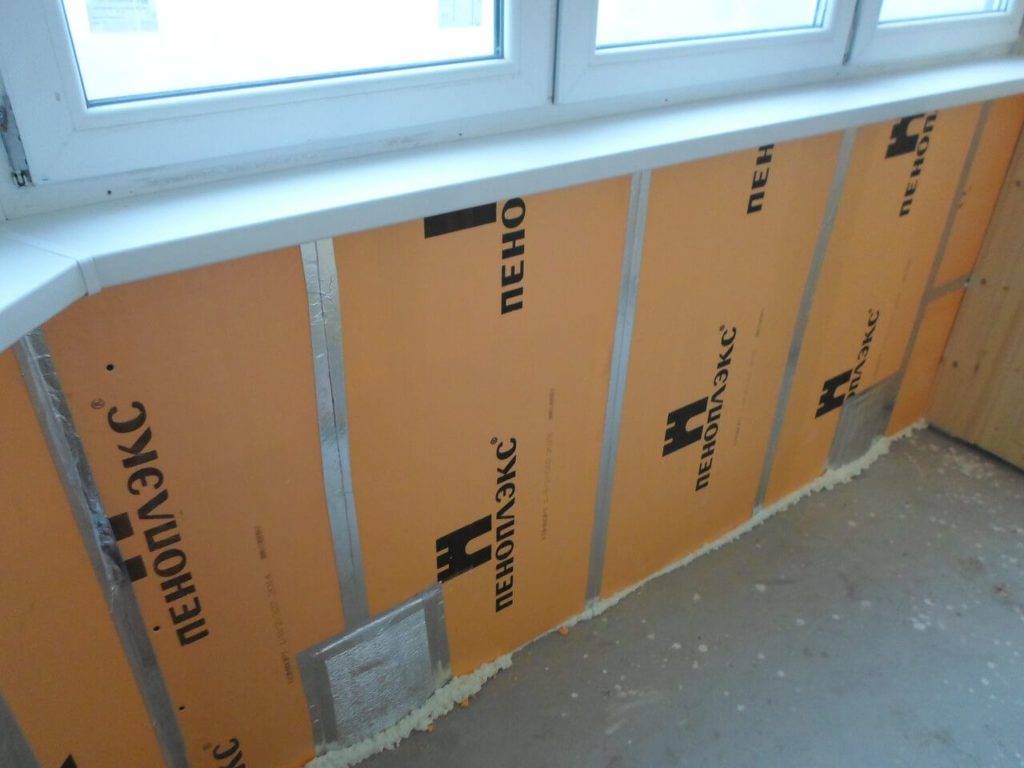
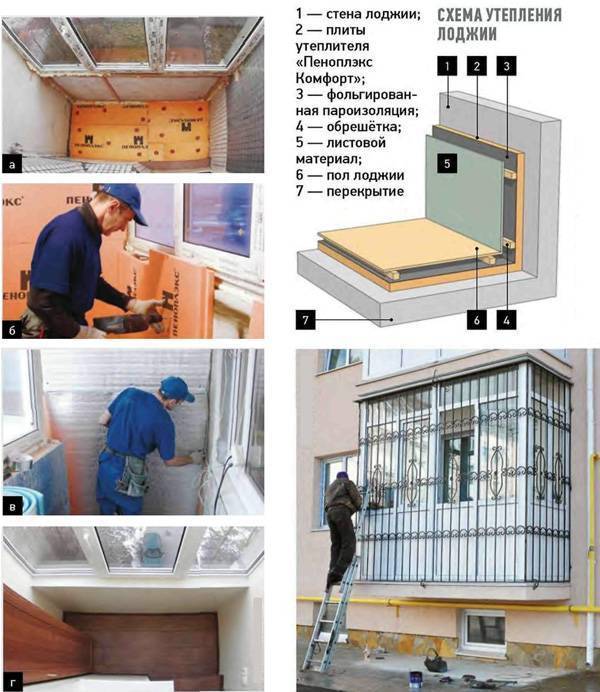
Balcony walls are first covered with foil polystyrene foam. Polyurethane glue or special dowels are used as fasteners. All joints are sealed with metal tape.
Dense polystyrene foam can be used as the last insulating layer of the carrier and side walls.The outer walls are covered with foil polystyrene foam.
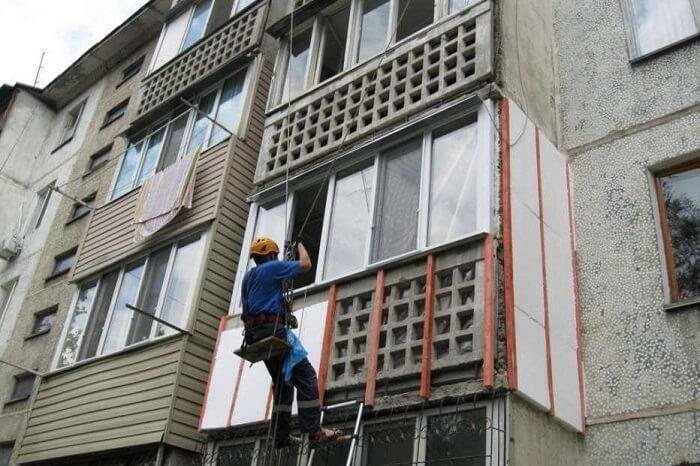
Balcony insulation from the outside
How to insulate a balcony from the outside? Carrying out the event allows you to exclude selection from the premises in relation to the area. Also, this solution eliminates the cooling of the walls. But it is worth noting the need to coordinate the project with authorities due to changes in the facade of the house, if this is not the private sector.
According to the technology, you can make a warm balcony as follows:
- Strengthening the parapet. This can be done using a reinforced frame made of a metal profile, brick or block masonry. Rarely used tongue-and-groove plate.
- Work surface preparation. The insulated base must be healthy, clean, durable. Treatment is carried out with protective compounds against fungus, mold (read more in the article “how to get rid of mold on the balcony”) and bacteria, followed by deep penetration strengthening priming. Metal structures are coated with anti-corrosion paints.
- Vapor barrier, insulation. The first is represented by films, membrane sheets with breathable ability. They are needed to remove moisture, protect thermal insulation from condensation. If there is a frame, then it is better to choose mineral wool, for a solid base it is more relevant than a slab. Less often preference is given to plaster, as it is heavier, has a relatively high thermal conductivity.
Further, to insulate the balcony, a hydrobarrier is laid on the outside, finishing is carried out. It can be plaster mortars or sheathing materials. More often, preference is given to the second solution due to low weight, wide range and aesthetics.
For walls with ceilings, penofol is relevant. This is polyethylene foam.If there is a foil coating of aluminum, then such material better reflects heat into the room. The flooring is used to be placed in front of the decorative sheathing. Contact with organic solvents must be avoided.
Fixation is carried out without overlap by means of a stapler, and the seams are glued with metallic tape.
Features of the roof-visor for the balcony
The roof must withstand the force of the wind, temperature changes, snow, ice, rain and at the same time not sag or rest on the glazing. In addition, the material of the visor must "extinguish" the sound of drops and wind, otherwise the "loud" roof will not let you fall asleep in bad weather. It should also be taken into account that an opaque roof will reduce the amount of sun in the house. Be sure to make a slope for snow to melt from the roof of the balcony. The main thing is to make a good waterproofing of the joints of the roof of the balcony and the walls of the building. For better waterproofing in the wall of the house, you need to make strobes, drown the visor and use a resistant non-drying waterproofing mastic.
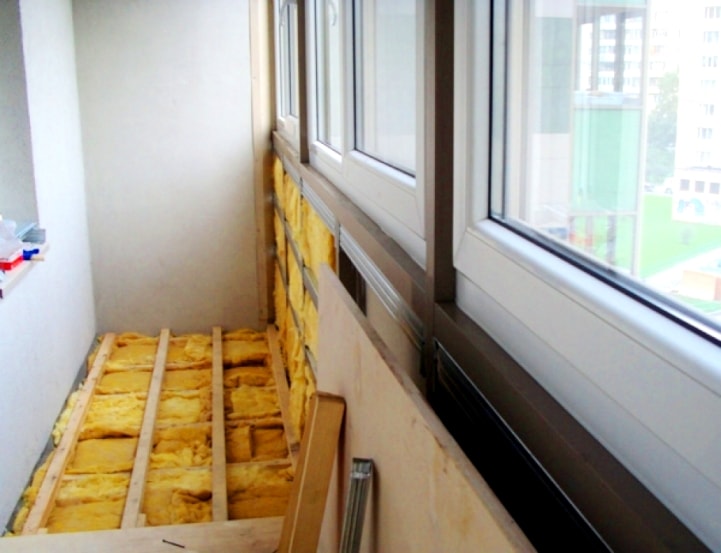
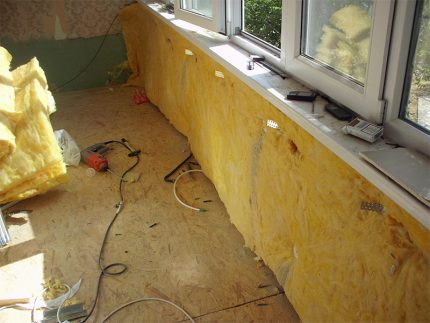
Do-it-yourself warming of the balcony with mineral wool
Warming with mineral wool is very popular. Work can be done on your own.
This is done in the following sequence:
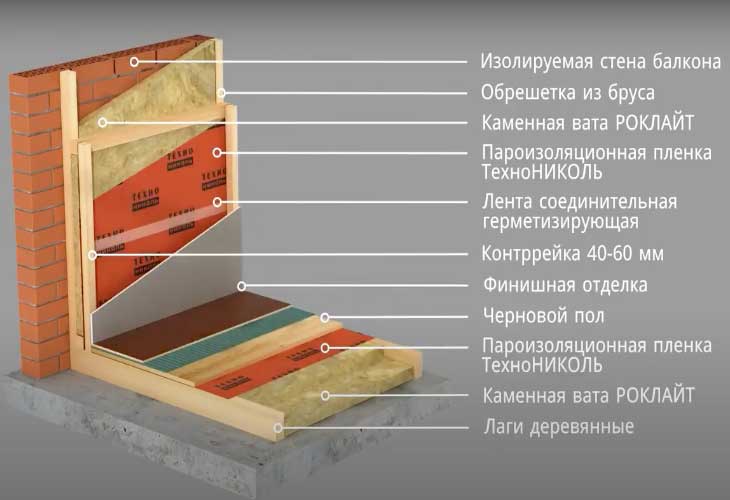
1. The frame is mounted. A beam measuring 50 by 50 cm is attached to the insulated surface. The distance between the elements is consistent with the size of the stacked plates. It should be 10 - 20 mm less than the corresponding geometric parameter. The frame can be vertical and horizontal. The optimal location of the crate is selected taking into account the subsequent finishing. The position of each element is controlled by a level.
2. Mineral wool slabs are laid between the frame posts without additional fastening.If necessary, the insulation is cut to size with a construction knife.
3. From above, a beam is attached to the racks of the frame, which is placed perpendicular to the previously fixed elements. It is attached with a similar step. Mineral wool slabs are laid perpendicular to those laid earlier.


4. From above, a vapor barrier is attached to the frame using a construction stapler. All joints of the vapor barrier material are glued with double-sided tape. Individual elements are connected with an overlap of at least 100 mm. At the points of contact with the window, walls and ceiling of the vapor barrier using a special sealing tape.
5. The counter-lattice is mounted. The pitch and spatial position are selected taking into account the subsequent finishing. A facing material is attached to the counter-lattice.

Source
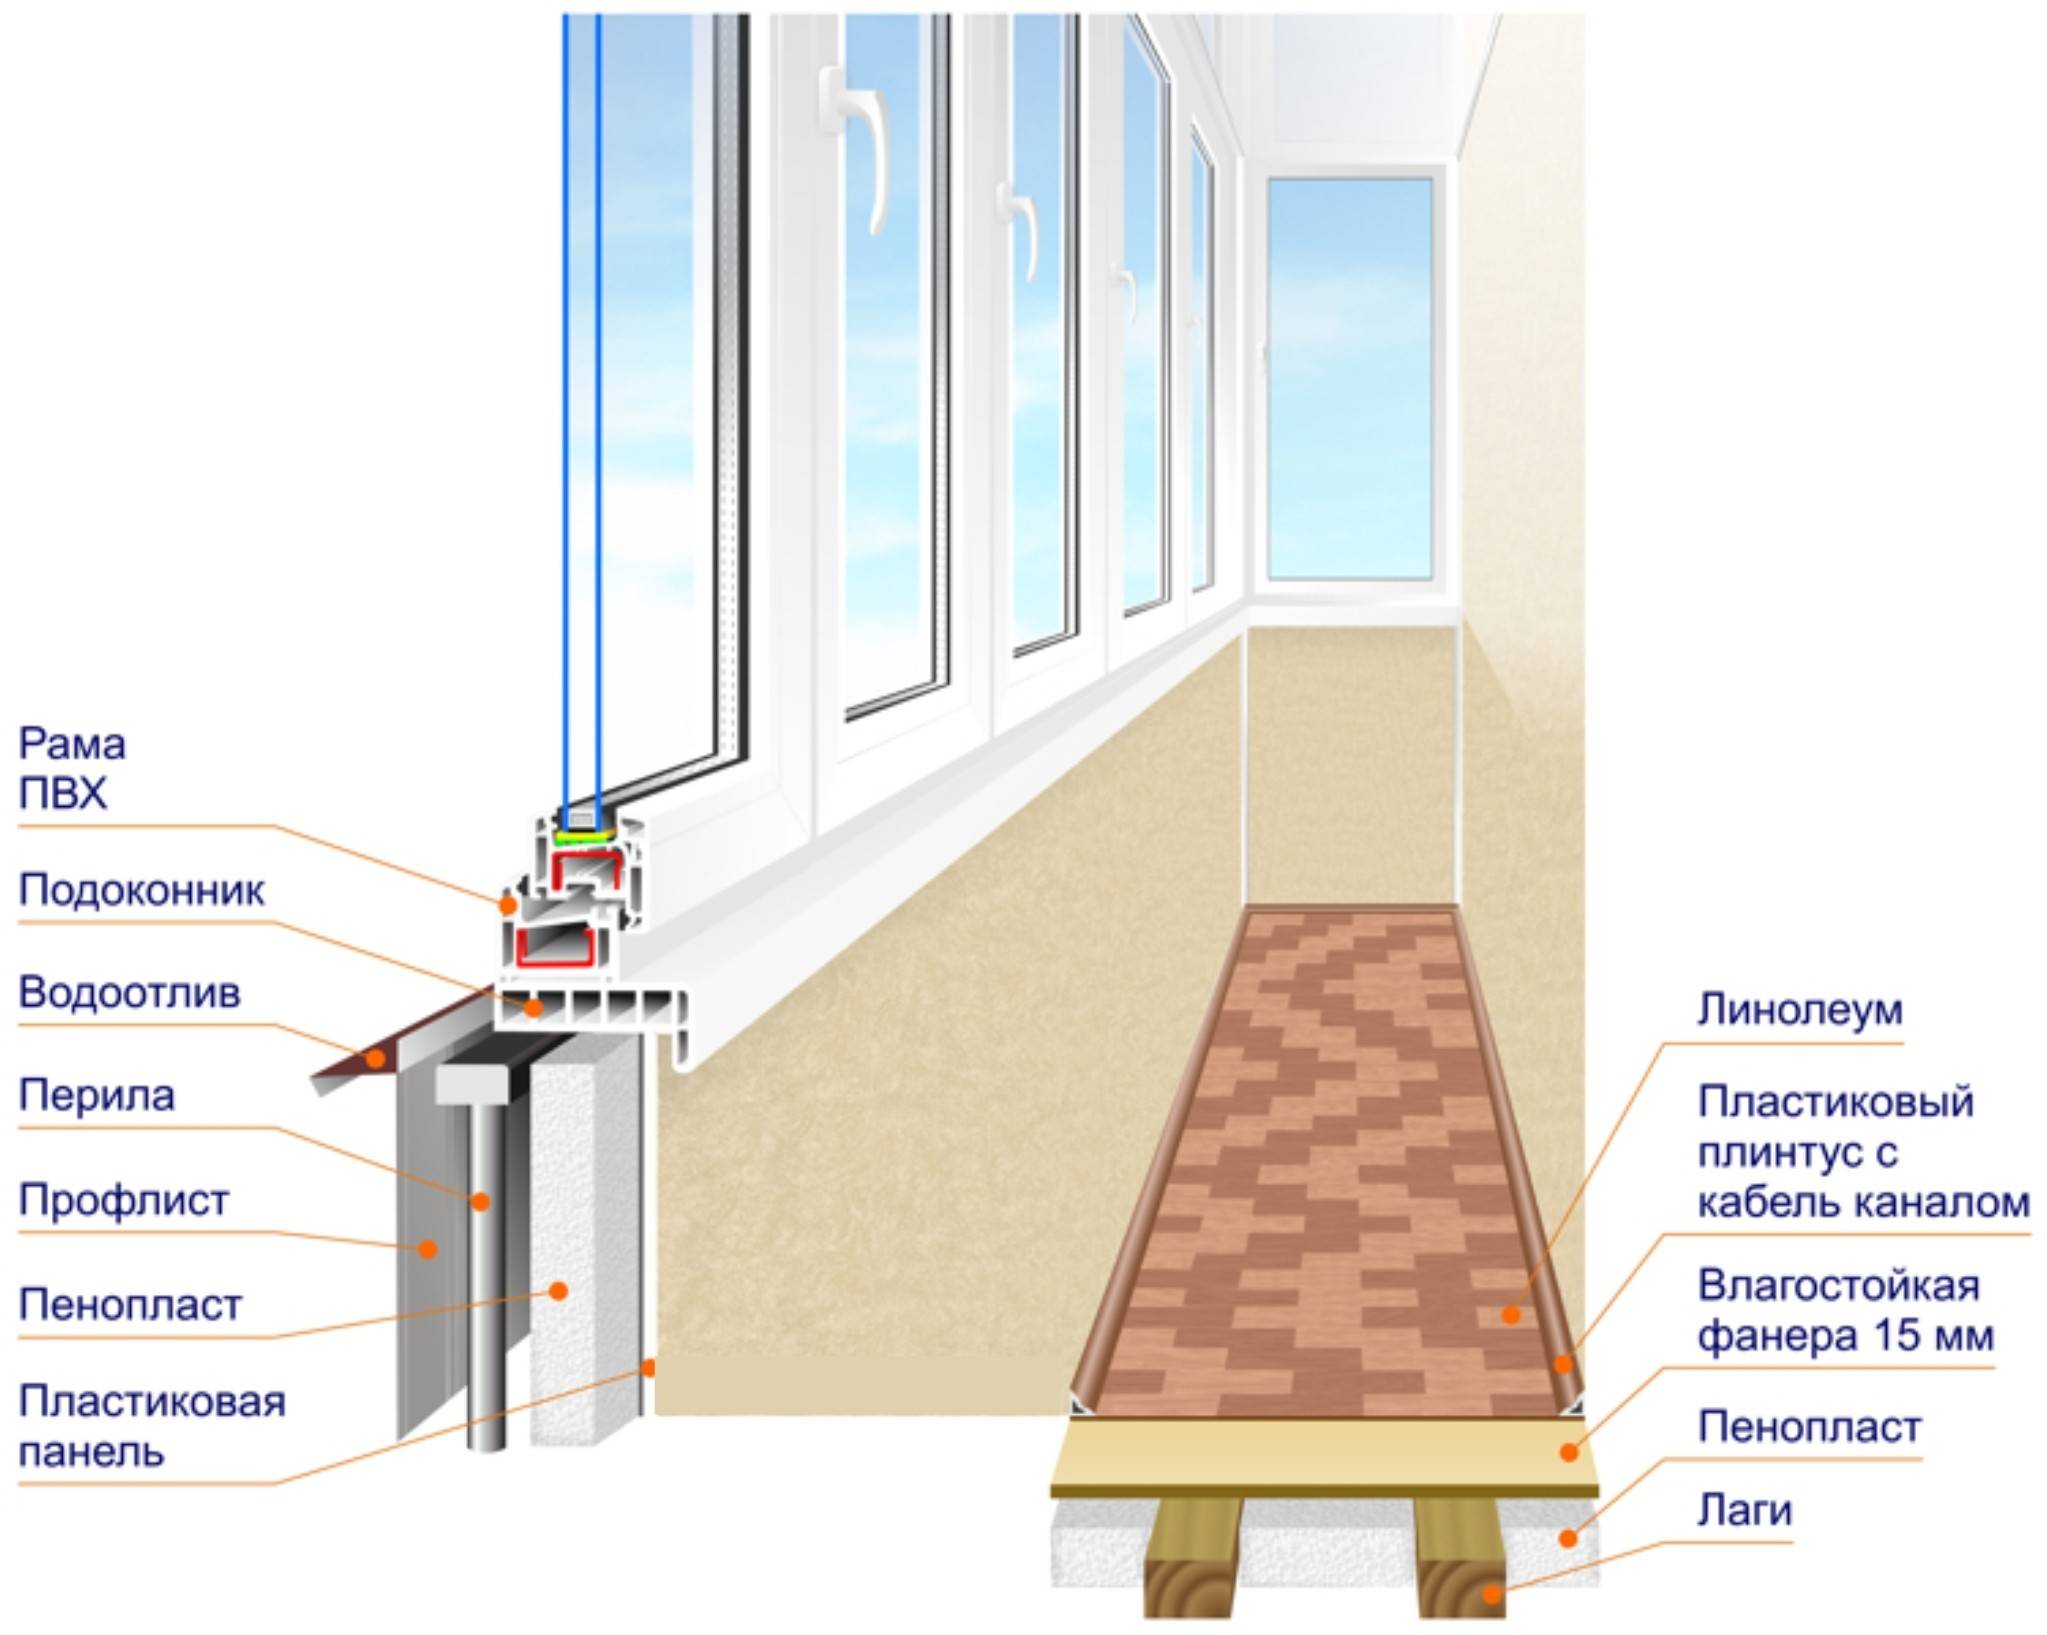
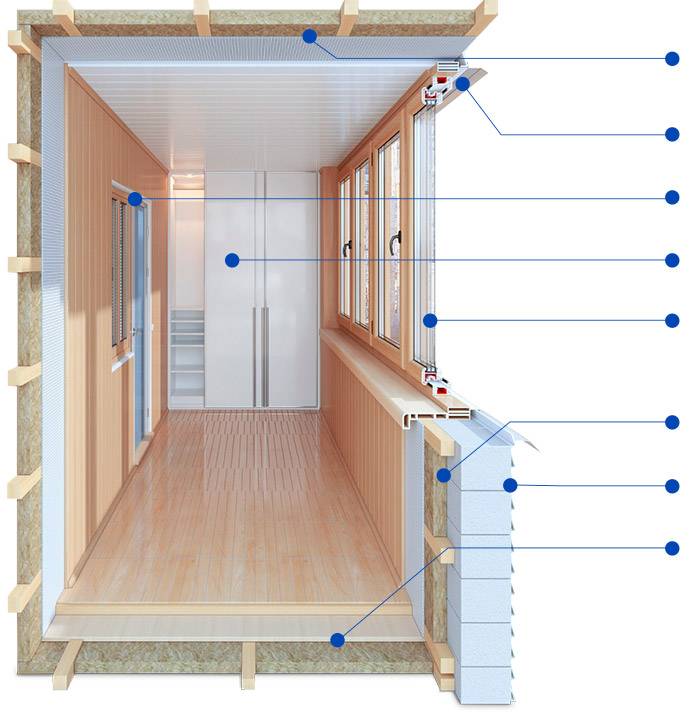
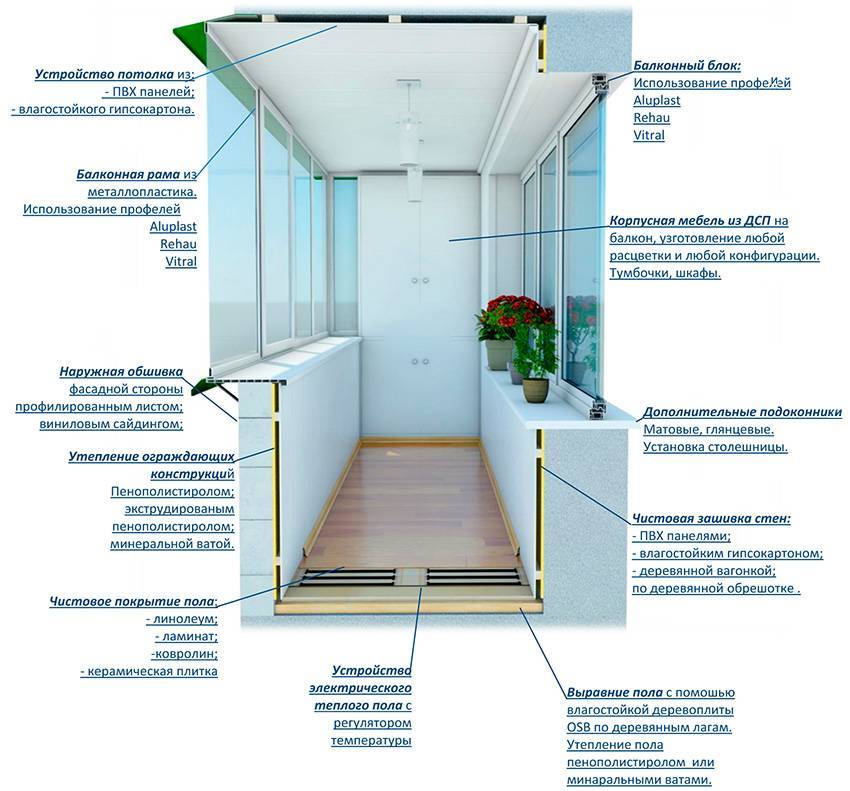
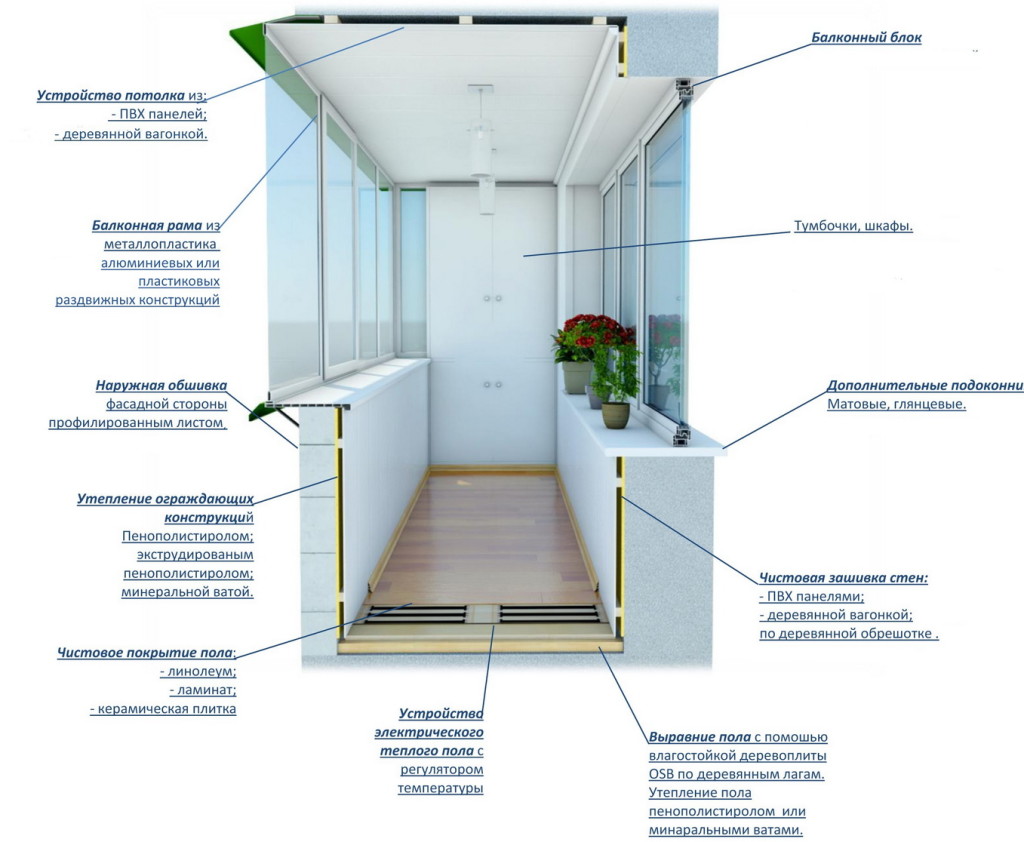
The choice of insulation for internal surfaces
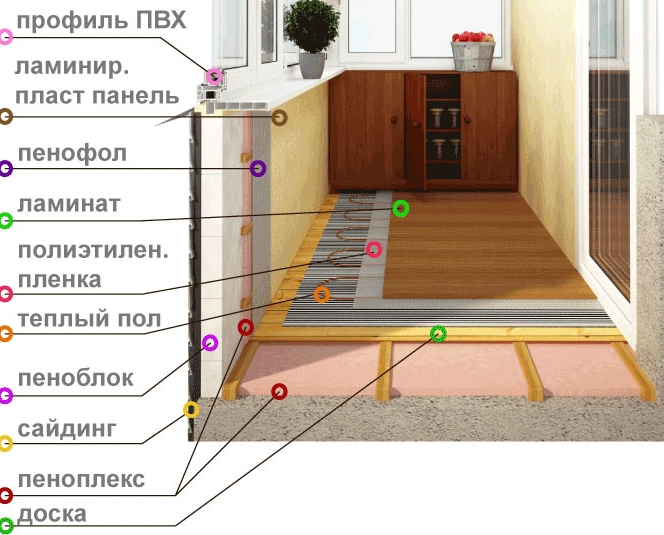
After glazing on the balcony, the internal surfaces are insulated: the ceiling, side walls, parapet, floor. Only the back wall, which borders the room, is not subject to thermal insulation.
The back wall is not specifically insulated for heat transfer between the balcony and the interior living space.
The main criteria in choosing a heater are the dimensions and thermal insulation characteristics of the material. For insulation of the balcony, foam plastic, extruded polystyrene foam and isolon are mainly used.
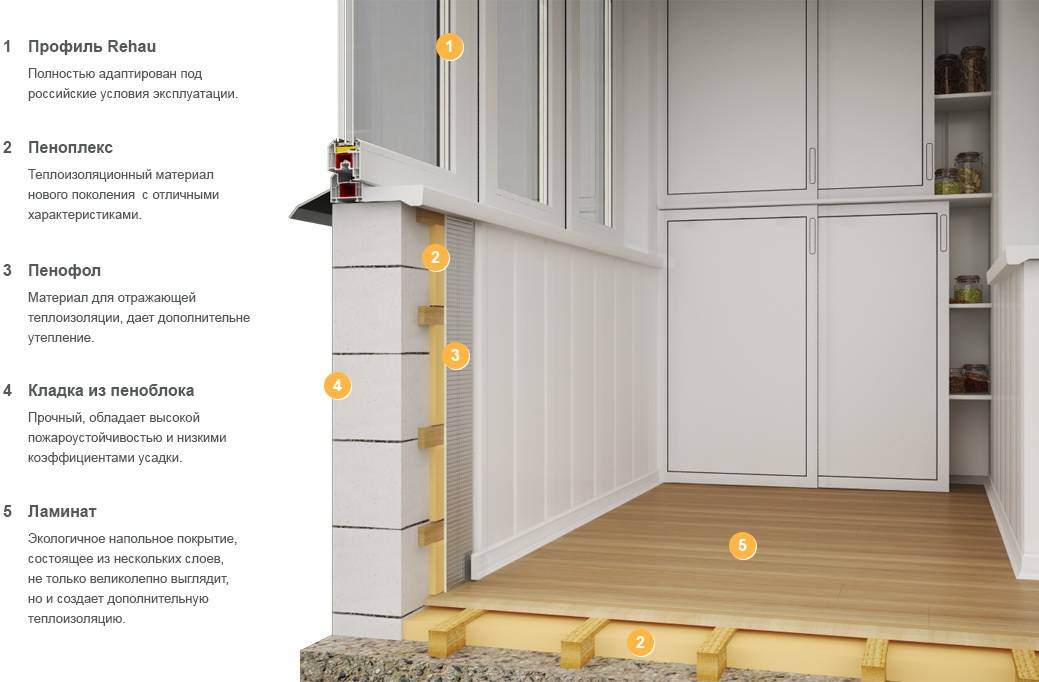
Expanded polystyrene foam
For more than half a century it has been used to insulate building objects. Having 98% air in the composition, which is in the closed cells of polystyrene, the foam plastic has a low mass, therefore it does not load the insulated structure.
Foam specifications:
- density: 25 kg/m³;
- water absorption in 24 hours: no more than 2%;
- thermal conductivity: 0.038 W/m² °C;
- operating temperature range: -60 ÷ +80 °С.
To make a warm balcony, a 50 mm thick foam sheet is used for the walls and ceiling, the heat transfer resistance of which is 1 m² ° C / W. The sheets are fixed with special glue or plastic fungi, the joints are treated with mounting foam.
Polyfoam - the most affordable insulation for a balcony
Extruded polystyrene foam
Like styrofoam, extruded polystyrene foam is made from polystyrene, so these materials are similar in appearance. The difference lies in the production technology. Thanks to the extrusion method, a polymer product with a dense structure is obtained, which increases its strength and thermal insulation properties.
Specifications of extruded polystyrene foam:
- density: 35-45 kg/m³;
- water absorption in 24 hours: no more than 0.2%;
- thermal conductivity: 0.030 W/m² °C;
- operating temperature range: -60 ÷ +80 °С.
When installing extruded polystyrene foam, the insulation layer is thinner compared to the use of foam. It is allowed to install sheets with a thickness of 30 mm, which have almost the same coefficient of heat resistance as 50 mm foam.
Extruded polystyrene foam allows you to create a uniform insulation contour on the balcony
The "extruder" is dense, calmly transfers the weight of a person. it is used for walls, ceilings, for floor insulation without additional crates.
How to insulate a loggia with Penopex (modern insulation based on extruded polystyrene foam), see the video tutorial:
Foamed polyethylene
Elastic polyethylene foam is well known to tourists, this material is used to make rugs for rest and overnight. Even with a slight coating thickness, polyethylene foam is an excellent heat insulator. Builders use the material in the arrangement of warm balconies and loggias.
Specifications of polyethylene foam:
- density: 33 kg/m³;
- water absorption in 24 hours: no more than 3%;
- thermal conductivity: 0.033 W/m² °C;
- operating temperature range: -80 ÷ +95 °С.
The main advantage of polyethylene foam over other heaters is its size. Rolled material with a thickness of only 10 mm is able to provide a heat transfer resistance of 0.97 m² ° C / W, which is enough for high-quality surface insulation.
Foamed polyethylene on the balcony is a saving of internal space
Ceiling insulation on the loggia
After the draft floor is completed and the front wall is insulated, it is necessary to perform heat and waterproofing of the ceiling on the loggia. All joints on the ceiling must be sealed with mounting foam or choose a special sprayed insulation based on polyurethane foam, which simultaneously works as a heater and waterproofing material. Depending on how the finish of the ceiling will look like, you can choose a heater for the ceiling. To fix the insulation or finishing, it may be necessary to install a special crate for the ceiling of the beams.


Insulation of walls and ceilings with classic heaters
Traditionally, classic heaters are used to insulate the loggia: foam boards or mineral wool rolls.
Traditionally, classic heaters are used to insulate the loggia: foam boards or mineral wool rolls.They are light, cheap, odorless and fire resistant. Unfortunately, these heaters are afraid of dampness and moisture and immediately fail when wet. But in view of the fact that the price of insulating a loggia with foam plastic or mineral wool materials is very low, they are often used when insulating a loggia with their own hands.
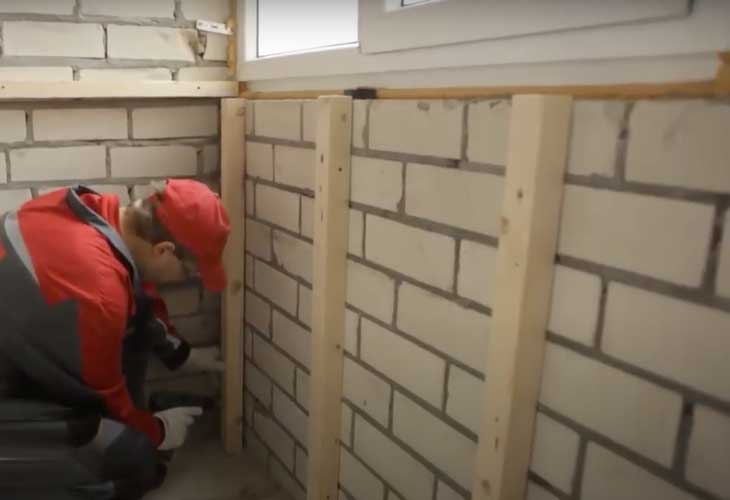
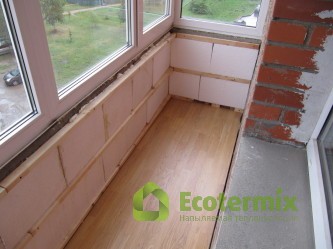
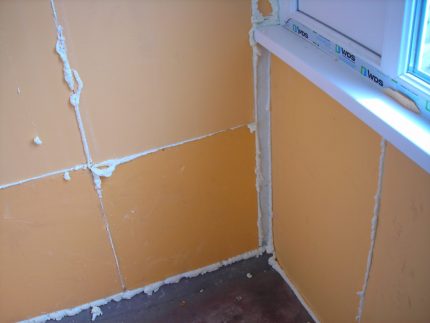
The method of wall insulation with mineral wool or polystyrene foam:
Stage 1 - the implementation of the crate with wooden beams (the cross section of the beam is 3 x 4 cm)
Stage 2 - laying between the insulation bars (foam sheets are attached to the wall)
Stage 3 - filling all the gaps between the bars and the foam with mounting foam
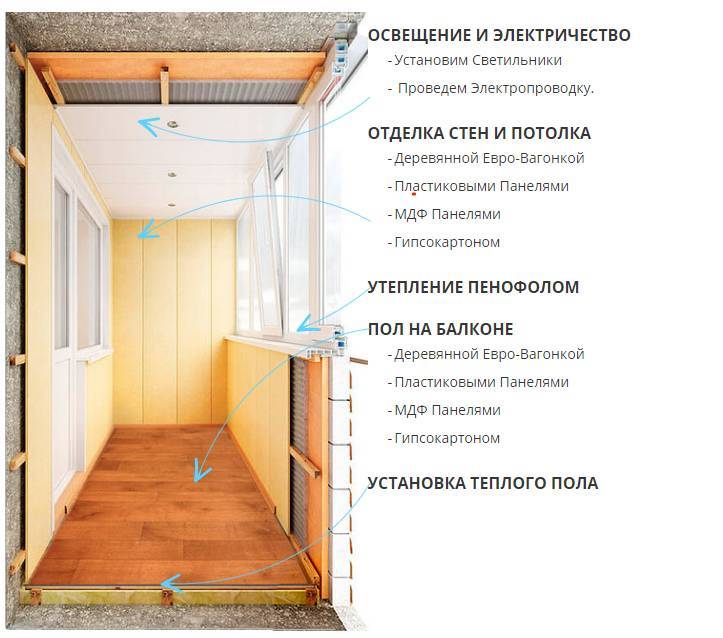
Do not forget about the electrical wiring. Cables for lighting and for connecting appliances should already be laid at the stage of insulation.
Stage 4 - finishing lining the walls of the loggia
Finishing the walls of the loggia
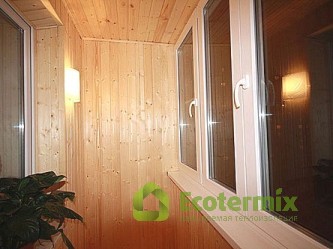
The decoration of the walls on the loggia depends on whether the loggia is an independent object or has become a part and continuation of the room in the apartment.
The decoration of the walls on the loggia depends on whether the loggia is an independent object or has become a part and continuation of the room in the apartment. If the loggia is a continuation of the room, then you need to finish it in the same style with the living space of the apartment. If the loggia functions and is used as an independent object, then the finishing of the loggia can be done with wooden clapboard, plastic panels, plaster, tiles, etc.
The method of insulating the ceiling with mineral wool or polystyrene foam:
If the ceiling is not properly insulated, then not only 15% of the heat will go through it, but also the low temperature on the ceiling will cause condensation. The cheapest heaters are polystyrene and mineral wool. They are lightweight and have low thermal conductivity.But fixing them to the ceiling of the loggia is not at all so simple. It is much more logical to insulate the ceiling of the loggia with a sprayed material based on polyurethane foam. But if foam is selected, then you need to act as follows:
At the first stage, it is necessary to fasten special transverse logs made of timber to the ceiling of the loggia. It is to these lags that the facing material will be attached in the future. The beams must be installed strictly according to the level. Styrofoam or mineral wool is laid between the wooden joists of the ceiling. Layers of foam or mineral wool are fixed with dowels or screwed with wire. All cracks, joints, voids are filled with mounting foam. The entire working space between the wooden joists must be filled with foam. After the preparatory stage, you can proceed to the installation of facing material on the ceiling of the loggia.
Here is a video on how loggias are insulated with foam plastic, wooden slats, penofol and with moisture-resistant drywall:
Ceiling insulation
The insulation is mounted according to the “top-down” scheme, i.e. start from the ceiling. Most often, foam plates are installed here. They can be fixed with tile adhesive. The composition is smeared around the perimeter of the plate, and several strokes are also made in the center.
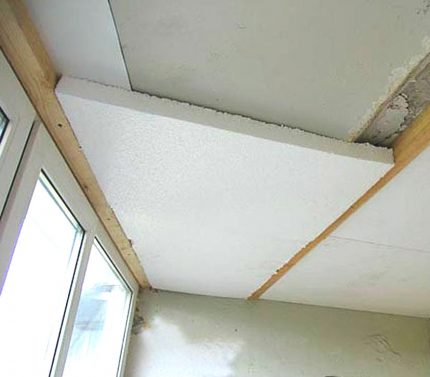
You can effectively insulate the ceiling with the help of foam boards, which are laid on a layer of adhesive and pressed tightly to the base
It is not necessary to completely cover the surface with glue. After that, the plate is pressed against the ceiling and wait a few minutes for the composition to seize. Then you can start gluing the next element.
The frame method of mounting this material is also allowed, but it is considered more time-consuming.
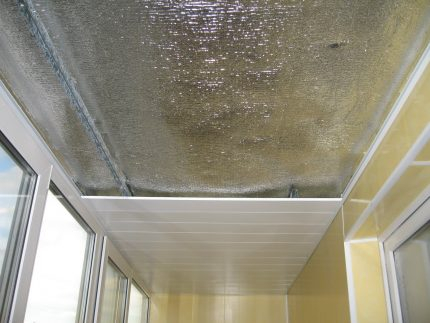
Separate sheets of penofol are laid end-to-end on the base, and then the joints are fixed with reflective adhesive tape
Finishing
After completing the thermal insulation of the loggia, it is worth thinking about finishing work, which also affects the degree of thermal insulation in the room. When all layers are laid and sealed, metal hangers must be returned to their original position, and then aluminum profiles must be attached to them.


It is convenient to attach almost any of the materials available on the modern construction market to these profiles. As a finishing material for the walls of the loggia, wooden, cork and metal slatted panels, PVC structures, siding and many other options are perfect.
Moisture-resistant drywall has proven itself quite well. The advantages of this material lie in the lightness of the structure, which "breathes" perfectly. Drywall is very affordable in terms of price, and it is also easy to process, paint, fix, stick wallpaper on its surface.
At first, warming a loggia may seem like a rather complicated and time-consuming process. However, if you decide to try, you will quickly realize that there are no particular difficulties here. All operations are quickly mastered and do not require special construction skills.
From the balcony it will also be possible to make a comfortable and useful room. For example, equip it with an office, a workshop, a small sports area or a comfortable rest room.
Balcony and loggia: differences and features of insulation
Why is it so important to understand the fundamental difference between a balcony and a loggia? Indeed, the technology for insulating a balcony and a loggia is different.Insulating a balcony with your own hands is more difficult than insulating a loggia
The choice of materials for warming the balcony and loggia should be made taking into account the characteristics of these areas.
Loggia: characteristics and distinctive features
The main advantage of the loggia is not only the presence of two walls, but also a more solid fastening.
Before proceeding to the search for differences in the insulation of the balcony and loggia, let's figure out what these living areas of the house are. The loggia, being part of the living space, however, is located outside the rooms and is in contact with the street. The same thing happens with the territory of the balcony. But if we talk about the loggia, then it is known that it is, as it were, recessed inside the house, and to be more precise, the loggia of residential apartment buildings has walls on the right and left. Thus, the loggia is built directly into the building and has two walls, that is, it is easier to insulate a loggia than a balcony, since it is partially ready for insulation. The main advantage of the loggia is not only the presence of two walls, but also a more solid fastening, which allows you to withstand a significant load in the form of materials for warming the loggia. On the loggia, you can put 2-chamber windows, heavy insulation, make additional masonry. A completely different picture when it comes to balcony insulation technology.
Balcony: design features
Unlike the loggia, the balcony is not deepened into the building, but protrudes outside.
Unlike the loggia, the balcony is not deepened into the building, but protrudes outside. The balcony has no side walls, but only a restrictive fence on three sides. The balcony is open to all winds and precipitation. Balcony railing is a lightweight material that does not play the role of insulation.The balcony is mounted on a reinforced concrete slab protruding from the wall of the house or on special steel beams. Wooden beams are still preserved in some houses of the old design or in cottage construction. Balconies in old houses on wooden beams are unsafe, they cannot be insulated, since the wood of the beams will not withstand the weight. Even when it comes to the steel beams of the balcony, it should be remembered that they are designed strictly for a certain load. For example, it is impossible to insulate a balcony with 2-chamber window blocks without additional strengthening of the base. To install heavy double-glazed windows, the construction of a special brickwork is required, which will significantly increase the weight of the balcony structure.
The floor is not properly insulated
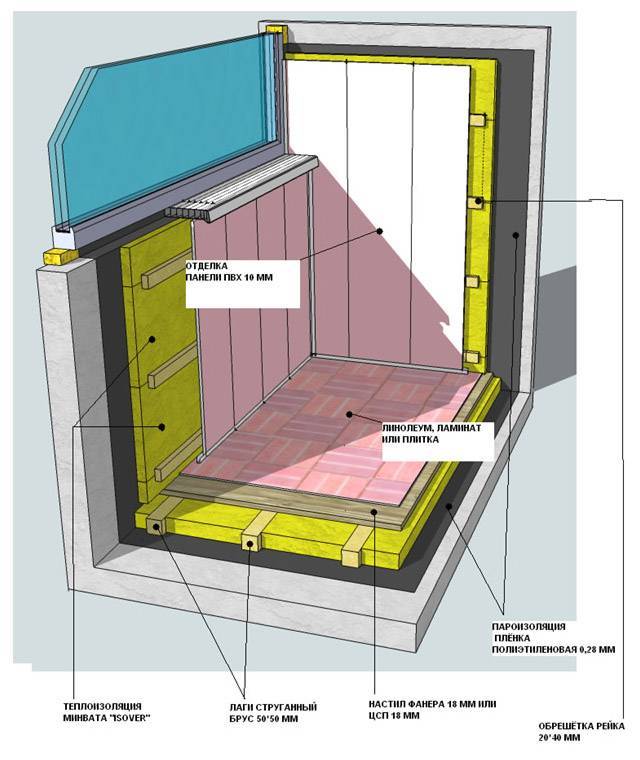
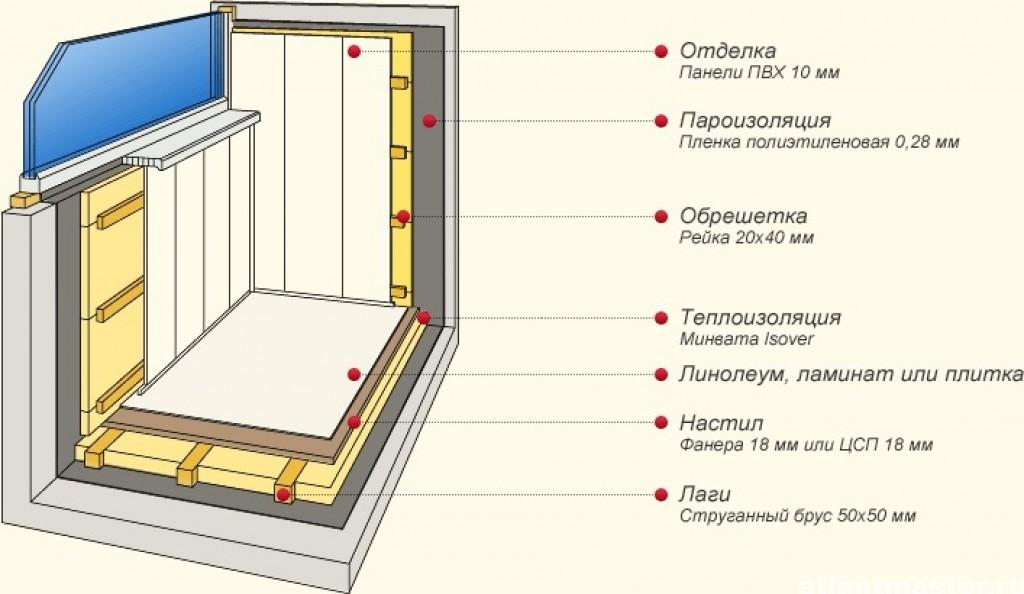
In order not to overload the floor slab (for example, with a concrete screed or leveling mixture), it is better to make the floor covering from lightweight modern materials. On top of the vapor barrier - foil or polyethylene film - two layers of foam or mineral wool mats are laid. Above - waterproofing, which can be used, for example, hydrostekloizol. Rolls are placed on top with an overlap of about 10-20 centimeters. With the help of a blowtorch, mastic-based strips are fused together, and if the use of open fire is impractical or dangerous for some reason, then the sheets are mechanically fastened together. Then a layer of plywood, and only then carpet or laminate.
Finally, the “classic” way of floor insulation is also not bad: wooden logs are laid on the slab, between which modern insulation materials are located.
Panoramic loggia insulation methods
Panoramic loggia insulation slightly different from standard work
In a panoramic room, it is very important that the windows are installed correctly and with high quality, and the requirements for windows are also very high. You should familiarize yourself with two options for solving the problem of insulation:
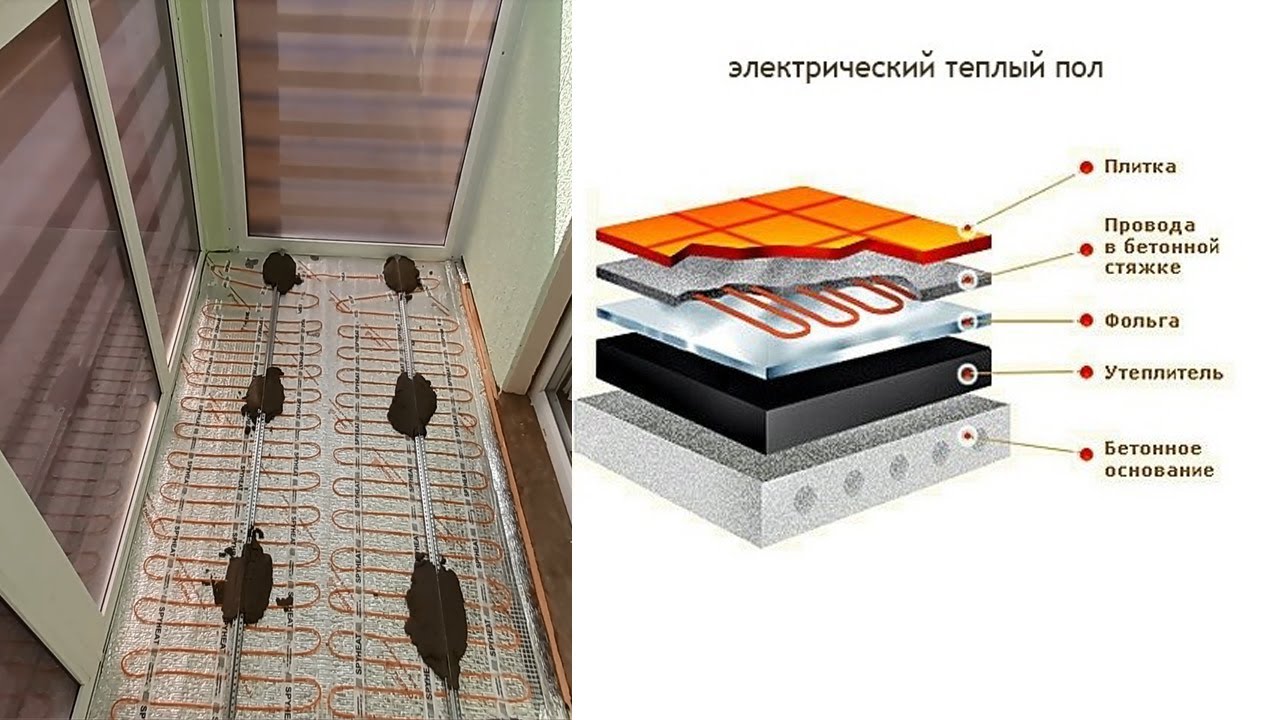
- Installation of a warm floor. This method will make it possible not only to make the flooring warm, but also to heat the entire area with the help of heat.
- If the panoramic loggia is connected to the room, then repairs should be immediately provided for in the room. Thanks to the overhaul, it will be possible to produce not only insulation, but also to make a general design. Then the balcony can be insulated using the standard method and an additional heating system can be installed in it. In addition, it can be heated from the heat emanating from the room itself.
The insulation of the panoramic loggia needs to be approached more carefully due to increased heat loss through window blocks
In general, the insulation of a panoramic loggia should begin with the removal of all cracks that can create a draft.
It will not be superfluous to install radiators and underfloor heating
In order to create comfort and warmth, the owner of the apartment will have to spend not only a certain amount of money, but also make considerable efforts, as well as time. Do-it-yourself warming of the loggia according to our step-by-step photo instructions is carried out for a period of 3 days to 1 week. Warming according to the instructions presented in the article, you can get a sufficient level of comfort, regardless of what the weather is like outside.


Recommendations for choosing a heater
The choice of materials and options for warming the loggia with your own hands is quite wide.
Among the most popular it is worth noting:
- mineral wool;
- Styrofoam;
- polyurethane foam;
- expanded polystyrene;
- penofol, etc.
Mineral wool has a low price, but this is almost its only advantage. To lay such material, you will first need to arrange a crate. Mineral wool is sensitive to moisture; when wet, it loses its useful properties, so it is not always suitable for a loggia.
 Mineral wool gives protection from the cold due to the air between its fibers. Installation should be carried out carefully so as not to crumple the material, this can degrade its heat-insulating properties.
Polyurethane foam is a sprayed seamless coating. Its thickness can be varied to save precious centimeters.
 Extruded polystyrene foam in the form of plates costs a lot, but it is very convenient to install such a heater, it effectively retains heat, and quickly fades when it ignites
Insulation such as extruded polystyrene foam is light and comfortable plates. It is very durable, retains heat well, provides a high level of fire safety. It can be installed very quickly, but the cost of such insulation can be quite high.
Penofol is a relatively thin material that complements other heaters for the loggia.
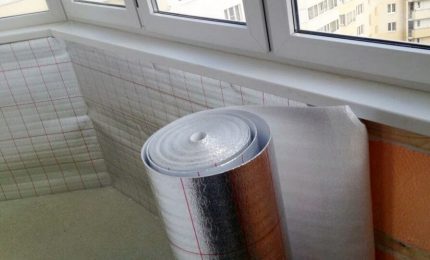 Penofol is a heat-insulating material made of foamed polymer and foil. The reflective layer is used as an additional barrier of protection from the cold.
It consists of a layer of expanded polystyrene and a reflective foil coating. To reduce costs and ensure the desired effect, materials can be combined.
For example, on the ceiling, you can use foam covered with a layer of foam, and on the balustrade and walls, you can use expanded polystyrene plates.
We warm the floor
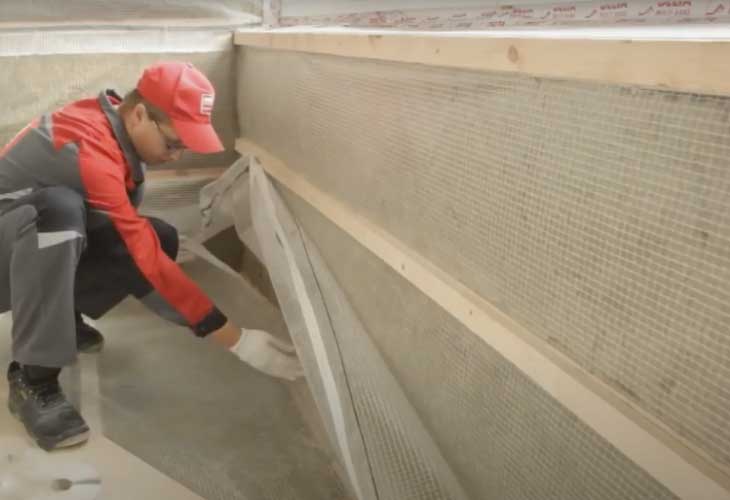
one.I lay a solid cellophane film on the entire surface of the floor so that the cellophane even goes a little on the walls. This ensures that there are no gaps.
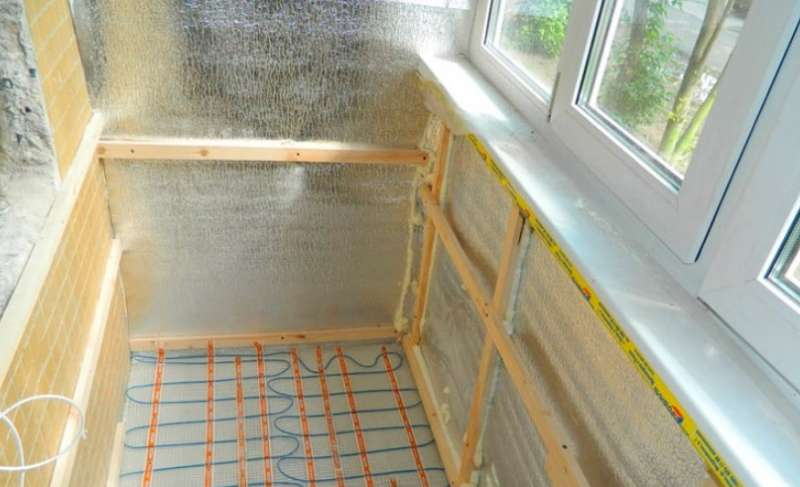
2. I put a foil vapor barrier film on the cellophane - penofol. Penofol immediately provides thermal insulation and vapor barrier. The main thing is not to confuse - put the foil up (see photo).
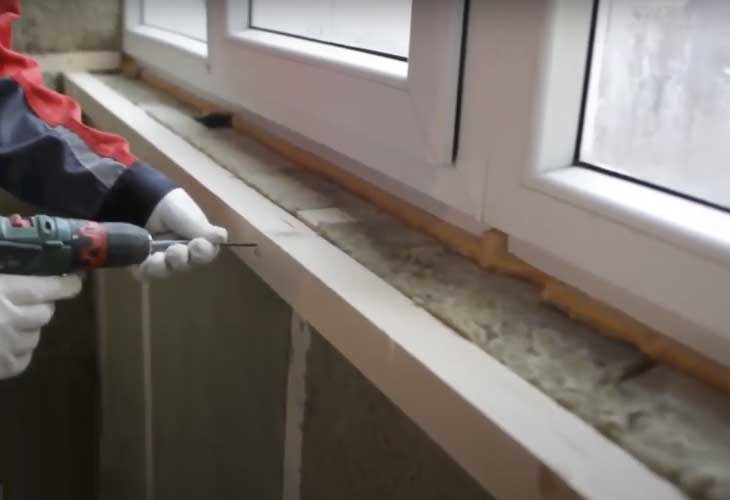
3. Then I put the bars on the floor - the distance between them should be no more than half a meter. Every 30 cm I drill holes in the bars for dowels. I insert dowels into the holes so that they completely drown. Then I screw in the screws.
4. I put foam between the bars. And, if necessary, I cut it with a knife for this. A couple of gaps that remain between the crate and the insulation, I carefully fill with mounting foam. It should be without toluene, since the latter softens the foam.
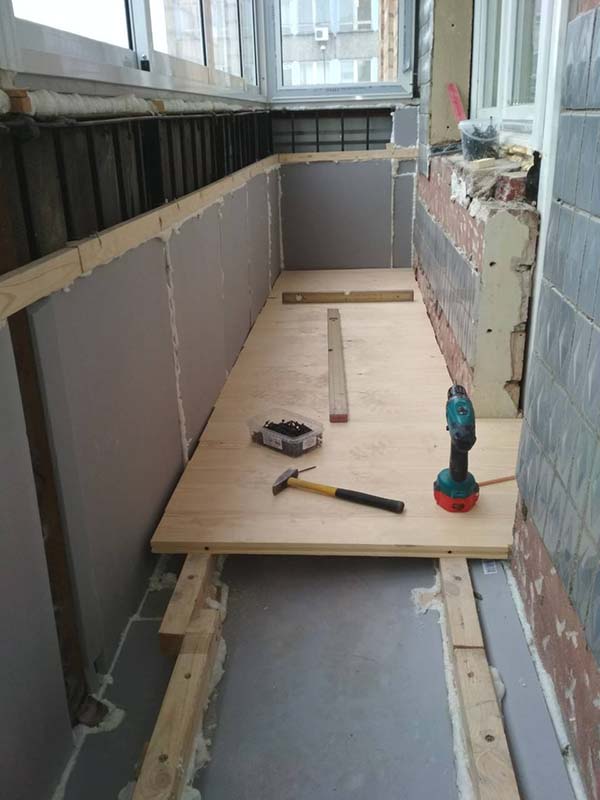
5. The next day, I cut off the excess of hardened foam with a clerical knife. And on top of the insulation I put sheets of plywood - each about half a meter wide. For fastening I use self-tapping screws.
How to insulate the floor on the balcony, look at the video: "Insulation of the loggia / balcony with your own hands"
Preparing the loggia for the installation of insulation
As before any finishing work, before installing the insulation, the necessary preparation of the internal surfaces should be made. This includes:
- Cleaning walls and ceilings from the remnants of old finishing materials.
- Puttying cracks and joints.
- Installation of waterproofing.
Wall and ceiling cleaning
Particular attention in this work should be paid if you decide to fix the insulation sheets with an adhesive composition. If the walls or ceiling are covered with smooth oil enamel, it is also advisable to remove it with a scraper.If the paint is too tight, you can use a grinder to remove it or make notches on the surface with a construction pick or an old hatchet
If the paint is too tight, you can use a grinder to remove it or make notches on the surface with a construction pick or an old hatchet.
Sealing cracks and crevices
The next step is to carefully seal all joints and cracks. This will prevent cold winter air from entering the room, which is fraught with the formation of condensation between the insulation layer and the wall. And this, in turn, leads to the appearance of mold and fungus.


To seal small cracks, you can use ready-made putties or dry putty mixes, the choice of which is quite large in any building supermarket. Large gaps can be sealed with mounting foam or cement mortar (plaster or concrete).
Waterproofing device
Waterproofing is another important stage in the preparation of internal surfaces for the installation of insulation. Its purpose is to protect the loggia from the penetration of moisture from the outside through the smallest pores of concrete or brick. And this is again the accumulation of moisture under the insulation, mold and fungus.
For waterproofing, bitumen-based roll materials can be used. This is a well-known roofing material and its modern derivatives. Sheets of roofing material with the help of special bituminous mastics are pasted over the inner surfaces of the outer walls, the upper and lower concrete slabs, that is, the floor and ceiling of the future room. Joints of sheets of roofing material should overlap and be well smeared with glue or mastic.
For the same purposes, you can use special liquid mastics on a bitumen or polymer base, which, after being applied to the wall surface, harden, forming a moisture-proof film. Such mastics are applied with a brush or roller.
Conclusions and useful video on the topic
Video #1 The procedure for laying stone wool:
Video #2 Penoplex + Penofol - thermal insulation of the entire balcony:
Video #3 Ceiling insulation tips:
Competent advice on how to insulate a balcony correctly and without errors can be obtained from manufacturers of thermal insulation materials. In addition to advertising information about products, they publish detailed instructions for installing insulation, the implementation of which guarantees high efficiency.
Thanks to the description of technical characteristics, which can also be found on the official websites of enterprises, it is possible to choose the most suitable materials.
Do you want to talk about how you equipped and insulated the balcony with your own hands? Do you have methods in your technological “arsenal” that can optimize the process of thermal insulation and the result of work? Please write comments in the block below, post photos, ask questions on the topic of the article.


