- Preparatory work
- Preparing the loggia for the installation of insulation
- Wall and ceiling cleaning
- Sealing cracks and crevices
- Waterproofing device
- What insulation is required for the loggia
- Important Points
- How to insulate a loggia so that it is warm in winter.
- Stages of warming the loggia
- How to make a balcony warm?
- Warm floor on the balcony
- Balcony glazing
- Wall insulation on the balcony
- Warm balcony in a panel house
- Warm balcony in a brick house
- Polyurethane foam for balcony insulation
- How to insulate a balcony with penoplex.
- The choice of heat insulator
- Mineral wool
- Polymer-based insulation
- Common mistakes when insulating a balcony
- What materials are better to choose
- Features of insulation work
- Frameless glazing
Preparatory work
Before proceeding directly to the insulation of the balcony, all debris and dirt should be removed from the loggia. If there are old coatings on the floor or walls, they must be removed. Also, when preparing, you need to divide the balcony into “cold” and “warm” zones. The former include walls and corners facing the street or bordering other non-insulated surfaces. All other parts of the balcony are classified as warm.
Based on this, a plan for future work is outlined:
- Walls and corners bordering the street should be insulated with great care;
- If the balcony borders on an insulated loggia, the partition between them can not be processed;
- The floor and ceiling are insulated, regardless of the design and location of the balcony;
- The corners formed by the "warm" zones are not insulated.
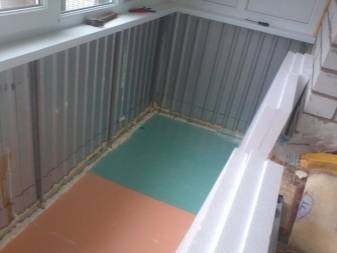
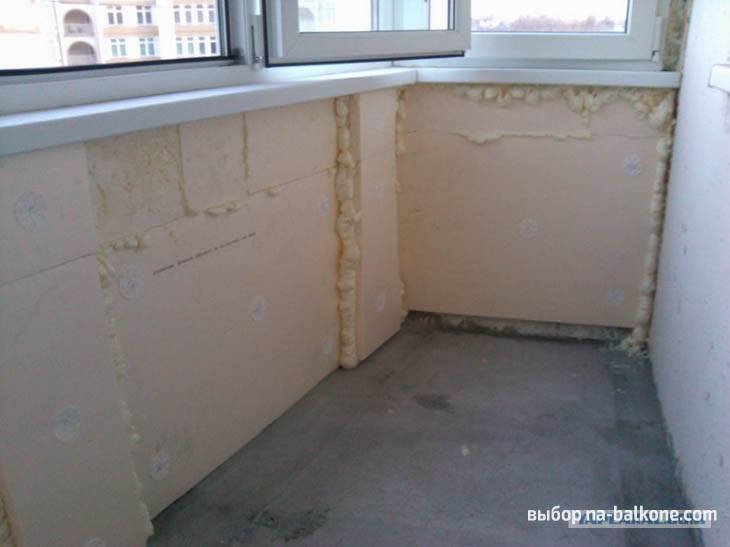
Before warming, it is recommended to cover the floor with a primer. This will prevent mold and harmful micro-organisms from growing. On unglazed loggias there are often through holes, holes and cracks. They are sealed with mounting foam or special solutions to avoid heat loss and extend the life of the insulation.
Preparing the loggia for the installation of insulation
As before any finishing work, before installing the insulation, the necessary preparation of the internal surfaces should be made. This includes:
- Cleaning walls and ceilings from the remnants of old finishing materials.
- Puttying cracks and joints.
- Installation of waterproofing.
Wall and ceiling cleaning
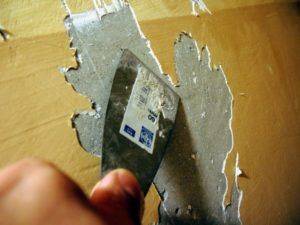
Particular attention in this work should be paid if you decide to fix the insulation sheets with an adhesive composition. If the walls or ceiling are covered with smooth oil enamel, it is also advisable to remove it with a scraper. If the paint is too tight, you can apply grinder to remove or make notches on the surface with a construction pick or an old hatchet
If the paint is too tight, you can use a grinder to remove it or make notches on the surface with a construction pick or an old hatchet.
Sealing cracks and crevices
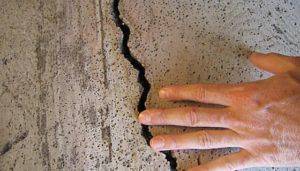
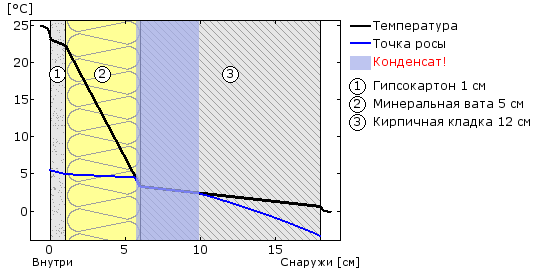
The next step is to carefully seal all joints and cracks. This will prevent cold winter air from entering the room, which is fraught with the formation of condensation between the insulation layer and the wall.And this, in turn, leads to the appearance of mold and fungus.
To seal small cracks, you can use ready-made putties or dry putty mixes, the choice of which is quite large in any building supermarket. Large gaps can be sealed with mounting foam or cement mortar (plaster or concrete).
Waterproofing device
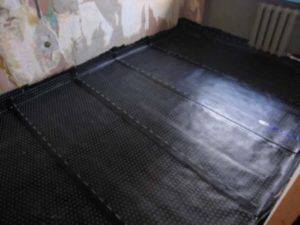
Waterproofing is another important stage in the preparation of internal surfaces for the installation of insulation. Its purpose is to protect the loggia from the penetration of moisture from the outside through the smallest pores of concrete or brick. And this is again the accumulation of moisture under the insulation, mold and fungus.
For waterproofing, bitumen-based roll materials can be used. This is a well-known roofing material and its modern derivatives. Sheets of roofing material with the help of special bituminous mastics are pasted over the inner surfaces of the outer walls, the upper and lower concrete slabs, that is, the floor and ceiling of the future room. Joints of sheets of roofing material should overlap and be well smeared with glue or mastic.
For the same purposes, you can use special liquid mastics on a bitumen or polymer base, which, after being applied to the wall surface, harden, forming a moisture-proof film. Such mastics are applied with a brush or roller.
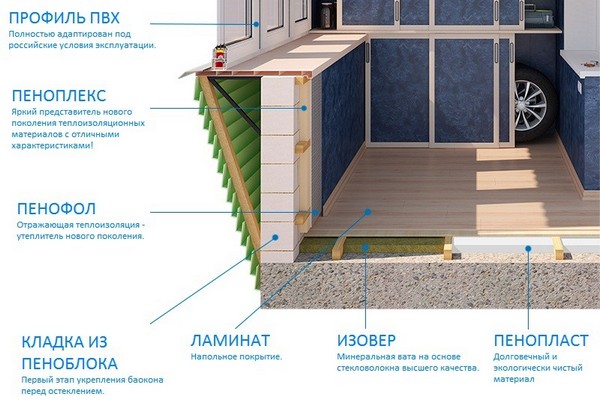
What insulation is required for the loggia
You can insulate the loggia both from the inside and outside. Each wall of this semi-open space has its own characteristics and requires an individual approach:
- the parapet is the most vulnerable part of the structure, as it borders on the cold air of open space. It is on this element that it is necessary to organize the insulation of the loggia or balcony from the outside;
- the main wall opposite to the parapet does not need a thick layer of insulation, since its thermal insulation qualities are provided for by the building structure;
- end walls can be common with heated rooms or adjacent to another loggia. In the first case, insulation is necessary, but not in a very thick layer, in the second case, you need to work as with an external wall, increasing the layer of insulation.
The ceiling and floor of the loggia require a special approach, but the material is selected depending on which floors they are in contact with. When planning the installation of stairs on the second floor on the loggia of a multi-level apartment, floor and ceiling insulation is not carried out.
Important Points
If you insulate the balcony, you will not only be able to expand the living space of the apartment relatively cheaply, but also significantly reduce the heat loss of housing. The fact is that it is through the balconies that most of the heat leaves. But in order for everything to be done efficiently, you need to know where to start. With a well-designed scheme, it will be much easier to turn a cold balcony into a small, but almost full-fledged room.


Comfortable insulated balcony as a continuation of the apartment
So, first sketch out a rough work plan - it will include:
- preparation and selection of insulation;
- glazing;
- insulation;
- finishing;
-
arrangement of an additional source of thermal energy (if necessary).
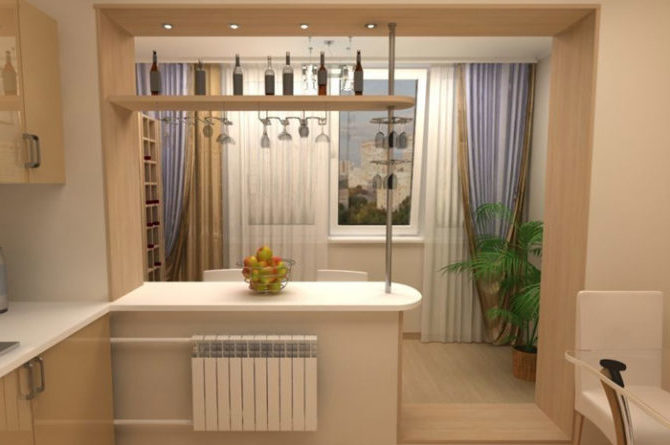
How to insulate a loggia so that it is warm in winter.
The main distinguishing feature of the loggias is their ability to become a continuation of the living space. There are two methods by which you can properly insulate the loggia. This is to turn this area into a continuation of the living space and insulate the loggia as a separate room.To insulate the loggia and turn it into a living area, as a continuation of the room, it is necessary to initially glaze it. To do this, you need to contact one of the companies that install PVC double-glazed windows on windows.
After that, they connect the living space and the loggia, dismantling a small piece of the wall and getting a passage in the form of a large arch. We must not forget about the tap towards the heating battery. Then there is the leveling of the floors, the insulation and finishing of the extended territory, the installation of electric lighting devices. Thus, the room turns into a full-fledged living space. A more difficult option is to insulate the loggia, turning it into a separate living room.
These works should also begin with the installation of double-glazed windows, such work can be done independently if you are a specialist in the installation of PVC glass blocks. If you do not have the experience of such an installation, then you need to learn from the experts involved in the sale and installation of plastic windows. After installing double-glazed windows, you can proceed to the insulation of the loggia with your own hands, using step-by-step instructions:
- To do this, the area of \u200b\u200bthe room is thoroughly cleaned of debris and pollution.
- Double-glazed windows and mechanisms are hung to prevent damage and all kinds of scratches.
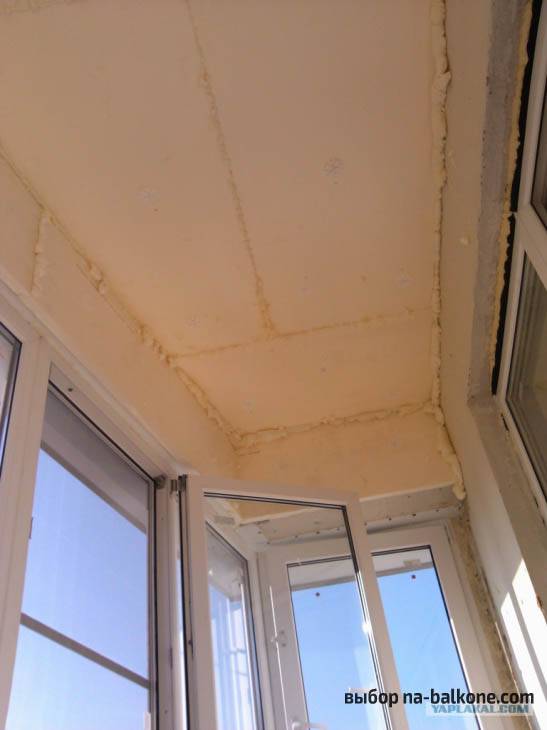
- Next, you can proceed with the arrangement of the ceiling, for this, a waterproofing cellophane film is fixed on the surface with the help of an adhesive mass, you can also use a special primer paint.
- Then, in special plastic hoses, electrical wiring is made with the output of points for sockets and lighting.
- After that, a regular crate made of wood or special metal profiles is arranged on the ceiling.
- Now you can install the ceiling structure. Most of all, foam sheets or mineral wool are suitable as a material for thermal insulation. They are fixed in the crate, bringing out the wires for lighting fixtures, if any.
- The final work with the ceiling is the installation of plasterboard sheets, you can also use plastic or wooden panels.
The final work with the ceiling is the installation of plasterboard sheets, you can also use plastic or wooden panels.
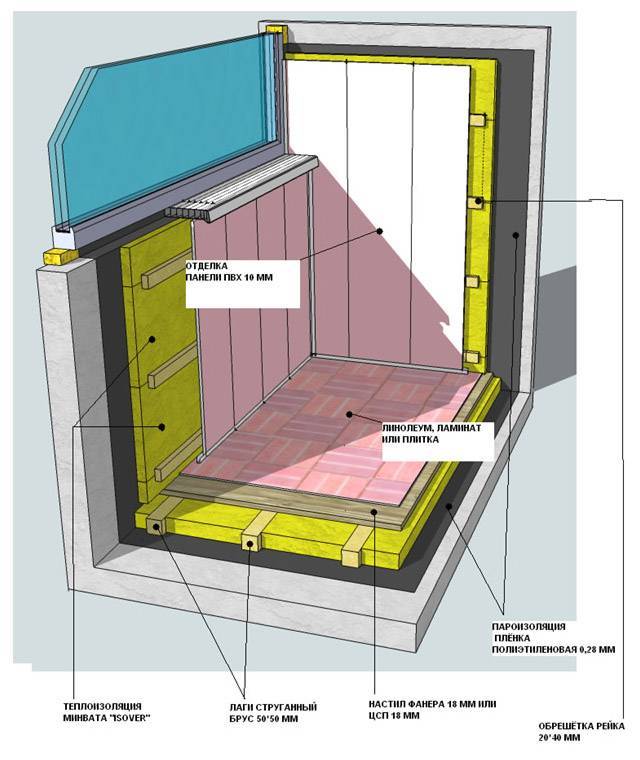
Do not forget about electrical outlets, the wiring of which must be brought to the surface. Next, we proceed to the improvement of the flooring. To do this, we arrange wooden logs on top of the previously laid insulating cellophane film and lay plates of insulating material, then we lay wooden boards or chipboard on top. On this, the main work on finishing the insulated loggia can be considered completed.
In conclusion, linoleum or other finishes are laid on the floor surface.
We can say that the work carried out on the insulation of the loggia in the panel house is identical. The only additions at the initial stage are drilling holes sloping towards the street to create ventilation under the surface of the insulation in case polystyrene was used.
It is worth noting that there is another technology for insulating a loggia in a panel house. Such work can be done using the insulation of the external loggia, but for this you will need to contact professional industrial climbers, and this is quite expensive.
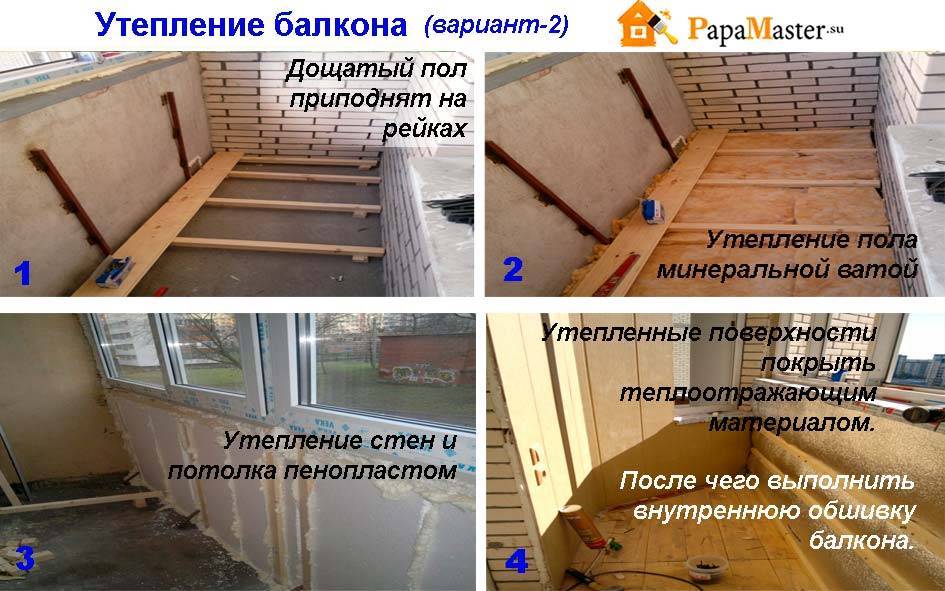
Stages of warming the loggia
When you have finally decided how best to insulate the loggia, you need to carry out a series of preparatory work:
- Sealing of all cracks between the walls and the frame / parapet, glazing.
- Preparation of the necessary surfaces.
- Waterproofing.
For glazing, you can safely choose double-glazed windows with a frame of any material. They must be functional, be sure to be ventilated and relatively light so that you do not create an additional load on the floor slab. The ceiling, walls and floor must be cleaned in advance of debris and other contaminants, and the integrity of the surface must be checked. If you find gaps or cracks between tiles, they must be filled with sealant and, if necessary, leveled.
Such materials include:
- Penofol.
- Folgoizolone.
- Ruberoid.
- Paints and coatings.
- Penetrating waterproofing.
Roll-type waterproofing should be glued overlapping to the base, and the resulting seams should be sealed with sealant, soldered or sealed with special adhesive tape. If you use foil isolon for coating, you get an additional layer of thermal insulation. When using paint, coating and penetrating types of insulation, it will be justified if you are engaged in insulation in hard-to-reach places and where the size of the room is very small.
Once you have decided on the material for waterproofing and are ready to insulate the loggia, you can proceed to the insulation itself. There are two ways:
- You can make a continuous layer of material for thermal insulation and in this way you minimize any chances of steam entering the insulation.
- Laying insulation and vapor barrier coating.
How to make a balcony warm?
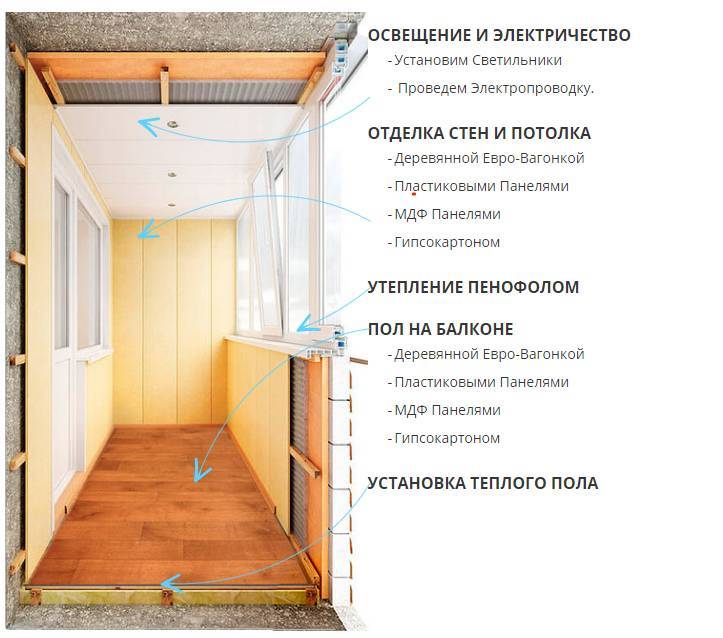
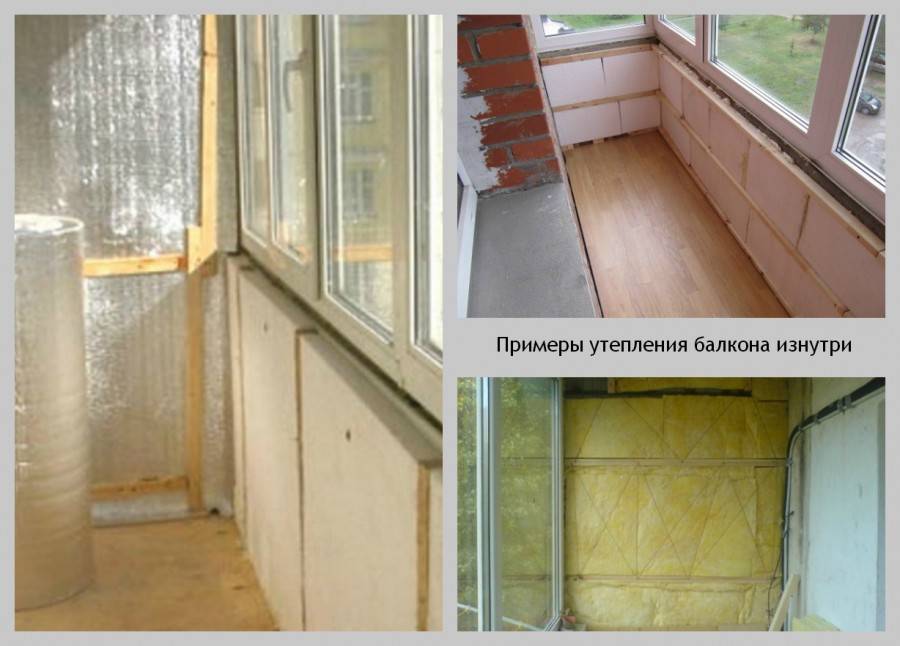
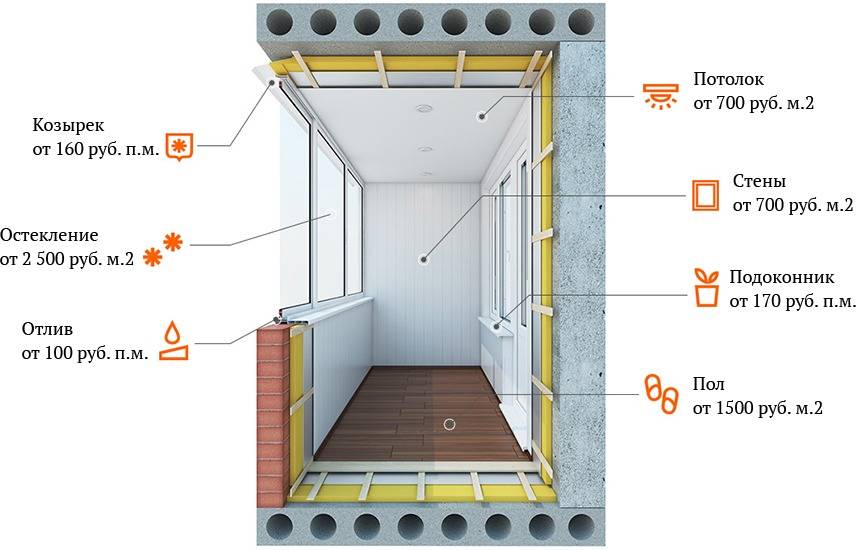
As mentioned above, in order to make the balcony warm, it is necessary to install a warm floor, glazing and wall insulation. Each of these processes has its own technological features, which should be studied in more detail. The choice of one or another option, as a rule, depends on the goals of the owners of the premises and how exactly they plan to use the balcony space. For example, to use a balcony as a separate room, it is necessary to insulate absolutely all surfaces of this space. But for storing winter blanks and drying clothes, it is enough to insulate only the parapet.
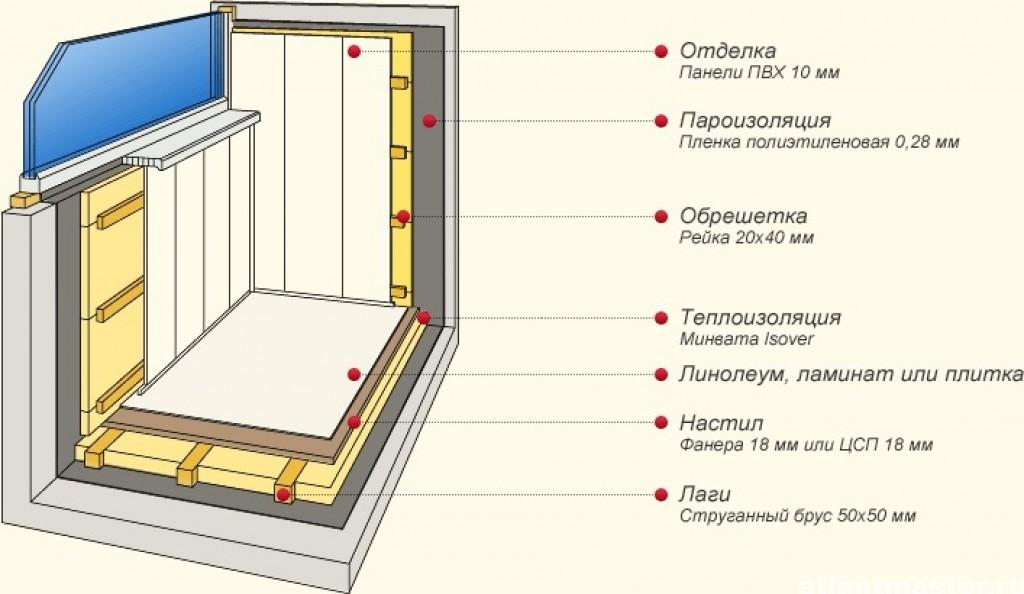
Rice. 2. Balcony insulation options.
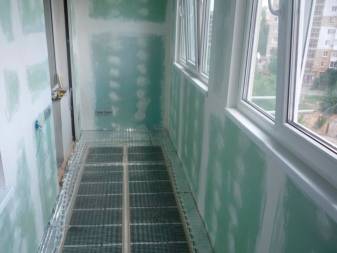
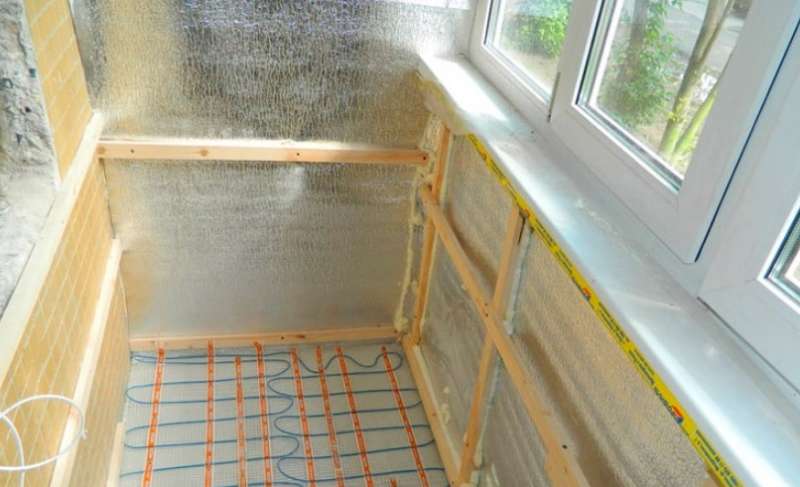
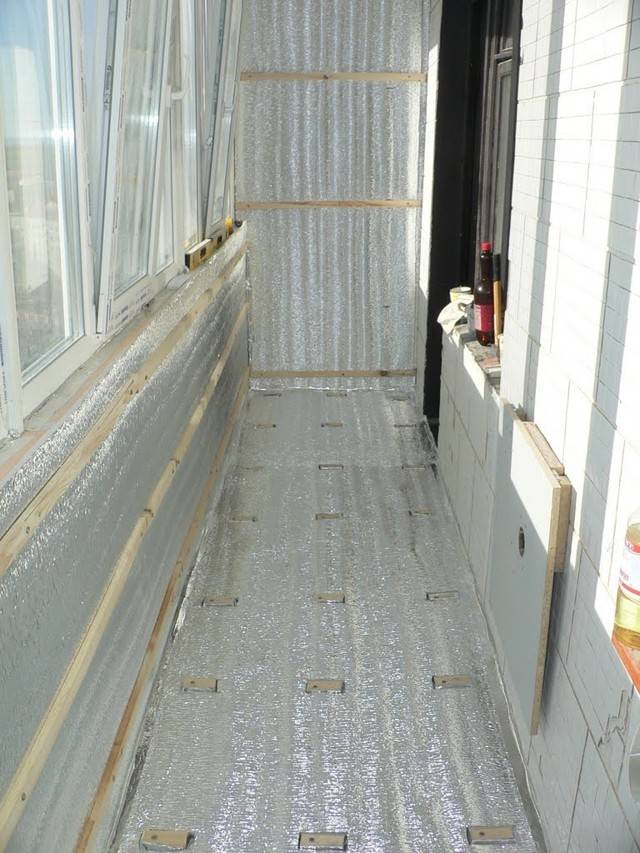
Warm floor on the balcony
When choosing a warm floor for a balcony, first of all, you need to decide on its type. Today there are water and electric floors with cable. The first option is characterized by a uniform distribution of heat. But the main advantages of electric underfloor heating are considered to be affordable cost and ease of temperature control. Installation of the electrical option involves such activities as leveling the base, laying a layer of thermal insulation, installing a reinforcing mesh and a temperature controller, pouring the site with cement mortar, laying the floor covering and measuring the resistance of the cable after drying.


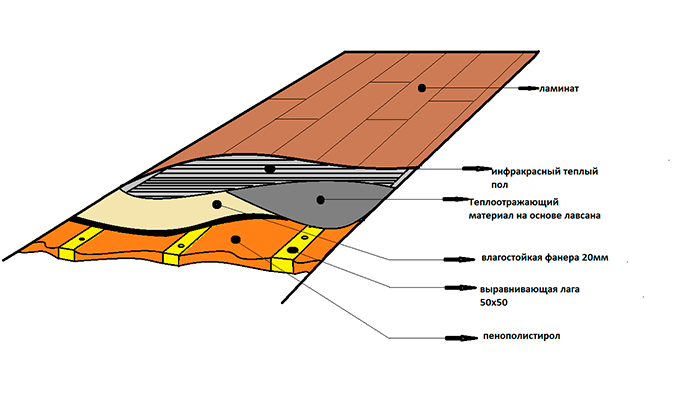
Rice. 3. Warm floor on the balcony.
Balcony glazing
AT balcony glazing, as a rule, windows with hinged sashes and 2-chamber double-glazed windows are used. For this, energy-saving metal-plastic windows are usually used. However, aluminum profile windows or their wood-aluminum counterparts can also be used as an alternative.Among the main stages of do-it-yourself balcony glazing, it is worth noting: the exterior decoration of the room, window system installation and ebbs, sealing seams and inner lining. At the last stage, all existing cracks are sealed. To do this, use mounting foam.
Rice. 4. Glazing of balconies.
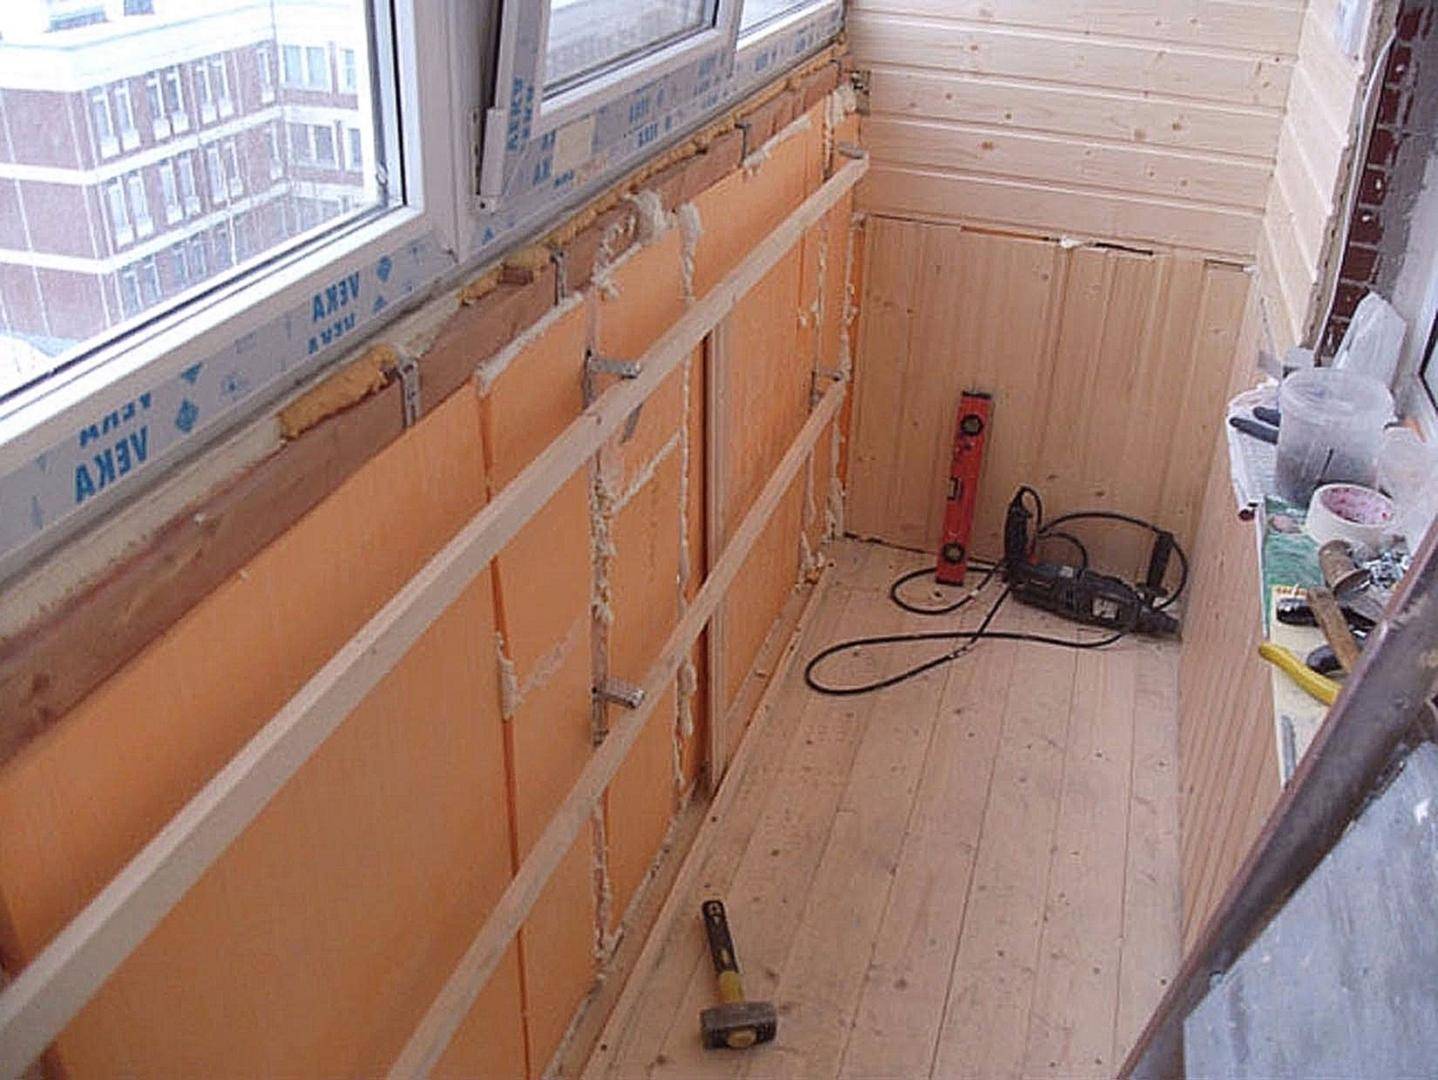
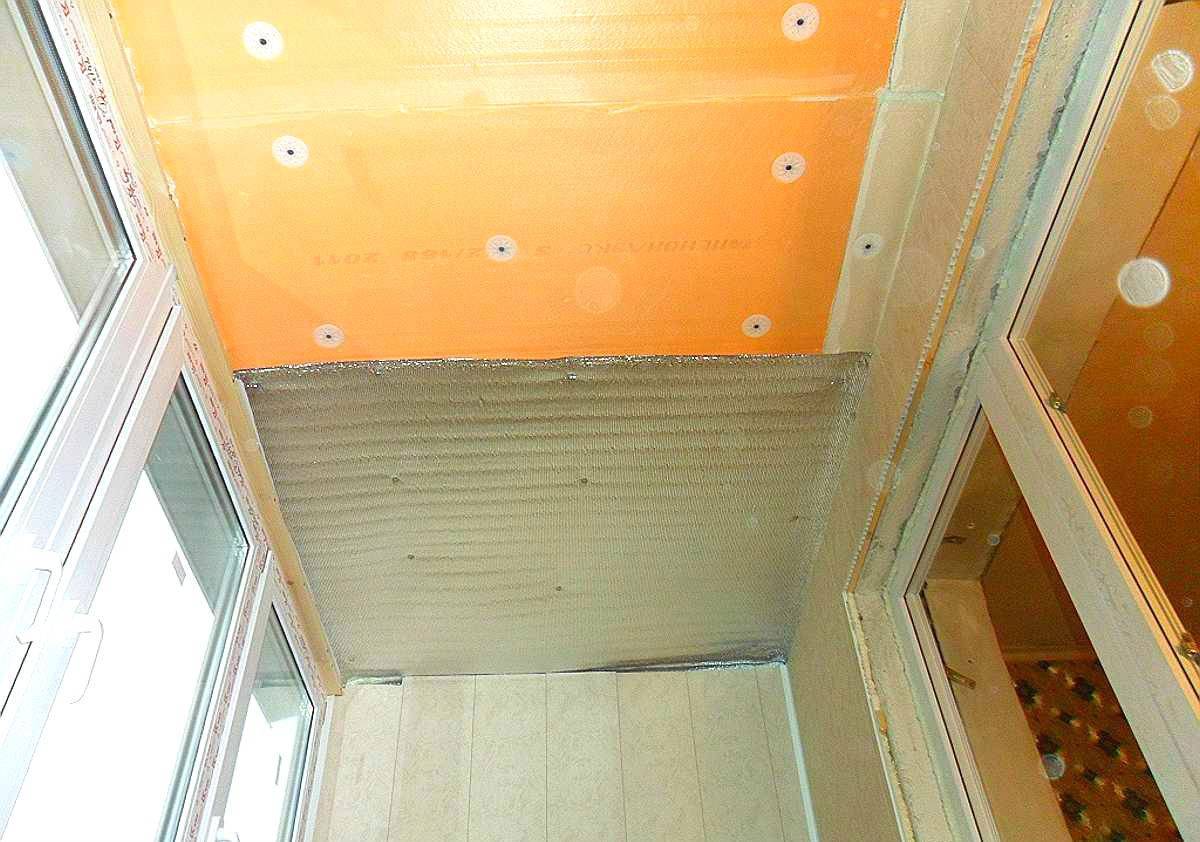
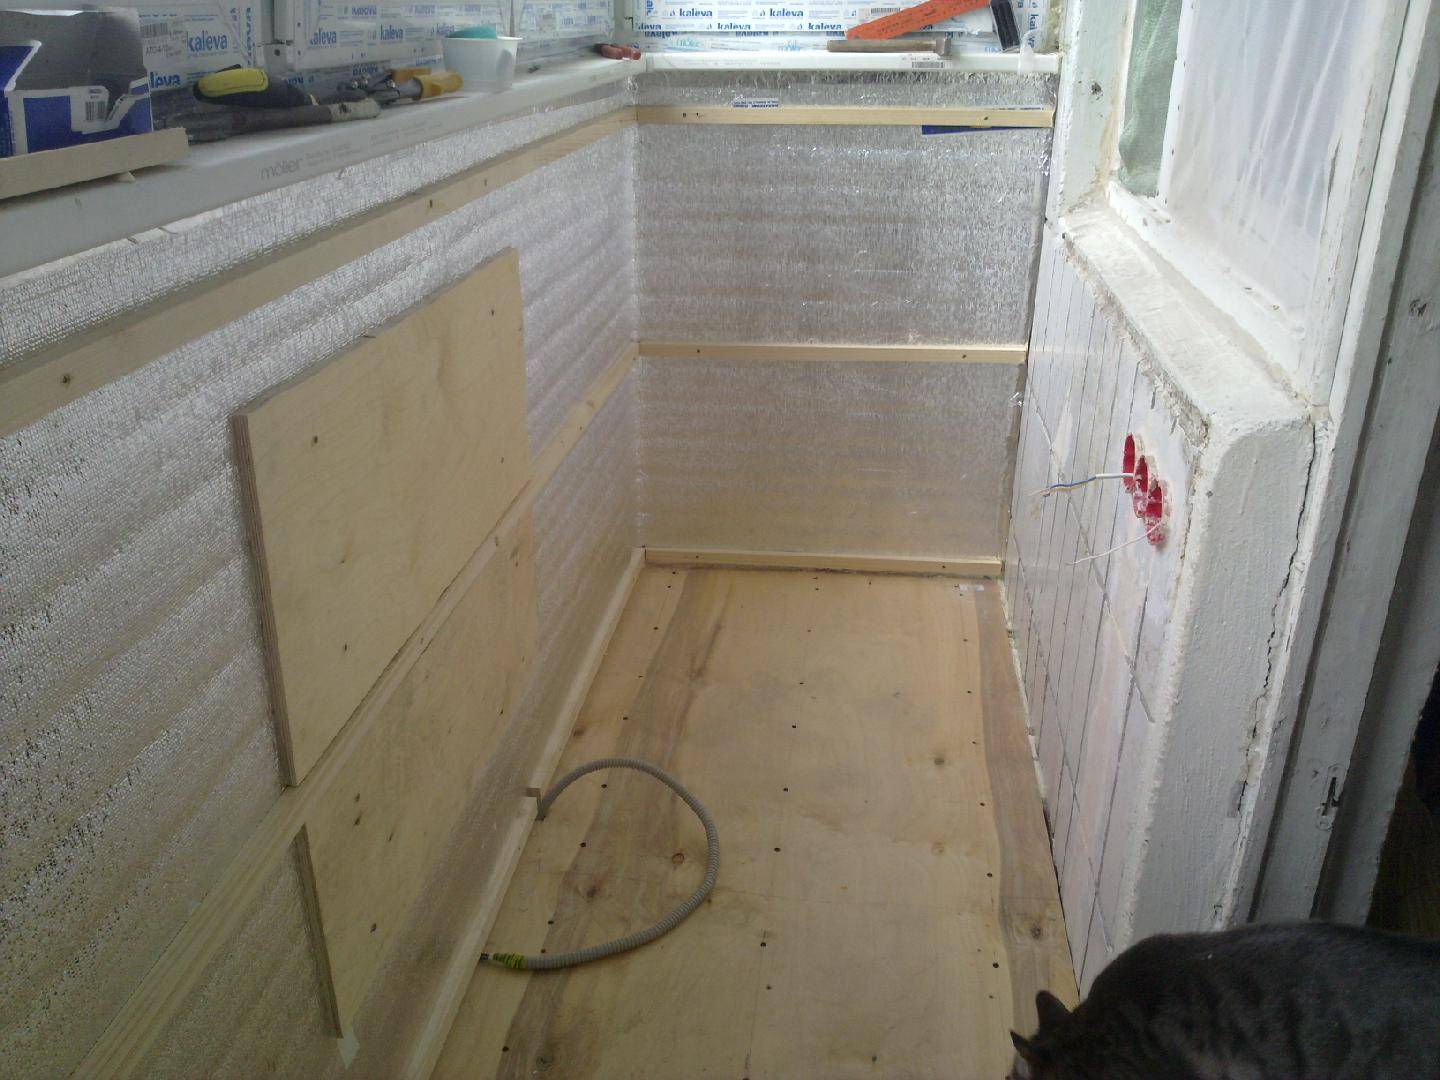
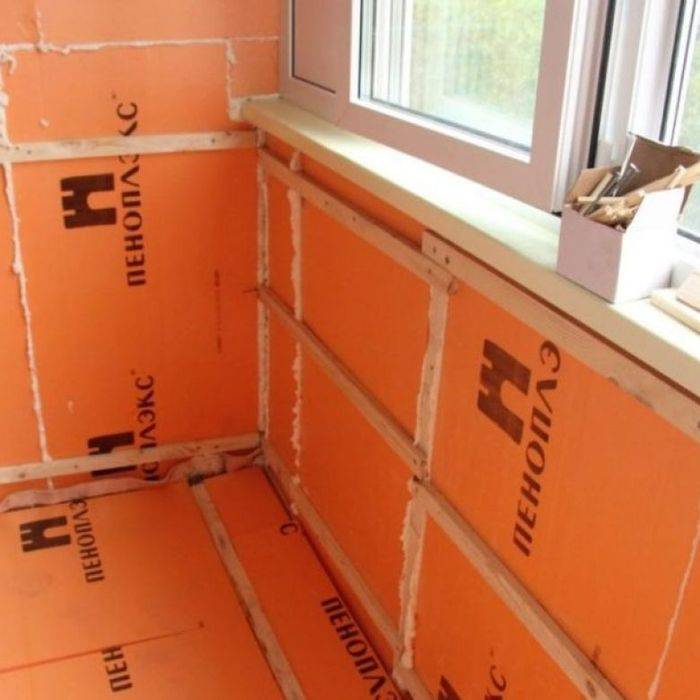
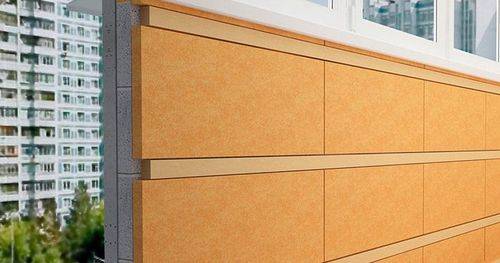
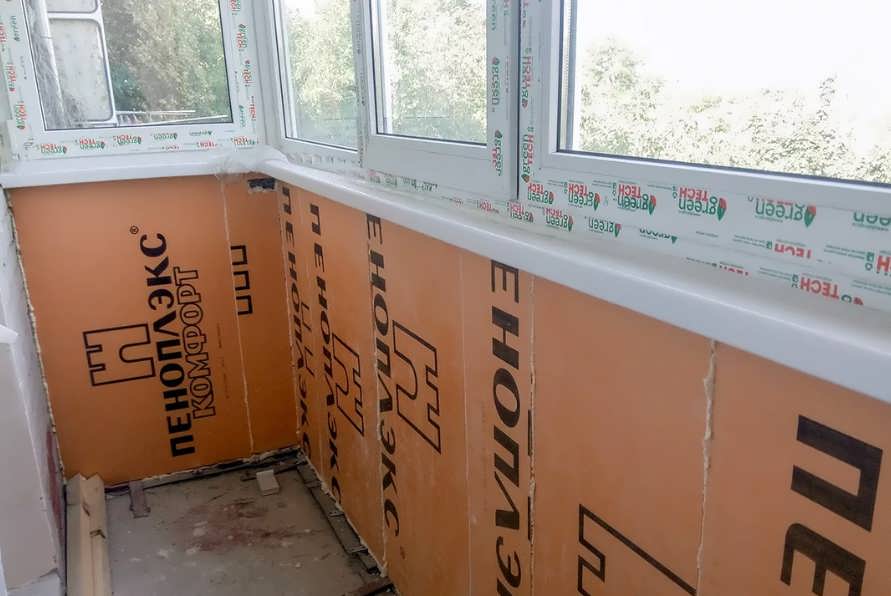
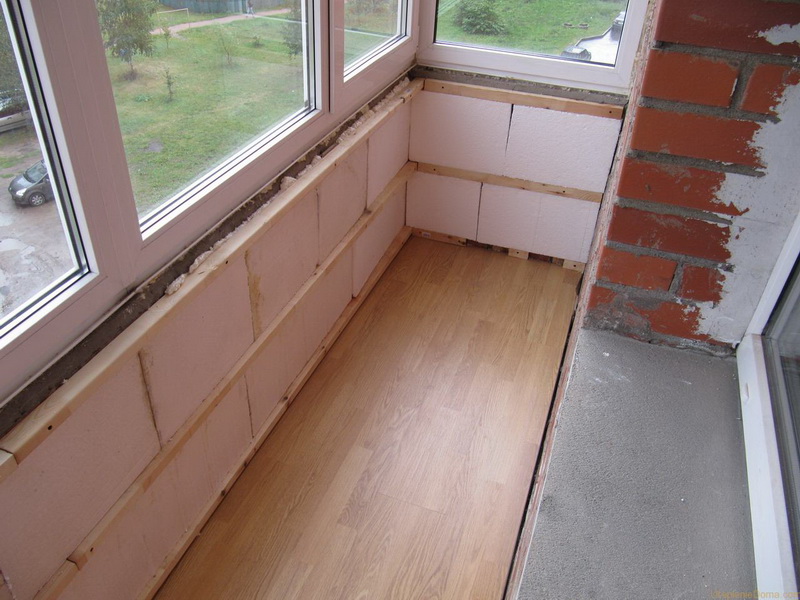
Wall insulation on the balcony
Instructions for warming the balcony with your own hands also provides for the insulation of the walls of this room. For this, a heater such as polystyrene is usually used. To attach this material to the walls of the balcony, a special cement adhesive is used, which must be applied in a thin layer. In order to ensure the most reliable fastening of this insulation, you can also use dowel-nails with wide caps. After that, penofol, which is an additional heat insulator, should be attached to the insulation. Then the seams of this heat insulator must be sealed with foil tape.
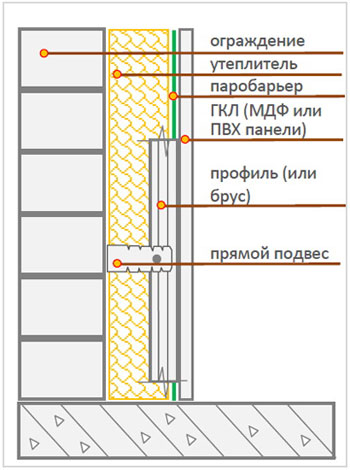
Rice. 5. Wall insulation on the balcony.
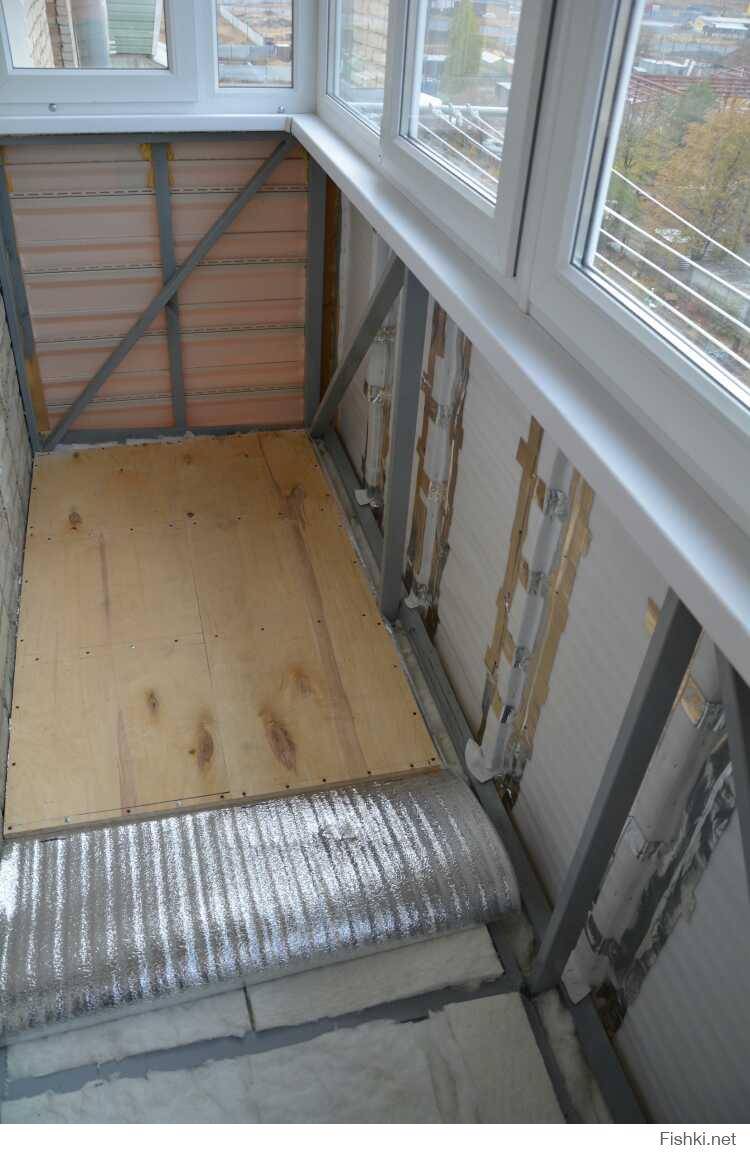
Warm balcony in a panel house
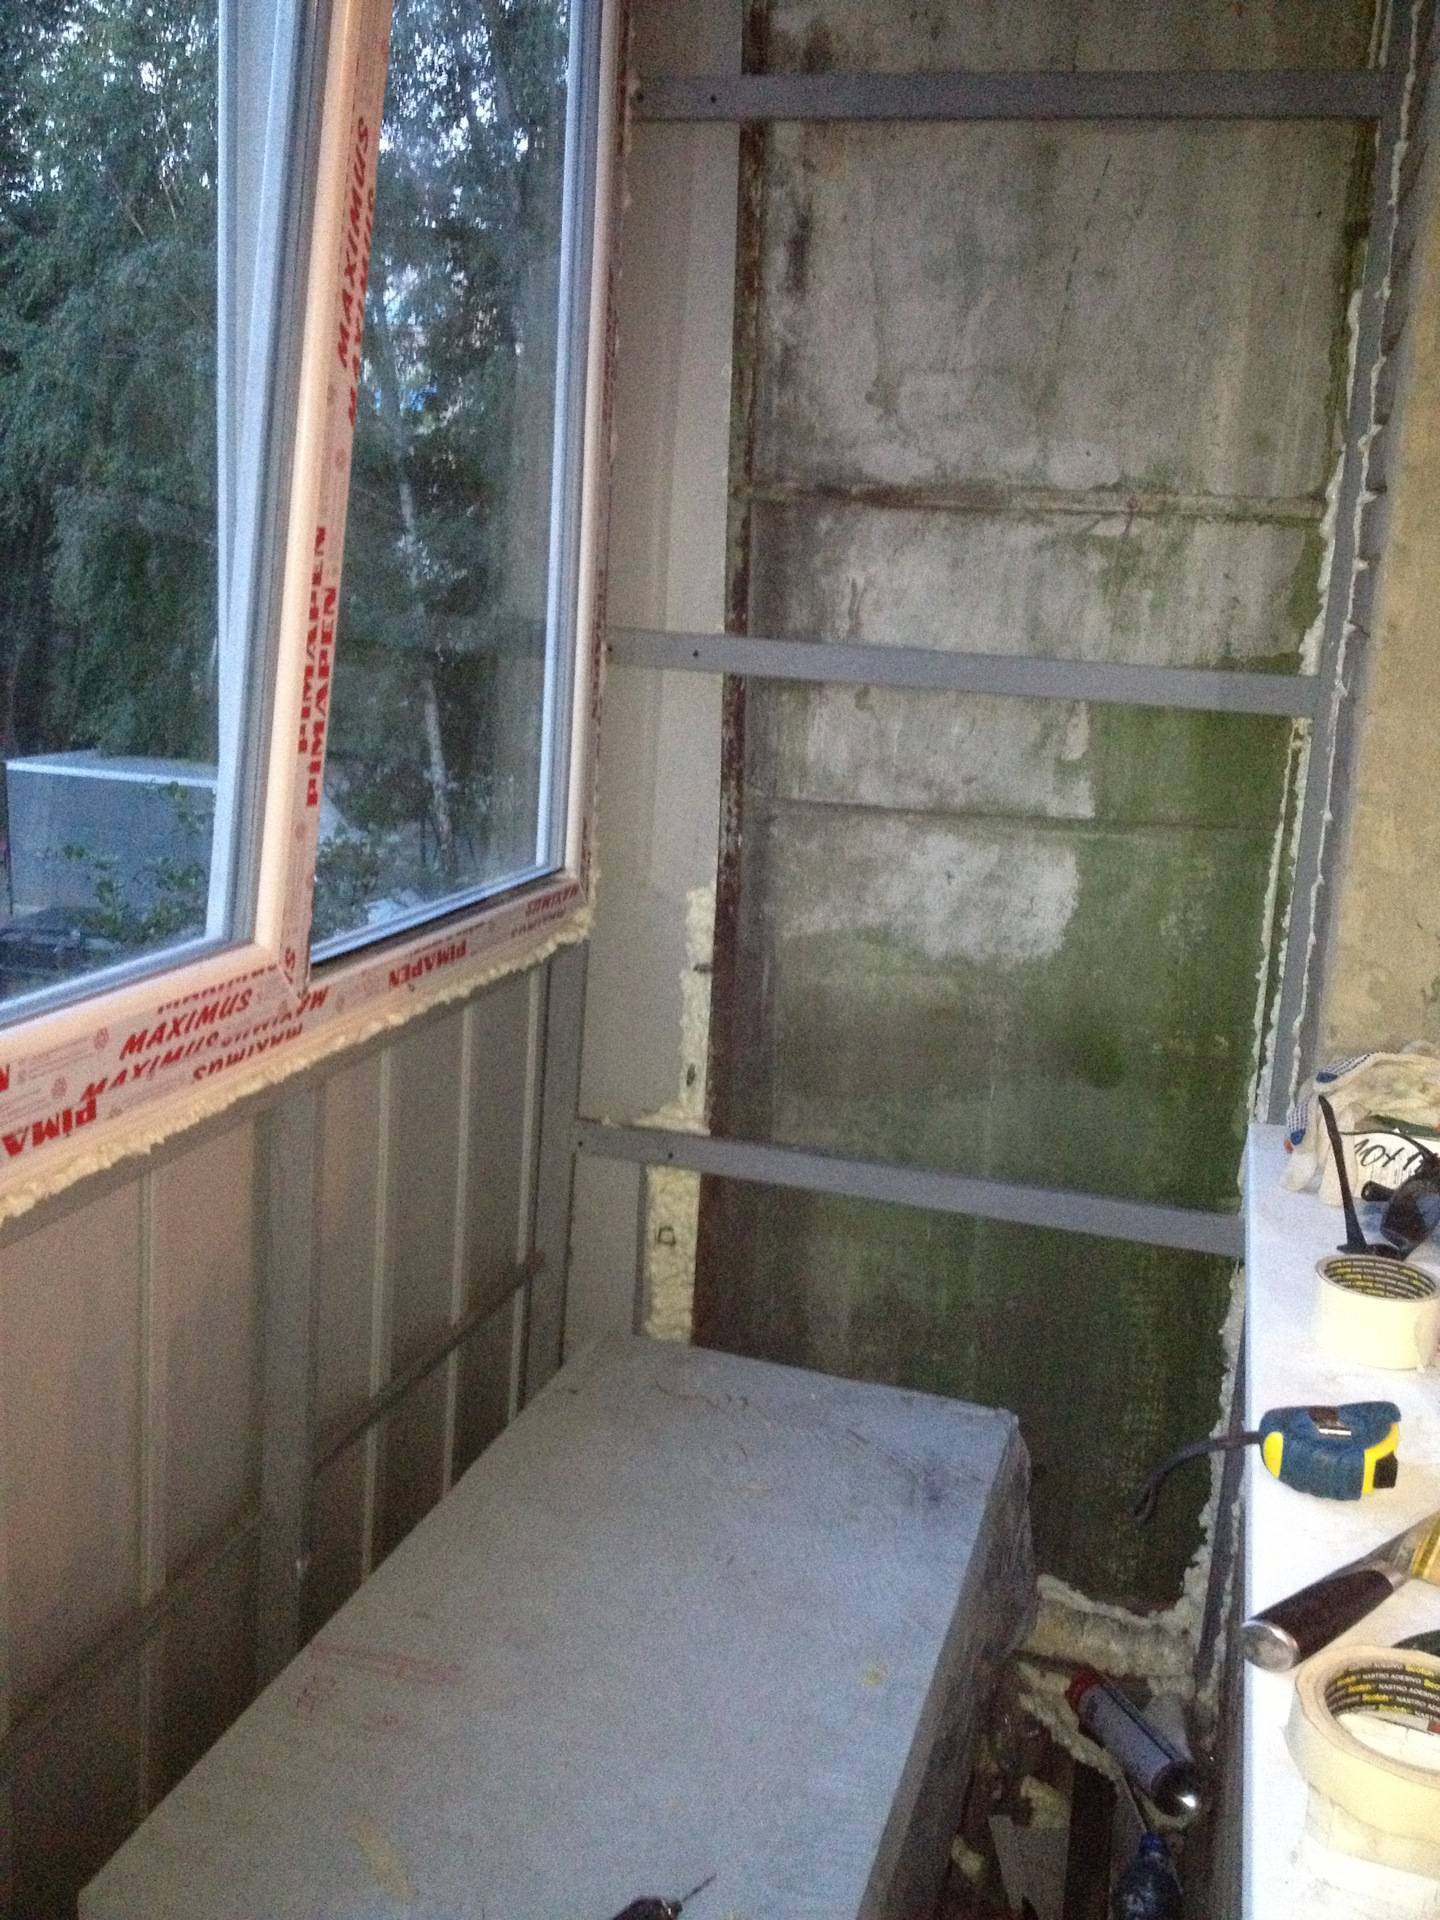
If the task is to make the insulation of the balcony in a panel house, then it is necessary to take into account the features of this structure. In particular, the presence of a technological gap through which rainwater can flow should be taken into account. This point greatly complicates the installation process.
To avoid any problems, it is necessary to install a window frame, which can significantly reduce the free space of the balcony. In order to avoid such a problem, the frame must be installed under the end plate.Thus, the balcony space retains its dimensions, while the gap between the plates is tightly closed.
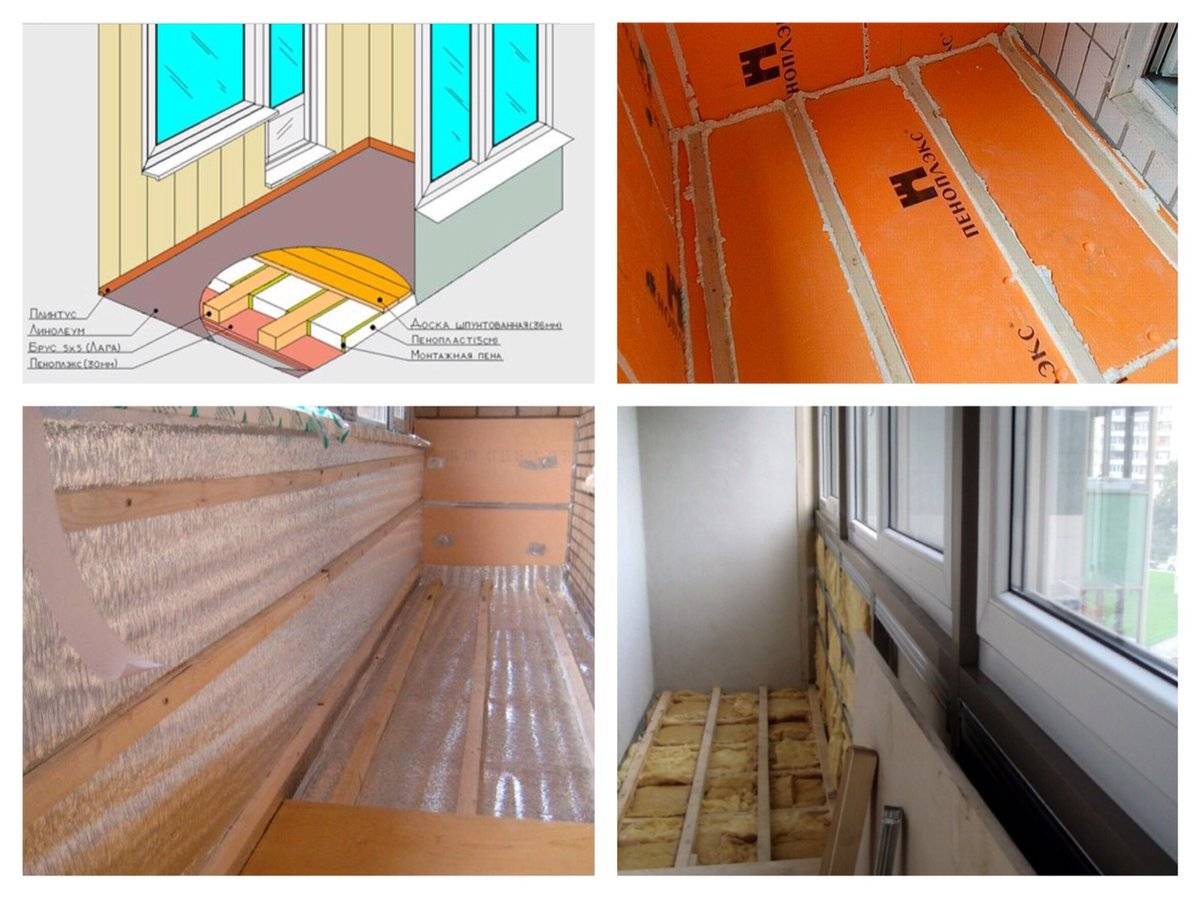
Rice. 6. Popular options for warming a balcony in a panel house.
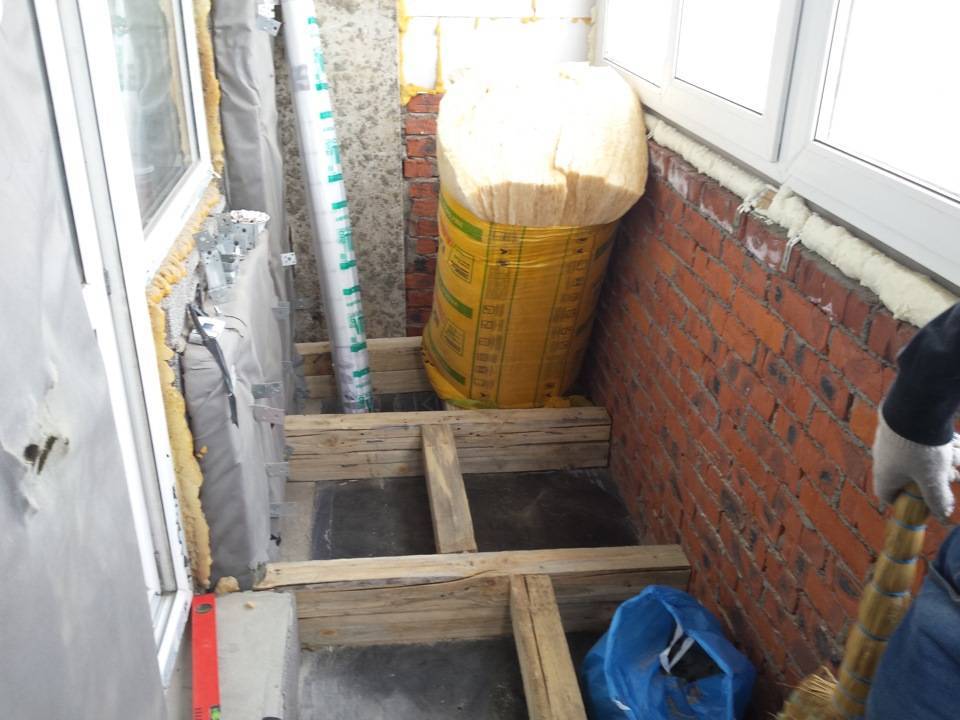
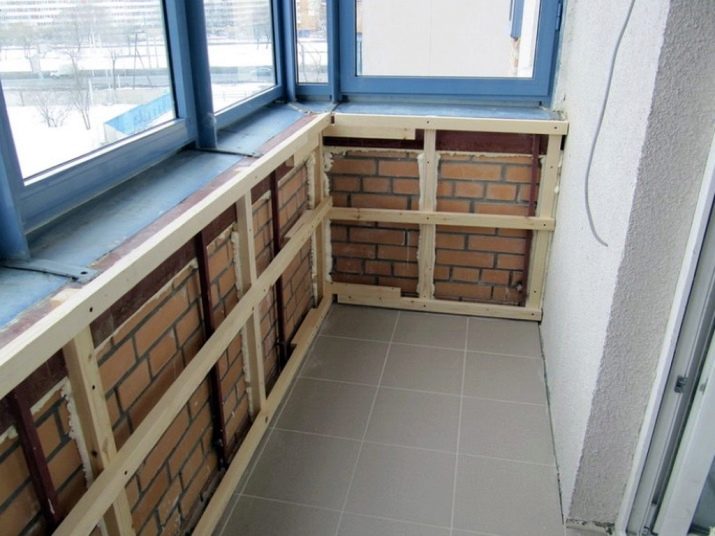
Warm balcony in a brick house
step by step warming instruction a balcony in a brick house involves the use of mineral wool or polystyrene as a heater. In addition, expanded polystyrene, penoplex or polyurethane foam can be used for this purpose. Isover sheets are also often used for insulation. The advantage of this option is ease of installation, good level of thermal insulation and lightness of the material.
The method of installing insulation in brick houses is practically no different from the installation algorithm in panel structures. The first layer of insulation is attached to the fence. Further, wooden bars are attached to the ceiling and floor, which create a "crate". The gaps in this crate are filled with insulation.
Rice. 7. Characteristics of popular options for heat insulators.
Polyurethane foam for balcony insulation
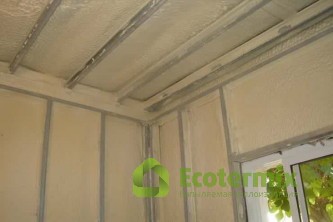
Polyurethane foam spraying is a moisture resistant and high-quality material.
Polyurethane foam insulation or insulation, as a rule, is obtained in two main ways - pouring and spraying. Despite the difference in the technological process, the principle of formation of PPU is identical. Both liquid-like substances are combined in a mixer. When pouring, the composition is placed in the mixing head, when spraying - in the gun. Then the substances are mixed, and then sprayed onto the walls or poured into the prepared form. In this case, the main thing is the speed of application and proportions, since polyurethane foam hardens very quickly.
Polyurethane foam spraying is a moisture-resistant and high-quality material that can be used even in the construction of pools and foundations. Our company performs thermal insulation works using polyurethane foam spraying on objects of any complexity.
We recommend watching a video on how simply and easily sprayed polyurethane foam from Ecothermix:


How to insulate a balcony with penoplex.
If penoplex is chosen as a heater, then there can be two options for insulation.
Full layer foam insulation.
This option for warming the balcony is simpler and easier. Of its advantages, the fact that the foam itself creates a sealed vapor-tight cocoon inside the balcony, so there is no need to use vapor barrier and vapor-permeable films.
The procedure is as follows:
We glue the foam boards with a special adhesive foam to the ceiling and walls of the loggia. Instead of adhesive foam for mounting foam, you can use special fungal dowels.
If the subsequent decorative finish is heavy, such as putty, then it is better to fix the insulation boards with fungal dowels.
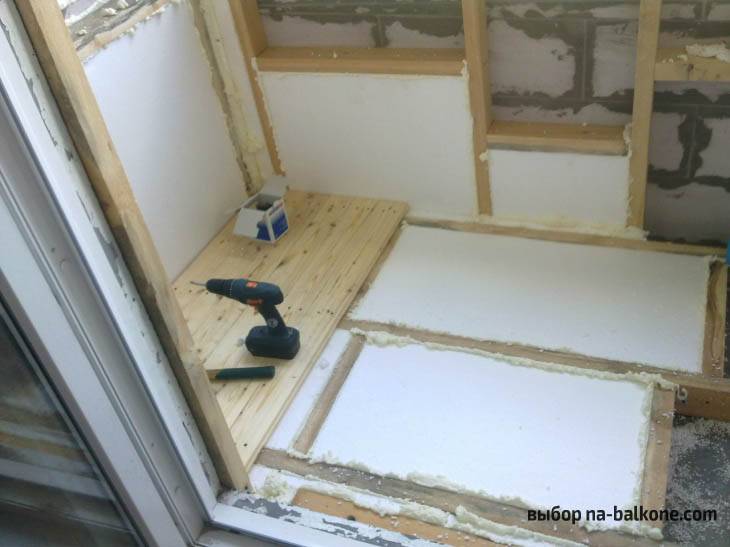
 The wall is insulated with foam.
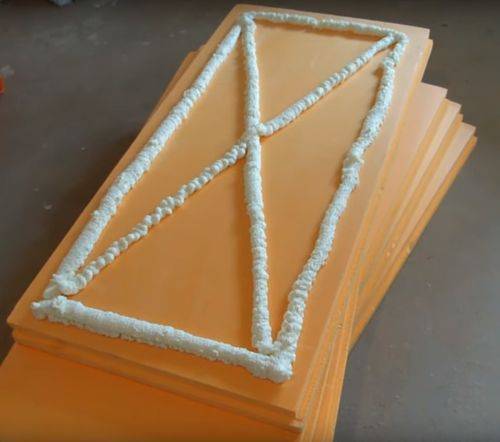 Glue-foam is applied to the penoplex.
We arrange the insulation sheets in such a way that there is a gap of about 1 cm between their edges and the walls.
Penoplex sheets have a step along their edges. It acts as a lock between the sheets, but the density of such a lock is not enough, therefore, before laying each subsequent sheet of insulation, we apply mounting foam or adhesive foam to the step.
Application of glue-foam on the locks of the penoplex.
- We fill all the gaps between the insulation sheets and the walls of the balcony with mounting foam.Thus, we cover all the blown gaps between the insulation and the walls.
- We glue all the joints between the sheets of insulation with metallized tape. Thus, we create additional protection against blown joints and make a kind of water-tight sealed circuit.
If a large thickness insulation is needed to insulate a balcony, for example 80-100 mm, then it makes sense to buy sheets 2 times thinner. In this case, they will be mounted in two layers with overlapping joints. So it is possible to achieve a decrease in the blowing of the insulation at the joints between the plates.
Further actions depend on the decorative decoration of the walls of the balcony.
If wallpaper will be glued to the walls, then the procedure is as follows:
- We scratch the insulation plates with a metal brush to give them increased roughness.
- We putty the entire surface of the foam using a plaster mesh. There is an additional pleasant moment here. A layer of plaster creates a non-combustible barrier between the room and the insulation. As a fire protection, this is a fairly good option.
- We paste wallpaper on the putty or paint the walls.
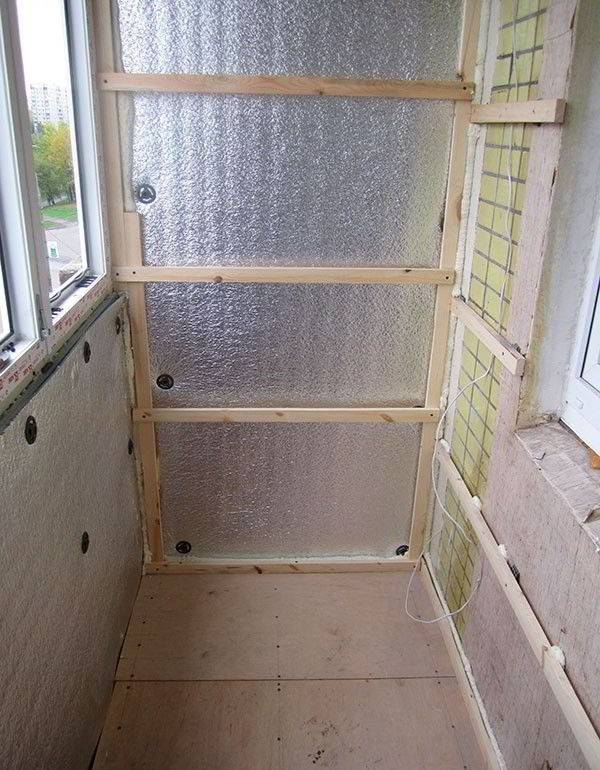
If the walls of the loggia will be sewn up with plastic or MDF panels, then they need to make a wooden frame. Therefore, the procedure is as follows:
- On top of the insulation we fasten wooden bars of a small section, for example 25x30mm. They should be attached to the ceiling and walls of the loggia through the insulation. This can be done with metal dowels.
 We mount a wooden frame on top of the insulation.
Now sheets of drywall, plastic or MDF panels can be attached to wooden bars.
Insulation of the loggia with a wooden lattice between the foam sheets.
This method of insulation has its pros and cons.Of the pluses - there is a wooden grate on which you can fix almost any type of decorative finish, plastic panels, drywall, lining, etc. Of the minuses, this is an additional work on the installation of wooden bars, and since the tree absorbs moisture well, it is necessary to use vapor-permeable and vapor barrier films.
 The insulation is laid between the wooden bars.
The procedure is as follows:
- We cover the ceiling and walls with a vapor-permeable film. It will release moisture from the wooden bars into the street and at the same time prevent moisture from penetrating inside the balcony from the street.
- We fasten wooden bars to the ceiling and walls of the balcony using metal dowels for concrete. One of the sides of the section of the bars should be equal to the thickness of the insulation. The distance between the bars is selected according to the size of the insulation. It should be 1-2cm more than the insulation.
- We lay foam sheets between wooden bars. We fix the sheets with glue-foam and special dowels.
- We fill with mounting foam all the cracks between the wooden bars and the insulation sheets.
- We sew it all up with a vapor barrier film. It can be replaced with ordinary polyethylene.
- We cover with drywall, clapboard or plastic panels.
The choice of heat insulator
Advantages and disadvantages are inherent in each type of thermal insulation. In order to choose the most suitable insulation, you should compare the main characteristics of heat insulators.
The most common options for heat insulators:
- Extruded polystyrene foam (penoplex);
- Foamed polyethylene (penofol);
- Polyurethane foam (PPU);
- Styrofoam;
- Mineral wool.
Mineral wool
The thickness of the sheets varies from 2 to 20 cm. Mineral wool is divided into three types, depending on the components of the raw material:
- Stone;
- slag;
- Glass.
An example of a mineral wool device on a loggia. The material is placed in the prepared structure. The frame for mounting can be made of metal profiles or wooden bars.


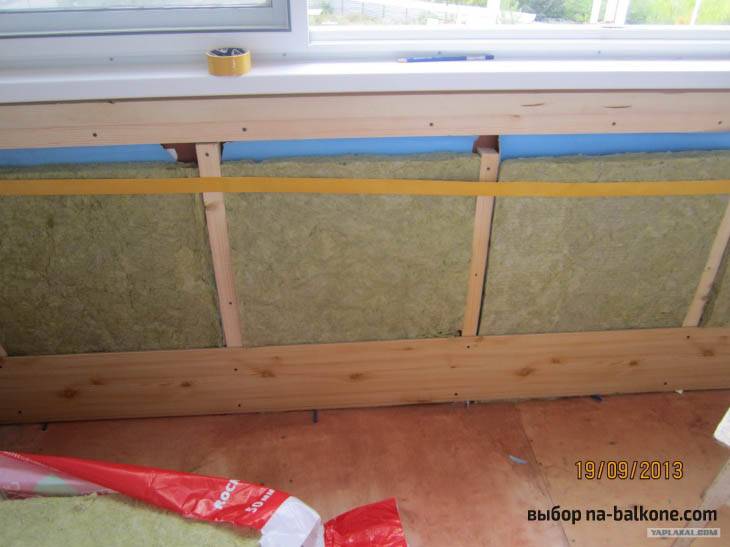
Manufacturers produce cotton wool in the form of mats and soft rolls. In some cases, one side is covered with foil. Aluminum foil improves the level of thermal insulation.
When laying mineral wool, the foil side should be directed inside the room. This principle allows heat to be reflected off the aluminum cladding and returned to the room.
The main disadvantage is that moisture acts destructively, a vapor barrier device is necessary.
Pay attention to the integrity of the mineral wool packaging before buying. Moisture adversely affects the properties of the heat insulator
For high-quality insulation, it is necessary that the space of the loggia be dry.
Polymer-based insulation
Penoplex, polyurethane foam, polystyrene, foamed polyethylene are polymers treated with foamed compounds.
Advantages:
- The presence of gas bubbles provides not only a good level of thermal insulation, but also a small weight of the plates;
- High degree of moisture resistance;
- The materials are durable;
- Antifungal resistance;
- Simplicity and convenience when laying plates or sheets, as well as rolls (polyethylene foam);
- An economical repair option, subject to the choice of foam as a heater.
The main disadvantage: they support the spread of flame during a fire, emit harmful substances during combustion.
When choosing foam and other materials based on polymers, it is necessary to correctly select the thickness of the plates and determine the density
If you plan to use the space in winter, in this case, choose a thickness of 50 mm. Density is determined by further coating - for putty, a value of 25 kg / cu. m.
1. Styrofoam sheets
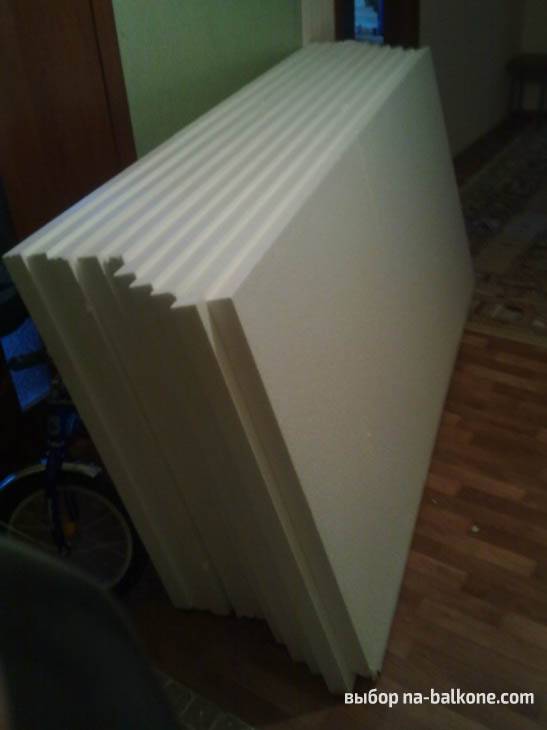
Insulator plates (expanded polystyrene) in the process of laying.
Styrofoam refers to budgetary methods of warming a loggia, however, it is considered a rather fragile material, therefore, a crate is required for installation. A worthy replacement is extruded polystyrene foam; its installation does not require the creation of a special frame.
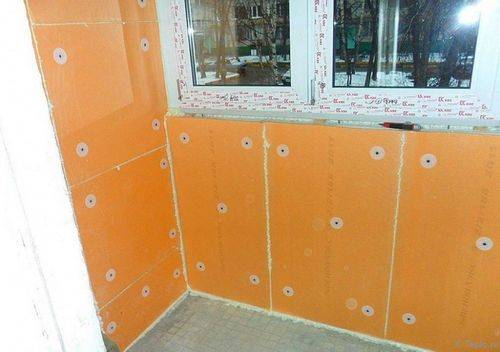
2. Penoplex
Extruded polystyrene foam boards (thickness 50 mm) are used as insulation. The seams between the elements are sealed with mounting foam. Penoplex is attached with the help of special dish-shaped dowels ("fungi").
3. Penofol
The material is used as a separate heat insulator, and with the help of penofol it is possible to provide a vapor barrier of expanded polystyrene. Due to the foil side, warm air is reflected and retained in the room.


In order to speed up the insulation of the structure, you can use an alternative method of thermal insulation - spraying polyurethane foam (PPU).
4. Polyurethane foam
PPU is one of the most modern heat insulators. The cost of application services is considered high compared to other analogues, but many have managed to evaluate the performance properties of polyurethane foam. This insulation is characterized by high thermal insulation performance, due to the finely porous structure.
Spraying of polyurethane foam is carried out by specialists, one day is enough for installation work, it also does not take much time to dry completely.
Common mistakes when insulating a balcony
As you can see, there is nothing complicated in the thermal insulation of a balcony. The main thing is to avoid common mistakes that are made with self-insulation.
- Don't stop halfway. It often happens that the owner is limited to installing good windows and sealing cracks, not paying due attention to the insulation of the parapet and other surfaces. As a result, the effect of such thermal insulation is visible only on electricity bills from the operation of an electric heater.
- Violation of technology and the use of low quality materials can create cold bridges that lead to heat leakage from the room.
And the last point - do not neglect heating. Without it, the balcony will never be truly warm and comfortable.
What materials are better to choose
For finishing balconies or loggias today there are a lot of varieties of finishing materials, with the help of which they give even the smallest room an original and attractive look. The main thing is to make the right choice of material for decoration. For insulation, experts recommend using cork, plastic panels, lining with a wooden or plastic base, drywall, plaster, MDF panels, decorative stone, aluminum profile, foam plastic, expanded polystyrene, penofol.
In the case of an uninsulated balcony, it is better to give preference to artificial stone, plastic frost-resistant lining, cork panels or tiles. The most commonly used finishing materials are:
Features of insulation work
So that thermal insulation is not meaningless, it is important to know 6 features:
- If there are wooden parts on the balcony, you can’t do without antiseptic treatment and waterproofing. For example, the most common liquid glass, which does not let water through, kills mold, and is very cheap in addition.
- In cold regions, it is better to make insulation in the form of a "pie" with an air cushion.
- Don't skimp on the underlayment. Ordinary foil foam will help. By the way, it additionally waterproofs the room.
- All layers of mounting foam must be puttied or sealed. It quickly crumbles under the influence of ultraviolet radiation and thermal insulation will have to be updated.
- No gypsum putty to touch the joints. It is hygroscopic and will become unusable in a year. Polymer putty or any finishing material labeled "waterproof" will do.
- If you plan to install a heater, then IR and oil are best suited. Fans or "wind blowers" will definitely not work.
By the way, a heating and ventilation system is required. Without active insulation, the balcony will still be cold and it will not become a continuation of the apartment. And good ventilation will prevent fungal infection.
Frameless glazing
Frameless glazing seems both beautiful and modern, besides it takes up a minimum of space. But. This is single glazing, which in winter will turn the loggia into a branch of the refrigerator, and frost will penetrate into the gaps between the frames. Therefore, this option should be discarded immediately. Double glazing only. Plastic windows with double-glazed windows and hinged sashes will be the right solution. In addition, they do not take up much space, they are easy to clean, and you can install mosquito nets in them.But if you still don’t have a soul for plastic windows, you can look at new technologies: these are lift-and-slide windows with thermal insulation.


