- Features of built-in hoods
- What to look for when choosing an inclined hood for the kitchen
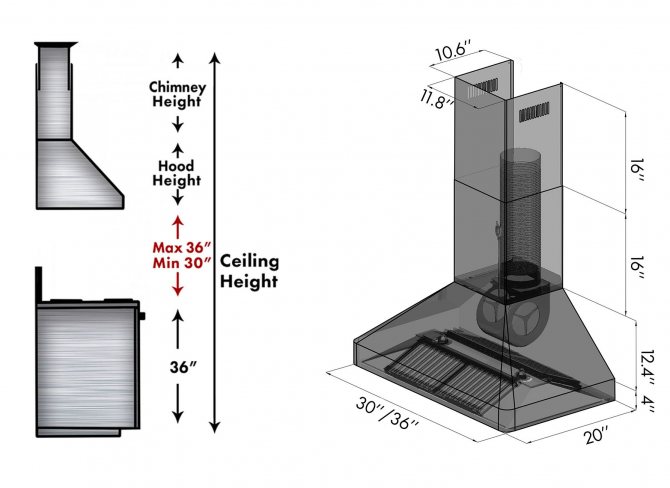
- Hood size
- Performance
- Type of installed filter
- Appearance and colors
- Scheme of a kitchen hood
- Video - installation of a kitchen hood
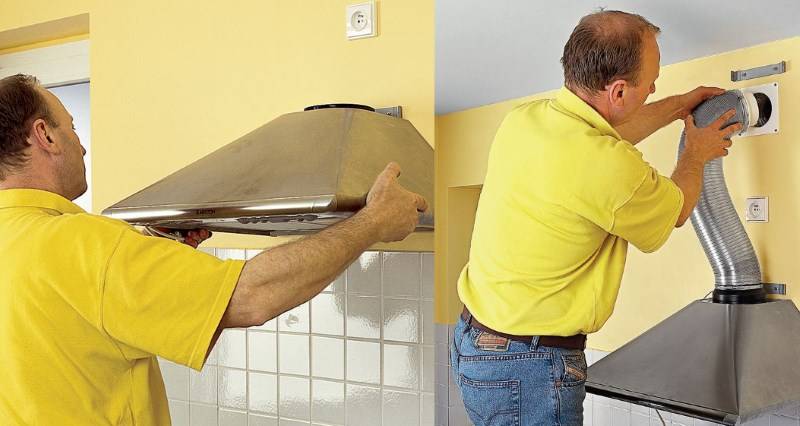
- Installation of the ventilation duct
- Duct size
- Fastening the corrugation to the hood and ventilation
- Fixing the duct to the wall
- How and where to bring the air duct
- How to install a kitchen hood with your own hands
- Electrical connection
- How and at what height to install the hood housing
- Comparative review of models
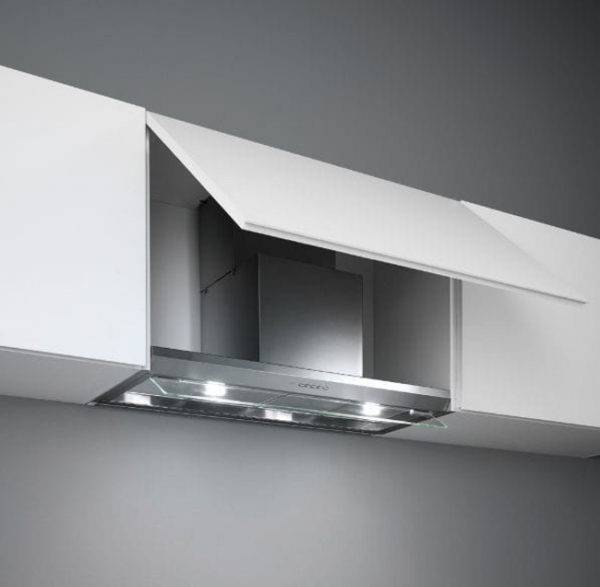
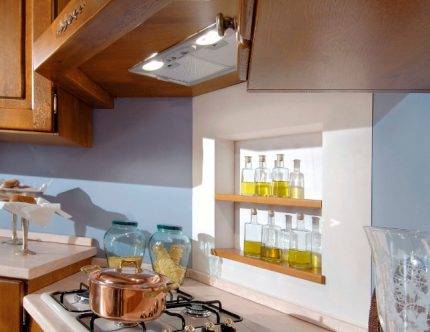
Features of built-in hoods
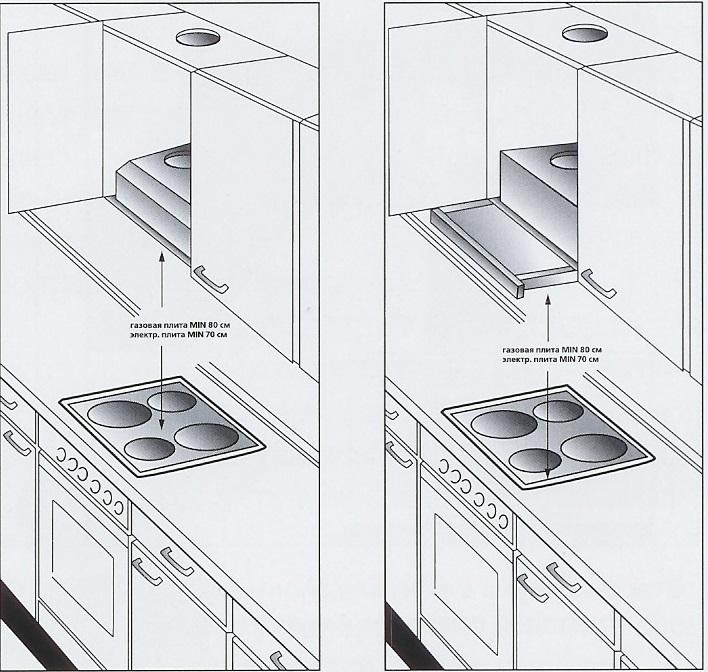
The built-in hood is installed in a wall cabinet specially designated for this purpose. It must first be prepared by removing the lower part for installing the working (receiving) panel and making a hole in the upper part of the cabinet for the air duct. Built-in hoods do not need a decorative casing, and some models do not have it at all, representing an assembly of functional units connected together.
The advantage of this design is hidden installation, the absence of visible wires, structural elements.The presence of the hood is revealed only by the control panel and the receiving panel at the bottom of the cabinet, which allows you to maintain the integrity and harmony of the appearance of the kitchen set. It is not torn into two parts, as it has to be done when mounting dome structures, it does not protrude forward, which is very inconvenient and creates a danger of hitting the head on the protruding parts. In addition, the internal volume of the cabinet with a hood is never fully occupied and can be used to store any accessories.
 Free space in the cabinet for built-in hood
The width of the working base of the hood must match the size of the hob. There are different options for sale:
- With a width of 50 cm. Optimal for small kitchen spaces, but require a matching hob.
- With a width of 60 cm. The most common option, corresponding to the dimensions of most electric stoves.
- With a width of 90 cm. This design is less common and is used in large kitchens to remove exhaust air from large cooking surfaces.
The choice of built-in hood is determined by the following criteria:
- Plate size.
- Technical characteristics of the device.
- Type and design features of the hood.
In standby mode, the built-in hood is in the assembled state, the front panel of the cabinet is closed. In the working position, it opens, the panel moves forward, providing a given area for capturing the air flow.
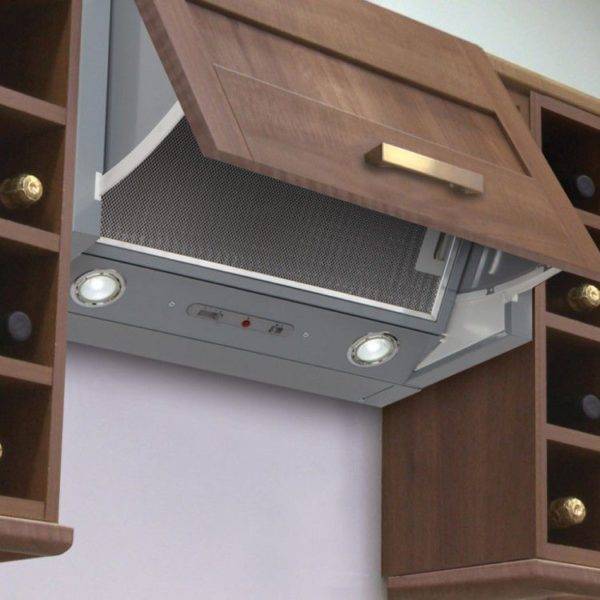 Built-in extractor in working position
There are models that can work not only in the exhaust air removal mode (flow), but also as recirculation units. They purify the air by passing it through filters and returning it back to the kitchen.This allows you to improve the overall mode of air exchange, reduces the need for fresh air in the room.
In addition to the basic functionality, when choosing a hood, you should pay attention to additional features:
- Work volume. This is an important parameter, since the device is located inside a cabinet, which is able to work as a resonator and amplify the hum from the fan.
- The presence of illumination. A convenient and useful addition that allows you to save on the main lighting of the kitchen.
We should not forget about the cost of the hood, which often becomes the main factor determining the choice of the user.
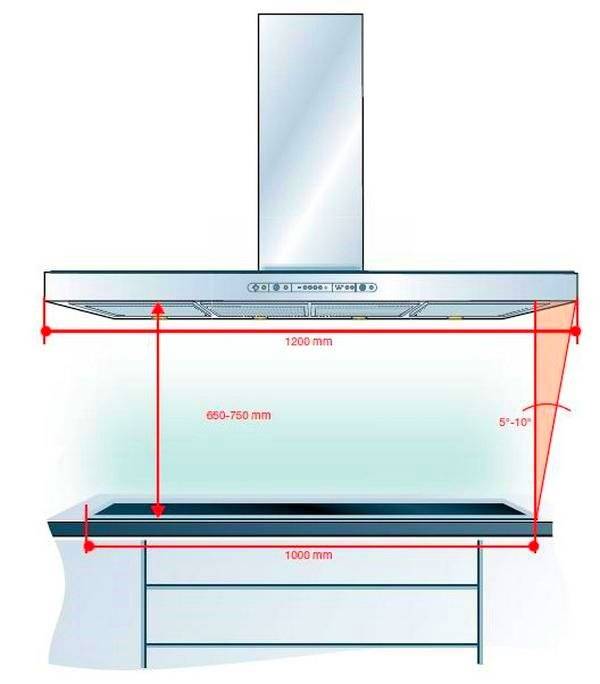
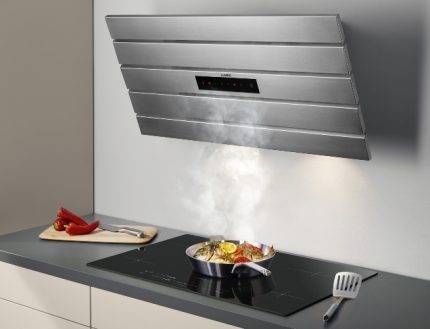
What to look for when choosing an inclined hood for the kitchen
Hood size
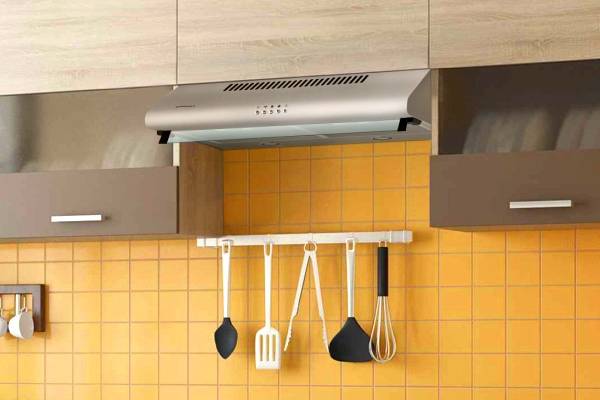
 Great solution for a small kitchen
The width of the equipment ranges from 350 to 1200 mm. In small kitchens, correspondingly small stoves are installed. That is why the hood will need a small one. As a rule, the width of the plate is about 50 cm, then the hood should be purchased with a width of 50 cm. For large rooms in which plates of the same size are installed, more “solid” appliances can be installed.
Performance
Namely, with the amount of air passing through the hood for 1 hour of operation. To determine the performance, the formula is used: the volume of the kitchen * 12 + 15%. Such a calculation will not only increase the efficiency of the equipment, but also reduce the load on it. For example, for a kitchen room of 17 m2, an extractor hood with a capacity of 1500 m3 / h is ideal. For small kitchens, hoods with a capacity of up to 1000 m3 / h can also be used.
Type of installed filter
Modern equipment can be equipped with a disposable carbon filter, which is subject to periodic replacement. Also, in inclined hoods, reusable grease filters can be installed, the maintenance of which consists in periodic washing with detergent
Appearance and colors
You can choose the hood not only in appearance, but also for additional functions: the presence of a timer, automatic shutdown.
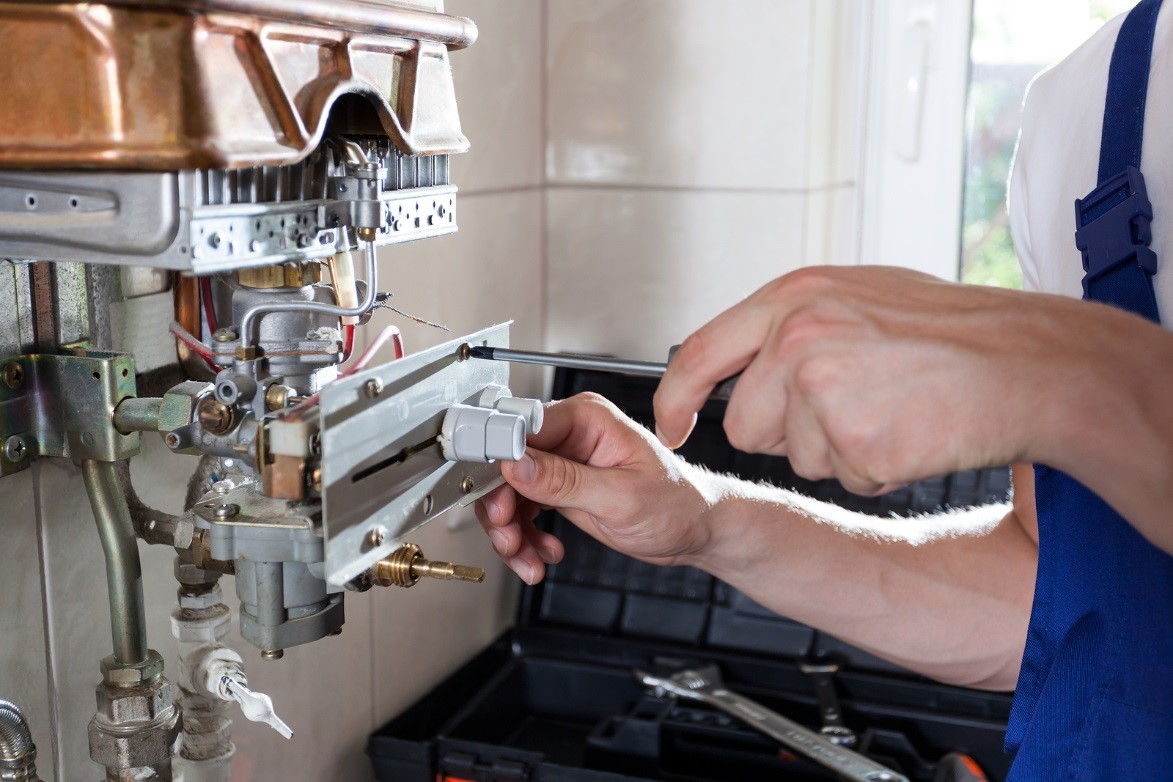
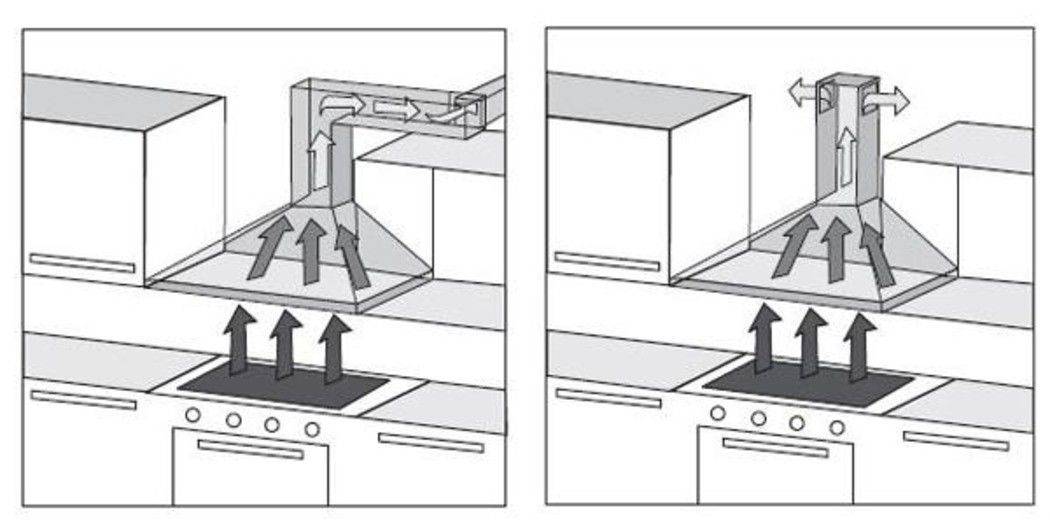
Scheme of a kitchen hood
In order to better understand what you are going to do, you first need to know the circuit of the device and the principle of its operation, otherwise nothing can be done normally. This is also necessary so that you can disassemble and then reassemble the hood yourself in the event of a breakdown or cleaning, which is desirable to do at least every six months to avoid possible fire.


An important role in the hood is played by its engine or engines, as in some more powerful models they are installed in two. This is a kind of "heart" of the whole device, the power of the operating device depends on it. Most often, such engines have a power of 50 to 200 watts, their speed is from 1500 to 2000 per minute. The performance of the device depends on this, but do not forget that the more power, the more electricity the hood will consume, be sure to consider this
In addition, more powerful hoods will have a high noise level, this should also be paid attention to.
An important role in the energy consumption of the hood and its structure is played by the lamps installed in it and aimed at illuminating the stove or hob. Most often, LED or halogen lamps are installed. If you want to save on energy consumption in the future, then you should give preference to LED lamps, since halogen lamps consume virtually the same amount of energy as conventional incandescent lamps.
To connect the device to the network, a regular cord is used, most often its length is one and a half to two meters, if this is not enough for you, then you will have to use an extension cord. If you want to hide the cord and extension cord, then think it over in advance.
An important role in the structure of the hood is played by an anti-grease filter, which is literally “at the inlet” of the device and is visible above the hob. This filter is needed in order to trap unpleasant odors, as well as protect the engine and other parts from dirt and large impurities. This is a kind of metal mesh or dense perforated foil with several layers, ideally it should have an anti-corrosion coating.
Some inexpensive models have so-called disposable filters, they are made of synthetic fabric, they will have to be changed very soon. They are inexpensive, but it is not very convenient, so it is better to give preference to the first option. It is necessary to clean the filters periodically, as they are covered with soot and grease, this can cause unpleasant odors and spoil the operation of the device.
Some more expensive models have charcoal filters, which are usually installed behind the hood motor.Such filters help to further purify the air, they contain microgranules of coal, which work on the same principle as filters for water purification. The disadvantage of such filters is that they need to be changed frequently, which is easy to do, but requires some skill. Dirty or old filters interfere with the normal operation of the hood in the kitchen.
Hoods also have several types of controls that differ from each other, you need to choose the type that seems convenient for you, by and large they do not have any functional differences. Here are the main types of controls:
- Button control. It is the presence of conventional recessed buttons that are familiar to every person. Usually the buttons are located on the front panel of the hood, they are easily accessible. Such control is most often found in the cheapest models of the device, but at the same time it is also the most reliable.
Slider control. Also an inexpensive type of control, which is found in many economical models. It works on the principle of a movable lever, it moves through the divisions, changing the power of the device and sometimes the lighting of the hob
Touch control. This control is the most popular, it is in most modern devices. Firstly, it looks very stylish, does not require special care and does not lose its presentation even after long-term operation. The touch panel is most often located on the front panel of the hood, it works at the slightest touch. In more expensive models, you can even set a specific program for the device.For example, with a sharp appearance of a strong odor, the motor starts to work in an enhanced mode, aimed at quickly eliminating an unpleasant odor, when a person approaches, an indicator light is activated that illuminates the surface.
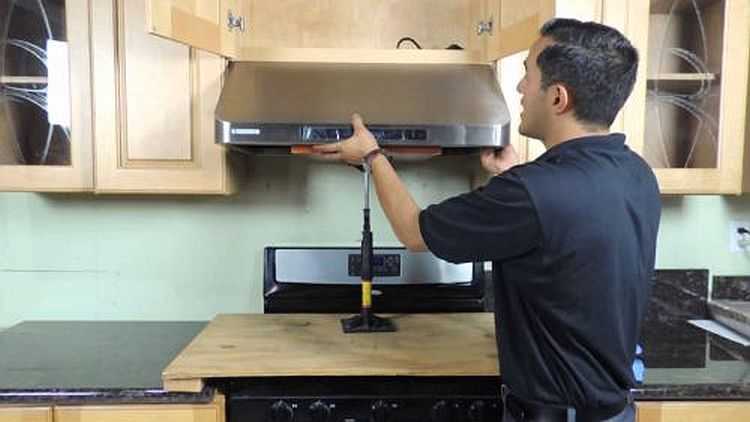
Video - installation of a kitchen hood
Some of the more “smart” models also work without human intervention, they turn on and off automatically when an odor is detected or the stove is turned on / off.
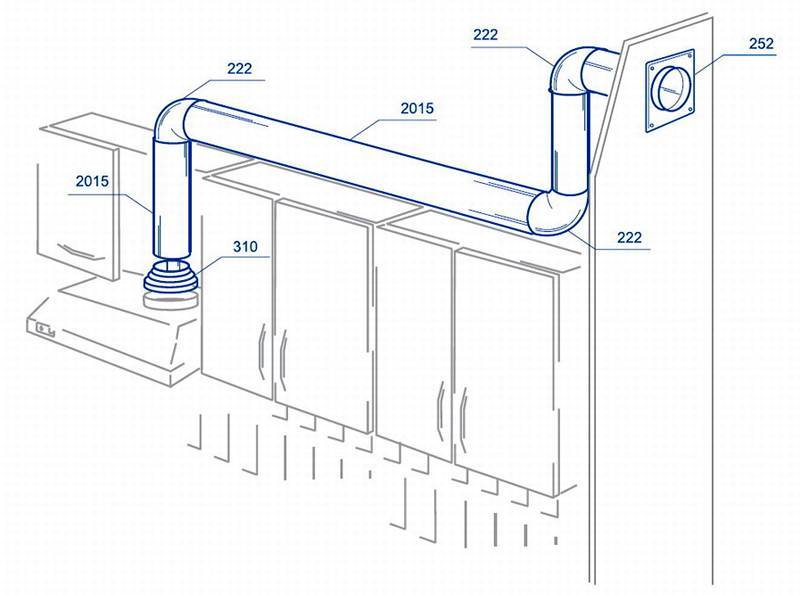
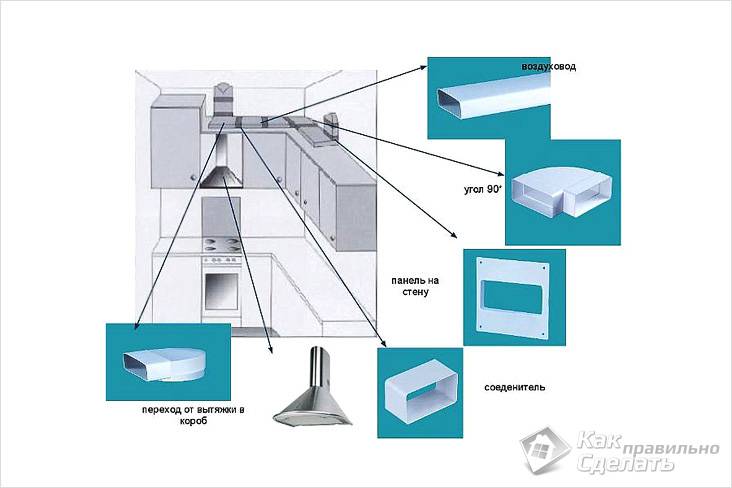
Installation of the ventilation duct
The operation of the hood is carried out by connecting to the ventilation duct. All pollution from the kitchen is discharged into the mine at home or thrown out into the street. As an air duct, you can use a plastic pipe or corrugation. The latter method is not popular because it makes a lot of noise during operation.
Air ducts are round and rectangular. For each, they use their own type of fastening, a shaped adapter, a hidden method into the wall. During installation, all requirements indicated in the equipment passport must be taken into account. For the ventilation duct, air ducts of the same diameter are used, turns and narrowing should be minimized.


Duct size
The effective operation of the hood depends on the size of the duct. When buying a product, you need to calculate its diameter. A pipe made of any material must fit exactly both to the opening of the ventilation shaft and to the hood. An incorrectly calculated value will significantly reduce the efficiency of the equipment, increase the load on the joints, and increase the noise.
You can correctly calculate the size of the corrugation of the pipe by measuring the diameter of the pipe on the hood and the opening of the ventilation duct itself. If the air duct is smaller, it must be expanded and ensured complete tightness by attaching an adapter of a suitable diameter.
According to the standard dimensional grid for round air ducts, products with a diameter of 8 - 30 cm can be found on sale. Rectangular products for T-shaped, built-in hoods must be supplemented with adapters. The most popular sizes are 5 x 10 cm, 8 x 15 cm.
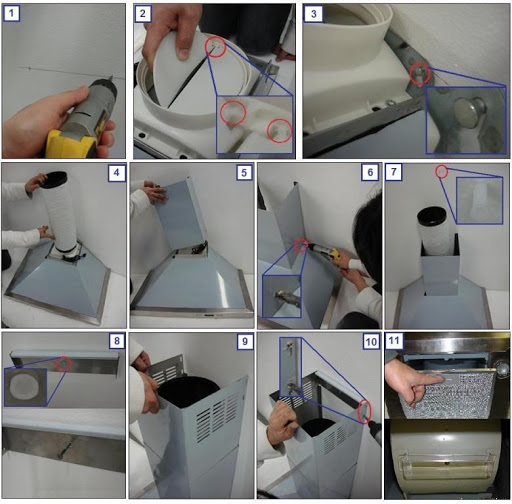
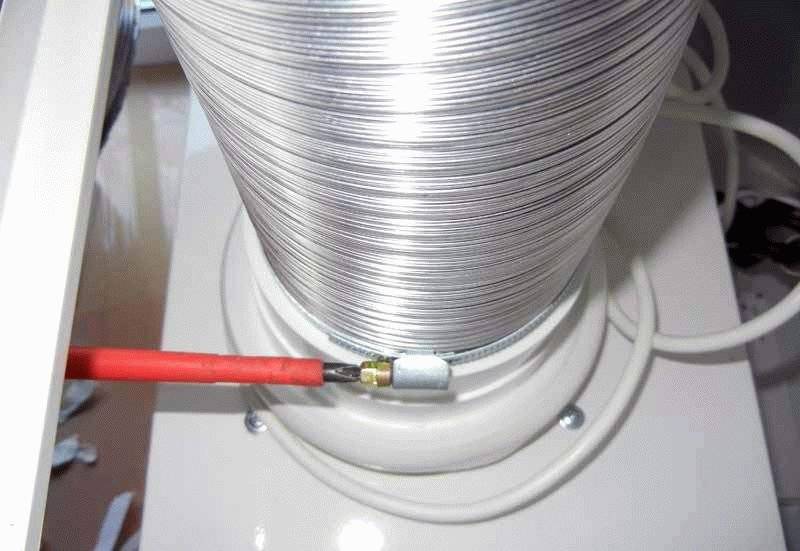
Fastening the corrugation to the hood and ventilation
Before starting work, it is necessary to clean the ventilation in the house or apartment. Then you should check the integrity of the duct. We inspect the plastic pipe for the presence of chips, various defects. The corrugation must be stretched to its full length, inspect the constituent elements. Then it is necessary to process the neck of the hood with a sealant and put a pipe on it. You can fasten it with a special clamp or ordinary wire.
While the structure dries, you can start preparing the vent. We fasten a special lattice with a ledge with self-tapping screws to the wall, put on a corrugation or a plastic pipe with a seal and fix it with a clamp. When installing, be sure to leave the lattice opening open for natural air circulation. You can check the operation of the hood by bringing a piece of paper to the surface of the turned on device at full power. Leaf retention is a sign of quality installation and proper suction.
Fixing the duct to the wall
Light, short plastic pipes can simply be glued to the wall, wooden furniture surface with ordinary silicone.This method of fixing is not suitable for walls tiled or pasted over with wallpaper. Also, difficulties will arise with a long air duct, more than 100 cm. In this case, tight clamps with dowels are used for fastening.
Metal pipes for the hood are attached to the wall with bracket-loops. The solution is unique for all sizes and does not depend on the remoteness of the installation site. Thanks to this mounting method, hum and vibration can be reduced. Also, the use of bracket-loops allows you to additionally compress the joints of some sections.

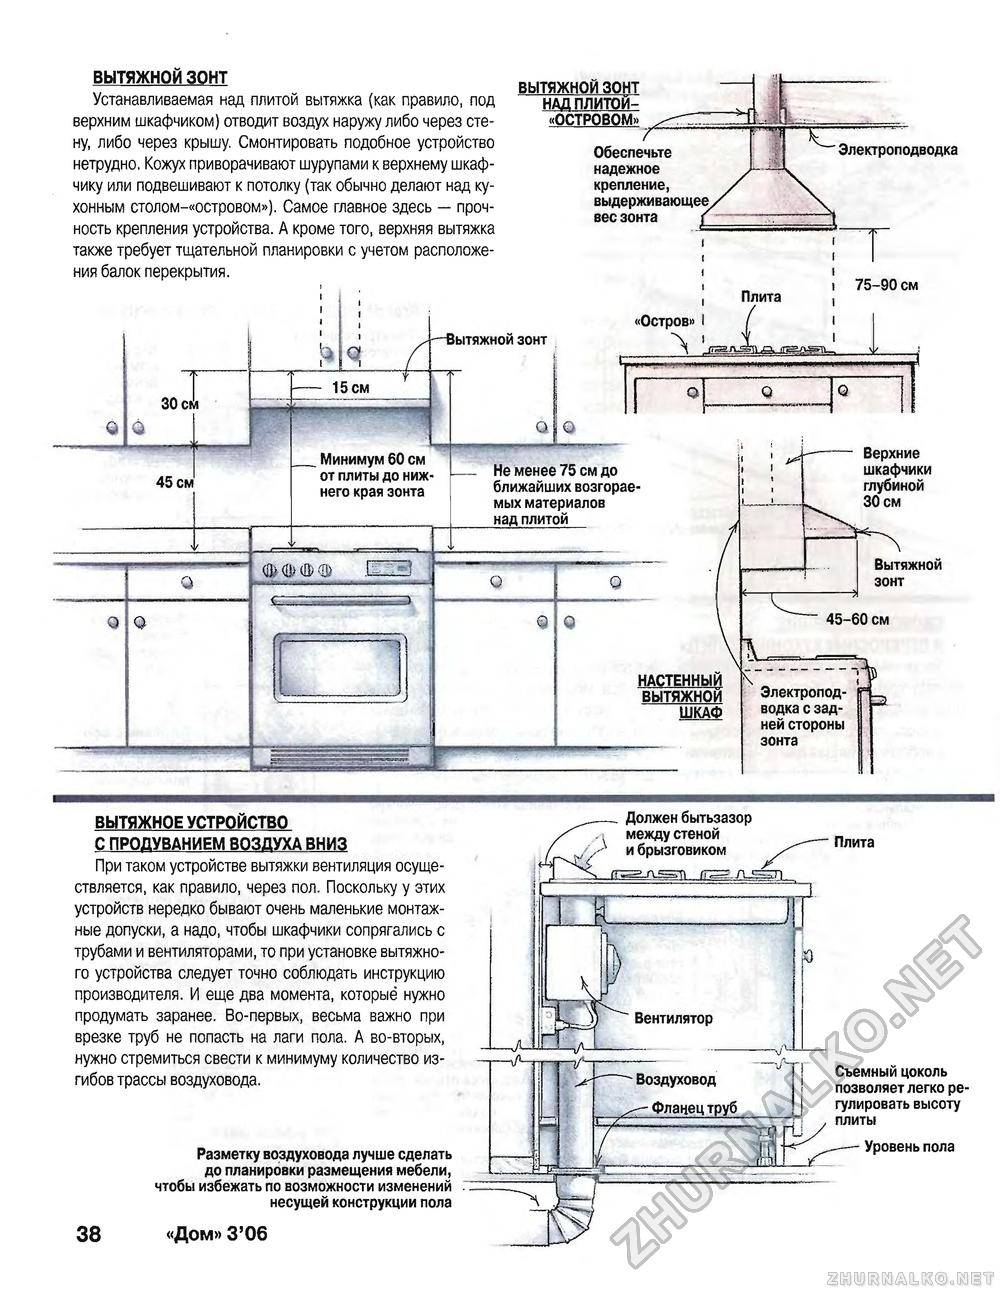
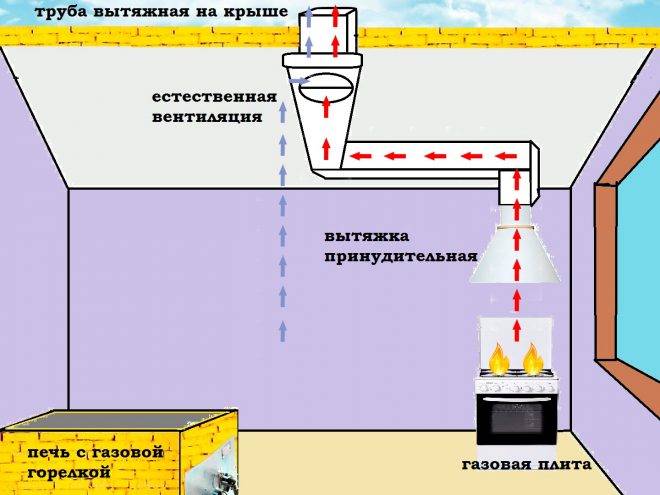
How and where to bring the air duct
If there are problems during the installation of the hood, it is impossible to crash into the natural circulation channel, then the only option is to take the duct outside the room through the wall. This solution will also be the best for a private house. If possible, the hood should be placed on the opposite side of the window.
To bring the pipe to the street, it will be necessary to lay a channel of minimum length. It is better to use a corrugation of round section, to do with just one turn. It is possible to exclude leakage, freezing of the channel if a check valve is installed. It must also be insulated with a moisture-resistant insulator. A protective umbrella is installed on the pipe from the outside of the wall, which prevents it from getting wet.
The air duct must be placed in a special box before being sent to the wall. It should be a strong plastic, drywall construction that can support its own weight and the weight of the hood pipe. All parts of the box are hermetically adjacent to each other. Before finally masking the duct, it should be checked for leaks.

How to install a kitchen hood with your own hands
Mounting the hood over the stove is actually not difficult if you have minimal skills in plumbing and repair work. You need to start with the electrical part.


Electrical connection
A regular socket is suitable for connection. But if there are no power points near the installation site, then you need to do the following.
It is necessary to bring an electric cable to the markup for the hood, simultaneously hiding it in the wall. You need to do this in the following sequence:
- First, find the nearest junction box. From it to the planned installation site of the hood, make a channel by chasing with a perforator and a special spatula.
- Lay the new cable into the cavity.
- Switch off the power supply.
- Carefully prying off with a screwdriver, remove the round cover of the junction box. Inside this cavity is a wiring. Determine the "phase" with a tester screwdriver, next to it will be "zero". It is to these conclusions that you connect a new cable, for example, using a terminal block.
- Install an overhead outlet for the hood and insert the bare ends of the cable into its contacts, fix them.
- Assemble the socket. Now you can turn on the power supply.
Grounding for ventilation is usually not used.
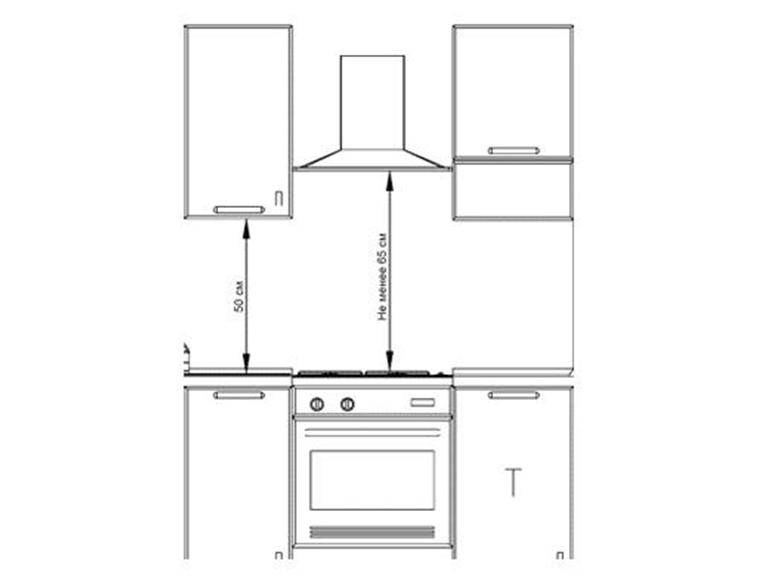
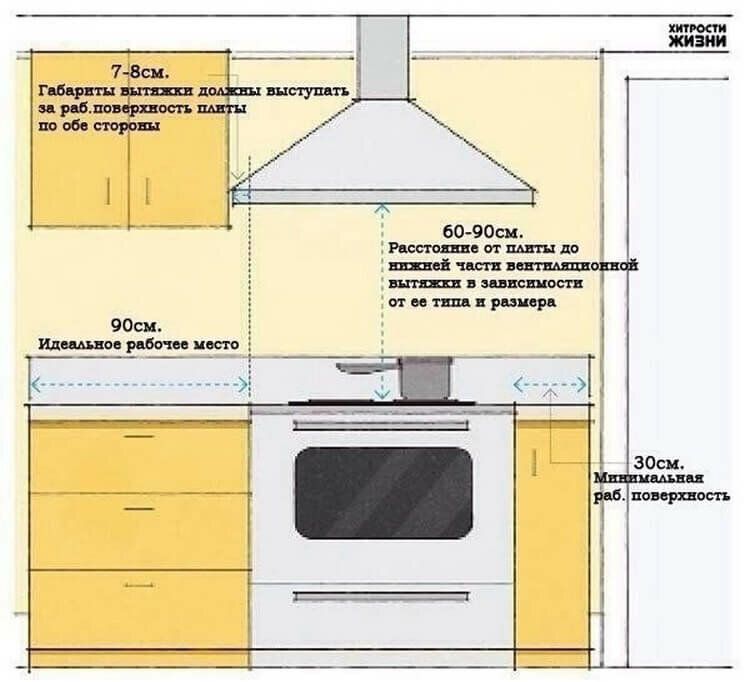
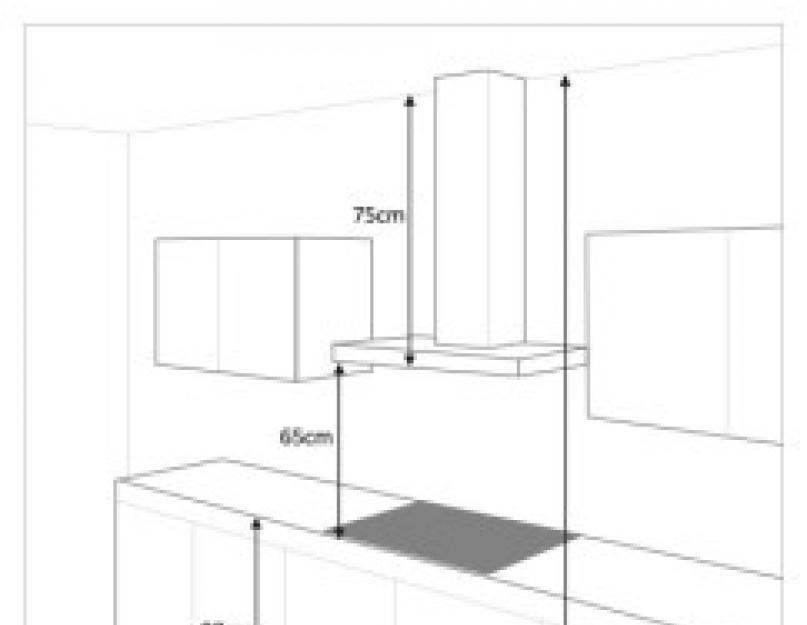
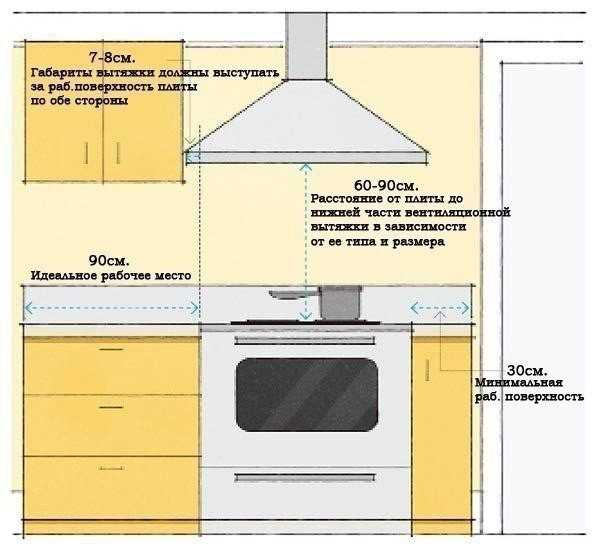
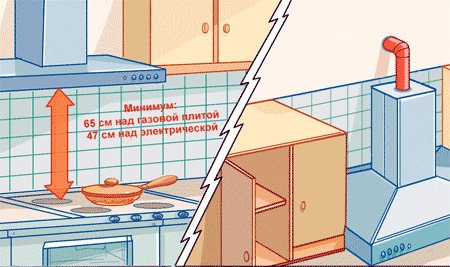
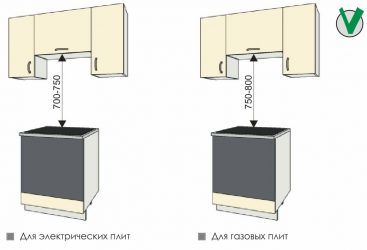
How and at what height to install the hood housing
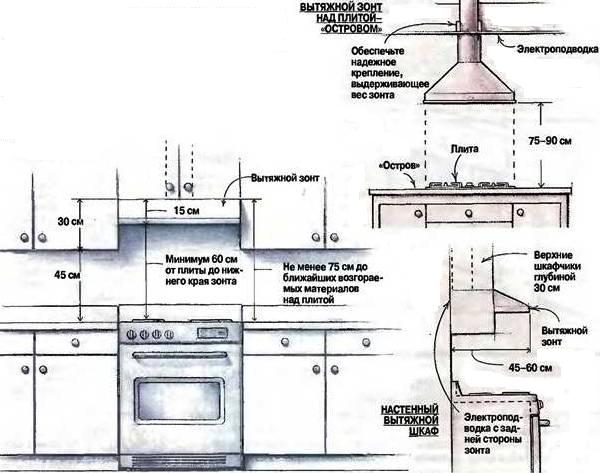
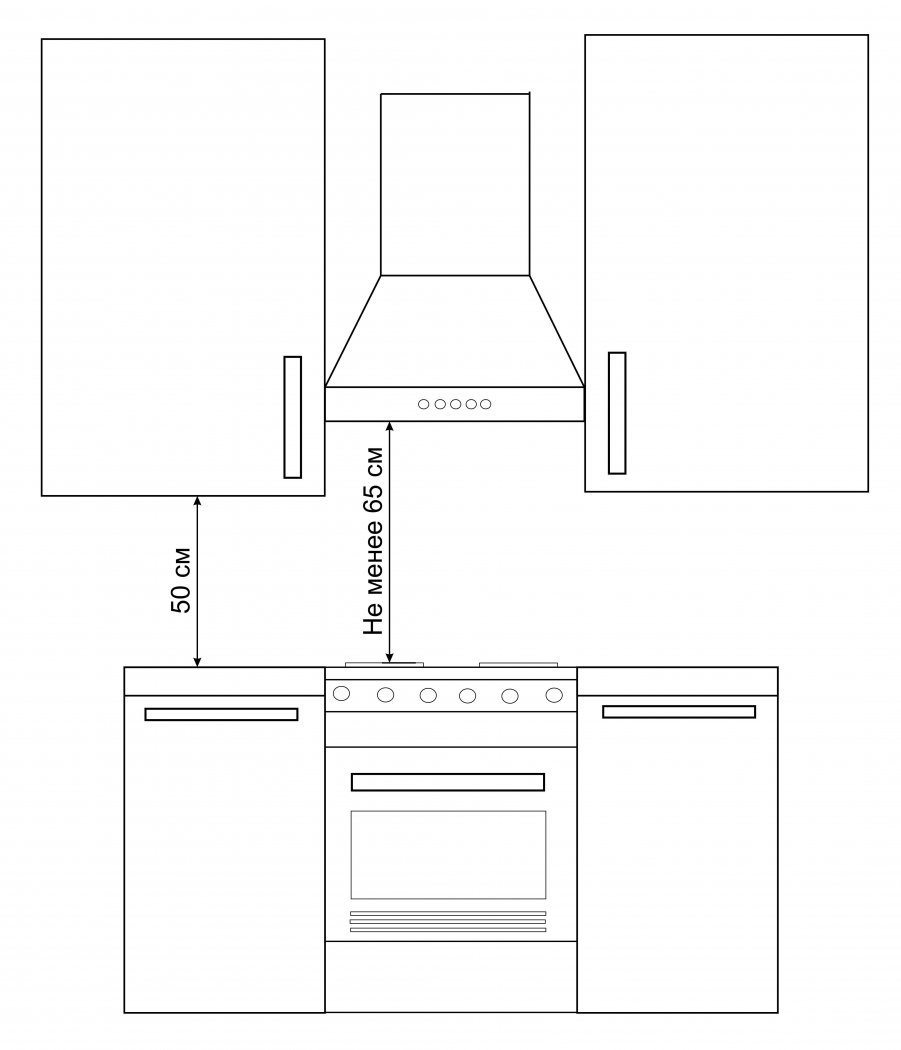
Usually, a forced ventilation device is placed above the stove directly on the wall. Most often, two points of support are sufficient. As a rule, the installation and operation manual is attached to the purchased hood.
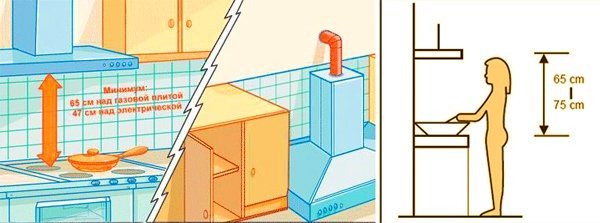
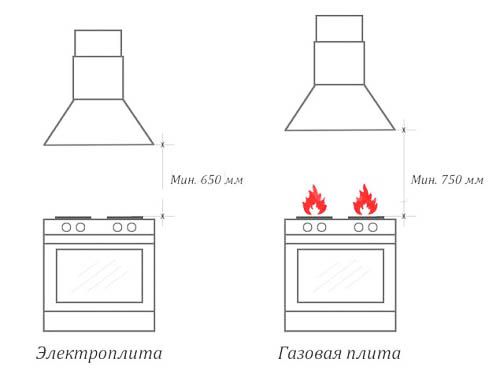
The optimal height above the gas stove is about 80 cm (over the electric stove, 70 cm is enough).It is necessary to retreat this value from the plate and draw a horizontal line with a pencil. This will be the bottom surface of the hood. Starting from it, you can mark the holes for hanging.
It is enough to measure the distance from the bottom wall of the device to the marks for fastening to a vertical plane with a tape measure. The same values should be noted already on the wall.
Next, drill holes, hammer in plastic dowels, screw in screws and hang the device case on them.
The process of fixing such a product is simple. The case is screwed with self-tapping screws to the upper wall of the wall cabinet in four places. When the door closes, he will remain invisible.
But such devices have a flat panel with filters at the bottom. She just needs to be visible. Most often, it has a retractable part and a backlight.
The marking for fixing the body is made according to the template, which must be included in the set of documents for this hood. Check it out when buying.
Comparative review of models
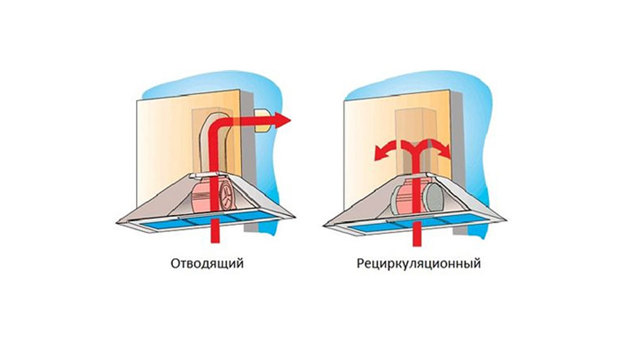
By and large, all modifications of hoods can be divided into three broad categories:
- flowing;
- recirculation;
- combined.
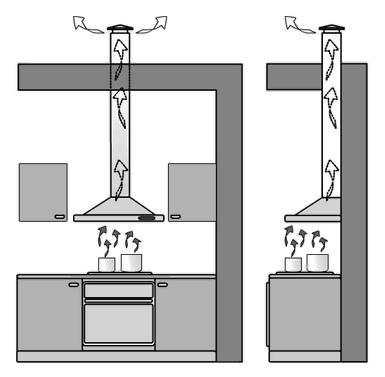
The first type is designed to transport combustion products to the ventilation duct of the building through an air duct. Therefore, in addition to fixing the hood body above the gas stove, it will be necessary to install channels for air to exit into the vent.
So that plastic or corrugated channels do not spoil the interior design, they are hidden behind suspended structures, false walls or placed in the upper kitchen cabinets - mezzanines.
Recirculating models are not equipped with air ducts, so they take up less space and are installed much faster. They clean the air masses by passing them through grease and carbon filters. In fact, they drive the air in a circle, freeing it from vapors, grease and harmful particles, but not refreshing.
Recirculating models have some advantages: they are compact and easy to install. Using the manufacturer's instructions, even a beginner with no experience in such work can install and connect such a hood
However, a huge segment of the market was occupied by universal models that can operate in both modes: flow and recirculation. Cleaning through filters can be carried out temporarily while the outlet lines are being repaired.


And if it is not possible to install air outlet channels, then filtration is the only possible way to improve the microclimate in the kitchen.
According to the installation method, the exhaust kitchen equipment is divided into autonomous and built-in. The first is mounted separately, on a wall or ceiling, and the second is built into kitchen cabinets or other suspended structures.
If you have chosen a built-in model, then when ordering a kitchen set, the performers must provide the dimensions of the technical device for precise fitting of the furniture element
By design and, accordingly, the appearance of the hood is divided into several types, while different manufacturers may have different names. The most popular are the so-called built-in sliders, one part of which is movable, domed and inclined models.
Due to the popularity of the "island" kitchen interior, ceiling models for work areas installed in the center of the kitchen have also become popular.
Installation of the hood is made depending on the design and functions of the model. To understand the installation features, you can ask the consultant for installation instructions before buying.
Perhaps there are some nuances that prevent the installation of this particular product in your kitchen. Suppose the ceiling structure cannot support the weight of the equipment, or the cabinets do not have duct openings.