- Preparing the switch for installation
- Varieties of switches for home use
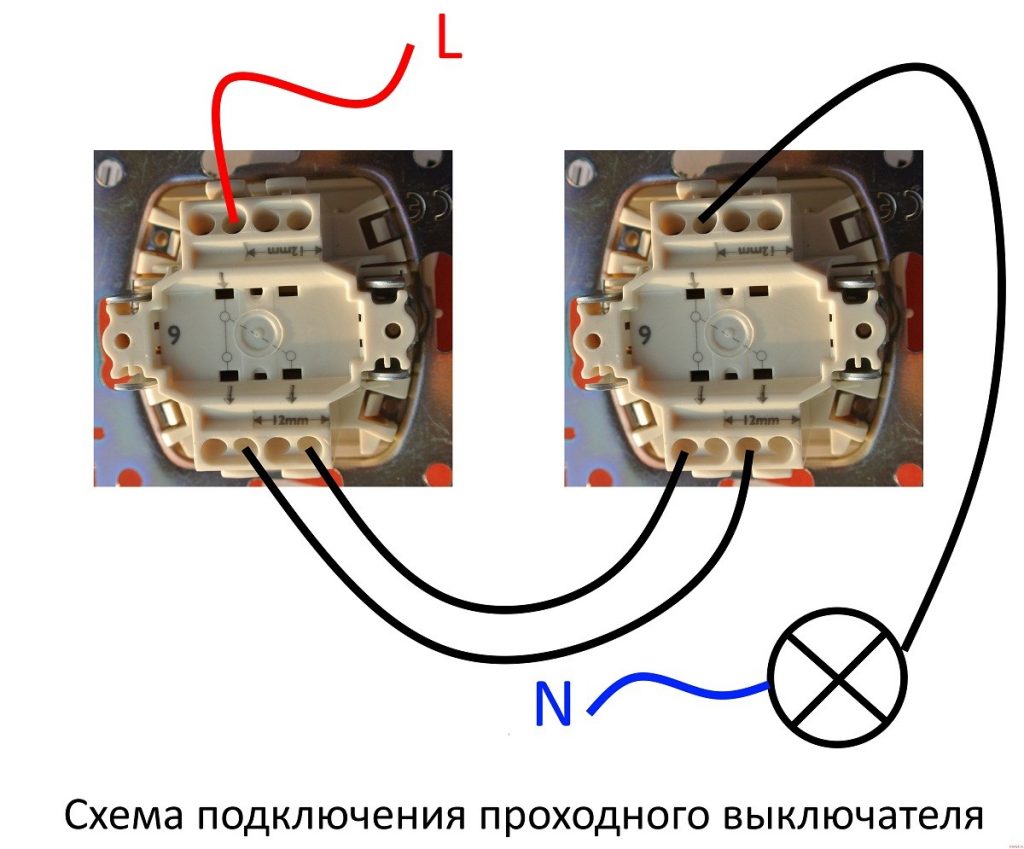
- The device and principle of operation of the pass-through switch
- A device that controls two groups of luminaires
- The switch turns off zero, not phase
- Connection
- Varieties
- How to get started?
- Two-gang pass-through switches
- Why Electrical Knowledge is Necessary
- Varieties of switches for home use
- Drawing up a wiring diagram
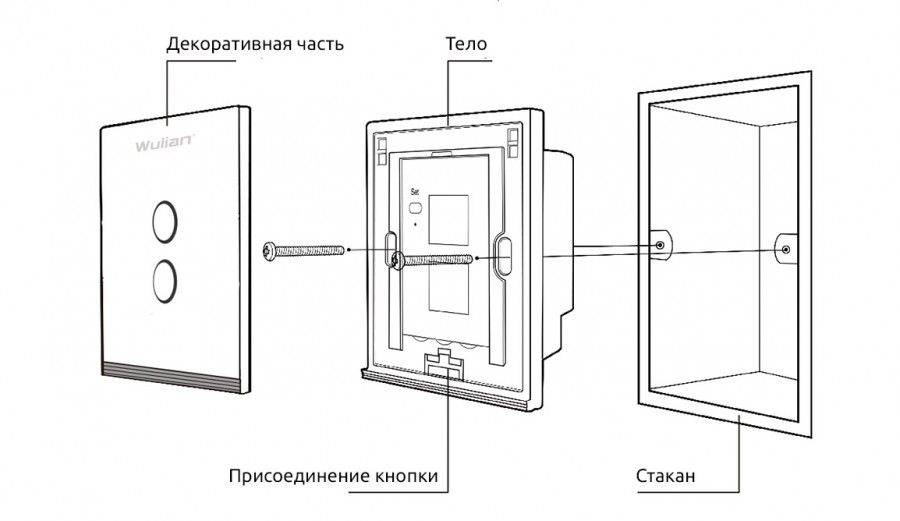
Preparing the switch for installation
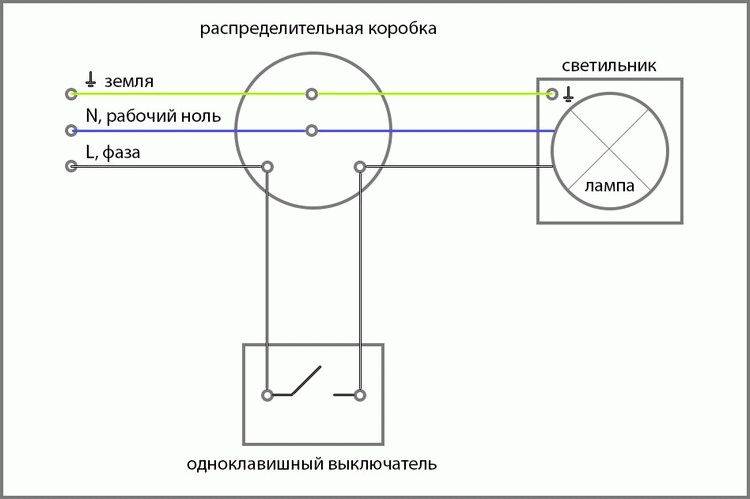
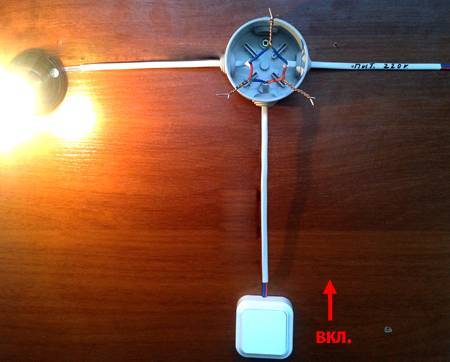
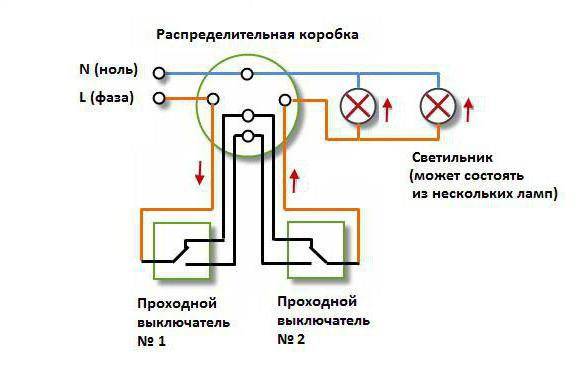
We all know that two wires, phase and zero, come to the light bulb. The switch is installed in the phase circuit. The principle of its operation is to close and open the switch mechanism of the phase wire going to the light bulb. The neutral wire comes to the light bulb directly from the junction box, without breaks (for more details, see the single-gang switch diagram).
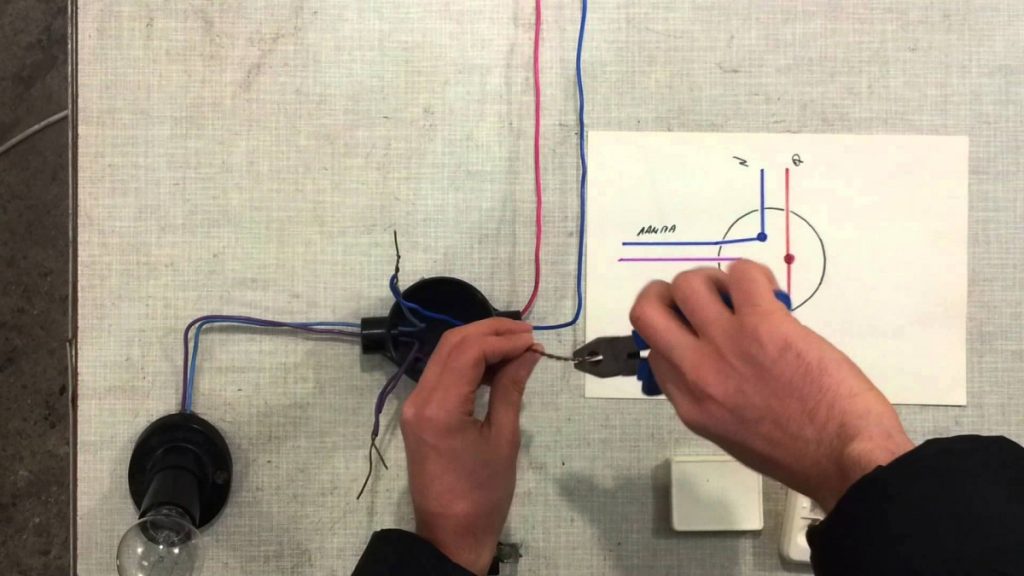
First of all, before carrying out all the work, it is necessary, using the voltage indicator (pointer), to determine the wire with the incoming phase. To do this, alternately bring it first to one wire, then to another. We mark the desired one with an insulating tape.
Now, we turn off the electricity, check its absence on the wires, using a voltage indicator, and only after that we get to work.
There are many different types of switches. They differ: by manufacturers, by price category, workmanship, various methods of connecting wires to terminals, and so on.
Let's consider two main installation options. In the first case, we will install a switch of a cheap price category up to 80 rubles.
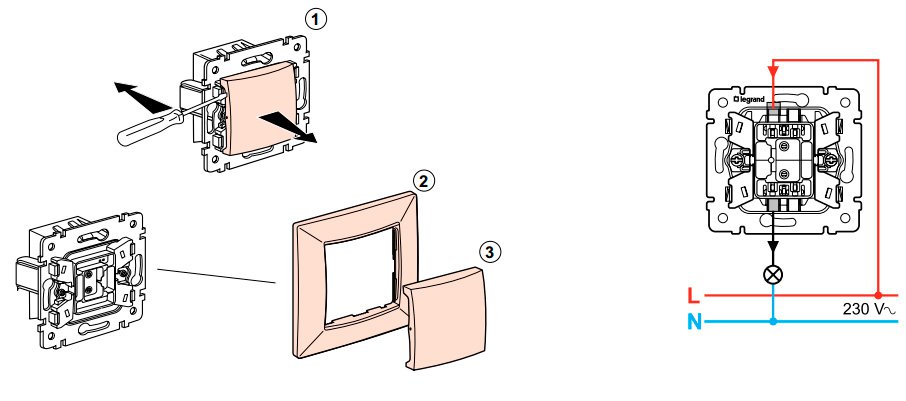
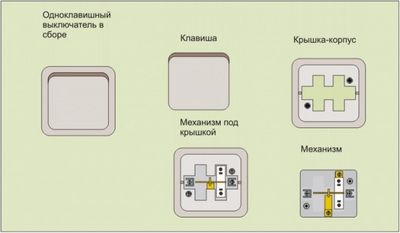
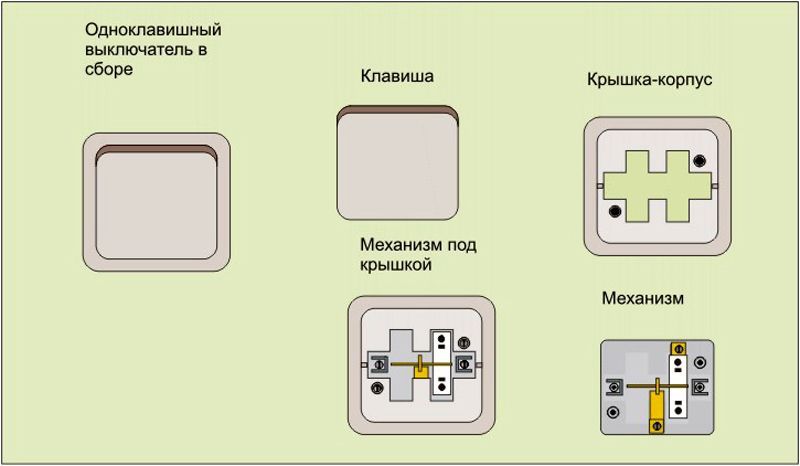
We prepare the switch for installation, and for one thing we will find out how the switch works.
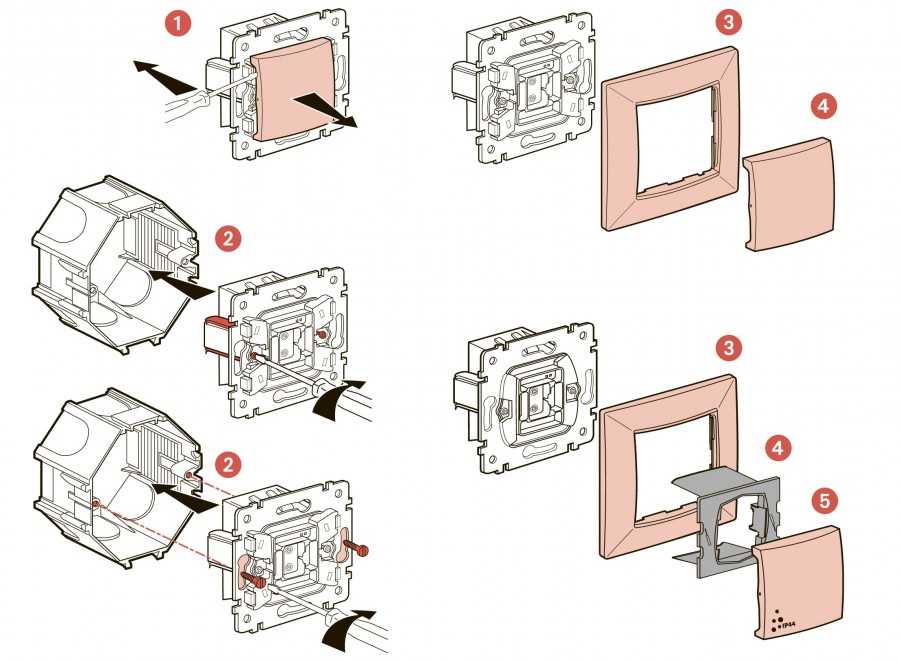
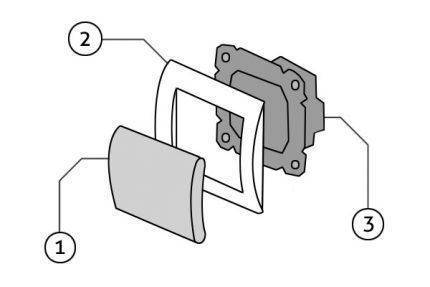
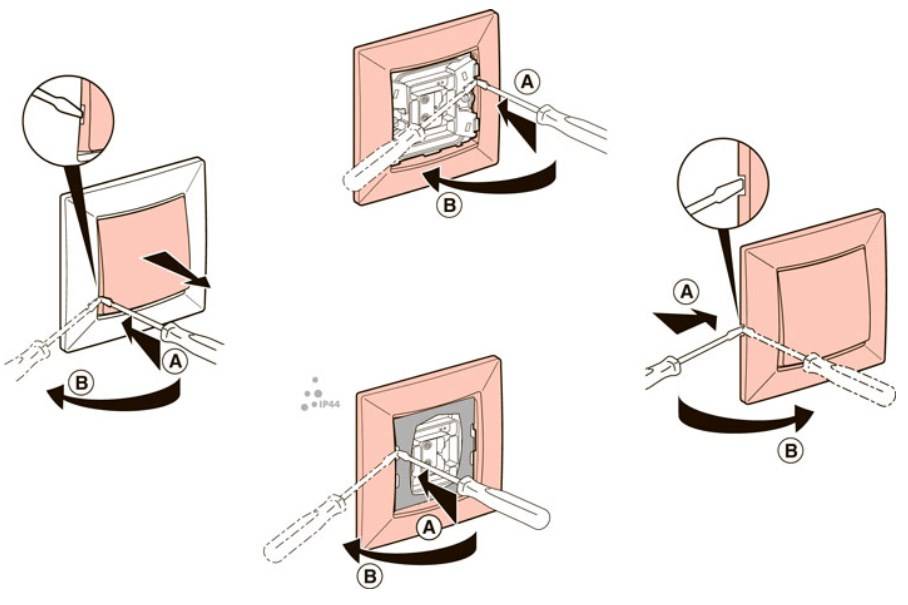
Using a flat screwdriver, remove the switch key, put it on the left or right side and disconnect it from the case.
We unscrew the two screws located diagonally on the protective frame, disconnect it from the mechanism.
There are four screws on the mechanism, two of them are contact screws, they are designed for attaching wires to the mechanism. The other two set in motion the spacer mechanism, which is designed to securely fix the mechanism in the socket.
contact screws.
Screws for the left and right spacers.
We unscrew the contact screws, on the upper end side it will be seen how the pressure plates move.
One of the contacts is incoming, the phase comes to it, the other is outgoing, the phase goes to the lamp from it. Each contact has two holes for connecting wires. We figured out how the switch works, proceed to the next step.
Varieties of switches for home use
Each manufacturer produces different models of switches, which differ both in shape and in internal structure. However, several main types should be distinguished.
Table 1. Types of switches according to the switching principle
| View | Description |
|---|---|
| Mechanical | Devices that are easy to install.Instead of the usual button, some models have a lever or cord. |
| Touch | The device works at a touch of a hand, and it is not required to press a key. |
| With remote control | This design is equipped with a special remote control that comes with the kit or a sensor that reacts to movements around. |
The most popular is the first option, which is installed everywhere. Moreover, such switches have become in demand from the very beginning of the appearance of the electrical circuit. The second option is less popular, especially in our country. The third option is a modern model, which is gradually replacing outdated switches from the market.
Installing a motion sensor in the structure is advisable both in terms of energy savings and home security. For example, if you install a structure at the entrance, then the residents will notice if intruders get into the apartment.
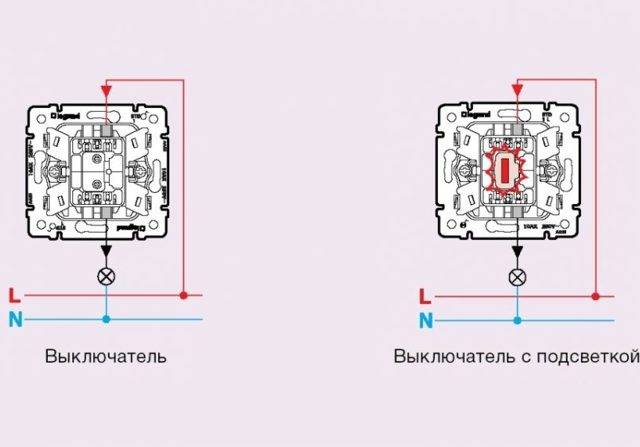
Switch with additional illumination
According to the design features, there are devices with one or more keys (on average, switches with two or three buttons are used for standard electrical appliances). Each button is responsible for turning on and off a separate circuit.
So, if several lamps are installed in one room at once: the main chandelier, spotlights, sconces, then it would be advisable to install a structure with three buttons.
In addition, no less popular are devices with two buttons, which are installed in all apartments without exception. Most often they are needed for a chandelier in the presence of many light bulbs.


According to the installation method, there are internal and external switches. The first option is installed in the apartment, because such structures look aesthetically pleasing.For safety during installation, a special box is installed, which is called a socket box.
Wiring diagram
Recessed switches are used when there is electrical wiring hidden in the wall. Overhead devices are mounted in the presence of external conductors. In this case, the connection scheme has no fundamental differences.
Where is the switch installed?
The device and principle of operation of the pass-through switch
It works as follows: when the light switch is turned on, the position is up, an electric current begins to flow to the lamp. However, if you are not sure of the correctness of the actions, it is better to play it safe and make the first connection under the supervision of an experienced electrician.
The connection diagram is not much more complicated than the connection diagram of a classic switch. To implement such a scheme, two-core cables are used, in everyday life, with a cross section of 1.5 mm2 over copper.
The circuit functions quite simply.
If there is no socket box and the switch is mounted outside, the base is screwed to the wall surface with two screws. This is somewhat more complicated than the previous case, but you can understand the principle of operation.
To do this, the clamp screws are loosened, the wires are inserted into the sockets, and the screws are clamped again. Wiring between two switches.
However, in practice, it is not possible to implement such a schematic diagram of installing a single-gang switch everywhere.
Therefore, sockets are connected with cables, the cross section of which starts from 2.5 mm2.
These switches harmoniously fit into the interior and do not attract attention.The two most common types of modern switches are a single-key wall model and a control panel, which is usually supplied with a lighting fixture. For example, according to the switching principle, all devices can be divided into: mechanical - elementary keyboard devices; , toggle switch, button, string, rotary knob; electronic touch, actuated by the touch of a hand; with remote control, equipped with a remote control or motion sensor.
How to connect a double switch #Electrician's Secrets / How to connect a double switch
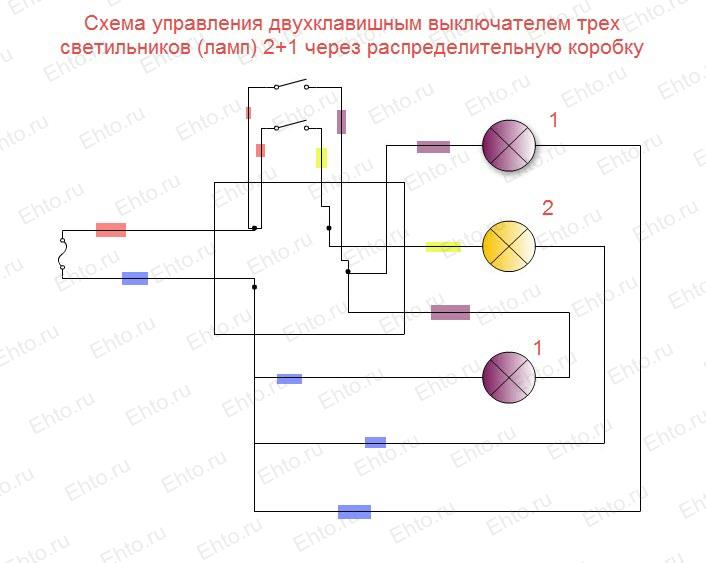
A device that controls two groups of luminaires
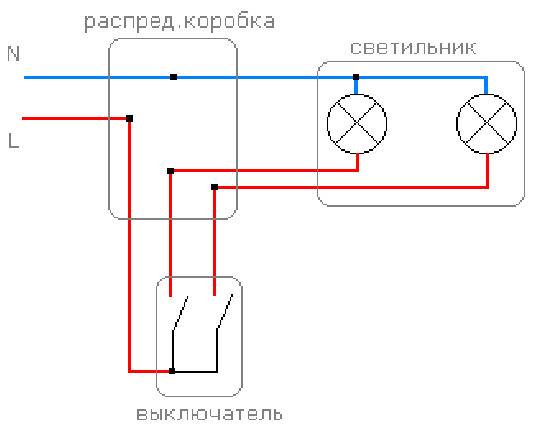
Wiring diagram for two-button walk-through switches
It is advisable to install a two-gang pass-through switch in a large room where it is necessary to control several lighting fixtures. Its design consists of two single switches in a common housing. Mounting one device to control two groups allows you to save on laying the cable to each of the single-gang switches.
Mounting a double pass switch
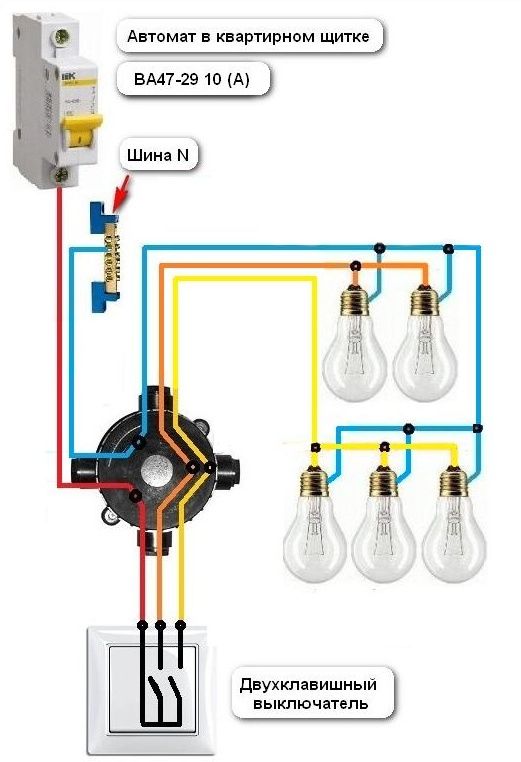
Such a device is used to turn on the light in the bathroom and toilet or in the corridor and on the landing, it is able to turn on the light bulbs in the chandelier in several groups. To install a pass-through switch designed for two light bulbs, you will need more wires. Six wires are connected to each, since, unlike a simple two-gang switch, the pass-through switch does not have a common terminal.In essence, these are two independent switches in one housing. The switching circuit of a switch with two keys is performed in the following sequence:
- Socket outlets for devices are installed in the wall. The hole for them is cut with a puncher with a crown. Two wires with three cores are connected to them through the strobes in the wall (or one six-core wire from the switch box).
- A three-core cable is connected to each lighting fixture: neutral wire, ground and phase.
- In the junction box, the phase wire is connected to the two contacts of the first switch. Two devices are interconnected by four jumpers. Contacts from lamps are connected to the second switch. The second wire of the lighting fixtures is switched with zero coming from the switchboard. When switching contacts, the common circuits of the switches close and open in pairs, ensuring that the corresponding lamp is turned on and off.
Connecting a cross switch
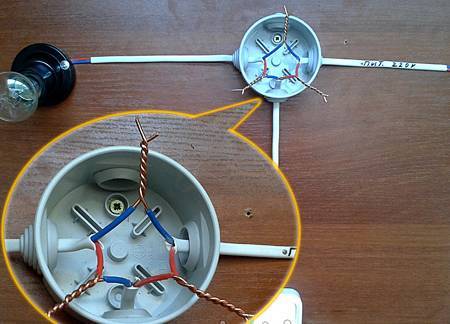
Two-gang switches are also used, if necessary, to control lighting from three or four places. A double cross-type switch is installed between them. Its connection is provided by 8 wires, 4 for each limit switch. For installation of complex connections with many wires, it is recommended to use junction boxes and mark all cables. A standard Ø 60 mm box will not accommodate a large number of wires, you will need to increase the size of the product or supply several paired or purchase a Ø 100 mm junction box.
Wires in junction box
It is important to remember that all work with electrical wiring and installation of devices is carried out with the power turned off.This video tells about the device, the principle of connection and installation of pass-through switches:
This video tells about the device, the principle of connection and installation of pass-through switches:
This video shows an experiment in which various ways of connecting wires were tested:
Wiring diagram
The principle of connecting switches
Wiring diagram for a two-gang switch with connection through a junction box
Everything is written correctly in the article, but I came across the fact that the electrician who installed the switches before did not leave spare wires in the box, and when one aluminum wire broke, I had to tinker with building this wire. I advise you to leave a margin for at least two repairs.


I myself studied to be an electrician and sometimes I work part-time as an electrician. But every year, or even every month, more and more electrical questions are being created. I work on private calls. But your published innovation is new to me. The scheme is interesting and will definitely come in handy in the near future. I always try to take the advice of "experienced" electricians.
The switch turns off zero, not phase
The second common mistake is that the connection through the switch is not
phase conductor, and zero.
One-key switch, as well as other types of switches
light, should always break exactly the phase. This is done for you
security, so that when replacing a light bulb in a cartridge or repairing a chandelier, you will not
got electrocuted.
At the same time, please note that even if you initially
everything was done correctly before climbing to the contacts of the lamp after
turn off the light, always check the absence of voltage indicator
screwdriver.The fact is, after time, the phase with zero can
swap places. Even without your participation
How is this possible, you ask?
Even without your participation. How is this possible, you ask?
The fact is, after time, the phase with zero can
swap places. Even without your participation. How is this possible, you ask?
As a result, in the apartment in all distribution boxes, the phase with zero
will be automatically swapped. And the light switch, which originally
was connected correctly, it will start to break the neutral wire.
Therefore, the rule “turned off - check the absence of voltage”
is your security guarantee.
When installing the circuit breaker in a junction box, pay attention to
pay attention to the position of the key when turning on and off the light. According to the recommendations, the switch should be positioned so that when the key is pressed down, the light turns off, and up, on the contrary, it turns on. According to the recommendations, the switch should be positioned so that when the key is pressed down, the light turns off, and up, on the contrary, it turns on
According to the recommendations, the switch should be positioned so that when the key is pressed down, the light turns off, and up, on the contrary, it turns on.
It is believed that in an emergency it is much easier
reach out with your hand and press the key down, thereby interrupting the electricity. That
the same applies to circuit breakers and modular circuit breakers in the switchboard.
“It's worth it - it works. Lies - does not work!
In fairness, it must be said that there are no clearly defined prohibitions to put the light switch in any particular way and in no other way. Remember that this is just a recommendation.
And everything is determined primarily by the brand and
the manufacturer of the product.
Connection
Having prepared the installation site, you can start connecting.Switch 1 key has two contact clamps, where the stripped wires are fixed with bolts. Each of the cores must be stripped of insulation by 5-8 mm


After that, the bare ends of the wires are inserted into the clamps and fixed with bolts, and it does not matter which of the conductors will be connected to which contact.
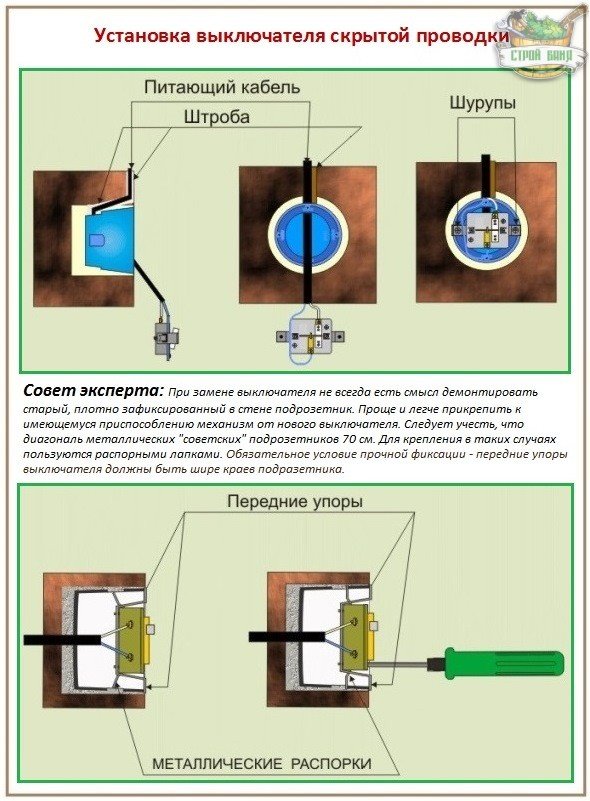
At the end of the connection, you should check the reliability of the fixation, and only after that, the device can be mounted in (on) the wall. Switch 1 key for open wiring is simply screwed to the socket. For embedded models, this process is a little more complicated. After fixing the conductors to the contacts of the working mechanism, it is placed in the mounting box. "Paws", while should rest against its walls. By tightening the screws of the "legs", the latter will begin to move apart, resting more and more. When the working mechanism is securely fixed, you can screw a decorative frame to it and install a key.
It remains only to turn on the electricity and check the results of their work.
Before the circuit for connecting the switch to the light bulb is implemented, it is necessary to think in advance how the electrical equipment will be placed. It is better to mark the markup on the wall so as not to miss some of the little things. Now you have to make the wiring and installation of equipment, and you need to do it so that everything works properly. In this article, we will help you figure out how to connect and carry out safe further operation of the devices.
Usually the switch is installed on one phase core, when it is turned off, the network opens, as a result, no voltage is supplied to the light bulb. It is worth noting that connecting the circuit in another way may be unsafe.
To place the wiring in the junction box, you need to stretch the cables to it that feed the entire room, then the wires coming out of the switch and the light bulb. Thus, we connect one wire from the light bulb to the neutral core, which is connected to the general network, the remaining one - to the switch conductor. The second core of the switch is connected to the phase conductor of the common power system. As a result, we get the connection of the working conductors of the lamp and the general wiring through the switch. Using a similar method, when switching the lamp switch, this part of the electrical circuit will be disconnected from the power supply.
Varieties
Consider the types of devices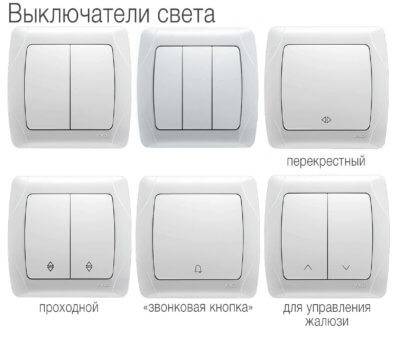
- Simple, one or more keys. They work on the principle of instantaneous switching on of light. A simple, proven option.
- Simple with a button. Exactly the same principle of operation as the keyboard, only with a button instead of a key.
- Switch with built-in relay. This is a small rotary mechanism that allows you to adjust the brightness of the included light.
- Pulse. They are similar in structure to push-button ones with the difference that the light is turned on only when the button is pressed.
- Remote. Devices on the control panel. A control unit is installed in the technological hole under the switch, which closes the contacts. Turning on the light - remote, through the radio remote control.
- Touch. A complex electronic device that closes a circuit when a hand touches a surface.
Switches are distinguished by the type of installation
- hidden - mounted on the wall;
- outdoor - they are installed on the wall for external wiring.
How to get started?
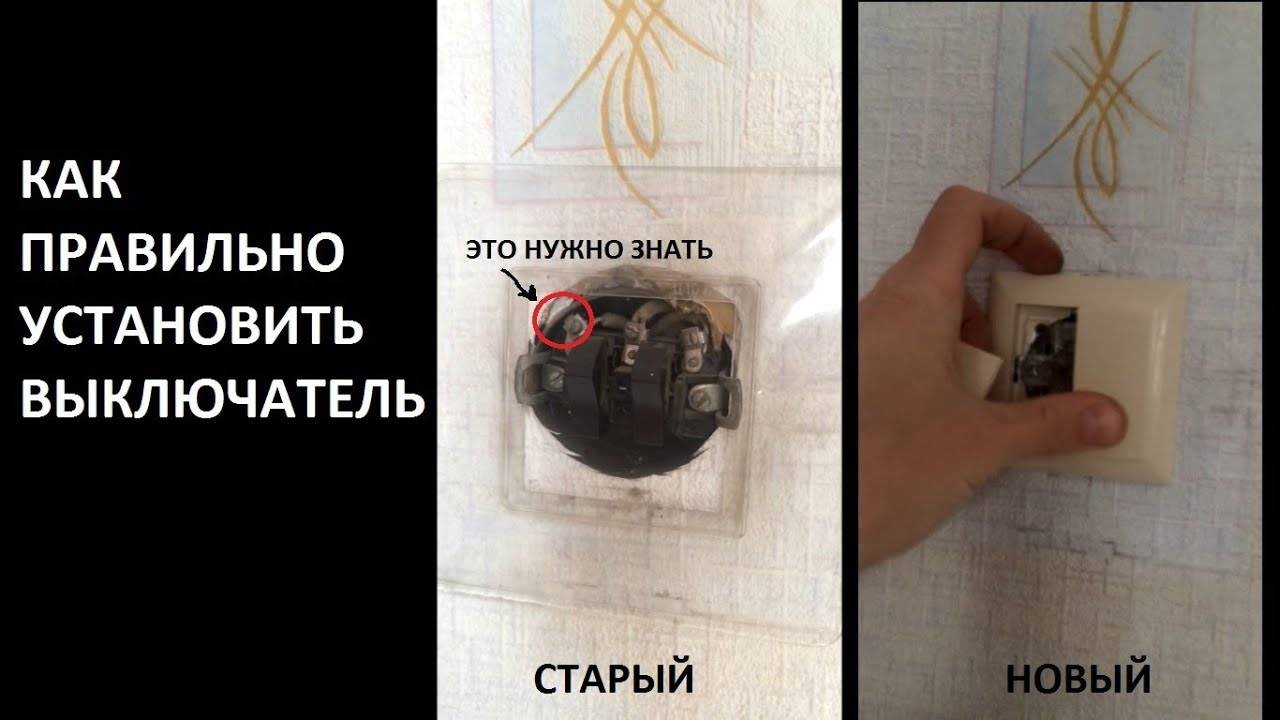
Therefore, before replacing the switch, it is necessary to carefully study the process of connecting wires and observe safety precautions when working with electrical appliances. Also, to replace the switch, you need to stock up on the necessary tools and, in fact, the switch itself.
To select a new switch, it is necessary, first of all, to determine which switch is needed by the type of fastening
It is enough to know whether your wiring is external or internal.
Then you should decide what you want to get from the switch, select the necessary functionality.
It is necessary to choose the principle of closing the circuit in the switch, it will be an expensive and fashionable touch switch or a conventional keyboard switch, with the ability to adjust the intensity of illumination or without such a function, with or without the illumination function of the lamp itself.
The backlight function should be chosen very carefully, because when using LED bulbs with this switch, the bulbs glow dimly in the dark.
It is also necessary to decide on the method of fastening the wires, screw or quick-clamp
If you have aluminum wiring, then there are no options, only screw ones, but if you have copper wiring, you can try modern quick-clamp terminals.
Also, in certain cases, it is necessary to pay attention to the maximum load of the circuit breaker and the material from which its base is made. For maximum load, there are usually switches 10 A and 16A
A 10 A switch can withstand a maximum of 2.5 kW, that is, 25 bulbs of 100 W
The base of the switch is usually made of plastic or ceramic.
Plastic can withstand 16A and ceramic can withstand 32A.
If you are choosing a switch for a small room with standard lighting, then these indicators are not so important, but if you have a room over 100 square meters. meters with powerful lighting, it is worth calculating the load and taking a switch with a ceramic base.
And the last indicator: moisture protection. This indicator is marked with the letters IP and numbers corresponding to the degree of moisture protection. So, for an ordinary room, a switch with IP20 is suitable, for a bathroom with IP44, and for the street it is better to take a switch with IP55
For the manufacture of the base of the switch, plastic or ceramics are usually used. Plastic can withstand 16A and ceramic can withstand 32A.
If you are choosing a switch for a small room with standard lighting, then these indicators are not so important, but if you have a room over 100 square meters. meters with powerful lighting, it is worth calculating the load and taking a switch with a ceramic base.
And the last indicator: moisture protection. This indicator is marked with the letters IP and numbers corresponding to the degree of moisture protection. So, for an ordinary room, a switch with IP20 is suitable, for a bathroom with IP44, and for the street it is better to take a switch with IP55.
To replace the switch, you will need the following tools:
- Voltage indicator. Needed for safe work. Before starting work, it is necessary to check the absence of current in the wires with an indicator and protect yourself from electric shock or accidental short circuit.
- Screwdriver Set. Screwdrivers are needed to remove the old switch and then install the new switch.
- Pliers.They will come in handy in case the wire breaks at the time of dismantling the old switch and it will need to be stripped.
- Insulating tape. It can be useful if the wire insulation is frayed. It is not necessary to have electrical tape when replacing a switch, but it is better to have it on hand just in case.
- Flashlight. It will be needed if insufficient sunlight falls on the switch.
Two-gang pass-through switches
The scheme for connecting light with two switches to control one lamp or group is the simplest. If you take more complex ones - two-key, you can independently control two lamps. At first glance, the circuit seems complicated, but, in fact, it consists of 2 connections for a pair of single-gang switches. This doubles the number of inputs and outputs.


After the circuit is assembled, it is advisable to check it with a multimeter. To do this, its probes should ring the input and output contacts of the switch. Switching the keys, you should follow the tester readings. If the circuit closes and opens as expected, the circuit can be connected to the network.
Why Electrical Knowledge is Necessary
Information about electrical devices known from school physics lessons is not enough for practical use.
An ordinary consumer is more likely to encounter circuit breakers, since they are the ones that work in connection with network overloads. It is not enough just to return the lever to its usual position, it is necessary to understand the reasons for the shutdown, otherwise the situation may repeat itself in the near future.
In order to navigate the filling of the electrical panel (which, by the way, is an indispensable element of the energy system of private houses), you need to know the composition and purpose of all devices - impulse relays, load switches, RCDs, etc.
Do I need to be able to change the automation myself? We recommend that you first study the theory, and at the first shutdown - and practice.
The fact is that there is not always the possibility of quick help from professionals: on a day off, electricians rest on a par with the rest. And if the house is located in a country house or in a village, it is better to get to know the power grid and related devices thoroughly.
Varieties of switches for home use
Each manufacturer produces different models of switches, which differ both in shape and in internal structure. However, several main types should be distinguished.
Table 1. Types of switches according to the switching principle
| View | Description |
|---|---|
| Mechanical | Devices that are easy to install. Instead of the usual button, some models have a lever or cord. |
| Touch | The device works at a touch of a hand, and it is not required to press a key. |
| With remote control | This design is equipped with a special remote control that comes with the kit or a sensor that reacts to movements around. |
The most popular is the first option, which is installed everywhere. Moreover, such switches have become in demand from the very beginning of the appearance of the electrical circuit. The second option is less popular, especially in our country. The third option is a modern model, which is gradually replacing outdated switches from the market.
Installing a motion sensor in the structure is advisable both in terms of energy savings and home security. For example, if you install a structure at the entrance, then the residents will notice if intruders get into the apartment.
Switch with additional illumination
According to the design features, there are devices with one or more keys (on average, switches with two or three buttons are used for standard electrical appliances). Each button is responsible for turning on and off a separate circuit.
So, if several lamps are installed in one room at once: the main chandelier, spotlights, sconces, then it would be advisable to install a structure with three buttons.
In addition, no less popular are devices with two buttons, which are installed in all apartments without exception. Most often they are needed for a chandelier in the presence of many light bulbs.
According to the installation method, there are internal and external switches. The first option is installed in the apartment, because such structures look aesthetically pleasing. For safety during installation, a special box is installed, which is called a socket box.
Wiring diagram
Recessed switches are used when there is electrical wiring hidden in the wall. Overhead devices are mounted in the presence of external conductors. In this case, the connection scheme has no fundamental differences.
Where is the switch installed?
Drawing up a wiring diagram
It is possible to calculate the dimensions of an apartment or street shield and decide on the choice of protective devices only after drawing up a schematic or wiring diagram for the energy supply at home.
The main thing is to indicate all electrical appliances, lighting equipment and electrical installation devices, as well as their power, voltage and current strength.
The electrical equipment layout plan is a sample diagram that makes it easy to calculate and select the contents of the electrical panel. For convenience, the arrangement of furniture is indicated, as well as the height of installation.
After preparing the wiring diagram, it is necessary to divide all the circuits into separate groups.
To do this, you need to follow the principles:
Now they are producing very powerful equipment, so you should not rely on universal advice, it is better to first study the installation requirements. For example, for some ovens, the conductor cross section must be at least 4 mm², and for water heaters even 6 mm². Accordingly, automatic machines for 20 or 32 A will be required.


In view of the foregoing, they draw up an assembly diagram of the electrical panel.
A sample diagram showing all electrical installation devices. Some of the machines are connected to the RCD. At the entrance there is an introductory 3-pole automatic machine, and after the counter a difautomat is installed
The installation of an RCD is mandatory, since without it the protection of outlet lines is considered inferior. The same can be said about dedicated power circuits for powerful equipment - each device needs its own disconnect device.
Equipment ratings: rated current - one step more than that of the connected machine, differential operation current - 30 mA.
All circuits related to a bathroom or bathroom connect an RCD with a differential. current 10 mA. This includes separate lines for underfloor heating, a washing machine, sockets, and a shower stall.


