- The process of attaching horizontal ventilation
- What methods are used to fix
- Installing the hood
- Training
- Installation
- Installation options for exhaust technology
- Used as filters
- General rules
- Some nuances and points of SNiP
- Duct selection
- Design features and dimensions
- Vertical fixation
- General installation rules
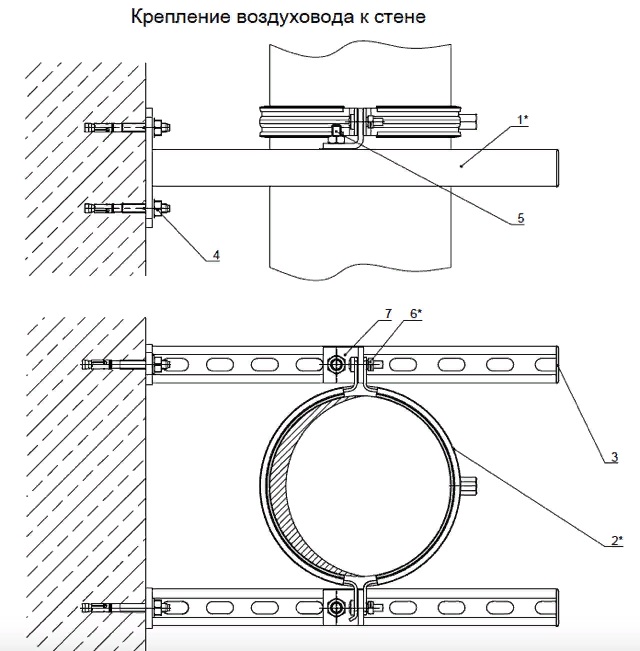
- wall mount
- Ceiling mount
- Normative distances according to GOST
- Variety of mounting types
- Selection Guide
- Attaching cables to the ceiling
- Features of types of fixation
The process of attaching horizontal ventilation
The entire instruction for the work is reduced to the following points:
- Inspect the place where the duct will pass.
- Place ventilation fasteners on the walls.
- Install lifts and bring all the details.
- Assemble all the parts that are separate into blocks and strengthen the clamps needed to attach the suspension.
- Assembly of air ducts using flange fasteners.
- The process of assembling and fastening the system to those elements that were previously attached to the walls.
- Check if the installation was done correctly. Connect the ventilation section that was again carried out, taking into account the blocks that are already in the building.
- Remove all devices that play only an auxiliary role, and check how the system works when assembled.
If the installation is carried out under a roof, it is necessary to supply parts and parts directly to the installation site. On the spot, they are independently connected, creating whole blocks, using special stands. Only after that, using winches, should the product be lifted and the flanges connected. They are pre-positioned in the places where it is needed. The section that has already been assembled is put in place, the winches move, and work begins with the next of the links. Thus, the whole process is carried out until the work is finally completed.
 Air duct installation
In the event that the column itself is made in the form of a lattice, the process will be carried out between the braces or along the edges. When choosing the first option, you should initially fix the nozzles and only after that proceed with the main work. At the place of installation of ventilation, it is introduced not entirely, but in fragments. The second of the options is distinguished by the feature of collecting large blocks, which should subsequently be lifted with a winch and attached with brackets.
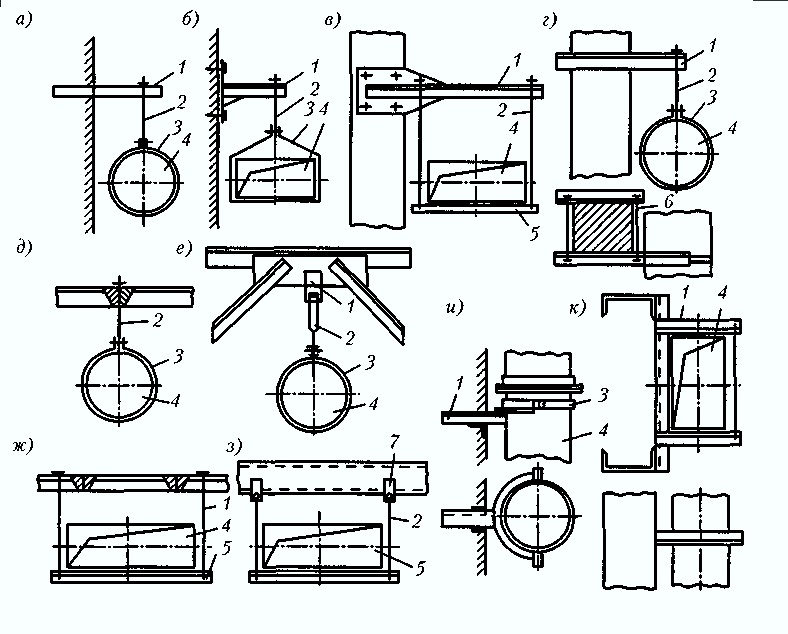
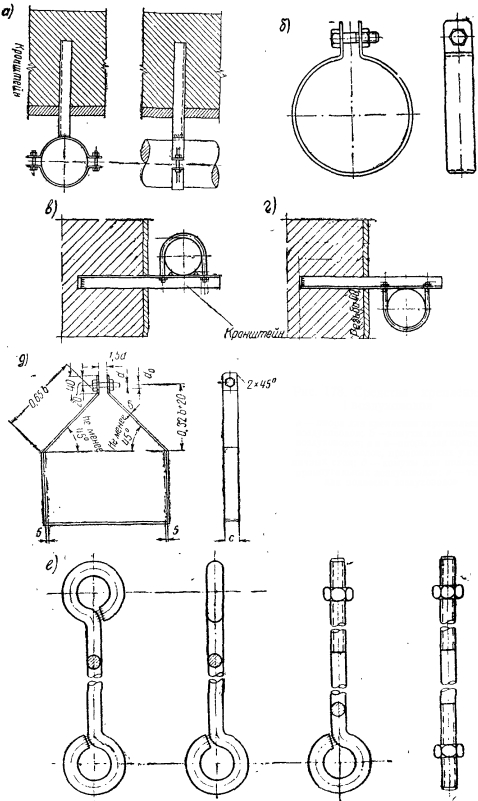
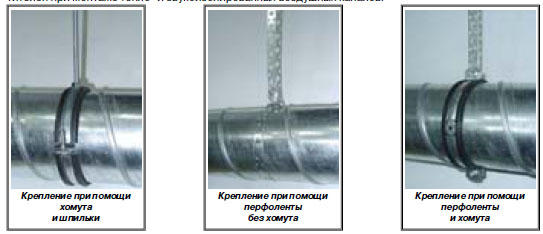
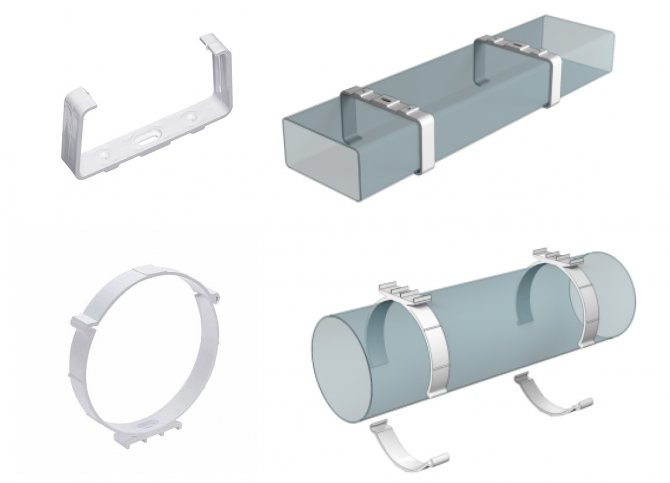
What methods are used to fix
Choice of mounting type and features fasteners are determined by the cross section of the hole (round or square) and the place where the equipment is attached (a mine or a wall of a house).
For fasteners use:
- Bracket in the form of a corner, structural elements are fastened to the corner with screws, screws;
- Bracket in the form of the letter Z. It is best suited for a rectangular section. The elements are also fastened using screws or screws;
- Studs and profile.To provide additional sound insulation, it is possible to use a rubber profile;
-
Punched tape. The most suitable option for fixing the air exchanger in the form of a round pipe. To perform this type of fixation, a loop is made, then it is fastened to the bolt in those places where the ventilation elements are interconnected. The advantage of this fixation option is its cheapness, but this option also has a drawback, there is not enough rigidity, so the pipe can vibrate;
- Clamps for mounting well complement the fixation with perforated tape, can significantly reduce the noise level. This method has limitations in application, suitable for pipes with a diameter not exceeding 20 cm;
- Collar, supplemented with a hairpin;
- Anchor. For this fixation option, a hole made in advance, a hairpin is required;
- Traverse in combination with a hairpin. The most suitable option for fixing a pipe with a rectangular section and a large size. The air exchanger support with this option falls on the traverse;
- A metal beam with a clamp and a hairpin fixed to it.
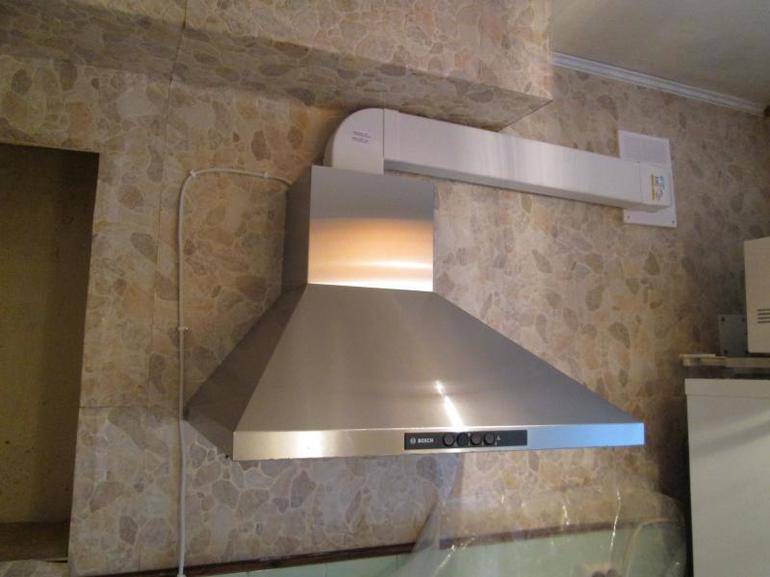
Installing the hood
Training
Before proceeding with the installation, choose the right place for the equipment - gas stove + hood. In the photo there is an electric stove - the recommendations are also relevant for gas facilities.
Before you install the hood over the gas stove, you must first prepare the room.
- Mark on the kitchen plan the location of all communications, as well as installed appliances, if the installation is carried out in an already operated room.
- The volatility of the hood assumes the presence of an outlet (but not above the stove!) With 220 V connected.A model with a circuit breaker is preferable: it will always turn off in time in the event of a short circuit or fire. If the kitchen is not equipped with a grounded outlet, the rules for installing a hood over a gas stove require that a separate RCD (16 A) be provided in the electrical cabinet. Connect to the network a line of three wires "zero", phase, "ground" in yellow insulation with a green strip drawn along it.
- The value between the exhaust device (lower edge) and the surface of the stove (burner) is measured.
- The completeness of the package is checked for the presence of the necessary fasteners, hooks, dowels, etc.
- The place of fastening of the structure is marked.
Installation
- air duct is assembled. It can be square or round. Standard version - size 130x130 mm It is better to choose a plastic construction with smooth internal surfaces. Its diameter should be the same along its entire length, correspond to the cross section of the ventilation hole and, preferably, have a check valve.
- Holes are drilled with a perforator for the hood clamps.
- Screws are screwed in.
- Using the level, the horizontal installation is checked.
- A hood is hung (without a box).
- Connects to an exhaust pipe connected to a duct.
- The hood is connected to an electrical outlet. If the cord is missing or short, an autonomous line is drawn from the shield or is diverted from the socket closest to the hood. It is strictly forbidden to make twists insulated with insulating tape at the places where the missing part of the cord is added.
- A test run of the technical device is carried out in all modes.
- During normal operation, the box is fixed at the final stage.
Installation options for exhaust technology
Comparative illustration: gas stove and electric
According to the installation version, exhaust devices are:
- built-in type - the entire installation is masked in a hanging cabinet;
- fireplace and dome type - the structures are fixed on the wall;
- island model - assembled on the ceiling;
- corner hood - placed in the corner;
- flat model - involves two planes of fixation: behind - to the wall, from above - into the hanging cabinet.
In any of the models, a certain type of filter elements is provided that absorb pungent odors, grease and other secretions.
Used as filters
- Grease traps - are installed only in kitchens with a ventilation shaft.
- Coal filters are elements of modern cleaning systems with a recirculation mode of operation.
Even with the observance of the rules for installing the exhaust system and operation, the efficiency of work will be underestimated if preventive maintenance is not carried out in time: clean surfaces, change filters. Thus, it is not difficult to create the conditions necessary for a safe and comfortable stay in the kitchen. For this, different methods are used. But it is the forced system with local exhaust above the stove that is considered the most optimal and common option.


General rules
With hidden or open cable installation, indoors or outdoors, there are a few general rules:
- The optimal distance between fasteners is 40-50 cm.
- If self-tapping screws, screws, dowels are used, they are twisted all the way so that the protruding hat does not damage the insulation.
-
The cable is laid evenly, without humps.If a margin is needed, it is placed in the least visible place.
Basically, recommendations are everything. They are versatile and easy. The distance can be reduced if necessary. For example, at the turns of the track, fasteners are installed at a small distance from the bend - 5-10 cm. The task is to ensure reliable fixation and prevent sagging.
Some nuances and points of SNiP
Effective soundproofing of air ducts.
Today, it is the SNiP that regulate the correct conduct of work on the arrangement of air ducts. Manual 7.91 to SNiP 2.0 allows you to create systems based on the data that is indicated in it. Only in accordance with them all the work will be carried out correctly, and in the end the expected result will be obtained. This manual is intended for professionals who work with ventilation, air conditioning and heating systems. Of course, the manual can also be used by amateurs who decide to build similar structures in the house on their own. It is worth talking about the main points of this annex to the SNiP in more detail.
Appropriate measures must be taken here to protect the building from the penetration of fire. All this is included in the technical documentation of the project.
Measures and means of protection against the spread of fire include:
- placement of all air ducts and related systems within one fire-protected section of the building;
- restrictions on connecting to a common air duct system that has a different degree of fire safety and explosion hazard;
- the use of fire-resistant materials in the design of air conditioning, heating and ventilation systems;
- the use of a special system of valves, which, if necessary, can be blocked to limit the spread of fire through the air ducts.
There are several basic systems for placing air ducts and related equipment. If the air locks on the branches are located behind the collector, then they have a reduced degree of fire safety. However, this does not mean that they cannot be used in practice. They are quite widespread due to their simplicity.
Duct selection
The choice of air duct should be entrusted to specialists who design your ventilation and air conditioning system. Engineers will take into account all factors (duct aerodynamics, equipment power, volume of air removed or replaced, etc.) and will find the optimal solution, in particular, they will determine the required cross section and material of the air duct.
Channel stiffness.
In an apartment or a private house, there is usually enough flexible sleeve - due to the low noise level, ventilation will not cause trouble for the owner. However, flexible and semi-flexible air ducts take up a lot of space, so rectangular ducts are more often used as the main lines, and flexible sleeves are brought directly to the ventilation grilles.
When implementing a larger-scale - general house or industrial ventilation system, mainly rigid air ducts are used according to:
- VSN 353-86 "Design and application of air ducts from unified parts";
- TU-"Metal air ducts";
duct material.
To move air masses with temperatures up to 80 ° C and relative humidity up to 60%, air ducts are used:
- From thin sheet cold-rolled galvanized steel with a thickness of 0.5–1.0 mm
- From thin sheet hot-rolled steel with a thickness of 0.5–1.0 mm
If the temperature or humidity in the room exceeds the specified parameters, stainless steel or carbon steel ducts with a thickness of 1.5 - 2.0 mm are used.
If there are chemically active gases, vapors, dust in the air mixture, air ducts are made of metal-plastic, aluminum and its alloys, carbon steel 1.5–2.0 mm thick with an appropriate protective coating. The tightness of the air ducts is provided according to the class "H" of specifications and "B" according to EVROVENT 2/2 with a pressure and vacuum limit of 750 Pa.


Air duct insulation.
The thermal insulation winding protects the air duct from condensation, which prolongs the life of the system. However, in apartment or office ventilation ducts, thermal insulation can be neglected - it is required mainly for highways located on the street or in unheated premises.
Soundproofing of air ducts is required mainly in residential premises - bedrooms, children's rooms. However, the noise problem can be solved in a constructive way - using large-section pipes with thick walls or by installing vibration isolation.
Design features and dimensions
Remember that when purchasing PVC air ducts, you need to stock up on adapters that will be needed to connect the plastic pipe and the hood. Adapters are also used for duct bends and connection to general house ventilation. If a corrugated product is used for the hood, then you can save on adapters for bending the pipe.
Any bend also negatively affects the functionality of the hood.When installing the duct in the kitchen, try to avoid 90 degree angles. This will overload the hood, which will significantly reduce the life of the product.
The diameter of the plastic pipe is selected according to the cross section of the ventilation hole. The dimensions of rectangular and square PVC kitchen ducts are standard. The following values are most often used: 110 × 55, 120 × 60 and 204 × 60 mm. The sizes of round plastic pipes vary from 110 to 150 mm in diameter.
You can buy these products in almost every hardware store. It should be noted that the price of flexible ducts is slightly higher than flat PVC ducts.
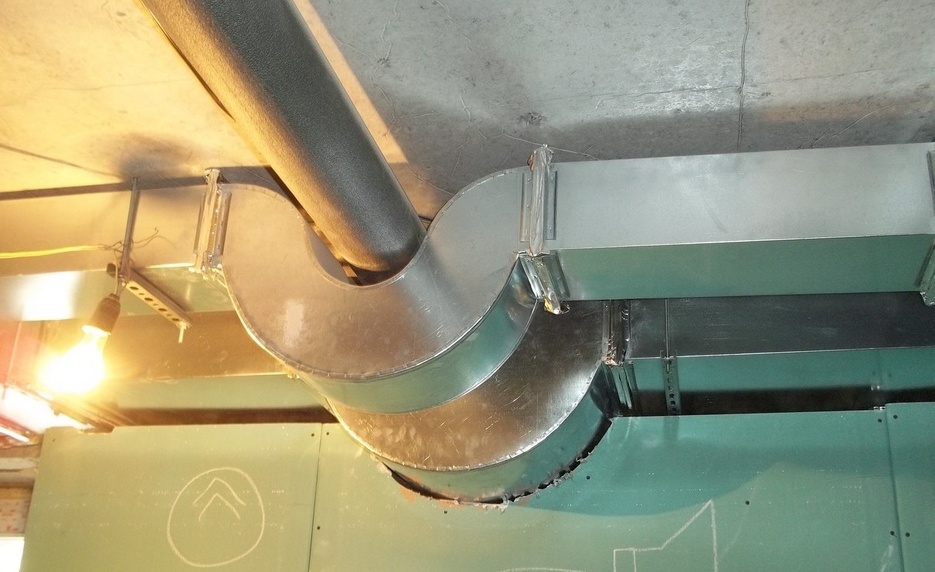
Vertical fixation
When fixing round air ducts to the ceiling, it is necessary to use supports, which include:
- console (metal);
- linings intended for this;
- clamps.
To connect round ventilation systems to a massive column made of reinforced concrete, it is better to choose brackets consisting of consoles that have already been welded to an iron slab and a pair of clamps. They will need to be connected with bolts when the duct assembly is completed.
In the event that it is impossible to mount ventilation on the walls, it can be placed on the roof.
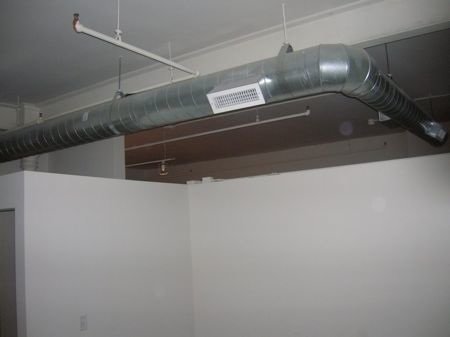
 Horizontal ventilation
General installation rules
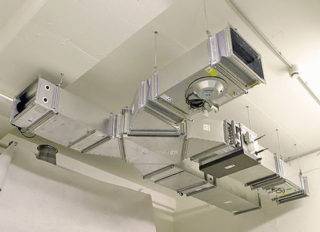
The scheme is drawn up so that the highway has a minimum number of turns and connecting sections
At the stage of technical design, the requirements for air exchange in the room are taken into account, the number of people and the volume of the room are taken into account
Ventilation is fixed in the following sequence:
- before installation, the system is divided into separate branches, the length of which does not exceed 12 - 15 meters;
- connection points are placed on the parts and holes are drilled;
- the elements of the line of a separate section must be fixed with bolts, clamps, the connections are fixed with adhesive tape or insulating sealant.
The assembled blocks and assemblies are combined into a single chain, the pipeline is fastened to the partition, wall, ceiling or removed through the roof.
wall mount
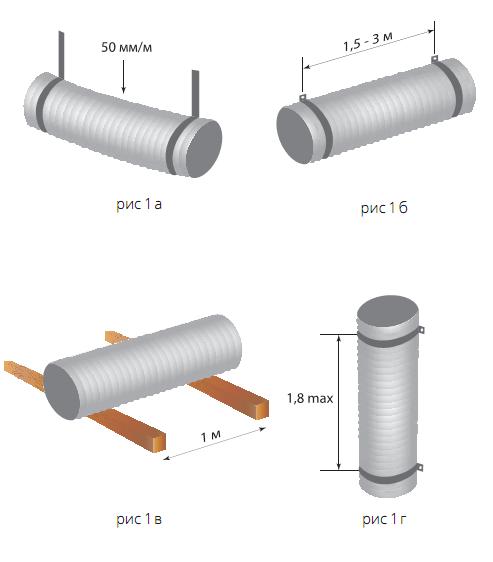
Clamps, supports, hangers are fastened with a step of no more than 4 meters for the installation of horizontal air ducts. Such a step is relevant if the diameter of a round pipe or the largest side of a rectangular section does not exceed 40 cm. The step distance is reduced to 3 meters if the specified channel dimensions exceed 40 cm.


A step of 6 meters is provided for air ducts on the flanges of round or rectangular ducts with the largest side of the section up to 20 cm or insulated pipes of different sections. If the dimensions exceed the specified value, the step is calculated in the project. Vertical fastening of ventilation pipes to the wall is carried out through a gap of no more than 4 meters. Fastening on the roof and outside the building is specified in the project and is taken according to the calculation.
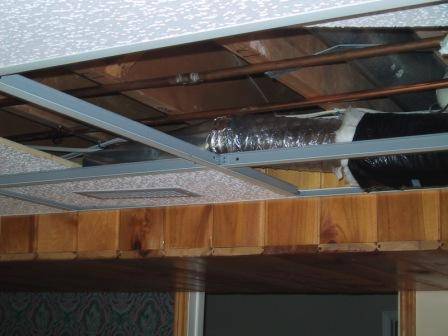
Ceiling mount
The air duct is attached to the ceiling in 50% of cases, if it is not possible to fix the ventilation to the wall. Hangers, studs and brackets are used for hanging.
Mounting options:
- Small-sized pipes are hung with an L-shaped bracket, self-tapping screws are used. Suspensions are fixed to the ceiling or beam with dowels (in concrete), self-tapping screws (in wood).
- Z - shaped studs are used to install rectangular channels, and the boxes are fixed to the ceiling in the same way as in the previous case.Due to the extra angle on the bracket, the load on the supporting hardware is reduced, and strength is increased.
- V - shaped suspensions are fixed to the upper floor with anchors. This type of suspension can withstand significant loads.
Normative distances according to GOST
The installation standards are prescribed in the document SNiP 3.05.01 - 1985, and the design takes into account the air duct location standards from SNiP 2.04.05.1991. The central axes of the highway should run parallel to the plane of the enclosing structures.
Standard distances are maintained:
- from the top of the round pipe to the ceiling should be at least 10 cm, and to nearby walls - 5 cm;
- from the round channel to the hot and cold water supply, gas pipeline, sewerage must be at least 25 cm;
- from the outer wall of a square and round pipe to electrical wiring - at least 30 cm.
- when fixing rectangular air ducts, the distance to walls, ceiling, other pipelines is not less than 10 cm (section width 10–40 cm), not less than 20 cm (width 40–80 cm), more than 40 cm (size 80–150 cm).
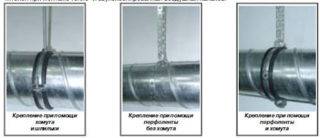
Variety of mounting types
The first part is released from the bandage. The ends of it must be parted and brought into the next part. All ends are tightened with a bolt. In turn, all parts are assembled and mounted.
There are also such methods of fastening when rails and tires are used. This option is perfect for mounting a structure with a rectangular cross section. The whole process comes down to several steps. It is necessary to install all fasteners and lifting mechanisms. Raise part of the structure and secure where necessary.If the installation is carried out in a horizontal position, then traverses will also be needed. Vertically, it would be better to use a grip, which is intended for the same. All joints should be connected with tires. In the same place where this is not possible, ordinary slats will do.
Selection Guide
Experienced experts give a number of tips to make it easier for owners to choose products for arranging a ventilation system. Some of them:
It is best to buy products in company stores or specialized outlets.
In addition to the product, the kit should include instructions for use, as well as a warranty card.
If there is no such documentation, it is better to refuse the purchase.
It is necessary to take into account the design of products so that they organically fit into the interior of the room.
The manufacturer is important. It is advisable to choose high-quality branded models.
No need to rely on low prices
Of course, a high-quality and reliable ventilation system will be quite expensive, especially if good materials are used. However, you need to understand that high-quality models will serve for many years without any complaints.
Products must have sufficient performance. If the ventilation system is weak, the hood will not be able to do its main task well, so the exhaust air masses will remain in the room.
In addition, when choosing the constituent elements of the ventilation system, it is necessary to take into account the main functions of the kitchen hood. The latter must meet the following characteristics:
- Attractive appearance is important in order for the device to organically fit into the interior, complementing it.
- Low noise level during operation.
- The ability to quickly and in the right amount to remove odors.
Attaching cables to the ceiling
It is necessary to fix the cables to the ceiling mainly when installing stretch ceilings or ceilings made of plastic panels and drywall. In the case of drywall, everything is somewhat simpler: there is a suspension system to which you can fasten the wire harnesses with plastic ties. In other cases, everything is somewhat more complicated: you have to drill a large number of holes for fasteners, because they use all the same clips and brackets, and you need to install a dowel under each (if the ceiling is made of concrete slab).


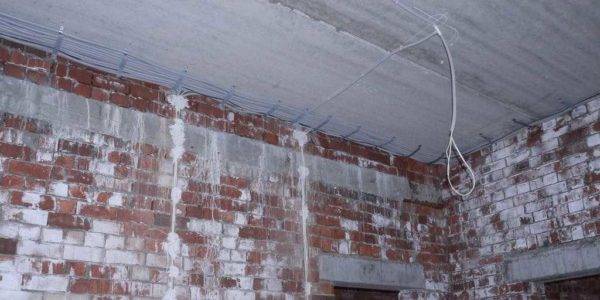
Fixing the cable to the ceiling is time consuming
There are several ways to speed up installation:
- Using cable trays (described above).
- After attaching a number of lines to the ceiling, hang small wire harnesses from them with plastic ties.
- Use a long perforated strip of metal for fastening.
Features of types of fixation
Most often in a professional environment, they use the combination of a bracket and a stud to fix parts. The fastening option is especially suitable if the weight of the system parts is significant. Thanks to the use of the bracket, a significant part of the load is removed from the fasteners.
If it is necessary to mount a rigid air exchanger, then it will be necessary to involve third-party specialists. A metal stud is used to fasten it to the wall. The thickness of the mounting stud is calculated based on such parameters as pipe length, stud material. This installation method can be used for both round and square pipes. To effectively support the parts, special clamps made of metal are used.The joints of the units and parts of the structure are strengthened with the help of special tightening bolts.
It is more convenient to use flexible fragments for do-it-yourself installation. For their fasteners, you do not need to have special knowledge, it is easy to perform all the necessary actions. It is only necessary to take into account the direction of the air flow during assembly. It is much easier to fix such structures in hard-to-reach places, such as ceilings and shafts, which can often be unsuitable for analogues made of rigid materials.
The cost of elements for a flexible ventilation system and fixing air ducts to the wall will be much cheaper than analogues made of steel. If it is necessary to install the air exchanger at a high altitude, then it is necessary to resort to the help of industrial climbers who have experience in carrying out such work.


