- Preparatory stage
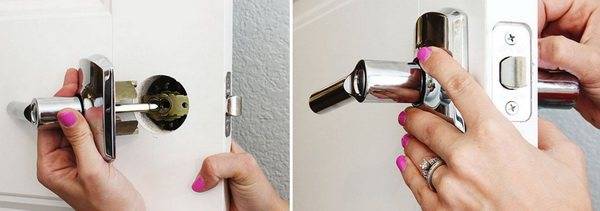
- How to insert door handles for interior doors?
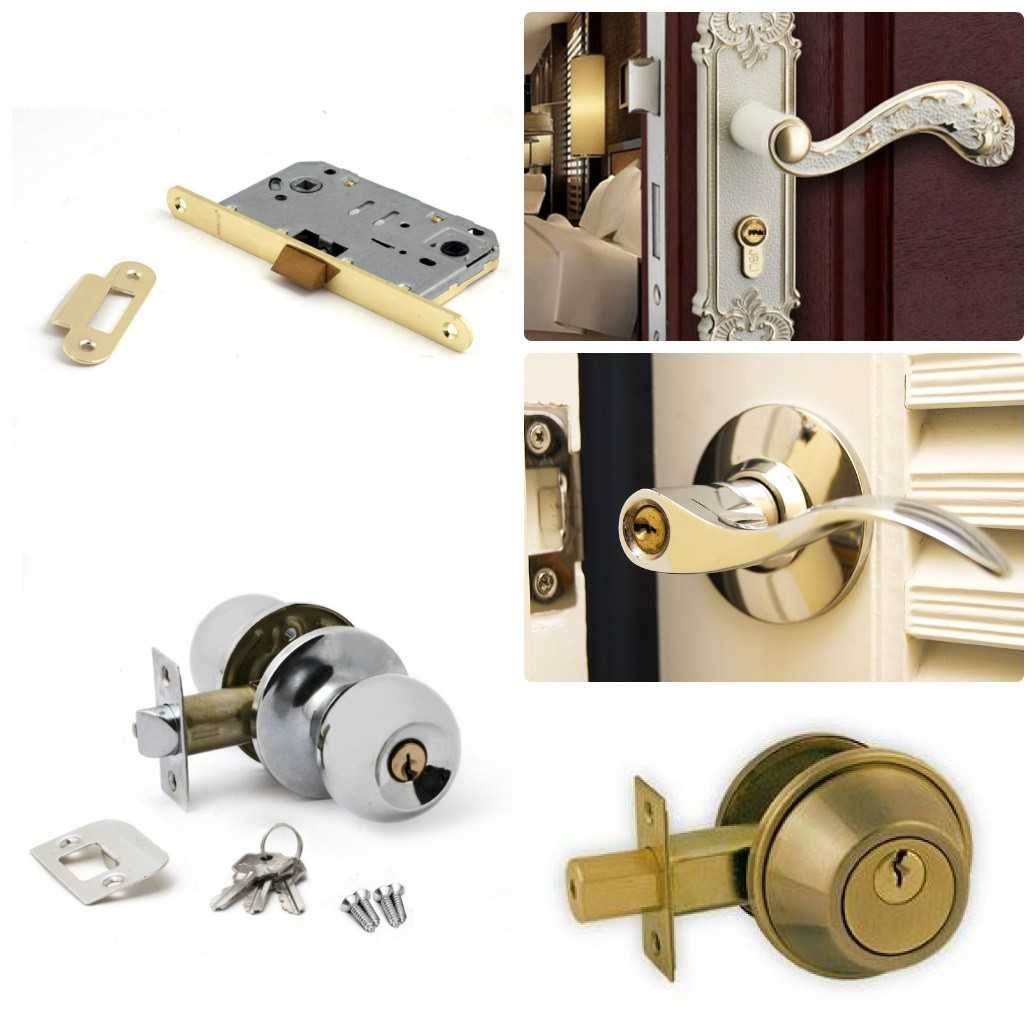
- What are the types of locks?
- Video explanation for installing the lock
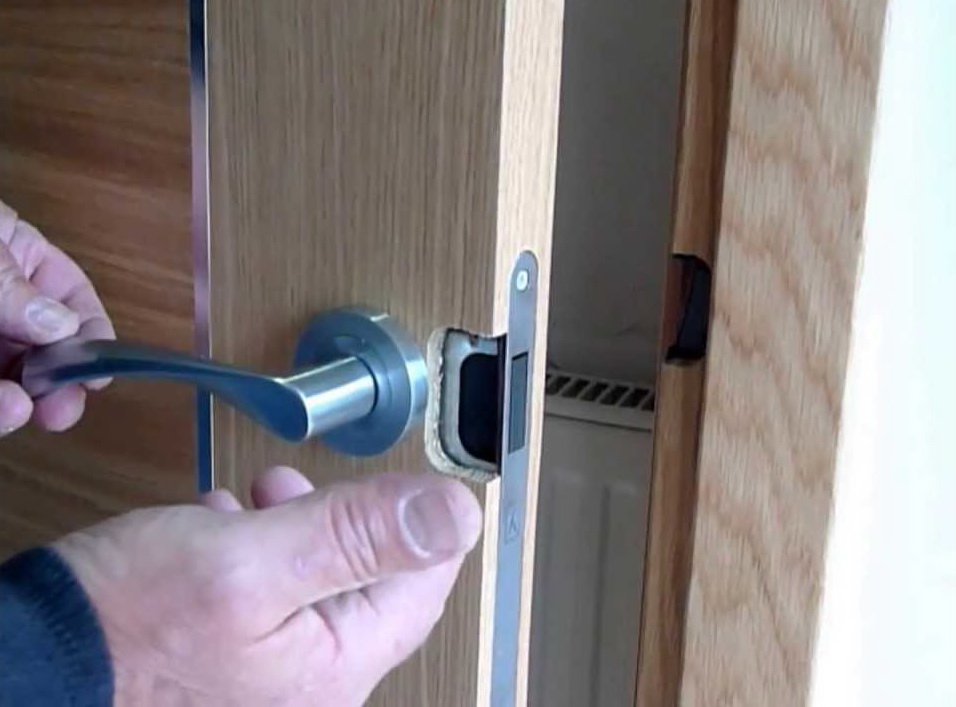
- Mounting a flat type lock
- Step-by-step instructions for inserting a lock
- Round lock insert
- Flat lock mortise
- Mounting plate installation
- Installation
- Proper installation of the lock begins with the choice of crown for the drill
- Installation process
- Installation of platbands on the door.
- Types of locks for interior doors
- flat
- Round
- Checking work
- Installation height
Preparatory stage
After the door handles and locks are selected, before installation, they study their features, the procedure for carrying out work, prepare the necessary tools for cutting the lock, make markings.
At the preparatory stage, the following points are taken into account:
- Experts recommend not to insert a locking device into a pre-installed interior door. First, a lock is inserted, then the canvas is mounted in a box.
- The thickness of the vertical bar of the leaf must correspond to the width of the locking device and be at least 40 mm.
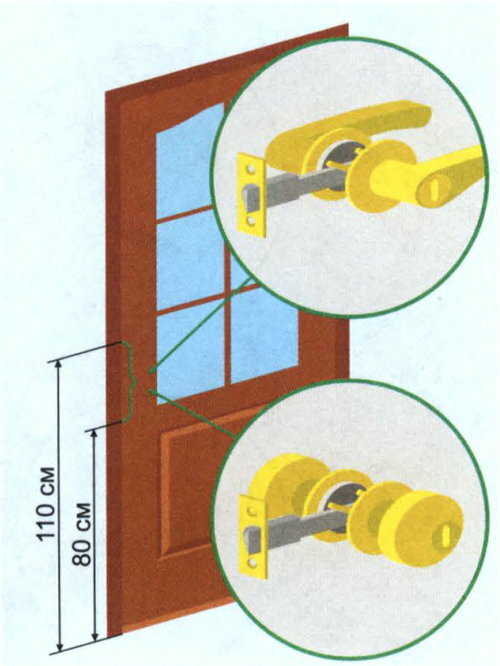
- The handle is at a comfortable height.
- Fittings are most often cut in at a distance of 1 m from the floor.
How to embed the lock correctly is described in the instructions for installing the lock, which is included in the hardware package.
How to insert door handles for interior doors?
There are various types of handles that are different from each other in color, shape, material, mechanism and installation method. If we take the last feature as the basis for the classification, then two types of handles are distinguished:
- Overhead.
- Mortise.
Installation of first class products is simple and hassle-free. They are simply fixed to the surface of the canvas, unlike other types of products. Installation of mortise handles involves pre-drilling a hole in the door leaf.
Mortise devices are divided, in turn, into two more types:
- Rotary knobs or knobs. They open the door without pressing the handle. The operation is performed by turning the holder. This kind of device can be equipped with a latch that blocks the lock tongue. This allows the door to be closed from the inside. Handles are very convenient in operation as have the round form.
The rotary handle is convenient in operation due to the round shape
- Push or push handles. Here it is easy to guess that the mechanism comes into action after pressing the lever.
The push handle-latch is actuated by pressing the lever
For sliding systems, hidden handles can be installed
It is worth noting that the handles are of a hidden type. They are designed for sliding systems such as sliding doors. When the doors move, the products do not interfere, do not spoil the wallpaper and walls.
In order for a thing to last for many years, it needs to be looked after. It's the same with accessories. Over the years, it ages and wears out, which negatively affects the product as a whole. To slow down this process, do not forget to take care of the fittings.
To take care of your hands:
- Wipe them from dust with water and special cleaning products. At the same time, avoid products that contain acids, alkalis and abrasive particles. They can damage the outer coating of the product, resulting in rust. After washing, the product must be wiped with a dry cloth.
- Tighten the loose handle. If this is not done, the mechanism will break.
- Protect the product from rough mechanical influences.
In addition to the handle, the door lock also needs your care. In this case, basic care means regular lubrication of the mechanism with special means. Sometimes sunflower or other vegetable oil is used as a substitute.
For lubrication of hard-to-reach places of the handle, use a tube nozzle.
Thus, having studied the basic subtleties of mounting the handle, you are able to master this task without outside help. The main thing at the same time is to believe in yourself and then the reward in the form of a well-installed pen will not be long in coming.
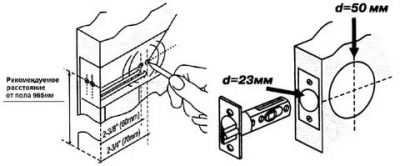
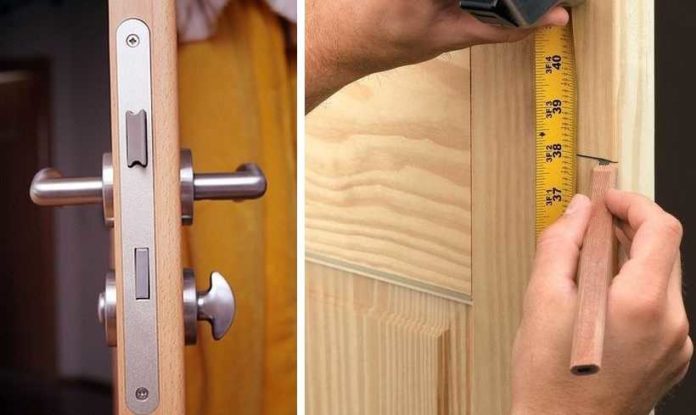
An important condition for installation the first time and the safety of the door leaf is the correct marking. The saying “measure seven times, cut once” is relevant here. Measure the required height of the mechanism from the floor (it is recommended to place it at a height of 80-100 centimeters). For marking, you can use a conductor, or you can get by with a classic angular ruler and a pencil.
What are the types of locks?
Depending on the type of construction, the following types of locks are distinguished:
In addition to classification according to the shape of the lock, it is possible to divide the types of fittings according to the type of locking mechanism:
- latches with a fixing element;
- invoices;
- scuppers;
- fall;
- mortise;
- magnetic.
The last type of fittings is considered innovative.It is suitable for any type of modern doors, does not make sounds during operation, and therefore the demand for them is growing rapidly.
Video explanation for installing the lock


This is interesting: Window decoration in the kitchen is the final stage of interior design
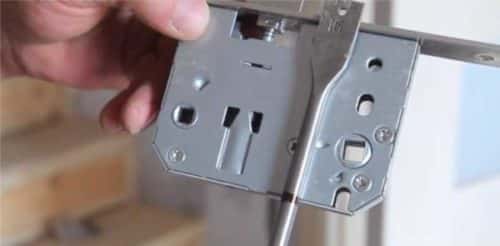
Mounting a flat type lock
When arranging this type of lock on a solid wood door, you can vary the height as desired. The MDF door has a zone suitable for inserting fittings at a level of 1 m. You can quickly install the lock by pre-drilling holes with a feather-type drill, the diameter of which should be 1-3 mm greater than the thickness of the lock structure. Drilling is recommended to be carried out with single holes in 2 passes. After that, a nest is arranged using a chisel, according to the instructions, the outline of the sweating contour is applied when the lock is inserted, and a hole for sweating is selected.
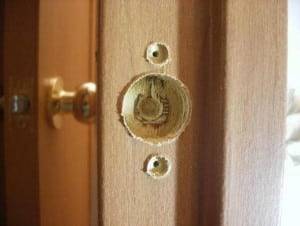
The recess for mounting the larva is performed as follows:
- A round recess of a slightly larger diameter is drilled for the cylinder.
- A round hole of smaller diameter is made to install the cassette bottom and pins.
- The remains of the chisel are removed.
As these steps are completed, the lock is ready for installation. Remove the larva and handle from it, insert it into the nest, and then return all parts to their original positions. The loose lock assembly has a play of 1 mm on all sides.
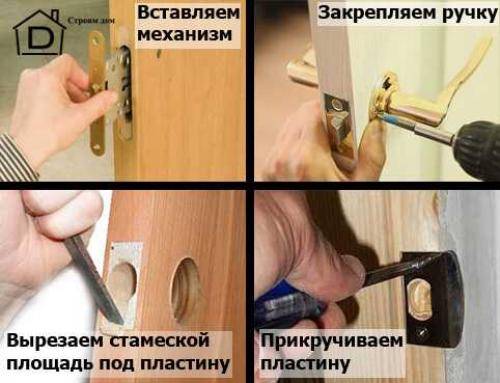
The next stage is the definition and marking of the points of the self-tapping screws. After marking, holes for self-tapping screws are drilled. When they are fully tightened, the lock is attached to the door, install the handle on the locking mechanism, as well as the pad for the tongue.
The handle at the lock can be round or L-shaped. To install this element, you must perform the following steps:
- On the front and back sides of the canvas, it is necessary to attach decorative overlays to the self-tapping screws.
- Insert and lock the handle mounting rod.
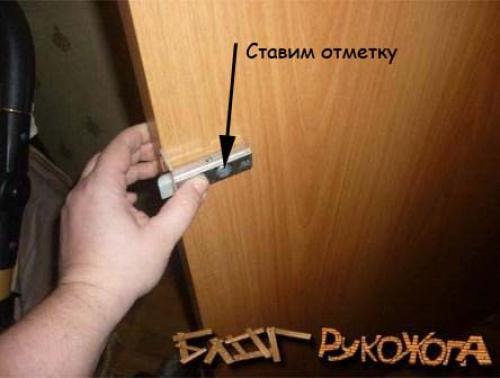
- Cover the canvas and make a mark on the box corresponding to the position of the tongue.
- Use a ruler to measure the length of the tongue, put the appropriate marks on the box.
- Attach the overlay to the marks and circle.
- Along the border of the bypass line, you need to make holes with a drill, the shape of which is brought to the desired one with the help of a chisel.
- At the last stage, an inlay is installed in the design of the lock and fixed with hardware.
After installation, be sure to check the smoothness and clarity of the lock. If an error is detected, then the localization of the tongue can be changed.
Step-by-step instructions for inserting a lock
The instruction will help to correctly insert the lock into the interior door. It takes into account the type of lock, and therefore has two sections for installing the case (round and flat) and the striker.
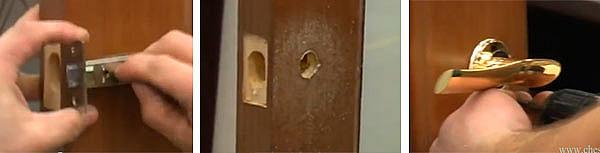
Round lock insert
The easiest way to do the work with modern equipment is enough for about 20 minutes. The cutter will prepare all holes neatly and accurately.
 Lock insertion by professionals.
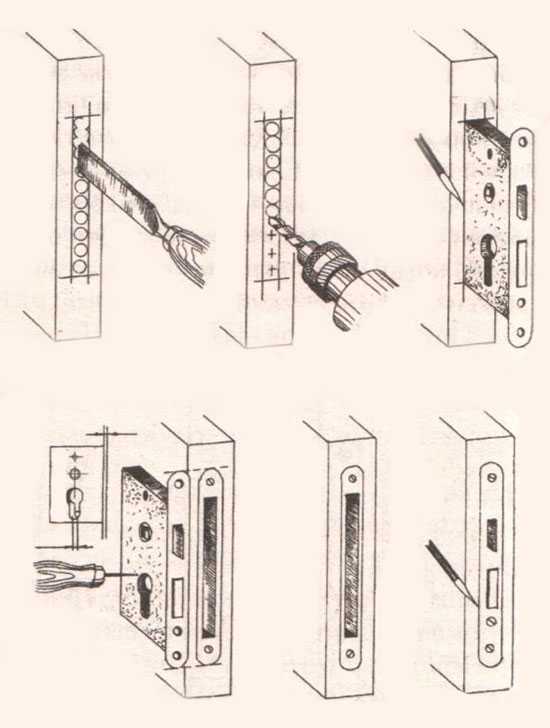
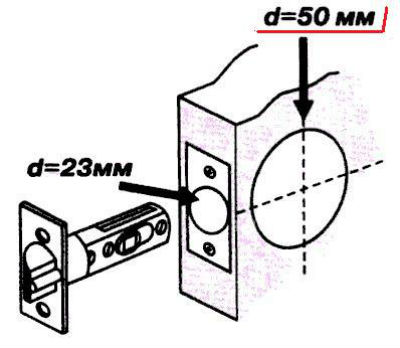
Manually doing the work is a little more difficult. The step-by-step installation algorithm consists of the following operations:
- a drill with a crown with a diameter of 50 mm is attached to a screwdriver or drill;
- setting the drill exactly in the center of the hole for the handle, the door is drilled until the gimlet exits from the back. It is undesirable to continue - the crown can damage the decorative coating of the door leaf. It is better to finish on the reverse side;
- on the crown, a knife is changed for a diameter of 23 mm;
- a hole for the latch is drilled from the end of the door. It should be exactly in the middle of the hole for the handle. The work can also be done with a drill pen - there is enough diameter;
- a latch is inserted close to the end;
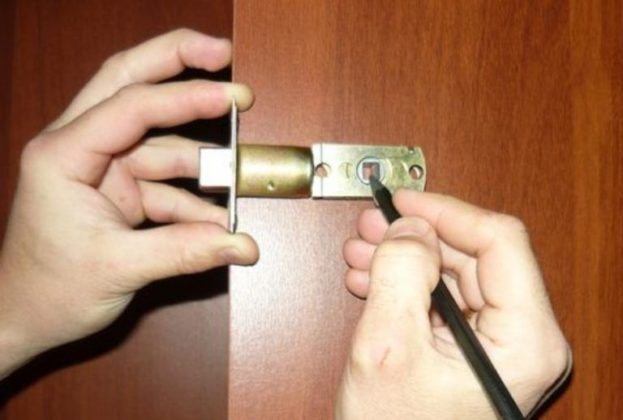
- the contour of the latch lining is marked with a pencil, as well as the places where the fixing screws are screwed in;
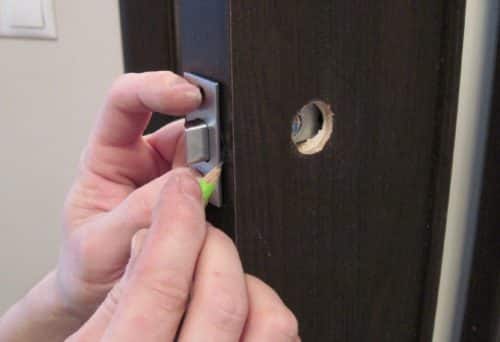 The contour of the latch and the place for self-tapping screws are marked.
- the latch is removed;
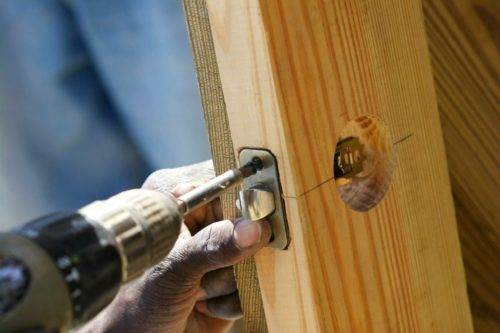
- a screwdriver with a drill with a diameter of 1 mm drills holes for self-tapping screws;
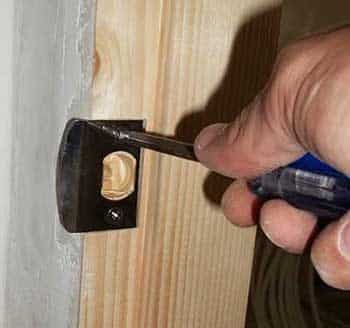
- at the end with a chisel and a hammer, a recess of 3 mm is cut down under the latch bar. In width and length, it is better to shorten and narrow, which will allow you to more accurately fit the recess under the insert. If the ends of the lining are oval, a feather drill will come to the rescue.
 Chisel to help.
It remains to install the handles and the latch.
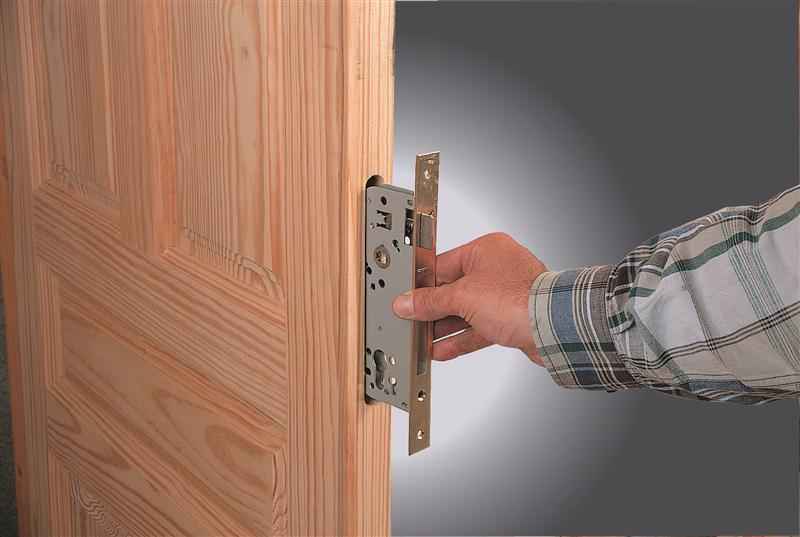
Flat lock mortise
And now let's look at how to embed a lock in an interior door if the body of the mechanism is flat. The work is carried out in the following sequence:
on a pen drill with a diameter equal to the thickness of the body of the locking device, the drilling depth is marked - equal to the length of the body;
 The drilling depth is determined.
- the drill is inserted into the drill. You can also use a simple drill of the desired diameter;
- focusing on the marks of the bottom and top of the lock, 7-8 or 9-10 holes are drilled one near the other (the number of holes depends on the size of the locking mechanism) to form a solid recess. The same work can be done with a chisel, chisel and hammer. It is long and laborious, but our grandfathers worked like that;
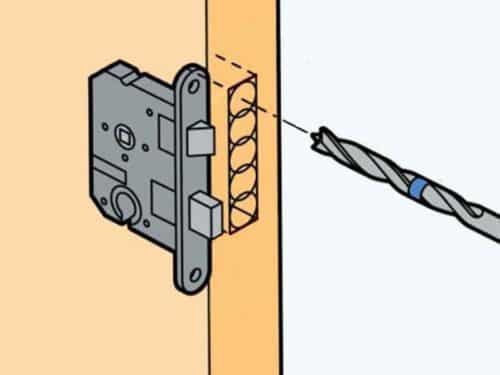 Scheme of drilling a recess for the lock case.
edges are trimmed with a chisel;
 The edges are trimmed with a chisel.
a larger drill is inserted into the drill and the edges of the recess are ground with it. You don't need to press hard.The fabric may be damaged.


 Grinding notches with a drill.
- holes for handles, a larva with pins are drilled with a feather drill of different diameters (you can drill under the pins with the same drill as for the larva - the decorative overlay will hide;
- a chisel hollows out a recess under the bar. The technology is the same as that of the round lock.
 A chisel hollows out a recess under the bar.
The castle is going.
 The latch bar is installed.
Given the wide variety of locks, the editors of the StroyGuru website decided to consider their assembly in a separate article.
Mounting plate installation
The final stage of the tie-in of the lock is the installation of a striker on the door frame. The phased workflow consists of the following operations:
the door closes. Dog marks are made on the opening. Thus, the location of the striker in height is determined;
 The location of the reciprocal bar in height is located.
is the depth of landing otvetka. To do this, from the outside of the door, the distance from the surface of the door leaf to the latch strip is measured, after which the same distance is laid off from the doorway to the edge of the striker;
 The position of the bar in depth is determined.
- the reciprocal bar is superimposed on the jamb;
- the dimensions of the strap, holes for self-tapping screws and a notch for the tongue are marked with a pencil;
 Places of self-tapping screws and recesses under the dog are marked with a pencil.
- if the gap between the door leaf and the jamb is greater than the thickness of the striker, it does not sink into the box. If less, a 3 mm recess is hollowed out with a chisel;
- holes are drilled under the screws with a 1 mm drill;
- a notch is hollowed out under the dog with a chisel. It can also be made with a pen drill;
 Holes are drilled for the screws and tongue.
with self-tapping screws, the bar is screwed to the jamb.
 The reciprocal bar is screwed with self-tapping screws.
In conclusion, inserting a locking mechanism into an interior door requires care and accuracy from the locksmith. The technology is simple. All work can be done by the owner of the apartment.
Installation
Installation of the handle begins with determining the height of its location on the interior door from the floor, most often this figure is 90-100 cm. All handles on room doors are placed at the same level for harmonious visual perception.
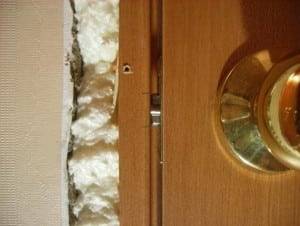
The next step is to mark the holes and grooves for the product. Experienced installers recommend tapping the canvas before marking, since most interior doors are made in the form of a frame and lintels made of bars, covered with MDF panels, natural or eco-veneer on top. The locking fittings must be installed exactly in the bar, since the outer panels are not able to support the weight of the mechanism due to the presence of a void between them.
It is better to put the handle on the canvas removed from the hinges or carefully fixed in the open position. Products for opening / closing the door may differ in size, location of mounting holes and installation methods, therefore, before installation, read the manufacturer's recommendations in the instructions.
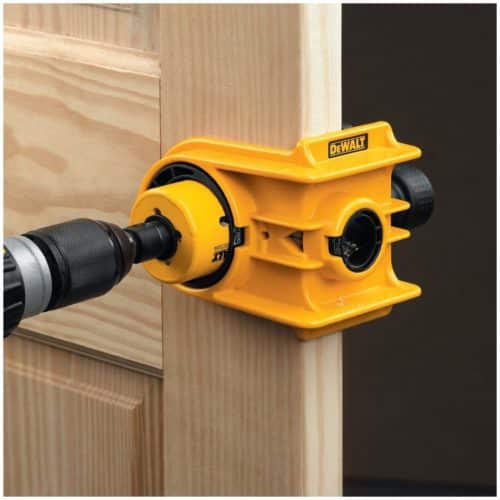
Proper installation of the lock begins with the choice of crown for the drill
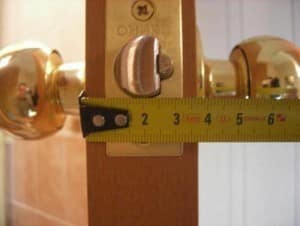
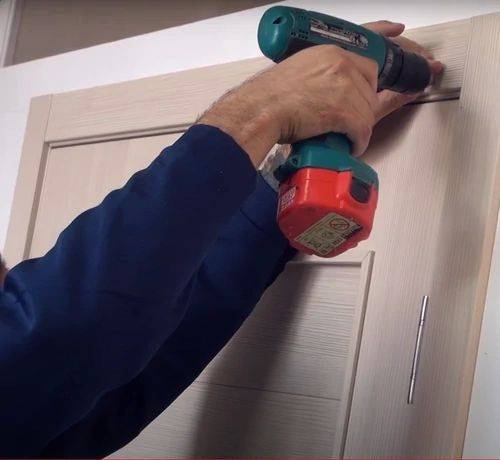
The main problem in which it is decided how to insert the lock into the door itself remains the choice of a crown for the drill, its diameter. It is assumed that it must be both fairly free, so that the lock penetrates into it, and narrow. The latter is necessary so that the hole remains invisible.To do this step correctly, you need to take a tape measure and measure the distance of the visible part of the castle and subtract a couple of centimeters from the result. If everything was done correctly, then the lock device will be freely inserted inside the plane, and the hole will be invisible. For those who are already confused at this stage, we offer to see how to embed a lock in a door (video).


If the choice of the correct crown for the drill remained a mystery, then you can use their special type - they are designed for door locks. They can be found in a set of several pieces, where the size of the diameter will be slightly different. When all the necessary marks are made, you can pick up a drill. There is one little secret here that allows you to make the hole the smoothest and most even in appearance: you need to drill not only from the input side, but from both. First, one part is drilled to the middle, and then the other. This is how the hole is made, and we proceed to the next step, allowing us to learn how to insert the lock into the interior door ourselves.
Installation process
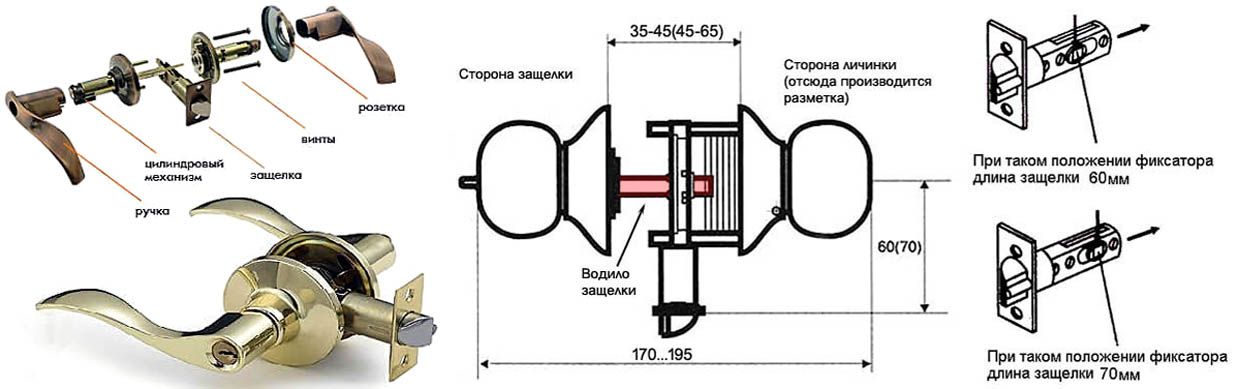
Let's say you installed a new interior door. Now you need to insert a handle into it. Its functioning depends on the quality of the working mechanisms and on the correct installation. Before talking about the installation process, we suggest that you familiarize yourself with its components.
Scheme of a door latch-knob type
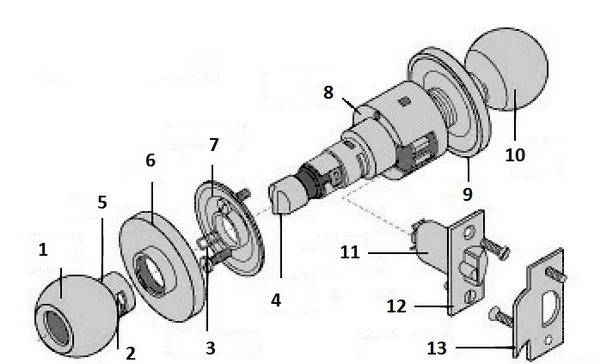
1 – internal rotary handle; 2 - technological hole; 3 - spring clip; 4 - lock button; 5 - handle shank; 6 - decorative flange; 7 - mounting plate; 8 – locking mechanism cylinder; 9 - decorative flange; 10 - external rotary handle; 11 - latch mechanism; 12 - plate for fastening from the end of the door; 13 - reciprocal plate for the door frame.
Making holes in the door leaf
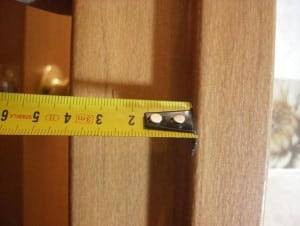
First you need to make a through cylindrical hole. To do this, use a tape measure to measure a distance of 1 - 1.2 m from the floor. Make a mark with a pencil. From the end of the door, measure a distance equal to the length of the latch mechanism. You can measure the mechanism with a ruler or look at its parameters in the manufacturer's instructions (all drawings should be there). The resulting intersection point will be the center of the hole. First, use a drill to make a hole with a diameter of 5 - 6 mm. Then install a crown on the drill, the diameter of which is equal to the diameter of the hole for the internal mechanism of the handle - as a rule, it is indicated in the instructions.
Useful advice! In order to make a neat through hole with a crown in the door leaf, first a shallow incision is made on one side of the door - 5 or 10 mm. After that, a through hole is made on the other side of the door, centering the crown over the hole from the drill. So, when the crown exits from the reverse side, the decorative coating will not peel off along the edges.
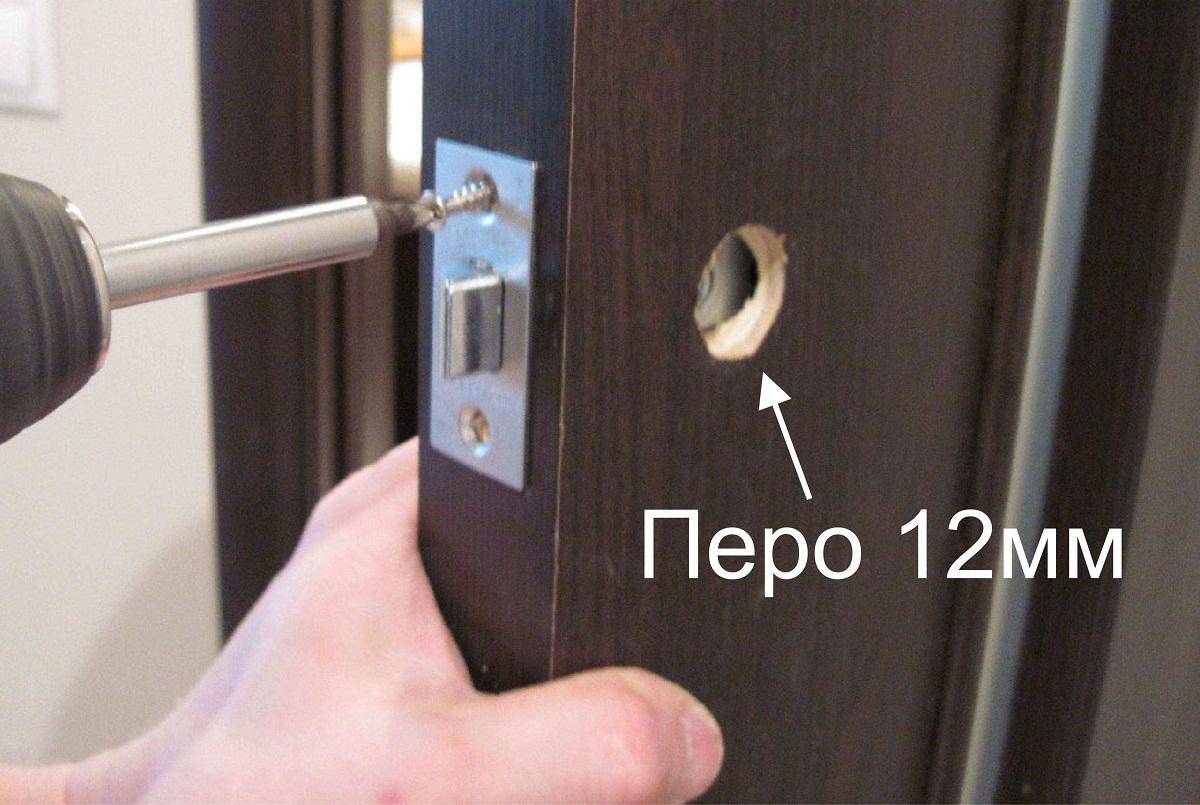
From the end of the door, according to the markup, you need to prepare a hole for the latch. To do this, a hole is made with a drill with a pen drill. If it is too small, you can expand it with a chisel. With the same hand tool, a small recess is made under the groove of the plate, which will be screwed from the end.
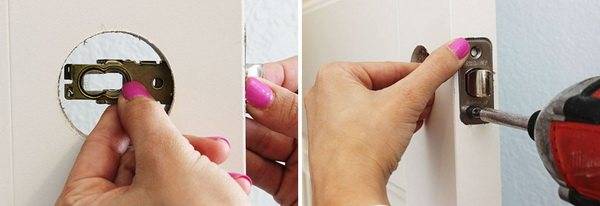
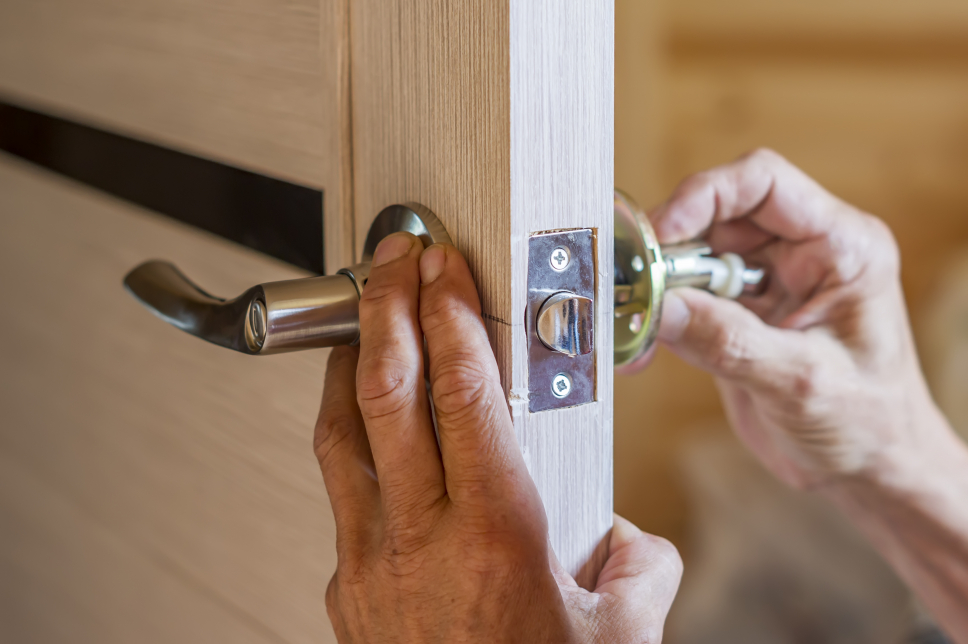
Installing the latch handle
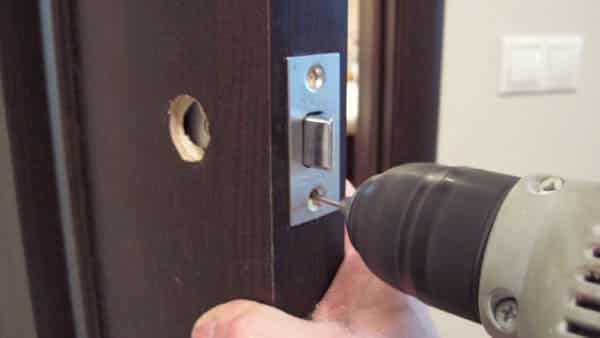
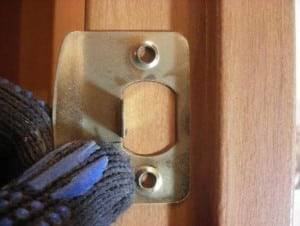
First, through the hole in the end, you need to insert the latch mechanism and screw the plate with self-tapping screws.
Then part of the handle with the cylinder is inserted into the groove of the latch mechanism. On the reverse side, a mounting plate is put on the cylinder protruding from the door leaf and screwed with self-tapping screws. Then put on a decorative flange
It is important that a small groove from the edge of the flange is at the bottom - for aesthetics. And the technological hole must coincide with the internal spring clip
Otherwise, if you need to dismantle the handle, it will be difficult to disassemble it. Having combined all the details of the latch handle in accordance with the diagram, install the handle by pressing - the inner pin will fix it.
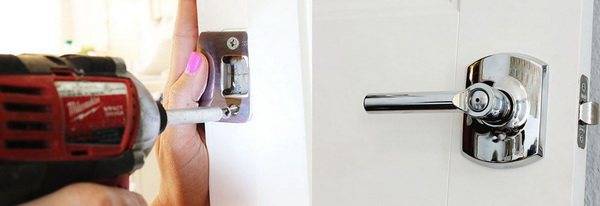
Strike plate mounting
Close the door and mark on the end of the door frame the place where the latch tab rests. Make a hole for it with a drill bit. A chisel will help you choose the required depth. Attach the mounting plate and screw it with self-tapping screws.
Ready! On average, installing a do-it-yourself latch handle takes 20 to 30 minutes. The main thing - take your time, study the manufacturer's instructions and the dimensions indicated there. Then everything will turn out perfectly the first time!
Separately, it should be said about the installation of the so-called handle on the outlet. Its internal mechanism is impressive. Under it, a nest is made at the end of the door - first it is drilled, then expanded with a chisel to the required size. The mechanism is placed inside the door leaf for fitting. Make recesses under the lining on the end part. Next, on the surface of the door leaf mark the location of the well and the square of the handle - holes are drilled. The latch mechanism is inserted inside and fixed with self-tapping screws.After that, handles are attached to both sides of the door. The reciprocal plate is attached according to the same principle as when installing a knob-type latch handle.


Installation of platbands on the door.
There are two ways to install platbands:
90 degree angle and 45 degree angle. If there is no miter saw or at least a miter box at hand, then it is better to stop at the 90-degree option.
We apply the trim to the door frame close to the hinges. Thus, we determine the gap between the platband and the edge of the door frame. This gap must be maintained on all sides of the door frame.
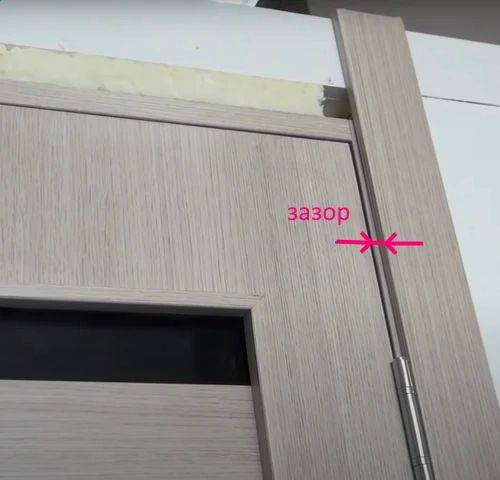 The photo shows the gap between the casing and the edge of the door frame.
We measure the required length of the platband. To do this, to the already installed platband, we apply a second platband or a trim from it from above. At the same time, we take into account the gap from the door frame to the platband. With a pencil, mark the required length of the platband.
 Determine the length of the side trim.
Cut the platband to the desired size.
We install the casing in place and drill one hole in it. The hole should be slightly smaller in diameter than the decorative nails.
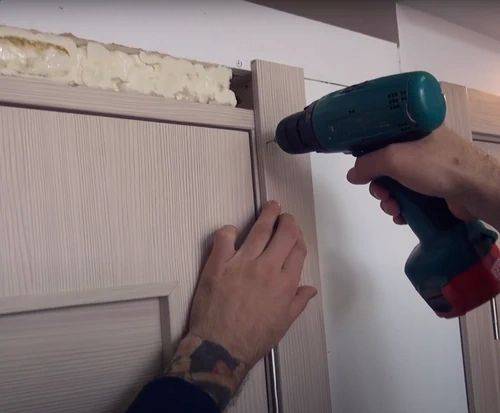 We drill a hole.
We nail the casing on one carnation. We don’t nail the nail to the end, because suddenly you need to adjust the location of the casing, then the nail can be easily pulled out.
- We apply the second side trim, determine its length and cut it to the desired size.
- We nail the second casing with a carnation like the previous one.
- Attach the top trim and mark its length.
 We mark the length of the upper casing.
- Cut off the top platband to the desired length and apply it in place.
- We drill holes in the platbands and nail them with cloves.We nail the upper bar with three cloves, and the side with five cloves. Carnations are nailed from top to bottom.
 We drill holes.
Using the same principle, we nail the platbands on the other side of the door. In the place where the additional strips are installed, we level the edges of the platbands along them.
Types of locks for interior doors
Depending on the method of tie-in, ease of use and other characteristics, the following types of locks are distinguished:
- Flat, having a rectangular frame and tongues separated from the latch of the lock. The design is distinguished by a high degree of reliability and is equipped with a lever handle (latch).
- Round locks in a cylindrical body, latch with tongue combined. The handle can be of any shape. The stopper and the cylinder cylinder of the lock were cut into the spindle.
- Reduced flat locks equipped with a rotary handle. The latch is missing.
- Round, in the design of which there is a special handle-knob.
Castles can be classified according to other criteria. The types of locking mechanisms are as follows:
- bolts;
- fall;
- latches with a lock;
- mortise type;
- invoices;
- magnetic.
The last type of locking devices does not create a sharp sound when closing, it can be mounted in any interior door (even already installed); magnetic locks are becoming increasingly popular.
To insert a lock into a newly acquired door, you need to know the thickness of the canvas and the features of its structure. There are such types of interior doors:
- MDF 35 mm wide.
- MDF 45 mm wide.
- Wooden door of a new design (width of panels from 50 mm).
- Wooden door fiberboard of the old design, having a plank frame.
Installing locks on interior doors can be done independently, knowing the design features and the principle of operation of the lock.
flat
This category of locks is the most expensive. They are more difficult to install, but provide good burglar protection. They give an additional load on the door, unlike round locks. A flat lock will fit the cash door.
It is permissible to install only flat locks of a reduced size in a 35 mm wide MDF door. Also in MDF it is allowed to embed only those locks in which the widest tongue is 15 mm. The end plate must not exceed 24 mm in width. This is due to the fact that only a wooden frame can take on the dynamic load created by the lock, and MDF is a weak material.
Round
This type of lock is most suitable for an apartment or residential building. They are designed to fit into any door. The push handle is used most often in those houses where people with limited mobility live. More effort is needed to use the rotary knob.


The knob-knob is distinguished by its safety: it is impossible to injure yourself or catch clothes on it.
The process of installing round locks with any handles remains the same. The lock mechanism with a cylindrical body is produced for doors with a thickness of 35-45 mm. Locks for large wooden structures are not always available for sale in small towns. But round locks are different in that they can be adapted to any door thickness. To do this, it is necessary to replace the latch carrier by installing a longer one.It is a rectangular steel plate 2-3 mm thick. There is a hole at one of its ends.
The latch release toggle switch must be set to a position that will match the material from which the door jamb is made. For wood it is 70 mm, for MDF - 60. The production of locks for interior doors has its own characteristics: their larva is located inside for the convenience of locking the door from the inside.
When the door opens to the left side, and a suitable lock has not been found, the latch and the larva must first be swapped. To do this, you need to disassemble the structure. For office space, this option is not suitable, because such a lock from the side of the larva is easy to disassemble even without the use of special tools.
This is interesting: How to embed a lock in the door
Checking work
After adjusting the locking mechanism, the operation of the system as a whole should be checked. To do this, close the door and check the correct installation of the back bar. If there is a slight latch play in the bar or, conversely, a millimeter displacement of the hole relative to the latch, then all it can be fixed by unbending or bending the adjusting plates of the back bar hole.
If the lock works correctly, then there should be no play between the latch and the back plate, the door closes tightly, the lock works easily, and without unnecessary noise.
How to properly insert a lock into an interior door, you will learn from the video.
Installation height
At what height to mount the handle, it is not clearly spelled out anywhere. Behind the scenes, it is installed in products made of mdf and timber at a distance of one meter from the floor covering.It can be lowered or raised a little - it all depends on the taste of the owner of the living space.
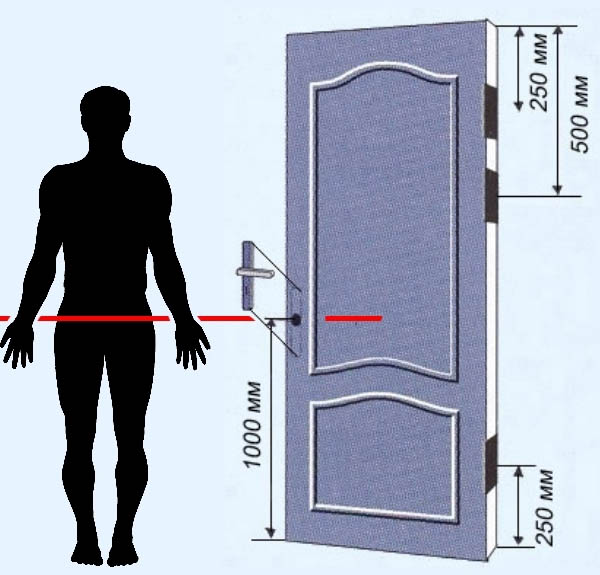
The installation height of the door handle is approximately 1 m
The height of the installation of the product is affected by the growth of the residents. As practice shows, a handle at a distance of 1 m is the best option for adults and children. When installing, also consider the level of the handles on other doors. Products must be at the same height.
The internal element (latch) is uniform, so it is installed in the same way for different handles with a snap mechanism. The height from the bottom of the door and the distance from the edge are standard.
- If the handle has a spherical shape, and the distance from the edge of the door to the decorative element of the leaf (for example, glazing) exceeds 140 mm, it is better to fix the mechanism 70 mm from the edge. If you install the handle at a distance of 60 mm, when closing the interior door from the inside, you can hit your hand on the door frame.
- When mounting the pressure product, the indentation must definitely be 60 mm.
At this stage, we have two holes ready. We proceed in the following order:
We install a snap-in mechanism in the side hole, fasten it with self-tapping screws.
- Remove the top of the handle. There must be a side hole for this.
- Using the key included in the set (you can take any other thin flat object), press the tongue inside the hole and remove the handle itself.
- We remove the decorative trim, we find the mounting holes under it.
- We install the outer part of the product, and then the inner half.
- We tighten both parts with the screws that are included in the kit.
- We put on a decorative overlay and the body of the latch handle.In this case, it is necessary to press on the inner tongue with a key or other suitable object.
- Now the door needs to be closed in order to circle the place where the latch tongue touches the door frame. According to this markup, we hollow out a recess for the entrance of the lock.
- We install a decorative plastic pocket covering the wooden groove.
- We fasten a metal plate over the hole for the tongue of the latch. At this point, the installation of the handle is completed.


