- Preparing for installation
- Toilet bowl with a tank floor Cersanit
- We put the toilet on the laid tiles
- Way for the lazy
- The right way
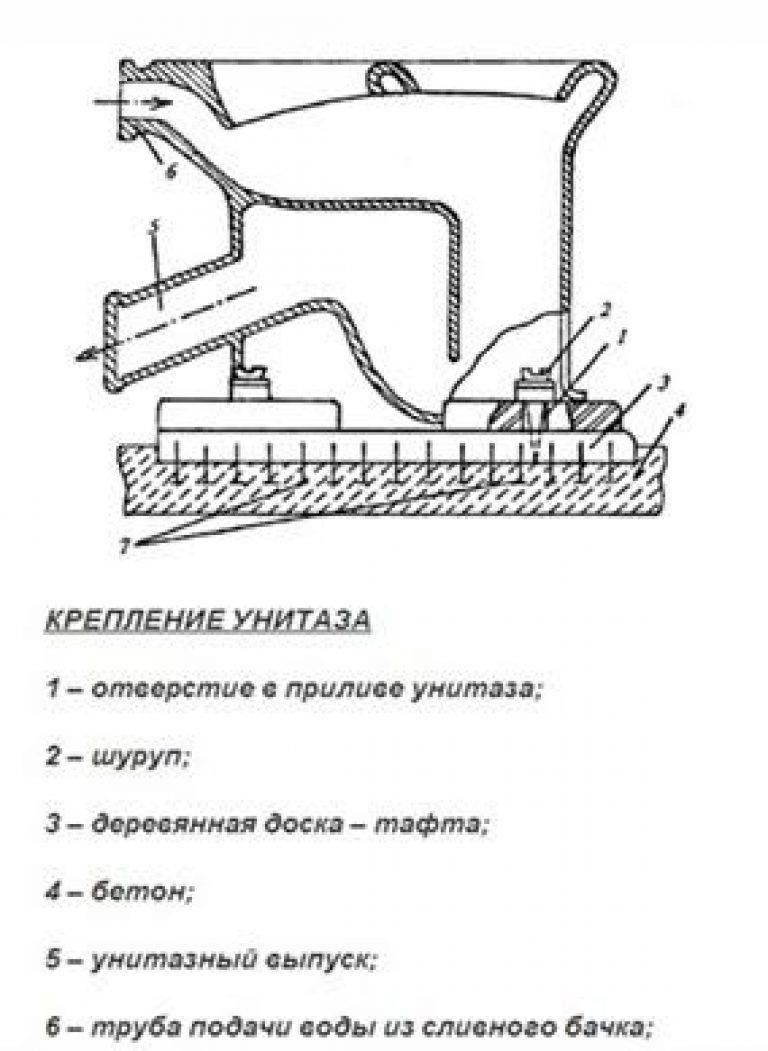
- Ways to fix the toilet
- Open mounting method
- Closed way
- How to dismantle a worn toilet
- Training
- Toilet close to the wall
- Features of the installation of the toilet
- Toilet Assembly
- Facing the floor surface around the installed toilet
- Mounting types
- Fastening with dowels
- Fastening without drilling
- The nuances of choosing a new plumbing fixture
- Tools and materials
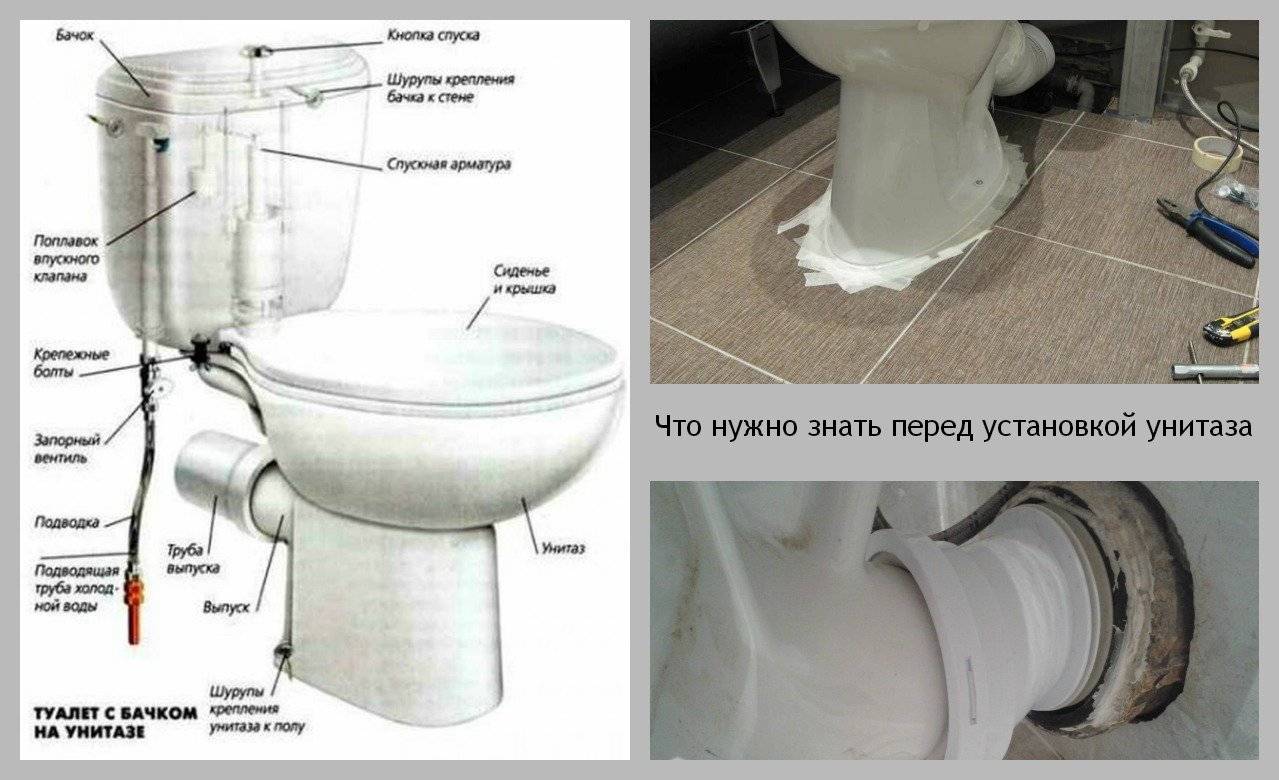
Preparing for installation
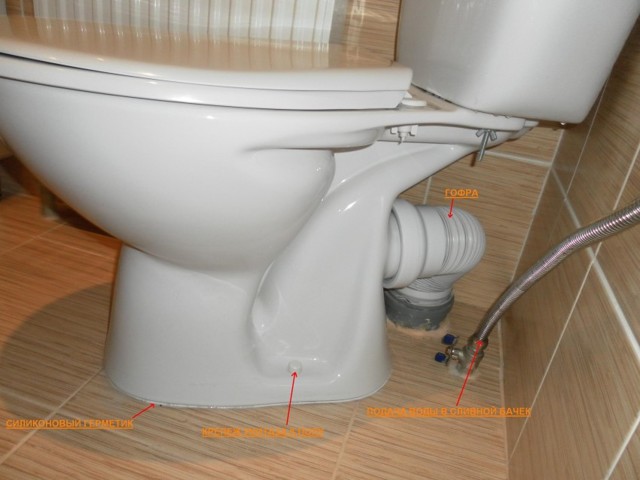
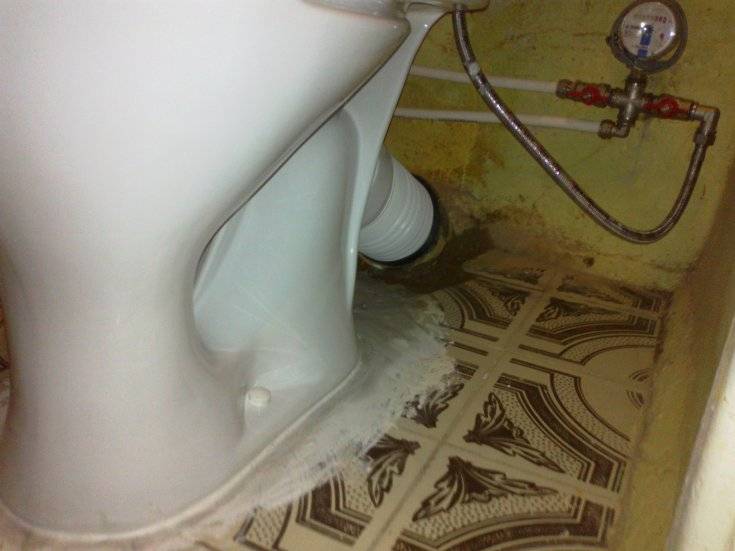
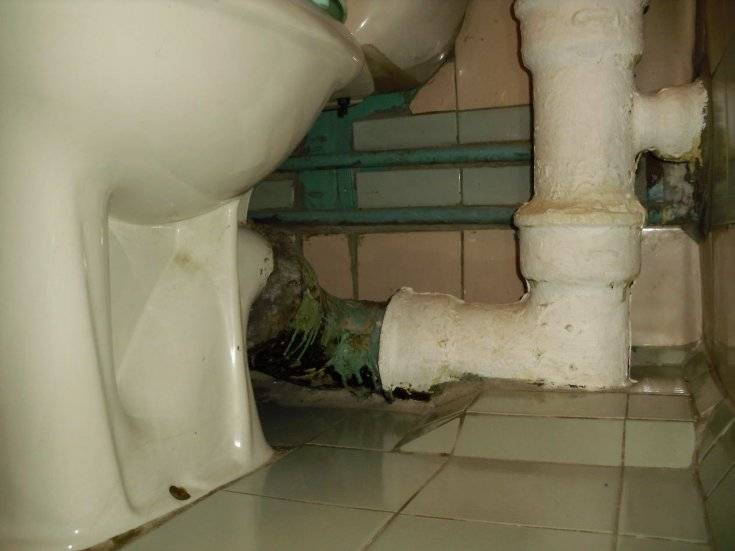
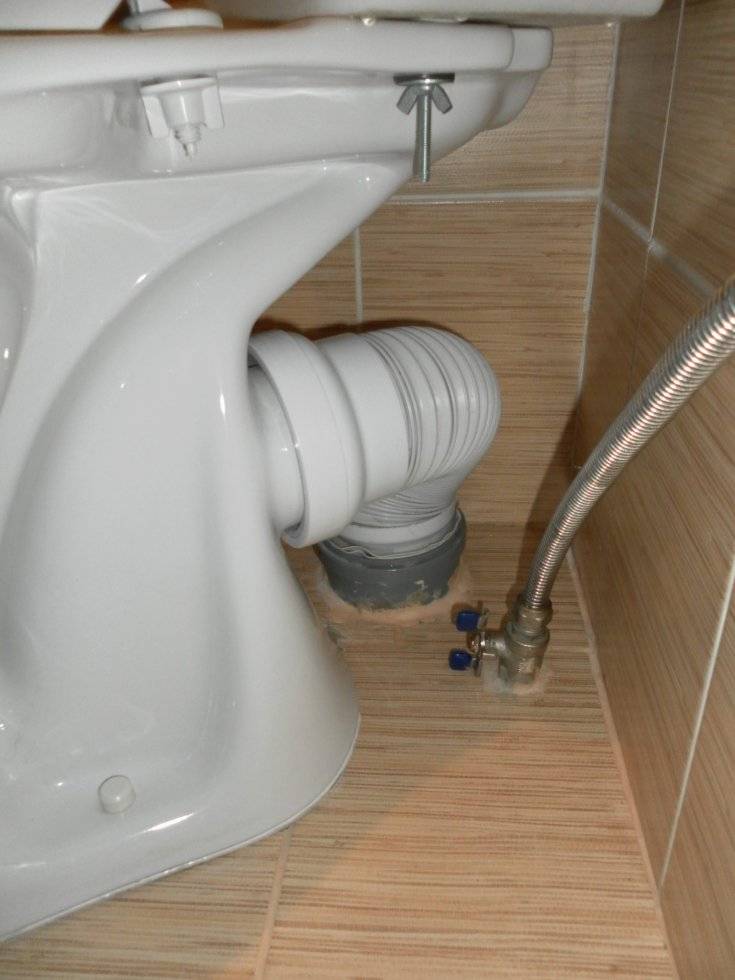
Before you install the toilet on the tile with your own hands, you need to carry out preparatory measures. They consist in the preparation of the surface and pipes. The toilet is connected to the sewer riser and to the water supply, so all the necessary lines must be connected and ready to be connected to the device. The back of the plumbing is placed against the wall so that the drain is above the sewer pipe. Otherwise, liquid stagnation in the pipe is possible, which is fraught with the appearance of an unpleasant odor.
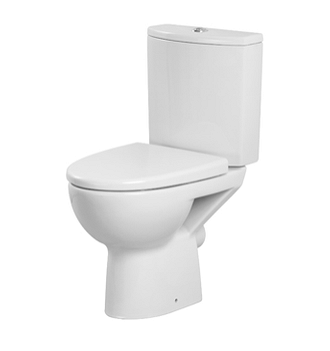
Toilet bowl with a tank floor Cersanit
It is good if the outlet of the plumbing equipment fits exactly into the sewer pipe. In this case, no adapters are required.If this is not the case, you need to prepare additional elements: plastic parts or corrugation. The latter is much easier to work with. To connect water, a flexible hose is used, which is fixed with a threaded connection.
The floor also needs to be prepared. The surface must be flat, without drops and protruding elements. Very rarely, but it happens. In this case, all significant roughness is rubbed with sandpaper or carefully removed with a chisel. Worse, if the irregularities are too large. Then you have to take care of the lining plate, which levels them. The tile must be cleaned before work so that dirt and debris do not get under the device.

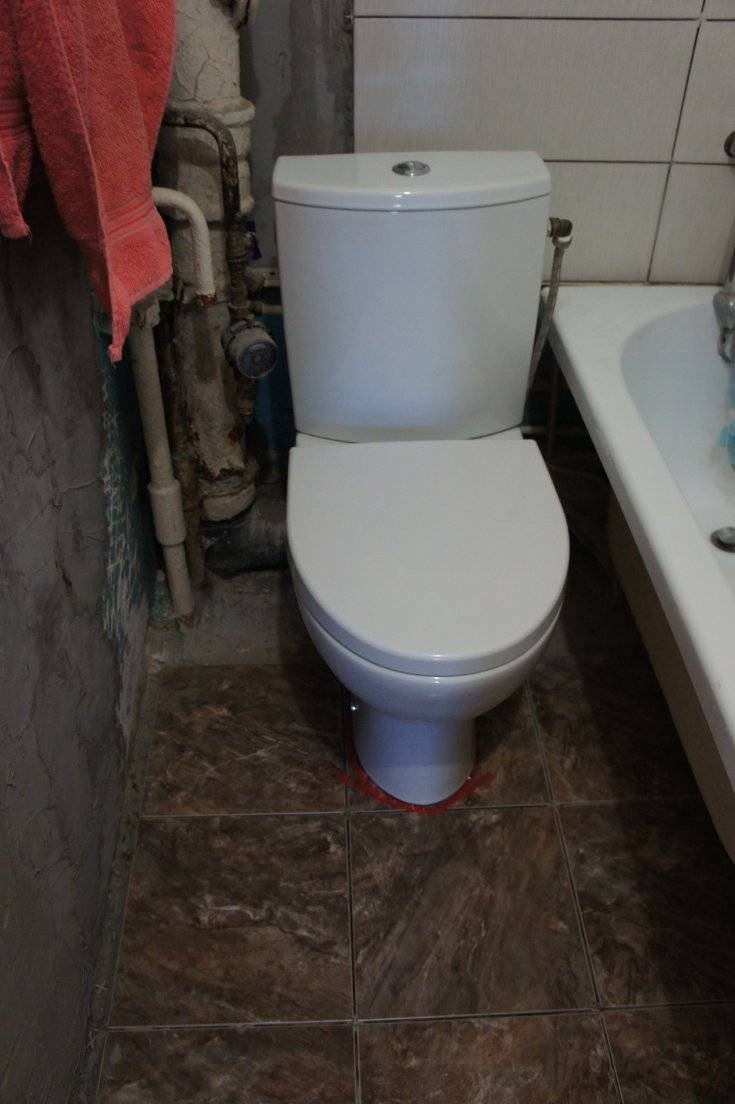
We put the toilet on the laid tiles
Good script. Right.
Installing a toilet on a tile is not only less tiring, it has a number of other advantages:
- The height of the toilet will be the most comfortable. The ears will not be covered by the knees.
- The appearance of the floor will be perfect, without any flaws in trimming the tiles. It is only advisable to make sure that the toilet is symmetrical with respect to the edges of the tiles. As an option, the tiles are laid diagonally, then problems with the visual positioning of plumbing can be forgotten.
Here, symmetry was sacrificed for the sake of saving tiles. However, it still turned out pretty good.
Well, what about the installation methods? How to install a toilet on a tile?
Way for the lazy
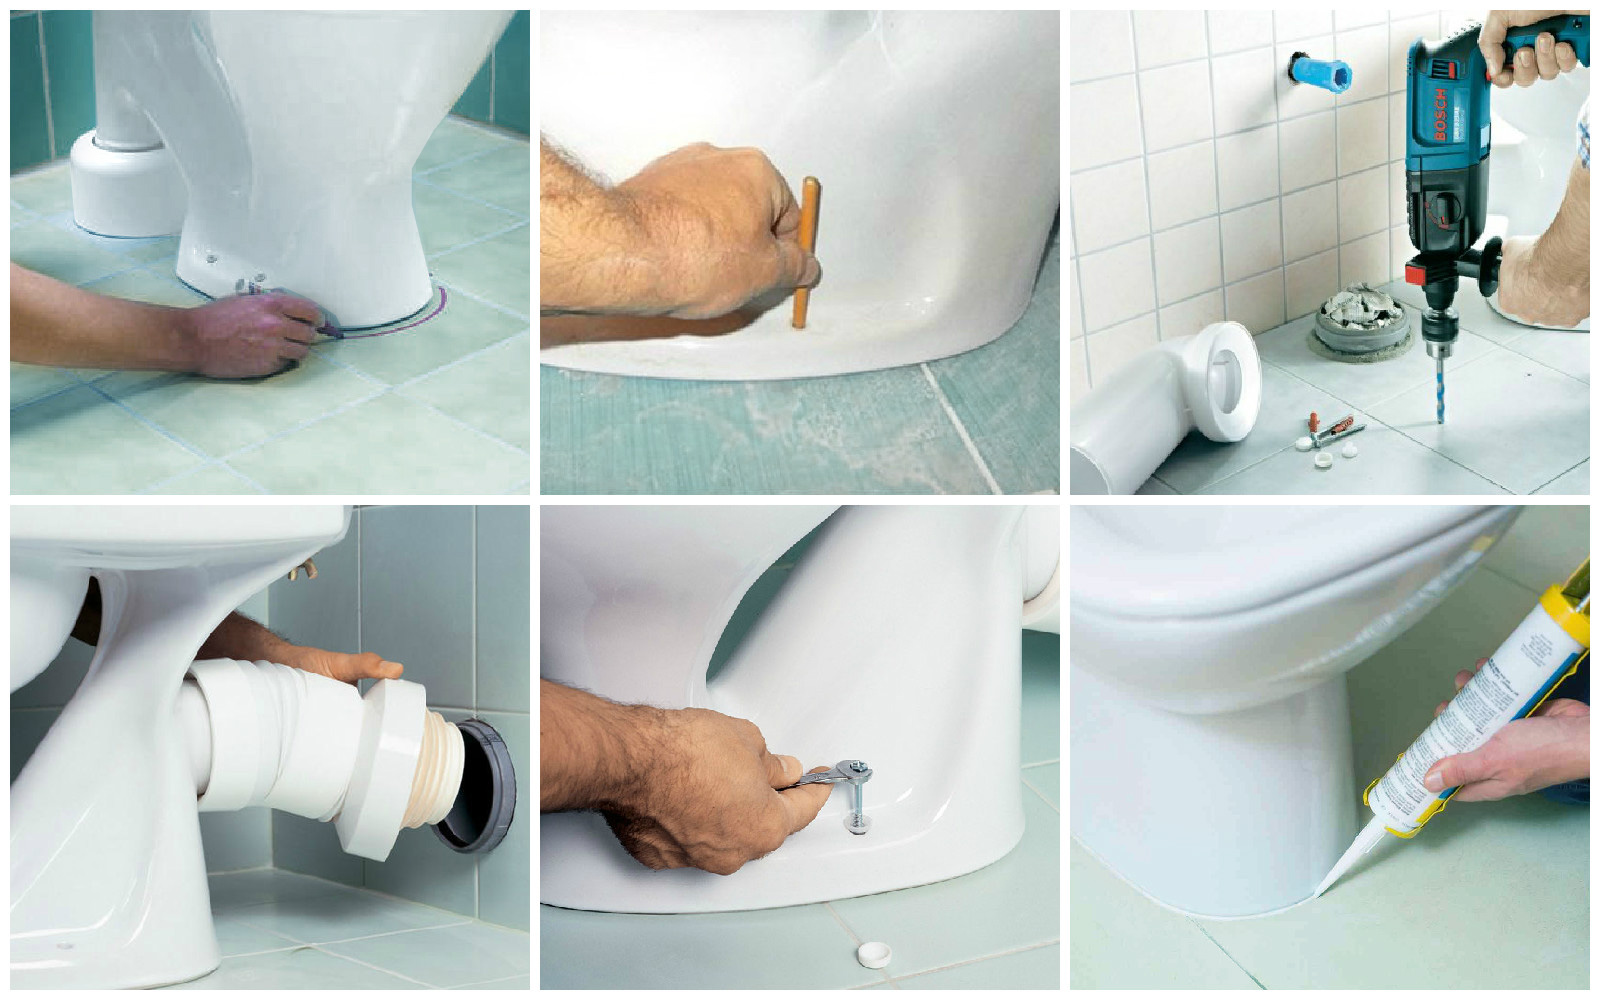
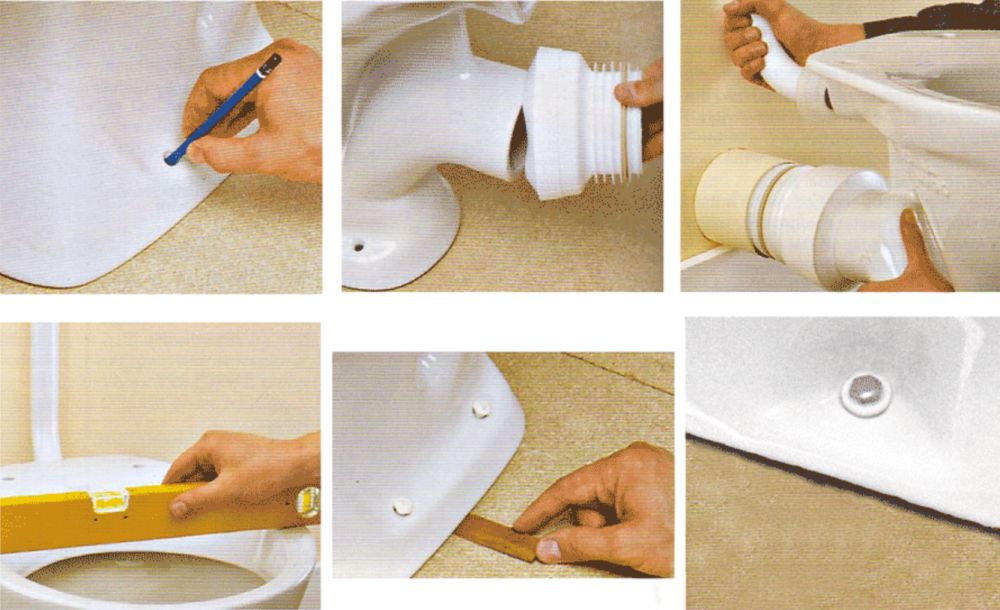
- We put the toilet in its future place and draw a contour with a pencil.
- Inside the contour we make a notch with a chisel. Cement will not adhere to the glossy surface of the tile. Take care of your eyes!
For a notch, it is better to take a tool more serious than the hammer in the photo
We dilute the cement mortar, the consistency of which resembles thick sour cream.The ratio of cement and sand is 1:1, pure cement is also acceptable. Usually five kilograms of cement is enough in excess.
We spread the solution on a notched tile moistened with water. We also wet the bottom of the toilet.
We put a toilet. Immediately without distortions and strictly horizontally. No level? The angle between the floor and the back wall will be a great guide. It is not always strictly horizontal, but the eye perceives the orientation of objects relative to each other.
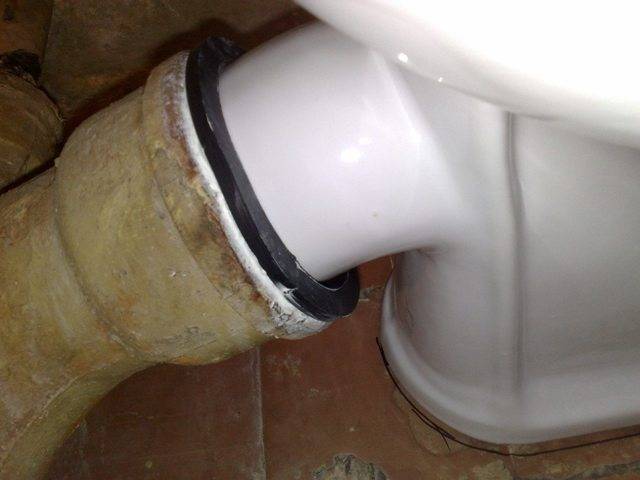
We use the solution squeezed out from under the base of the toilet bowl in order to cover the outlet of the toilet bowl in the cast-iron socket.
Important: if the sewer pipes are plastic, you will have to take care of purchasing rubber cuff seal. Cement is not applicable for plastic - leaks are guaranteed
Advantages of the method: no complicated tools and materials are needed for installation. Only hands, a hammer with a chisel, cement and some water.
Disadvantage: with a smeared outlet, dismantling the entire toilet bowl is possible, but difficult. In addition, you can sit on the toilet only after a day.
More often, when trying to remove the toilet, the release breaks off, but it also happens
The right way
How to install a toilet bowl on a tile correctly, so that it is easy to remove it?
- Perforator with a drill;
- A tile drill with a diameter slightly larger than a drill;
- Cuff for connecting the outlet of the toilet bowl with sewer pipes;
- Silicone sealant;
- adjustable wrench;
- Set of fixing screws. They are usually bundled with a new toilet, but are also sold separately, already with plastic dowels.
- Preferably a little cement, literally half a kilogram.
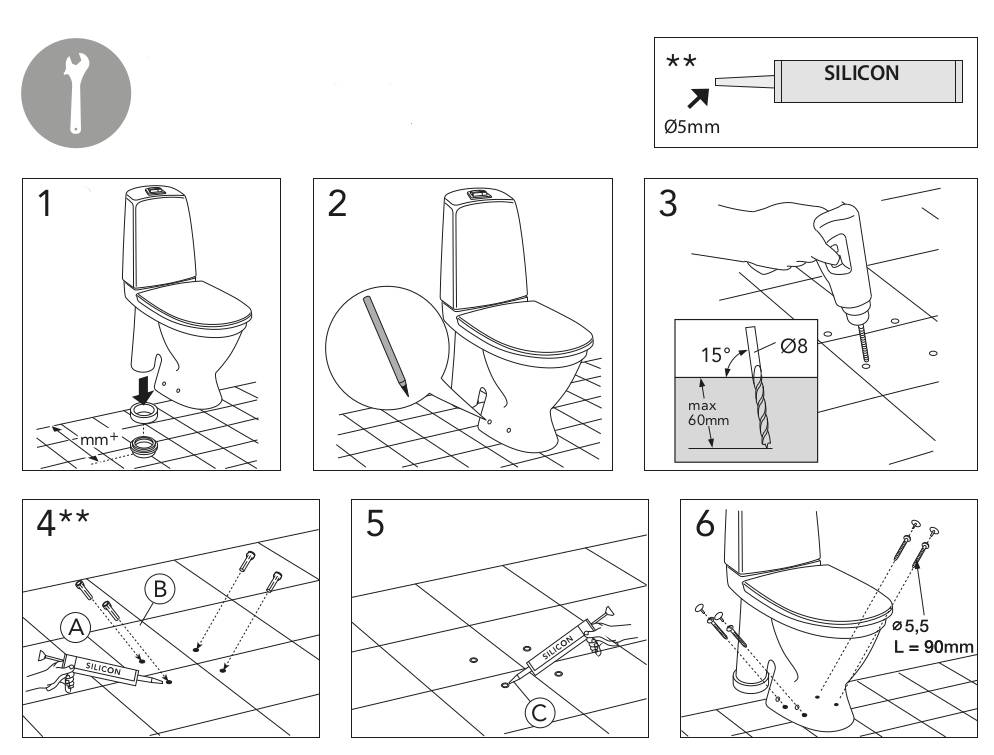
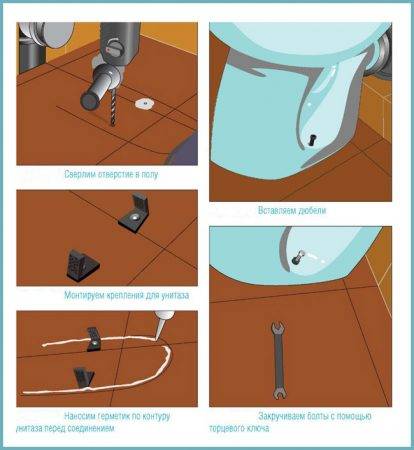
The main operations will be as follows:
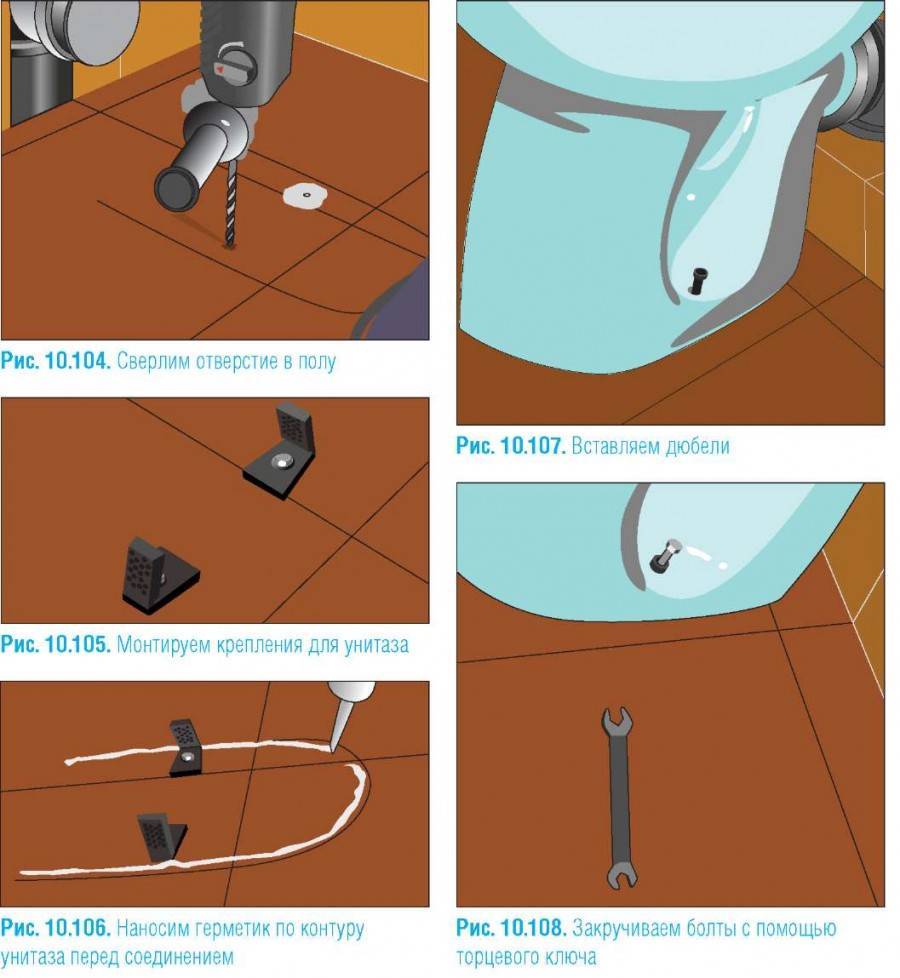
- Mark the mounting holes with a pencil.
- We drill the tile with a tile drill.
- Then we take a puncher with a drill and deepen the holes to the length of the dowels.
- We put the dowels in place.
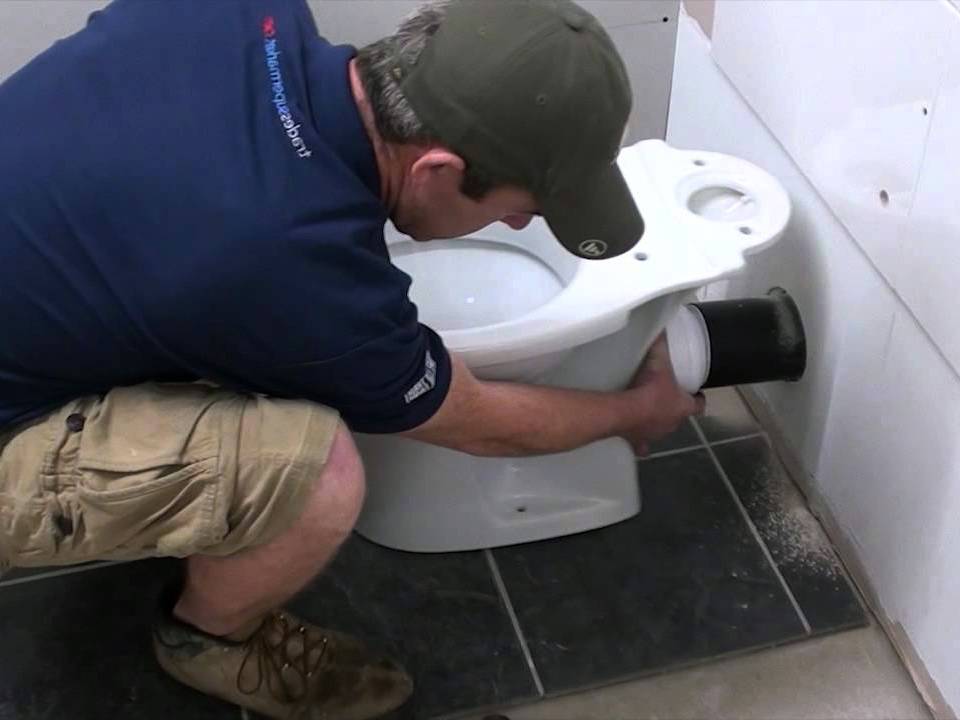
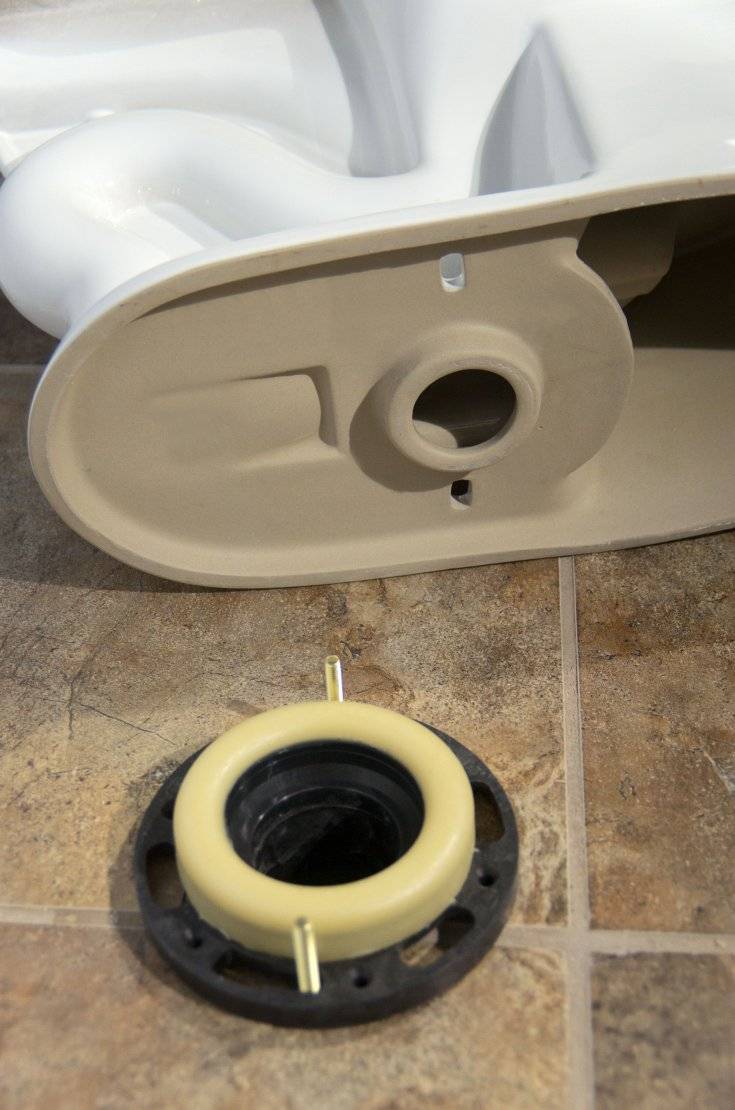
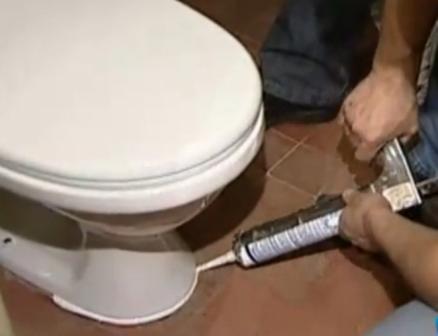
- We apply sealant to the outlet of the toilet bowl and put a sealing cuff on it.
You can also insert the cuff into the socket first - the result will not change
We apply sealant to the outside of the cuff and into the sewer socket cleared of debris and put the toilet in place.
Carefully tighten fasteners. Stop as soon as the toilet stops shaking. Of course, you need to attract it evenly and without much effort. Faience is fragile.
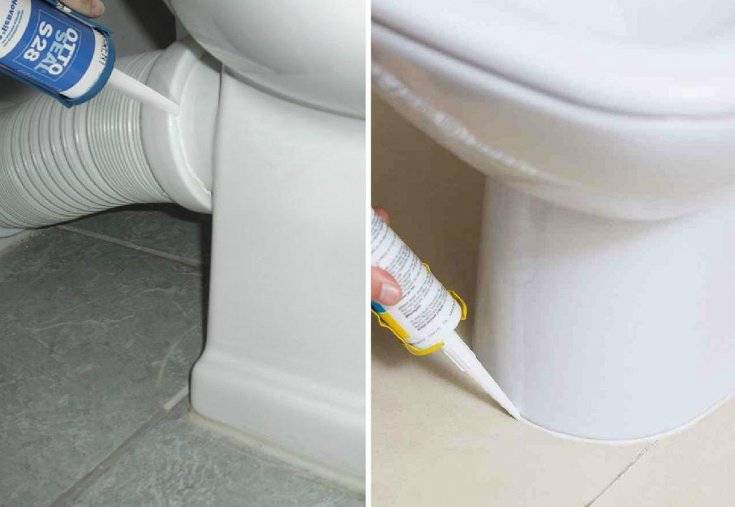
We coat with a cement solution all the cracks between the tiles on the floor and the base of the toilet bowl. This will distribute the vertical load along the entire edge of the base. Of course, when the cement dries.
It is also possible to use a sealant for this purpose; but it will remain soft and supple. And we just don't need it.
Sealant is worse, but also suitable
Ways to fix the toilet
Depending on the type of toilet you purchased, it can be fixed in two ways: open and closed. With a closed mount, the bolts are placed inside the structure, with an open mount, the bolts are attached at the foot of the toilet bowl. Let's consider both methods in detail.


Open mounting method
The open method is considered simple and reliable, however, in terms of aesthetic characteristics, it is inferior to the closed one in that the fasteners are located in plain sight. However, the open installation method takes less effort and time.
 Open toilet installation
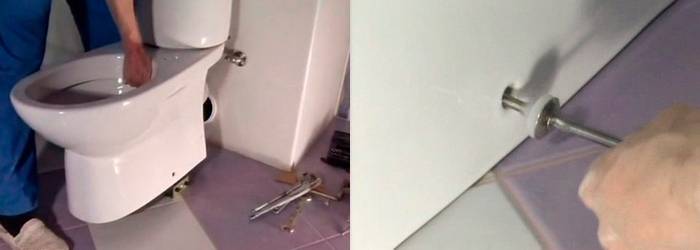
In order to proceed with the installation, select a place and place the toilet in the way it should be located in the future. Using a pencil, make marks in the places where you will need to drill holes for fasteners.
Draw the outline of the base of the toilet with a pencil.In place for holes, you must first scratch the glaze on the tile with a core, otherwise the drill will slide on the smooth surface of the tile. After that, a hole is made in the tile with a drill on glass, and then the required depth is drilled with a drill on concrete with a puncher.
The holes are thoroughly cleaned of dust, filled with silicone sealant, into which the dowels are inserted. The sealant will serve not only as a fastener, but also will perform the role of waterproofing. Before installing the toilet, apply a strip of silicone sealant along the drawn contour. This will prevent moisture from getting under the base of the toilet.
 Marking the floor before installing the toilet
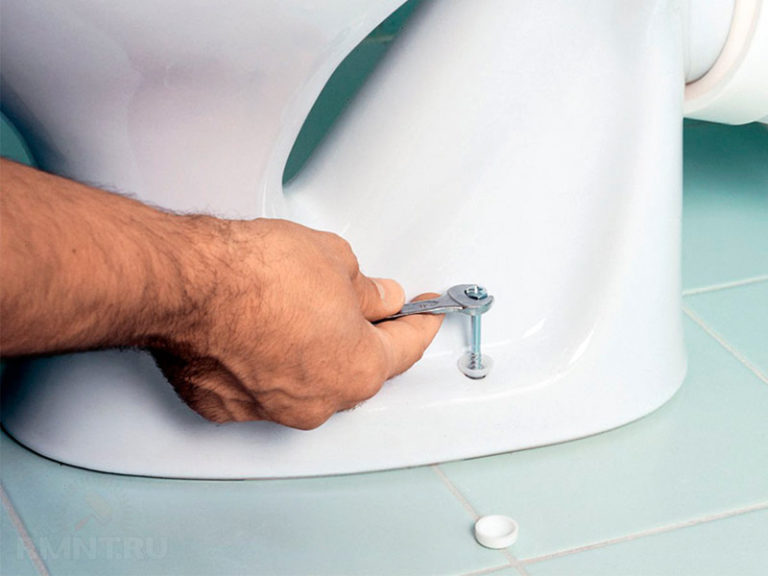
The last step is to install the mounting sleeves and tighten the bolts.
This should be done carefully, as overtightening can damage the toilet and cause cracks. In order not to overdo it as you tighten the bolts, check how strong the toilet is.
The fastening points are closed with special plugs sold complete with fasteners. This allows you to smooth out the visual imperfections of the external fasteners. At the end of the work, excess silicone must be removed with a rubber spatula.
Closed way
If you want to install the toilet in such a way that the fasteners are not visible, then you should clarify when buying whether the selected model is suitable for this. Installation is carried out similarly to open. The toilet is put in place, the contour is applied to the tile with a pencil and the marks for the holes are transferred.
 Scheme of installing a toilet bowl with a closed method
The first install a rigid mount.To do this, holes are drilled in the tile in a way already known to us, filled with silicone and dowels are installed, on which the connecting structure is attached. After that, a toilet bowl is placed on it and fixed with bolts through the holes on the side.
Advice. Masters advise not to tighten the bolts all the way until the connection of the toilet bowl with the water supply and the outlet sewer pipes is adjusted.
It is worth mentioning the cases when it is impossible to drill a tile to install a toilet bowl. The reasons may be different, for example, a floor heating system installed under the tiles. In this case, the toilet bowl is most often simply glued to the tiled surface with special glue, liquid nails, or epoxy resin is used for fastening. In this case, the tiles and the lower base of the toilet must be prepared in advance, because smooth surfaces have little adhesion. To roughen the surfaces to be bonded, sand them with sandpaper.
How to dismantle a worn toilet
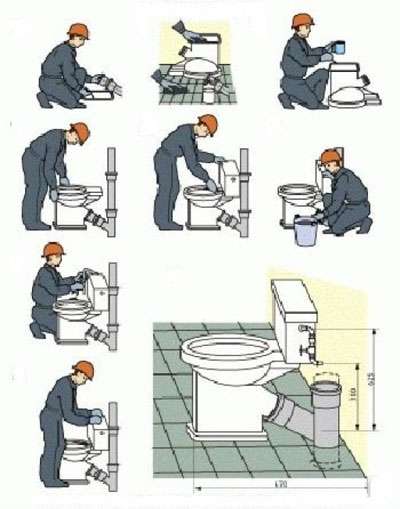
The corresponding work is carried out in stages:
- First you need to close the valve;
- Then drain the water from the tank;
- The next step is to disconnect the water hose from the tank;
- After - remove the tank;
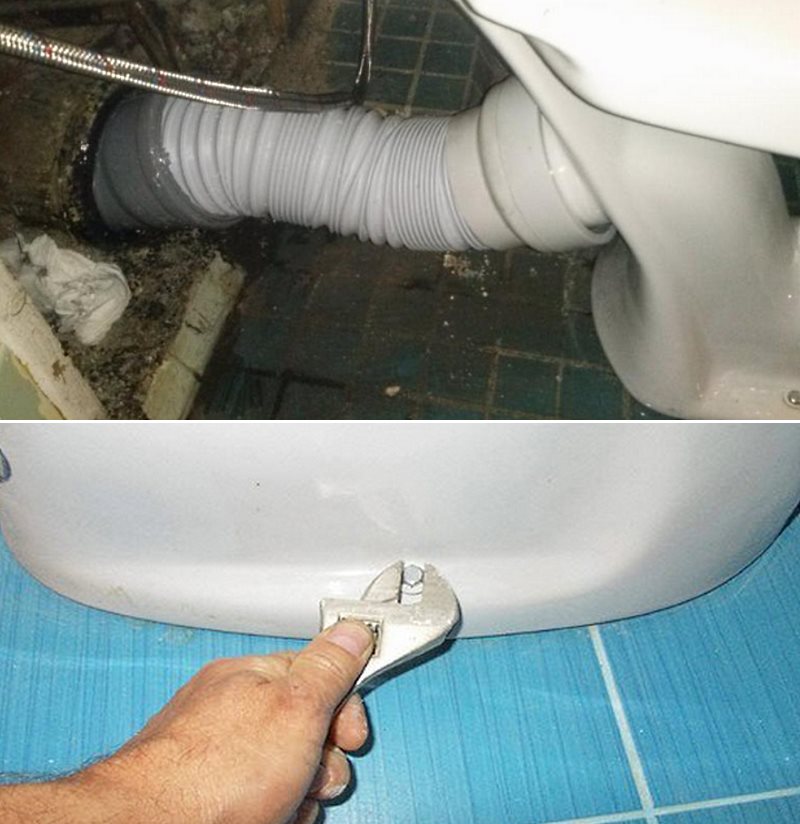
- Next, you need to unscrew the nuts behind the toilet to move the device away from the outlet into the sewer (to drain the remaining water, the product should be tilted in different directions);
- Then you will have to clean the passage into the sewer so that it can be freely clogged with a rag or a cork of the desired diameter.
To break the fixing bolts, it is better to use an open-end wrench and an adjustable wrench. The nut is unscrewed last, while the first holds the head.
Sometimes an old toilet hides worn taffeta under it, which must be disposed of with a hammer and chisel. Often old sewer drains are fixed with cement. Such a "mount" can also be knocked down with a chisel.
Training
choosing a new plumbing fixture
If the bathroom is very small and rearrangement is technically impossible, you need to choose a model of the same type as the device to be replaced.
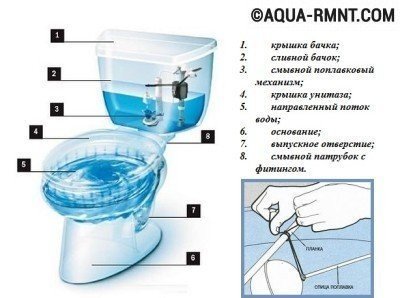
Floor toilets differ in the design of the main components. The outlet drain of the toilet bowl can be:
- vertical;
- horizontal;
- oblique.
The bowls are divided into:
- funnel-shaped;
- visor;
- dish-shaped.
The cistern can be mounted on the wall or combined with the base of the toilet. To fix the toilet to the floor, two or four attachment points are most often provided, but there are models that are attached to the floor by means of corners, which are necessarily included in the delivery.


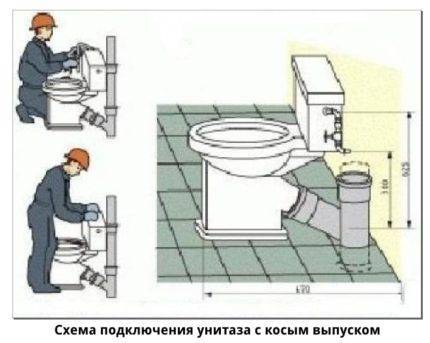
The most important selection criterion is the type of outlet drain. If you do not plan to redo the sewer pipe supply, the drain should be arranged in the same way as before. It is almost impossible to qualitatively and reliably combine drains and inlets that do not correspond to each other, if this is not a toilet with a release
The method of installing the tank must be taken into account when designing and performing finishing work in the bathroom. To install the tank, you will need to prepare a place and mount the anchor in the wall.
If the replacement of the toilet is not part of a major overhaul, but is carried out on an emergency basis, it is better that the design of the new toilet's cistern matches the previous one. This is not a dogma, but elementary considerations of saving time, effort and money.
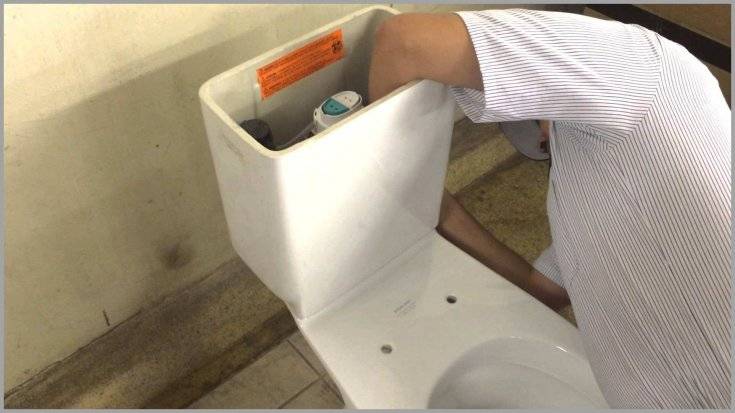
dismantling the old one:
- First you need to disconnect the drain tank from the water supply.
- Shut off the water supply, drain the tank and disconnect the hose.
- After that, the tank can be removed from the mounts.
- To break the bolts, you will need a screwdriver or open-end wrench to hold the bolt and an adjustable wrench to loosen the nut.
- If the bolts are heavily rusted or slagged with salt deposits, they must first be soaked with kerosene, vinegar, or use special compounds. For this purpose, WD-40 lubricant is used. After processing, the deposits are loosened and the bolt lends itself more easily.
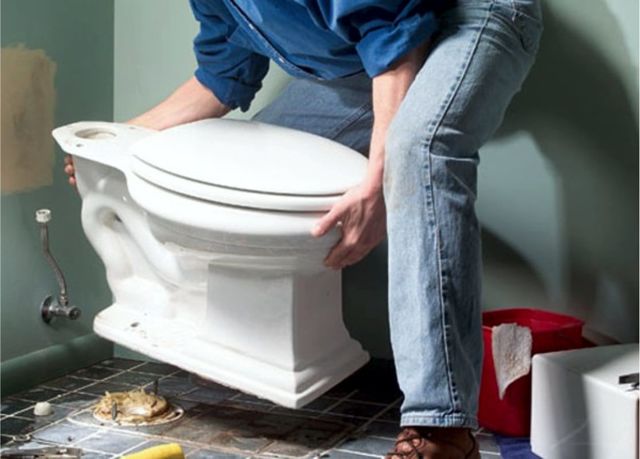
- After dismantling the tank, the toilet itself is removed. First unscrew the nuts, and then disconnect the device from the sewer.
- In old houses, where major repairs have not been carried out for a long time, drains are fixed to sewer pipes with a cement coating that needs to be knocked down. To do this, the coating is pierced with a chisel in two or three places.
- After that, the toilet will have to shake from side to side until the drain loosens.
- Then the toilet is tilted to drain the remaining water and only then is it disconnected from the sewer.
- The hole must be closed with a wooden plug of the appropriate diameter or clogged with a rag gag. This operation should not be neglected, the gases from the sewer not only smell disgusting, they are flammable and highly toxic.
Careful handling of the old toilet during dismantling is not necessary; to facilitate the work, part of it can be beaten off.
You can make a hole in the toilet pipe and use an impromptu lever made from improvised materials like a stick or a metal rod. If the financial situation allows, at the same time as replacing the toilet, it is worth replacing the cast-iron pipes with more modern plastic ones.
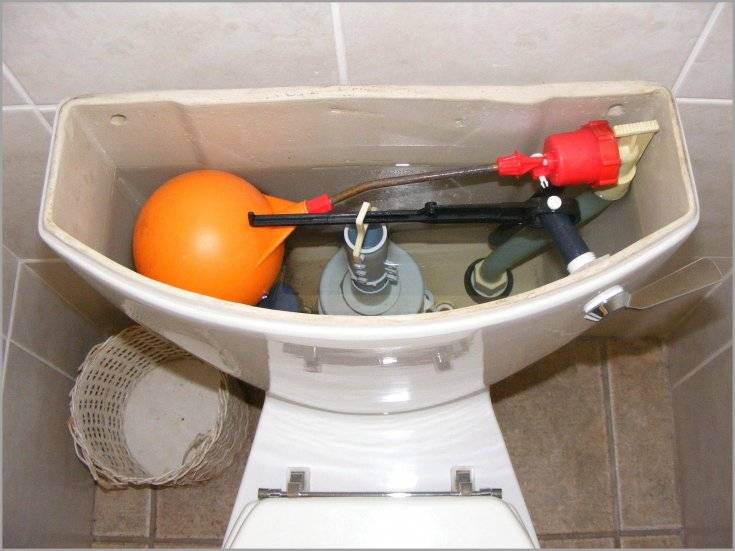
Each product is accompanied by instructions, following which the device can be assembled by everyone.
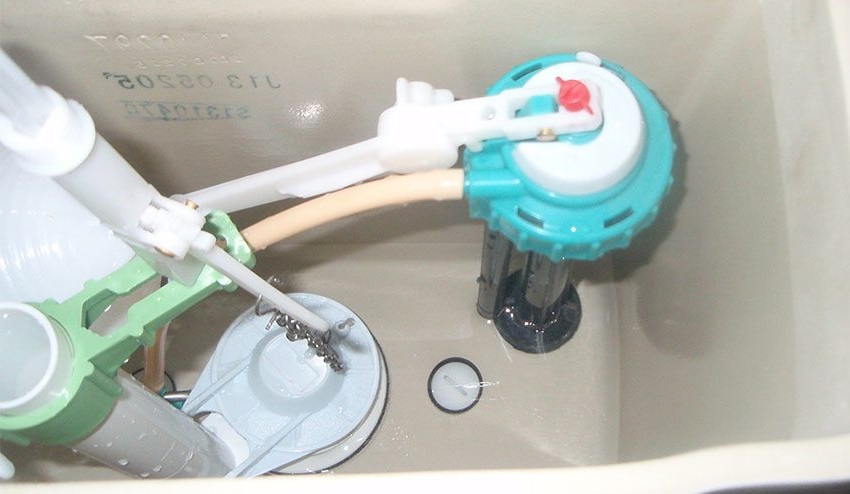
In general, the assembly scheme looks like this:
- A drain mechanism is installed in the tank. It is included in the delivery package already assembled, it only needs to be inserted into the tank and fixed. Before installing the mechanism, it is necessary to inspect the mating surfaces and remove any burrs found.
- A rubber sealing washer is put on the device, it is inserted into the tank and screwed with a plastic nut with a seal. To avoid damage to the nut, this operation is carried out manually, without the use of any tools.
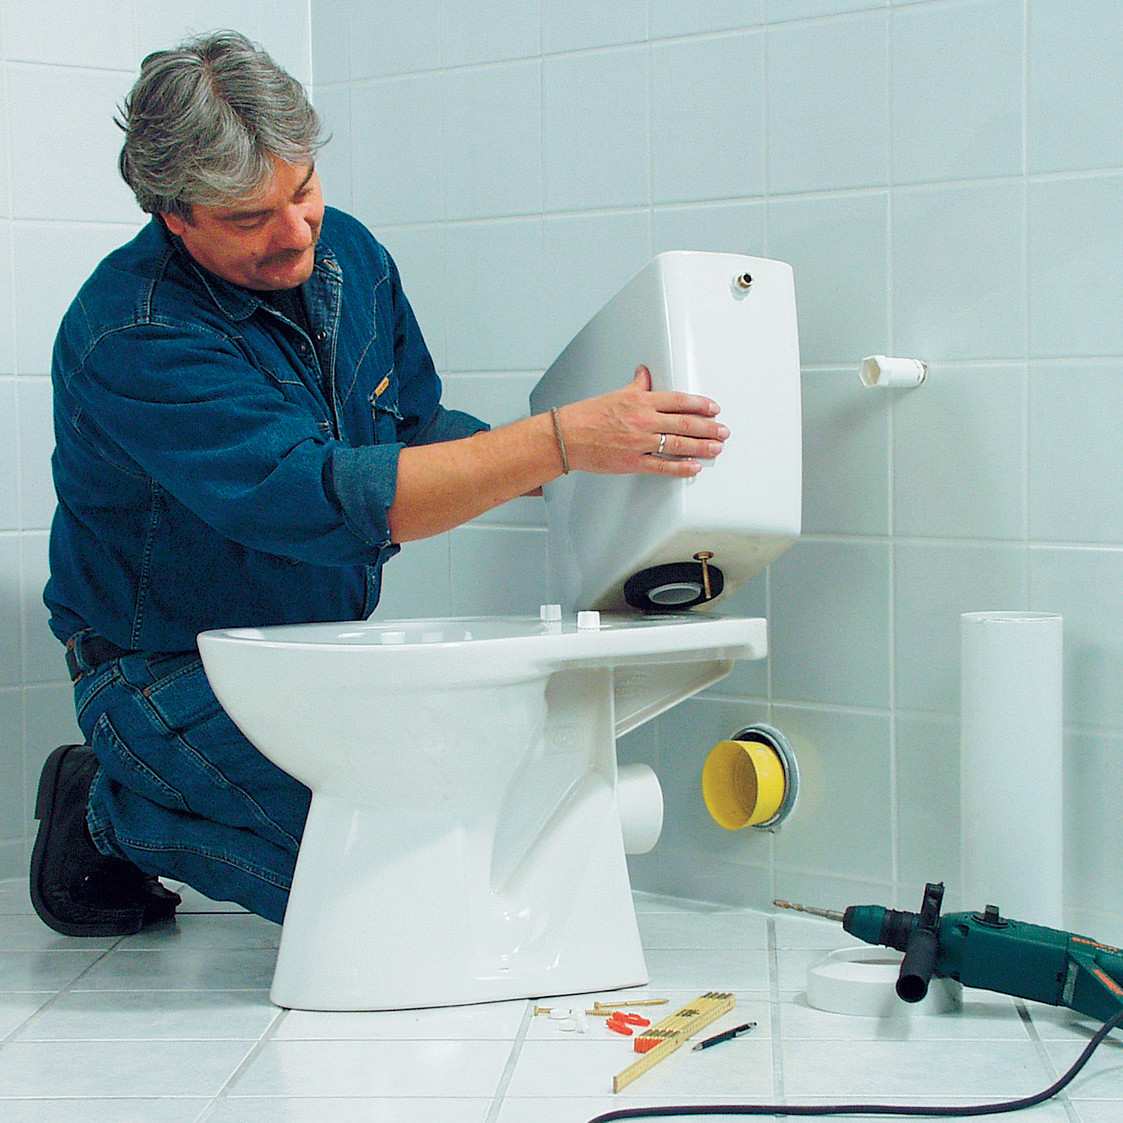
- A tank with a flush mechanism installed is attached to the toilet. For this, a set of fasteners is provided, which includes bolts, nuts, washers and rubber seals. Before inserting the bolts into the holes provided for them, washers are put on them, then sealing elements.
- After alignment, seals are first put on the protruding ends, then washers. The nuts are tightened to the stop, alternately, so that the force is distributed evenly.
From this video you can learn how to assemble and install the toilet flush tank yourself:
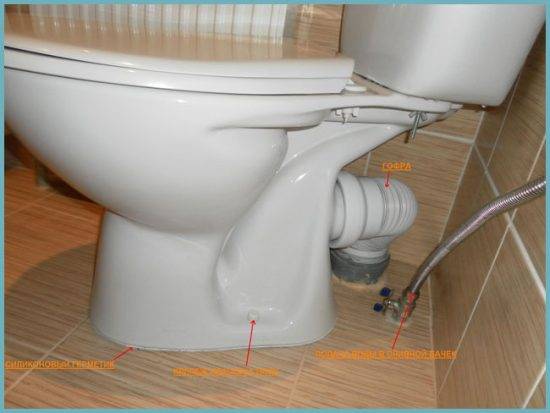
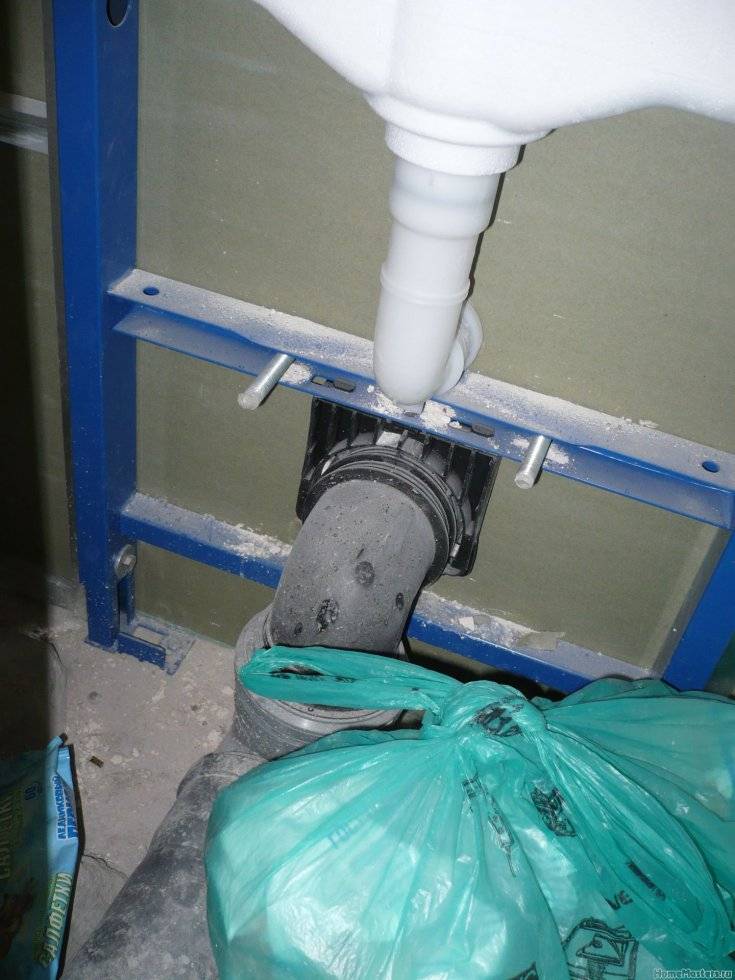
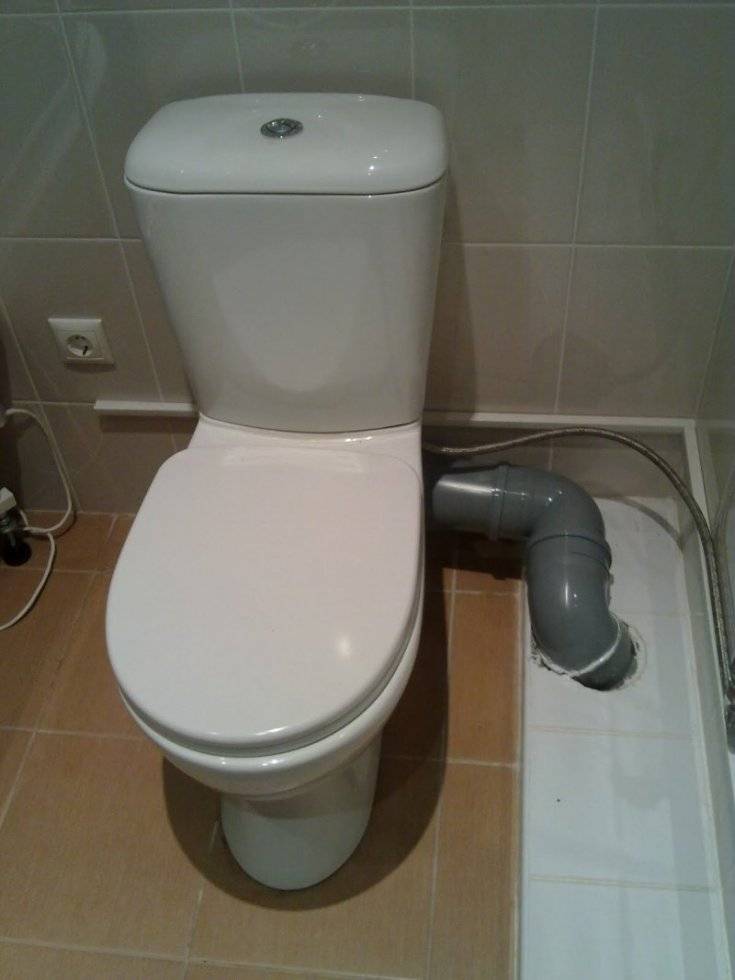
Toilet close to the wall
By this is meant the closest location of the tank to the wall. By the way, there is no need to make the tank
touched the back wall. More practical for washing and maintenance will be a small gap of 5-10 cm between the tank and
wall.
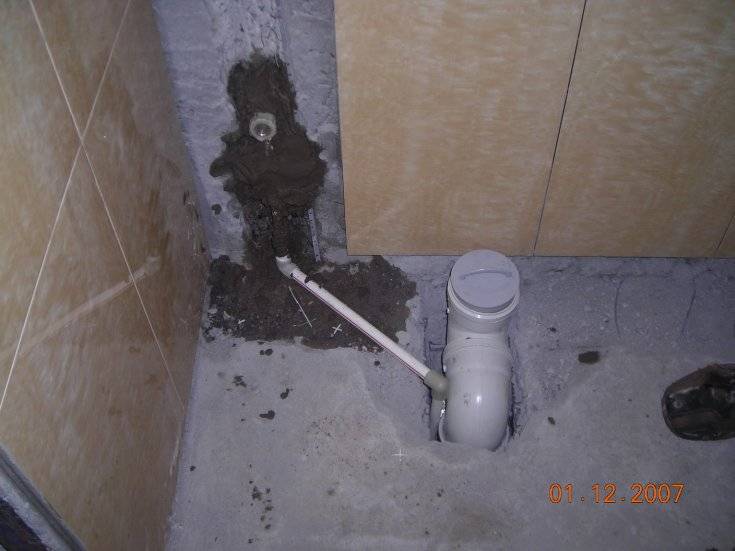
To implement this solution when distributing sewerage, the drain riser should be located as close as possible to
wall if possible.This applies to both vertical risers and horizontal outlets.
∅110 mm.
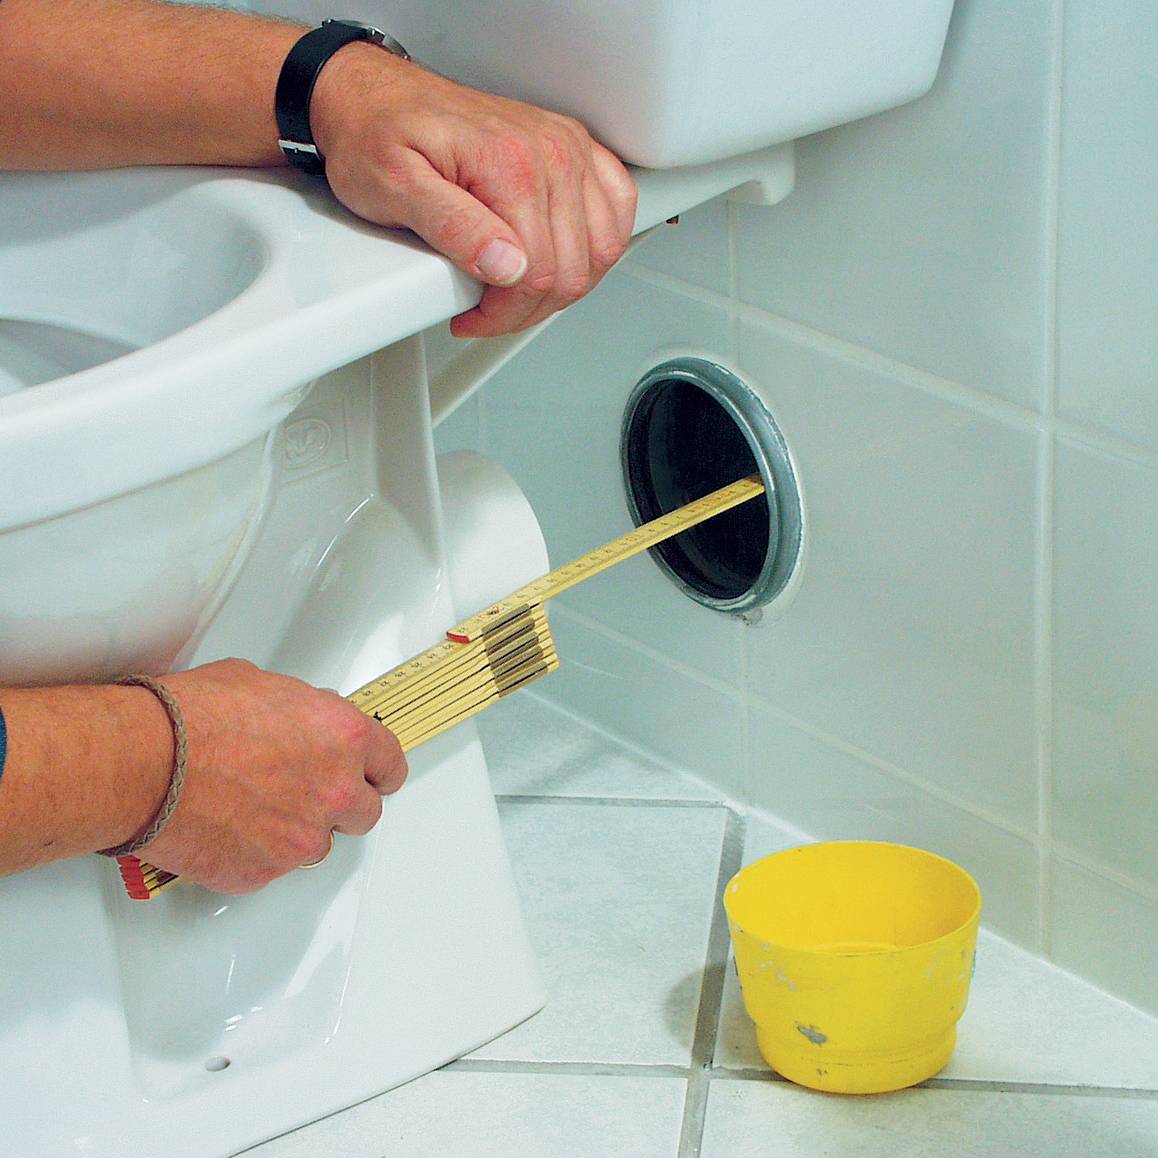
If the pipes are planned to be sewn up with a drywall box and tiled, the thickness of the plasterboard and the tile with
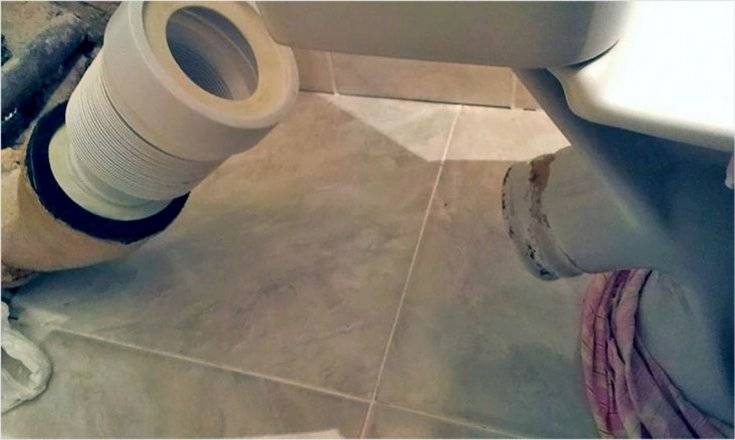
glue. During the installation of the sewer, it is necessary to use the future toilet for fitting on site. During the fitting
the fan pipe can be cut to the estimated length, but it is better to make a few centimeters of margin so as not to
make a mistake. It is better to shorten the pipe several times than to cut too much and buy a new one.
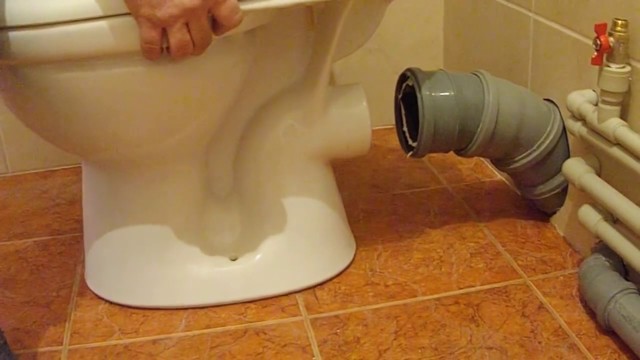
When trying on the toilet bowl and putting the sewer in the right position, you should not forget about the general slope
sewer pipes in the direction of water drainage in 2-4%.
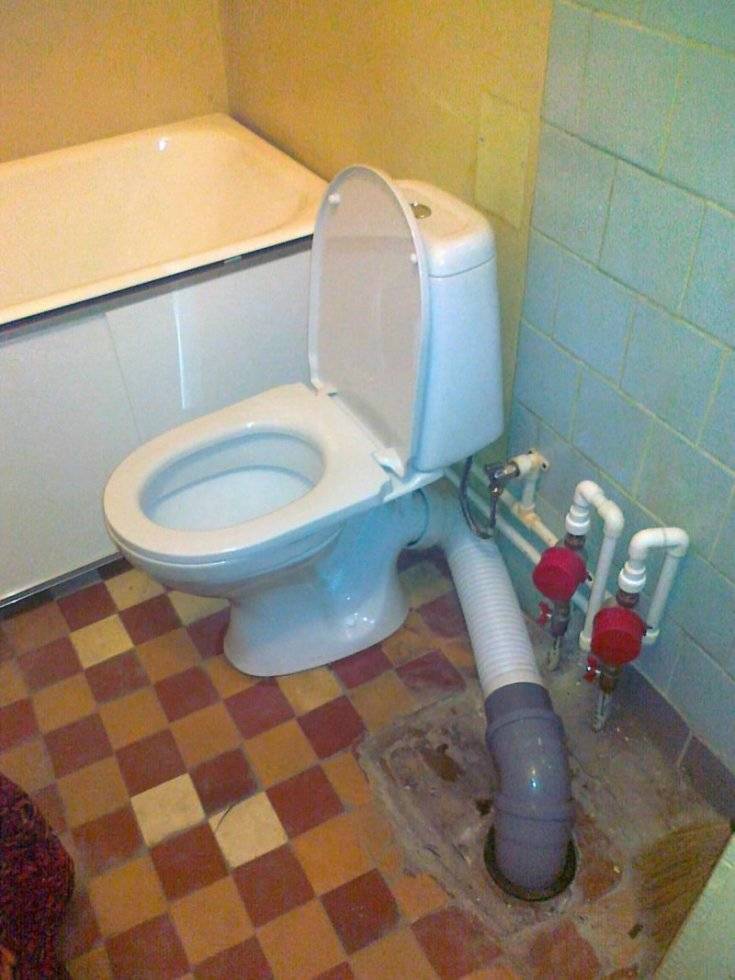
And this is a fitting of a bowl with a direct outlet and installation using a 45 degree corner fan pipe. To take into account the thickness of the floor tiles
with glue, the sole is placed on a small piece of drywall.
I especially singled out the supply of the length of the fan pipe, also due to the fact that when communications are installed, as a rule,
no tiles on the floor yet. Therefore, floor tiles and adhesive thickness should also be taken into account.
If communications are planned to be sewn up with a box, you should also take into account the height of the box with tiles so that the toilet
I didn’t hook it with a part above the outlet where the tank is attached. When the pipes are exposed, the toilet is removed, all the boxes
assembled according to plan.
That's actually all I wanted to talk about connecting the toilet with a fan pipe. And finally
a few photos from the corner installation.
In the following publications, we will definitely consider the installation of the installation.
Rate this post:
- Currently 4.54
Rating: 4.5 (24 votes)
Features of the installation of the toilet
When installing plumbing with your own hands, you will have to face some nuances:
- the toilet is heavy and fragile, so accuracy and sufficient physical strength are required;
- you will have to work in cramped conditions, especially if the bathroom is small;
- connection to the sewer must be made in compliance with angles and slopes, careful calculation is needed to determine the optimal position of all elements;
- the device must be fixed as firmly and stably as possible.


According to the requirements of building codes, in rooms where there is water supply and sewerage, waterproofing of the floor must be arranged with a 15-20 cm approach to the wall. This measure will protect the lower rooms from leaks in the event of an accident. In addition, natural or forced ventilation should function in the toilet. Finishing is made of hygienic waterproof materials, undemanding to care for.
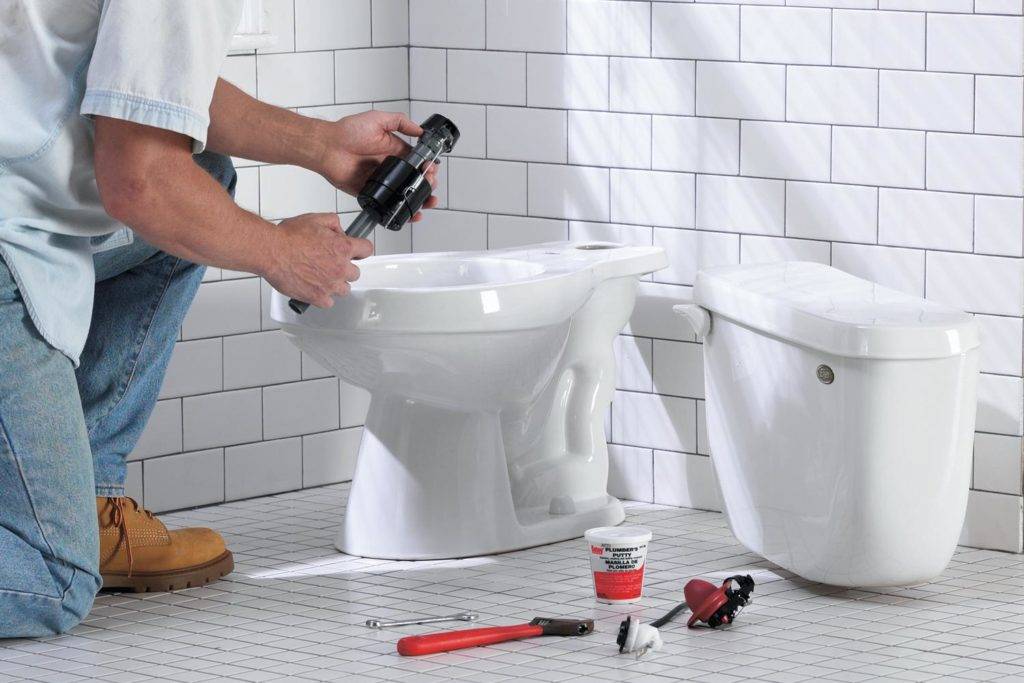
Toilet Assembly
It will be useful for newly elected masters to know how to properly install the toilet bowl with their own hands, without breaking anything.
For this, thematic models were initially disassembled. This makes it possible to safely transport the toilet and install it step by step on site:
- A ready-made drain mechanism is placed inside the tank (in order for the mechanism to fit clearly, all burrs must be removed);
- The drain system is sealed with a rubber washer, and then fixed with a nut;
- The tank is attached to the bowl;
- All structural elements are fixed by means of bolt nuts, provided that the holes are already present with washers with rubber seals.

The plastic fasteners used in the fill valve and drain system welcome careful hand tightening.
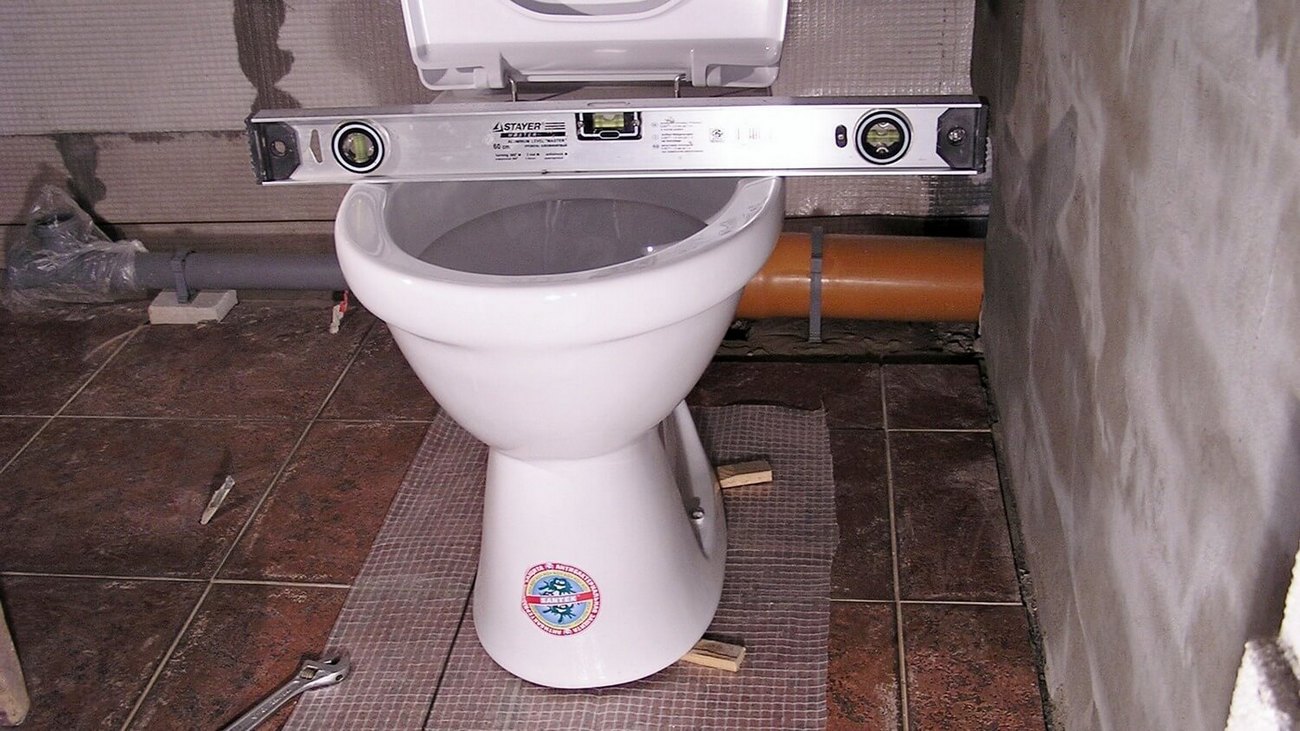
Before installing the toilet with a level, you need to make sure that the base under the plumbing is even. Various errors can be eliminated by placing rubber pads.
Some experts use chopsticks, hammering them into holes to a certain depth. The protruding ends should fix the desired position of the toilet, limiting its contact with the floor.
The location of the pre-drilled holes for the toilet must match the location of the holes in the toilet itself. Fastening takes place with dowels. They must be hammered through tight nuts, and then fixed with plugs.
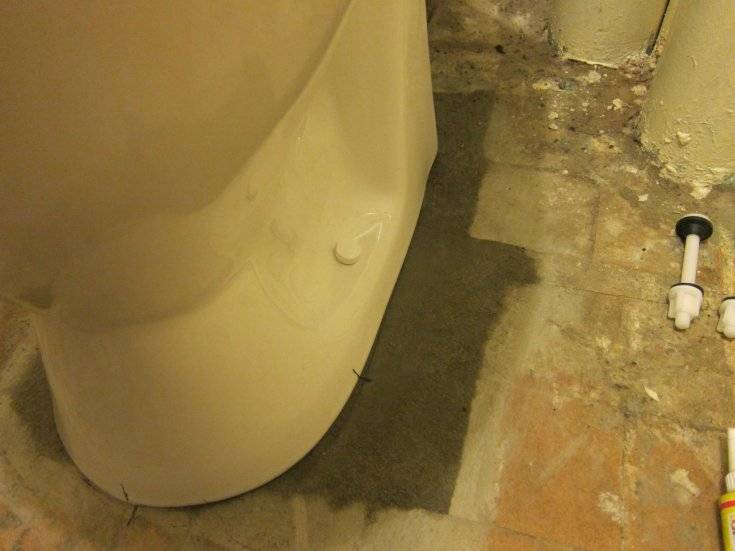
Facing the floor surface around the installed toilet
Sometimes circumstances develop in such a way that the toilet was installed before the flooring was done. For example, there are no funds to purchase high-quality tiles, or the desired option has not yet been found in the assortment of stores. But it is impossible to live in an apartment normally without a toilet bowl, it was installed, the decoration was left for the future. Another option is cosmetic repairs, with laying new tiles directly on the old one (there are such technologies), but it was decided not to change the toilet bowl.
Those owners who plan to follow this path should immediately be warned - they will face many difficulties. These are difficulties with curvilinear cutting of tiles, and problems with fitting fragments. Moreover, you will have to work in very cramped conditions.
One more nuance.
If the new lining is laid on top of the old one, without dismantling it, then the previously standing toilet bowl will be slightly lower relative to the resulting floor surface. It seems to be not much, but it can bring serious inconvenience to some family members, at least at first.
Mounting types
As noted above, there are two main mounting options, and both have their own characteristics, we will consider each of them separately.
Fastening with dowels
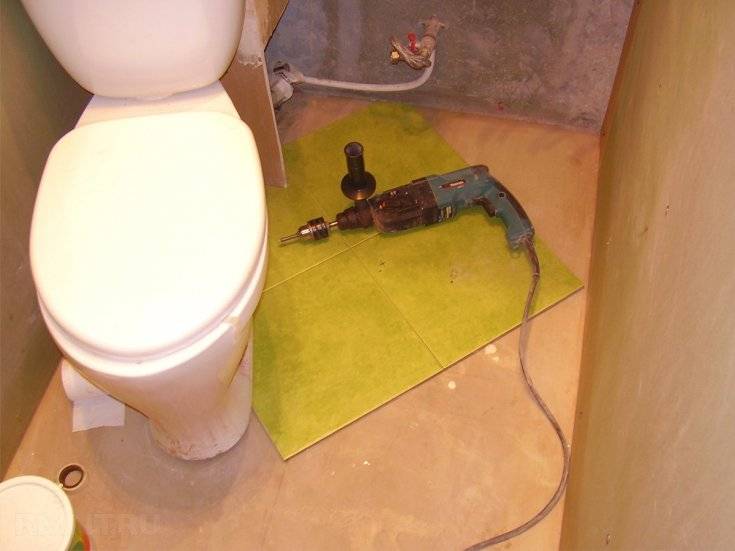
Let's figure out how to install a toilet bowl with your own hands on a tile in accordance with the technology and recommendations of equipment manufacturers:
- To work, you will need an impact drill, drills for tiles (10 mm) and concrete (8 mm), as well as a key for screwing fasteners and a pencil for marking.
- First, the toilet is installed and connected to the sewer system, while it must be set as accurately as possible, exactly the way it should be located. After that, its location is drawn with a pencil, and the mounting holes are marked. After completing the markup, the equipment must be removed and removed.
It is important to clearly mark the desired position
Further, holes are made in the tile with a ceramic drill according to the marks made. After that, a concrete drill is placed on the tool and a hole of the required depth is drilled in the base (in order not to drill too deep, you can stick tape or construction tape on the drill as a guideline).


Drilling is done carefully so as not to damage the tile
After that, plastic dowels of the appropriate diameter are hammered into the holes, most often they come with the equipment, but you can also purchase them separately.
- Next, plumbing is installed, and the mounting screws are baited. Before you fix the toilet on the tiled floor, you should check its position, if there are distortions, then you need to put plastic plates under the base.After that, you can finally tighten the fasteners, but you should not be particularly zealous, as you can crush the ceramics.
- The last operation is sealing the junction of the base and the floor, if earlier cement mortar was most often used for this, then nowadays it is much easier to use a special sanitary sealant for sewer pipes - its price is low, but it can withstand moisture and mold for many years.
The sealant reliably protects the joints from dirt and water.
Fastening without drilling
This option is used when there is no tool or if the base is too strong and difficult to drill.
Consider how to install a toilet on a tile in this way:
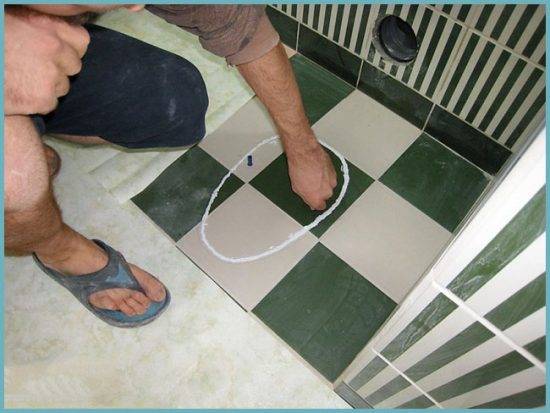
First, the structure is set up as it will stand, the base is outlined with a pencil, and the toilet bowl is removed.
After that, notches are made inside the outlined area with a hammer and chisel so that the surface becomes uneven and the setting of the solution improves. The work is carried out carefully, since during its implementation the fragments fly in all directions and can get into the eyes.
The cement mortar is diluted to the consistency of thick sour cream, it needs about 1 liter. The composition should be mixed thoroughly so that no lumps are present in it.
Next, the sole of the toilet bowl is wetted, it is rather rough, so the solution adheres to it very well.
The prepared mixture is laid out in an even layer along the marked perimeter, after which a toilet bowl is placed on it and pressed with little effort
It is important to set it as accurately as possible so as not to move later. Excess mortar is removed, they can later be smeared with seams.
Features of the use of the composition and the drying time will tell the instructions on the package
We figured out how to glue the toilet to the tile and how to do it as reliably and efficiently as possible. The choice of composition is yours.
The nuances of choosing a new plumbing fixture
Before carrying out repairs in the bathroom, you should carefully prepare for it. It is especially necessary to think about how to change the toilet bowl in the apartment with your own hands when the residents continue to use the toilet.
In this case, plumbing should be changed as quickly as possible, but without the proper organization of repair work, this becomes impossible. First of all, they make a choice of a suitable model, prepare all the tools and building materials, and then proceed to implement their plan.
The most important thing, before you install and dismantle the toilet, is to purchase a new plumbing fixture. Depending on the model chosen, a set of tools and materials is prepared for replacement.
Toilets are of two types:
- floor;
- suspended.
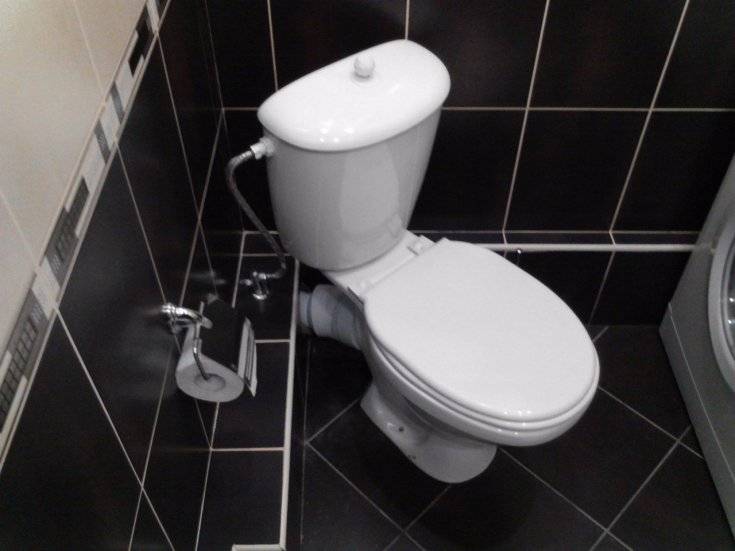
Floor models are more popular and their choice is huge. They are of the "compact", "monoblock" type, with a separate tank and bowl, as well as with a flush system of a hidden design.
A monoblock is a product that combines a water tank and a bowl into a single system. In the toilet - a compact, these two parts are sold as a set and connected during installation - this is the most popular option presented on the domestic market for sanitary products.
A retro model, during the installation of which the tank must be placed under the ceiling and connected to the bowl with a pipeline, has become less and less common in recent years. In them, in order to flush, you should pull the rope or chain with a handle. Such plumbing looks appropriate in a bathroom decorated in the appropriate style.
The modern solution is the arrangement of a hidden drain system. Before replacing an old toilet bowl with a new one of this type, it is necessary to consider the construction of a false wall, behind which a drain tank with an installation system will be hidden. Externally, hidden models look very neat, since only the drain button will be located on the wall, and engineering communications will remain hidden.
The bowl of the hanging toilet bowl is not placed on the floor. It is hung on anchor bolts built into the wall. As a result, there is free space under the bowl and it can be used to good use. This design is also advantageous from a hygienic point of view. It is not difficult to wash the floor under it, but a dirty coating often collects around the floor product.
Another important point that should be considered before replacing the toilet with your own hands is the direction of release from the bowl, which can be of three types:
- at an angle;
- direct;
- vertical.
As for devices with a vertical drain, they are usually used in the homes of America and China. Its convenience lies in the fact that the toilet bowl can be located anywhere in the bathroom, and communications are laid in the interfloor overlap. We also implement this arrangement option in domestic sewer systems, but only in private households.


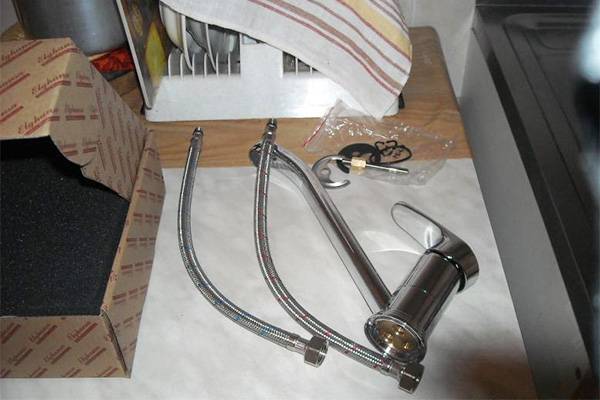
Tools and materials
In addition to the toilet, you will need:
- Corrugated drain pipe.
- Water hose for cold water and ball valve to the pipeline.
- Tape-fum or tow.
- Sealant or epoxy. For decorative embedding - the remains of grout from the tile.
- Drill with drills for ceramics and concrete.
- Wrench.
- Screwdrivers.
- Kern.
- Pencil, chalk.
- Spatula, cleaning products.
Fasteners, as a rule, are included in the toilet bowl package. If this is not provided, anchor bolts are purchased in accordance with the diameters of the holes.
It is important to purchase them in an anti-corrosion design - leaks or condensation in the toilet are inevitable, which will certainly respond with rust