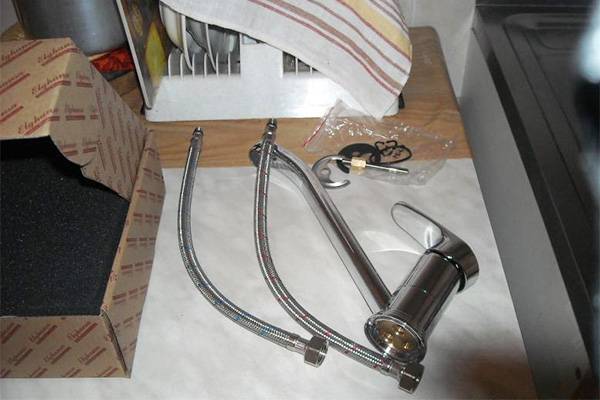
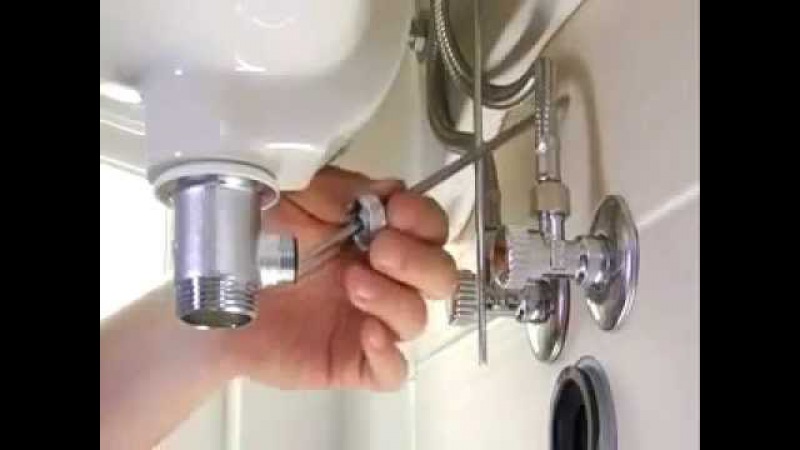
- Connecting a flexible water supply
- Faucet installation
- Step-by-step instruction
- Bathroom faucets, their types and choice of installation location
- Currently, bathroom faucets are available in three installation options:
- Here you need to focus on the following considerations:
- Fitting
- The nuances of installing a mixer
- When the stainless steel sink
- If the sink is made of glass
- Other types of shell material
- Washbasins on a semi-pedestal
- Kitchen faucet installation
- Assembly
- Installation on the sink
- Washing installation
- Connecting hoses and siphon
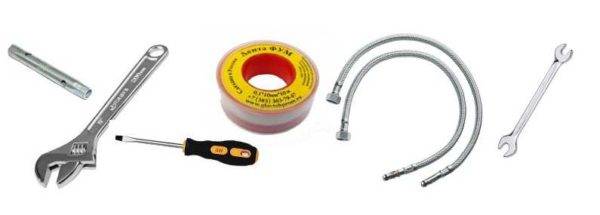
- A set of tools and materials
- What is needed for work
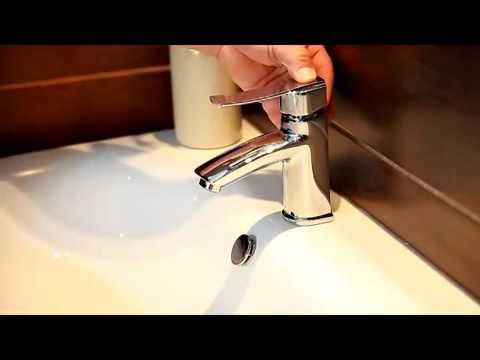
- How to dismantle old equipment?
- Errors during installation
- What is needed for work
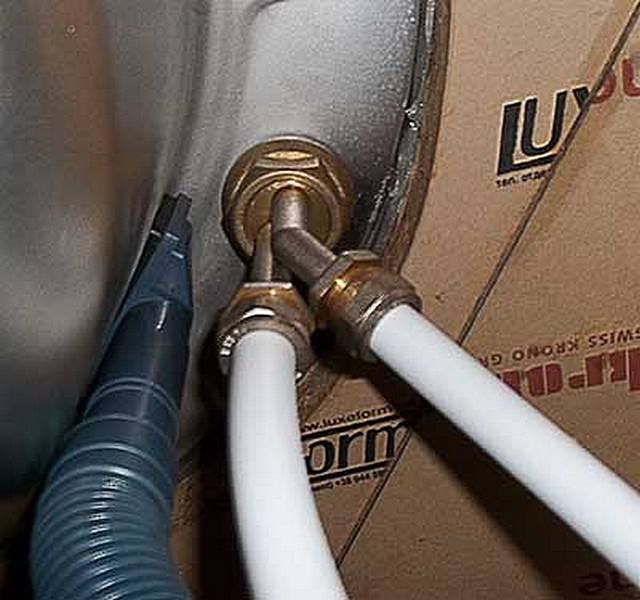
Connecting a flexible water supply
In order to qualitatively connect a flexible hose with a mixer, it is necessary to adhere to the following requirements:
- It is forbidden to mount the eyeliner in a highly taut position.
- To prevent damage and leakage, the connecting elements are not tightened to the stop.
- The eyeliner should be in a natural state, without excessive twisting and kinks.
- The diameter of the eyeliner should be 5-6 times less than the bending radius.
- To avoid premature corrosion, it is necessary to connect elements from matching materials (for example, steel parts are joined to steel products, brass to brass or copper, etc.).
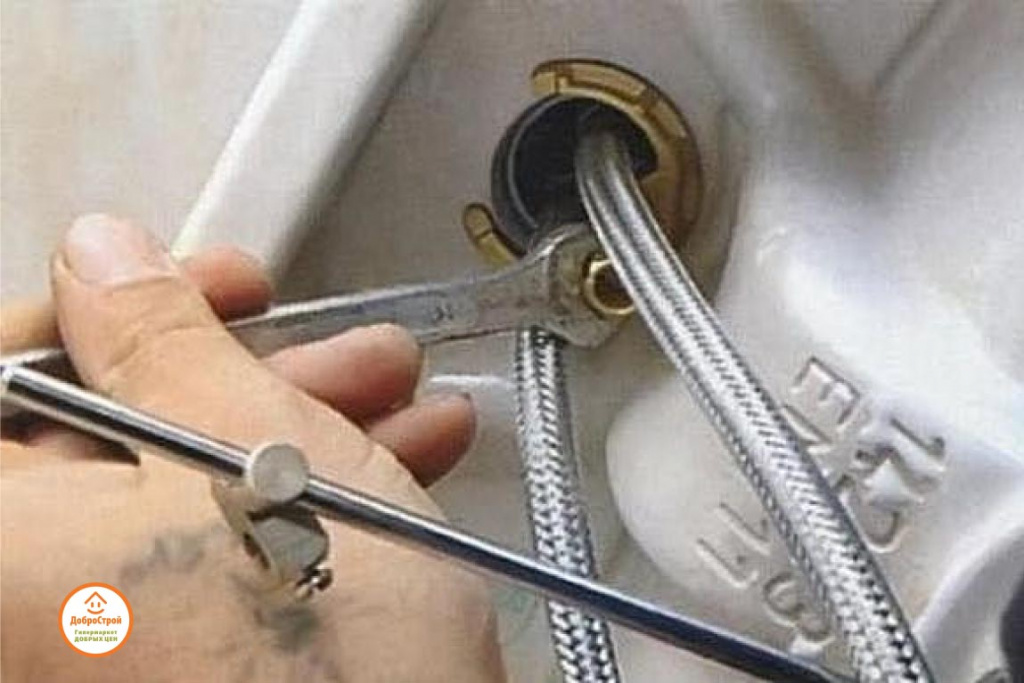
Despite the presence of rubber seals in the fitting, it is necessary to additionally use winding material, which will improve the sealing of the joints. The best solution would be to use sanitary flax and sealant.
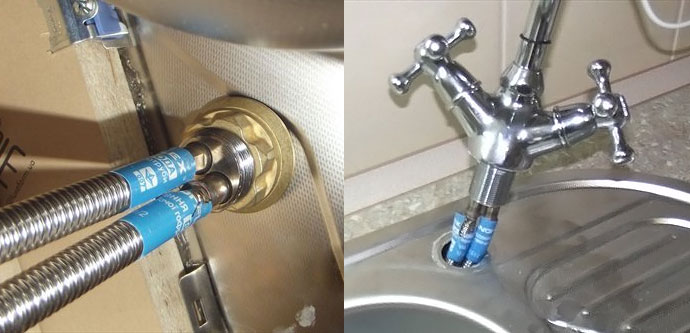
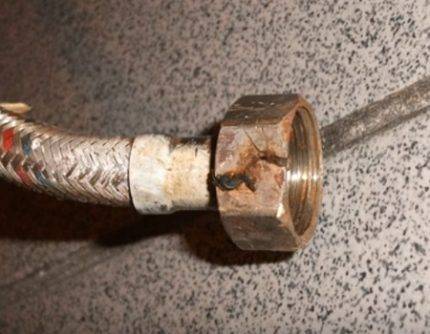
Flexible faucet connection
A completely logical question immediately arises: how can a flexible hose be connected to a water pipe, when screwing in the fitting can be accompanied by simultaneous unscrewing of the hose from the mixer body? To avoid this, an eyeliner is used, one of the fittings of which has a left-hand thread (usually it is screwed into the mixer body).
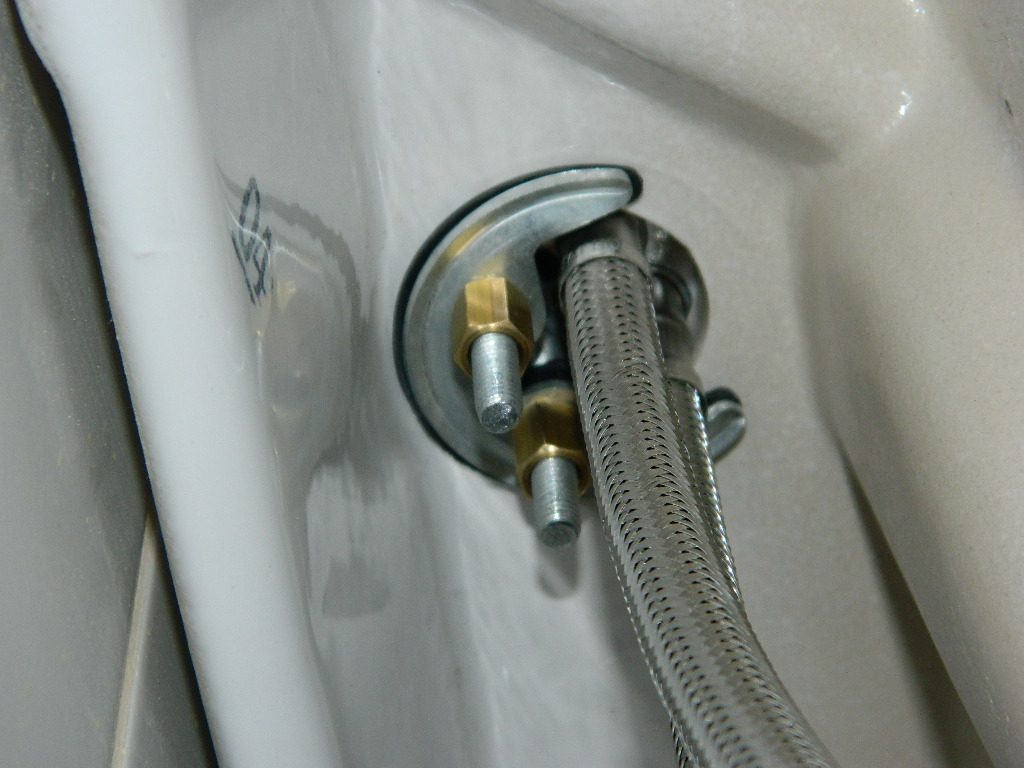
Particular attention is paid to the thread of the water pipe. If it is cut on a thin or metal pipe that will rust, then a stainless steel protective cap is installed between the union nut and the thread
Connecting the faucet to the plumbing system
The best solution is when, when connecting the inlet to the pipe, the internal thread has a minimum length of 1.5 cm. The thread must be located on a thick wall, and the elements are screwed in using winding for sealing.
Sealing rubber gaskets are exposed to hot water, which reduces their service life. But this is not the only reason for their premature wear. During installation, the seals must not be turned flat or overtightened.
Faucet installation
Installing a faucet in the bathroom with your own hands is as follows.Pre-connect the body with a shower hose, watering can and gander. Such manipulations are possible even without a tool, since the process of how to install the mixer yourself is not difficult.
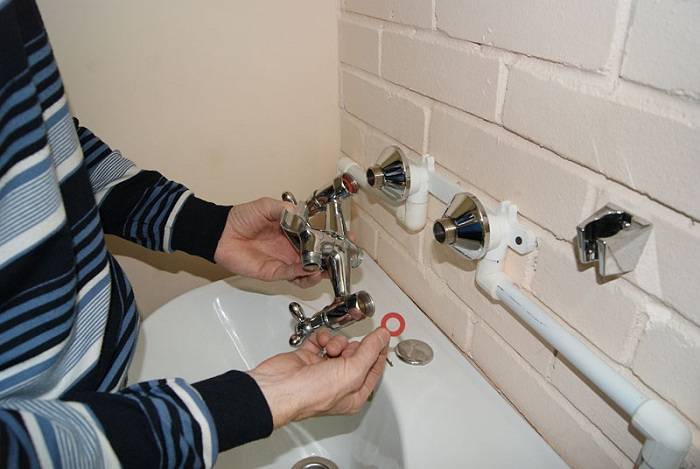
For direct installation of plumbing in the bathroom, we will use the so-called fum tape, a special translucent sealing material, although in the old fashioned way you can use ordinary tow with sealant or ordinary sunflower oil. We check the screwing level of the eccentrics using the building level - this is perhaps the most difficult task when installing the mixer.
For screwing onto metal-plastic pipes on the wall of eccentrics, we wrap them with fum - tape or tow. Usually the distance between the holes in standard models is 15 cm. If for some reason this distance has been violated, eccentrics will help to remove the imbalance.
After that, you can start trying on the mixer body. If the body becomes easy, then the eccentrics have been installed correctly. Now you need to remove the case and wind the decorative shades. At the same time, make sure that they are as close to the wall as possible.
Do-it-yourself installation and installation of a faucet in the bathroom video
We screw the body. When installing it, there is no need for additional use of winding, since its function is performed by the gaskets that come with the device. Tighten the nuts with a wrench. When tightened correctly, the wrench should make a creaking sound. To tighten the nuts sufficiently, let the water run, and pull just enough to stop the water from dripping. Now you can connect the gander and the shower head.
Step-by-step instruction
Prepare mounting tools:
- gas and adjustable wrenches;
- FUM tape (can be replaced with ordinary tow or linen thread);
- a set of hex keys;
- pliers;
- Screwdriver Set;
- wrenches.
Often, when installing inlet fittings, it is almost impossible to maintain a distance between them equal to 150 mm. If you made a small mistake, then it's okay. Especially for this, transitional eccentrics are included with the plumbing fixture.
Take your chosen sealing material and wrap it around the threads of the eccentrics, and then screw them into the inlet fittings of the water main. Rotate the eccentrics to obtain a distance equal to or as close as possible to 150 mm. Check the horizontal position of the installation with a spirit level.
Pre-screw the body of the new faucet and make sure it is level. Check how the union nuts are tightened. They should be quite easy to tighten by hand on the entire thread of the nut. If it is rather tight, you will need to fine-tune by slightly turning the eccentrics to achieve unhindered twisting. After that, you will need to wind up the decorative cups that will hide the connection point of your new faucet to the mains.
Insert the gaskets and put the body of the product in place. Take the wrench and tighten the fixing nuts. Be sure to place a piece of soft cloth under the jaws of the wrench so as not to spoil the coating of the nuts and the general appearance of the product.
Just in case, you can apply pressure to the line and make sure there are no leaks. In case of its presence, it is necessary to additionally tighten the nuts until the leakage is completely eliminated.
Next, you will need to install the gander. Screw on the nut and tighten it with a wrench through a piece of fabric. Insert the gasket and screw the watering can hose to the main body. Insert another gasket, only now to connect the watering can to the hose. Mark the position and attachment points of the watering can holder.


Next, you will need to drill holes for the fasteners and fix the watering can holder bracket to the wall. After that, the process of self-installation of the faucet in the bathroom can be considered complete. Finally, you will need to open the shut-off valves, make sure that the mixer is working properly and check the tightness of the connections.
We will analyze the step-by-step installation of a mortise sink under the countertop. Together we will collect the drain sink system and connect it to the plumbing in the bathroom.
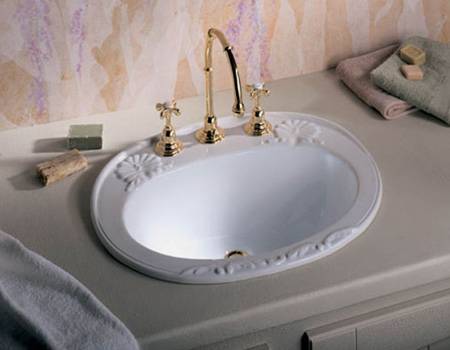
Bathroom faucets, their types and choice of installation location
When buying a bathroom faucet, it is important not to get lost in the abundance of models on offer. When going to the store, you should already know exactly what device you need to buy.
Currently, bathroom faucets are available in three installation options:

- wall - the most common and familiar;
- on-board, installed on the side of the bath (which must have a width of at least 7-8 cm, otherwise installation will be impossible);
- a mixer on a rack or a special shelf is an expensive device, the cost of which is several times higher than that of a conventional mixer.
The latter option is rarely used, since its installation requires quite a lot of space, which is simply not available in a standard bathroom.You will only need to choose a place for installing the mixer in the case of equipping a new bathroom during the construction of a house or a major overhaul of a bathroom.
Here you need to focus on the following considerations:
- Choose the installation location by eye and evaluate whether it will be convenient to use the mixer.
- If this is a mixer with a shower, then it must be mounted at a height of 120 cm from the bottom of the bath after its installation.
- If the gander of the mixer will also turn the sink, then the height must be selected even more carefully. Please note that the height of the sink is rarely less than 85 cm. To this must be added the size of the faucet itself and the height necessary for comfortable hand washing.
- You should not mount the mixer on the horizontal, which is located at the height of the curb, which is usually done at a height of 100 cm from the floor. It is better to place the device where the wall is lined with smooth tiles, otherwise the faucet reflectors will not adhere tightly to the surface (the curb usually has a rough finish).
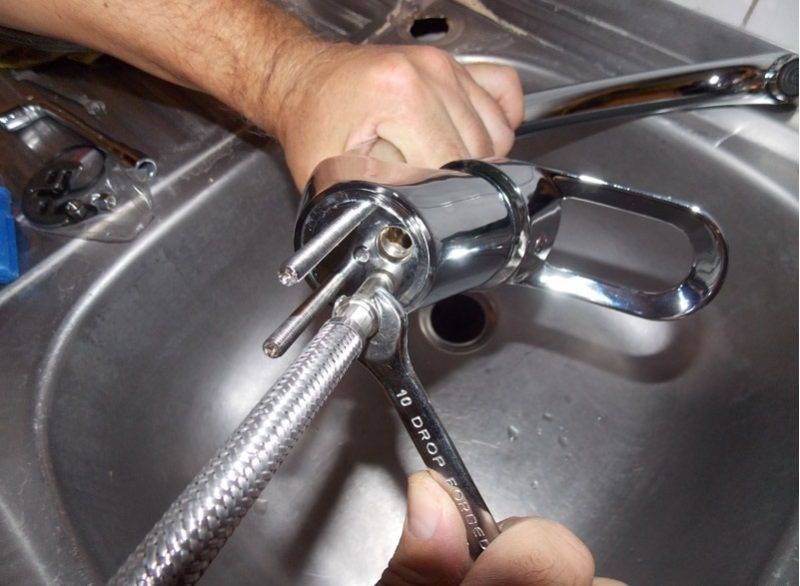
Fitting
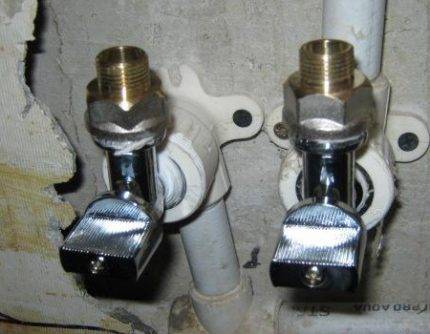
To assess the general situation, you must first try on. Eccentrics are screwed into water sockets, on
eccentrics are screwed onto the reflectors, the mixer without gaskets is screwed onto the eccentrics.

What do we evaluate? The first point is the alignment of the water sockets, or in other words, screwed eccentrics should not
stick out in different directions, their ends should be in the same plane. If the deviation is too large, cap
mixer nuts will be screwed on with force - this is bad!
There are two ways to solve the problem of poor alignment of water outlets: correct the position of the water outlets themselves (which
very problematic when the tile is laid) or to be wiser with “pasting” one eccentric to another (about this
a little lower).
However, unevenly set water sockets are an infrequent phenomenon, given that the threaded connection and gasket
deviation can be corrected. The problem will be obvious only with very careless installation of the eyeliner.
More attention during fitting should be given to the position of the reflectors. If the water outlets are flush with the wall
or sticking out - reflectors may not be pressed tightly against the wall. Here, the dimensions of the eccentrics and the depth of
reflectors
With reflectors not adjacent to the wall, there are two ways - shorten the eccentrics or look in stores
deeper reflectors. With the conclusions sticking out of the wall, you will have to do both.
Here, the dimensions of the eccentrics and the depth of
reflectors. With reflectors not adjacent to the wall, there are two ways - shorten the eccentrics or look in stores
deeper reflectors. With the conclusions sticking out of the wall, you will have to do both.

Digressing a little on the topic of installing water sockets, I note: the optimal position is when the internal thread
the output is slightly recessed into the wall (into the tile), by about 5-7 mm. There is no answer with exact dimensions, different
mixers - different sizes.

The ideal position would be when, during fitting, the reflectors are pressed tightly against the wall, and the union nuts
mixers (without gaskets) are screwed up to the base of the reflectors with virtually no gaps. Keep in mind that when
sealing threaded connections, the eccentrics will screw in a little less, and rubber gaskets will fit into the mixer.
The nuances of installing a mixer
With the installation of a faucet on ceramics, everything is clear, but questions may arise when the sink is made of a different material.There are small nuances, which we will now take a closer look at.
When the stainless steel sink
The most important thing in installing a mixer is to choose the right model and correctly perform each stage of the work. It is not difficult, but it requires attention and calmness. If the sink is made of stainless steel, then you need to choose a faucet of a suitable design, size and shape
If the sink is made of stainless steel, then you need to choose a faucet of a suitable design, size and shape.
Moreover, most often stainless steel is used for the manufacture of kitchen sinks - it is a durable material. It is more convenient to mount the mixer in stainless steel when it is not installed at the workplace.


If the sink is easily removed, then it is better to do this by putting it in place after installing the faucet
When there is no way to remove the sink, you have to enlist the help of a friend, son, wife or other person. After all, the conditions in which the stainless steel sink is located are very constrained. Therefore, you can not do without an assistant and a flashlight.
The process of installing the faucet on a stainless steel sink is similar to installing it on a ceramic sink. If there is no hole for the mixer, then it is easy to cut it with your own hands, processing the edges so that they become smooth.
If the sink is made of glass
Glass products are often used in the interior. Shells made of this material look especially stylish. Moreover, they can be of different shapes, colors and sizes - it all depends on the flight of designer imagination.
Image gallery
In the installation of the faucet on the glass sink, there will also be no difficulties.
It is important to follow the safety rules and choose the most suitable model
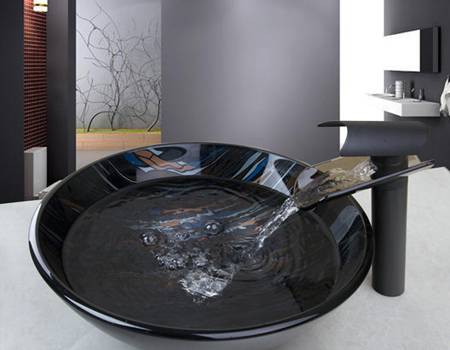
Often, a waterfall-type mixer - frap is selected for glass sinks.Some manufacturers supply a mixer and a bottom valve as a set.
Installation is carried out on the surface in which the hole is provided. If this is a model mounted on a pedestal, then you have to work with this base.
When working with glass, you should not rush - although it is heavy-duty, it can break when a hammer falls.
Other types of shell material
In addition to ceramics, glass and stainless steel, marble, porcelain, granite, plastic, acrylic and even wood are used for the production of sinks. Porcelain containers are quite expensive. As for the installation, it is simple and depends on the type of mixer to be installed. The purchased model comes with instructions that detail how to properly install.
The porcelain sink looks elegant and sophisticated. For her, mixers of a special configuration are most often provided, when the valves for supplying water are located separately from the spout. There are corresponding holes in the sink body
If in a bathroom there is a sink or a pedestal for a sink from a tree, then installation - the mixer does not differ in special complexity. The only thing is that this material is rather capricious and will simply not be able to serve for a long time. The faucet will most likely outlive the sink.
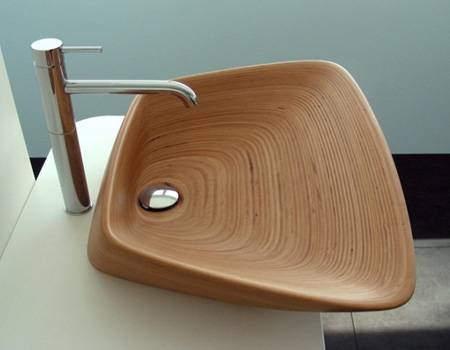
A wooden sink can be made in the form of a bowl fixed on a base made of a polymer or other material. In this case, the installation of the mixer will take place in the base
For marble, granite and acrylic, it is necessary to use a mixer installation technology similar to installation on a ceramic sink
It is important to assemble the mixer correctly, and in the process of tightening the fasteners, do not overtighten anything and carefully perform the connection and sealing knots

Granite sink is most often used for the kitchen. It allows you to add sophistication to the design of the room. Often the manufacturer completes a granite sink with a suitable faucet model.


Washbasins on a semi-pedestal
Unlike a full-fledged pedestal, a semi-pedestal does not perform load-bearing functions, but only hides communications that fit the bowl. Such sinks look sleeker and more compact, but require a completely different way of summing up communications, which should come out of the wall decorative semi-pedestal level
The advantages of this type of washbasin include saving space, which is important for small bathrooms, as well as the ability to independently determine the installation height.
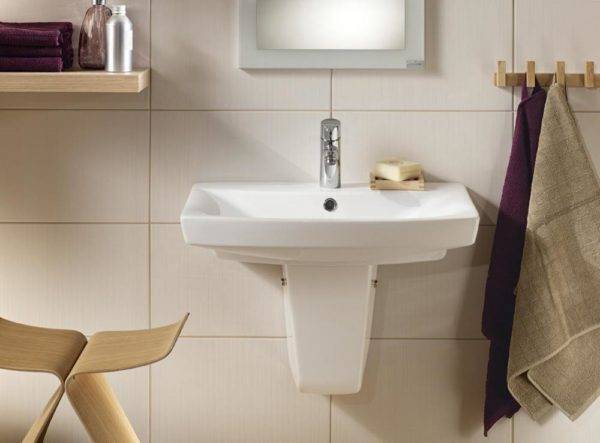 The semi-pedestal performs only decorative functions, hiding the supply lines.
Mounting Features
Since the semi-pedestal does not support the bowl, special powerful brackets are used to attach the sink, which are attached to the wall with dowels and self-tapping screws or anchor bolts.
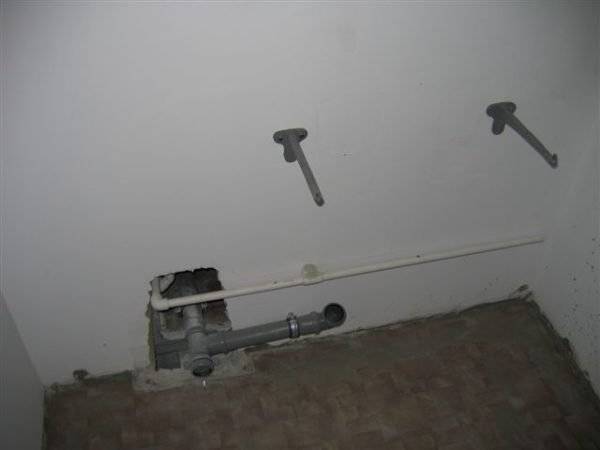
When the brackets are securely fixed to the wall, a washbasin is hung on them, after which they are connected to the sewerage and water supply. Semi-pedestal installation can be done with one of two ways:
- Hanging with spring suspension. For this, special holes are provided in the lower part of the bowl, into which loops of a metal spring are threaded.Then bolts are put on the ends of the loops, after which the semi-pedestal is hung and fixed with nuts.
- Fastening to the wall with studs. To do this, after mounting the sink and connecting the communications, the semi-pedestal is applied to the wall in the right place, the attachment points are marked through the mounting holes. Then holes for dowels are drilled at the marked points, into which the studs are screwed. The semi-pedestal is put on the pins and pressed with nuts using plastic washers.
Some models are equipped with a towel holder that can be attached both to the bottom of the sink and to the wall using dowels and screws.
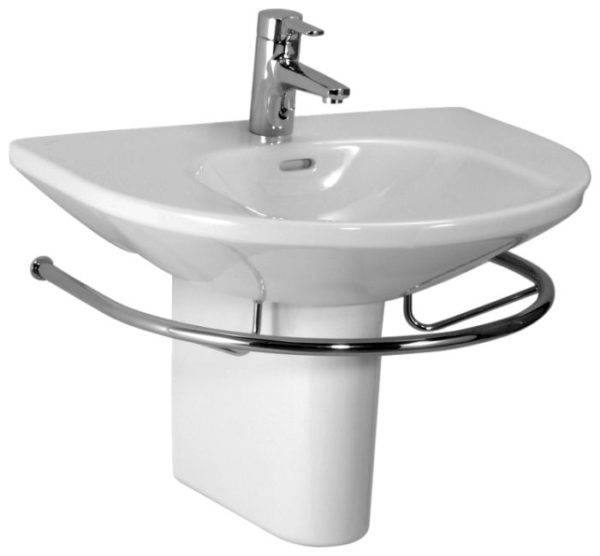 Washbasin with half pedestal and towel holder.
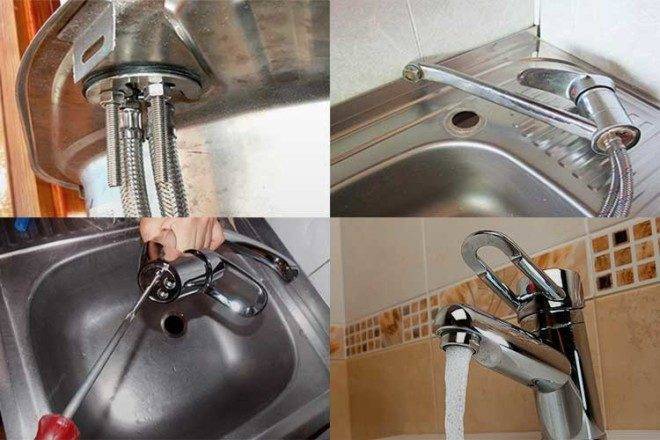
Kitchen faucet installation
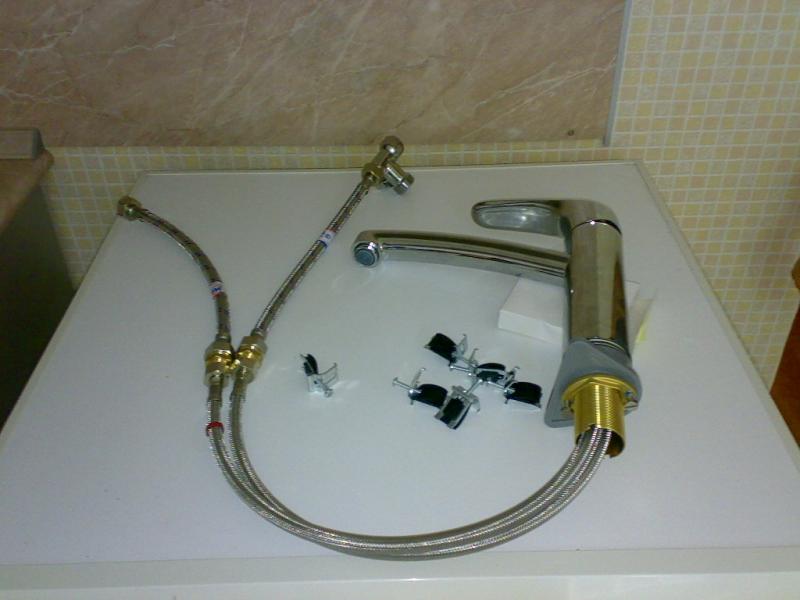
Replacing the faucet in the kitchen is nearing completion. Now we assemble the crane and install it in place. It is much more convenient if the work can be carried out on a removed sink. If this is not possible, all manipulations will have to be carried out reclining in the closet. Approximately as in the photo.
Not the most comfortable position
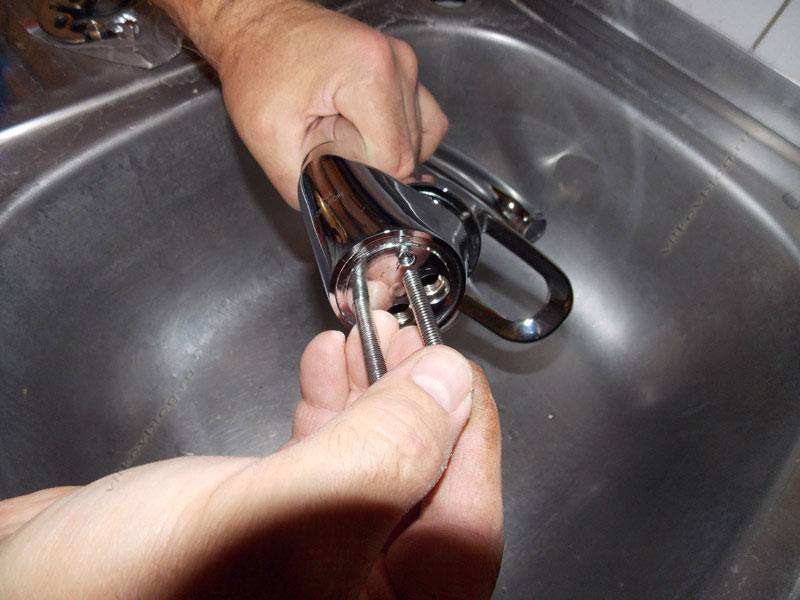
Assembly
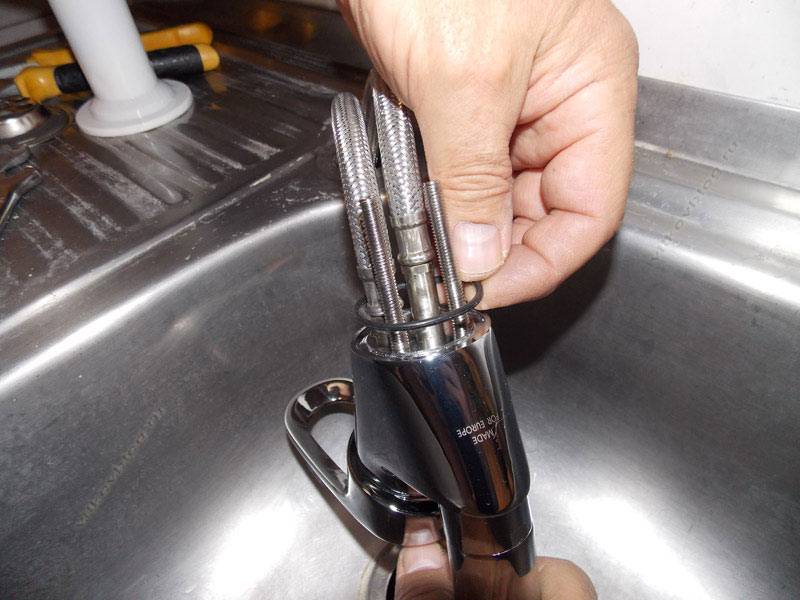
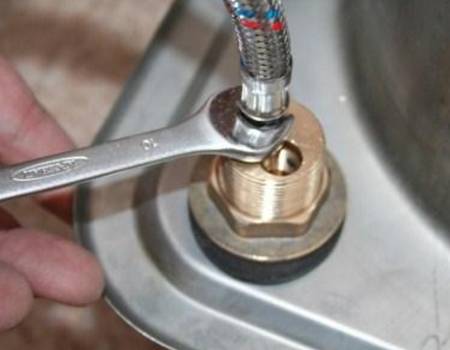
First, we fasten flexible hoses to the mixer. They are screwed in by hand, then tightened a little with a key - no more than 2 turns.
We screw the flexible hose into the holes on the mixer body, tighten it slightly with a wrench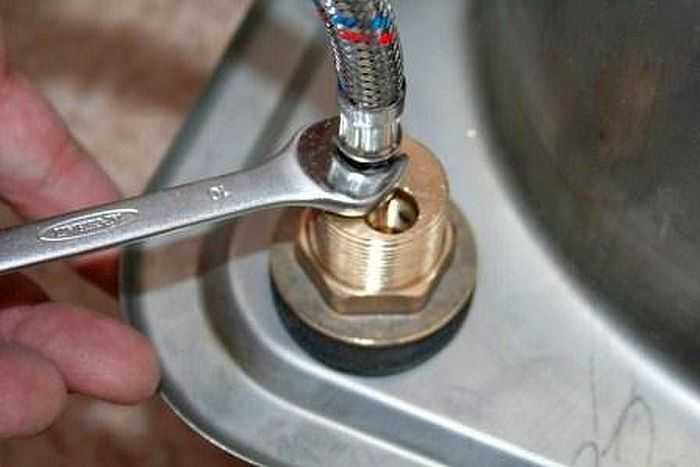
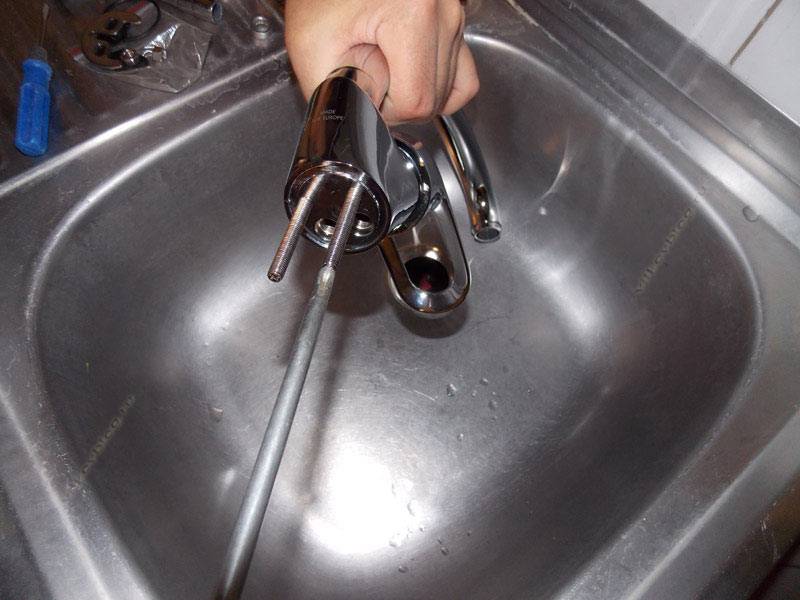
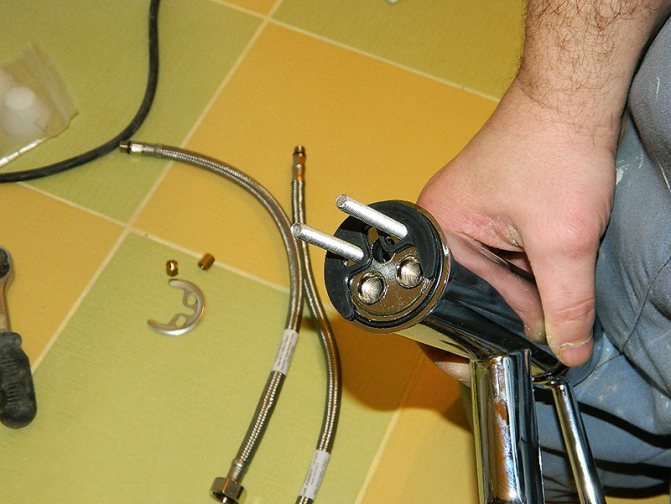
Now you need to put a rubber gasket on the body, which seals the junction of the mixer and the sink surface. This rubber ring of decent diameter is included in the kit. It is pulled through the installed supply hoses, placed on the body.
Install gasket on body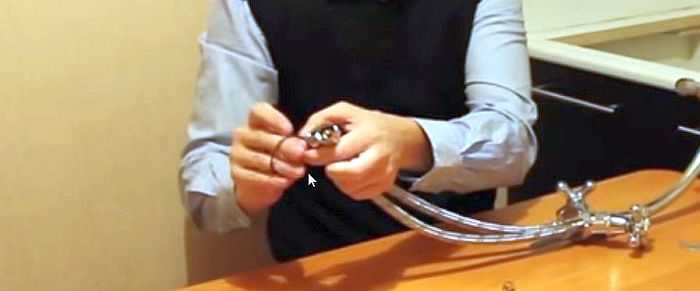
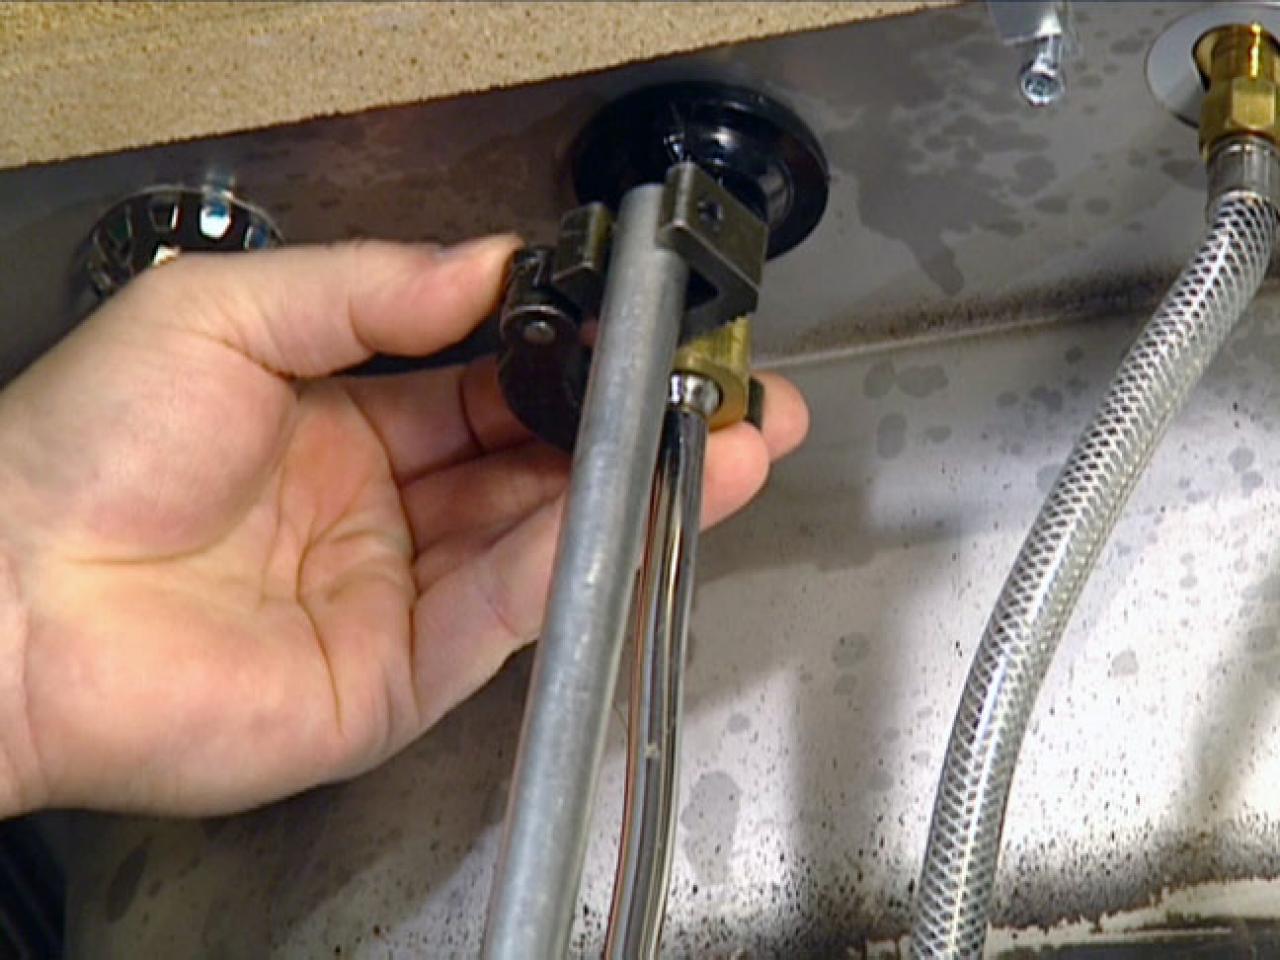
In modern kitchen faucets, there are two different forms of attachment to the sink.The first - with the help of a nut - you saw in the part where it was about dismantling the mixer. It's just an "older" system. The second provides for the presence of rods and spacers-clamps in the form of a horseshoe. The rod is usually one, but there may be two. If there are such rods, they are screwed into the appropriate socket. If a nut is screwed on it, it is removed.
Rod for additional fixation
Installation on the sink
Now the kitchen faucet can be installed on the sink. First, flexible hoses are inserted into the hole, then the body is placed in the center of the hole. Further actions depend on the type of fastener. If this is an ordinary nut, they simply tighten it, trying not to overtighten it.
The nut is screwed onto the body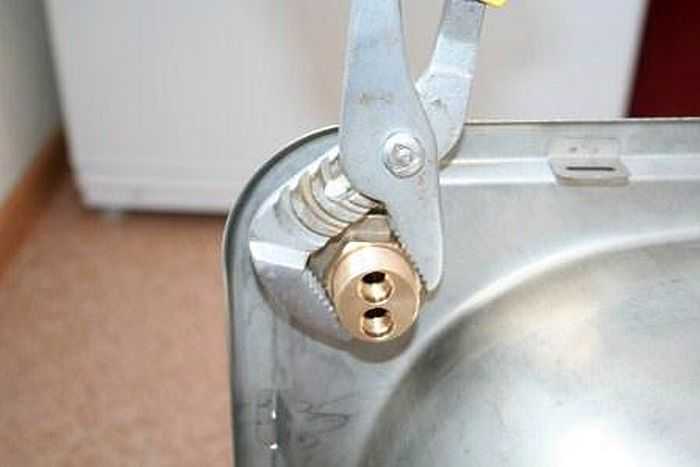
If it is a model with rods, the appearance is different, although the meaning is the same. First, the gasket is put on (it is also in the shape of a horseshoe), then the pressure plate. Next, the nuts are screwed onto the rods. The nuts are slightly tightened with a wrench. TODE nothing complicated.
Faucet attachment with rods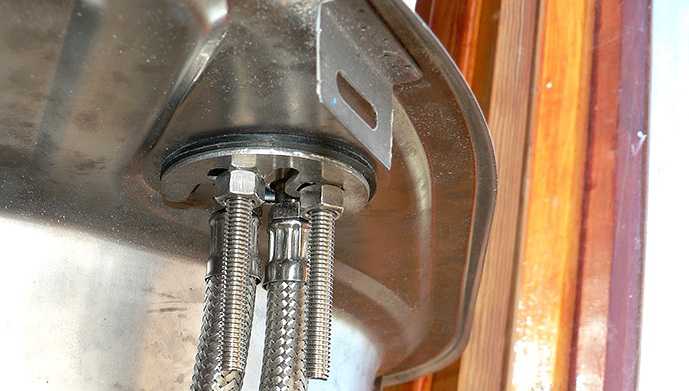
Turn the sink over and turn on the faucet. He must be dead. There shouldn't be any loopholes. If there is movement, tighten the mount.
Washing installation
Now the sink with the mixer installed on it is placed in the prepared place. First, a silicone sealant is applied from the back of the sink around the perimeter (not acrylic - it quickly turns yellow). Then the sink is installed in place, the fixing bolts are tightened.


Preparing the sink for installation
Then everything is simple: put in place, align with the edges of the table, tighten the fasteners. It is made in the form of petals that attract the sink to the countertop when you tighten the nuts. The sink must stand firmly, without shifts.
Connecting hoses and siphon
With a siphon, everything is simple - they pulled the corrugated hose to the nozzle, tightened the nut by hand until it stops. All. Do not use the keys - everything is made of plastic.
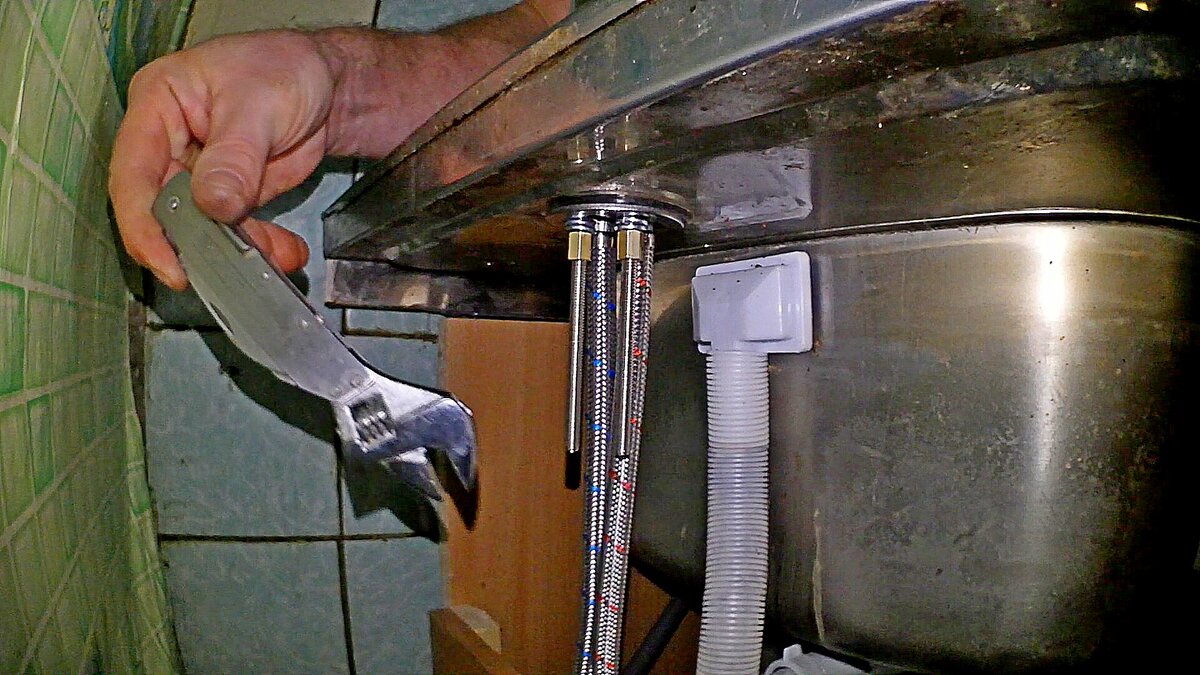
With the connection of the water supply is not much more difficult. Just be sure not to confuse the place of connection of cold water. Its entrance is on the right. After making sure that there is a rubber gasket in the union nut of the flexible liner, we bring it to the pipe, tighten the nut as much as possible with our fingers. Then we take the key and tighten it one or two turns. Do not pull hard - you can cut through the gasket and then the connection will flow.
But what about tow, winding and paste? When using hoses of normal quality, they are not needed. Connection without them is reliable and tight. It will be possible to rewind a lot if, after a test run, drops of water appear from under the nuts. But this shouldn't be. There is no need to wind tow or fum-tape just like that. Extra time and extra pressure on the union nut.
After connecting to the hot pipeline, we can assume that the independent replacement of the faucet in the kitchen is over. It remains to turn on the water and check if everything is working properly and if the connections are leaking. To do this, the joints are wiped with a dry cloth, and then carried out several times by hand.
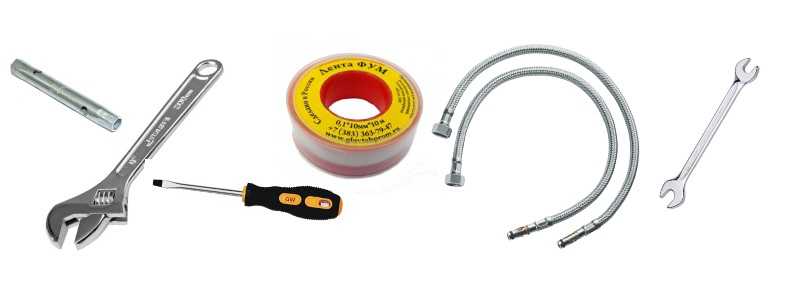
A set of tools and materials
Since it is necessary to install the faucet on the sink with high accuracy and proper quality, for installation work it is necessary to prepare a standard set of tools for plumbing work:
- Large and small pliers.
- Adjustable and gas wrenches.
- Screwdrivers of different types and sizes.
- Hexagons.
- Open-end wrench 12×14 mm.
- Vinyl tape, MUV tape (Fluoroplastic Universal Material) or tow.
- Roulette.
You may need additional tools.Therefore, before buying and installing, you should study the installation instructions given by the manufacturer of your mixer and, based on these data, prepare an accurate set of tools and materials.
This is interesting: Installing a faucet in the bathroom: option with side mounting
What is needed for work
Replacing a faucet in the kitchen consists of two stages - first remove the old one, then mount and connect the new one. In addition to the new faucet, you will need keys of the right size and some auxiliary materials. Most often, keys are needed for 10 and 11, for 22 and 24. In order to remove the mixer from the countertop or sink, you will need two adjustable wrenches.
One more moment. You will most likely need new hoses. Although most kitchen faucets are equipped with flexible hoses, their length is 30 cm. This is not always enough. Before starting work, you need to make sure that the length of the regular hoses is enough.
What you need to replace the faucet in the kitchen
It depends on how far from the mixer are cold and hot water pipes. The hoses should sag slightly, because when the tap is turned on / off, a sharp change in pressure occurs, from which the hoses twitch. If they are stretched, the connection will loosen very quickly and leak. So, if from the pipes to the inlet of the mixer 25 cm or less, regular hoses will suffice. If more, buy longer ones. And advice: get high-quality, not the cheapest. They quickly become unusable and can flood both you and the neighbors from below, if any. Therefore, take flexible hoses in a stainless braid or corrugated stainless pipe.They will serve for a long time and without complaints.
To buy hoses for a kitchen faucet, you will need the size of the "needle" - the tip that is screwed into the faucet, as well as the diameter of the pipe and the type of end (male-female) - to select the correct fittings.
To seal the connection, you will need linen tow with sealant paste or fum tape. You will need various gaskets and o-rings (should come with the kit, but just in case, find everything you have).
How to dismantle old equipment?
How to install the sink correctly? You should start by dismantling the device that has served its purpose. To do this, first unscrew the nut that secures the mixer. After that, the device is disconnected from the eyeliner, carefully removed and removed. Then the drain elements are dismantled. The nuts are unscrewed from the bottom of the sink. A siphon is disconnected from the drain outlet, the water from which is immediately removed. If it is necessary to replace the siphon, it is separated from the drain pipe. At the end of the work, it is recommended to tightly close the opening of the sewer pipe with a rag, cork or other suitable object in order to prevent the appearance of an unpleasant odor. The sink is removed from the support.
Errors during installation
When an invited master with remarkable experience is involved in the installation, the result of his work will be excellent - he knows all the nuances for sure. But self-assembly does not exclude the occurrence of various troubles. Especially if such work is carried out for the first time in life.
Firstly, after installation, you may find that the crane is dancing from side to side or leaning to the side. This problem will not arise if the nut is carefully fixed at the stage of its connection to the sink.You also need to check the correct placement so that you do not have to redo the work.
With the correct installation of the mixer, the deflection angles of the lever for turning on hot and cold water relative to the tap are equal
The second trouble is that when hot water is turned on, cold water flows and vice versa. This is also an easily fixable problem.
Just at the stage of connecting the tap to the water supply, there was confusion with the pipes. It is necessary to shut off the supply of cold and hot water, disconnect the flexible connection and, having swapped the tubes, reconnect them.
Most often, the hot water supply pipe is on the right, and the cold water supply is on the left. If water meters are installed nearby, then you can determine from the meter
As a result, a flexible hose with a red tape should be connected to a pipe supplying hot water, and a tape braided in blue should be connected to a cold water supply pipe.
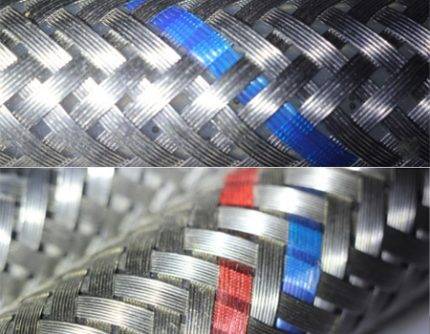
Cold water can be supplied through an eyeliner with blue tape or through a universal one that has both red and blue braided tape
Thirdly, leaks may appear at the junctions. This is the result of a weak tightening of the nut. You should tighten it at the leak and look again. If the leak does not stop, then the reason may be in the nut itself - perhaps it was overtightened, and it burst. Have to use a spare.


Silumin nuts break especially often - products made from this material attract with their low price. It is highly undesirable to use them at home - a more expensive product will last 10-15 years without requiring replacement
Fourth, flexible eyeliner can burst.
This happens if one of the following situations occurs during installation:
- the flexible tube was short and had to be stretched a little;
- too long eyeliner was attached, it twisted and bent several times;
- technical rubber eyeliner with an aluminum frame, and the junction is hard to reach. It was sharply bent and broke;
Whatever the cause, it must be eliminated. It is bad when there is not enough length, but no less bad when this length is in excess.
It is correct to choose the optimal eyeliner, taking into account the material - it is desirable that the rubber tube be made of food grade rubber, and the outer braid made of stainless steel or galvanized.
With installation rules faucet for bathroom fixtures The room will be introduced by the following article, the contents of which we recommend that you familiarize yourself with.
What is needed for work
Replacing a faucet in the kitchen consists of two stages - first remove the old one, then mount and connect the new one. In addition to the new faucet, you will need keys of the right size and some auxiliary materials. Most often, keys are needed for 10 and 11, for 22 and 24. In order to remove the mixer from the countertop or sink, you will need two adjustable wrenches.
One more moment. You will most likely need new hoses. Although most kitchen faucets are equipped with flexible hoses, their length is 30 cm. This is not always enough. Before starting work, you need to make sure that the length of the regular hoses is enough.
What you need to replace the faucet in the kitchen
It depends on how far the cold and hot water pipes are from the mixer. The hoses should sag slightly, because when the tap is turned on / off, a sharp change in pressure occurs, from which the hoses twitch. If they are stretched, the connection will loosen very quickly and leak.So, if from the pipes to the inlet of the mixer 25 cm or less, regular hoses will suffice. If more, buy longer ones. And advice: get high-quality, not the cheapest. They quickly become unusable and can flood both you and the neighbors from below, if any. Therefore, take flexible hoses in a stainless braid or corrugated stainless pipe. They will serve for a long time and without complaints.
To buy hoses for a kitchen faucet, you will need the size of the "needle" - the tip that is screwed into the faucet, as well as the diameter of the pipe and the type of end (male-female) - to select the correct fittings.
To seal the connection, you will need linen tow with sealant paste or fum tape. You will need various gaskets and o-rings (should come with the kit, but just in case, find everything you have).