- Algorithm for removing the old crane model
- Installation Recommendations
- Installing a new faucet
- The nuances of installing a mixer
- If the sink is stainless steel
- If the sink is made of glass
- Other types of shell material
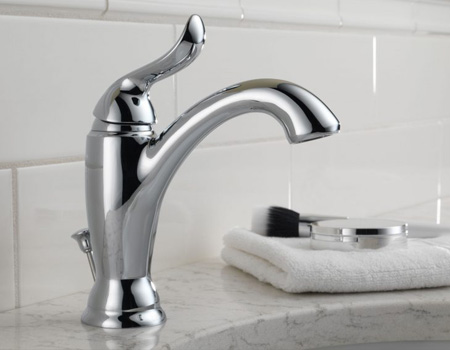
- Faucet Selection Tips
- Selection of eyeliners
- Peculiarities
- Self-replacing the mixer
- Dismantling of old equipment
- Installation of a new mixer
- Errors during installation
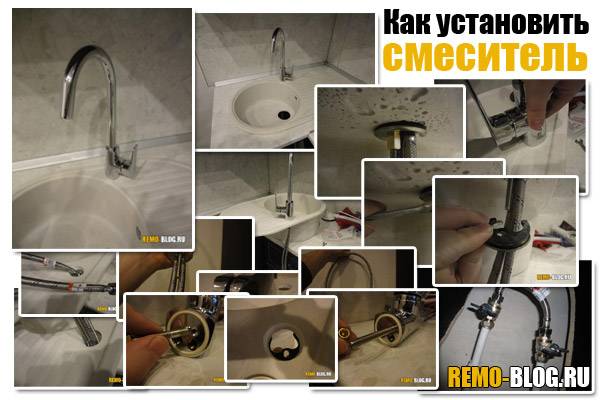
- Kitchen faucet installation
- Assembly
- Installation on the sink
- Washing installation
- Connecting hoses and siphon
- Conclusions and useful video on the topic
Algorithm for removing the old crane model
- Installing a faucet on the sink begins with shutting off the water supply in the riser. To make sure that it is not there, just open the tap.
- The old device is unscrewed from pipes with hot and cold water. After that, the threaded connection on the pipes is cleaned. If the threaded connections are stuck, and they are hard to unwind, then the places are pre-treated with kerosene. After 20 minutes, the thread unwinds.
- It is recommended to mark the location of the cold and hot flow pipes. Only after that the eyeliner is disconnected.
- The device is fixed in place with a nut. It is unscrewed with a small adjustable wrench. Sometimes the mixer is attached with a stud or a pair of studs, on which nuts are screwed for fixing.
When the lock nut is unscrewed, the half-washer is removed. The old device is taken out through the hole in the sink up. The hot and cold water supply hoses are also alternately pulled out.
Installation Recommendations
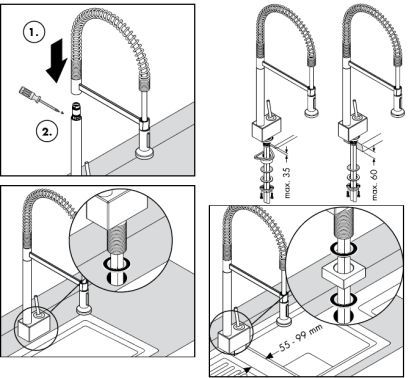
Kitchen faucets can have two types of fastening: the device is fixed with a nut or two studs. Depending on this, the method of mounting the mixer is determined.
In designs with a clamping nut, the installation process is complicated by the presence of a long base, so the question of how to install a kitchen faucet is solved in the following order:
Install the O-ring.
Mark the mounting hole in the sink and drill it.
Install the mixer in the prepared slot.
Screw on the fixing nuts and tighten them with an adjustable wrench.
Attach a hose with a short fitting.
Next, connect a flexible hose with a long needle.
Check the performance of the equipment, paying attention to the formation of defects.

The second option for attaching the faucet to the sink involves the use of studs. In this case, it may be difficult to tighten the flexible hoses after installing the faucet on the sink or countertop. For this reason, you must first screw the nuts into the base of the mixer, and then install it in place.
In general, the work is carried out according to the following scheme:
- The studs are screwed into place.
- Flexible plumbing hoses lead from the bottom of the sink.
- The mixer is located in the seat.
- Fix the device with fixing pins.
In both cases, it is necessary to control the position of the sealing elements, the space between the parts must be completely filled.Even small gaps are not allowed.
Installing a new faucet
After dismantling the old mixer, they begin to install a new product. The installation process of the device does not require special knowledge and skills, even a novice master can carry out the work, while it is necessary to follow the basic recommendations, which we will consider in more detail.
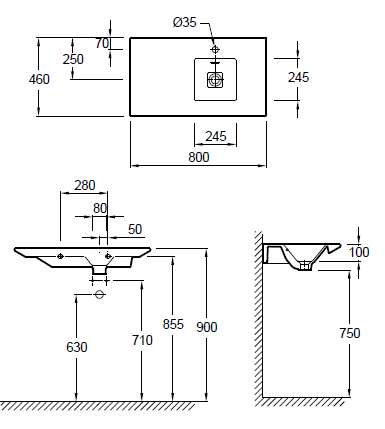
Remember, if there is no hole for the product in the sink board, it is necessary to cut it, taking into account the dimensions of the mixer. If it already exists, they measure it and compare the dimensions of the device and the diameter of the hole, which should fit each other.
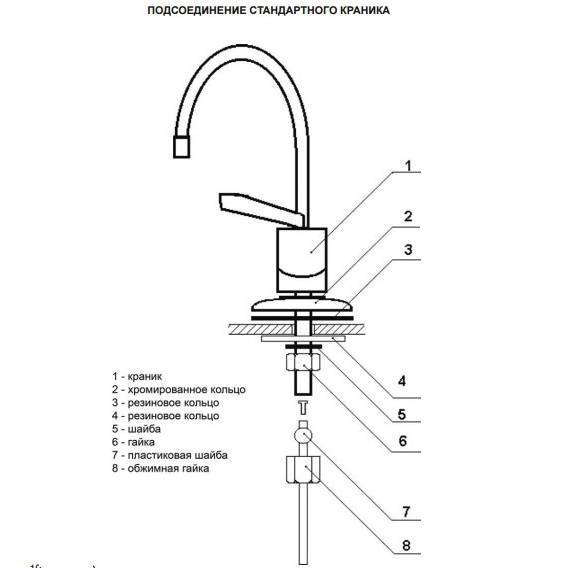
Mixer installation sequence.
- Check the package of the device for the presence of rubber gaskets.
- Install the sink faucet. First of all, screw the supply hose onto the product, then remove the nuts located on the device from the studs and completely tighten them. Next, a hose is passed through the drain hole and a rubber gasket is put on.
Remember, the seat for the mixer must first be cleaned of dirt and grease.
To eliminate the possibility of a tap leak, treat the surface of the sink and the installation site of the device with an ethyl solution.
- Attach new faucet. For this purpose, special nuts and pliers are used.
To create a reliable and tight connection between the device and old metal pipes, it is necessary to use tape-fum or wind the thread.
- Check the quality of the connection between the mixer and the nozzle. If necessary, the product is pressed with pliers.
- Connect the mixer to the system.This action is performed after winding the tow, checking the presence of a rubber gasket, choosing the location of the water taps. To connect the device to communications, an adjustable wrench or a regular open-end wrench is used, thanks to which the nuts are securely clamped, while monitoring the condition of the rubber inserts.

How to change the faucet in the kitchen
It is important at the stage of connecting the hose to the water supply not to confuse the hot and cold water supply. To this end, it is necessary to carry out the following action: turn the mixer so that the tap looks at you, in this position the inlet, which is located on the right - cold water, on the left - hot
The nuances of installing a mixer
With the installation of a faucet on ceramics, everything is clear, but questions may arise when the sink is made of a different material. There are small nuances, which we will now take a closer look at.
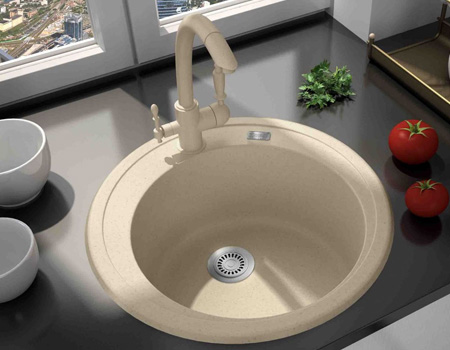
If the sink is stainless steel
The most important thing in installing a mixer is to choose the right model and correctly perform each stage of the work. It's not difficult, but it requires attention and calmness.
If the sink is made of stainless steel, then you need to choose a faucet of a suitable design, size and shape.
Moreover, most often stainless steel is used for the manufacture of kitchen sinks - it is a durable material. It is more convenient to mount the mixer in stainless steel when it is not installed at the workplace.
Image gallery
Photo from
Connecting a flexible hose before installing the faucet
Fixing the mixer on the dismantled sink
Choosing a perfectly flat area for mounting the mixer
The process of tightening the eyeliner and studs
If it is not possible to remove the sink, you will have to enlist the help of a friend, son, wife or other person.After all, the conditions in which the stainless steel sink is located are very constrained. Therefore, you can not do without an assistant and a flashlight.


The process of installing the faucet on a stainless steel sink is similar to installing it on a ceramic sink. If there is no hole for the mixer, then it is easy to cut it with your own hands, processing the edges so that they become smooth.
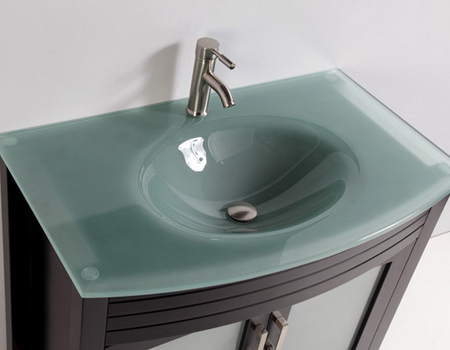
If the sink is made of glass
Glass products are often used in the interior. Shells made of this material look especially stylish. Moreover, they can be of different shapes, colors and sizes - it all depends on the flight of designer imagination.
Image gallery
Photo from
Colored glass sink
transparent bowl
Illuminated glass sink
High-tech sink
In the installation of the faucet on the glass sink, there will also be no difficulties.
It is important to follow the safety rules and choose the most suitable model
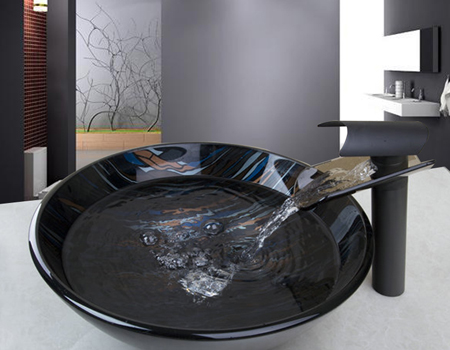
Often, a waterfall-type mixer - frap is selected for glass sinks. Some manufacturers supply a mixer and a bottom valve as a set.
Installation is carried out on the surface in which the hole is provided. If this is a model mounted on a pedestal, then you have to work with this base.
When the sink is a separate product, it has holes for the faucet
It is important here not to drop anything heavy and not to overtighten the fasteners. When working with glass, you should not rush - although it is heavy-duty, it can break when a hammer falls
When working with glass, you should not rush - although it is heavy-duty, it can break when a hammer falls.
Other types of shell material
In addition to ceramics, glass and stainless steel, marble, porcelain, granite, plastic, acrylic and even wood are used for the production of sinks. Porcelain containers are quite expensive. As for the installation, it is simple and depends on the type of mixer to be installed. The purchased model comes with instructions that detail how to properly install.
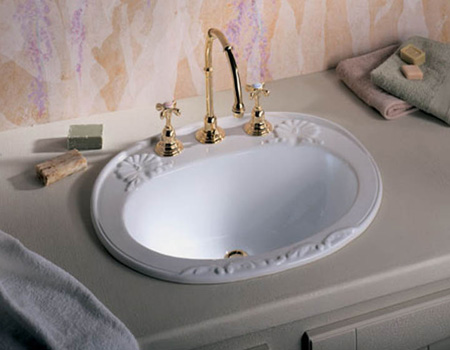
The porcelain sink looks elegant and sophisticated. For her, mixers of a special configuration are most often provided, when the valves for supplying water are located separately from the spout. There are corresponding holes in the sink body
If in a bathroom there is a sink or a pedestal for a sink from a tree, then installation - the mixer does not differ in special complexity. The only thing is that this material is rather capricious and will simply not be able to serve for a long time. The faucet will most likely outlive the sink.
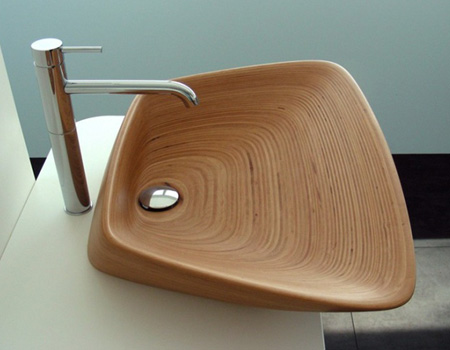
A wooden sink can be made in the form of a bowl fixed on a base made of a polymer or other material. In this case, the installation of the mixer will take place in the base
For marble, granite and acrylic, it is necessary to use a mixer installation technology similar to installation on a ceramic sink
It is important to assemble the mixer correctly, and in the process of tightening the fasteners, do not overtighten anything and carefully perform the connection and sealing knots
Granite sink is most often used for the kitchen. It allows you to add sophistication to the design of the room. Often the manufacturer completes a granite sink with a suitable faucet model.


Faucet Selection Tips
- The water distribution mechanism is easier to install and replace later without removing the sink if it is selected with two pins instead of one large nut. Models whose price is average and above average are usually fastened with pins. They are installed and dismantled without disturbing the position of the washbasin.
- A cheap faucet comes with unreliable hoses. It is recommended to purchase new hoses before installing the faucet on the sink. This will help you avoid having to replace them soon.
- An easy way to select a reliable faucet is by weight. Several models are selected and their weights are compared. The mixer that is the heaviest of all will be made of brass. The rest are aluminum and its alloys.
- Non-standard models are more difficult to repair, as there may be problems with spare parts. Then only the installation of a new mechanism will help correct the situation.
Selection of eyeliners
The connection of the tap to the water supply system is carried out with flexible and rigid connections. Reliability is distinguished by rigid, and ease of installation - flexible eyeliners.
The length of the standard flexible hose is 86 cm. This is enough to prevent the hoses from breaking. They fit in a semicircle.
If the kit includes short eyeliners, 30 cm long, then they will have to be sharpened. There are extra connections and problem areas for leaks. Therefore, it is recommended to immediately purchase hoses of the required length. The eyeliner should not be stretched.
The compatibility of the materials of the mixer and the connecting hose is taken into account so that corrosion does not appear on the elements.
Peculiarities
Below are some of the features of concealed mixer taps.
Support of the set temperature, without thermal drops. Mixers of all models are equipped with a thermostat.One of the problems with conventional spouts is the unpredictability of temperature: the faucet cannot independently supply water of the required temperature during the process of adjusting the faucet. Built-in mixers easily solve this problem, since the user himself sets the temperature, which does not change on its own, but only after he changes it to another. If in an apartment or a separate room there is not one spout, but several, then for each tap it is necessary to set its own temperature parameters.
Eliminates additional abrasions and bruises. Almost every inhabitant of the planet has been crippled at least once due to bathroom items. With a hidden mixer, such incidents will not occur, since the protruding part of the device is too small. And now you can completely forget about the constantly tangled hose from the shower, which strives to slip out of your hands.
Aesthetics and convenience in one device. As already noted, with a hidden spout, there is no chance of hitting yourself or a child on a faucet or getting tangled in a shower hose.
The faucet control can be placed against one wall or even near the door, and the faucet itself can be placed against the other wall above the bath. With this model, you do not have to adapt to the pipes - the user will have complete freedom of creativity, because the mixer can be placed where you want.
It harmoniously looks in the space of the room. In fact, the built-in faucet will suit almost any bathroom interior. Suffice it to recall what a standard bathroom looks like: in almost all interiors, all kinds of cans of soap, gel, shampoos, conditioners and other daily toilet items are visible. If it is possible to hide all this in the cabinets, then the pipe with the watering can definitely cannot be removed.
Save space even in a small space. As mentioned above, the faucet takes up very little space in the visible part, so it can be considered a practical solution for a miniature bathroom.
In addition to this obvious plus, one can also highlight the fact that shelves for soap accessories can be attached to the place of the old mixer. However, in this case, it is necessary to remember where the pipes go, and stay away from this place with working tools.
A rational approach to space planning. If the bathroom, unlike the previous paragraph, is large, then a person has the opportunity to install two or more faucets on one device. For example, you can set two rain showers opposite each other to create hydrorelaxation. In this case, it is recommended to opt for shower systems with a larger diameter and make sure that the pump pipe connected to the faucets delivers enough water. Otherwise, you may encounter insoluble problems with the water supply.
Simplifies room cleaning. Most users are familiar with the situation when beautiful faucets after a while became a collection of stains and plaque. To clean all the fittings in the bathroom, sometimes you have to spend the whole day off. With built-in faucets, cleaning time will be reduced by several times, which saves time and labor resources.
Self-replacing the mixer
The replacement process is carried out in several stages:
- dismantling of obsolete equipment;
- mounting a new mixer.
Dismantling of old equipment
After preparing all the components, you can begin to dismantle the old mixer. The work is done in the following order:
- blocking the water supply. To stop the water supply, valves installed on the central highways in front of the meters are used. In the absence of individual cranes, it is required to contact the management company;
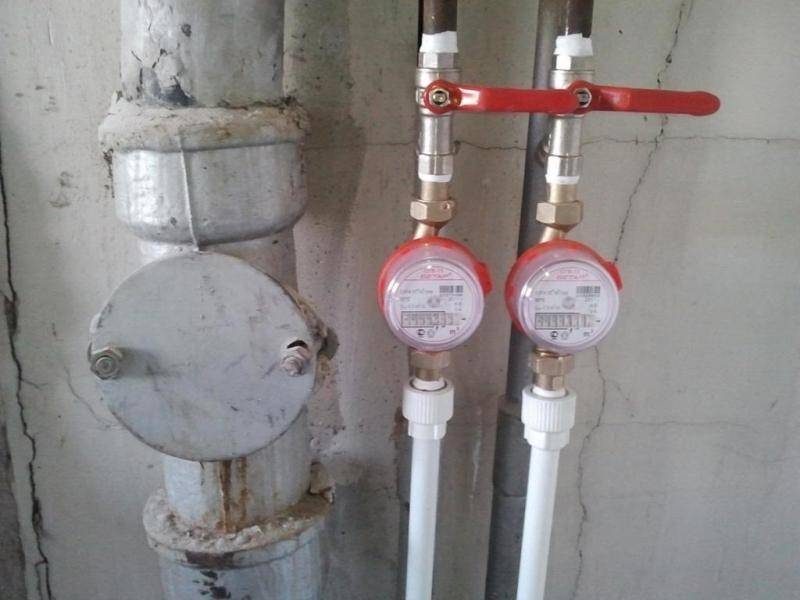
Valves for self-closing water supply
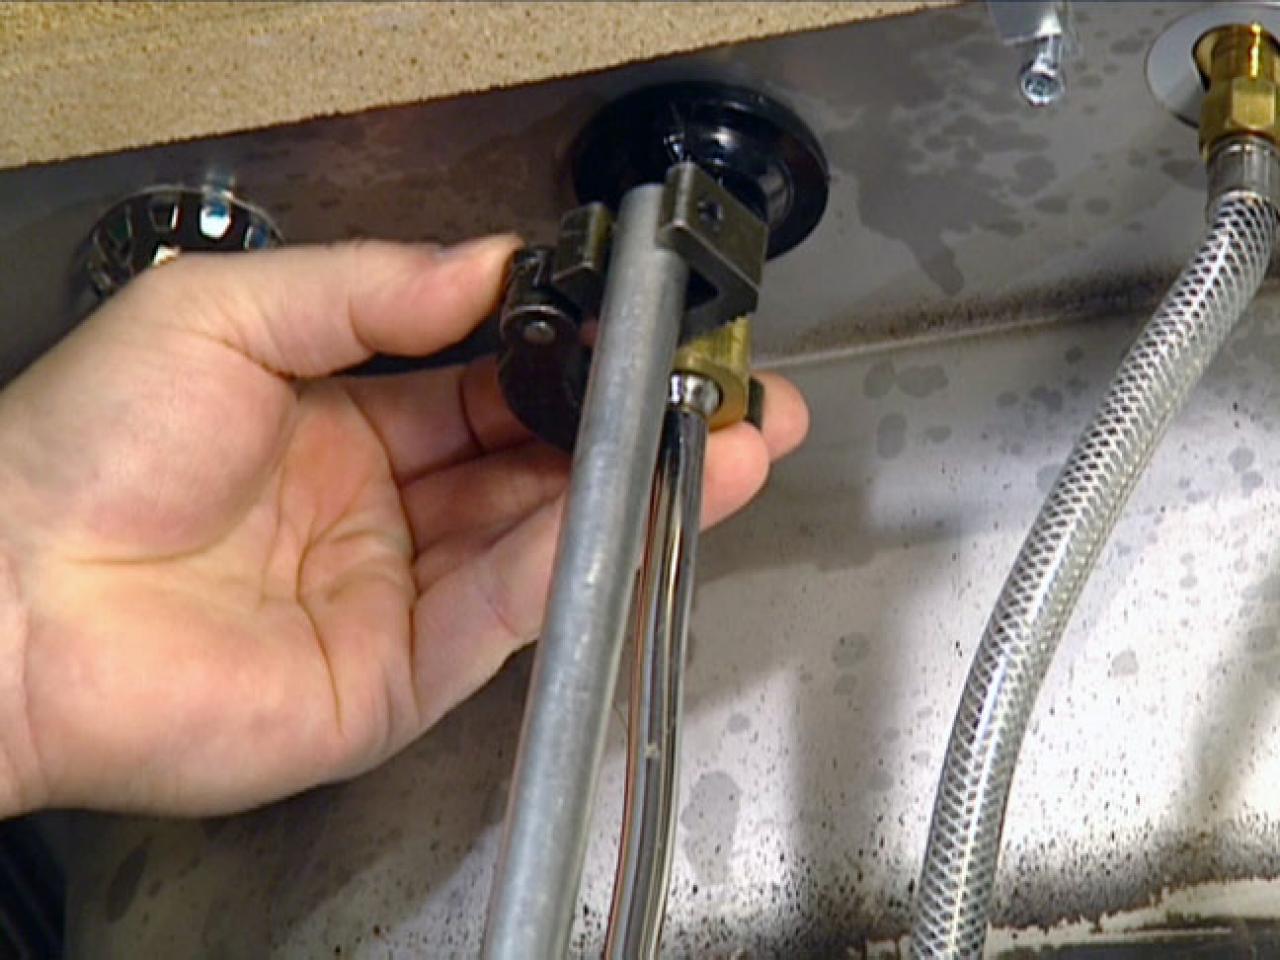
- disconnection of the liner;
After turning off the water supply, a small amount of liquid remains in the pipes and flexible piping. To avoid flooding, when disconnecting the piping on the floor, it is recommended to put a rag or install a shallow container.
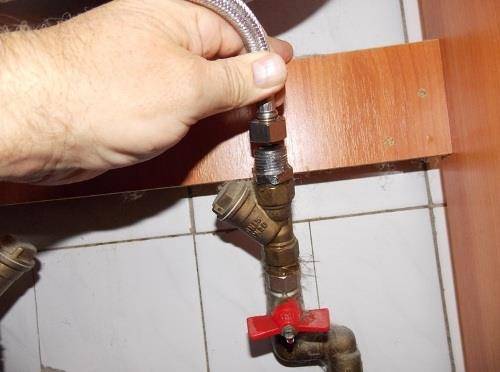
Disconnecting the mixer from the water supply
- disconnect mixer. Kitchen faucet can be installed:
using pins. The device can be provided with one mounting stud or two identical studs. To dismantle the equipment in this situation, it is required to loosen the nuts located on the fastening studs;
Fixing the mixer with studs
with a nut fastener. Dismantling is also carried out after loosening the fixing nut;
Nut fixation
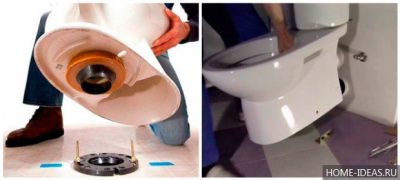
- dismantling. After the kitchen faucets are loosened, the equipment can be removed through the mounting hole.
Final removal of the mixer
After removing the faucet, it is recommended to clean the threads on the pipes at the point where the equipment is connected to the water supply system and remove dirt at the location of the gaskets when attaching to the sink.
Installation of a new mixer
Installation of new equipment is carried out according to the following scheme:
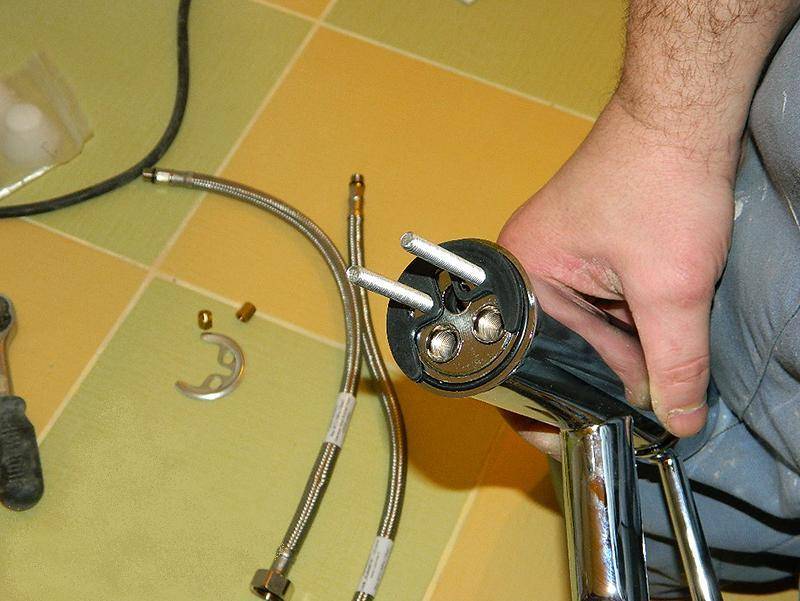
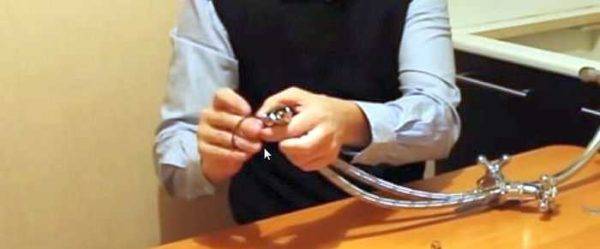
- mixer assembly. Modern manufacturers can supply mixers assembled, partially assembled or disassembled.If disassembled or partially assembled equipment is purchased, then a complete assembly of plumbing is required before installation. As a rule, detailed assembly instructions are supplied with the kit;
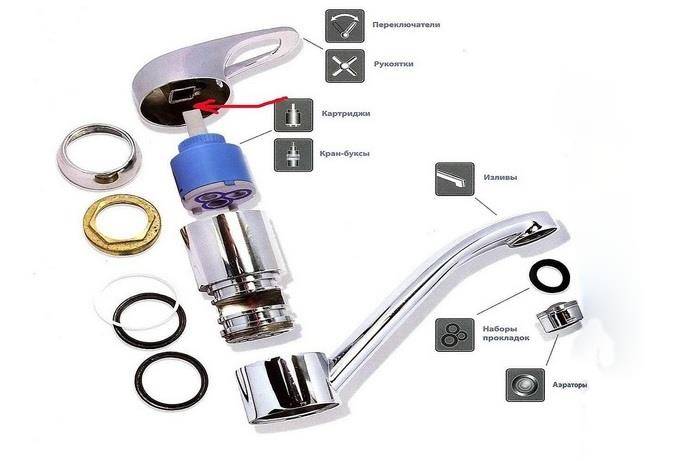
Scheme for collecting a single-lever mixer
- connection of supply hoses;
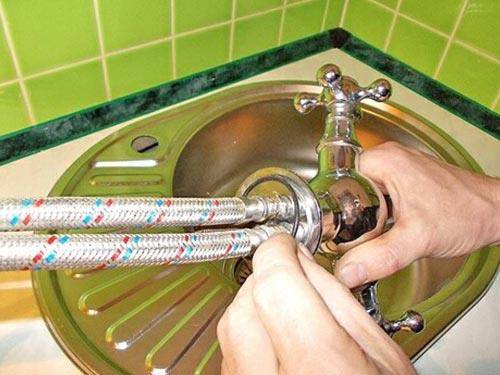
Installation of a flexible connection to the water supply
To eliminate the possibility of leakage at the point of connection of the equipment to the supply pipes, special sealing rings are used, which are included in the flexible piping kit, or any sealing material.
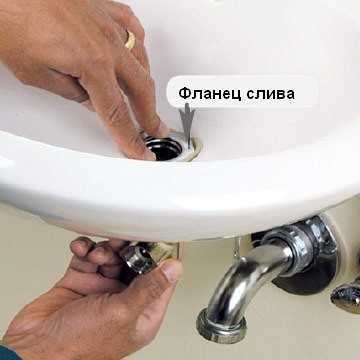
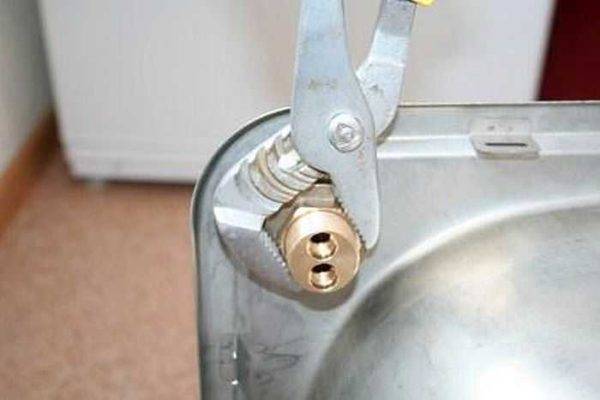
- fixing the mixer to the sink, performed in the following way:
- installation of a gasket at the point of contact between the faucet and the sink;
- inserting equipment into the mounting hole;
- installation of a protective pad at the bottom of the sink;
- fixing the mixer with nuts;
Fixing the faucet to the sink
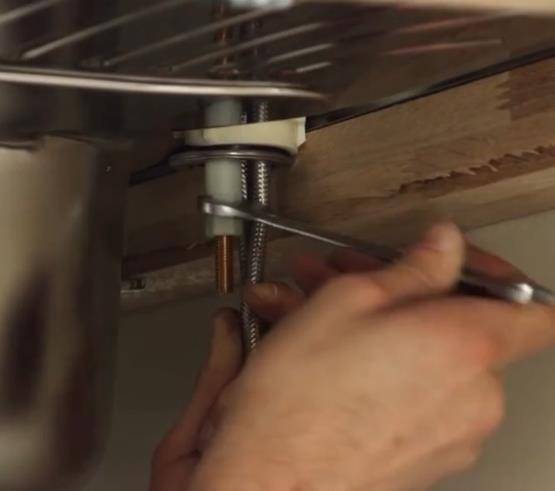
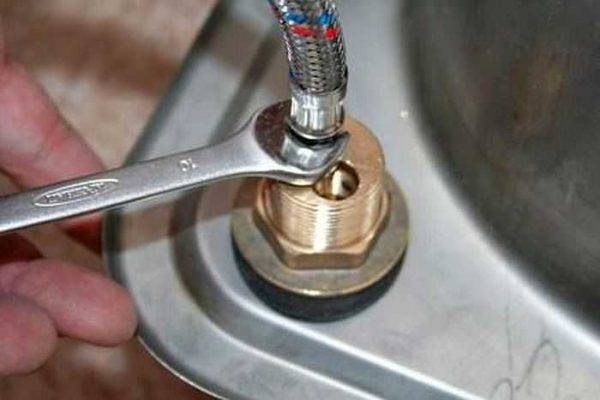
- connecting the supply hoses to the pipes of the water supply system;
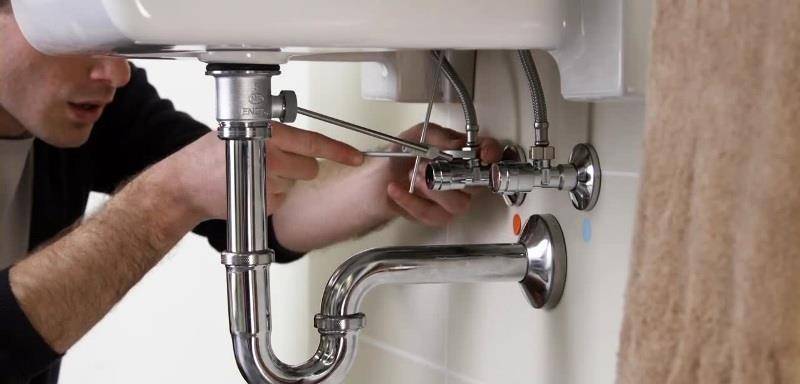
Connection to the water supply system
- checking for leaks. To do this, the water supply to the equipment begins and all joints are carefully inspected. If a leak is detected, seal with gaskets, sealant or insulating material (for threaded connections).
A more detailed installation process is presented in the video.


To ensure that the need to replace the mixer occurs as rarely as possible, it is important to properly care for the equipment, change the seals in a timely manner, clean the filters installed on the water pipes
Errors during installation
When an invited master with remarkable experience is involved in the installation, the result of his work will be excellent - he knows all the nuances for sure.But self-assembly does not exclude the occurrence of various troubles. Especially if such work is carried out for the first time in life.
Firstly, after installation, you may find that the crane is dancing from side to side or leaning to the side. This problem will not arise if the nut is carefully fixed at the stage of its connection to the sink. Also, you need to check the correct placement so that you do not have to redo the work.
With the correct installation of the mixer, the deflection angles of the lever for turning on hot and cold water relative to the tap are equal
The second trouble is that when hot water is turned on, cold water flows and vice versa. This is also an easily fixable problem. Just at the stage of connecting the tap to the water supply, there was confusion with the pipes. It is necessary to shut off the supply of cold and hot water, disconnect the flexible connection and, having swapped the tubes, reconnect them.

Most often, the hot water supply pipe is on the right, and the cold water supply is on the left. If water meters are installed nearby, then you can determine from the meter
As a result, a flexible hose with a red tape should be connected to a pipe supplying hot water, and a tape braided in blue should be connected to a cold water supply pipe.

Cold water can be supplied through an eyeliner with blue tape or through a universal one that has both red and blue braided tape
Thirdly, leaks may appear at the junctions. This is the result of a weak tightening of the nut. You should tighten it at the leak and look again. If the leak does not stop, then the reason may be in the nut itself - perhaps it was overtightened, and it burst. Have to use a spare.
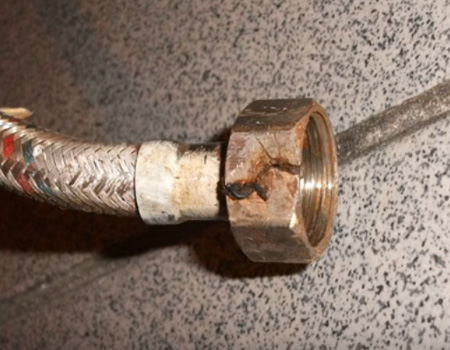
Silumin nuts break especially often - products made from this material attract with their low price. It is highly undesirable to use them at home - a more expensive product will last 10-15 years without requiring replacement
Fourth, flexible eyeliner can burst. This happens if one of the following situations occurs during installation:
- the flexible tube was short and had to be stretched a little;
- too long eyeliner was attached, it twisted and bent several times;
- technical rubber eyeliner with an aluminum frame, and the junction is hard to reach. It was sharply bent and broke;
Whatever the cause, it must be eliminated. It is bad when there is not enough length, but no less bad when this length is in excess. It is correct to choose the optimal eyeliner, taking into account the material - it is desirable that the rubber tube be made of food grade rubber, and the outer braid made of stainless steel or galvanized.
Image gallery
Photo from
Flexible hose bends smoothly
Cheap hose breaks easily when bent
Silumin nuts cracked
Corrugated stainless steel pipe
Kitchen faucet installation
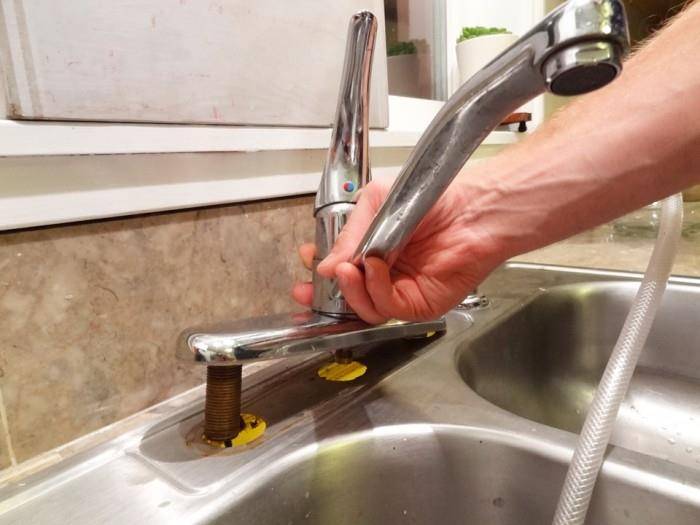
Replacing the faucet in the kitchen is nearing completion. Now we assemble the crane and install it in place. It is much more convenient if the work can be carried out on a removed sink. If this is not possible, all manipulations will have to be carried out reclining in the closet. Approximately as in the photo.
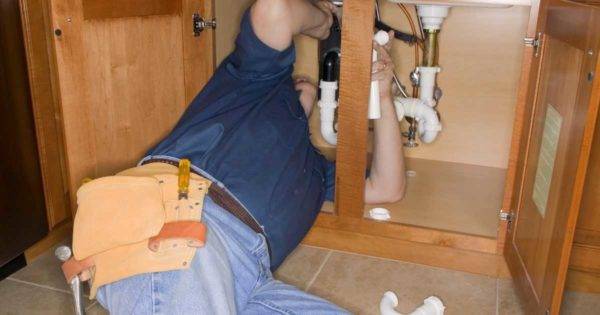
Not the most comfortable position
Assembly
First, we fasten flexible hoses to the mixer. They are screwed in by hand, then tightened a little with a key - no more than 2 turns.


We screw the flexible hose into the holes on the mixer body, tighten it slightly with a wrench
Now you need to put a rubber gasket on the body, which seals the junction of the mixer and the sink surface. This rubber ring of decent diameter is included in the kit. It is pulled through the installed supply hoses, placed on the body.
Install gasket on body
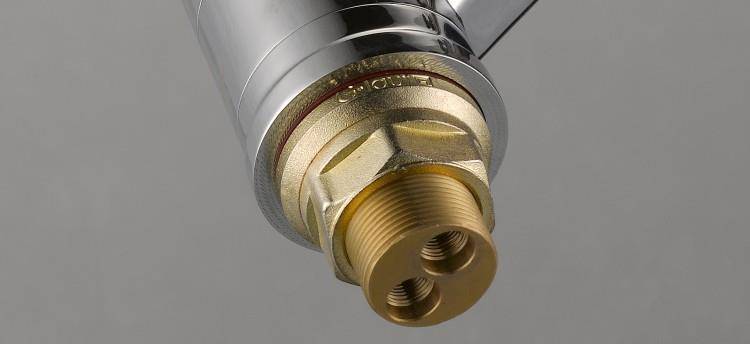
In modern kitchen faucets, there are two different forms of attachment to the sink. The first - with the help of a nut - you saw in the part where it was about dismantling the mixer. It's just an "older" system. The second provides for the presence of rods and spacers-clamps in the form of a horseshoe. The rod is usually one, but there may be two. If there are such rods, they are screwed into the appropriate socket. If a nut is screwed on it, it is removed.

Rod for additional fixation
Installation on the sink
Now the kitchen faucet can be installed on the sink. First, flexible hoses are inserted into the hole, then the body is placed in the center of the hole. Further actions depend on the type of fastener. If this is an ordinary nut, they simply tighten it, trying not to overtighten it.
The nut is screwed onto the body
If it is a model with rods, the appearance is different, although the meaning is the same. First, the gasket is put on (it is also in the shape of a horseshoe), then the pressure plate. Next, the nuts are screwed onto the rods. The nuts are slightly tightened with a wrench. TODE nothing complicated.
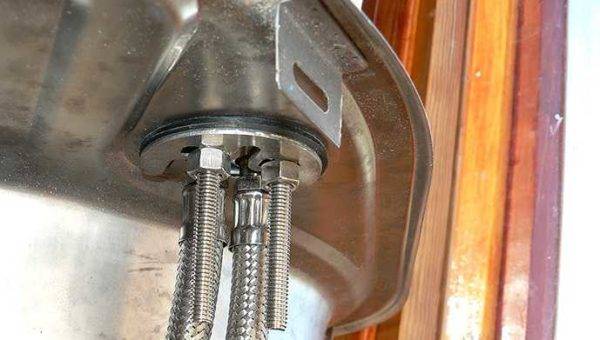
Faucet attachment with rods
Turn the sink over and turn on the faucet. He must be dead. There shouldn't be any loopholes. If there is movement, tighten the mount.
Washing installation
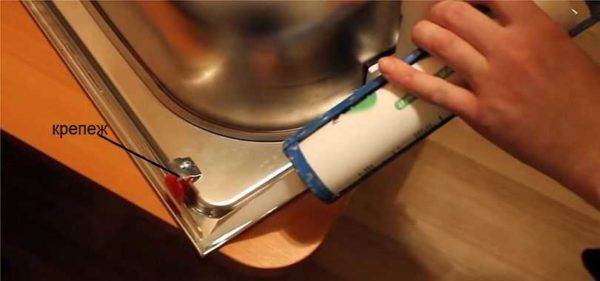
Now the sink with the mixer installed on it is placed in the prepared place. First, a silicone sealant is applied from the back of the sink around the perimeter (not acrylic - it quickly turns yellow).Then the sink is installed in place, the fixing bolts are tightened.
Preparing the sink for installation
Then everything is simple: put in place, align with the edges of the table, tighten the fasteners. It is made in the form of petals that attract the sink to the countertop when you tighten the nuts. The sink must stand firmly, without shifts.
Connecting hoses and siphon
With a siphon, everything is simple - they pulled the corrugated hose to the nozzle, tightened the nut by hand until it stops. All. Do not use the keys - everything is made of plastic.
With the connection of the water supply is not much more difficult. Just be sure not to confuse the place of connection of cold water. Its entrance is on the right. After making sure that there is a rubber gasket in the union nut of the flexible liner, we bring it to the pipe, tighten the nut as much as possible with our fingers. Then we take the key and tighten it one or two turns. Do not pull hard - you can cut through the gasket and then the connection will flow.
But what about tow, winding and paste? When using hoses of normal quality, they are not needed. Connection without them is reliable and tight. It will be possible to rewind a lot if, after a test run, drops of water appear from under the nuts. But this shouldn't be. There is no need to wind tow or fum-tape just like that. Extra time and extra pressure on the union nut.
After connecting to the hot pipeline, we can assume that the independent replacement of the faucet in the kitchen is over. It remains to turn on the water and check if everything is working properly and if the connections are leaking. To do this, the joints are wiped with a dry cloth, and then carried out several times by hand.
Conclusions and useful video on the topic
Installing a mixer with a bottom valve has its own characteristics. How to do it correctly is described in the video:
If the length of the flexible hose that comes with the mixer is not enough, you should buy a longer one. The video clip tells in detail about the nuances of these hoses and the selection rules:
It is convenient to mount the faucet if the sink has not yet been installed. So there is comprehensive access when tightening various fasteners:
Even the original frap faucet must be carefully inspected and assembled before installation. And after completing the installation work, you should check its performance:
If everything is done correctly and slowly, then installing the mixer will be an interesting pastime. A self-done scope of work will please with an excellent result, which is in no way inferior to a professional installation performed by an experienced plumber
It is important that everything is securely fastened, but without fanaticism - fasteners do not like to be overtightened