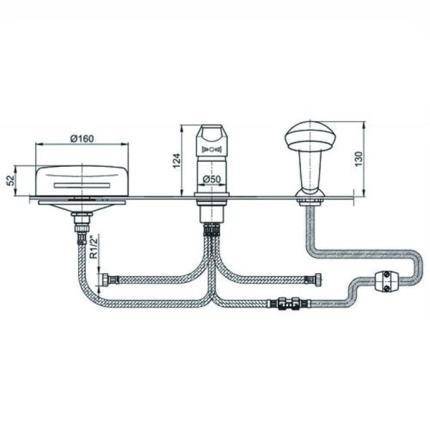
- Mounting on a horizontal surface
- Variety of species
- Design features of the built-in crane
- Installation options
- Removing the old faucet
- On-Board Faucet Installation
- Instructions for drilling holes in an enamelled bath
- Tips for Drilling Holes in an Acrylic Bathtub
- How to remove an old faucet
- How to install a faucet in the bathroom: the subtleties and nuances of installation
- Features of drilling on enamel
- Installation subtleties
- Assembly Features
- How to assemble a single lever faucet
- How to put a two-valve option with a shower
- Tasks, advantages and disadvantages of cascade mixers
- Benefits of a mixer on board
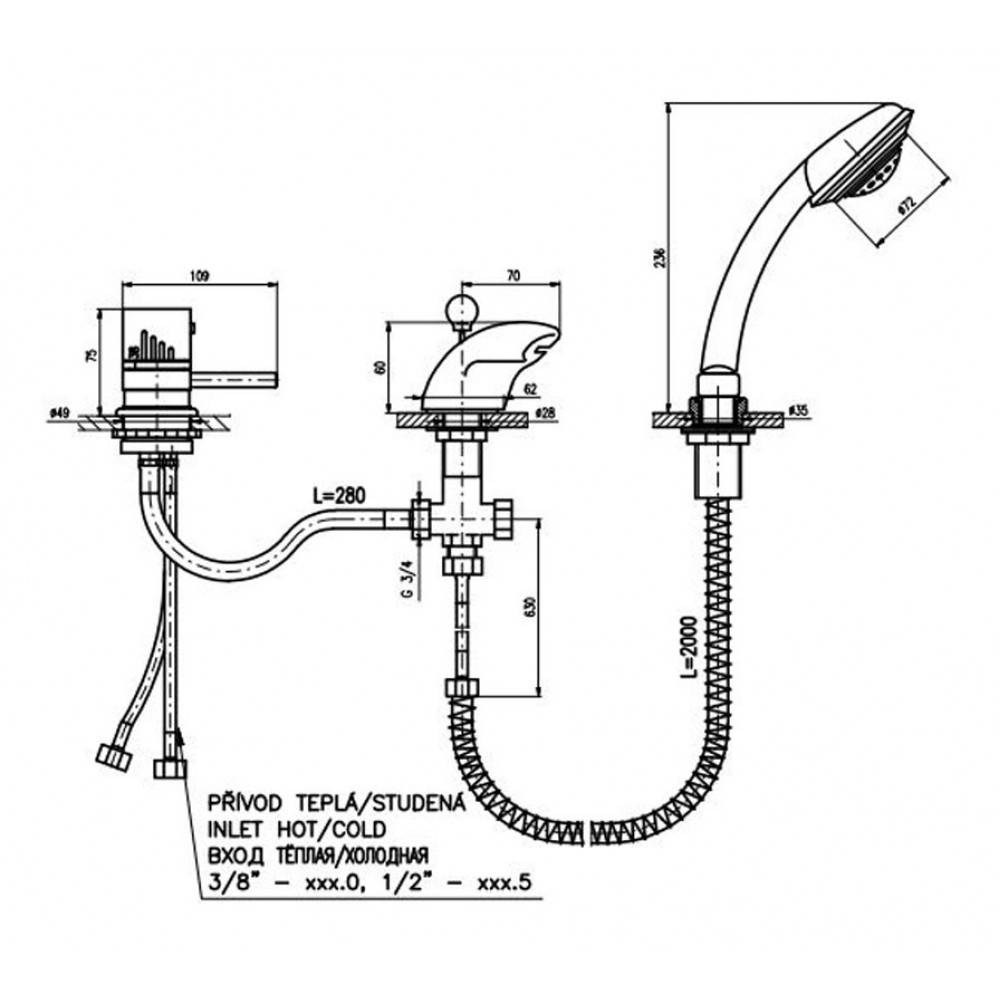
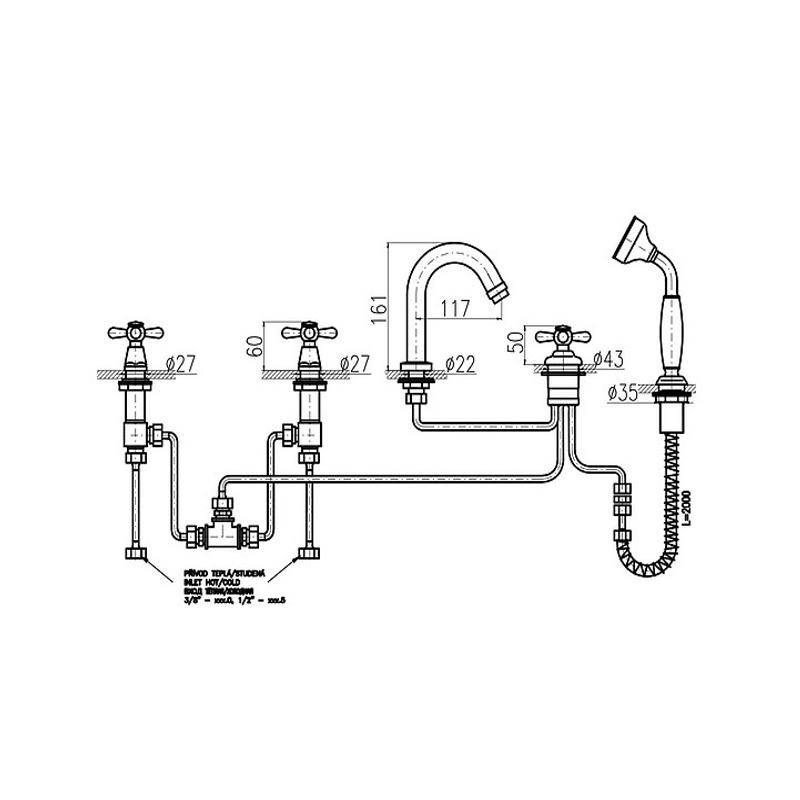
Mounting on a horizontal surface
The device is transferred to a horizontal surface when the model is not standard, or is intended for mounting on the side of the bath. Before installing the mixer on the side, you need to check with the seller about the possibility of performing such an installation. Or study the information on the website of the manufacturer of the bath. The rim must be able to withstand the load.
The algorithm for mounting on a horizontal plane differs from installing a crane on a wall:
- We study the instructions from the manufacturer for installation on the side of the font.
- That part of the side is reinforced with a plate, on the surface of which holes for the tap are later drilled.
- A scheme for connecting the tap to the water supply pipes using the connecting hoses from the kit is being developed in advance. At the same time, the freedom of movement of the bath after installation should not be limited, so that there is access to the equipment.
- A faucet with an automatic thermostat after installation is adjusted to the required temperature.
- So that during operation the horizontal plane is not damaged, it is sealed with construction tape. When the holes are drilled on the side, the tape is removed. Before installing the device, the edges of the holes on the side are processed with a suitable tool.
- According to the instructions, the crane design itself is assembled into a single whole. If everything is mounted correctly, then the connection hoses easily fall into place. The device is fixed on the base.
- Connections are tested for tightness. The bath is in place. If the connecting hoses for the faucet are not long enough to move the font, then the supply lines are extended. Then the installation process will be completed.
Variety of species
The first models, which were installed in a mortise way, were not very convenient to use. Manufacturers in their developments focused on comfortable use and design of structures. They offer a wide range of models.
- Device with two valves of the mortise type of installation. With the help of these two crane boxes, the power of the flow of water supply, its temperature, is changed.
- Mortise model with one lever. They regulate the water pressure.
- Thermostat. The outlet water temperature is programmed once. The sensor is responsible for mixing fluid flows with different temperatures. At the outlet is a liquid with a given temperature.
According to the types of water flows at the outlet, devices of the mortise installation method are represented by three types:
- A model for a set of bowls has been developed - a typesetting model;
- Mortise faucet for a bathtub with a shower - shower view;
- Imitation of a waterfall - a cascade design.
The model of the mixer on the edge of the bathtub of a standard design is not endowed with special technical data: the liquid flows in a straight stream with little splashing. A new cascade-type model, for example, a Kobra mixer, is mounted in a mortise way, quickly fills the bowl with water with a powerful stream, filling is silent, and belongs to expensive installations. In 1 minute, 50 liters of liquid are collected.
Design features of the built-in crane
The main difference between the built-in model and the usual one is the separation of nodes. Each part of the structure (faucet, watering can, spout) performs its function and is mounted in its place.
Such separate mounting allows you to install the element in the place where it will be most convenient to use it.
Benefits of using an inline model:
- saves space in the bathroom;
- simple installation scheme;
- interior design;
- functionality in use;
- separate design allows you to quickly fill the bowl with water.

The biggest drawback of the design remains its high price.
Installation options
There are several ways to install the faucet, which determine the comfort of use and the overall design of the bathroom. We will now take a closer look at each of them:
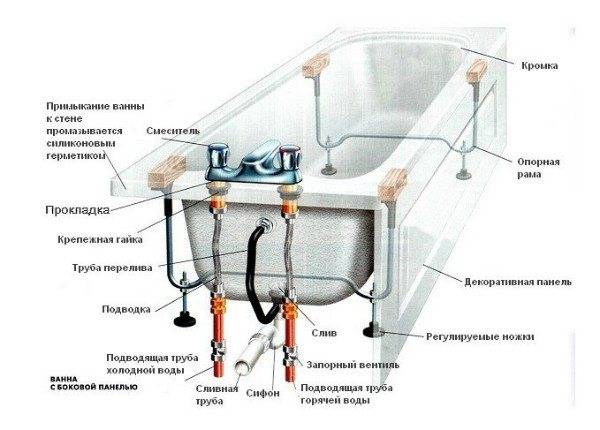
- Wall mounting. Really classic and perhaps the most popular way. With it, you can mask all unnecessary parts and elements, leaving only the faucet itself outside.In this case, the bath should be firmly pressed against the wall on which the mixer is located, so that water and splashes go clearly into its drain, and not flow down the walls to the floor. The installation height of the faucet above the bath in such a situation is regulated only by you, depending on the comfort of use and the distance from the front edge of the bath;
- Stand mixer. A modern and very interesting way that allows you to emphasize the stylization of the bathroom design. It is suitable only for rooms with a large area, where the bath will be installed in an open space. A faucet is also installed on a special stand next to the bathtub. In this case, it is worth considering in advance the water supply, which should pass through the thickness of the floor;
- Inset in the side of the bath. A decorative and very pretty installation method, which, however, is famous for its famous minus. It is, of course, possible to install the faucet on the side and thereby increase the aesthetic value of the appearance. But the trouble comes when the mixer breaks down. It is very difficult to find a replacement for it, since such specimens are produced in single versions, and the fasteners for them are cut out at the factory. Therefore, choosing a similar installation method, you need to be 100% sure that the mixer is of high quality and its service life is extremely durable;
- Pipe mounting. The simplest and most famous way, which has been known to us for decades. It is certainly not worth calling specialists here - anyone can easily cope on their own. Most often, such an installation is used if a special quality repair is not planned in the bathroom, or it is postponed for a long time, and there is a need to replace the faucet.Although, in our time there are several original stylized directions in which the installation of a mixer on pipes is used very often, and this is no longer a simple repair, but an expensive design and design.

Removing the old faucet
Before installing a new faucet in the bathroom, the old model is dismantled. So that the work is not difficult, it is carried out in strict sequence:
- At the common riser, the water supply is blocked.
- The dismantling of the old model begins after unscrewing the union nuts of the fasteners.
- If there are regulating eccentrics available, they must be unscrewed.
- After that, the condition of the pipes is inspected. This is done in order to determine if the pipeline needs to be replaced. Over time, steel pipes become overgrown with rust. This leads to a decrease in their throughput. In addition, debris particles get in and clog mixers with ceramic closures. Subsequently, they quickly fail. Therefore, if the pipes are heavily clogged, it is better to replace them.
- The thread is cleaned of rust residues. A metal brush is used for this.
- It is possible to choose a new model correctly only if the center-to-center distance between pipe bends is known.
When these steps are completed, you can proceed to install the device.
The range allows you to choose the crane that is needed in a particular situation. Foreign and domestic manufacturers produce models for mounting on a vertical or horizontal plane, of various configurations.
Installing the faucet in the bathroom on a vertical plane is carried out without altering existing attachment points.This installation method is used if an urgent replacement of broken equipment is carried out or for minor cosmetic repairs in the room.
For horizontal installation, the surface is prepared in advance, existing pipes are transferred. This is done during a major renovation when the equipment in the room is changed.


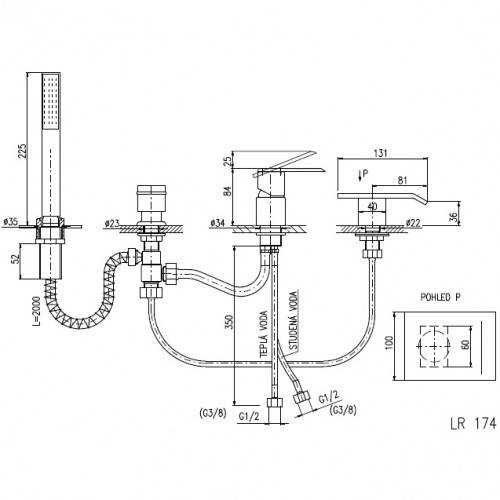
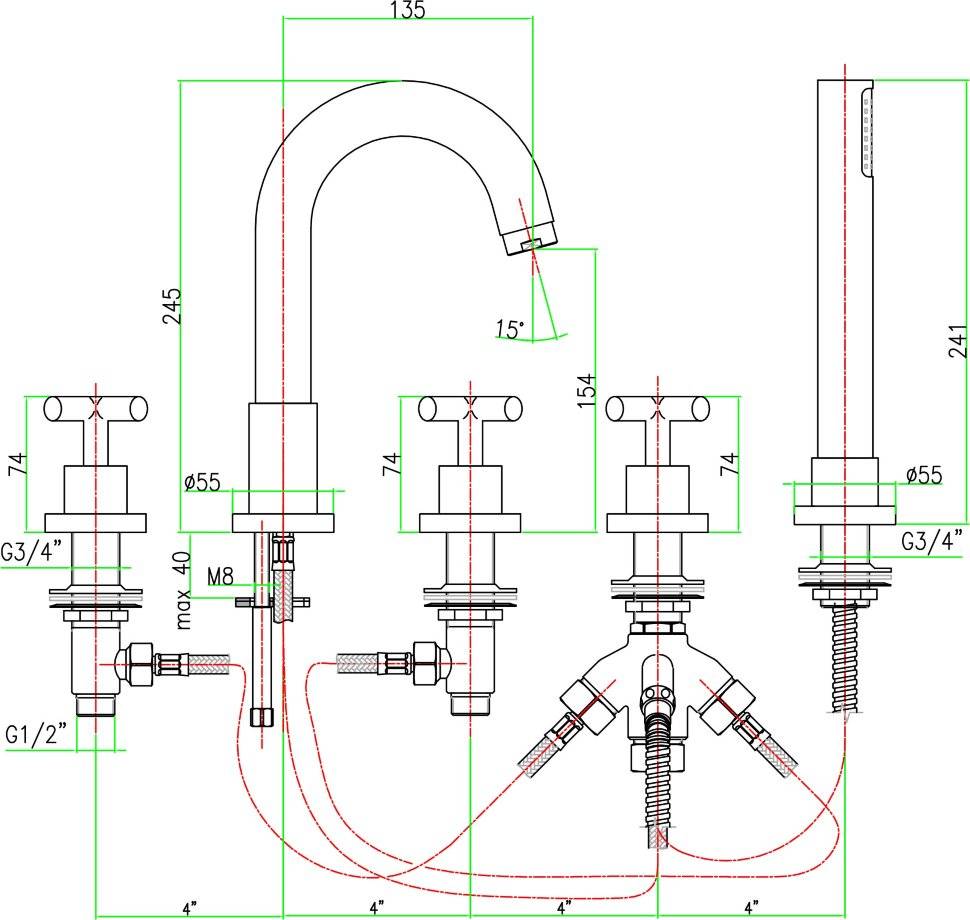
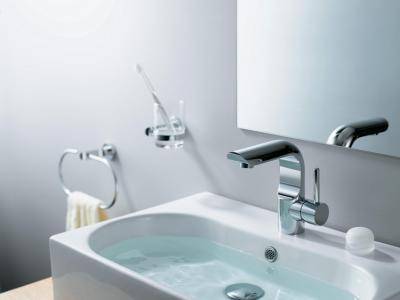
On-Board Faucet Installation
"On-board" means that the appliance will be attached directly to the side of the tub or sink itself. Usually new sinks or bathtubs have a pre-drilled hole, otherwise you will have to drill it yourself.
How to calculate the optimal height of the mixer in the bathroom from the floor, there is no single standard. The value is influenced by several factors: the growth of households, ease of use, mixer model, room size. Plumbers also look along the length of the pipe to prevent excessive tension.
Instructions for drilling holes in an enamelled bath
This is a complex job that requires skills and special equipment.
Main tools:
- marker;
- pen drill;
- screwdriver (a drill will do);
- scotch;
- plasticine.
Operating procedure:
How to install a faucet in the bathroom if there is no main hole? To begin with, establish a place and close it more tightly with a piece of transparent tape.
Fashion a small plasticine collar, the dimensions of which will be x2 greater than the diameter of the future hole, and the height will be 0.5 cm. Attach a home-made collar to the surface of the bath and draw water there.
Carefully drill a hole with a drill (its dimensions are Ø 5–6 mm), focusing on the center of the mark. Set a small speed and do not press the drill too hard. Drill carefully, the thickness of the bath, even cast iron, is small.
When a hole appears, the water will go there.Having cleaned the drilling sites, mold a small cap from the same plasticine and close the hole with it, only from below
It is important to fix tightly, holding water.
Inserting the tip of a 10-12 mm drill into the hole, slowly increase its diameter. After removing the adhesive tape and artificial hill (shoulder), clean the surface. Also remove the plasticine cap from below.
hole finish
Now, to install the faucet on the bathroom yourself, you need to slowly work the edges of the hole with a rubber nozzle and a piece of sandpaper, inserting them onto the cartridge. For protection, it is better to seal the surface of the enamel around with transparent tape.
Also remove the plasticine cap from below.
The hole is ready. Now, to install the faucet on the bathroom yourself, you need to slowly work the edges of the hole with a rubber nozzle and a piece of sandpaper, inserting them onto the cartridge. For protection, it is better to seal the surface of the enamel around with transparent tape.
Tips for Drilling Holes in an Acrylic Bathtub
First, special on-board adapters are mounted for installing a mixer - devices with small spouts. Under the shower you will need a separate hole. It is advisable to carry out installation immediately, while the new bathtub is still being installed. Then it is easy to hide all the pipes and other elements under the tiles.
The installation height of the bathroom faucet must be determined immediately by inserting it into a special hole.
From below, fix the rubber gasket with a large figured washer. Tighten them with a clamping nut. First, screw it in by hand, then tighten it slightly with a wrench (half a turn is enough).
Connect the faucet installation valves to their pipelines. Turn on the water, checking the tightness with a piece of paper.
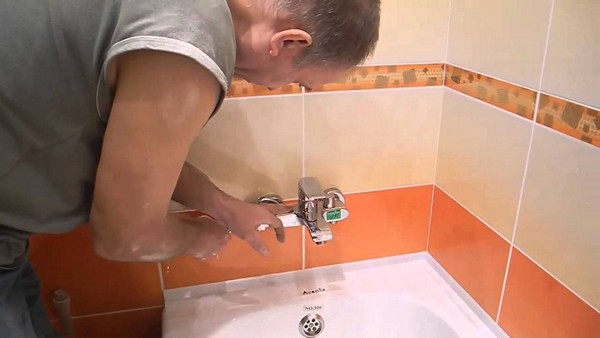
How to remove an old faucet
All devices have expiration dates and when they expire, dismantling is needed. How to install a new faucet in the bathroom on the wall, if the old one is still hanging there? To begin with, competently get rid of it:
- Inspect the mixer, especially its nuts. Under their size, prepare the necessary tools.
- Carefully remove scale, dirt, solid oxides from the corners of the threaded part.
- Try to unscrew all the nuts with a wrench without applying too much pressure. The nut is jammed - then make 0.5 turns back and unscrew again.
- The mixer is old, installed a long time ago - it is better to pre-wet all its connections with a solution, and several times. The toilet "Duckling" is ideal.
- Check eccentrics. They are working, in addition, the thread is identical to the new mixers - then you should leave them. This simplifies the installation of a new faucet in the bathroom. In addition, earlier eccentrics were mounted from other, high-quality alloys, which is why they are much more durable than modern ones.
Part of the eccentric suddenly fell off, got stuck inside the fitting. The problem is unpleasant. You will have to pull out and change the fitting. Sometimes it is fixed inside the wall, under the tiles. It will be necessary to dismantle part of the wall, then restore it after installing the mixer.


Changing the mixer is an important and large-scale business. If desired, it can be done at home on your own, without waiting for the arrival of a plumber. Flush mounting skills and possession of the necessary tools will come in handy
Flush mounting skills and possession of the necessary tools will come in handy.
How to install a faucet in the bathroom: the subtleties and nuances of installation
What else do you need to know in order to quickly and reliably install a bathroom faucet yourself?
- You need to know how to use the tow correctly.When winding linen, you need to follow some rules. Firstly, you need to wind it along the thread twisting, secondly, tightly, and, thirdly, with a cone, the base of which is directed from the front edge of the thread. You also need to ensure that the tow is not wound with a twisted bundle - it should be fluffy and lie down only in the grooves of the thread.
- If the installation of the faucet is carried out simultaneously with the replacement of water pipes, then you will need to know the height of the installation of the faucet in the bathroom - as a rule, it is 150-200mm above the top edge of the bathtub.
The subtleties of installing a faucet in the bathroom
Now you know how to install a faucet in the bathroom. Finally, I just want to give a couple of tips regarding the choice of this plumbing fixture.
First, pay attention to the body material - a high-quality mixer can be determined by weight (it is heavy). Secondly, it would not be superfluous to determine the material of the eccentrics - if they are silumin, then it is better not to install them, since such eccentrics quickly rot
And, thirdly, do not forget about the reputation of the manufacturer - not so many companies produce really durable and reliable mixers.
Features of drilling on enamel
Repairers believe that beginners should not make holes for the faucet in cast iron or steel bathtubs on their own. Unpleasant consequences can be caused by enamel, which is used not only as a decor, but also performs a protective function.
However, if the person who decided to install the enamelled bathtub has experience in repair activities, then you can try to use special tools to insert the mixer.

In this case, in addition to the standard set of tools, you will need a special drill attachment, which is designed for cutting glass and ceramic products. The best option for such a drill is a ballerina nozzle.
The advantage of the ballerina is that it has the shape of a compass, which can be adjusted to any diameter. Subsequently, this cutter can be used to mount other products with a diameter different from the mixer holes.

In order for the enamel not to crack when drilling, you need to do the work at low speeds. Some craftsmen recommend using a hand drill, which will not create as much vibration as an electric drill.


To prevent the nozzle from moving from the marking point, it is recommended to purchase a special jig - a bar (most often made of wood), which has cells inside in which the nozzle is attached.
For better contact of the nozzle with the enameled surface, it is recommended to place a container with water or a special coolant nearby. During the drilling process, it is necessary to dip the nozzle into the liquid so that there is no burn in the hole for the mixing structure.

Some masters work in a different way in order to avoid cracking the enameled surface at the drilling site. A special metal plate is attached to the surface of the side, through which holes are drilled. After the formation of the basis for the mixing system, the metal is removed and the structure is installed.
Installing a mixing system is a simple job.However, the process of inserting a mixing structure into the rim of a bathtub requires basic knowledge of hole measurement, drilling, and clamping of materials. Studying the basics of installation activities, as well as preparing high-quality materials, will help you quickly and efficiently install the mixing system in an acrylic bath.
Installation subtleties
It is necessary to fasten the gander to the main unit, then the line of the hose with a watering can. You do not need to use wrenches and tighten the nuts too. After assembling the model, you can start the installation, which consists of the following steps: wrap the eccentrics with sealing tape, then insert the fittings located in the wall, which are left over from the previous faucet.
This must be done very carefully. If there is no tape at hand, tow can become a substitute. Next, we screw in the eccentrics, strictly measuring the distance between the inlets on the mixer and using the level. This is done for a reason - the distance should be strictly 15 centimeters. After that, we wind the main block onto the eccentrics. You need to do this slowly, as you need to fix it carefully.
Try not to rush, and if something doesn’t work out, it’s better to take a short break and calm down. If the block is wound on both sides calmly, then everything can be put correctly. Then the block must be removed and decorative shades screwed onto the eccentrics, which must fit snugly against the wall and cover the places where the mixer taps into the wire. If that's the case for you, then you've done a great job. Next, we fasten the block back using winding. In order for the shrinkage to be dense, it is necessary to use gaskets from clamping nuts. Nuts need to be tightened with a wrench, but not very much.
Open the hot water tap and check how the mixer works. Start the test with a small pressure, gradually increasing the power of the water supply. Be sure to check how the shower works. If everything is in order, then you did it the first time. But if there is a leak, you need to find its source, turn off the water again and repeat all over again. There is a high probability that you have overtightened the nut or any fastener very much.
You have already understood how to install a new faucet instead of a worn-out one, now let's deal with a more difficult task - installing a faucet on a new wall. First, pipes are replaced, the walls are tiled. Further, plumbing pipes are laid out, beacons for plaster are installed. You must calculate the recesses in the wall so that they exactly match the distance from the lighthouse to the tiled plane. This is about 17 centimeters. If you are not sure that you can carry out all these works, then it is better to invite a specialist, so that later there will be no problems when installing the mixer.
After all the work done, you can begin to install the fittings. In order to install them, you need to set aside the distance between the centers of the fittings - 15 centimeters. The centers should be on the same parallel, the extreme point should protrude beyond the wall, the fittings should be flush with a suitable height. After installing the fittings, you can attach the mixer. This is done in the same way as in the previous version.
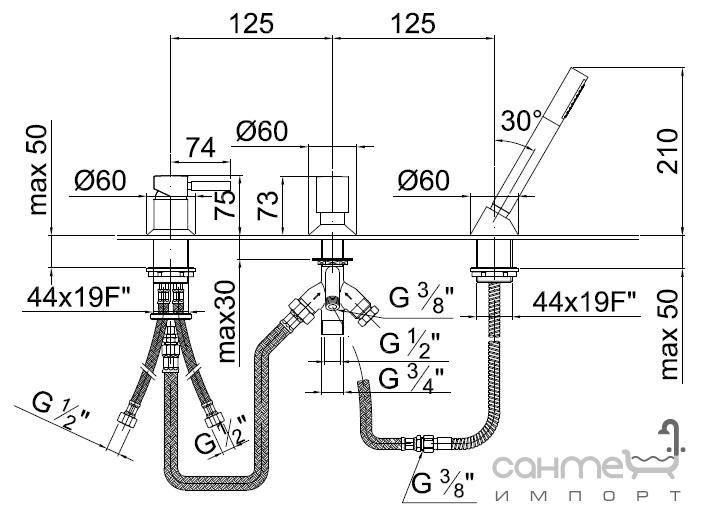
Now consider another option for installing the mixer - on a horizontal surface. Such a need arises when installing the mixer on board the bath.Before embarking on such an installation, it is imperative to clarify whether the bearing side of the side of the board can withstand the increased load. To mount this type of mixer, you will need a drill with a set of cutters, wrenches and screwdrivers.
At the beginning of the installation, it is necessary to mark up, so that later the plates can be strengthened along it. After marking, holes are drilled in the side of the bath. Carefully read the instructions on how to connect the mixer to the pipeline using the connecting hoses and other components included in the kit. Next, we seal the horizontal surface with masking tape to protect the surface from chips and damage, apply markings and start drilling the holes that are necessary to install the mixer. After the holes are ready, remove it and process the edges with a special tool.


The next step is to collect all the details and fix them without using keys. If the connecting hoses have freely taken their places, then everything is done as it should and you can proceed to the final fixing of all parts of the mixer. The next step is to check the mixer for a leak.
The last way to install the faucet, recognized as the most difficult and expensive - installing the faucet in the floor. Even before your bathroom is renovated, you need to start laying two pipes for cold and hot water. Indentations are made in the floor the size of the diameter of the pipes, pipes are laid along these indentations to the place where the bath will be located. After this, the recesses are sealed, a floor screed is made and tiles are laid. Then we act according to the technology described above - we mount the mixer, check for leaks, etc.
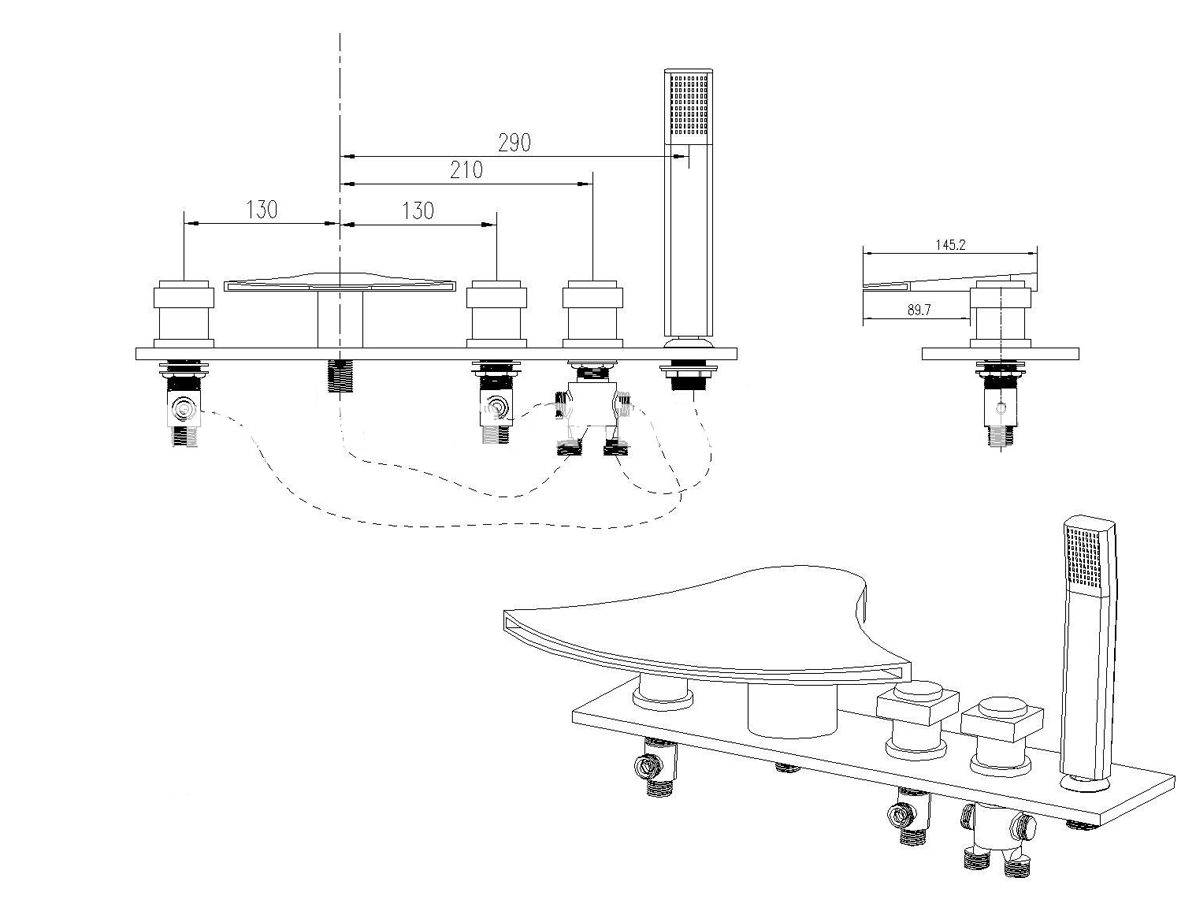
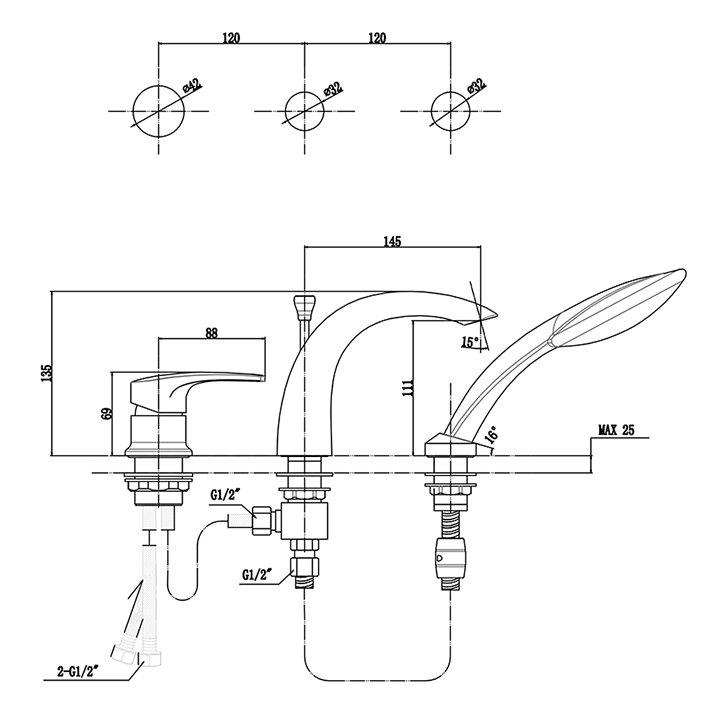
Assembly Features
Any bathroom faucet is conditionally divided into several parts: the main unit with a control element (valve or ball type, cartridge), gander and shower (hose and watering can). First, the main block is assembled, and the order of its assembly depends on the type. Next, a gander is installed, for which a gasket is laid and fixed with a union nut. The gander must turn in a horizontal plane without water leakage.
The last stage is the installation of the soul. The shower head is attached to the hose with a union nut located on the hose. Before connecting, a gasket is placed in the socket of the watering can. The nut is tightened with a wrench or adjustable wrench. A hose with a watering can is installed at the corresponding outlet of the mixer with a gasket installed. Fastening is provided by a union nut located on the hose.
How to assemble a single lever faucet
Subsequence:
- A gasket is installed under the ball element.
- A control ball is installed through the top hole.
- The clamping nut is tightened with a wrench or adjustable wrench.
- The lever is installed and fixed with a screw.
- A decorative overlay is installed.
How to put a two-valve option with a shower
Subsequence:
- Standard rubber gaskets are fixed on the valve stems (faucet boxes). Usually this is done by a central screw, screwed with a screwdriver.
- The valves are installed in the corresponding sockets in the body. Beforehand, a rubber gasket is laid between the body and the side of the valves. The valves are tightened to the stop using a wrench or adjustable wrench.
- An adjusting valve is inserted into the hole for connecting the shower, after which a threaded adapter is screwed on.
- A crank is inserted into the socket for the shower regulator, which is fixed with a special bolt.
- Handles are fixed to the valves with screws, and the fixing screws are closed with decorative plugs.
- The adjusting handle is fixed to the shower spool with a screw. The screw is closed with a decorative cap.
Attention! Assembly and disassembly of mixers must be carried out strictly in accordance with the instructions. Different models may have specific nuances that must be taken into account.
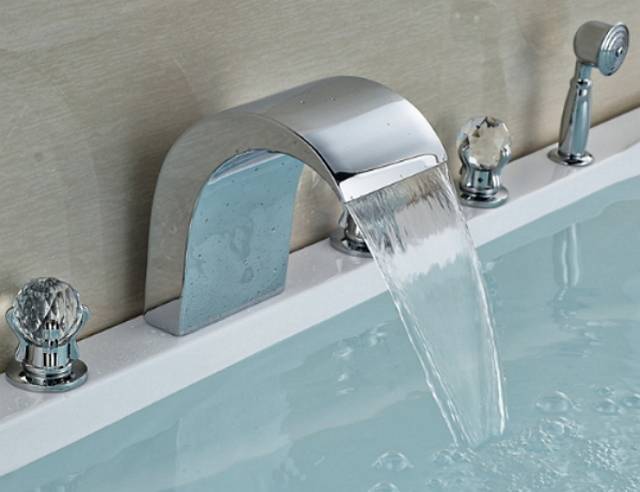
Tasks, advantages and disadvantages of cascade mixers
Cascade and mortise type mixers have their own specific operational tasks. The task of such faucets is to create a powerful and even water flow for quick, but gentle filling of the tub. Therefore, for such tasks, the design of the mixer must be very reliable and durable. The advantages of cascade mortise mixers include the fact that they have an adapted design,
aesthetics - the first advantage of a cascade mixer
durability, high quality of the material from which they are made, meet all the technological standards of the present time.
Of course, you should pay attention to the fact that the above advantages of cascade mortise mixers will be visible only with proper installation, based on a gradual and step-by-step procedure. That all models of this type of faucet were developed not only because of the technical need for improvement.Part of the reason is the rapid popularity of this type of faucet went hand in hand with the popularization of the design vision of a modern bathroom, as well as the desire of people to have their own graceful waterfall in their home that fills their bath.
Part of the reason is the rapid popularity of this type of faucet went hand in hand with the popularization of the design vision of a modern bathroom, as well as the desire of people to have their own graceful waterfall in their home that fills their bath.
That all models of this type of faucet were developed not only because of the technical need for improvement. Part of the reason is the rapid popularity of this type of faucet went hand in hand with the popularization of the designer's vision of a modern bathroom, as well as the desire of people to have their own graceful waterfall in their home that fills their bath.


The initial and most basic advantages of this type of mixer have already been given above, but do not forget that the specific design of the cascade and mortise mixer is that it eliminated the most annoying problems associated with masking and hiding such technical elements, like hoses and pipes. Thus, the location of the bath from the side looks monolithic, aesthetically beautiful and the eyes are not distracted by the above elements of the water supply and drain system.
In addition, in the classic faucet installation model, the bath faucet also has an attached shower hose, which usually clings to
bathtub with built-in faucet
holder above the bath, which gives the bathroom a kind of messy look.As opposed to a conventional faucet, the cascading and inset faucet scheme allows such a shower hose to be hidden due to the space under the bath. And, if necessary, the hose from the shower will be freely pulled out through the hole in the bathroom.
But, despite all the advantages, nevertheless, mortise cascade mixers on the side of the bath have some disadvantages. These shortcomings are associated with the hole for the hose. The problem is that when the shower hose is pulled through the hole in the tub and pulled out of its concealment space below it, when the shower is not needed, the hose is subject to friction and serious bending in certain places. Because of this, he simply frays, which entails his exit from the working state in the near future.
Investigator, its service life is significantly reduced. For example, a shower hose that is installed on a wall-mounted faucet has a service life of one to several years, as practice shows, in most cases such hoses “outlive” the entire period to the maximum. At the same time, the service life of the same shower hose, but which is attached to a cascade and recessed mixer, has a service life of six months to one year. Thus, you will have to change shower hoses much more often.
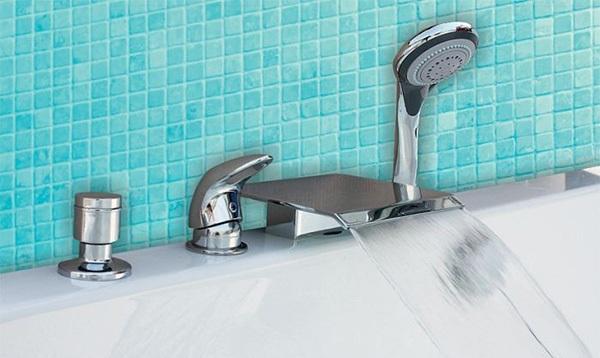
Benefits of a mixer on board
A bath is a container designed to maintain human hygiene.
It is made from:
- cast iron;
- of stainless steel;
- synthetic acrylic.
Any font, no matter what material it is made of, has two holes:
Drain - for descending into the sewerage of dirty water from the bath.
Overflow - for precautionary purposes and to prevent overflow.
However, this model involves mounting the mixer on the wall.
Now there are new types of containers, on the side of which there are additional holes for mounting the mixer. Its location has the following advantages:
- Silent water filling. Everyone has faced the problem when, when a tub is filled with a bathtub from a wall-mounted tap, the rooms of the apartment are filled with the sounds of the Niagara Falls. The noise effect occurs due to the fact that drops of water fall from a height and create splashes that cover the tiles of the walls and floor.
- Convenient operation. The location of the mixer at a height forces the bather to manipulate the valves of the hot and cold taps and make movements that are traumatic when moving in a slippery bath. The faucet on board allows you to adjust the water temperature with a flick of the wrist, without getting up.
- Concealment of communication hoses. To hide hoses or pipes on the wall behind a crane, these places have to be ditched and plastered. When installing a faucet on the side of the bath, this problem disappears by itself.


