- Installation of the socket
- Installing a socket in concrete, aerated concrete or brick
- Prices for socket drills (core drill)
- Install a drywall switch step by step
- Other articles in the section: Electrical
- Installation of a socket in a concrete base
- Step 1 - markup on the wall
- Step 2 - Punching a Hole in the Concrete
- Step 3 - Installing the box into the wall
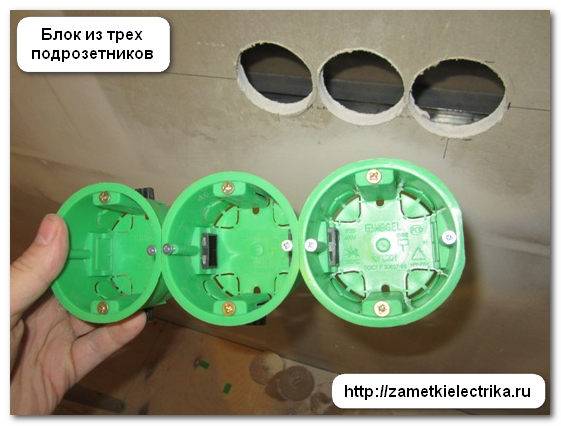
- Step 4 - combining several sockets
- Socket in a concrete wall
- Installation of sockets in plasterboard walls
- Installation of socket boxes
- Socket installation
- Installation and connection of sockets and switches
- Crowns for concrete
- Carbide tips
- Diamond tips
- Solders with tungsten carbide coating
- Installation without linking to profiles
- Place for an outlet
- Tips
Installation of the socket
After purchasing materials, you can draw a place for installation. The technology used for installation differs depending on the type of wall. Working with concrete, aerated concrete and brick is almost identical, but with drywall it is different. Differences are also observed in the set of tools that will be required.
Installing a socket in concrete, aerated concrete or brick
Working with such wall materials requires a specialized tool. You will need to prepare:
- perforator;
- core drill 68 mm;
- chisel or pike under the puncher.
core drill
Prices for socket drills (core drill)
core drill
First you need to make a landing hole in the wall to install the socket using a special core drill. It is installed on a drill or puncher. Crowns come in different price segments, and differ in the material of the cutting edge. They are diamond and carbide. Also drills differ from each other in the mode of operation. Some are used only with a drill, while others are percussion, so they are suitable when drilling with chiseling turned on.
If you want to drill in reinforced concrete, then you will need to use a more expensive diamond-coated bit on the segments, since cheap equipment breaks. You also need to set the optimal number of revolutions recommended in the instructions for the drill.
There is a concrete drill in the center of the cylindrical crown. It is used for centering. The protruding drill is placed in the center of the future socket box and a deepening is carried out into the wall until the ring is drilled with a crown. After that, you need to stop drilling and remove the centering. This will prevent the protruding part of the tool from making a through hole. The center drill is removed by knocking out with a wedge or unscrewing a special clamping bolt.
Drilling into the wall
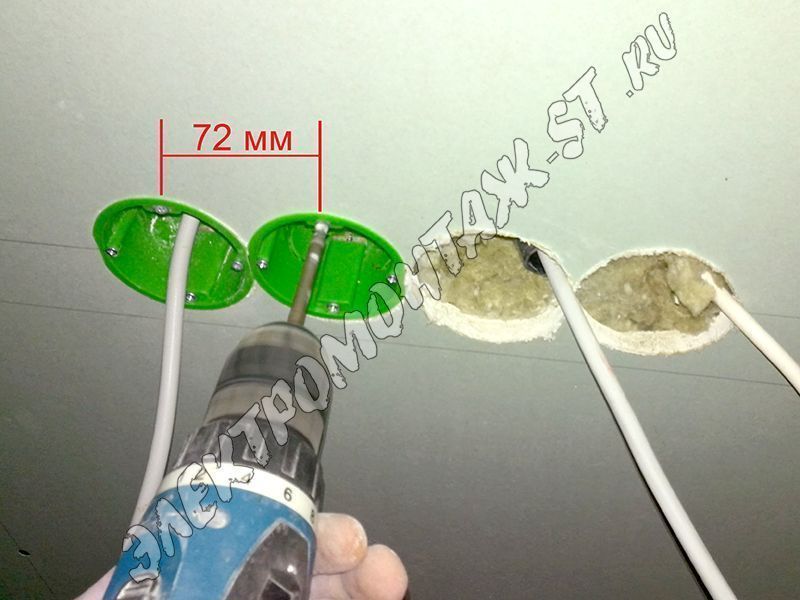
If you need to install a block of sockets, then you need to look at their instructions, as well as at the parameters of the sockets and determine the center distance. Usually it is 71 mm. To make everything even, ideally, immediately after removing the crown to remove the center drill, it is necessary to make markings from a small hole along a horizontal line in increments of 71 mm.The resulting points will be used to center subsequent drills in the future.
Block markup
After drilling, an annular hole will remain. It remains only to knock out its central part. It is convenient to do this with a puncher with a pike. You can get by with an ordinary hand chisel and a hammer. You need to insert the tool into a narrow strip of a drilled larger circle and hit. As a result, the central part will fall out. When working with aerated concrete or brick, this is not difficult. When knocking out concrete, it will be more difficult if it is reinforced with steel reinforcement.
Mounting sequence
Having a ready hole, you can cut a strobe in the wall to the ceiling, where the junction box is located, in order to make a branching of the power cable. To compensate for the error, the laid cable is taken longer by 30-40 cm. In the future, the excess can be cut off. Turning to laying the cable and connecting to the junction box, you will need to de-energize the room.
Junction box
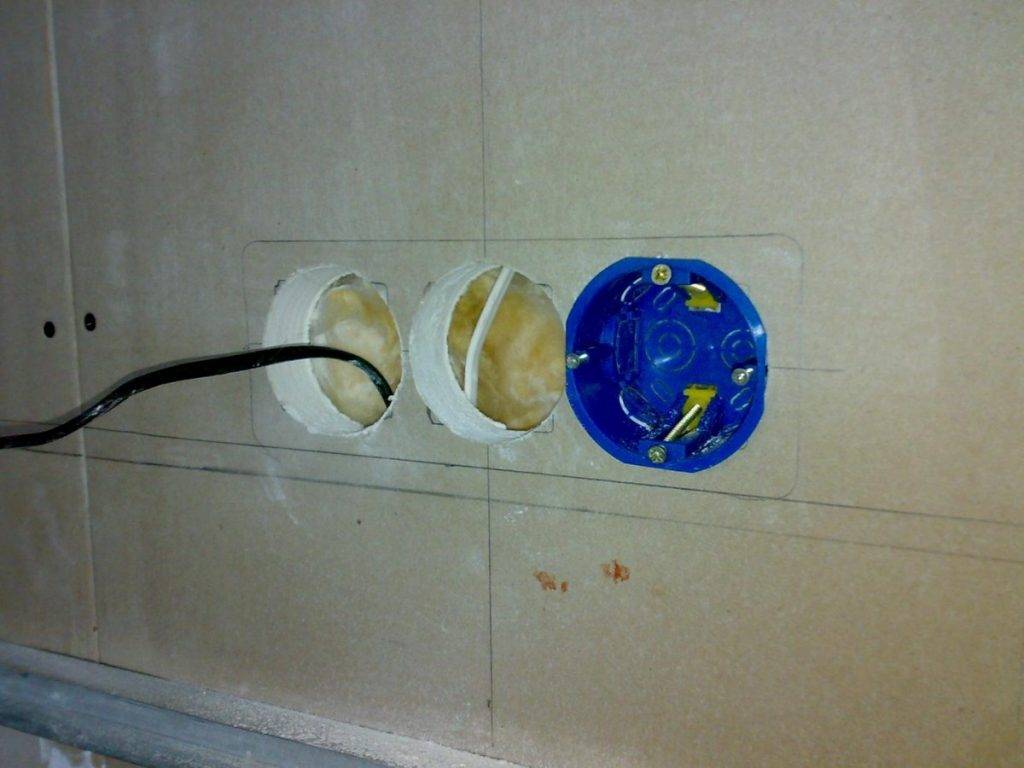
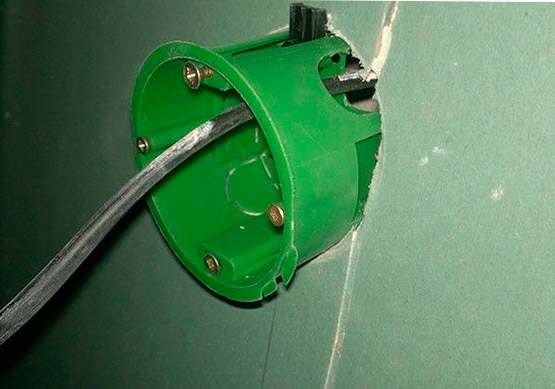
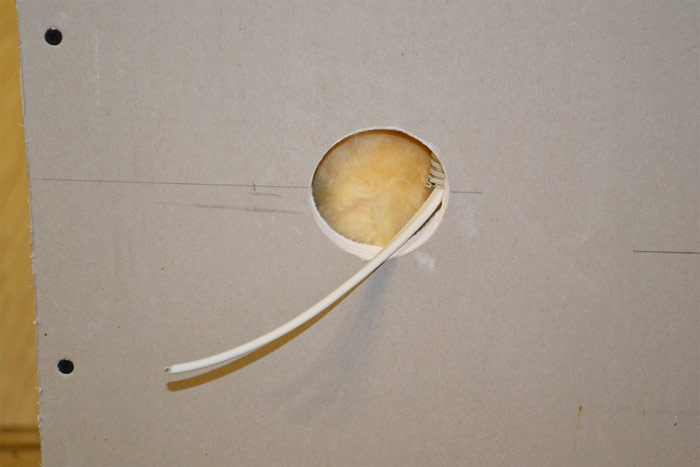
After preparing the strobe and the hole for the socket itself, you need to insert the installation box into it and check the depth so that nothing sticks out. Next, prepare a thick mortar. It is most convenient to use alabaster and gypsum plaster.
To get the power wire into the box, you need to break the window in it with pliers or cut it off with a knife. In such places, manufacturers make the plastic thinner to allow mechanical extrusion. Next, you need to lay a little solution deep into the hole, and then insert the box with the wire wound into it.
Pasting socket boxes
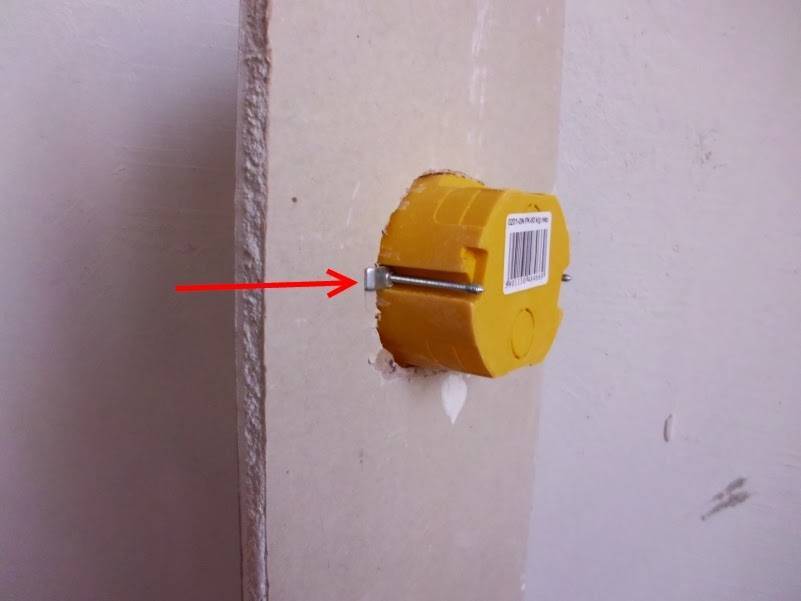
The socket box should be set exactly with the help of a level.If it has only two vertical or horizontal mounts, then their orientation must be selected depending on the characteristics of the outlet purchased. In the presence of 4 mounts, this does not matter.
Socket with two fasteners
The side cavity between the box and the wall is also filled with mortar. If alabaster was used, then after 3-4 hours the installation box will sit securely. You should wait until the solution is completely dry and stops emitting fumes. In no case should polyurethane foam be used to fix the socket boxes, since it is a combustible material.
Work as a grinder
Install a drywall switch step by step

- Accurately mark the place for installing the switch;
- Lean the mounting box against the wall and, circling it, draw the outline of the future hole. Mark its center;
- Drill a hole in the drywall;
- Drill carefully, do not forget that under the drywall, an electrical cable is laid;
- In the mounting box, cut holes for the cable and, after pulling the cable for the switch into it, install the box on the wall;
- Disassemble the switch by removing the cover from it. Loosen the mounting screws in the wire contactors and the mounting screws for the switch body;
- Strip the cable insulation by 10-12 cm. Strip the cable cores by 5-7 mm;
- Fix the cleaned wires in the switch terminals;
- Install the switch in the mounting box.
The hole for the switch is drilled after painting. After finishing the walls, the switches themselves are placed and the decorative covers are closed.


Other articles in the section: Electrical
- 3 options to install a socket in a plasterboard partition
- Corrugation for drywall
- Flame retardant cables for wiring in drywall
- How to quickly install a switch on drywall
- How to properly lay wiring in a drywall partition
- How to install a socket on drywall
- Socket for drywall - choice, dimensions, price, installation of a socket on drywall
- Replaceable wiring in drywall
- Wiring under drywall
- Electrical equipment for drywall
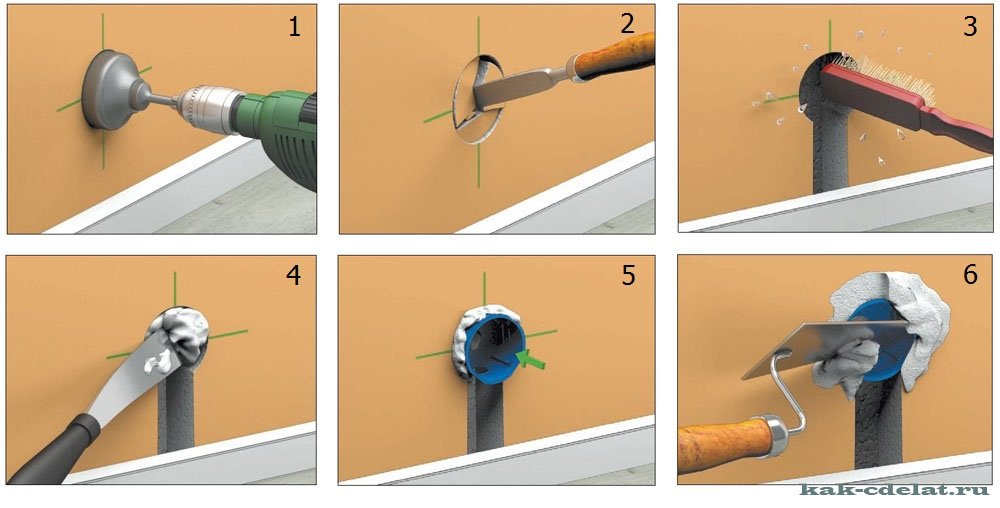
Installation of a socket in a concrete base
If you have already decided where you will have sockets, you can proceed with the installation work, which consists of several stages.
Before installing the socket in concrete, markings are made, then a hole is made in the wall and a gypsum mortar is prepared.
Step 1 - markup on the wall
The sequence of markup work is as follows:
- measure with a tape measure the distance from the floor to the intended installation location of the socket;
- if the flooring has not yet been laid, then you need to add another 5 cm;
- using the building level, draw two lines: horizontal and vertical with an intersection point at the place where the box will be installed;
- put the glass against the wall and circle it with a pencil.
If two or more socket boxes are to be installed, then first a horizontal line is drawn using the building level. It should be located at the distance from the floor at which the sockets will be placed.
Find the center of the first box and draw a vertical line through it. Then set aside exactly 71 mm and draw a second vertical.This place will be the center of the second glass. The marking of the following socket boxes is carried out in a similar way.
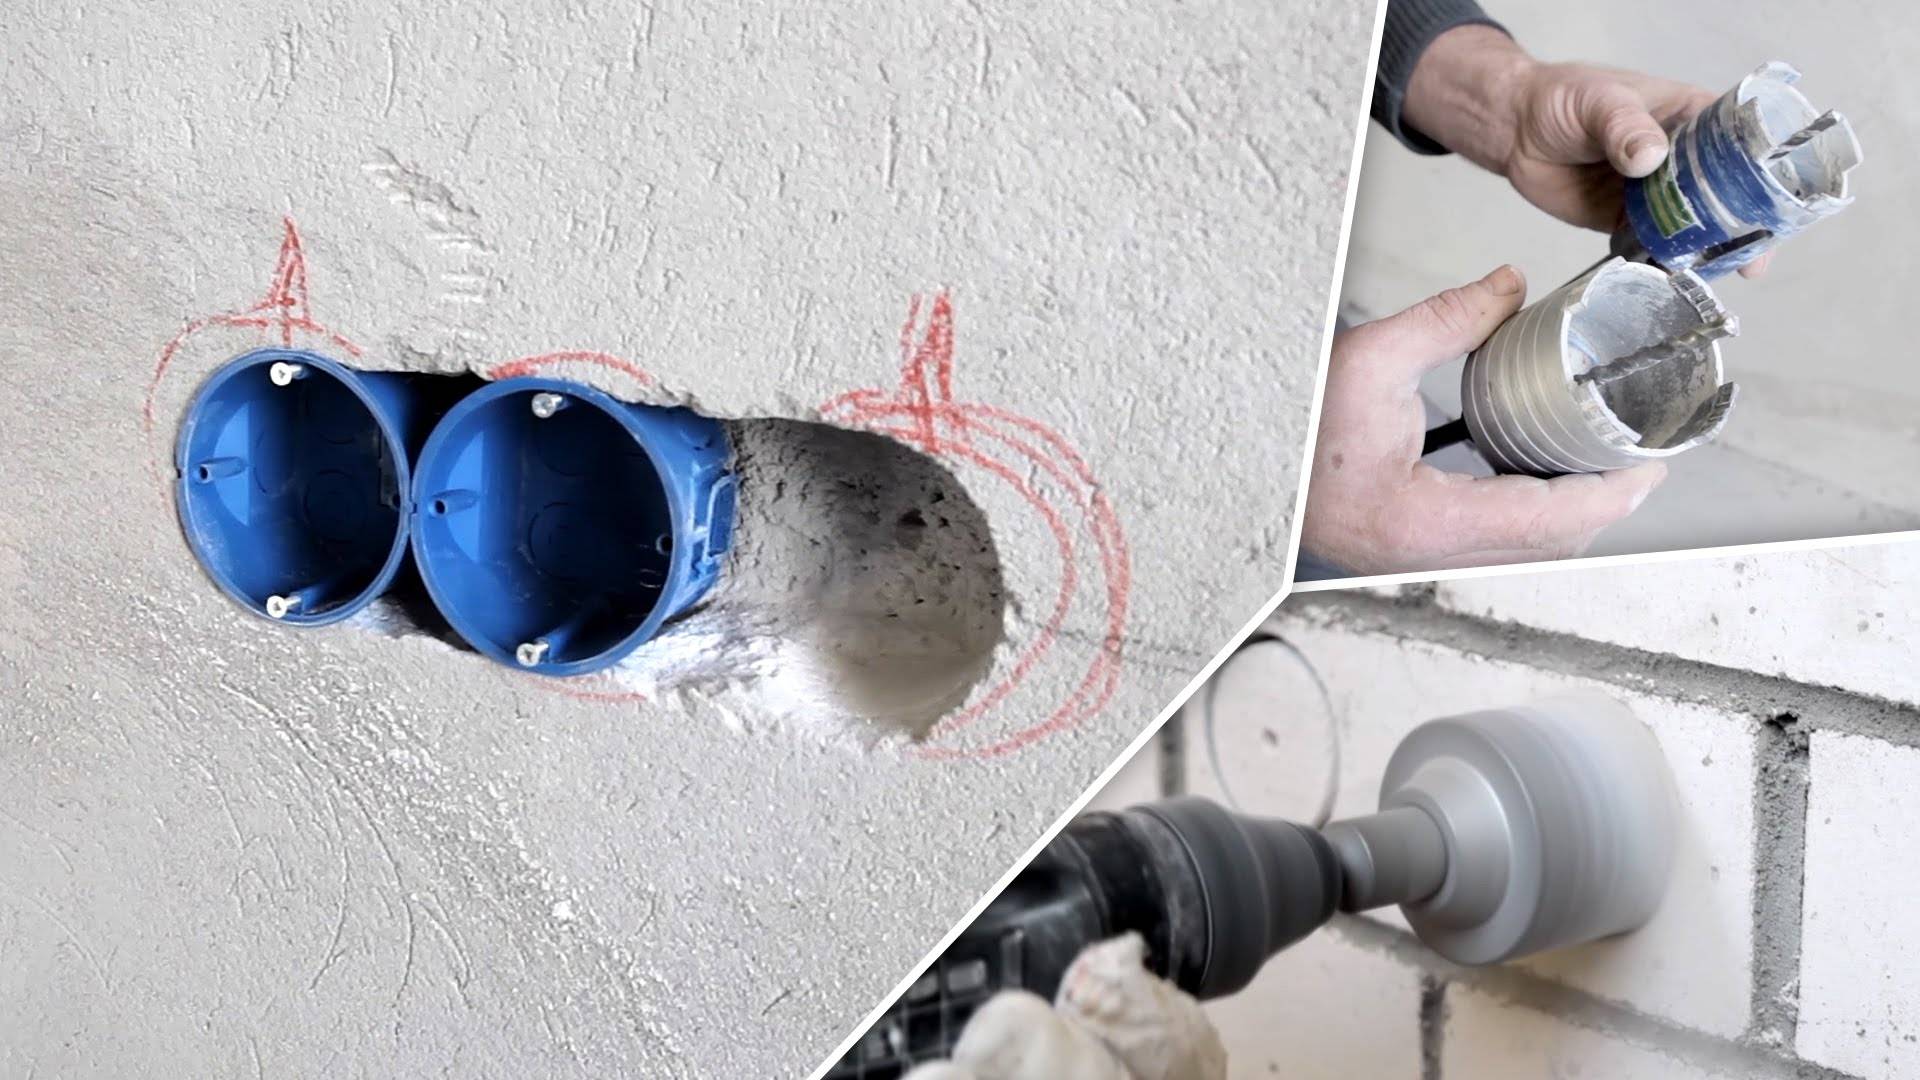
Step 2 - Punching a Hole in the Concrete
There are several ways to make holes in a brick or concrete wall. The simplest of them is with the help of a crown for concrete with victorious teeth, with which it, crashing into the wall, makes a circle of the desired size.
In the center of the crown there is a drill made of pobedit for making a central hole.
Since standard sockets have an outer diameter of 67-68 mm, a crown with a diameter of 70 mm is suitable for work. The nozzle is put on a puncher or drill, set on a marked line and a hole is made.
Then the nozzle is pulled out, and the entire remaining layer of concrete is knocked out of the hole with a chisel and hammer.
If there is no crown for concrete, then you can make a hole with a drill with a drill bit. First, a central hole is drilled to the entire depth of the nozzle, and then holes are made along the circumference line with the same drill.
The more of them, the easier it will be to gouge a hole of the desired diameter and depth with a chisel with a hammer or perforator.
Another way is to make a square hole using a grinder with a diamond disc nozzle. First, the center lines are cut, and then along the entire perimeter of the socket. The process, as always, ends with a chisel with a hammer.
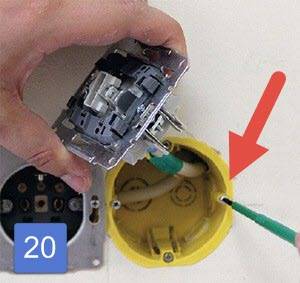
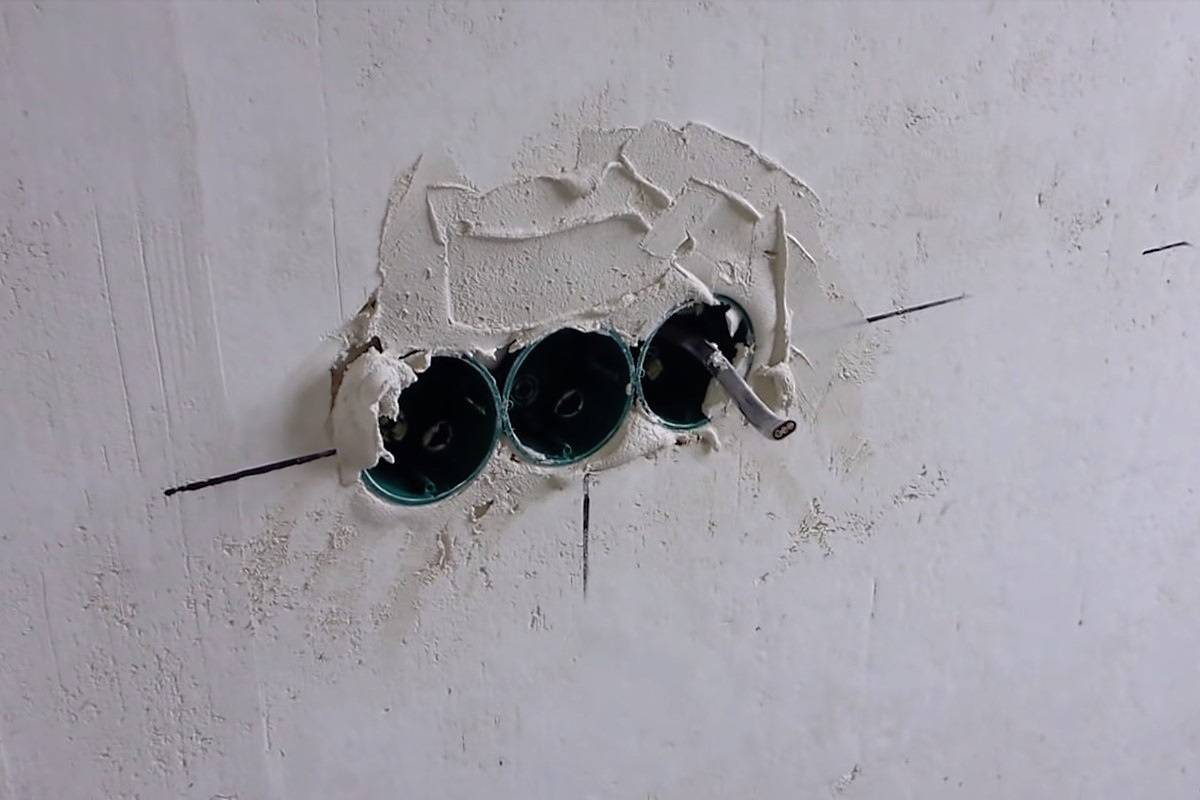
Step 3 - Installing the box into the wall
After the hole is made, it must be cleaned well and a socket box inserted into it for fitting. It should freely enter in width, and in depth there should be a margin of about 5 mm for the solution.
If everything turned out as it should, now it is necessary to make a passage for laying the wire from the upper or lower part of the hole (depending on the location of the electrical wiring in the room).
The socket also needs to be prepared. We turn it over with the bottom side, where the slots for the wires are located and cut one of them with a knife. We get the wire there and insert the box into the wall to check.


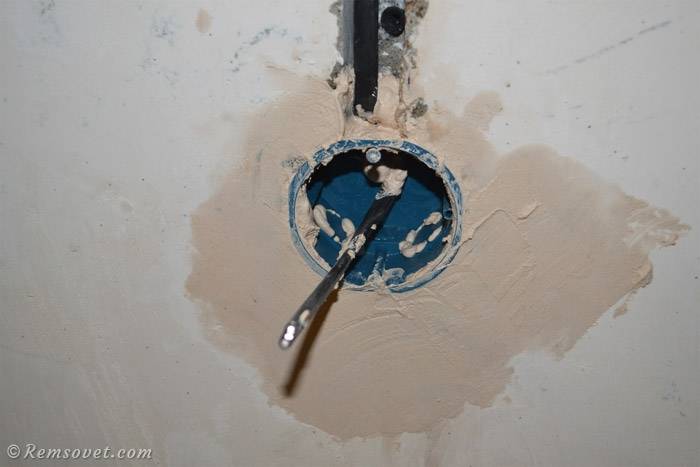
To fix the glass, we prepare a solution of gypsum or alabaster, which should have the consistency of sour cream. It is worth considering that the solution of these materials hardens very quickly, and you have no more than three to four minutes to complete the process of installing the socket. After five minutes, the mixture will no longer be suitable.
Two minutes before laying the box in the wall, the hole is wetted with water. After the liquid is absorbed, a layer of gypsum is applied to its walls with a spatula. A wire is threaded into the glass, its back part is also smeared with a solution, and the socket is inserted into the hole.
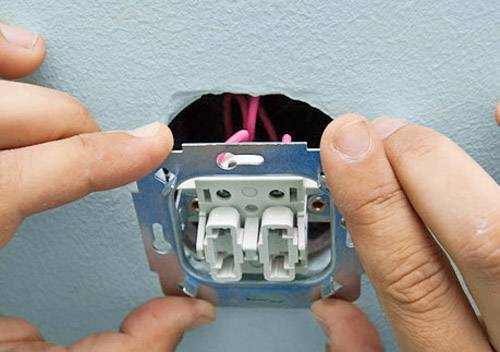
Adjust the position of the box so that its edge is flush with the wall and the screws are horizontal.
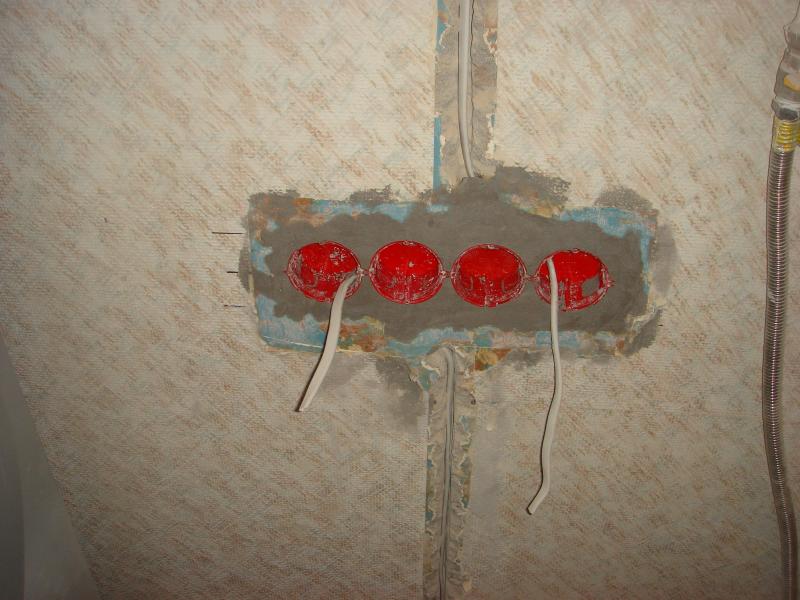
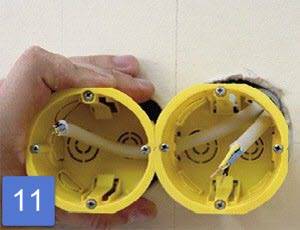
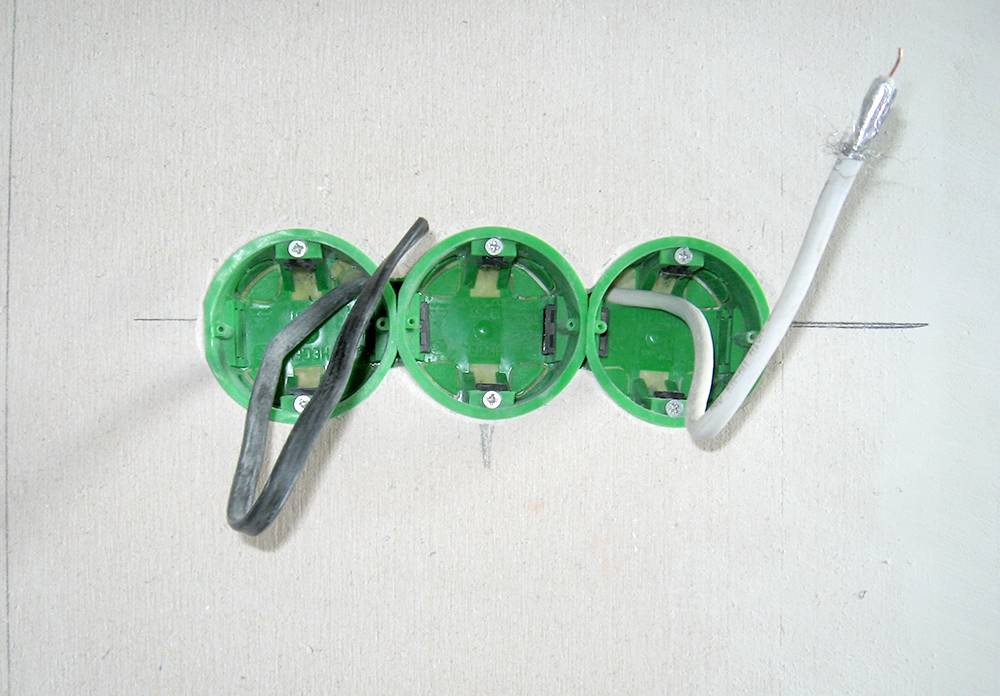
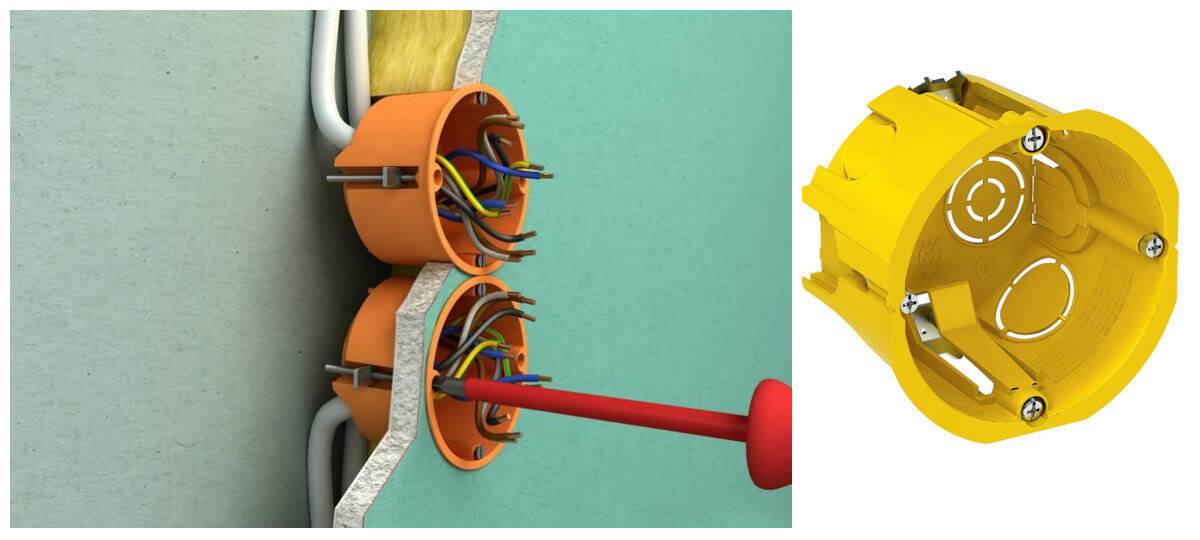
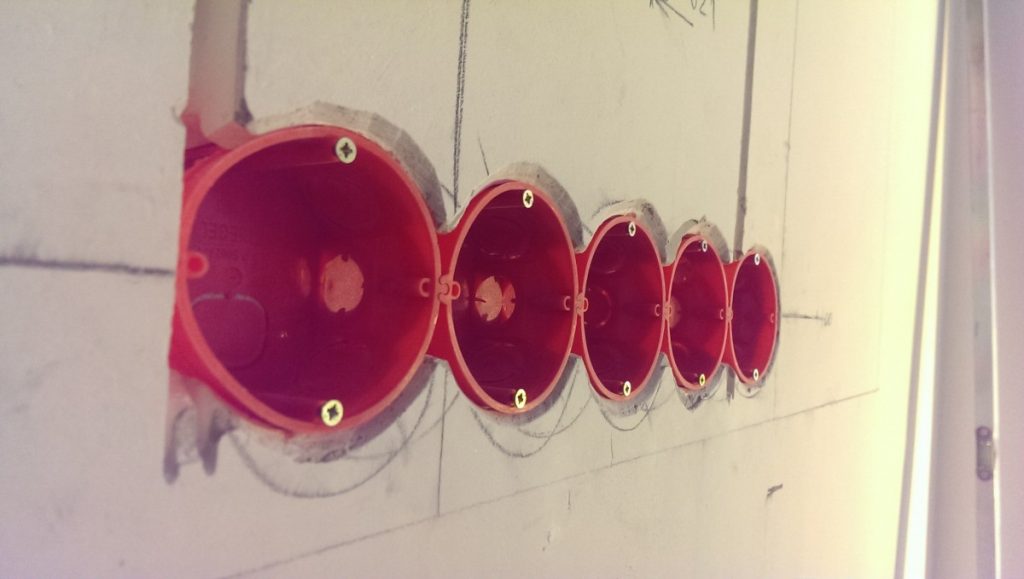
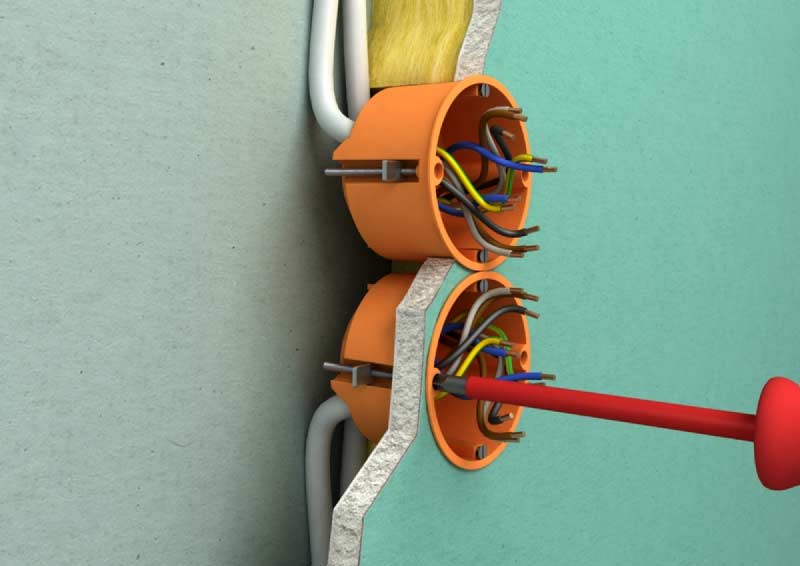
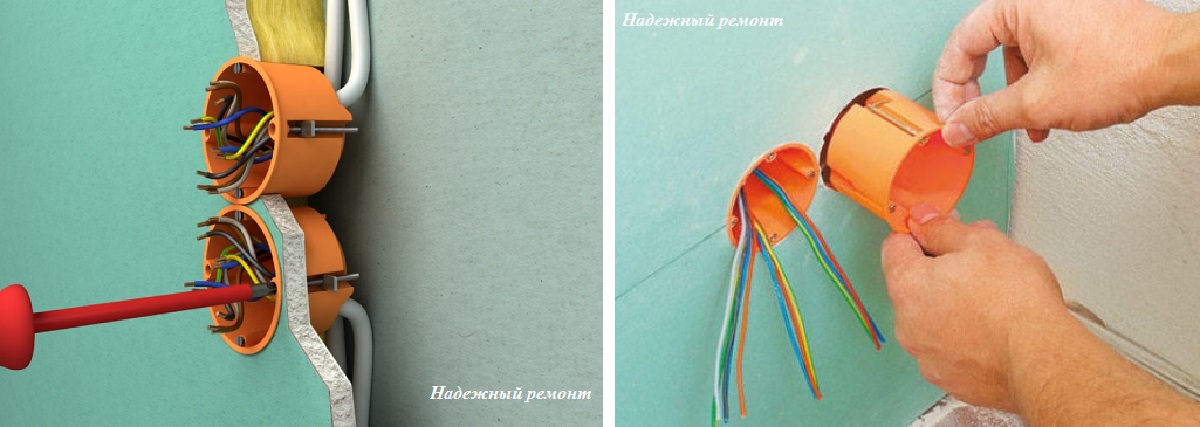
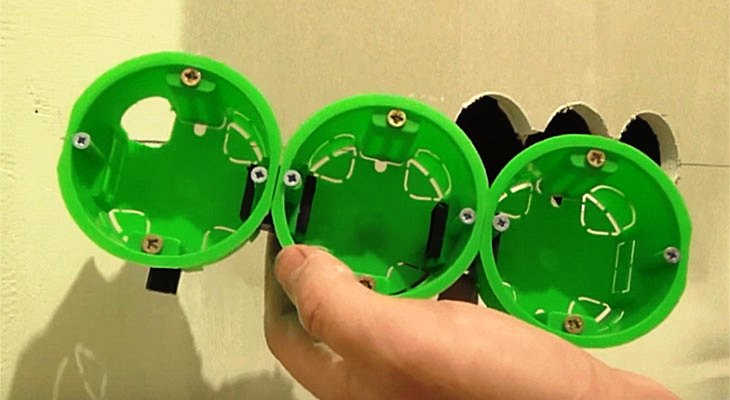
Step 4 - combining several sockets
How the marking of two or more socket boxes is performed was described above. Making holes is done in the same way as for a single box. The only difference is the need to combine the holes with each other. This can be done with a chisel or grinder.
Before installation work, the socket boxes must be docked with each other using a side fastener. Installation into the wall is carried out similarly to the installation of a single glass.
An important point that you need to pay attention to when attaching a block of boxes is the strict alignment of the socket boxes horizontally while they are fixed in the wall with a gypsum mortar. It is necessary to carry out this part of the installation only with the help of the building level.
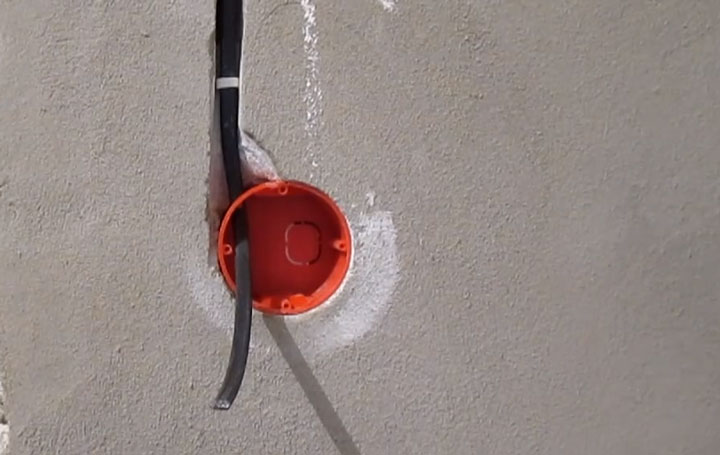
Socket in a concrete wall
1. First you need to make a hole in the wall, with a diameter of at least 68 mm. The best way is to use a puncher and a concrete crown with a diameter of 68-70 mm (you can use a larger diameter crown).
Hole for the socket with a crown
Crown for concrete
The circumference of the cylindrical crown has victorious teeth, a circle is cut with them, a victorious drill is used to center the crown. The crown is mounted on a rotary hammer (SDS+) or a drill. The hole is made by drilling or hammer drilling until the bit is completely sunk into the wall. Next, the crown is pulled out, and the hole is completed with a chisel or a perforator bit.
A niche in the wall can also be done in other ways, but I do not welcome them:
Hole for socket grinder
Bulgarian. Four cuts are made in the wall - with a square, and then hollowed out with a chisel or bat.
Two very big drawbacks - the danger of the method (working as a grinder at waist level) and dirt (very, VERY much dust)
Drill. 15-20 holes are made in the wall in a circle, then hollowed out with a chisel or bat. Disadvantages - dreary and unaesthetic.
Hole for the socket with a drill
2. Now that the hole is ready, you need to clean its dirt and prime it, at least once. When the primer is absorbed (1-3 hours), it is necessary to fill the niche with putty (coarse-grained gypsum is suitable).


3.The plug for cable entry is removed, the cable is threaded and the socket box is recessed into the niche, the voids around are filled with putty. It is better to output the cable with a margin of at least 10 cm (it is never too late to cut off the excess)
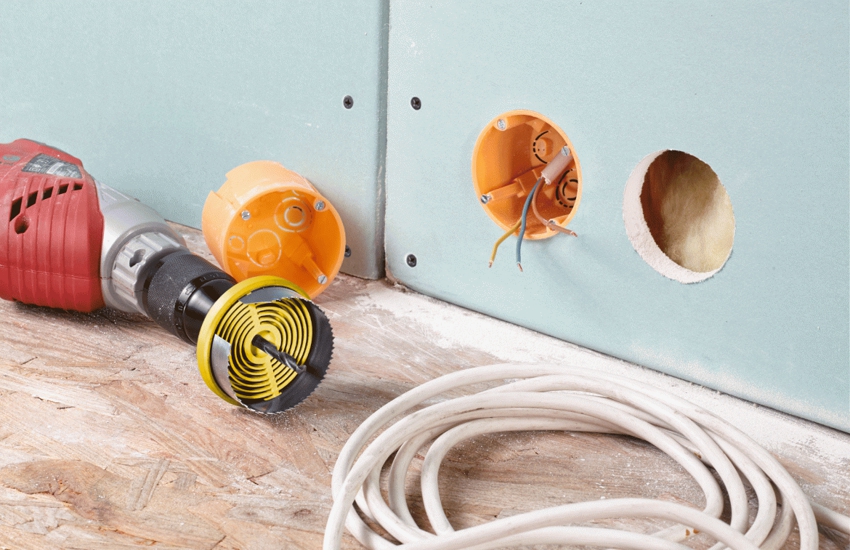
Installation of sockets in plasterboard walls
Ways to fix the outlet on the walls with plasterboard finish are selected depending on how the wiring is laid. Methods have significant differences when a hidden electric line is laid or open, directly on the wall.
In the case of open cable laying in wall-mounted plastic boxes, the socket element itself is screwed to the wall surface using a mounting butterfly.
However, if concealed wiring under plasterboard sheathing is used, completely different methods must be applied.
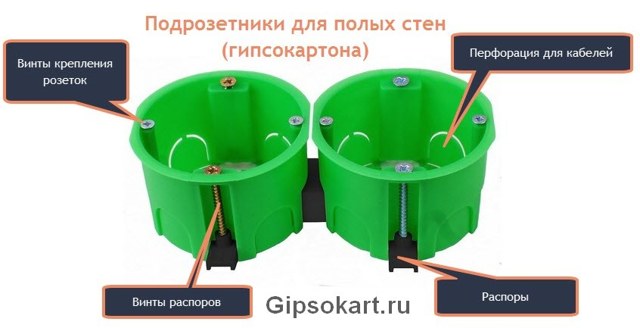
Installation of socket boxes
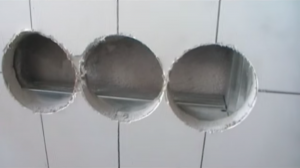
Before making a hole in the drywall, markings are made where plastic cups for the outlet will be installed. The marks must match the pinout.
In addition to mounting sockets around the room at a height of 300 millimeters from the floor surface, conclusions must be drawn in other necessary places. For example, under household appliances in the kitchen, or in the hall.
 Scheme of installed undercuts
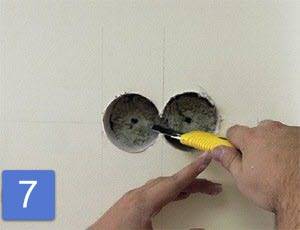
The easiest way to make holes is with a drill, into which a drywall crown is clamped. Having measured the desired distance from the floor, mark the center of the future outlet. After setting the center of the crown on the mark, carefully drill the opening.
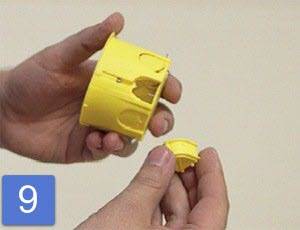
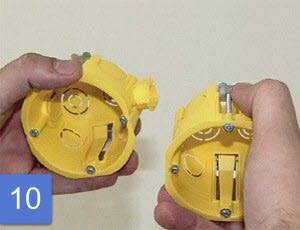
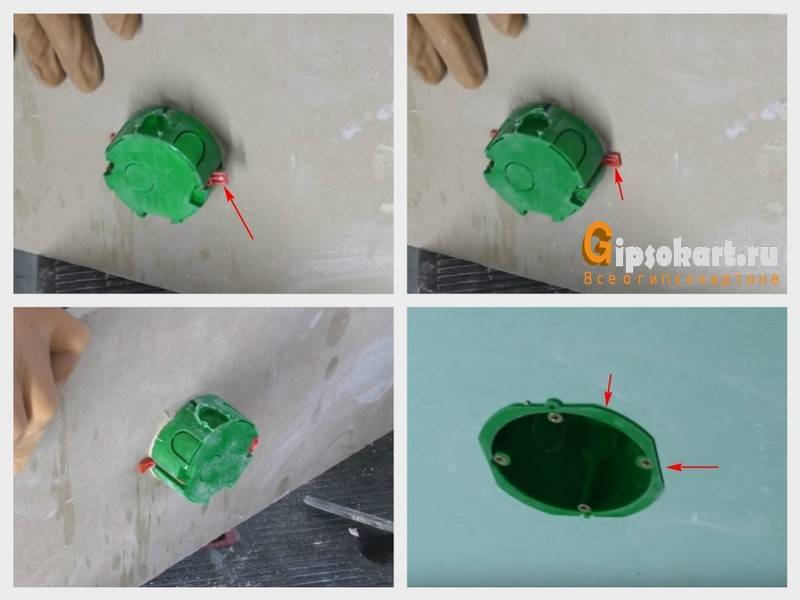
In the holes made, a plastic socket is mounted under the main element of the outlet. Without it, it is very difficult to fix it in the void under the drywall.
The socket box has four screws, two of which fix the part, and two more fix the metal plate of the socket itself.
First, you need to cut a hole in the socket into which the wiring is inserted. It is desirable that the length of the cable be with a margin. Then insert the plastic socket into the opening made.
Having set the plastic cup in level, tighten the screws, firmly fixing it in the casing. 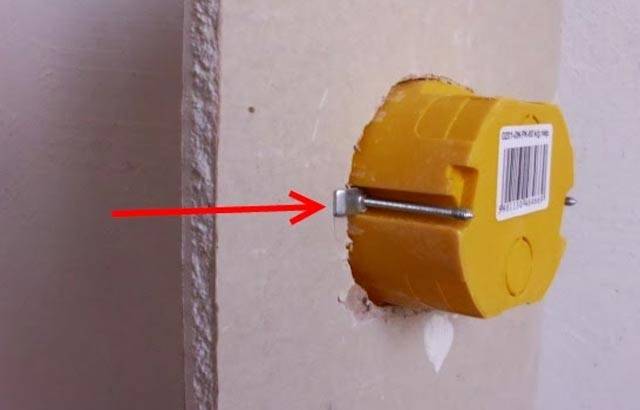 Thus, the socket block is also mounted, installing the corresponding triple sockets.
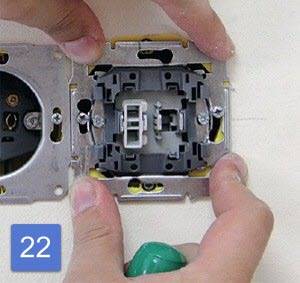
Socket installation
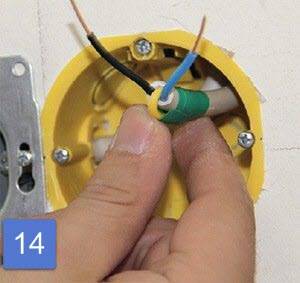
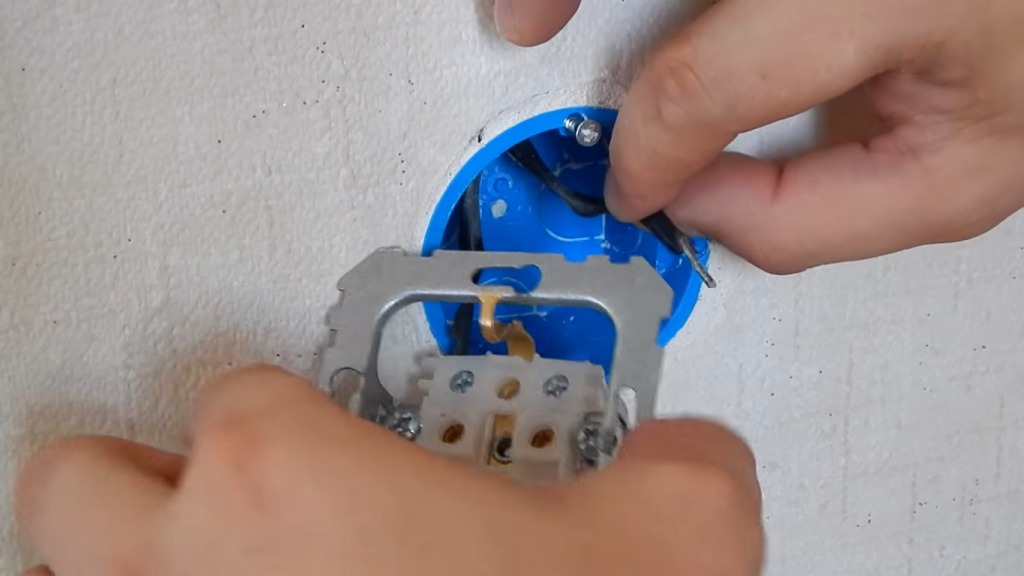
If the wiring is not connected to power, you can proceed directly to the installation of the main element of the outlet. Otherwise, it is best to turn off the electricity for safe operation. You need to check the presence of voltage in the network with an indicator screwdriver.
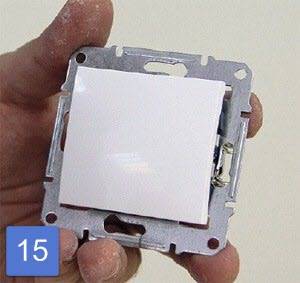
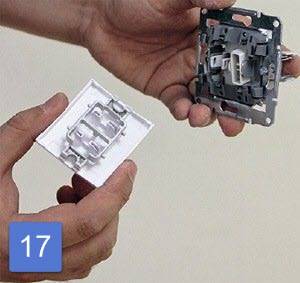
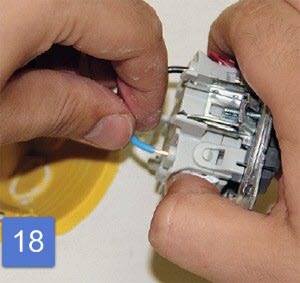
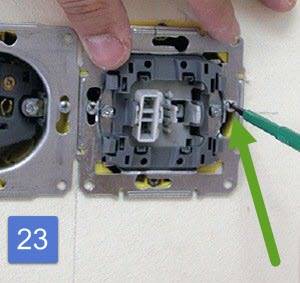
Before installing the outlet in drywall, it is disassembled by removing the protective plastic cover from it. Usually it is fixed with one screw in the middle. 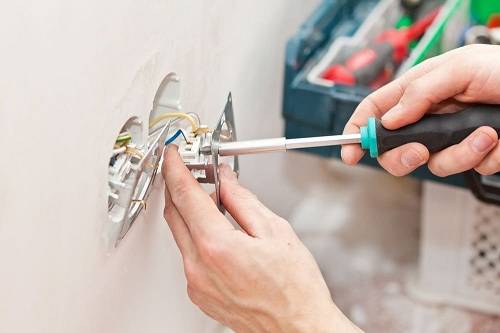 The ends of the wiring for sockets must be stripped of insulation, about 5–8 mm long (depending on the terminals). At the back, you need to loosen the screws on the terminal clamps and insert the bare wires into them, then fix them by clamping the fasteners.
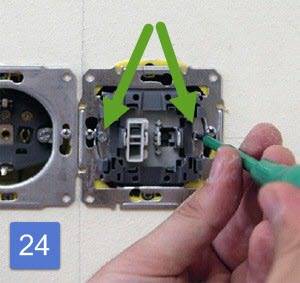
If there are three cores in the cable, grounding is done (accordingly, you need to purchase the same socket). In this case, the wire responsible for the "ground" is inserted and fixed in the central contact on the sockets. The connected socket must be placed in a plastic cup, secured with screws. 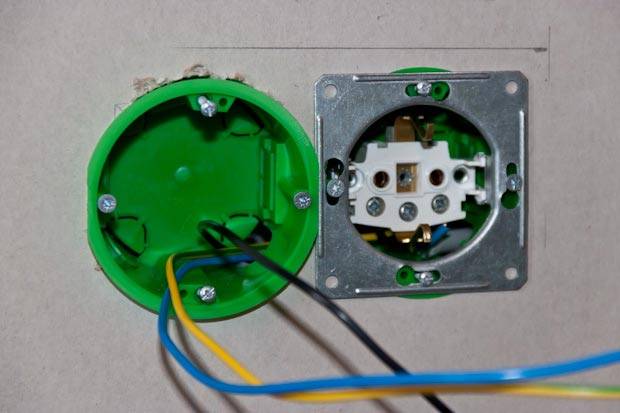 Fastening is carried out in two ways:
- The first is using spacers on the socket, which diverge to the sides when the corresponding screws are tightened.
- Second, insert the socket and using the bolts on the socket, tighten the fasteners.
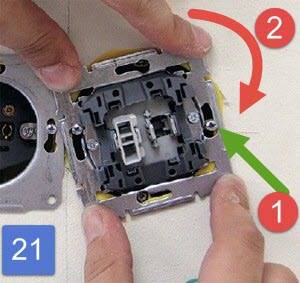
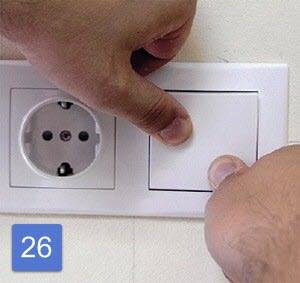
After checking the fastening (the socket must be firmly fixed, and the wires must not fall out of the terminals), put on protective decorative plastic covers and screw the fixing bolt. After that, you can turn on the power and check the functioning of the outlet.
The switch is installed in a similar way.
Installing sockets in a drywall wall is not difficult for the master and usually all this work is done by helpers. If you have questions, you can watch the relevant videos on the Internet. The main thing is to install the sockets correctly, then the socket will last the allotted time.
Installation and connection of sockets and switches
Attach the devices carefully so that all connections are correct and extremely reliable. The wiring in the house is most often divided into two or three main wires:
- zero working - N (mainly blue);
- phase - L (brown);
- grounding (zero protective) - PE (yellow-green).
But you can rely on color only if the distribution is initially made according to this rule. To make everything error-free, each device has its own connection sequence.


If the switch is connected in series with the light bulb, then it is customary to connect the sockets in parallel. It is also necessary to first determine the type of wiring. The fact is that in old apartment buildings there is no separate tap to ground, but there is zeroing. In such a situation, the PE connection terminal remains free, and the yellow-green wire (if any) is folded and insulated.
The easiest way to mount sockets. Standard Technology:
- The wires taken out of the box are cut to the desired size, the ends are stripped.It is taken into account that everything should fit freely inside the module.
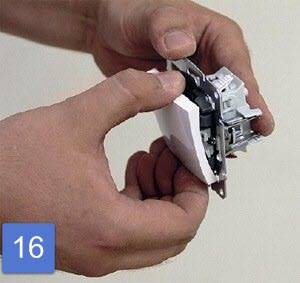
- The outer plastic cover is removed, for this the central screw is unscrewed.
- The inner base most often combines a metal plate and an element with contacts. To connect the cores, screws are unscrewed that release the connectors.
- Phase and zero are connected in any order and attract well.
- Next, you need to attach and align the frame and fix the overlay with openings for the plug on top.
Before connecting the outlet, all 3 wires should be checked for voltage with an indicator. Switches on plasterboard walls should be placed a little differently. The main difference is that it is the phase that is supplied to the gap (to the contacts). The device will also work when zero is connected, but in this case the lamp will always be energized.
When mounting the switch, a phase wire is placed on the break, it can be detected using an indicator, when energized, the indicator light should glow
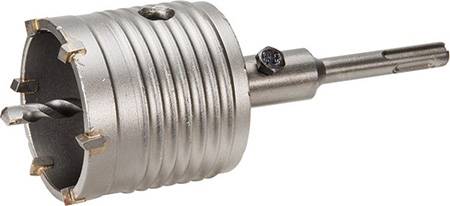
Crowns for concrete
Drilling holes in concrete for socket boxes is performed with special crowns. In addition to concrete, they can be used on brick, reinforced concrete and any stone. The large diameter of the crown is most often used when installing socket boxes or for laying pipes through the walls.
The shape of the crown is a pipe section with holes in the side walls for waste disposal. Along the perimeter of one edge there are solderings made of special alloys. They serve as the cutting element of the tool. In the center from the other end of the tube there is a through hole for screwing the shank. It is necessary for fastening the crown in the chuck of a drill or puncher.The shank itself has a seat on the side of the crown for the installation of a center drill. During operation, the drill plays a guiding role so as not to stray from the markup.

Crown in disassembly
The center drill and shank are often sold as a set with a bit. There are also extension cords designed for a rotary hammer with different cartridges: SDS Plus or SDS Max. Extensions have standard threads similar to those on the body of the crown, so they are easy to change. The center drill is cylindrical and conical. The standard hole saw is usually supplied with a cylindrical drill, while the long shank can be sold with a conical drill.
The effectiveness of drilling depends on what kind of soldering the crown is equipped with. The fact is that each soldering is designed for a specific drilled material. For example, soldering on concrete will quickly fail if it is drilled on reinforced concrete.
Carbide tips
The most common in everyday life are crowns with soldered metal hard alloys. The alloy is very strong and durable, but if fittings come across, solders quickly fly out. They are best for drilling on plain concrete or brick. It is possible, of course, to drill through reinforced concrete to the level of reinforcement, but this level cannot always be guessed.
The carbide-tipped hole saw is suitable for use with an impact drill or rotary hammer. The low cost of the product made it popular in domestic use for mounting socket boxes.
Diamond tips
Anyone who has ever cut reinforced concrete with a grinder knows that it is better to do this with a diamond blade. Drilling in reinforced concrete provides a similar technology, but instead of a disk, a crown with diamond tips is needed here.Its design consists of segments coated with diamond coating. Diamond grit allows you to cope with any hard material, even rebar. But here we must remember that drilling in reinforced concrete and other materials occurs only in an unstressed way. Otherwise, the crown itself will deteriorate, plus the supporting elements of reinforced concrete structures will undergo undesirable destruction.
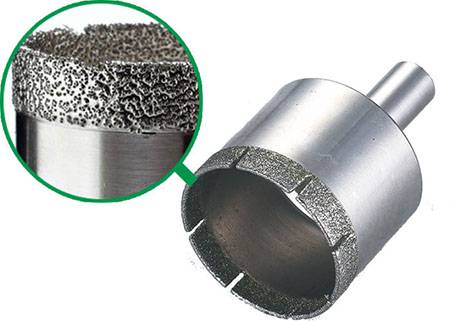
Diamond soldering drills well on brick, tile, tile, which allows you to make an even hole. However, the high cost of such crowns allows them to be used in professional construction. It is not advisable to buy an expensive nozzle to make several holes for socket boxes at home.
Diamond coating is characterized by different hardness, as indicated by the marking of the crowns:
- marking with the letter M indicates soft diamond coating. Such crowns are used for drilling high-strength concrete and are easily cleaned from clogging by dust;
- diamond coating of medium hardness with marking C is suitable for drilling reinforced concrete;
- hard-coated nozzles, marked with the letter T, are used for drilling at low speeds in high-quality concrete.
You can view the list of diamond crowns of some popular companies in the table below:
Solders with tungsten carbide coating
A crown with such soldering can be drilled not only in brick or concrete, but also in tiles. This is very convenient when you need to drill a socket for a socket on a concrete wall finished with ceramic tiles. With only one tungsten carbide tip, the hole is drilled in one go. The main thing is to choose the right diameter.
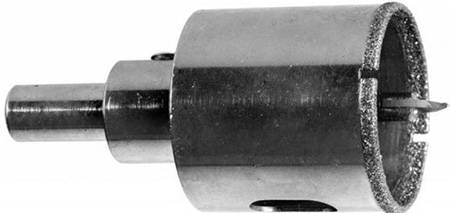
Tungsten carbide hole saw with drill shank
The nozzle is equipped with a hexagonal shank designed for clamping with a drill chuck. Drilling efficiency is achieved by the power of the tool, which should be more than 800 watts. Although such a coating is universal, it is still afraid of metal. Fittings caught in the wall will quickly disable soldering. Therefore, on a reinforced concrete wall, the tile is first drilled with a nozzle with a tungsten carbide coating. Then, a diamond nozzle is taken and drilling is continued with it. Naturally, their size should be the same.
Installation without linking to profiles
Perhaps you forgot to cut a hole during the installation phase, or decided to install a block of three or four instead of one outlet. Hitting the galvanized profile in this case is more than likely. Work in this case requires experience and does not bode well for a beginner.


- Drill and crown, as usual, cut drywall;
- Take out the resulting "patch"
- With a knife, scissors for metal, a chisel, cut out the profile so that you can put the socket into the resulting hole
At the same time, you should not be afraid that the structure of the entire wall will suffer. Drywall is attached to the profile at many points, and the profile itself is also attached to concrete at many points. By removing 5-10 cm of the metal profile, you will not change anything in the overall design.
A typical mistake of krivoruk masters is a couple of centimeters past and plus two hours of work
When working on cutting the profile, be extremely careful - the chance of injury is very high. If possible, avoid this method of installing the socket. In a small hole, with a diameter of 62 mm, it is very difficult to work accurately.At best, you will damage the round hole in the fragile GCR, at worst, injure yourself with the sharp edge of the cut metal profile.
Place for an outlet
There are certain standards by which specialists prefer to work when installing sockets. They relate to the gap from the devices to the surfaces of the room:
- Distance half-socket - 30 cm.
- Half switch distance - 90 cm.
- The distance between the socket and the wall is 18 cm.
If possible, such standards should be applied. You can change them individually. It is necessary to put the outlet in such a way that it is convenient to use the product. For example, kitchen devices are made on an “apron”, approximately at a height of 1.2 meters - household appliances will be connected there. In the bathroom, devices are usually installed at a height of a meter in order to comfortably turn on the washing machine.
In other rooms, it is also worth focusing on the available equipment. It may be better to mount the socket in drywall at a higher height than the recommended 30 cm. It is necessary to take into account the wiring in the room, so it is better to identify the location of the sockets even at the repair stage.
If a place for the product is found, you need to mark it with a construction marker using a level. The first hole will then be made in the center of the mark - the beginning of the future hole for the socket.
This is interesting: Silicone sealant "Moment" - the pros and cons
Tips
In order for the installation of sockets in drywall to be carried out as correctly as possible, it is advisable to adhere to the following recommendations:
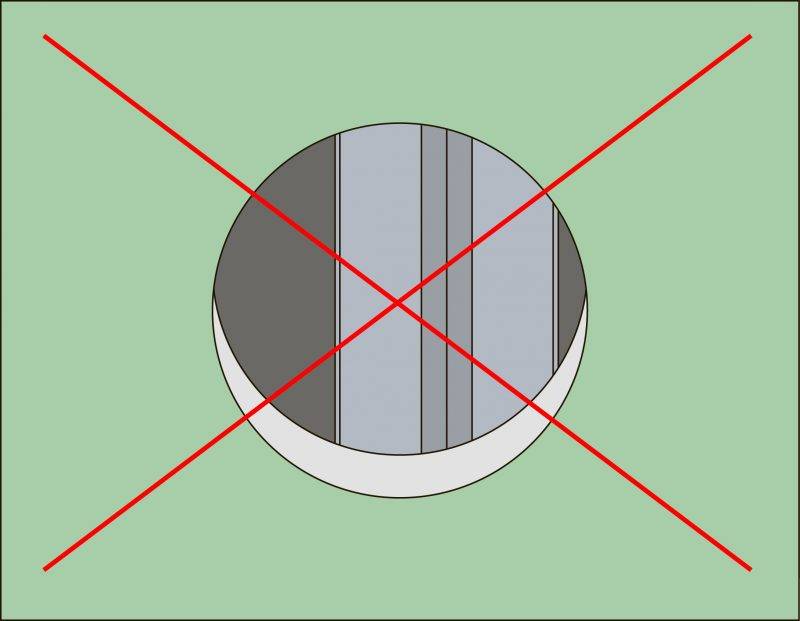
- Take into account the presence of an empty space between the drywall and the main surface of the wall (it must be at least 4.5 cm and the glass must be freely placed in the base).You can deepen the base base with a puncher or chisel.
- Even at the stage of mounting the structure from the GKL, at the place of the planned installation of the socket, it does not interfere with the wiring to be brought out with a margin of 20-30 cm.
- When installing several devices, use the building level for the correct marking and installation of sockets.
- It is necessary to conduct electrical wiring inside the structure only in the protection of electrical wires from possible mechanical influences (in a corrugated hose) in order to minimize their damage during installation or operation.
- It should be borne in mind that when creating holes, you can come across a metal profile on which the GKL is based. To prevent this from happening, use a powerful magnet. Attach it to the wall, and lead along the surface, so find out if there is a metal profile behind the ceiling.
- If nevertheless there was contact with a metal structure, then one should not despair. Since there is no need to move the holes for the sockets to another place. A fragment of a profile that impedes work is cut off with iron scissors or knocked out (bended) with a simple chisel.
When making repairs, you, most likely, thoroughly calculated everything. But after a certain period of time, it may be necessary to install an additional switch, you will need to hang a picture or change the location of wall lamps. And then chaotically laid wiring can be a fundamental problem. Since a puncher or an electric drill can safely damage hidden electrical wiring and make a short circuit.To avoid such surprises, position the electrical wiring parallel to the floors, adding a few 90 degree turns. It is desirable to fix the laying scheme: sketch a plan, sketch, or just take a picture at least on the phone. Then in a few years, you will be able to drill walls without any obstacles and doubts at any point without any undesirable consequences for the electrical wires.
Mounting an outlet in a drywall wall is quite simple and can be done by hand. Following all the above recommendations, such a procedure as installing electrical outlets in a gypsum board wall will be implemented most correctly and as soon as possible.
How to choose and install a socket in drywall, see the following video.


