- Siphon types
- Tips from professional designers
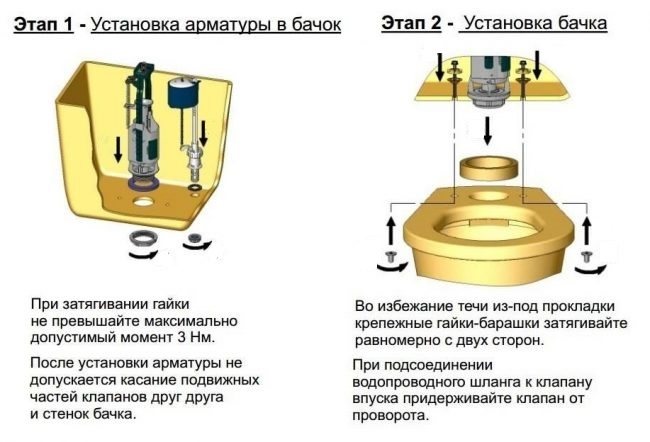
- How to install a sink siphon
- Use of mounting brackets
- Installation errors, their causes and solutions
- Installing the wall product
- Required Tools
- Preparatory stage
- Faucet and washbasin assembly technology
- Fixing the sink to the wall
- Connection to water and sewer systems
- Dismantling of old plumbing
- Sink selection
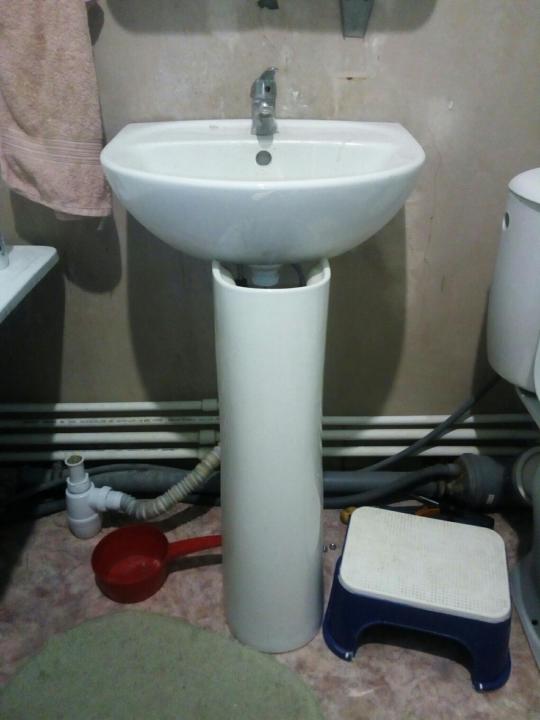
- How to install a pedestal sink
- Video - How to install a sink with a pedestal
- Features of mounting a built-in sink
- Marking the installation site
- Sawing and edging
- Installing the bowl and connecting equipment
- Floor-mounted washbasins with pedestal
Siphon types
Siphon - a mechanism located directly under the sink, similar to the letter S, connects the washbasin bowl and the sewer.
Siphon types:
- 1. In the form of a bottle. Equipped with a water lock system, it can also be connected to a water drain from a washing machine, the ability to carry out self-cleaning. Often a siphon will be used with an overflow system.
- 2. The tubular model of the siphon is made in the form of a pipe with bends. The bend of the pipe provides a shutter from sewer odors.
- 3. The corrugated siphon is similar to the tubular type, but has a plastic structure, can change shape and reduce size.
- 4. Siphons with overflow system.Any type of siphon can be equipped with an overflow system that protects the sink from overflowing. The siphon has an additional tube that connects to the hole on the side of the sink.
Tips from professional designers
Many experts recommend such types of sinks that would meet hygiene standards. In this case, a great solution would be to buy porcelain products. They fully meet quality standards, have high wear resistance. In addition, porcelain is a material of the middle price segment, which means it is available to everyone.
Use the advice of qualified personnel in the selection of a wall-hung sink and other plumbing fixtures, then you do not have to change or repair plumbing fixtures often
Pay attention to the style of the bathroom. If you are dominated by delicate pastel colors, then the best option would be a model made of glass or white faience / porcelain
Instead of a shiny gloss, you can choose frosted glass, which is not so easily soiled and partially masks splashes flying in all directions.
Additionally, pay attention to the manufacturer. For example, Italian models of the Kerasan brand are of high quality.
The company has long been engaged in the manufacture of stylish accessories and furniture for bathrooms.
When buying a hanging sink, do not forget about the material of manufacture and size. For spacious bathrooms - large models, for small bathrooms - compact.
If you are at a loss, choose standard-sized products. These are suitable for installation in any bathroom, and you do not have to spend effort and money to connect them.
But do not forget that the most important thing in choosing a hanging sink is to make it as convenient as possible to use, durable, reliable and safe for all family members. Having picked up the model you like, get acquainted with the rules of installation and installation at home.
How to install a sink siphon
A siphon is an elbow pipe installed between the sink and the drain pipe. The siphon is designed to prevent unpleasant odors in the bathroom. Also, debris is retained in the siphon and can be removed so that it does not get further into the sewer pipeline.
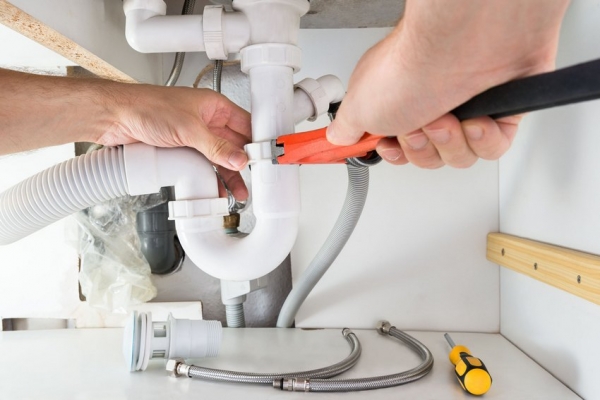
To install a siphon with your own hands, you need:
- Install a sump at the bottom of the siphon, sealing the connection with a gasket.
- Install a plastic coupling nut on the outlet pipe, then a cone-shaped gasket. This gasket should be located a few centimeters from the edge of the nozzle.
- Connect the outlet pipe to the flask. The nut must be tightened only with your hands, and not with a tool, so that it does not burst.
- Connect the siphon to the outlet pipe with a coupling nut. The connection must be sealed with a gasket.
- Connect the outlet pipe to the sewer outlet using a cone gasket.
- Install a mesh into the drain hole of the sink and secure it with a long screw.
- Check tightness of connections. To do this, open the tap and supply water.
Use of mounting brackets
Installing an overhead sink requires a little less time and can also be done using special metal corners. They usually come with it. In total, at least 4 mounting plates are required, which will be fixed on the outside of the cabinet with self-tapping screws.Since the wall of the cabinet-stand rarely exceeds a thickness of 18 mm, the screws in the set are 16 mm long.
The step by step process looks like this:
- We screw in the screws by 5-6 mm.
- We hang a mounting corner on them (with the inner corner part to the cabinet).
- We clamp the screws, but not completely, leaving room for adjustment.
- We put the sink on the stand so that the powerful main fastening screw is fixed in the very depths of the metal corner.
- We clamp the screws until they stop and make sure that the fixation is secure
Installation errors, their causes and solutions
Sometimes, after the installation is completed or some time after installation, it turns out that the sink with the pedestal was installed poorly.
A number of symptoms that indicate this:
- the sink is wobbly;
- the pedestal is tottering;
- there is a gap between the bowl and the pedestal;
- there is a gap between the bowl and the wall.
Most of these problems can be solved without dismantling the product. If your washbasin on the pedestal began to walk and tremble from one touch, the problem is in the level. During editing, of course, you used the spirit level, but perhaps not hard enough.
Use the level literally at every stage. In order not to measure the same thing a hundred times, make yourself marks with a pencil for orientation
If it turns out that the fasteners are not at the same level, this must be corrected. A large difference in height is corrected only with new fasteners, and a small one can be corrected by slightly twisting the mounting pin.
To slightly correct the position of the washbasin, you can put a thicker rubber pad under the mount or, if the diameter of the hole in the sink allows, move the washbasin a little and press it with a bolt
If the washbasin itself is held evenly, and only the pedestal staggers, the problem is in the base. A perfectly flat floor is a rarity. Maybe your pedestal hit the junction of the floor slabs or the problem is in the screed itself, but if you do not want to level the floor, use silicone.
Drying, it creates a fairly dense layer that compensates for the distortion. Walk silicone along the junction of the “legs” and the floor. The same solution is suitable for eliminating the gap near the wall or between the bowl and the pedestal. Silicone sealant is an indispensable item in the plumbing arsenal.


Installing the wall product
Required Tools
Attach the sink to the wall will help such tools:
- powerful screwdriver;
- gas key;
- electric drill with drills of 6, 8, 10 mm;
- a drill designed for concrete work, equipped with a pobedit tip;
- several wrenches;
- the level that determines the horizontal;
- marker with a thin rod;
- a hammer.
To make the threaded connections tight, you should purchase FUM tape in advance at the store, but you can get by with ordinary tow. Stock up on enough fasteners.
Preparatory stage
Before attaching the washbasin to the wall, it is necessary to bring communications to the installation site, namely pipes with hot and cold water. They can be made of metal-plastic, metal and PVC material, be sure to check the condition of the pipes for leaks. Place a valve at the outlet of each pipe, which, if necessary, will help stop the flow of water. The best choice is a valve made of chrome.
The sink must be fixed at a level of 80 cm, counting from the top of the washbasin to the floor.
Before hanging the sink on the wall, make a mark on the wall with a marker where exactly the appliance will be placed. Through 2 points, draw a line horizontally located relative to the floor surface. This is the main reference point for mounting the unit.
Each sink has holes through which the washbasin is fixed. Attach a ruler and measure the distance between the holes, measure the resulting value on the wall. Thus, you should have 4 marks: a horizontal line, a central fixation point for the product and a pair of marks calculated for the bolts.
You need to start the process by drilling a hole in the tile panels. Next, change the drill to a larger one and make holes for the fasteners in the wall. Insert the dowels into the holes, note that they must enter with great effort.
Faucet and washbasin assembly technology
In most cases, wall-mounted specimens go on sale from the manufacturer already with a hole in the shelf for mounting the faucet to the washbasin.
Fix the faucet to the sink hole, turn the latter over and tighten the faucet tightly with the nut
Pay attention to how symmetrically placed the spout of the mixer to the washbasin
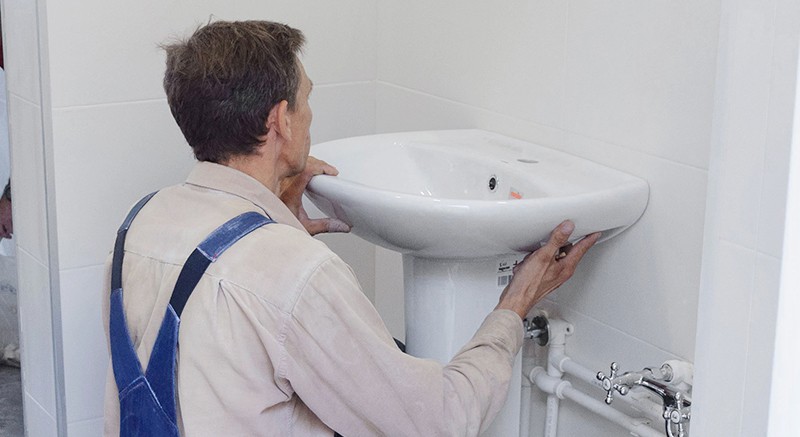
Fixing the sink to the wall
It will not be possible to hang the sink on the wall without the appropriate fixing kit, including studs and gaskets.
Install the studs on the dowels. First, "put" a couple of nuts on the stud, then use the wrench and screw each stud.
Now is the time to apply silicone sealant to the end of the washbasin, namely to the area where it comes into contact with the wall structure.Put the washbasin on the studs, install the gaskets and tighten the fasteners well. Slightly "shake" the device from side to side, if there are no vibrations and movements - the work of fixing the washbasin to the wall can be considered completed.
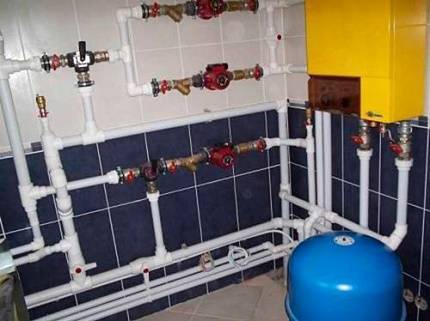
Connection to water and sewer systems
Wind the linen around the thread of the valve, lubricating it with a special paste, for example "Unipak". Connect the mixer hoses to the pipes and tighten them with an adjustable wrench. Do not overdo it - this can provoke a rush of cushioning material. The sink is now connected to the plumbing. It remains to work with the sewer.
Make sure all connections are secure
Put the siphon on the washbasin. Before assembling the siphon, read the installation instructions in detail. Check that all gaskets are well aligned with the sink. Position the hose from the siphon to the sewer drain. Turn on a small amount of water and see if the wall gets wet. If everything is in order - you can be congratulated, the wall-mounted sink is installed!
Dismantling of old plumbing
Note that the plumbing kit you purchased, as a rule, includes not only fasteners, but also special elastic gaskets for the sink and pedestal. Before mounting the structural elements in the wall, using a perforator, holes are made for fastenings, in which plastic dowels are fixed to the glue.
Then, with the help of flexible hoses, taps of the water supply network are connected to the mixer installed on the sink. After that, it will be possible to proceed to the connection of the sink drain, which is mounted in compliance with the known rules (with the installation of an overflow system and a siphon connected to the sewer).
We suggest that you familiarize yourself with the Raptor saves from fleas quickly and forever
After installing the pedestal in place, it remains only to finally tighten the fixing bolts, while leveling the sink. After completing these procedures, it will be possible to turn on the water supply and make sure there are no leaks. We advise you to additionally watch a video that shows the process of installing a sink with a pedestal.
See that the set of plumbing you bought, in most cases, includes not only fasteners, but also special elastic gaskets for the pedestal and sink. Before mounting the structural elements in the wall, using a perforator, holes are made for fastenings, in which plastic dowels are fixed to the glue.


First, a sink is fixed on the wall with the help of special bolts with gaskets, which is pre-aligned with the horizon line. When installing plumbing, the bolts are first “caught” in the dowels, and then carefully (without excessive hardening) are pulled up to a state that provides a snug fit of the sink to the wall.
At the end of the installation of the pedestal in place, it remains only to completely tighten the fixing bolts, at one moment smoothing the sink in level. After completing these procedures, it will be possible to turn on the water supply and make sure there are no leaks. We recommend that you additionally watch a video that demonstrates the process of installing a sink with a pedestal.
In the case of installing a new sink instead of old equipment, it is important to know the sequence of actions for removing old plumbing. When dismantling the old sink, work is carried out in the following sequence:
When dismantling the old sink, work is carried out in the following sequence:
The water is shut off and the faucet valves are turned off.
Removed if there is a pedestal.
The faucet mount is unscrewed at the bottom of the sink and the faucet is removed.
The siphon is unscrewed from the neck of the sink, water is carefully drained from it.
The siphon pipe is pulled out from the sewer hole, which is closed with a special plug or a plastic bag to block unpleasant odors.
The nuts that secure the sink are unscrewed, and it is removed.
When installing new plumbing, it is advisable not to use old flexible water hoses and a siphon, which can leak during re-installation due to worn rubber gaskets.
Before installing a new sink, you need to remove the old one. The procedure for dismantling the old sink is as follows:
- Unscrew mixer fittings.
- Disconnect the water supply line.
- Remove mixer.
- Unscrew the siphon fasteners and remove it. If the siphon needs to be replaced, it must be disconnected from the drain pipe.
- Close all openings with a stopper. If you plan to install a new sink with a pedestal, this is not necessary.
- Remove old sink.
Sink selection
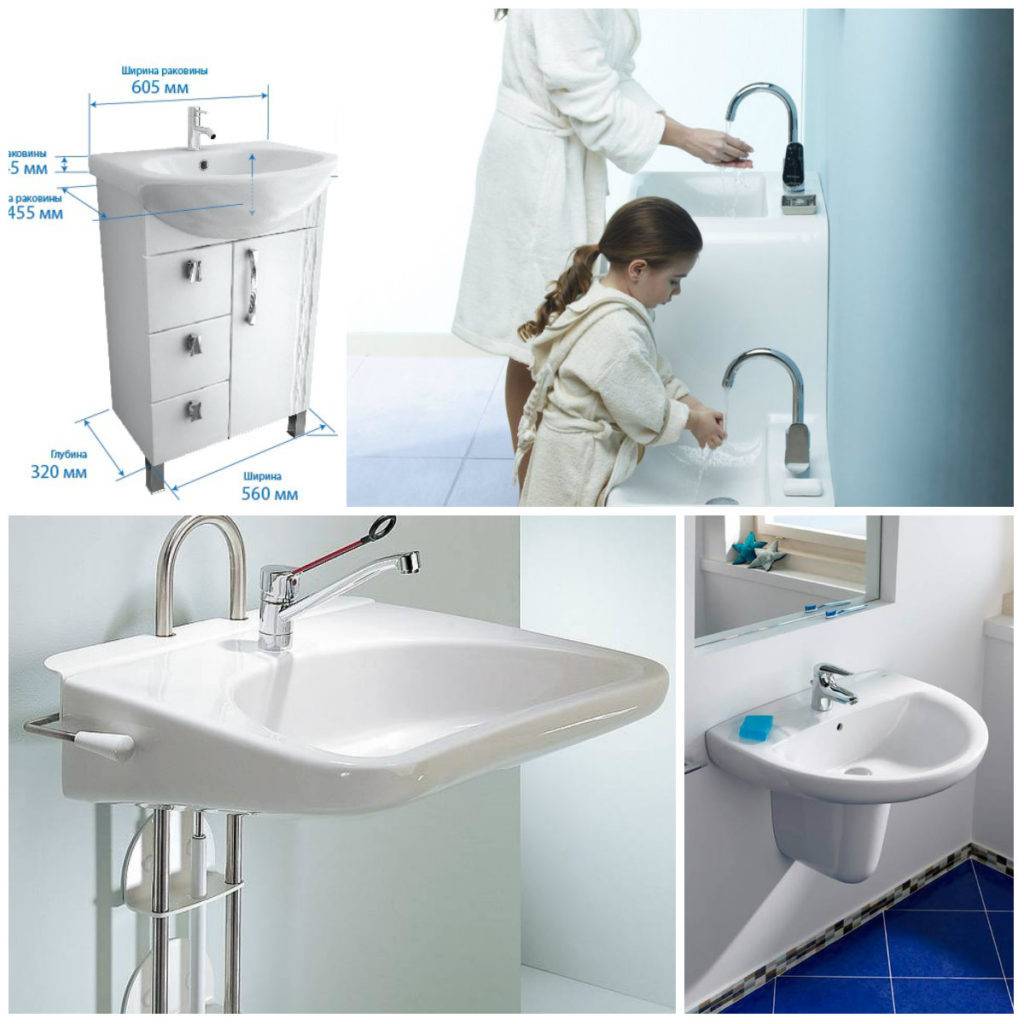
Modern bathroom equipment is very beautiful and high-tech. There is a huge selection of sanitary ware, which allows you to carry out a variety of design projects. In pursuit of the appearance of the bathroom, do not forget about convenience. The equipment should be as comfortable as possible for the person performing hygiene procedures. The dimensions of the equipment are important when choosing.
Before purchasing a sink with a pedestal, the first step is to take all the measurements in the place where it will stand, and then choose a sink with the appropriate dimensions.
A bulky sink can take up most of the space in a bathroom, while installing a sink that is too small can cause inconvenience. In specialized stores, there are a huge number of plumbing options that meet all these conditions and perform their functions. However, the installation of a traditional sink with a pedestal is still the most preferred. Such a washbasin has an aesthetic appearance, is quite compact and convenient, while the pedestal allows you to cover not too aesthetic plumbing pipes
How to install a sink with a pedestal will be described below, but now you should pay attention to the choice of equipment
Before going to the plumbing store, you need to measure the place where it is supposed. This will allow you to determine the size of the plumbing equipment. As practice shows, the optimal size of the sink is from 55 to 65 cm. If you want to install a smaller bowl, it will be inconvenient, since water during the procedures will certainly fall on the floor and walls. A large sink will take up too much space, which is not always acceptable even in spacious rooms. As for the height of the pedestal, it should be sufficient so that the person does not have to lean too much when washing.
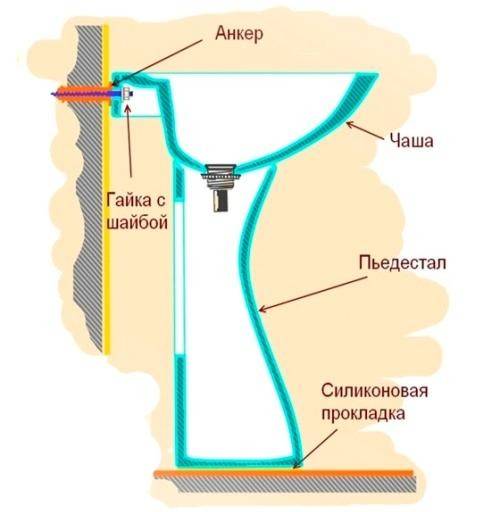
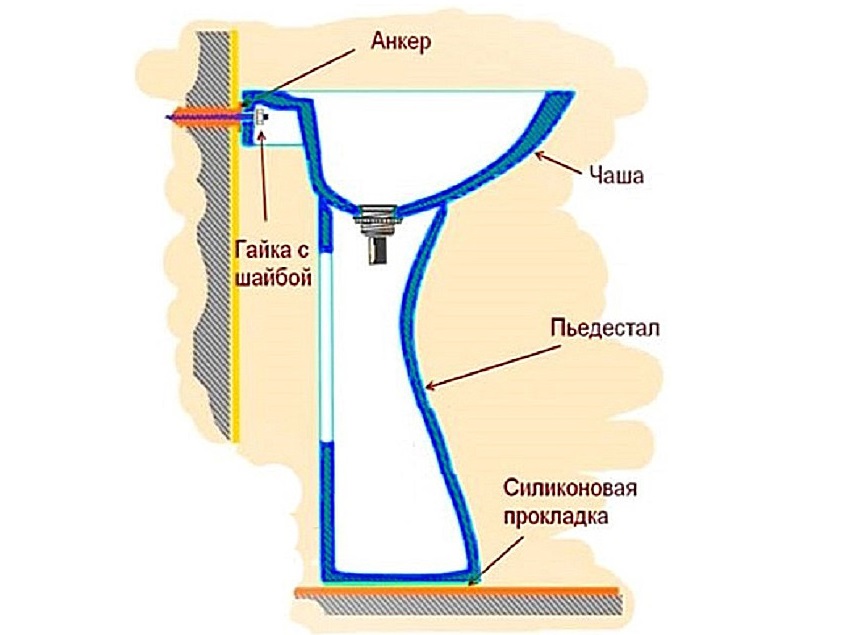
Scheme of the structure of a shell with a pedestal.
The appearance of the sink bowl can be very different. Designers advise choosing a pedestal in a shape similar to the shape of a bowl.If the bowl is square or rectangular, then it is recommended to install a cubic pedestal, while a rounded sink, for example, will require the same rounded pedestal. The same recommendations apply to the material from which the plumbing equipment is made. The material must be the same. To increase functionality, you can choose a pedestal under the sink, which has various shelves where items necessary in the bathroom will fit.
It is worth paying attention also to the type of sink: it can be deaf or have. Both options are acceptable, however, it should be borne in mind that the second option will require the installation of an additional plug. It is good that there is an overflow hole in the sink, then in case of any problem with the drain, the water will not go to the floor, but to the sewer
Before buying, you must once again carefully inspect the equipment you like and make sure that there are no scratches, chips or other defects on it. It is worth trying to put the sink on the selected pedestal. It should match perfectly in color and accurately enough to enter the place intended for it.
It is good that there is an overflow hole in the sink, then in case of any problem with the drain, the water will not go to the floor, but to the sewer. Before buying, you must once again carefully inspect the equipment you like and make sure that there are no scratches, chips or other defects on it. It is worth trying to put the sink on the selected pedestal. It should match perfectly in color and accurately enough to enter the place intended for it.


Now that the pedestal sink selection has been made, installation can begin.
How to install a pedestal sink
Before installation, the sink + pedestal set looks exactly like this
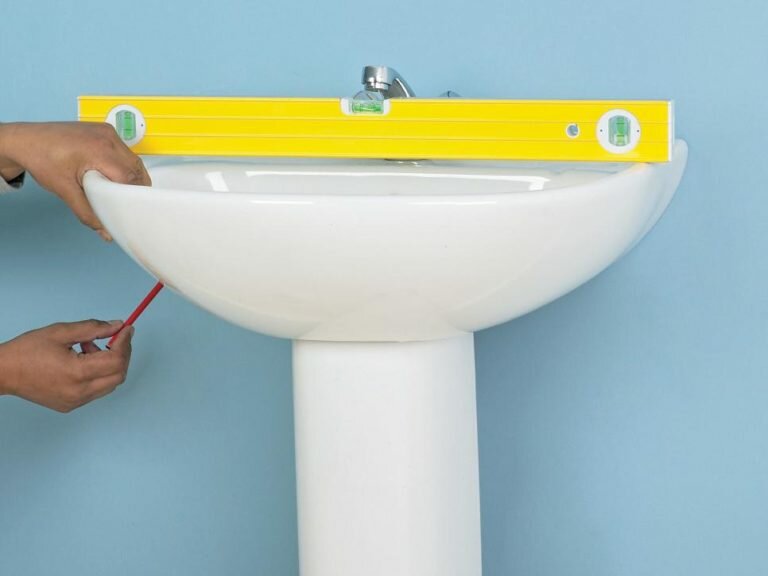
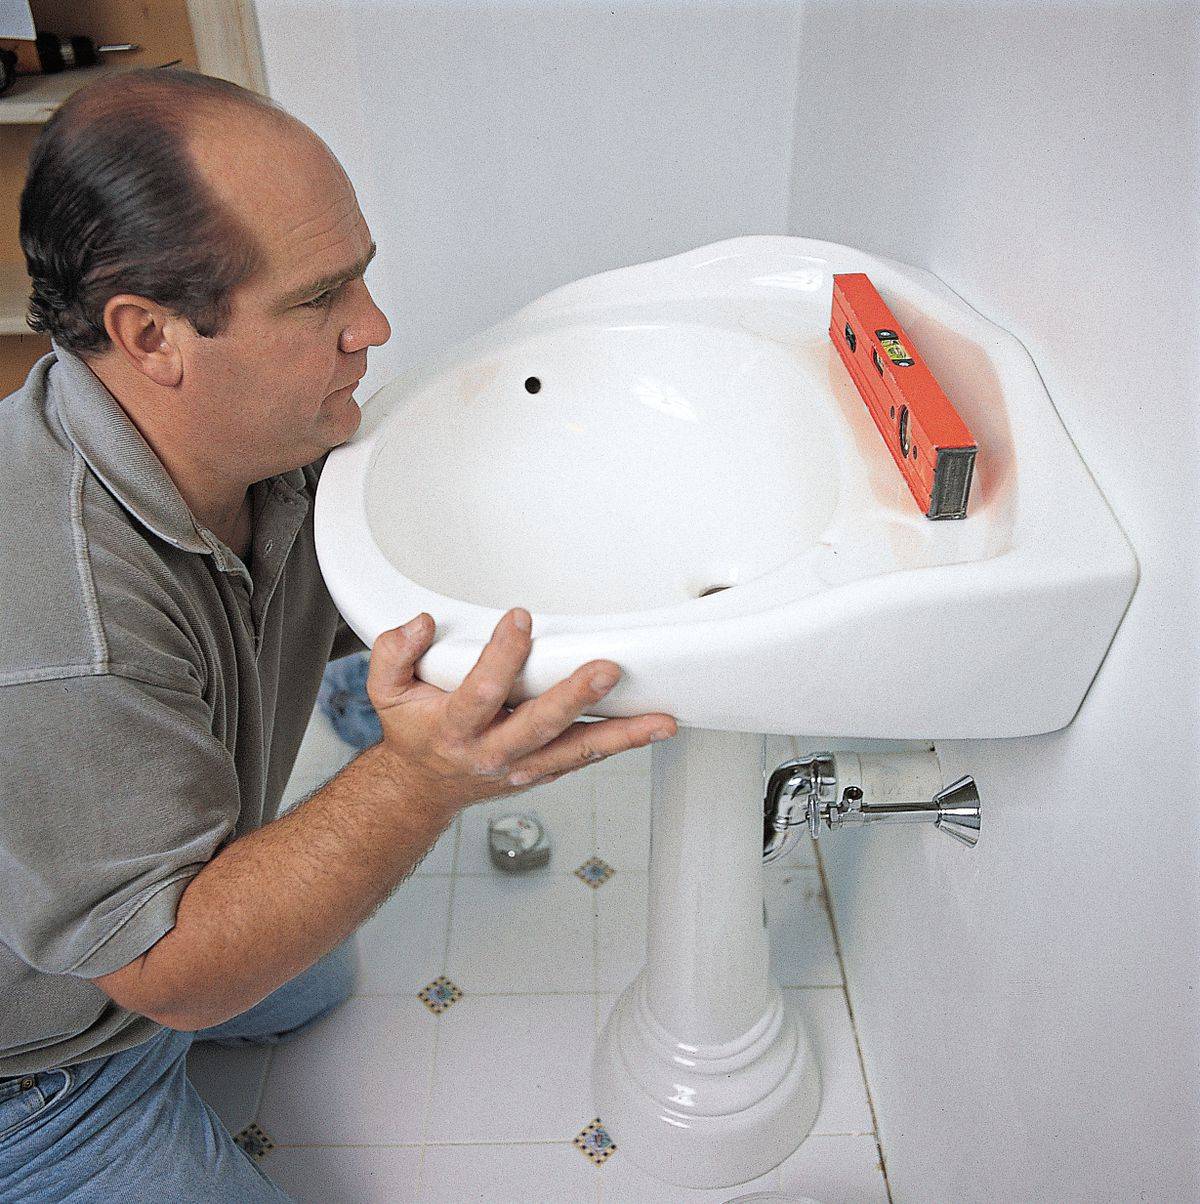
When the bathroom is completely ready for the installation of new plumbing, you can take a new sink and pedestal and put them in place for future installation. With the help of the construction one, the horizontality of the washbasin and the verticality of the “legs” should be achieved, after which, with a pencil on the wall, make markings in the places of the mounting holes.
With the help of a construction tool, you should achieve the horizontality of the washbasin and the verticality of the “legs”, after which, with a pencil on the wall, make markings in the places of the mounting holes
It is necessary to check the correctness of the markup by measuring the distance between the mounting holes on the sink and between the pencil marks with a tape measure. The sink and pedestal for this must be set aside for a while for convenience.
It is necessary to check the correctness of the markup by measuring the distance between the mounting holes on the sink and between the pencil marks with a tape measure.
If your sink is going to have a faucet, it's a good idea to start installing it before the sink is attached to the wall. This will allow you to make installation efficiently and with convenience. The mixer is installed in the technological hole on a rubber gasket, it is fixed from below with one or two fixing nuts, which are attached to the kit.
The next stage of work is the noisiest. Using a perforator (drill diameter 7 mm), you need to carefully gouge holes for the brackets exactly according to the marking (holes in ceramic tiles are drilled with a drill).
Using a perforator (drill diameter 7 mm), you need to accurately mark out the holes for the brackets exactly according to the marking
Pre-prepared plastic dowels are inserted into the holes (you can use a small amount of glue for the strength of the installation of the dowels), into which metal brackets are screwed with an adjustable wrench. Next, plastic expansion nuts (eccentrics) are screwed onto the threaded part of the brackets. Fasteners are checked for horizontality and adjusted by eccentrics.
Pre-prepared plastic dowels are inserted into the holes (you can use a small amount of glue for the strength of the installation of the dowels), into which metal brackets are screwed with an adjustable wrench
Now the pedestal and sink are re-installed, the horizontal and vertical structure of the structure is checked. If everything is perfect, you can tighten the nuts - clamps on the brackets (do not forget to install rubber gaskets), and then proceed to connect the water supply and siphon.
If everything is perfect, you can tighten the nuts - clamps on the brackets
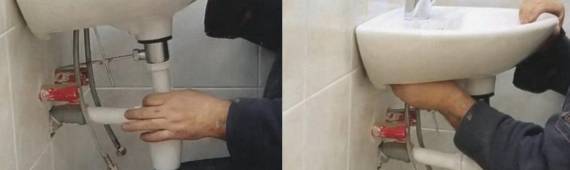
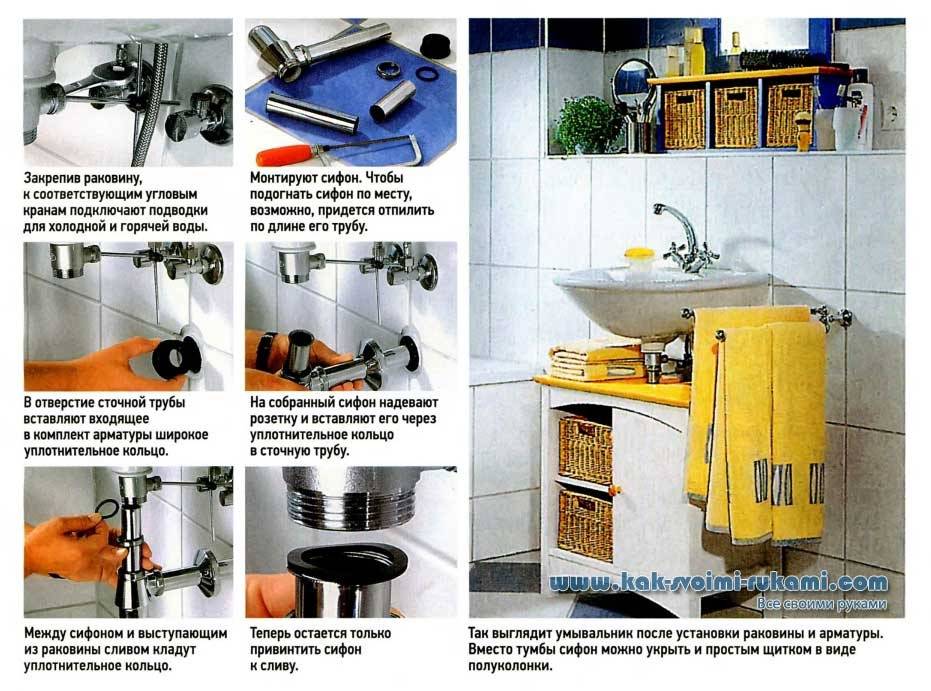
From below, we connect flexible water hoses to the mixer and pipelines of hot / cold water
It is important not to damage the rubber seals. If you do not plan to install a faucet, and a technological hole is provided in the washbasin, it can be closed with a special decorative plug
From below, we connect flexible water hoses to the mixer and pipelines of hot / cold water
How to install a sink siphon is described in detail in one of the articles on the site. After reading the step-by-step instructions, you can easily assemble this drainage element.
Video - How to install a sink with a pedestal
If after installation you notice that the sink is staggering, then the following may be the reason for this:
- uneven flooring under the sink (remedy - careful dismantling of the plumbing kit and leveling the floor);
- insufficiently tightened fastener nuts (the way to fix the problem is to tighten the nuts with an adjustable wrench).
Washbasin with pedestal CEZARES
Washbasins with a pedestal can be installed not only frontally, but also in the corner of the bathroom to save free space. The installation technology is completely identical, however, for the corner option, additional work may be required to connect water supply and sewage pipes.


Corner washbasin with pedestal
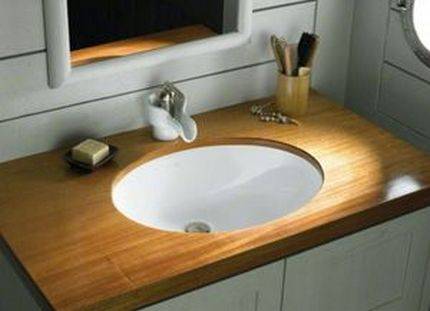
Features of mounting a built-in sink
Built-in models are cut into the countertop from below or from above.
Each installation method has its own nuances:
- When installed on top of the bowl, it will protrude above the surface from one to three centimeters.
- The lower tie-in method is preferable because during operation it is convenient to collect splashes with just one movement.
Regardless of whether the sink is completely recessed into the cabinet, or it will partially rise above the surface, the drain fittings will still be located inside the cabinet.
If you plan to mount a built-in sink, be prepared for the fact that you will need to perform the perfect processing of all joints
L-shaped fasteners are used to carry out the tie-in from below, and the fixation is performed to the base of the support.
Marking the installation site
To simplify the marking of the countertop for the installation of a recessed sink, the use of a template will help. Many leading manufacturers include it in the kit with most built-in models.
When determining a place for installing a washbasin, two conditions are guided:
- The sink should not be on the very edge or right up against the wall.
- It should provide free access and ease of use.
The point of creating the correct markup is that the washbasin is firmly fixed in the countertop, but at the same time does not fall through the hole in it.
For lack of a template, the shell is turned upside down and applied to the surface. Draw a contour with a simple pencil.
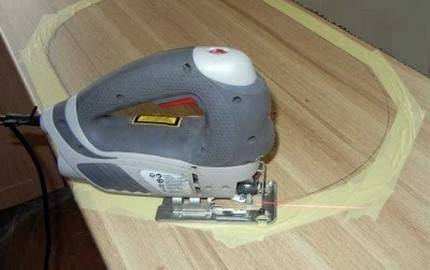
The line of the inner contour traditionally recedes to the center by 1.5-2 cm relative to the outer line; it serves as a guide when cutting a hole for the bowl
In order to correctly calculate the distance from the edges of the plumbing to the eyelets of the fasteners, measurements are taken and transferred to the circled contour. The resulting size determines the distance that should be retreated from the line in order to create an internal contour that acts as a support for the sides of the bowl.
Sawing and edging
The hole for installing the bowl is made using a jigsaw. If you have to work with a hacksaw, be prepared for the fact that you need to trim the edges.
When working with a hacksaw, in order to get a neat cut, first a hole is drilled in the region of the marking line inside the outlined contour. Its diameter should be such that the hacksaw blade fits freely.
Important! To minimize the risk of chips on the decorative surface of the countertop, sawing should be done slowly and without excessive effort. The end surfaces of the created hole are treated with fine-grained sandpaper or polished with a file.
The end surfaces of the created hole are treated with fine-grained sandpaper or polished with a file.
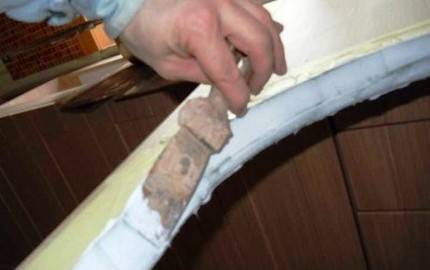
To avoid problems with leakage during operation of the equipment, the cleaned edges of the tabletop cut in 2-3 layers are covered with a sealing compound.
When choosing a sealant, it is important to focus on the type of material used in the manufacture of countertops. So for plastic and wood coatings, sealing impregnations based on alcohol are used.
Installing the bowl and connecting equipment
The bowl is installed in the countertop and deepened. To ensure a tight fit, the product is rotated slightly back and forth. After that, it remains only to tighten the installed fasteners and remove the silicone with a napkin, which is squeezed out when the bowl is seated in place. The assembled and fixed structure is left for a day until the adhesive composition dries completely.
To connect the equipment, a mixer is installed in the hole, connected to the hoses and fixed with fasteners. The outlet of the siphon is brought into the sink, a pipe is attached to it, which is led out into the sewer socket.
In general, the technology for connecting the faucet and siphon of the built-in sink is almost identical to that described when installing the console model.
The specifics of assembling a complex from a countertop and a countertop sink are given here, we recommend that you familiarize yourself with a very useful material.
Floor-mounted washbasins with pedestal
In addition to the tulip-type washbasins familiar to us, floor-standing monolithic models have appeared in the assortment of sanitary ware manufacturers. They look very attractive and aesthetically pleasing, transforming the interior of the bathroom. You can install floor-standing washbasins not only near the walls or in the corner, but also in the center of the bathroom, if the area allows.The main difficulty when installing away from the walls is the connection of the plumbing and sewer pipes. However, skilled master plumbers cope with this task, often supplementing the washbasin with a modern floor mixer.


Monolithic floor-mounted tulip washbasin with floor-mounted faucet
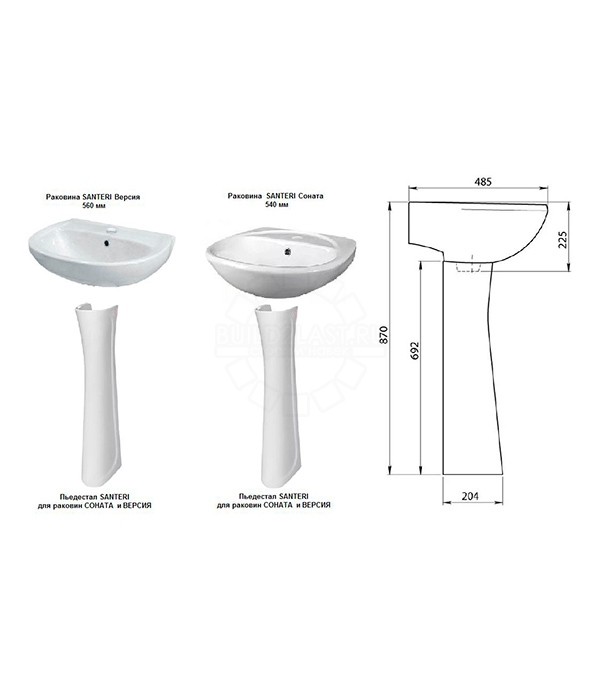
Washbasin on a pedestal, drawing
Corner washbasin with pedestal
Sink with pedestal, material - tempered glass, steel
Sinks on a pedestal (material - natural stone)
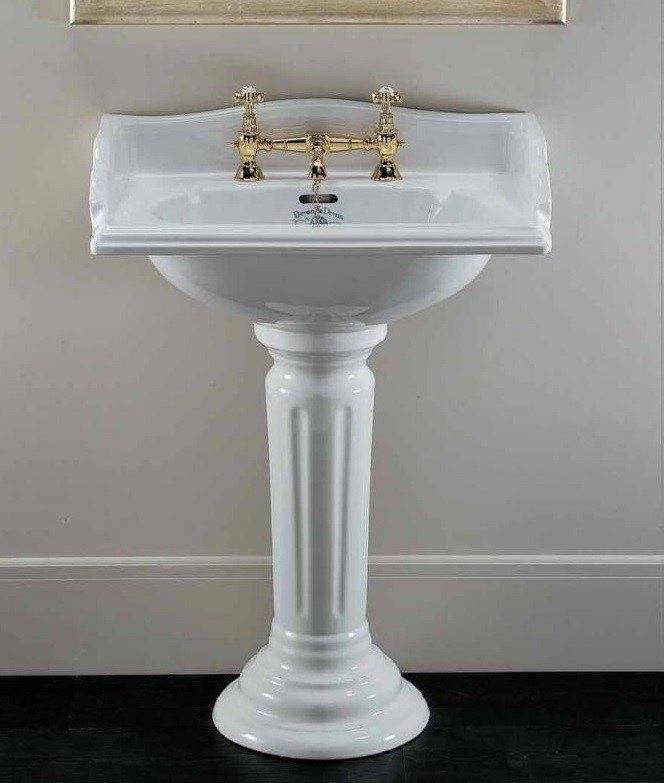
Washbasin with pedestal Sanitan Victorian
From below, we connect flexible water hoses to the mixer and pipelines of hot / cold water
Before installation, the sink + pedestal set looks exactly like this
Monolithic floor-mounted tulip washbasin with floor-mounted faucet
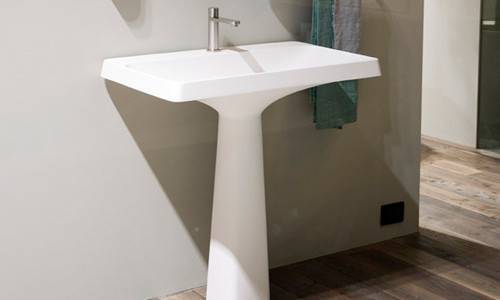
Sink on a pedestal with shelves
How to install a pedestal sink
Washbasin with pedestal CEZARES
If everything is perfect, you can tighten the nuts - clamps on the brackets
Pre-prepared plastic dowels are inserted into the holes (you can use a small amount of glue for the strength of the installation of the dowels), into which metal brackets are screwed with an adjustable wrench
Using a perforator (drill diameter 7 mm), you need to accurately mark out the holes for the brackets exactly according to the marking
It is necessary to check the correctness of the markup by measuring the distance between the mounting holes on the sink and between the pencil marks with a tape measure.
With the help of a construction tool, you should achieve the horizontality of the washbasin and the verticality of the “legs”, after which, with a pencil on the wall, make markings in the places of the mounting holes
This is interesting: How to eliminate blockage in toilet without plunger - easy ways