- Installation subtleties
- Manufacturers overview
- Different sinks are needed, different sinks are important
- Washbasin fixing
- Creating a landing hole in the countertop
- Staged fixation of the sink
- Overhead and mortise sinks: how to install correctly
- How to make and assemble with your own hands?
- Tools and materials
- Mounting
- Installation
- Sealant selection
- Types of products and installation methods
- Conclusions and useful video on the topic
- Conclusion
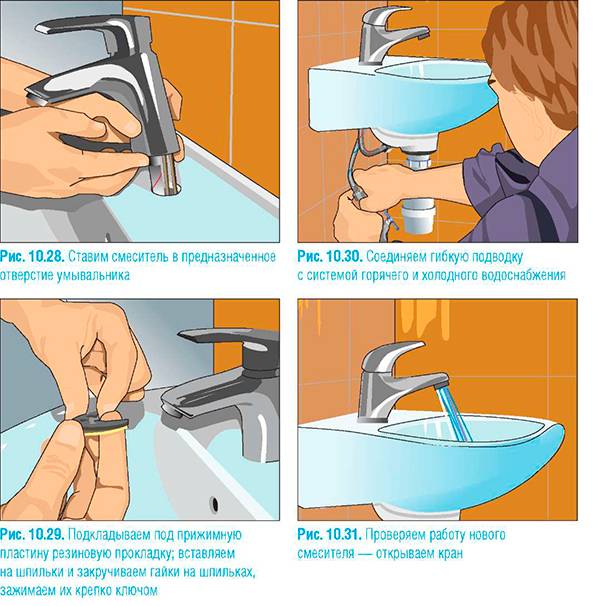
Installation subtleties
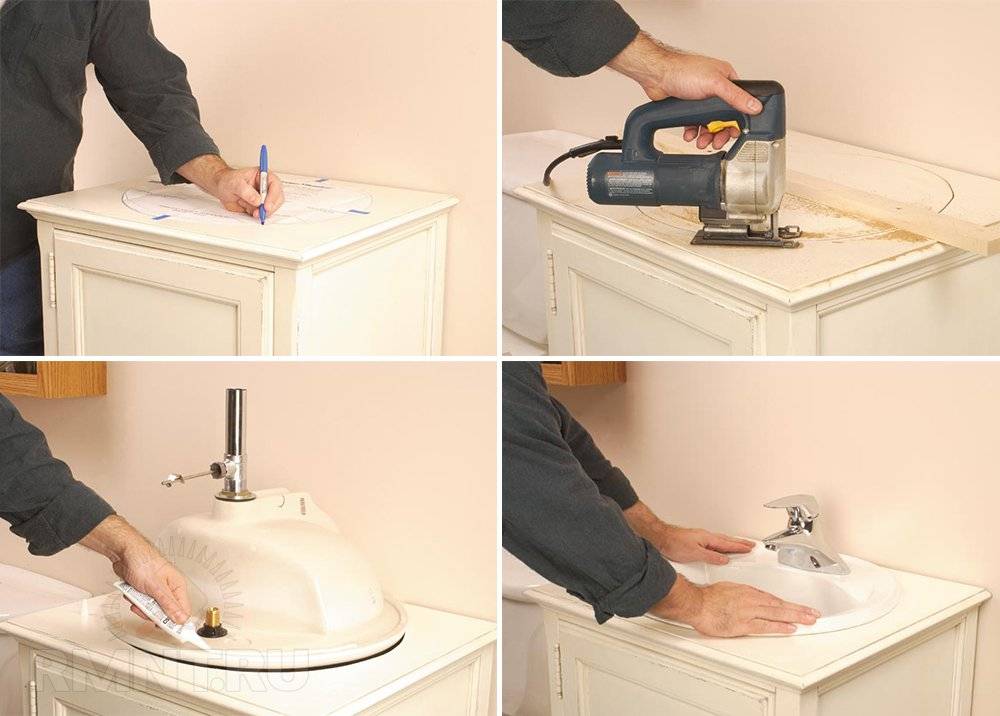
Experts say that installing a mortise sink is a more complicated process. Usually, the kit always comes with a cardboard template that shows exactly what hole to cut in the countertop. If not, then you will have to use the design itself. To begin with, the template is placed on the surface, using a pencil, outline its contours. First you need to tightly fix the cardboard with tape.
After the template is outlined for the first time, you should step back one or one and a half centimeters and re-draw the outline of the template. It is the second line that is used when working with a jigsaw. Then a drill is used in the work, with its help a connector for a jigsaw is made. The drill must have exactly the same parameters as the tool itself.
Following the jigsaw, sandpaper is included in the process.With its help, you need to clean the surface well and completely get rid of sawdust. When the hole is cut out, the sink is tried on.
Manufacturers overview
Ready-made floor cabinets under the sink are represented by many manufacturers. There is a choice of world and domestic brands, economy class options and luxury furniture. It is worth considering in more detail some manufacturers.
The Swedish concern IKEA is rightfully one of the most sought after in the world. His kitchen furniture is made according to the frameless principle of facade formation - only high-quality MDF is used for them. The sink cabinet of various monotonous colors - gray, white, beige, light purple, in combination with the rest of the set will look organically in a single monolithic image. The furniture covering is made of environmentally friendly veneer, which is easy to clean and is not subject to harmful effects.
Another great feature of IKEA sink cabinets is the pull-out system, thanks to which doors and drawers open and close completely in one motion. Facades are attached to dowels and ties, the structures are as strong as possible. All furniture is presented on plastic legs that can withstand loads up to 120 kg. Various models allow you to use them even in the smallest kitchens.
At the moment, there are 4 main IKEA lines for the kitchen:
- youth;
- Provence;
- modern style;
- Scandinavian style.
The combination of reliability and fashionable style is familiar to many who have never even purchased products from this Swedish manufacturer.
Leroy Merlin kitchen furniture is represented by economy class items, despite the relatively low cost, you can purchase very stylish and original models. There is a choice of bedside tables made of chipboard with a laminate or plastic finish, or more expensive options made of MDF with a PVC finish and natural wood textures.
Headsets from Leroy Merlin of the DELINIA model range have frame facades with arrays of Chinese-made natural veneer. Several design styles are presented, among them: classic, modern, Provence. The colors of furniture from this manufacturer are light and dark brown for various types of wood, as well as various youth ones: green, orange, silver and others.
The Italian brand Zetta has extensive experience in creating high quality kitchen furniture. The manufacturer is famous for its stylish headsets, which are made from environmentally friendly materials using advanced world technologies.
Kitchen cabinets, like other pieces of furniture, are made from several materials:
- laminated chipboard of various textures and colors;
- MDF 19 and 22 mm;
- massifs of ash, oak, linden, birch.
Facades and doors of kitchen sets are finished with enamel, acrylic, PVC, plastic. We use natural veneer from various types of wood and eco-veneer that imitates real wood. The facades of the furniture are framed using stainless steel and aluminum. There are options for doors with tempered figured and painted glass inserts.
Cabinets under the sink Zetta will be reliable and stylish, there is a choice of different designs and styles: cozy Provence, modern classics, modern.Color solutions can be very diverse - from cozy dark wood-like textures to bright youthful colors. The furniture is produced both according to the classical Italian canons, and is designed according to individual orders.
Stolplit is a domestic manufacturer that has long been famous for its original and affordable kitchen sets. High-quality materials are used in the production: natural veneer and eco-veneer, laminated chipboard, MDF. You can choose models of different color ranges, many design options are presented, both ready-made headsets and individual cabinets for various sizes.
Stolplit kitchen furniture is durable and easy to maintain at very friendly prices that are affordable for any family. It is possible to choose items for the interior for every taste. The manufacturer produces sets with hinged doors and frame facades, it is possible to order cabinet furniture according to individual projects.
ZOV kitchens are loved by many domestic buyers for their stylish look and ease of maintenance at relatively low prices. Today it is possible to order various cabinets under the sink made of MDF and chipboard, which will last for many years. At the same time, the finishes and materials are of high quality and harmless.
Different sinks are needed, different sinks are important
Indeed, kitchen sinks are produced in the widest range, from which in a specialized plumbing store "eyes run wide". Kitchen sinks can be divided into at least six categories:
- Sinks hinged, cut-in and laid on. The hinged option is now rare, it is more relevant for communal apartments and government institutions than for modern repairs.But mortise and overhead sinks compete with each other in popularity, their long-term reliability and aesthetic appeal are comparable;
- Sinks made of stainless steel alloys, chrome-plated or nickel-plated, sinks made of natural granite or artificial stoneware, acrylic and even glass (!). However, due to practicality, 90% of all models are made of stainless steel and representative porcelain stoneware;
- Sinks angular and standard, round, oval, square, rectangular and curly. The more intricate the shape of the sink, the more difficult it is to give it impeccable cleanliness and maintain a sparkling shine on a daily basis. After all, the sink is used not for beauty in the living room, but for mundane household needs in the kitchen;
- By design, ordinary single sinks and sinks with two bowls (of the same or different sizes, the same or different shapes, etc.) are distinguished. There are convenient models with an overflow of water from one bowl to another;
- By the location of the mixer - on the wall or on the sink itself (the first option is rare);
- According to the availability of additional options - the ability to install a water filter, outlets for connecting a washing machine, automatic valves for adjusting the drain, additional taps for connecting garden hoses, etc.
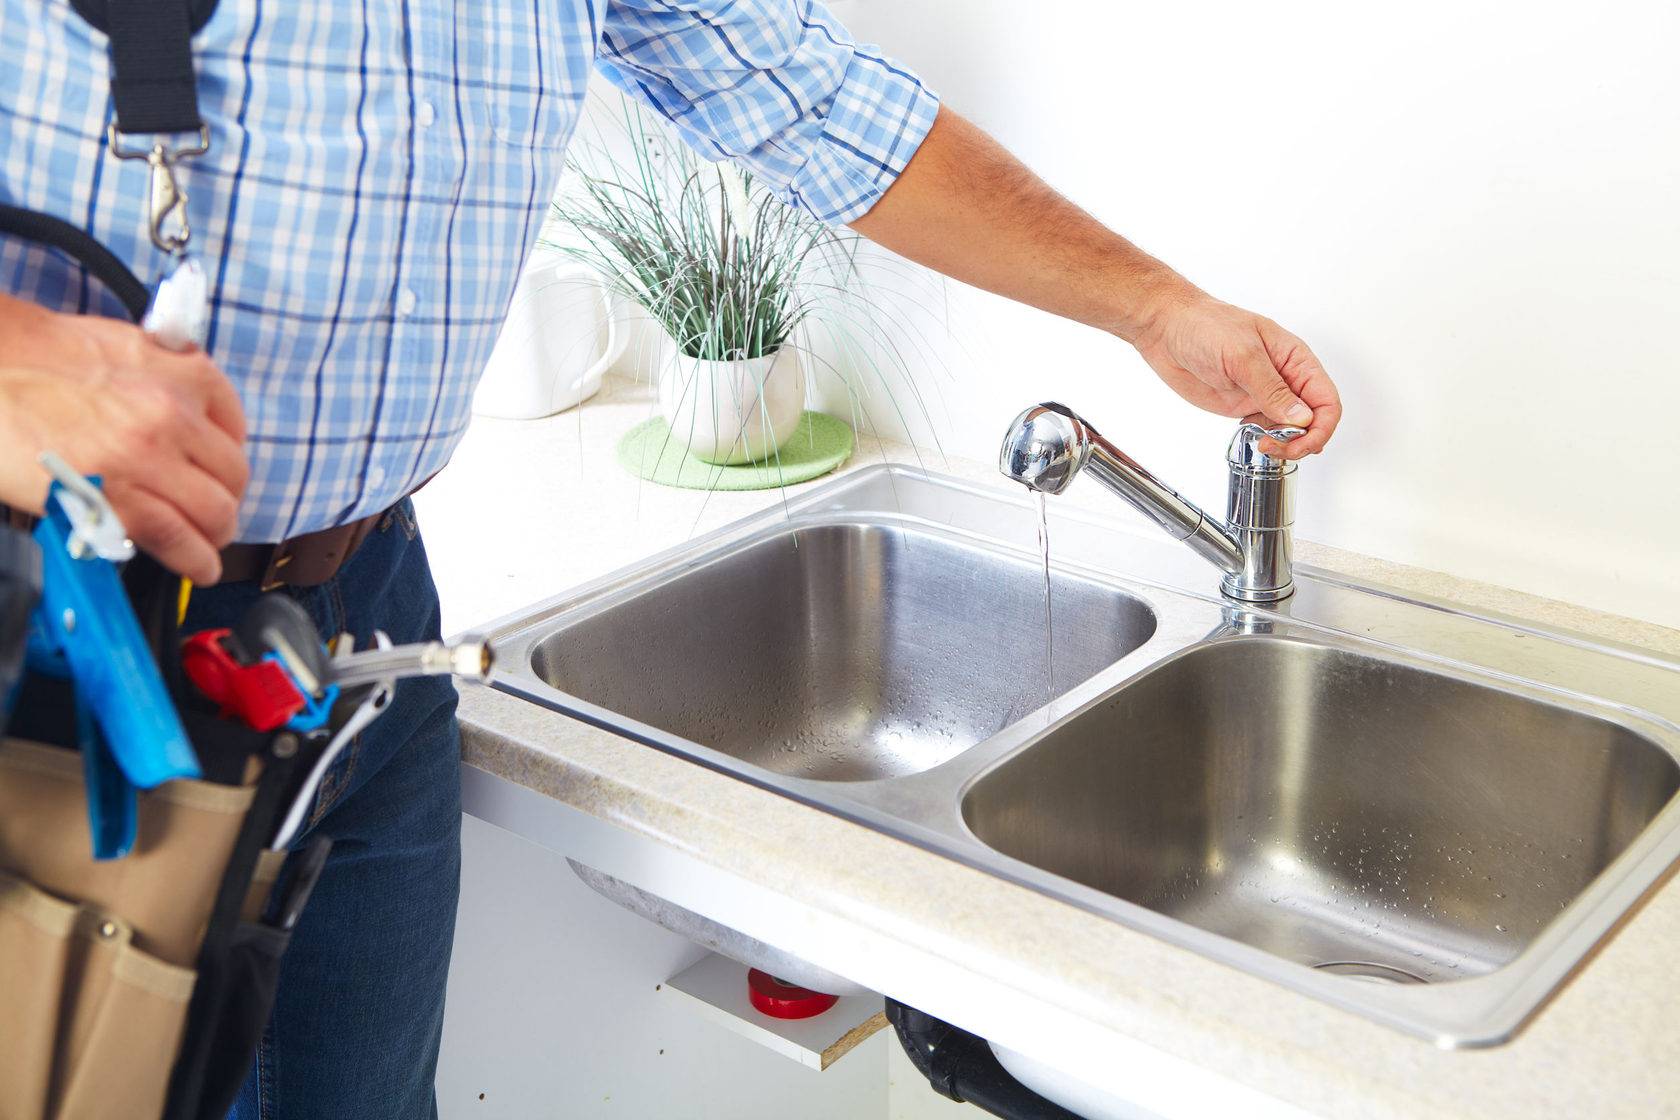
Stainless steel sinks have gained overwhelming popularity due to their affordable price, durable functionality, compatibility with a wide variety of kitchen renovations, and ease of sanitization.
Granite and steel sinks are available in overhead and mortise versions, installing a sink in the kitchen with your own hands is possible for both. However, we must first take care of the furniture basis of our assembly efforts.


Washbasin fixing
To install the sink into the countertop and fix it steadily and securely there, you need to go through two steps.
Creating a landing hole in the countertop
Sink measurements.
Using a drill (10 mm), we make a through hole in the countertop in one place (if we are talking about a round sink), or in several places (in case of a rectangular sink, we make markings in the corners). The hole should be made so that it is as close as possible to the cut line, but in no case touches it. You need to drill from the front surface. Thus, we have a hole (s) for the entry of the file.
Using a jigsaw, clearly along the cut line, we make a closed cut. From time to time we screw self-tapping screws into the slot, they will play the role of temporary fasteners so that the inside of the countertop does not fall down and does not change its position, which could interfere with work. We attach the sink to the cutout, check whether it was done correctly: the sink should enter freely, with a slight backlash. If necessary, we additionally perform hole correction with a jigsaw.

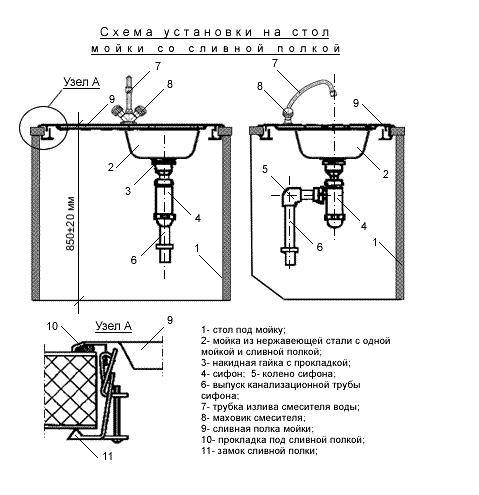
Scheme of installation of a sink.
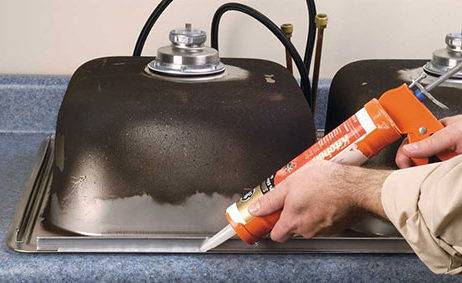
Next, we clean the cut from dust and, using a small rubber spatula, liberally cover its surface with silicone sealant. This is necessary so that in case of water ingress, the countertop does not swell. If chips are formed on the plastic during sawing, it is recommended to lubricate them as well. It is not necessary to apply a thick layer of sealant to the cut.
Along the entire perimeter on the side of the sink we glue a sealant made of foamed polyethylene (sold complete with a sink). If, during the gluing process, the seal protrudes beyond the outer contour of the rim by more than 1 mm, then it should be cut (with a sharp blade or the tip of a mounting knife). If this is not done, then the sink may not be pressed tightly against the countertop. We moisten a clean cloth in acetone or gasoline and degrease the connection line of the sealant and the countertop and the surface of the sealant. We apply sealant to the sealant with an unbreakable strip, the strip should not be thick. In some cases, you can find the installation of a sink without the use of a sealant, where the entire space is filled with sealant. However, such installation is not entirely practical, as it leads to a large consumption of sealant, and an increase in drying time, and in the case of not entirely successful installation, it greatly complicates the process of dismantling the sink.
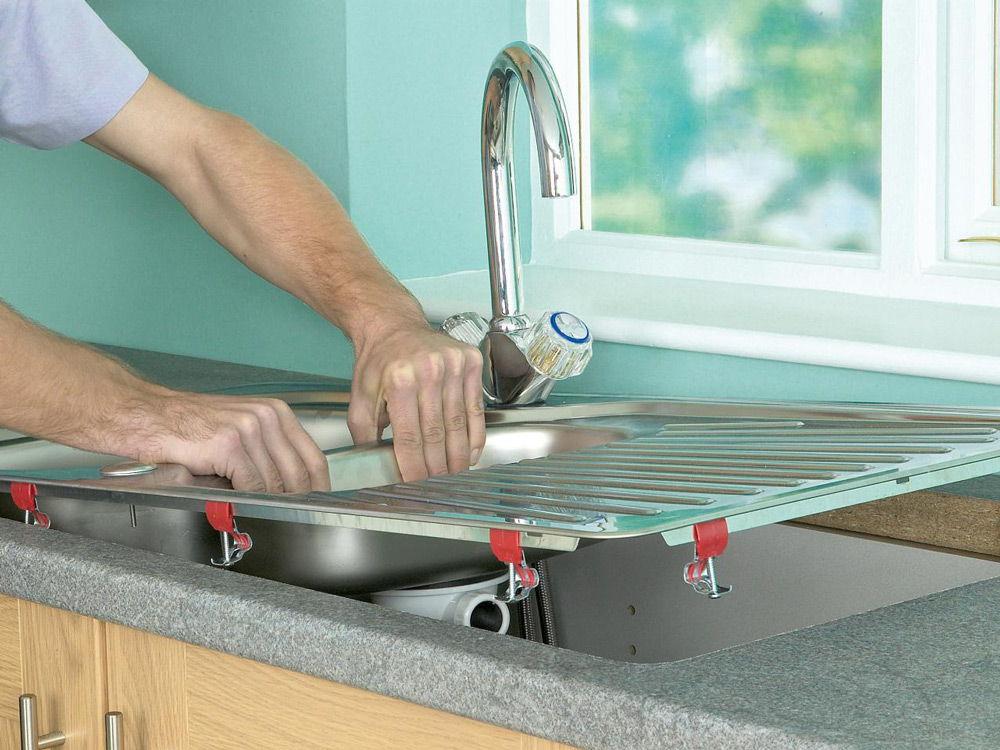
Staged fixation of the sink
Double wash plan.
We put the sink in the hole made in the countertop, carefully align it with the markup (apply the markup so that it is preserved after cutting the countertop).
With the help of 2-4 fasteners, we first fix the sink, periodically monitoring its position on the markings. Installation of fasteners should be carried out at an equal distance from each other, do not tighten the fastener to the end. We install all the fasteners, for this you can turn the countertop face down. We evenly and consistently tighten all the fasteners completely, we do it manually, without resorting to the help of a screwdriver, so as not to strip the threads in the plastic nuts. In order for the spikes of the fasteners to stick well into the countertop, you can process them with a file.
Next, the sink is attracted to the countertop by tightening the self-tapping screw. The result is considered positive if the ends of the metal part of the fastener are firmly fixed in the tabletop. Then tighten the fasteners with a screwdriver.
We evaluate the installation: the sink should be firmly pressed against the surface of the countertop around the entire perimeter, it should be installed according to the marking lines. An additional confirmation of the snug fit of the sink can be the protruding sealant. With a clean cloth, remove excess sealant and markings from the surface of the countertop. Let the sealant harden overnight.
Installing a mortise kitchen sink is a responsible matter. If it is not performed with sufficient quality, then later it can not only quickly disable the countertop during operation, but also pretty spoil the appearance of the kitchen.
Overhead and mortise sinks: how to install correctly
Overhead models are the most convenient and easy to install. Such a sink is usually placed on a cabinet specially made to fit its dimensions (however, the sinks themselves come in virtually any size and are even made to order).

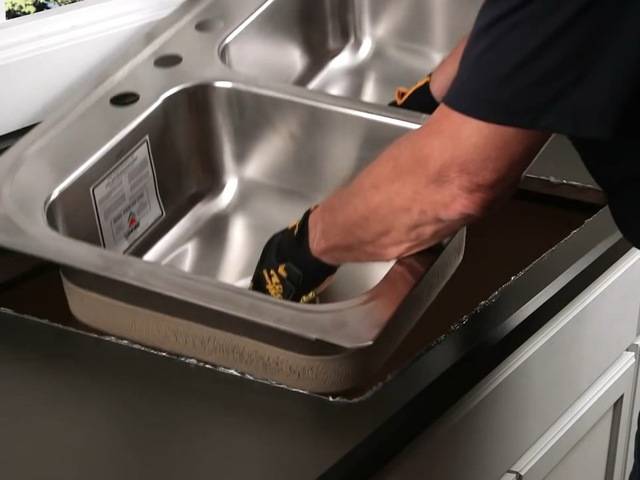

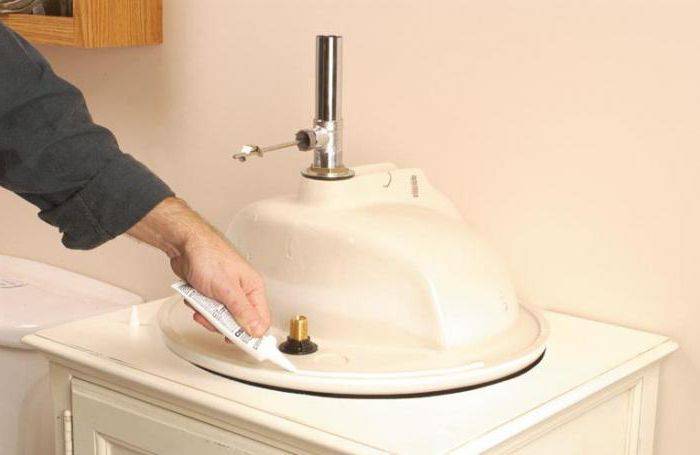
The material of the cabinet (most often it is chipboard) is extremely susceptible to moisture, therefore, in order to extend the life of the countertop or cabinet, it is necessary to pre-treat the ends with sandpaper before installation, and then apply a layer of sealant to them. The latter will not only protect the material from moisture, but also provide a more dense fixation of the sink in its place.
You can fix the overhead sink on the cabinet with the help of corners with holes. Self-tapping screws are screwed into these holes with the help of a screwdriver (or a screwdriver, if you have enough patience), fixing the sink “in the nest”.Excess sealant protruding from under the edges of the sink must be carefully removed.
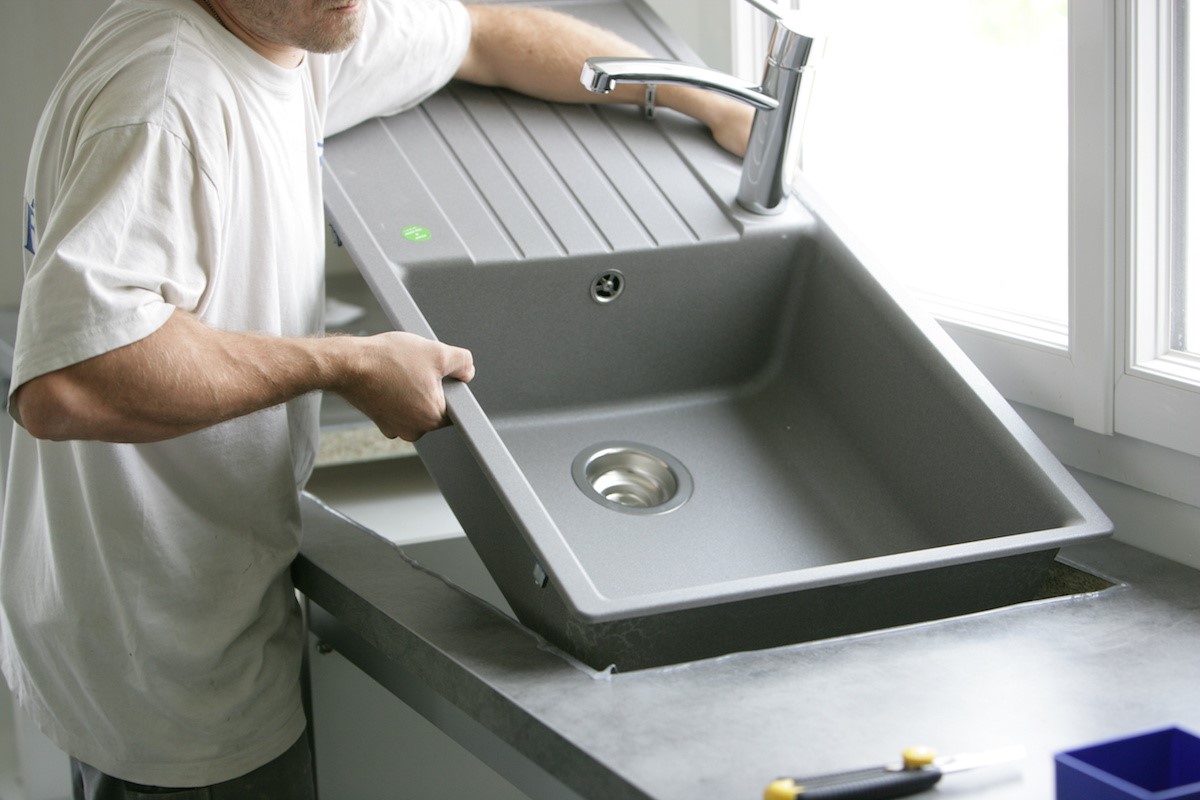
As for mortise sinks, they look a little more impressive than overhead ones, however, they also require more effort from the installer in installation. The first step in the algorithm of actions during the installation of such a sink will be the choice of its installation site.
Remember that too little indentation of the sink insert from the front edge of the countertop can lead to premature breakage. The minimum recommended indents are at least 5 cm from the edge and 2.5 cm from the wall. If the dimensions of the countertop simply do not allow installing the sink further from its edge, it is necessary to fasten the countertop with a wooden block (on the inside) in a vulnerable place.
After the choice of place is over, you can proceed to the markup. Some sinks (especially those with an unusual shape) come with special insert templates. If you find one, you can consider yourself lucky. Apply it to the countertop, circle it with a pencil and proceed to the frame. If there is no template in the kit, you will have to apply the markup yourself.
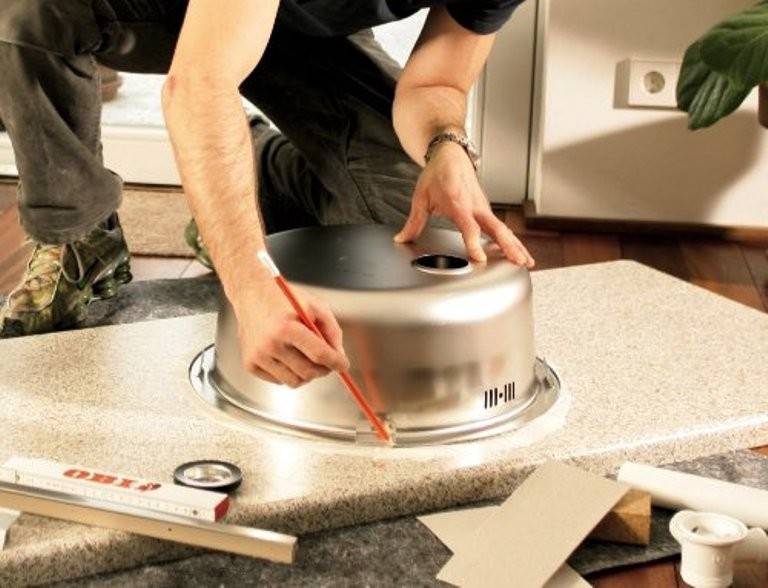
The sink is turned upside down and placed on the countertop. Outline it with a pencil, then measure the length of the side in several places (it can be different), and transfer the measurements to the circle outlined on the tabletop. After that, you can start cutting the hole.
When cutting a hole, do not rush, because too fast a cut forms chips on the edges of the tabletop. In order to minimize their number, the marking contour is sometimes pasted over with masking tape.So that the cut hole does not fall out ahead of time, splitting a good part of the countertop, it must be supported from below. It is more convenient to make a tie-in together, however, if there is no assistant, you can screw self-tapping screws into the resulting slot along the tie-in, which will support the sawn part and prevent the material from clamping the jigsaw file.
After the hole is cut out, it is necessary to check its dimensions by briefly putting the sink in place. If everything is in order, the sink can be removed and proceed to grinding the surfaces. It is best to do this with a special nozzle on a drill, but you can also use sandpaper. The result should be the same - a smooth cut surface without roughness and notches.
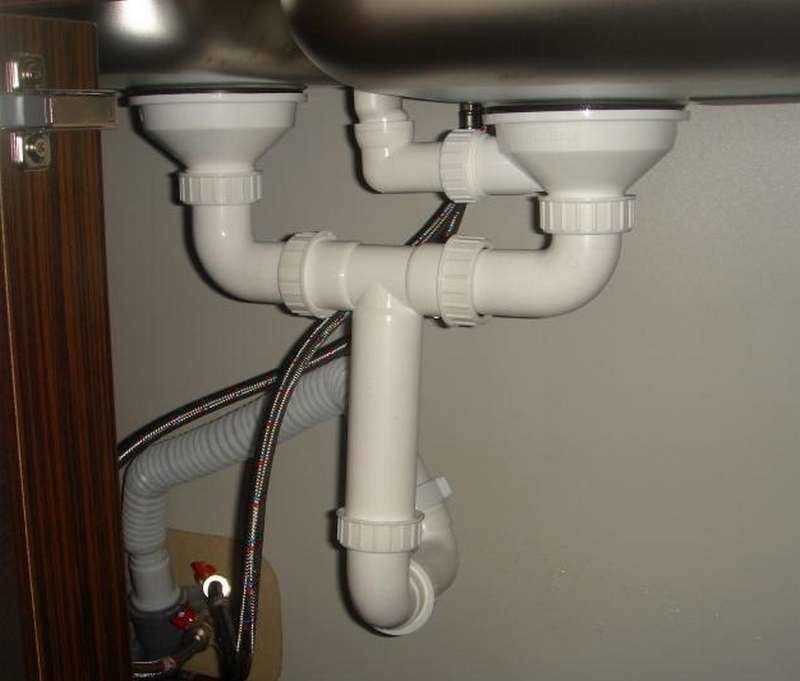
Fixing the mortise sink is carried out according to the same principle as fixing the consignment note. At the stage of fixing, it is better to abandon the screwdriver and work with screwdrivers. The last stage of installation is the assembly of the siphon and the connection of the sink to communications, after which it is checked.
How to make and assemble with your own hands?
The workflow will look like this:
According to the existing scheme, we prepare the necessary details. They are cut from lumber with a jigsaw or saw. If laminated chipboard was chosen as consumables, all edges are trimmed with PVC film. This will prevent the material from swelling during operation.
The assembly of the cabinet begins with the manufacture of the sidewalls. In our case, their dimensions will be 87 by 60 cm. Small rectangles measuring 6 by 11 cm are cut out in front of the bottom of the parts.
Now crossbars are attached to the sidewalls. They are made of plywood, 8 mm thick. The width of the crossbars must be at least 12cm.Since these details will not be visible, there is no need to overprocess and ennoble the details. But for long-term operation, it is better to treat plywood with an antiseptic.
The crossbars are attached to the sidewalls in different ways. They can be fixed with steel furniture corners or screws.
Next, proceed to the installation of the bottom. Its dimensions will be 70 by 50 cm. The bottom is fastened with screws to the crossbars.
Now you can attach the upper crossbars on which the sink will be installed. The first crossbar is located vertically, and is attached so that it does not protrude beyond the cabinet. The rear wall of the pedestal will be attached to this crossbar in the future. The second upper crossbar is placed horizontally.
The next step in the manufacture of cabinets for washing with your own hands will be fixing the back wall. No load will be placed on it, therefore, it can be made from thin plywood or pressed cardboard. It will be much easier to cut holes for communications in these materials than in thick chipboard.
Now you can start assembling the front frame. In the manufacture of shelves and doors, the dimensions indicated in the drawing are taken.
The next step is to install the mortise shelf on rollers.
Next, attach the cabinet doors.
Here, special attention is paid to the loops. They must be of high quality and able to withstand loads.
A good choice would be hinges with closers.
The final step in assembling the sink cabinet is to install the handles.
Tools and materials
Many people do not know what tools and materials are needed in order to properly install a sink. They may differ depending on the sink material.Consider, without which tools it is impossible to install the sink:
- electric jigsaw;
- electric drill with a set of drills;
- pliers;
- screwdriver;
- rubber seals;
- silicone;
- sandpaper;
- square;
- regular pencil;
- ruler;
- scotch.
If you have all the above tools and materials, you can proceed to the preparatory stage that precedes the installation - marking. Proper editing allows you to hold photo and video materials on this topic.


Mounting
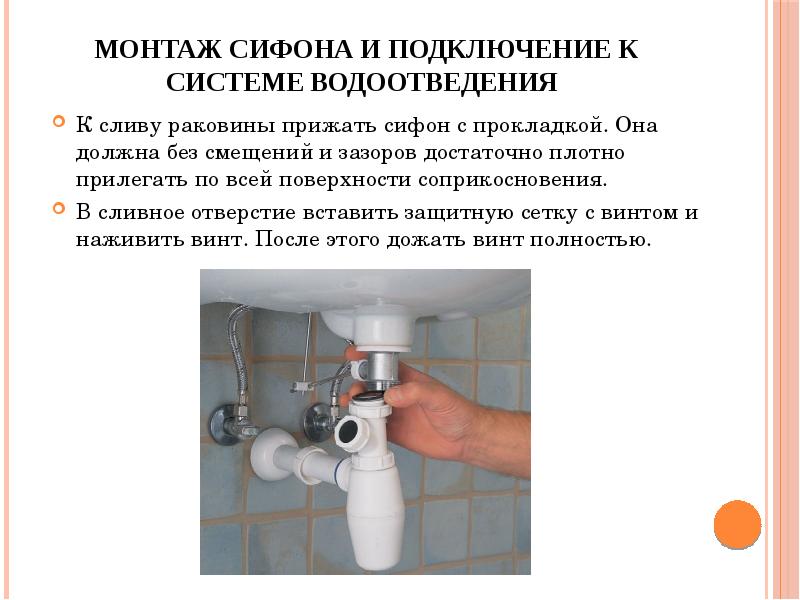
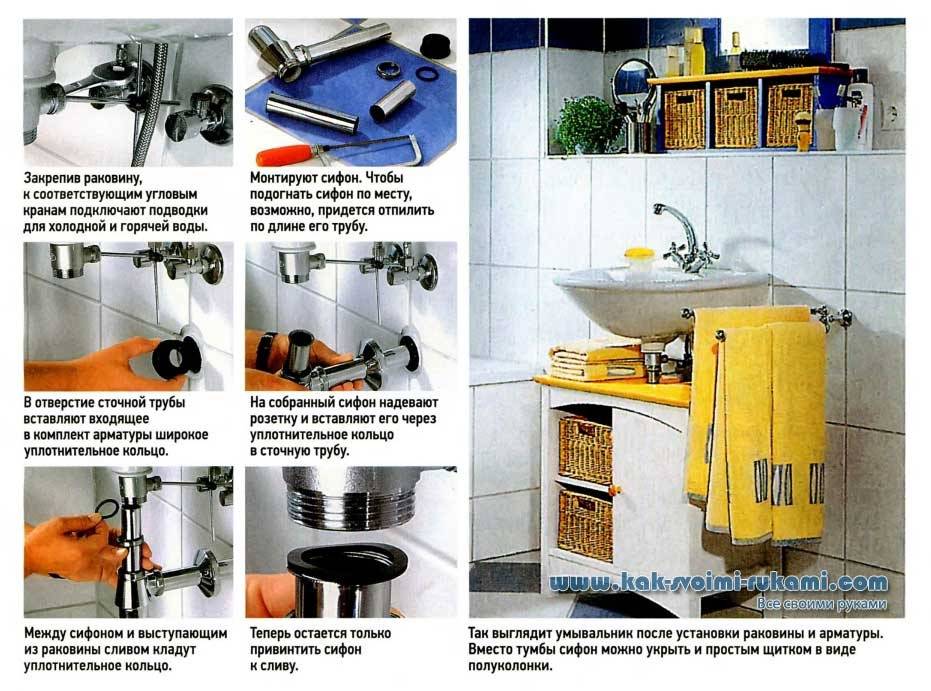
Each owner can screw the siphon with his own hands without involving a plumber. Installation should be carried out very responsibly, paying attention to every detail. Negligent attitude will cause constant leaks or the formation of unpleasant odors in the room due to gaps between the components of the device.
The main requirement during installation work of this type is the tightness of the fasteners.
Therefore, much attention is paid to the quality fastening of components. The gaskets that come with the kit are often either too thin or made of poor quality rubber.
Therefore, it is advisable to purchase third-party gaskets.
Installation
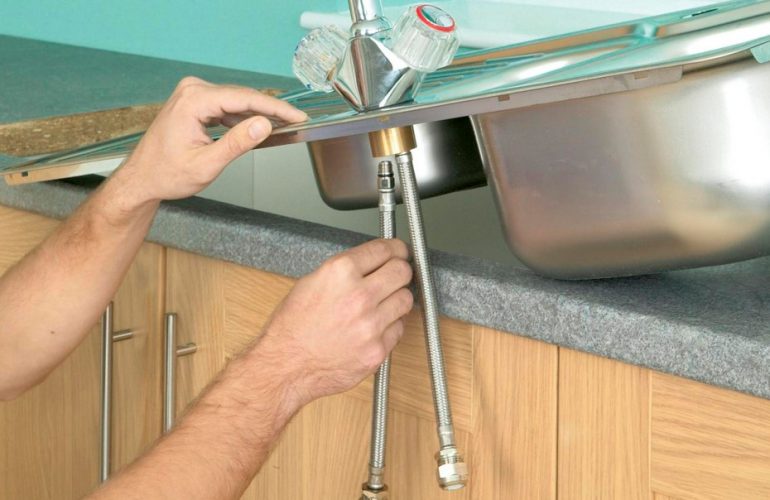
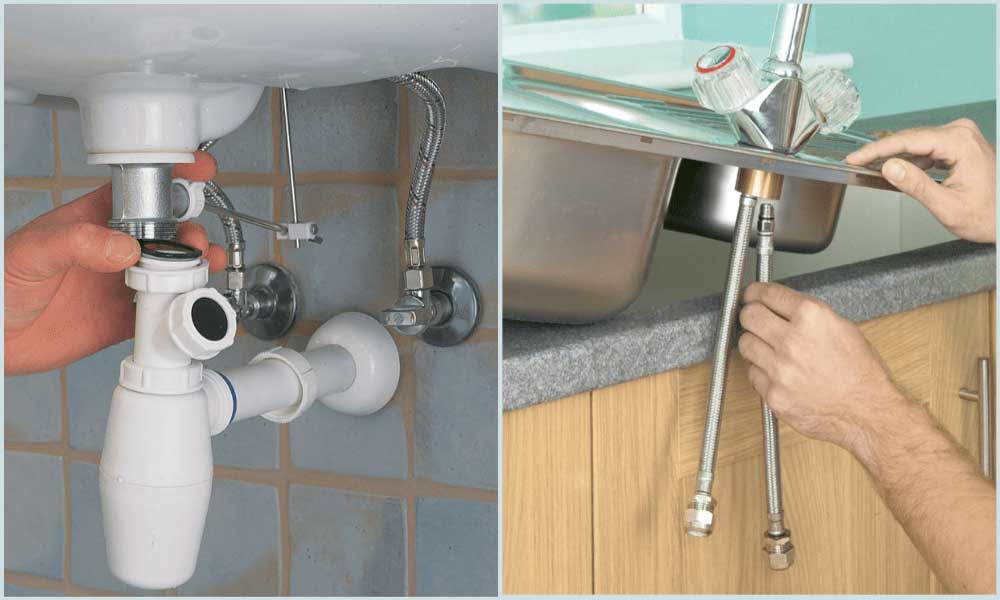
Lay out the tools and accessories in advance so that they are at hand. It is also desirable to decide on a mixer and a siphon so that everything is installed immediately, otherwise it will be difficult to install later. How to attach a stainless steel sink to a cabinet? This is not difficult if the steps to assemble the frame itself have already been completed.
-
L-shaped mounts are installed, both in the kit and purchased separately.
-
Attach fasteners from the inside and mark under them the places where it is necessary to screw in the self-tapping screw.Drill a hole (not a through hole) 0.5 cm higher from the mark, screw in a self-tapping screw and put the mount. Do the same actions in other places of the structure.
-
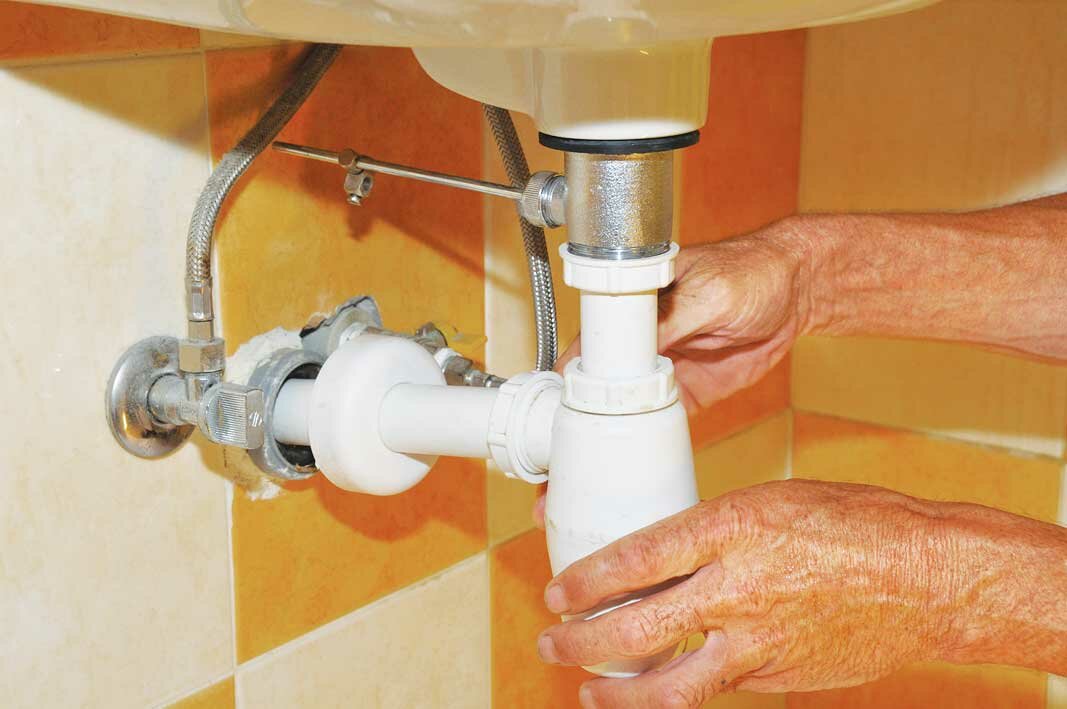
Next, a sanitary ware is assembled, a siphon with all gaskets is attached to it, and a mixer is fixed.
-
Treat the ends of the walls with sealant. It is needed so as not to protect the furniture from moisture.
-
Now you can proceed to fixing - put on a furniture frame, where the fasteners are placed on self-tapping screws.
-
Do plumbing work to connect the water supply and drain in the kitchen.
-
After the attachment of the stainless steel sink to the cabinet is completed, you can check it for leaks. The sink is filled with water. Check if water is leaking from the junction of the sink and siphon.
- Installing doors in the kitchen cabinet is the final stage, which will be the final point in plumbing work.
The sink is attached to the cabinet with fasteners and a hermetic agent. This is the most reliable way, quite durable.
So the question of how to install a stainless steel sink on a cabinet has been resolved. With proper performance of work, it is able to stand for a long time.
Many attach the sink to the countertop. There are options when, when ordering kitchen furniture, the need for a hole in the countertop for installing plumbing is stipulated. Then there will be little work with the installation of the sink.


If there is no specially allocated space on the countertop, then you will have to do everything yourself.
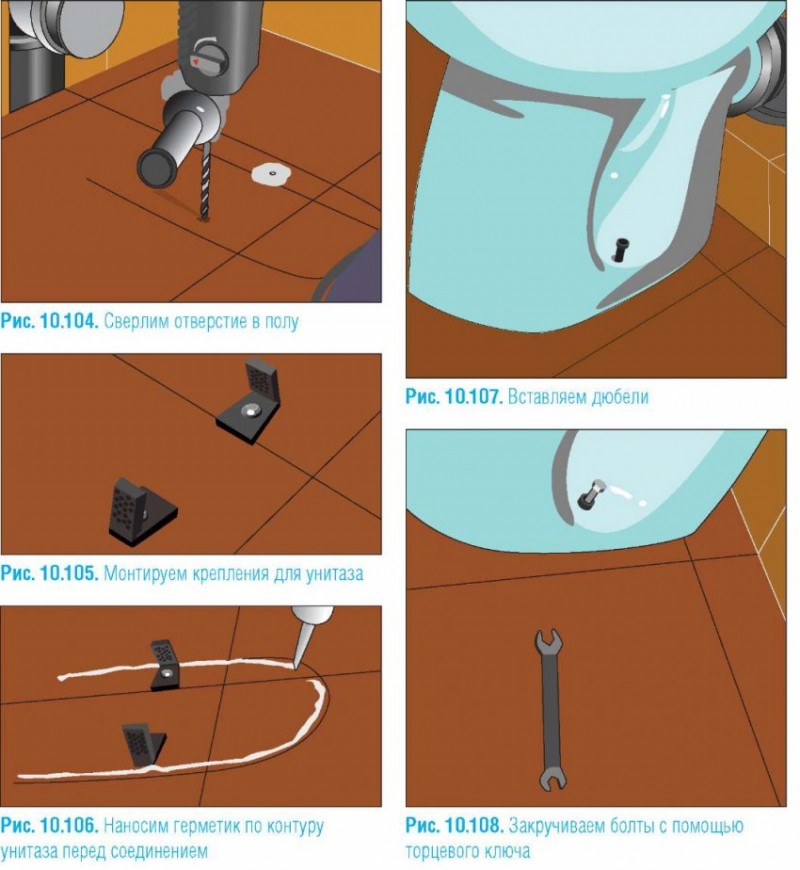
-
Mark the contours on the surface with a pencil. Take into account the margins from the edges (5 cm). Take measurements under the bowl.
-
Make a hole at the corners of the outline.
-
Glue masking tape from the outer side of the contour so that the surface around it is not damaged during work. Before cutting the opening, fix the part to be removed from below so that it does not damage the surface under it when it falls.
-
Treat the ends of the countertop with sealant, assemble the complete plumbing elements (faucet and siphon) and install. This will prevent moisture from getting under the structure, thereby spoiling the appearance of the furniture by deformation and delamination.
-
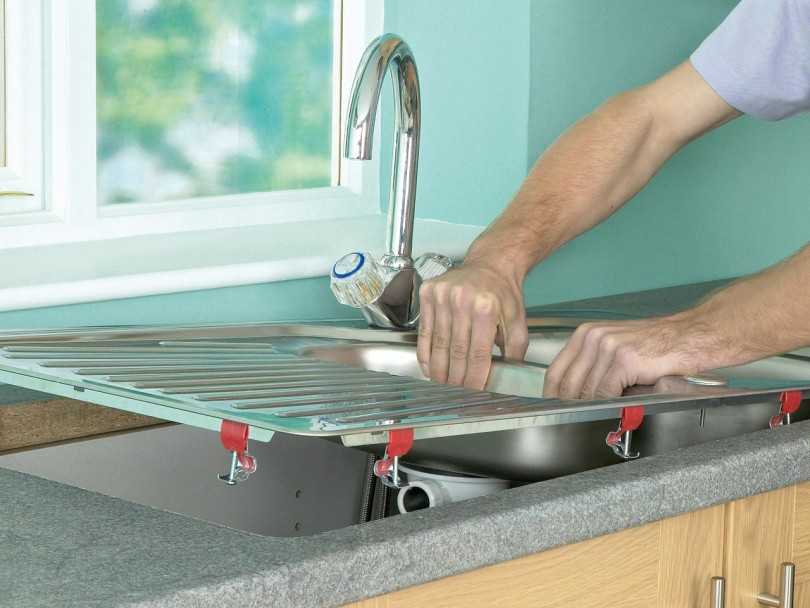
Fix with clamps (included in its package when buying).
So, having considered how to fix a stainless steel sink on a cabinet with fasteners and on a countertop, you can see that doing this is not as difficult as it seems.
The hardest part is getting the hole right. If it turns out to be more than it should be, then the paws will not be able to hold the sink.
Sealant selection
Sealant plays an important role in installation. The building materials market offers several options for this tool:
- acrylic - does not contain harmful substances, great for metal, chipboard and MDF, dries quickly. The main disadvantage is strong shrinkage and rigidity, joints can crack over the years and will let water through;
- polyurethane - suitable for places with high humidity and unstable temperatures, has excellent adhesion to almost all materials. The sealant is elastic, practically does not shrink, but it is better not to use it for MDF, chipboard, plastic. The polyurethane composition is ideal for sinks made of stone, granite, metal;
- silicone - elastic, does not shrink, has excellent adhesion.
Apply any sealant to clean materials to improve adhesion. Without prior preparation, cracks and moisture ingress are possible.
Types of products and installation methods
There are several options for installing a sink in a countertop. The choice of installation method depends on the design features of the sink. The most common types of sinks are:
| Product types | Advantages | Flaws | Installation principle |
| Overhead | Budget price range. Ease of installation. | Small material thickness. Formation of a gap between the countertop and the sink. | The sink is placed on a stand-alone cabinet in such a way that it becomes a continuation of the worktop in the kitchen. |
| Mortise | Ease of use. Practicality and durability. | High price. | Inserting the sink into the countertop, into a specially made hole, provides for fastening with clamps and brackets to the inside of the module. |
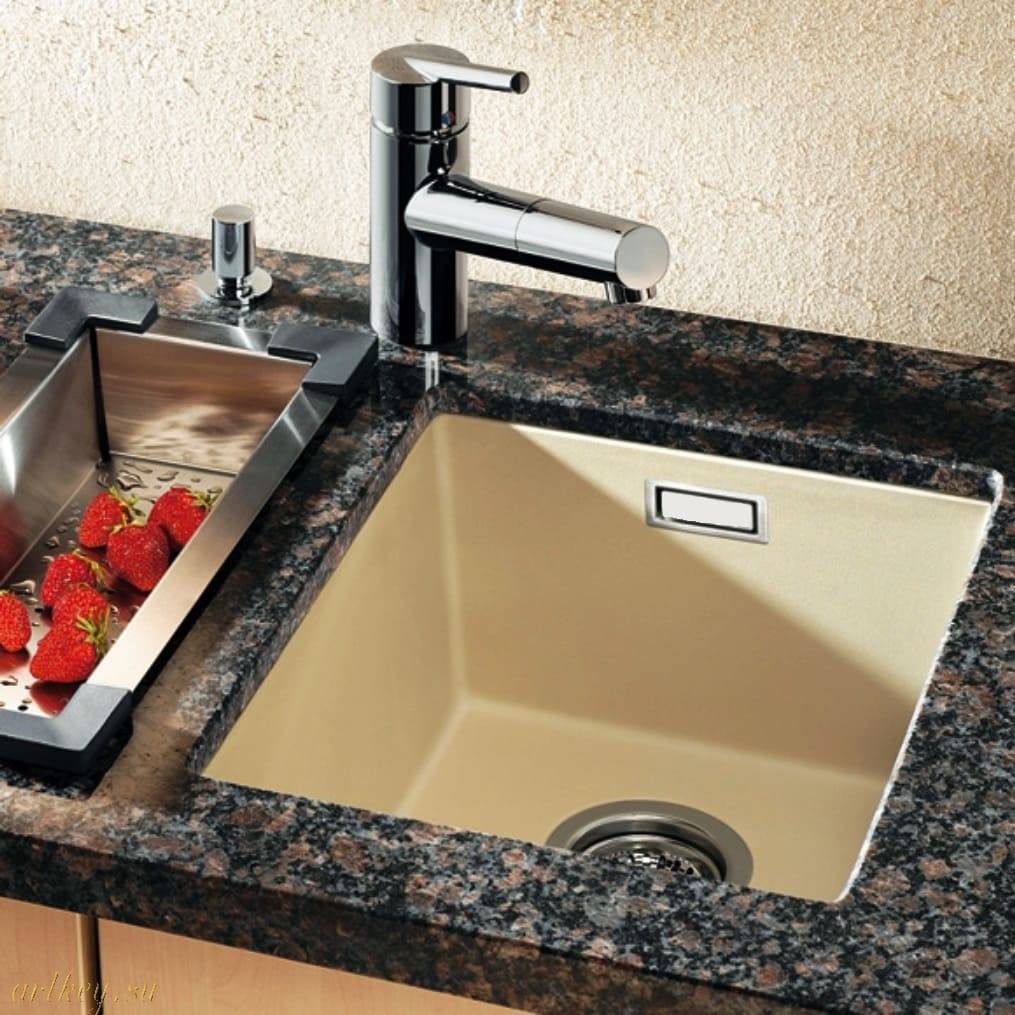
| Underbench | Aesthetic appearance. Noise isolation. Durability due to reliable sealing of joints. | Inaccessibility due to high cost. Not suitable for all countertop materials. | Sinks are mounted in a cut-out hole, but are fixed below the countertop, forming a single whole with it. |
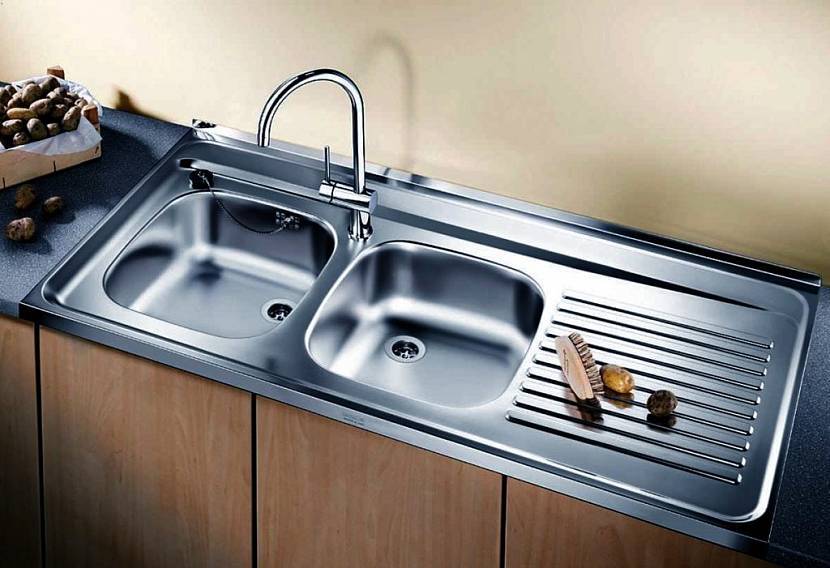
Overhead two-section sink
Kitchen sinks are traditionally made from stainless or enamelled steel, as well as from artificial stone and composite materials, which favorably differ in resistance to external influences and sudden changes in temperature.
Conclusions and useful video on the topic
Videos are a great opportunity to consolidate knowledge about the assembly and installation of siphons, as well as learn how to practice the installation of plumbing equipment on your own, avoiding common mistakes.
Video guide for replacing an old, failed kitchen sink siphon:
Non-standard installation of a siphon connected to a drain hole with a corrugated pipe:


Assembly and tips for proper installation of an inexpensive siphon with overflow:
As you can see, assembling simple models does not take much time and does not require special knowledge. When replacing an old siphon, it takes more effort to dismantle worn-out equipment.
If there are no questions about installing a drain device for a kitchen sink, you can do all the work yourself. To solve more complex problems of connecting the device, it is better to contact a plumber.
Want to talk about your personal experience in installing a siphon under a kitchen sink? Do you have useful information that you would like to share with site visitors? Please write comments in the block form below, express your opinion and post a photo on the topic of the article.
Conclusion
Choosing a sink for your own kitchen is required carefully, considering all the nuances. This applies not only to the materials used in the manufacture, but also to the installation methods.
The sink, which is installed in a kitchen of a certain style, can become not only an integral part, but also a special accent. It will emphasize both the severity of lines and transitions throughout the headset and countertop, and add a little modern style, as is the case with an integrated or undermount sink.
The main thing at the initial stage is to decide on the installation method and the material that will be used in the design of the kitchen, and then such a necessary thing as a sink will also become its main decoration.
Watch this video on YouTube