- Final stage
- Training
- Independent installation of interior doors
- Proper installation of interior doors according to SNiP
- Choosing materials
- Wooden
- artificial materials
- Glass
- Fixing the door frame
- Assembling the door frame
- Precautions, rules of care
- How to replace a door: step by step instructions
- Two-leaf interior doors
- Mounting options
- Preliminary work
- measurements
- Tools and materials
- Main features of the product
- Installation of sliding interior doors
- Canvas installation
Final stage
After the door frame is installed, it is necessary to begin the process of hanging. To do this, fasten the loops. Then put the canvas.

The process is laborious, if you install it yourself, you should ask for help. When working in pairs, someone holds the door, the other fixes the hinges. Before this process, it is worth deciding on the side of opening the doors.

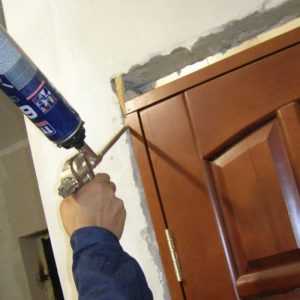
Then use mounting foam to fill the distance between the box and the opening. Thus, you will increase sound insulation, thermal insulation, fill in surface irregularities, hide defects. The advantage of foam is ease of use, a positive effect on the strength of the structure.

For protection purposes, masking tape is used, possibly a film. By using them, the foam will not fall on the surface of the opening. Fresh can be cleaned with alcohol, or a special solvent. The hard consistency of the foam is removed mechanically. This leads to damage to the appearance of the product.

The final touch is the installation of platbands. This element is trimmed at the height level, then trimmed at a 45-degree angle. Attached with glue.

Training
Technological preparation is divided into several steps.
Measurement and preparation of the doorway, pay due attention to the material and quality of the door structure.
A lock and hinges are attached to the model, then the door leaf is assembled, other necessary elements are mounted.
Then they install the doors in the apartment in the right place, connecting the door frame to the canvas.
Use mounting foam to improve the quality of fixation.
Carry out installation of accessories, platbands.
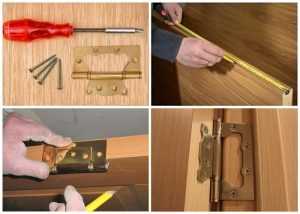
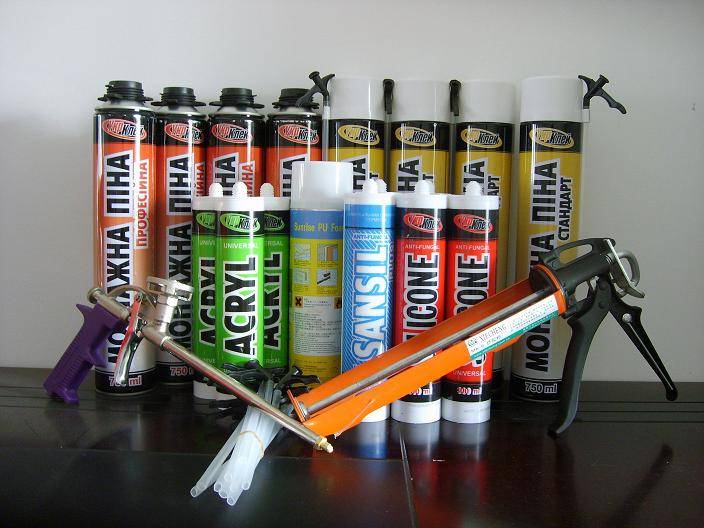
To perform a high-quality procedure, a number of materials will be required:
- prepare nails, dowels;
- mounting foam;
- fittings in the form of handles, locks;
- wedges are necessary for work;
- the box and the door leaf are the base, the basis.

Take a drill, prepare a perforator in advance. The use of a circular or milling machine is encouraged. Take a hammer, tape measure, level, chisel, crowbar. For installation work, you will need to use a screwdriver and a screwdriver, a hacksaw.

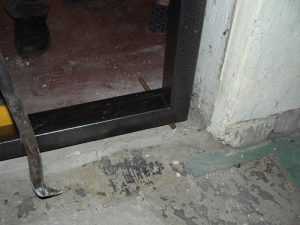
Before the actual technological work, as can be seen in the photo of the door installation, the work surface is prepared. It is necessary to remove the old door structure, if present.

In order not to damage the opening, it is necessary to use a crowbar, removing an unnecessary element with smooth movements. This tool will also be needed when removing the box, filing it. In case the door frame is cemented, use a hammer to remove it.

Independent installation of interior doors
After completing the preparatory work and preparing all the necessary tools, you can begin to install interior doors. Of the tools you will need a hammer, a short rack level and a crowbar. In addition, it is necessary to purchase a cylinder with low-pressure polyurethane foam during polymerization. An example is Macroflex 65 foam. Wood wedges should also be prepared. To date, there is a proven technology on how to install interior doors correctly. You can see the installation process in the video.
![[instruction] installation of interior doors | video](https://fix.housecope.com/wp-content/uploads/d/d/d/ddd5d5baa2aa76dd1194056e1eeb34e8.jpe)


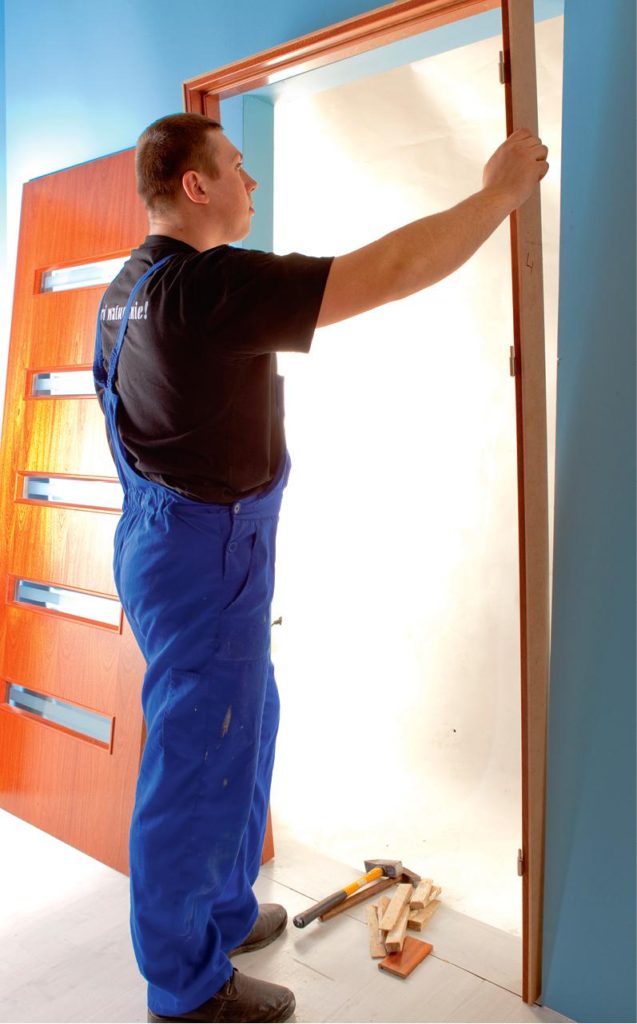
The first step is to put the door block in the opening
During this process, it is important to pay special attention to the side on which the structure is being installed. When installing, it is advisable to be where the door will open. Now you should set the structure in the center of the opening
When moving the door unit to the right or left, it is necessary to ensure the same gaps between the structure and the walls on both sides
Now you should set the structure in the center of the opening. By moving the door block to the right or left, it is necessary to ensure the same gaps between the structure and the walls on both sides.
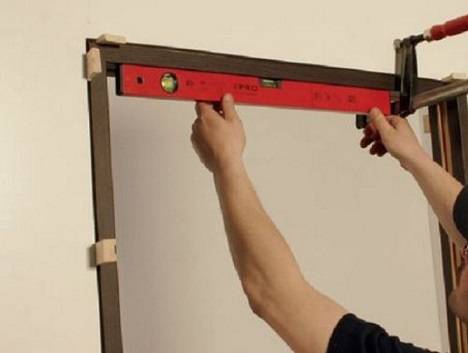
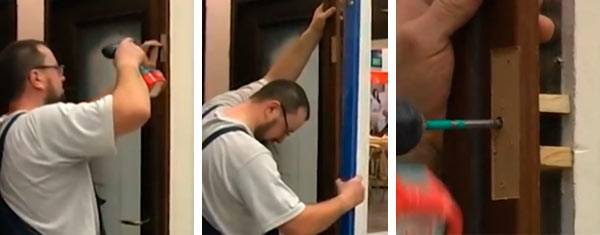
At the next stage, you will need to make sure that the vertical position of the door frame racks is correct. To do this, you can use the rack level. It must be applied from below the upper transverse jumper.If the level is not respected, you will need to use a crowbar, lifting the desired rack with it and placing wooden wedges under it.
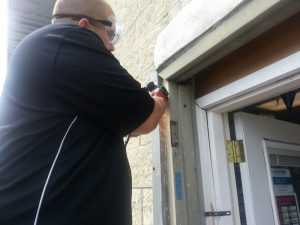
After that, you should fix the door block to the partitions. To do this, it is necessary to drill holes with a diameter of 6 mm in the protruding part of the wooden lintels. Then dowels are hammered into these holes. In the process of fixing the door block, it is necessary from time to time to check the position of the structure relative to the side walls.
After that, the door frame and opening should be wetted with water. This procedure is carried out in order to increase the polymerization of the mounting foam and its adhesion to the walls of the opening. Then you need to once again make sure that the correct position of the door frame is maintained. To do this, use the rack level. In addition, it is necessary to check the presence of gaskets made of cardboard between the door leaf and the boat. If some fell out in the process of performing work, then they must be returned to their place.
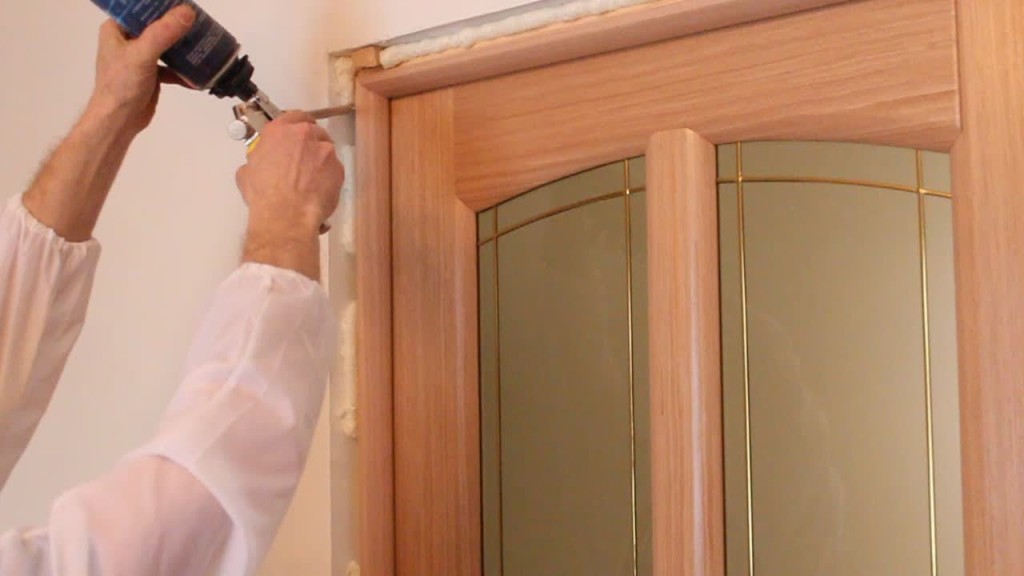
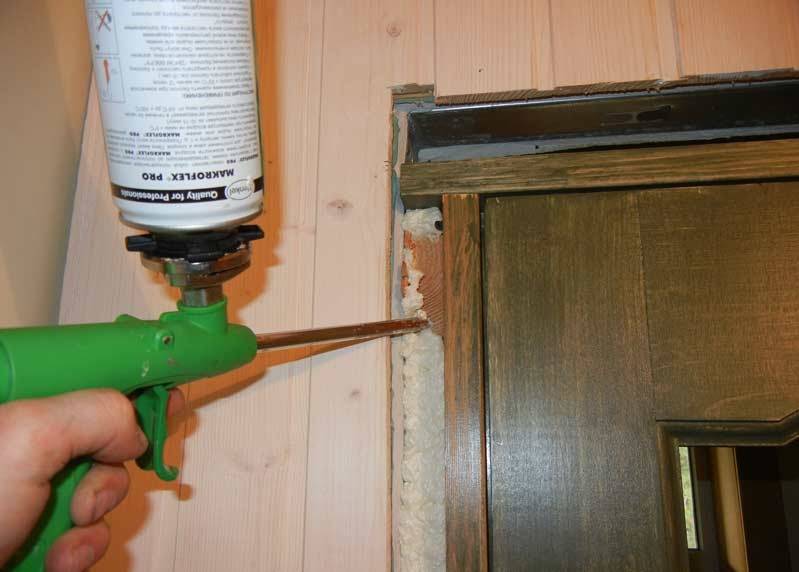
At the next stage, it is necessary to fill the gaps between the door block and partitions using mounting foam. After that, you need to let the foam grab and dry. This will take several hours. As a rule, the polyurethane foam completely hardens in 6-10 hours. By the way, it will be said that polyurethane foam is a poisonous material. To avoid the unpleasant consequences of skin contact with it, you can use protective gloves. In addition, it is necessary to protect the surface of the products with masking tape, pasting the door block around the perimeter with it.
After that, you must remove all aids. Now they are no longer needed.So, with the help of a screwdriver, dowels and self-tapping screws are dismantled, which secure the jumpers in the door frame. Then you need to remove the rails themselves and open the door. Cardboard pads should fall to the floor on their own after the door is opened.
Proper installation of interior doors according to SNiP
Sometimes when installing doors, some people and many craftsmen wonder how to position the opening of an interior door. The question seems to be simple, but in fact, it is not always possible to answer it correctly. To put the door correctly, and so that it opens in the right direction, you need to follow certain recommendations and building codes.
They are as follows:
- If the room or other room (bath, kitchen, toilet) is small in size, then the canvases must open outward.
- There is also another recommendation, the doors should open to where there is more space.
- If the area of \u200b\u200bthe room is large, then the doors, on the contrary, must swing open towards the room.
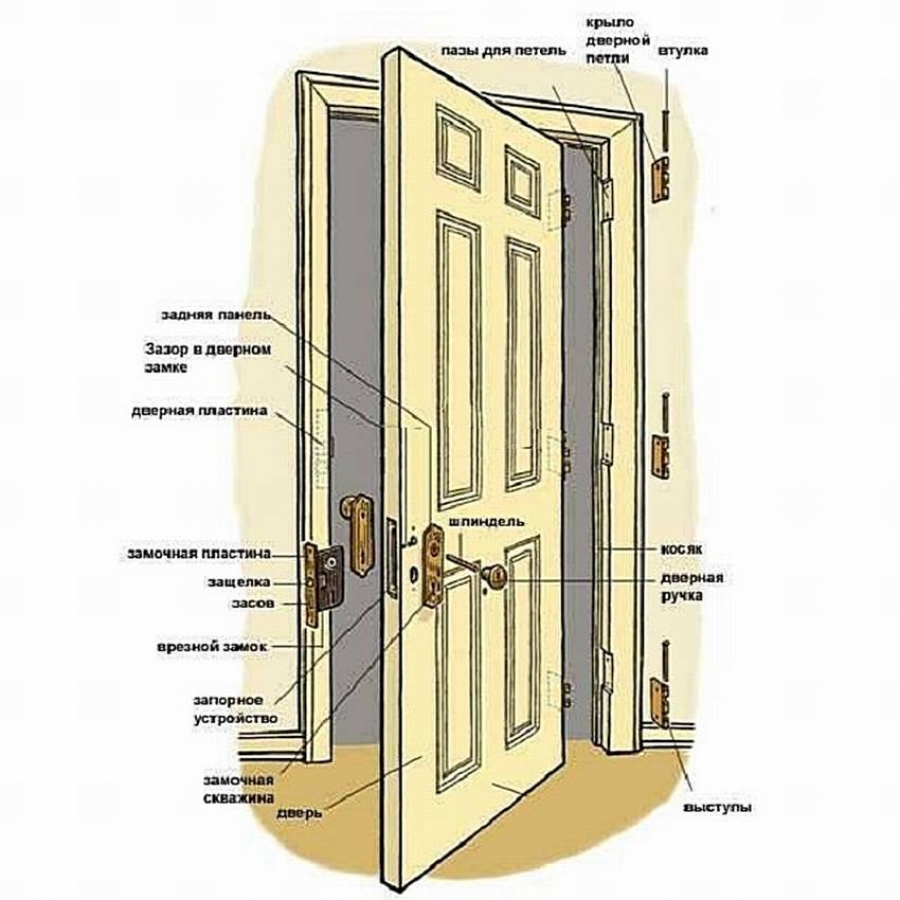
 Before you start installing doors, it is worth checking for the presence of all its components.
When designing houses and premises or in the course of redevelopment, doorways should be placed so that, when opened simultaneously, both doors do not block the passage and do not block each other. If this does not work out in any way, then it is necessary to hang the doors so that one opens in one direction, the other in the other. Opening methods are dictated by the rules of fire safety, as well as the rules for providing emergency assistance. If a person becomes ill, then he will not be able to block the canvas that opens outward.
Due to compliance with the norms and requirements of SNiP, safety is increased when people are in a room, not only in a residential area, but also in any other. Of course, the requirements of SNiP and GOST when installing doors apply to more public buildings than residential ones, but, nevertheless, it is worth adhering to them in residential premises.
Choosing materials

Interior doors
When choosing what material an interior door will be made of for do-it-yourself installation, they are guided by its quality, durability, and also cost.
Wooden
Wooden doors
Wood products are always popular among connoisseurs of natural materials. They are elegant, give the room a prestigious look, harmless to the human body. They are divided into the following categories:


- Expensive. Such models are made mainly to order from solid wood: oak, alder, fine wood veneer. The design is performed classic or non-standard, taking into account the wishes of the customer. For such models, carved decorative elements with trim, complex fittings are used.
- Average price. For this category, pine products that have undergone the processing of “artificial aging” of wood are popular. The technology is called "brushing". Subsequent varnishing will emphasize the natural pattern, as well as give a respectable look to the finish.
- Inexpensive. Pine sections are made, covered with environmentally friendly veneer, varnished or laminated. For veneer, cherry, walnut, ash, alder and other tree species are used. In this series of goods there are quality samples
Wooden structures are sensitive to moisture, prone to drying out, so they are not suitable for rooms with high humidity.
artificial materials

Eco-veneer doors
In this series of goods, the filling of the structure matters. For filling use:
- pine wood blocks
- cellular hollow cardboard
- MDF and chipboard
Of these materials, MDF compares favorably. This is a fibrous material, the structure of which includes natural resins. It is durable, not afraid of moisture, easy to process, does not emit harmful compounds.

MDF
To cover the filling used:
- Laminate. Imitates natural wood. Differs in high decorative and protective properties. Disadvantage - at high humidity or temperature, it emits fumes harmful to humans
- PVC coating. It has excellent design properties, as well as resistance to chemical attack. They produce a film of different colors, the color of which does not change for a long time during operation.
- The veneer is natural. The thinnest cut of natural wood. Unstable to mechanical influences and the environment. Products covered with natural veneer are difficult to distinguish from solid wood
- Ecoveneer. In the manufacture, to bind natural fibers, formaldehyde is used, it releases harmful compounds that are dangerous to a living organism.
Cellular cardboard filler, with external volume, is completely fragile, unreliable, short-lived.
Glass

Glass
Filling the frame with glass is beautiful, stylish and modern. In order for glass inserts to be better combined with the interior, they can be:
- toned with any shade of color
- repaint
- make a mirror surface
- decorate a stained glass pattern or decorate with a metal ornament
- apply any logo
For glazing, glass is used, tempered using a special technology - triplex, so it is completely safe.
Glass doors have a drawback - they have low sound insulation.
How to make a children's house with your own hands: from wood and other materials. Dimensional drawings | (80 Photo Ideas & Videos)
Fixing the door frame
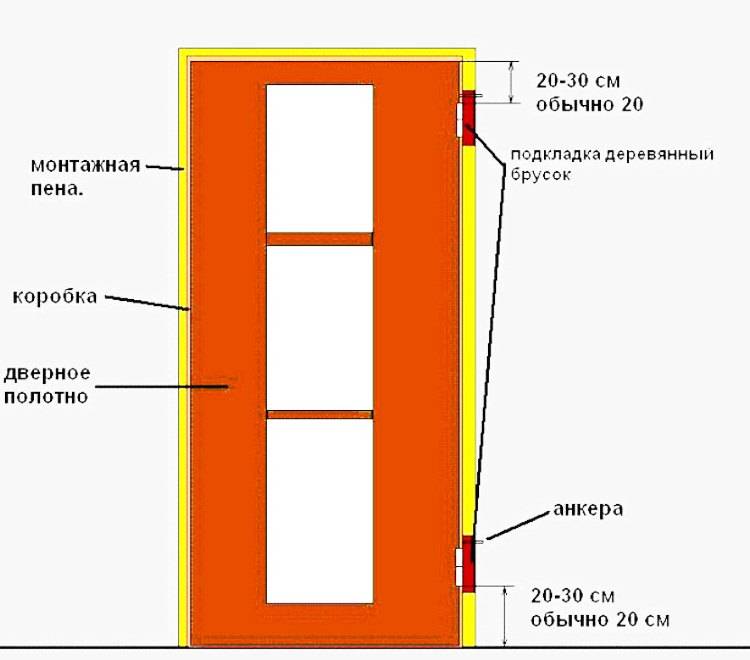
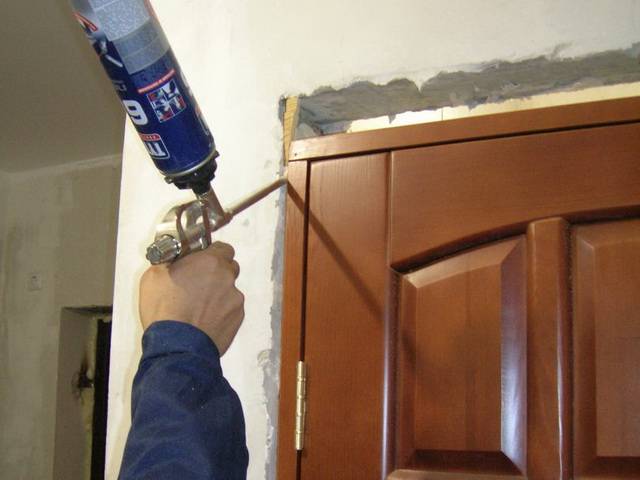
The next step in how to install an interior door is to secure the box. The gap that exists between the opening and the door frame is usually filled with mounting foam. This is done to fix the door block and increase sound and heat insulation. Mounting foam perfectly fills even the smallest defects, cracks and cracks. This material is easy to use and goes well with any type of surface.
Before filling the gap, it is necessary to close the box so that the foam does not get on it. To do this, it can be pasted over with masking or construction tape, or with a film. If a little foam has already got on the surface of the box, then while it is fresh, it can be easily washed off with solvents or alcohol. If the foam has already hardened, then it can be quite difficult to remove it in this state - this is only possible mechanically, which entails inevitable scratches.
One of the properties of foam is that it can expand significantly in size. When applying this must be taken into account. Sometimes it happens that the door frame is simply deformed - this happens to those who do not know how to correctly insert the door frame and interior door. To prevent this from happening, cardboard spacers are usually used. They are installed between vertical racks. Also, thick cardboard can be laid between the closed opening and the box.
Before starting to work with the cylinder, it is recommended to shake its contents well for a minute.In order for the foam to better connect with the surface, it is advised to moisten the opening a little.
To prevent distortions of the box, the foam is applied in two steps. At the first stage, the application is spot-on. Then, after cooling, fill in whatever is left. Excess material is cut off with a sharp knife.
Then it remains only to install the platbands and accessories. To do this, they are cut to the height of the box at an angle of 45 ° for horizontal and universal slats. Fasteners can be carried out on nails or glue.


Here's how to insert an interior or any other door with your own hands. Our detailed instructions will help the home master, and on the video you can see the entire installation process from A to Z.
Assembling the door frame
Well-established technologies for installing interior doors allow us to produce door sets as ready-made door blocks, including complete sets with fasteners, and with blanks for assembling a door block. The first option does not require comments.
Let us consider in detail the second option, when a universal size box is included with the door leaf:
- Let's prepare the place of work - cover it with packing material from the door block so as not to leave scratches on the surfaces.
- Let's determine the direction of opening the doors and, accordingly, orient the top-bottom of the door frame parts.
-
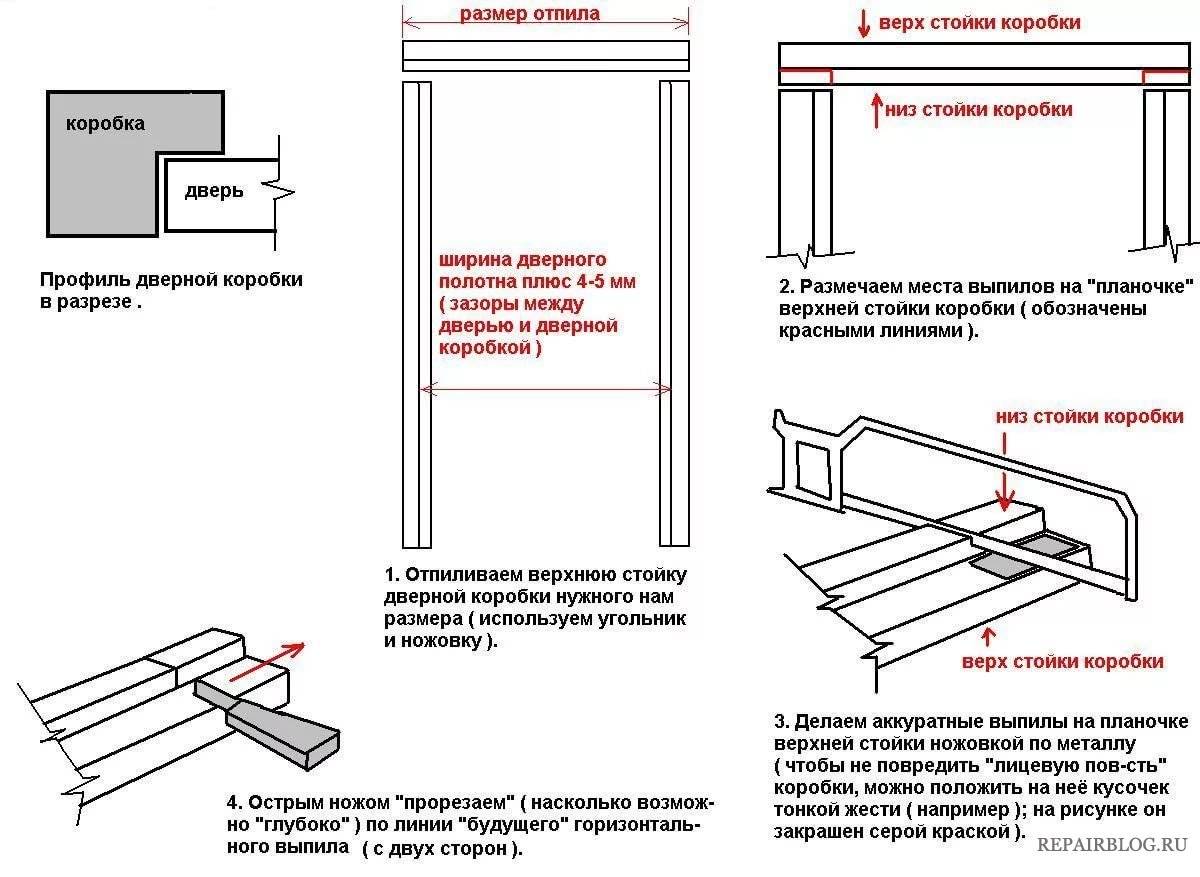
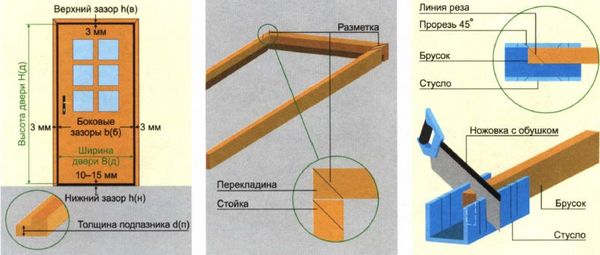
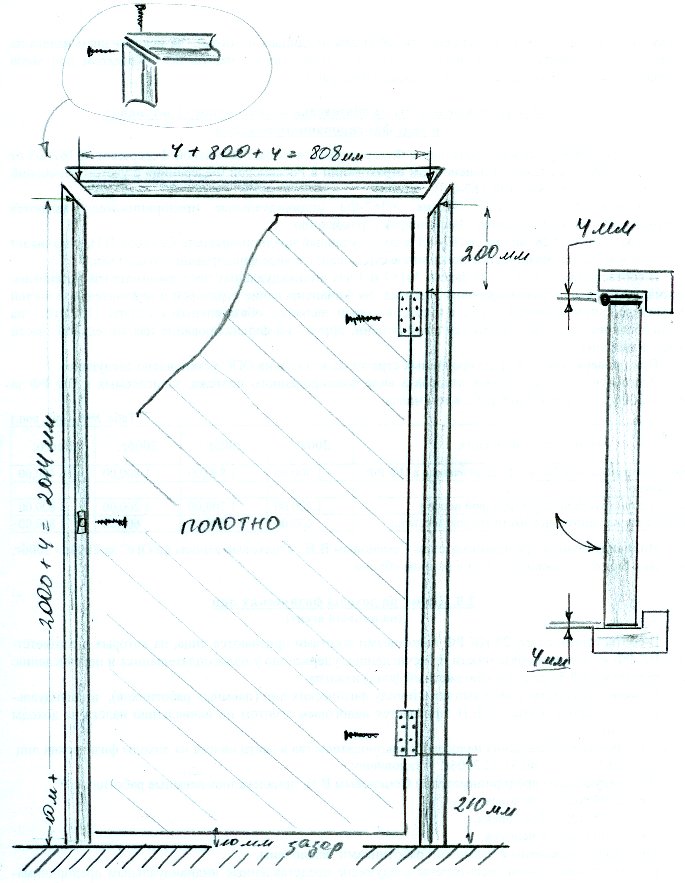
We mark the upper element of the box according to the size of the canvas +7 mm and cut it off with a hacksaw at an angle of 45 degrees, as shown in Figure 1.
-
We lay the short and long elements of the box in accordance with Figure 2. We clamp the joint to be joined with a clamp, we drill holes with a diameter of 2.5 mm.We take out a long element from the clamp and drill a hole up to 4.5 mm (Figure 2).
- On the other hand, we carry out similar actions. We connect the structure with self-tapping screws from the attached kit.
Precautions, rules of care
The key to successful work on the installation of an interior door is the control of all geometric parameters before purchase, the external condition, and the configuration. After payment for the goods, no claims will be accepted.
It is advisable not to allow strong temperature fluctuations inside the rooms. Also, monitor the regular ventilation of the premises - due to the lack of fresh air, there is an increase in humidity, leading to damage to wooden products.
The door should not be thrown open abruptly, with force or in any other way that causes a violation of the integrity of the unit. Although most models have special coatings that prevent wear, you should avoid rough mechanical impact on the canvas, trim, frame.
Regularly clean wooden surfaces with a damp cloth, napkin, cloth. Such a simple way of care will preserve their aesthetic beauty.
Contact of wood with acids, alkalis, solvents, and other chemicals is undesirable. They destroy the integrity of the material.
Obviously, the above step-by-step instructions for installing an interior door make the entire installation process very doable. Following the advice will allow you to competently cope with the task, and timely care for new interior items will preserve their aesthetics and functionality for a long time.
How to replace a door: step by step instructions
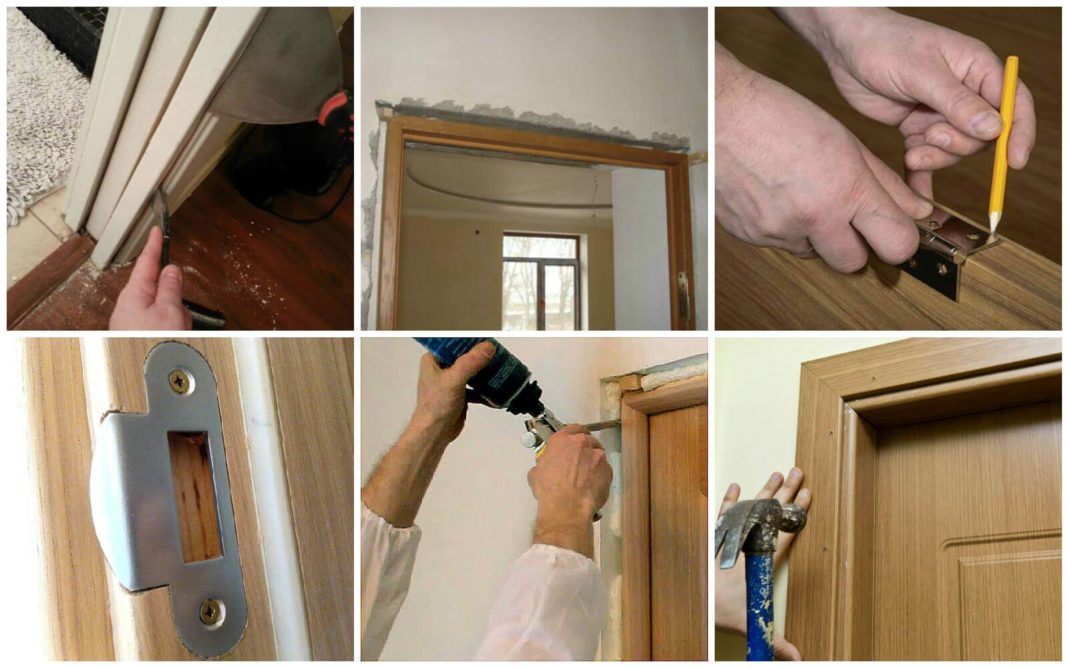
- Remove decorative trim. If the hinges are detachable, then immediately remove the old door from the hinges.Otherwise, unscrew the old screws on one side of the hinge (from the door or frame).
- The door unit can be installed in an existing wall opening. To carefully remove the old box, it can be sawn into pieces.
- Before starting the installation of an interior door, let's try it on in the doorway to check its dimensions and direction of opening. Let's analyze the state of the opening in the wall. Any extra padding must be removed. Before the advent of construction foam, builders often used tow soaked in gypsum mortar to seal gaps.
- If the opening is 2-4 cm wider than the box, then we will install extensions from bars or boards. If it is wider, then you will have to install a false box made of timber or boards.
- Install the door block assembly in the prepared opening and secure it with wooden wedges.
- Let's check the horizontality of the upper lintel and the verticality of the jambs, the gaps and right angles of the door block (Fig. 2).
- We fix the door block using mounting foam. When choosing it, be sure to familiarize yourself with its characteristics. You need to know the coefficient of secondary expansion of the foam: the smaller it is, the better. Remove excess foam after hardening.
- Let's fix the box. If there is a false box made of wood in the opening, then it is enough to use screws. If the opening in the wall is made of concrete, brick or gypsum blocks, we take dowel-nails.
- We install or manufacture a door frame that will close the space between the ceiling and the upper beam of the door frame.
 Drawing: Zh. Zhdanova
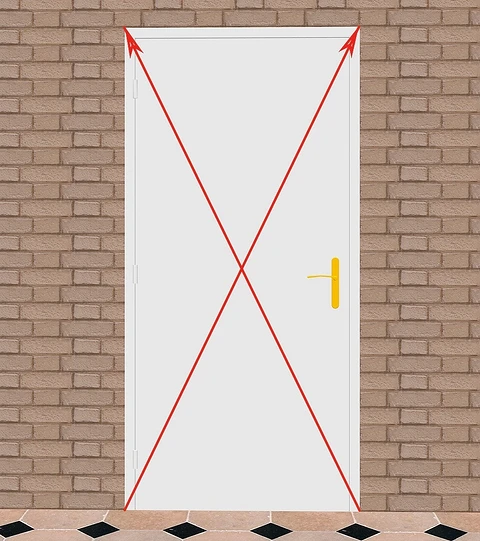
After measuring the diagonals, make sure that A \u003d B, that is, the corners of the opening are straight
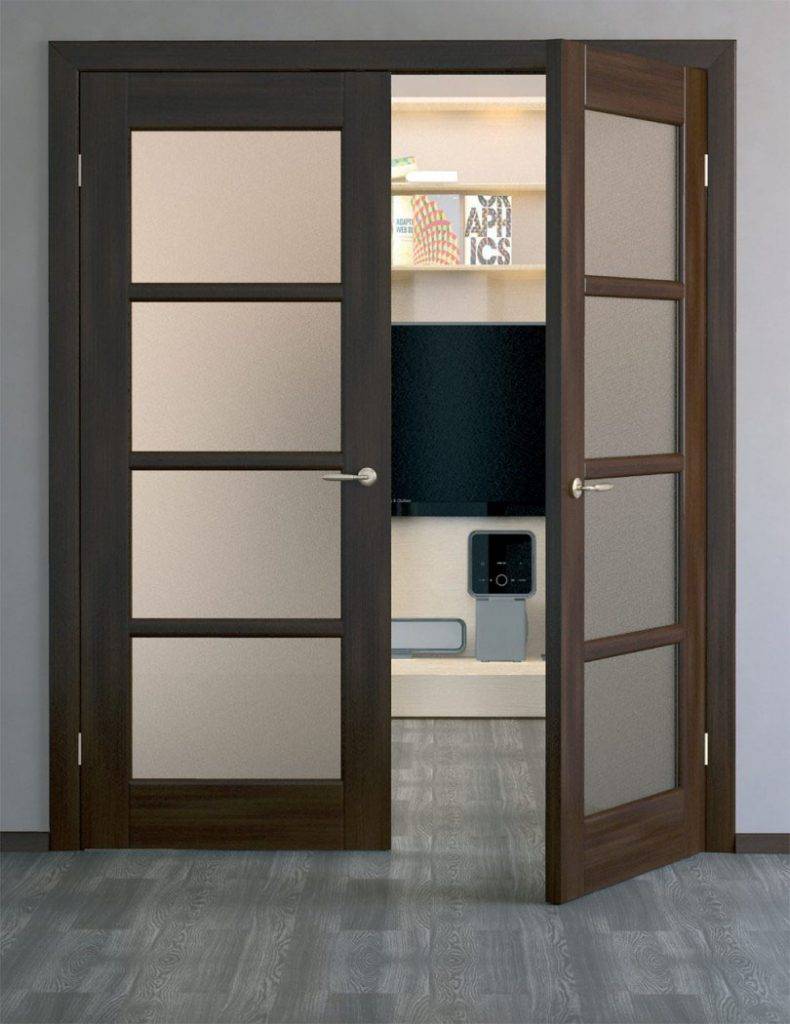
Two-leaf interior doors
In large apartments or houses where there is a lot of space, the owners often prefer double doors between rooms (hinged or sliding). Installation of double doors of any version is also simple, but has its own specifics.
The process of installing double doors consists of the following steps:
- Unpack the kit and determine where the top and bottom are, the glossy side of the door and the matte side. How the sashes will stand in the doorway and where to look. In which of them there will be a handle, and in which bolt. All mark and sign.
- Assemble the box and fit the hinges. There are slight differences between the types of doors. For swing structures, you need to make 2 fragments of a frame beam sawn at 45 ° from scraps of the board (this will be the top plate needed when measuring the location of the loops) and connect it to the side racks.

Set the crossbar (espagnolette) before inserting the loops. On each leaf, cut the hinges into the door itself and into the side post. Remove the fragment made earlier.
- Hang the first door on the hinges, aligning it in level, as with the installation of a single-leaf hinged door. After that, carefully hang the second one, adjusting it in accordance with the first one, mark the place for the second beam and fix it with self-tapping screws.
- After making sure that both sashes are evenly positioned relative to each other, foam the seams. When solidified, the foam increases many times in volume, so it is better to use foam with a low expansion coefficient.
- Before inserting the handles, fix the striker mating plate in the door frame.
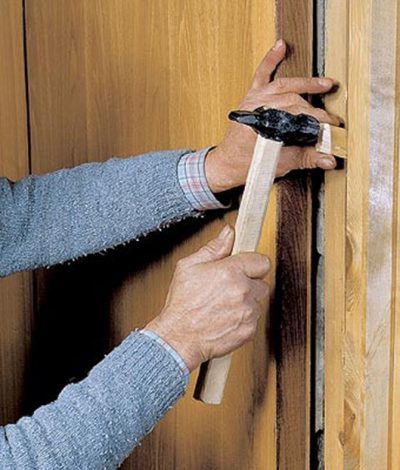
- Nail the flashing (embossed profile rail) with nails, initially smearing it with hot-melt adhesive for greater strength, and install the platbands.
Installing interior doors with your own hands is not difficult
It is important to consistently perform all installation steps
What do you think about this?
we value your opinion
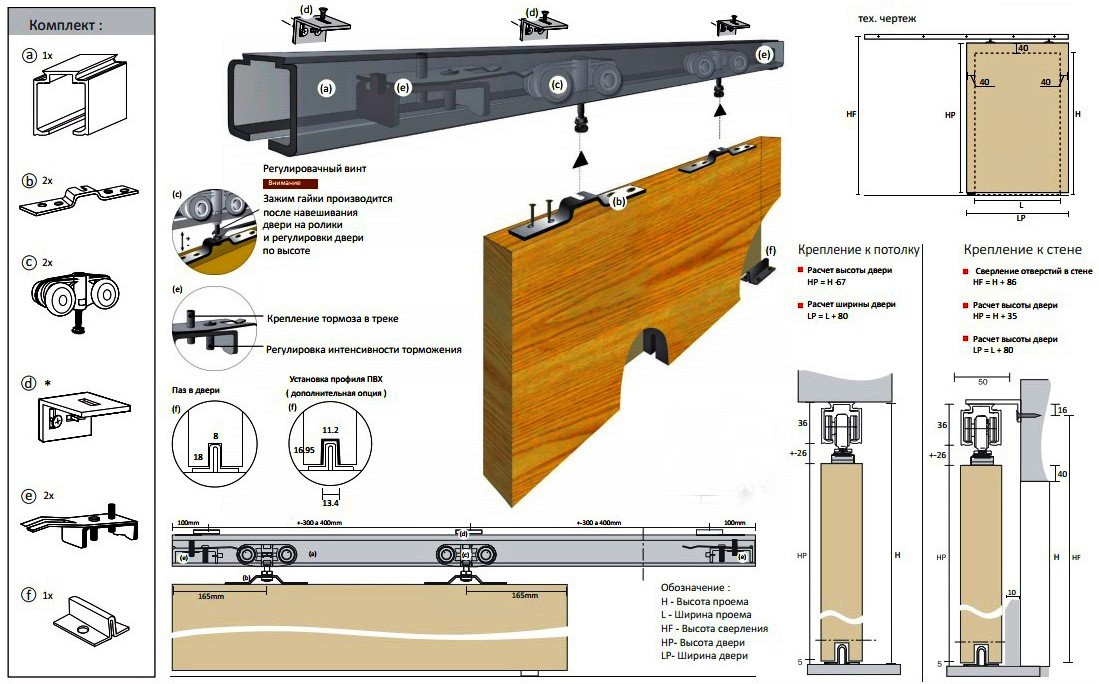
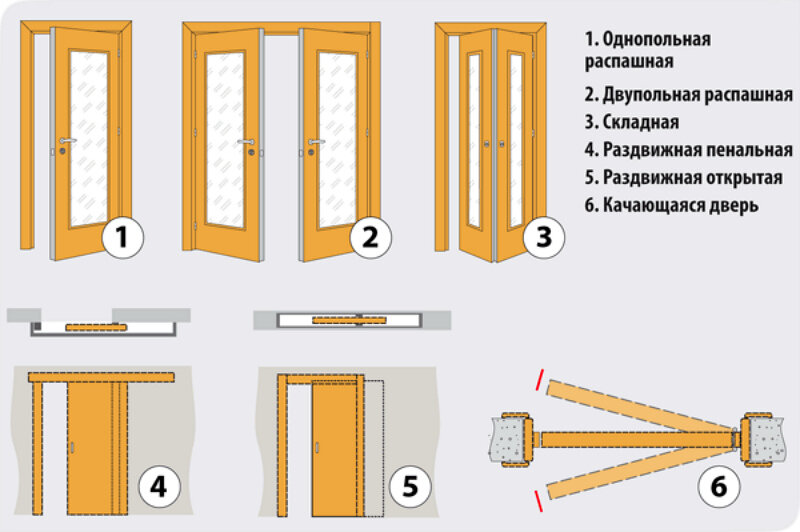
Mounting options
Regardless of the sliding door system, installation methods can be:
-
Sliding doors. Guides are fixed on the wall along which the canvas rolls.
Sliding doors. The guide is mounted on the wall above the correct opening
-
Cassette. A special niche is made in the wall in which the door leaf is hidden. They are also sometimes called! Retractable.
Cassette sliding interior door: the canvas is hidden in a wall niche
-
Cascading. They consist of one fixed canvas and several movable ones. Movable, if necessary, move and hide behind a fixed part.
Cascading sliding doors: one leaf pulls the other
The easiest installation option is compartment doors. They can be installed independently, and not only at the stage of repair, but also after it.
It is only important that the opening is even, and the wall has a normal bearing capacity. The disadvantage of such a system is that you can’t put anything close to the wall in the place where the door rolls back.
There is one more thing: very low sound insulation. It's easy to explain: if you look from the end, there is a gap of several millimeters on the sides. It is necessary so that the canvas does not “shuffle” along the wall. And all sounds perfectly penetrate through it, becoming only a little quieter.


Cassette doors are good because in the open state the leaf is in the niche of the wall and does not interfere. The second plus is that seals can be installed around the perimeter of the opening, which give much higher sound insulation performance. The disadvantage of installing a sliding door in a niche is that it can only be done at the repair stage.The second drawback: to make a pencil case for sliding doors, they usually put a false wall, and this is stolen centimeters of area.
Cascading - one of the varieties of compartment doors. It just has more guides: according to the number of movable door panels. Installation is perhaps the most difficult: a lot of details and high accuracy of installation is required. The systems are classified as elite, and they rarely save on installation: repairs will cost more.
Preliminary work
During construction or repair, one of the last elements of the building are interior doors.
How to install them so that it is beautiful and the design lasts for many years is shown in this instruction:
- during the construction of a new building or during the installation of a new additional partition
- due to the need to replace the existing door
measurements
We need to first prepare an opening for installing the door frame. We are not considering the construction of a new building here - everything is done according to the project and according to the approved technology.
Consider the option - how to install interior doors, if the building is in operation, that is, in your own house, which is much more difficult than in construction according to a finished project.
- We approve the general design - a swing door (see Installation of swing interior doors. How to combine beauty and functionality), in which direction to open, or a sliding door.
- We decide on the design of the door - rectangular or with an oval top, solid or with a glass insert (see photo).Interior doors with stained glass: about beauty and individuality), door color, handles, hinges, coating - we approve for ourselves all the nuances of the overall design and visible structural elements.
-
We approve the size of the doorway (web width). Standard (usual) door sizes are in the range of 70–80 cm. To purchase a door, we will use the table.
- It is necessary to first remove the old door block and evaluate the opening in the wall in terms of its strength (see How to strengthen the doorway).
Not a very complicated science - how to install an interior door - still requires a professional approach.
Tools and materials
To dismantle the old door, you will need (see Dismantling interior doors):
- Phillips screwdriver
- straight screwdriver
- a hammer
- nail puller
To repair a doorway (seal large chips with cement-sand mortar on gypsum or brick partitions), a trowel or trowel may be required. Before applying the solution, it is necessary to drive several nails 70 × 3 half their length into the chipped area into the plaster partition.
To install the door block you will need:
- Drill
- Clamp
- Screws, e.g. 80×5
- A hammer
- Hacksaw
- Chisel
- Screwdriver
- Wedges (wood or plastic)
- Right angle square
- Elbow 45 degrees
- Level or plumb
- Roulette
- Pencil
Main features of the product
Natural wood is the best material. Today, it is additionally treated with impregnations and solutions, which improves performance. Now there is an opportunity to choose natural wood or its analogues, for example, MDF. Often people choose combinations - the product itself is made of wood, and upholstered with MDF panels on top. Expensive breeds look spectacular.These include oak, maple, mahogany.

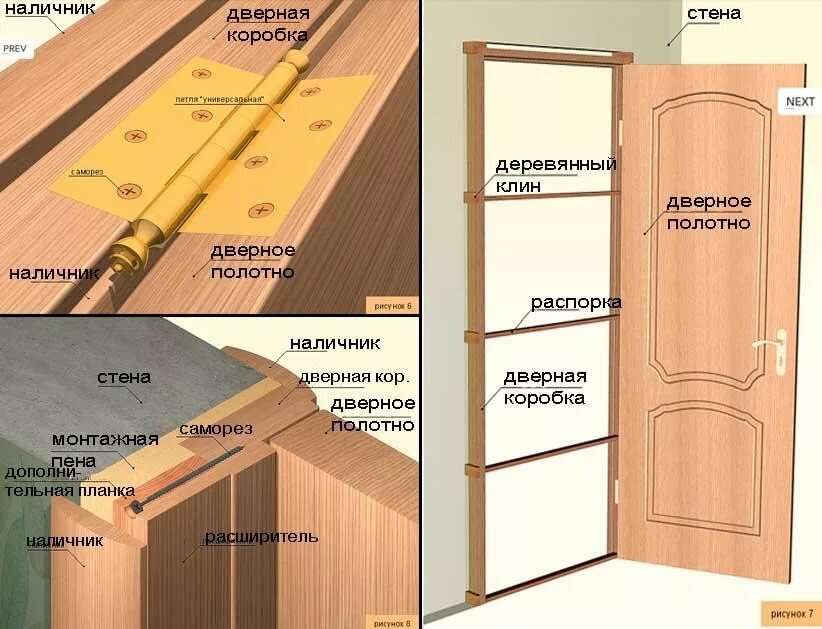
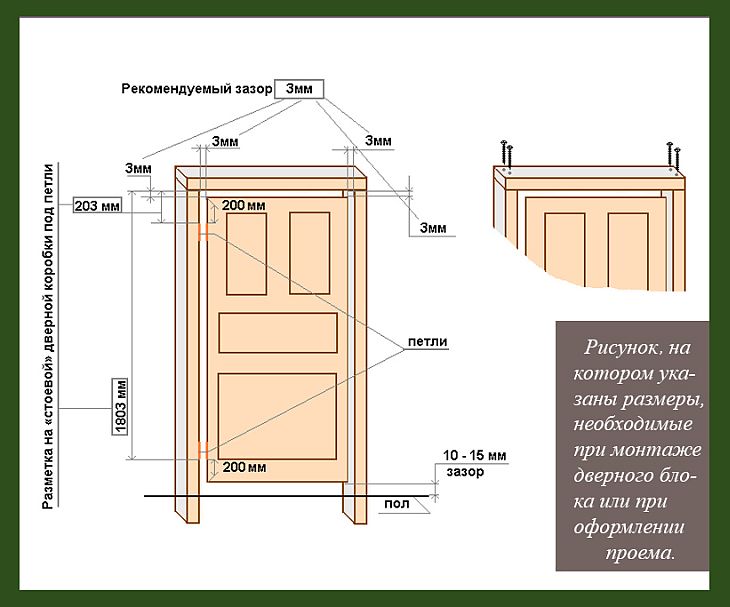
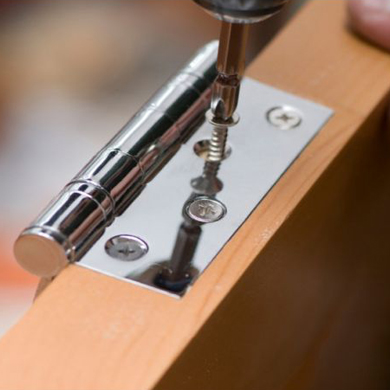
Features of marking the door frame for hinges
Any door designs have features. The first is appearance. Models look spectacular and decorative in most cases
You can pay attention to the color, pattern and decor elements. If you wish, you can do the finishing yourself, creating what you like.
The second point is the strength of the structure. It becomes possible under the condition of high-quality processing. It guarantees durability of service, shock resistance. In other words, installing a solid door with a frame guarantees reliable protection against intruders.
An important feature is the naturalness of the material. This is a serious characteristic, which is forgotten when buying a door. It is this characteristic that determines the safety of operation and environmental friendliness. We can talk about high environmental friendliness only in cases with a door leaf made of natural wood. Its analogues, including MDF, no longer guarantee such a level.
Door frame and door installation
If you are wondering how to install a door, you should know that a wooden structure is used both as an interior door and as an entrance door. The delivered option will definitely fit into the interior due to its versatility.
Installation of sliding interior doors
Recently, not ordinary hinged interior doors are in great demand, but sliding doors (slider), which slide along rails or ride to the side (into the opening, pencil case, wall) on rollers.

They are of two types:
- a sliding accordion door, consisting of small plastic or wooden slats, which, when easily moved, save space;
- a door built into a pencil case or a wall, working according to the wardrobe technology.
Advantages of sliding doors:
- custom design:
- more space in the room for furniture;
- safety;
- do not open spontaneously in drafts.


The disadvantages include:
- poor noise and sound insulation, as well as the penetration of odors, but this is not difficult to eliminate by installing a felt gasket on the pediment;
- the difficulty in repairing it and in caring for the surface where the door moves;
- the high cost of installation, but if the installation of sliding interior doors is done by hand, then the costs are practically no higher than when setting up swing doors.
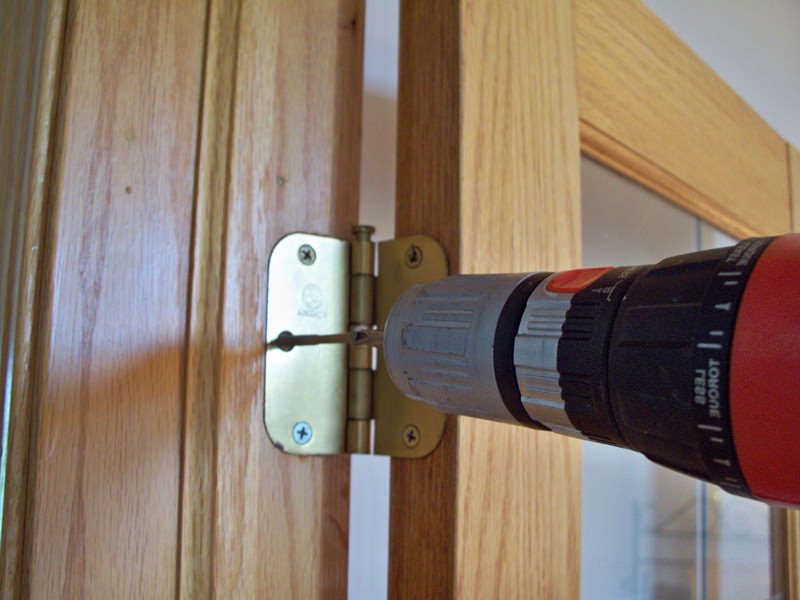
Canvas installation
When the box is level and fixed, it's time to move on to installing the door leaf. First, hinges are screwed onto the door. Most often, detachable hinges are offered for interior doors, which have a rod that can be removed or fixed in a hinge. One-piece hinges are also sold, but they are practically not used now.
If loops with a embedded rod are used, then everything is very simple - the canvas is easily put on and removed from the box. To do this, you just need to gently lift the door to a small height.
If it does not rise (and on some door models this is really not easy to do), then a one-piece type of hinges and a removable rod are used. To mount these types of hinges, they are also fixed with screws on the box, and then screwed to the door leaf. If the rod can be pulled out of the hinge, then it is simply removed, and the canvas is removed.
When the hinges are installed, you can proceed to hanging the canvas. It is better to perform this operation not on your own, but with someone's help.One person will hold the canvas, the second will install the one-piece hinges or direct the canvas into place (if the hinge is collapsible).


