- Mounting racks and hinges - step by step instructions
- Manufacturing
- Wood
- Concrete
- Door sills
- Dobors and platbands
- What you need to install an interior door
- Required Tools
- What cutters are needed to install interior doors
- Box saw
- Preparing an opening for installing an interior door
- Height
- Width
- Thickness (or depth) of the opening
- Sliding door design
- What are door frames?
- Mechanism
- Dismantling of interior doors
- Benefits of using interior doors without a threshold
- Do-it-yourself door installation - let's evaluate the front of the upcoming work
- Sliding door installation
- How to remove door panel
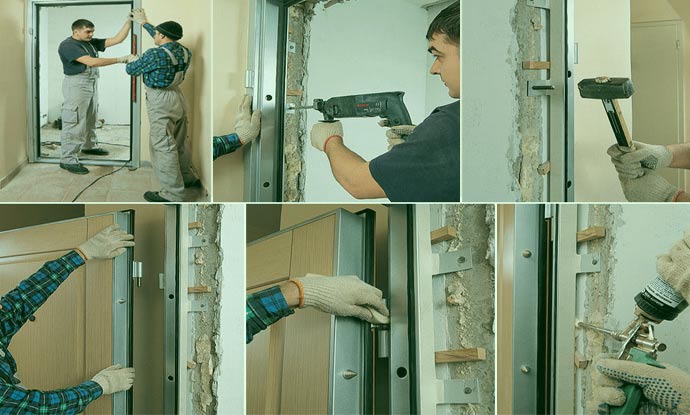
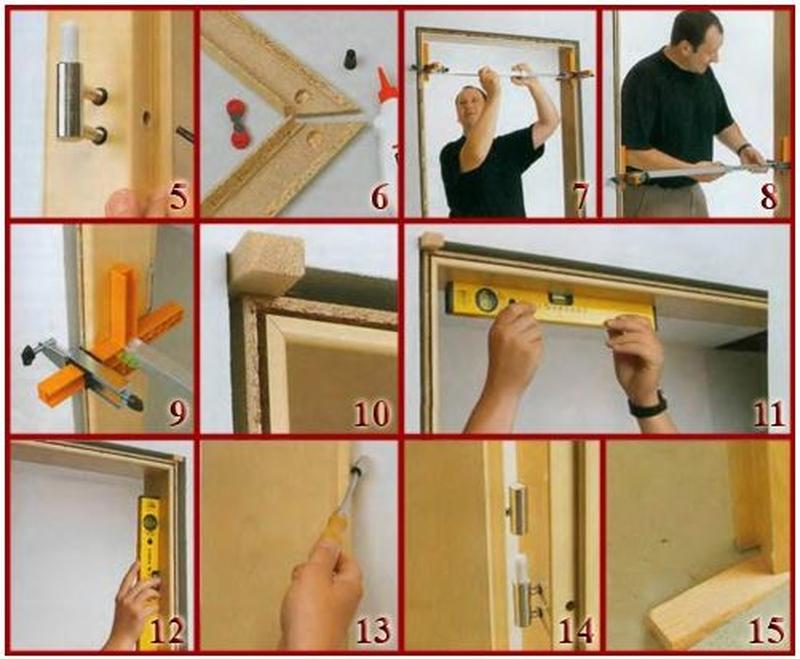
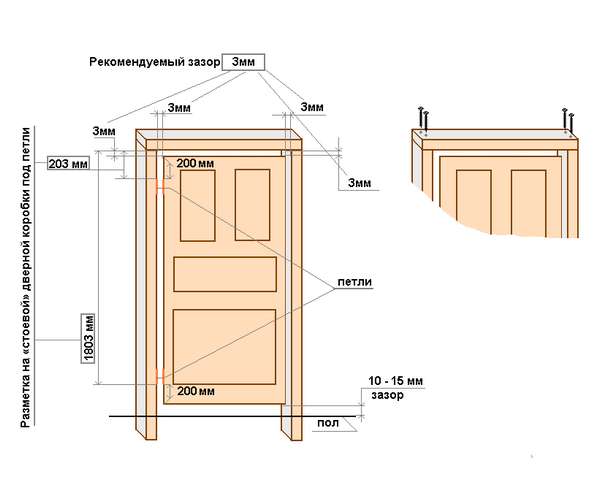
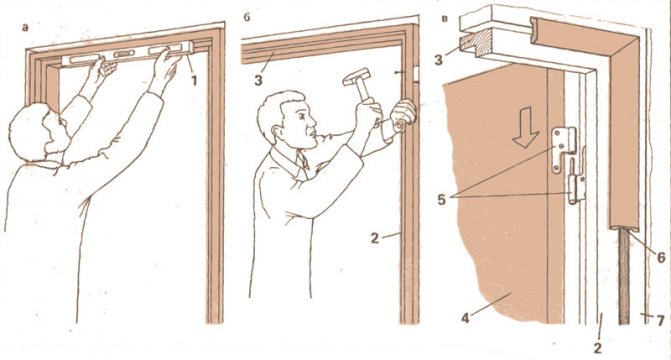
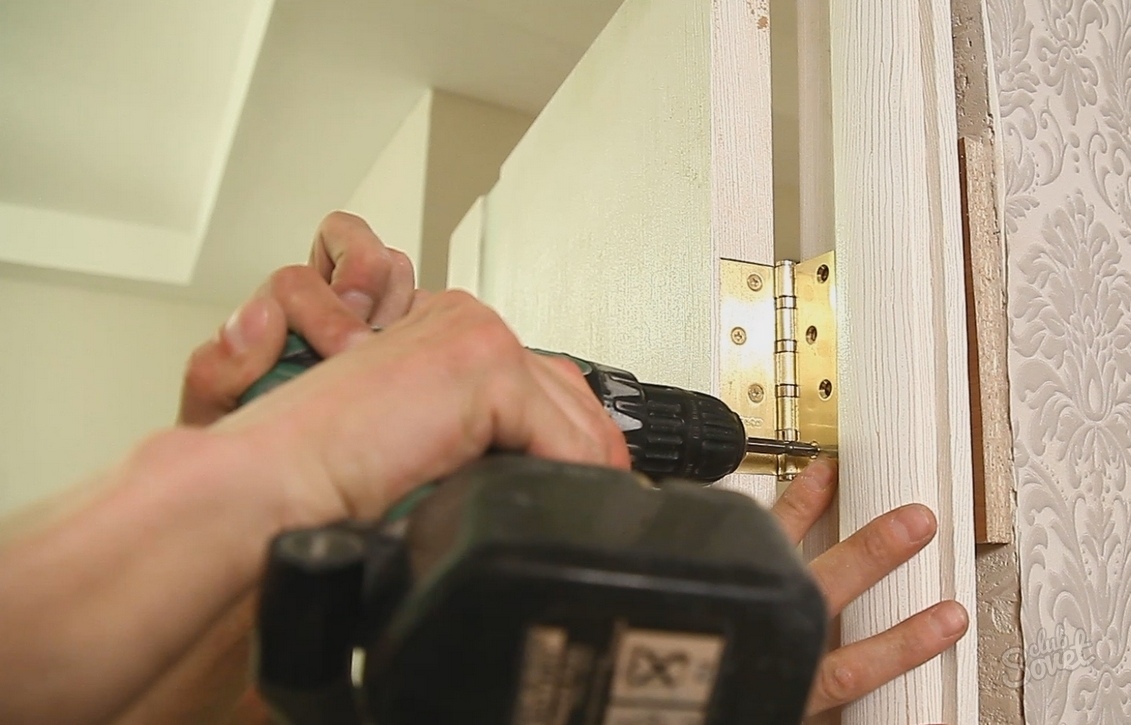
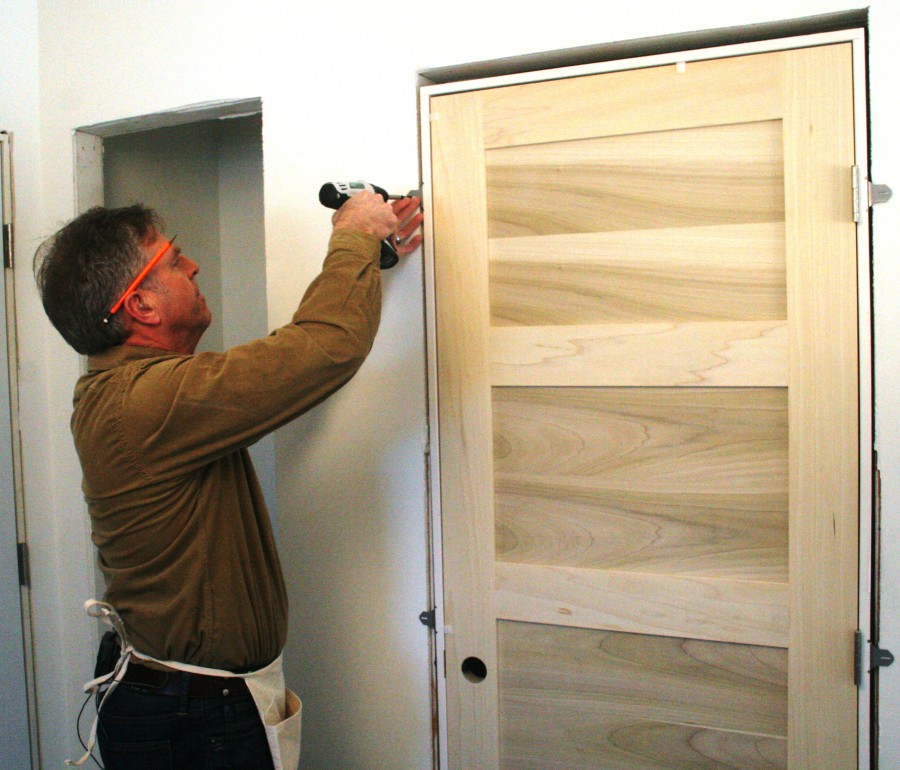
Mounting racks and hinges - step by step instructions
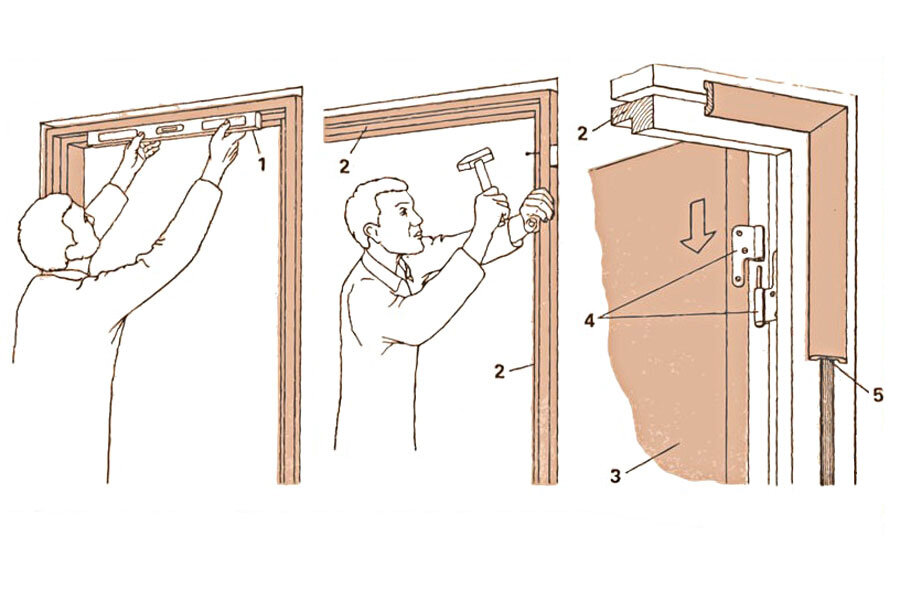
It is very important to install the racks correctly. Attached to them is a door frame.
If you install it on crooked racks, the operational functionality of such a door will be minimal. Rack preparation is carried out as follows:
- The upper parts of the racks must be cut with a hacksaw (it is better to take a saw with small teeth) and a miter box. This operation is easier to do if you have a miter saw.
- On the inside of the rack, measure the required length (it consists of the bottom gap, the height of the door leaf and the top gap).The lower gap is usually taken to be about 1 cm, the upper one - no more than 0.4 cm. Prepare the second rack in the same way.
- Now you start processing the lintel. Measure the desired length on the inside. The required length will include the width of the leaf, a small (about 0.4 cm) gap on the side where you will put the lock on the door, and another gap on the side of the hinges. Get the length (internal) of the lintel. Note - absolutely accurate.
Installation of interior door racks
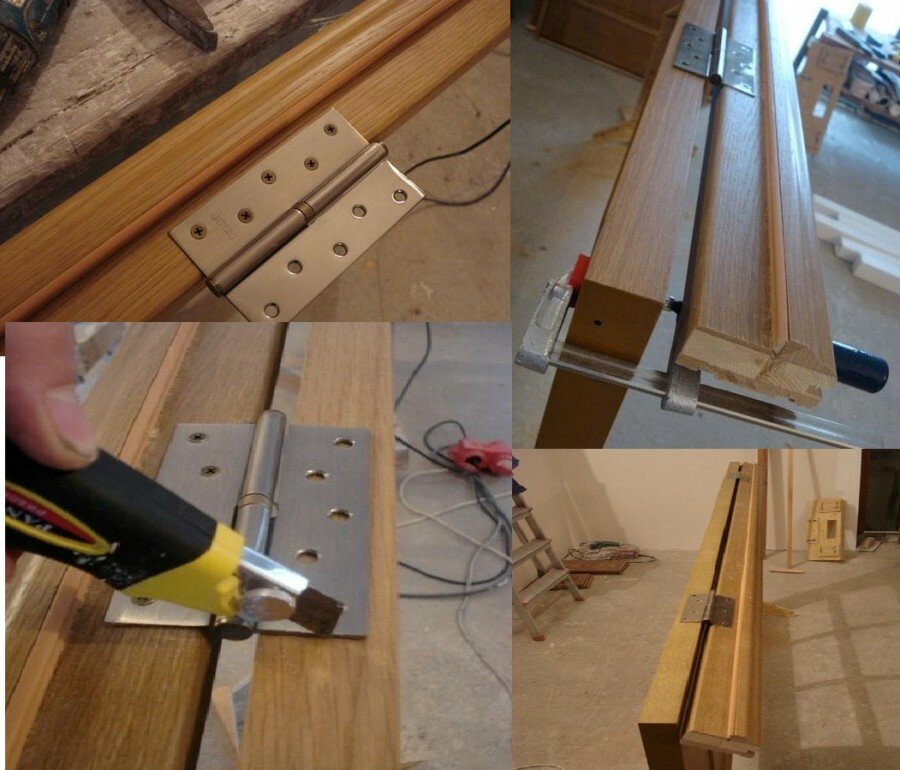
Now you can saw off the ends of the lintel with your own hands (again, with a miter saw or a miter box). This procedure is done at a 45° angle. Next up are the door hinges. Their installation should be done with the utmost care.
It is important to determine the exact value of their depth and the distance between the lower and upper edges of the door leaf. The scheme of work is as follows:
- We measure on the rack (on the inside) from the top edge a distance of 20 cm.
- We apply the loop to the selected area, outline its contour (use a regular pencil).
- When folded, the hinge leaves a free space (gap) from the rack to the canvas of 0.4 cm. We calculate the installation depth of the fitting element, taking into account its thickness.
- With a chisel (or better with a milling cutter) we make a platform for the loop.
- Similarly, we determine the size and location of the installation of the lower hinge. But in this case, the value of the lower gap (1 cm) must be added to 20 cm.
- Having installed the hinges on the rack, we apply this design to the canvas and make marks about the areas where the hinges are located.
- It remains to make seats for the loop elements.
You have accomplished a difficult task on your own. Now you can deal with the box and platbands. More on this later.
Manufacturing
Wood
If you need to replace a worn wooden nut, you first need to dismantle the old one with the usual tools - a hammer and nail puller (if it was nailed) or a screwdriver (for somarez).
Dismantling
It will serve as a template for you to make or purchase.
After that, you have to do the following:
Thoroughly clean the installation site from dust and dirt. If the destruction of the concrete base occurred during dismantling, remove all the broken-off elements of the screed and level it with a solution, having previously primed the surface.
It is possible to install the threshold only after the solution has completely dried.
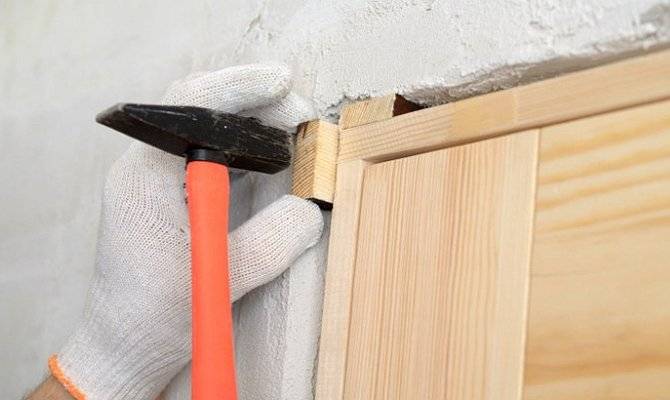
In the lower part of the side racks of the door frame, make grooves to the height you determine, measure the desired length and cut a wooden blank along it
Insert it into place by carefully tapping it with a hammer through the wooden spacer.
Installation
If you do not know how to fix it, then drill it with a thin drill in 2-3 places through and through so that marks remain on the base. Remove, make holes in the concrete according to the marks and hammer dowels into them.
Put the threshold back in place and fasten it with self-tapping screws, drowning the hats into the body of the tree
Fill up the formed holes.
Concrete
Often after installing new doors, no matter what - entrance doors, balcony doors (see Options for balcony doors: how to make the right choice) or doors to bathrooms - you see such a picture
After installing the door
Naturally, the question arises: how to do it yourself so that they look good on both sides? The best solution would be the installation of a concrete threshold with its subsequent finishing.
In this case, you can repeat the configuration of the existing ledge, or you can make the nut wider and more comfortable so that you step on it with your whole foot when entering and exiting.
So:
- Cut off the mounting foam and clean the place for pouring, prime it and screw iron bolts into the floor to the height of the future threshold. They will play the role of reinforcement.
-
Make formwork from boards or any durable sheet material in size and height. Install it in place and secure it firmly with spacers.
Formwork installation
- In the picture above, it was immediately decided to lay out the threshold with tiles, so before pouring the concrete, it was cut and adjusted in size so that it could be laid on a damp base, and not glued later.
- If you decide to use other finishing materials, then lay a plastic film on the wooden formwork so that concrete does not stick to it and the edges are even. And then pour the prepared solution into it, filling all the corners and controlling the level.
- Let the mortar dry for a day, then carefully remove the formwork. Moisten the concrete with water over the next few days to prevent cracking.
-
When the threshold reaches good strength, finish it with any desired material - tiles, laminate, linoleum, etc.
Concrete, finished with porcelain stoneware and painted in the color of the walls
Door sills
Open-mounted metal or plastic sills are easy to install. They are cut to fit the width of the doorway on both sides so that the mounting holes are the same distance from the edges.


Then holes for dowels are marked and drilled in the floor through the mounting structures.After that, it remains only to install the dowels, lay the threshold in place and fasten it with self-tapping screws.
Interroom with hidden fastening
A slightly different installation occurs with a hidden mount.
- Holes with a diameter of 5 mm are drilled in the floor at an equal distance from each other.
- The dowel-nails included in the set of the nut are inserted into the groove on its reverse side and distributed evenly along the entire length. The number of fasteners must correspond to the number of holes in the floor.
- The threshold is applied to the floor, the dowel-nails are installed directly opposite the holes and lead into them. After that, through the rubber gasket, the threshold is nailed to the floor.
This is interesting: Doorway without a door finish: highlighting in general terms
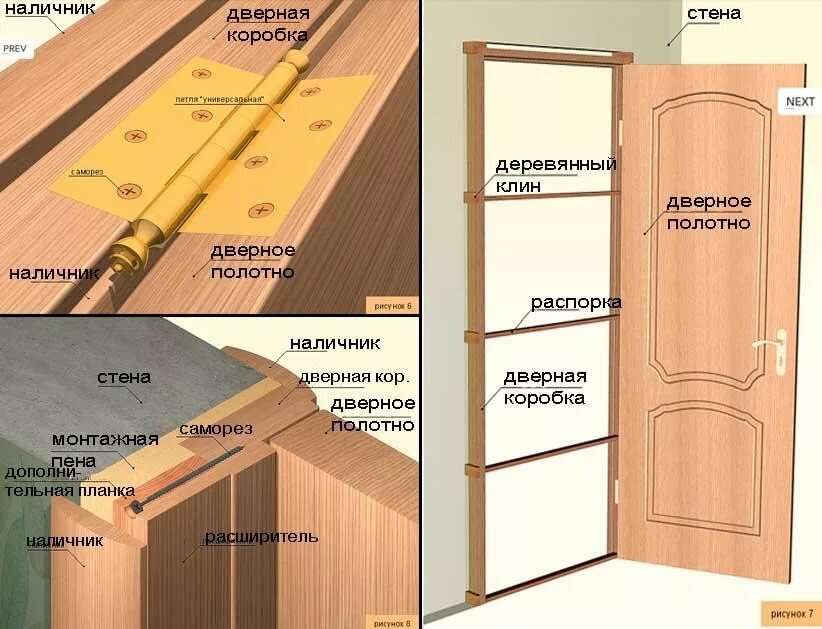
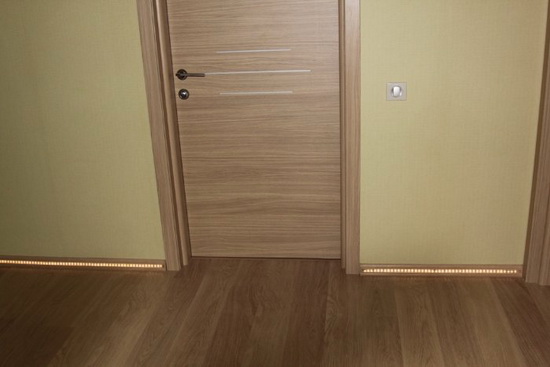
Dobors and platbands
Extensions are called wide strips that cover the ends of the doorway where the width of the box is not enough for this. A platband is a bar that closes the door frame from the side of the room (on both sides of the opening). The installation of platbands completes the finishing of the doorway, by this time the walls near it should be completely ready (wallpapering, decorative plaster, painting, and so on).
Depending on where the door opens - inward or outward - the box is mounted along the inner or outer edge of the opening. Accordingly, the extensions on the interior door are installed on the opposite side. Its width is chosen so that, together with the bars of the box, it completely covers the end of the opening. The width of the platbands is selected taking into account the width of the box beams and possible defects along the edge of the opening.Instead of the usual narrow platbands, you can mount wide ones with decorative trim.
Installing the addition of interior doors and platbands is often carried out using tongue-and-groove systems (the so-called "telescopic extensions"). Hidden mounting options are also provided. The illustration shows the doorway finishing system with telescopic architraves and extensions in section.
What you need to install an interior door
As with any other installation work, the successful installation of interior doors requires special tools and supplies.
Required Tools
Starting the self-assembly of interior doors, you need to arm yourself with the appropriate tool:
- electric drill with a set of nozzles (for screws with different slots);
-
a set of drills for wood (the larger the range, the better);
- perforator (in the event that fastening is carried out on anchor devices);
-
electric or manual furniture saw (ideal - end circular saw);
- drill bits or drills for concrete (diameter 4 and 6 mm);
-
miter box, a set of chisels of different widths;
-
measuring tool - hydraulic level, tape measure, square, etc .;
- knife, pencil, marker.
You will also need consumables:
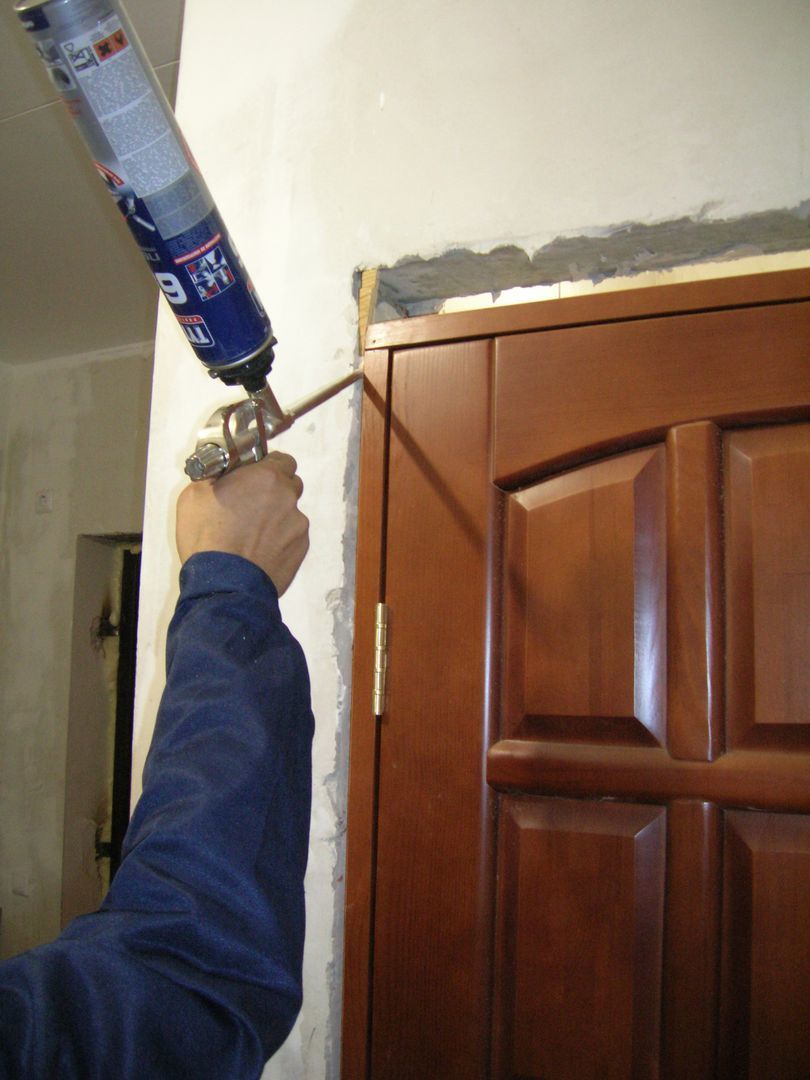
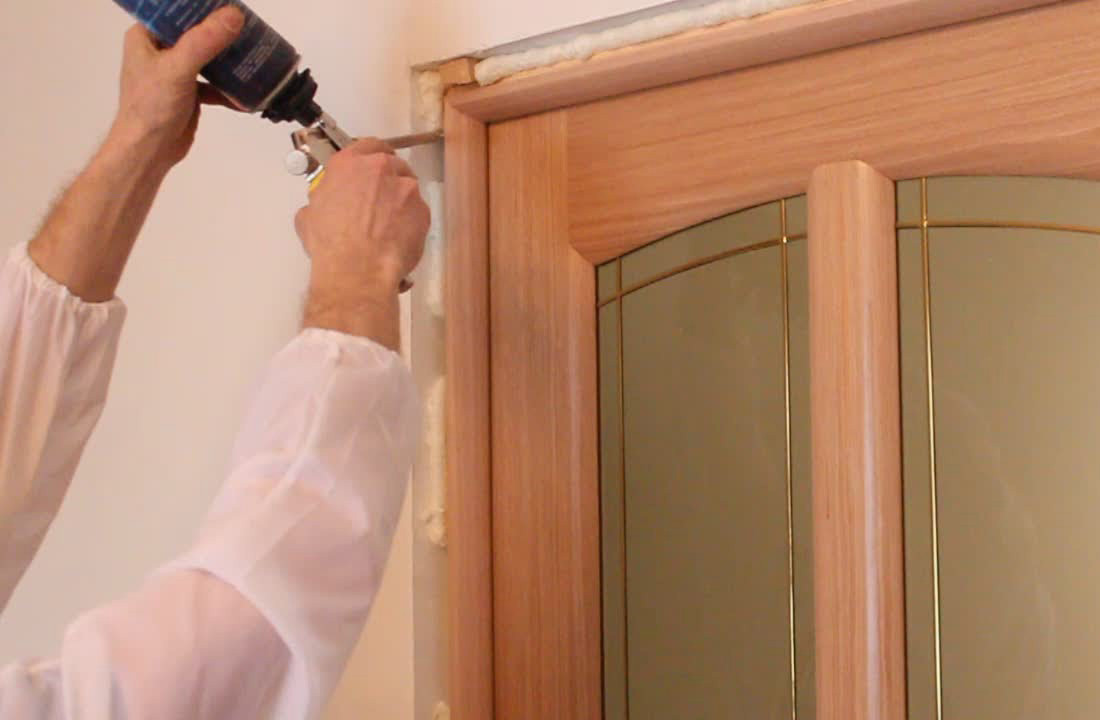
-
polyurethane foam (plus a gun for its application);
-
wood screws (with a large thread pitch);
- dowel-nails or anchor bolts;
- brackets or hinges.
What cutters are needed to install interior doors
If there is an opportunity to buy or rent a router, you should definitely use it. With the help of a manual router, the selection for hinges and locks is significantly accelerated. There is no need for chisels, the quality of the grooves improves.In order to optimize the process, it is desirable to use small diameter cutters. Thanks to this, you will have to cut less wood in the corners by hand. For example, for door hinges, a cutter with a diameter of 9.5 mm is ideal. To select the lock, a groove cutter of the appropriate length is used (to the depth of insertion of the locking device).
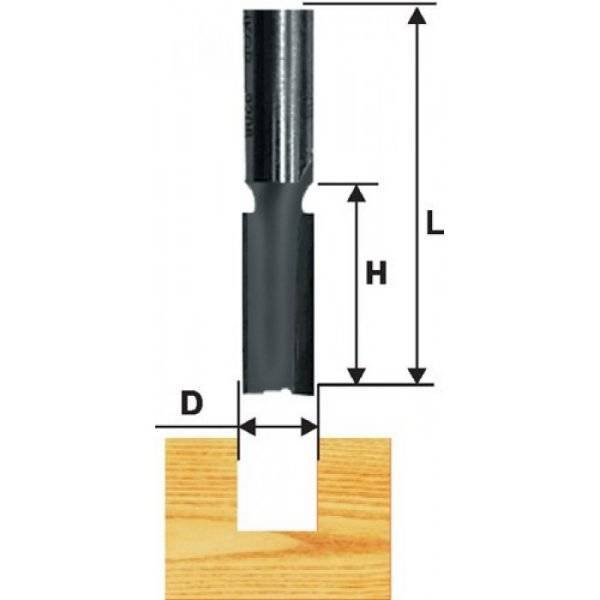
The main characteristics of a groove cutter include the height and diameter of its working part, as well as the size of the shank for clamping the router
Box saw
A few words about the electric saw. When installing one door, of course, it makes no sense to buy a "circular", especially an end one. You can use an ordinary hand saw with a small (furniture) tooth.

With a saw with fine, unset teeth, you can make even and clean cuts of parts.
But if there is a construction or reconstruction of an entire apartment in which from 5 to 15 doors are installed, you can at least think about renting a tool. The quality and speed of assembly using a miter saw increases several times. Much also depends on the type of doors and platbands. Some have to be cut to size, others require little to no cutting.


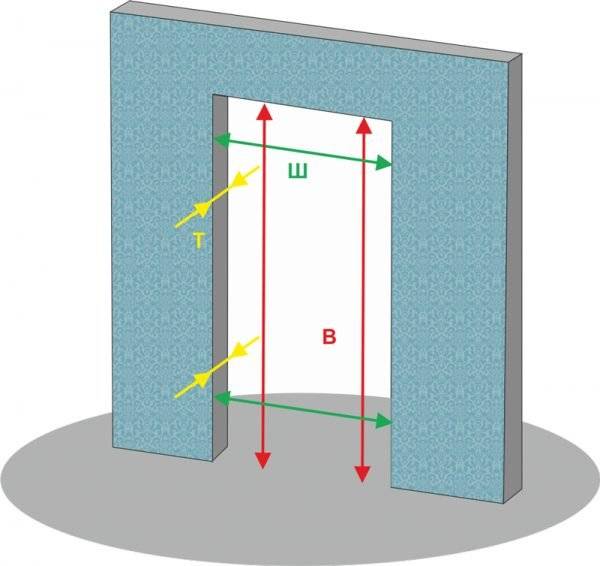
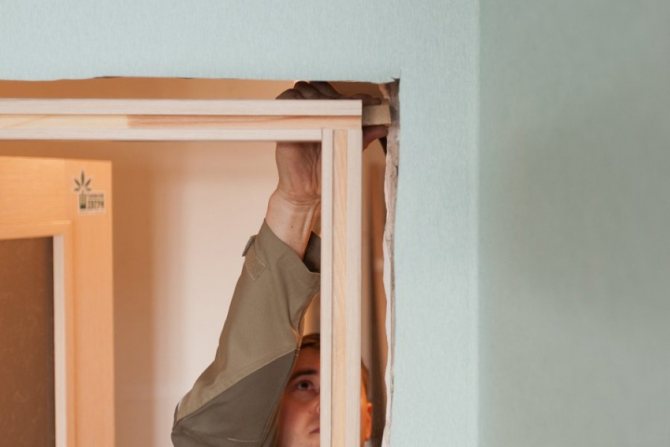
Preparing an opening for installing an interior door
The main task in preparing the doorway is:
- removal of excess materials from the end of the wall (remnants of mounting foam, plaster, broken bricks, etc.);
- creating the correct geometric shape of the hole in the wall (a rectangle, not a trapezoid).
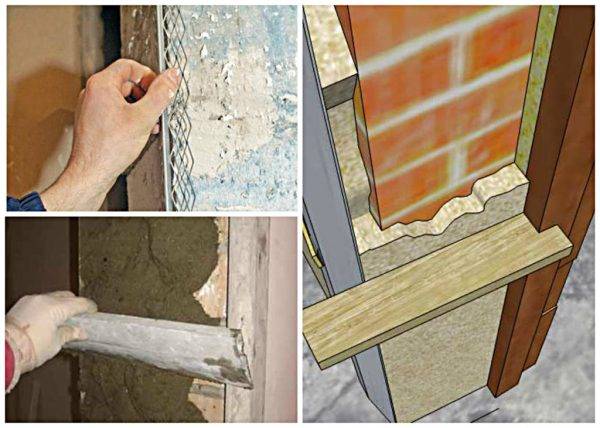
If the brickwork is in poor condition, it must be plastered with cement mortar.
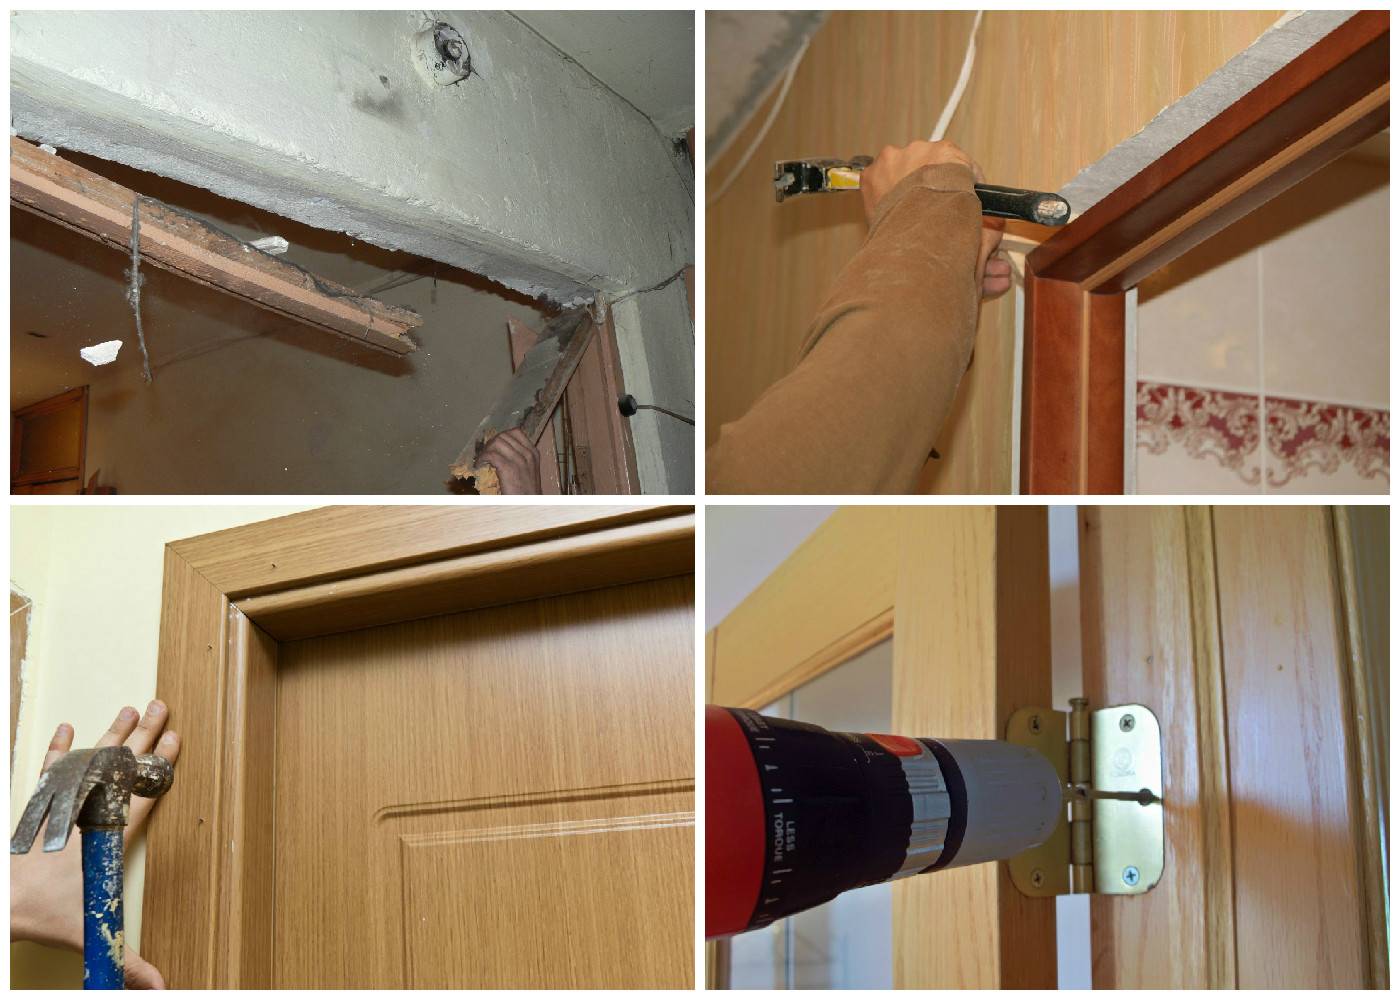
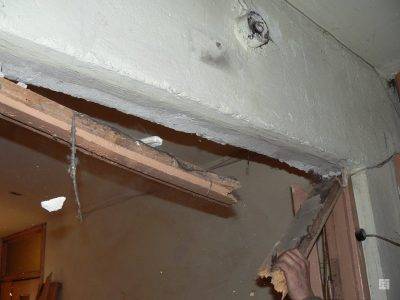
In new buildings, doorways should theoretically have dimensions close to standard.However, in practice this does not always happen. In a house or apartment where reconstruction is taking place, old doors must be dismantled before installing new ones. If at the same time the opening was damaged, it must be restored - leveled and plastered.
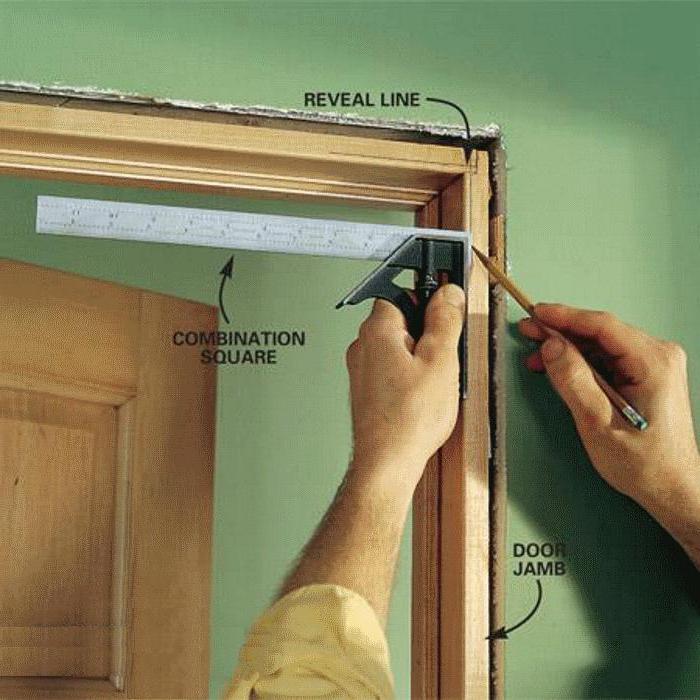
The following geometric parameters of the opening affect the quality of the installation of the door block.
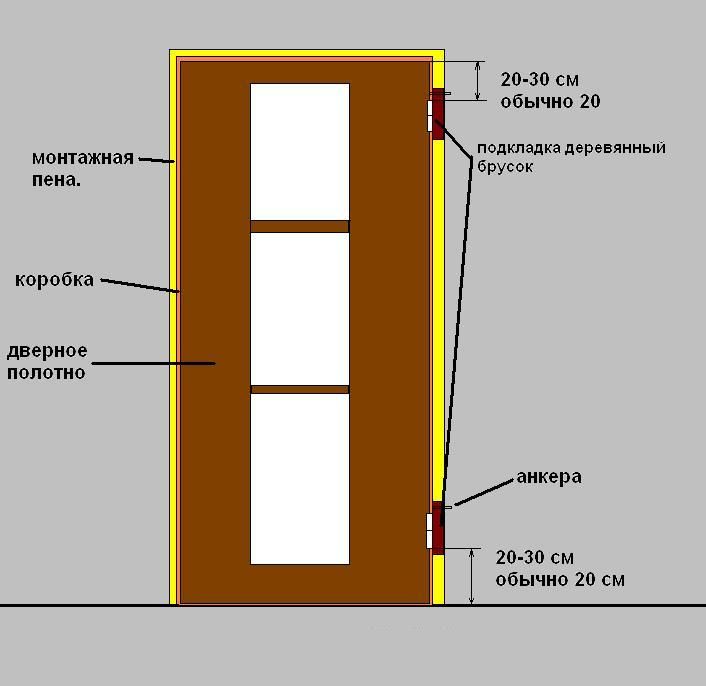
Height
The height is measured from the “clean floor”, i.e. from the level of the finishing floor covering - laminate, tile, linoleum, etc. It is necessary that the height be the same over the entire plane. A similar requirement applies to the floor - it should not have bumps and pits, especially if the installed door does not contain a threshold in its design - all defects will remain visible. The height of the opening should be 6-7 cm more than the vertical size of the door itself.
The dimensions of the doorway must take into account the technological tolerances for the installation of the frame and the necessary mounting clearances
Width
Similar requirements are imposed on the width of the opening - it must be the same over the entire height of the door. Vertical planes should be at right angles to the floor and be parallel. If this is not the case, the sidewalls must be leveled. The width of the doorway is determined based on the width of the door leaf - 10 cm are added to it (5 cm on each side).
Thickness (or depth) of the opening
An important condition that must be observed when preparing the opening is that the end should have a rectangular shape. In the lower part, at the intersection with the floor, a right angle (90o) should be formed.
If the thickness of the walls is not the same, gaps will form under the platbands, which, in fact, is a marriage.
Sliding door design
The system of such doors consists of several parts:
- Frame.
- The mechanism itself: guide, latch, roller carriages and more.
- Dobory with platbands.
- Planks masking the driving mechanism.
- Additional fittings: handles and locks.
What are door frames?
There are only four options for door frames:
MDF, covered with different tones.
Aluminum for light weight and long life. Such frames are not afraid of moisture and they may not have decorative elements if they are painted or anodized.
Strained glass. This option is the best suited for an apartment or house with high-tech interior design. In addition, such doors will ideally fit in the bathroom, where the humidity is high or in the meeting room, if there is a need for an overview.
Wood. The cost of such doors is much higher than other options, but they almost do not release heat from the room.
Mechanism
The door is moved apart by roller carriages, one or two, which are just the fastening of the entire leaf. The guide vector is made of aluminium. The rollers are made of polymeric materials, which are extremely resistant to various kinds of damage and wear out slowly. The rotation of the rollers occurs with the help of bearings, they also ensure the ease of movement of the carriage.
More details can be seen on the installation video sliding interior doorsdo-it-yourself coupe:


At this stage, we want to warn you: you should not buy a solid wood door leaf if you are planning to install a sliding structure - heavy doors can lead to breakage of the entire mechanism.
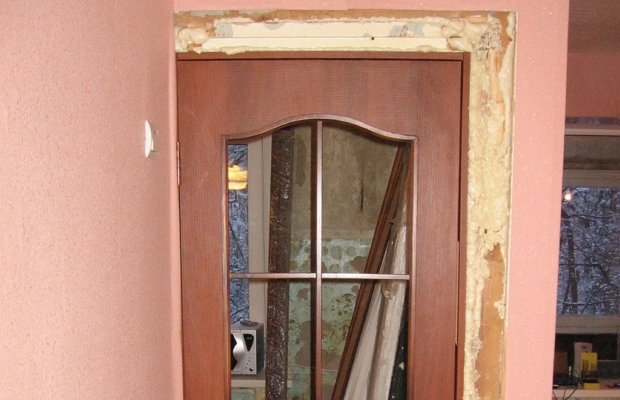
Dismantling of interior doors
Immediately before starting the installation of new openings and doors, dismantling of old structures should be done.
This work must be done very carefully and carefully.
Dismantling the old box
The more solid it remains, without damage, the less it will have to be spent on it, and it will also be easier to carry out further preparation, and subsequently the installation of doors. It is necessary to carry out dismantling work in the following order:
- The door leaf must be removed from the hinges, and if this fails, dismantled with the hinges (unscrew the screws that fixed the curtains to the frame).
- Carefully inspect the entire doorway and remove any parts of the trim that do not hold well.
- Remove cash. This should be done with a crowbar, very carefully.
- The mounting foam that filled the gaps should also be removed with a regular hacksaw.
- The old door frame in several places vertically needs to be sawn with a saw.
- Remove the sawn-off elements, starting from the lower parts.
- Eliminate the upper and lower (if there is a threshold) horizontal parts of the doorway.
- Remove all used mounting elements with a sharp knife.
Benefits of using interior doors without a threshold
 The use of doors without a threshold in an apartment is rare, only in cases where:
- the floor covering is made without joints and from one material;
- in the place of possible installation, heavy traffic of people is expected (narrow passage);
- the style of the room does not imply its separation in the zone of the doorway;
- The room needs better ventilation.
It should also be borne in mind that cleaning in a room where there is no threshold is more efficient.After all, the demarcation bar and its fastening in the form of slightly protruding self-tapping screws tend to accumulate dirt, and therefore are more difficult to clean.
In addition to this, today cleaning the floor of an apartment from manual labor has been retrained into a technological one: many owners have already managed to enjoy all the opportunities that a robot vacuum cleaner provides. It's no secret that even the latest examples of such equipment do not always cope with obstacles in the form of a threshold - a number of models turn around, bumping into it, and some, even worse, trying to get over, simply get stuck, and are not able to continue cleaning up the space.
Therefore, in some cases, the absence of a threshold under the interior door is fully justified.
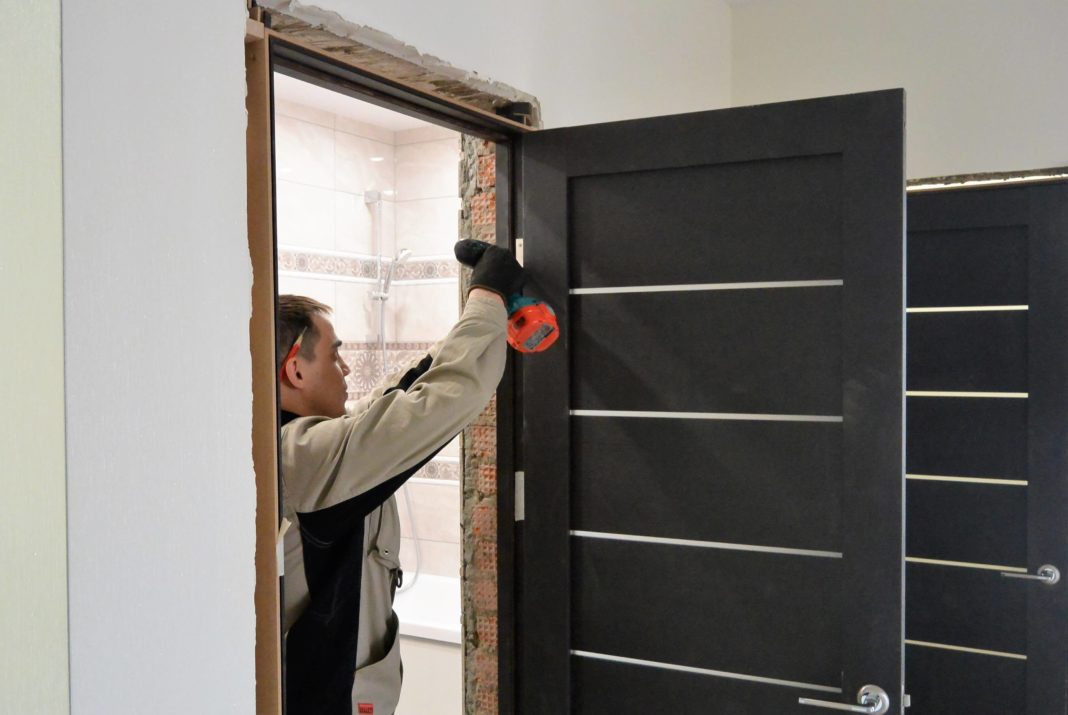
Do-it-yourself door installation - let's evaluate the front of the upcoming work
Door structures between rooms in an apartment or a private house cannot be called very complex technical systems. However, their assembly and installation require knowledge of a number of nuances. Firstly, a self-installed door should not spontaneously open. Secondly, it must close without excessive effort. Thirdly, door structures must have a certain strength and not fall apart in cases where they are mounted in the dwellings of "lovers" to slam the doors.
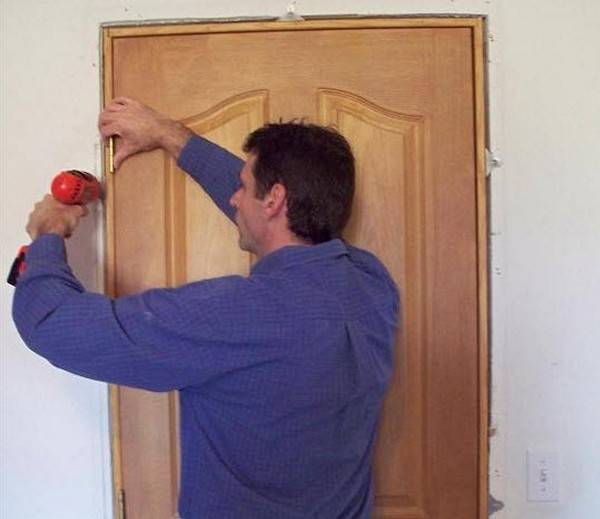
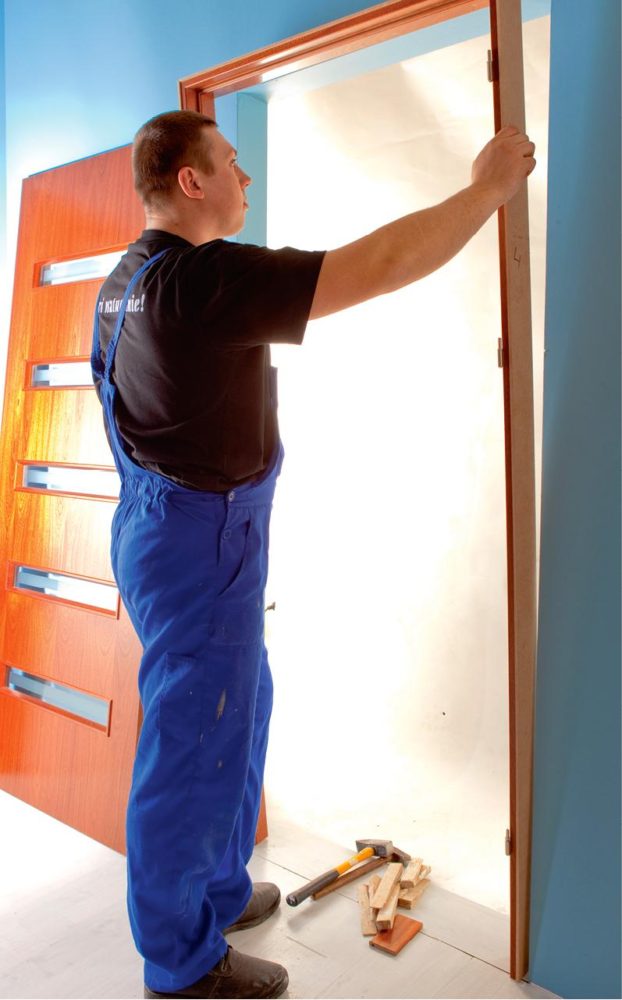
Do-it-yourself installation of different types of interior doors is carried out in several stages:
- Assembly of the supporting structural element - the box.
- Installation of the canvas, and then the box beam (a handle, hinges and other fittings are attached to it).
- Aligning the box in the door and fixing it securely.
- Canvas hanging.
- Finishing of doors with platbands.
Types of interior doors
A conventional door block consists of two elements - a leaf and a box. The latter is made of hinged and feigned timber, as well as lintels. If you will be installing doors with a threshold, the box is complemented by a special bottom bar. The door leaf in most cases is hung on two hinges. There are systems with three loops, but they are used extremely rarely. The set of door blocks, as a rule, includes platbands. If the manufacturer does not provide any, you will need to purchase them separately.
In situations where the door frame is smaller in width than the door opening, you need to purchase extensions or trim the walls with flashings or slopes that are more elegant in terms of design. Here you need to know that professionals do not advise plastering slopes if you do the installation of structures made of wood materials (for example, MDF) with your own hands. Such doors are simply deformed after applying a plaster composition to them.
An excessively wide opening is often reduced with a wooden beam. Its dimensions should correspond to the "extra" width. Such a beam is installed from the side of the door pillar, where its hinges are located. The beam is attached to the rack with small universal self-tapping screws, and it is connected to the wall with anchors. Do-it-yourself installation of interior structures with your own hands is recommended after pre-finishing the premises (it is understood that you have leveled the walls, carefully and accurately puttyed them, and then plastered them).
Reducing the doorway with a wooden beam
Otherwise, there is a high probability that the system may “float” from high humidity. Be sure to equip the rough flooring, as well as determine the thickness and type of finish floor that you will do. Without this, you will not be able to accurately mount the door frame to the height of the threshold. If you just decide to change the interior doors in a room where no repairs are being carried out, the latest recommendations do not matter.


Sliding door installation
When installing a sliding type door structure, special attention should be paid to the perfect coincidence of the floor surface with the lower edge of the door panels and make sure that there are no distortions at the wall openings. The upper guide is mounted on a flat surface with brackets, if necessary, an even, well-dried beam is first mounted in the opening, and then a guide profile is mounted to it
The upper guide is mounted on a flat surface with the help of brackets, if necessary, an even, well-dried beam is first mounted in the opening, and then a guide profile is mounted to it.
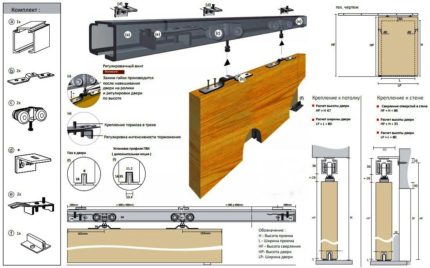 Sliding door fastening scheme: a - rail profile, b - door brackets, c - rollers with adjusting screw, d - brackets for fastening the timber, e - brake, f - flag for fixing the door
The length of the guide is determined from the calculation of twice the width of the web. 10 cm must be subtracted from this value. For marking, the door must be placed vertically against the wall so that it is tightly pressed against it. In the closed position, markings are made along the upper edge, then you need to move the canvas to the open position and re-mark.If the dimensions at the marked points do not match, then it is worth focusing on the extreme furthest from the floor.
To determine where the upper surface of the guide will be, you need to take the distance from the highest extreme points, add the width of the profile and add another 0.5 - 1 cm. It is necessary to measure the result obtained from the marked markings upwards, and put down new marks.
The timber on which the guide will be should be 1-1.5 cm wider than the door leaf. This is necessary in order to better fix the decor later. The lower plane of the bar must be aligned with the measured points. If the wall is not completely flat, then it is necessary to make a solid substrate to fill the voids for a snug fit of the timber. If the irregularities are minor, then it should be fixed more tightly on the wall.
Before the beam is placed on the wall, it is necessary to attach a guide to it. In this case, it is necessary to monitor the straightness of the profile location. The center point of the bar should be located exactly above the extreme point of the opening.
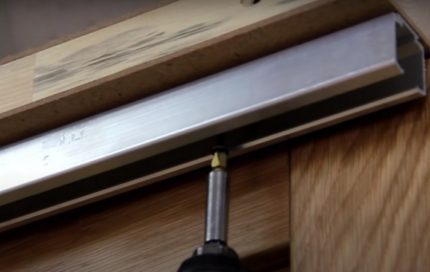 Chamfered mounting holes are drilled exactly in the center of the guide profile, they are needed for a snug fit
The bar is fastened with screws to the bar in such a way that subsequently a gap of 0.4-1 cm remains between the door and the wall.
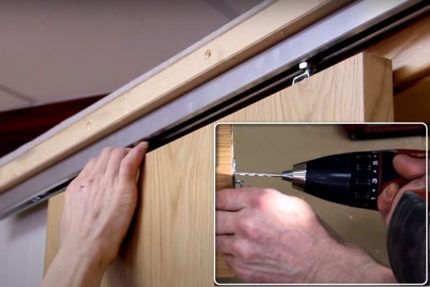 Brackets are mounted to the upper end of the door. The assembled web travel mechanisms are inserted into the profile guide
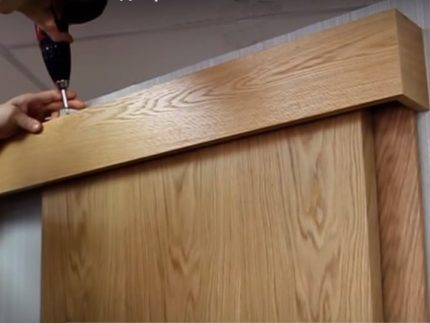
The door leaf is hung on rollers and the fastener is twisted. At this stage, the blade should be adjusted by tightening the screws.
It is necessary to maintain a distance of 0.5-1 cm from the bottom edge of the door panel to the floor and adjust the vertical line of the door edge.Next, a fixing flag is fixed on the floor.
 A bar with a profile should be closed with a platband or an additional board. A U-shaped structure is assembled at a right angle and attached to the bar with self-tapping screws
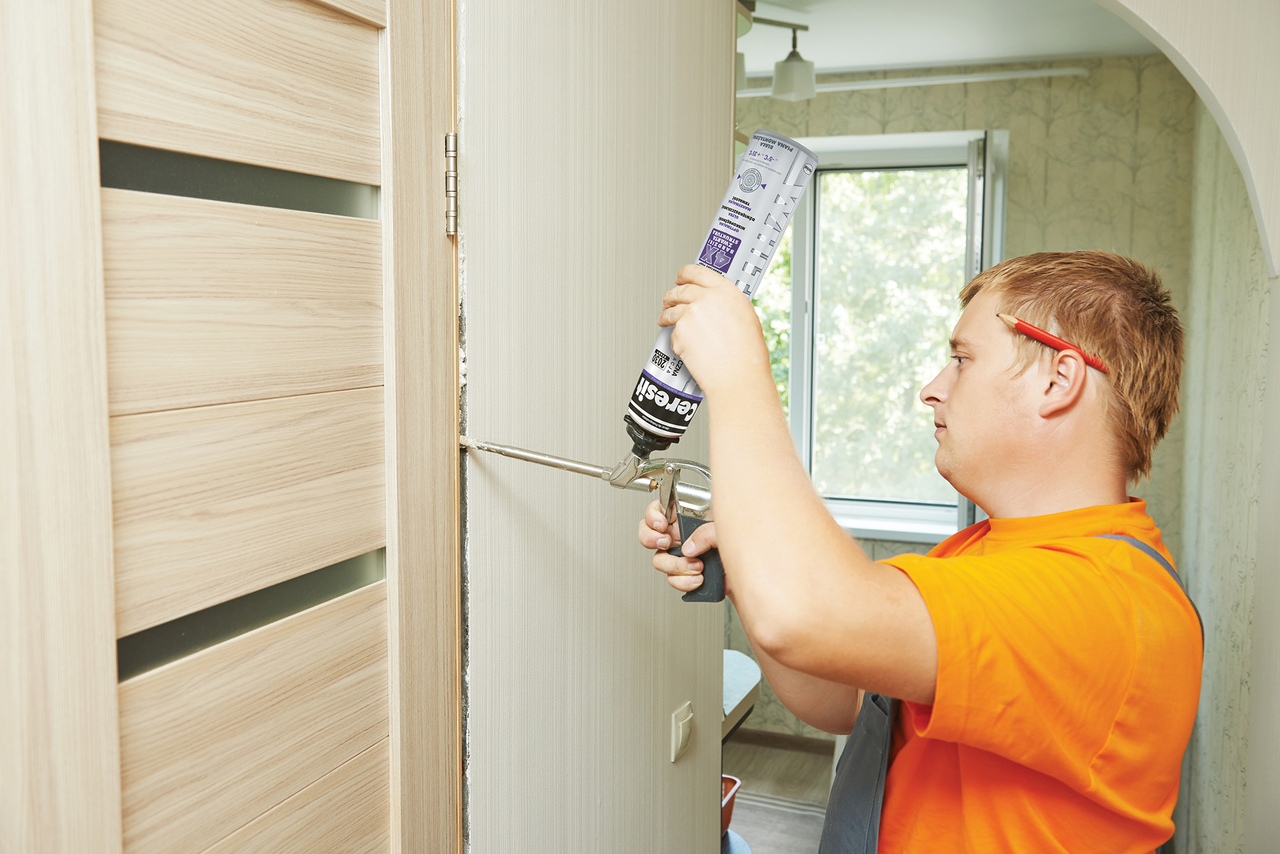
The doorway is finished with additional elements. The voids are filled with foam, which also fixes them on the opening. Further along the perimeter, the opening is trimmed with platbands.
How to remove door panel
It is attached with hinges. These loops have different designs. It turns out that the canvases of interior doors are removed in different ways.
The hinges consist of fasteners:
- on the door;
- on the doorframe.
In most older models, a rod is attached inside the element, which is located on the vertical rack of the jamb. This is a permanent fixture. And in the element that is installed on the door leaf, there is a tubular hole. A rod is inserted into this hole.


Pulling the axial rod out of the loop
There is also such a type of canopies, where the rod is inserted into both parts of the loop. When dismantling a door with such hinges, it is enough to pull out these rods (they have a mushroom cap on top, which prevents them from falling out).
To remove the rod, use a wide screwdriver or other similar tool. Lightly tapping on the handle, it is possible to push the pin out of the loop tubes. The door will not tip over if work is started from the bottom hinge. Otherwise, the inverted door under its own weight will tear out part of the hinge that is installed on the jamb. But the loops can not be changed if they are in good condition. They can be used when installing a new canvas.
When the canvas is dismantled from the opening, you will need to remove:
- pens;
- loops;
- locks.


