- What materials are used to make caps for their fasteners
- How to make a fungus on a pipe with your own hands
- Main Models
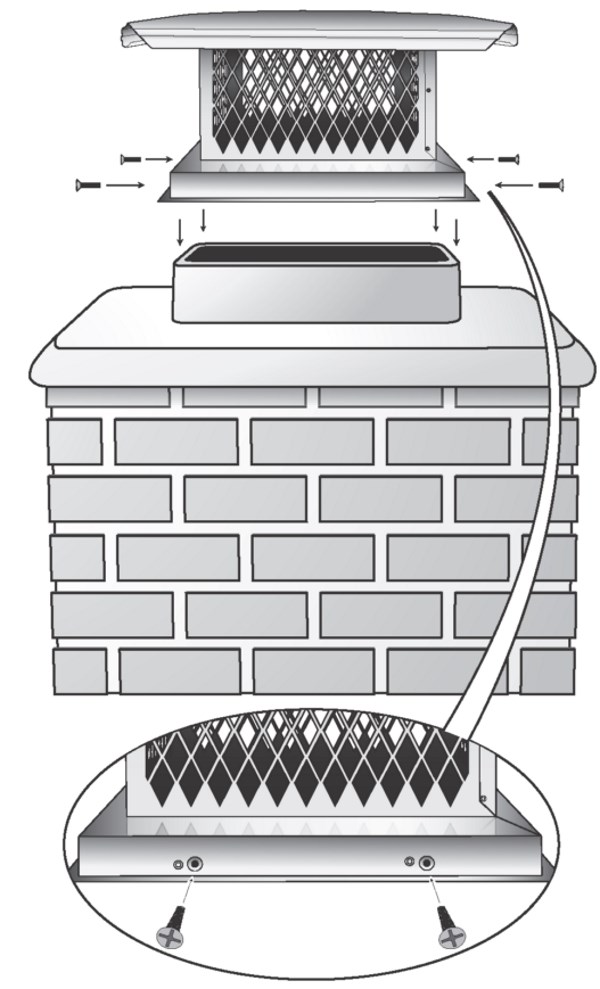
- Installation Recommendations
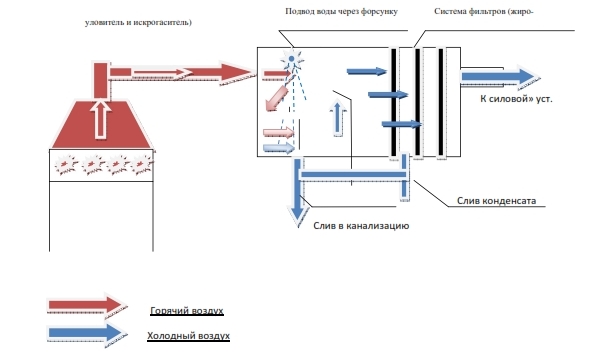
- Varieties and principle of operation
- Application
- Varieties and principle of operation
- The principle of operation and mandatory installation locations for spark arresters
- What is a spark arrester?
- Where is it used and why is it needed?
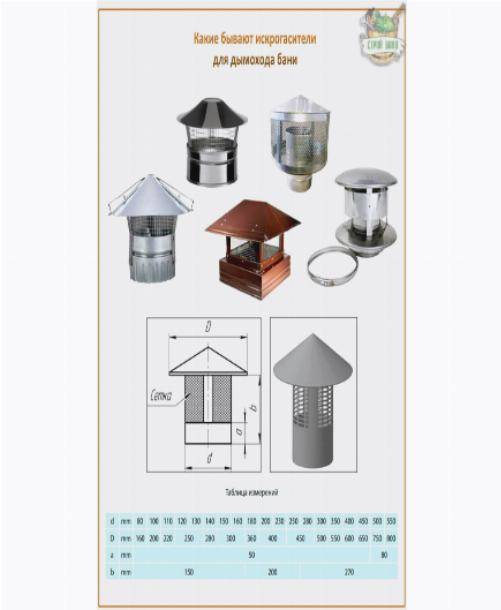
- Varieties of spark arresters
- Where is it sold and how much does it cost?
- We make a visor with our own hands - how to cope with the task?
- Do-it-yourself step-by-step manufacturing and installation of a spark arrester
- Necessary materials and tools
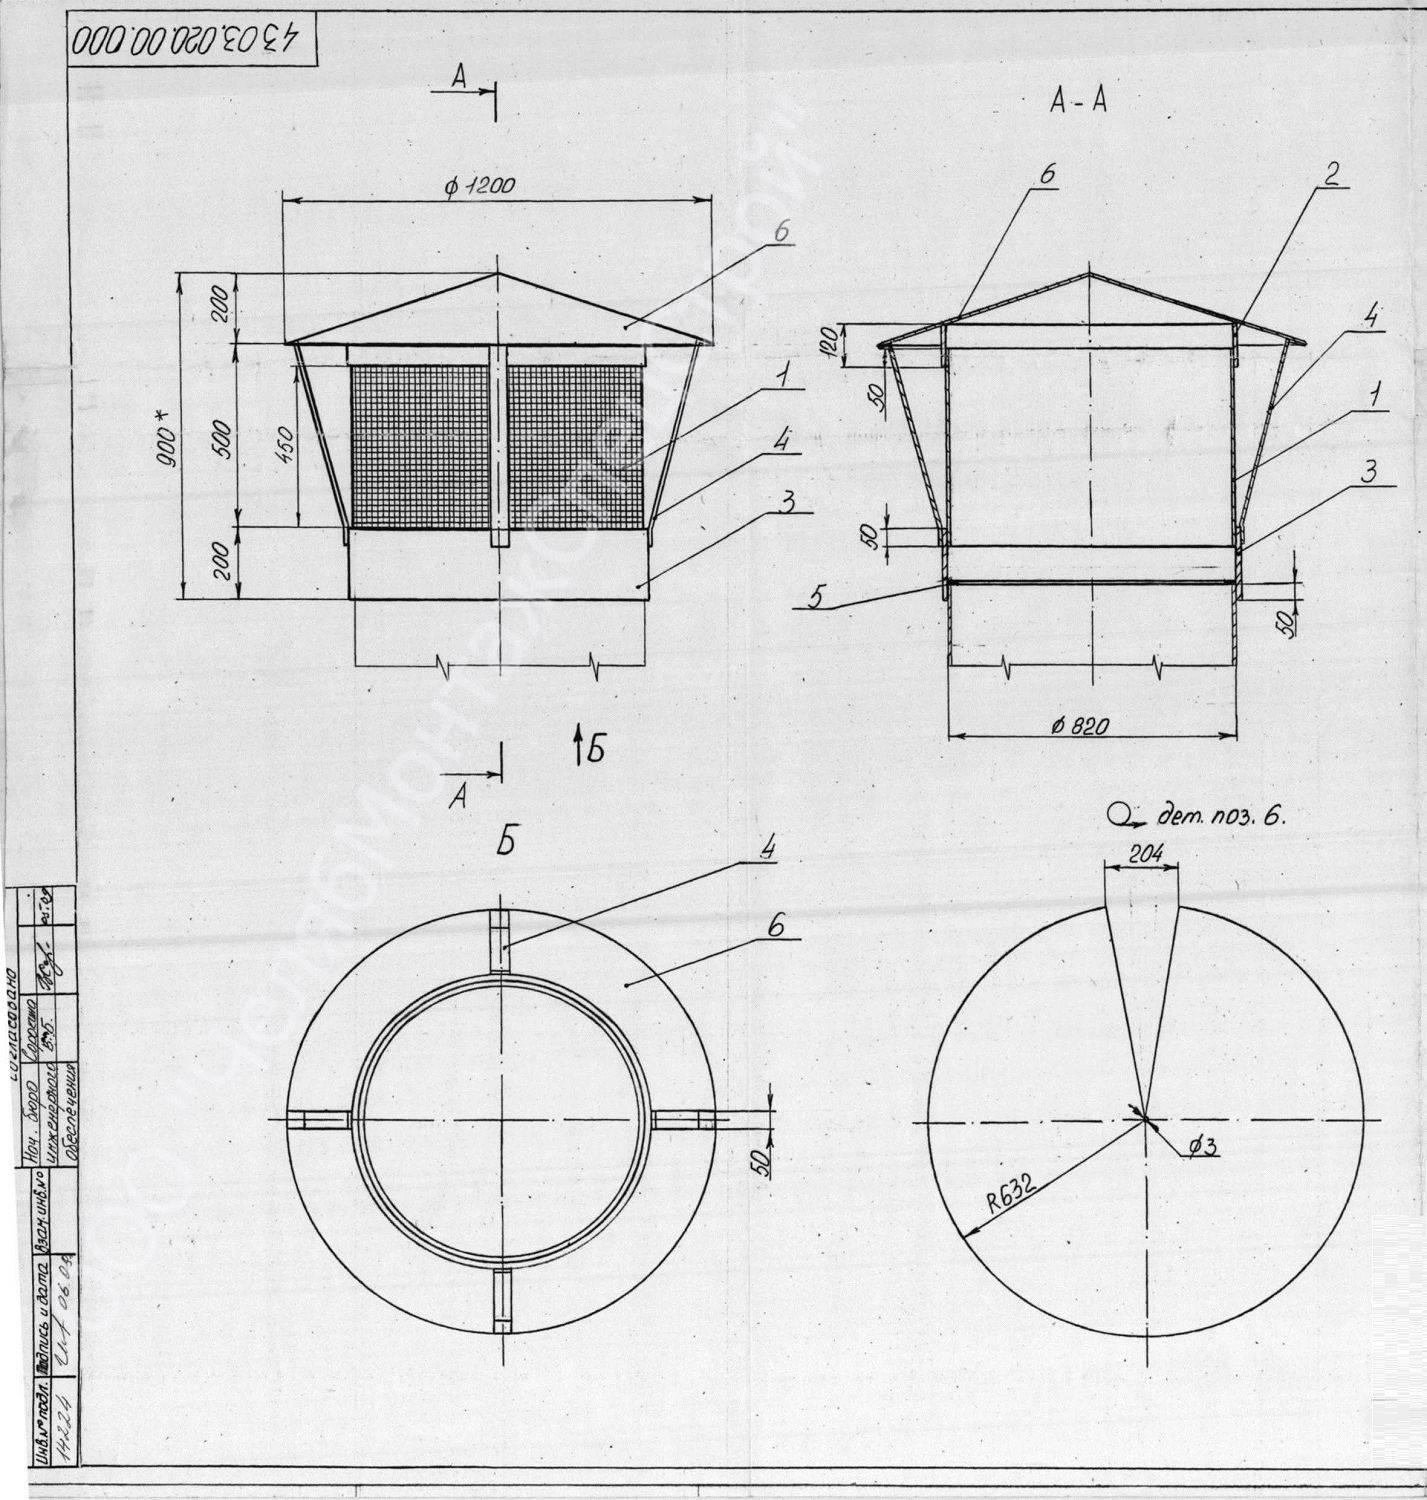
- Drawing and diagrams
- Size calculation
- Mounting Features
- Video: A chimney spark arrester will save your life and property
- Conclusions and useful video on the topic
What materials are used to make caps for their fasteners
Chimney caps are made of materials that are resistant to corrosion, tolerate high temperatures and have a long service life. The requirement for temperature conditions is valid only if the device will close the chimney. For ventilation ducts, a product made of polyester, pural, etc. is quite suitable. In all other cases, use:
- Galvanized steel
- stainless steel
- Copper
- Alloy zinc-titanium
Vanes (chimneys) made of copper serve for a long time, from 50 to 100 years.This is one of the most durable materials, but when installing it, it is necessary to use copper hardware. Otherwise, active corrosion processes will begin, which will significantly reduce the life of the device. Installing a zinc-titanium cap on the chimney provides for the same reasons the use of only galvanized hardware. Zinc-titanium is a new alloy that was recently used only for roofing materials, but today many companies have begun to produce chimney caps from it. They have a half-century warranty period and the price is much less than that of copper. You can install caps from other materials on the pipe with ordinary hardware, although it’s still better to take those that are not amenable to oxidation and destruction: most of the weather vanes can last for decades, and climbing onto the roof because it was torn off by the wind due to a collapsed fastening is not the best good time. If we talk about a brick pipe, then you can use either ordinary long nails or threaded ones (but it is almost impossible to dismantle them), you can use dowels. In each specific case, the fastening system is selected based on the shape and material of the pipe, the available fastening holes, etc.
Wrought iron chimney caps
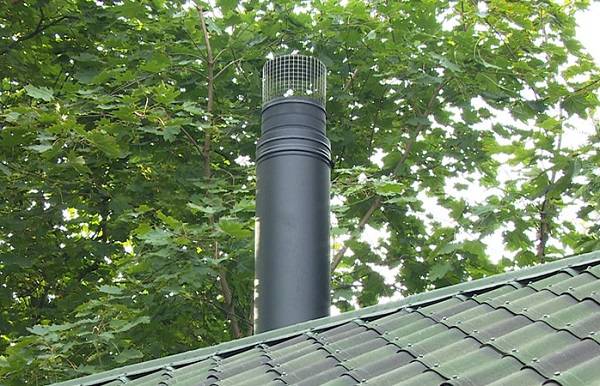
The most popular type of this product is a stainless steel chimney with or without a polymer coating. The service life in this case is 20 years, but the price is much lower. The option with a polymer coating is especially popular - the color can be matched to the tone of the roof, and if the design is in the style of the roof, this option looks great.
How to make a fungus on a pipe with your own hands
Making a chimney cap yourself is not an easy task.If you do not have much experience in this area, you can first transfer the drawing to a sheet of cardboard, cut it out and think about ways to connect and fasten it. After the picture becomes more or less clear, you can cut out the parts from the metal and start assembling
It is very important to measure the chimney accurately and strictly adhere to the measured values during manufacture.
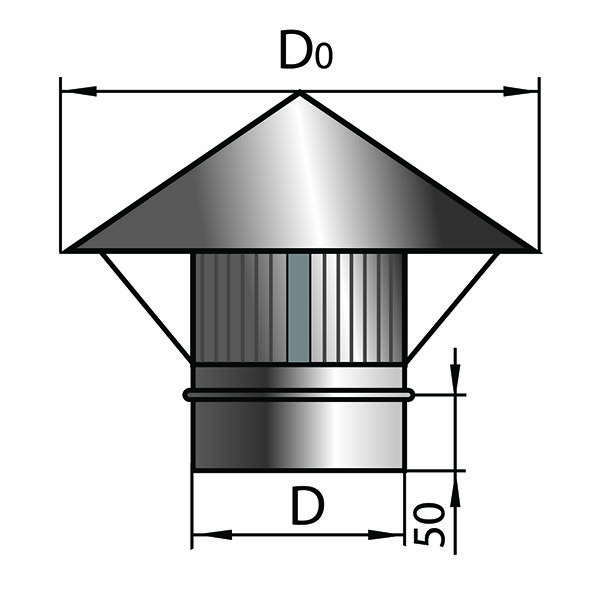
Here is one of the drawings of a chimney in the form of a small pitched roof. The angle is determined by the formula, which is indicated on the first sheet.
Chimney cap drawing
Chimney cap drawing
The procedure is as follows:
- Put the metal blank on the table face up, in the place indicated on the drawing, drill a hole with a diameter of 3.5 mm.
- Bend the part along all dotted lines by 90 o. For this, it is better to use a sheet bender. Then the lines will be clear, without dents. If there is no such device, you will have to use improvised means: fix a piece of the corner on the workbench with the shelf up. To be able to bend the entire (or almost entire) line at once, you can use a bar.
- Bend the part along the lines "d". The angle is determined experimentally: you should get a solid cap. The design should be even, without distortions (put it on the table to check). If everything “converged”, mark a point on the lower stiffener with a marker through the drilled hole, mark the future hole, then drill.
- Connect the cap and fix with a 3.2mm rivet.
- On the lines "a" and "b" bend everything so that you can install the legs.
- On the outer perimeter of the pipe, make the base of the cap from the corners. Position the corners so that one edge rests on the masonry, and the second is on the side. Prepare the "legs" for the cap. Everything is connected by welding.
- The finished base must be cleaned, coated with an anti-corrosion compound, then painted in several layers with exterior paint.
- Connect the cap to the base.
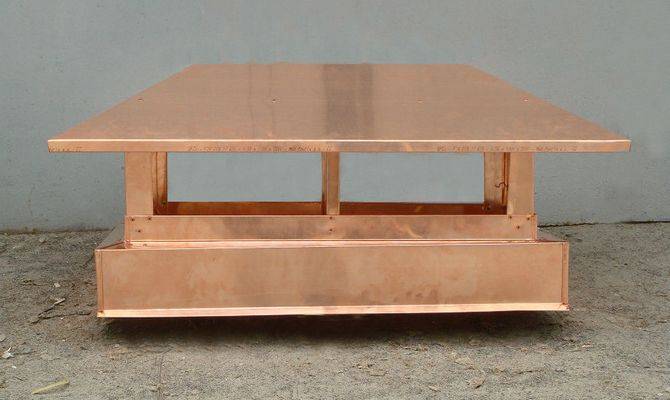
If making a square chimney seems difficult to you, maybe this option will be easier. Its implementation will be quite simple if you have a piece of bent sheet metal of the right size. If there is a regular sheet, you can bend it on a special device (usually tinsmiths have it).
Do-it-yourself chimney
The order of work is as follows: prepare the base of the cap from the corner according to the results of measurements of your chimney. Position the corner so that the structure holds well: one rib rests on the edge of the chimney, the other covers it from the outside. Make the legs that will support the cap and connect it to the base. Make them strong enough so that they can withstand wind loads and withstand snow masses. Treat all parts with an anti-corrosion compound and paint. Assemble the structure into a single whole. The collection method depends on the material.
Here is an example of how to make a deflector for a metal pipe. The author of this video has it installed on a basement ventilation pipe, although a similar design can be used on a metal pipe from a solid fuel boiler.


In this video, the manufacture of a conventional umbrella for a pipe.
You are always welcome)) And how to fix the cap depends on the material of the pipe. Judging by the fact that the scan is only for square or rectangular, you have a brick pipe. If so, you can fasten the weather vane to the dowels, but more often. And not in a seam, but only in a brick. If the winds are strong, you can make the lower part, which will put on a pipe, wide and fasteners to beat not in one row, but in a checkerboard pattern: from top to bottom. If you did not guess with the material - unsubscribe.
Main Models
The elements of the chimney that ensure the elimination of hot incandescent particles are different. At home, as a rule, two types of spark arresters are used:
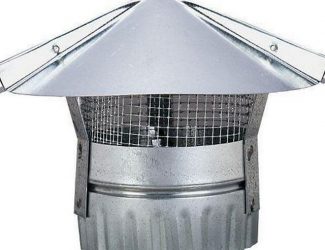
- The corrosion-proof casing representing a grid design. You can do it with the help of improvised means.
- Deflector. In addition to extinguishing solid incandescent particles, it improves traction by redirecting the wind flow. Protects the furnace device and the bath from a dangerous phenomenon - reverse thrust as a result of strong winds.
The damper in the form of a casing is the most popular, since its design is quite simple. Holes are made in the pipe or a special nozzle in the form of a grid is attached to it. The disadvantage of this design is the frequent revision of the spark arrester. Mesh with perforation quickly become clogged, as combustion products settle on their surface. The higher the degree of pollution, the less draft in the pipe. The spark arrester, made in the form of a casing, is subject to frequent cleaning. On sale there are assembled casings for extinguishing sparks. Their advantage is a simple connection to the chimney.
More modern devices are spark arresters - deflectors. Outwardly, they look more aesthetically pleasing. During the operation of the deflectors, the draft in the chimney does not decrease. Such absorbers are equipped with mesh and perforation. Their distinguishing feature is the presence of constriction points, which allow you to increase the thrust inside the spark arrester element.Depending on the location of the narrow sector, there are various models of absorbers, many of which are very similar in appearance to the casing, but are more aerodynamic. The disadvantage is the rapid contamination, the need for frequent cleaning, especially when using resinous logs as fuel.
Installation Recommendations
Do-it-yourself chimney for a bath
Do-it-yourself chimney for a bath
The chimney in the bath must be carefully closed next to the combustion chamber and at the junction with the ceilings. To protect the walls, steel sheets with a refractory coating are used.
To increase the efficiency, a special mesh is installed in the pipe, on which stones are poured. Warming up with smoke, they will be an additional source of heat, which will somewhat reduce fuel consumption and the heating time of the steam room.
The chimney is conducted exclusively from the bottom up.
Each next pipe section is inserted into the previous one, as a result of which condensate will accumulate inside the system.
If necessary, the pipe should be easily dismantled (sooner or later it will burn out), so you should take care of a removable elbow.
The chimney above the roof must be closed with a special "umbrella" to protect it from precipitation.
If possible, installation is carried out away from the walls.
2
Internal smoke duct - it will always be warm in the steam room!
With this method of installation, the pipe is installed above the stove in the bath, stretched to the ceiling, passed through the attic, and then through the roof. The height of the tract should correspond to the level of the roof ridge or be 0.5–1 m longer than it. In this case, quality traction is guaranteed.The main advantage of the internal chimney is that the thermal energy coming through the pipe from the stove heats both the steam room itself and the attic. As a result, the required bath temperature is reached quickly and with low fuel consumption. The disadvantage of the internal structure is the complexity and complexity of laying pipes through the roof and ceiling.
It is possible to correctly make a smoke duct indoors using a simple algorithm. First, draw a diagram of the chimney, focusing on the size of the steam room. Decide on the number and length of the necessary parts (turns, straight sections). Order the required metal elements for pipe assembly at a hardware store. Along the way, get in it two sheets of metal with holes in the middle. You will put these products on the floor of the attic and on the ceiling in the bathhouse (from below). The diameter of the holes must correspond to the cross section of the pipe used. By the way, it should be chosen as wisely as possible.
The pipe of the internal chimney is discharged through the ceiling
The pipe should have a diameter (internal) in the range of 15–20 cm. A design with a smaller cross section will not provide the necessary traction. If you take a pipe with a large diameter, the thermal energy will leave the stove very quickly and the room will not warm up well. The recommended height of the metal smoke duct is 5 m. One more piece of advice. Choose a pipe with a wall thickness of 1–1.2 mm. This product will serve you for a really long time.
Additionally, you will need to prepare a rubber seal (you will put it on the tract after the pipe is removed to the roof) and a sealant for high-quality waterproofing of the structure. Step by step guide to installation of a chimney metal in the bath is given in the next section.
Varieties and principle of operation
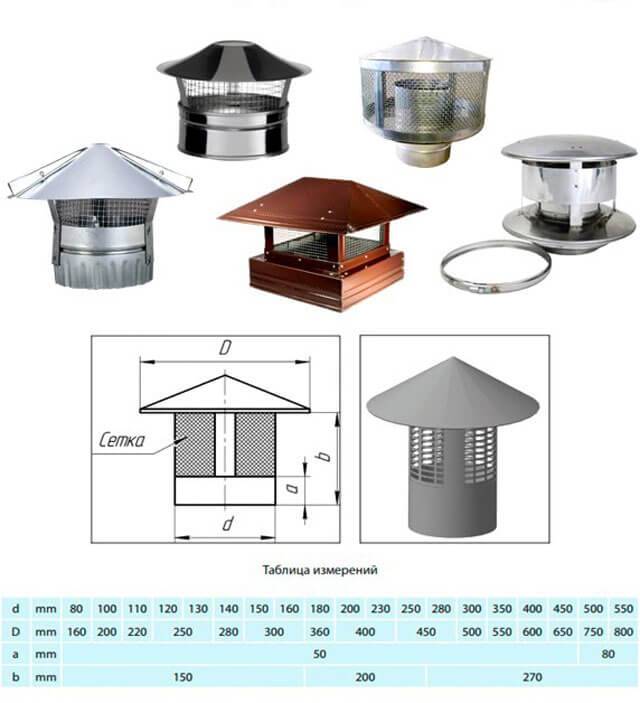
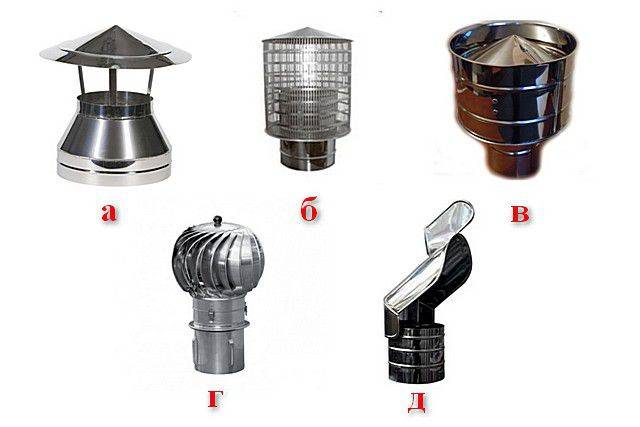
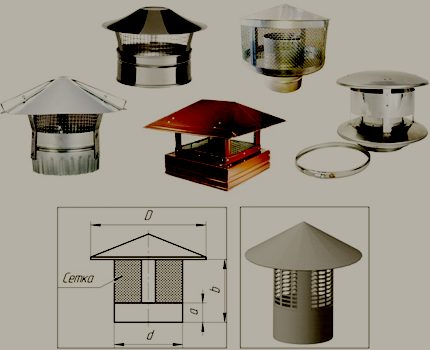
There are several design options for pipe caps. They differ in appearance, characteristics and functionality. Some of them can only be bought in specialized stores, others are assembled by hand according to the schemes. Here are the main types of deflectors:


How to make a brick chimney with your own hands?
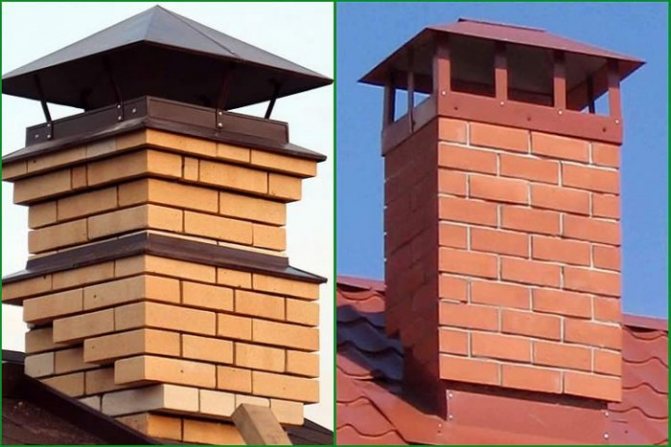
- classic "house" with a pitched roof;
- a spark arrester with a weather vane will help not only protect the roof from ignition, but also show the direction of the wind;
- with a semicircular roof;
- with gabled roof;
- flip-top, provides easy access for cleaning the chimney.
In addition to functionality, the visors above the chimney pipe can be divided into several options according to the shape of the structure:
- tent;
- flat;
- vaulted;
- four tongs;
- four-slope;
- spire-shaped;
- gable.
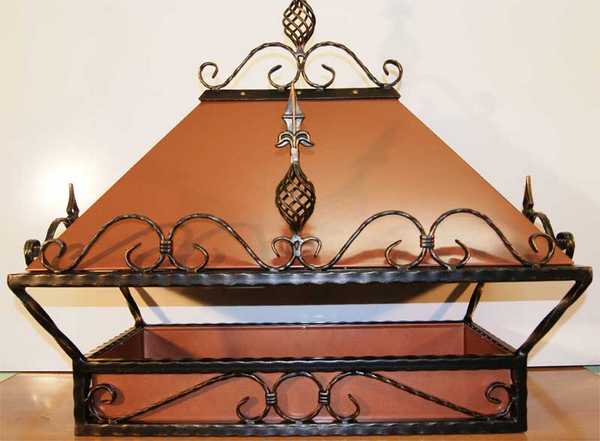
The photo shows a decorative deflector:
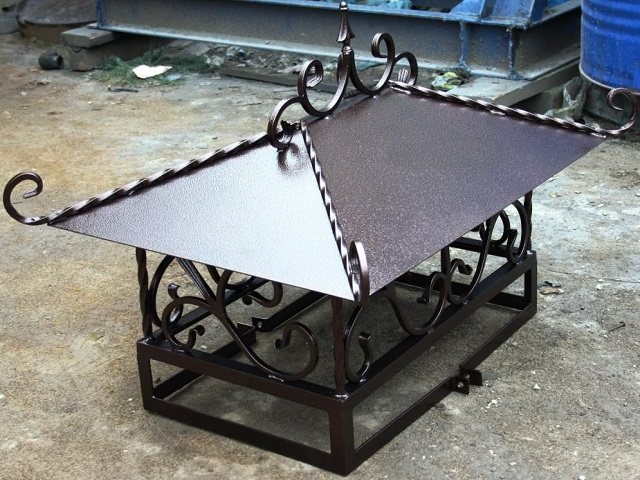
The deflector works as follows. When the wind passes under the hood, certain turbulences appear, pulling the air out of the pipe. Thanks to the additional draft, the smoke rises strictly vertically and does not wander inside. This helps to avoid noise, vibrations, and makes the flame more even. Thanks to the spark arrester, ventilation functions are added to the furnace.
Application
The most critical situations in terms of the possibility of provoking a fire, the required places, the organization of the installation of spark arresters are set out in PPR-2012 - an official document regulating the fire regime in Russia:
- The management of enterprises and organizations is obliged to ensure the good condition of spark arresters / extinguishers installed on heating, technological equipment, shafts of smoke exhaust systems in case of fire.
- It is forbidden to operate tanks, special vehicles for the transportation of flammable liquids, combustible liquids, cylinders with gases, other dangerous goods that are not equipped with spark arresters that are in good condition.
- The chimneys of mobile drying units used to prepare the harvest of grain crops must be equipped with spark arresters.
- It is forbidden to enter autotractor equipment that is not provided with spark arresters to the territory of the gas station during refueling and receiving fuel.
In general, the management of motor transport, agricultural enterprises, heads of local administrations of settlements, where furnace heating of residential buildings, outbuildings outbuildings is obliged to organize the implementation of control over the availability, serviceability of spark arresters, tk. it depends on this whether fires will occur in the jurisdictional territory for this reason.
In turn, each owner / owner of a private residential / country house, bath / sauna must ensure the safe operation of heating / kitchen units / structures - stoves, fireplaces, boilers, barbecues, barbecues, because. any such device that processes solid fuels, emitting hot products of combustion into the atmosphere, poses an increased fire hazard. This is especially true for owners of residential, utility buildings made of combustible building materials, as well as in the presence of such buildings, as well as roofs made of combustible materials in neighboring areas.
This applies both to the construction of new buildings and to the operation of existing buildings, especially since the costs of acquiring, installing spark arresters on chimneys are not so significant, and maintenance, which consists in periodically / if necessary, cleaning grids / grates from accumulated soot, ash, does not presents particular difficulty.
A spark arrestor for a barbecue, barbecue, sauna, summer kitchen or country house is an example of how a device that is quite simple in technical terms can not only make living, outdoor recreation comfortable, but also ensure the safety of people.
A spark arrester certificate is a mandatory documentation, along with a technical passport and an installation and operation manual, attached to a finished factory product upon sale.
The purchase of handicraft products or independent making spark arresters according to advice The "guru" from the Internet is fraught with both loss of money, time and nerves, and failure to achieve the goal due to the non-compliance of products with the design requirements of the standards, the quality of the parts and materials used.
Varieties and principle of operation
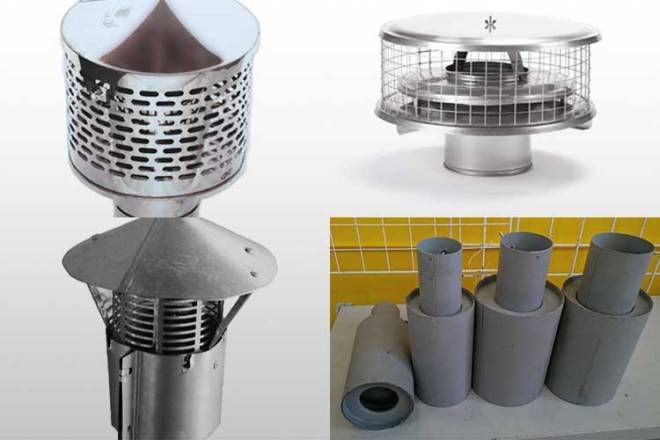
This element can be presented in various designs. However, the following are the most common chimney spark arresters:
- an element in the form of a roof, which is closed with a metal mesh;
- an object with metal mesh walls, which is equipped with a deflector.
The second option is considered the highest quality and optimal, but its cost is more significant, and it is quite difficult to make it yourself.
The main elements of any spark arrester are:
- metal grid;
- spark-extinguishing cover;
- a cover that closes the element when the stove and chimney pipe are not in use.
The principle of operation and mandatory installation locations for spark arresters
Spark arrestor on the chimney
The principle of operation of this device is quite simple, like the spark arrester device itself. Moving along the chimney channel, a stream of smoke with sparks (not completely burned parts of the fuel) encounters an obstacle in its path in the form of a grid or grid of other materials. Such an obstacle cannot interfere with the passage of smoke, so the draft of the heating boiler does not deteriorate. At the same time, the sparks are extinguished by collision with the spark arrestor grid. Such a seemingly simple design provides a fairly effective protection of the building from the occurrence of fire hazards during the heating season.
Building and fire codes require a spark arrester to be installed in the chimney in the following cases:
- Operation of all solid fuel boilers, stoves, fireplaces and devices for providing hot water (titans).
- Buildings that have a potentially high temperature (baths, saunas).
- Buildings whose supporting system is made of combustible materials or flammable roofing is used.
Generally speaking, this device should be installed on almost every chimney. In order to save money and not purchase an expensive factory model, it is quite possible to manufacture and install a home-made spark arrester. At the same time, it should be borne in mind that a mesh with a cell of no more than 5 mm should be used in the design (but it is also not worth using a mesh that is too thick, it can also become an obstacle to smoke).In addition, devices for this purpose should be subjected to regular preventive cleaning to remove soot deposits.


What is a spark arrester?
Spark arrester - a special "superstructure" with an umbrella, which is located on the chimney. It serves to prevent the exhaust of flammable sparks, soot and other combustion products. In design and function, the spark arrester differs from the deflector, which accelerates the air flow to increase traction.
The principle of operation of the spark extinguisher is as follows:
-
Smoke, together with the combustion products contained in it (ash, sparks, tar, soot, etc.) goes up the chimney to the spark arrester cover.
-
The cover changes the direction of the smoke so that it passes through the side screens. To do this, the structure is made in the form of a cone or dome so that the smoke is directed sideways.
-
The metal mesh extinguishes sparks and filters hot ash. Because of this, like any filter, the spark arrester must be cleaned periodically.
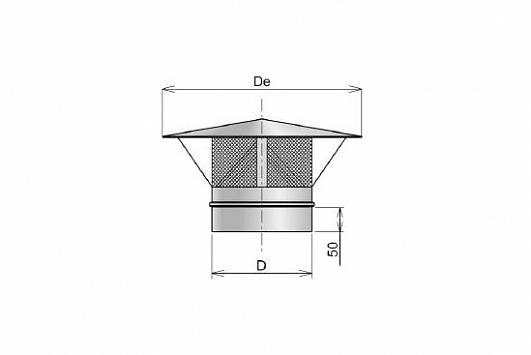
The grid is made of stainless steel and is firmly attached to the chimney or to the nozzle on it. The mesh openings of the grid should preferably not exceed 5x5 millimeters in size.
The umbrella is also made of stainless steel, and performs an additional protective function: it prevents debris, precipitation and birds from entering the chimney. Garbage is highly flammable and causes a fire: fallen leaves, branches, pieces of paper that have accidentally flown in and other flammable objects should not be in the chimney. Birds can get stuck in the net and die by disrupting the spark arrester. Also, the umbrella prevents precipitation from entering the pipe, disrupting its operation.
Where is it used and why is it needed?
Spark arresters can be useful for the pipe channel of any furnace: for a bathhouse, a country house, a cottage, a garage, a workshop and other buildings.
Stoves used for heating and other purposes (fireplace, potbelly stove, bakery oven, etc.) - need a spark extinguisher to avoid a fire.
Varieties of spark arresters
There are several options for creating a spark arrester:
-
The spark-extinguishing mesh is welded directly into the chimney. Unreliable design, clogs very quickly, but its manufacture requires a minimum of time and effort. It may be suitable for one season, after which it will need to be changed, or for rarely used rooms (for example, baths).
-
Elbow on the pipe. It reduces draft, sparks do not fly out as quickly (they can be extinguished better) and a more restrained flow of smoke provides additional heat. Minus - it can be implemented only at the stage of construction of the chimney.
-
Spark arresters are made in the chimney, and the end is tightly welded. Such a design can be made from a pipe cut and simply placed on top of the chimney so that in the future it can be changed without touching the “main” chimney.
-
The head-deflector is installed together with the spark arrester on the chimney. It serves to accelerate thrust and counteracts the creation of reverse thrust. If the weather in the area is mostly calm, and strong wind is rare, then its presence is not necessary.
According to the principle of action, you have to choose only from two options:
-
Standard spark arrestor.
-
Spark arrester with deflector.
The difference between them is significant only if the house is located in an area with frequent thunderstorms, strong winds (mountains, coastal areas, fields) and the pipe runs straight vertically.The deflector then accelerates the air in the pipe and throws sparks through the spark arresters at a higher speed, preventing back draft that can cause a fire. The functionality of the spark extinguisher suffers somewhat.
In forests or near towns, there is no need for a deflector, and only a spark arrestor can be installed (or add a knee to the chimney to slow down smoke and save wood, if it is just being built). The design for extinguishing sparks must be placed on straight chimneys, especially if the roof is made of combustible materials.
Where is it sold and how much does it cost?
Similar products can be found ready-made, in stores that sell stoves and heating boilers. They can also be offered by companies that design and build chimneys.


Spark arrestor on the chimney
Approximate cost:
-
a simple "grid" that is inserted into the chimney: from 100-200 rubles;
-
spark arrestor with an umbrella, mounted on top of the chimney: from 700-900 rubles.
We make a visor with our own hands - how to cope with the task?
In order to make a cap on the pipe yourself, it is enough to have a minimum of locksmith skills and, of course, a great desire. There are many drawings on the Internet for making both complex and very simple umbrellas. It will be easy to choose the option you need. And we'll talk about how to make an elementary fungus-house with four slopes.
DIY fungus
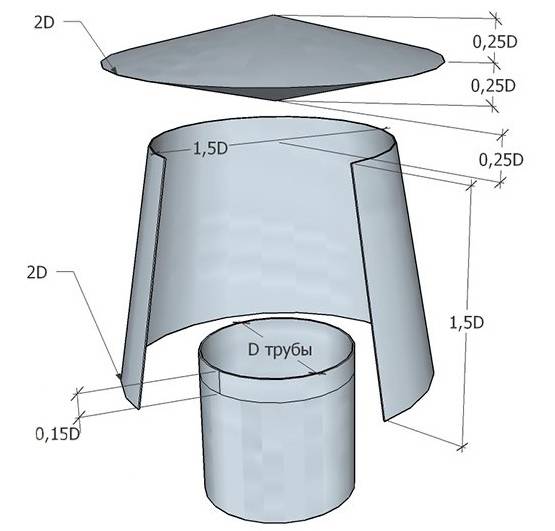
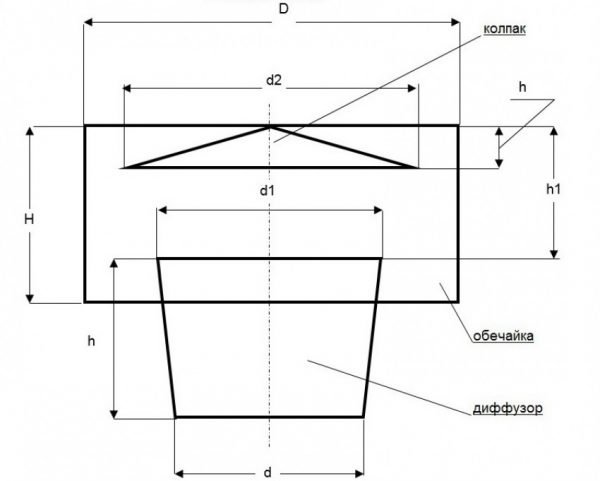
You need to determine the geometric dimensions of the chimney, apply them to the sketch presented above, and then, using the scan below and a special formula, calculate the exact parameters of the cap.
We recommend making an umbrella from 0.5 mm thick powder-coated metal or galvanized. In order not to be mistaken in size, cut out a pattern of the future cap from thick paper (preferably from cardboard). It must be done 1 to 1 (life size). And then apply the pattern to the metal sheets and mark the cut lines on them with any sharp tool.
Cut the metal according to the marks and make a visor according to the following algorithm:
- Bend the workpiece along the lines marked on the pattern with the letter D, after that - along all the dotted lines.
- Drill the sections of the connection of the umbrella with a drill and create a single structure with the help of rivets.
- From galvanized or powder-coated metal, you make support legs and a base. The supports also need to be riveted to each other.
- Install the umbrella made on the base, fasten it with the same rivets.
- Mount your own made cap on the pipe.
Last tip. It is desirable to treat the base under the metal visor with an anti-corrosion compound. In this case, it will be able to resist rusting due to moisture and constant temperature changes for a long time.
Do-it-yourself step-by-step manufacturing and installation of a spark arrester
Consider a step-by-step manufacturing option for a spark arrester with a deflector umbrella, consisting of a body, a mesh structure and a deflector cap.
Necessary materials and tools
For self-assembly of such a spark arrester, you will need the following tools:
- measuring instruments (tape measure, level, etc.);
- screwdriver, clamps, pliers and hammer;
- rivets in a set or a welding machine;
- metal scissors, grinder, drill and drill bits.
Drawing and diagrams
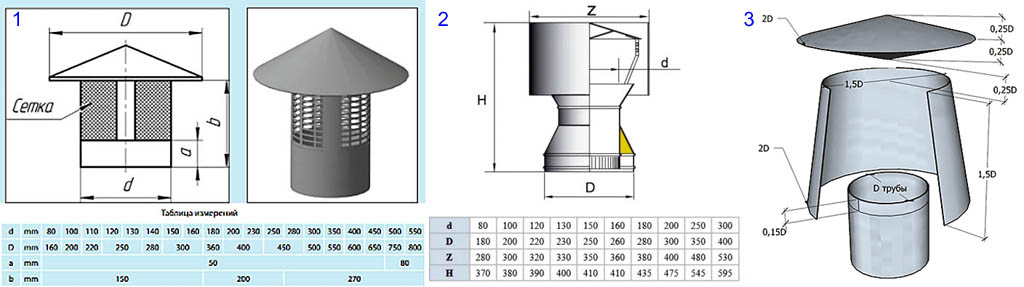
Here is an example of assembling a simple spark arrester based on a common basic drawing.
Let's designate the main components and along the way we will tell you how to make them:
- Cylindrical branch pipe - a glass that will be put on the chimney pipe. For the manufacture you need a metal sheet. We cut out a rectangle from it with a length equal to the length of the circle lying at the base (Fig. 2).
You can calculate the required dimensions using the formula: "L \u003d π × D", where L is the length, π ≈ 3.14, and D is the required cylinder diameter. We carefully bend the resulting strip with a pipe, for example, into a cone, combine the edges, drill several holes on them and fasten them with rivets.
- Metal mesh - a network with cells. It is best to purchase a ready-made stainless steel mesh base. A cylinder based on it is made in the same way as a glass.
- Protective umbrella cap - the main thing here is to correctly pattern the cone. To do this, we calculate the required workpiece radius using the formula: “C \u003d √ (h² + (D / 2)²)”, where C is the length of the lateral component of the cone, h is the required height, D is the diameter. Carefully fold the finished cut out scan with a cone (Fig. 3)
- Racks for connecting parts into a single structure are made from the same sheet metal. (Fig. 4) The length of the posts is determined by the dimensions of the structure, taking into account the required margin from below (approximately 20 mm for 1-2 rivets for attaching to the glass). It is better to place these elements at an angle to the vertical - from the pipe to the edges of the umbrella.
Now about assembly. We attach racks for 1-2 rivets to the “glass” pipe. We insert a mesh cylinder into the space between the racks-holders so that it enters the lower pipe a little and rests on the cone.Now we expose the fungus - we bend the mounting pads of the racks so that they fit snugly against the inside of the cone. We drill through holes through the racks and the umbrella, after which we finally fix the entire structure.
Size calculation
Before starting work, you need to measure the dimensions of the chimney, in accordance with which the sketches of the device will be displayed.
It is equally important to determine the correct size of the cells - they should not be more than 5 mm
Mounting Features
Proper installation depends on the dimensions of the device parts. At the slightest discrepancy between the diameters, it will not work to install a spark arrester on the pipe. A welding machine is used to connect individual elements. The joints obtained after welding must be thoroughly cleaned. For final fixing, you will need rivets or brackets.


Video: A chimney spark arrester will save your life and property
This is interesting: The main fire trucks - general and targeted applications
Conclusions and useful video on the topic
As a spark arrester, you can use a deflector in which a protective plate is additionally installed - a skirt with raised edges surrounding the device. About this model in the video:
About the features of the spark arrester and its structure in the video clip:
Step-by-step improvement of the deflector, which makes an excellent spark arrestor. What is required for this video will tell:
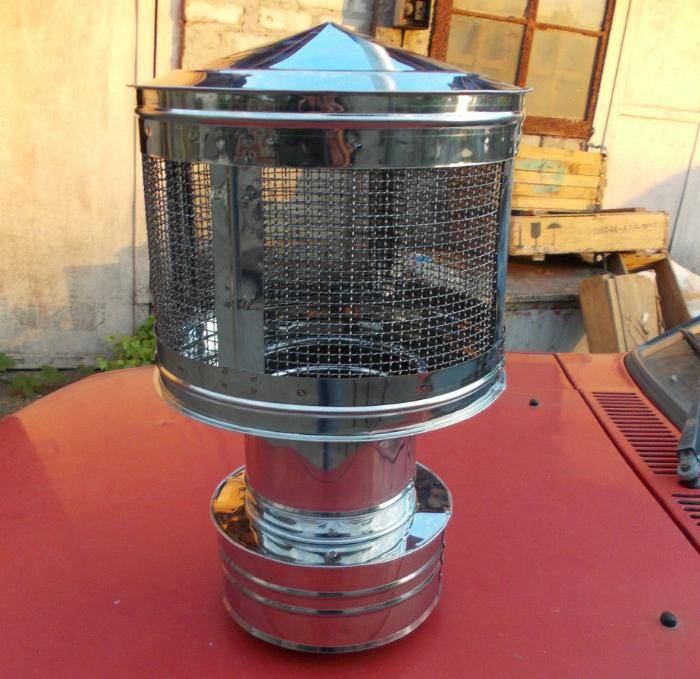
An overview of the finished model of the mesh spark arrester, which is completely ready for installation on the chimney, in the video clip:
A chimney spark extinguisher is a vital device that can save property and people's lives.And the price does not bite - especially since you can make a spark arrester with your own hands using improvised materials.
Such a precaution will help protect the house from accidental fire. After all, the sparks flying out of the chimney will go out, overcoming the path through this metal device.
Do you have any questions, or would you like to share your personal experience in making a chimney spark arrester? Please keep to this article. You can attach a photo of your homemade product to the feedback - the contact form is located below.


