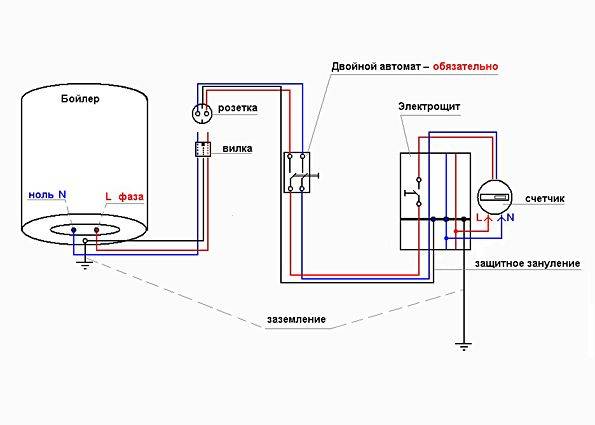
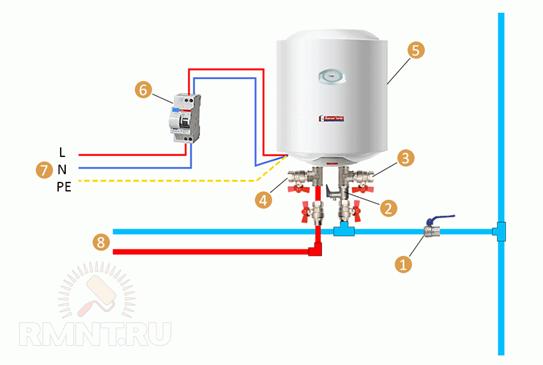
- Standard wiring diagram
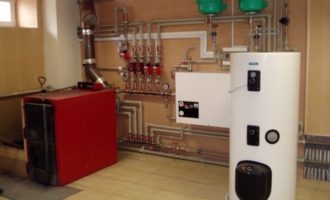
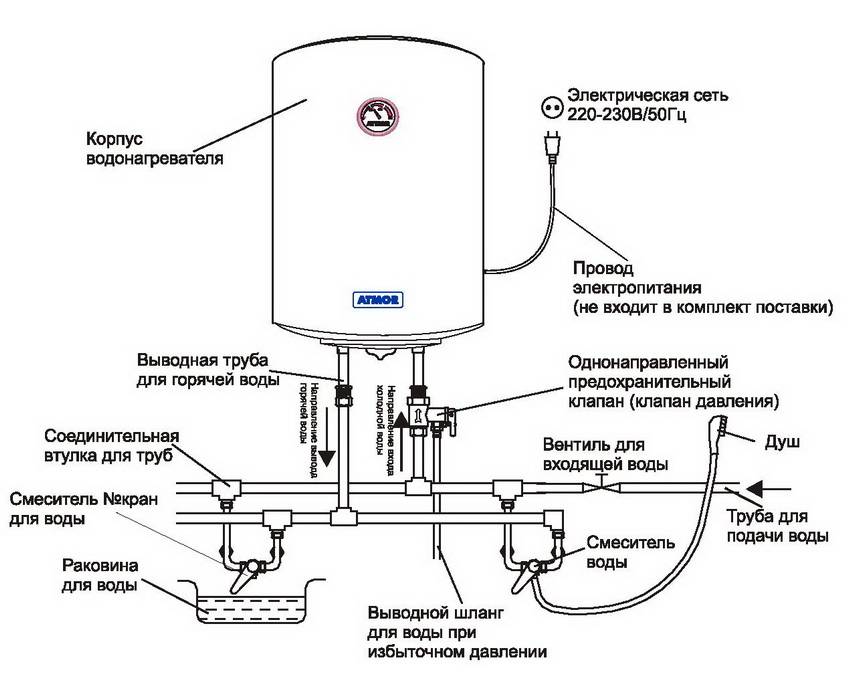
- Water heater and autonomous water supply
- Connection to the water pipe
- Insertion into a pipe made of metal-plastic
- polypropylene
- Steel pipes
- Step-by-step instructions for installing a boiler
- Storage type equipment: device and principle of operation
- Various boiler connection schemes
- Scheme of connecting a water heater in an apartment
- Connection to the plumbing system
- Briefly about the principle of operation of the drive
- Materials and accessories
- Do-it-yourself boiler installation - is it possible?
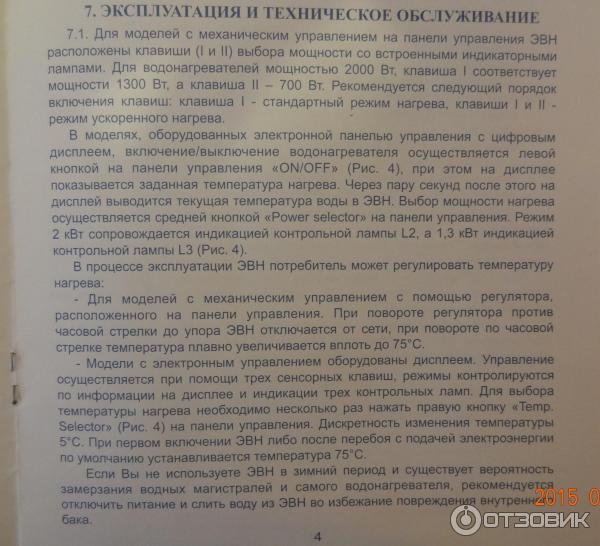
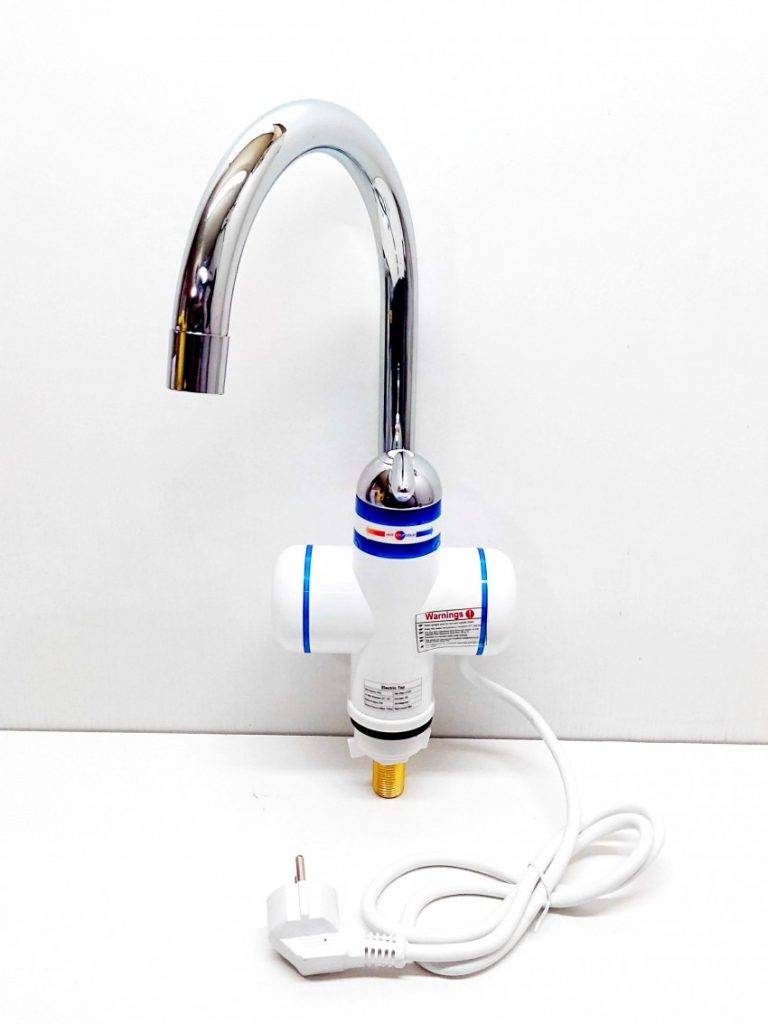
- How to install a flow water heater
- Organization of power supply
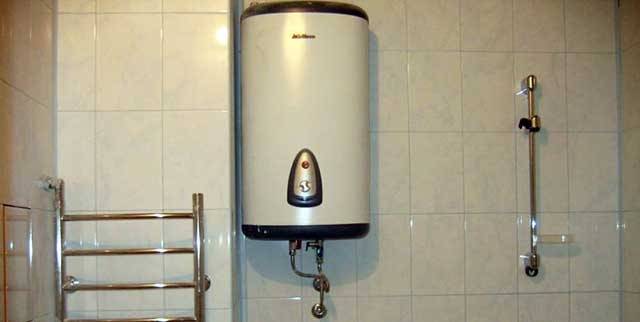
- Selecting an installation site
- Wall mounting
- Criteria for error-free installation of equipment
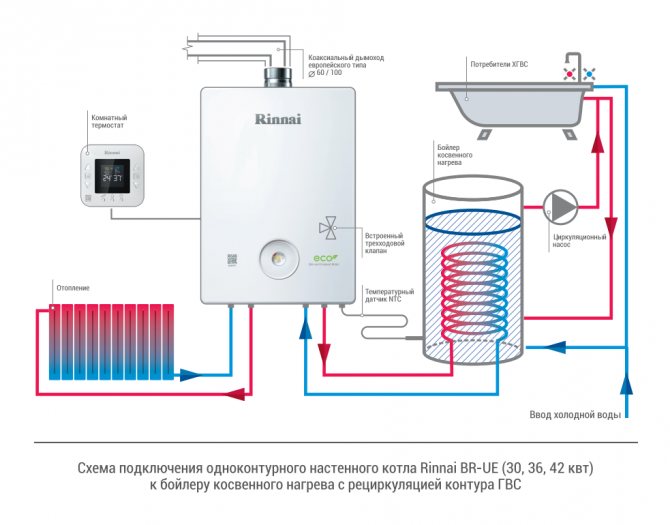
- Installing an indirect heating boiler
Standard wiring diagram
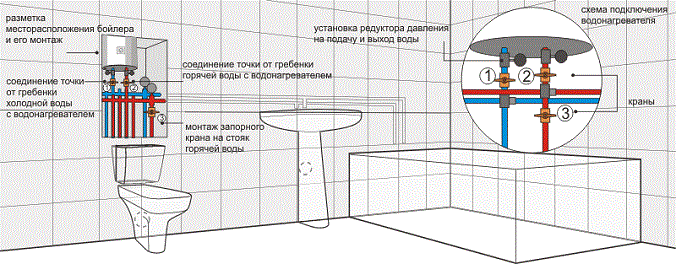
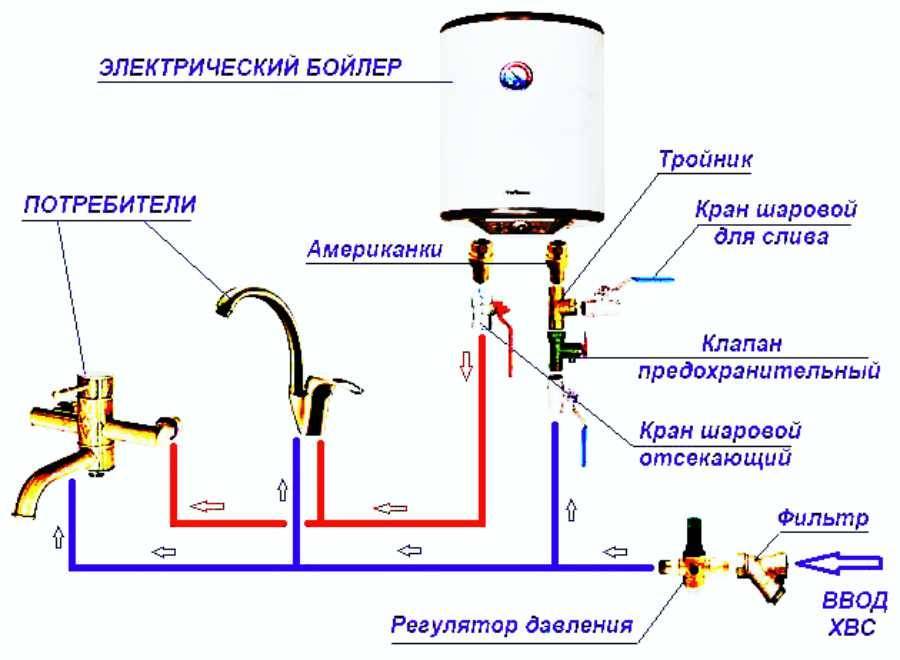
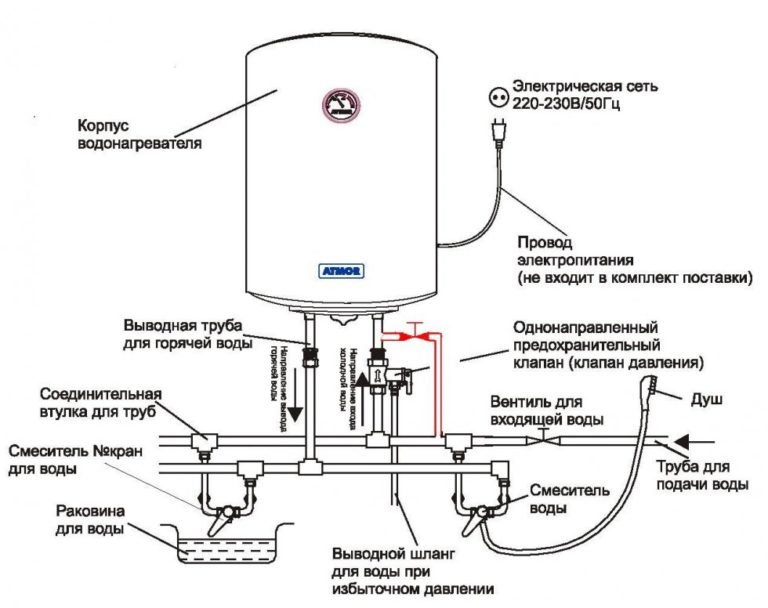
A person who has a general idea of the layout of the water supply network on an apartment scale and the concept of operation of a storage electric water heater will not be difficult to figure out with the order of its connection to the pipes of cold and hot water supply.
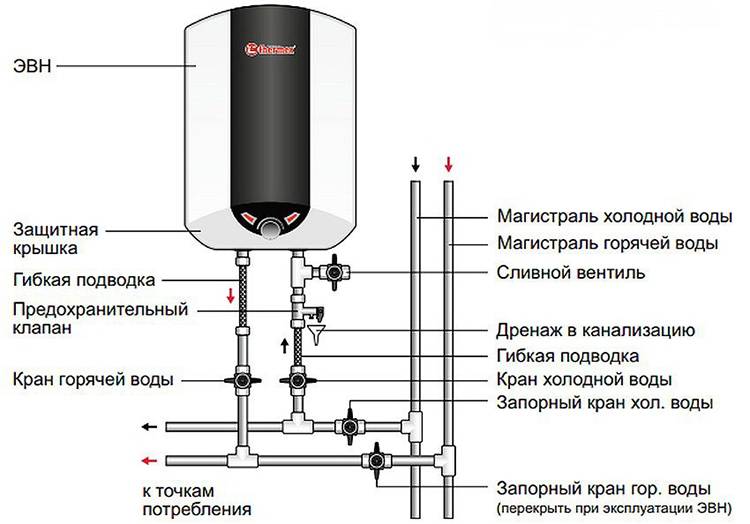
Boiler connection diagram in the apartment
So, cold water must be supplied to the boiler
This is done by inserting (mounting) a tee in the most convenient place under specific conditions.
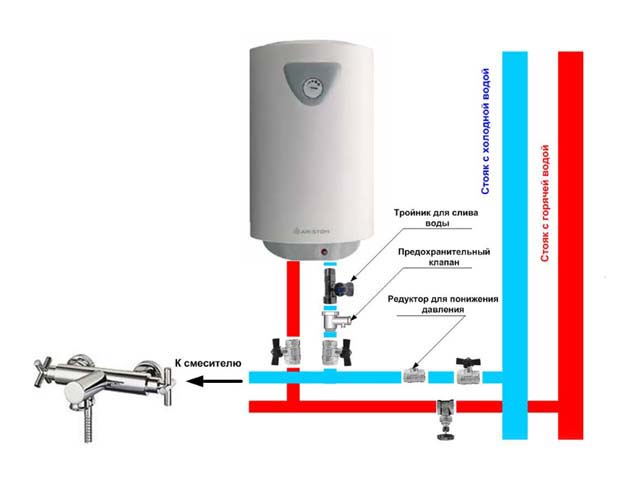
A safety group must be installed on the supply pipeline - one or more special valves.Their importance and installation rules will be discussed below in a separate section of the article. The outlet pipeline of the heated water cuts into the network of the local apartment hot water supply - directly to the passing pipe - through the installed tee, or, preferably, to the collector
If the apartment is connected to a centralized hot water network, a tap must be installed that will cut off, as necessary, the internal network from the common riser.
The outlet pipe of the heated water cuts into the network of the local apartment hot water supply - directly to the passing pipe - through the installed tee, or, preferably, to the collector. If the apartment is connected to a centralized hot water network, a tap must be installed that will cut off, as necessary, the internal network from the common riser.
- This generally accepted scheme can be supplemented with some elements. So, many masters prefer to install tees with taps in front of the entrances to the boiler on both hot and cold pipes, which make it easy to empty the electric heater tank for maintenance or repair work. This somewhat “weights” the installation process, but gives certain conveniences in the future.
-
If pressure surges often occur in the cold water supply network, or the water pressure goes beyond the values \u200b\u200ballowable for a particular boiler, a water reducer will be required. It will equalize the pressure and protect the electric heater from hydraulic shocks.
Another addition would be a thermostatic mixing valve.It will provide an even, pre-set temperature in the hot water supply system, eliminate the possibility of possible burns, etc. However, to install it, you will need to insert another tee in the cold water pipeline - in the thermostatic valve itself, hot and cold flows are mixed to the required temperature.
Scheme using a thermostatic valve
Water heater and autonomous water supply
Autonomous water supply is often gravity, that is, the source of water is a tank installed in the attic, into which water is pumped using a pump.
- If less than 2 m: a tee is screwed immediately to the outlet fitting of the tank, the outlets of which are connected by pipes to the mixer and the inlet pipe of the water heater.
- More than 2 m: a tee for distributing water to the boiler and mixer is installed below the level of the boiler, laying a pipe to it (tee) from the tank.
The first scheme differs from the second one in the presence of a safety valve, which is installed on the outlet (hot) pipe of the water heater.
Connection to the water pipe
To connect the water heater to cold water and hot water, you will need:
- wrenches (it is better to take a pair of adjustable wrenches);
- FUM tape;
- tees for tapping into existing pipelines;
- two shut-off valves;
- safety and check valves;
- plastic pipes or hoses in a metal braid;
- pipe cutter and soldering iron for plastic or appropriate fittings;
The process of connecting the boiler to water pipes is reduced to connecting two pipes (inlet with cold and outlet with hot water) to the threaded pipes on the heater body. And the main point here is the correct insertion of tees for these branches into the existing water supply pipeline.
The procedure for connecting the boiler to hot water consumers
Insertion into a pipe made of metal-plastic
If the water supply is made of metal-plastic pipes, then compression or press fittings will be required. With the first, when connecting the water heater, it is easier to work, you need to tighten the nuts with wrenches. And the latter are more reliable, but form an integral connection.
To install the tee, you will need to cut a section of the appropriate size on the pipeline. To do this, it is better to use a pipe cutter, but you can also take a hacksaw for metal with fine teeth. Just make sure that the aluminum layer of metal-plastic does not protrude on the cut edge. The foil can be pulled inside the pipe, due to which the latter will be narrowed.

Boiler connection diagram and consumables
polypropylene
If you need to connect the boiler to a water pipe made of polypropylene pipes, you will need a soldering iron. The incision is made in the same way as in the case of metal-plastic. Then the tee is heated on one side and soldered to the pipe, and then the second end is soldered. On the side there is a free end with a thread for connecting the outlet from the water heater.
Variants of water supply schemes through the boiler
Steel pipes
You will have to tinker with steel pipes. Here it is necessary either to take on the grinder and then cut the thread to connect the tee with a die or a screw clamp, or install an overhead clamp (“vampire”, tee-clip) and drill the pipeline.
The first option for connecting the water heater to the water supply is more difficult to install and more reliable in operation, and the second is faster and simpler, but not so durable.
But here is how to connect the drain of the washing machine to the sewer - you can simply hang the drain hose on the bathtub, or you can install a tee with a side outlet. In the second case, the reliability will be an order of magnitude higher.


With steel water pipes, everything is in many ways similar. However, both an inserted tee and an overhead clamp give approximately the same result. Moreover, if there is no experience as a grinder, then it is better to use the second option.
Steel pipes are not easy to connect, so more often this option for connecting to a boiler for industrial needs or intensive use
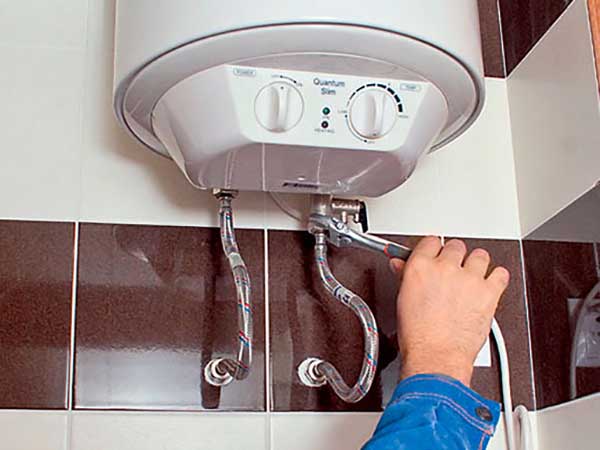
Step-by-step instructions for installing a boiler
It is better to work together, if this is not possible, then call an assistant at least just to hang the water heater.
Step 1. Decide on the installation location of the storage boiler, draw up a layout of pipelines. You will need to supply cold water and hot water.
A water heater will be installed here. The dimensions of the room correspond to the dimensions of the boiler
We recommend connecting according to the simplest and most reliable scheme. There is a shut-off valve at the cold water inlet, followed by a safety valve assembly with a return. A valve is not needed at the hot water outlet; for repairs, it is enough to close one. If you wish, you can put valves at every turn and on every pipe, but the result of such work will only be negative. In addition to having to buy unnecessary elements, installation time will increase and the number of possible leaks will increase. Practice shows that all other shut-off valves are never used, only one inlet is always blocked.
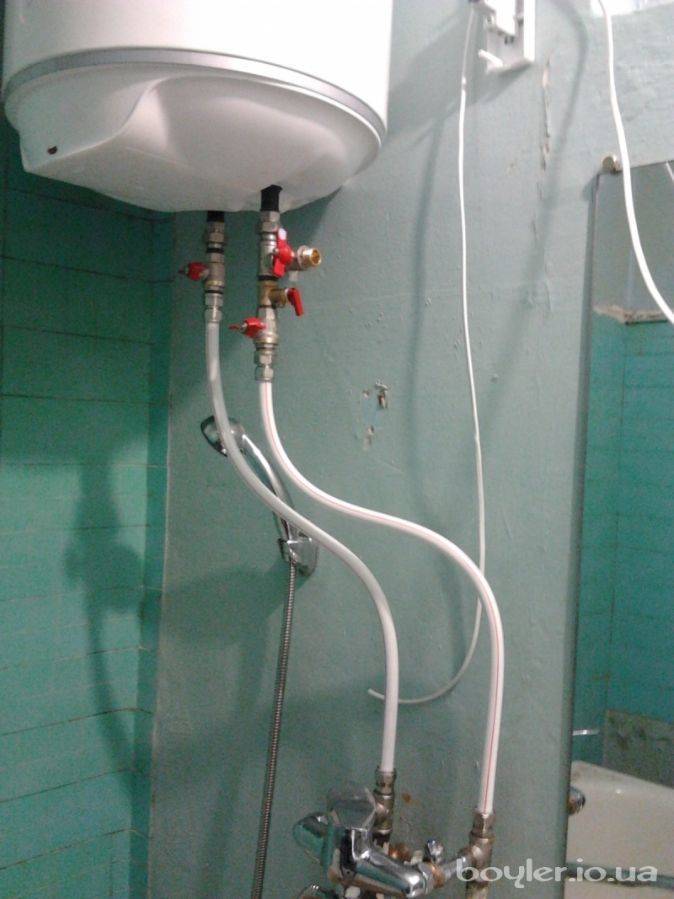
If you have new construction and pipe sockets have already been made in the wall, then the work is much simplified. And if the boiler is installed in an already operated bathroom? The water supply is best taken from the sink. Dismantle the connection at the cold water inlet and install a tee there. Connect hot water to an existing shower faucet. You can do this work quickly by using outdoor piping and flexible hoses, or you can ditch the walls and hide communications. The second option is much better, but requires more effort. In addition, it is not always possible to restore wall cladding with ceramic tiles in its original form. Decide for yourself which option to choose.
Step 2. Unpack the water heater and check the contents. What should be in the delivery is indicated in the manufacturer's instructions. In the same place, by the way, an approximate installation scheme is also given. From this diagram, only one point is important for you - how to connect the safety valve. We have already mentioned that it is located in the same building with the reverse.
Storage type equipment: device and principle of operation
The device is a heat-insulated tank of arbitrary shape. A heating element is mounted in it, which heats the water to the temperature set by the owner.
Electric water heaters - a practical solution for uninterrupted hot water production
It is only important to correctly determine the volume of the device. It varies from 35 to 85C
In a heat-insulated container, the heated liquid retains its temperature for 2-3 hours.After the water cools down by 0.5C, the automation is activated and the heater turns on to heat the liquid.
It varies from 35 to 85C. In a heat-insulated container, the heated liquid retains its temperature for 2-3 hours. After the water cools down by 0.5C, the automation is activated and the heater turns on to heat the liquid.
When the set temperature is reached, the device switches off. This mode of operation allows the device to save energy.
Heaters built into the tank can be tubular or spiral. The first option is more reliable, not afraid of air congestion, but over time it is sure to become covered with scale.
Spiral devices are not afraid of scale and they heat up an order of magnitude faster. The tank can be steel or plastic. Its inner surface is covered with enamel or glass-ceramic.
So that the welds of the steel tank do not rust, special anode rods are inserted into the tank, which prevent the iron from oxidizing. They need to be changed at intervals of 5-8 years.
The standard design of the water heater includes a thermostat responsible for maintaining the set temperature. The instrument control system can be either manual or automated.
The device can be equipped with an additional function for rapid heating of water. Storage water heaters differ in volume, which, in turn, affects the rate of water heating.
The larger the volume, the longer the equipment will warm up the liquid. It is advisable to accurately calculate the need for hot water so as not to force the device to idle and at the same time not experience a shortage of it.
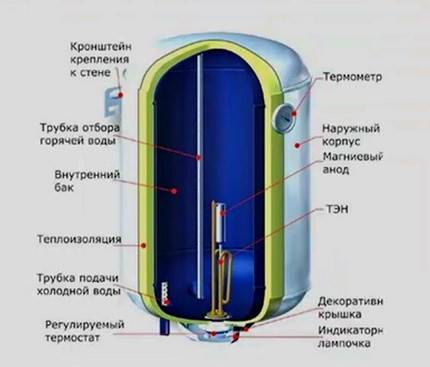 The diagram shows the general arrangement of an electric storage water heater
Various boiler connection schemes
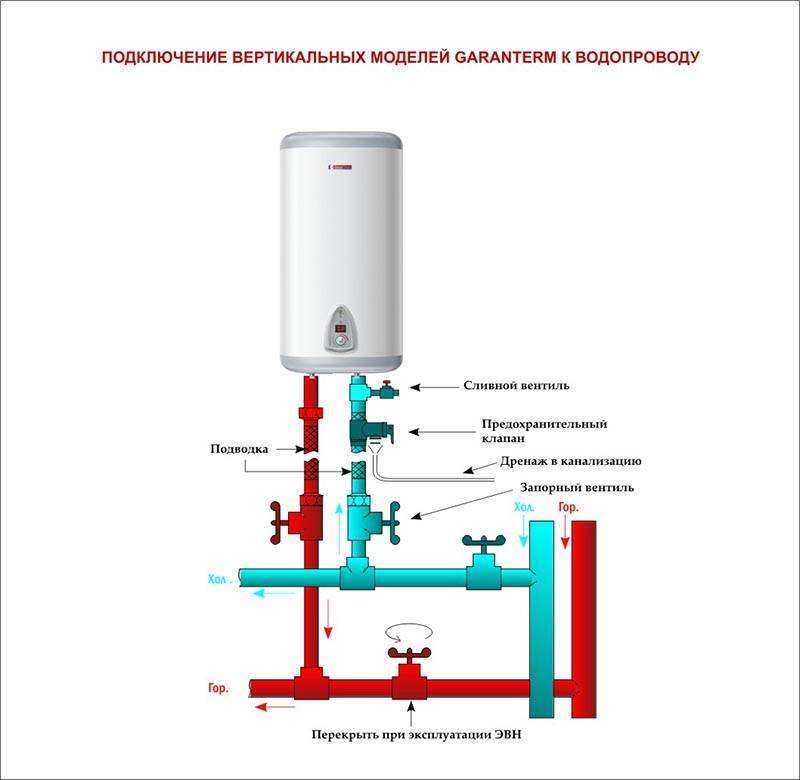
To connect the boiler to the water supply, they usually use the scheme shown below:
 The diagram shows the procedure for connecting a storage water heater to a conventional plumbing system. The location of the taps, shut-off valve, drain, etc. is indicated.
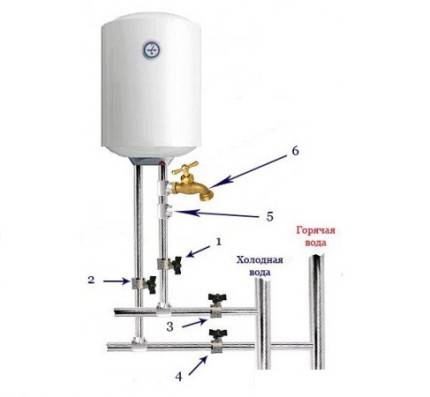
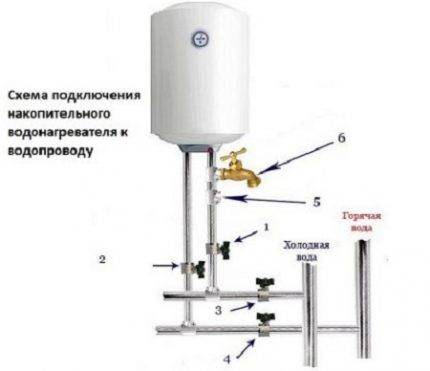
The figure shows the conditional arrangement of risers, which are indicated by the words “cold water” and “hot water”. The numbers “1” and “2” refer to conventional stopcocks.


One of them is opened so that cold water enters the tank, through the other, the liquid heated to the desired temperature is supplied to the hot part of the water supply.
In those periods when the storage water heater is not working, it is recommended to close these taps.
Under the numbers "3" and "4" is another pair of taps. These devices are responsible for the flow of water into the apartment from a common riser.
Usually they are available in every apartment, regardless of whether the apartment has a boiler or not. And if tap “3”, through which cold water flows, is closed only if it is necessary to stop the supply of water to the apartment, then tap “4” should be completely closed during the operation of the heater.
If this is not done, then hot water from the boiler will go into the house riser.
The number “5” is the mounting location of the check valve. This is a very important element of the water heater connection system, as it protects the equipment from damage.
In the event of a shutdown of cold water (which happens not as rarely as we would like), it is the check valve that will not allow the liquid to leave the storage tank of the boiler.
In the absence of a check valve, water will leave the device back into the riser. As a result, the heating elements will run idle, which will lead to their rapid failure.
It should be remembered that boiler manufacturers usually include a non-return valve in the delivery package, so it is necessary to clarify its presence even during the purchase of the device.
 When connected to the water supply system of the storage heater, stopcocks are used, with which you can control the flow of water into the tank
The tap, which is marked with the number “6”, is designed to drain water from the water heater tank. This crane is used extremely rarely, for example, if the device needs to be repaired or it is intended to be dismantled.
In this case, according to the technology, the water from the tank must be drained. Do not neglect the installation of this element, since emptying the large capacity tank in other ways can be quite laborious.
The drain valve must always be slightly higher than the non-return valve, otherwise it will not be possible to remove water from the tank.
Thus, if the storage water heater is working, then taps “1”, “2” and “3” should be open, and tap “4” should be closed. If the boiler is turned off, it is necessary to close the taps “1” and “2”, and the taps “3” and “4” should be opened.
Detailed information on connecting a storage water heater to the water supply system is presented in the following video:
Scheme of connecting a water heater in an apartment
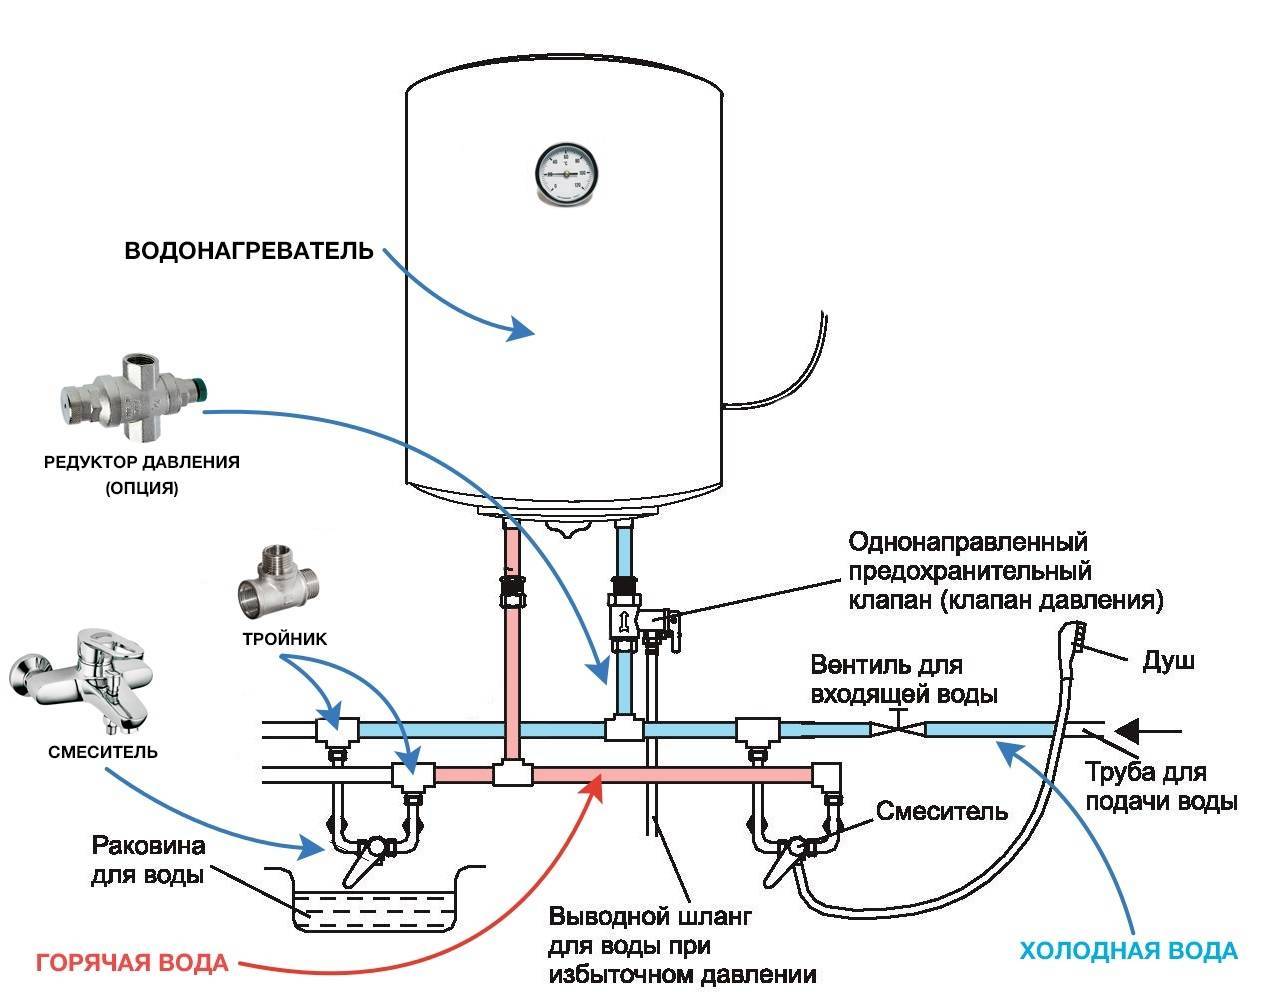
The presence in the apartment of a centralized water supply system implies compliance with the scheme based on the elements presented:
- inlet pipe with unidirectional pressure relief valve;
- outlet water hose for overpressure;
- mixers;
- connecting sleeve for water supply;
- outlet pipe for hot water.
In the process of connecting and operating the water heater, you will need to follow a few simple recommendations given by the manufacturer.
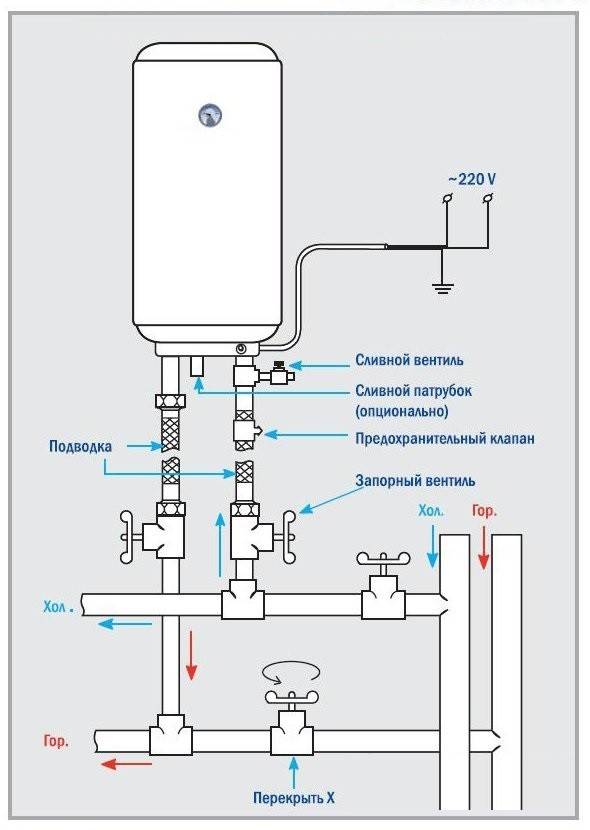
Scheme of connecting EWH to the water supply
It is important to remember that connecting a device that is not filled with water to the electrical network is strictly prohibited, and the liquid that has passed through the water heating equipment should not be used for food purposes. In order for the installation process of the water heater to go smoothly, and the device itself to be used for the longest possible time, it is necessary to use the parts recommended by the equipment manufacturer.
In order for the installation process of the water heater to go smoothly, and the device itself to be used for the longest possible time, it is necessary to use the parts recommended by the equipment manufacturer.
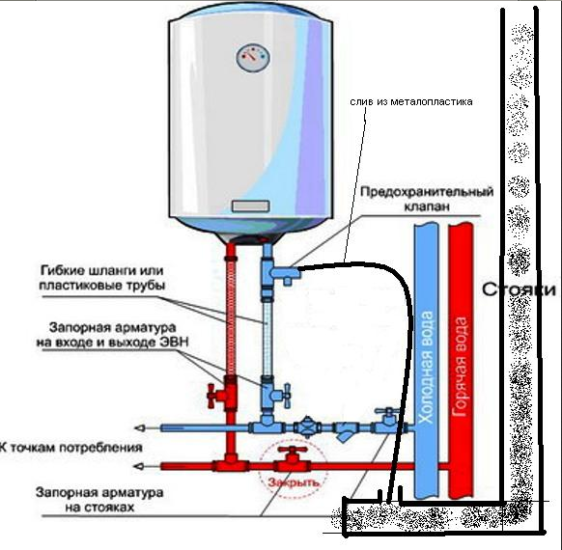
Connection to the plumbing system
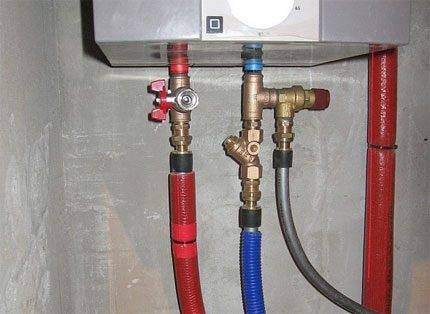
The drain hole of this type of heaters, regardless of the model, is usually located at the bottom. First, you must assemble and install the so-called security group. This is a set of valves and fittings designed to prevent various emergencies that may occur during operation of the device.
An adapter is installed at the top, which is often called the “American”. Next, a bronze tee is screwed on. A non-return valve is attached to its lower part, which prevents water from pouring back into the plumbing system. Another tee is attached to the side branch of the tee.


 The diagram shows in detail the connection of the storage water heater: hot and cold water risers, water taps (1 and 2); stopcocks (3 and 4); check valve (5); drain valve (6)
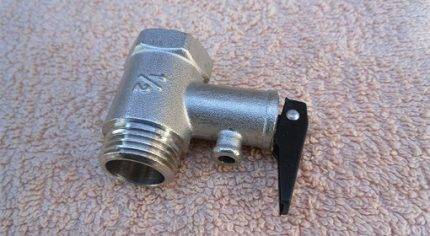
A safety valve of 6 bar is attached to it in order to make it possible to automatically lower the pressure inside the tank if it has reached a critical level.
A special compression fitting for a water pipe is attached to the same tee. Through it, at excess pressure, part of the water will be discharged from the storage tank into the sewer.

Scheme of the storage water heater safety group. This set of devices prevents dangerous emptying of the device's container and removes excess water if the pressure inside exceeds the norm.
After installing the device, be sure to make sure that the pressure valve hole remains open, otherwise the device simply will not work.
All threaded connections should be sealed and sealed. Experts recommend allowing the sealant to dry for at least four hours.
The photo clearly shows and signs the elements of the storage water heater safety group
When installing the device, it is important to strictly follow the sequence of their connection. To connect the device to the cold water riser, steel, copper, plastic or metal-plastic pipes can be used.
When doing the installation yourself, plastic pipes are most often used, since it is relatively easy to solder them.
To connect the device to the cold water riser, steel, copper, plastic or metal-plastic pipes can be used. When doing the installation yourself, plastic pipes are most often used, since it is relatively easy to solder them.
Some use flexible hoses for this purpose, but this solution does not justify itself. As practice has shown, such elements wear out quickly.
The individual elements of the storage water heater safety group are connected with a thread. In accordance with the norms, these places should be sealed and treated with sealant.
It is clear that before inserting pipes, hot and cold water entering the apartment should be shut off. A shut-off valve should be installed between the cold water riser and the heater so that, if necessary, the water supply to the device can be turned off. All connections are carefully sealed.
Now you need to bring another pipe that will connect the heater to the hot water system in the apartment. In this area, you will need another shut-off valve: between the hot water riser and the heater.
This tap must always be turned off so that heated water from the boiler does not enter the common hot riser of the house. Again, you need to monitor the sealing and sealing of all connections.
The shut-off valve for cold water between the heater and the risers must be installed in such a way that, when closed, it does not interfere with the flow of water to other consumers, cutting off only the heater.
And the connection to the hot water supply system must be made so that, if necessary, it is possible to restore the flow of hot water from the common riser to the system in the apartment.
On this connection to the plumbing system can be considered complete. Some experts at this stage recommend performing a preliminary check: fill the container with water, and then drain it and see if there is a leak.Such a check can only be done after the sealant has completely dried on all joints.
Briefly about the principle of operation of the drive
For proper installation and connection of the water heater to engineering networks, you need to know the device and the principle of operation of the device. The design and scheme of work looks like this:
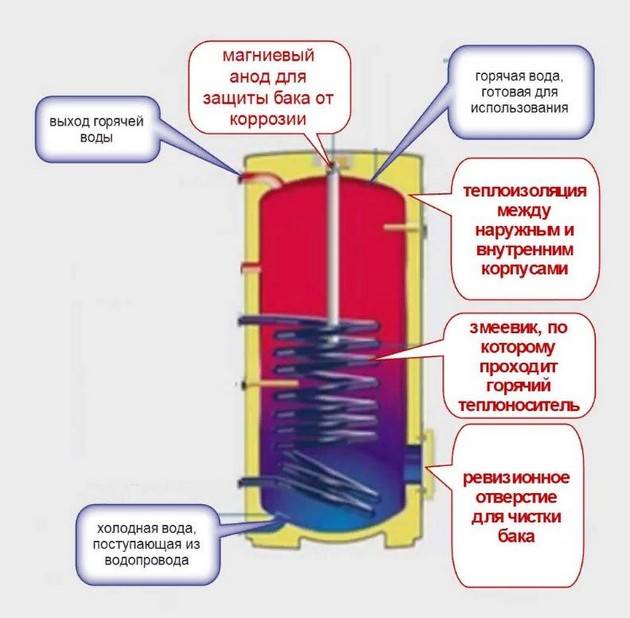
- The main container - stainless steel or enameled steel - is filled with cold water through a pipe that goes into the lower zone of the tank.
- When filling, the air is completely forced out into the DHW system through the hot water intake pipe located in the upper zone of the tank.
- After turning on the boiler, the water is heated by a tubular electric heater (abbreviated as a heating element) built into the bottom of the tank.
- On the same site with the heating element, an automation unit is installed - a submersible temperature sensor and a thermostat. When the container temperature reaches a predetermined threshold, the automation de-energizes the heating element. After the water has cooled down by 3-5 °C, the thermostat turns on the heating again.
Sectional diagram of an electric heating tank - A boiler safety group is placed at the inlet from the water supply. The part consists of a safety and check valve, the function is to relieve excess pressure from the expansion of the heated liquid and prevent water from leaving the tank back into the pipe.
- Next to the heating element is a magnesium anode that protects the metal of the tank from electrochemical corrosion. Outside, the container is insulated with a layer of polyurethane, then closed with a decorative casing, as shown in the sectional diagram.

The device of vertical and horizontal boilers is identical - the intake pipe is at the top, the supply pipe is at the bottom. Hence the main problem of servicing any storage water heater arises - it is impossible to drain the water through the tap.The issue is solved in different ways, depending on the strapping scheme, which we will consider later.
Materials and accessories
As a rule, storage and instantaneous water heaters are equipped with mounts - brackets or brackets designed to hang the unit on the wall. The remaining components and pipeline fittings will have to be bought independently.
To install and properly connect an electric boiler according to a standard scheme, prepare a set of materials:
- 3 ball valves DN15;
- 2 American women of identical diameter;
- tee DN15;
- safety check valve intended for boilers;
- metal-plastic pipes (cross-linked polyethylene, corrugated stainless steel or polypropylene are also suitable) with connecting fittings;
- three-core copper cable VVG with a conductor cross section of 2.5 mm²;
- automatic two-pole switch, rated for a current of 20 amperes.
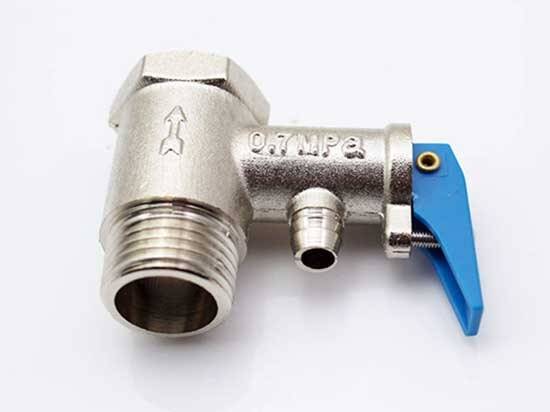
This is what the pressure relief valve looks like from the tank
If the pipe connections to the storage water heater are planned to be wall-mounted, it is better to take a pipe made of metal-plastic, stainless steel or cross-linked polyethylene. PPR wiring is not recommended to be hidden. Do not forget about the brackets for attaching pipes to the walls - the pipes should not load the boiler pipes with their own weight.


The length of the cable for connecting to the mains depends on the remoteness of the main control panel, from where a separate power line will have to be routed. The second connection option is to the nearest power distribution box. For laying wiring in an open way, prepare plastic cable channels or a corrugated sleeve.
With hidden laying, pipes immediately go into the wall
The option of connecting an indirect heating boiler depends on the type of boiler and the heating scheme. But you will definitely need pipes with fittings and a low-power circulation pump that develops a pressure of 4 m of water column (0.4 bar).
Do-it-yourself boiler installation - is it possible?

Do-it-yourself boiler installation
We note right away that in the absence of minimal knowledge in the field of plumbing, it is better to entrust the installation to specialists. This is more true for apartments, because if mistakes are made during installation, then the neighbors below will suffer first of all.
Simply put, self-installation is a risky procedure. But if you carefully study the manufacturer's instructions and act strictly according to the technology, then no problems should arise, especially since this option has its advantages, such as:
- cost reduction - you do not have to pay for the work of a plumber;
- saving time;
-
acquisition of skills that will be required for the further operation of the equipment.
Moreover, if repairs begin in the room in which the water heater is installed, then no specialists will be needed to dismantle the device, since everything can be done by hand.
How to install a flow water heater
The process of installing a instantaneous water heater with your own hands includes a preparatory period
First of all, it is important to correctly determine the model. To choose the device that is optimally suited for its characteristics, the following factors are taken into account:
- the number of people living in the house;
- maximum hot water consumption with all taps open at the same time;
- number of water points;
- desired water temperature at the outlet of the tap.
Having a clear idea of the requirements, you can proceed to the selection of a flow heater of suitable power
Separately, it is worth paying attention to other nuances: the complexity of installation, price, maintainability and the availability of spare parts for sale.
Organization of power supply
The power of household instantaneous heaters varies from 3 to 27 kW. The old electrical wiring will not withstand such a load. If a non-pressure device rated at 3 kW can still be connected to an existing electrical network, then powerful pressure models require a separate line.
A powerful water heater cannot be connected to a power outlet. From the device lay a straight line to the electrical panel. The circuit includes an RCD. The circuit breaker is selected according to the power of the flowing electrical appliance. According to the standard, the indicator is 50–60 A, but you need to look at the instructions for the device.
The cable cross section is selected in the same way, taking into account the power of the heater, but not less than 2.5 mm 2. It is better to take a copper wire and be sure to have a three-core one. The instantaneous water heater cannot be used without grounding.
Selecting an installation site
The choice of the location of the water heater is determined by the convenience and safety of using the device:
When installing a water heater in an apartment, it is important to choose a place so that there is a free approach to the device. There are control buttons on the case. All family members will set the optimum water temperature according to their preference.
The installation of the electrical appliance is carried out so that during the use of a shower or sink, splashes of water do not fall on its body.
The device is placed as close as possible to the water points and the electrical panel, taking into account the convenient connection to the water supply.
All family members will set the optimum water temperature according to their preference.
The installation of the electrical appliance is carried out so that during the use of a shower or sink, splashes of water do not fall on its body.
The device is placed as close as possible to the water points and the electrical panel, taking into account the convenient connection to the water supply.


The choice of installation location depends on the type of flow device:
- Non-pressure low-power models are designed to connect one draw-off point. The water heater is often made in the form of a faucet mounted on the sink. Non-pressure models are mounted under the sink or on the side of the sink. The device can be equipped with a hose with a shower head. It will be optimal to install a flowing water heater in the bathroom near the shower. If the question arises, how to connect a non-pressure instantaneous water heater, there is only one answer - as close as possible to the mixer.
- Powerful pressure models are able to provide hot water for more than two water points. It is allowed to install an electrical appliance near the cold water riser. With this scheme, hot water will flow to all the taps of the apartment.
The presence of IP 24 and IP 25 markings on the water heater means protection against direct water jets. However, it's not worth the risk. It is better to place the appliance in a safe, dry place.
Wall mounting
The instantaneous water heater is installed on the wall by hanging. Included with the product are dowels with self-tapping screws, mounting plate, brackets. When installing an electric flow-type water heater, two important nuances are taken into account:
- Support strength. A wall made of solid materials is perfect. The device is characterized by light weight.It can be fixed even on a plasterboard wall. The main thing is that the wall does not stagger, and a mortgage was provided under the plasterboard for reliable fixation of the brackets.
- During installation, the ideal horizontal position of the body of the flow device is observed. At the slightest inclination, an air lock is formed inside the water heater chamber. A heating element not washed by water in this area will quickly burn out.
Installation work begins with the markup. The mounting plate is applied to the wall and the places for drilling holes are marked with a pencil.
It is important at this stage to set the horizontal level. Holes are drilled according to the markings, plastic dowels are driven in with a hammer, after which the mounting plate is screwed with self-tapping screws. Support base ready
Now it remains to fix the water heater body to the bar
The supporting base is ready. Now it remains to fix the body of the water heater to the bar.
Criteria for error-free installation of equipment
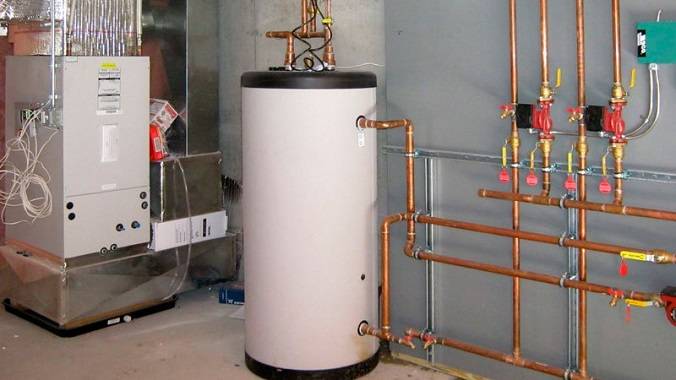
Among the main points of installation, which should be focused on in order not to make mistakes, is the correspondence of the diameters of the pipelines in relation to the inlet fittings, as well as the cross section of the cable supplying the electric heater of the boiler. The diameter of the supply pipes must ensure the free flow of water along the inlet / outlet lines
Therefore, a larger diameter of the sleeves with the transition to the size of the fittings is still acceptable, but the cross section of the pipelines is smaller than the boiler inlet pipes, already seen as a gross mistake
The diameter of the supply pipes must ensure the free flow of water along the inlet/outlet lines. Therefore, a larger diameter of the sleeves with a transition to the size of the fittings is still acceptable, but the cross section of pipelines smaller than the boiler inlet pipes is already seen as a gross mistake.
A good example of equipping an electric heating boiler installation with all the necessary fittings. It should also be noted here that the insulation of all incoming and outgoing lines was qualitatively (error-free)
The picture is similar for the cross section of the supply cable. It is not forbidden to use a cable with a larger cross section, and it is strictly forbidden to use a cable of a smaller cross section.
True, a cable with a cross-section increased against the norm creates difficulties when laying in channels, it takes up more free space. Here, it seems logical to select the exact cross section of the wire depending on the load current.
The power outlet is usually mounted directly at the device. The mounting height of the socket from the floor level is not less than 1.5 m. Household boilers are designed for single-phase alternating current 220-250 W. The current load, as a rule, is not less than 10 A.
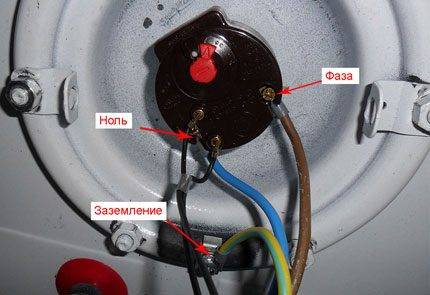
Connecting the boiler system according to the electrical diagram. Such a variant of connections can be considered made unmistakably. The cross section of the wire corresponds to that specified in the documentation, the ground circuit is present
The exact value is determined by the performance of the heater and is indicated in the technical documentation. It is for the specified current value that it is necessary to select a circuit breaker.
For example, for flow heaters, the following current cutoff standards for automatic machines are relevant (table):
| Boiler power (flow circuit), kW | Automatic cutoff current, A |
| 3,5 | 20 |
| 5,5 | 25 |
| 6,5 | 30 |
As a rule, all the required connection parameters are specified in the instructions for the boiler. The user manual explains exactly all the points of installation. Therefore, it is recommended to carefully study the documents included in the package of the device before installation.
Installing an indirect heating boiler
Let's leave aside the hanging of heat exchangers on the heating main, it's still not 100% legal. We will figure out why and how to connect an indirect heating boiler to the general system of individual housing. First of all, this is not just indirect heating. This is a system for replacing the heat source, depending on external conditions. As a rule, the boiler capacity is at least 100 liters, and two heat exchange circuits. A traditional boiler (gas or any other) is connected to them, as well as a solar battery. Not the one that generates electric current, but the collector of solar heat.
As a result, during the operation of the boiler room (for space heating), or in the bright sun, the water in the common boiler always heats up. That is, you receive heat conditionally free of charge. Moreover, if the sun effectively heats water even in cold weather (and modern batteries work even at near zero temperatures), you can save on traditional water heating and use the boiler as a consumable container.
That is, the system “works” the other way around: through the first heat exchanger, the sun heats the water in the tank, and the second coil can supply it to the radiators or the “warm floor” system.