- Installation of sockets in a wooden house: we provide fire safety
- Legal requirements for concealed wiring
- Installation of sockets in open wiring
- Wall outlet installation
- Connection
- Connection rules
- Options for using Internet outlets
- Varieties of sockets
- According to the method of installation, sockets are divided into
- Types of sockets by type of wiring
- By number of contacts
- Mounting
- How is the apartment or house electrical network arranged?
- How to install and connect indoors or car?
- Safety
- The device and installation locations of socket blocks
- RJ-45 connector crimp
- Internet cable connection scheme by color
- Crimping a twisted pair in a connector
- Video lesson: crimping the RJ-45 connector with pliers and a screwdriver
- Various options for connecting the socket block
- Scheme of serial connection of the socket block
- Diagram of parallel connection of the socket block
- Options for using Internet outlets
- Installing an internal outlet
- Installation of a double socket in one socket
- Tools for installing a double socket
- What you need to know before connecting a double socket?
- Conclusions and useful video on the topic
Installation of sockets in a wooden house: we provide fire safety
Dried wood burns well.
This property creates big problems in terms of ensuring the safety of buildings made of wood: logs, timber or made using frame technology.
Installation of wiring in a wooden house requires strict adherence to the rules developed by many years of human experience, and the installation of sockets is a necessary part of this process.
The sad experience of fire victims and firefighters shows that when the fire is located inside a wooden wall, it is very difficult to extinguish it. You will have to initially disassemble part of the wall structure, and this takes a lot of time.
Legal requirements for concealed wiring
Russian regulations require electrical wires and cables to be insulated from wood with an airtight metal space.
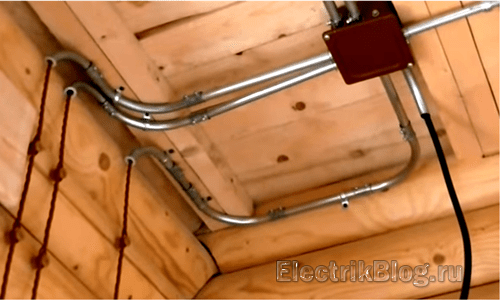
In the event of damage to the insulation and the start of its ignition, it will not allow the fire to spread to the tree, and the limited volume of air will exclude the flow of oxygen, thereby preventing combustion.
Therefore, hidden wiring is placed in metal pipes or boxes of a certain thickness, and sockets and switches are built into special designs of socket boxes made of non-combustible materials.

They have a hole on the side for a threaded connection with an electrical cable entry pipe, and the socket mechanism is inserted and fastened with screws from above. Conventional plastic structures are prohibited here.
Installation of sockets in open wiring
I will give two permitted by the rules and the most fireproof methods:
- retro wiring;
- cable channels.
For these cases, plastic socket cases closed on all sides are made.
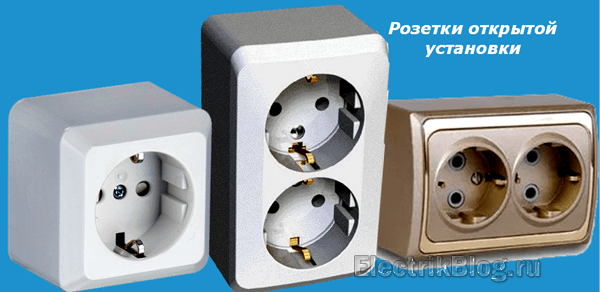
They are attached to the wall through special adapters - socket boxes made of non-combustible materials.
There are similar coasters made of various layers of wood, which are additionally used for decorative purposes. They are protected from fire by impregnation with fire-fighting mixtures.

Such treatment does not exclude the complete development of the fire, but significantly delays the onset of ignition.
Methods for open wiring and installation of electrical points in it can be done not only in wooden houses, but also inside buildings from any other building materials.
Technical aspects of connecting and placing wiring in retro style, I propose to watch in the video by Vladislav Gusler.
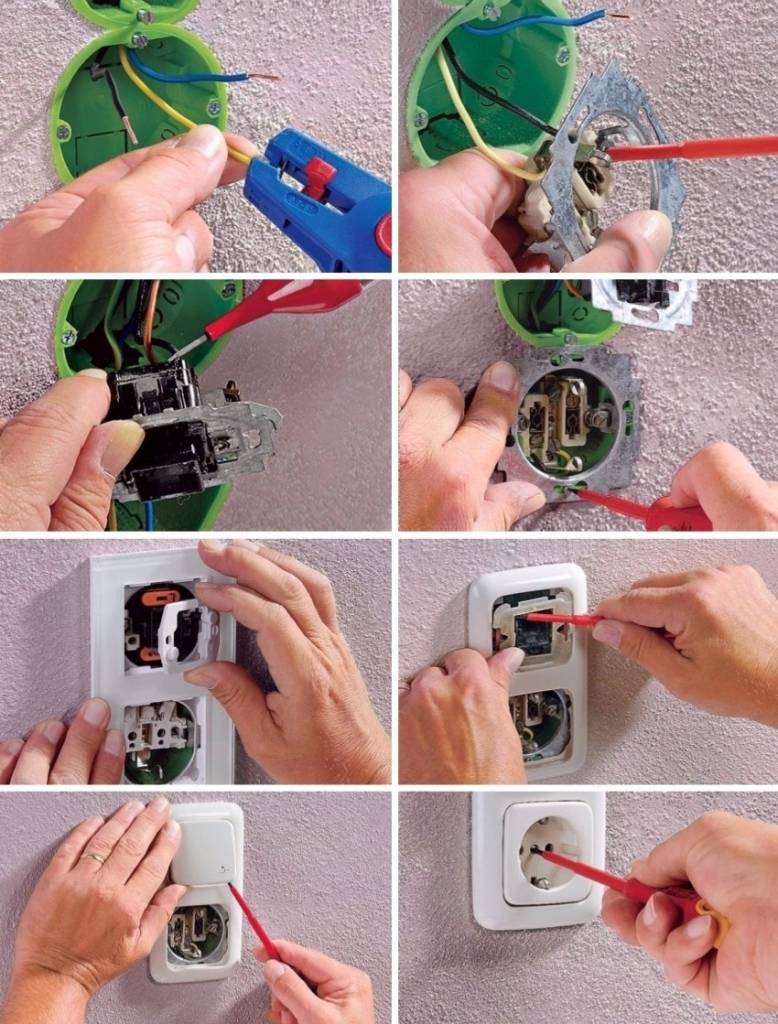
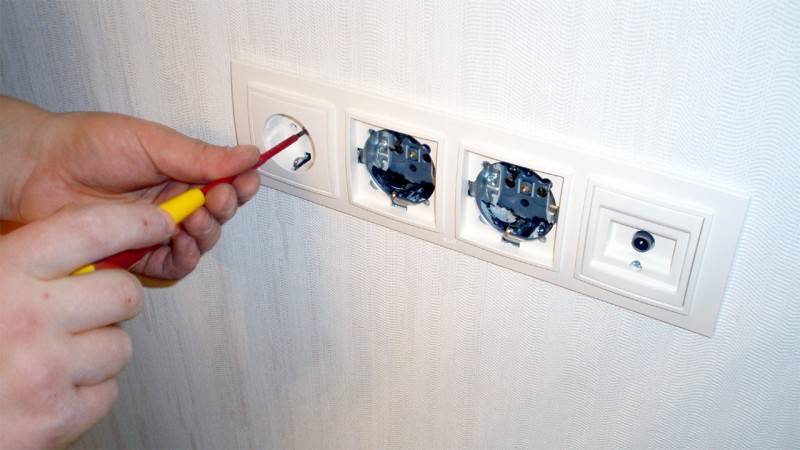
Wall outlet installation
What you need:
- socket
- electrical wires (it is worth choosing with a cross section of at least 2 sq. mm.)
- socket box
So, after choosing a place for the outlet and turning off the current, we proceed directly to the installation:
- We place a distance from the floor of 30–100 cm. We mark the installation site with a pencil. We consider the distance from the switchboard to the designated place and determine how many meters of wiring are needed.
- We install a special nozzle for drilling holes in the drill chuck, corresponding to the type of wall and working with electrical fittings.
- Turn on the drill, if necessary, take an extension cord that is suitable in power for the electric drill you are using.
- Put on protection (goggles and, if possible, a respirator) and drill the required hole in the wall.
- Make a groove for the electrical wire. Use a grinder with an appropriate disc or gouge the groove with a chisel and hammer.
- Then the socket box (through which the wiring is pulled out) is installed and fixed in the finished hole.
The first part of the work has been completed.
Connection
Open the junction box.Then, using the terminal clamps, the electrical wire is connected.


It is not recommended to use the wire twisting method. There are enough convenient small terminals on the market, designed for any wire section. Better take them - safely and securely.
Modern methods of connecting wires using terminals and terminal blocks:
Connection methods using terminals
So,
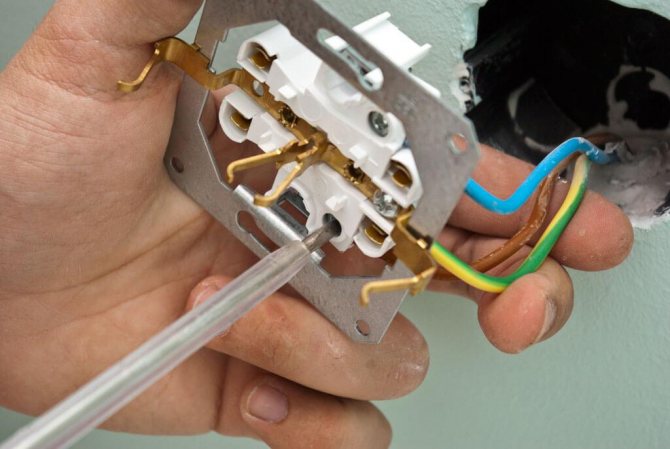
- Remove the cover from the outlet. Loosen or unscrew the screws that will clamp the wires. Insert the ends of the wire (after stripping them) and tighten them firmly with screws.
- The screws of the installed legs are loosened and reduced to the body of the socket, which is inserted, and fastened (in the process of tightening the screws) into the socket. The paws, spreading out to the sides, are fixed to the socket and hold the structure in the wall.
- It is recommended to make sure that all wiring is connected.
Turn on the power and test the operation.
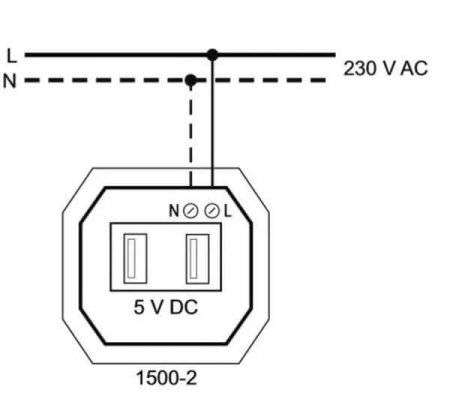
Connection rules
Connecting an outlet with a USB port is not difficult. However, if there is not enough experience, it is better to invite a specialist. For installation, you will need a screwdriver, a phase indicator and a knife.
Consider a step-by-step connection algorithm in an apartment:
- If the place is prepared, and it is not necessary to dismantle the existing outlet, the phase wire is determined by the indicator.
- The supply line is de-energized in the shield.
- Remove insulation from conductors.
- Next, you need to insert the wires into the clamps of the voltage conversion module, and tighten the screws. Check the reliability of connection to 220 V.
- Place the socket in the technological place on the wall.
- If there are fastening antennae, alternately pulling them up, achieve placement of the socket exactly in the middle. If the socket is fastened with self-tapping screws, set it in the middle and screw it on.
- Install decorative trim.
- Apply voltage and test the charger.
Connecting a USB outlet in a private house is no different from installing it in an apartment. However, it should be remembered that working with electricity without the appropriate skills is dangerous. Therefore, it is necessary to start work in compliance with safety regulations. We invite you to watch the video instructions for installing a USB socket from the Unica New series from Schneider electric:
You may also need a USB socket connection diagram:
Options for using Internet outlets
In addition to “home” use projects, there are still a sufficient number of options.
In which the installation of such sockets for the Internet will not only be relevant, but sometimes simply an original way out of a special, security-demanding situation, taking into account the technical conditions for providing access to the Internet.
Depending on the type and purpose of the building, technical requirements for the arrangement of apartments in such buildings are put forward.
There are several main categories of such premises:
- offices, classrooms and server rooms;
- Internet clubs and electronic libraries;
- IT shops and workshops for maintenance of computer equipment;
- buildings with increased protection against penetration.
For most offices and auditoriums, in addition to the presence of wireless Internet access points, it is mandatory to equip walls and office furniture with RJ-45 sockets, which provide connection of “working” computer stations to the Internet, as well as to local networks.
Not a single server-type room can do without the presence of installed twisted-pair connectors in / on the walls.This is a mandatory requirement for every IT engineer who has taken up the construction of a "server" or data warehouse.
The design is an ideal way to provide in a limited space the entire list of necessary interfaces for connecting a laptop, phone, printer, etc.
The rapid development of technology affects all aspects of our lives and education in particular.
Now it is very “hard” to imagine an educational institution of any level, from school to university, without auxiliary search tools (computers). Those who seek and provide the necessary information in a huge “knowledge bank” - an electronic library.
If you are a private entrepreneur or the owner of a business that is associated with the sale and / or repair of computer and office equipment, then the presence of socket structures is simply “vital” for the normal working conditions of your employees.
And another example of mandatory equipment with Internet outlets and constructs is the premises for corporate and government security services.
As well as banking and other vaults, with increased protection against penetration, where any significant electromagnetic radiation is actually prohibited or interception of packet information through wireless data transmission is possible.
Varieties of sockets
Devices that have reached their useful life need to be replaced with new ones. This is necessary to avoid some dangerous moments - a short circuit and electric shock to residents. Before you conduct an electrical outlet, you need to choose the most suitable model that meets specific technical requirements.


 Designer sockets
In the modern market, you can find electrical appliances of various materials, quality, design, installation method. When buying, the level of security and the way in which the socket will be mounted also play an important role.
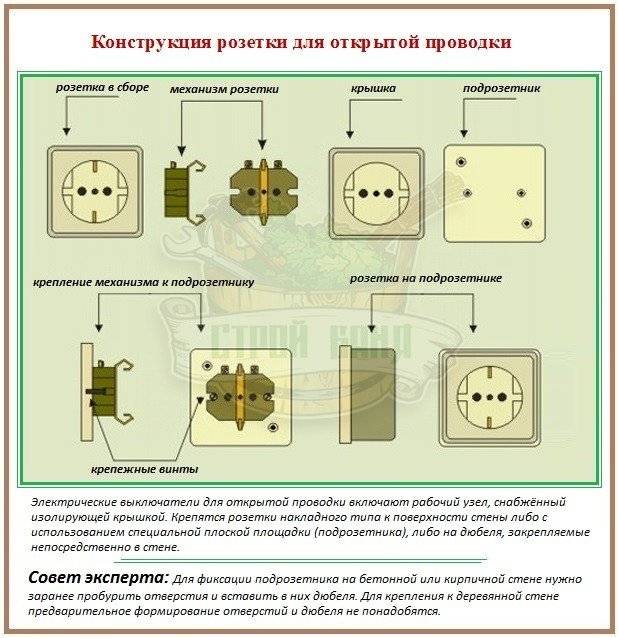
According to the method of installation, sockets are divided into
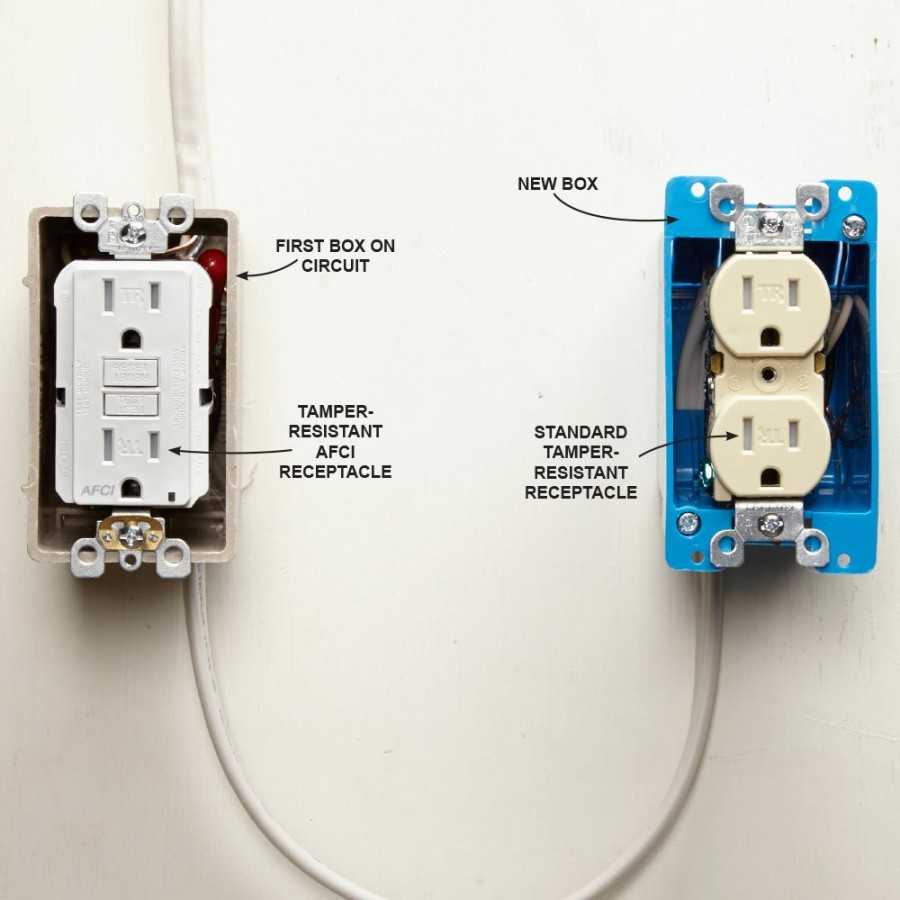
- Overhead options. This option is ideal for wooden houses, since electrical equipment is located inside, and not outside, which protects against fire hazards. Their main meaning is that the contacts and wires in the surface-mounted socket are located outside the wall, in a protective case made of dielectric materials. Decoratively disguised electrical wiring is also supplied to them outside the wall.
- Embedded models. Such devices are intended for installation inside brick, concrete or plasterboard walls. Before connecting a built-in type socket, it is necessary to make a recess in the wall of a certain diameter and depth. A fastener is inserted into it - a glass-socket box, in which the electrical appliance is fixed. The difference between such sockets will be that they will not go beyond the surface of the wall, with the exception of the external decorative lining. Wiring is brought to them either under the facing material (drywall, wall panels), or in strobes. Strobes are deep grooves specially made in the wall where wires are laid, after which they are sealed with plaster or putty.
Types of sockets by type of wiring
- Screw. They are attached to the terminals with screw clamps.
- Spring. With hand clamps that press the wires to the terminals, instead of screws.
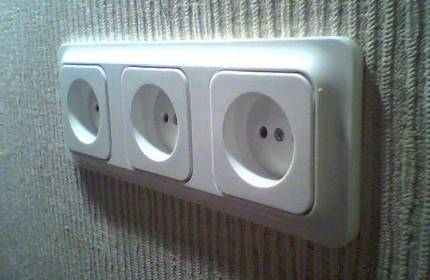
 Overhead type of sockets
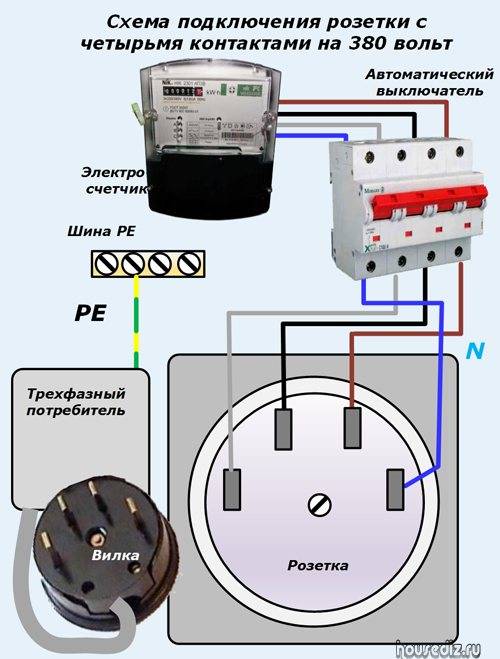
By number of contacts
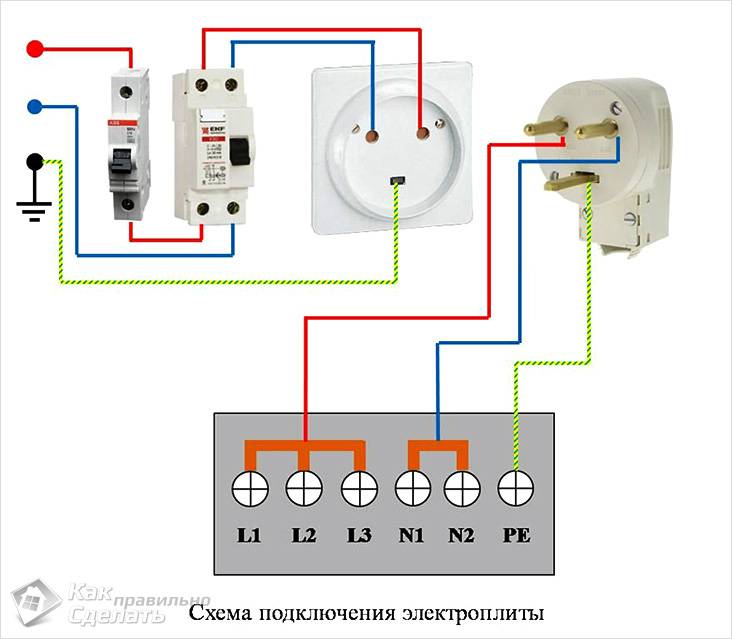
Sockets are divided into two-phase and three-phase.The first are intended for houses in which the wiring consists of only two cores, phase and zero. Three-phase are placed in the place where the third, grounding wire enters the wiring. We would recommend such models for household appliances, for example, for washing machines, and they are also well suited for computer system units.
Mounting
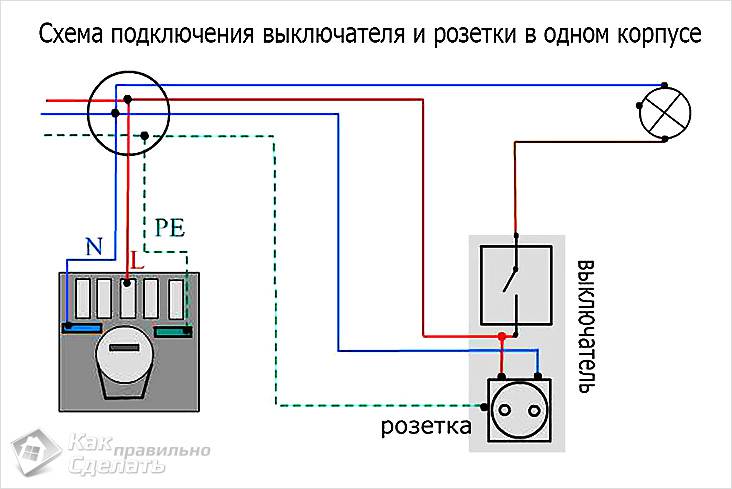
Next, you need to remove the decorative trim from the outlet itself, and only then begin installation. Your socket can be of two types - with zero, phase and ground, and the same only without grounding.
The sockets themselves usually have contacts for all these wires, but when there is no ground, it is enough just to connect the zero and phase to the desired terminals and tighten the fixing screws. Make sure that both wires are connected to different terminals - this can lead to a short circuit.

At this stage, you already know how to install an outlet with your own hands. Then it remains only to fix it in the socket and put a decorative trim on top.
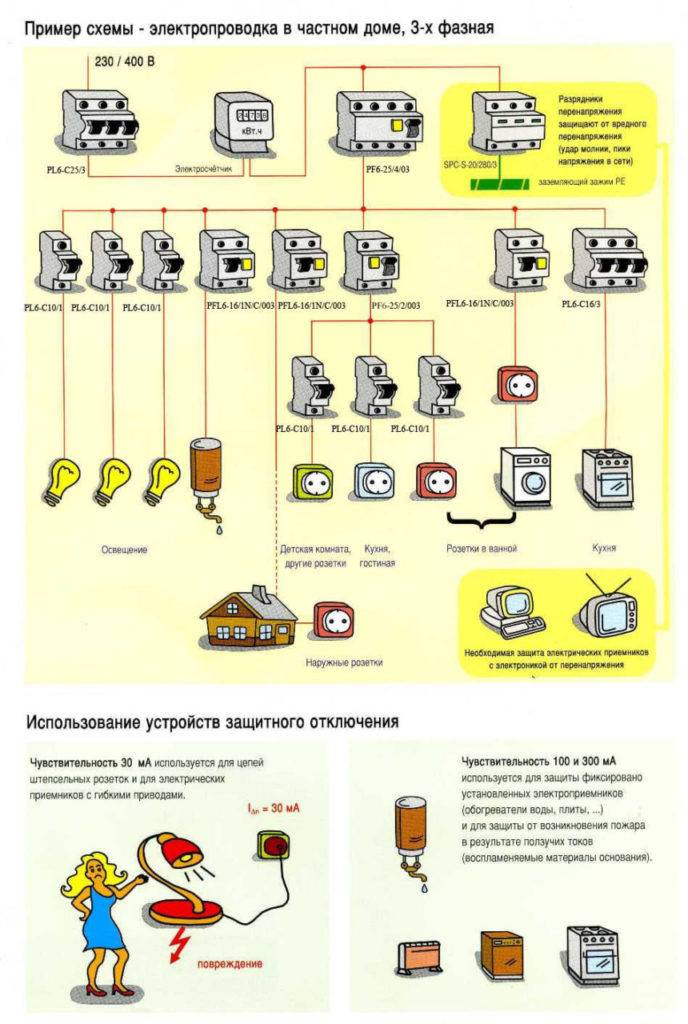
How is the apartment or house electrical network arranged?
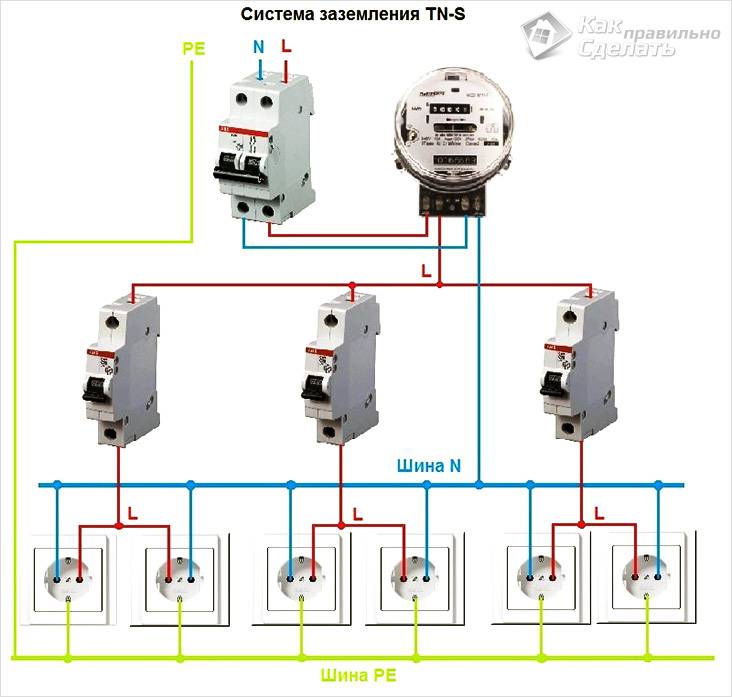
Before you start trying to make any improvements and improvements to the electrical network, you need to figure out how it works and functions. We are now interested in how the wiring around the house or apartment is divorced. The connection scheme, as a rule, is classic and here are the components it includes.
 This is what the wiring diagram looks like in an ordinary private house
- The first element in the intra-house network is always the introductory shield. It is located in the apartment, on the landing or on the street, when it comes to home ownership.Looking inside, you will see an introductory machine, to which the power cable from the public electrical network is connected, various protection devices and, most likely, an electric meter. Sometimes, instead of an introductory machine, a knife switch or a package switch can be installed, but this is in very old houses.
- From the introductory machine there are wires that are routed to the counter. A group of other automata (single-pole, differentiated, and so on) is connected from it. These devices are combined into groups, of which there are usually 2 or more, depending on the potential loads that may be placed on the intra-house network.
- Dividing into groups is a very convenient way to connect electrical outlets in the house. This allows you to separate specific rooms and, if necessary, turn off the power supply only in them, the rest of the rooms will not be de-energized.
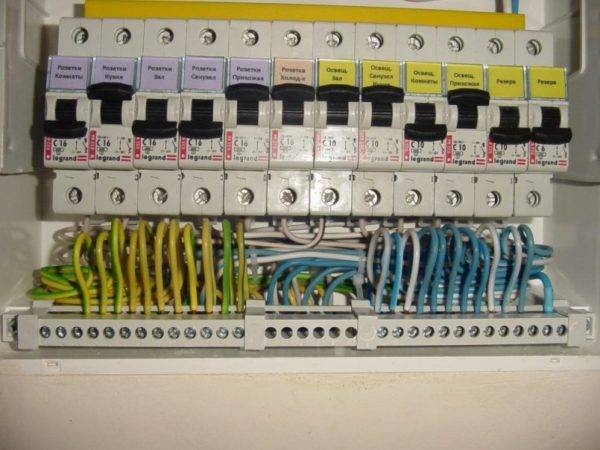 It will be impossible to get confused in this shield - a smart electrician signed the purpose of each machine
It will be impossible to get confused in this shield - a smart electrician signed the purpose of each machine
- The breakdown of the electrical network into parts can be performed according to several criteria. This may be the ease of installation or the nature of the loads - there is no strict regulation, but the master always follows the same logic chosen by him. However, there are regulations regarding electrical appliances in the kitchen and bathroom - they must always be connected in separate groups.
- Further from the machines, long wires begin their journey, which are thrown through all the rooms to the junction boxes. These boxes are nodes in which one line branches into several. This is where the wires leading to sockets and switches originate.
How to install and connect indoors or car?
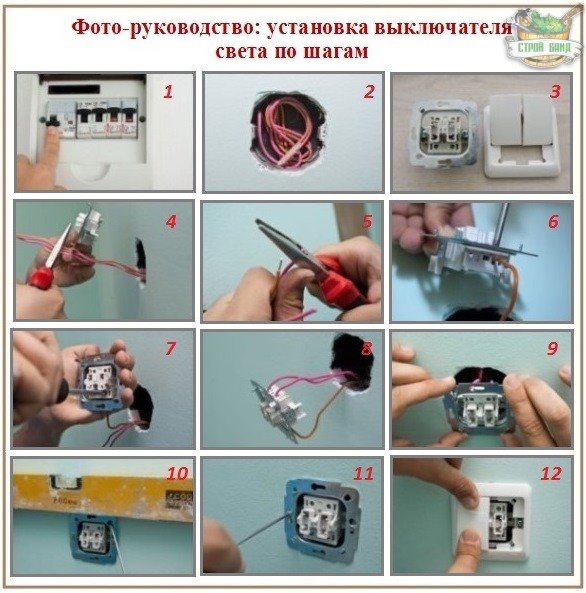
 Step by step installation guide:
- Carefully check the wires with a phase screwdriver.
- Switch off the voltage in the main electrical panel.
- Detach the decorative cap.
- Clean the wires with a knife from the insulation, scrape off the tips of the metal from the oxide film.
- Insert the wires into the clamping places, tighten them with bolts.
- Install the socket in a technological hole in the wall or in a glass.
- Fasten the socket in the center with a tension mustache. Tighten the screws with a screwdriver in turn so that the structure is exactly in the center.
- Put the decorative trim in place.
- Insert into the cigarette lighter and leave it in this place.
- Disassemble the block and hide its chip under the torpedo. Power input contacts from additional wires from the battery or the cigarette lighter itself. Buy a USB cable and bring it under the dashboard to any convenient place on the dashboard. You can also pass the wire under the car tunnel and place the socket at the level of the gearbox.
Advice
If the socket in the car is connected to the battery, try not to leave the connected devices in the car. Otherwise, the battery itself will quickly sit down.
Safety
Always carry out all kinds of work after de-energizing the room. Check the wires to the phase indicators. Everything must be done with rubber insulation. Extend the wires.
Solder all places, and do not twist. Avoid contact with bare wires.
The socket in the wall must be insulated and tightly fixed. Cut off any excess and lay it in the wall.All wires and equipment must be rated for amperage rating.
In this simple way, you can easily and safely install a grounded outlet. If you follow all the rules and regulations, you will get a quality job done.
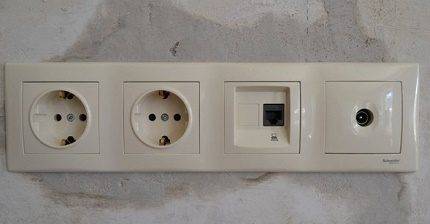
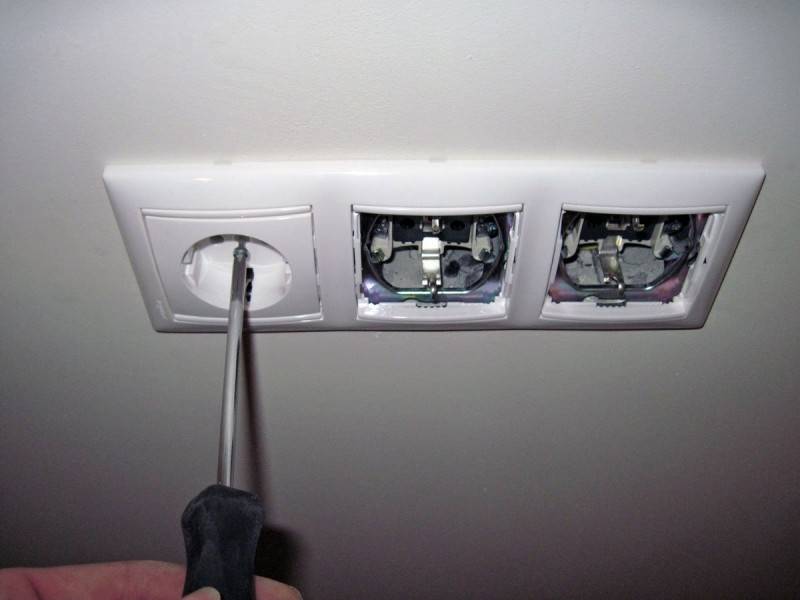
The device and installation locations of socket blocks
The design of the socket block differs from the usual socket only in the number of "seats". It consists of a plastic body and an internal part, represented by terminals with contacts and terminals, to which springs for plugs are attached.
Most modern models are equipped with grounding contacts, which are designed to increase the safety of the system and reduce the voltage from all electrical appliances connected through the unit.
The number of connection points of the installed socket block is determined based on the presence of household appliances planted in one group
Socket blocks are of two types:
- Designed for concealed wiring. They are installed in the thickness of the wall using a module made of socket boxes made in the form of glasses;
- Designed for open wiring. They are installed on the wall surface using a socket box made in the form of a plate.
In addition to the two main types of socket blocks, there is also a very practical retractable type. They are easily mounted in a countertop or in a cabinet, from which they are pulled out during the period of operational need. Their principle of operation is similar to power sources located on / in the wall.


Socket blocks are often installed in kitchens, placing them at a desktop at a height of 10 cm, inside kitchen cabinets and behind the walls of adjacent cabinets at a level of 30-60 cm from the finished floor. Built-in sockets are convenient to use when connecting a group of low-power household appliances: hoods, multicookers, refrigerators ...

The mortise housing of a retractable socket group, consisting of three to five electrical outlets, remains hidden in the tabletop until you lightly press on its top panel
When arranging halls and living rooms, they are placed near computer tables or behind a TV screen. Outlet groups of three electrical outlets can often be found in bathrooms. But in this case, devices with waterproof cases are used, placing them at a distance of at least 60 cm from the water source.
RJ-45 connector crimp
An Internet cable that enters an apartment or house, which is most often called a twisted pair cable, often ends in a small plastic connector. This plastic device is the connector, and usually RJ45. In professional jargon, they are also called "Jack".
Its case is transparent, due to which the wires of different colors are visible. The same devices are used on connecting wires that connect computers to each other or to a modem. Only the order of location (or, as computer scientists say, pinouts) of wires can differ. The same connector is inserted into a computer outlet. If you understand how the wires are distributed in the connector, there will be no problems connecting an Internet outlet.
Internet cable connection scheme by color
There are two connection schemes: T568A and T568B. The first option - "A" is practically not used in our country, and everywhere the wires are arranged according to the "B" scheme. It must be remembered, since it is it that is required in most cases.
To finally clarify all the issues, let's talk about the number of wires in a twisted pair. This internet cable comes in 2-pair and 4-pair. For data transfer at speeds up to 1 Gb / s, 2-pair cables are used, from 1 to 10 Gb / s - 4-pair. In apartments and private houses today, mainly, streams up to 100 Mb / s are brought. But with the current pace of development of Internet technology, it is quite possible that in a couple of years the speeds will be calculated in Megabits. It is for this reason that it is better to immediately expand the network of eight, and not of 4 conductors. Then when you change the speed you do not have to redo anything. It's just that the equipment will use more conductors. The difference in cable price is small, and sockets and Internet connectors still use eight-pin.
If the network is already wired two-pair, use the same connectors, only after the first three conductors laid according to scheme B, skip two contacts and lay the green conductor in place of the sixth (see photo).
Crimping a twisted pair in a connector
There are special pliers for crimping wires in the connector. They cost about $6-10 depending on the manufacturer. It is more convenient to work with them, although you can get by with a regular screwdriver and wire cutters.
First, insulation is removed from the twisted pair. It is removed at a distance of 7-8 cm from the end of the cable. Under it there are four pairs of conductors of different colors, twisted in twos. Sometimes there is also a thin shielding wire, we simply bend it to the side - we do not need it. We unwind the pairs, align the wires, spreading them in different directions. Then fold according to the scheme "B".
We clamp the wires in the right order between the thumb and forefinger, lay out the wires evenly, tightly to each other.Having aligned everything, we take wire cutters and cut off the excess length of the wires laid out in order: 10-12 mm should remain. If you attach the connector as in the photo, the twisted pair insulation should start above the latch.
We put a twisted pair with cut wires into the connector
Please note that you need to take it with the latch (protrusion on the cover) down
Each conductor must get into a special track. Insert the wires all the way - they should reach the edge of the connector. Holding the cable at the edge of the connector, insert it into the pliers. The handles of the pliers are brought together smoothly. If the body has become normal, no special efforts are required. If you feel that it “does not work”, double-check whether the RJ45 is in the socket correctly. If everything is fine, try again.
When pressed, the protrusions in the tongs will move the conductors to the micro-knives, which will cut through the protective sheath and ensure contact.
Such a connection is reliable and problems with it rarely occur. And if something happens, it’s easy to remake the cable: cut off and repeat the process with another “jack”.
Video lesson: crimping the RJ-45 connector with pliers and a screwdriver
The procedure is simple and easy to repeat. It may be easier for you to do everything after the video. It shows how to work with pliers, as well as how to do without them, and do everything with a regular straight screwdriver.
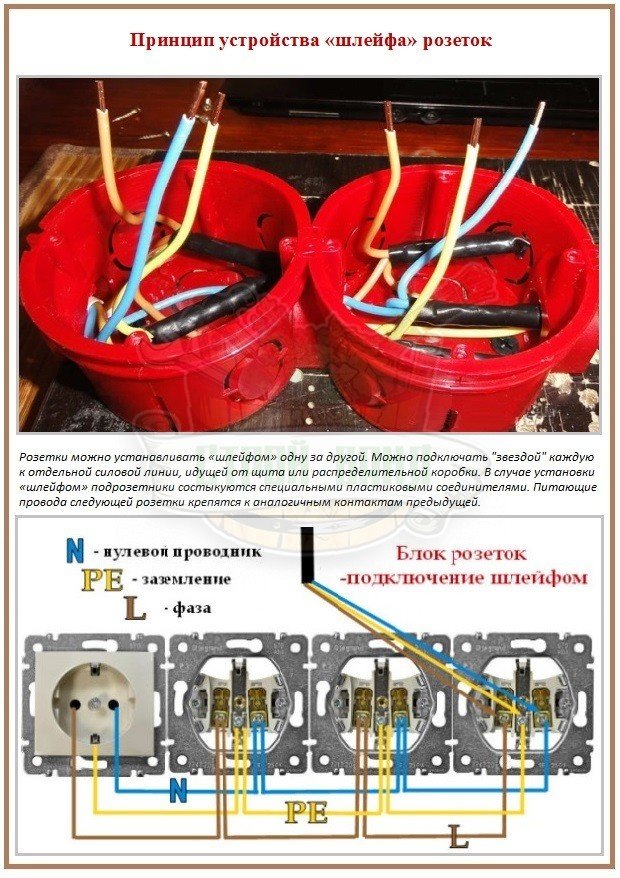
Various options for connecting the socket block
Works related to electrical networks and switching devices require special knowledge and certain skills. There are two ways to connect the socket block:
- sequential, it is also a loop;
- parallel, another name is a star.
Scheme of serial connection of the socket block
A distinctive feature of such a scheme is that each structural element (electric point) is powered from the previous one, and that, in turn, from its predecessor. In other words, sockets are connected like light bulbs on a garland - only the first one is connected to the network, and the rest are switched with its contacts in a serial way: phase - with phase, zero - with zero. Jumpers (loops) act as connecting links in this chain.


A conventional socket is designed for a current load of up to 16 A
However, in the proposed scheme, this indicator cannot be applied for each connector, since here the total total value of the current strength at all points is taken into account. Therefore, this option is suitable for feeding a group of devices with low power. The disadvantage of the loop option is the dependence of the circuit elements on each other, and, accordingly, the general vulnerability - in the event of a break or damage to one of the jumpers, all subsequent links cease to function.
The disadvantage of the loop option is the dependence of the circuit elements on each other, and, accordingly, the general vulnerability - in the event of a break or damage to one of the jumpers, all subsequent links cease to function.
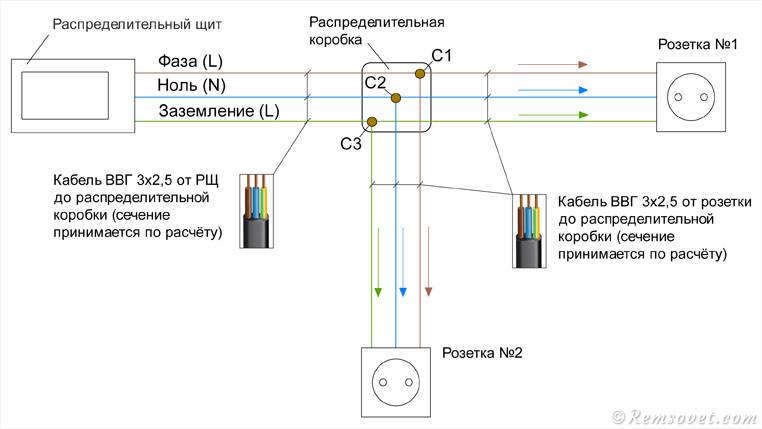
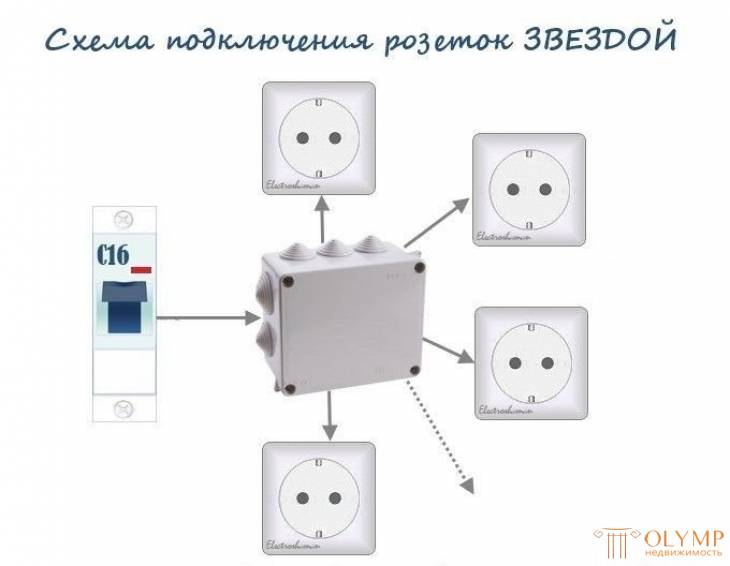
Diagram of parallel connection of the socket block
Unlike the previous method, the star connection implies an independent wire connection to each component cell of the block.That is, in the junction box, the phase and neutral conductors are split into taps (the number corresponds to the number of connectors), which are sent to the corresponding contacts of the device. For example, if the device consists of three cells, then three phase and three neutral wires are placed in the cable channel laid from the box to the installation site.
Parallel Connection Diagram
"Zvezda" has the advantage that if one of the elements is damaged or fails, the rest will work in the same mode, providing their consumers with electricity. The disadvantage of this method of switching can be considered the relative complexity of installation and the relative high cost of wiring due to the need to use additional wires.
Options for using Internet outlets
In addition to “home” use projects, there are still a sufficient number of options where the installation of such sockets for the Internet will not only be relevant, but sometimes just an original way out of a special security-demanding situation, taking into account the technical conditions for providing access to the Internet.
Depending on the type and purpose of the building, technical requirements for the arrangement of apartments in such buildings are put forward. There are several main categories of such premises:
- offices, classrooms and server rooms;
- Internet clubs and electronic libraries;
- IT shops and workshops for maintenance of computer equipment;
- buildings with increased protection against penetration.
For most offices and classrooms, in addition to the presence of wireless Internet access points, it is mandatory to equip walls and office furniture with RJ-45 sockets, which provide connection of "working" computer stations to the Internet, as well as to local networks.
Not a single server-type room can do without the presence of installed twisted-pair connectors in / on the walls. This is a mandatory requirement for every IT engineer who has taken up the construction of a "server" or data warehouse.

The rapid development of technology affects all aspects of our lives and education in particular. Now it is very "hard" to imagine an educational institution of any level, from school to university, without auxiliary search tools (computers) that search for and provide the necessary information in a huge "knowledge bank" - an electronic library.
If you are a private entrepreneur or the owner of a business that is associated with the sale and / or repair of computer and office equipment, then the presence of socket structures is simply “vital” for the normal working conditions of your employees.
And another example of mandatory equipment with Internet sockets and constructs is premises for corporate and government security services, banking and other vaults, with increased protection against penetration, where any significant electromagnetic radiation is actually prohibited or packet information can be intercepted through wireless data transmission.
Installing an internal outlet
Immediately it must be said that all sockets are divided into internal and external. Their working principle is the same.The difference between them is that the external sockets are installed directly on the wall, and the internal sockets are installed in boxes (socket boxes) that are “hidden” in the wall.
First of all, for safety reasons, it is necessary to disconnect all electrical wiring in the apartment from the power supply. We are talking about circuit breakers in the electrical panel, which is usually located in the corridor of the apartment or on the landing.
Left completely without electricity in the house, you may need lighting in the workplace. It’s good if there is enough daylight, but when it’s dark, you need to think about alternative sources of lighting, for example, a flashlight may come in handy.
Necessarily! Additionally, use a multimeter or an indicator screwdriver to make sure that there is no voltage in the outlet.
Prepare your tools:
- wire cutters
- Level
- Pliers
- Screwdriver
- Pencil
- Knife.
Installation of a double socket in one socket
A double socket consists of two plugs, but is installed in one socket. With the use of certain tools, it is not difficult to install the product yourself, you just need to follow some rules.


Tools for installing a double socket
A set of tools required to connect a two-socket socket:
- a screwdriver that is comparable in size to the screws of the structure;
- a screwdriver coated with a dielectric;
- cable (when replacing the product is not required);
- perforator;
- socket;
- knife;
- self-tapping screws;
- wire cutters;
- multimeter.
What you need to know before connecting a double socket?
Before proceeding with the installation of the structure, it is necessary to carry out some preliminary measures:
- choosing a place for an outlet;
- cabling;
- installation of a socket;
- selection of a specific type of outlet.
It will be problematic to install the device on your own without an idea of \u200b\u200bwhat phase and zero are in an electrician. This is the name of the conductors of electricity in the outlet. A current is supplied through the phase electrical wire, while the zero one serves for the protective grounding of the structure. In new types of sockets, there is also a third cable - a protective zero cable, which additionally protects the product and prevents short circuits.
Usually the phase is located on the right, but it will not be superfluous to check its position. To do this, use a special screwdriver tester or multimeter. Hands must be protected with rubber gloves. When testing, a screwdriver will indicate the location of the phase wire with a light signal. After taking measurements, the line must be de-energized.
In a room where grounding is provided, the socket also has a grounding contact. "Earth" is connected only to the central terminal of the device.
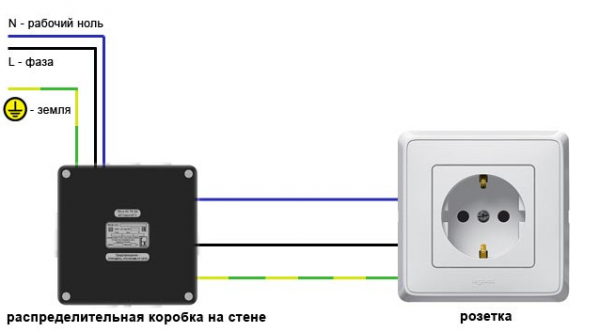 Visual socket connection diagram
Conclusions and useful video on the topic
A video with a visual demonstration and a detailed explanation of how to properly redo the outlet:
Guide on how to change the socket:
Even a novice master can change the outlet on his own. The main thing is to observe safety precautions and strictly adhere to the above actions.
If you had to change or redo the outlet yourself, please share your experience with our readers, tell us about the nuances that you need to know for those who are faced with such work for the first time. Write comments, ask questions on the topic of the article in the block below.


