- DIY bed made of wood: step by step process
- DIY simple bed
- Making a semi-double bed
- Making a double bed
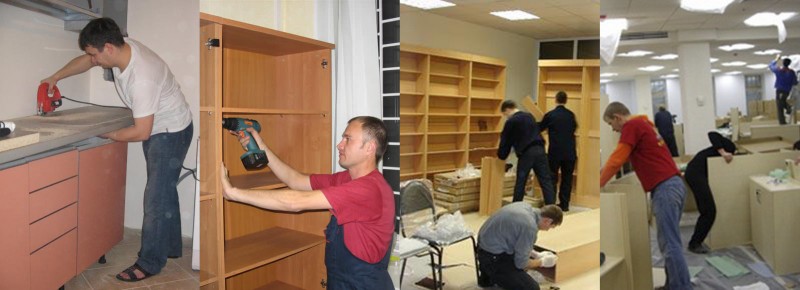
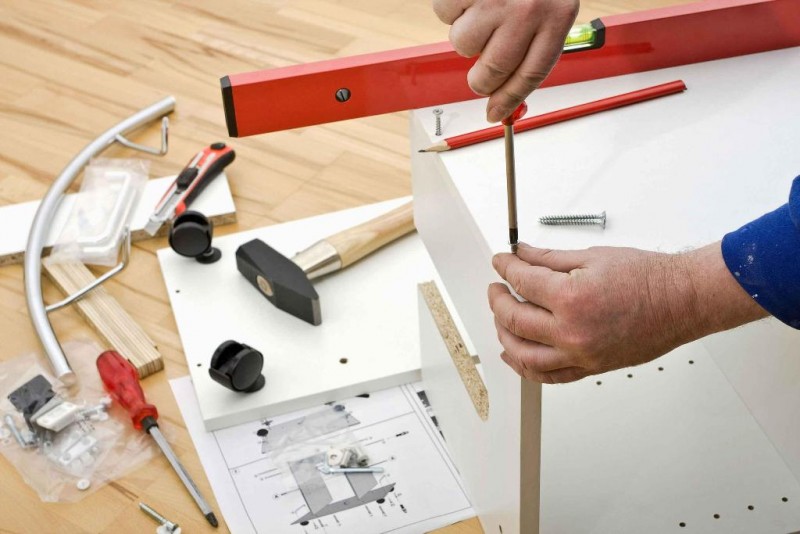
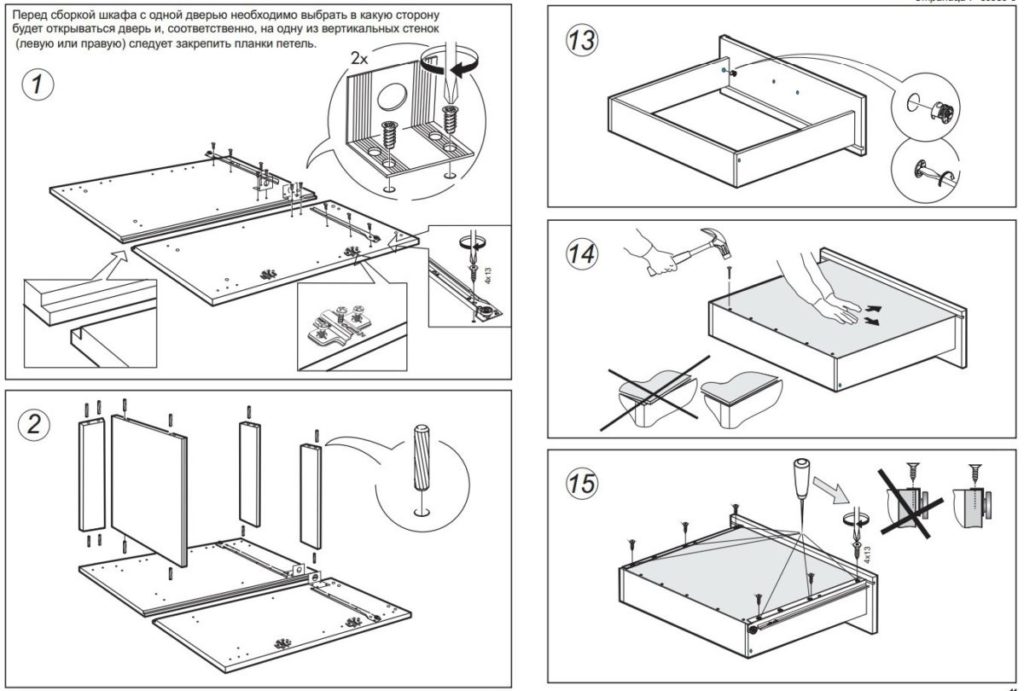
- DIY furniture assembly photo
- Benefits for a small apartment
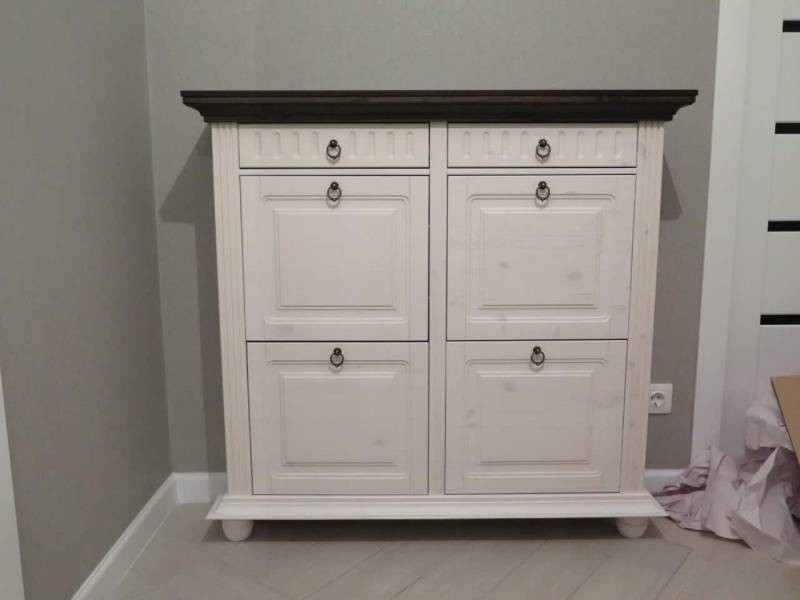
- Dresser
- What to make a bed from: the pros and cons of different materials
- Economical and energy efficient garage ovens
- The sequence of manufacturing a stove in a garage, functioning at a test
- Disadvantages of a furnace for a garage for working out, features of operation
- Crib Requirements
- How to make a bed yourself
- Drawing up drawings and diagrams
- frame
- headboard
- Installation of lamellas
- Manufacturing and installation of legs
- DIY bed frame made of wood drawing
- General recommendations for installation
- DIY baby crib photo
- double bed frame blueprint
- Bed with decorative headboards
DIY bed made of wood: step by step process
The algorithm of actions for self-assembly of a wooden bed is as follows:
- preparation - creating a project for a future bed, purchasing material, cutting it into the necessary elements;
- assembly of all components according to the drawing;
- processing and decoration.
DIY simple bed
Consider the independent manufacture of a bed for a standard mattress 90 x 200 for an adult or 80 x 190 for a teenager. Before starting work, prepare the following:
- bar 5 x 5 cm - we will form legs from it;
- boards - 2.5 x 24.5 cm for the frame, 2.5 x 10 cm for floor slats, 2.5 x 20 - for the headboard;
- bar 2.5 x 5 for supporting elements under the lamellas.
In addition to lumber, you will need:
- screed for bed and corners;
- self-tapping screws;
- wooden dowels 80 x 8 mm;
- wood glue;
- finishing material (impregnation, stain and varnish).
To assemble any bed, you will need a set of tools:
- drill with drills;
- screwdriver;
- plane;
- hacksaw or small circular saw;
- grinder, with a grinding wheel;
- clamps;
- paint brushes;
- level and carpentry angle;
- miter box - for trimming corners at 45 degrees;
- tape measure or building meter.
The algorithm of actions is as follows:
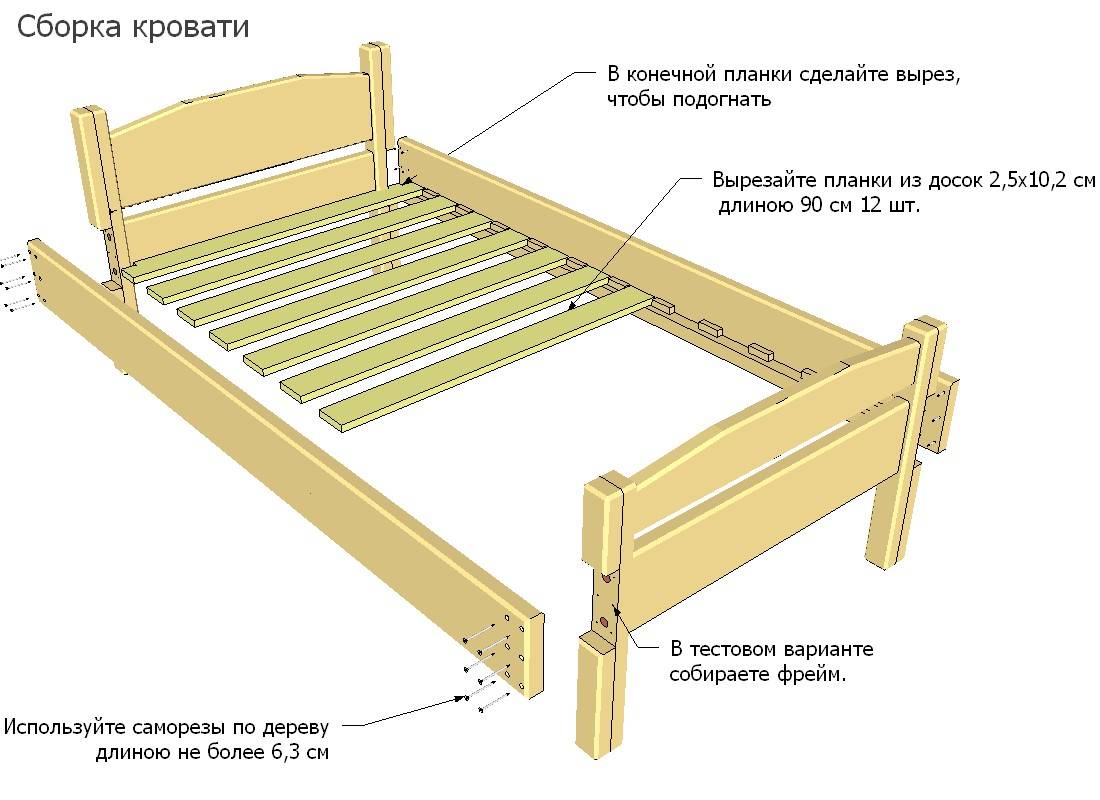
The first step is going to the headboard. Cut out 2 legs 80 cm long from 5x5 cm bars on the inside at the top of each element, drill a hole for fasteners, three for each segment.
Prepare two blanks 95 cm long from a 2.5x20 cm board
From the end part, equip holes that should match those drilled earlier on the bars.
Apply wood glue to the places of the parts that will be in contact, connect and fasten with specially prepared dowels - carefully hammer with a rubber mallet.
The turn of the footboard has come, which is mounted from a board 2.5x24x95 cm and two small pieces of a bar 40 cm each for the legs.
You should fasten them in the same way as the headboard.
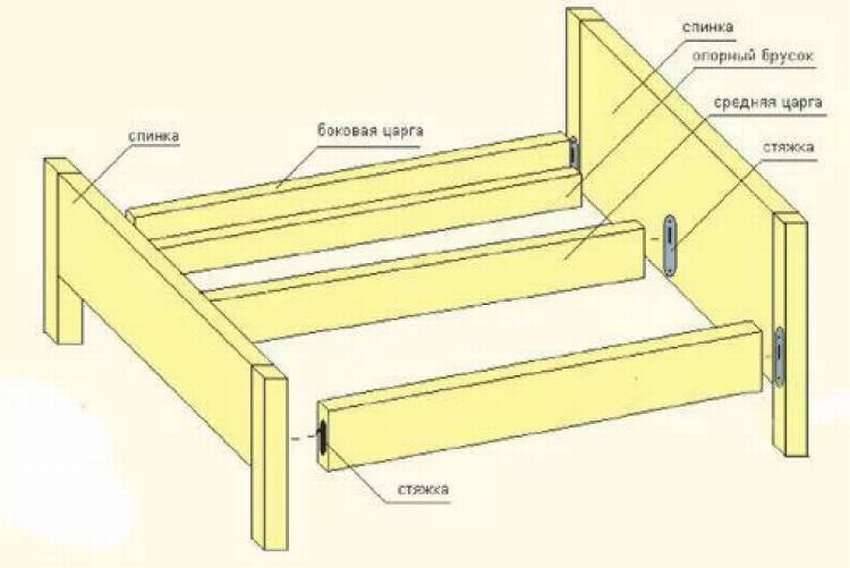
Then you need to fasten the headboard and footboard with sidewalls from a board of 2.5x25x190 cm. The elements are fastened with ties and furniture corners with alignment along the edges of the legs.
The support bars are installed along the lower edge of the sidewalls, having previously smeared the mates with carpentry glue
Before removing the clamps, all elements are scrolled with self-tapping screws in increments of 25 cm.
From the board of the desired section, make 14 lamellas, which are screwed to the support bars with self-tapping screws at a distance of 3.5-5 cm.
Making a semi-double bed
When assembling this type of bed, an additional jumper should be mounted along the bed, which will not allow the mattress to sag. In this case, the headboard is assembled from two bars and a wall, which is formed from 2–3 boards 140 cm long, 2.5 cm in section. The legs are made from a bar. Fastening is done with dowels, carpentry glue and self-tapping screws.
The footboard is also going. The sidewalls are located on the same level with the lowest boards of the back and footboard. The outer edge of the topmost board needs to be made secure, so the corners are cut off. This can be done with a special tool or using a hand planer.
Making a double bed
Two people on the bed is a significant weight, so the selection of material must be approached very thoroughly. It is desirable to make a bed of solid wood. A standard bed for two has dimensions of 2.0 x 1.6 meters.
To do this, prepare the following components:
- bar 5x5 cm, for framing and legs, 30x30 mm for supporting elements for lamellas;
- boards 2x10 cm for flooring under the mattress;
- furniture corner and screws.
The tool is the same as when assembling the first two types of beds.
The algorithm of actions is as follows:
- Assemble a frame with internal parameters for a mattress with a height of at least 20 cm. To do this, several bars are glued together with clamps.
- Then prepare a longitudinal jumper.
- All elements are fastened with wood glue and furniture corners with alignment along the edges.
- The legs of a double bed are made of thick timber, from which all sharp corners are cut.
- To prevent the structure from deforming at the corners, braces or triangular inserts are installed.
- Support elements are arranged along the lower edge of the sidewalls.
- From the boards, slats are prepared, which are mounted on the support beam using self-tapping screws with a step of no more than 3 cm.
After the assembly is completed, it remains to process all surfaces with sandpaper, cover with stain and varnish.
If you approach the installation correctly, then it will not be difficult to assemble any bed with your own hands, just be patient and follow the tips described above.
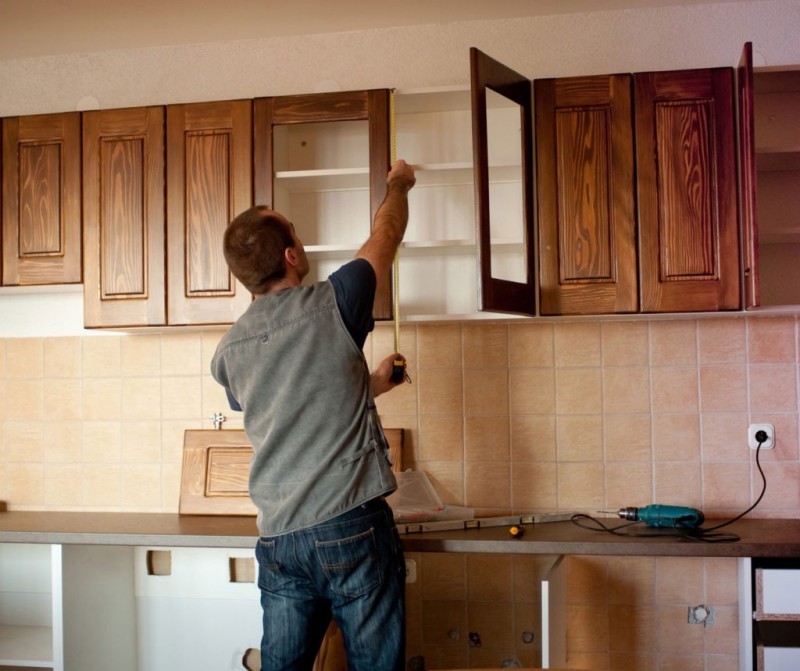
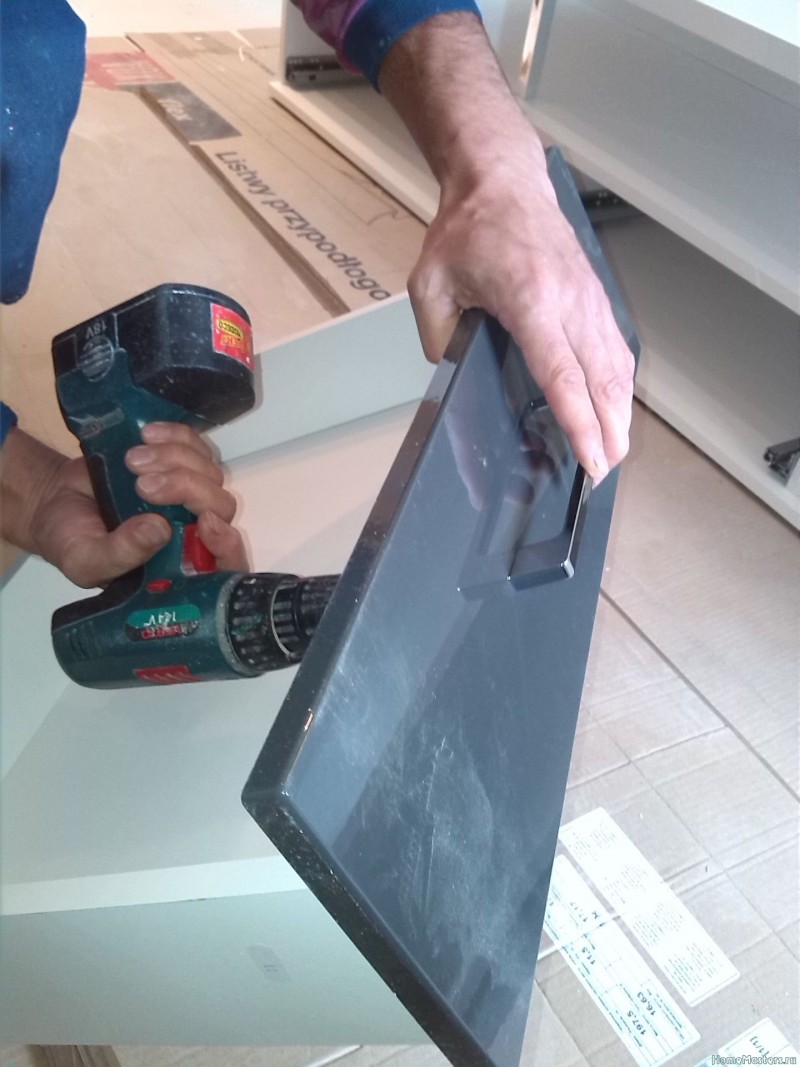
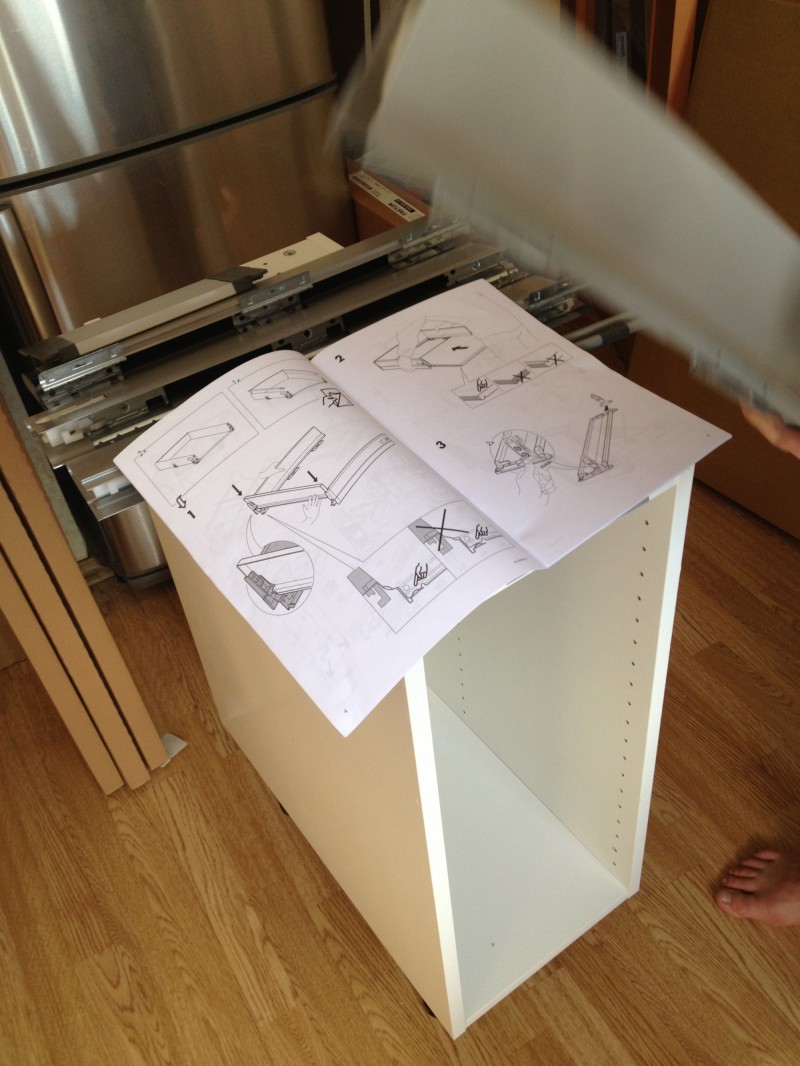
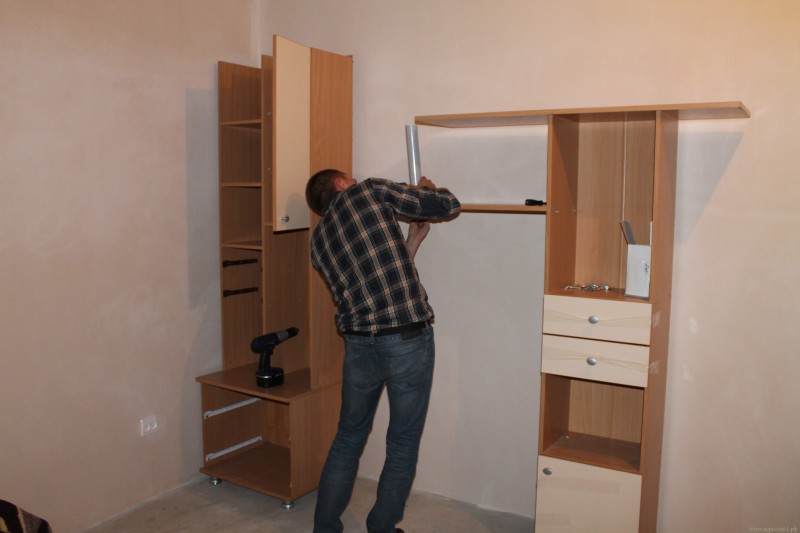
DIY furniture assembly photo


We also recommend viewing:
- DIY kitchen furniture
- Do-it-yourself furniture restoration
- DIY garden furniture
- How to make a table with your own hands
- DIY folding table
- DIY round table
- DIY wood furniture
- Do-it-yourself cat house
- DIY armchair
- Do-it-yourself ottoman
- Pallet furniture
- hanging chair
- decorative mirror
- Cabinet with own hands
- DIY bed
- Furniture decoupage
- Do-it-yourself tabletop
- DIY stool
- DIY kitchen table
- DIY computer desk
- DIY hammock
- DIY coffee table
- Do-it-yourself upholstered furniture
- DIY book shelves
Help the project, share on social networks 
Benefits for a small apartment
The main advantages of transformer furniture include:
- space saving. These designs are ideal for small apartments where it is not possible to install massive furniture;
- functionality.In the daytime, they turn into a closet with additional furniture items, and at night they turn into a spacious sleeping place;
- diversity. Transformer furniture, depending on the type of design and materials chosen, will fit into classic and modern interiors. Their facades can consist of mirror surfaces that visually enlarge the space.
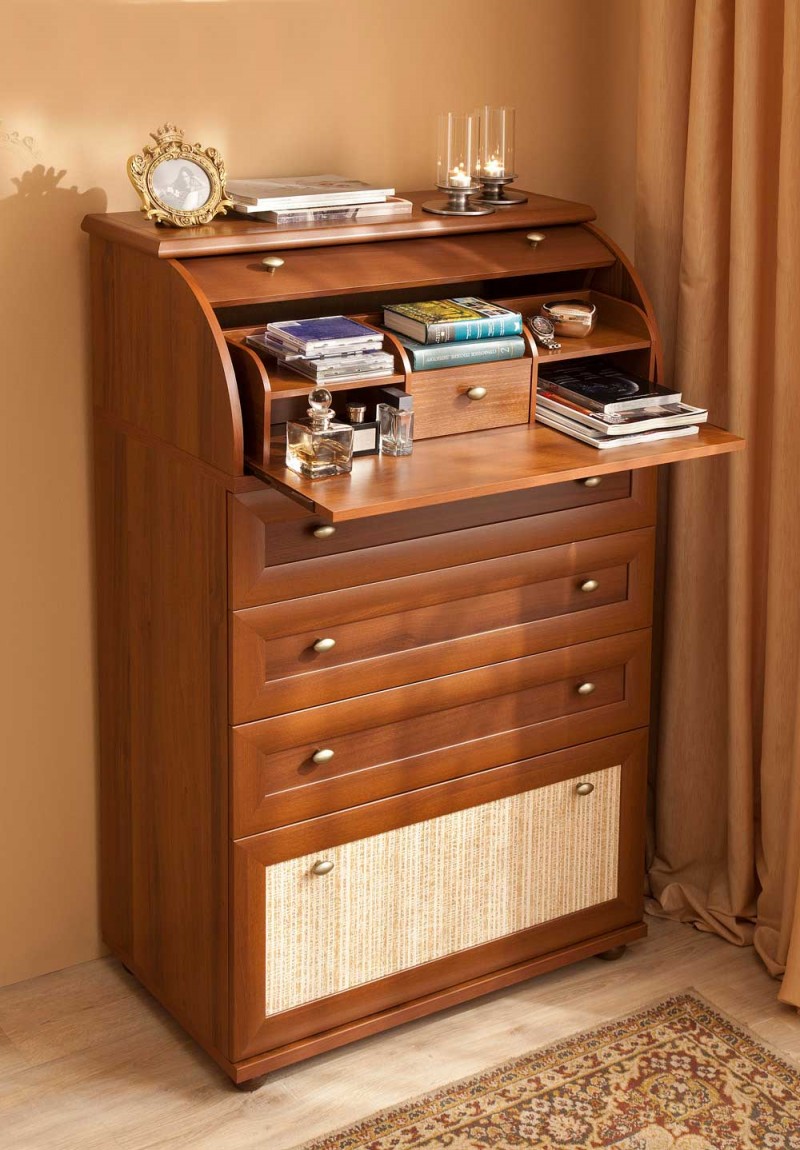
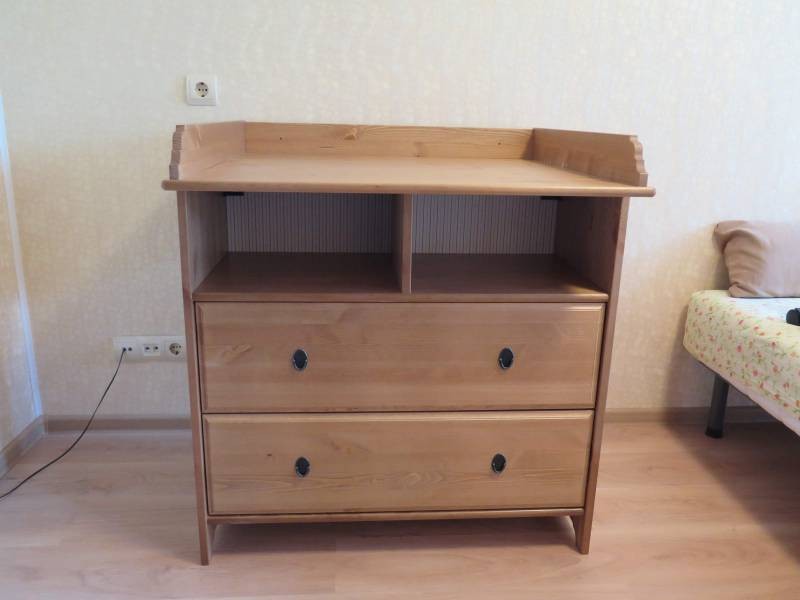
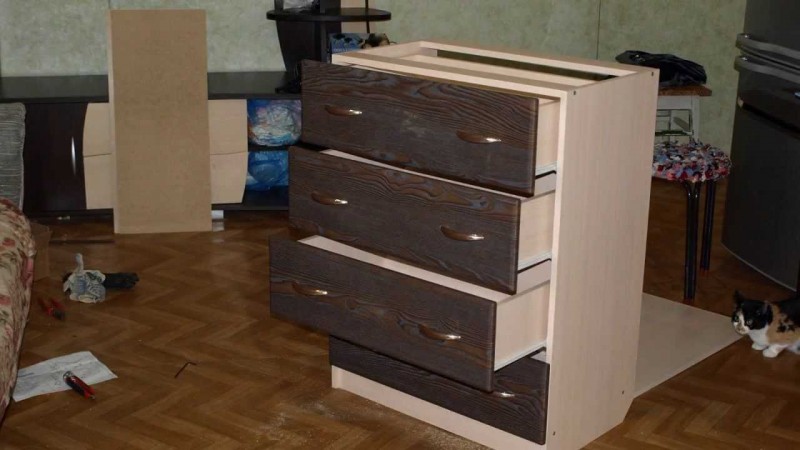
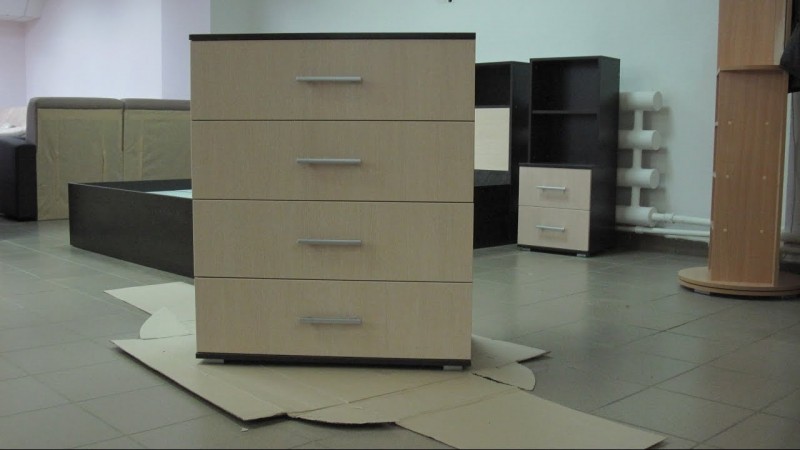
Dresser
Let's consider the do-it-yourself furniture assembly scheme using the example of an ordinary chest of drawers. The item is very useful, and in any living room - it's hard to imagine a bedroom or a nursery without it.
Previously, its role was performed by simple chests. The disadvantage of such a piece of furniture was a very simple design - at its core, it was a box that was closed with a lid, which is very inconvenient for storing a large amount of clothes, despite the obvious capacity.
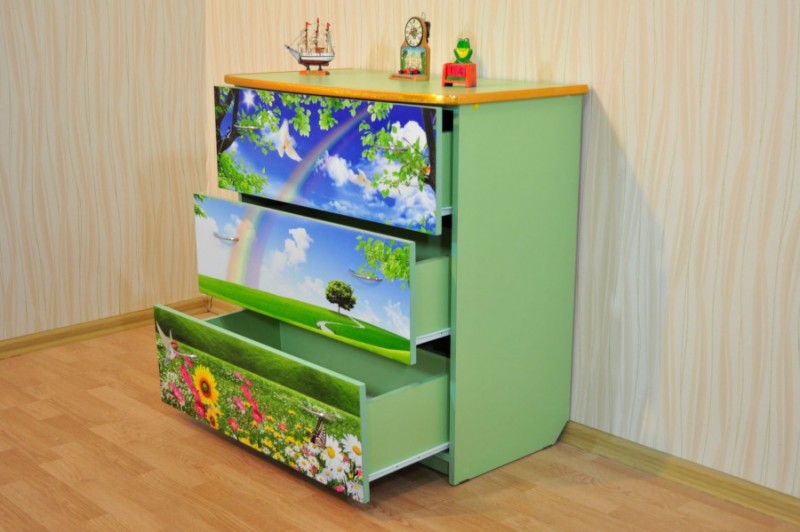
Its modern counterpart, a chest of drawers, is well suited not only for outerwear, but also for shoes, cosmetics and other things that the owner may need.

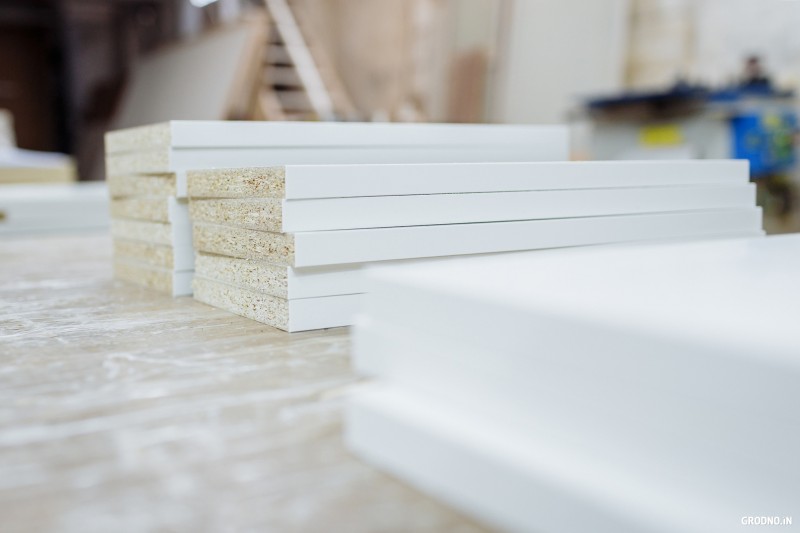
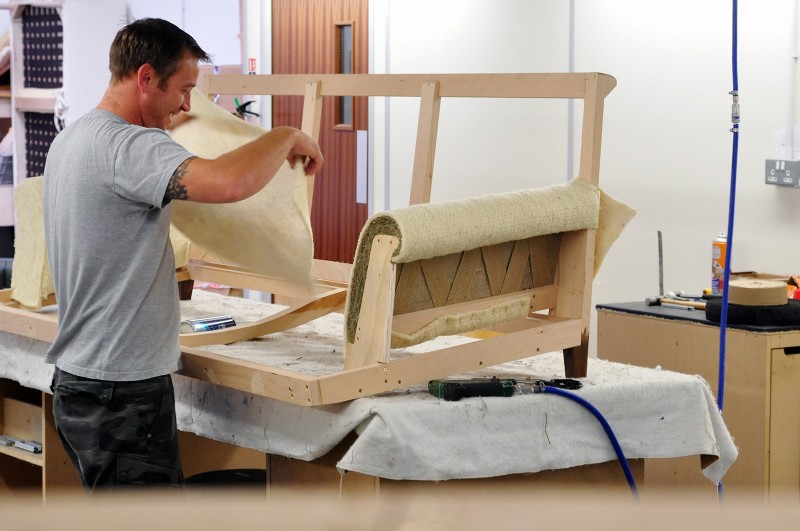
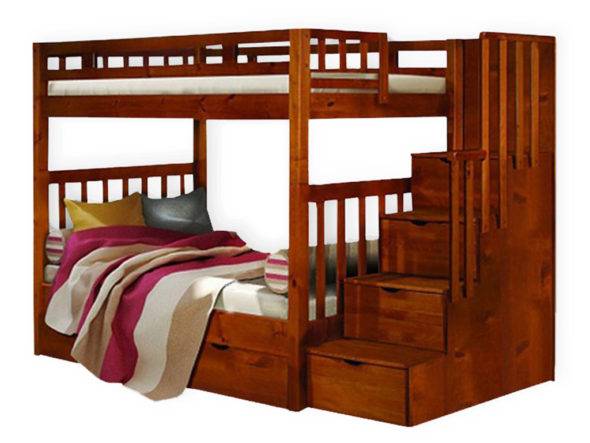
What to make a bed from: the pros and cons of different materials
Metal is the most durable material for making beds. Finished products have a light and aesthetic appearance, withstand a lot of weight. The disadvantages of metal structures are the high cost and the need to work with a welding machine.
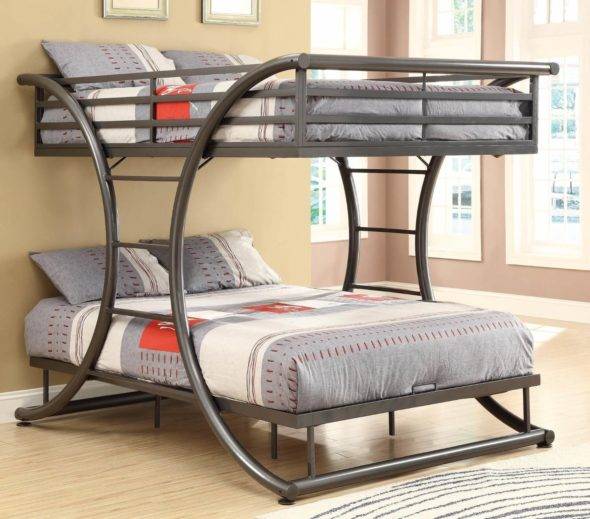
Metal bunk bed can withstand heavy weight and is suitable for adults
Solid wood is an expensive and difficult material to process, but beds made from it are beautiful, durable and reliable.
Solid pine bunk bed suitable for children and adults
The most common beds are made of edged or planed boards.For manufacturing, it is necessary to purchase well-dried material, otherwise the structure may “lead” and it will deform. With the correct creation of the drawing, such a bed can withstand an adult.
Bunk bed made of edged board - an economical and easy-to-make option
MDF beds are an inexpensive option. The product is durable and beautiful. During processing, the MDF board does not generate dust and does not form chips. This design is best used only in children's rooms, since it can break under heavy loads.
MDF bunk bed suitable for toddlers
Chipboard contains formaldehyde, so it is not recommended to use it to make a bed without a sealed coating. This material is not suitable for the main structure, as it will not be able to withstand a lot of weight. It is better to make backs, decorative panels or drawers for things and toys from chipboard.
A bunk bed made of chipboard with a built-in wardrobe must be covered with a film that does not allow formaldehyde to evaporate
Furniture board is a reliable and durable material. This is a slab that is glued together from various bars of natural wood. She's great for making a bunk bed. In this case, it must be borne in mind that the plate has internal stress, which must be taken into account during operation.
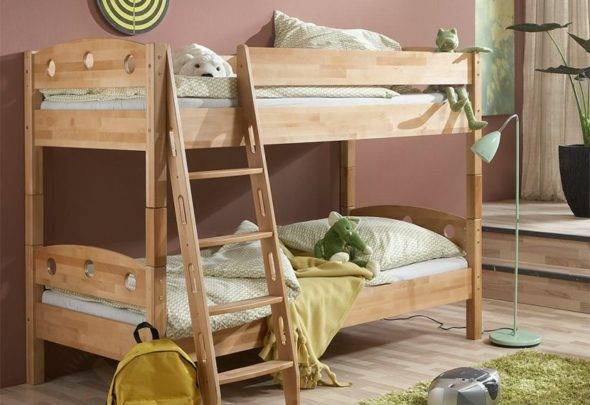
A bunk bed made of durable furniture board will serve the owner for many years.
Economical and energy efficient garage ovens
A waste oil furnace is considered the most economical, as it eliminates additional fuel costs. If you correctly calculate the materials and strictly follow the manufacturing instructions, then it will not smoke and pollute the air excessively.The operation of such furnaces on transmission, machine or transformer oil is provided. A diesel oven for a garage functions on the same principle.
Structurally, the unit consists of two containers, which are interconnected by a perforated pipe with many holes. If a decision is made in favor of installing a working furnace in the garage, then it is necessary that it meets the following requirements:
- maximum weight - 30 kg;
- capacity - up to 12 liters;
- standard size - 70x50x30 cm;
- average fuel consumption - 1 l / hour;
- exhaust pipe diameter - 100 mm.
The wood-burning garage stove from two gas cylinders is very economical and easy to maintain
To build such a structure is quite simple. No nozzles and droppers are needed to create it, so special knowledge, skills or experience are not needed to make it.

Directly for the manufacture of the furnace will require the following materials:
- steel pipe;
- two metal containers;
- steel corner.
The container can be the case of an old unusable refrigerator compressor or a gas cylinder. A furnace for a garage for mining should be made of a material with a thickness of at least 4 mm, since it is supposed to be heated up to 900 ° C, so thin metal will simply burn out.
The sequence of manufacturing a stove in a garage, functioning at a test
A garage oven for mining is beneficial if there are large stocks
The process of creating this type of stove in the garage with your own hands includes the following steps:
- Installing the lower container on the legs. For this purpose, parts with a size of 20 cm are produced from a metal corner, onto which the container is welded in a horizontal position.
- Cutting a hole in the middle of the lower part of the body, which serves as a firebox and a fuel tank, welding a vertical pipe to it, connecting both containers. It is desirable that the upper part is removed. This is necessary for cleaning the burner.
- Drilling about a dozen holes in the pipe at a height of half a meter. The first hole must be at least 10 cm from the main body of the oven.
- Making a hole on the top of the furnace tank for pouring oil and a lid that will help regulate the level of heating of the room and the combustion process itself.
- Welding a branch pipe on the upper tank.
- Construction of a galvanized steel exhaust pipe at least 4 meters long and fastening it to the nozzle.
Painting will give a presentable look to the garage stove. For this purpose, a mixture of silicate glue, crushed chalk and aluminum powder is used.
Disadvantages of a furnace for a garage for working out, features of operation
To use such a stove, in order to avoid emergency situations, it is necessary in accordance with clear instructions. To do this, using the lower opening of the furnace, it is necessary to put a small amount of kindling paper into the fuel tank. Next, approximately 1 liter of used oil is poured. The paper is set on fire and wait a couple of minutes until the oil boils. When the oil begins to burn slowly, it must be added as necessary in the amount of 3-4 liters.
Despite the many advantages of this type of garage oven, it is necessary to mention their disadvantages, in particular:
- a very long chimney, which must be at least 4 meters in height;
- it is required that the chimney device be strictly vertical, without bends and horizontal sections;
- The oil containers and the chimney must be cleaned regularly - about once a week.
The oil consumption in the furnace during mining is regulated by the air supply damper and is 0.3 - 1 l. in hour
The process of creating a heating system in a garage must be approached responsibly so that such structures as a mining boiler, a brick oven, a do-it-yourself potbelly stove are profitable and bring maximum heat. It should be noted that economical options must be carefully looked after, and brick structures require a certain time for kindling. To create a long-burning metal furnace, certain skills and knowledge will be required. At the same time, any of the options considered, under the conditions of proper construction and subject to the rules of operation, will make the garage warm and comfortable.
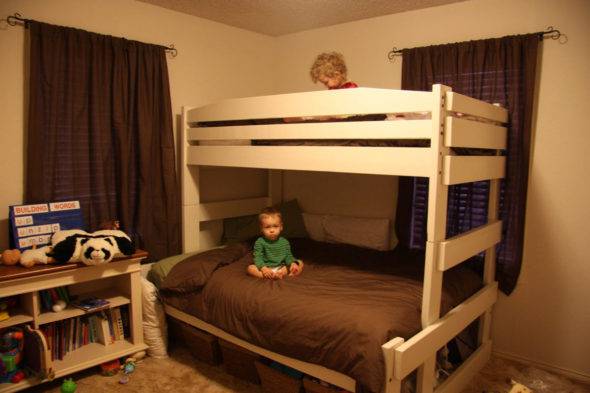
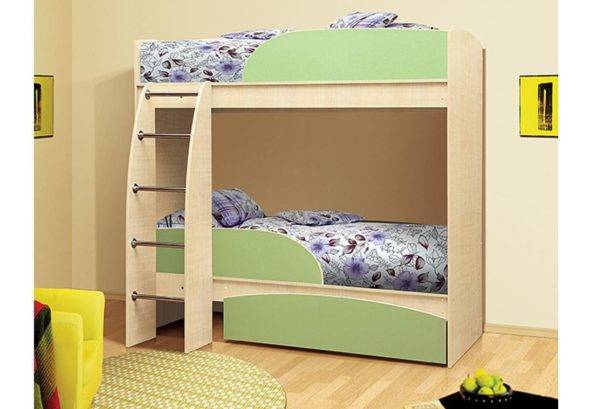
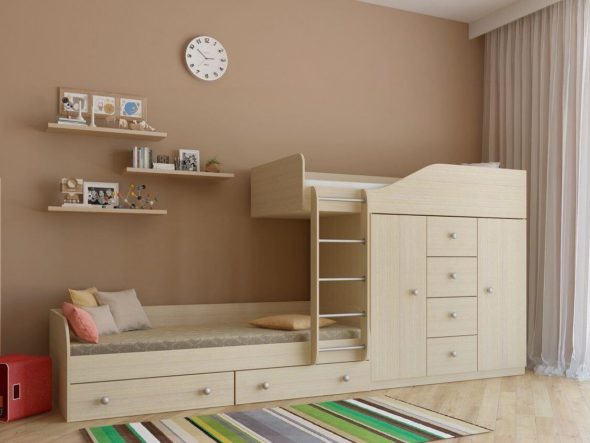
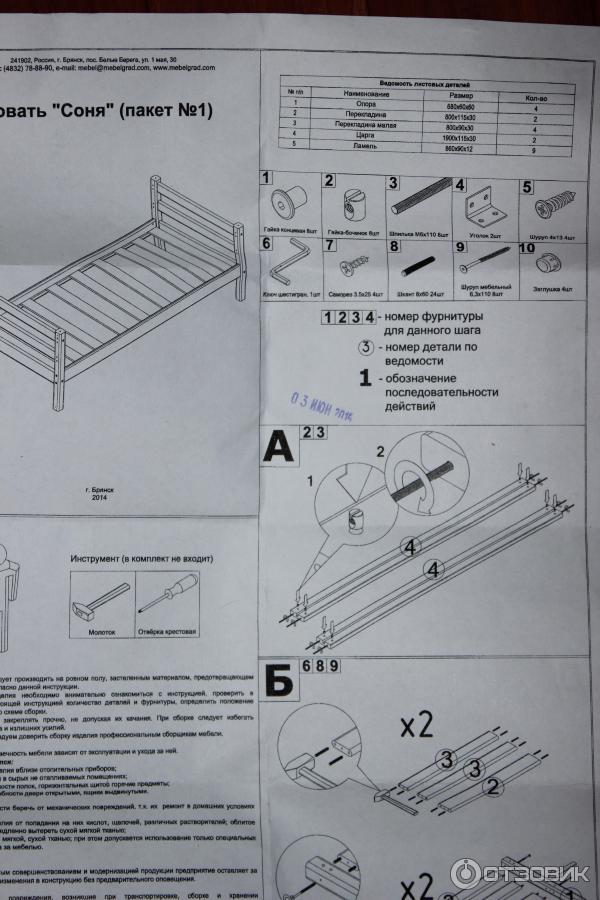
Crib Requirements
The range of beds for children is quite extensive. The choice of a high-quality and functional model is a determining factor that ensures a good sleep for a child and its proper development.
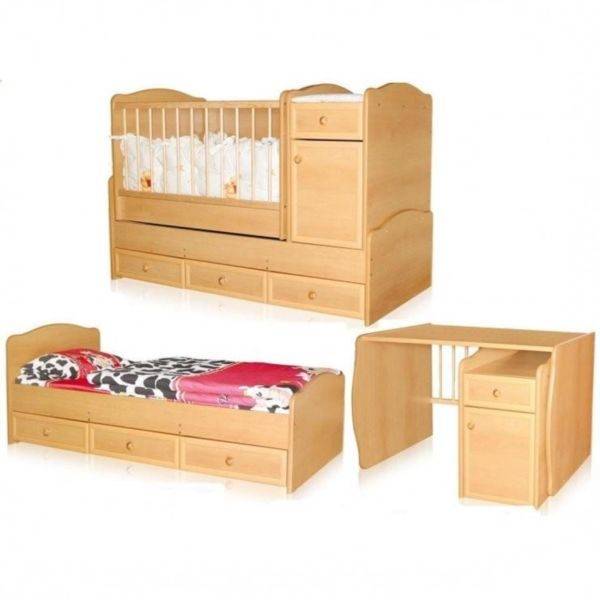
Crib-transformer
The current standards set the requirements for baby beds. According to GOST 19301.3-2016, they are divided into 2 types:
for babies up to three years;
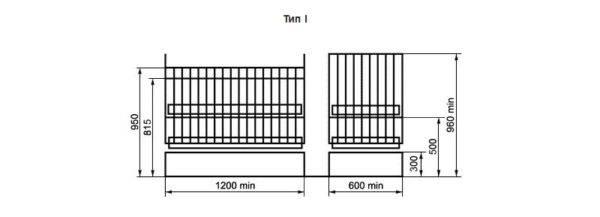
First bed type
for children whose age is 3 ... 7 years.
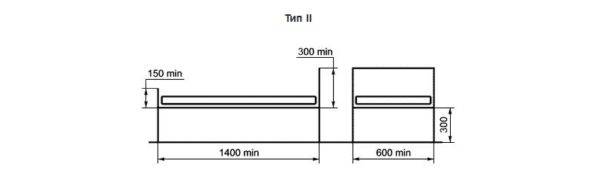
Second type of bed
GOST regulates the requirements for furniture items installed in preschool institutions and residential premises.
- The vertical racks of the beds of the first type should not be located at a distance exceeding 7.5 cm from each other. This is necessary so that the baby's head cannot crawl between them or legs and arms get stuck.
- In cots for babies, it is possible to shift the side walls down by 13.5 cm.
- Fences can be equipped with an additional horizontal rail placed at a height of 81.5 cm from the floor level.
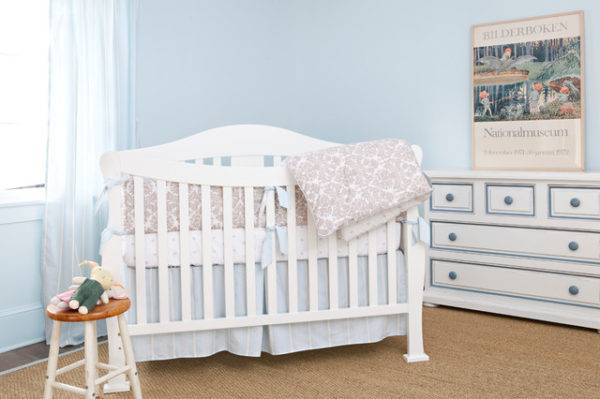
Regardless of whether it will be a separate room in the apartment or a corner in the parents’ room, you can’t do without a crib
The dimensions established by the standards are important not only when taking into account the dimensions of the furniture for its successful placement in the room. Manufacturers of accessories for beds are guided by them: mattresses, pillows, blankets, KPB, so parents do not need to spend extra time when choosing accessories.
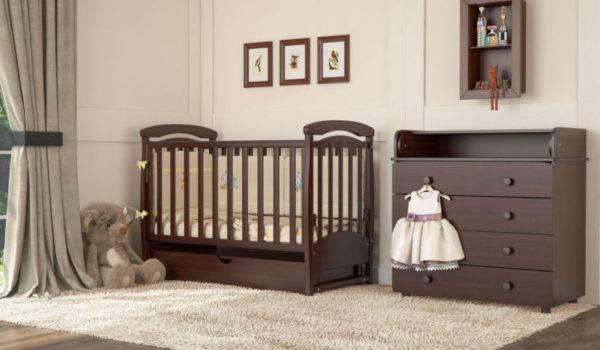
Crib for babies up to four years old
What are the requirements for baby cots?
- Sustainability. The furniture must stand on the surface so that there is no risk of tipping over when the child inside moves.
- Safety. All structural elements must not have damage, chips, splinters, cracks or protrusions that can lead to injury. The gap between the side wall and the mattress should not exceed 1 ... 2 cm. The latches should close securely.
- Good ventilation. The bottom and side walls of the cribs are recommended to be made of slats. This will ensure optimal ventilation of the mattress and the entire crib.
- Functionality. Installed wheels (with locks) make it easy to move the beds. Movable side walls allow you to install the crib next to the parent's bed. The adjustable height of the bottom makes it easy to put the baby down, and when he grows up, he will not let him get out on his own. Silicone pads installed on the sidewalls are useful when the child begins to gnaw on everything.
It is also necessary to take into account the factor that a piece of furniture purchased or made by oneself must fit into the interior of the room in which it is installed.
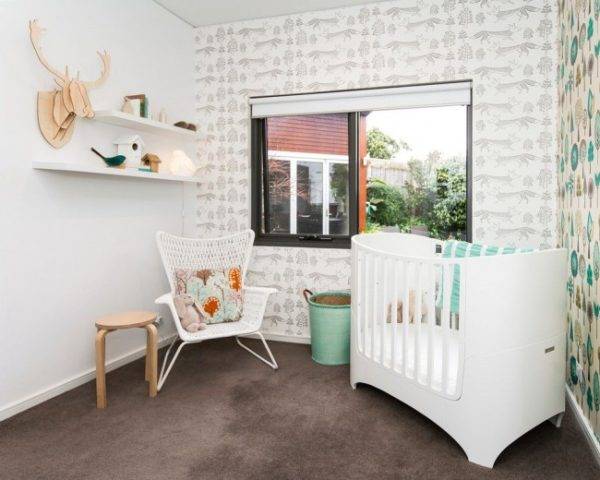
Small white baby bed
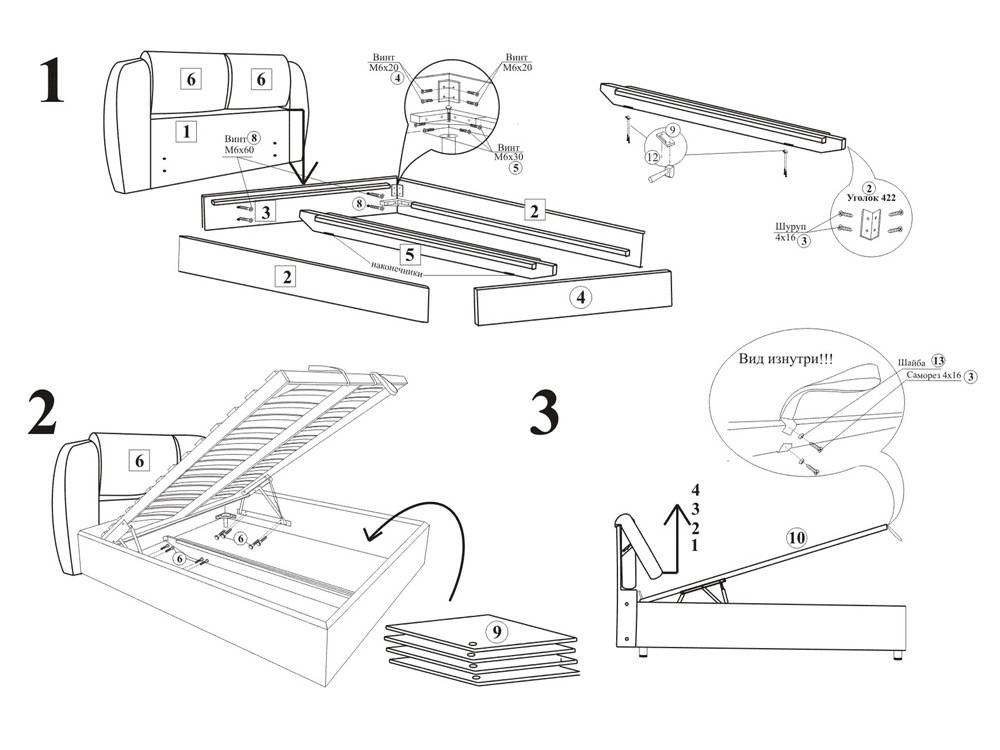
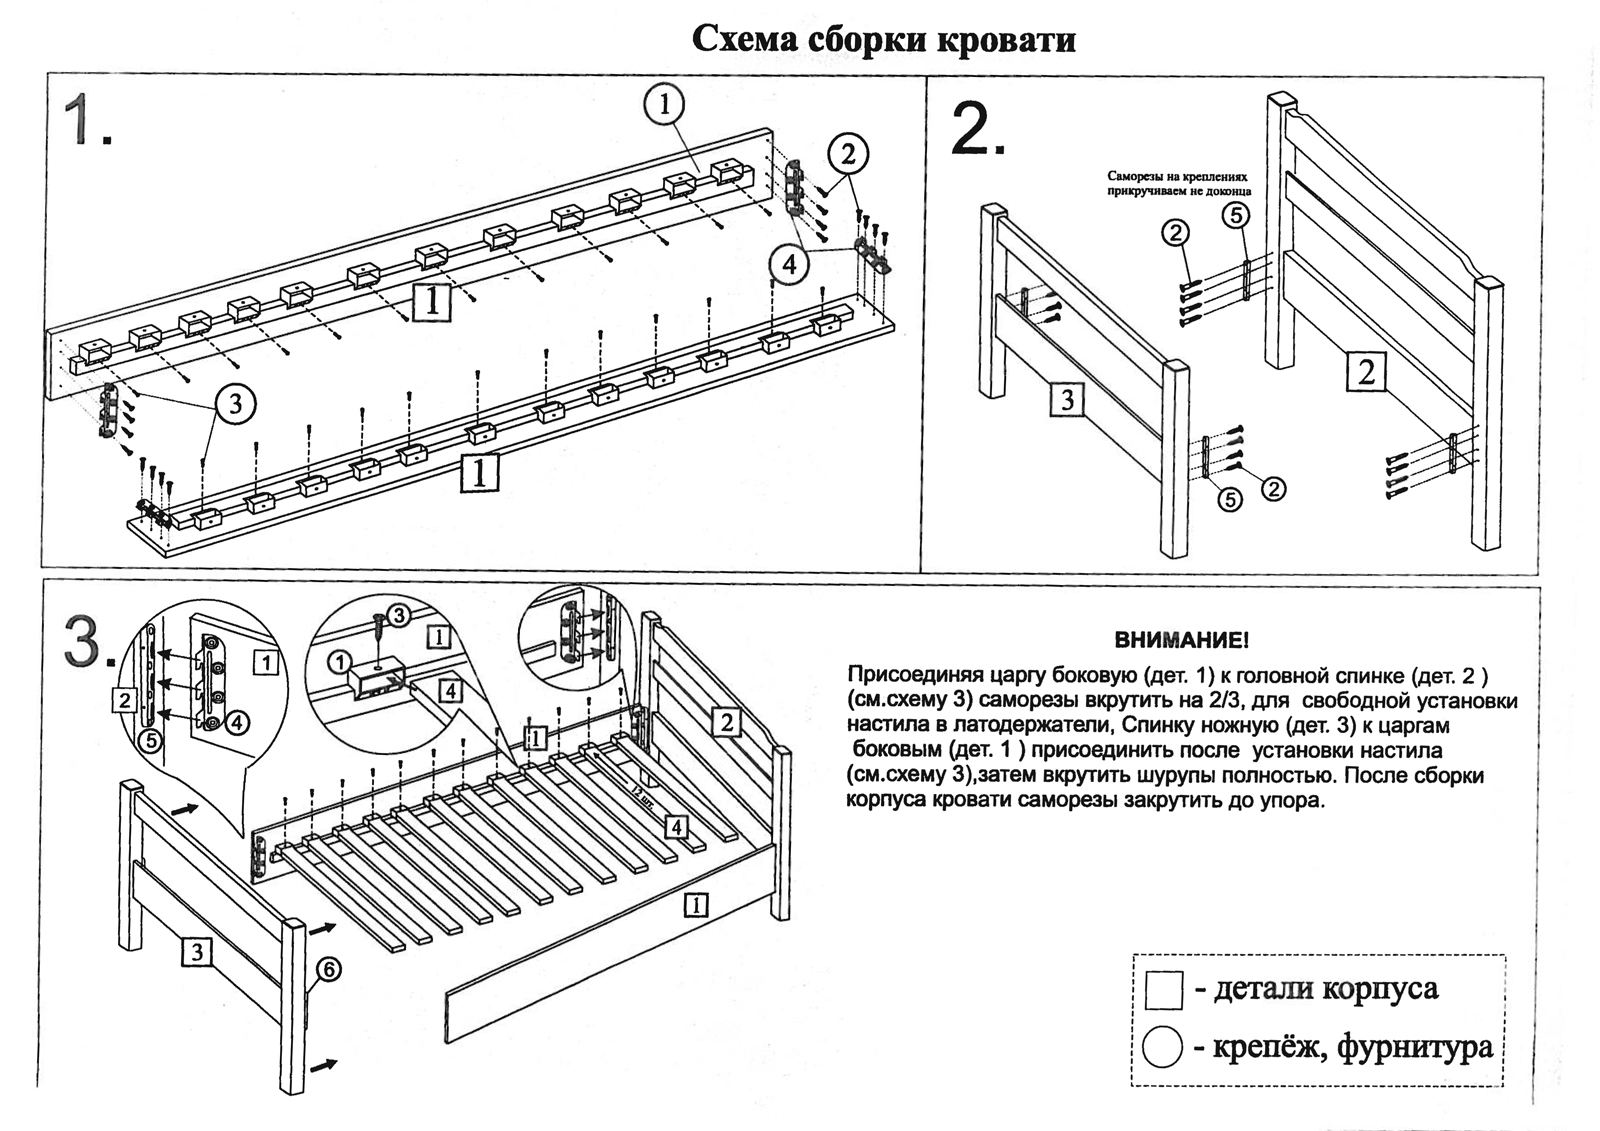
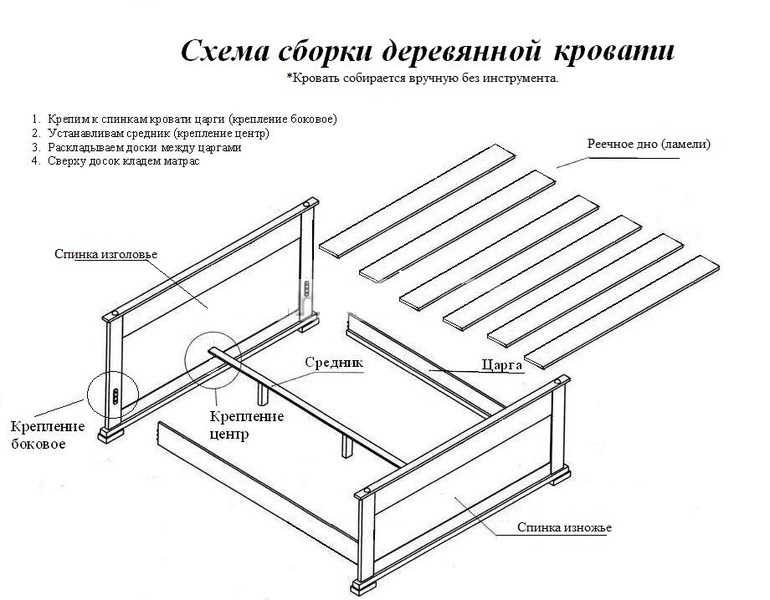
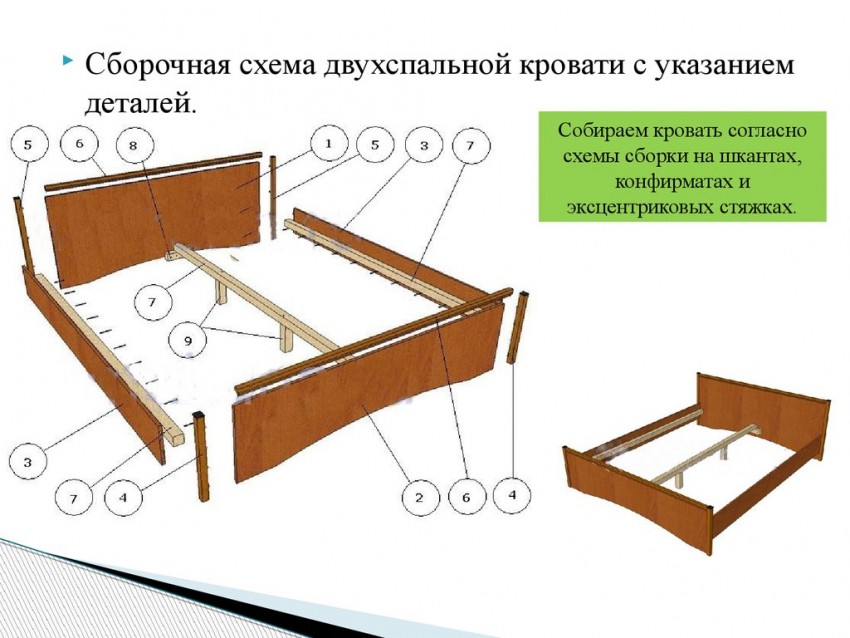
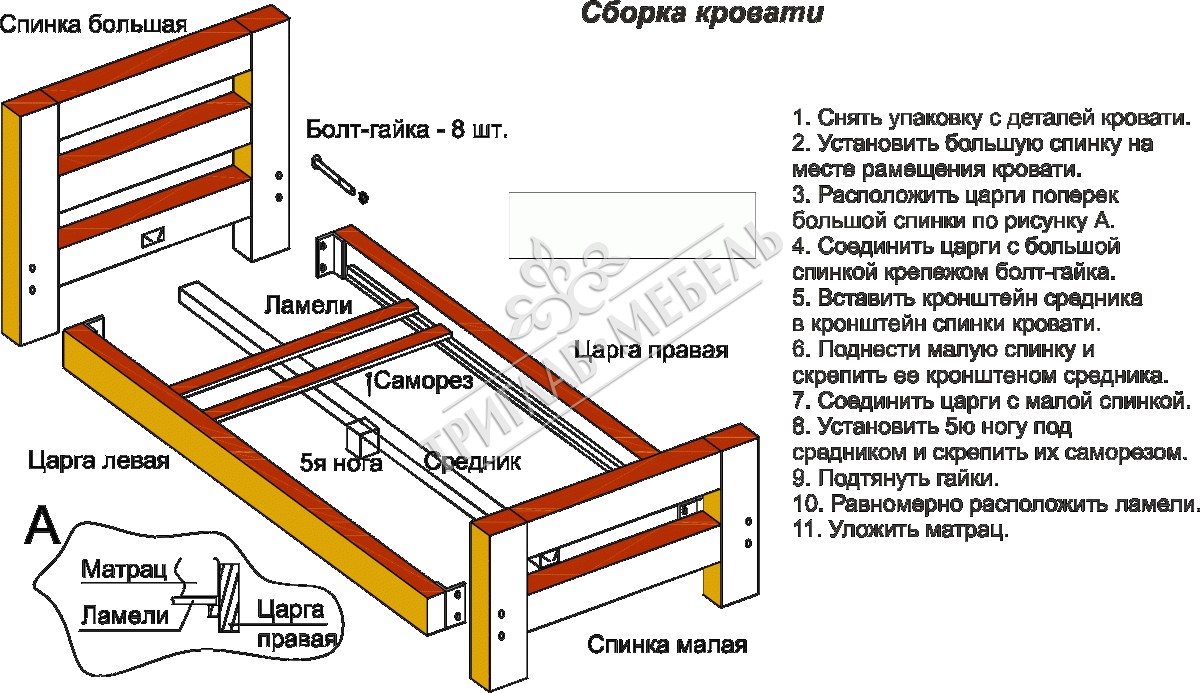
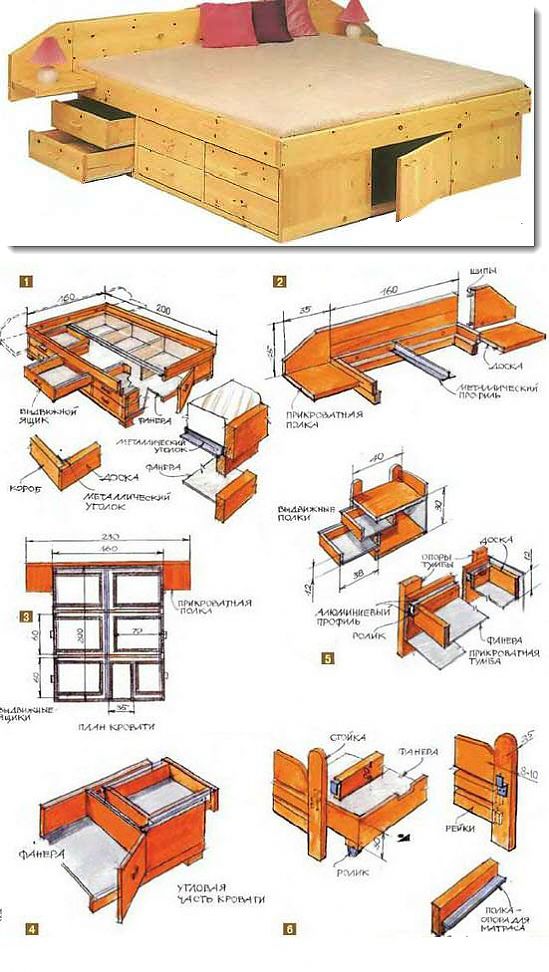
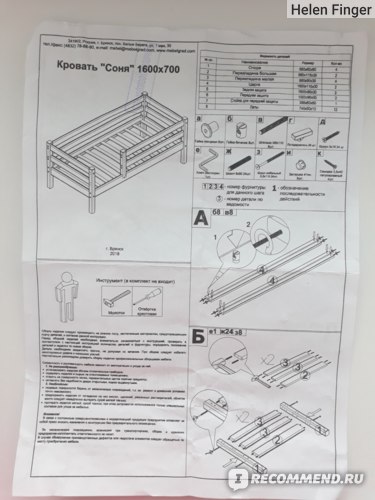
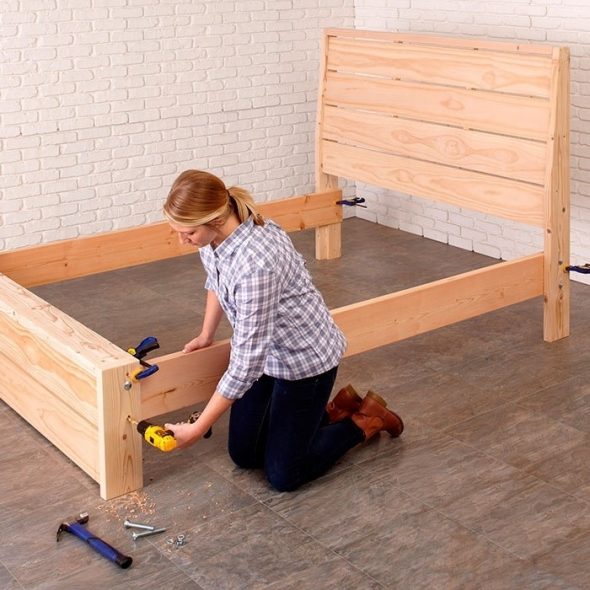
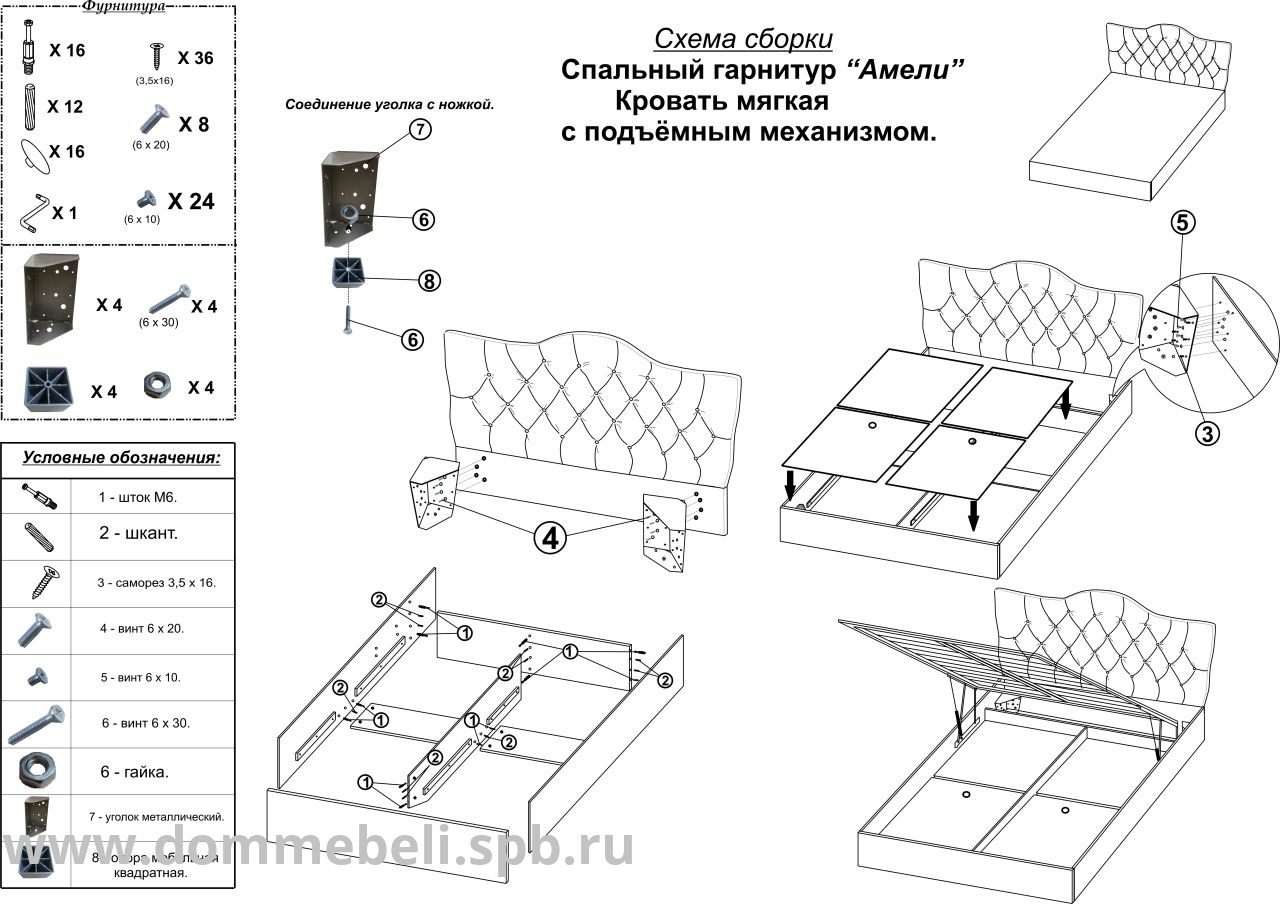
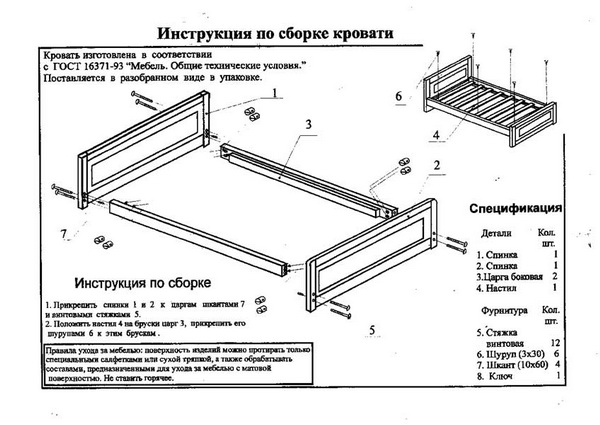
How to make a bed yourself
If you decide to make a single bed with your own hands, then do it consistently. You can’t just buy a few boards and connect them together.
![[instruction] how to make a bed with your own hands | 60+ photos](https://fix.housecope.com/wp-content/uploads/1/3/b/13bd58d2f91d391cea70f1df17987c66.jpeg)

 You can draw a sketch of the bed in a special program.
To make high-quality furniture, you will need to complete drawings and diagrams, calculate the dimensions of the bed, think about additional elements in the form of a headboard or armrests, even before assembly itself.
Drawing up drawings and diagrams
The drawing is one of the key things in preparing for the assembly of the bed. The final result will depend on how accurately and correctly the scheme is executed. Not one, even a professional craftsman with extensive experience, does not work without a drawing.
In order to draw a diagram, you need to make several segments on a sheet of paper, which will be equal to the width, length and height of the product. At the same time, you need to take into account the size of your room, so that you understand how much final space remains on all sides. The dimensions of each part are calculated and drawn separately.
 An example of a bed can be found online.
Also, a ready-made drawing, which can be found in books or on the Internet, can become a solution. All the details are already indicated there, you just have to adjust the dimensions to those that fit into the room.
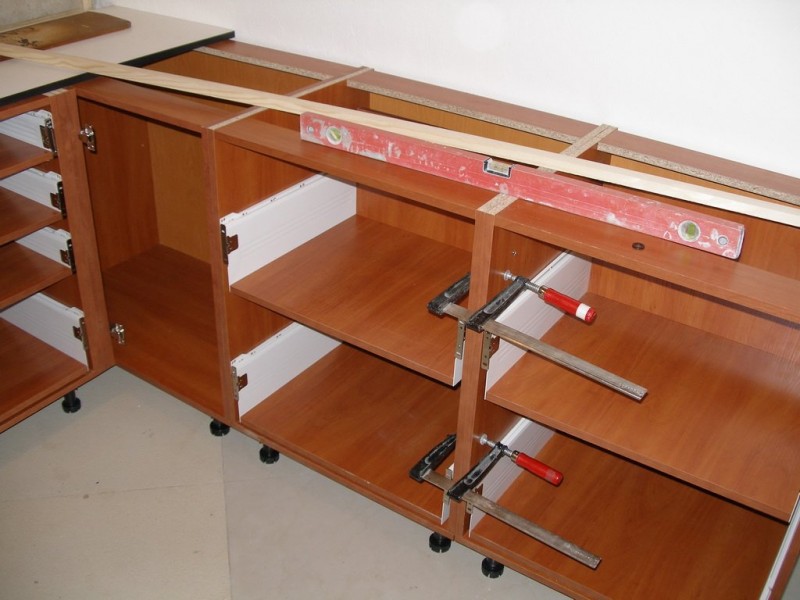
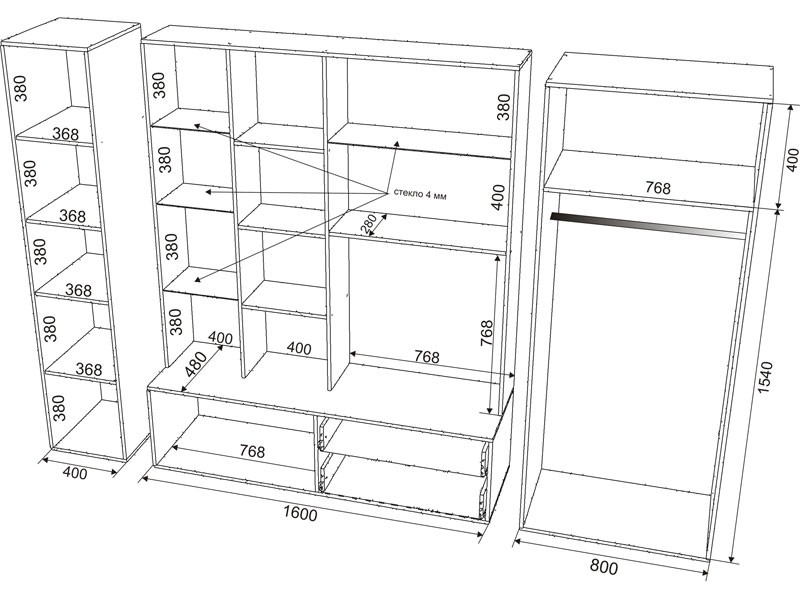
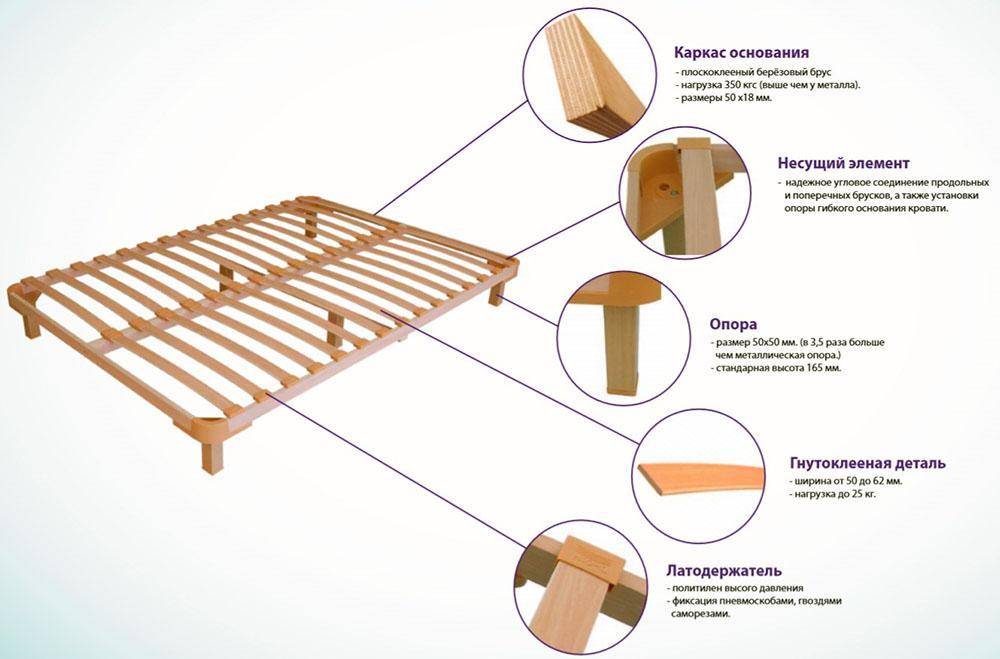
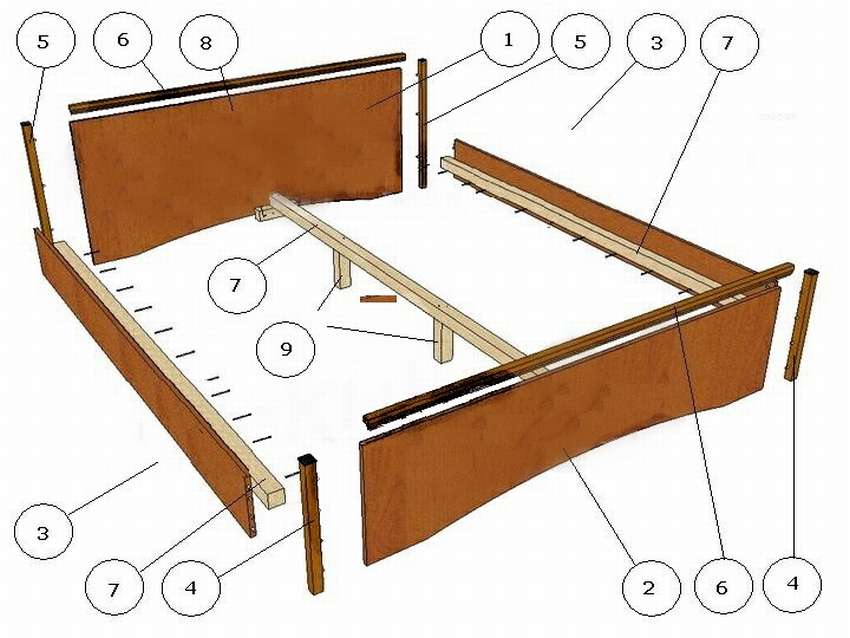
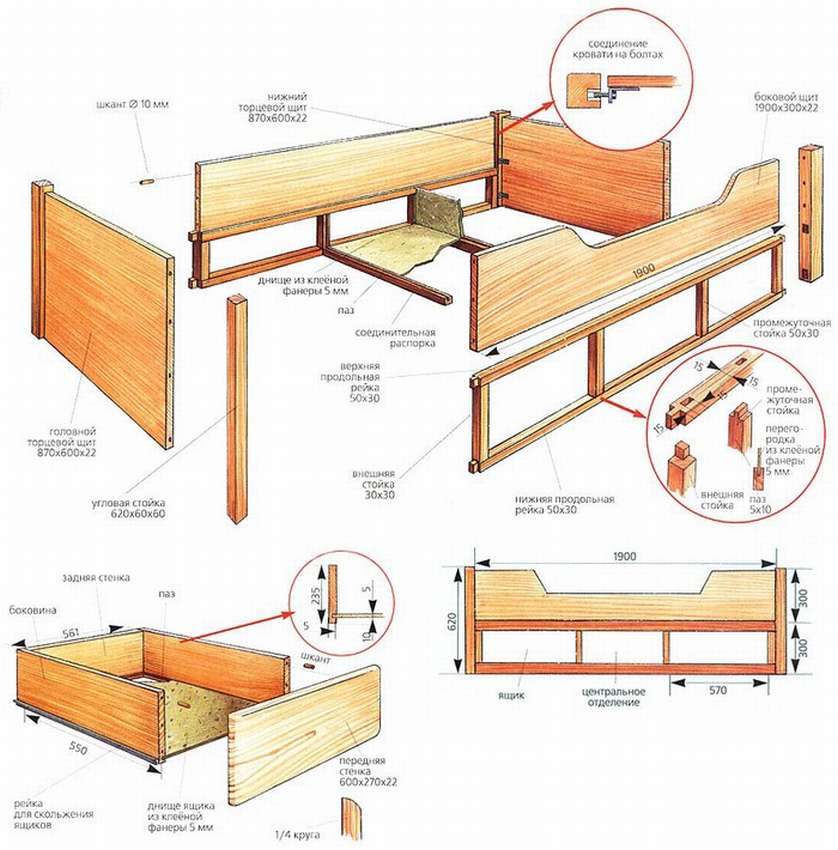
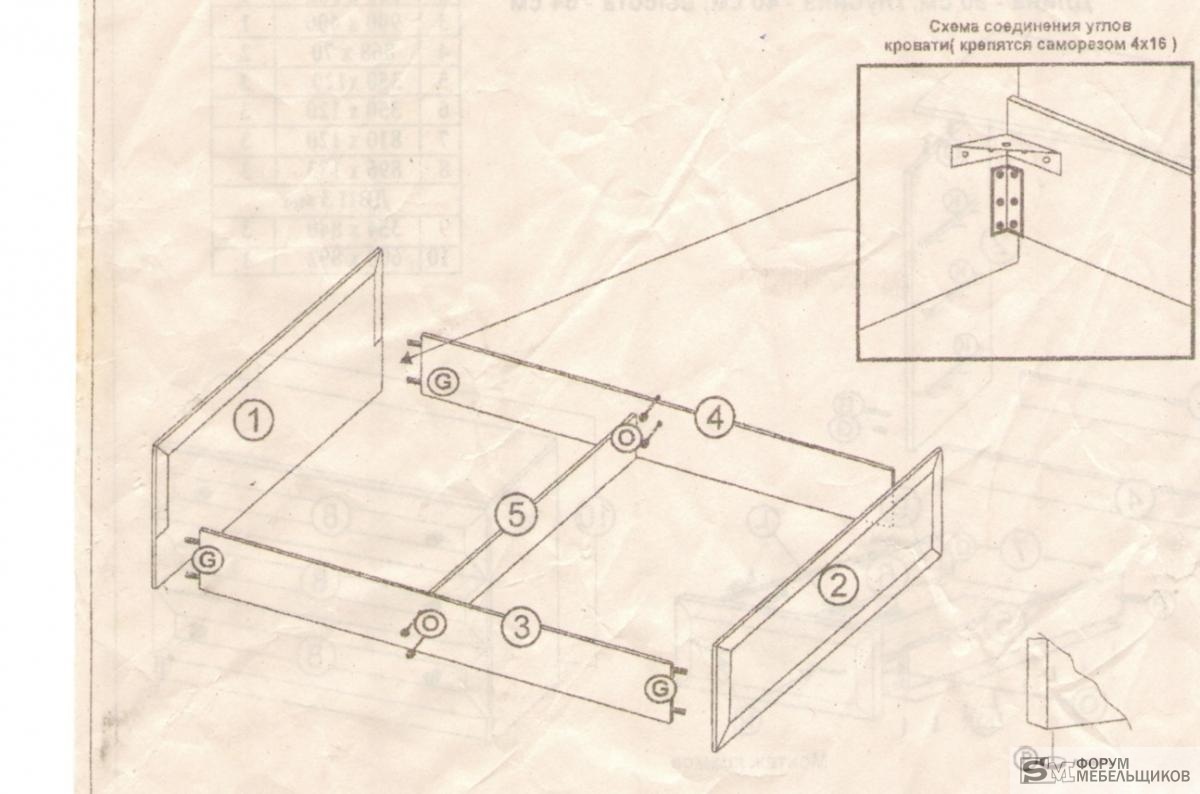
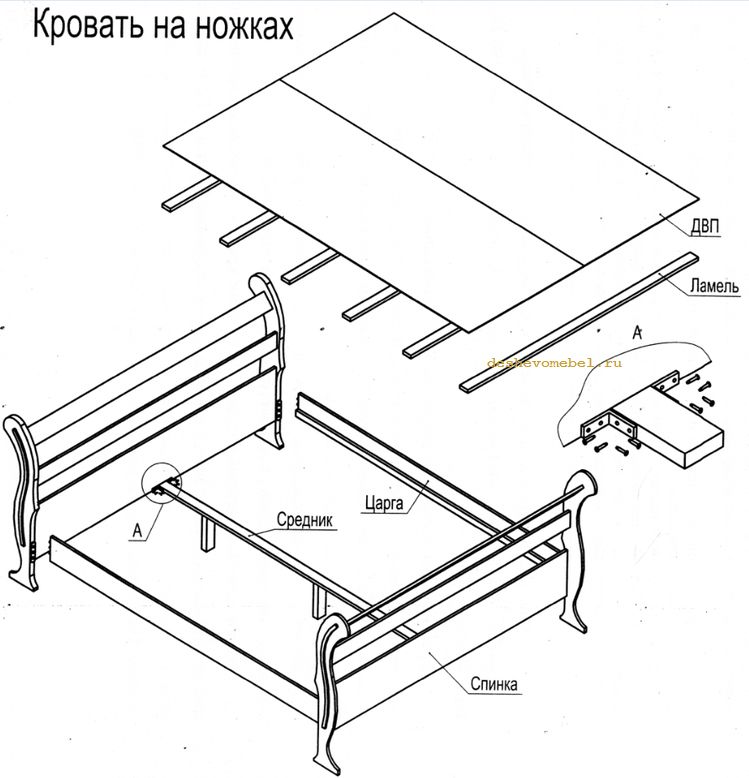
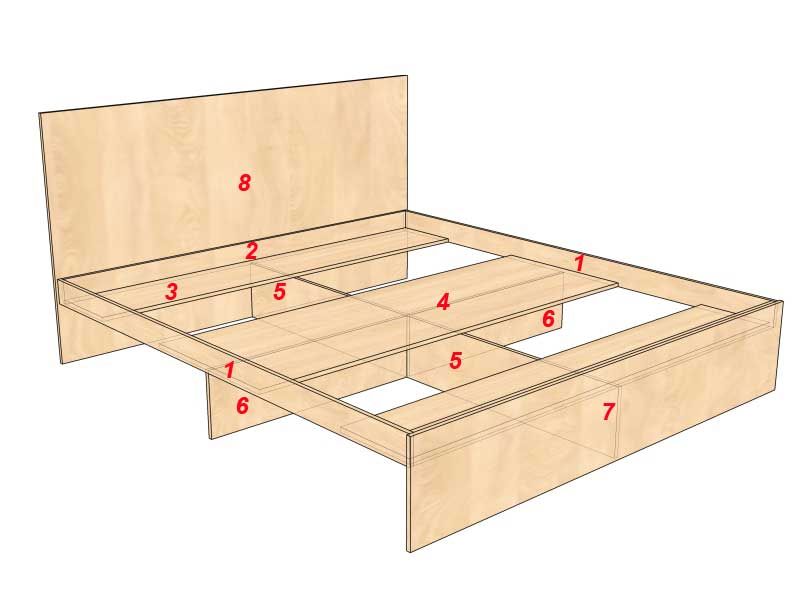
frame
One of the most important details in a bed is the frame. It is a box that acts as the base of the bed.
 Bed sides can also be made from pallets.
In the simplest assembly, it consists of four sides, which are pulled together by a beam, for more reliable fastening. The sides of the frame can be narrow if the bed is on legs or wide if legs are not provided for in the project.
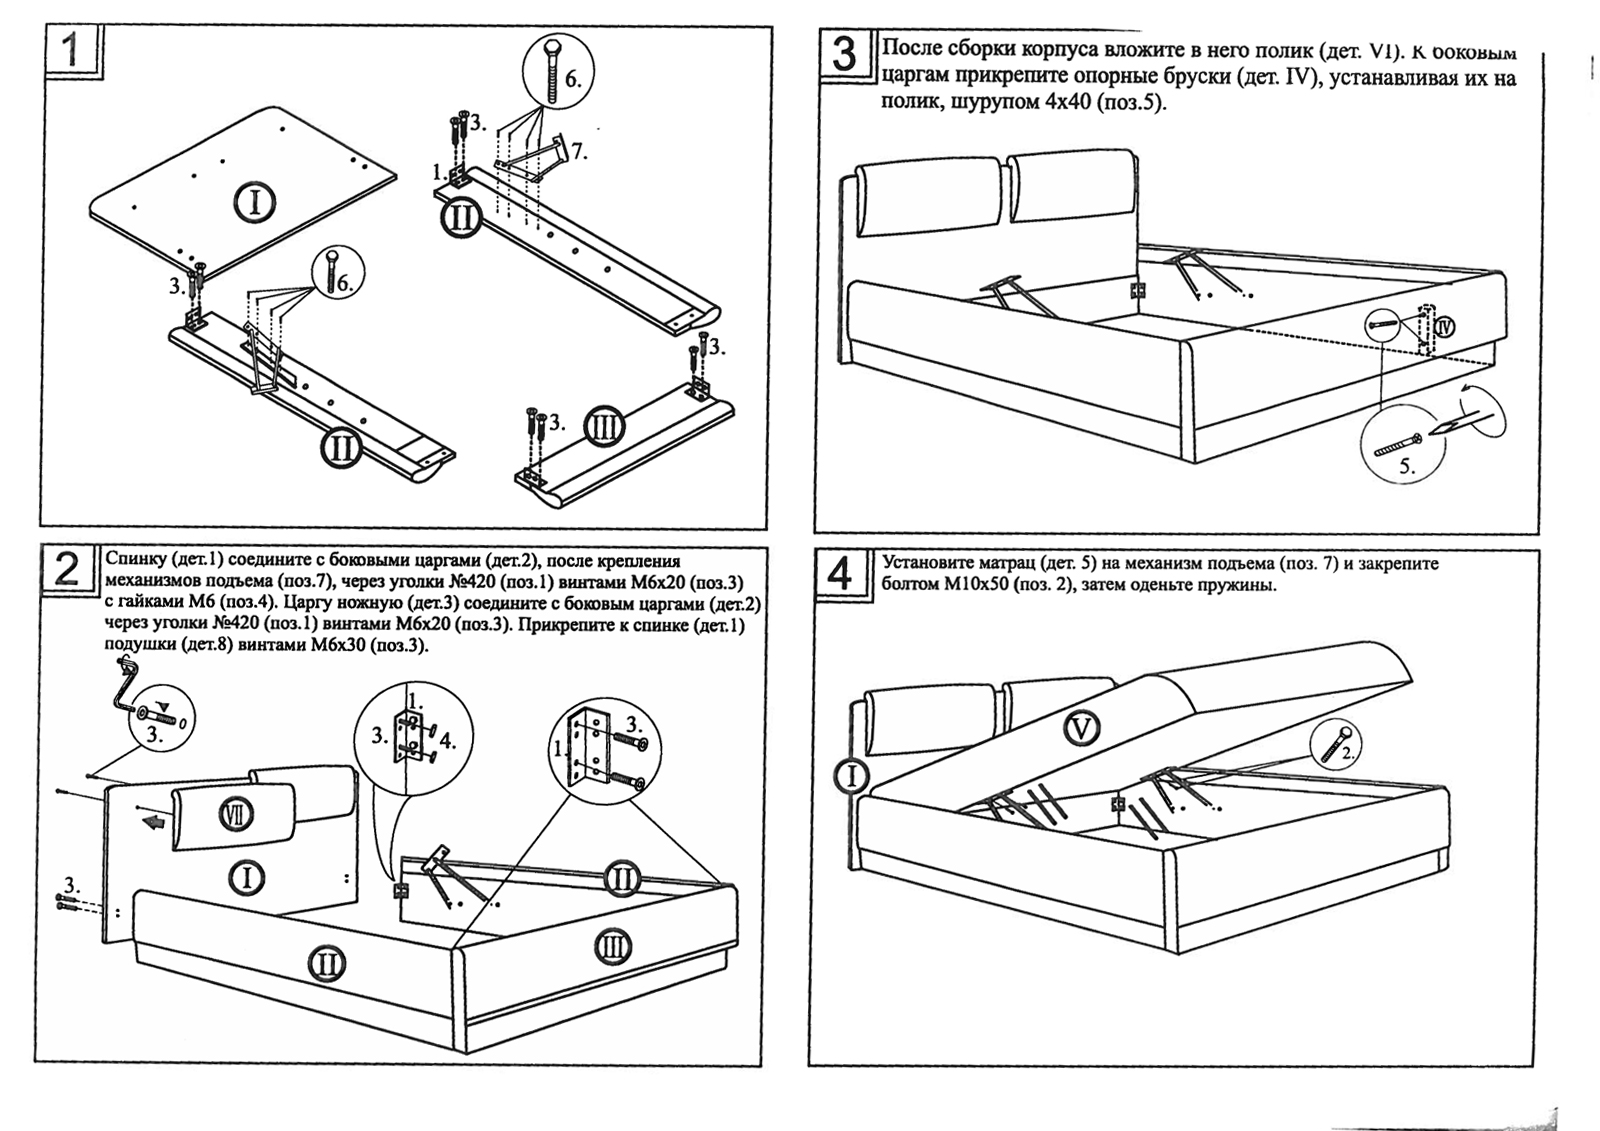
 Use quality bed mechanism.
headboard
Installing a headboard on a bed is not necessary, but it adds coziness and furniture looks more aesthetically pleasing with it.
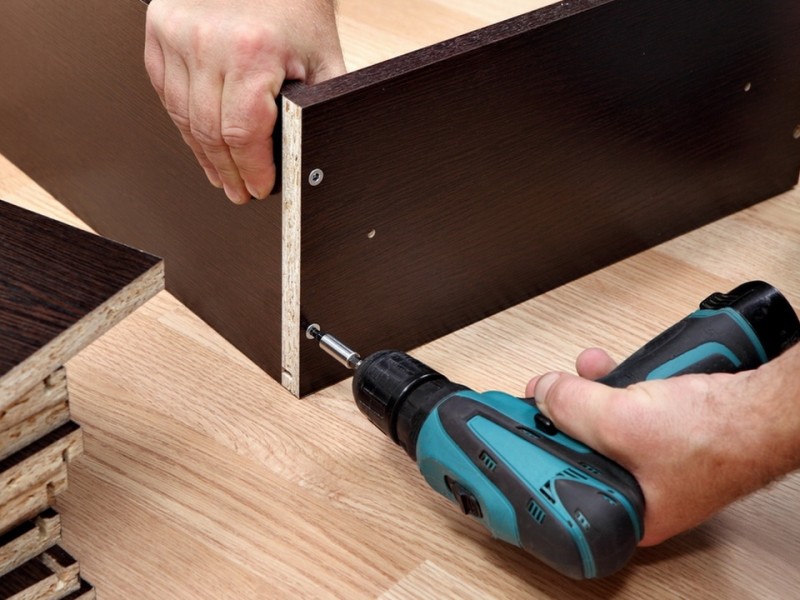
 See the instructions for assembling the bed.
The headboard is made from the same material as the bed frame, and can be sheathed on top with soft material, painted or installed with decorative tools. You can also make shelves or drawers on it.
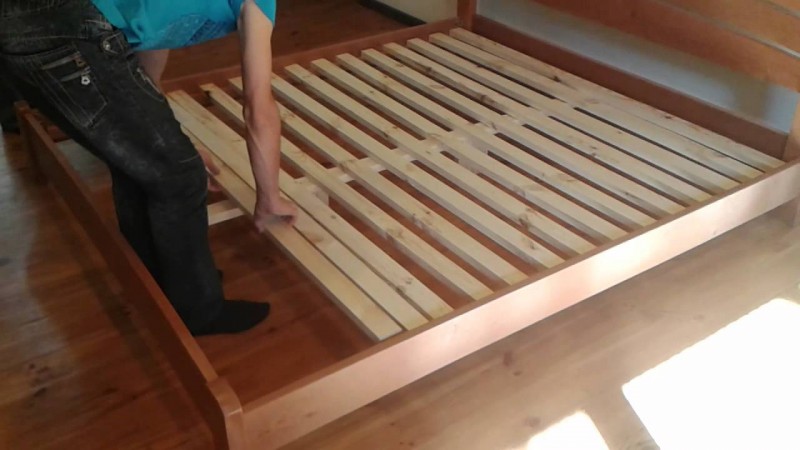
Installation of lamellas
The slats are the frame on which the mattress will be placed in the future. The structure consists of a base (usually metal) and wooden slats. Their installation in the finished product is very easy, it is enough to place the lamellas in the box.
 It is not difficult to assemble the lamellas, but you need to do it carefully.
You can also assemble this part yourself. The slats are necessary so that the load is distributed over the mattress correctly. In this case, it will serve you for a longer time.
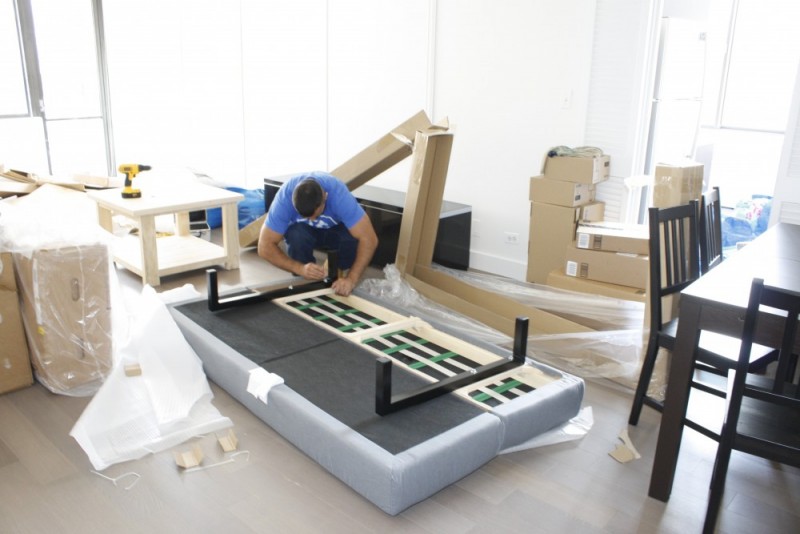
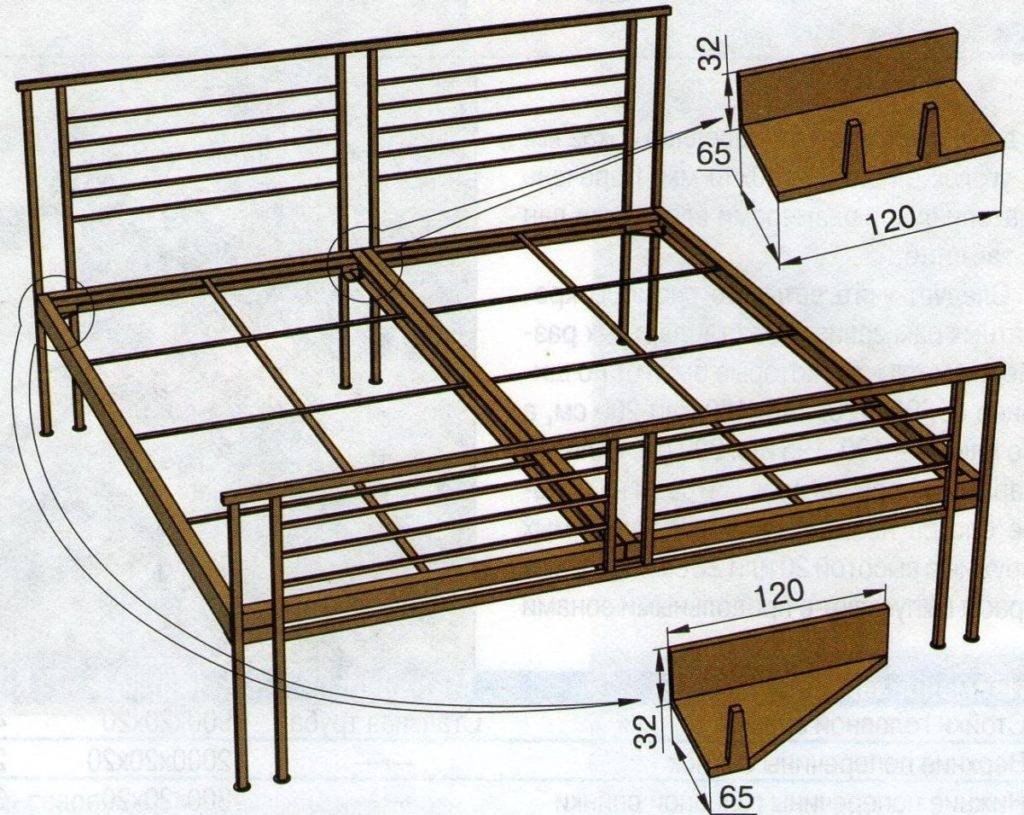
Manufacturing and installation of legs
Legs can be made from metal or wood. They are installed on the box, after its assembly. It is necessary to correctly calculate the weight of the bed, taking into account the mass of the person, and based on this, choose the legs in size.
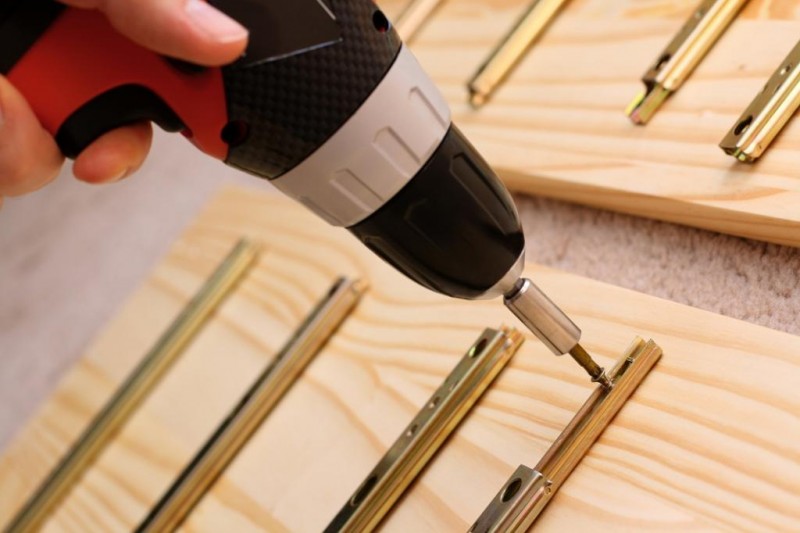
 Use quality tools to assemble the bed.
They can be made from wood or metal. In the first and second case, the part will require grinding and processing.
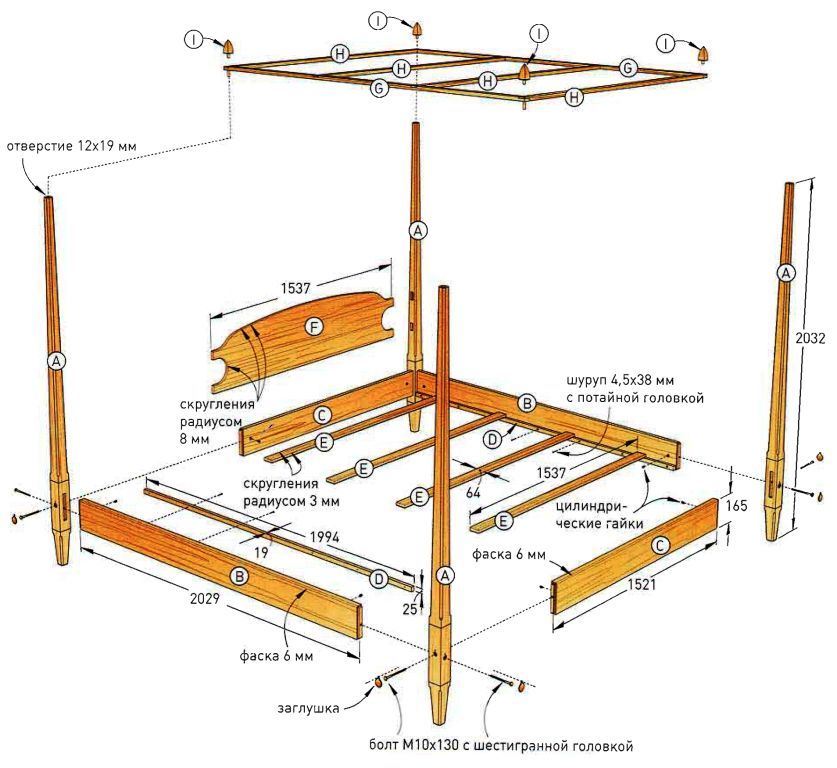
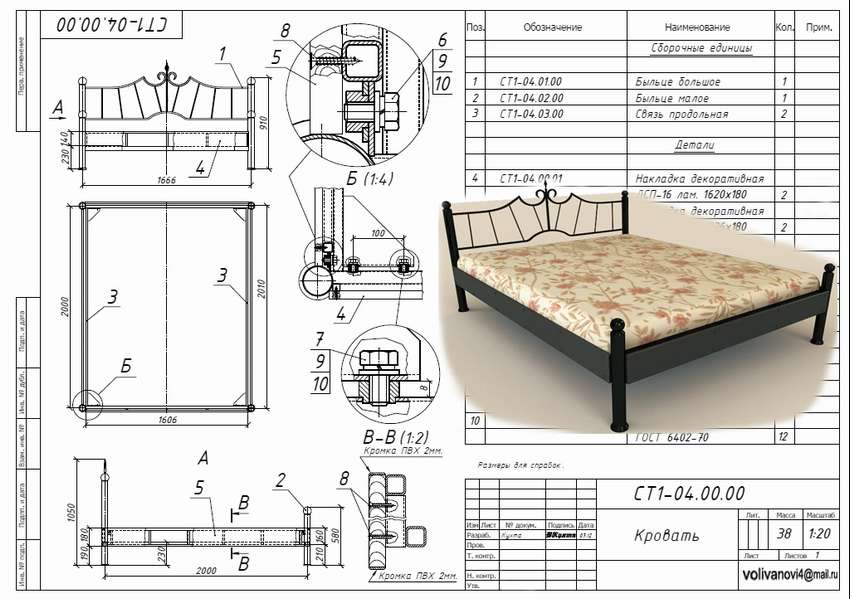
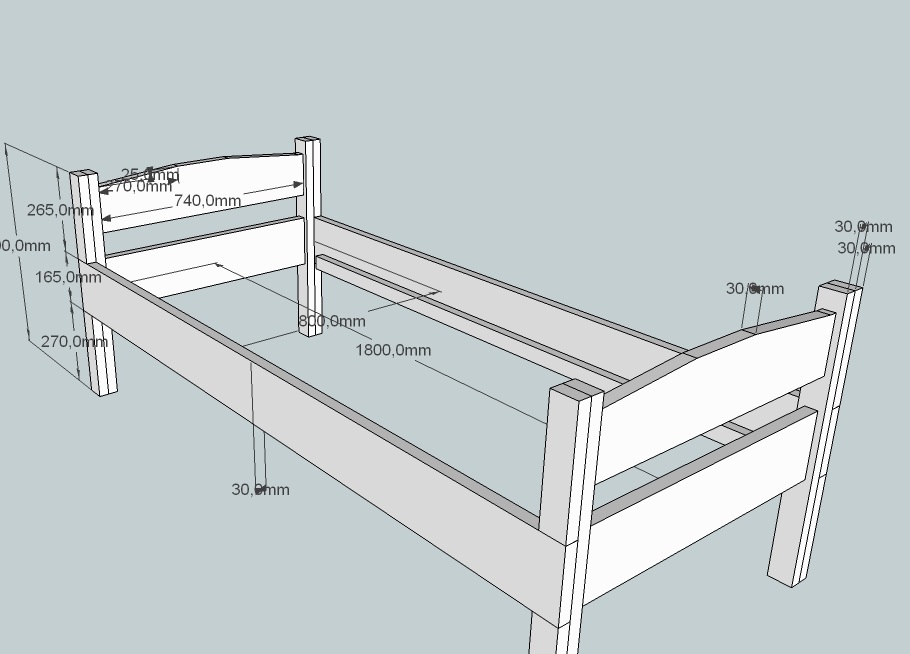
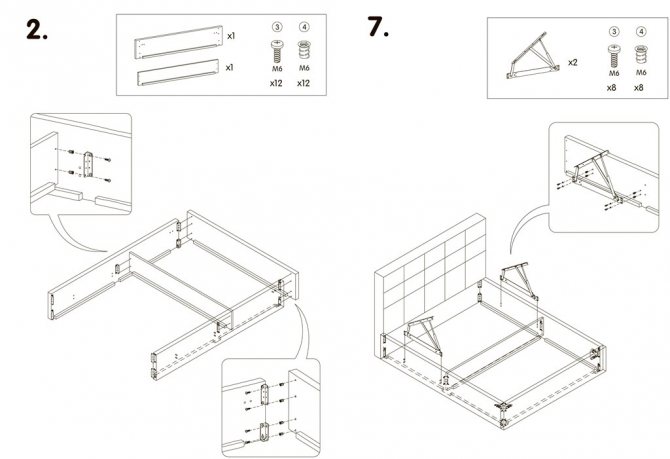
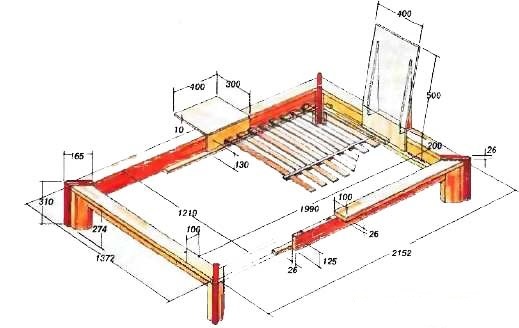
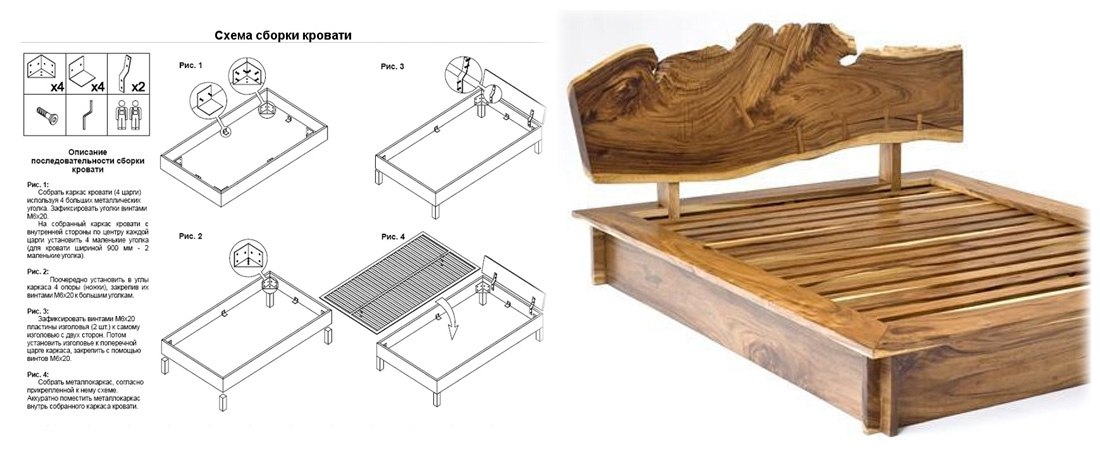
DIY bed frame made of wood drawing
How to make a king size bed frame step by stepMaking furniture yourself is not only saving the family budget, but also an opportunity to show your creativity. Being DIY gives you the freedom to choose the design, size and finish that suits your tastes. If you like rustic style in the interior, you will love this project. An important tip, first buy a mattress, and then proceed to make the bed.
Dimensions of parts according to the diagram on the right
A - 2 boards 4×4 52" (132cm) long, 1 board 2×4 83 1/2" (212cm) long, 1 board 2×6 85 1/2" (217cm) long A - 14 boards 2×6 29” (74cm) long, 4 boards 1×4 76 1/2” (194.5cm) long B – 2 4×4 25” (63.5cm) long, 1 2×4 83 1/2” (212 cm) long, 1 board 2 × 6 85 1/2” (217 cm) long B - 14 boards 2 × 6 19” (48 cm) long, 4 boards 1 × 4 - 76 1/ 2" (194.5 cm) C - 2 boards 1 × 10 80 1/2" (205 cm) long D - 2 boards 2 × 4 80 1/2" (205 cm) long, 1 board 2 × 4 76 long 1/2" (194.5cm)E - 17 planks 1×4 76 1/2" (194.5cm) long
Source /finishes/furniture/how-to-build-a-king-size-bed-frame/#more-6622
Another similar project with a simple design. Here are drawings that will help you make a do-it-yourself double bed in a rustic style. This frame is made mainly of 2x4 timber, so the structure will be very strong and reliable. Always align components before driving screws. It is also advisable to pre-drill holes for the screws, otherwise the wood can easily split. Use glue to increase adhesion. Of course, only if you are not going to disassemble the structure in the near future.
A - 2 x 2 x 4 33" (84 cm) long, 2 x 61" (155 cm) long, 11 x 17 1/2" (45 cm) long, 1 x 70" (178 cm) long B - 2 2 × 4 bars - 33 inches (84 cm) long, 2 pieces 61 inches (155 cm) long, 11 pieces 6 inches (15 cm) long, 1 piece 70 inches (178 cm) long C - 2 bars 2 × 4 long 81" (206cm) Support Planks L - 3 2x4s 81" (206cm) long, 1x 8" (20cm) E - 15 1x4s 61" (155cm) long 14x 2x 4 8′(245cm) long 15 planks 1×4 6′(183cm) long bed brackets
Source /finishes/furniture/2×4-queen-size-bed-plans/#more-26932
General recommendations for installation
The following guidelines will help you assemble a durable and aesthetically appealing bed design.
• Product parameters are determined taking into account the dimensions of the mattress
It is important to provide a slight elevation above the frame (legs or other elements), this will allow you to easily clean the dust under the bed
• From a large range of wood products for a bed, an even beam is more suitable (preference is given to glued pine). It is pleasant to work with the material, during operation there are no unpleasant nuances.
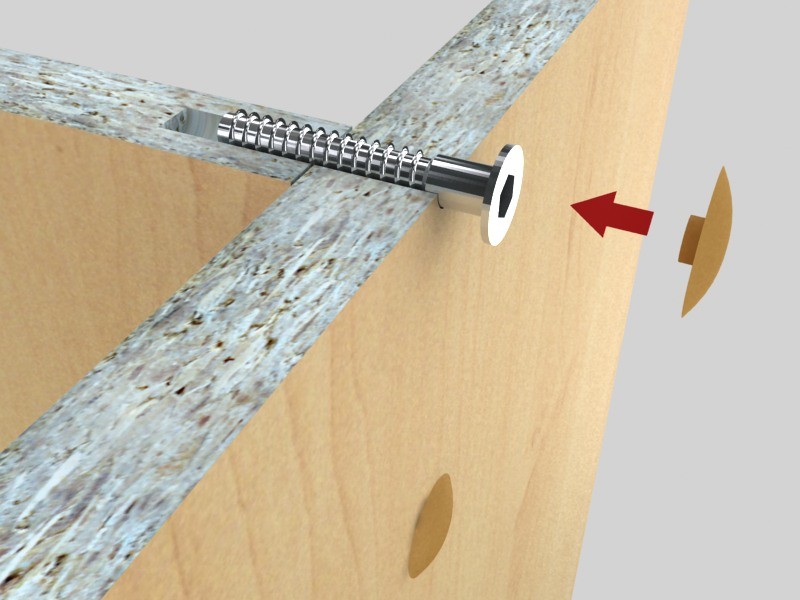
• Hardware and other fasteners must be purchased with a margin.
• If you plan to equip the drawers built into the frame, you need to purchase additional sheets of chipboard.
• When choosing metal corners, you should pay attention to the quality of fasteners. If there are roughness and burrs, it is better to refuse such products.
• The frame must be assembled only from timber, other materials are not suitable.
• The bottom is made of plywood or slats. The second option is preferable in terms of performance and hygiene requirements.

• As fasteners, in addition to metal corners, it is recommended to use: nails, phosphated self-tapping screws (diameter 5-6 mm), dowels. It is better to refuse the use of dowels.
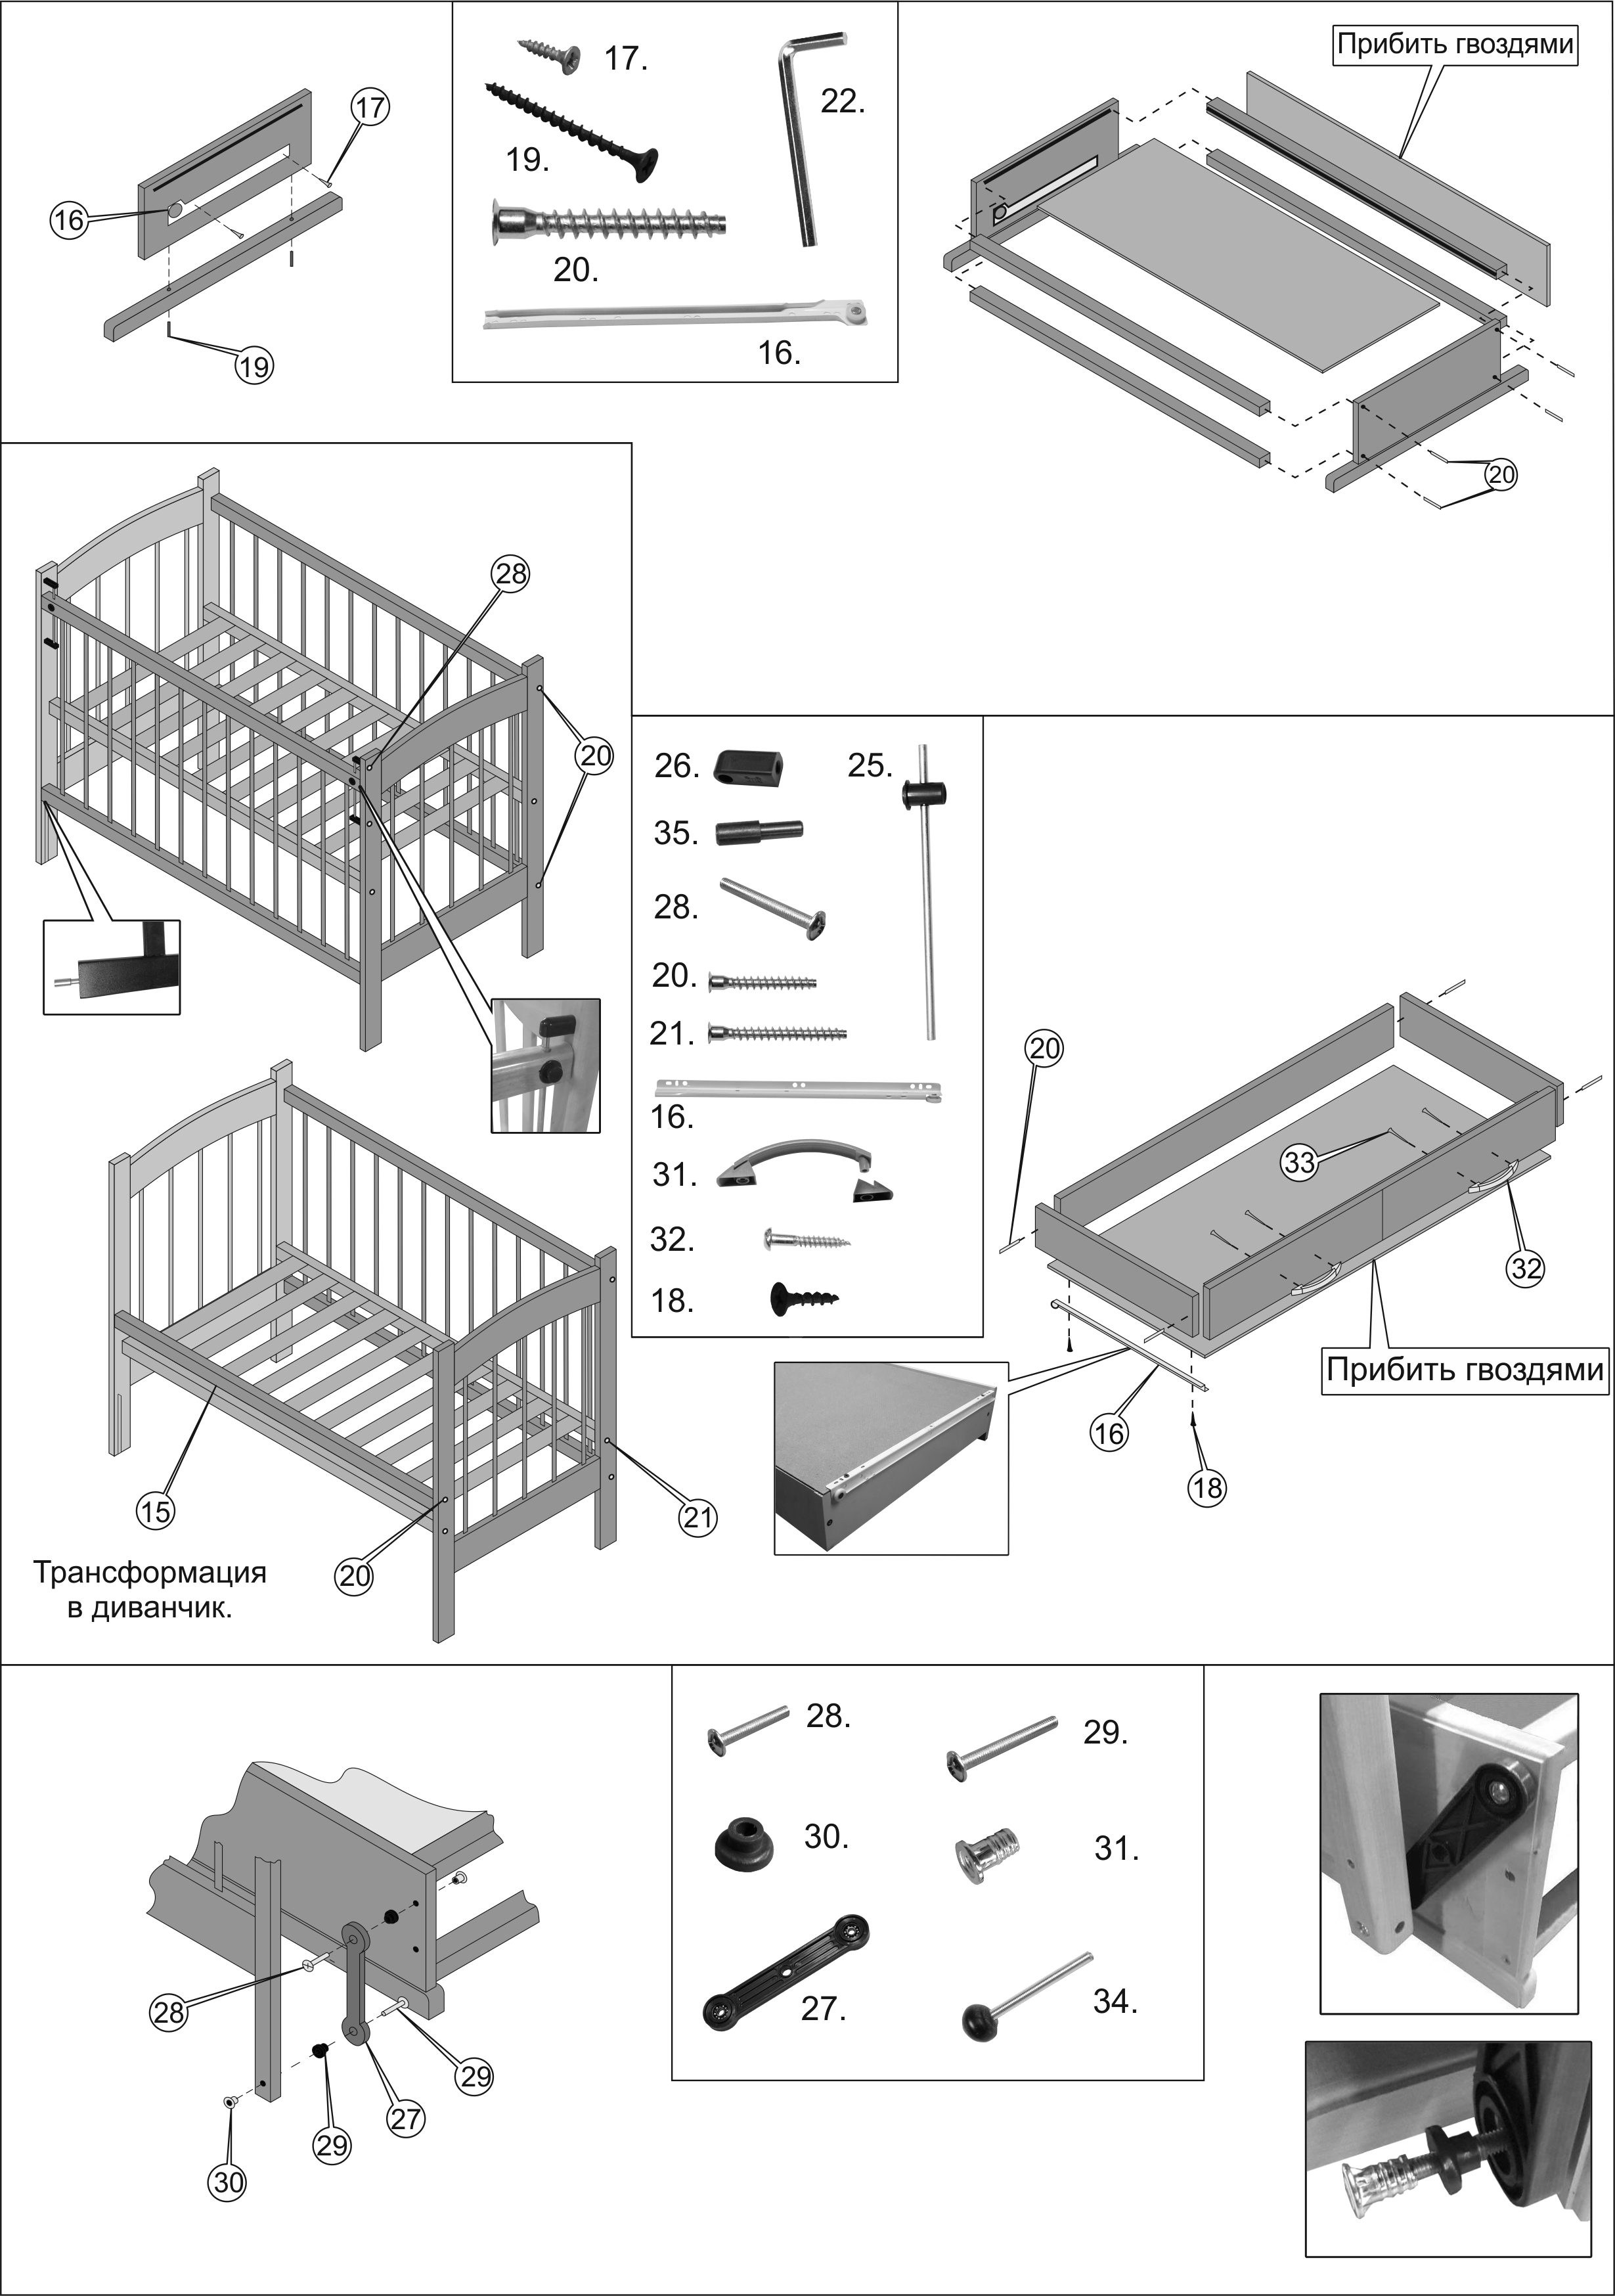
DIY baby crib photo
We also recommend viewing:
- DIY mill
- Do-it-yourself motoblock
- Do-it-yourself gate
- Do-it-yourself summer shower
- DIY garden figures
- Do-it-yourself swing
- DIY toilet in the country
- DIY garden paths
- Do-it-yourself playground
- DIY veranda
- Do-it-yourself barn
- Do-it-yourself pond
- DIY beds
- DIY chicken coop
- DIY flower garden
- DIY septic tank
- Do-it-yourself fountain
- DIY tire crafts
- Do-it-yourself cellar
- DIY fly trap
- DIY aviary
- DIY pool
- Do-it-yourself canopy
- DIY garden
- Do-it-yourself porch
- DIY paving slabs
- Do-it-yourself smokehouse
- Do-it-yourself barbecue
- Do-it-yourself barrel
- DIY hammock
- DIY landscape design
- DIY flowerbeds
- DIY greenhouse
- Do-it-yourself Alpine slide
- Make a cage with your own hands
- How to decorate the yard with your own hands
- Watering with your own hands
- Do-it-yourself drinker
- Do-it-yourself change house
- DIY fishing rod
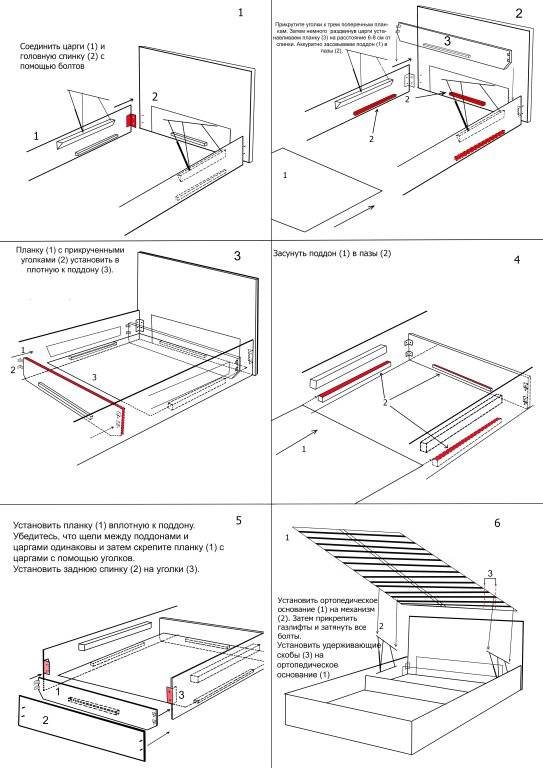
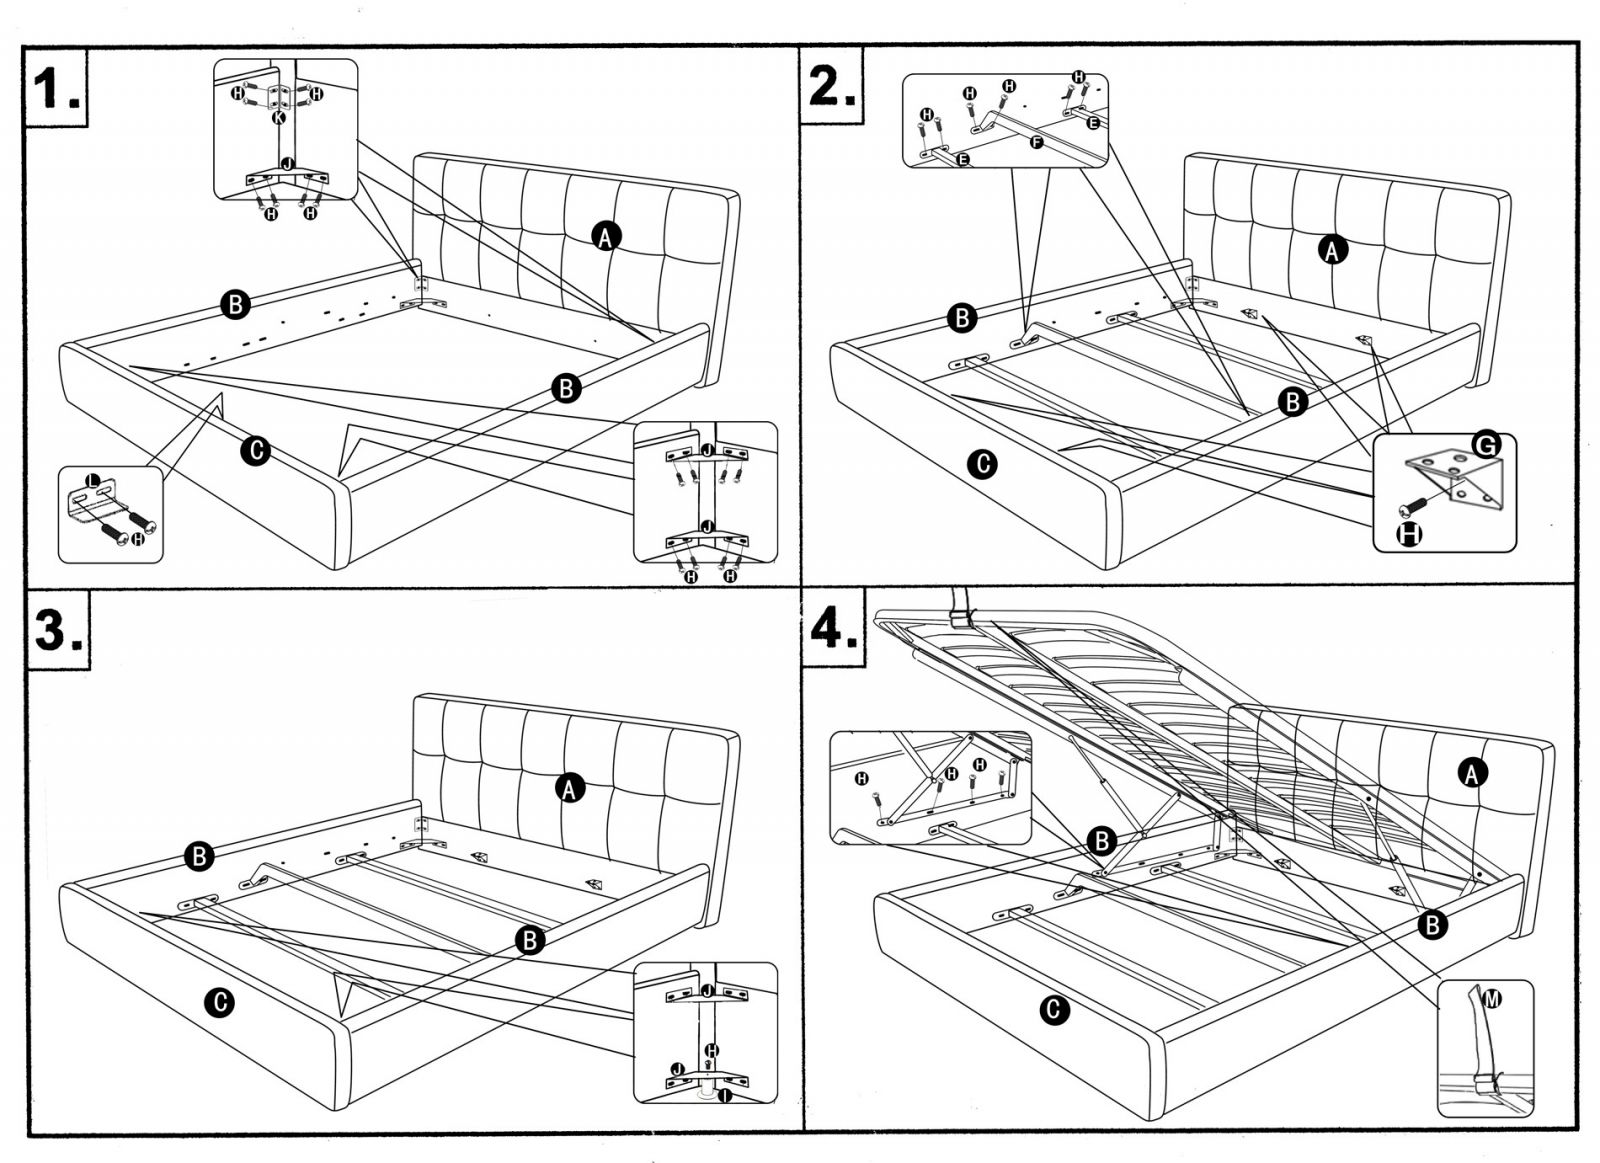
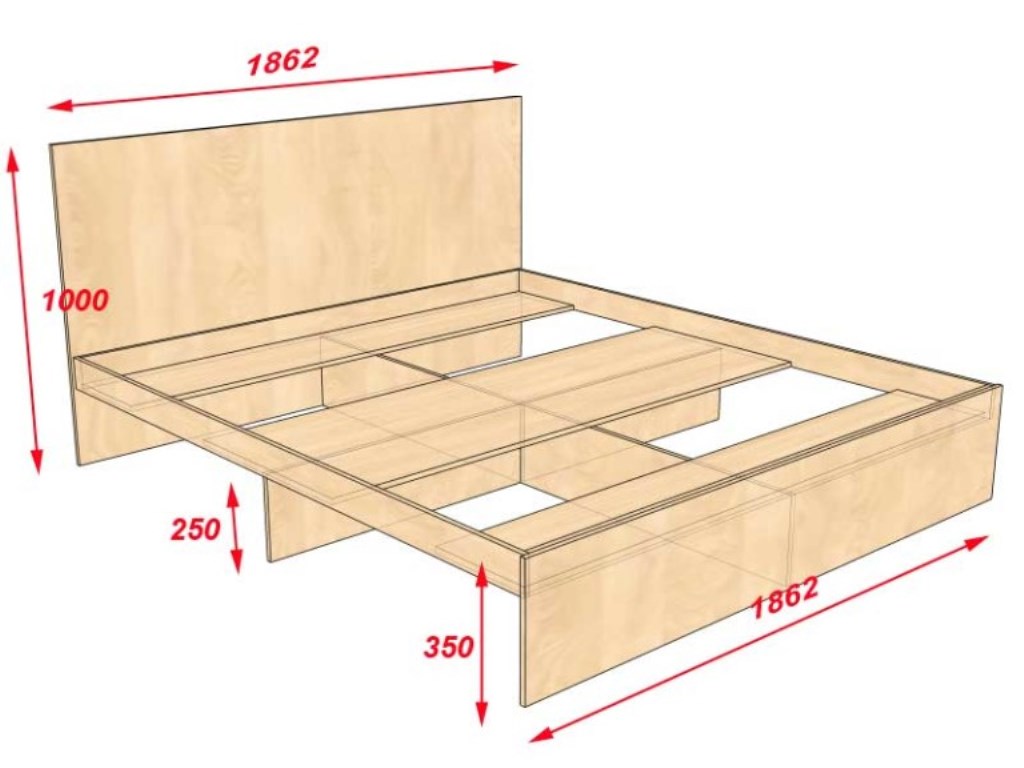
double bed frame blueprint
Here are the blueprints of a double bed with step by step instructions so you can make it yourself using only 2×4 blocks. This is a full size bed frame that can be assembled in one day. The article provides detailed instructions, diagrams and drawings with dimensions. Make sure the design matches the rest of the furniture in your bedroom.The dimensions of the parts in the diagram are indicated by letters, see the translation in centimeters below.
- A - 2x 2x4 - 33" (84 cm) long, 2 pieces 54 1/2" (139 cm) long, 1 piece 63 1/2" (162 cm) long, 11 pieces - headboard length
- B - 2 bars 2 × 4 21 "(53 cm) long, 2 pcs. 54 1/2″ (139 cm), 1 pc. 63 1/2" (162 cm), 11 pieces long 6" (15 cm) footrests
- C - 5 bars 2×4 75 1/2″ (192 cm) long
- D - 17 bars 2×4 54 1/2 inches (139 cm) long 14 bars 2×4 8′ (245 cm) long
- 9 bars 2×4 10′ long (305cm)
- wood stain
- bed brackets
Source /bed/2×4-full-size-bed-frame-plans/
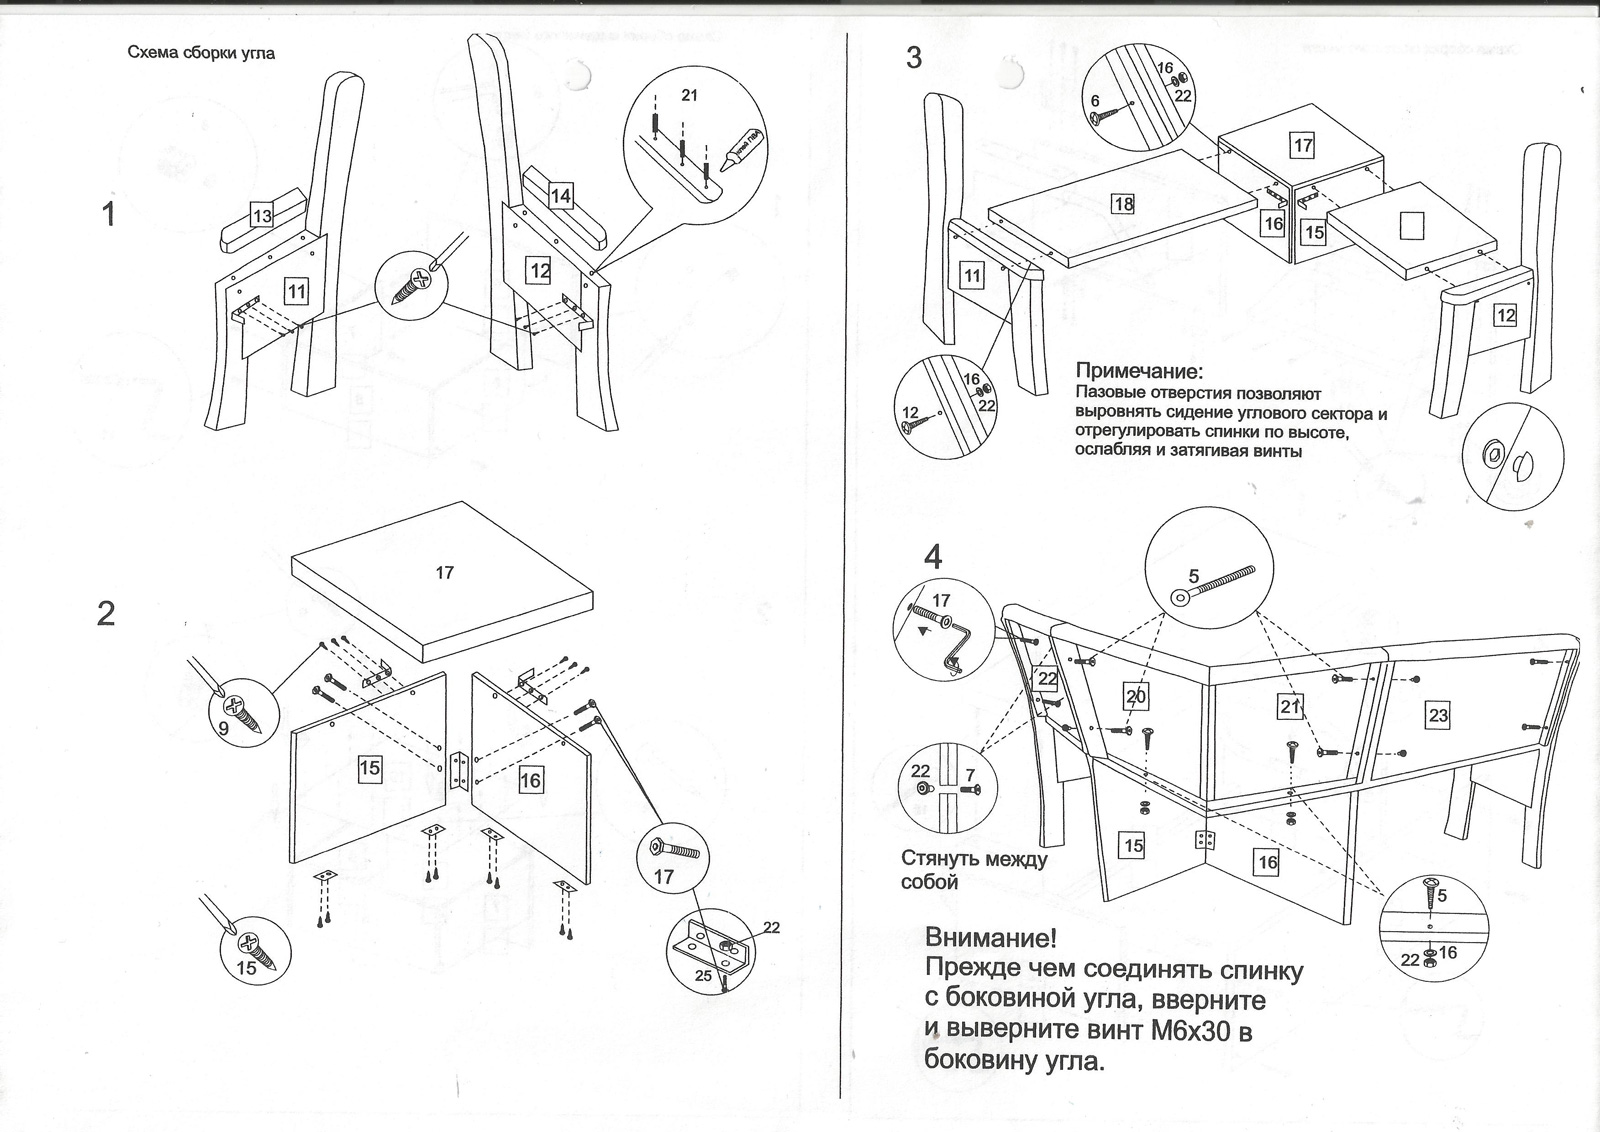
Bed with decorative headboards
In the instructions, which includes step-by-step diagrams, which shows how to make a beautiful double bed with decorative headboards. This is the order. Carefully draw an oval pattern on the 1x10 board as shown in the diagram. Cut out the pattern, clearly marking the centers, before making any cuts in the boards (so you know where to align the ovals). Once the ovals are cut and sanded, you won't be able to sand much after assembly, mark on the 1x4 and 1x8 boards where to place the oval as shown in the diagram. You can use a different type of leg. For extra support, you can add a fifth leg to the center of the bed if needed.
![[instruction] how to make a bed with your own hands | 60+ photos](https://fix.housecope.com/wp-content/uploads/7/f/a/7fa66f7a8f572bfb028c71e970a14ddb.jpeg)
The headboard is made in the same way as the footrest, but with longer legs. The side panels are attached from the bottom of the footboard. Use 1/2" pocket hole screws and wall brackets or 80mm long screws on the outside. This bed is designed to be used with a box spring. Attach the spikes flush to the bottom of the side rails with screws and glue.
Read the full instructions with a list of materials and dimensions for sawing parts on the website, link under the gallery.
Source


