- Light element selection
- How to change a light bulb in a stretch ceiling
- When do headlight bulbs need to be replaced?
- Why can LED lamps flicker when turned off
- Step-by-step instruction "for dummies"
- General replacement principles
- Disposal: an important part of the replacement procedure
- Modern energy saving light bulbs
- Replacing a halogen lamp
- How to change a light bulb in a spotlight on a stretch ceiling
- G4, G9
- E14, E27
- Your “survivability” directly depends on this and how long the battle will last.
- Folk methods
- Replacing the license plate light bulb - tips
- Conclusions and useful video on the topic
Light element selection
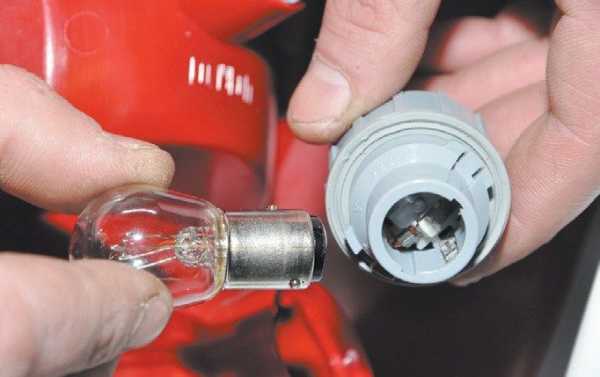
Before you change a lamp that is out of order, you need to purchase a new item that fits your car. The headlight devices of most modern cars are equipped with elements with a base of the H4–H7 type of the following varieties:
- Inexpensive light bulbs with tungsten filament. Differ in short term of operation and a weak light stream.
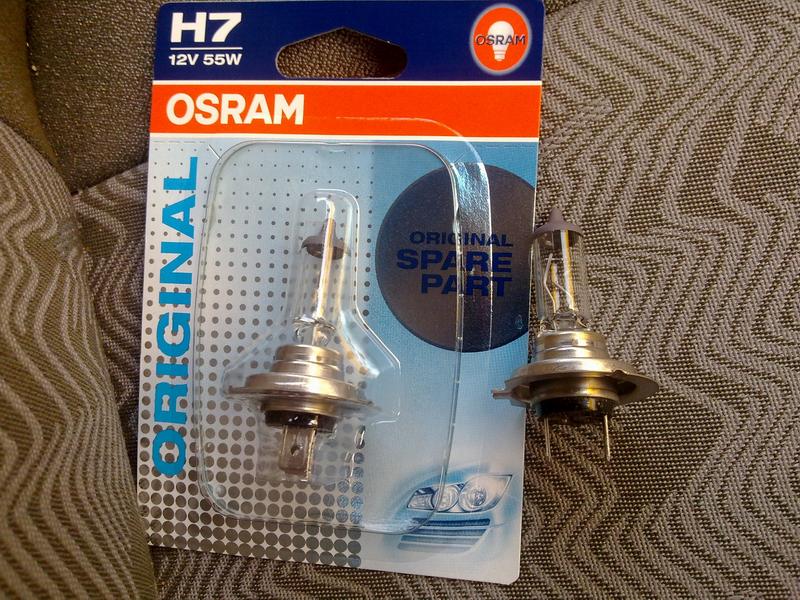
- The most common are halogen lamps. They combine an acceptable cost with optimal light output and a long service life.
- Gas-discharge, they are xenon. Reliable and expensive products, a characteristic feature - they give out a bright beam of bluish light.
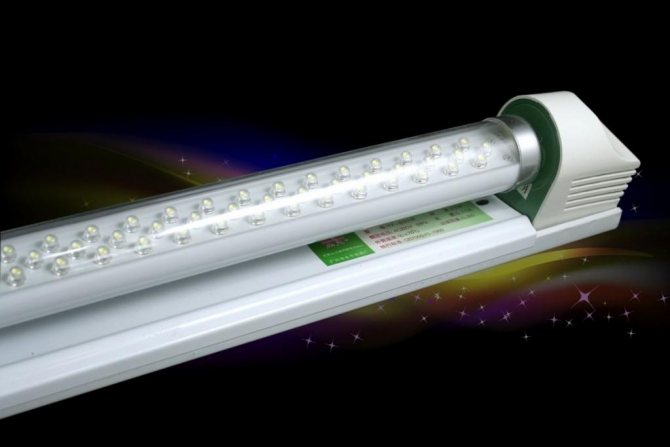
- LED.Economical elements that create good illumination and are distinguished by a long period of operation. Minus - the high price of the product.
If desired, a standard halogen lamp can be replaced with an LED or xenon lamp, provided that the part fits on the base. When changing the type of lighting elements, you will have to buy and put a couple of bulbs in both headlights. Regardless of the type, the electrical power of the part should be 55 W (marking on the package - 12V / 55W). It is not recommended to change the low beam bulb to a more powerful one, so as not to dazzle the drivers of oncoming cars.
 Products of domestic manufacturers "Mayak" and "Dialuch" attract with an optimal price-quality ratio. Among foreign brands, it is worth highlighting several well-known brands:
- Philips;
- Bosch;
- OSRAM;
- General Electric;
- Koito.
How to change a light bulb in a stretch ceiling
If your light bulb fails, then for the optimal operation of the lighting system, an immediate replacement of the lamp is required. But not everything is so simple: sometimes you have to remove the lamps from the socket in order to remove the lamp. Depending on the type of lamp, you will need to perform different steps to replace it.

How to change the lamp:
- If your lamps use conventional incandescent lamps, then you just need to turn off the light in the room, unscrew the old lamp and screw in a working model in its place.
- To replace a halogen or LED light bulb, you will have to work a little. So, to begin with, turn off the power supply in the room, then remove the cover of the lamp and remove the fixing ring. If you are dealing with a halogen lamp, remove it with a tissue or glove. Fat from the fingers can reduce its life.To remove the lamp, try to shake it with soft, unsharp movements. If the light bulb is not given, then gently twist it around its axis.
When do headlight bulbs need to be replaced?
The performance of head optics depends on several factors:
- the health of the bulbs themselves;
- fuse integrity;
- wiring condition.
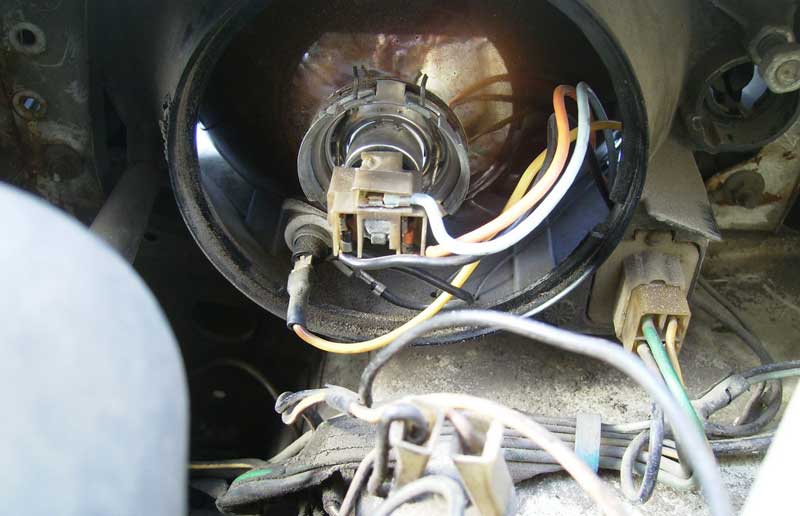
Often the headlight unit loses its tightness over time, which is why moisture gets inside. If there is a lot of it and it is present in the contact group, a short circuit cannot be ruled out. In this case, the fuse blows, and the situation can be corrected by replacing the fuse and drying the optics, followed by replacing the sealant.
A standard halogen lamp has a life of two to five years, the service life depends both on the overall quality of the lamp and on the material of the filament itself. A burned-out lamp cannot be restored, it must be replaced with a new one.
A car is called movable property for a reason. Considering the quality of the roadway inherent in Russian roads, it is not surprising that the contact group of optics is subject to increased shaking and vibrations, so that over time cases of deterioration of contacts in the connectors are not excluded. This can be manifested by short-term loss of light when driving through bumps, and then you need to carefully check the reliability of the contacts and the integrity of the connecting wires at the point of their entry into the connectors.
There are signs that in the short term the lights will stop working and you will need to replace your headlight bulbs:
- if you have xenon headlights installed and after turning them on they start to burn brightly, as expected, but after a few tens of seconds after the lamps warm up, a pink tint appears;
- too bright or, on the contrary, dimmed light of "halogens" indicates their possible imminent death;
- if there are LED lamps, then a sign of their failure is periodic flashing.
You can immediately go to the store when the described symptoms occur, without waiting until you are left without electricity at the most inopportune moment.
When a pink spectrum of xenon lamps appears, you have approximately 2-3 days before complete failure.
The enhanced glow of the halogen lamp can be explained by the thinning of the thread, which causes it to heat up to temperatures that are noticeably higher than the nominal one. In this case, the lamp begins to shine noticeably stronger, but this state of affairs does not last long. Usually, either during a trip or the next time you turn on a thin thread, it burns out.
But the opposite scenario also happens. When the filament burns, it contaminates the bulb with combustion products from the inside, which leads to dimming of the light of the head optics. Such a lamp can shine for a long time, but with a significant decrease in luminosity and blurring or complete disappearance of the cut-off line.
If the LED lamps begin to flash, this is a clear sign of their imminent demise, and if the necessary measures are not taken, the case may end in a blown fuse. In addition, in the event of failure of the control electronics of the LED optics (board or stabilizer), overheating of the electrical wiring and short circuit of the relay contacts may occur.
Why can LED lamps flicker when turned off
First, let's say a few words about the design of the LED lamp. Although it is connected to an alternating current source, it works on direct current. The voltage in the network is 220 V, and for the operation of the LEDs, a lower voltage is required. In order to turn the alternating voltage into a constant and reduce its value, a special device called a driver is included in the LED lamp. A four-diode rectifier is installed at the driver input. To smooth out the ripples of the rectified current, it, like the rectifier, uses electrolytic capacitors. After the capacitive filter, the voltage is applied to an electronic circuit that converts and stabilizes the output voltage. Now, knowing the design of the driver, we can explain why the LED lamp flickers after turning off.
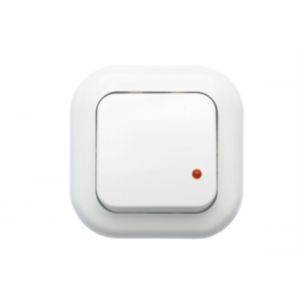
One of the reasons for the flickering or intermittent flashing of the LED lamp after turning off is backlit switches. When the switch is on, the current goes to the lamp directly through its contact system, and when it is off, it goes through a low-power neon light bulb. Working after disconnection in series with the load, it consumes a small current. Current flows not only through the backlight, but also through the load.


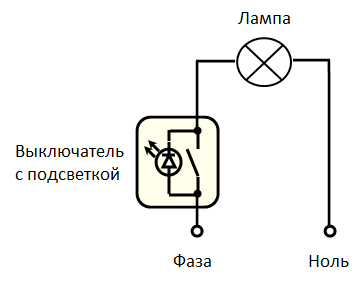
The current supplying the backlight of the switch passes through the load
Passing through the rectifier diodes of the driver, it charges the electrolytic capacitor of the filter. The voltage on it increases and, when it reaches a value sufficient to trigger the stabilization circuit, it goes to the LEDs. They flash and discharge the capacitor.Further, the process is repeated with a frequency depending on the driver parameters: capacitor capacitance, stabilization method, LED power.
The backlit switch may be one of the reasons for the flickering of the LED lamp when off.
For exactly the same reason, energy-saving lamps flash in the off state. They also contain a circuit that includes a rectifier, a filter, and a circuit for starting and maintaining the lamp. Fluorescent lamps with semiconductor ballasts also do not tolerate illuminated switches and periodically flash after being turned off. The answer to the question of how to remove the flickering of LED and other lamps in this case is also obvious. It is necessary to change the switch to a normal one, without illumination. Or remove the neon bulb from it. This is not difficult to do, since the light bulb is connected using a detachable screw connection and its absence will not affect the operation of the device.
But sometimes the backlight is necessary, and on some models it is more complicated, and it’s not so easy to get rid of it. And replacing the switch is not desirable, as the design of the room is violated. How to get rid of the flickering of LED lamps in this case? It is necessary to exclude the passage of current through the lamp circuit, to direct it along a different path. The easiest way out works when placing lamps in a chandelier or turning on a group of lamps with a single switch. One of them needs to be replaced with a low power halogen or incandescent. Their resistance is much less than that of all lighting fixtures connected to the switch, so the current through it in the off position will go more. The remaining miniature current is guaranteed not to be enough to charge the capacitors.If the lamp is connected in a single copy or the use of another type of lighting fixture is undesirable or impossible, a constant resistor can be used for shunting. A resistor with a resistance of about 51 kOhm and a power of at least 2 watts is suitable. It must be connected in parallel to any of the lamps grouped together.
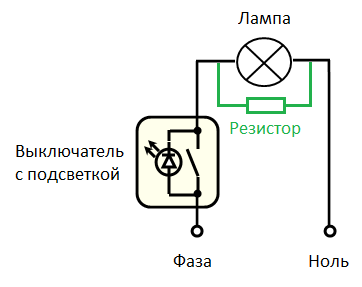
A resistor connected in parallel shunts the current through the load.
It is convenient to do this in the junction box or directly on the lamp holder (if there is only one lamp in the group).
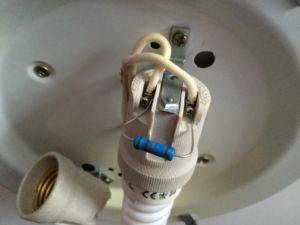
The terminals of the resistor must be insulated, and it’s a good idea to put a heat-shrinkable or insulating tube on it. If the length of its conclusions is not enough, they can be increased by soldering flexible wires with a cross section of 1.5 mm 2. But why do the lamps still flicker after turning off if there is no backlight in the switch. This happens if there are cables for another purpose, for example, a socket network, next to the lighting wiring. After the switch is turned off, the wire leading from it to the lamp is influenced by these cables and they induce enough voltage in it to flicker the LED lamps. Moreover, zero always comes to them. You can deal with pickups in the same ways: by installing an incandescent lamp or resistors.
Step-by-step instruction "for dummies"
The most important thing in replacing the lamp is not to rush.
Perform one action after another strictly according to the instructions:
Check again if the circuit breaker is off.
Pull the burnt out light bulb out of the housing.
Using a straight screwdriver, slightly pry the decorative bezel from the edge, leaving only a small gap.
Then gently poke in another small screwdriver.
Proceed carefully and slowly.Move two screwdrivers at the same time to widen the gap
Do not remove the bezel completely, leave a gap large enough for your fingers to easily fit into it.
Press the latches against the bulb body and carefully pull it out.
At the last stage, unscrew all the screws holding the wires in the terminal and disconnect the contacts.
If you have a good understanding of what parts the structure consists of, slowly begin to assemble the lamp back in the same order in which you removed all the elements.
 Before installing a new lamp, make sure it is the correct size. It is best to purchase exactly the same light bulb that stood before and not experiment.


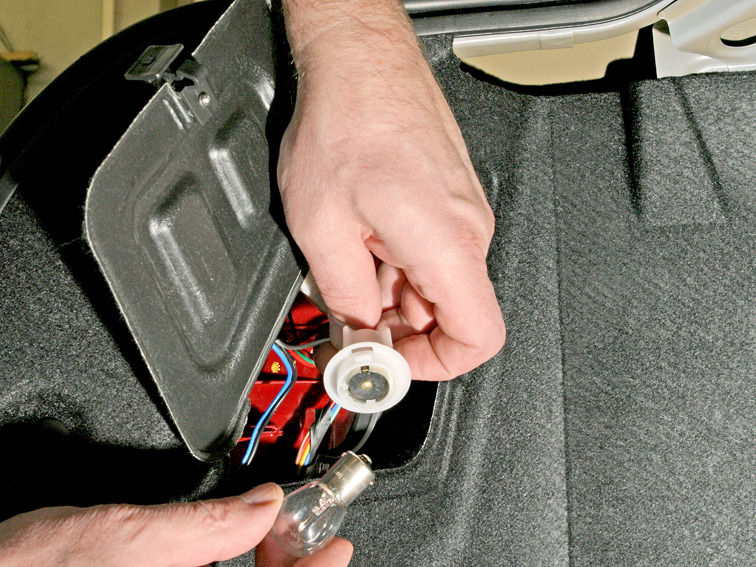
General replacement principles
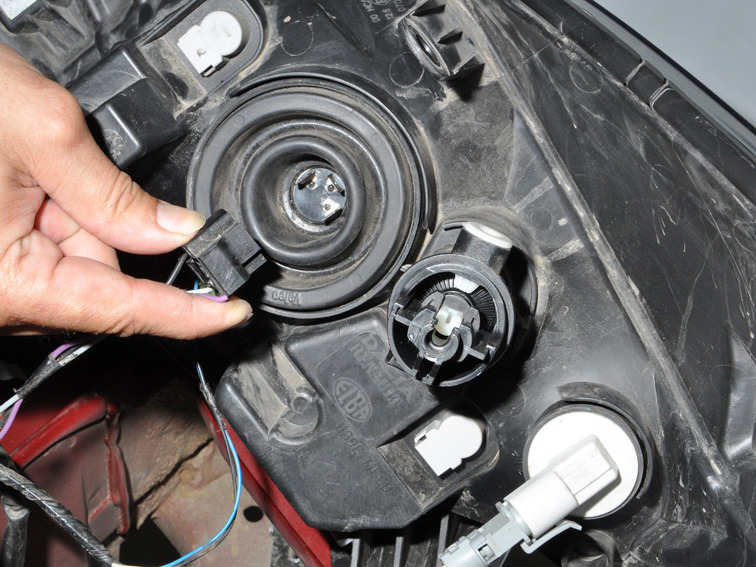
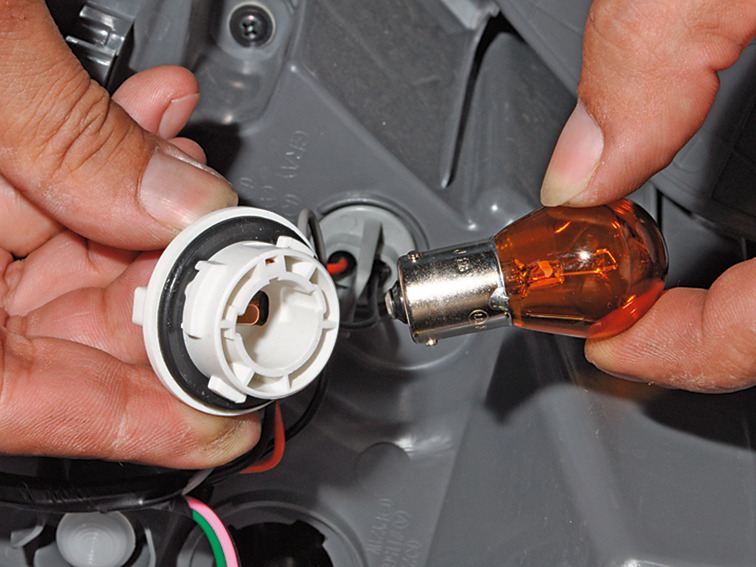
First you need to wash or clean the necessary part of the body from dust. If the headlights and the holes for their mounting are dirty, cleaning is required. Replacing a license plate light bulb is a step-by-step process:
- Unscrew the bolts that secure the headlights to the tailgate trim with a Phillips screwdriver. If they are rusty, use WD-40 or a liquid wrench: spray on corroded parts and wait a bit. The product will provide additional lubrication and help reduce loosening resistance.
- If the lights are secured with clips, then it is even easier to remove them. Just pry the latches off with a flathead screwdriver. However, it is not always possible to pry the ceiling lights, then you need to move them to the side (left to the left, right to the right). On the other side there will be a slot where you can stick a flat screwdriver.
It is recommended to purchase an additional pair of clips: if the lantern is held by such fasteners, plastic elements often break during dismantling.
Before mounting the ceiling, it is recommended to lubricate the screws and holes with special silicone grease. This will slow down the corrosion process and ensure easy screwing.
- If necessary, sand the license plate light with special paste. It is not recommended to use sandpaper. The best option would be to replace the used case with a similar one.
- Fix the backlight, insert the clips on one side, snap on the other, fasten the screws.
Self-replacement of the ceiling and backlight optics is justified if there is no damage to the automotive wiring. If the lack of light is due to a shorted wire, it is recommended to contact a car service.
Disposal: an important part of the replacement procedure
The dismantled lamp must be handled with care.
That is, it does not need to be placed on hard surfaces, in places where someone's careless movement will lead to injury.
It is not recommended to throw them in the general trash bag. It is best to get rid of unnecessary lamps immediately. This will help eliminate accidental trouble.
When performing a replacement, it is forbidden to load the network, make any changes to the design of lamps, fixtures, as this is fraught with trouble
But it should be remembered that only safe incandescent lamps and their LED counterparts are allowed to be simply thrown into the general waste bin.
Since they cannot cause other harm, except for injuries due to careless handling.
And mercury-containing products should be handed over to responsible persons, which may be electricians of ZhEKs, representatives of structures specializing in recycling, or lowered into containers designed for this.
The procedure for replacing lamps is considered successfully completed only after their disposal. At the same time, it is worth remembering that mercury-containing lamps are dangerous and must be taken to special points or thrown into containers.
And only after all this, the replacement of the lamp can be considered completed and positive results can be expected in terms of safety, comfort and economy.
Modern energy saving light bulbs
Currently, there is a wide selection of lamps for lighting. In addition to Ilyich's light bulbs familiar from childhood, a wide range of energy-saving lamps with different characteristics appeared on store shelves. Which ones are preferable?
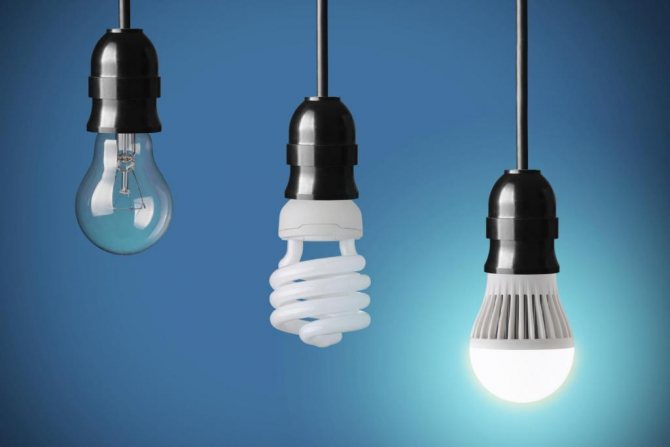
Fluorescent lamps are low pressure discharge lamps. They are produced with a transparent and matte flask, on the walls of which a phosphor is applied. It is the source of light when the lamp is turned on. Their durability is 15 times higher than the life of incandescent lamps. In addition, such lamps emit an even and stable stream of light, which makes them very popular. In addition, they deliver a uniform and stable beam of light and have a wide range of color rendering, from warm, close to incandescent light, to cool daylight. The efficiency of fluorescent lamps reaches 80%.

These lamps are widely used for both industrial and domestic lighting. But they require increased attention due to the content of mercury vapor in them, which are the strongest poison. Of course, a person will not be poisoned by one broken light bulb, but still, one should not casually throw a burnt-out lamp into a trash can, especially since a special disposal method is provided for them. Spare lamps should be kept out of the reach of children.


LED lamps are also durable, their resource varies in a wide range from 1.5 to 10 years, depending on the manufacturer. They are resistant to mechanical damage, function normally in a wide range of temperatures, and emit uniform pure light. They do not contain any substances hazardous to humans.
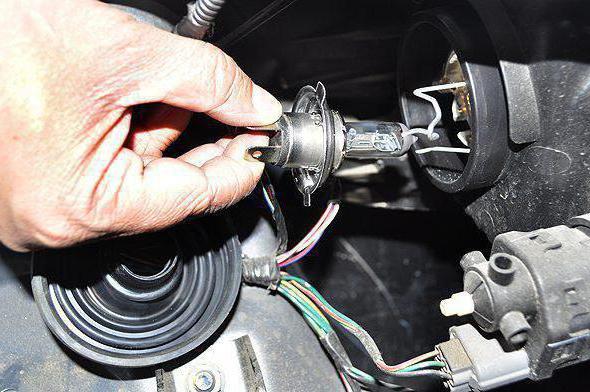
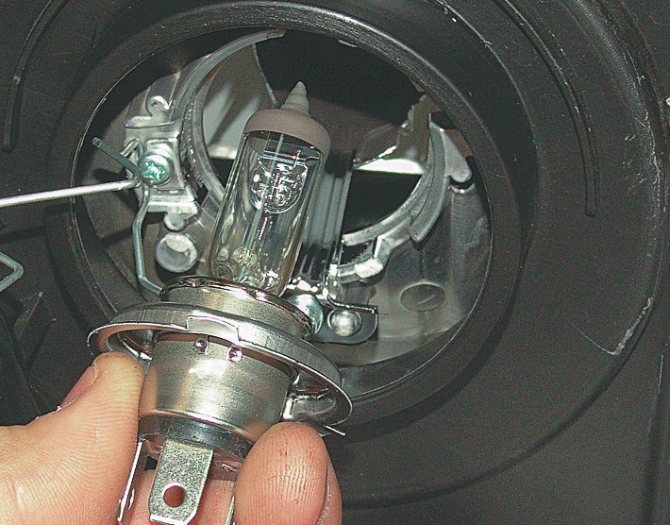
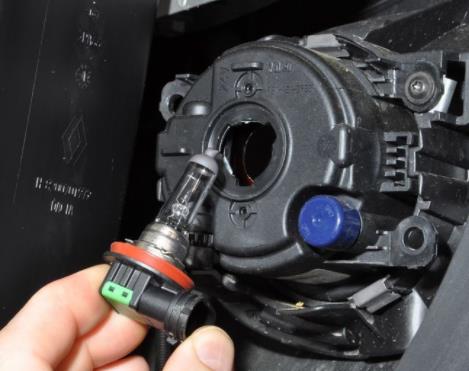
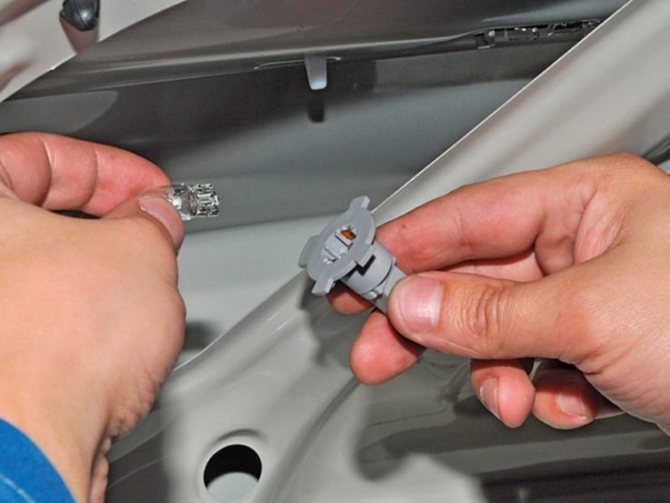
Replacing a halogen lamp
Replacing halogen-type spotlights is practically no different from the same actions with any other light sources. Before replacing the halogen bulb, turn off the power in the apartment
Then carefully remove the fixture holding the lamp, remove the lamp from the socket and install a new one in the same place.
When replacing a halogen lamp, remember not to touch its glass surface.
The fact is that halogen light sources operate at high temperatures, and if a little fat from the fingers gets on the surface of the bulb, the bulb will overheat and fail. If contact does occur, thoroughly wipe the affected surfaces with alcohol.
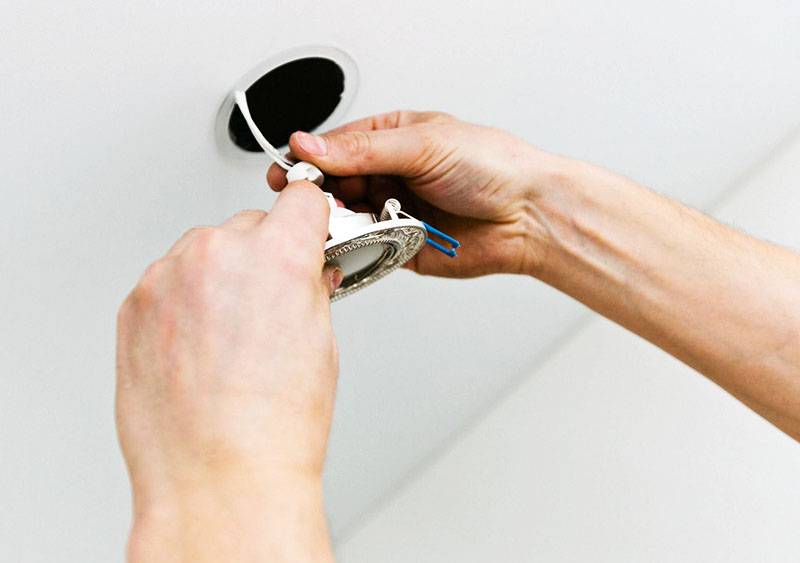
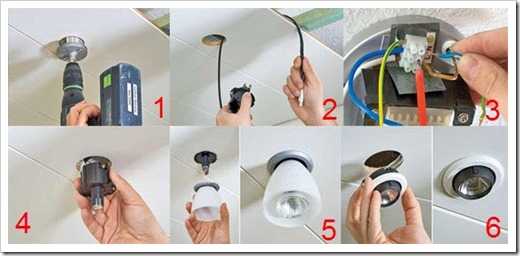
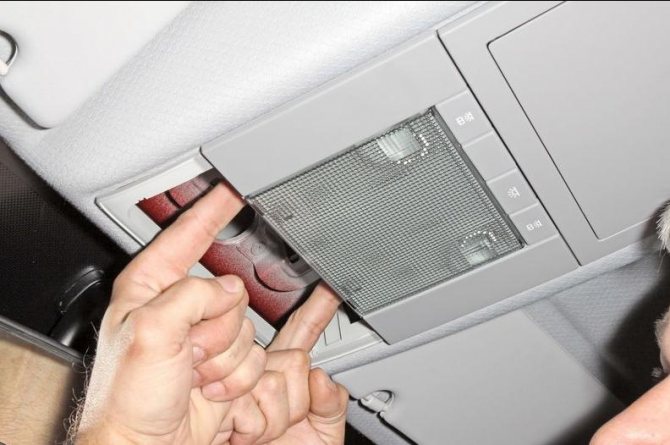
How to change a light bulb in a spotlight on a stretch ceiling
Depending on the type of cartridge, light bulbs are removed in different ways. Let us consider in detail the replacement process for each type of base. Before starting work, it is better to de-energize the network on the shield, otherwise it is possible an electric shock.
It is not very convenient to remove light bulbs of this type from the spots, since the outer part is recessed into the luminaire body and is located above the plane of the stretch ceiling. In the plafonds, they are held with a special retaining ring or a wire clip with antennae at the ends. These luminaires are compatible with LED and halogen pin type elements.
To change a light bulb with a G5.3 base, you need to squeeze the two antennae and pull out the fixing bracket. If a retaining ring is used as a retaining part, it is simply unscrewed. The lamp falls out. Then it must be disconnected from the contacts by pulling it towards you. After that, a new lamp is connected, inserted into the lamp body and the fixing ring is installed in place.
Note! Insert halogen bulbs carefully, it is advisable to use a napkin or gloves for this. Touching the flask with your fingers shortens the life of the instrument
Sometimes the retaining ring does not sit back after replacing the light bulb
This happens for several reasons:
Sometimes the retaining ring does not sit back after replacing the light bulb. This happens for several reasons:
- the case is deformed - it will have to be replaced;
- the ceiling is fixed too high and the base rests on the concrete base - you need to purchase a lamp of exactly the same size, a difference of 1 mm can cause a problem;
- clamps of the wrong size - this happens if it was necessary to unscrew several light bulbs and the rings were mixed up.
In fixtures under the GX53 base, the lamps protrude from the ceiling by 3-4 mm. On their back side there are two pin-contacts that are inserted into the corresponding grooves on the body of the lighting fixture. Dismantling is carried out by turning the lamp counterclockwise until it clicks, then it is simply pulled out.
Replacement is very easy, no fixing parts need to be installed or wires need to be disconnected. It is enough to insert a new lamp and turn it clockwise.


G4, G9
The design feature of such lamps is that the body protrudes beyond the plane of the ceiling. With G4 and G9 base, LED and halogen pin-type models are available. To dismantle the lamp, just pull it down. Then just insert a new one into the groove. You do not need to rotate the lamp. In some models, you first need to disassemble the spotlight, namely, unscrew the decorative diffuser.
E14, E27
Such lamps are changed in the same way as in a conventional chandelier or sconce.
Holding on to the flask, carefully unscrew it counterclockwise. Then they screw in a new one until it stops, but without effort. Sometimes the light bulb is difficult to grab with your fingers, in this case you can use masking tape
Sometimes the light bulb is difficult to grab with your fingers, in this case you can use masking tape.
It is worth noting that fixtures under the E14 and E27 base are rarely installed in tension structures, since they take up a lot of space. In order not to lower the ceiling level, more compact models are used.
Your “survivability” directly depends on this and how long the battle will last.
Solving the question of how to install a light bulb in World of Tanks will not be difficult even for a beginner, you just have to choose the most convenient way and follow the necessary sequence of actions.
You need to download the mod archive;
move this file to the installation folder of this game application;
This installation method does not provide any animations, they must be done by hand, you can also create sounds for them.
You need to download and install XVM, unlike the first method. Although you can simplify this method a little and just take the folder from the downloaded archive file and copy it to the installation folder of the game application.
This option in this method is simpler with the same result. Yes, and the necessary functions will immediately start without unnecessary passages of installation confirmation and selection of actions. Only if XVM is downloaded only for the "Bulb" you should not add various functions from it, so that in the future there will be no questions in the system.
Upon completion, we find the “Light Bulb” res_mods/XVM/res/SixthSense.png. You can run any PNG file here and the alerter is ready. You can use any icon as a picture for notification, the main thing is that it matches the format, otherwise the mod will not recognize it.
Folk methods
Yes, it's the people. Do not be surprised, craftsmen will always be found in any business. What to do if a light bulb bursts and how to remove it without resorting to the services of a specialist? True, all these methods are applicable to conventional old-style lamps.
Method 1. Using a plastic bottle. Heat its neck over a candle or lighter. Insert it into the cartridge and wait until it cools down. We are waiting for the plastic to seize and slowly unscrew the damaged lamp.
Method 2. The easiest and safest. Cut a medium sized potato in half. We put it on the remains of the lamp and calmly remove it.
Method 3. This applies to light bulbs with a small base. These are commonly used in carob chandeliers.
Method 4. We use a dry cork from a wine bottle. We put it on fragments and slowly remove it.


All of the above methods are suitable if you suddenly do not have a special tool at hand. But, this is in case the light bulb base has not melted and has not stuck to the cartridge. Then you definitely can't do without a tool.
Important! For any manipulations with lighting devices, it is always necessary to de-energize them beforehand.
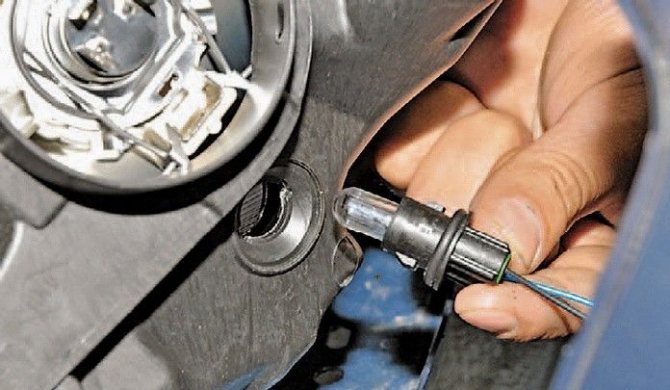
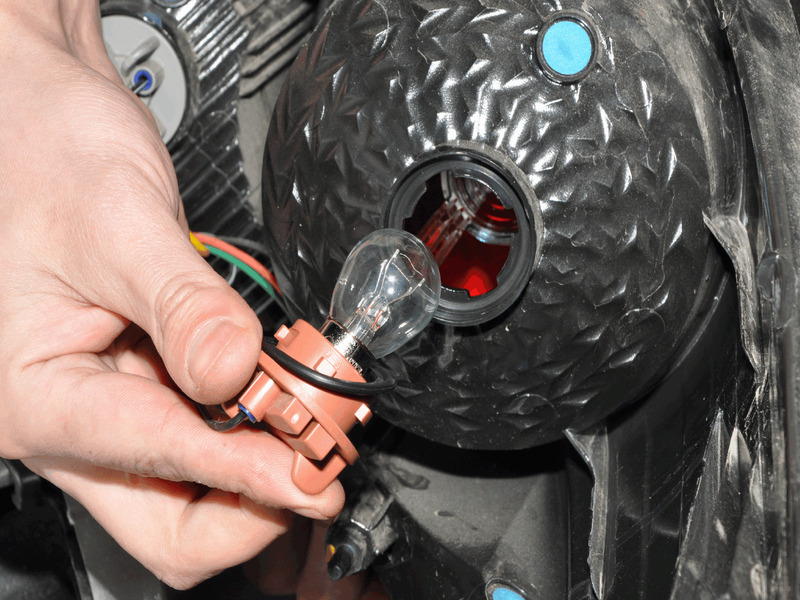
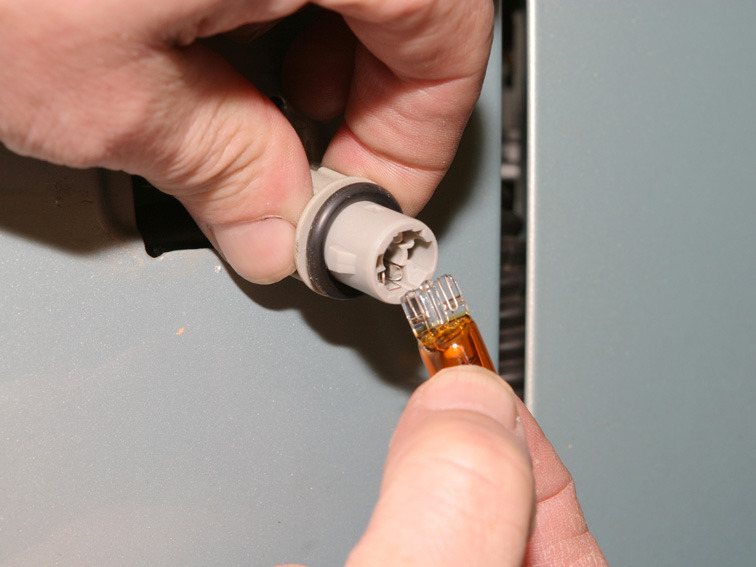
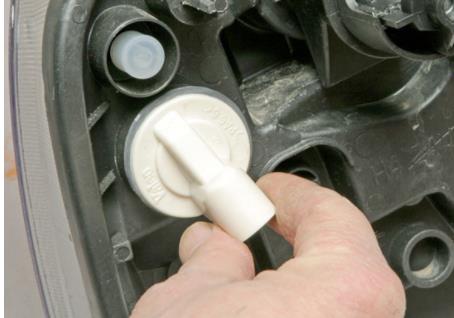
Replacing the license plate light bulb - tips
Always before starting work, you need to make sure that you turn off the ignition several times. Otherwise, big trouble can happen. For example, perhaps in the worst case, you can be electrocuted. It's not fatal, but definitely unpleasant. A short circuit can also occur, and part (at best) of the car's electronic systems will fail.
There are cases when, due to negligence, a short circuit occurred on the ignition on, and from this the on-board computer, although it did not burn out, began to show inaccurate data
Therefore, pay special attention to the ignition!
Before purchasing a light bulb, be sure to check its power and compatibility with the model of your car, for example, on a Lada Priora car, light bulbs without a base with a power of 5 watts are used.
During operation, do not touch the bulb with bare hands. It could catch fire, and from this it would be very hot, especially for halogen ones, since during operation they gain a temperature of 3000 degrees
In addition, if you install the light bulb with your bare hands, then fatty fingerprints on its surface can again provoke its early failure.
Be careful and only use gloves!
After installing the light bulb in the socket, wipe it with an alcohol wipe. Thus, you will remove dust and grease marks from your hands.
Conclusions and useful video on the topic
The first video will help you figure out the correct procedure for replacing lamps:
The video will help you figure out how to dismantle with a damaged glass flask:
The main point when replacing all kinds of lamps is the observance of numerous safety measures. Which require the performer to possess certain knowledge, skills, use special tools and equipment.
Only all of the above will make it possible to carry out the replacement correctly, that is, it is safe for the health of the performer and all the inhabitants of the house.
Have you repeatedly witnessed accidents due to non-compliance with electrical safety rules that occurred when replacing a light bulb? Tell us about it in the comment block - these stories will help many home crafters who are careless about the issue of personal safety to avoid injury and electric shock.


