- How to crimp an RJ-45 cable correctly?
- Selection and preparation of tools
- Crimping step by step instructions
- Connecting the LED strip
- How to connect multiple LED strips
- Connecting an RGB strip via a controller
- Method No 1: We twist the wires with our hands
- Crimping the network cable
- How to extend the internet cable
- How to twist the cable
- Methods for connecting wires or cables to each other
- Crimping
- Bolted connection
- Terminal blocks
- Types of terminal blocks for multi-core and single-core cables
- Terminals in junction box (copper or metal)
- Self-clamping terminal blocks WAGO
- Use of tips
- Soldering wire lugs
- How to check the quality of crimping an Internet cable?
- How to split an internet cable
- Coupler
- Splicing stranded wires without twisting
- Connecting wires with a diameter of less than 1 mm with a twist
- Connection of copper wires in any combination by soldering
- Connecting electrical wires by soldering
- Connecting wires in junction boxes
- How to quickly crimp twisted pair
- Procedure for crimping with a crimper
How to crimp an RJ-45 cable correctly?
There are various ways to crimp the RJ-45 cable, among which there is even a crimping of the connector without special pliers, using an ordinary flat-head screwdriver.
But we will consider how to competently make a reliable and functional working patch cord, which does not differ in characteristics from purchased models.
Selection and preparation of tools
Having a set of special tools at hand makes it much easier to crimp the patch cable. Of course, you will have to allocate an amount for the purchase of a crimper, stripper, tester or crosser, but if you buy a quality tool, it will last for years.
To properly secure the connectors on the cable, you will need:
The main of these tools are pliers and a tester - this is the minimum set necessary for the correct pinout and crimping of a twisted pair.
When buying pliers, you need to check their quality and it is advisable to pre-test the tool. Some crimpers are equipped with blades that can be used to strip the strands.
Crimping step by step instructions
To make a patch cord, you will need to prepare materials - a cable and connectors, arm yourself with a tool and choose a pinout scheme depending on which devices the finished cord will connect.
List of materials:
- a twisted pair segment no longer than 100 m - according to the Ethernet pinout, this is the maximum length of standards for domestic use;
- for one cable - two RJ-45 connectors (their marking is 8Р8С);
- a set of tools - crimper, stripper, tester.
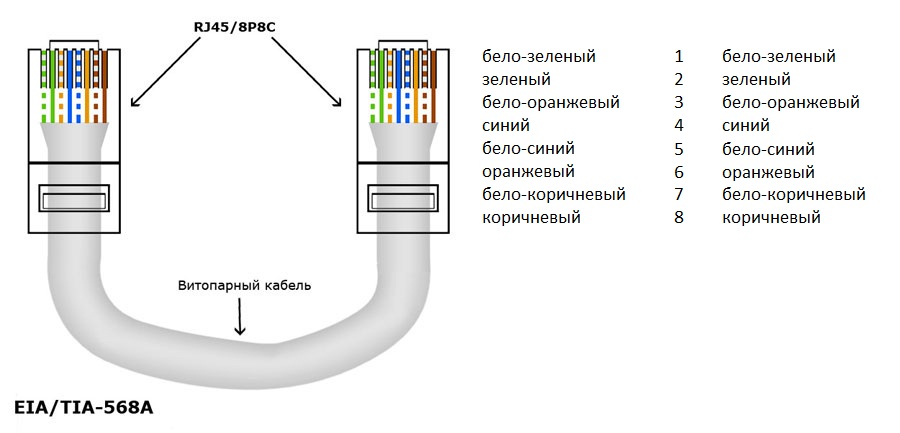
Most often, a cable is required to connect a PC to a network device, so we recall the direct crimping scheme, and for reliability we simply put it in a conspicuous place so that it is in front of our eyes at the time of wire distribution.
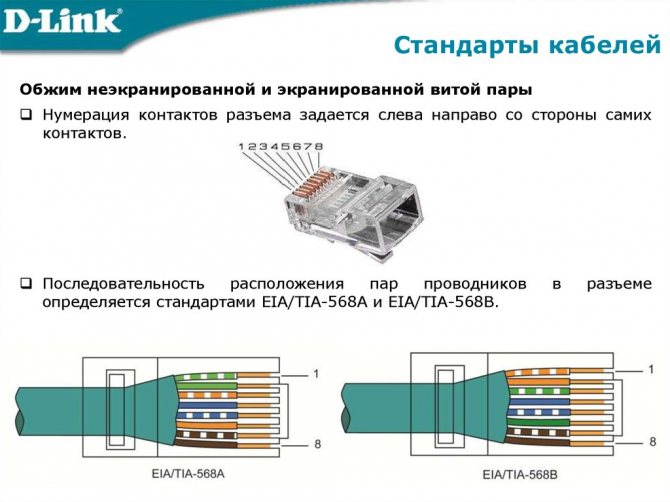
 A ready-made color scheme can be found on the Internet and printed on a piece of paper - visual perception contributes to memorization, and in the future it will no longer be required
Do not forget that types A and B differ only in the location of the orange and green twists, you can use both options.
Step-by-step instruction:
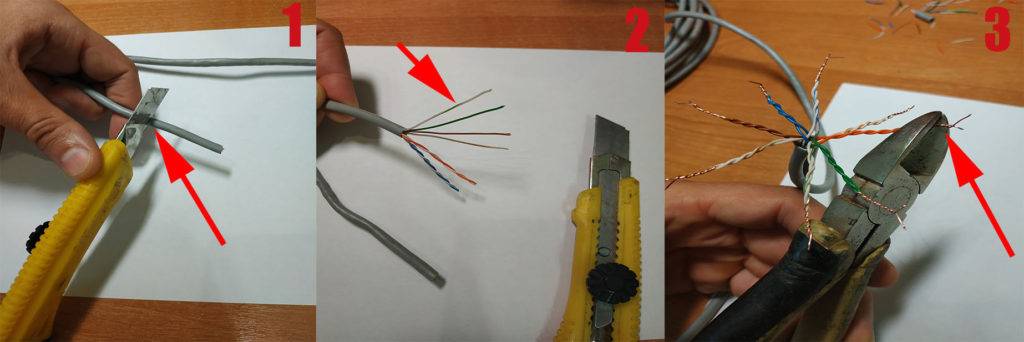
- Step 1 - Cut off a piece of cable by the meter, without a margin, but of sufficient length with wire cutters or crimper blades.
- Step 2 - We retreat from the end 2-4 cm, make a circular incision on the outer insulation with a stripper, and then carefully remove it.
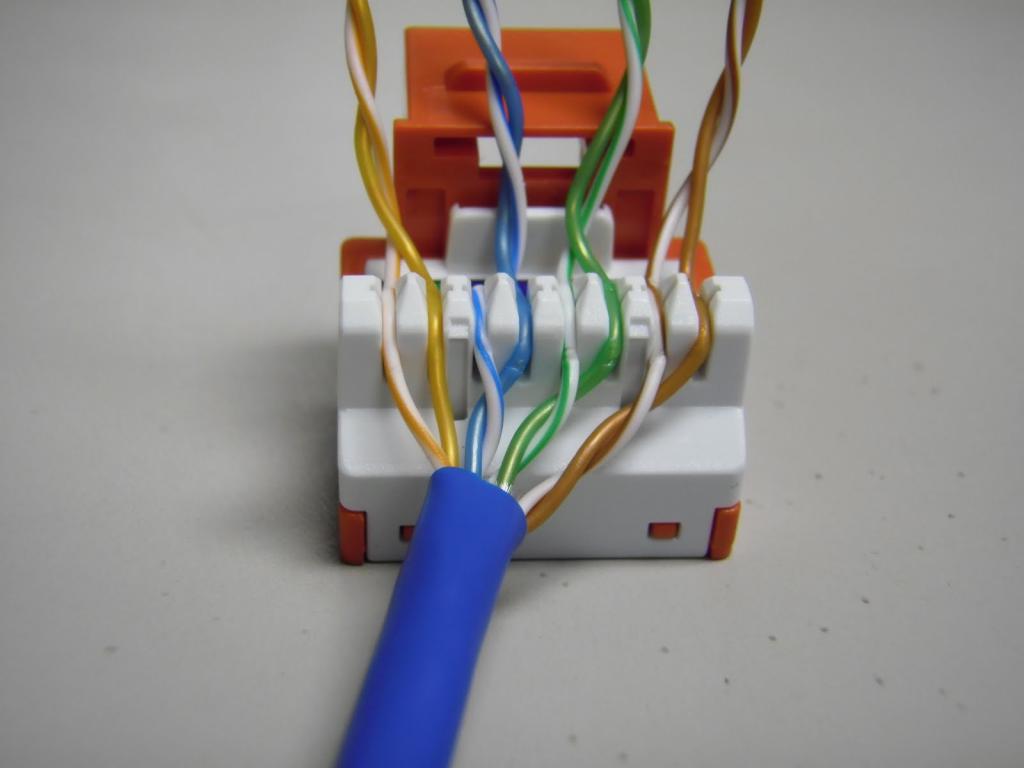
- Step 3 - The conductors are twisted in pairs, so before crimping, we unwind all the pairs, straighten the cores and distribute them according to the chosen scheme. In addition to the conductors, a nylon thread hides under the shell - you just need to pull it back.
- Step 4 - Trim the conductors. To do this, we retreat from the edge of the outer insulation by 1.0-1.3 cm and cut off the wires with wire cutters strictly perpendicular to the axis of the twisted pair. We make sure that the multi-colored tips are the same length.
- Step 5 - Insert the conductors into the connector and advance until it stops.
- Step 6 - We crimp: insert the connector with the conductors into the desired connector of the crimper (marked 8P) and squeeze the handles of the pliers. You can hear a click.
- Step 7 - We check the reliability of fastening - we easily pull the cable, as if trying to get the conductors out of the connector. With proper crimping, the cores sit firmly.
- Step 8 - Test the finished patch cord for serviceability. We insert the connectors into the sockets of the tester, turn on the device and follow the indication. If everything is in order, the lights will turn green in pairs. If there is no indication or the red light is on, the procedure will need to be repeated.
The hand is stuffed quickly - after several independent crimps. The crimping skill is useful when moving to a new apartment, where network wires are hidden in baseboards or sewn into walls and connected to computer outlets.
No need to worry about the cable being too long or short - you can always crimp the patch cord to the desired length. If the power cord suddenly gnaws through the dog or it just bends, you can quickly make repairs.
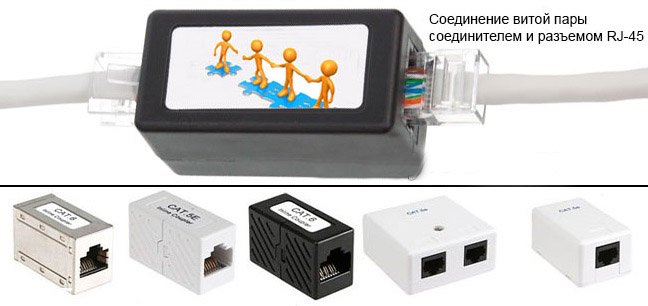
It may also be interesting for you to see how you can connect a twisted pair cable to each other, for this, follow this link.
Connecting the LED strip
Most LED strips run on 12V or 24V. If the line of crystals is one, the power supply is 12 V, if there are two - 24 V. Any DC source that produces this voltage is suitable: battery, power supply, battery, etc.
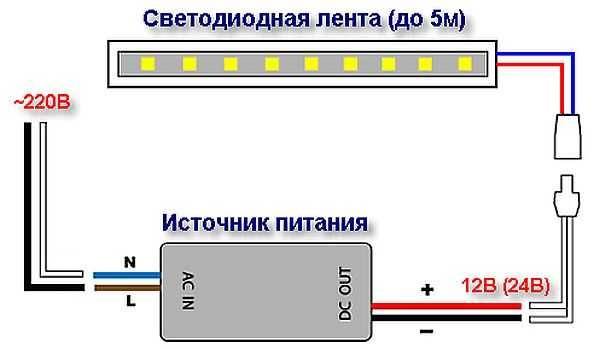
Scheme for connecting an LED strip to a 220 V network through a power supply
To connect the tape to a 220 V household network, a converter or adapter is required (also called blocks or power supplies, adapters).
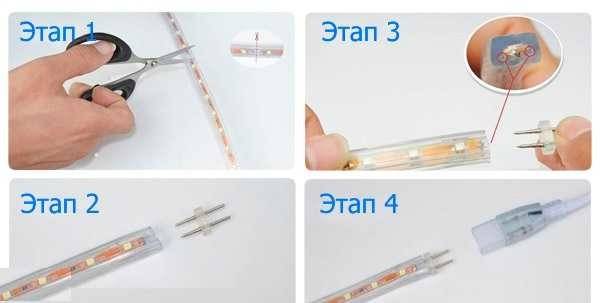
Recently, tapes have appeared that can immediately be connected to a 220 V network. All of them are sealed in plastic tubes - 220 Volts is no longer a joke. They are also cut along the marked lines, connected using a special connector that is inserted into the conductors. A cord with a built-in rectifier is connected to the connector (this is a diode bridge and a capacitor).
Connecting a special LED strip to a 220V network
This tape differs from the usual one in that in it small sections (20 pcs) with LEDs are connected not in series, but in parallel, also in such a way that the diodes are directed towards each other. Due to this, we obtain the required voltage of 220 volts or so. The alternating current is converted to direct current using a diode bridge, and the ripple is damped by a capacitor.
Wiring diagram for LED strip without power supply
In principle, such a tape can be assembled from a regular one, but you will need to take care of insulation: touching an element connected to a household network without an adapter is fraught with serious consequences.
How to connect multiple LED strips
Each of the tapes, depending on the modules used and the number of elements per meter, consumes a different amount of current. The average parameters are shown in the table. Knowing how long you want to mount the backlight, you can choose an adapter that will deliver the required current.

Table of current consumption by LED strips powered by 12 V
Sometimes the required tape length exceeds 5 meters - when it is necessary to illuminate the room around the perimeter. Even if the power supply can deliver the required current, two or more five-meter tapes cannot be connected in series. The maximum allowable length of one branch is those 5 meters that come in a reel. If you grow it by connecting the second one in series, a current will flow along the tracks of the first tape, many times higher than the calculated one. This will lead to a rapid failure of the elements. The track may even melt.


If the power of the power supply is such that several tapes can be connected to it, separate conductors are pulled to each of them: the connection scheme is parallel.
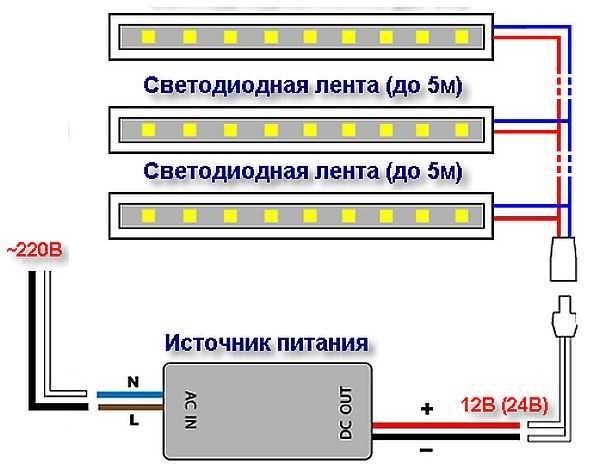
How to connect several LED strips to one power supply
In this case, it is convenient to place the power supply in the middle, for example, in the corner, and from it there are two tapes on both sides. But it's often cheaper to buy several smaller adapters than one more powerful one.
Connecting an RGB strip via a controller
The power supply is connected in series, then the controller. They are connected to each other with two wires.There are already 4 conductors coming out of the controller, which are routed to the corresponding contact pads of the RGB tape.
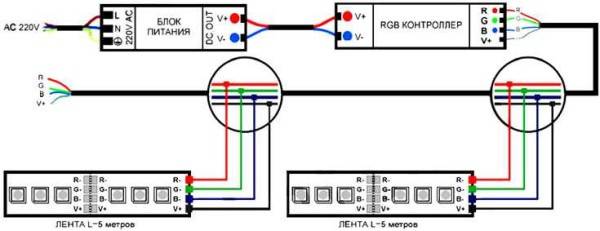
Connecting an RGB LED strip via a controller
In the same way as in monochrome ribbons, in this case the maximum allowable length of one line is 5 meters. If a longer length is needed, then two bundles of wires of 4 pieces each depart from the controller, that is, they are connected in parallel. The length of the conductors can be different, but it is more rational that the power supply and the controller are in the middle, and two backlight branches go to the sides.
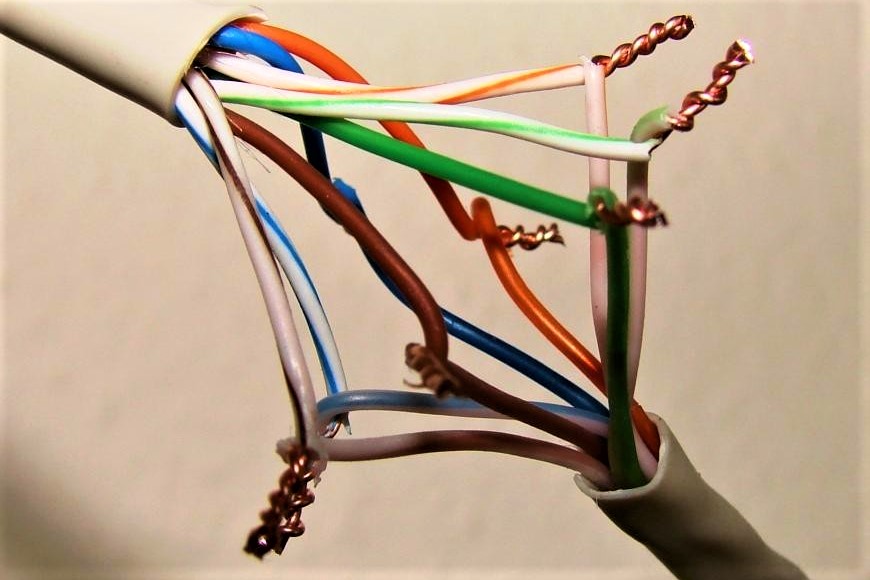
Method No 1: We twist the wires with our hands
For this method, you will need duct tape, a knife and hands, from the right place. In almost every home, these items are always available.
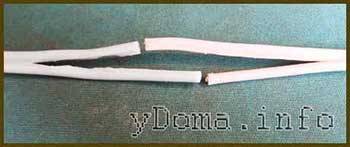
- The first thing to start with is to take both ends and remove the protective outer braid from them.
- Now unwind all the cores individually and remove the insulation from each.
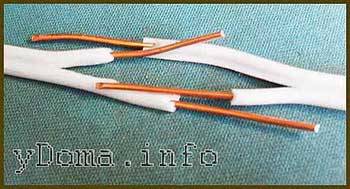
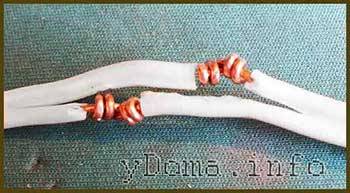
- Twist all wires strictly by color. With this action, it is necessary to twist, starting from the insulation, as in the photo.
- It is desirable to cut the sharp ends of the twisted strands, but not necessary.
- We isolate each color of the twist separately, and at the end all together.

If you make such a twist in your house and hide it from a curious house cat, it will serve you for more than one year. And you do not have to urgently run to the store for a new wire.

But if such a twist is on the street, then in the coming months it is still desirable to replace the cable. Since in the place where the twisted pair is twisted, under the influence of natural factors (rain, snow, wind, sun), your connection will be oxidized.Because of this, you will experience frequent interruptions in the Internet, low speed and loss of pings. Well, or, if you want to save money, then every six months you will have to make a new twist in place of the old one. So the decision is yours.
We showed the first way how to connect your Internet cable to each other with virtually no cost.
Crimping the network cable
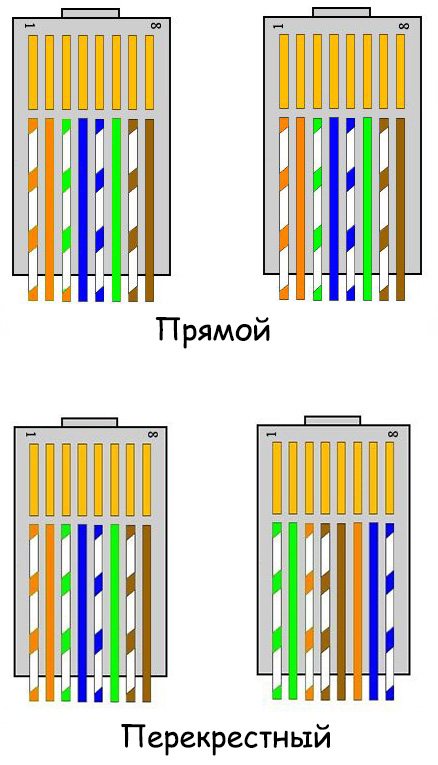
There is one more nuance, we need to decide which of the two options we will crimp the cable.
Straight
- such a cable is suitable for connecting a computer to a router, for a regular Internet cable, etc. We can say that this is a standard.
Get to the point.
We take the cable and remove the top insulation. Just stepping back from the beginning of the cable about two centimeters, we make an incision in the upper insulation, in a tool like mine, there is a special hole into which we insert the cable and simply scroll the crimper around the cable. Then we remove the white insulation by simply pulling it off the cable.
Now we unwind all the wires so that they are one at a time. We clamp them with our fingers and set them in the order we need, depending on which cable you are crimping. See diagrams above.
When all the veins are set correctly, they can still be cut off a little if they turned out to be very long, and it will not hurt to align them. So when everything is ready, we very carefully and slowly begin to insert these cores into the connector. Make sure that the wires enter the connector correctly, each into its own hole. Once the cable has been inserted into the connector, check again for proper core placement, then insert the connector into the crimper and squeeze the handles.
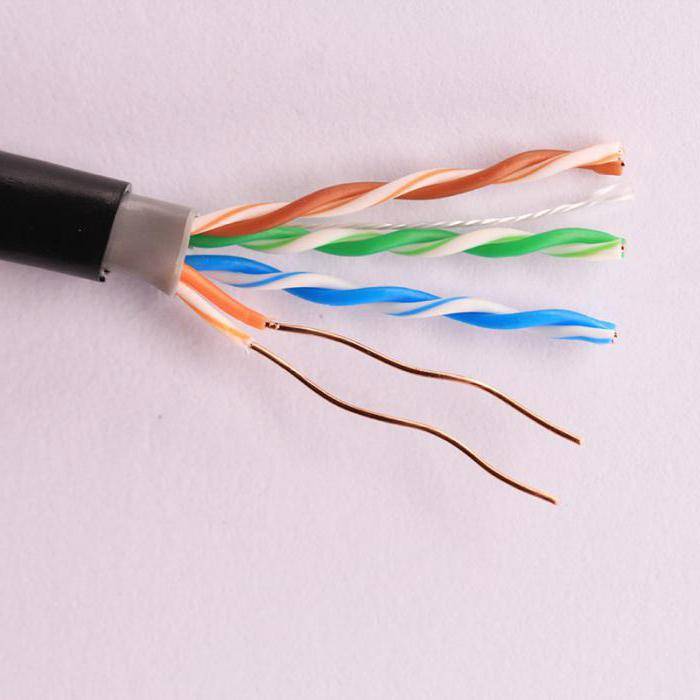
If your cables lie haphazardly near the computer, or you accidentally stretched or broke the network cable from the Internet, then you need to decide how to compress the RJ-45 network cable. You can compress a cable in different ways, so I will tell you how to compress a twisted pair cable correctly. And also consider the option if there are no special tools at hand. I chose this topic because computer networks are my profession and I have to work with network cables on a daily basis. First, let's find out what a network cable is.
A network cable is a conductor that includes eight copper wires (cores). These wires are twisted with each other, which is why this wire is often called a twisted pair.
So, let's say we want to connect our computer to the Internet. To do this, we need a line drawn to the modem - a patch cord, a computer and a modem.
So, before you learn how to crimp a network cable, let's go through the list of tools that we need for this:
1.Twisted pair cable (1.5 meters is usually enough);
2. Side cutters or scalpel;
3. RJ-45 connectors and caps;
4. Tool for crimping (Crimper);
5. LAN - tester;
6. As well as a sober head and straight arms: oops:. First of all, it will be necessary to remove the top layer of insulation from both ends of the twisted pair. The insulation can be removed using tweezers or a knife, which is located on the crimping tool. You may be wondering, "How many millimeters of insulation should be removed from the ends of a twisted pair?" I will answer you that 15-20 mm will be enough. It should be noted that the removal of insulation must be carried out carefully, without damaging the insulation of the cores themselves.

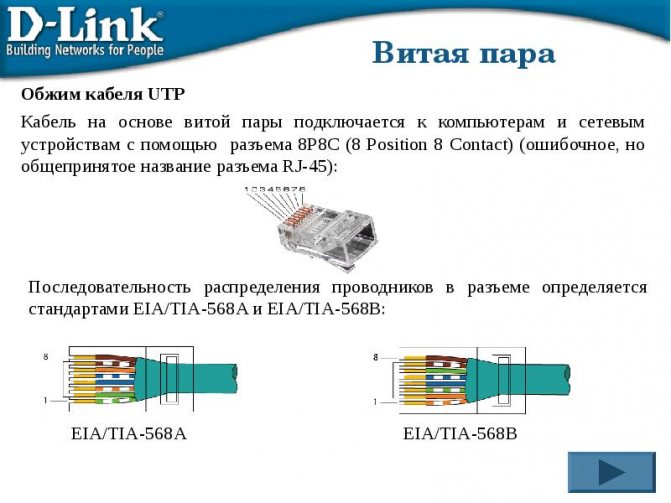
After you have removed the insulation from the two ends of the twisted pair, you should unwind the cores and straighten all the wires according to the crimping diagram below.
Further, it should be noted that the crimping of the cable can be carried out in two ways:
Straight crimp cable.
This method is suitable if you want to connect your computer to a local network or to the Internet.
Cross crimp cable.
This method is used if you want to connect two computers together.
How to extend the internet cable
Getting the Internet into an apartment or house, the provider leaves a small supply of cable. But if the computer needs to be moved to another room, then problems can arise. There are several ways to extend the wire
- Replace cable. To do this, you usually need to contact your provider, who will change it. But first you need to buy a twisted pair cable of the required length, and then pay for the services of a technician.
- Install a network switch. Solving the problem in this way is not the cheapest option, but in addition to extending the cable, it makes it possible to connect other devices in the house to the network.
- Use a Wi-Fi router. Wireless data transfer will eliminate the need for a cable at all. You can connect to the Internet anywhere in the apartment.
- Buy a special extension adapter. It is easy to use, small in size and inexpensive. This is the most popular way to increase the length of the Internet wire.
- Twist the wires by hand. This method will allow you to increase the cable to the desired length at no additional cost, but the signal quality is often reduced.
How to twist the cable
Since twisting wires does not require any additional costs and special tools, many people use this method to lengthen the cable at home. This can be done in different ways.
If you do not want to re-crimp the cable, then the twisted pair cable already brought into the house or apartment must be cut in any convenient place and insert a piece of wire of the required length there
But it is important to remember about a significant minus: there will be two places of twisting on the way to connect to the Internet, and this cannot but affect the data transfer speed. And the longer the wire, the worse.
If you are ready to re-crimp the cable, then cut off the crimped end, lengthen the wire and attach the new RJ45 connector
This way, your cable will only have one twist point.
It is necessary to connect the cores of the same color to each other, and the junction points must be well insulated.
Methods for connecting wires or cables to each other
The connection points of two conductors must meet the following requirements:
- reliability;
- mechanical strength.
These conditions can also be met when connecting conductors without soldering.
Crimping
This method requires special equipment. Crimping of wires with sleeves is carried out for both copper and aluminum wires of different diameters. The sleeve is selected depending on the section and material.
Pressing algorithm:
- stripping insulation;
- stripping wires to bare metal;
- the wires must be twisted and inserted into the sleeve;
- conductors are crimped using special pliers.
The selection of the sleeve causes the main difficulties. An incorrectly selected diameter will not be able to provide reliable contact.
Bolted connection
Bolts, nuts and several washers are used for contact.The junction is reliable, but the design itself takes up a lot of space and is inconvenient when laying.
The connection order is:
- stripping insulation;
- the cleaned part is laid in the form of a loop with a diameter equal to the cross section of the bolt;
- a washer is put on the bolt, then one of the conductors, another washer, the second conductor and the third washer;
- the structure is tightened with a nut.
A bolt can be used to connect several wires. Tightening the nut is done not only by hand, but also by a wrench.
Terminal blocks
The terminal block is a contact plate in a polymer or carbolite housing. With their help, any user can connect the wires. The connection takes place in several stages:
- stripping insulation by 5-7 mm;
- removal of the oxide film;
- installation of conductors in sockets opposite each other;
- bolt fixing.
Pros - you can connect cables of different diameters. Disadvantages - only 2 wires can be connected.
Types of terminal blocks for multi-core and single-core cables
In total there are 5 main types of terminal blocks:
- knife and pin;
- screw;
- clamping and self-clamping;
- cap;
- walnut grips.
The first type is rarely used, they are not designed for high currents and have an open design. Screw terminals create a reliable contact, but are not suitable for connecting multi-core cables. Clamp terminal blocks are the most convenient devices to use, no special equipment is needed for their installation. Caps are also used frequently, but unlike clamping devices, caps can be used repeatedly. "Nut" is practically not used.
Terminals in junction box (copper or metal)
Terminals are the most common connection method in a junction box. They are cheap, easy to install, provide a secure contact, and can be used to connect copper and aluminum. Flaws:
- cheap devices are of poor quality;
- only 2 wires can be connected;
- not suitable for stranded wires.
Self-clamping terminal blocks WAGO
2 types of Vago terminal blocks are used:
- With a flat-spring mechanism - they are also called disposable, since reuse is impossible. Inside is a plate with spring petals. When installing the conductor, the tab is pressed out, and the wire is clamped.
- With lever mechanism. This is the best connector. The stripped conductor is inserted into the terminal, the lever is clamped. Re-installation is possible.
With proper operation, Vago terminal blocks work for 25-30 years.
Use of tips
For connection, 2 types of tips and sleeves are used:
- in the first, the connection is made inside the product;
- in the second, the termination of two electrical wires occurs with different tips.
The connection inside the sleeve or tip is strong and reliable. There are also special sleeves for connecting copper and aluminum wires.
Soldering wire lugs
The tips are connected to the wiring using a press. If not, contact can be made by soldering.
The electrical wire and the tip are tinned inside, the stripped cable is brought inside.
The entire structure on the contact must be wrapped with fiberglass tape, heated with a burner until the tin melts.
How to check the quality of crimping an Internet cable?
So, the connectors on the LAN cable are installed. How can you now be sure that the connection being created is reliable?
There are several ways.
- The easiest is to connect the LAN cable directly to its destination. That is, if after switching the devices everything began to work normally, then we can congratulate the master on the successful completion of the installation.
- Professionals evaluate the quality of crimping and the condition of the laid communication lines using special devices - LAN testers.
These devices usually consist of two blocks, that is, you can check the cable, the opposite connectors of which are spaced in different rooms. Even easier, of course, is to check the patch cord with it.


One example of a LAN tester
Both the main and the additional remote unit have ports for connecting connectors. After switching the cable, the power is turned on, and the device starts scanning each wire, which is signaled by numbered light indicators. If there is a break on the line, then it is immediately noticeable which of the wires is faulty. Or, for our case, which contact of the connector is crimped poorly.
A LAN tester is the privilege of professionals, and at home you can try using a regular multimeter. It is set to ringing (with sound indication) or to the minimum resistance, for example, 200 ohms. And then they check each wire of the same color on two adjacent Internet cable connectors.
Ringing the wires of the Internet cable after crimping the connectors
Such a revision will not take much time. True, the tester probes must be thin in order to accurately hit the specific connector contacts of the same name. This is solved either by sharpening them, or by temporarily installing thin wire tips.
If some wire does not ring (from those significant for a particular connection), then you will have to redo it.
And how to ring the Internet cable with a multimeter if the connectors are removed from each other (for example, in different rooms). Nothing too complicated either.
If you look at the schematic diagram of the device ports of switching devices, then you can see an induction coil connecting the wires of one pair (for example, green - white-green). That is, there must be conductivity between them.
An exemplary diagram of the port device for switching LAN devices with a cable
This means that you can insert one connector into the port of any of the devices (it is better to do this when the device is turned off), and then check the conductivity of the line on the second connector. Usually for home lines (up to 100 megabits) it is enough to test only two pairs. Check the resistance between orange and white-orange, green and white-green.
Of course, there will be resistance (calculated in units of ohms), and it depends to a greater extent on the length of the cable
But what is important - for both pairs it should be approximately the same. If the difference is large, or the resistance is very large, and even more so if the line does not ring at all, you should look for a marriage in the work done and redo it again
For more information on this check, see the video below:
How to split an internet cable
Often netizens wonder how to split an Internet cable. Such measures may be required in several situations:
- when moving a laptop around an apartment / house, i.e. the need to connect it to the Internet in different rooms;
- if you have several computers / laptops and need to connect them to the Internet.
The problem is solved in different ways.
- In both cases, the easiest way out is to buy a Wi-Fi router.But not everyone wants to connect to the network in this way.
- If you need a cable connection, then the most reliable option is a switch. Its advantage is that all devices connected through it access the Internet at the same time. Moreover, there can be as many such devices as there are ports in network equipment.
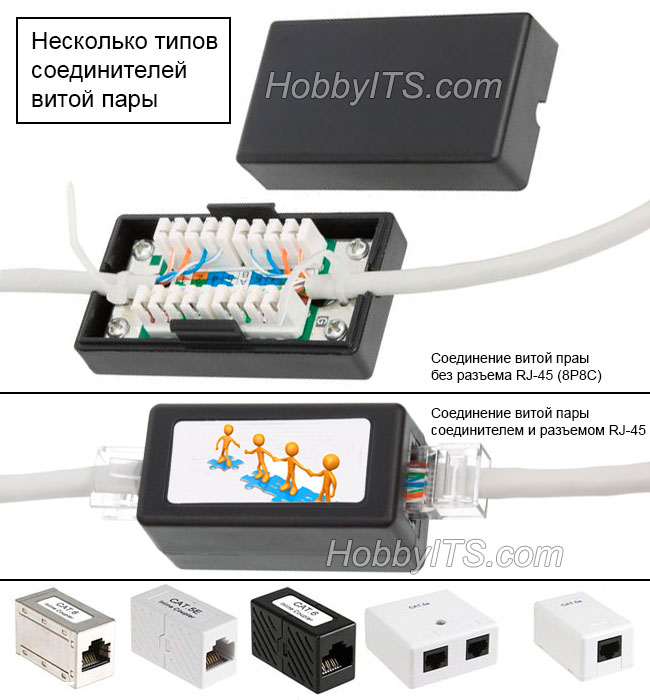
- A splitter adapter is another convenient and inexpensive option. But you can connect to the World Wide Web through it only two computers, no more.
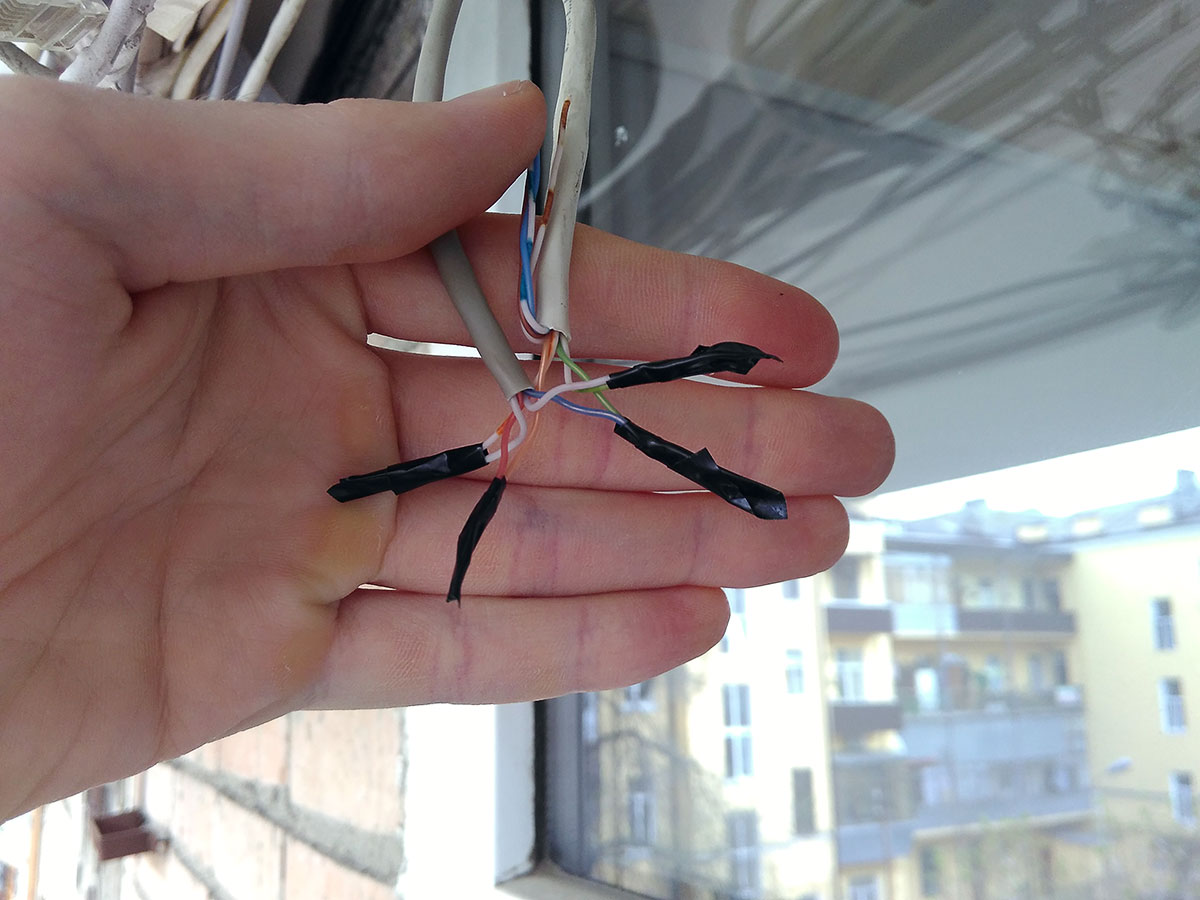
- Some netizens suggest manually branching the internet cable. To do this, you need to wind two of the same color to each core, insulate everything well and separate the wires in the room. But this method does not guarantee the quality of the connection, so experts do not recommend using it. In addition, you can only connect to the network with such a cable one by one, two computers will not work simultaneously in such a situation.
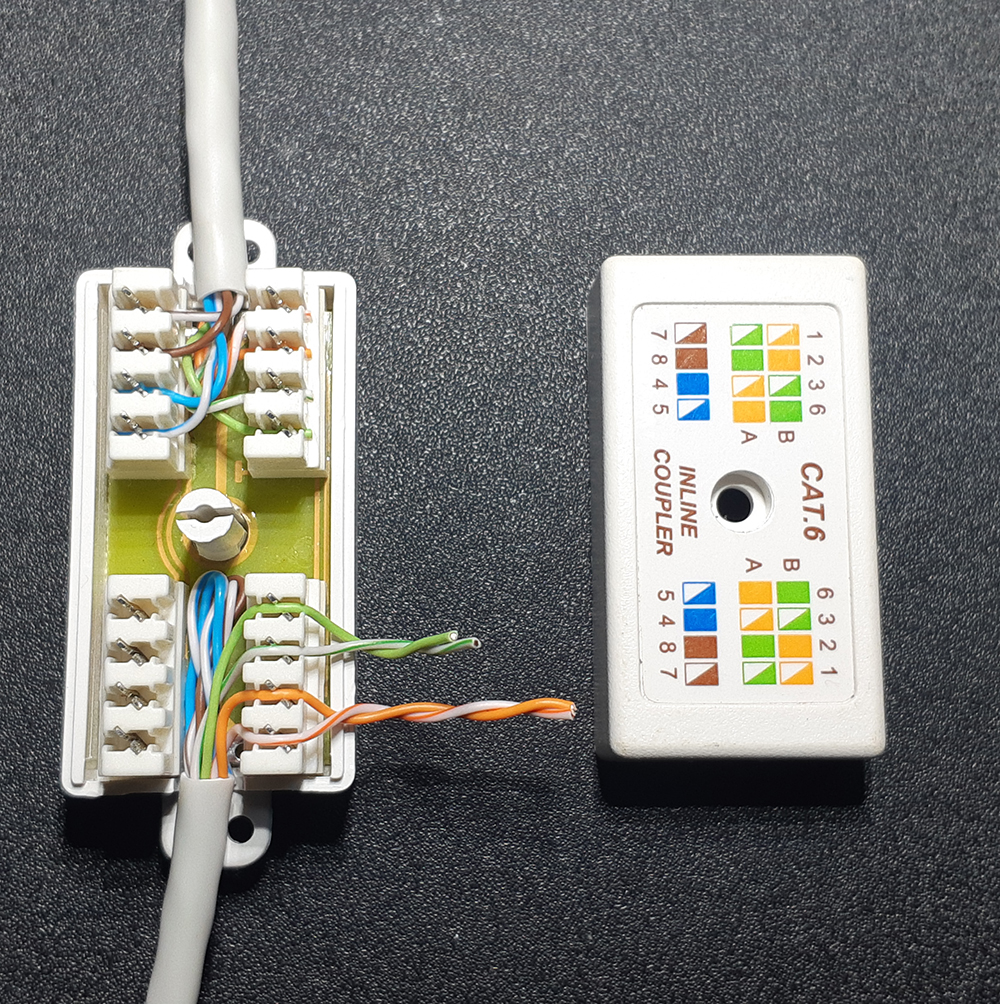
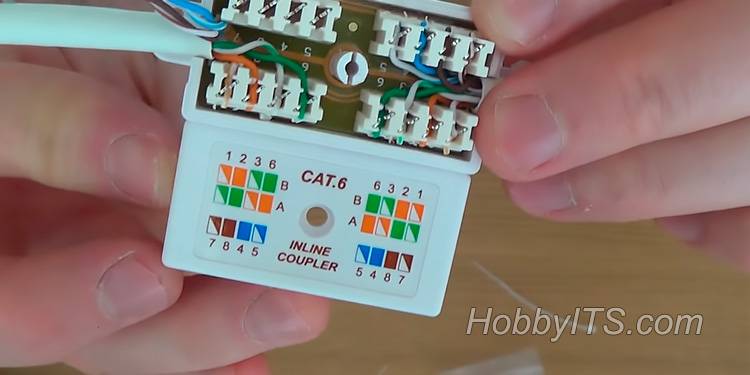
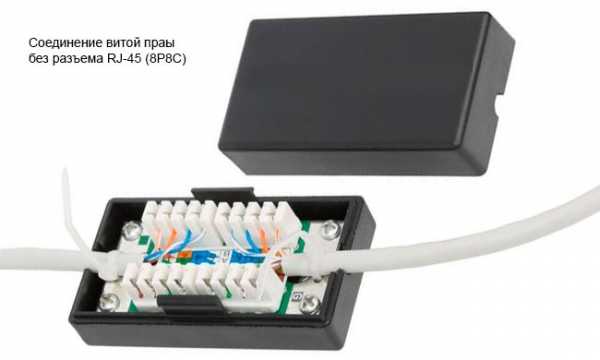
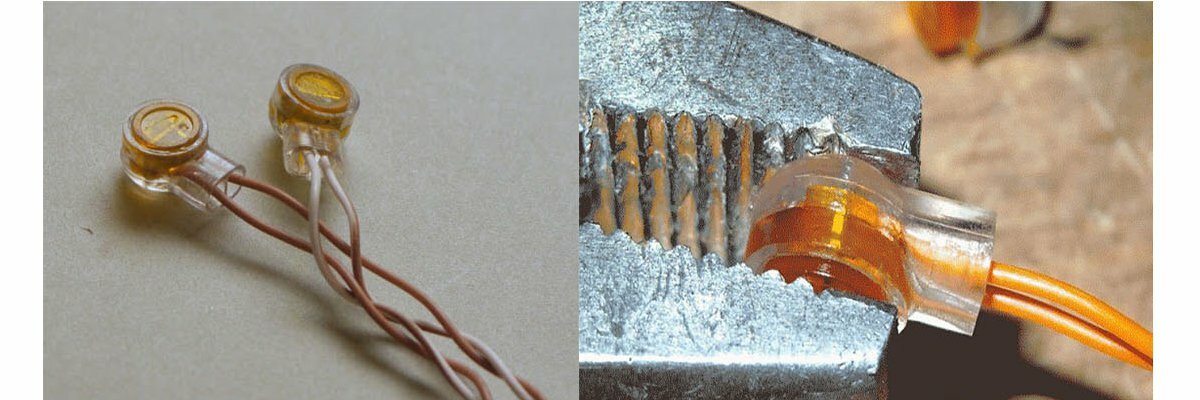
Coupler
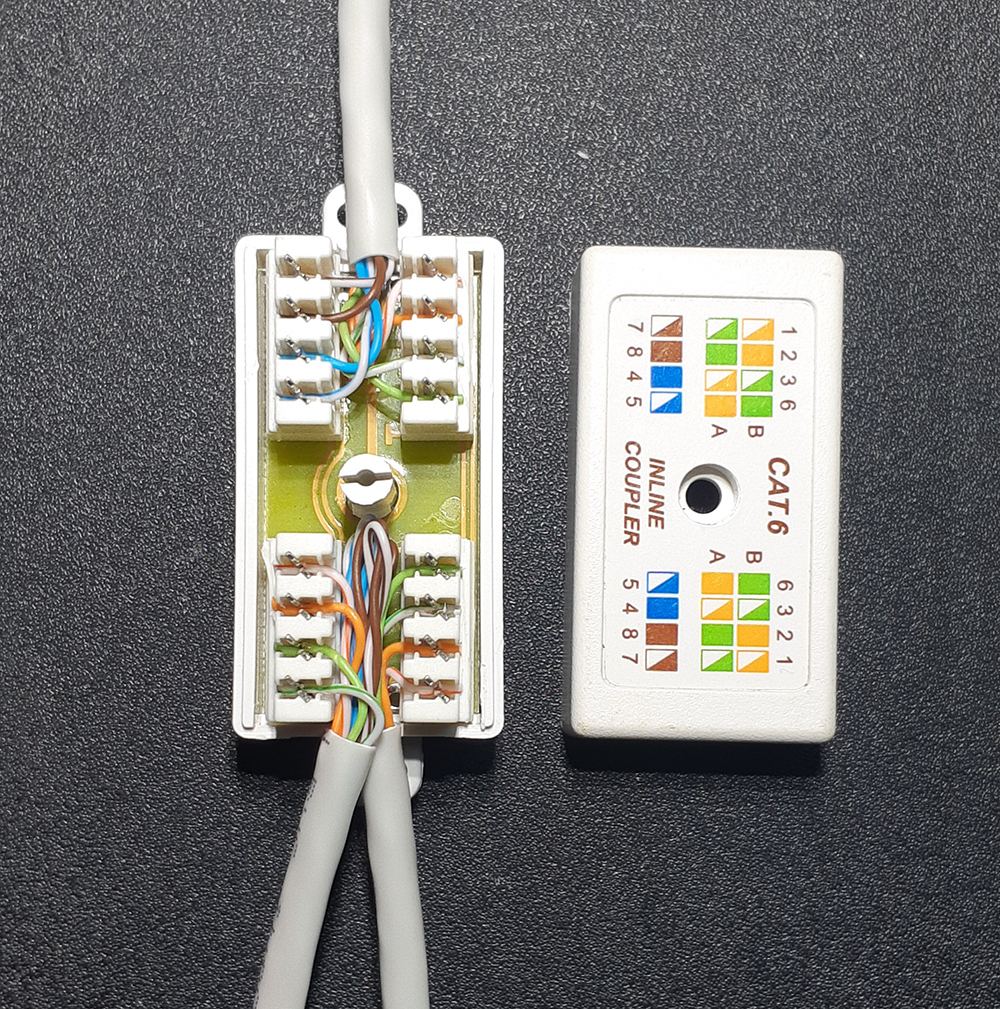
In my opinion, this is the most correct LAN cable connector - both from the point of view of cable management and from the aesthetic side: everything is done beautifully and neatly. The coupler is made in the form of an opening box with 16 knife contacts. By the way, the same principle is used in network outlets. A cable is inserted into it from both sides and, using a screwdriver, is securely pressed into the knife contact:
In general, it is much more convenient to do this with a special tool - a puncher. It looks like a knife with a special V-shaped blade. It evenly pushes the strands into the blade contact of the coupler. This is what the simplest version of the puncher looks like:
True, buying it for an ordinary user in order to once extend the Internet cable around the house, of course, makes no sense, because you can use an ordinary small slotted screwdriver. Such a twisted-pair connection is held quite reliably and firmly. If it is used not indoors, but on the street, then it is better to wrap it with electrical tape properly so that water cannot get inside.
A big plus of the coupler is that in order to connect or extend the twisted pair, absolutely no specific tool is needed - only a screwdriver and straight arms!
Splicing stranded wires without twisting
You can splice stranded wires in the same way as single-core ones. But there is a more perfect way, in which the connection is more accurate. First you need to adjust the length of the wires with a shift of a couple of centimeters and strip the ends to a length of 5-8 mm.
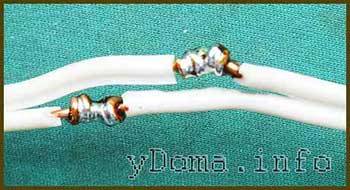
Fluff the slightly cleaned areas of the pair to be joined and insert the resulting “panicles” into each other. In order for the conductors to take a neat shape, they must be pulled together with a thin wire before soldering. Then lubricate with soldering varnish and solder with solder.
All conductors are soldered. We clean the places of soldering with sandpaper and isolate. We attach on both sides along the conductors one strip of electrical tape and wind a couple more layers.
This is what the connection looks like after being covered with electrical tape. You can still improve the appearance if you sharpen the places of soldering with a needle file from the side of the insulation of adjacent conductors.
The strength of the connected stranded wires without soldering is very high, which is clearly demonstrated by the video. As you can see, the weight of the monitor is 15 kg, the connection can withstand without deformation.


Connecting wires with a diameter of less than 1 mm with a twist
We will consider the twisting of thin conductors using the example of splicing a twisted-pair cable for computer networks. For twisting, thin conductors are released from insulation for a length of thirty diameters with a shift relative to adjacent conductors and then twisted in the same way as thick ones. Conductors must wrap themselves around each other at least 5 times. Then the twists are bent in half with tweezers. This technique increases the mechanical strength and reduces the physical size of the twist.
As you can see, all eight conductors are connected with a sheared twist, which eliminates the need to insulate each of them individually.
It remains to fill the conductors in the cable sheath. Before refueling, to make it more convenient, you can pull the conductors with a coil of insulating tape.
It remains to fix the cable sheath with insulating tape and the twist connection is completed.
Twisted pair cable splicing technology is covered in a separate article "Twisted Pair Cable Extension".
Connection of copper wires in any combination by soldering
When connecting and repairing electrical appliances, it is necessary to lengthen and connect wires with different cross-sections in almost any combination. Consider the case of connecting two stranded conductors with different cross sections and number of cores. One wire has 6 conductors with a diameter of 0.1 mm, and the second has 12 conductors with a diameter of 0.3 mm. Such thin wires cannot be reliably connected with a simple twist.
With a shift, you need to remove the insulation from the conductors. The wires are tinned with solder, and then the smaller wire is wound around the larger wire. It is enough to wind a few turns. The place of twisting is soldered with solder.If you want to get a direct connection of wires, then the thinner wire is bent and then the junction is insulated.
Using the same technology, a thin stranded wire is connected to a single-core wire with a larger cross section.
As is obvious from the technology described above, any copper wires of any electrical circuits can be connected. At the same time, one should not forget that the permissible current strength will be determined by the cross section of the thinnest wire.
Connecting electrical wires by soldering
The connection of copper wires with high-quality soldering is the most reliable and is practically not inferior to a solid wire. All of the above examples of wire twists, except for aluminum and tinsel, when the conductors are tinned before twisting and then soldered with solder, will be reliable on a par with solid wires. The only downside is the extra work involved, but it's worth it.
If you need to connect a pair of wires and the conductors from twisting should be directed in different directions, then a slightly different type of twist is used.
By splicing two pairs of double wires in the manner described below, it is possible to obtain a compact and beautiful connection by twisting both solid and stranded pairs of conductors. This twisting method can be successfully applied, for example, when splicing broken wires in a wall, extending a wire when moving a socket or switch from one place on the wall to another, when repairing or extending the length of the carrying cable.
To obtain a reliable and beautiful connection, it is necessary to adjust the lengths of the ends of the conductors with a shift of 2-3 cm.
Remove the insulation from the ends of the wires.
Perform pairwise twisting of the conductors.With this type of twisting, two turns are enough for a single-core wire, and five for a stranded wire.
If you plan to hide the twist under plaster or in another inaccessible place, then the twist must be soldered. After soldering, you need to go over the solder with sandpaper to remove any sharp solder icicles that can pierce the insulation and stick out of it. You can do without soldering if you have access to the connection and a small current flowing through the conductors, but the durability of the connection without soldering will be much lower.
Due to the shift of the twist points, it is not necessary to isolate each of the connections separately. We attach on both sides along the conductors along a strip of insulating tape. In conclusion, you need to wind three more layers of insulating tape. According to the requirements of the Electrical Safety Rules, there must be at least three layers.
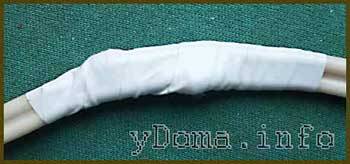
Wires spliced and soldered in the manner described above can be safely laid into the wall and plastered on top. Before laying, it is desirable to protect the connection with a vinyl chloride tube, dressed in advance on one of the pairs of wires. I have done this several times, and the reliability has been confirmed by time.


Connecting wires in junction boxes
When I moved into an apartment built in 1958 and began to make repairs, I immediately encountered the flashing of lighting bulbs in time with hammer blows on the walls. There was a primary task of repair, revision of junction boxes. Opening them showed the presence of poor contact in the twists of copper wires. To restore contact, it was necessary to disconnect the twists, clean the ends of the wires with sandpaper and twist again.
When trying to disconnect, I ran into a seemingly insurmountable obstacle.The ends of the wires broke off even without any effort. Over time, copper lost its elasticity and became brittle. When stripping the wire, the insulation was obviously cut with a knife blade in a circle and notches were made. In these places, the wire broke off. Copper hardened from temperature fluctuations.
To return copper elasticity, unlike ferrous metals, you can heat it to red and quickly cool it. But for this case, such an approach is unacceptable. The ends of the wires were no more than 4 cm long. There was no choice for the connection. Only solder.
I stripped the wires with a soldering iron, melted the insulation, tinned them with solder, tied them in groups with tinned copper wire and filled them with solder using a 60-watt soldering iron. The question immediately arises, how to solder the wires in the junction box if the wiring is de-energized? The answer is simple, using a soldering iron powered by a battery.

So I updated the connections in all junction boxes, spending no more than 1 hour on each. I am fully confident in the reliability of the connections made, and this has been confirmed by the 18 years that have passed since then. Here is a photo of one of my boxes.
When leveling the walls with Rotband in the hallway and installing a stretch ceiling, the junction boxes became a hindrance. I had to open them all, and the reliability of the solder joint was confirmed, they were in perfect condition. So I'm bold.
The connections currently practiced with the help of a Wago flat spring clamp terminal block greatly reduce the time spent on installation work, but are much inferior in reliability to solder connections. And in case lack of spring-loaded contacts in the block and completely make connections in high-current circuits unreliable.
How to quickly crimp twisted pair
If you urgently need to make a patch cord, but you do not know in what sequence to arrange twisted pair cores, but there is no Internet at hand and there is no one to ask - there is a simple option:
- We take any sequence of cores that is convenient for you
- Crimping the first connector
- We take exactly the same sequence of cores from paragraph 1
- Crimping the second connector
- Ready!
Note that this is a completely wrong approach. This should only be done in very extreme cases. Those. when you forgot / don't know about two common crimping schemes, there is no one to ask / find out from, and a working link is very necessary.
As soon as the network started working, the Internet went up - we go to this page and re-compress the network cable according to the schemes that were above!
Procedure for crimping with a crimper
First, you need to strip the outer layer of insulation by about 2.5–3 cm. There are special recesses on the crimper for such manipulation. In this case, you need to be very careful not to damage the insulation of the twisted pair wires.
After that, you need to carefully straighten the cores, arranging them in the desired sequence, and cut them so that you get a smooth perpendicular edge. Next, along the grooves inside the plug, bring the cores inward so that they enter the contacts of the plug. The outer insulation of the wire must also go inside. Otherwise, after several bends, the connector will not withstand and the wires will break.
After that, it is already possible to crimp the wire and the second fastening place with a crimper, on which there is a special groove for the 8P network wire. If there is enough crimping, then the contacts pierce the core insulation. Such an action has two functions - a strong contact and additional fixation are created.
As long as the instructions are followed exactly, the twisted-pair connector will work as intended. If something went wrong, the colors of the cores were mixed up, etc., it is for this case that the stock of plugs mentioned above is needed.


